Embed Size (px)
Citation preview
primary | PR03
teach with space
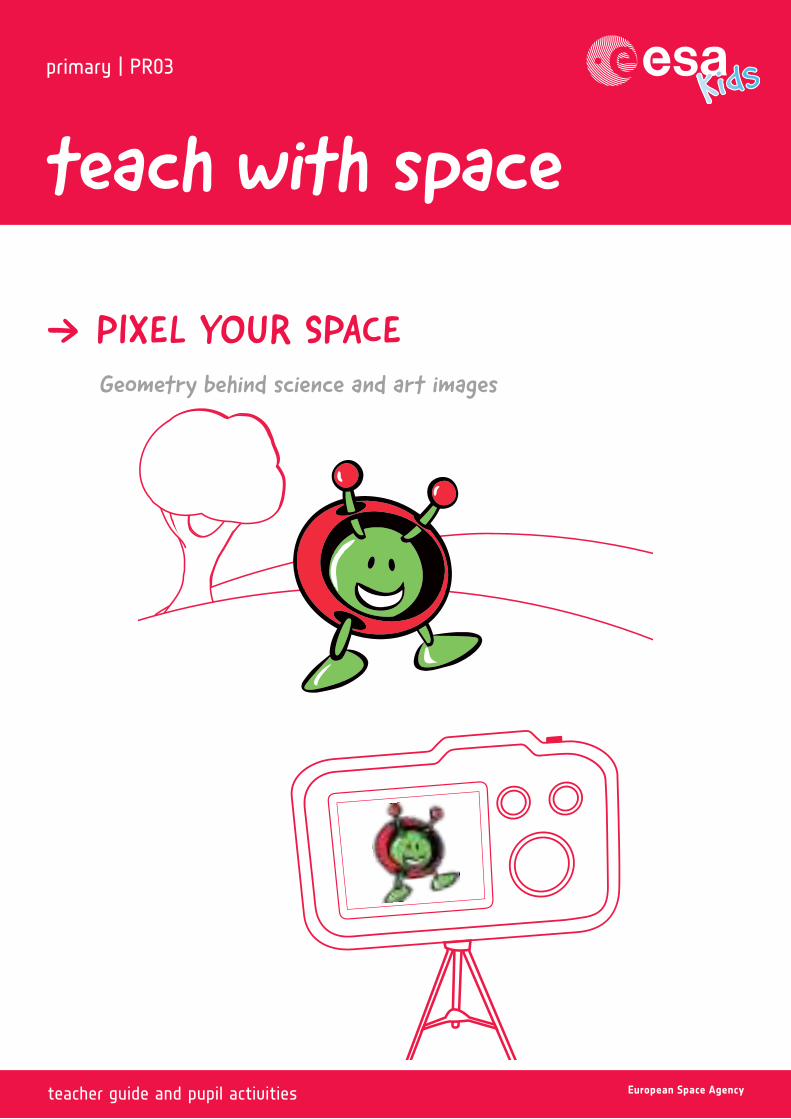
Geometry behind science and art images
PIXEL YOUR SPACE
teacher guide and pupil activities
teach with space - pixel your space | PR032
If you compare old astronomy images, or even videogame graphics, you will probably notice a large difference in the level of detail that you can see. Have you ever wondered why? To answer this, we need to introduce the concept of 'pixels', which are used to create such images.
Fast facts page 3
Background page 4
Activity – Pixel your space page 8Introducing pixels page 8Creating a pixel artwork page 8Explaining the concept of pixels page 9
Suggest extension activities page 11
Conclusion page 12
Worksheet page 13
Space context @ ESA page 17
Rosetta page 17
Hubble Space Telescope page 17
Gaia page 18
Herschel page 19
Appendix page 20
Links page 23
INTRODUCTION
teach with space - pixel your space | PR033
Age range: 8–11 years old
Type: pupil activity
Complexity: easy
Teacher preparation time: 30 minutes
Lesson time required: 1.5–2 hours
Cost per kit: low (less than 10 euro)
Location: indoor (any classroom)
Includes the use of: printed photos, craft material, the internet
Curriculum relevance
Outline
Pupils will learn
Geometry behind science and art images
FAST FACTS
Mathematics• Use geometric tools to draw two-
dimensional shapes• Perform basic multiplication and division
Science and technology• Understand the basic principles of a
technological process
Art & design• Explore different artistic processes
(abstraction, composing an image with basic geometric shapes)
• Develop a wide range of art and design techniques in using colour, patterns, textures, lines, shapes, different forms and space
• Discover the work of a range of artists
In this activity, pupils will understand the basics of geometric components of images, including pixels, and their scientific and artistic relevance. Pupils will work with an image and produce a processed 'pixelated' copy and compare his/her artwork with the original image to draw conclusions from the artistic and scientific perspective. Pupils will explore how basic geometric shapes can create a more complex image, understand that more pixels will give more detail and discover stylization as an artistic process.
1. To process and stylize an image.2. About innovative artistic styles.3. To draw parallel lines, grids and squares.4. What pixels are.5. The basics of imaging.
PIXEL YOUR SPACE
teach with space - pixel your space | PR03 4
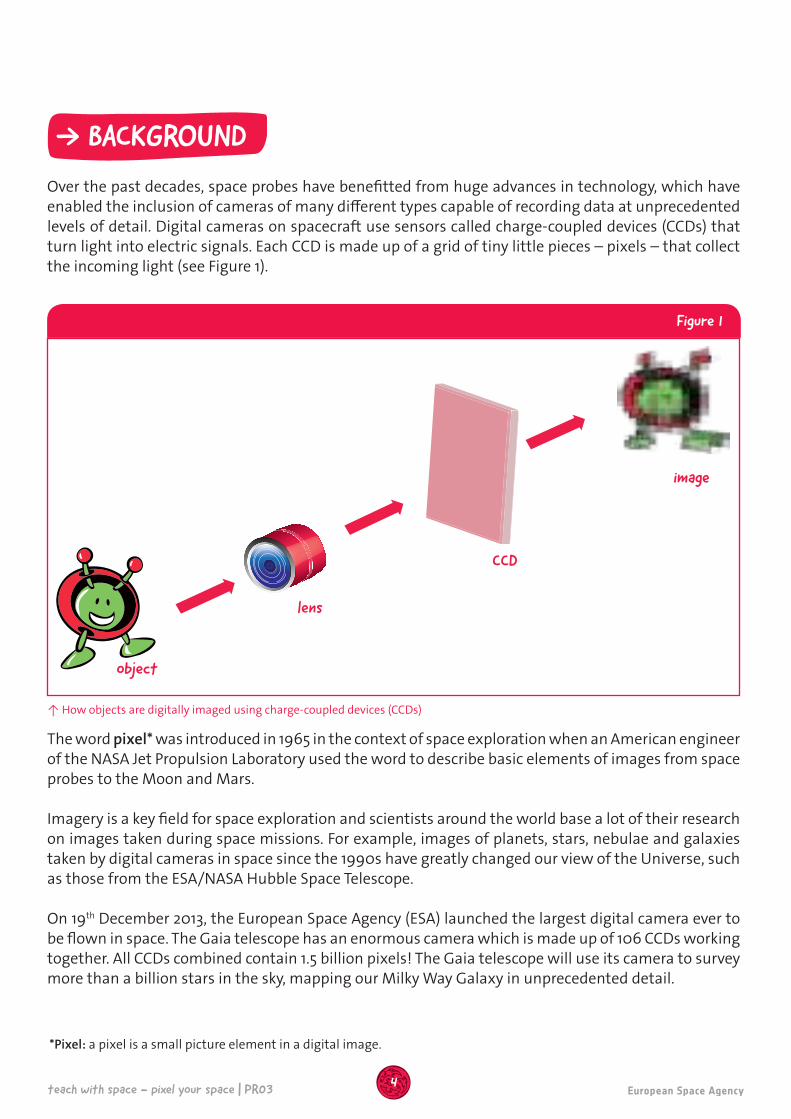
Over the past decades, space probes have benefitted from huge advances in technology, which have enabled the inclusion of cameras of many different types capable of recording data at unprecedented levels of detail. Digital cameras on spacecraft use sensors called charge-coupled devices (CCDs) that turn light into electric signals. Each CCD is made up of a grid of tiny little pieces – pixels – that collect the incoming light (see Figure 1).
The word pixel* was introduced in 1965 in the context of space exploration when an American engineer of the NASA Jet Propulsion Laboratory used the word to describe basic elements of images from space probes to the Moon and Mars.
Imagery is a key field for space exploration and scientists around the world base a lot of their research on images taken during space missions. For example, images of planets, stars, nebulae and galaxies taken by digital cameras in space since the 1990s have greatly changed our view of the Universe, such as those from the ESA/NASA Hubble Space Telescope.
On 19th December 2013, the European Space Agency (ESA) launched the largest digital camera ever to be flown in space. The Gaia telescope has an enormous camera which is made up of 106 CCDs working together. All CCDs combined contain 1.5 billion pixels! The Gaia telescope will use its camera to survey more than a billion stars in the sky, mapping our Milky Way Galaxy in unprecedented detail.
BACKGROUND
object
lens
CCD
image
Figure 1
↑ How objects are digitally imaged using charge-coupled devices (CCDs)
*Pixel: a pixel is a small picture element in a digital image.
teach with space - pixel your space | PR03 5
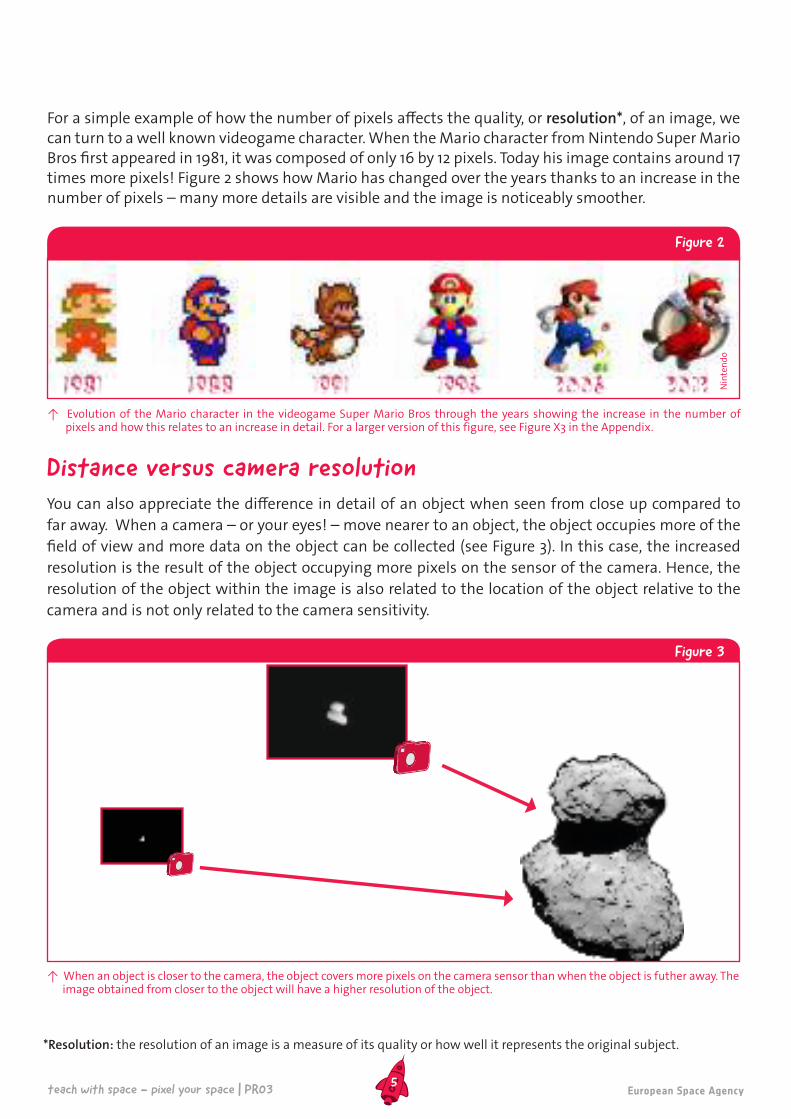
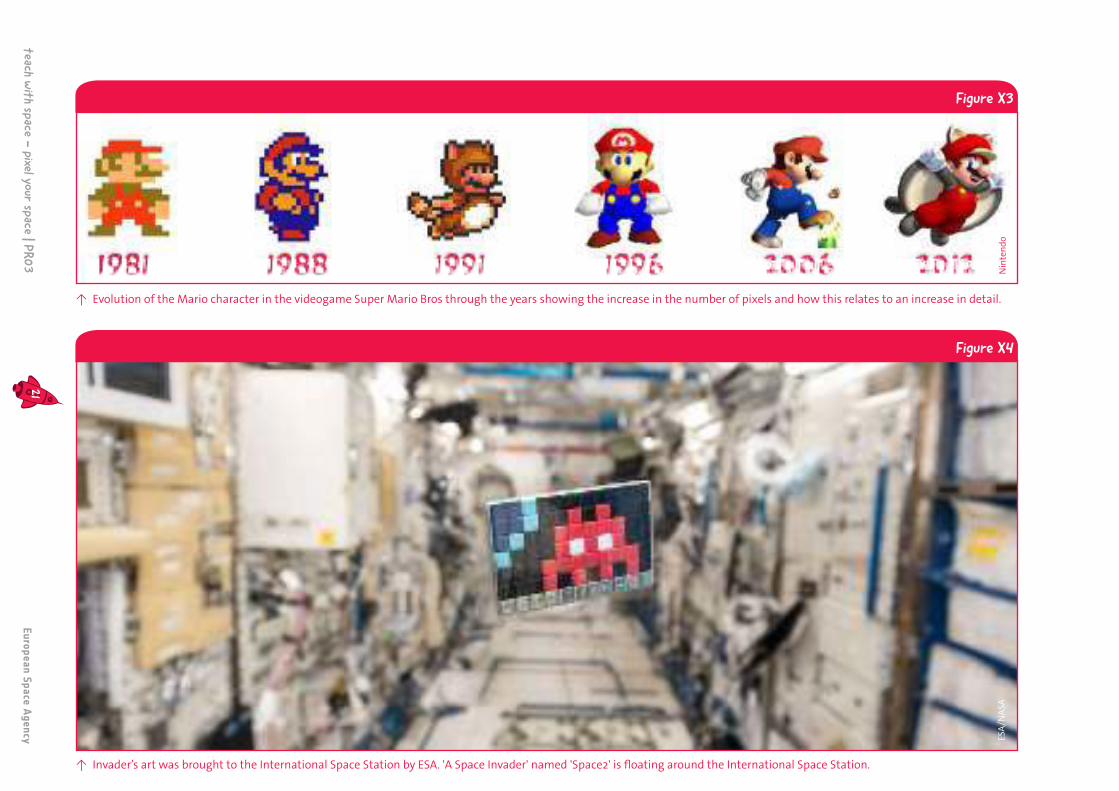
For a simple example of how the number of pixels affects the quality, or resolution*, of an image, we can turn to a well known videogame character. When the Mario character from Nintendo Super Mario Bros first appeared in 1981, it was composed of only 16 by 12 pixels. Today his image contains around 17 times more pixels! Figure 2 shows how Mario has changed over the years thanks to an increase in the number of pixels – many more details are visible and the image is noticeably smoother.
Figure 2
↑ Evolution of the Mario character in the videogame Super Mario Bros through the years showing the increase in the number of pixels and how this relates to an increase in detail. For a larger version of this figure, see Figure X3 in the Appendix.
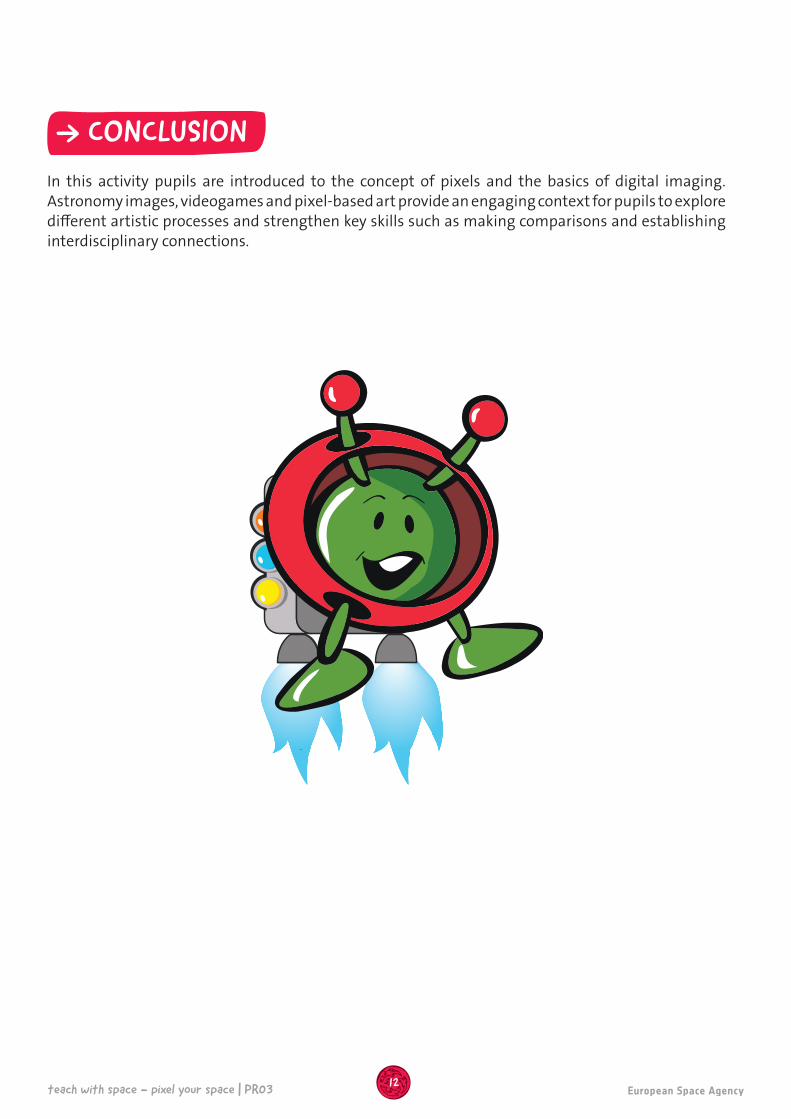
Distance versus camera resolutionYou can also appreciate the difference in detail of an object when seen from close up compared to
far away. When a camera – or your eyes! – move nearer to an object, the object occupies more of the
field of view and more data on the object can be collected (see Figure 3). In this case, the increased
resolution is the result of the object occupying more pixels on the sensor of the camera. Hence, the
resolution of the object within the image is also related to the location of the object relative to the
camera and is not only related to the camera sensitivity.
*Resolution: the resolution of an image is a measure of its quality or how well it represents the original subject.
Figure 3
↑ When an object is closer to the camera, the object covers more pixels on the camera sensor than when the object is futher away. The image obtained from closer to the object will have a higher resolution of the object.
Nin
ten
do

teach with space - pixel your space | PR036
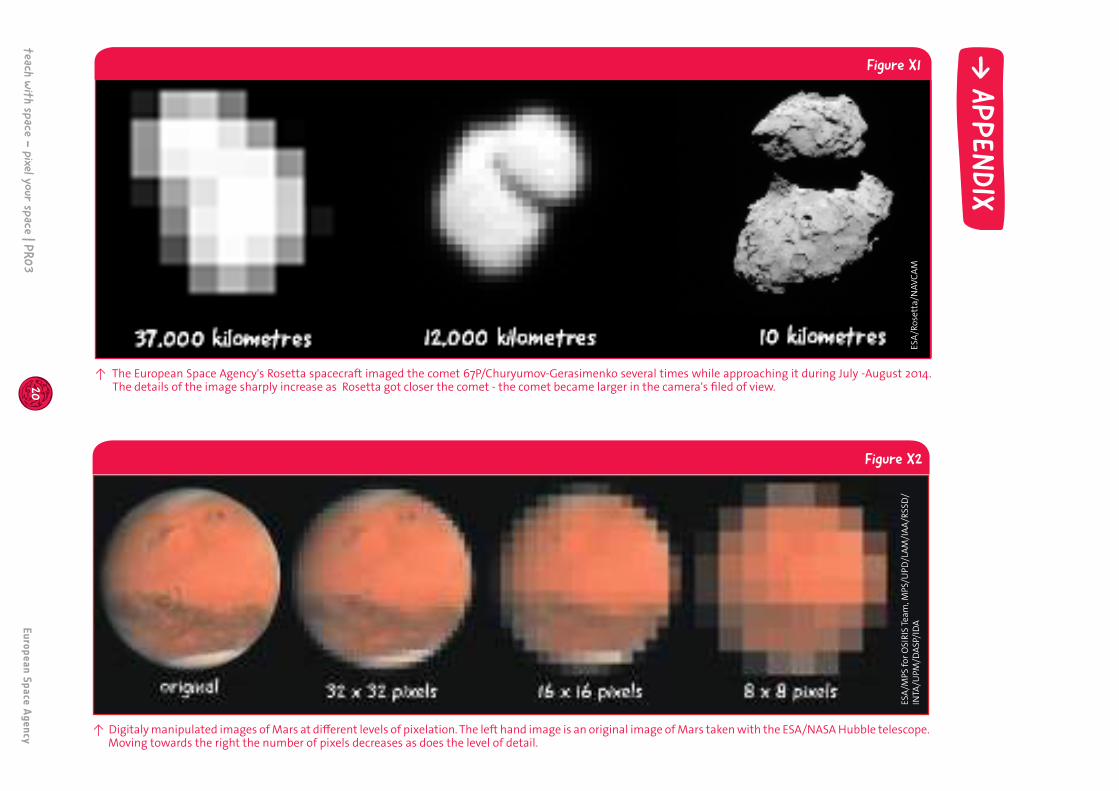
ESA's Rosetta spacecraft imaged the comet 67P/Churyumov-Gerasimenko several times during its
approach in July–August 2014. Compare the quality of the images during the journey towards the
rendez-vous: the details of the comet sharply increased as Rosetta moved closer to the comet but the
camera remained unchanged (see Figures 3 and 4).
Figure 4
↑ ESA 's Rosetta spacecraft imaged the comet 67P/Churyumov-Gerasimenko several times while approaching it during July – August 2014. The details of the image sharply increase because when Rosetta was closer to the comet, the comet was larger in the camera's filed of view. For a larger version of the figure see Figure X1 in the Appendix.
Pixelation and artAboriginal Australians use paint dabbing techniques to represent various symbols in some of their
paintings. The combination of sweeping colourful dots aligned in various shapes is a very effective
technique that enables beautiful patterns to be made. Figure 5 shows an example of Aboriginal art
using dots.
Figure 5
↑ This Aboriginal painting represents a lizard surrounded by sweeping colours. The background is composed of hundreds of individual spots of different colours.
ESA
/Ro
sett
a/N
AV
CA
M

teach with space - pixel your space | PR037
Georges Seurat (1859–1891) was a French painter who stunned the world with a painting technique
called pointillisme. The pointillisme technique involves making many small dabs with the paint brush
rather than longer brush strokes as is done traditionally. This technique is similar to representing pixels
on the canvas. Figure 6 shows a painting by Seurat.
Figure 6
↑ Parade de Cirque (1889) by Georges Seurat. Zooming into the picture in more detail (right) reveals the small dabs of paint used to build up the painting typical of the pointillisme technique.
Figure 7
↑ Invader’s Pac-Man pixelated art on the wall of the Guggenheim museum in Bilbao, Spain.
Invader is a French urban artist born in 1969 who models his street art on the pixelated arcade games
graphics of the 1980s. Typically Invader's art is displayed in urban areas – for example, Figure 7 shows
the Pac-Man character on the Guggenheim museum in Bilbao, Spain. More recently, Invader has
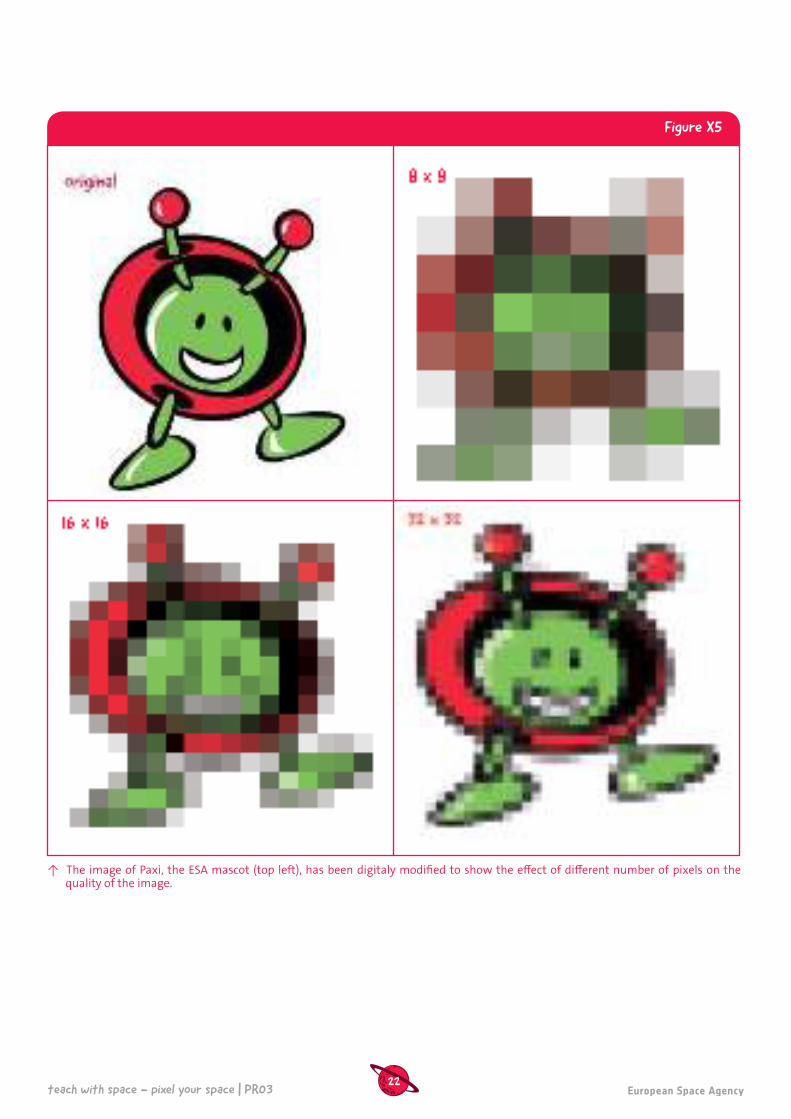
worked with ESA and brought some of his pixelated art work to various ESA establishments and to the
International Space Station. Figure 8 shows a piece of art by Invader called 'A Space Invader' floating
around the International Space Station.
Figure 8
↑ Invader’s art was brought to the International Space Station by ESA. A Space Invader named 'Space2' is floating around the International Space Station. See also Figure X4 in the Appendix.
Inva
der
ESA
/NA
SA

teach with space - pixel your space | PR03 8
ACTI
VIT
Y
• Images printed from this document – see Figures X1–X4 in the Appendix• Student Worksheets (one per pupil) printed from this document – see pages 13–16 • Rulers• Pencils• Colouring pencils or crayons• Squared paper (0.5 cm) – optional.
Introducing pixels (10 minutes)
Create curiosity by showing the class images with different resolutions (different numbers of pixels)
from space and videogames and by showing artwork from the artist Invader (Figures X1 to X4 in
the Appendix). Discuss what features are identifiable at low and high resolutions (fewer and more
pixels respectively). Come to the conclusion that more pixels give a higher quality image.
Creating a pixel artwork (1 hour)
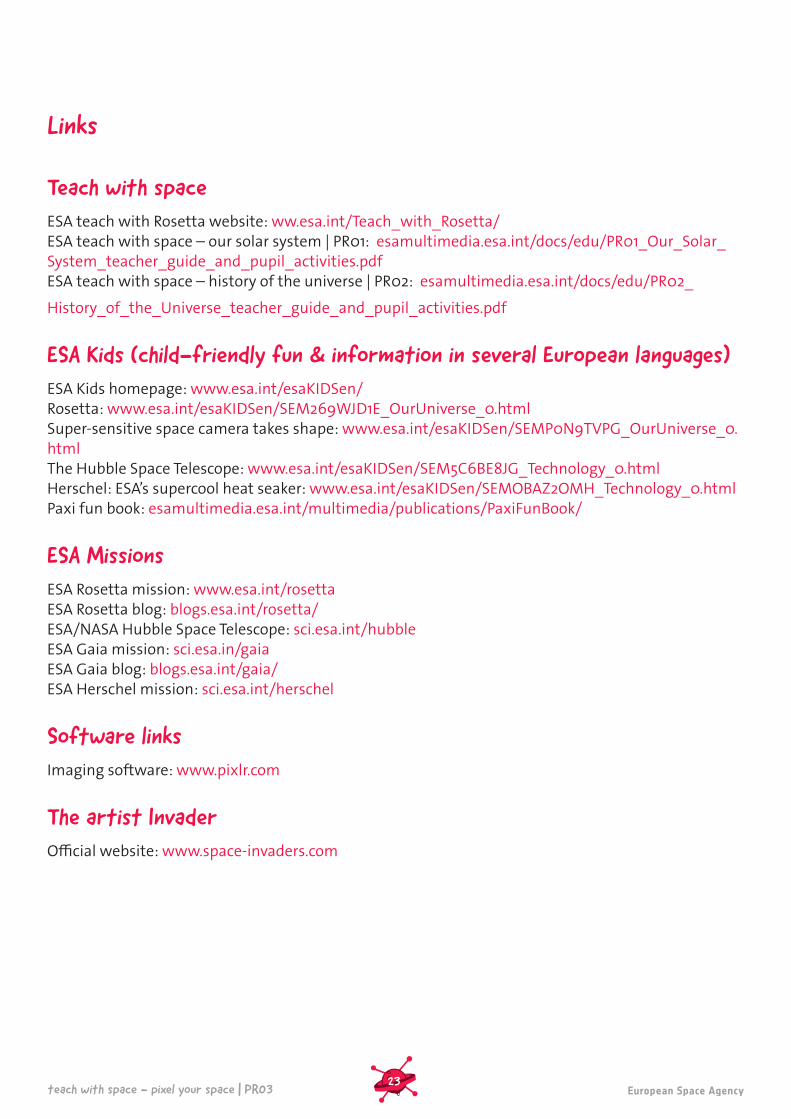
Show the class the original and pixelated images of Paxi, ESA's mascot, to compare the different
numbers of pixels and the quality, or resolution, of the images (see Figure X5 in the Appendix).
For younger pupilsCopy the Worksheet (page 13–14) and distribute to each pupil. For Tasks 1 and 2, ask the pupils to
complete the grids on the Worksheet – one grid should be drawn over the picture of Paxi and one
grid should be drawn in the empty square on the right of the worksheet. The pupils should finish
assigning numbers to the rows and letters to the columns to facilitate the work. Lead the class in
colouring the first 5 pixels together and then allow the pupils to complete the pixelation alone. Using red, green and black coloured pencils or crayons, fill each square in the empty grid with one colour. For each square, the colour should be the average colour in each square of the original image.
For older pupilsCopy the Worksheet (page 15–16) and distribute to each pupil. For Tasks 1 and 2, ask the pupils to build evenly spaced grids of 8 x 8 and then 16 x 16 pixels, one in the empty square on the Worksheet and the other over the picture of Paxi. If preferred, squared paper could also be used. Fill the first few squares in as a class and then the pupils can complete the activity individually. Using red, green and black coloured pencils or crayons, fill each square in the empty grid with one colour. For each square, the colour should be the average colour in each square of the original image.
Pixel your spacePupils will learn about pixels, the tiny elements that make up any digital image, and the relationship between the number of pixels and the quality of the image. Pupils will create pixel art – pixelated versions of another image – which can be used for a class display.
Equipment

teach with space - pixel your space | PR03 9
Explaining the concept of pixels (15 minutes)
Pixels (from pix for 'pictures' and el for 'element') are the smallest unit of data (information) in
a digital image. A greater number of pixels means that more information is contained within an
image: the more pixels, the more realistically the digital image will represent the original subject.
Individual pixels are usually presented as small squares in a two-dimensional grid (Figure 1).
If you magnify any digital image, you will be able to see thousands of small squares, each filled in
with a single color. The combination of these squares – or pixels – forms the image. Figure A1 shows
how an image is made up of many pixels.
ACTI
VIT
Y
Figure A1
↑ Magnifying images of the Earth taken from satellites reveals that they are also composed of millions of pixels each containing a specific colour.
The first digital cameras did not have many pixels resulting in 'blocky' images. With the improvement
of technology, sensors could register more data – more pixels – and the quality of images dramatically
improved. In Figure A2, you can clearly see the difference in resolution in space images throughout
the years.
ESA
/VIT
O -
Pro
ba
V

teach with space - pixel your space | PR0310
↑ Comparison of M51, the Whirpool galaxy, imaged with the NASA Spitzer Space Telescope (left panel) and an image of the same galaxy taken with the ESA Herschel Space Observatory (right panel).
ACTI
VIT
Y
Figure A2
Classroom discussion (10 minutes)
Discuss the finished artworks with the whole class. Some questions to get started with are:• Does the 8 x 8 pixel artwork look better or worse than the 16 x 16 pixel one? How do they
compare to the 32 x 32 pixel image of Paxi in Figure X5.• What is the relationship between the number of pixels and the quality of the image (details
that you can appreciate)?• What is the relationship between the number of pixels and the amount of information?• How far can you go in decreasing the number of pixels and still understand the subject of the
image?
NA
SA/J
PL-C
alte
ch /
SIN
GS
ESA
& T
he
PAC
S C
on
sort
ium

teach with space - pixel your space | PR0311
Distance versus resolution experiment (20 minutes)
As discussed on page 5, and shown in Figures 3 and 4, if the camera is closer to the object, the object will take up more pixels in the image and the resolution of the object will be better. However, the number of pixels on the camera does not change. This effect can be seen by doing a simple experiment.
Using a digital camera, take an image of an object from 50 cm. Take a second image at a distance of 10 metres. Analyse the photographs and specifically look at the amount of detail of the object in
question (see the Links section for suggested imaging software).
Manipulating images on a computer (20 minutes)
Choose a digital image and open the file with an image editing programme (see the Links section for
suggested imaging software). Resize the image to 8, 16 and 32 pixels wide and zoom in until you can
see the individual pixels. Compare this with pixelated artworks of the same picture that the pupils
have composed manually.
Pixel art & craft (1 hour)
Choose an image from this guide, or choose your own image, and ask pupils to create a grid as
described in Task 1 on the Worksheet. Stimulate the pupils creativity by creating artwork with
material other than crayons such as: • Paint and stamps (wine bottle corks)• Coloured paper cut into small squares• Peg boards• Coloured stickers / sticky notes
• Heat fusible beads from arts and crafts shops
Pixel collage (2 hours)
Create pixel art on a large scale. Divide an image into sections. Working in groups of 2–3, ask the
pupils to pixelate their sections of the mosaic as described in Task 1 on the Worksheet – the mosaic
could have 32 x 32 pixels, or many more. When all sections are finished, assemble the wallpaper.
ACTI
VIT
Y
Suggested extension activities
teach with space - pixel your space | PR03 12
In this activity pupils are introduced to the concept of pixels and the basics of digital imaging. Astronomy images, videogames and pixel-based art provide an engaging context for pupils to explore different artistic processes and strengthen key skills such as making comparisons and establishing interdisciplinary connections.
CONCLUSION
teach with space - pixel your space | PR03 13
WO
RKSH
EET
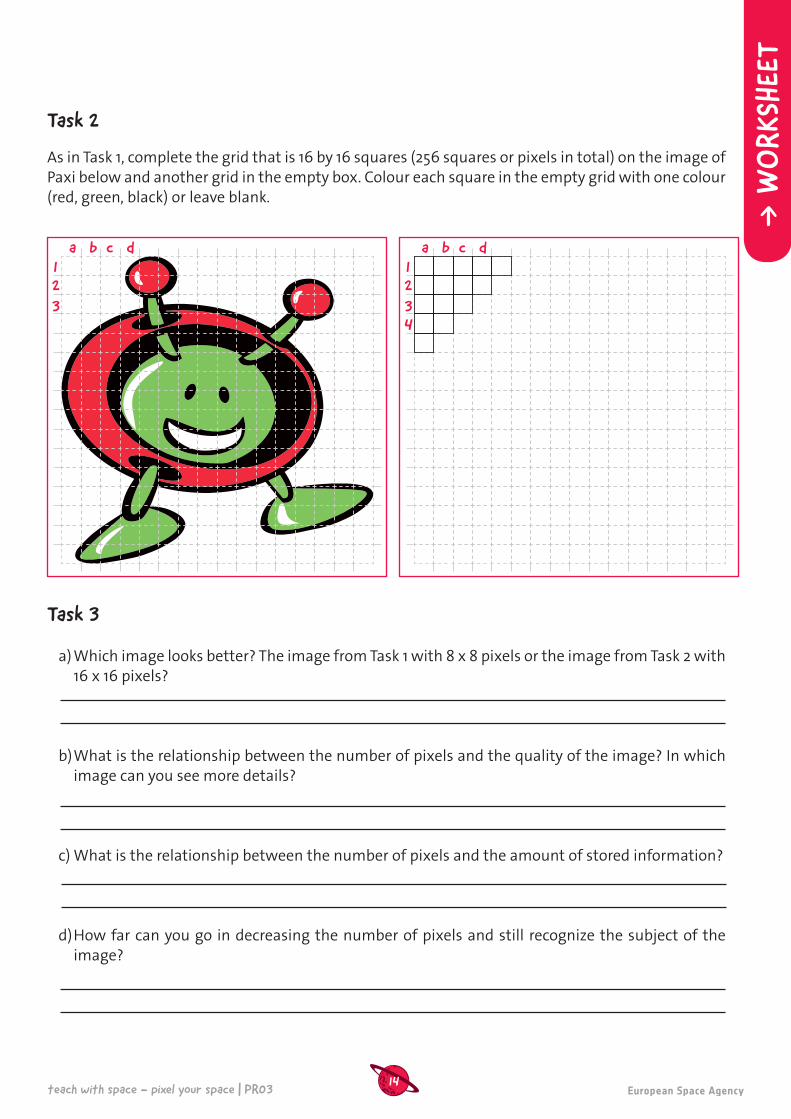
Task 1
Using a pencil and a ruler complete the grid that is 8 by 8 squares (64 squares or pixels in total) on the image of Paxi below. Also complete the grid in the empty box. Give numbers to the rows and letters to the columns. A start has been made for you. Each square represents a single pixel.
Using red, green and black coloured pencils or crayons, fill each square in the empty grid with one colour. For each square, the colour should be the main colour in each square of the image of Paxi. For white areas, leave the square blank.
What do you need to do?
Pixel your space
a b c
1
2
3
a b c
1
2
3
teach with space - pixel your space | PR0314
WO
RKSH
EET
Task 2
As in Task 1, complete the grid that is 16 by 16 squares (256 squares or pixels in total) on the image of Paxi below and another grid in the empty box. Colour each square in the empty grid with one colour (red, green, black) or leave blank.
Task 3
a) Which image looks better? The image from Task 1 with 8 x 8 pixels or the image from Task 2 with 16 x 16 pixels?
b) What is the relationship between the number of pixels and the quality of the image? In which image can you see more details?
c) What is the relationship between the number of pixels and the amount of stored information?
d) How far can you go in decreasing the number of pixels and still recognize the subject of the image?
a b c d123
a b c d1234
teach with space - pixel your space | PR0315
WO
RKSH
EET
Task 1
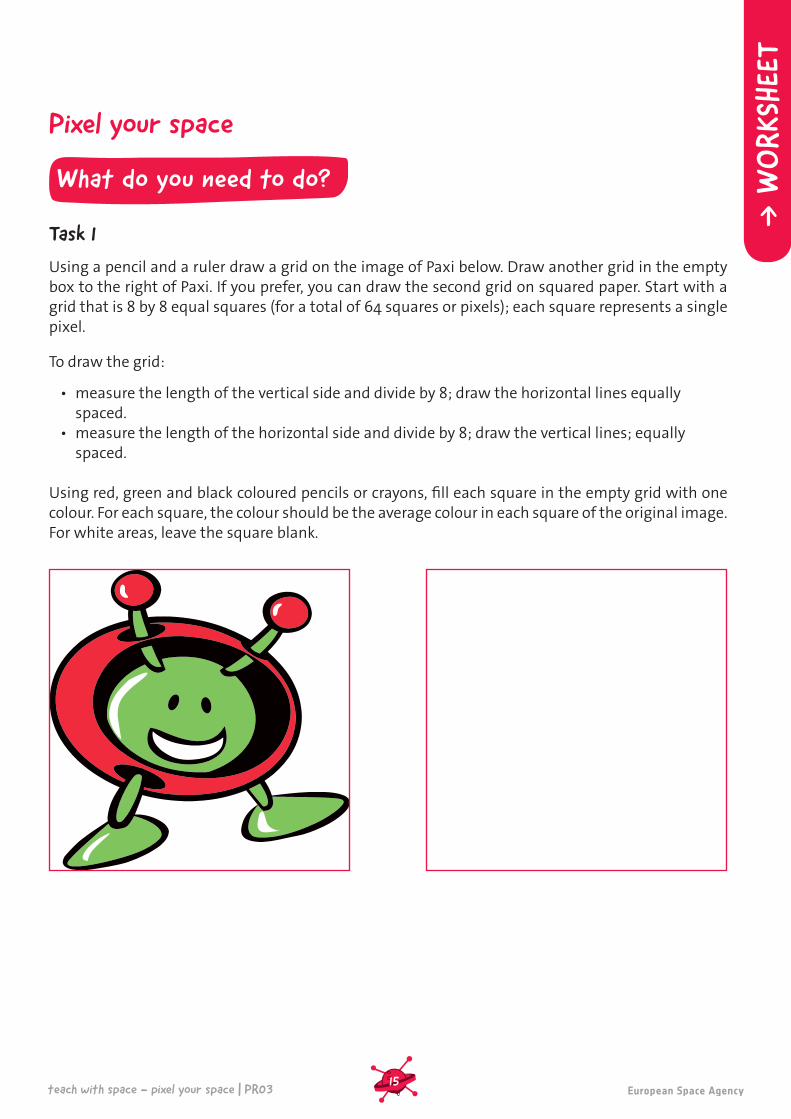
Using a pencil and a ruler draw a grid on the image of Paxi below. Draw another grid in the empty box to the right of Paxi. If you prefer, you can draw the second grid on squared paper. Start with a grid that is 8 by 8 equal squares (for a total of 64 squares or pixels); each square represents a single pixel.
To draw the grid:
• measure the length of the vertical side and divide by 8; draw the horizontal lines equally spaced.
• measure the length of the horizontal side and divide by 8; draw the vertical lines; equally spaced.
Using red, green and black coloured pencils or crayons, fill each square in the empty grid with one colour. For each square, the colour should be the average colour in each square of the original image. For white areas, leave the square blank.
What do you need to do?
Pixel your space

teach with space - pixel your space | PR03 16
Task 2
As in Task 1, complete the grid that is 16 by 16 squares (256 squares or pixels in total) on the image of Paxi below and another grid in the empty box. Colour each square in the empty grid with one colour (red, green, black) or leave blank.
Task 3
a) Which image looks better? The image from Task 1 with 8 x 8 pixels or the image from Task 2 with 16 x 16 pixels?
b) What is the relationship between the number of the pixels and quality of the image? In which image can you see more details?
c) What is the relationship between the number of pixels and the amount of stored information?
d) How far can you go in decreasing the number of pixels and still recognize the subject of the image?
WO
RKSH
EET
teach with space - pixel your space | PR03 17
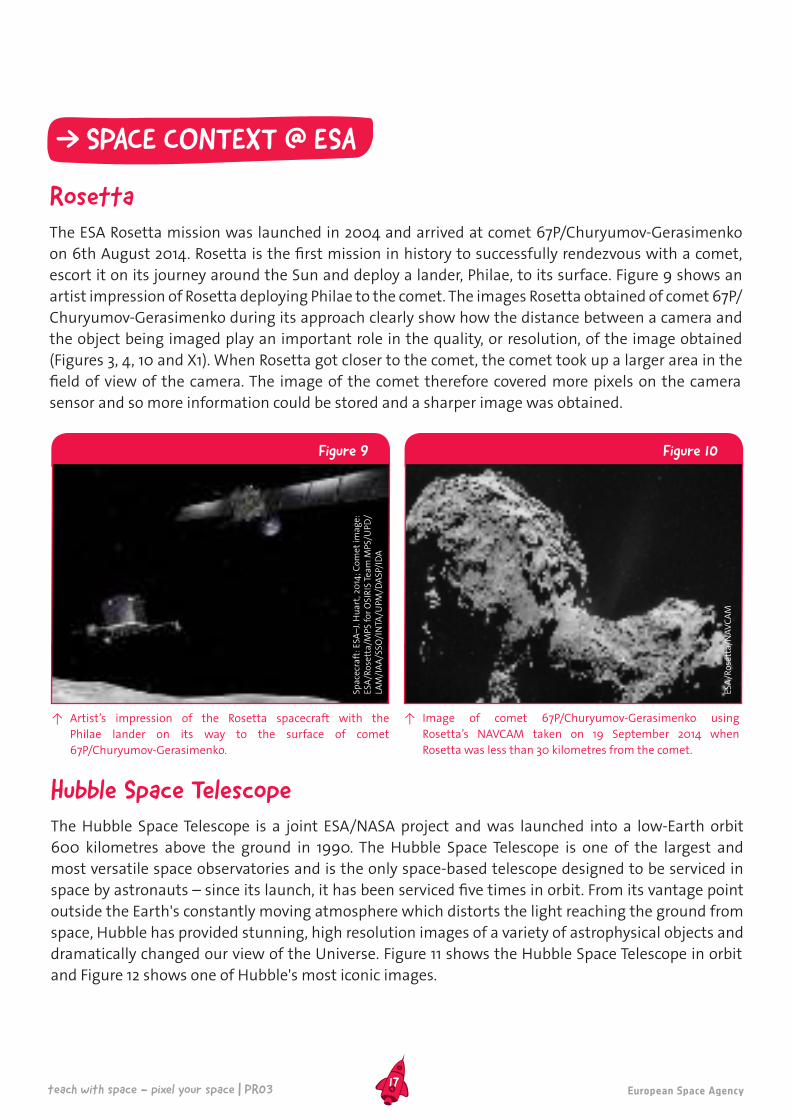
RosettaThe ESA Rosetta mission was launched in 2004 and arrived at comet 67P/Churyumov-Gerasimenko
on 6th August 2014. Rosetta is the first mission in history to successfully rendezvous with a comet,
escort it on its journey around the Sun and deploy a lander, Philae, to its surface. Figure 9 shows an
artist impression of Rosetta deploying Philae to the comet. The images Rosetta obtained of comet 67P/
Churyumov-Gerasimenko during its approach clearly show how the distance between a camera and
the object being imaged play an important role in the quality, or resolution, of the image obtained
(Figures 3, 4, 10 and X1). When Rosetta got closer to the comet, the comet took up a larger area in the
field of view of the camera. The image of the comet therefore covered more pixels on the camera
sensor and so more information could be stored and a sharper image was obtained.
SPACE CONTEXT @ ESA
↑ Artist’s impression of the Rosetta spacecraft with the
Philae lander on its way to the surface of comet
67P/Churyumov-Gerasimenko.
Figure 9
Spac
ecra
ft: E
SA–
J. H
uar
t, 2
014
; Co
met
imag
e:
ESA
/Ro
sett
a/M
PS f
or
OSI
RIS
Tea
m M
PS/U
PD/
LAM
/IA
A/S
SO/I
NTA
/UPM
/DA
SP/I
DA
Figure 10
ESA
/Ro
sett
a/N
AV
CA
M↑ Image of comet 67P/Churyumov-Gerasimenko using
Rosetta’s NAVCAM taken on 19 September 2014 when
Rosetta was less than 30 kilometres from the comet.
Hubble Space TelescopeThe Hubble Space Telescope is a joint ESA/NASA project and was launched into a low-Earth orbit
600 kilometres above the ground in 1990. The Hubble Space Telescope is one of the largest and
most versatile space observatories and is the only space-based telescope designed to be serviced in
space by astronauts – since its launch, it has been serviced five times in orbit. From its vantage point
outside the Earth's constantly moving atmosphere which distorts the light reaching the ground from
space, Hubble has provided stunning, high resolution images of a variety of astrophysical objects and
dramatically changed our view of the Universe. Figure 11 shows the Hubble Space Telescope in orbit
and Figure 12 shows one of Hubble's most iconic images.

teach with space - pixel your space | PR0318
Figure 11
↑ The NASA/ESA Hubble Space Telescope image of the Eagle
Nebula's Pillars of Creation. The Eagle Nebula is a vast stellar
nursery spanning around 9.5 light-years across, or 90 trillion
kilometres, and is located around 7 000 light-years from the
Solar System.
Figure 12
NA
SA, E
SA/H
ub
ble
an
d t
he
Hu
bb
le H
erit
age
Team
↑ The NASA/ESA Hubble Space Telescope in low Earth orbit, 600
kilometres above the surface of the Earth.
GaiaOn 19th December 2013, ESA launched the largest digital camera ever to be flown in space. The Gaia
telescope has an enormous camera which is made up of 106 CCDs working together. All CCDs combined
contain 1.5 billion pixels. The Gaia telescope will use its high resolution camera to accurately survey
the positions and motions of more than a billion stars in the sky, mapping our Milky Way Galaxy in
unprecedented detail.
Figure 13
↑ Gaia's Sky Mapper was briefly used in a special mode during
the test phase to image a crowded part of the sky. Whilst
there are many stars in the image, Gaia's high resolution
camera manages to clearly separate the individual objects.
Figure 14
NA
SA, E
SA/H
ub
ble
an
d t
he
Hu
bb
le H
erit
age
Team
EESA
–D
. Du
cro
s, 2
013
↑ Artist's impression of the Gaia telescope.
teach with space - pixel your space | PR0319
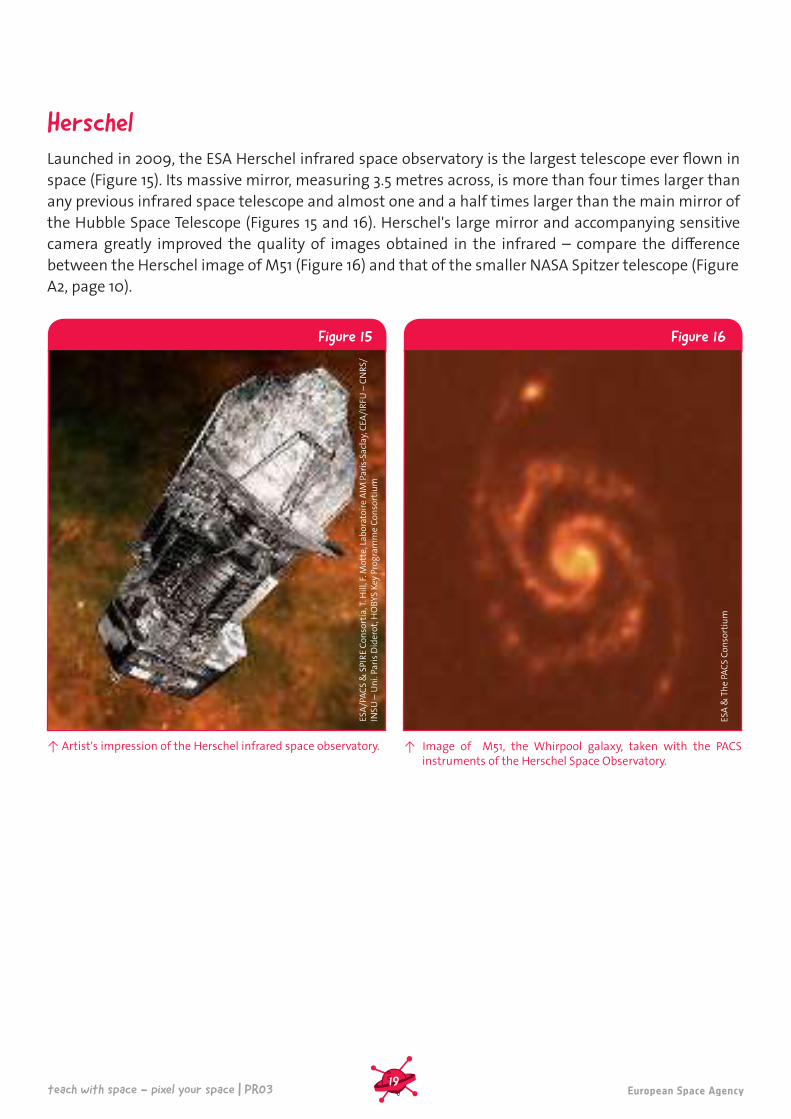
HerschelLaunched in 2009, the ESA Herschel infrared space observatory is the largest telescope ever flown in
space (Figure 15). Its massive mirror, measuring 3.5 metres across, is more than four times larger than
any previous infrared space telescope and almost one and a half times larger than the main mirror of
the Hubble Space Telescope (Figures 15 and 16). Herschel's large mirror and accompanying sensitive
camera greatly improved the quality of images obtained in the infrared – compare the difference
between the Herschel image of M51 (Figure 16) and that of the smaller NASA Spitzer telescope (Figure
A2, page 10).
Figure 15
↑ Image of M51, the Whirpool galaxy, taken with the PACS instruments of the Herschel Space Observatory.
Figure 16
↑ Artist's impression of the Herschel infrared space observatory.
ESA
/PA
CS
& S
PIR
E C
on
sort
ia, T
. Hill
, F. M
ott
e, L
abo
rato
ire
AIM
Par
is-S
acla
y, C
EA/I
RFU
– C
NR
S/IN
SU –
Un
i. Pa
ris
Did
ero
t, H
OB
YS K
ey P
rog
ram
me
Co
nso
rtiu
m
ESA
& T
he
PAC
S C
on
sort
ium
teach with space - pixel your space | PR03
20
APPENDIX
Figure X1
Figure X2
↑ The European Space Agency's Rosetta spacecraft imaged the comet 67P/Churyumov-Gerasimenko several times while approaching it during July -August 2014. The details of the image sharply increase as Rosetta got closer the comet - the comet became larger in the camera's filed of view.
↑ Digitaly manipulated images of Mars at different levels of pixelation. The left hand image is an original image of Mars taken with the ESA/NASA Hubble telescope. Moving towards the right the number of pixels decreases as does the level of detail.
ESA
/Ro
sett
a/N
AV
CA
MES
A/M
PS f
or
OSI
RIS
Tea
m, M
PS/U
PD/L
AM
/IA
A/R
SSD
/IN
TA/U
PM/D
ASP
/ID
A
teach with space - pixel your space | PR03
21
Figure X3
Figure X4
↑ Evolution of the Mario character in the videogame Super Mario Bros through the years showing the increase in the number of pixels and how this relates to an increase in detail.
↑ Invader’s art was brought to the International Space Station by ESA. 'A Space Invader' named 'Space2' is floating around the International Space Station.
Nin
ten
do
ESA
/NA
SA
teach with space - pixel your space | PR0322
Figure X5
↑ The image of Paxi, the ESA mascot (top left), has been digitaly modified to show the effect of different number of pixels on the quality of the image.
teach with space - pixel your space | PR0323
Links
Teach with spaceESA teach with Rosetta website: ww.esa.int/Teach_with_Rosetta/ESA teach with space – our solar system | PR01: esamultimedia.esa.int/docs/edu/PR01_Our_Solar_System_teacher_guide_and_pupil_activities.pdfESA teach with space – history of the universe | PR02: esamultimedia.esa.int/docs/edu/PR02_
History_of_the_Universe_teacher_guide_and_pupil_activities.pdf
ESA Kids (child-friendly fun & information in several European languages)ESA Kids homepage: www.esa.int/esaKIDSen/ Rosetta: www.esa.int/esaKIDSen/SEM269WJD1E_OurUniverse_0.html Super-sensitive space camera takes shape: www.esa.int/esaKIDSen/SEMP0N9TVPG_OurUniverse_0.html The Hubble Space Telescope: www.esa.int/esaKIDSen/SEM5C6BE8JG_Technology_0.htmlHerschel: ESA’s supercool heat seaker: www.esa.int/esaKIDSen/SEMOBAZ2OMH_Technology_0.html Paxi fun book: esamultimedia.esa.int/multimedia/publications/PaxiFunBook/
ESA MissionsESA Rosetta mission: www.esa.int/rosettaESA Rosetta blog: blogs.esa.int/rosetta/ ESA/NASA Hubble Space Telescope: sci.esa.int/hubbleESA Gaia mission: sci.esa.in/gaiaESA Gaia blog: blogs.esa.int/gaia/ ESA Herschel mission: sci.esa.int/herschel
Software linksImaging software: www.pixlr.com
The artist InvaderOfficial website: www.space-invaders.com
teach with space - pixel your space | PR03www.esa.int/education
An ESA Education productionCopyright © European Space Agency 2015