Embed Size (px)
Citation preview
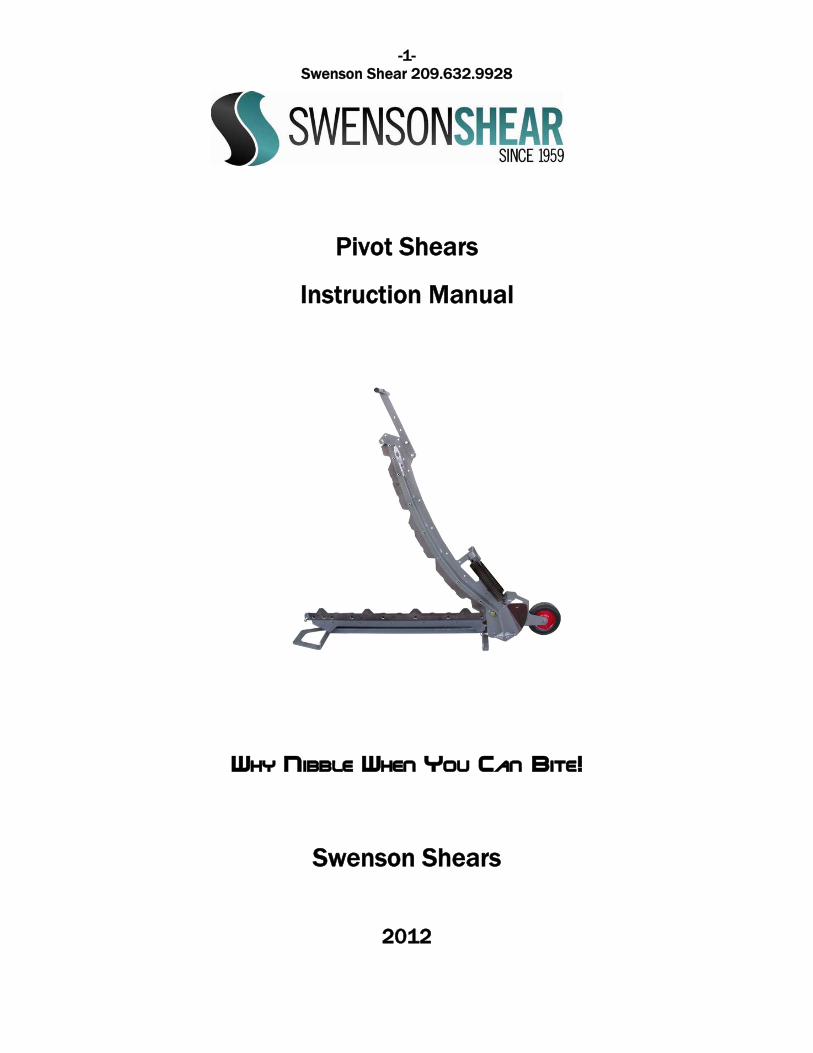
-1- Swenson Shear 209.632.9928
Pivot Shears
Instruction Manual
Why Nibble When You Can Bite!
Swenson Shears
2012
-2- Swenson Shear 209.632.9928
PACKING CHECKLIST
The following items will be found in the shipping box:
1. Shear (Top blade should be locked in place with clevis pin and clip. Do not remove clevis pin before removing the shear from the shipping box)
2. Packing slip and instruction manual
3. Pre-alignment jig (optional— consisting of two metal legs, two 2x4 wood pieces and a small bag of wood screws)
If you are missing
Any parts, please contact Swenson Shear immediately at
209-632-9928.
-3- Swenson Shear 209.632.9928
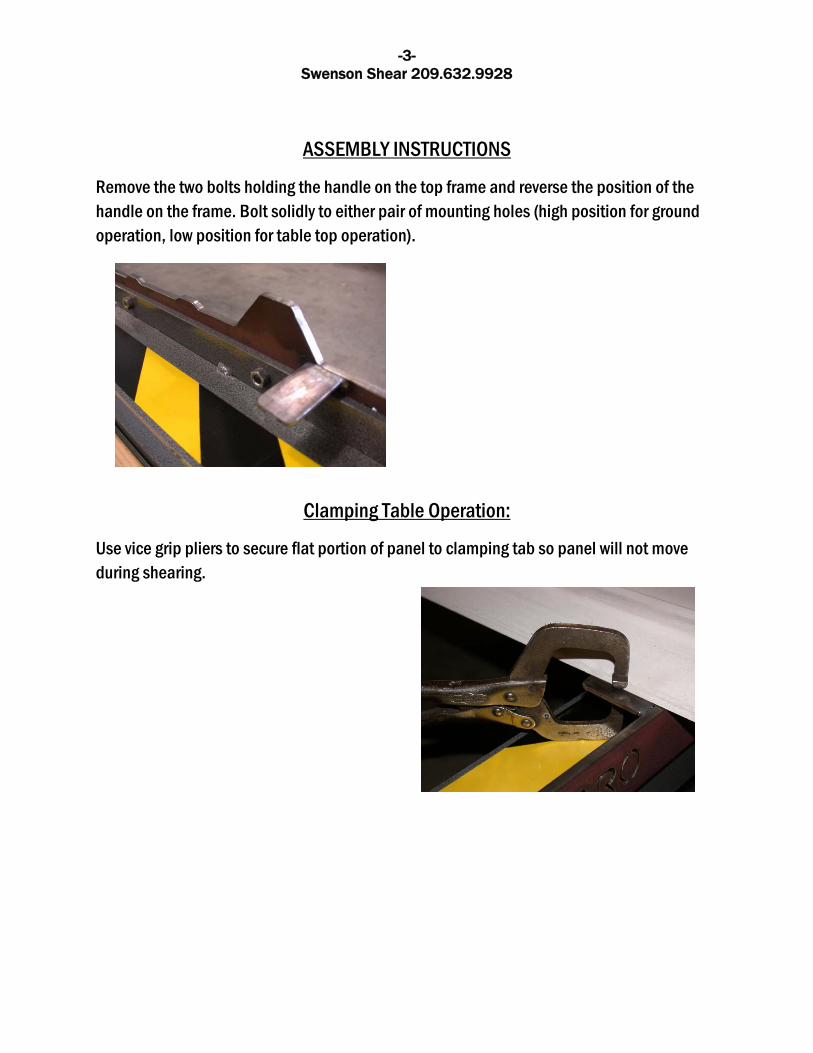
ASSEMBLY INSTRUCTIONS
Remove the two bolts holding the handle on the top frame and reverse the position of the handle on the frame. Bolt solidly to either pair of mounting holes (high position for ground operation, low position for table top operation).
Clamping Table Operation:
Use vice grip pliers to secure flat portion of panel to clamping tab so panel will not move during shearing.
-4- Swenson Shear 209.632.9928
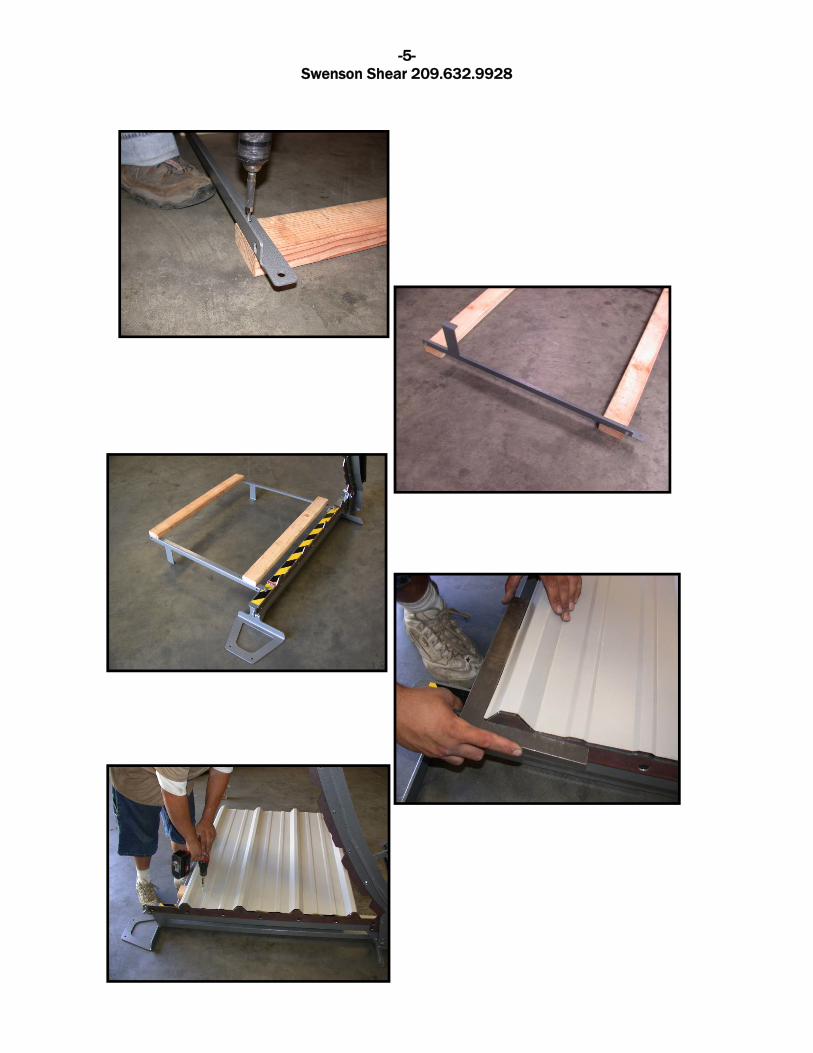
Pre-Alignment Jig Accessory (optional)
Contents of Pre-Alignment Jig Package:
• Two powder-coated leg pieces
• Two wood pieces 39 3/8” in length
• Wood screws
• Two clevis pins with clips
Assembly Instructions:
1) Place the 2x4 pieces on the floor and screw the jig legs to the 2x4 pieces flush with the edge of the wood using the screws supplied.
IMPORTANT: Confirm that the distance
Between the 3/8” holes on the ends of
The jig pieces are 38 inches before screwing
The legs on to the 2x4!
2) With all four corners attached in a square pattern, turn the jig over and attach the legs to the shear frame using the clevis pins supplied
3) Place a short piece of sacrifice panel matching the blade profile across the 2x4 pieces and perpendicular to the cutting blade. Edge of panel should be about half-way across the width of the cutting blade. Cut sample piece square using the shear if you are not using a factory sheared edge. Use carpenter square to confirm position of the panel relative to the cutting blade.
4) With panel perpendicular to cutting blade, screw panel to both 2 x 4 pieces to lock in place.
*Jig can now be removed or installed quickly by simply pulling the clevis pins out of the mounting holes!
-5- Swenson Shear 209.632.9928
-6- Swenson Shear 209.632.9928
SAFE OPERATION INSTRUCTIONS
WARNING: CARELESS OR IMPROPER OPERATION OF THIS SHEAR MAY RESULT IN SERIOUS INJURY.
OPERATOR MUST READ AND UNDERSTAND THESE INSTRUCTIONS PRIOR TO OPERATION OF THIS SHEAR.
GENERAL DESCRIPTION OF DEVICE:
The Swenson Shear is a hand-operated, pivot-style shear designed to cut a variety of materials. DO NOT cut material thicker than 24 gauge mild steel or equivalent.
PREPARATION FOR OPERATION
• PLACE SHEAR ON FLAT AND FIRM SURFACE.
• Top blade of shear MUST ALWAYS BE STOWED IN CLOSED POSTION using supplied clevis pin and clip. Prior to removal of clevis pin, hold one hand on shear handle to control the raising of the blade
• Remove clip from locking clevis pin and remove pin from hole.
• Lift top blade of shear to full upright position.
• Store clevis pin and clip for safe keeping in hole above blade lock hole at handle end of top blade.
• Check surrounding area to be sure there are no electrical cords in the vicinity of the shear operation. Electric shock may occur if cord is severed by shear.
-7- Swenson Shear 209.632.9928
OPERATION OF SHEAR
Operator must always stand at rear of shear facing machine from the handle end. Shear blade should never be lowered without an operator holding the handle at the end of the shear.
Material that is to be cut should be oriented in the shear without operator placing hands or fingers near or under the top shear blade.
In some cases, shear operation may require the assistance of a person working to the side of the shear to hold the material in place while operator shears the material.
NOTE – DANGER OPERATOR ASSISTANT INSTRUCTION: NEVER HOLD MATERIAL WITH HANDS AND FINGERS LESS THAN TWO FEET FROM THE CUTTING SURFACE. If cut width leaves less than 24 inches of material for assistant operator to hold, material must be sheared without person holding material or material must be clamped to a pre-alignment jig or other device.
Shear Operator must hold both hands on the top blade handle with both feet flat on the ground for operation. Shearing motion is a quick, continuous downward motion of the blade with OPERATOR PAYING CLOSE ATTENTION TO CUT PROGRESS AND TO ANY POSSIBLE OBSTACLES IN CUT PATH.
Operator should NEVER JUMP UP TO GRAB SHEAR HANDLE. Operator must be tall enough while
standing flat footed in front of the shear to reach handle with both hands. DO NOT JUMP UP TO ADD WEIGHT TO TOP BLADE DURING SHEARING MOTION. If material offers
resistance sufficient to keep operator from moving blade down through material smoothly with both feet on the ground, stop shearing operations immediately and investigate the material in question. DO NOT shear material of greater thickness than 24 gauge in mild steel or equivalent.
POST-SHEAR OPERATION: When shearing operation is complete, carefully lower top blade and latch blades carefully to frame with supplied clevis pin and clip.
MAINTENANCE:
Apply light oil, such as WD40, to top and bottom blade cutting surfaces periodically prior to operation
Periodically check the grease on the heel pad of the shear. Clean off dirt as necessary and grease with any heavy duty grease.
To grease entire heel pad or for disassembly of shear for any reason, note instructions on next page.
-8- Swenson Shear 209.632.9928
Blade Replacement
Tools Required:
- 3/16” Allen wrench
- 1 1/8” socket & drive
1) Open shear fully and lay shear on side with the main pivot bolt nut towards the top.
2) Loosen the main pivot nut, flat washers and spring washers,
3) Loosen and remove fasteners on blades and pull blades off
4) Place new blades on top and bottom and tighten fasteners
5) Once new blades are attached, tighten main pivot nut and follow Blade Realignment Procedure.
REASSEMBLY OF SHEAR
1) Set bottom frame back on top frame and insert pivot bolt from bottom.
2) Install washers (1 flat, 2 springs, 1 flat) and locknut. Note the orientation of the spring washers as depicted on the label near the pivot block on the bottom frame of the shear.
3) Reattach springs to spring mount holes.
4) Lift shear to upright position making sure both spring hooks remain engaged.
5) Tighten locknut until spring washers nearly flatten when shear is closed. They should not touch.
NOTE: Pivot locknut should be tightened just enough to partially collapse the spring washers when the shear is closed. The spring washers should relax when the shear is opened.
-9- Swenson Shear 209.632.9928
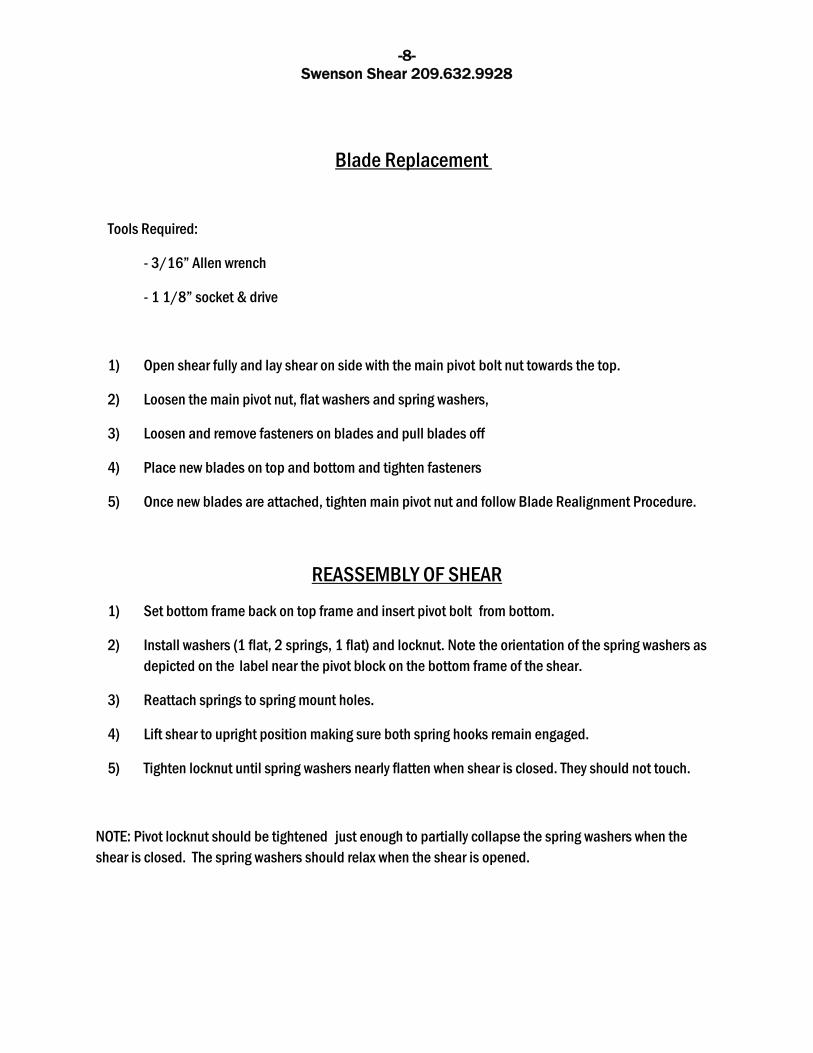
BLADE ALIGNMENT PROCEDURE
After changing blades, it may be necessary to align the top blade with the bottom blade in order to achieve the best cut possible. This is done using the adjusting screws that
move the pivot bolt to the front or rear. Simply loosen the lock nuts and move the pivot bolt either direction. Be sure to retighten the lock nuts when adjustment is complete.
-10- Swenson Shear 209.632.9928
What You Can Order From Swenson Shear
Blade Sets
Swenson Shears feature quick-change blades for easy switching between panels or pitches. When you call to order additional blades, be sure to specify your shear model or
serial number, panel profile and desired cut angle.
Shears
Swenson Shear offers cutting shears for nearly every type of exposed fastener, stone coat and soffit panel profiles. When you are ready to upgrade, or buy more of the same model
of your shear, Swenson Shear is here to help guide you in the right direction. Check out our product showcase below to see all of our cutting options.
SnapTable
Swenson Shear has revolutionized the concealed fastener panel industry by creating the SnapTable product line. With our portable table to notch, shear and hem your panels, we
guarantee the SnapTable will be your Ultimate Metal Roofing tool.
How To Order From Swenson Shear
Contact: Jonathan Dravecky
Email: [email protected]
Phone: 209.632.9928
Fax: 209.667.8427
-11- Swenson Shear 209.632.9928
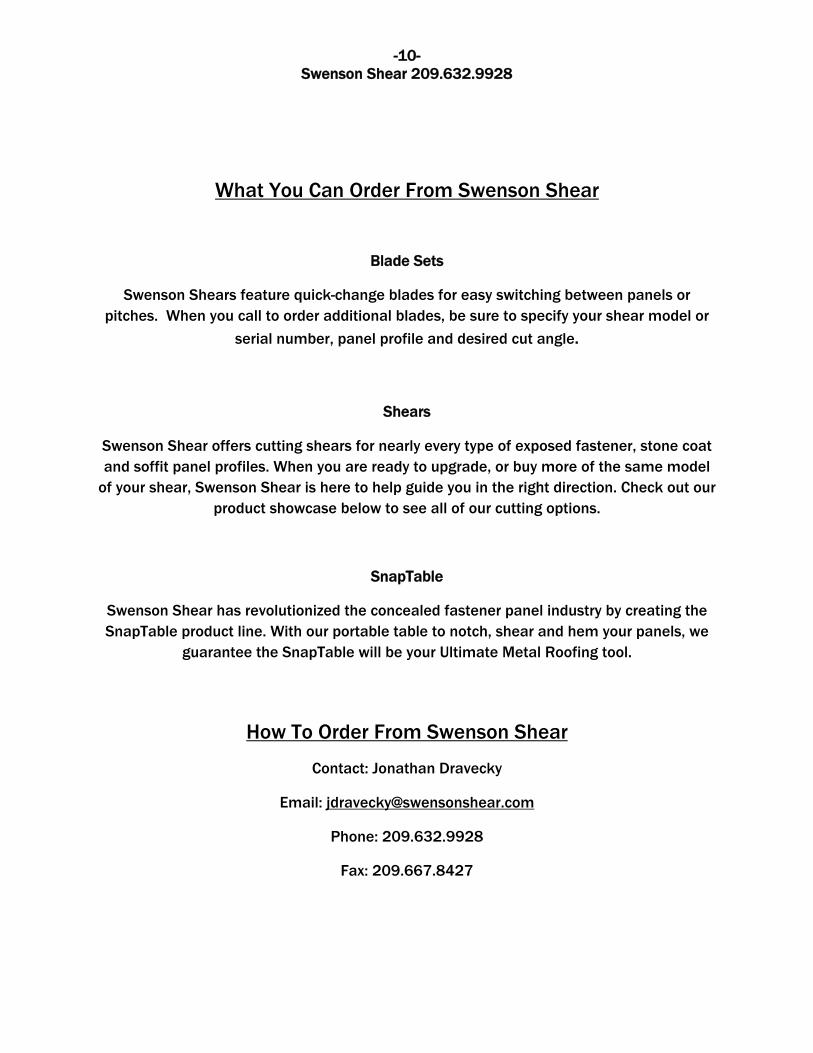
Model 24
Stone Cutter
This rugged design will stand up to the brutal wear and tear of the stone-coated steel jobsite. A rock solid frame and hardy blades provide maximum performance under
extreme shearing conditions
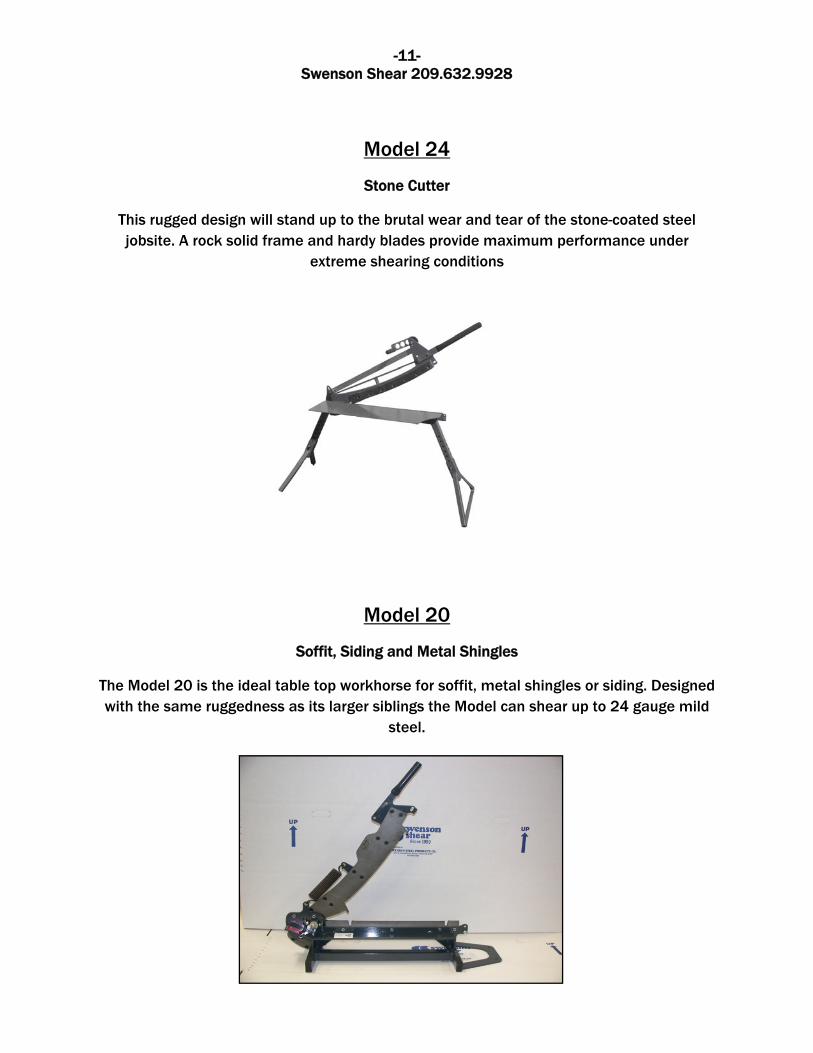
Model 20
Soffit, Siding and Metal Shingles
The Model 20 is the ideal table top workhorse for soffit, metal shingles or siding. Designed with the same ruggedness as its larger siblings the Model can shear up to 24 gauge mild
steel.
-12- Swenson Shear 209.632.9928
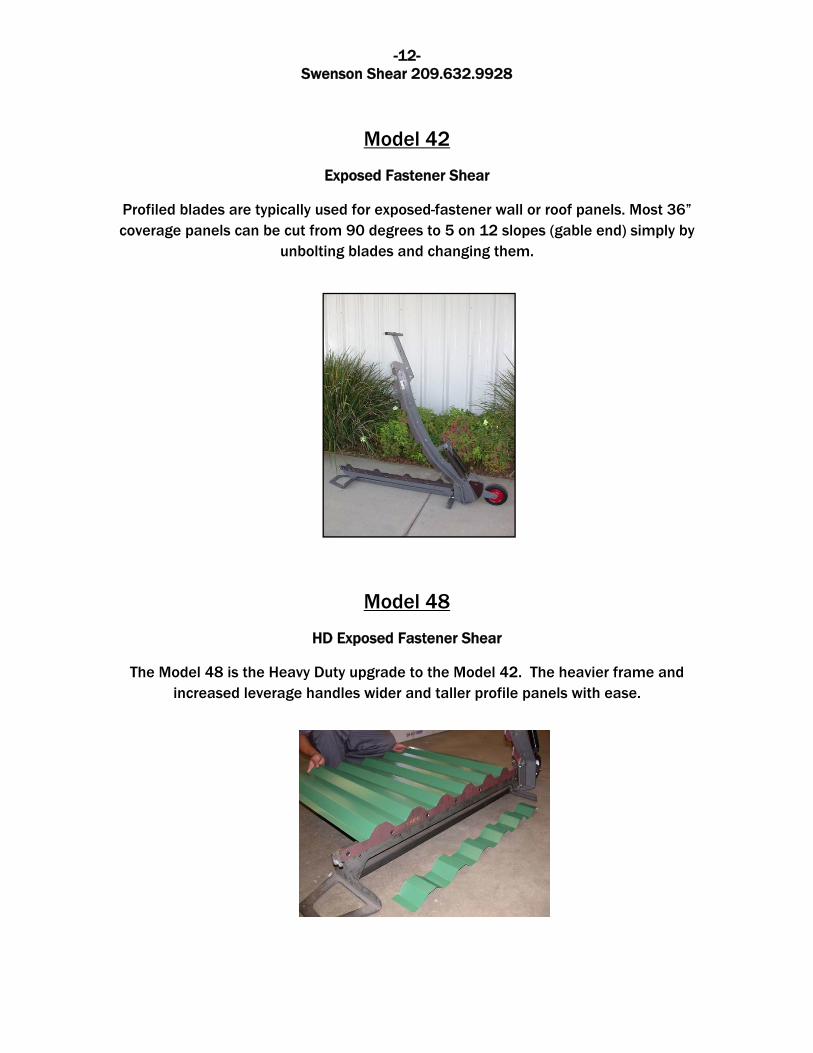
Model 42
Exposed Fastener Shear
Profiled blades are typically used for exposed-fastener wall or roof panels. Most 36” coverage panels can be cut from 90 degrees to 5 on 12 slopes (gable end) simply by
unbolting blades and changing them.
Model 48
HD Exposed Fastener Shear
The Model 48 is the Heavy Duty upgrade to the Model 42. The heavier frame and increased leverage handles wider and taller profile panels with ease.
-13- Swenson Shear 209.632.9928
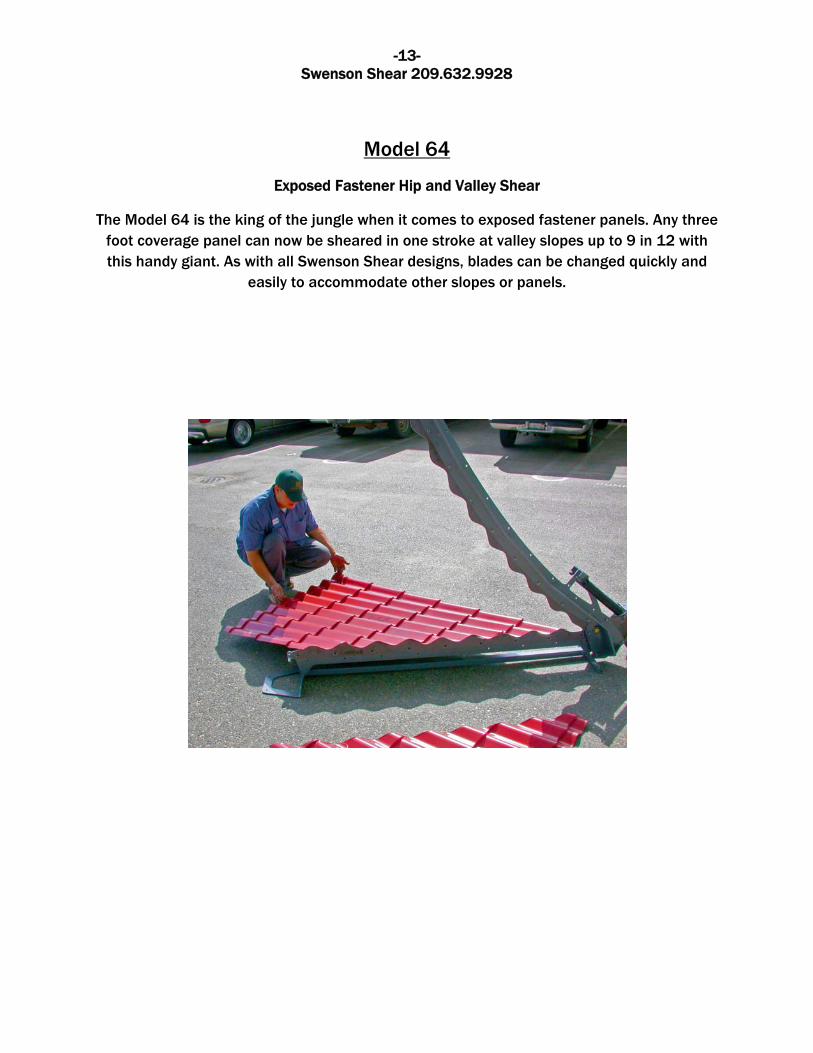
Model 64
Exposed Fastener Hip and Valley Shear
The Model 64 is the king of the jungle when it comes to exposed fastener panels. Any three foot coverage panel can now be sheared in one stroke at valley slopes up to 9 in 12 with this handy giant. As with all Swenson Shear designs, blades can be changed quickly and
easily to accommodate other slopes or panels.
-14- Swenson Shear 209.632.9928
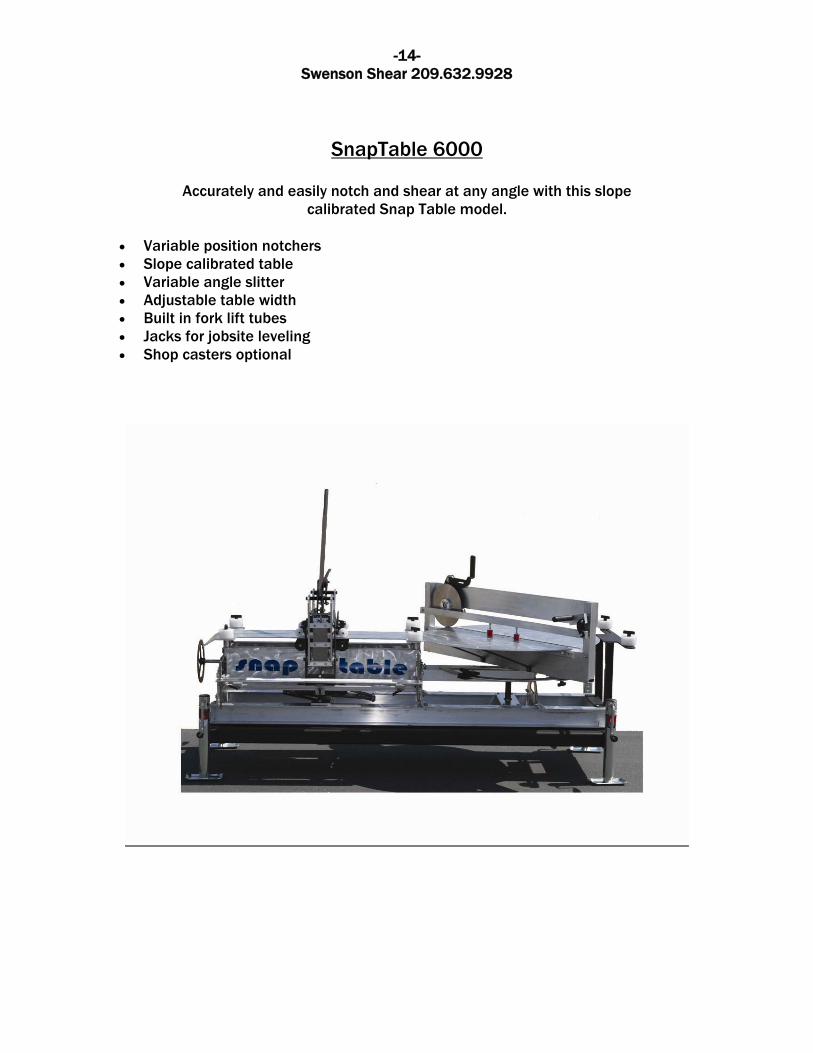
SnapTable 6000
Accurately and easily notch and shear at any angle with this slope calibrated Snap Table model.
• Variable position notchers • Slope calibrated table • Variable angle slitter • Adjustable table width • Built in fork lift tubes • Jacks for jobsite leveling • Shop casters optional
-15- Swenson Shear 209.632.9928
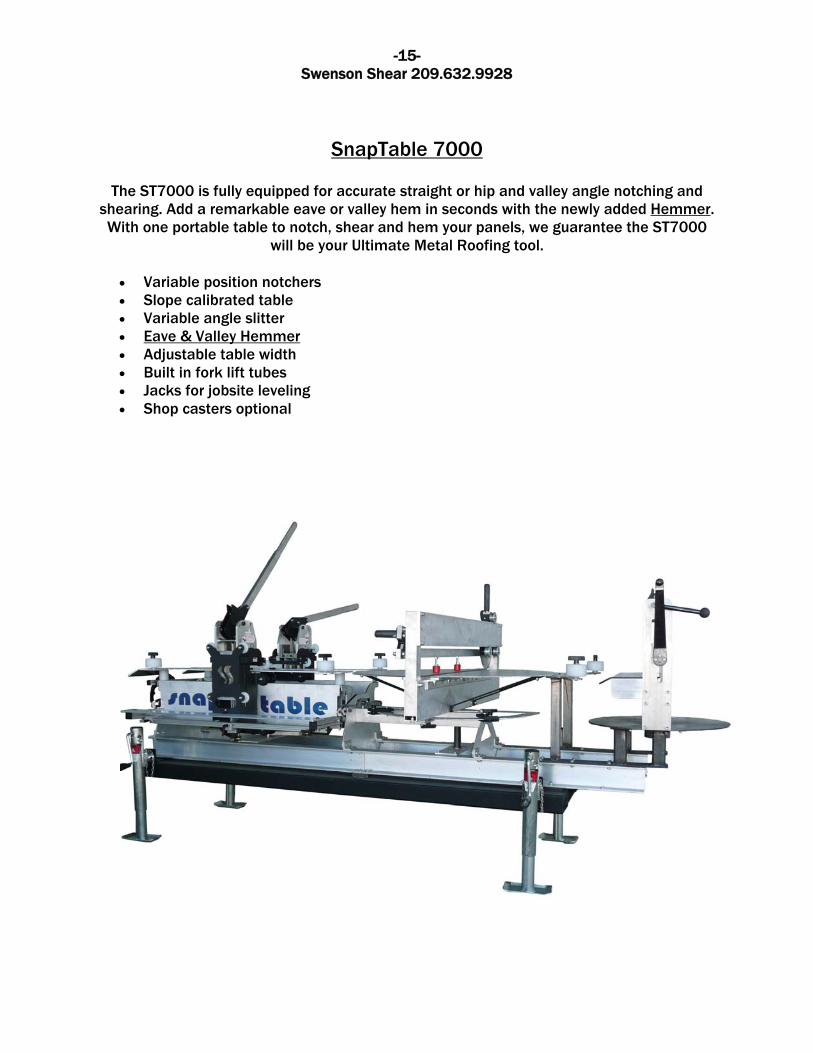
SnapTable 7000
The ST7000 is fully equipped for accurate straight or hip and valley angle notching and shearing. Add a remarkable eave or valley hem in seconds with the newly added Hemmer. With one portable table to notch, shear and hem your panels, we guarantee the ST7000
will be your Ultimate Metal Roofing tool.
• Variable position notchers • Slope calibrated table • Variable angle slitter • Eave & Valley Hemmer • Adjustable table width • Built in fork lift tubes • Jacks for jobsite leveling • Shop casters optional
-16- Swenson Shear 209.632.9928
Contact Us:
Mailing Address:
P.O. Box 190
Keyes, CA 95328
Physical Address
4257 E. Keyes Road
Ceres, CA 95307
Toll Free: 877.588.8748
Phone: 209.632.9928
Fax: 209.667.8427
Email: [email protected]
www.swensonshear.com
WARRANTY:
SWENSON SHEARS ARE WARRANTED TO BE FREE FROM MATERIAL OR MANUFACTURING DEFECTS FOR A PERIOD OF 10 YEARS FROM THE DATE OF PURCHASE EXCLUDING BLADES AND SPRINGS.

-17- Swenson Shear 209.632.9928