Embed Size (px)
Citation preview
Pippi – User & Server Management Systems
Version 1.4.7
User Guide
Contents
Brief Overview
Setup Instructions
System Explanations
Commands
Configuring Pippi
Using Pippi
Brief Overview
What is Pippi?
Pippi is a mod created for Conan Exiles by the user Joshtech a.k.a
CoOkIeMoNsTeR. Pippi adds new features and systems to game play which
assist admins in maintaining players while also adding to the players
experience.
Pippi is modular by design, meaning that each system is separate from each
other but they all work together. A good example of this would be the Warp
System and the Map System. By having warps in the Warp System the Map
System can be configured to provide a visual representation of where the
warps are to the player. Further on in this document I will go further into
detail of each system.
Certain existing features of Conan Exiles have been completely rewritten to
provide a better experience, some of these features are the Chat System
and Map System.
Setup Instructions
Since Pippi is a Mod for Conan Exiles, it is installed the same way as other
mods.
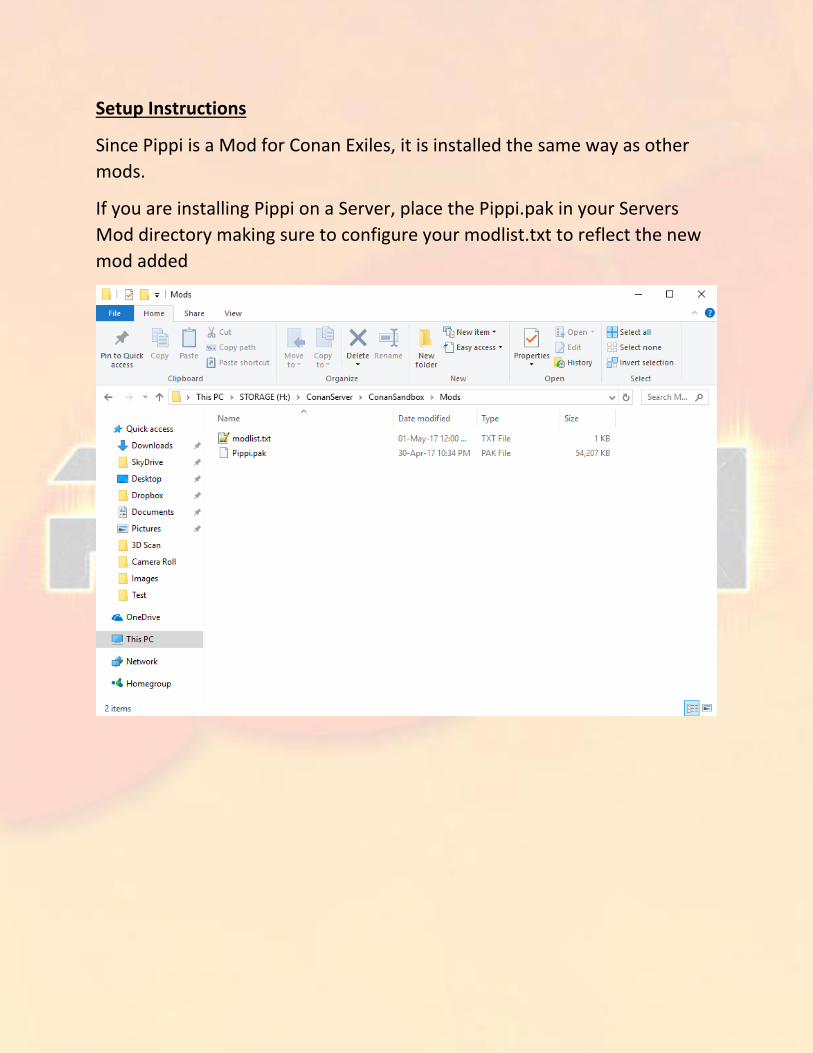
If you are installing Pippi on a Server, place the Pippi.pak in your Servers
Mod directory making sure to configure your modlist.txt to reflect the new
mod added
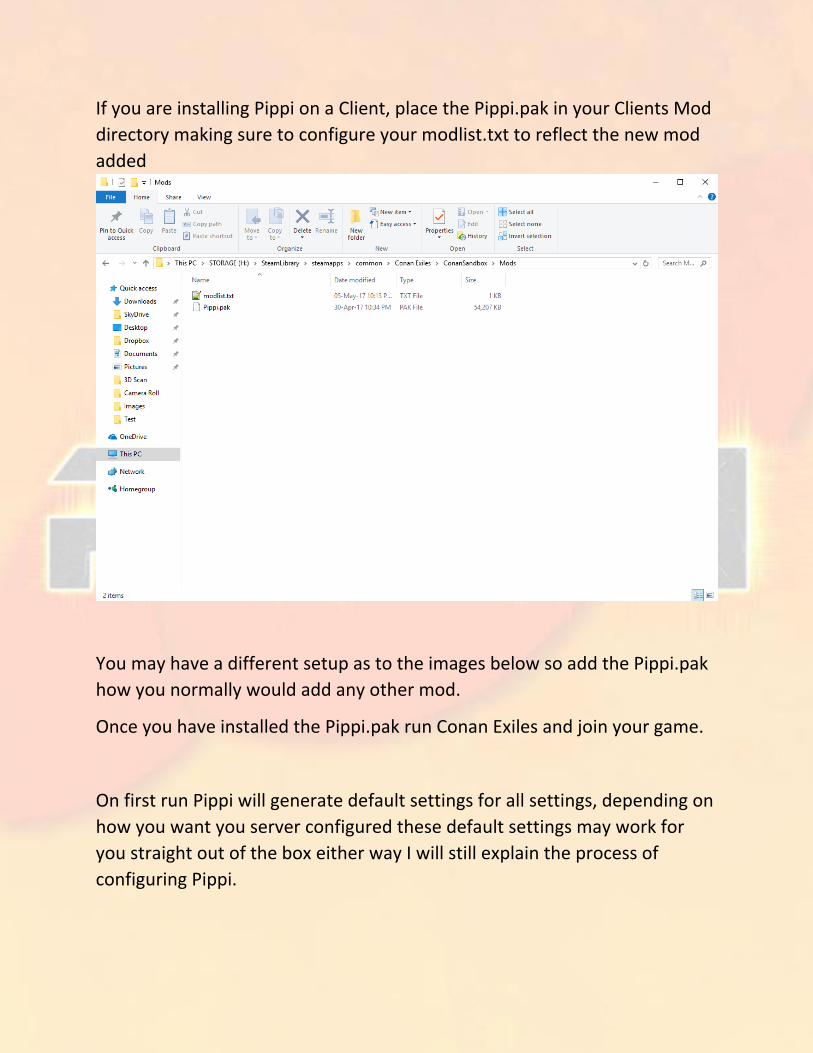
If you are installing Pippi on a Client, place the Pippi.pak in your Clients Mod
directory making sure to configure your modlist.txt to reflect the new mod
added
You may have a different setup as to the images below so add the Pippi.pak
how you normally would add any other mod.
Once you have installed the Pippi.pak run Conan Exiles and join your game.
On first run Pippi will generate default settings for all settings, depending on
how you want you server configured these default settings may work for
you straight out of the box either way I will still explain the process of
configuring Pippi.
System Explanations
As of writing this guide there is a total of 12 Systems that make up Pippi.
Announcement System
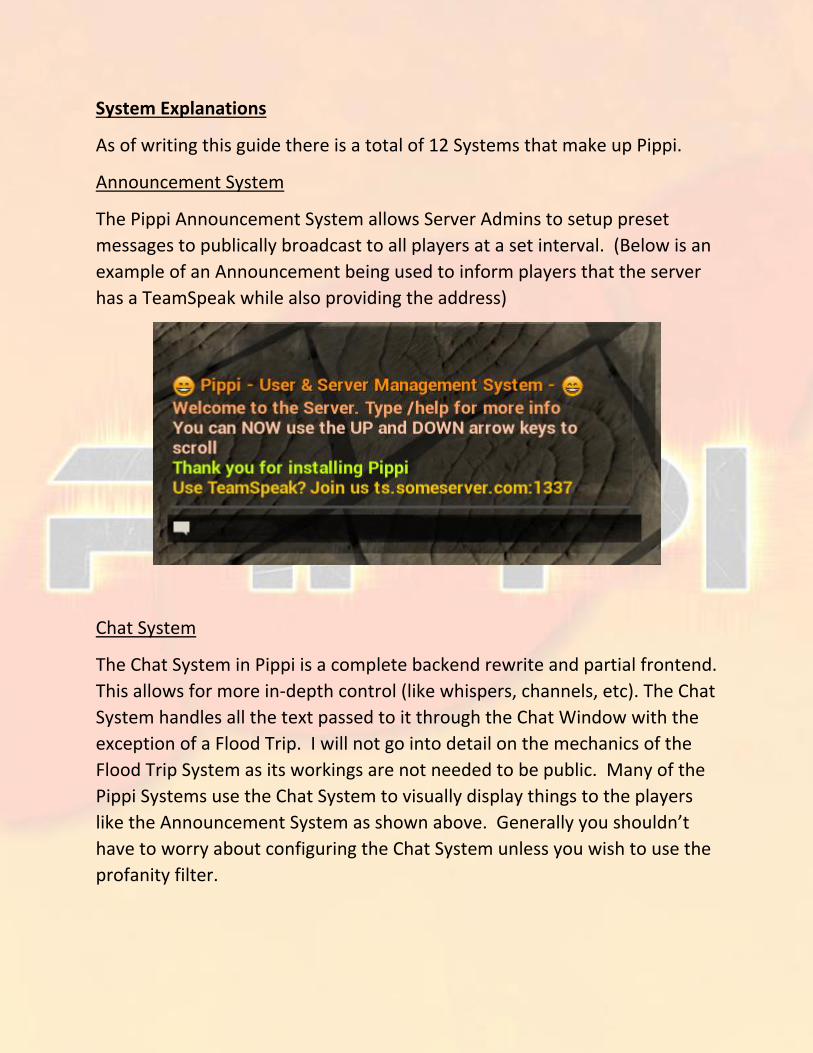
The Pippi Announcement System allows Server Admins to setup preset
messages to publically broadcast to all players at a set interval. (Below is an
example of an Announcement being used to inform players that the server
has a TeamSpeak while also providing the address)
Chat System
The Chat System in Pippi is a complete backend rewrite and partial frontend.
This allows for more in-depth control (like whispers, channels, etc). The Chat
System handles all the text passed to it through the Chat Window with the
exception of a Flood Trip. I will not go into detail on the mechanics of the
Flood Trip System as its workings are not needed to be public. Many of the
Pippi Systems use the Chat System to visually display things to the players
like the Announcement System as shown above. Generally you shouldn’t
have to worry about configuring the Chat System unless you wish to use the
profanity filter.
Command System
The Command System is the heart of the all the commands that can be used
within Pippi. The Command System controls who can call commands, who
can see commands (Dynamic Help Generation) and the configuration of
commands. It is also in charge of making sure every time Pippi updates that
your servers command list is up to date and working properly
Event System
No information on this system… yet
Info System
The Info System is the most basic system within Pippi but is important as it
keeps track of install & update dates.
Jail System
No information on this system… yet
Map System
The Map System is a complete rewrite both front and backend. This has
allowed far more control with not only what is displayed on the map but
how the map itself works. The Pippi Map can be zoomed and panned to
allow better viewing. The Map System adds new functionality such as
showing where other players are such as guild member, showing warps from
the warp system, homes from the player management system, personal and
guild markers, player positions.
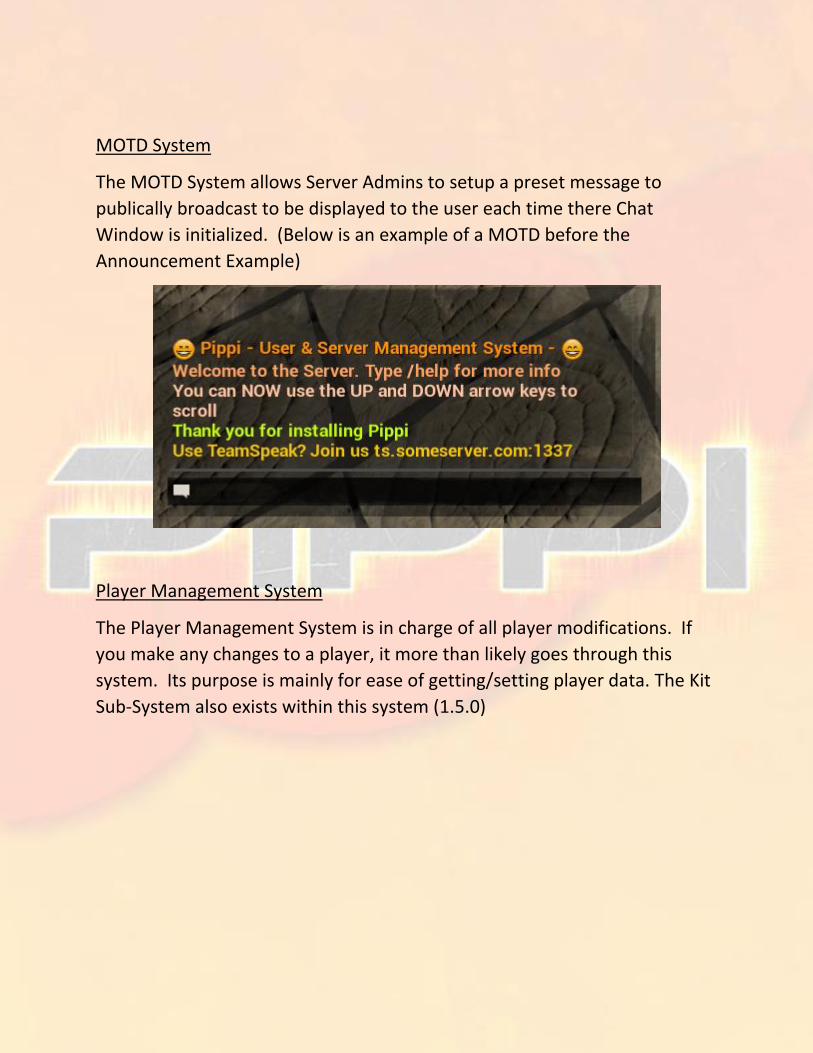
MOTD System
The MOTD System allows Server Admins to setup a preset message to
publically broadcast to be displayed to the user each time there Chat
Window is initialized. (Below is an example of a MOTD before the
Announcement Example)
Player Management System
The Player Management System is in charge of all player modifications. If
you make any changes to a player, it more than likely goes through this
system. Its purpose is mainly for ease of getting/setting player data. The Kit
Sub-System also exists within this system (1.5.0)

Rules System
The Rules System is what maintains if players have accepted the rules,
where to display the rules etc etc. While this could have been a subsystem
of the Player Management System I decided to make it its own system (An
example of a basic rules page is below, you can get creative and use the
basic tools to change fontsize, colour etc)
Save System
The Save System has the most important job of them all, it makes sure that
all the systems configuration is saved/loaded from the database as well as
handling new/existing players Pippi Player Configs writing
Warp System
The Warp System handles the creation, teleportation of players and general
management of Warps. The Map System communicates with this system to
provide players with a visual representation of where the Warps exist
providing the warp is available to them.
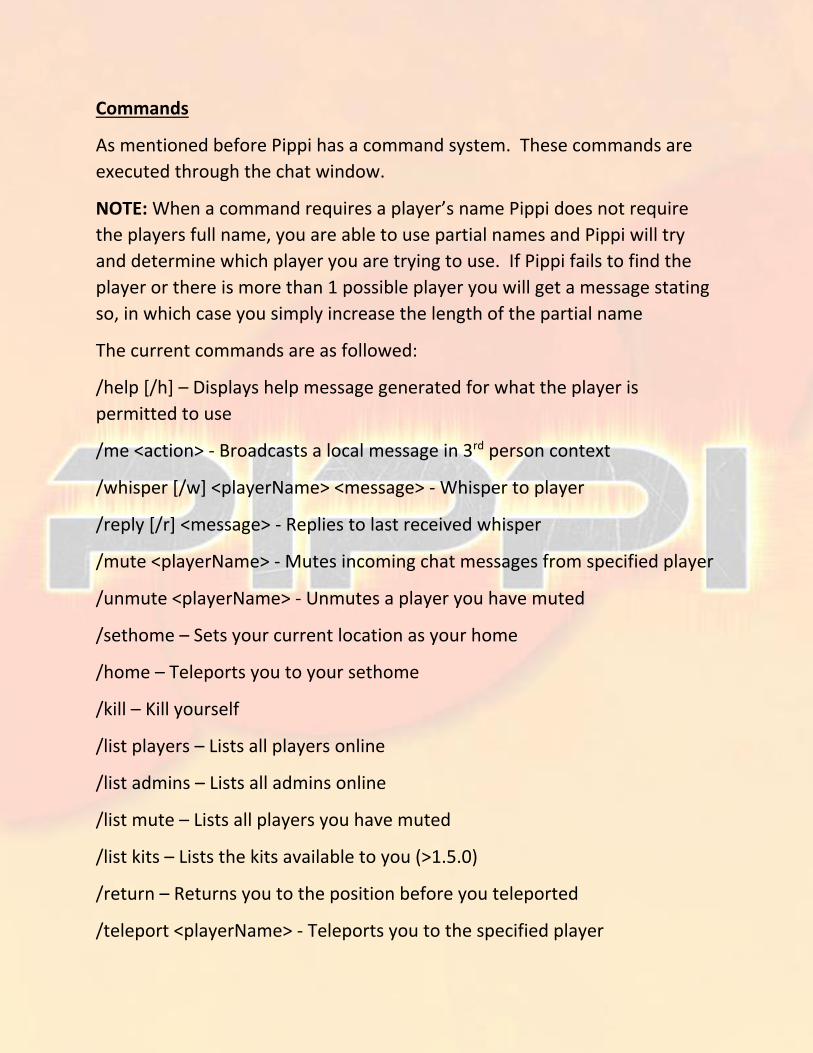
Commands
As mentioned before Pippi has a command system. These commands are
executed through the chat window.
NOTE: When a command requires a player’s name Pippi does not require
the players full name, you are able to use partial names and Pippi will try
and determine which player you are trying to use. If Pippi fails to find the
player or there is more than 1 possible player you will get a message stating
so, in which case you simply increase the length of the partial name
The current commands are as followed:
/help [/h] – Displays help message generated for what the player is
permitted to use
/me <action> - Broadcasts a local message in 3rd person context
/whisper [/w] <playerName> <message> - Whisper to player
/reply [/r] <message> - Replies to last received whisper
/mute <playerName> - Mutes incoming chat messages from specified player
/unmute <playerName> - Unmutes a player you have muted
/sethome – Sets your current location as your home
/home – Teleports you to your sethome
/kill – Kill yourself
/list players – Lists all players online
/list admins – Lists all admins online
/list mute – Lists all players you have muted
/list kits – Lists the kits available to you (>1.5.0)
/return – Returns you to the position before you teleported
/teleport <playerName> - Teleports you to the specified player
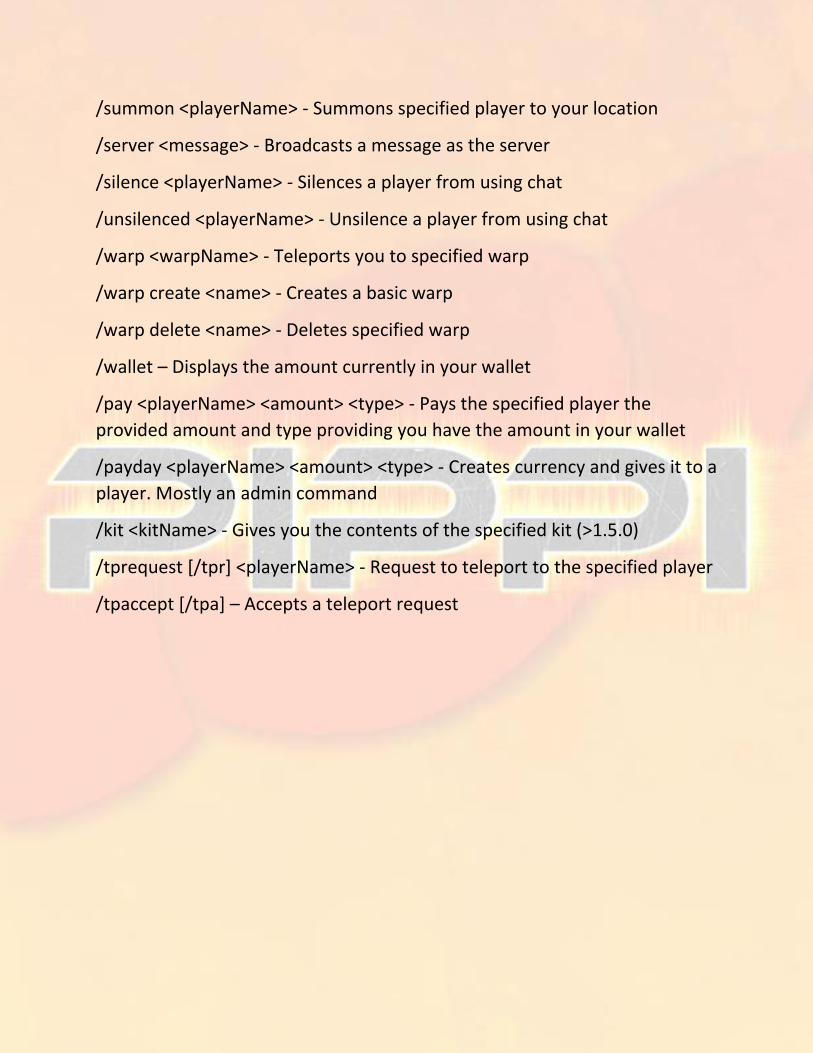
/summon <playerName> - Summons specified player to your location
/server <message> - Broadcasts a message as the server
/silence <playerName> - Silences a player from using chat
/unsilenced <playerName> - Unsilence a player from using chat
/warp <warpName> - Teleports you to specified warp
/warp create <name> - Creates a basic warp
/warp delete <name> - Deletes specified warp
/wallet – Displays the amount currently in your wallet
/pay <playerName> <amount> <type> - Pays the specified player the
provided amount and type providing you have the amount in your wallet
/payday <playerName> <amount> <type> - Creates currency and gives it to a
player. Mostly an admin command
/kit <kitName> - Gives you the contents of the specified kit (>1.5.0)
/tprequest [/tpr] <playerName> - Request to teleport to the specified player
/tpaccept [/tpa] – Accepts a teleport request
Configuring Pippi
To access the Pippi Admin Panel you use the already existing key combo
CTRL-SHIFT-C to display it on the screen. (The images used here are from the
soon to be released 1.5.0 but the same configuration is the same).
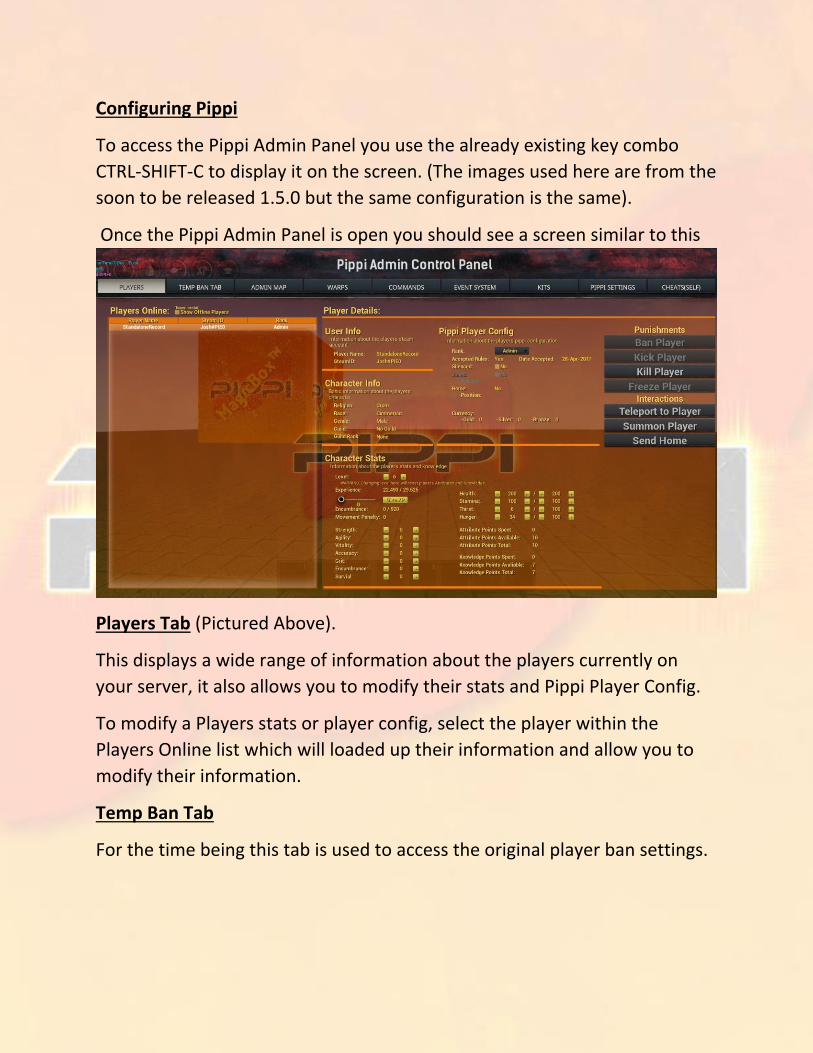
Once the Pippi Admin Panel is open you should see a screen similar to this
Players Tab (Pictured Above).
This displays a wide range of information about the players currently on
your server, it also allows you to modify their stats and Pippi Player Config.
To modify a Players stats or player config, select the player within the
Players Online list which will loaded up their information and allow you to
modify their information.
Temp Ban Tab
For the time being this tab is used to access the original player ban settings.
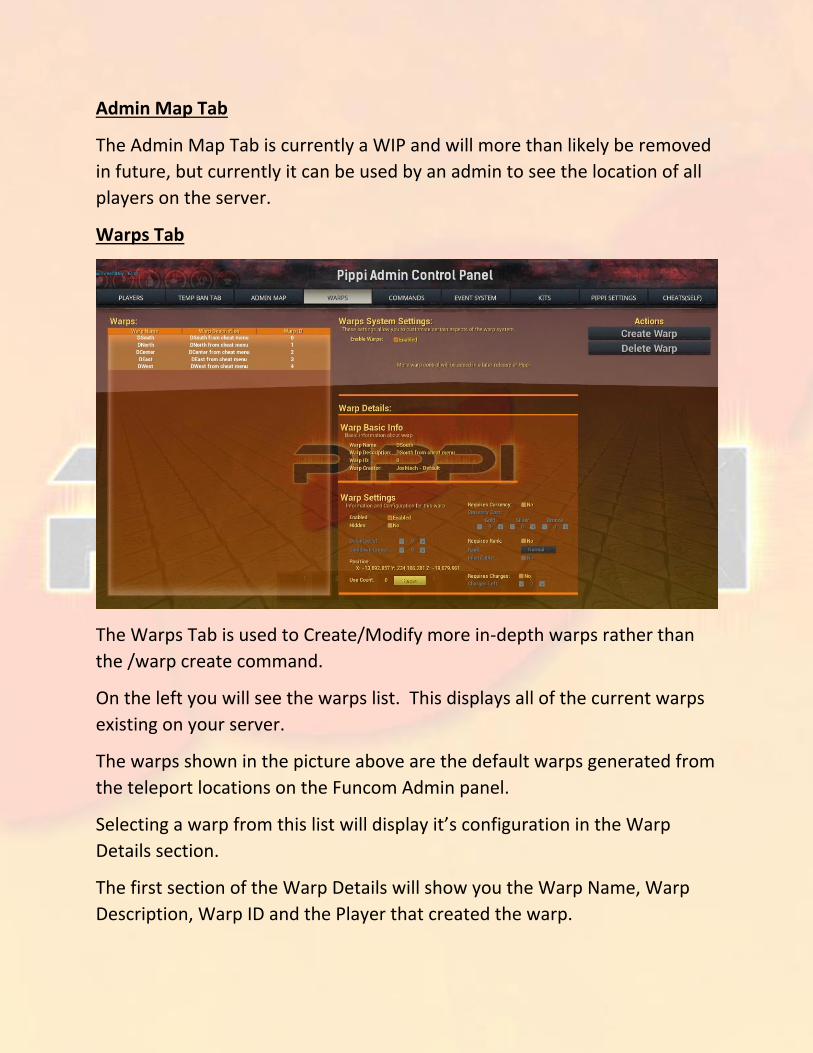
Admin Map Tab
The Admin Map Tab is currently a WIP and will more than likely be removed
in future, but currently it can be used by an admin to see the location of all
players on the server.
Warps Tab
The Warps Tab is used to Create/Modify more in-depth warps rather than
the /warp create command.
On the left you will see the warps list. This displays all of the current warps
existing on your server.
The warps shown in the picture above are the default warps generated from
the teleport locations on the Funcom Admin panel.
Selecting a warp from this list will display it’s configuration in the Warp
Details section.
The first section of the Warp Details will show you the Warp Name, Warp
Description, Warp ID and the Player that created the warp.
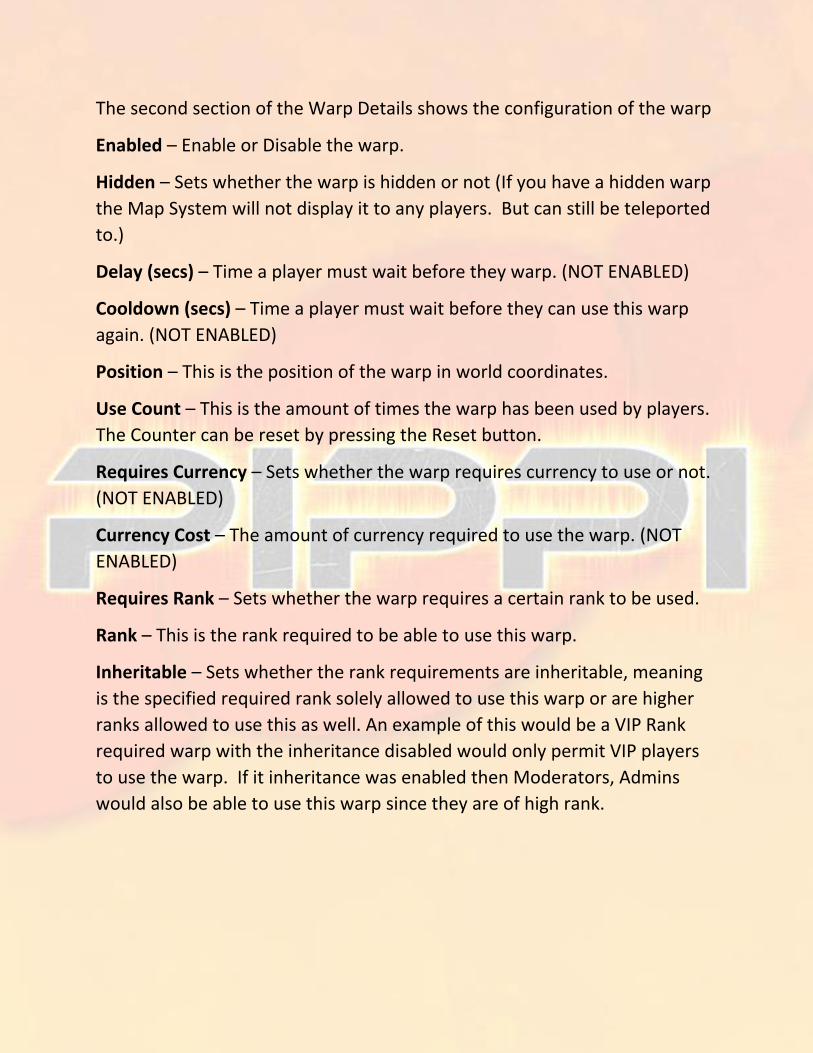
The second section of the Warp Details shows the configuration of the warp
Enabled – Enable or Disable the warp.
Hidden – Sets whether the warp is hidden or not (If you have a hidden warp
the Map System will not display it to any players. But can still be teleported
to.)
Delay (secs) – Time a player must wait before they warp. (NOT ENABLED)
Cooldown (secs) – Time a player must wait before they can use this warp
again. (NOT ENABLED)
Position – This is the position of the warp in world coordinates.
Use Count – This is the amount of times the warp has been used by players.
The Counter can be reset by pressing the Reset button.
Requires Currency – Sets whether the warp requires currency to use or not.
(NOT ENABLED)
Currency Cost – The amount of currency required to use the warp. (NOT
ENABLED)
Requires Rank – Sets whether the warp requires a certain rank to be used.
Rank – This is the rank required to be able to use this warp.
Inheritable – Sets whether the rank requirements are inheritable, meaning
is the specified required rank solely allowed to use this warp or are higher
ranks allowed to use this as well. An example of this would be a VIP Rank
required warp with the inheritance disabled would only permit VIP players
to use the warp. If it inheritance was enabled then Moderators, Admins
would also be able to use this warp since they are of high rank.
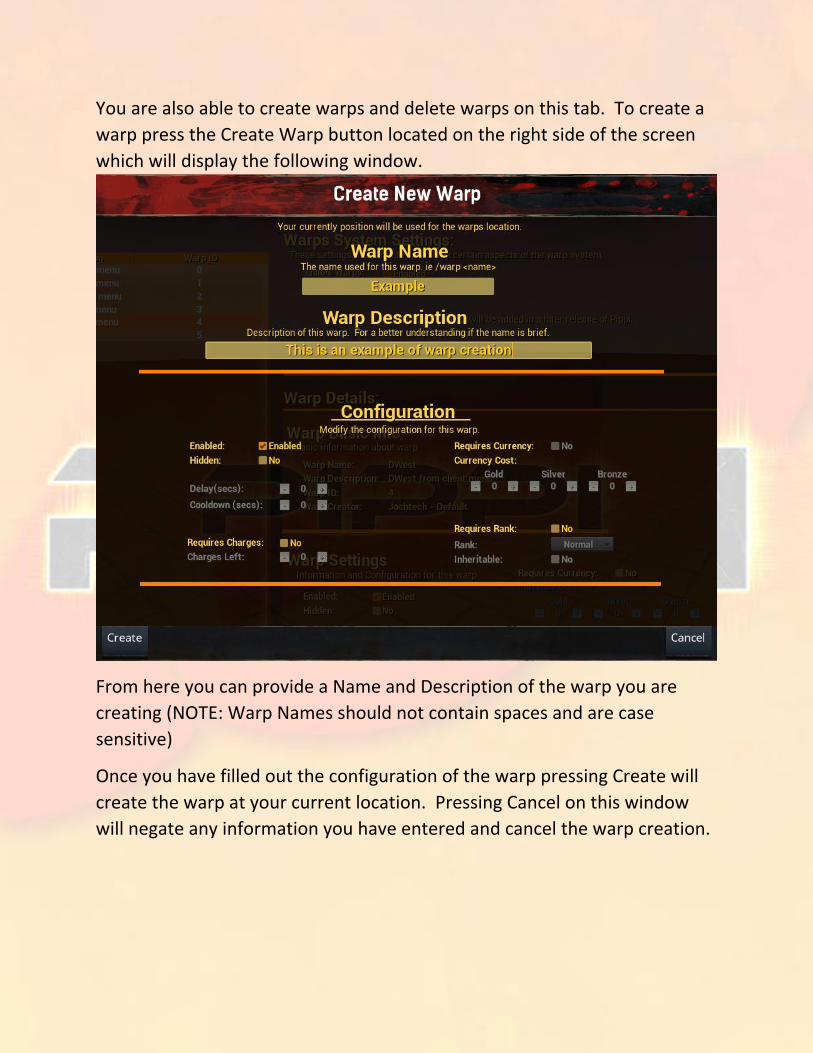
You are also able to create warps and delete warps on this tab. To create a
warp press the Create Warp button located on the right side of the screen
which will display the following window.
From here you can provide a Name and Description of the warp you are
creating (NOTE: Warp Names should not contain spaces and are case
sensitive)
Once you have filled out the configuration of the warp pressing Create will
create the warp at your current location. Pressing Cancel on this window
will negate any information you have entered and cancel the warp creation.
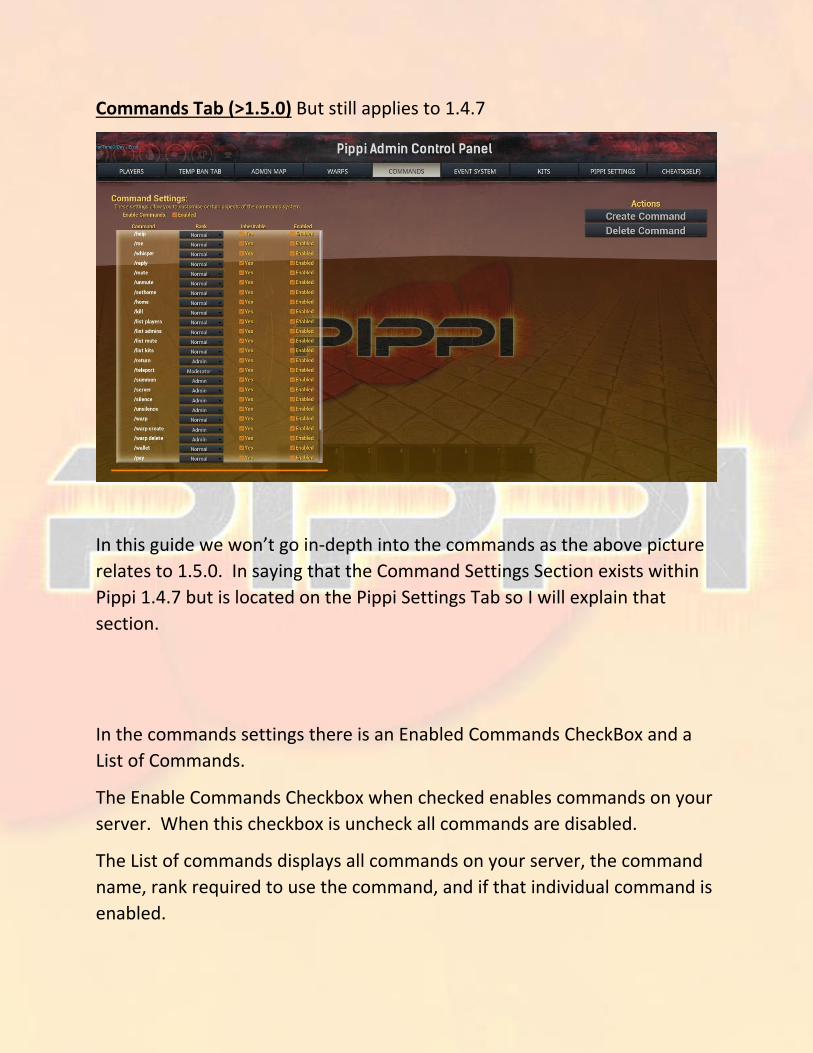
Commands Tab (>1.5.0) But still applies to 1.4.7
In this guide we won’t go in-depth into the commands as the above picture
relates to 1.5.0. In saying that the Command Settings Section exists within
Pippi 1.4.7 but is located on the Pippi Settings Tab so I will explain that
section.
In the commands settings there is an Enabled Commands CheckBox and a
List of Commands.
The Enable Commands Checkbox when checked enables commands on your
server. When this checkbox is uncheck all commands are disabled.
The List of commands displays all commands on your server, the command
name, rank required to use the command, and if that individual command is
enabled.
Command – This is the command used to execute the command through
the Chat Window.
Rank – This is the rank required to use the command
Inheritable - Sets whether the rank requirements are inheritable, meaning is
the specified required rank solely allowed to use this command or are higher
ranks allowed to use this as well. An example of this would be a VIP Rank
required command with the inheritance disabled would only permit VIP
players to use the command. If it inheritance was enabled then Moderators,
Admins would also be able to use this command since they are of high rank.
Enabled - Enable or Disable the command.
Event System Tab (>1.5.x) Does not apply to 1.4.7
Under construction
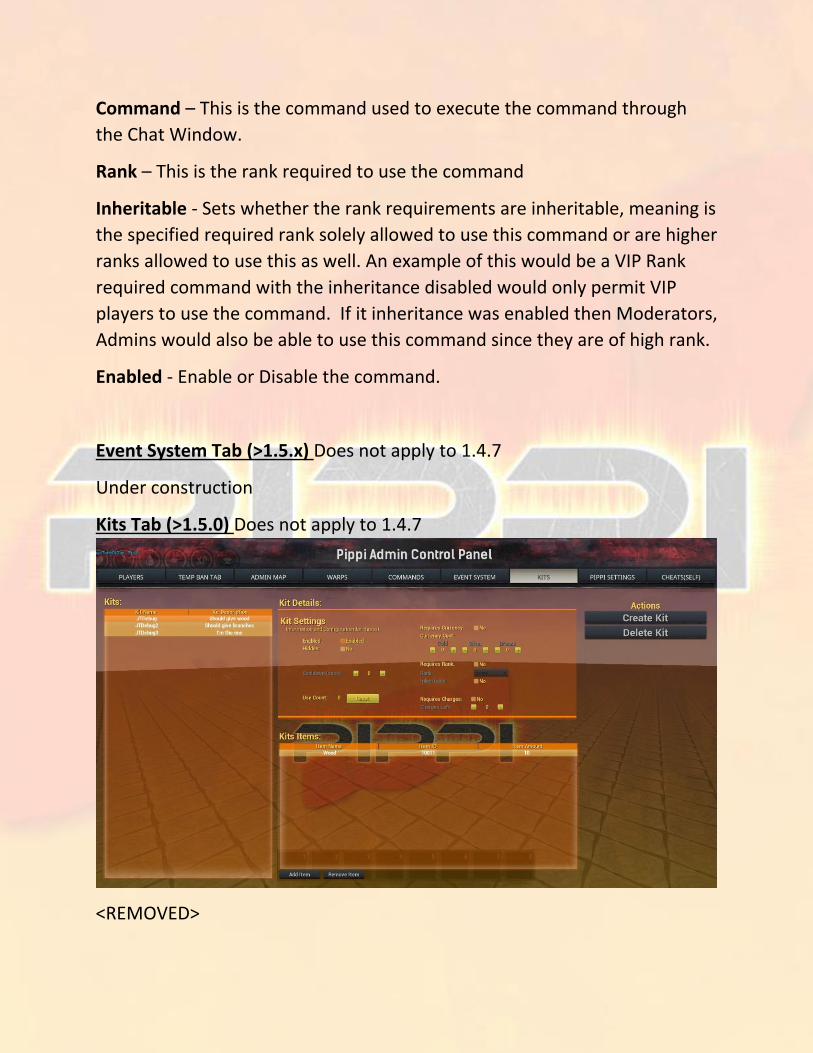
Kits Tab (>1.5.0) Does not apply to 1.4.7
<REMOVED>
Pippi Settings Tab
The Pippi Settings is made up of multiple System Settings. These include
Chat Settings, Rules Settings, Announcement Settings, Map Settings, MOTD
Settings and Pippi Info.
NOTE: If you are using 1.4.7 then this tab will also contain the Commands
Settings as pictured in the Commands Tab section of this guide.
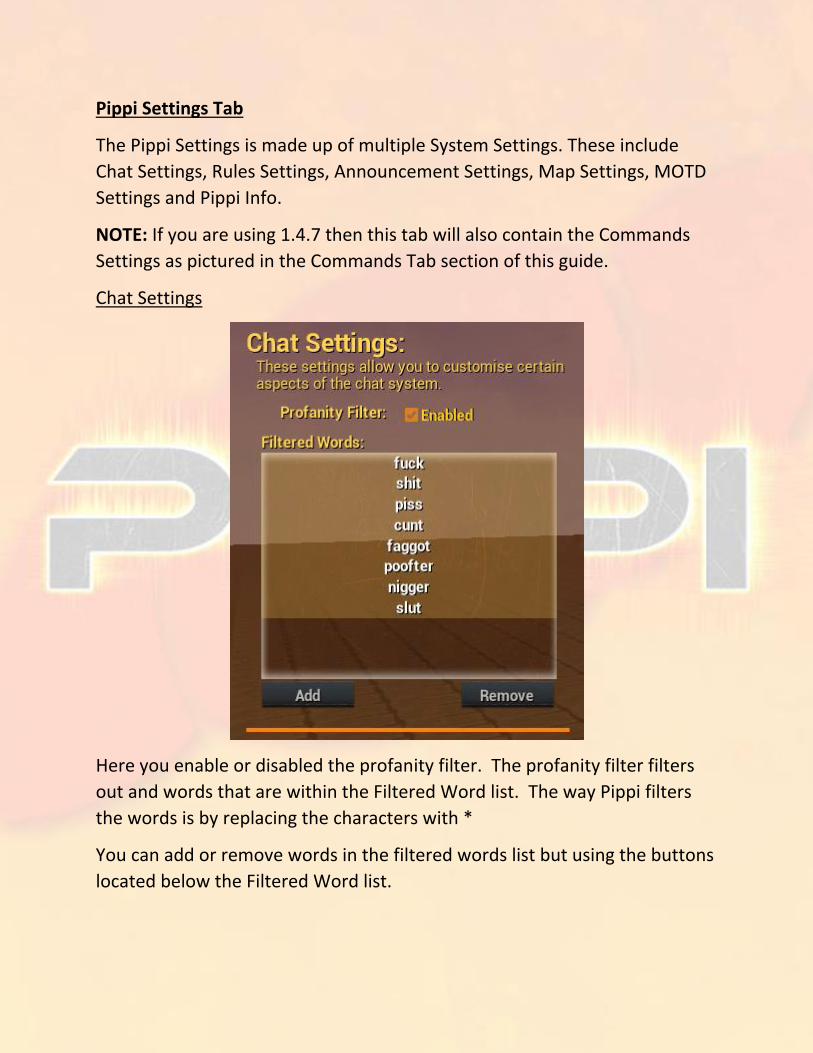
Chat Settings
Here you enable or disabled the profanity filter. The profanity filter filters
out and words that are within the Filtered Word list. The way Pippi filters
the words is by replacing the characters with *
You can add or remove words in the filtered words list but using the buttons
located below the Filtered Word list.
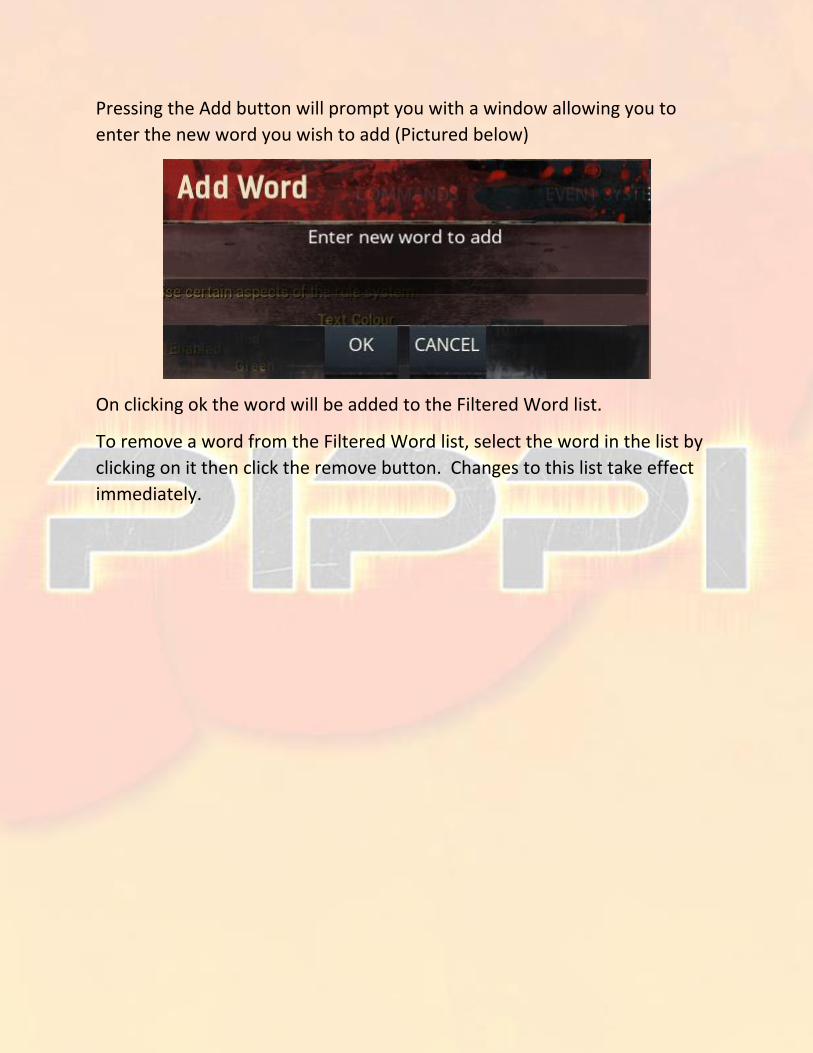
Pressing the Add button will prompt you with a window allowing you to
enter the new word you wish to add (Pictured below)
On clicking ok the word will be added to the Filtered Word list.
To remove a word from the Filtered Word list, select the word in the list by
clicking on it then click the remove button. Changes to this list take effect
immediately.
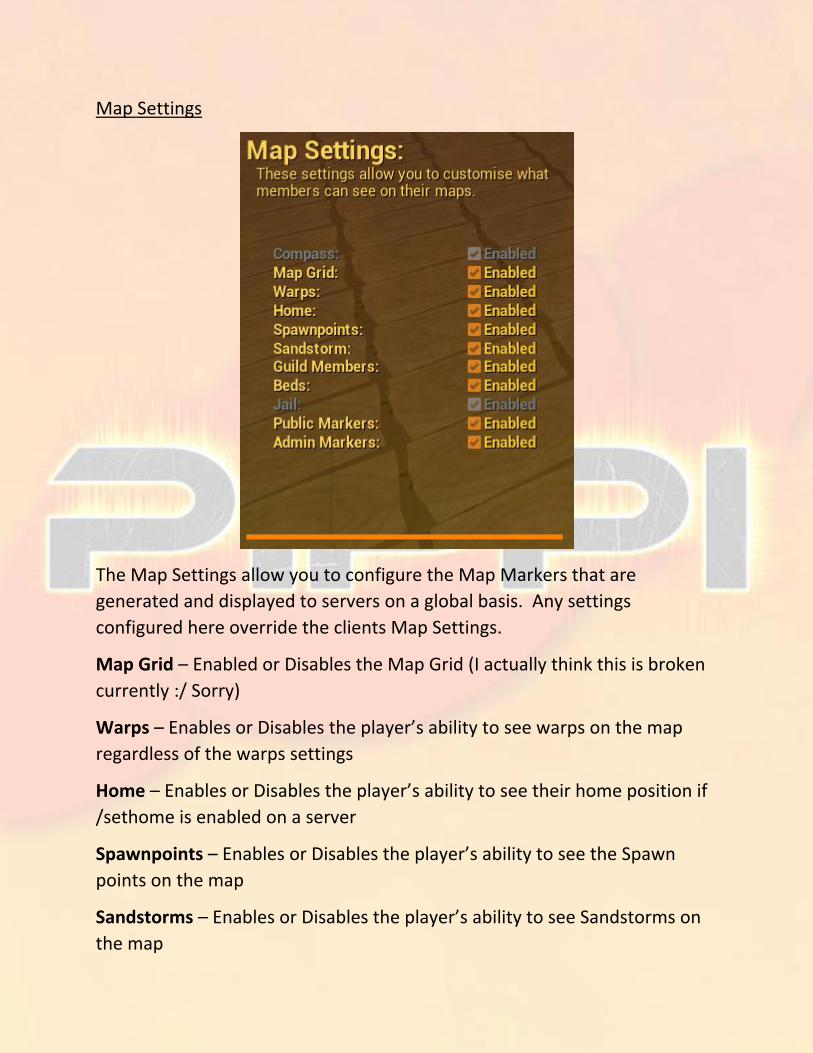
Map Settings
The Map Settings allow you to configure the Map Markers that are
generated and displayed to servers on a global basis. Any settings
configured here override the clients Map Settings.
Map Grid – Enabled or Disables the Map Grid (I actually think this is broken
currently :/ Sorry)
Warps – Enables or Disables the player’s ability to see warps on the map
regardless of the warps settings
Home – Enables or Disables the player’s ability to see their home position if
/sethome is enabled on a server
Spawnpoints – Enables or Disables the player’s ability to see the Spawn
points on the map
Sandstorms – Enables or Disables the player’s ability to see Sandstorms on
the map
Guild Members – Enables or Disables the player’s ability to see Guild
Members on the Map
Beds – Enables or Disables the player’s ability to see their Bed on the Map
(Only the one they will respawn at on death)
Private Markers (Personal Markers) - Enables or Disables the player’s ability
to see their Personal Markers on the Map (I have no idea why it’s not there
:/ Some pixies must have stolen it)
Public Markers (Guild Markers) - Enables or Disables the player’s ability to
see their Guild Member’s Guild Markers on the Map
Admin Markers – Enables or Disables then player’s ability to see markers set
by admins (>1.5.0)
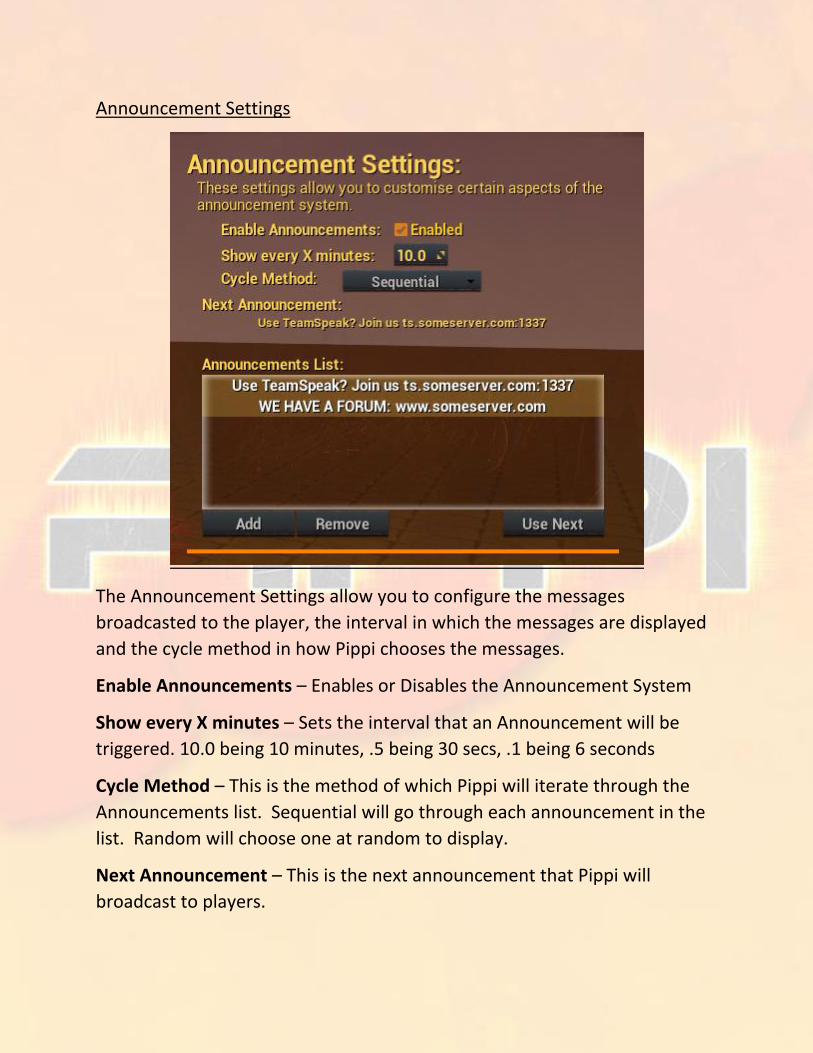
Announcement Settings
The Announcement Settings allow you to configure the messages
broadcasted to the player, the interval in which the messages are displayed
and the cycle method in how Pippi chooses the messages.
Enable Announcements – Enables or Disables the Announcement System
Show every X minutes – Sets the interval that an Announcement will be
triggered. 10.0 being 10 minutes, .5 being 30 secs, .1 being 6 seconds
Cycle Method – This is the method of which Pippi will iterate through the
Announcements list. Sequential will go through each announcement in the
list. Random will choose one at random to display.
Next Announcement – This is the next announcement that Pippi will
broadcast to players.
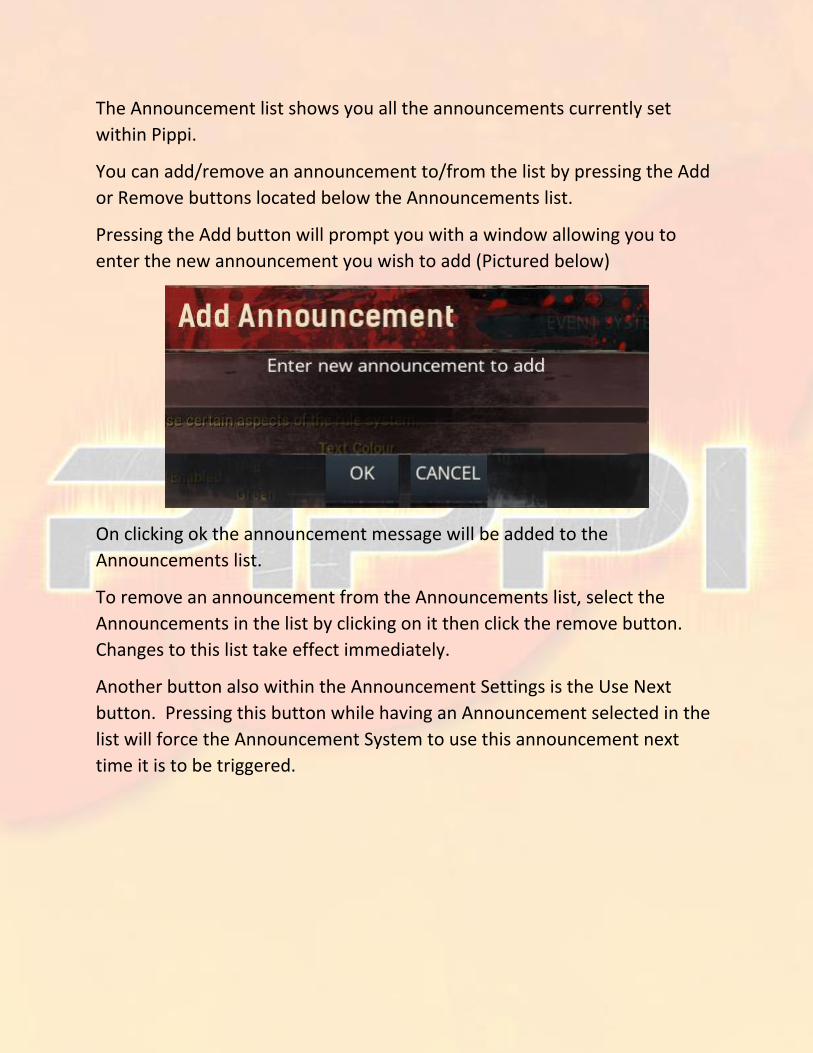
The Announcement list shows you all the announcements currently set
within Pippi.
You can add/remove an announcement to/from the list by pressing the Add
or Remove buttons located below the Announcements list.
Pressing the Add button will prompt you with a window allowing you to
enter the new announcement you wish to add (Pictured below)
On clicking ok the announcement message will be added to the
Announcements list.
To remove an announcement from the Announcements list, select the
Announcements in the list by clicking on it then click the remove button.
Changes to this list take effect immediately.
Another button also within the Announcement Settings is the Use Next
button. Pressing this button while having an Announcement selected in the
list will force the Announcement System to use this announcement next
time it is to be triggered.
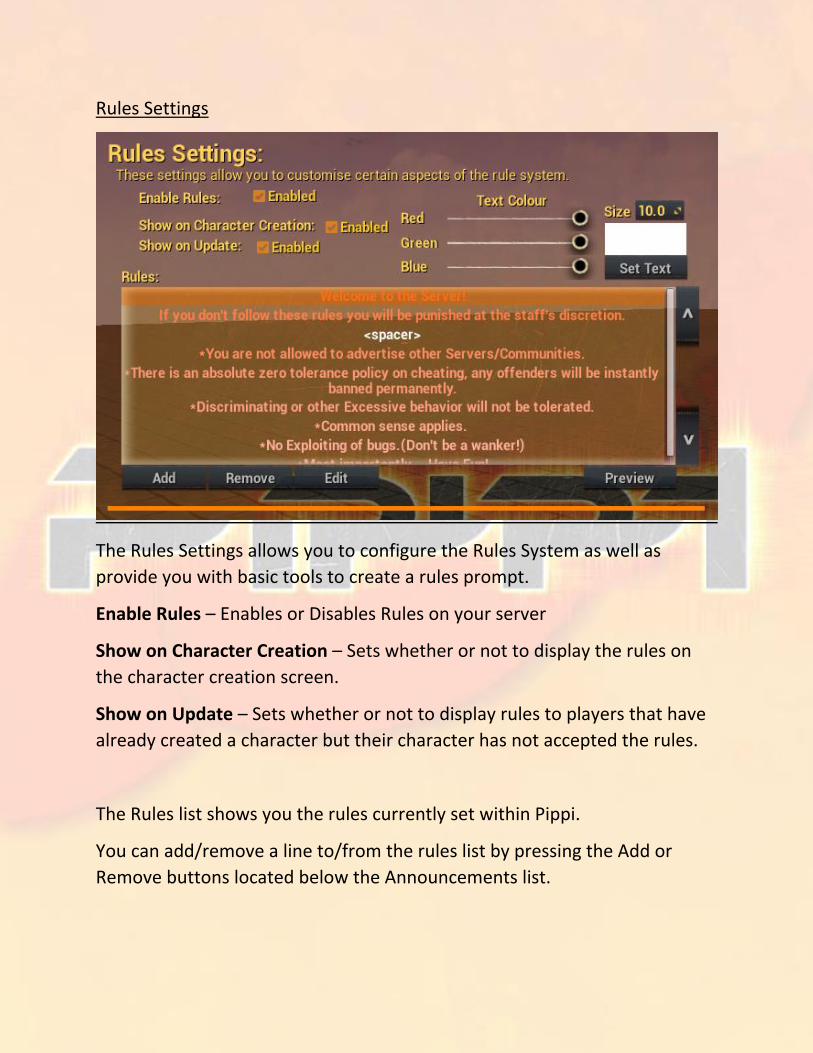
Rules Settings
The Rules Settings allows you to configure the Rules System as well as
provide you with basic tools to create a rules prompt.
Enable Rules – Enables or Disables Rules on your server
Show on Character Creation – Sets whether or not to display the rules on
the character creation screen.
Show on Update – Sets whether or not to display rules to players that have
already created a character but their character has not accepted the rules.
The Rules list shows you the rules currently set within Pippi.
You can add/remove a line to/from the rules list by pressing the Add or
Remove buttons located below the Announcements list.
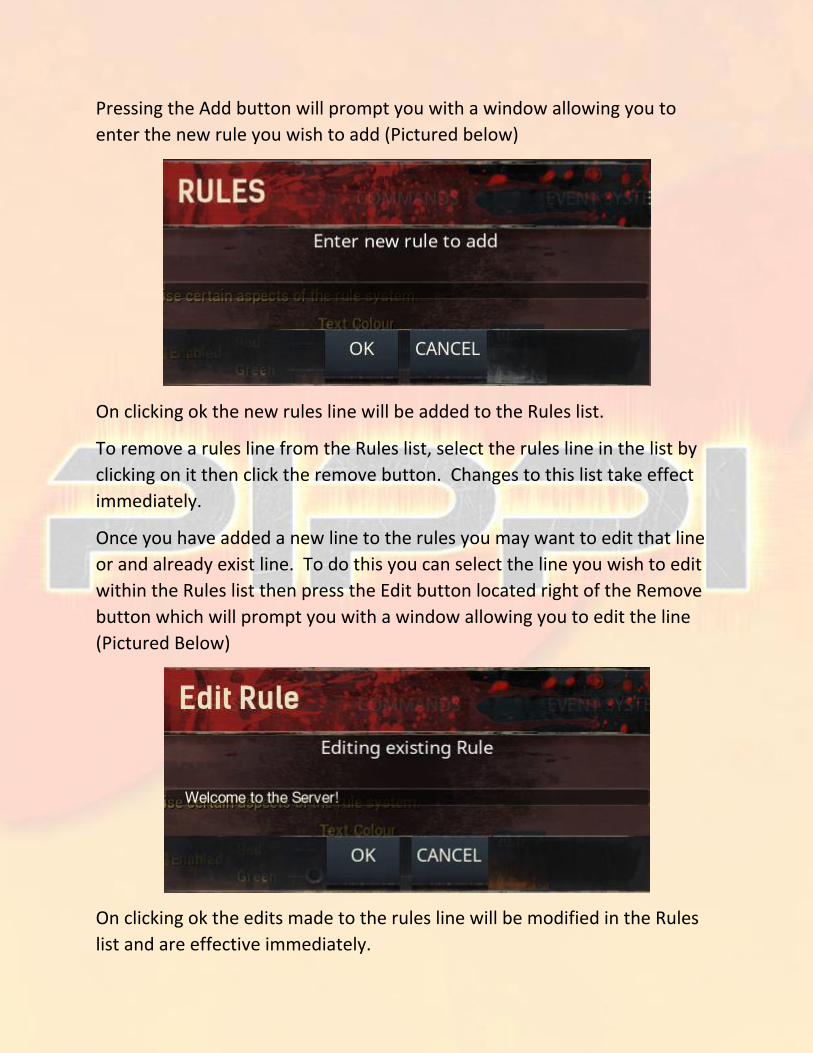
Pressing the Add button will prompt you with a window allowing you to
enter the new rule you wish to add (Pictured below)
On clicking ok the new rules line will be added to the Rules list.
To remove a rules line from the Rules list, select the rules line in the list by
clicking on it then click the remove button. Changes to this list take effect
immediately.
Once you have added a new line to the rules you may want to edit that line
or and already exist line. To do this you can select the line you wish to edit
within the Rules list then press the Edit button located right of the Remove
button which will prompt you with a window allowing you to edit the line
(Pictured Below)
On clicking ok the edits made to the rules line will be modified in the Rules
list and are effective immediately.

You can move a Rules lines position by using the Arrow buttons located on
the right of the Rules list.
To change the font size or colour of a Rules line, select the line that you wish
to make the changes to, then using the colour sliders and font size make the
adjustments to your liking. Once you are happy with the changes press the
Set Text button to set the changes. (Pictured Below)
If you wish to preview what the Rules will look like when presented to a
player, you can use the Preview button located Bottom Right of the Rules
List. This will pop up a window showing you what the Rules will look like.

MOTD Settings
The MOTD Settings allows you to customize the MOTD that is displayed
when a player’s Chat Window is initialized.
Enabled MOTD – Enables or Disables the MOTD being displayed
Show on Login – No Used currently
The Message Of The Day list functions very similar to how the Rules list
functions with the Adding/Remove/Editing with the only exception being
that you cannot set the font size as this is a client setting.
Pippi Info
The Pippi Info displays the current version of Pippi running on your server,
the date that you first installed Pippi on your server, and the date that you
updated Pippi on your server.
Cheats(Self) Tab
This tab is just the original Funcom Admin Panel with minor GUI changes.
Everything here should function as normal
Using Pippi
Now that you have configured Pippi to how you would like it, it’s time to
start using it.
Chat
The Chat has gone through a few changes from the normal vanilla chat. To
open the chat window you use the normal GlobalChat key binding that you
would normally use. By default I believe this is Enter.
Once the chat window is opened, sending messages is just like before in
typing the message then pressing enter to send it.
The first change we will discuss is Channel Switching, a player can switch
between channels by pressing the TAB key when the Chat Window has
focus. The current channels available are Global, Local, Clan, Whisper.
Global – These messages are sent to everyone who is in Global chat
Local – These messages are only received by local players
Clan – These messages are only received by Guild Members
Whisper – If you have a whisper recipient then messages sent in this
channel are treated as whispers to the last player you received or sent a
whisper to/from
To change the font size of your chat text you can use the /fontsize
<number> to change it or use the key combo CTRL-SHIFT-ALT and
MouseScroll to change the font size.
The Chat Window may also be expanded, to do this simply press the + on
your numpad whilst the Chat Window has focus and that will expand the
Chat Window
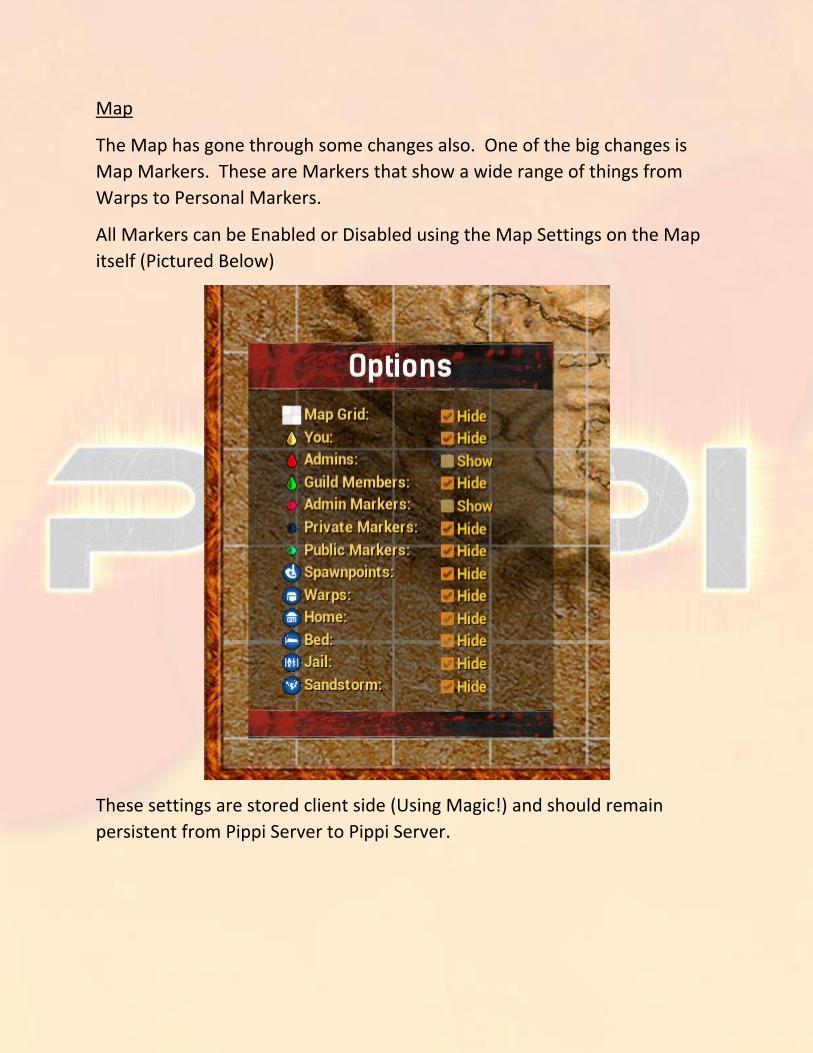
Map
The Map has gone through some changes also. One of the big changes is
Map Markers. These are Markers that show a wide range of things from
Warps to Personal Markers.
All Markers can be Enabled or Disabled using the Map Settings on the Map
itself (Pictured Below)
These settings are stored client side (Using Magic!) and should remain
persistent from Pippi Server to Pippi Server.
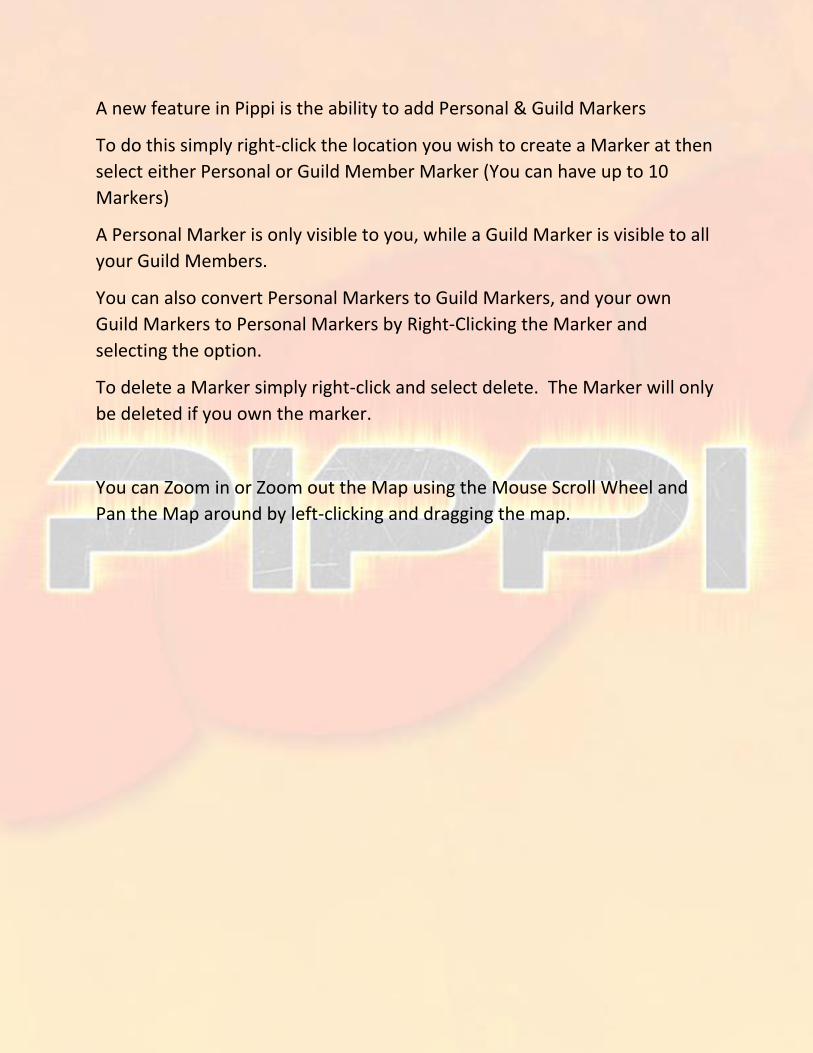
A new feature in Pippi is the ability to add Personal & Guild Markers
To do this simply right-click the location you wish to create a Marker at then
select either Personal or Guild Member Marker (You can have up to 10
Markers)
A Personal Marker is only visible to you, while a Guild Marker is visible to all
your Guild Members.
You can also convert Personal Markers to Guild Markers, and your own
Guild Markers to Personal Markers by Right-Clicking the Marker and
selecting the option.
To delete a Marker simply right-click and select delete. The Marker will only
be deleted if you own the marker.
You can Zoom in or Zoom out the Map using the Mouse Scroll Wheel and
Pan the Map around by left-clicking and dragging the map.

I’m sure that I have missed a few things, or haven’t gone in-depth in some
areas. Since this is the first version of this guide it can only get better right?
Haha
Kind Regards,
Joshtech