Embed Size (px)
Citation preview
Pineapple & Posiesby Cindy Mann-Vitale
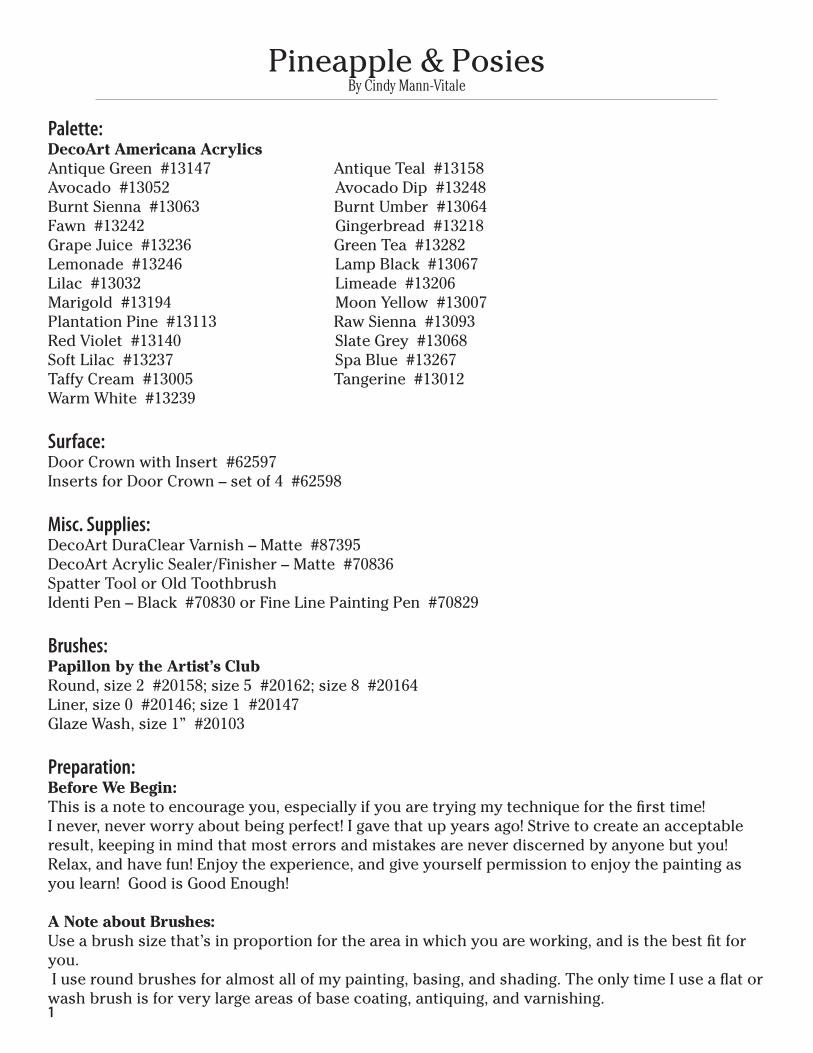
Pineapple & PosiesBy Cindy Mann-Vitale
Palette: DecoArt Americana AcrylicsAntique Green #13147 Antique Teal #13158Avocado #13052 Avocado Dip #13248Burnt Sienna #13063 Burnt Umber #13064Fawn #13242 Gingerbread #13218Grape Juice #13236 Green Tea #13282Lemonade #13246 Lamp Black #13067Lilac #13032 Limeade #13206Marigold #13194 Moon Yellow #13007Plantation Pine #13113 Raw Sienna #13093Red Violet #13140 Slate Grey #13068Soft Lilac #13237 Spa Blue #13267Taffy Cream #13005 Tangerine #13012Warm White #13239
Surface:Door Crown with Insert #62597Inserts for Door Crown – set of 4 #62598
Misc. Supplies:DecoArt DuraClear Varnish – Matte #87395DecoArt Acrylic Sealer/Finisher – Matte #70836Spatter Tool or Old ToothbrushIdenti Pen – Black #70830 or Fine Line Painting Pen #70829
Brushes: Papillon by the Artist’s ClubRound, size 2 #20158; size 5 #20162; size 8 #20164Liner, size 0 #20146; size 1 #20147Glaze Wash, size 1” #20103
Preparation:Before We Begin:This is a note to encourage you, especially if you are trying my technique for the fi rst time!I never, never worry about being perfect! I gave that up years ago! Strive to create an acceptable result, keeping in mind that most errors and mistakes are never discerned by anyone but you!Relax, and have fun! Enjoy the experience, and give yourself permission to enjoy the painting as you learn! Good is Good Enough!
A Note about Brushes: Use a brush size that’s in proportion for the area in which you are working, and is the best fi t for you. I use round brushes for almost all of my painting, basing, and shading. The only time I use a fl at or wash brush is for very large areas of base coating, antiquing, and varnishing.1
Fill in holes, if needed, lightly sand, and wipe away dust.
I like to seal the surface with a light application of the Dura Clear Matte Varnish, slightly diluted with water, in a ratio of approximately 50-50. Allow to dry, then lightly sand the surface to smooth. The surface should not be overly slick or smooth, as in a glass like surface. You should be able to discern a slight texture to the surface when brushing your fi ngertips over the wood. Clean of the surface of any residue or dust before transferring the pattern.
I usually transfer the entire design onto my board, and paint the background and base coat around each design element. This is, of course, a tedious process. What can I say? It’s a “Cindy” thing! However, it is more reasonable to base coat the majority, if not the entire board surface with the primary background color, allow to dry, and then transfer all the design elements. If you are working with a pale or white background base coat, it works well to base in the entire surface, since painting over a very light and neutral color does not distort the next paint applica-tion. If the background is a dark color however, then I suggest an undercoating of white to lift the base coating back up to the desired level for best results.
If the surface or grain of the wood raises during the basing process, then sand lightly with very fi ne grit sandpaper, or a piece of brown paper bag. As I have mentioned above, do not sand the surface until it becomes slick and shiny. If you only have the very fi ne grit sandpaper, be sure to use a very light touch. Using the sandpaper will most likely require an additional coat of paint. With the brown paper I fi nd it does not require any touch up painting.
If the surface becomes too slick, it will hinder the shading mixture from adhering. The paint mix-ture will slide over the surface and smear. My shading process works much better if the surface is slightly rough, or has “tooth”. In that way, the shading mixture grabs into the grain. Keep in mind that the results I achieve are a result of many layers, or applications of the shading applications, and are not accomplished in one simple step. In the fi rst steps of the process, the results may be slightly blotchy or mottled. Do not be concerned with this, but simply allow to dry completely, then apply another application until you are pleased with the results.
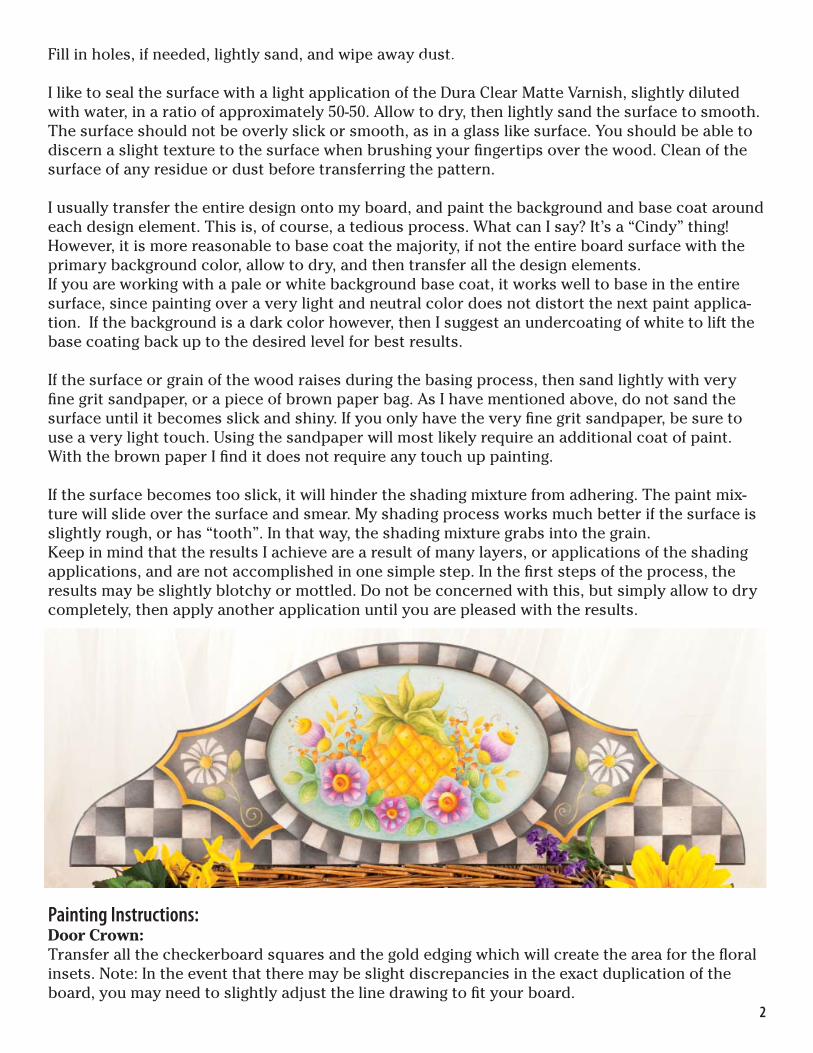
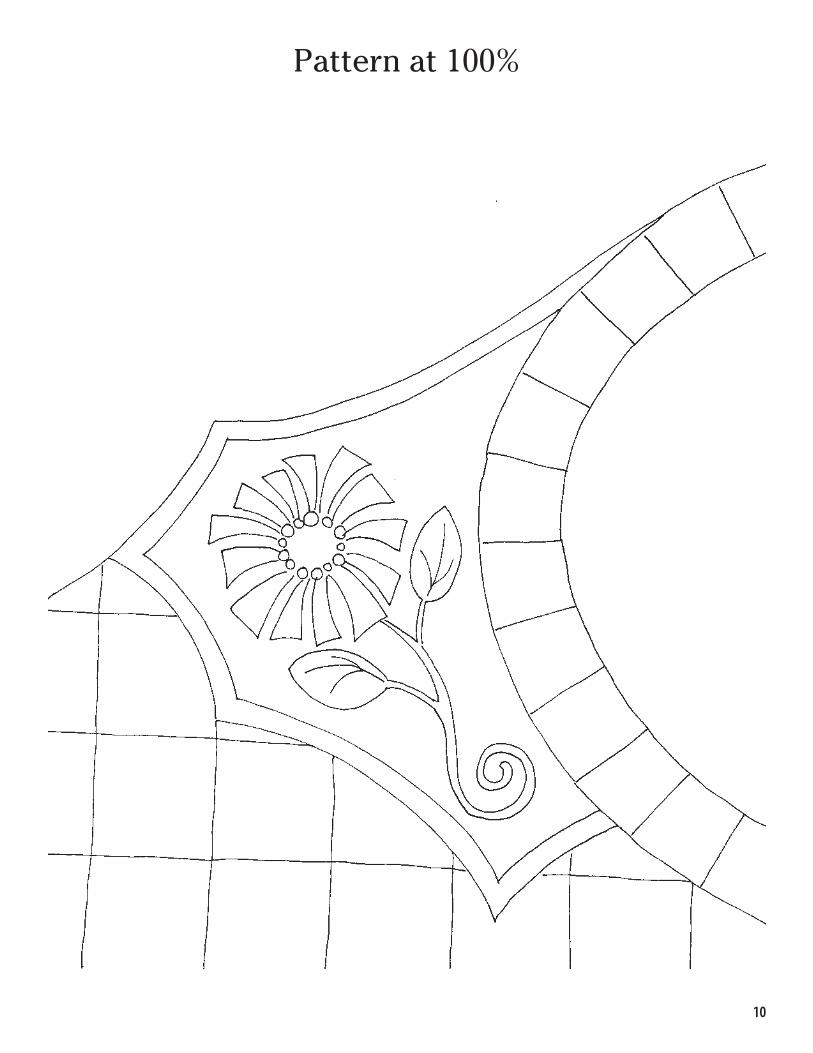
Painting Instructions:Door Crown:Transfer all the checkerboard squares and the gold edging which will create the area for the fl oral insets. Note: In the event that there may be slight discrepancies in the exact duplication of the board, you may need to slightly adjust the line drawing to fi t your board.
2
ANGEL #1- “WILMA”
Do Not Transfer the Following:The fl ower, stem or leaves. This will be transferred after the base coating and shading are com-pleted.
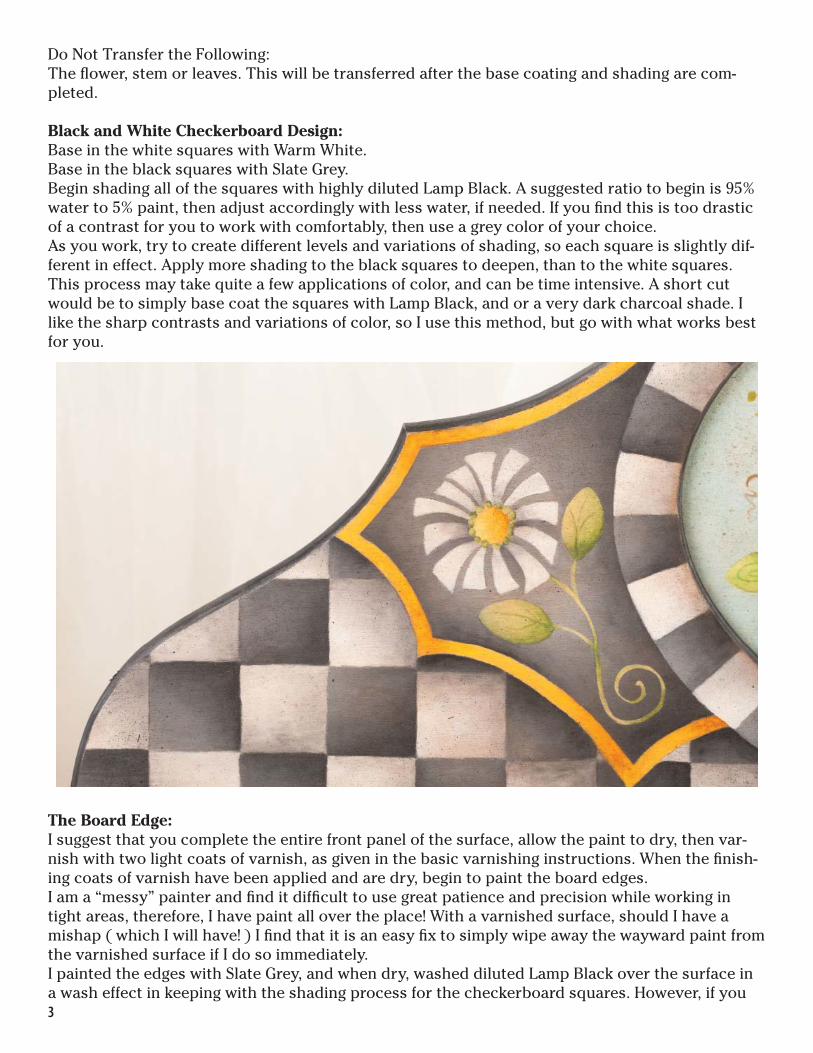
Black and White Checkerboard Design:Base in the white squares with Warm White.Base in the black squares with Slate Grey.Begin shading all of the squares with highly diluted Lamp Black. A suggested ratio to begin is 95% water to 5% paint, then adjust accordingly with less water, if needed. If you fi nd this is too drastic of a contrast for you to work with comfortably, then use a grey color of your choice. As you work, try to create different levels and variations of shading, so each square is slightly dif-ferent in effect. Apply more shading to the black squares to deepen, than to the white squares. This process may take quite a few applications of color, and can be time intensive. A short cut would be to simply base coat the squares with Lamp Black, and or a very dark charcoal shade. I like the sharp contrasts and variations of color, so I use this method, but go with what works best for you.
The Board Edge:I suggest that you complete the entire front panel of the surface, allow the paint to dry, then var-nish with two light coats of varnish, as given in the basic varnishing instructions. When the fi nish-ing coats of varnish have been applied and are dry, begin to paint the board edges. I am a “messy” painter and fi nd it diffi cult to use great patience and precision while working in tight areas, therefore, I have paint all over the place! With a varnished surface, should I have a mishap ( which I will have! ) I fi nd that it is an easy fi x to simply wipe away the wayward paint from the varnished surface if I do so immediately. I painted the edges with Slate Grey, and when dry, washed diluted Lamp Black over the surface in a wash effect in keeping with the shading process for the checkerboard squares. However, if you 3
want a faster and easier application, simply paint the board edges with Lamp Black or a dark char-coal grey.
Gold Band: Base coat with Moon Yellow. Shade some areas with Raw Sienna, leaving “open” areas to provide contrast with the base coat.
Floral Design:Transfer the fl ower center, the petals, the stem and the leaves.Do not transfer the dots around the fl ower center, or the veining on the leaves. Those will be transferred after the base coating and shading are complete.
The white fl ower: Base in the fl ower center with Taffy Cream. Shade with Raw Sienna.Base in the petals with Warm White. Shade with highly diluted Lamp Black. Add the green dots around the outside center of the fl ower with the tip of a liner brush, with Green Tea. Allow to dry, then use diluted Avocado and lightly shade over the dots with a liner brush.
The Stem and Leaves:Base coat with Green Tea. Shade with diluted Avocado. Paint the veining on the leaves with dilut-ed Avocado and a liner brush.
Varnishing:When all the paint has thoroughly dried, brush on a thin, even application of varnish. Using a damp glaze/ wash brush, dip into diluted varnish ( approx. 50-50 varnish to water ) and brush on a light even coat. Allow to dry and repeat for complete coverage. I do not like a heavy, shiny fi nish. The surface should be adequately sealed, so when the antiquing is brushed on later, it will not grab into the grain of the wood and cause dark staining.
Antiquing:Allow the varnish to completely dry, and then apply a wash of highly diluted Burnt Umber to cre-ate an antiqued effect with a large brush. I prefer a 1 inch glaze, or wash brush. Fill damp brush with mixture, and work over the surface until brush is empty. Work in grids, brush mixture over the surface, pulling out as far as possible to empty the brush.Refi ll brush, and repeat until entire surface is covered, blending the edges as you work, for even coverage.The process can be repeated to darken, if needed, when the fi rst application has completely dried. You can also add additional applications of the Burnt Umber wash to accent certain areas, such as the corners, with the glaze brush, or a small round brush for smaller areas, just as you would ap-ply the shading technique.Note about Inking:For this project I decided against inking all the design elements. Use your own judgment as to what details you want to add to your project. If you decide to ink, then it should be drawn on before the spattering process.
Spattering:Spatter the surface with a spatter tool or toothbrush, using Lamp Black. I suggest that you test the spatter pattern before spattering your project to be sure the paint is the right consistency before going directly to the surface.
4
5
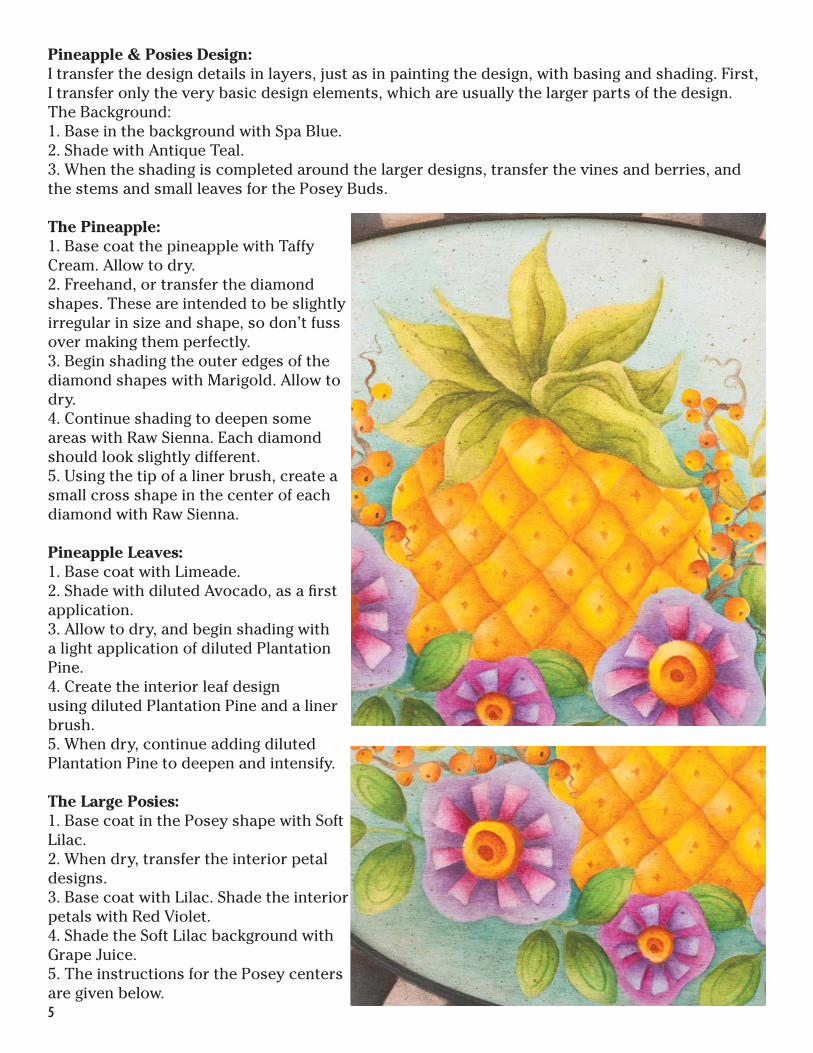
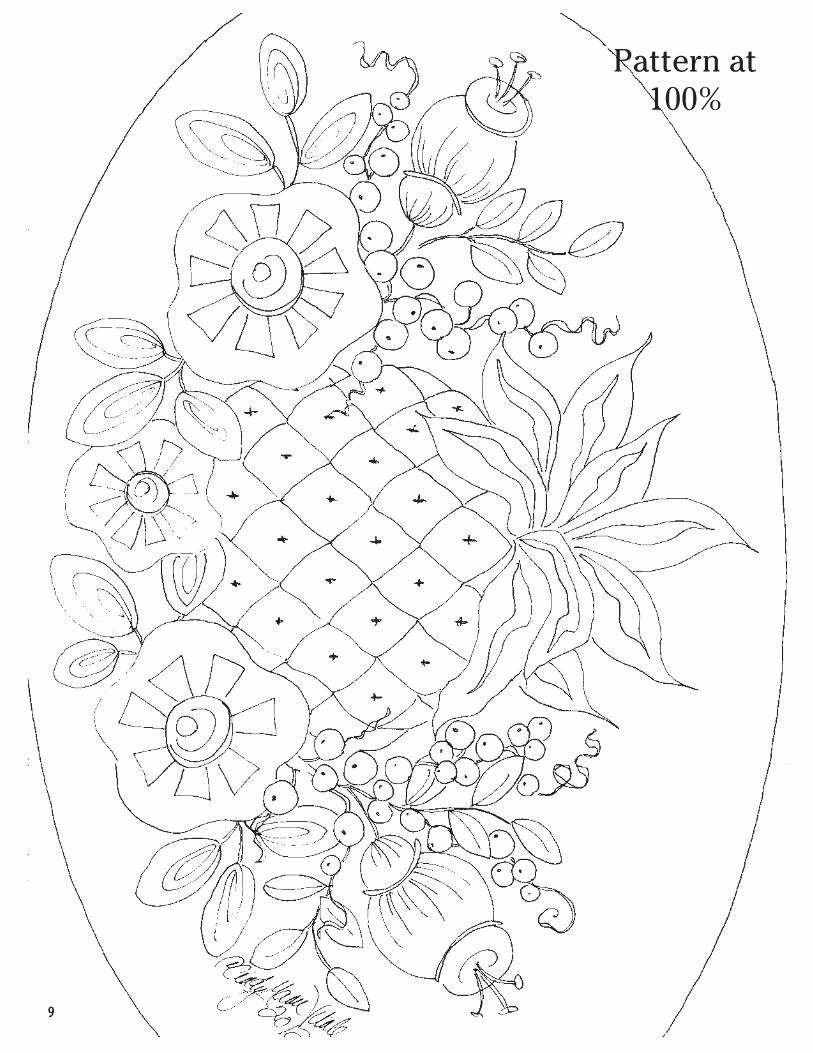
Pineapple & Posies Design:I transfer the design details in layers, just as in painting the design, with basing and shading. First, I transfer only the very basic design elements, which are usually the larger parts of the design.The Background:1. Base in the background with Spa Blue. 2. Shade with Antique Teal. 3. When the shading is completed around the larger designs, transfer the vines and berries, and the stems and small leaves for the Posey Buds.
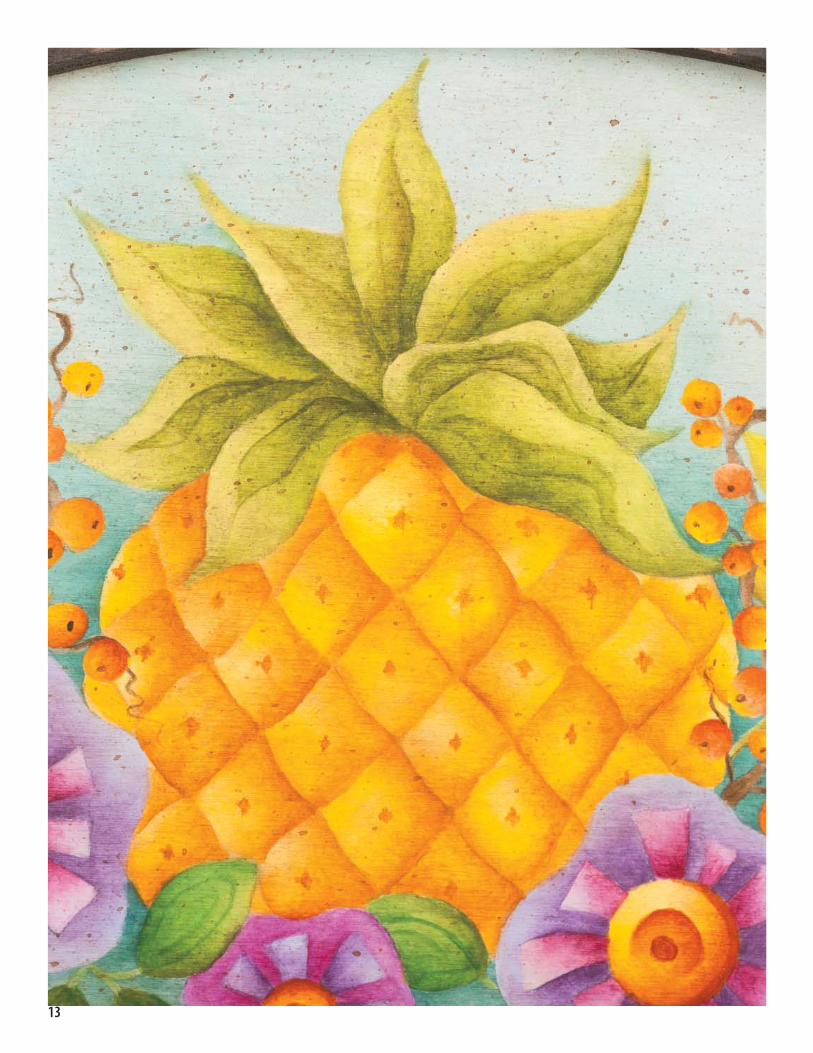
The Pineapple:1. Base coat the pineapple with Taffy Cream. Allow to dry. 2. Freehand, or transfer the diamond shapes. These are intended to be slightly irregular in size and shape, so don’t fuss over making them perfectly. 3. Begin shading the outer edges of the diamond shapes with Marigold. Allow to dry.4. Continue shading to deepen some areas with Raw Sienna. Each diamond should look slightly different. 5. Using the tip of a liner brush, create a small cross shape in the center of each diamond with Raw Sienna. Pineapple Leaves:1. Base coat with Limeade. 2. Shade with diluted Avocado, as a fi rst application. 3. Allow to dry, and begin shading with a light application of diluted Plantation Pine.4. Create the interior leaf design using diluted Plantation Pine and a liner brush. 5. When dry, continue adding diluted Plantation Pine to deepen and intensify.
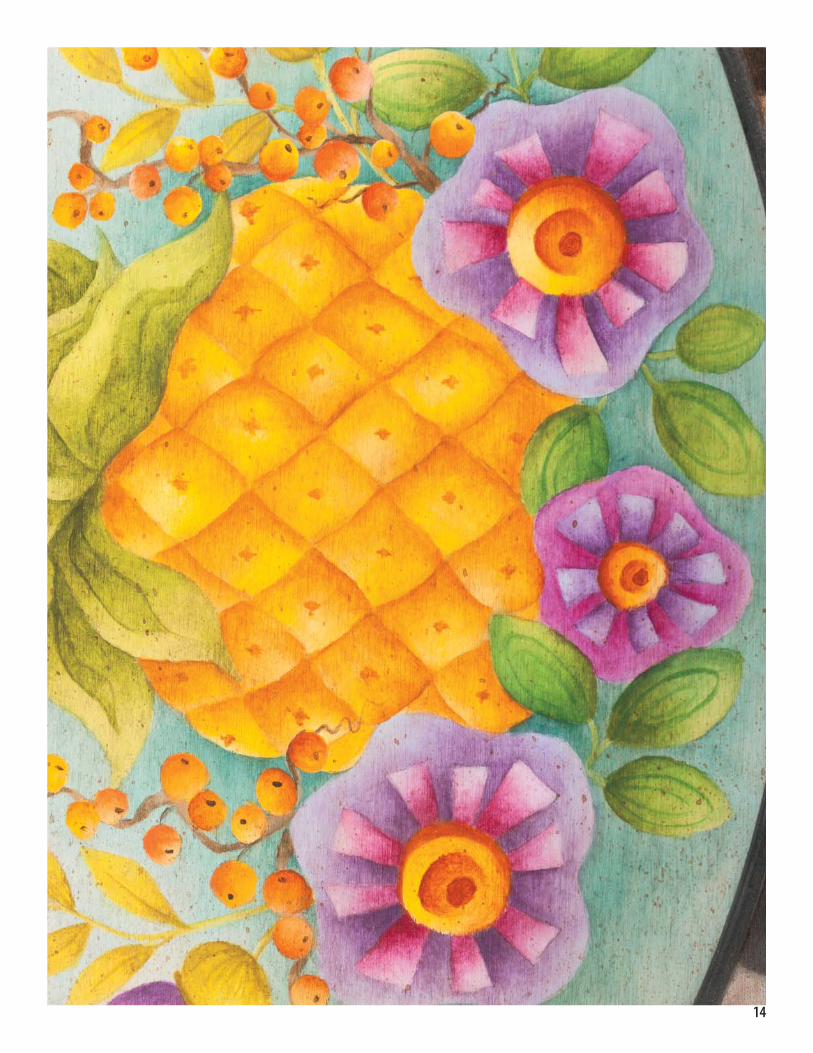
The Large Posies:1. Base coat in the Posey shape with Soft Lilac.2. When dry, transfer the interior petal designs. 3. Base coat with Lilac. Shade the interior petals with Red Violet.4. Shade the Soft Lilac background with Grape Juice. 5. The instructions for the Posey centers are given below.
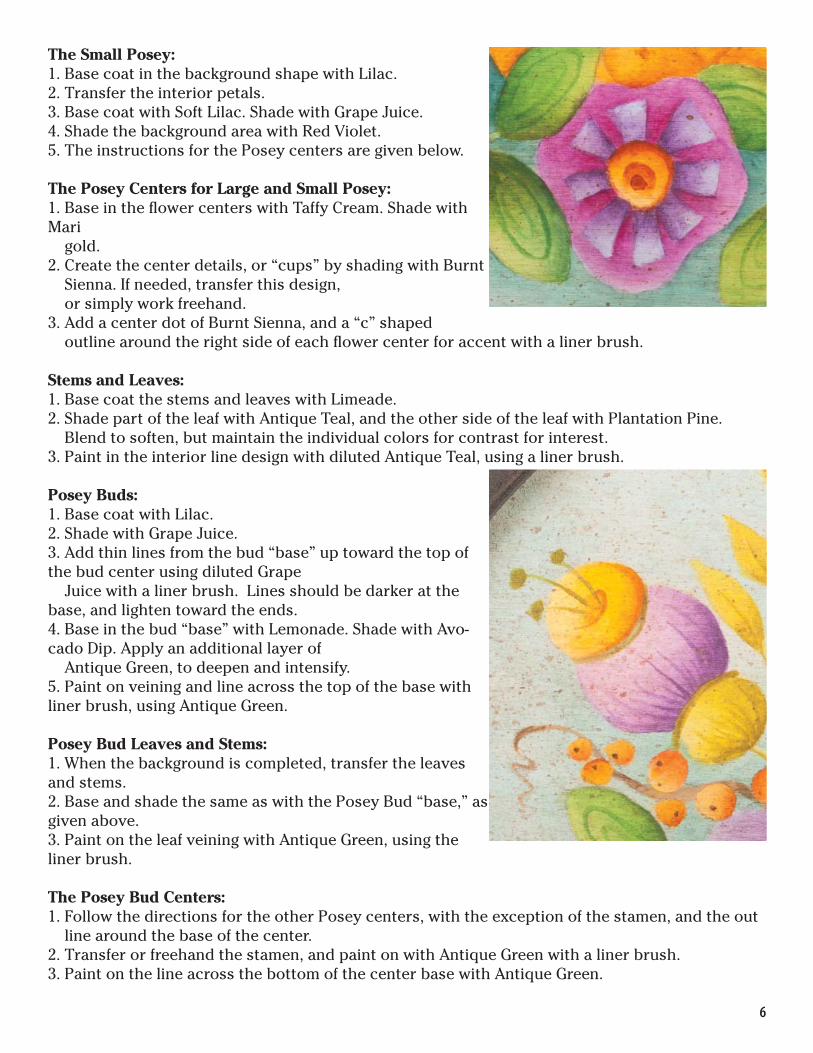
The Small Posey:1. Base coat in the background shape with Lilac.2. Transfer the interior petals.3. Base coat with Soft Lilac. Shade with Grape Juice.4. Shade the background area with Red Violet.5. The instructions for the Posey centers are given below.
The Posey Centers for Large and Small Posey: 1. Base in the fl ower centers with Taffy Cream. Shade with Mari gold. 2. Create the center details, or “cups” by shading with Burnt Sienna. If needed, transfer this design, or simply work freehand. 3. Add a center dot of Burnt Sienna, and a “c” shaped outline around the right side of each fl ower center for accent with a liner brush. Stems and Leaves: 1. Base coat the stems and leaves with Limeade. 2. Shade part of the leaf with Antique Teal, and the other side of the leaf with Plantation Pine. Blend to soften, but maintain the individual colors for contrast for interest.3. Paint in the interior line design with diluted Antique Teal, using a liner brush.
Posey Buds:1. Base coat with Lilac. 2. Shade with Grape Juice.3. Add thin lines from the bud “base” up toward the top of the bud center using diluted Grape Juice with a liner brush. Lines should be darker at the base, and lighten toward the ends.4. Base in the bud “base” with Lemonade. Shade with Avo-cado Dip. Apply an additional layer of Antique Green, to deepen and intensify. 5. Paint on veining and line across the top of the base with liner brush, using Antique Green.
Posey Bud Leaves and Stems:1. When the background is completed, transfer the leaves and stems.2. Base and shade the same as with the Posey Bud “base,” as given above. 3. Paint on the leaf veining with Antique Green, using the liner brush.
The Posey Bud Centers:1. Follow the directions for the other Posey centers, with the exception of the stamen, and the out line around the base of the center. 2. Transfer or freehand the stamen, and paint on with Antique Green with a liner brush. 3. Paint on the line across the bottom of the center base with Antique Green.
6
7
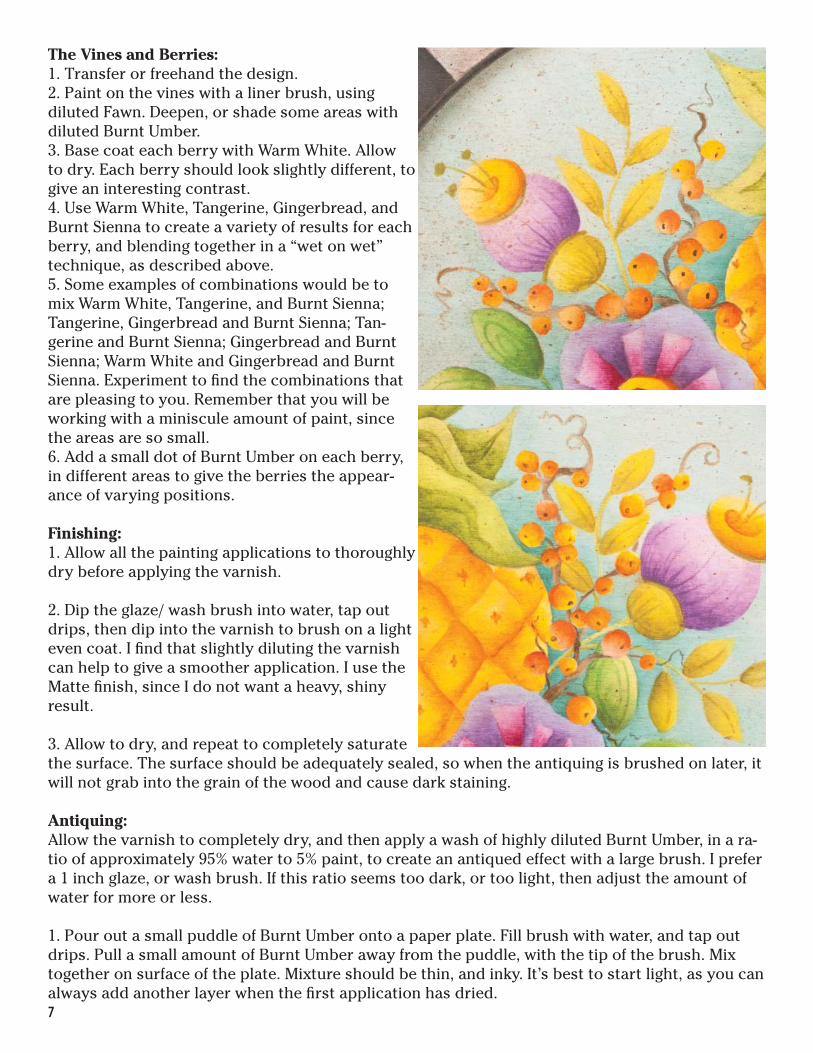
The Vines and Berries:1. Transfer or freehand the design. 2. Paint on the vines with a liner brush, using diluted Fawn. Deepen, or shade some areas with diluted Burnt Umber. 3. Base coat each berry with Warm White. Allow to dry. Each berry should look slightly different, to give an interesting contrast. 4. Use Warm White, Tangerine, Gingerbread, and Burnt Sienna to create a variety of results for each berry, and blending together in a “wet on wet” technique, as described above.5. Some examples of combinations would be to mix Warm White, Tangerine, and Burnt Sienna; Tangerine, Gingerbread and Burnt Sienna; Tan-gerine and Burnt Sienna; Gingerbread and Burnt Sienna; Warm White and Gingerbread and Burnt Sienna. Experiment to fi nd the combinations that are pleasing to you. Remember that you will be working with a miniscule amount of paint, since the areas are so small. 6. Add a small dot of Burnt Umber on each berry, in different areas to give the berries the appear-ance of varying positions.
Finishing:1. Allow all the painting applications to thoroughly dry before applying the varnish.
2. Dip the glaze/ wash brush into water, tap out drips, then dip into the varnish to brush on a light even coat. I fi nd that slightly diluting the varnish can help to give a smoother application. I use the Matte fi nish, since I do not want a heavy, shiny result.
3. Allow to dry, and repeat to completely saturate the surface. The surface should be adequately sealed, so when the antiquing is brushed on later, it will not grab into the grain of the wood and cause dark staining.
Antiquing:Allow the varnish to completely dry, and then apply a wash of highly diluted Burnt Umber, in a ra-tio of approximately 95% water to 5% paint, to create an antiqued effect with a large brush. I prefer a 1 inch glaze, or wash brush. If this ratio seems too dark, or too light, then adjust the amount of water for more or less.
1. Pour out a small puddle of Burnt Umber onto a paper plate. Fill brush with water, and tap out drips. Pull a small amount of Burnt Umber away from the puddle, with the tip of the brush. Mix together on surface of the plate. Mixture should be thin, and inky. It’s best to start light, as you can always add another layer when the fi rst application has dried.
8
2. Brush mixture over the surface, pulling out as far as possible to empty the brush. Refi ll brush, and repeat until entire surface is covered, blending the edges as you work, for even coverage.
3. You can add additional applications of the Burnt Umber wash when previous layers have dried. For added interest, accents can be added to corners, or specifi c areas of the design. Apply the us-ing the same method as with the shading technique.
Inking:As an option, you can outline the fi nished design with the Identi Pen or Fine Line Painting Pen, or enhance only certain areas of the design. Inking pulls out design elements and is an easy way to add fi ne details that would be diffi cult with a brush and paint. When using the pen, I usually out-line all shapes and designs. I opted for a softer look with this design, and did not add the inking.
Spattering:1. Pour out a small puddle of Burnt Umber onto a paper plate.2. Dip the tips of the toothbrush bristles into the edge of the paint puddle, or use a spatter tool of your choice.3. Test the spatter pattern on another surface. I use a large sheet of packing paper to ensure the paint is not too thick or too thin. 4. Spatter the surface, applying spattering to your own preference. For this design, I applied spattering what I would consider lightly.
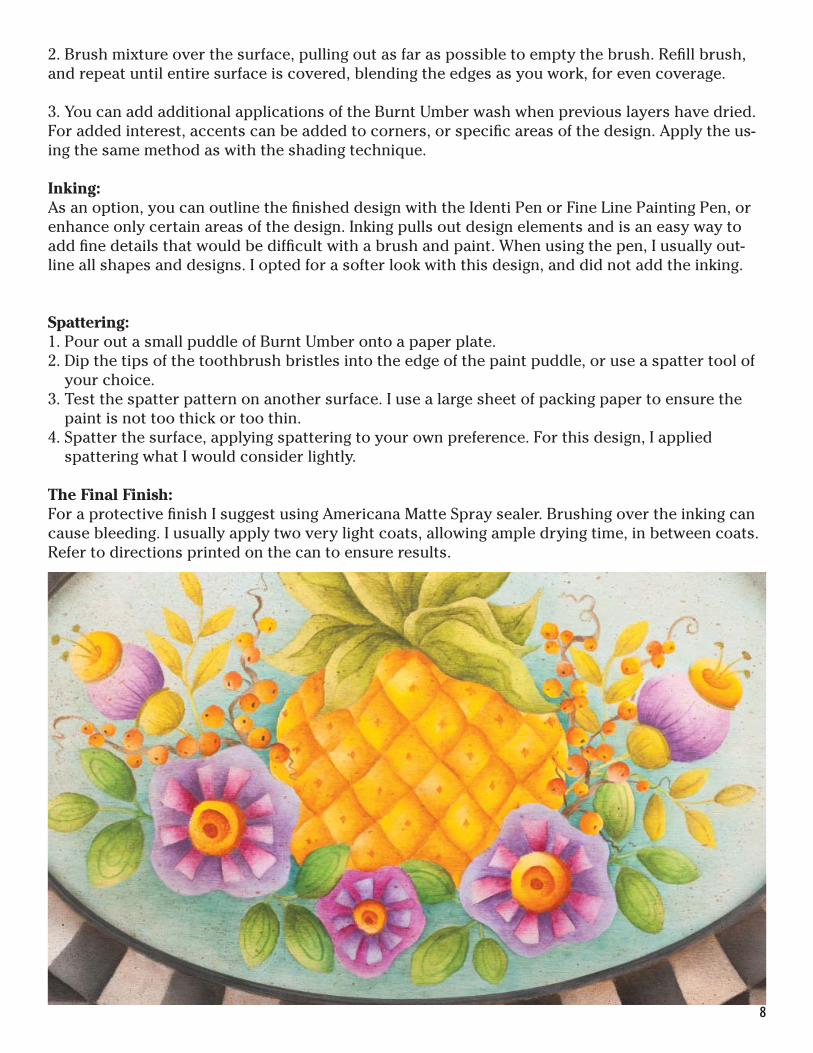
The Final Finish:For a protective fi nish I suggest using Americana Matte Spray sealer. Brushing over the inking can cause bleeding. I usually apply two very light coats, allowing ample drying time, in between coats.Refer to directions printed on the can to ensure results.
9
Pattern at 100%
10
Pattern at 100%
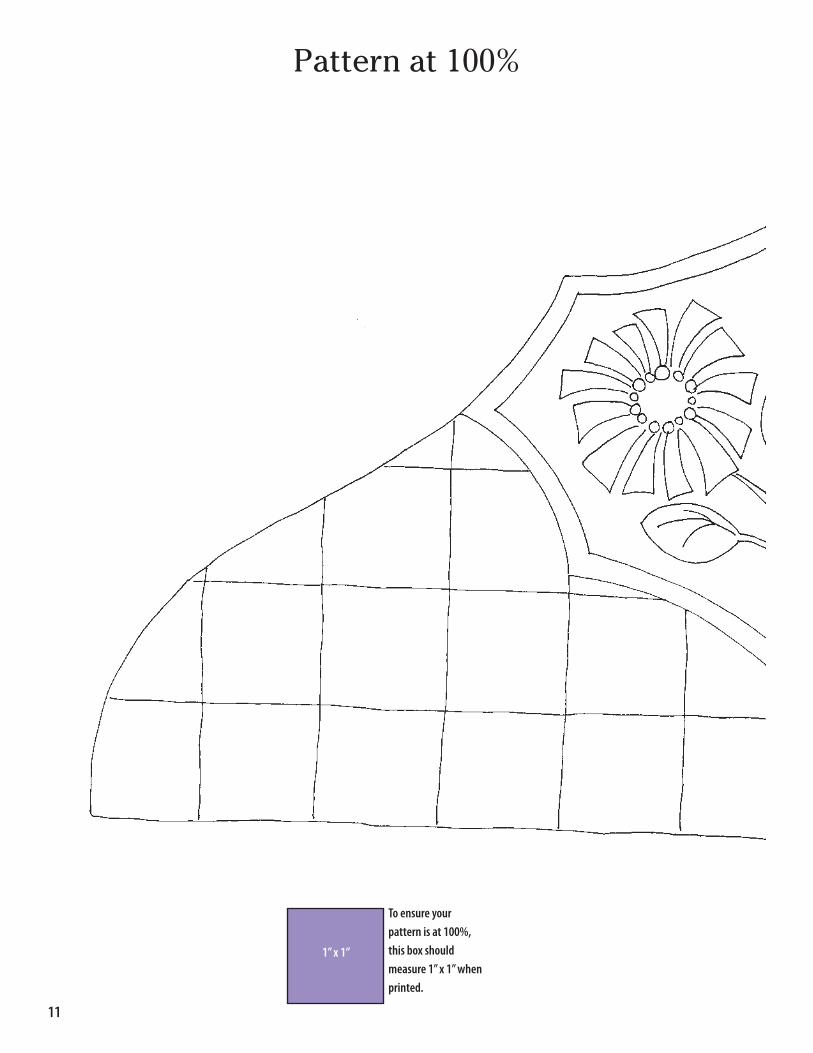
Pattern at 100%
1” x 1”
To ensure your pattern is at 100%, this box should measure 1” x 1” when printed.
11
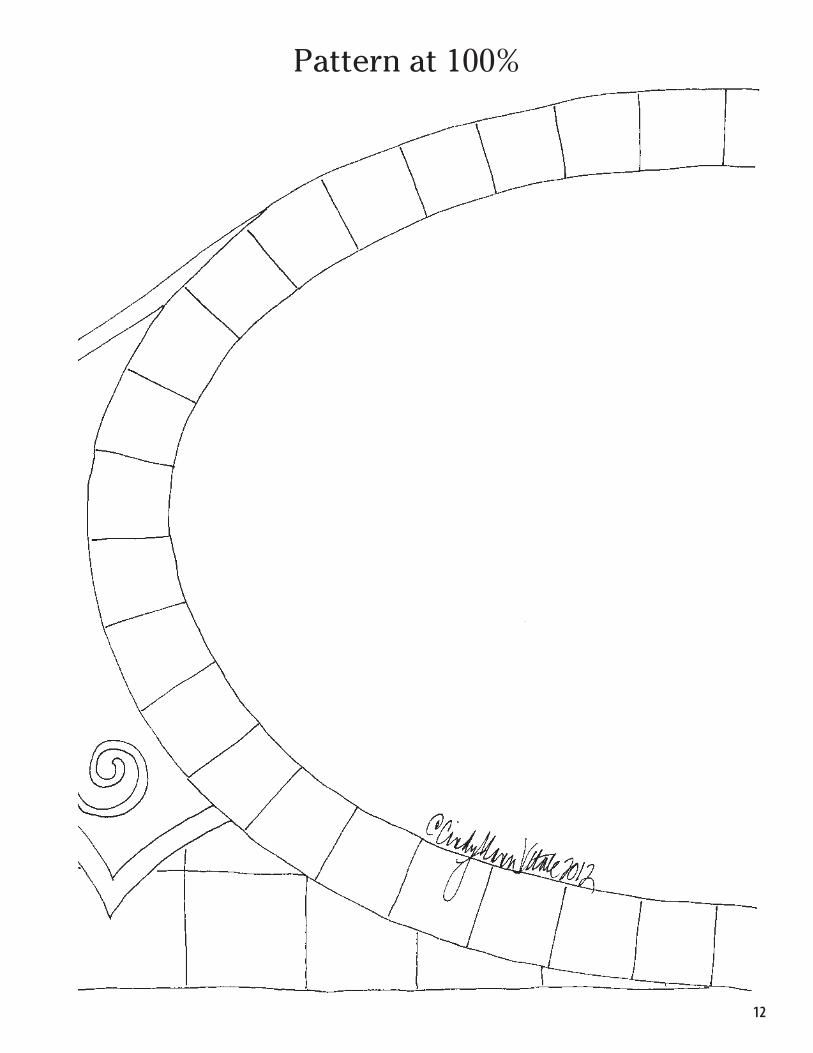
Pattern at 100%
12
13
14
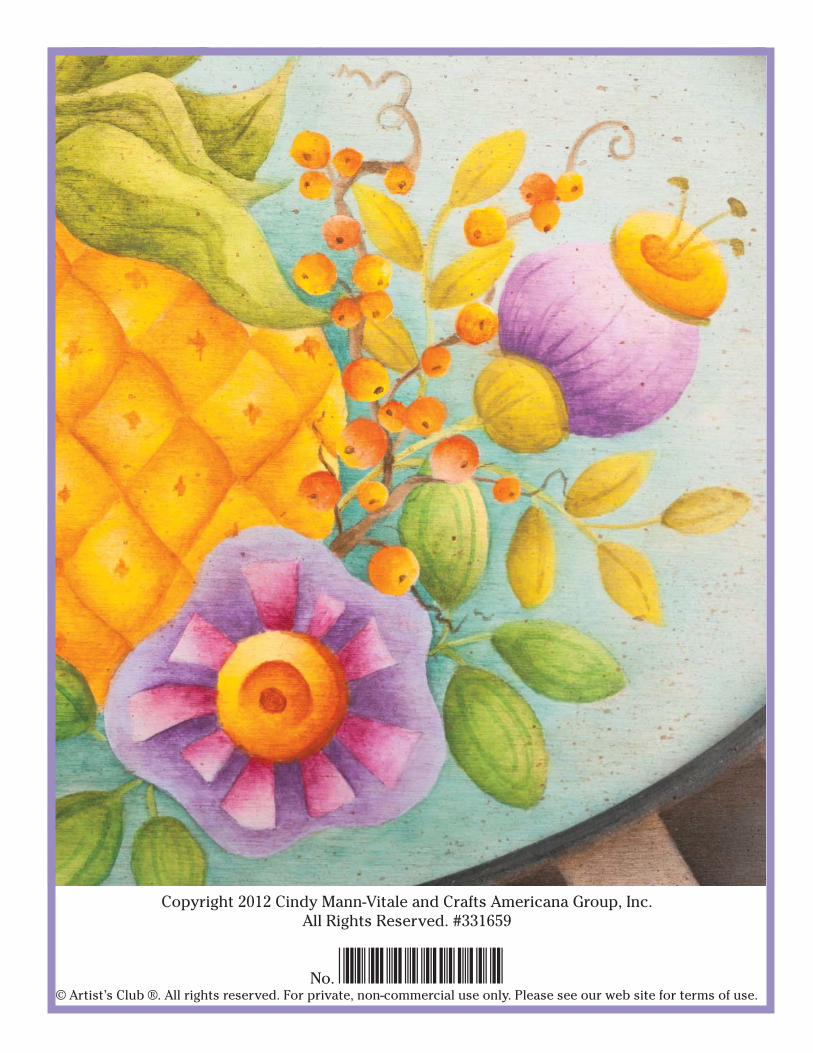
Copyright 2012 Cindy Mann-Vitale and Crafts Americana Group, Inc. All Rights Reserved. #331659
No. *A331659*© Artist’s Club ®. All rights reserved. For private, non-commercial use only. Please see our web site for terms of use.