Embed Size (px)
Citation preview
PICO UNBOXING GUIDE
16-0802
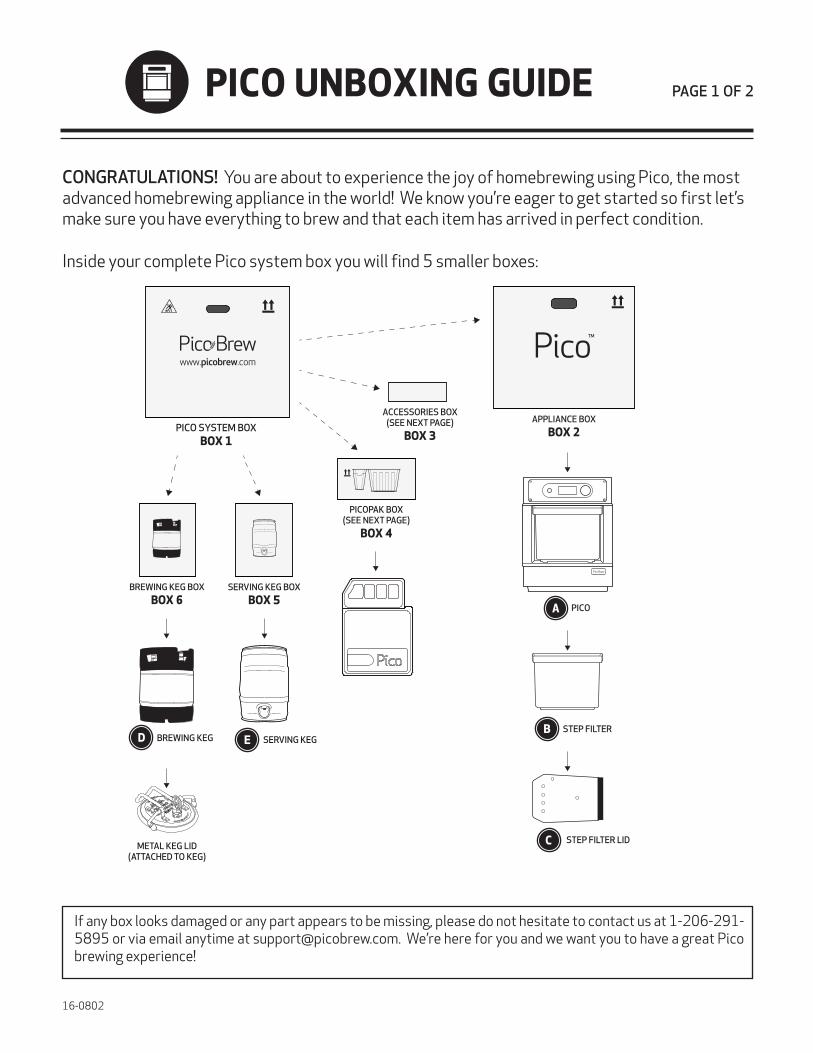
CONGRATULATIONS! You are about to experience the joy of homebrewing using Pico, the most advanced homebrewing appliance in the world! We know you’re eager to get started so first let’s make sure you have everything to brew and that each item has arrived in perfect condition.
If any box looks damaged or any part appears to be missing, please do not hesitate to contact us at 1-206-291-5895 or via email anytime at [email protected]. We’re here for you and we want you to have a great Pico brewing experience!
Inside your complete Pico system box you will find 5 smaller boxes:
PICO SYSTEM BOXBOX 1
BREWING KEG BOX
BOX 6SERVING KEG BOX
BOX 5
PICOPAK BOX(SEE NEXT PAGE)
BOX 4
ACCESSORIES BOX(SEE NEXT PAGE)
BOX 3APPLIANCE BOX
BOX 2
PICO
STEP FILTER
STEP FILTER LID
BREWING KEG
METAL KEG LID(ATTACHED TO KEG)
SERVING KEG
A
EB
C
D
PAGE 1 OF 2
16-0802
HOPS
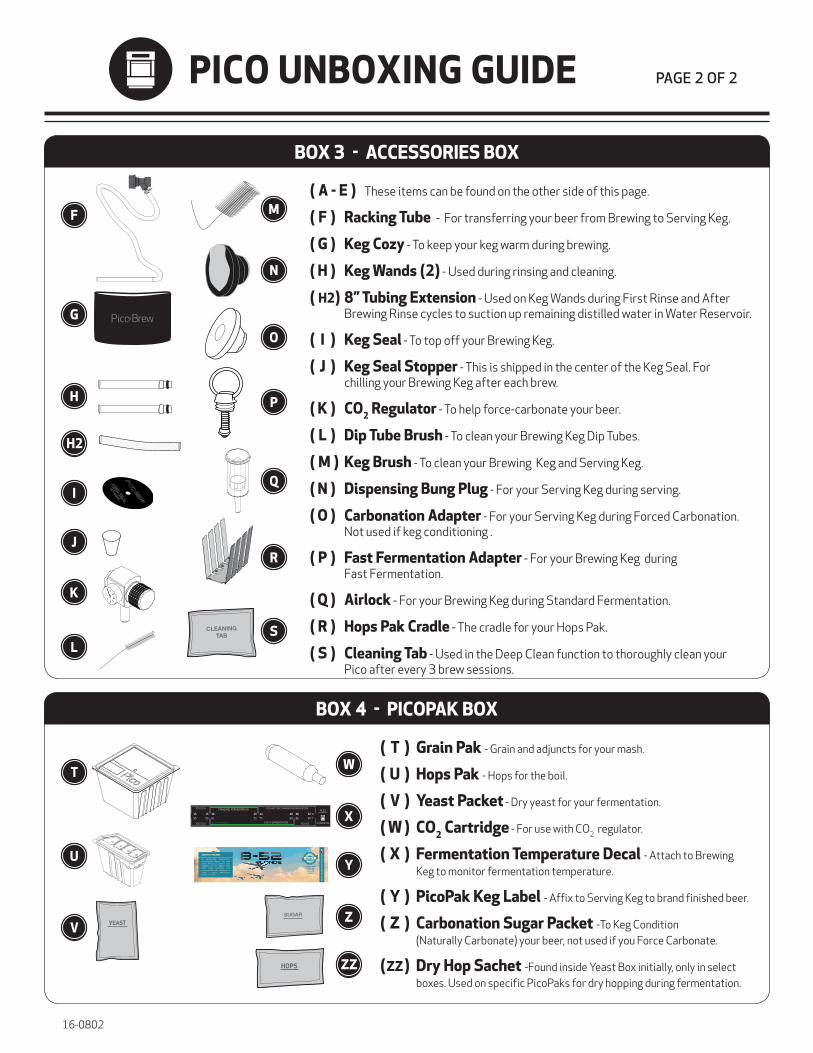
( A - E ) These items can be found on the other side of this page.
( F ) Racking Tube - For transferring your beer from Brewing to Serving Keg.
( G ) Keg Cozy - To keep your keg warm during brewing.
( H ) Keg Wands (2) - Used during rinsing and cleaning.
( H2) 8” Tubing Extension - Used on Keg Wands during First Rinse and After Brewing Rinse cycles to suction up remaining distilled water in Water Reservoir.
( I ) Keg Seal - To top off your Brewing Keg.
( J ) Keg Seal Stopper - This is shipped in the center of the Keg Seal. For chilling your Brewing Keg after each brew.
( K ) CO2 Regulator - To help force-carbonate your beer.
( L ) Dip Tube Brush - To clean your Brewing Keg Dip Tubes.
( M ) Keg Brush - To clean your Brewing Keg and Serving Keg.
( N ) Dispensing Bung Plug - For your Serving Keg during serving.
( O ) Carbonation Adapter - For your Serving Keg during Forced Carbonation. Not used if keg conditioning .
( P ) Fast Fermentation Adapter - For your Brewing Keg during Fast Fermentation.
( Q ) Airlock - For your Brewing Keg during Standard Fermentation.
( R ) Hops Pak Cradle - The cradle for your Hops Pak.
( S ) Cleaning Tab - Used in the Deep Clean function to thoroughly clean your Pico after every 3 brew sessions.
( T ) Grain Pak - Grain and adjuncts for your mash.
( U ) Hops Pak - Hops for the boil.
( V ) Yeast Packet - Dry yeast for your fermentation.
( W ) CO2 Cartridge - For use with CO2 regulator.
( X ) Fermentation Temperature Decal - Attach to Brewing Keg to monitor fermentation temperature.
( Y ) PicoPak Keg Label - Affix to Serving Keg to brand finished beer.
( Z ) Carbonation Sugar Packet -To Keg Condition (Naturally Carbonate) your beer, not used if you Force Carbonate.
( ZZ ) Dry Hop Sachet -Found inside Yeast Box initially, only in select boxes. Used on specific PicoPaks for dry hopping during fermentation.
PAGE 2 OF 2 PICO UNBOXING GUIDE
F
G
H
H2
U
K
V
L
M
N
O
P
W
Q
X
R
S
Y
Z
ZZ
J
T
BOX 3 - ACCESSORIES BOX
BOX 4 - PICOPAK BOX
I
SUGAR
CLEANINGTAB
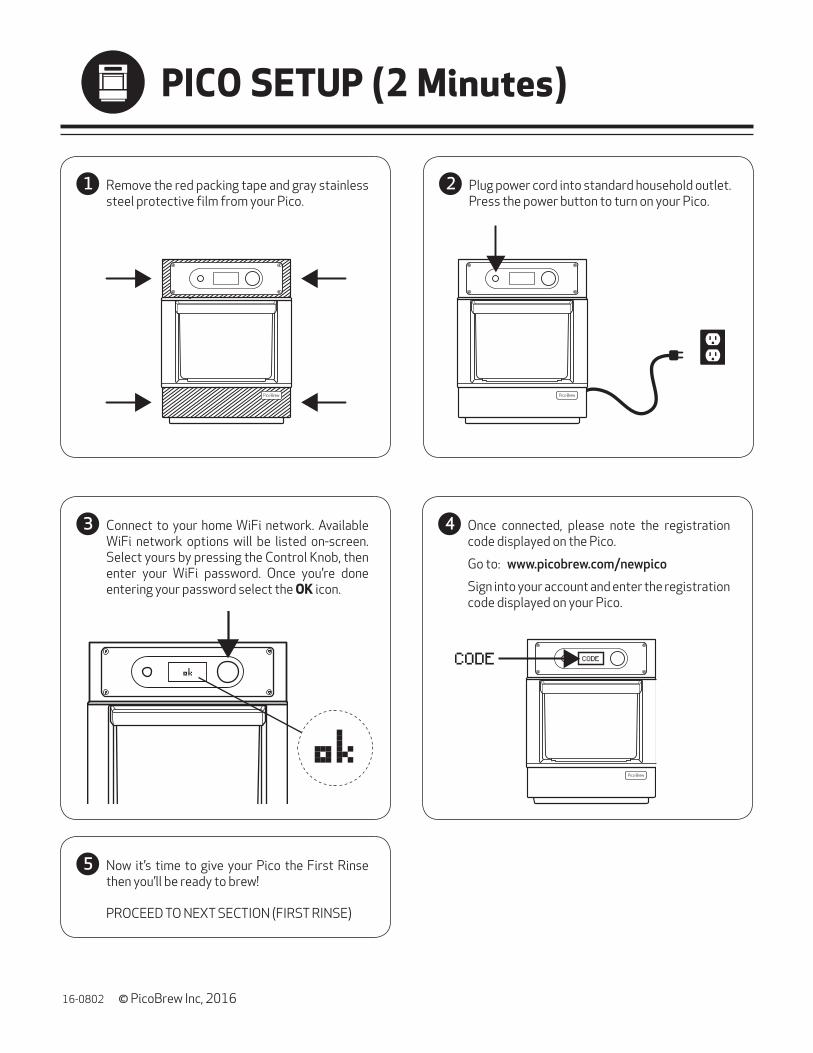
Plug power cord into standard household outlet.Press the power button to turn on your Pico.
2
Connect to your home WiFi network. Available WiFi network options will be listed on-screen. Select yours by pressing the Control Knob, then enter your WiFi password. Once you’re done entering your password select the OK icon.
Now it’s time to give your Pico the First Rinse then you’ll be ready to brew!
PROCEED TO NEXT SECTION (FIRST RINSE)
3
5
4
Remove the red packing tape and gray stainless steel protective film from your Pico.
1
16-0802 © PicoBrew Inc, 2016
Once connected, please note the registration code displayed on the Pico.
Go to: www.picobrew.com/newpico
Sign into your account and enter the registration code displayed on your Pico.
PICO SETUP (2 Minutes)


PICO SETUP - FIRST RINSE (8 MINUTES) PAGE 1 OF 2
Add a couple inches of tap water into the Brewing Keg. On top of the Pico unit, lift the black lid to reveal the Water Reservoir. Place Black Keg Seal over the opening of Brewing Keg and press into the center of it until it pops into place. Add 0.5 gallons (or 8 cups) of distilled water to the Water Reservoir.
2After setting up your Pico and connecting to WiFi, rinse the Brewing Keg, Keg Seal, Step Filter, and lid with tap water. The Step Filter is located in the front of your Pico. To remove it lift it up and slide it out. After rinsing the Step Filter and lid slide them back into the Pico until the Step Filter clicks into place. Remove the Keg Seal Stopper located in the center of the Keg Seal. Set the Keg Seal Stopper aside, this will not be needed until after the brew session is complete.
1
4 Use the Control Knob to select Utilities. Press Control Knob to select * First Rinse *. After approximately 7 minutes the Pico First Rinse Cycle will complete.
FIRST RINSE
Locate the post on the Brewing Keg marked “OUT” – locate the BLACK Ball Lock Connector on the end of the hose. Pull up on the outer plastic ring of the BLACK Ball Lock Connector, place the Connector on the OUT keg post, release outer plastic ring and press down firmly on Ball Lock Connector. Continue to press down on the Connector until it audibly clicks into place. Repeat this procedure with the GRAY Ball Lock Connector on the keg post marked “IN”.
3
OUT IN
16-0802 © PicoBrew Inc, 2016
You will need: • 0.5 gallons distilled water (or reverse osmosis) • Black Keg Seal • Brewing Keg
• Keg Wand • Plastic Tubing Extension
PICO SETUP - FIRST RINSE PAGE 2 OF 2
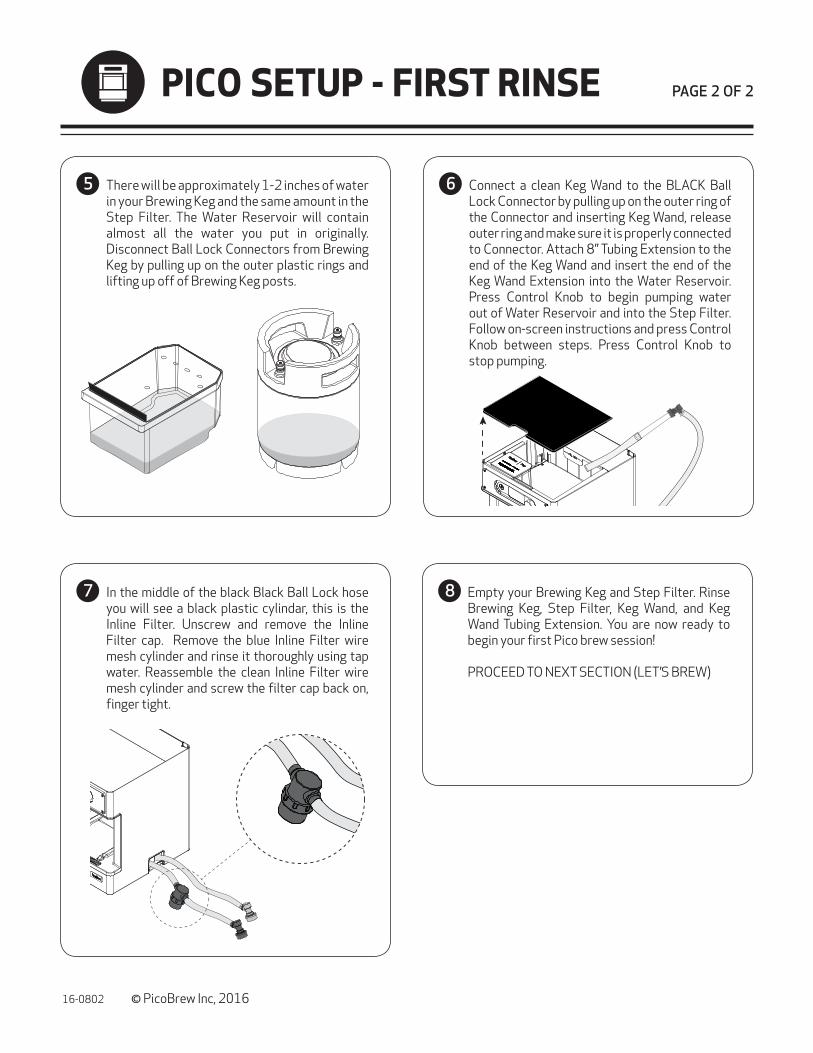
Connect a clean Keg Wand to the BLACK Ball Lock Connector by pulling up on the outer ring of the Connector and inserting Keg Wand, release outer ring and make sure it is properly connected to Connector. Attach 8” Tubing Extension to the end of the Keg Wand and insert the end of the Keg Wand Extension into the Water Reservoir. Press Control Knob to begin pumping water out of Water Reservoir and into the Step Filter. Follow on-screen instructions and press Control Knob between steps. Press Control Knob to stop pumping.
6
In the middle of the black Black Ball Lock hose you will see a black plastic cylindar, this is the Inline Filter. Unscrew and remove the Inline Filter cap. Remove the blue Inline Filter wire mesh cylinder and rinse it thoroughly using tap water. Reassemble the clean Inline Filter wire mesh cylinder and screw the filter cap back on, finger tight.
7 8
There will be approximately 1-2 inches of water in your Brewing Keg and the same amount in the Step Filter. The Water Reservoir will contain almost all the water you put in originally. Disconnect Ball Lock Connectors from Brewing Keg by pulling up on the outer plastic rings and lifting up off of Brewing Keg posts.
5
Empty your Brewing Keg and Step Filter. Rinse Brewing Keg, Step Filter, Keg Wand, and Keg Wand Tubing Extension. You are now ready to begin your first Pico brew session!
PROCEED TO NEXT SECTION (LET’S BREW)
16-0802 © PicoBrew Inc, 2016
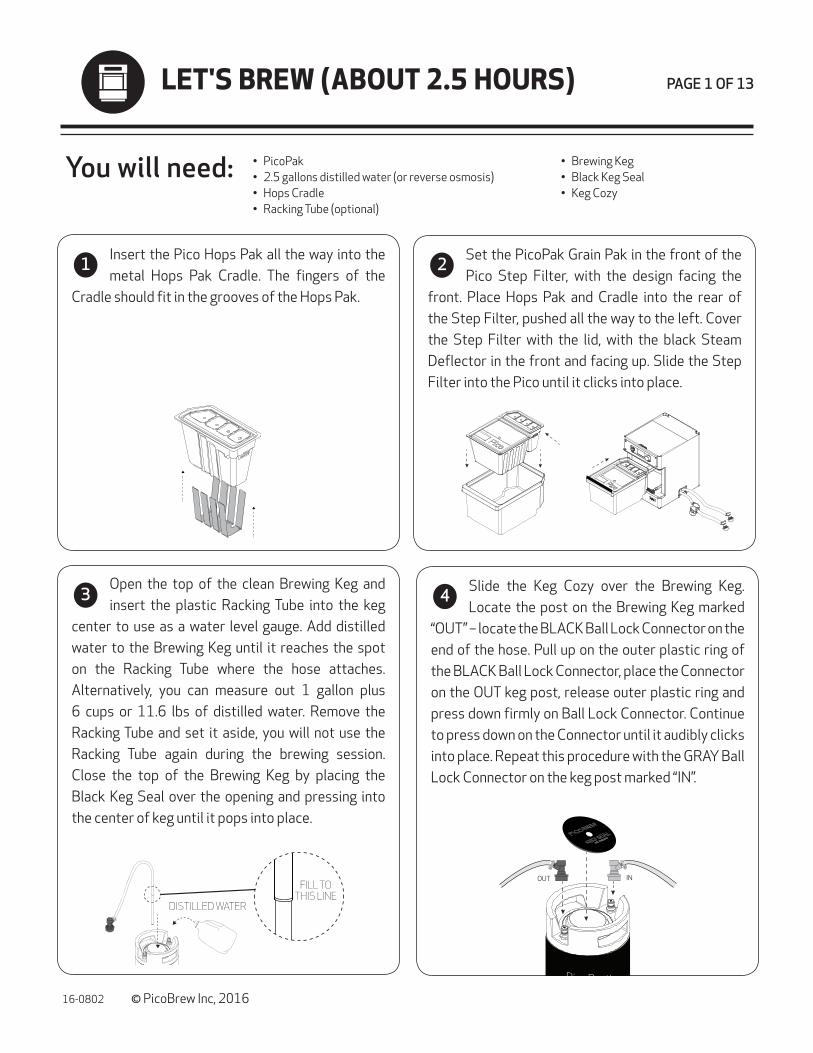
You will need: • PicoPak • 2.5 gallons distilled water (or reverse osmosis) • Hops Cradle • Racking Tube (optional)
• Brewing Keg • Black Keg Seal • Keg Cozy
OUT IN
DISTILLED WATER
FILL TOTHIS LINE
16-0802 © PicoBrew Inc, 2016
Insert the Pico Hops Pak all the way into the metal Hops Pak Cradle. The fingers of the
Cradle should fit in the grooves of the Hops Pak.
Set the PicoPak Grain Pak in the front of the Pico Step Filter, with the design facing the
front. Place Hops Pak and Cradle into the rear of the Step Filter, pushed all the way to the left. Cover the Step Filter with the lid, with the black Steam Deflector in the front and facing up. Slide the Step Filter into the Pico until it clicks into place.
Slide the Keg Cozy over the Brewing Keg. Locate the post on the Brewing Keg marked
“OUT” – locate the BLACK Ball Lock Connector on the end of the hose. Pull up on the outer plastic ring of the BLACK Ball Lock Connector, place the Connector on the OUT keg post, release outer plastic ring and press down firmly on Ball Lock Connector. Continue to press down on the Connector until it audibly clicks into place. Repeat this procedure with the GRAY Ball Lock Connector on the keg post marked “IN”.
Open the top of the clean Brewing Keg and insert the plastic Racking Tube into the keg
center to use as a water level gauge. Add distilled water to the Brewing Keg until it reaches the spot on the Racking Tube where the hose attaches. Alternatively, you can measure out 1 gallon plus 6 cups or 11.6 lbs of distilled water. Remove the Racking Tube and set it aside, you will not use the Racking Tube again during the brewing session. Close the top of the Brewing Keg by placing the Black Keg Seal over the opening and pressing into the center of keg until it pops into place.
3 4
1 2
PAGE 1 OF 13LET'S BREW (ABOUT 2.5 HOURS)
1 GALLONDISTILLED WATER
PAGE 2 OF 13
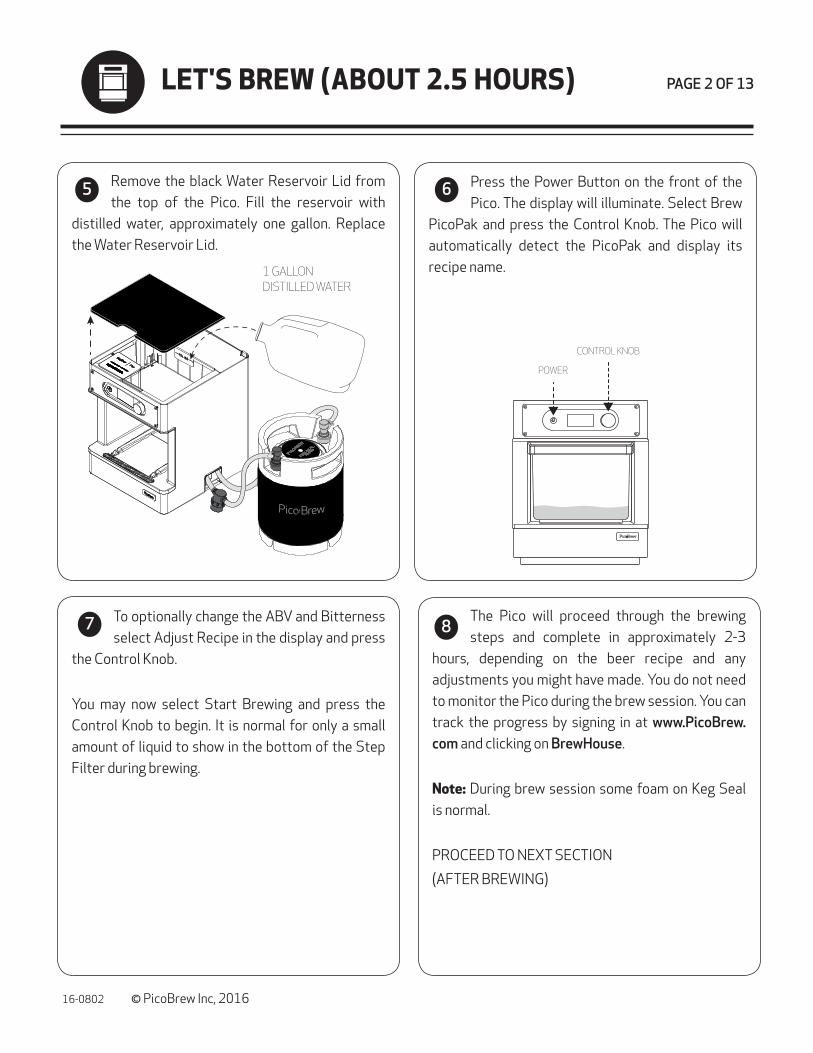
Press the Power Button on the front of the Pico. The display will illuminate. Select Brew
PicoPak and press the Control Knob. The Pico will automatically detect the PicoPak and display its recipe name.
To optionally change the ABV and Bitterness select Adjust Recipe in the display and press
the Control Knob.
You may now select Start Brewing and press the Control Knob to begin. It is normal for only a small amount of liquid to show in the bottom of the Step Filter during brewing.
The Pico will proceed through the brewing steps and complete in approximately 2-3
hours, depending on the beer recipe and any adjustments you might have made. You do not need to monitor the Pico during the brew session. You can track the progress by signing in at www.PicoBrew.com and clicking on BrewHouse.
Note: During brew session some foam on Keg Seal is normal.
PROCEED TO NEXT SECTION
(AFTER BREWING)
Remove the black Water Reservoir Lid from the top of the Pico. Fill the reservoir with
distilled water, approximately one gallon. Replace the Water Reservoir Lid.
16-0802 © PicoBrew Inc, 2016
LET'S BREW (ABOUT 2.5 HOURS)
POWER
CONTROL KNOB
8
6
7
5
You will need: • Keg Seal Stopper • Keg Wands
• Plastic Tubing Extension
• Waste container (needs to hold approximately half gallon of liquid)
CONTROL KNOB
TAP WATER
PAGE 3 OF 13
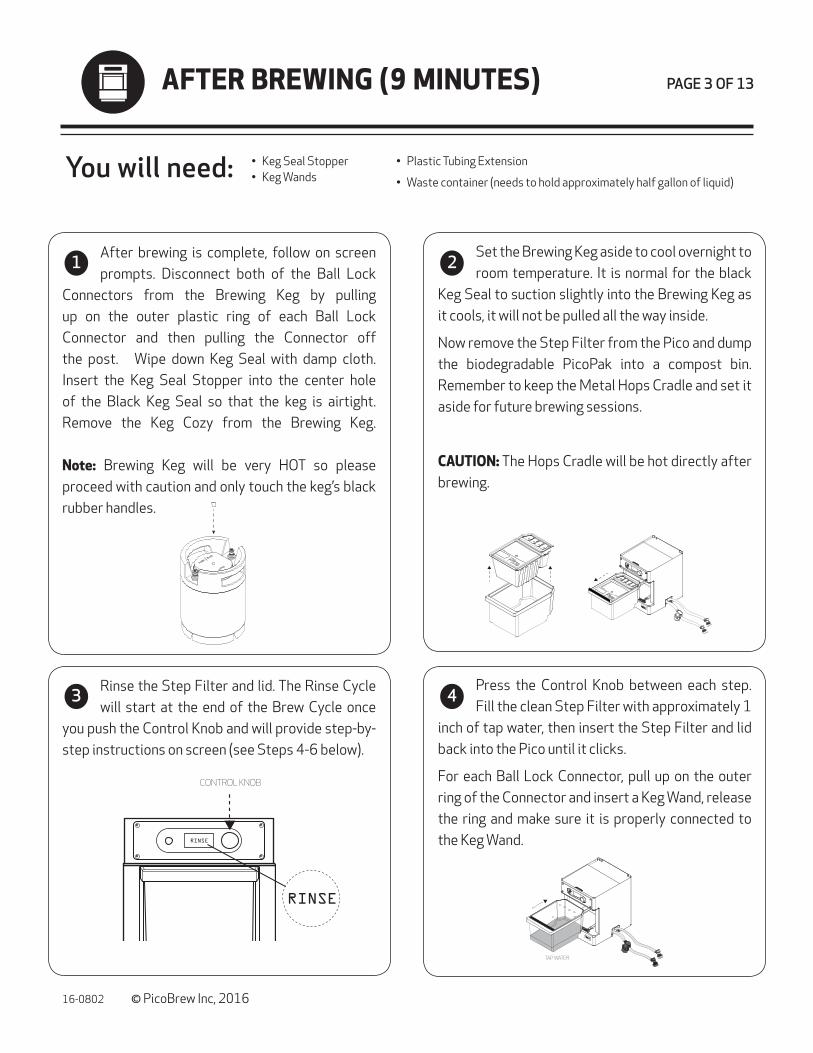
After brewing is complete, follow on screen prompts. Disconnect both of the Ball Lock
Connectors from the Brewing Keg by pulling up on the outer plastic ring of each Ball Lock Connector and then pulling the Connector off the post. Wipe down Keg Seal with damp cloth. Insert the Keg Seal Stopper into the center hole of the Black Keg Seal so that the keg is airtight. Remove the Keg Cozy from the Brewing Keg.
Note: Brewing Keg will be very HOT so please proceed with caution and only touch the keg’s black rubber handles.
Set the Brewing Keg aside to cool overnight to room temperature. It is normal for the black
Keg Seal to suction slightly into the Brewing Keg as it cools, it will not be pulled all the way inside.
Now remove the Step Filter from the Pico and dump the biodegradable PicoPak into a compost bin. Remember to keep the Metal Hops Cradle and set it aside for future brewing sessions.
CAUTION: The Hops Cradle will be hot directly after brewing.
Rinse the Step Filter and lid. The Rinse Cycle will start at the end of the Brew Cycle once
you push the Control Knob and will provide step-by-step instructions on screen (see Steps 4-6 below).
Press the Control Knob between each step.Fill the clean Step Filter with approximately 1
inch of tap water, then insert the Step Filter and lid back into the Pico until it clicks.
For each Ball Lock Connector, pull up on the outer ring of the Connector and insert a Keg Wand, release the ring and make sure it is properly connected to the Keg Wand.
16-0802 © PicoBrew Inc, 2016
AFTER BREWING (9 MINUTES)
21
43
PAGE 4 OF 13
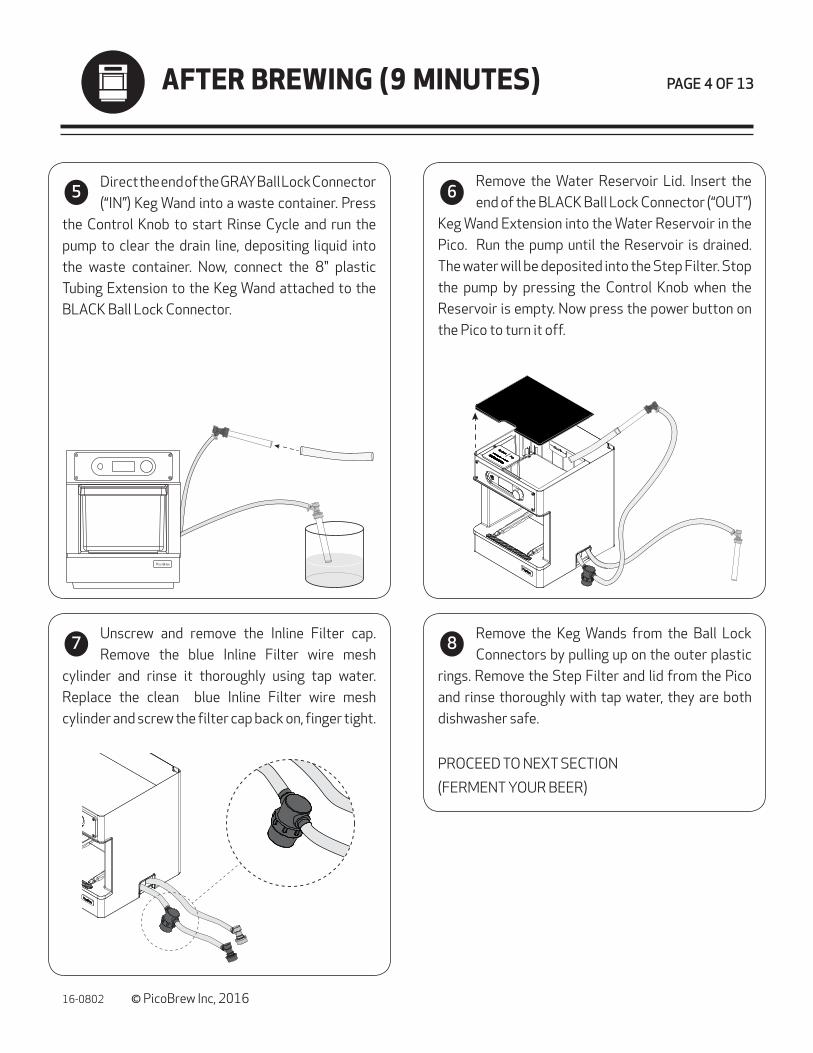
Direct the end of the GRAY Ball Lock Connector (“IN”) Keg Wand into a waste container. Press
the Control Knob to start Rinse Cycle and run the pump to clear the drain line, depositing liquid into the waste container. Now, connect the 8" plastic Tubing Extension to the Keg Wand attached to the BLACK Ball Lock Connector.
Unscrew and remove the Inline Filter cap. Remove the blue Inline Filter wire mesh
cylinder and rinse it thoroughly using tap water. Replace the clean blue Inline Filter wire mesh cylinder and screw the filter cap back on, finger tight.
Remove the Keg Wands from the Ball Lock Connectors by pulling up on the outer plastic
rings. Remove the Step Filter and lid from the Pico and rinse thoroughly with tap water, they are both dishwasher safe.
PROCEED TO NEXT SECTION
(FERMENT YOUR BEER)
Remove the Water Reservoir Lid. Insert the end of the BLACK Ball Lock Connector (“OUT”)
Keg Wand Extension into the Water Reservoir in the Pico. Run the pump until the Reservoir is drained. The water will be deposited into the Step Filter. Stop the pump by pressing the Control Knob when the Reservoir is empty. Now press the power button on the Pico to turn it off.
AFTER BREWING (9 MINUTES)
16-0802 © PicoBrew Inc, 2016
6
8
5
7
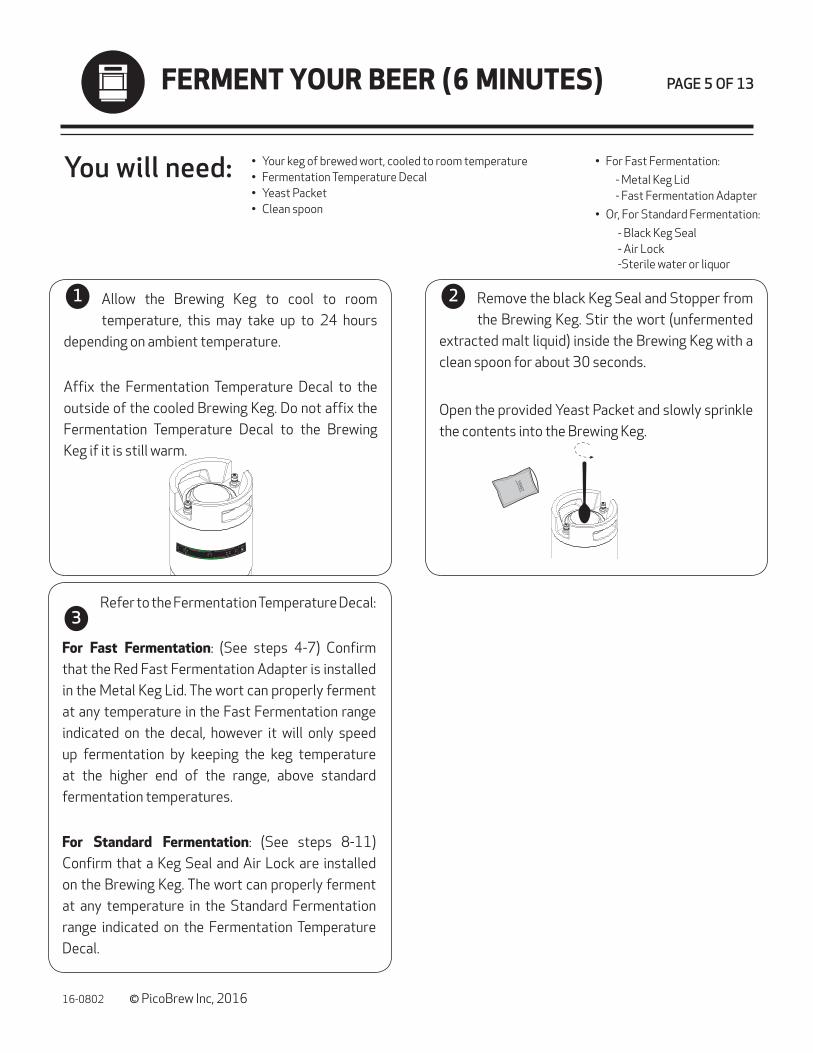
You will need: • Your keg of brewed wort, cooled to room temperature • Fermentation Temperature Decal • Yeast Packet • Clean spoon
• For Fast Fermentation:
- Metal Keg Lid - Fast Fermentation Adapter
• Or, For Standard Fermentation:
- Black Keg Seal - Air Lock
-Sterile water or liquor
16-0802 © PicoBrew Inc, 2016
PAGE 5 OF 13
Allow the Brewing Keg to cool to room temperature, this may take up to 24 hours
depending on ambient temperature.
Affix the Fermentation Temperature Decal to the outside of the cooled Brewing Keg. Do not affix the Fermentation Temperature Decal to the Brewing Keg if it is still warm.
Refer to the Fermentation Temperature Decal:
For Fast Fermentation: (See steps 4-7) Confirm that the Red Fast Fermentation Adapter is installed in the Metal Keg Lid. The wort can properly ferment at any temperature in the Fast Fermentation range indicated on the decal, however it will only speed up fermentation by keeping the keg temperature at the higher end of the range, above standard fermentation temperatures.
For Standard Fermentation: (See steps 8-11) Confirm that a Keg Seal and Air Lock are installed on the Brewing Keg. The wort can properly ferment at any temperature in the Standard Fermentation range indicated on the Fermentation Temperature Decal.
Remove the black Keg Seal and Stopper from the Brewing Keg. Stir the wort (unfermented
extracted malt liquid) inside the Brewing Keg with a clean spoon for about 30 seconds.
Open the provided Yeast Packet and slowly sprinkle the contents into the Brewing Keg.
FERMENT YOUR BEER (6 MINUTES)
2
3
1
16-0802 © PicoBrew Inc, 2016
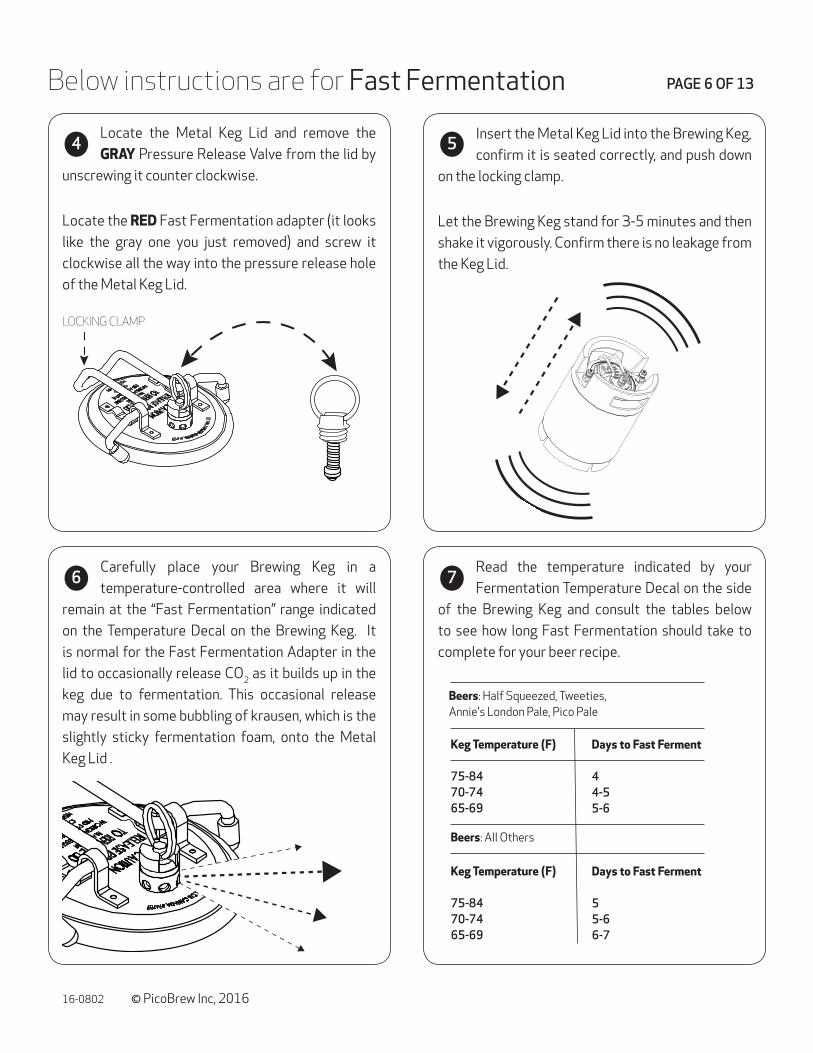
LOCKING CLAMP
PAGE 6 OF 13
Insert the Metal Keg Lid into the Brewing Keg, confirm it is seated correctly, and push down
on the locking clamp.
Let the Brewing Keg stand for 3-5 minutes and then shake it vigorously. Confirm there is no leakage from the Keg Lid.
Carefully place your Brewing Keg in a temperature-controlled area where it will
remain at the “Fast Fermentation” range indicated on the Temperature Decal on the Brewing Keg. It is normal for the Fast Fermentation Adapter in the lid to occasionally release CO2 as it builds up in the keg due to fermentation. This occasional release may result in some bubbling of krausen, which is the slightly sticky fermentation foam, onto the Metal Keg Lid .
Read the temperature indicated by your Fermentation Temperature Decal on the side
of the Brewing Keg and consult the tables below to see how long Fast Fermentation should take to complete for your beer recipe.
Locate the Metal Keg Lid and remove the GRAY Pressure Release Valve from the lid by
unscrewing it counter clockwise.
Locate the RED Fast Fermentation adapter (it looks like the gray one you just removed) and screw it clockwise all the way into the pressure release hole of the Metal Keg Lid.
Below instructions are for Fast Fermentation
4
Beers: Half Squeezed, Tweeties, Annie's London Pale, Pico Pale
Beers: All Others
Keg Temperature (F) 75-84 70-74 65-69
Keg Temperature (F) 75-84 70-74 65-69
Days to Fast Ferment 4 4-5 5-6
Days to Fast Ferment 5 5-6 6-7
6 7
5
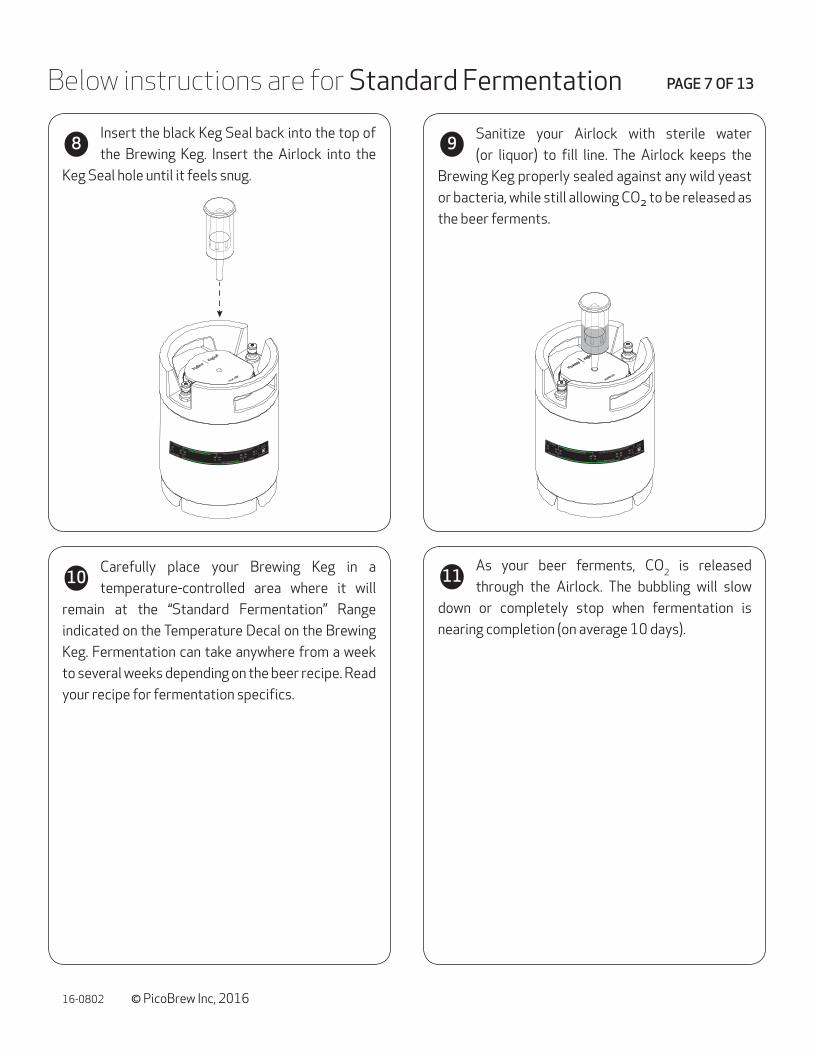
Sanitize your Airlock with sterile water (or liquor) to fill line. The Airlock keeps the
Brewing Keg properly sealed against any wild yeast or bacteria, while still allowing CO2 to be released as the beer ferments.
Carefully place your Brewing Keg in a temperature-controlled area where it will
remain at the “Standard Fermentation” Range indicated on the Temperature Decal on the Brewing Keg. Fermentation can take anywhere from a week to several weeks depending on the beer recipe. Read your recipe for fermentation specifics.
Insert the black Keg Seal back into the top of the Brewing Keg. Insert the Airlock into the
Keg Seal hole until it feels snug.
Below instructions are for Standard Fermentation
8
10
9
As your beer ferments, CO2 is released through the Airlock. The bubbling will slow
down or completely stop when fermentation is nearing completion (on average 10 days).
11
16-0802 © PicoBrew Inc, 2016
PAGE 7 OF 13
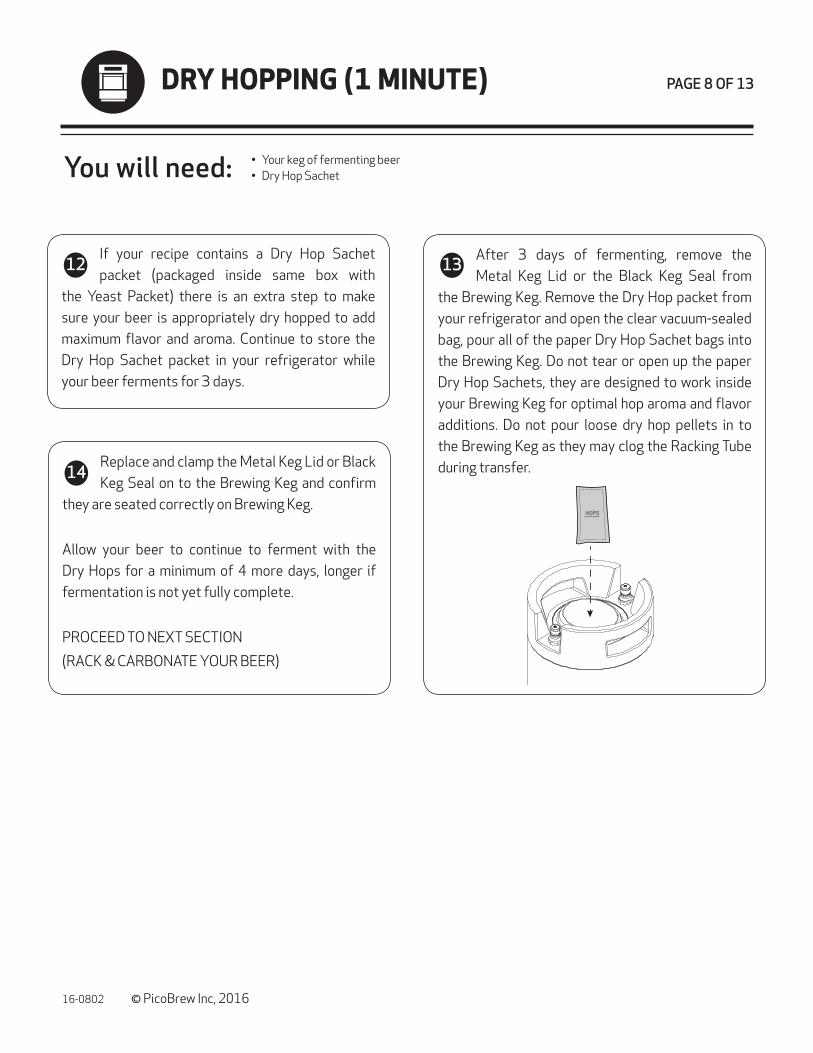
If your recipe contains a Dry Hop Sachet packet (packaged inside same box with
the Yeast Packet) there is an extra step to make sure your beer is appropriately dry hopped to add maximum flavor and aroma. Continue to store the Dry Hop Sachet packet in your refrigerator while your beer ferments for 3 days.
12After 3 days of fermenting, remove the Metal Keg Lid or the Black Keg Seal from
the Brewing Keg. Remove the Dry Hop packet from your refrigerator and open the clear vacuum-sealed bag, pour all of the paper Dry Hop Sachet bags into the Brewing Keg. Do not tear or open up the paper Dry Hop Sachets, they are designed to work inside your Brewing Keg for optimal hop aroma and flavor additions. Do not pour loose dry hop pellets in to the Brewing Keg as they may clog the Racking Tube during transfer.Replace and clamp the Metal Keg Lid or Black
Keg Seal on to the Brewing Keg and confirm they are seated correctly on Brewing Keg.
Allow your beer to continue to ferment with the Dry Hops for a minimum of 4 more days, longer if fermentation is not yet fully complete.
PROCEED TO NEXT SECTION
(RACK & CARBONATE YOUR BEER)
14
13
You will need:
DRY HOPPING (1 MINUTE)
• Your keg of fermenting beer • Dry Hop Sachet
HOPS
PAGE 8 OF 13
16-0802 © PicoBrew Inc, 2016
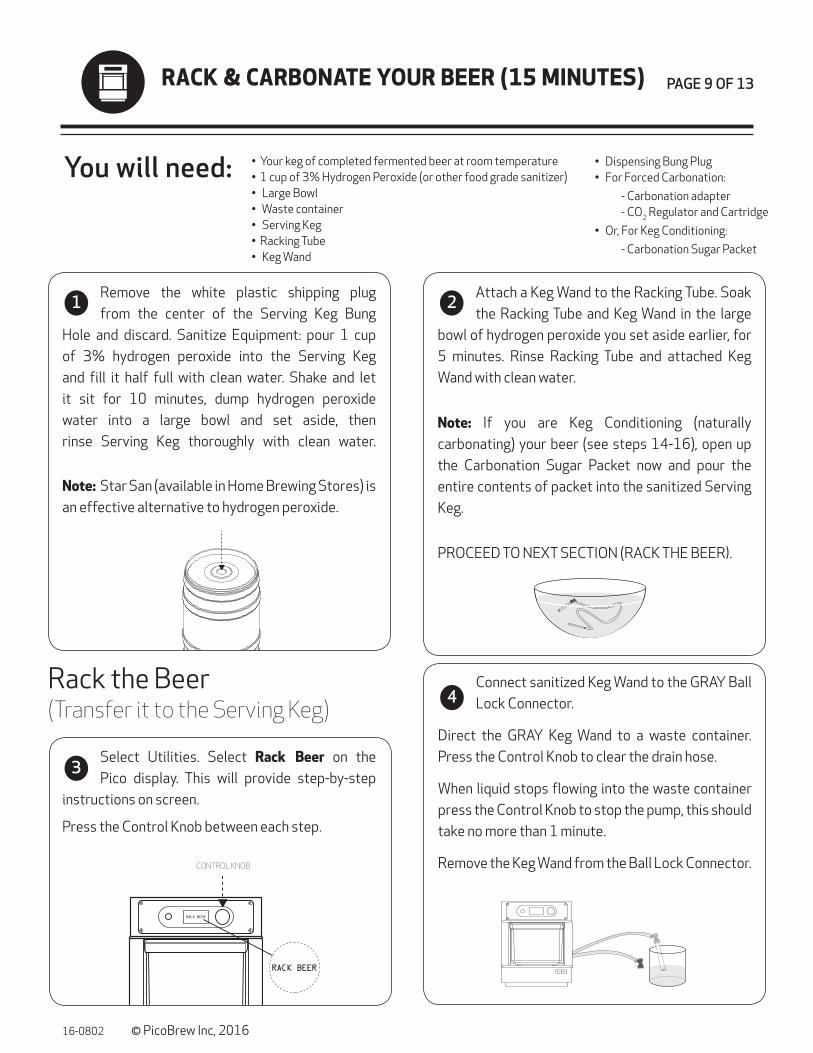
RACK & CARBONATE YOUR BEER (15 MINUTES)
You will need: • Your keg of completed fermented beer at room temperature • 1 cup of 3% Hydrogen Peroxide (or other food grade sanitizer) • Large Bowl • Waste container • Serving Keg • Racking Tube • Keg Wand
• Dispensing Bung Plug • For Forced Carbonation:
- Carbonation adapter - CO2 Regulator and Cartridge
• Or, For Keg Conditioning:
- Carbonation Sugar Packet
CONTROL KNOB
PAGE 9 OF 13
Remove the white plastic shipping plug from the center of the Serving Keg Bung
Hole and discard. Sanitize Equipment: pour 1 cup of 3% hydrogen peroxide into the Serving Keg and fill it half full with clean water. Shake and let it sit for 10 minutes, dump hydrogen peroxide water into a large bowl and set aside, then rinse Serving Keg thoroughly with clean water.
Note: Star San (available in Home Brewing Stores) is an effective alternative to hydrogen peroxide.
Attach a Keg Wand to the Racking Tube. Soak the Racking Tube and Keg Wand in the large
bowl of hydrogen peroxide you set aside earlier, for 5 minutes. Rinse Racking Tube and attached Keg Wand with clean water.
Note: If you are Keg Conditioning (naturally carbonating) your beer (see steps 14-16), open up the Carbonation Sugar Packet now and pour the entire contents of packet into the sanitized Serving Keg.
PROCEED TO NEXT SECTION (RACK THE BEER).
Select Utilities. Select Rack Beer on the Pico display. This will provide step-by-step
instructions on screen.
Press the Control Knob between each step.
Connect sanitized Keg Wand to the GRAY Ball Lock Connector.
Direct the GRAY Keg Wand to a waste container. Press the Control Knob to clear the drain hose.
When liquid stops flowing into the waste container press the Control Knob to stop the pump, this should take no more than 1 minute.
Remove the Keg Wand from the Ball Lock Connector.
Rack the Beer(Transfer it to the Serving Keg)
16-0802 © PicoBrew Inc, 2016
4
3
21

16-0802 © PicoBrew Inc, 2016
1”
PAGE 10 OF 13
Pull up on Fast Fermentation Adapter to confirm valve is not under pressure. Connect
the GRAY Ball Lock Connector to the Brewing Keg IN post, this will allow the Pico to pressurize the Brewing Keg with air.
Connect the Racking Tube’s Ball Lock Connector to the Brewing Keg OUT post.
Insert the Racking Tube in the Serving Keg Bung Hole and press the Control Knob, this
will begin to transfer beer from the Brewing Keg to the Serving Keg.
Do not leave this unattended. You will fill to just under 1” from top of Serving Keg.
Direct the Racking Tube to the waste container and press the Control Knob. The
initial wort coming from the Racking Tube may contain trub (sediment). When no more trub flows into the waste container press the Control Knob to stop the drain, this should take no more than 30 seconds if needed at all, this is only to clear out any trub.
When air begins to enter the Racking Tube, or if the Serving Keg fills to within 1” of the top,
* then press the Control Knob to turn off the pump and stop the process.
Once racking is complete it is safe to remove Racking Tube from Serving Keg and to disconnect Ball Lock Connectors.
*DO NOT OVER FILL
8
6
7
5
16-0802 © PicoBrew Inc, 2016
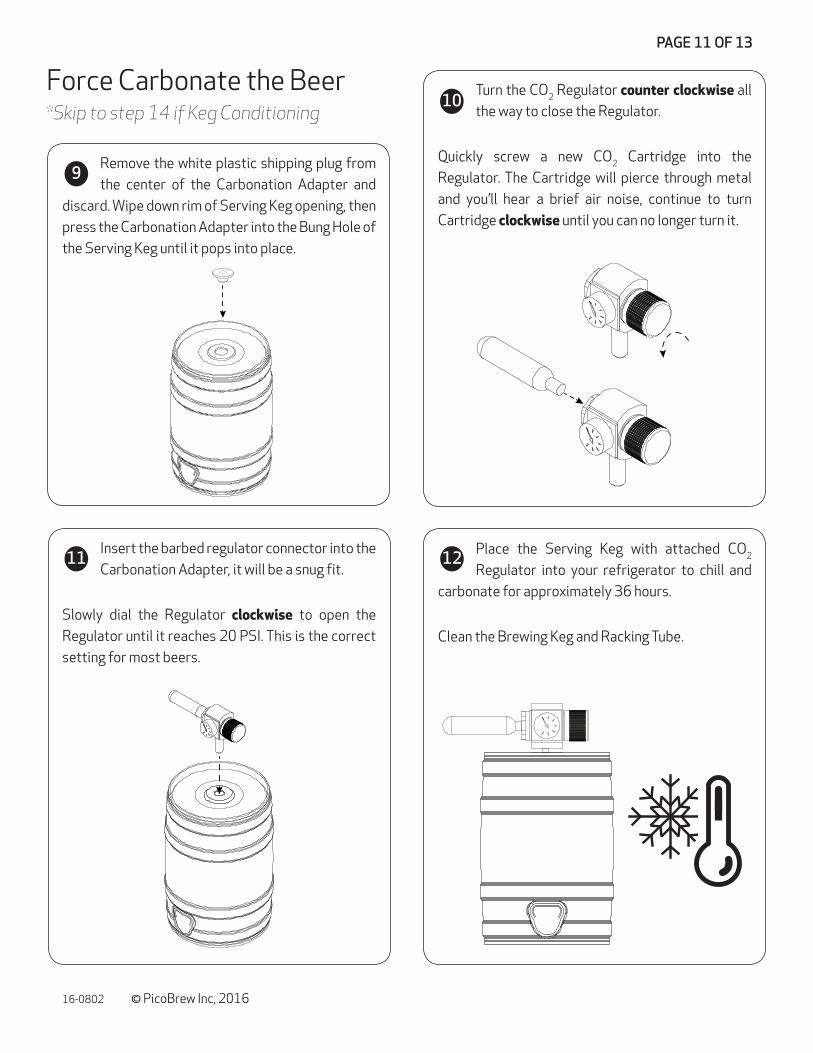
PAGE 11 OF 13
Remove the white plastic shipping plug from the center of the Carbonation Adapter and
discard. Wipe down rim of Serving Keg opening, then press the Carbonation Adapter into the Bung Hole of the Serving Keg until it pops into place.
Insert the barbed regulator connector into the Carbonation Adapter, it will be a snug fit.
Slowly dial the Regulator clockwise to open the Regulator until it reaches 20 PSI. This is the correct setting for most beers.
Turn the CO2 Regulator counter clockwise all the way to close the Regulator.
Quickly screw a new CO2 Cartridge into the Regulator. The Cartridge will pierce through metal and you’ll hear a brief air noise, continue to turn Cartridge clockwise until you can no longer turn it.
Place the Serving Keg with attached CO2
Regulator into your refrigerator to chill and carbonate for approximately 36 hours.
Clean the Brewing Keg and Racking Tube.
10Force Carbonate the Beer*Skip to step 14 if Keg Conditioning
1211
9
16-0802 © PicoBrew Inc, 2016
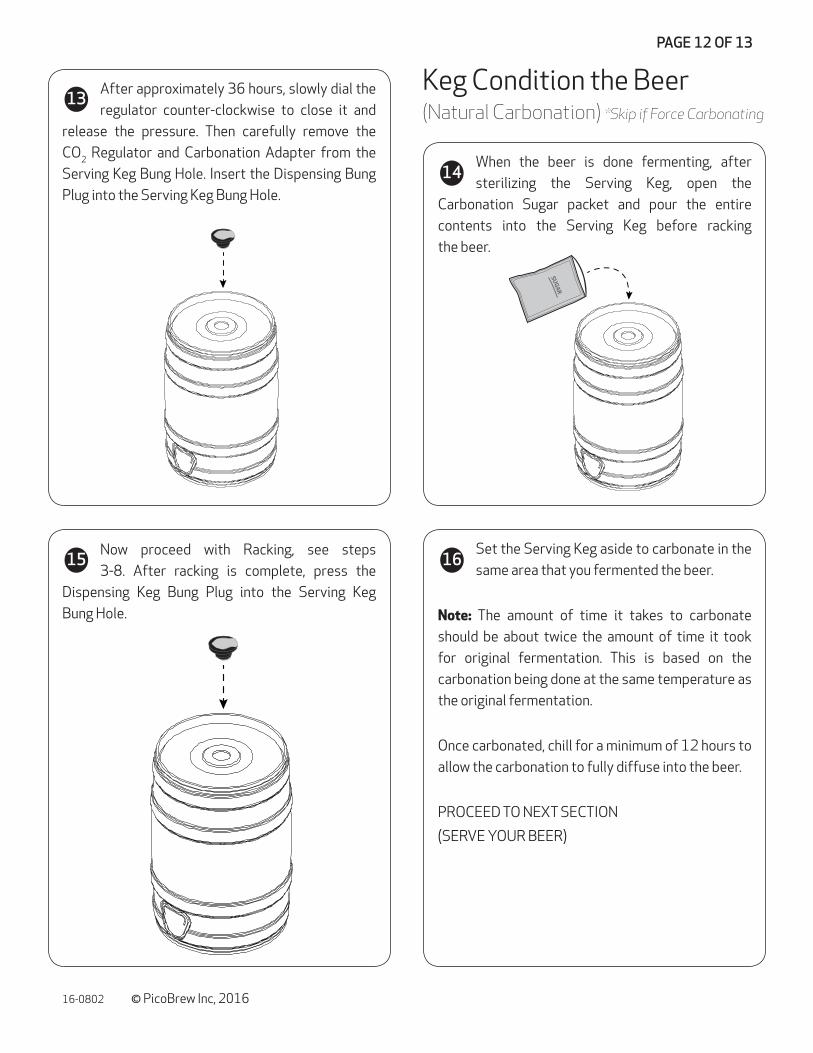
PAGE 12 OF 13
After approximately 36 hours, slowly dial the regulator counter-clockwise to close it and
release the pressure. Then carefully remove the CO2 Regulator and Carbonation Adapter from the Serving Keg Bung Hole. Insert the Dispensing Bung Plug into the Serving Keg Bung Hole.
When the beer is done fermenting, after sterilizing the Serving Keg, open the
Carbonation Sugar packet and pour the entire contents into the Serving Keg before racking the beer.
14
Keg Condition the Beer(Natural Carbonation) *Skip if Force Carbonating
Now proceed with Racking, see steps 3-8. After racking is complete, press the
Dispensing Keg Bung Plug into the Serving Keg Bung Hole.
Set the Serving Keg aside to carbonate in the same area that you fermented the beer.
Note: The amount of time it takes to carbonate should be about twice the amount of time it took for original fermentation. This is based on the carbonation being done at the same temperature as the original fermentation.
Once carbonated, chill for a minimum of 12 hours to allow the carbonation to fully diffuse into the beer.
PROCEED TO NEXT SECTION
(SERVE YOUR BEER)
1615
13
16-0802 © PicoBrew Inc, 2016
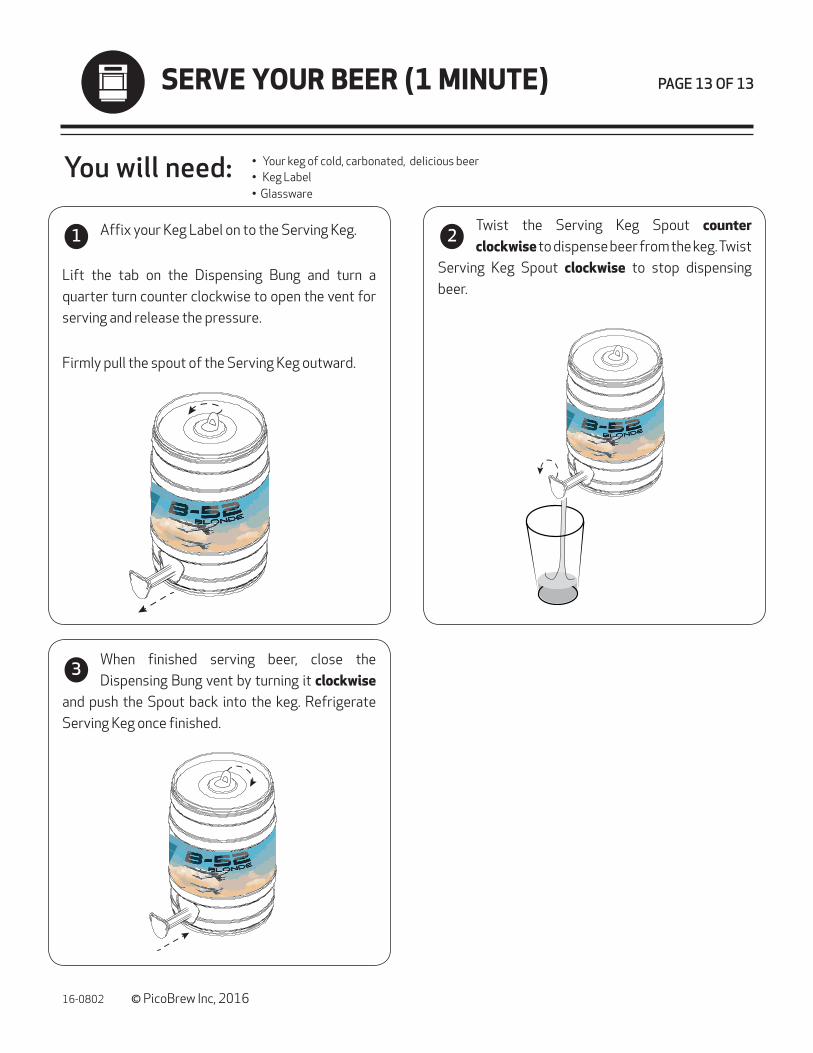
You will need: • Your keg of cold, carbonated, delicious beer • Keg Label• Glassware
PAGE 13 OF 13
Affix your Keg Label on to the Serving Keg.
Lift the tab on the Dispensing Bung and turn a quarter turn counter clockwise to open the vent for serving and release the pressure.
Firmly pull the spout of the Serving Keg outward.
When finished serving beer, close the Dispensing Bung vent by turning it clockwise
and push the Spout back into the keg. Refrigerate Serving Keg once finished.
Twist the Serving Keg Spout counter clockwise to dispense beer from the keg. Twist
Serving Keg Spout clockwise to stop dispensing beer.
SERVE YOUR BEER (1 MINUTE)
2
3
1