Embed Size (px)
Citation preview

Physics ofTiming & Spacing
This tutorial explains basic timing and spacing with simple examples, such as the acceleration of a falling ball. You’ll fi nd that the core principles ap-ply equally well to more complex ani-mation, such as a jumping character or a waterfall.
“It’s not important what goes on each frame of film; it’s the spaces between the frames that are important.“
Norman McLaren Oscar-winning animator of “Neighbors”
www.AnimationPhysics.com
June 2011
© 2011 Alejandro L. Garcia
Creative Commons Attribution-Noncommercial-Share Alike 3.0 United States License
2 Animation Physics — Timing and Spacing
► Typically the fi rst animation exercise you do is a falling ball. In this exercise, the composition couldn’t be simpler. It’s just the same round ball in every frame.
Nevertheless, animating the ball so that it moves realisti-cally can still be a challenge. But the challenge is not in how you draw the ball but where it is drawn on each frame.
Another way to view the challenge of this test is to realize that it’s all about the timing and the spacing. Suppose you space your key drawings as shown here. Are those spac-ings correct? Is there any pattern to the distances?
How much time does it take for the ball to move from one drawing to the next? One frame per drawing? Two? More? How does that timing depend on the size of the ball? What about the ball’s weight?
In this tutorial we’ll look at how to make your animation look realistic by getting the timing and spacing physically correct. You may later fi nd that you need to alter that reality to better serve your story, but that will be easier to do if your motion looks correct from the start.
Ball Drop Animation Test
The principles illustrated in this tuto-rial by the ball drop animation test will apply to your other animation work, even character animation such as a person jumping or effects animation such as a stream of water.

3 Animation Physics — Timing and Spacing
Important: In this tutorial, the number of frames between key poses is fi xed in each exam-ple. In your own animation work you may fi nd your-self putting a different number of frames between each key, such as putting more drawings when the action is fastest. But to keep things simple, in our
examples we’ll always have the same number of frames be-tween each key pose and between each drawing.
► Animators use three different ways of measuring time:• Frames (intervals of 1/24th of a second)• Keys (given number of frames between key poses)• Clocks (actual seconds as measured by a clock)
For example, you may “slug out” a scene using a stop watch, then convert that into a number of key poses, which are indi-cated on frames in your exposure sheet (also known as an X sheet or dope sheet).
In this example, key pose #1 is drawn on frame 1, key #2 on frame 4, and so forth. This is called “shooting on threes” since only every third frame has a different drawing. Be-cause our persistence of vision is about a tenth of a second we see this as a (choppy) animation of a person jumping. Further drawings could be added as”breakdowns” and “in-betweens.”
Frames, Keys, Clocks
Frame Key Pose1 #1
2 /
3 /
4 #2
5 /
6 /
7 #3
8 /
#5
#4
#3
#2
#1
Note: Animation uses a confusing varity
o f frame rates. The most common is 24 frames per second (fps) is since it’s used for fi lm. Digital video is often recorded at 30 fps. The con-version is easy since 4 frames of fi lm = 5 frames of video.
4 Animation Physics — Timing and Spacing
► The simplest type of motion is uniform motion; a bowling ball rolling on the fl oor is a good example.
In uniform motion, the velocity is constant so the spacings from frame to frame are constant. The greater the spacing, the faster the ball is traveling.
Uniform motion may not appear uniform due to the distortion of scale when shown in perspective, such as in the example below in which a ball is rolling from the foreground towards the background.
Uniform Motion

5 Animation Physics — Timing and Spacing
► The timing and spacing indicates the speed at which an object or a character is traveling.
The table on the right converts speed from miles per hour into spacing distance (in inches) between frames. The table also gives the distance traveled in one second of time.
Usually you won’t time the motion going frame-to-frame but rather by blocking in key poses. For example, suppose your character is “power walking” at about 4 miles per hour. Blocking in the action with a key pose every six frames then the spacing is approximately 18 inches between the keys (6 frames x 3 inches per frame).
Timing, Spacing, and Speed
Miles per Hour
Inches per Frame
Distance per Sec.
2 1 1/2
35 inches
4 3 70 inches
10 7 14 2/3 feet
30 22 44 feet
60 44 88 feet
90 66 44 yards
Question: These key poses for the girl on the sled are three frames apart; about how fast is she going?
Answer: The spacing looks to be around fi ve feet, which is 20 inches per frame, so her speed is around 30 m.p.h. Dangerous!
A normal walking speed is around 3 miles per hour while running is typically in the range of 6 to 10 mph.
17 inches 19 inchesNote: The table is also useful when staging a scene. For example, if a
character is sprinting at 10 miles per hour then you need about 15 feet of space for a shot lasting one second.

6 Animation Physics — Timing and Spacing
► When an object’s motion is not uniform, the object is either speeding up, slowing down, or changing direction.
If the speed is decreasing then the spacing between drawings decreases, which in animation is called “slowing in” (or “eas-ing in”). A sled slowing due to friction is a simple example of slowing in.
If the speed is increasing then the spacing between drawings increases, which in animation is called “slowing out” (or “easing out”). A ball rolling down an incline is a simple example of slowing out.
Slowing in and out is one of the “Principles of Animation” listed by Frank Thomas and Olie Johnston in their classic book, The Illusion of Life. They describe it “an important discovery that became the basis of later refi nements in timing and staging.”
Slowing In and Slowing Out
A ball thrown upward slows in as it rises to the apex and then slows out as it falls back downward.
Note: The apex is the highest point or the furthest point
reached by a moving object.
Slowing inSlowing Out
Slowing Out
Slowing in

7 Animation Physics — Timing and Spacing
► The table below lists the distance fallen from the apex after a certain amount of time (or frames) for an object fall-ing straight down.
Distance Fallen from the Apex
Time (sec.) Frames Distance Fallen from Apex
1/24 1 1/3 inch
1/12 2 1 1/3 inches
1/8 3 3 inches
1/6 4 5 1/3 inches
1/4 6 1 foot
1/3 8 1 3/4 feet
1/2 12 4 feet
2/3 16 7 feet
3/4 18 9 feet
1 24 16 feet
2 48 64 feet
The distances fallen from the apex may also be found using this formula:
(Distance in inches) = (1/3 inch) x (Number of Frames) x (Number of Frames)
For example, the distance fallen after 6 frames is (1/3)x(6)x(6) = 12 inches.
Question: What is the distance fallen after 5 frames?
Answer: The distance is (1/3)x(5)x(5) = 25/3 = 8 1/3 inches.
Shooting on twos (two frames per drawing) the fi rst drawing below the apex is 1 1/3 inches down. This softball is 4 inches wide so that’s a third of its diameter.
The distance that an object falls does not depend on its weight if air resistance is minimal. We’ll discuss the effect of air resistance in later in this tutorial.

8 Animation Physics — Timing and Spacing
► This table gives the time it takes an object to fall various distances. It is useful for measuring reaction time, as shown in the photo.
Reaction Time
Experiment: Take a one dollar bill and have a friend put their thumb and index fi ngers
near Washington’s head. At random, you let go of the dollar.
Can your friend react fast enough to catch the money?
Probably not! Typical reaction time is 0.20 to 0.25 seconds.
Half the length of dollar bill is 3 inches so it takes about 1/8 of a second (0.125 seconds) to fall this distance.
Distance Time (sec.)
1” 0.07
2” 0.10
3” 0.12
4” 0.14
5” 0.16
6” 0.17
7” 0.19
8” 0.20
10” 0.23
12” 0.25
14” 0.27
16” 0.29
18” 0.30
Release
Catch
Note: When you time a short scene with a stop watch should you account
for reactiom time? No! The reason is that your reaction time in pressing START is more or less equal to the reaction time to hit STOP.
Typical reaction times are about 0.20 to 0.25 sec-onds. Compare with your visual frame rate (rate at which you see distinct images), which is about 0.10 seconds per image.
9 Animation Physics — Timing and Spacing
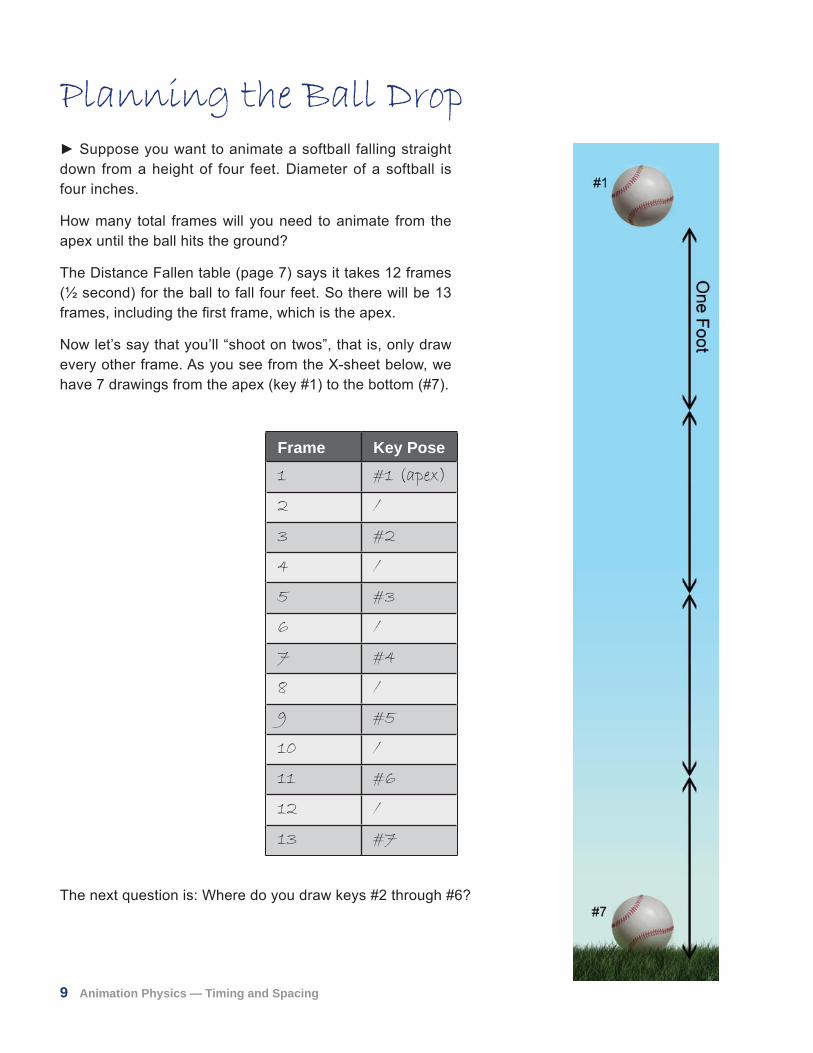
► Suppose you want to animate a softball falling straight down from a height of four feet. Diameter of a softball is four inches.
How many total frames will you need to animate from the apex until the ball hits the ground?
The Distance Fallen table (page 7) says it takes 12 frames (½ second) for the ball to fall four feet. So there will be 13 frames, including the fi rst frame, which is the apex.
Now let’s say that you’ll “shoot on twos”, that is, only draw every other frame. As you see from the X-sheet below, we have 7 drawings from the apex (key #1) to the bottom (#7).
Planning the Ball Drop
Frame Key Pose1 #1 (apex)
2 /
3 #2
4 /
5 #3
6 /
7 #4
8 /
9 #5
10 /
11 #6
12 /
13 #7
The next question is: Where do you draw keys #2 through #6?
10 Animation Physics — Timing and Spacing
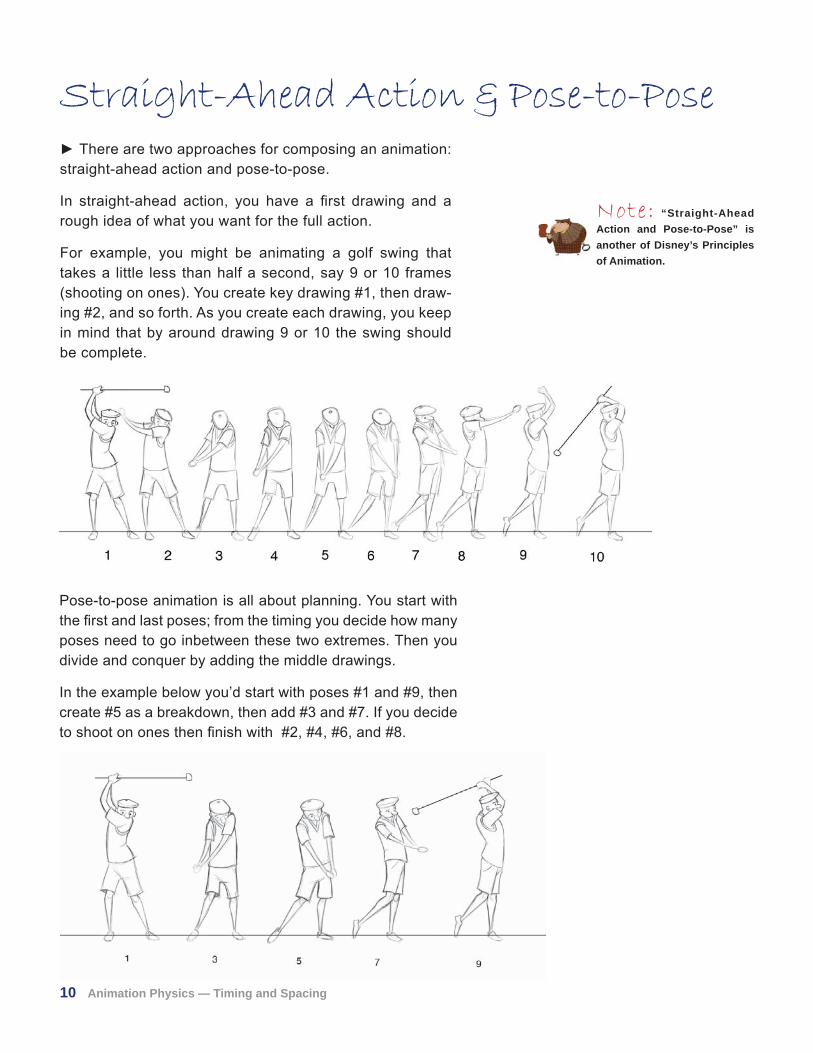
► There are two approaches for composing an animation: straight-ahead action and pose-to-pose.
In straight-ahead action, you have a fi rst drawing and a rough idea of what you want for the full action.
For example, you might be animating a golf swing that takes a little less than half a second, say 9 or 10 frames (shooting on ones). You create key drawing #1, then draw-ing #2, and so forth. As you create each drawing, you keep in mind that by around drawing 9 or 10 the swing should be complete.
Straight-Ahead Action & Pose-to-Pose
Pose-to-pose animation is all about planning. You start with the fi rst and last poses; from the timing you decide how many poses need to go inbetween these two extremes. Then you divide and conquer by adding the middle drawings.
In the example below you’d start with poses #1 and #9, then create #5 as a breakdown, then add #3 and #7. If you decide to shoot on ones then fi nish with #2, #4, #6, and #8.
Note: “Straight-Ahead Action and Pose-to-Pose” is another of Disney’s Principles of Animation.

11 Animation Physics — Timing and Spacing
► For a falling object, the spacings follows a simple pattern, which we’ll call “The Odd Rule” because it uses the odd numbers (1,3,5,etc.)
From the apex, the distance between drawings increases in the ratios 1:3:5:7:9…
If you’ve had a physics class then you probably didn’t learn about acceleration in this way.
Physicists like to measure falling by the total distance from the apex, which increases in the ratios 1:4:9:16:25:… or 12:22:32:42:52:...
As you see below, the physicists’ description and the Odd Rule give exactly the same the positions for the falling ball.
The Odd Rule
Ping-pong ball falling from a height of four feet, shot on two’s.
Diameter of a ping-pong ball is about 1 1/2 inches.

12 Animation Physics — Timing and Spacing
► Let’s see how to use the Odd Rule to animate the falling softball using Straight-Ahead Action.
Remember that we’re “shooting on twos” so the fi rst drawing after the apex is when the ball has fallen for a time of two frames.
The Distance Fallen table (pg. 7) tells us that in two frames the distance fallen is 1 1/3 inches, which happens to be a third of the diameter of the softball. Key #2 is drawn at that distance from the apex.
By the Odd Rule, the next key is spaced three times farther, which puts key #3 a distance of one diameter below key #2 (which is 4 inches below #2).
Again, by the Odd Rule, the spacing between keys #3 and #4 is fi ve times farther than between #1 and #2. The next spacing is seven times farther, and so forth.
Straight-Ahead Action & the Odd Rule
Important: You should use the Odd Rule as a helpful guide for judging timing and spacing of your key drawings.
Do not use a ruler and a calculator when draw-ing your animation. That approach only works for the very simplest tests, is time intensive,
and creates stiff action.
The better approach is to understand the Odd Rule and be able to apply it instinctively. You should be able to feel the rhythm of the pattern when you see it.
You will need such skills when creating more sophisticated animation, like a jumping character.
Question: Instead of a softball you animate a falling bowling ball; how far below the apex is the fi rst drawing when shooting on twos?
Answer: The distance is 1 1/3 inches regardless of the object falling.

13 Animation Physics — Timing and Spacing
Note: It doesn’t matter whether you measure dis-tances from the bottom, the center, or even the top of the
ball as long as you always measure from the same spot on the ball.
► Here’s another way of thinking about the Odd Rule that is sometimes easier to visualize and to use:
Starting from the apex, the spacing between keys increases in the ratios 1:3:5:7:9…
Notice that:
3 = 1 + 2
5 = 3 + 2
7 = 5 + 2
9 = 7 + 2
etc.
In other words, after the fi rst increment, all the others are longer by the same amount.
For any falling object, the fi rst spacing below the apex is:
1/3 inch (if Shooting on Ones) or;
1 1/3 inch (if Shooting on Twos) or;
3 inches (if Shooting on Threes)
All the spacings between the drawings after this fi rst one are longer by the same increment and this increment is:
2/3 inch (if Shooting on Ones) or;
2 2/3 inch (if Shooting on Twos) or;
6 inches (if Shooting on Threes)
The important thing is not the numbers above but rather it’s the simple fact that the spacings always get longer by the same amount (that is, by the same increment). Maintaining a constant increment in the spacings makes slowing in or slowing out look believable.
The Odd Rule (Increment Version)

14 Animation Physics — Timing and Spacing
► Once the drawings are complete, it’s easy to use the Odd Rule to check that the spacings are believable.
We know that “shooting on twos” the fi rst drawing after the apex is always 1 1/3 inches below it. That distance happens to be a third of the ball’s diameter.
By the increment version of the Odd Rule, all the other spac-ings are larger by twice that amount, which is 2 2/3 inches, or two-thirds of the ball’s diameter.
The Odd Rule essentially has three parts; the fi rst two are the most important:
• From the apex, spacings increase between drawings.• After the apex, that increase in the spacing is always by
the same amount.
You should always visually check your spacings to be sure that these two conditions are met.
The fi nal part of the Odd Rule is:• That increase in the spacing is twice the distance from
the apex to the fi rst drawing below the apex.
For large objects, such as a basketball, the drawings near the apex are too close together to apply the last part. But if you increase the spacing for the rest of the drawings in a consistent fashion then the motion should still look correct.
Checking the Spacings
After creating a realistic animation of a falling softball it’s likely that your fi lm’s director (or your teacher) will make you alter the timing or spacing. That’s life as an animator.
But your efforts were not wasted since your animation has physically realistic motion as its foundation.

15 Animation Physics — Timing and Spacing
► “Fourth Down at Half Time” is a useful rule for creating breakdown drawings in pose-to-pose animation and a way to check your spacings when working straight-ahead.
The rule is easiest to understand from the examples below:• Key #3 is half way in time between #1 and #5. • Key #3 is a fourth the distance from #1 to #5.
The rule works like this: Pick any key below the apex, call it the “bottom key.” Find the key that is half-way in time be-tween the bottom key and the apex, call that the “half-time key.”
If your spacings are correct then the half-time key should be a quarter of the distance from the apex to the bottom key.
Fourth Down at Half-Time
Half-time key
Half-time key
Bottom key
Bottom key
6 frames per key
(Medium Shot) 3 frames per key
(Close-up Shot)
Bowling ball is one foot in diameter
Apex key
Apex key
16 Animation Physics — Timing and Spacing
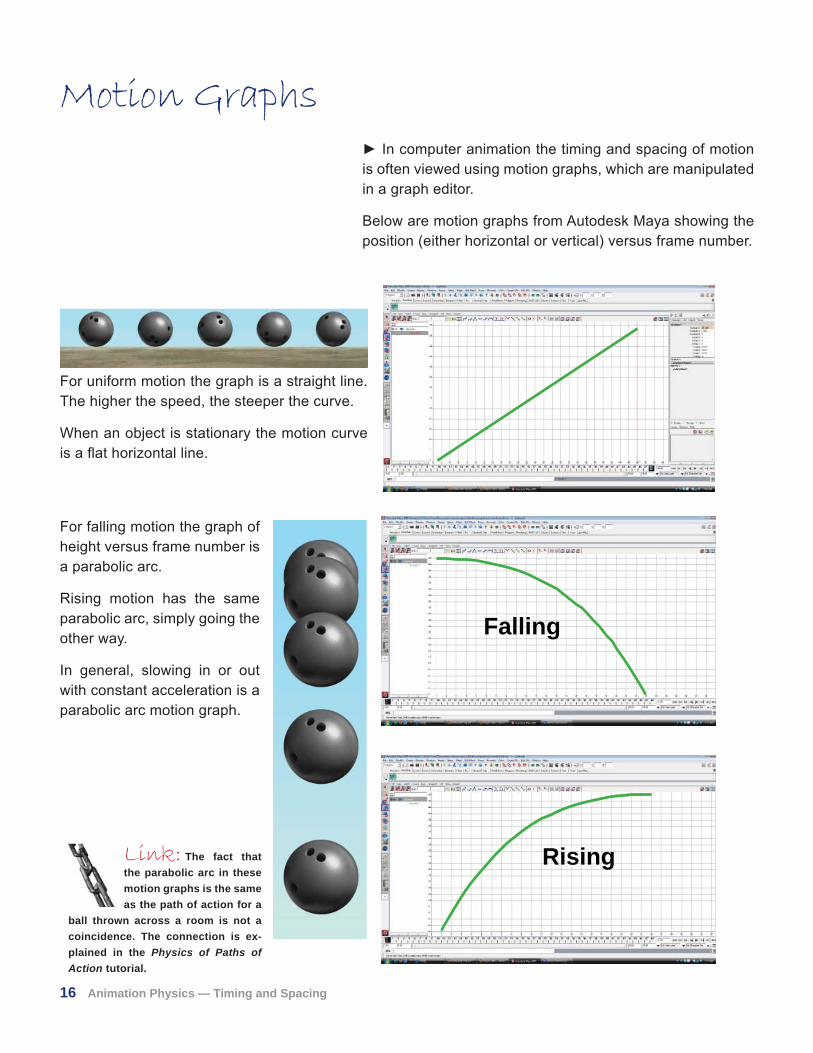
► In computer animation the timing and spacing of motion is often viewed using motion graphs, which are manipulated in a graph editor.
Below are motion graphs from Autodesk Maya showing the position (either horizontal or vertical) versus frame number.
Motion Graphs
For uniform motion the graph is a straight line. The higher the speed, the steeper the curve.
When an object is stationary the motion curve is a fl at horizontal line.
Falling
Rising
For falling motion the graph of height versus frame number is a parabolic arc.
Rising motion has the same parabolic arc, simply going the other way.
In general, slowing in or out with constant acceleration is a parabolic arc motion graph.
Link: The fact that the parabolic arc in these motion graphs is the same as the path of action for a
ball thrown across a room is not a coincidence. The connection is ex-plained in the Physics of Paths of Action tutorial.

17 Animation Physics — Timing and Spacing
► Here is an example of applying “Fourth Down at Half-Time” in a pose-to-pose animation of the falling softball:
From our planning of the scene, we blocked out apex and bottom keys on frames 1 and 13 (see page 9).
The apex position is four feet (48 inches) off the ground so at the half-time key (frame 7) the ball is one foot (a fourth down) below the apex. That means that on frame 7 the ball is at a height of 36 inches.
In Autodesk Maya these three keys, on frames 1, 7, and 13, give you the motion graph shown below; the resulting mo-tion is realistic and believable.
Using Fourth Down at Half-Time
STOP: You now know the basic phys-ics for animating falling objects. So before reading any further, apply what you’ve learned and create your own animation of a ball drop.
The rest of this tutorial covers a variety of topics related to creating believable accelerated motion. Come back later and read the rest to make your animation even better.
In this example we mathematically calculated the position of the half-time key but usually you would just visually estimate its location as a quarter of the way down from the apex.
Note: The motion graph curve should be fl at at the apex, which usually requrires the tangent for that key to be set manually.
18 Animation Physics — Timing and Spacing
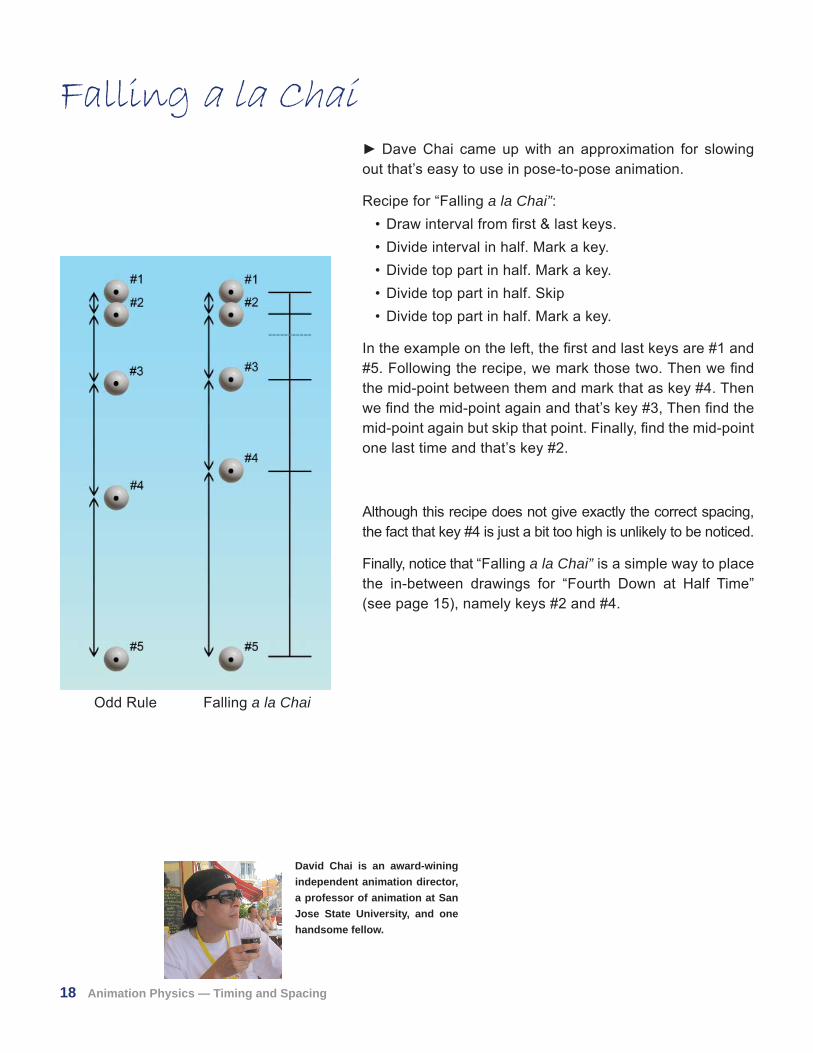
► Dave Chai came up with an approximation for slowing out that’s easy to use in pose-to-pose animation.
Recipe for “Falling a la Chai”:• Draw interval from fi rst & last keys.• Divide interval in half. Mark a key.• Divide top part in half. Mark a key.• Divide top part in half. Skip• Divide top part in half. Mark a key.
In the example on the left, the fi rst and last keys are #1 and #5. Following the recipe, we mark those two. Then we fi nd the mid-point between them and mark that as key #4. Then we fi nd the mid-point again and that’s key #3, Then fi nd the mid-point again but skip that point. Finally, fi nd the mid-point one last time and that’s key #2.
Although this recipe does not give exactly the correct spacing, the fact that key #4 is just a bit too high is unlikely to be noticed.
Finally, notice that “Falling a la Chai” is a simple way to place the in-between drawings for “Fourth Down at Half Time” (see page 15), namely keys #2 and #4.
Falling a la Chai
Odd Rule Falling a la Chai
David Chai is an award-wining independent animation director, a professor of animation at San Jose State University, and one handsome fellow.

19 Animation Physics — Timing and Spacing
Note: An animation of such a small object with such large spac-ings would not look very good due to strobing (see page 21).
► When the motion slows out or slows in the in-between drawings are not spaced evenly but instead they’re shifted towards the apex.
The example on the right shows how a set of key poses shot on twos are in-betweened for shooting on ones (1 frame per key). To draw the in-betweens, divide the fi rst distance by 4, then keep the same ratios of 1:3:5:7.
Notice how the fi rst in-between drawing is signifi cantly clos-er to the apex. On the other hand, the rest of the in-between drawings are just slightly above the half-way distance.
Finally, verify for yourself that the spacings obey the “Fourth Down at Half Time” rule.
In-betweens of Accelerated Motion
Question: From what height is this ball falling? How big is the ball?
Answer: Shooting on ones it falls for 6 frames after the apex so it is falling from a height of one foot. The ball is about a third of an inch in diameter so it could be a small marble.

20 Animation Physics — Timing and Spacing
► Despite what you’ve seen in countless cartoons in which a character falls off a cliff, objects don’t physically stretch as they fall (not even raindrops).
Objects visually stretch as they gain speed due to motion blur.
Motion blur does not depend on the object’s material yet it will look more natural for rigid objects (like a bowling ball) to stretch less than elastic objects (such as a water balloon).
The motion blur makes a falling object look stretched in the vertical direction while its width is unchanged. Howeverin animation this makes the object’s volume appear to change, as if the object is growing longer. You thus need to narrow the width to maintain a consistent visual volume.
Acceleration “Stretch”
ActualShape
HumanEye

21 Animation Physics — Timing and Spacing
► Strobing is a distracting visual effect that occurs when drawings are spaced so far apart between frames that the perception of motion is lost and the action appears choppy.
When the action is slow, the overlapping of an object from one frame to the next helps maintain the perception of fl uid motion.
When the action is too fast, the perception of motion can be lost because the object seem to disappear in one location and then reappear elsewhere.
Stobing & Stretch
Note: Perception of motion is sometimes confused with persistence of vision. When an object disappears the brain momentarily sees a “ghost” of
the object--this is persistence of vision. This visual effect not why we see motion in animation.
This action is slow so the drawings achieve perception of motion.
This action is fast so the drawings may be too far apart to keep a perception of motion.
Using stretch allows us to keep the same speed in the action while reducing the gap between the drawings.

22 Animation Physics — Timing and Spacing
► We’ve been analyzing the timing of a ball falling straight down but what about a ball that’s thrown straight upward?
It turns out that the timing of a ball slowing into the apex is just the reverse of how it slows out from the apex.
That means that from the apex you can use the same draw-ings twice, once on the way up (#1 to #6) and again on the way down (#8 to #13). You could do this but you shouldn’t.
The reason you shouldn’t re-use your drawings is that your animation will look jerky due to an optical effect called strob-ing.
When the eye sees an object disappear and then reappear in the same spot it jars the illusion that the object is moving through space, instead we perceive it as vanishing and reap-pearing.
To avoid strobing, shift the positions of your drawings a bit up or down; while they may not be exactly in the right loca-tions the motion will still look realistic if you (approximately) follow the basic principles we’ve discussed.
Up and Down
Hang time of a jump is easy to fi nd be-cause it’s just twice the time it takes to fall from the apex height.
For example, the hang time for a four foot jump is 24 frames (12 frames going up and 12 coming down).
23 Animation Physics — Timing and Spacing
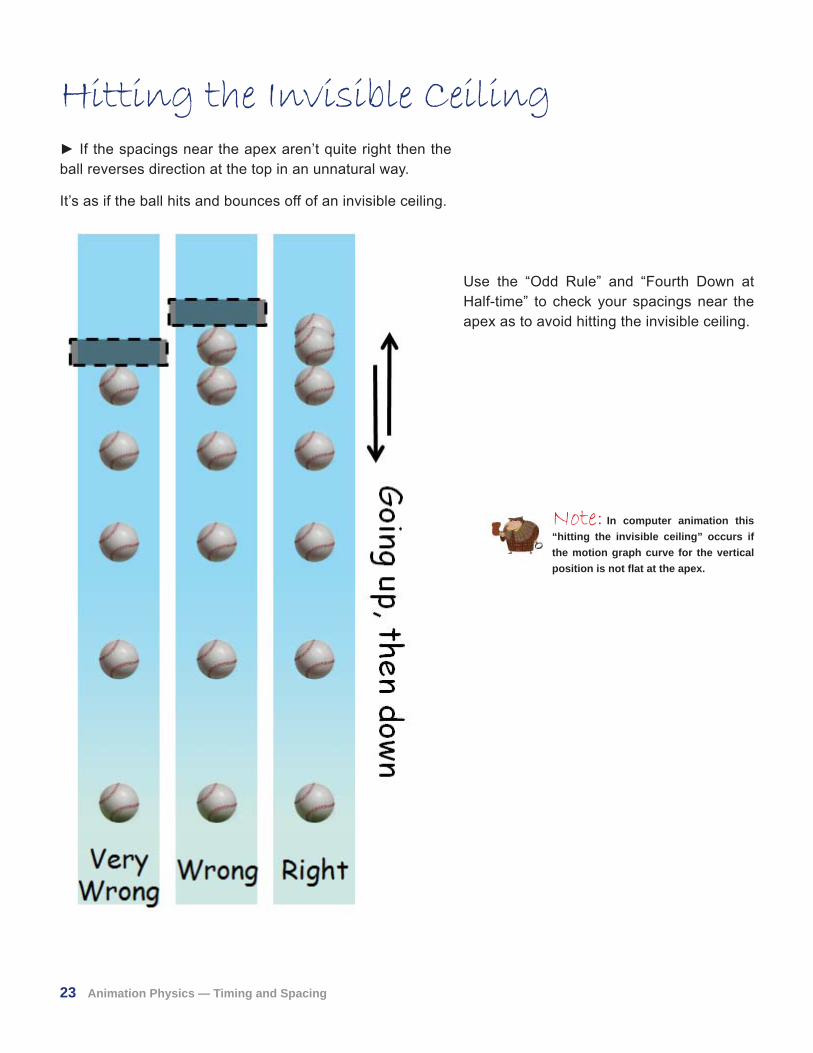
► If the spacings near the apex aren’t quite right then the ball reverses direction at the top in an unnatural way.
It’s as if the ball hits and bounces off of an invisible ceiling.
Hitting the Invisible Ceiling
Use the “Odd Rule” and “Fourth Down at Half-time” to check your spacings near the apex as to avoid hitting the invisible ceiling.
Note: In computer animation this “hitting the invisible ceiling” occurs if the motion graph curve for the vertical position is not fl at at the apex.
24 Animation Physics — Timing and Spacing
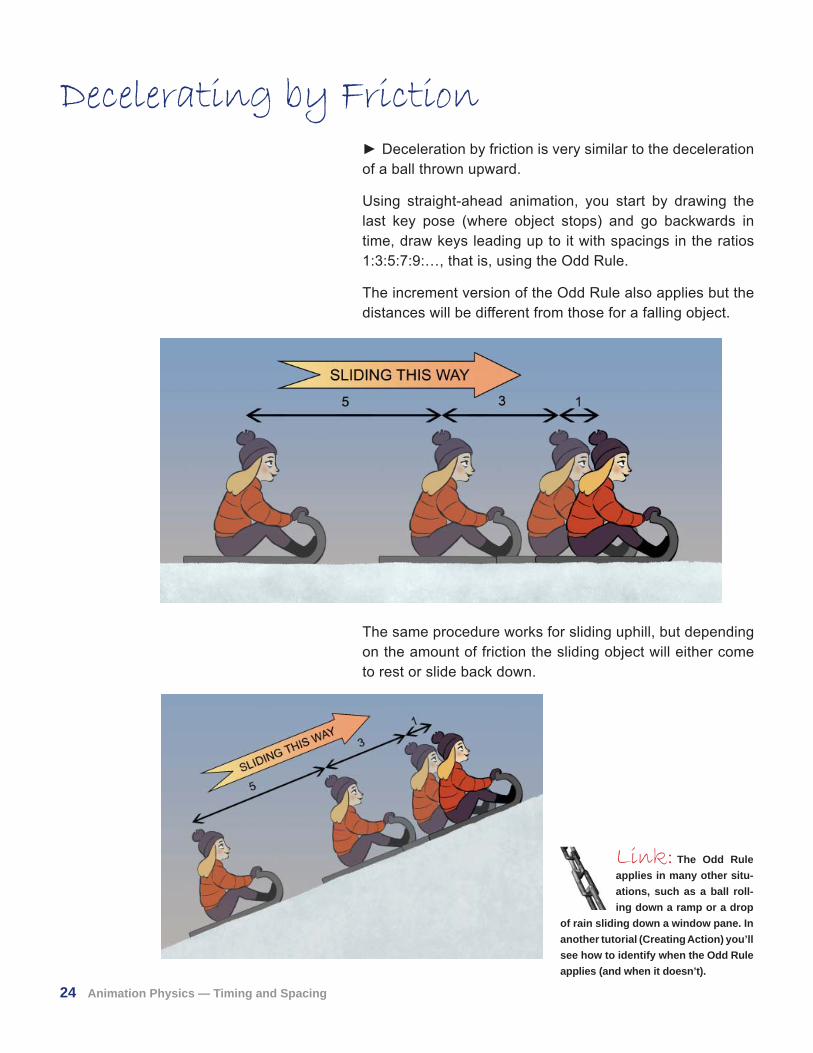
► Deceleration by friction is very similar to the deceleration of a ball thrown upward.
Using straight-ahead animation, you start by drawing the last key pose (where object stops) and go backwards in time, draw keys leading up to it with spacings in the ratios 1:3:5:7:9:…, that is, using the Odd Rule.
The increment version of the Odd Rule also applies but the distances will be different from those for a falling object.
The same procedure works for sliding uphill, but depending on the amount of friction the sliding object will either come to rest or slide back down.
Decelerating by Friction
Link: The Odd Rule applies in many other situ-ations, such as a ball roll-ing down a ramp or a drop
of rain sliding down a window pane. In another tutorial (Creating Action) you’ll see how to identify when the Odd Rule applies (and when it doesn’t).
25 Animation Physics — Timing and Spacing
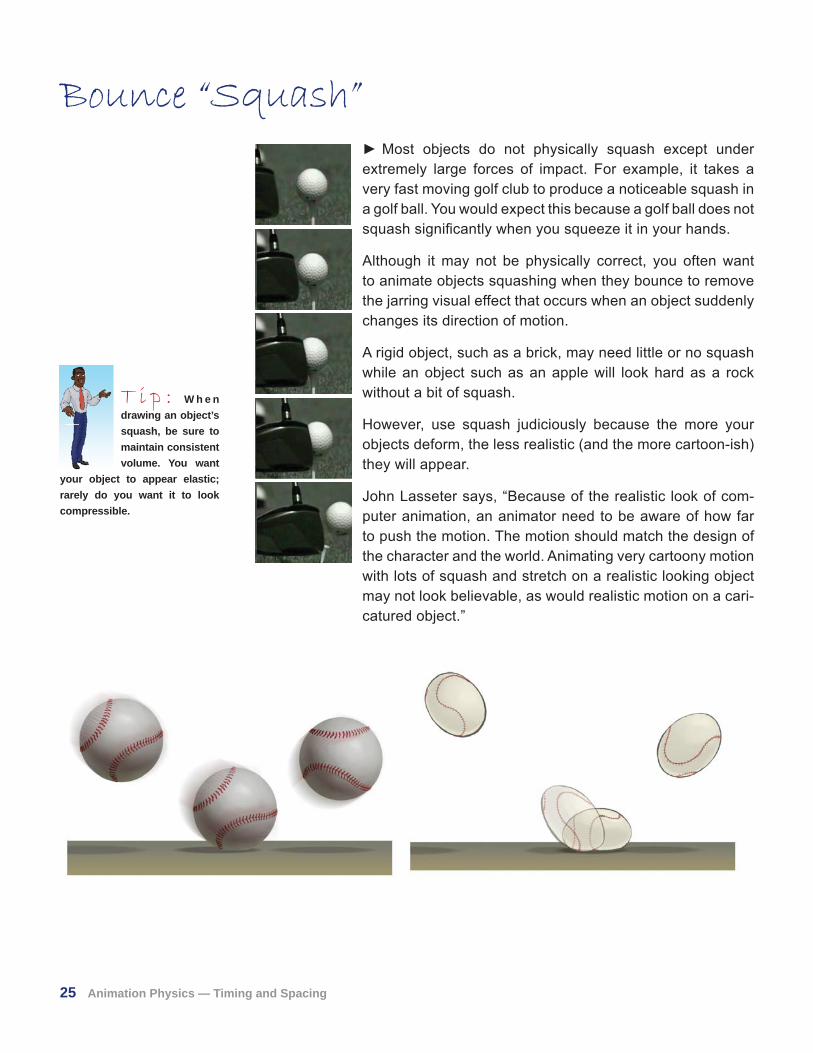
T i p : W h e n drawing an object’s squash, be sure to maintain consistent volume. You want
your object to appear elastic; rarely do you want it to look compressible.
► Most objects do not physically squash except under extremely large forces of impact. For example, it takes a very fast moving golf club to produce a noticeable squash in a golf ball. You would expect this because a golf ball does not squash signifi cantly when you squeeze it in your hands.
Although it may not be physically correct, you often want to animate objects squashing when they bounce to remove the jarring visual effect that occurs when an object suddenly changes its direction of motion.
A rigid object, such as a brick, may need little or no squash while an object such as an apple will look hard as a rock without a bit of squash.
However, use squash judiciously because the more your objects deform, the less realistic (and the more cartoon-ish) they will appear.
John Lasseter says, “Because of the realistic look of com-puter animation, an animator need to be aware of how far to push the motion. The motion should match the design of the character and the world. Animating very cartoony motion with lots of squash and stretch on a realistic looking object may not look believable, as would realistic motion on a cari-catured object.”
Bounce “Squash”

26 Animation Physics — Timing and Spacing
► The approximate speed of an object that’s fallen from a given height may be found using the table below or by the following formula:
(Speed in inches per frame) =
(4) x (Square Root of the Height in feet )
To fi nd the height from the speed of the falling object, use:
(Height in feet) =
(1/16) x (Speed in inches/frame) x (Speed in inches/frame)
Here is an example of how to use this table and formulas in timing an animation: Below we have Alice (in Wonderland) falling down the rabbit hole. The distance between drawings is about two feet, so if we’re shooting on twos the distance between frames is one foot, which means that we’re seeing her after having fallen from a height of only 9 feet.
Falling Speed
H e i g h t (feet)
S p e e d (inches per frame)
S p e e d (miles per hour)
1 4 54 8 109 12 1516 16 2025 20 2536 24 3049 28 3564 32 40100 40 50256 64 80400 80 100
Question: Suppose that we’re shooting on ones instead of on twos; in that case from what height has Alice fallen?
Answer: The distance between frames is 24 inches so she’s fallen from a height of 36 feet, which is about three fl oors.
The table and the formulas assume that air resistance is negligible, which is not true for very light objects, for falls from very great heights, or if the air pushes with great force.
For example, because Alice’s dress acts like a parachute it may be that she’s fallen from a greater height yet due to air resistance she is fl oating downward more slowly.
The Empire State Building has 102 fl oors. At 12 feet per fl oor, that puts the top fl oor at a height of 1224 feet. From the formu-la, a fall from this height would reach a speed of 140 inches per frame (about 200 m.p.h.). However, air resistance is signif-icant so the speed will be lessened.

27 Animation Physics — Timing and Spacing
► When an object falls straight down but the motion is viewed in perspective, all we have to do is use the Odd Rule but account for the distortion of sizes due to perspective.
In this example, we see Alice (in Wonderland) falling down the rabbit hole as viewed from above, looking straight down.
Straight Falling in Perspective
The size of the fi rst two rectangles is somewhat arbitrary since they depend on the station point of the viewer (distance between the viewer and the picture plane).
Once those fi rst key poses are selected, all the rest of the positions are fi xed by the Odd Rule.
Alternatively, use “Falling a la Chai” (see page 18) for pose-to-pose animation going from the apex to the lowest key.
Falling golf ball, 1/24 second intervals

28 Animation Physics — Timing and Spacing
► This tutorial has covers the essentials of slowing in and out, focusing on the ball drop animation test. Specifically, we considered a ball falling straight up and down, focusing on the timing of a ball slowing out from (or back into) the apex.
A more advanced test would have the ball travelling in an arc, possibly in perspective, and have it lose height with each successive bounce. We’ll discuss this type of motion (and more) in the next tutorial, Physics of Paths of Action.
Paths of Action
Image CreditsAll illustrations not listed below are by Charlene Fleming and photos not listed are by the author
Water Fountain, pg. 2, http://upload.wikimedia.org/wikipe-dia/commons/b/bb/Balboa_1_bg_020903.jpg
Jumper, pgs. 2, Corey Tom
Detective, pgs. 3, Rebbaz Royee
Bowler bowling, pg. 4, http://commons.wikimedia.org/wiki/Image:Bowlerbowling.JPG
Walker, pgs. 5, Corey Tom
Juggling, pg. 6, Aracapital, http://www.aracapital.com.au/
Softball vs. Bowling Ball, pg. 7, Rebbaz Royee
Dr. Experiment, pg. 8, Rebbaz Royee
Golfer, pg. 10, Dora Roychoudhury
Director’s Chair, pg, 14, http://www.thedirectorschairtv.com/
David Chai, pg, 18, http://www.houseofchai.net/
Basketball Players, pg, 22, http://sportscenteraustin.blogs.com/photos/uncategorized/sports_center_basketball_inju-ries.jpg
Cliff jumper, pg. 20, Rebbaz Royee
Golf ball squash, pg. 25, http://perfectgolfswingreview.net/TI-impact.jpg
Baseball squash pg. 25, Rebbaz Royee
Empire State Building, pg. 26, Wallace Gobetz (wallyg), Flickr.
Bouncing Ball, pg. 28, http://commons.wikimedia.org/wiki/Image:Bouncing_ball_strobe_edit.jpg
Physics of Animation is a project supported, in part, by the National Science Foundation
Special thanks to Alice Carter, Cassidy Curtis, David Chai, John Clapp, Courtney Granner, Lizz Greer, Rex Grignon, Martin McNamara, and the Shrunkenheadman Club at San Jose State.


![Thirteen recursion. Recursion ► [define horizontal-array [object spacing count → [if [= count 1] object [group object [translate [point spacing 0] [horizontal-array](https://img.pdfslide.us/doc/110x75/56649d375503460f94a10460/thirteen-recursion-recursion-define-horizontal-array-object-spacing.jpg)