Embed Size (px)
Citation preview
PHOTOTHERAPY WITH TIMER
FOR NEWBORN JAUNDICE
GRADUATION PROJECT SUBMITTED TO
THE BIOMEDICAL DEPARTMENT
OF
NEAR EAST UNIVERSITY
BY
YUSUF İNCEKALAN
SÜLEYMAN ÖKSÜZ
PARTIAL FULFILLMENT OF THE
REQUIREMENTS
FOR THE DEGREE OF BACHELOR OF SCIENCE
IN
BIOMEDICAL ENGINEERING
NICOSIA 2015

PHOTOTHERAPY WITH TIMER
FOR NEWBORN JAUNDICE
GRADUATION PROJECT SUBMITTED TO
THE BIOMEDICAL DEPARTMENT
OF
NEAR EAST UNIVERSITY
BY
YUSUF İNCEKALAN
SÜLEYMAN ÖKSÜZ
PARTIAL FULFILLMENT OF THE
REQUIREMENTS
FOR THE DEGREE OF BACHELOR OF SCIENCE
IN
BIOMEDICAL ENGINEERING
NICOSIA 2015

We hereby declare that all information in this document has been obtained and presented in
accordance with academic rules and ethical conduct. We also declare that, as required by
these rules and conduct, we have fully cited and referenced all material and results that are not
original to this work.
Name, Last name:
YUSUF İNCEKALAN – SÜLEYMAN ÖKSÜZ
Date:05/01/2015
I
ABSTRACT
Blue-light phototherapy has been an essential therapeutic tool in the
management of neonatal jaundice for decades. Rarely, it is accompanied by
acute dermatological and systemic side-effects, but fortunately these are
reversible and can be adequately and promptly treated in routine neonatal
practice. In contrast, much less is known about the potential long-term side-
effects of neonatal blue-light phototherapy (NBLP). Many of the data that are
currently available on how NBLP influences melanocytic naevus (MN)
development are controversial. The results of recent well-designed
epidemiological surveys suggest that NBLP could well be a risk factor for MN
formation, and highlight the need for additional in vivo and in vitro studies.
NBLP is at present the mainstay of treatment for neonatal jaundice, but in the
future greater consideration should be given to its long-term side-effects when
phototherapy is indicated. It is relevant to emphasize the importance of
appropriately restricted and adequate clinical guidelines, and strict monitoring of
the management of hyperbilirubinaemia, in order to avoid the unnecessary
overtreatment of newborn infants.
Keywords: Newborn jaundice, Phototherapy, Timing Circuit, Arduino

II
Dedication
We would like to dedicate this project to our beloved parents, grandparents and
family for their encouragement and support. Also to our friends, I will always
appreciate all they have done.
III
ACKNOWLEDGEMENTS
First and foremost we would like to thank our supervisor Mr. Ali Işın who has shown
plenty of encouragement, patience and support as he guided us through this project as
graduate students
We are also thankful for the contributions and comments of teaching staff of the
Department of Biomedical Engineering.
We are especially grateful to Assoc. Prof. Dr. Terin Adalı for being constant source of
encouragement. She helped us gain self-confidence. Here also we would like to thank our
co-advisor Mr. Fatih Nurçin and Mr. Cemre Özgöçmen who helped us one way or
another.
This Project was generously supported by the Department of Biomedical Engineering of
the Near East University.

IV
CONTENTS
ABSTRACT……………………………………………………………………………….I
ACKNOWLEDGEMENTS…………………………………………………………….III
TABLE OF CONTENTS……………………………………………………………….IV
LIST OF FIGURES……………………………………………………………………..IV
LIST OF DIAGRAMS…………………………………………………………………...X
LIST OF CHARTS……………………………...………………………………………XI
CHAPTER 1. INTRODUCTION .....................................................................................1
1.1 The Bilirubin..............................................................................................................1
1.1 Figure 1:The bilirubin in the human body system....................................................2
1.1 Figure2: The bilirubin producing pathway................................................................3
1.2 What is the bilirubin test? .........................................................................................4
1.3 Why it is done?............. ............................................................................................4
1.4 How to prepare?.........................................................................................................4
1.5 How it is done?..........................................................................................................5
1. 5.1 Blood sample from a heel stick …………………………………….……….5
1.5.2 Blood sample from a vein………………………………………….………...5
1.6 How It Feels? ................................................................................................................6
1.6.1 Blood sample from a heel stick……………………...………………….…...6
1.6.2 Blood sample from a vein? …………………………..……………………...6
1.7 Risks...............................................................................................................................6
1.7.1 Heel stick……………………………………………………………………..6

V
1.7.2 Blood test…………………………………………………………………….6
1.8 Results……………………………..……………………………………......………....6
1.8.1 Normal values in adults? ……………………………………………....…….6
1.8 Table: Normal bilirubin levels…………………………………………….………7
1.8.2 High values…………………………………………………………….…….7
1.8.3 Low values…………………………………………………………….……..7
1.8.4 Normal values in newborns………………………………………….…….7
1.9 What affects the test? ………………………………………………………….….8
1.10 Understanding the bilirubin………………………………………………….…8
1.11 Abnormalıtıes of bılırubın…………………………………………….………….9
1.11.1 Gilbert's Syndrome………………………………………………...……..9
1.11.2 Criglar-Najjar Syndrome, Type ……………………………………..……..9
1.11.3 Criglar-Najjar Syndrome, Type II (Arias Syndrome) …..…………...……..9
1.11.4 Dubin-Johnson Syndrome………………………………………….….…9
1.11.5 Rotor Syndrome………………………………………………………….9
1.12 Hyperbilirubinemia………………………………………………………….…..10
CHAPTER 2. NEWBORN JAUNDICE…………………………………………….…11
2.1 Newborn jaundice………………………………………….……………..…….…11
2.2Causes……………………………………………………………….………….…11
2.3Symptoms………………………………………………..…………………..…..…12
2.4 Exams and Tests………………………………………………………….……..…12
2.5 Treatment………………………………………………………………..………...13
2.6 Outlook (Prognosis) ……………………………………………………..……..…14
VI
2.7 When to Contact a Medical Professional ? ……………………………….………14
2.8 Prevention………………………………...………………………………………15
2.9 Alternative Names…………………………………………………………………15
CHAPTER 3. PHOTOTHERAPY………..……………………………………….…...16
3.1 Phototherapy ……………………………………………..……...………………..16
3.2 Indications……………………………………………………..…………...……...18
3.3 Contraindications……………………………………………………….….…..….18
3.4 Technical Considerations………………………………………………………….19
3.4.1 Important factors of the photoherapy………………………………………19
3.5 Complication Prevention………………………………………………………….21
3.6 Outcomes………………………………………………………………………….22
3.7 Patient Education & Consent……………………………………………….……..23
3.7.1 Patient instructions……………….……………………….……………………..23
3.8 Patient Preparation………………….………………………….………………….23
3.8.1 Positioning…………….……………………….…………………….....….23
3.9 Monitoring & Follow up…………………………….…………………..………..24
3.10 Approach considerations……………………………………………….….…….24
3.11 Device Summary………………………………………………………....…….26
3.12 Halogen-based phototherapy lamps…………………..…………………………26
3.13 Fluorescent tubes………………………………….………..……………………27
3.14 Fiberoptic phototherapy……………………….……………...……………….…27
3.15 LED phototherapy……………………………………………..…….………….28
VII
CHAPTER 4. ‘ARDUINO’ PROGRAMMABLE CIRCUIT BOARD……….…….30
4.1 Arduino………………….………..…………………………………..….…….…30
4.2 Summary………………………………………….…………………………..…..32
4.3 Schematic&Reference Design……………………………………………....…....33
4.4 Power…………………………………………………………………….…..…..34
4.4.1 The power pins are as follows………………………………………..…....34
4.5 Memory………………………………………………………………………...….35
4.6 Input and Output……………….…………………………………………………35
4.7 Communication………………………………………………………………….36
4.8 Programming…………………………………………………….……………….36
4.9 Automatic (Software) Reset…………………………………….……….……….37
4.10 USB Overcurrent Protection……………………………….……….………….38
4.11 Physical Characteristics…………………………………..…………………….38
CHAPTER 5. WHY DO WE NEED TO USE TIMER ON PHOTOTHERAPY?.....39
5.1 At the normal conditions…………………………………………………...………39
5.2 Main risks of the phototherapy…………………………………………………….39
5.2.1 It may cause skin rush and burns…………………………………...……….39
5.2.2 It damages the nerve layer at the back of the eye (retina)…………..............40
5.2.3 Dehydration……………………………………………………….....………41
5.2.4 Skin Rash…………………………………………………………….………41
5.3 Improvements………………………………………………………….………..…42
5.4 Advantages………………………………………………………….…………..….42
5.5 The flowchart of the our innovative project…………...………………….………..43

VIII
5.6 Requirements……………………………………………………………..………...44
5.6.1 An ‘Arduino Uno R3’ programmable circuit board (x1)……………..….….44
5.6.2 2x16 LCD screen shield V2 for ‘Arduino Uno R3’(x1)…………....………44
5.6.3 LM35 temperature sensor (x1)………………………….………...…………45
5.6.4 LDR (Light Dependent Resistor) (x1) ………………………………………45
5.6.5 Sparkfun electret microphone (x1) ……………………………………….…46
5.6.6 Relays (x2) ………………………………………………………...………..46
5.6.7 Adapter (220VAC to 12VDC) (x1) ……………………………..….………46
5.7 Diagram of Phototherapy With Timer…………………………………….……….47
5.8 How it used?..............................................................................................................47
5.9 Innovation for Phototherapy……………………………………………...………..48
5.10 Purpose………………………………..…………………………….….………..48
REFERENCES…………………………………………………………………..…...…49
APPENDIX- THE COMPLETE PROGRAM LISTING……………………...……..50
LIST OF FIGURES

IX
3.1: Light in the blue region of the spectrum, near 460 nm, is most strongly
absorbed by bilirubin…...................................................................................................18
3.2 : neoBLUE light-emitting diode (LED) phototherapy radiometer…………………22
3.3 :Infant under Ohmeda halogen lamp with eye protection..........................................23
3.4: Infant under neoBLUE phototherapy light and lying on fiberoptic
phototherapy blanket…………………………………………………………..………..24
3.5: neoBLUE light-emitting diode (LED) phototherapy system………………………25
4.1 : Arduino R3 front………………………………………………………..………...26
4.2: Arduino R3 back…………………………………………………………………...27
5.1: A hazardous type of the phototherapy to overused.(Burns)..………………………35
5.2: A hazardous type of the phototherapy to overused.(Dehydration) ………………..37
5.3: A hazardous type of the phototherapy to overused.(Skin rash)…. ………………..38
5.4: Arduino…………..……………………………….…………………………….….40
5.5: 2x16 LCD screen shield V2 for ‘Arduino Uno R3’…………………………..…..40
5.6: LM35 temperature sensor…………………………….…………….…………..….41
5.7: LDR (Light Dependent Resistor) ………………….………………………………41
5.8: Sparkfun electret microphone………………….………………………….…….....42
5.9: Relays………………………………………………..……………………………..42
5.10: Adapter (220VAC to 12VDC) ………………….………………….…………….42
5.11: It can apply to in front of the old phototherapy. .…………………..…………….44

X
LIST OF DIAGRAMS
1.1: The bilirubin production sequences and relations between the organs ……….............2
1.2: The bilirubin producing pathway...................................................................................3
3.1 :Mechanism of phototherapy………............................................................................16
4.3: Schematic & Reference Design……….......................................................................29
5.1: A hazardous type of the phototherapy to overused.(Optic nerve damaging) .............36
5.2 :The flowchart of the our innovative project………………………………...……….39
5.3: Diagram of Phototherapy With Timer.........................................................................43

XI
LIST OF CHARTS
1.1: Normal bilirubin levels...............................................................................................16
4.1: Technical properties of the ‘Arduino’ programmable circuit board............................37
1
1.INTRODUCTION
1.1 The Bilirubin
A bilirubin test measures the amount of bilirubin in a blood sample. Bilirubin is a
brownish yellow substance found in bile. It is produced when the liver breaks down old
red blood cells. Bilirubin is then removed from the body through the stool (feces) and
gives stool its normal color.
Bilirubin circulates in the bloodstream in two forms:
Indirect (or unconjugated) bilirubin. This form of bilirubin does not dissolve in
water (it is insoluble). Indirect bilirubin travels through the bloodstream to
the liver, where it is changed into a soluble form (direct or conjugated).
Direct (or conjugated) bilirubin. Direct bilirubin dissolves in water (it is soluble)
and is made by the liver from indirect bilirubin.
Total bilirubin and direct bilirubin levels are measured directly in the blood, whereas
indirect bilirubin levels are derived from the total and direct bilirubin measurements.
When bilirubin levels are high, the skin and whites of the eyes may appear yellow
(jaundice). Jaundice may be caused by liver disease (hepatitis), blood disorders (hemolytic
anemia), or blockage of the tubes (bile ducts) that allow bile to pass from the liver to the
small intestine.
Mild jaundice in newborns usually does not cause problems. But too much bilirubin
(hyperbilirubinemia) in a newborn baby can cause braindamage (kernicterus) and other
serious problems. So some babies who develop jaundice may need treatment to lower
their bilirubin levels. (Healthwise,2013)
2
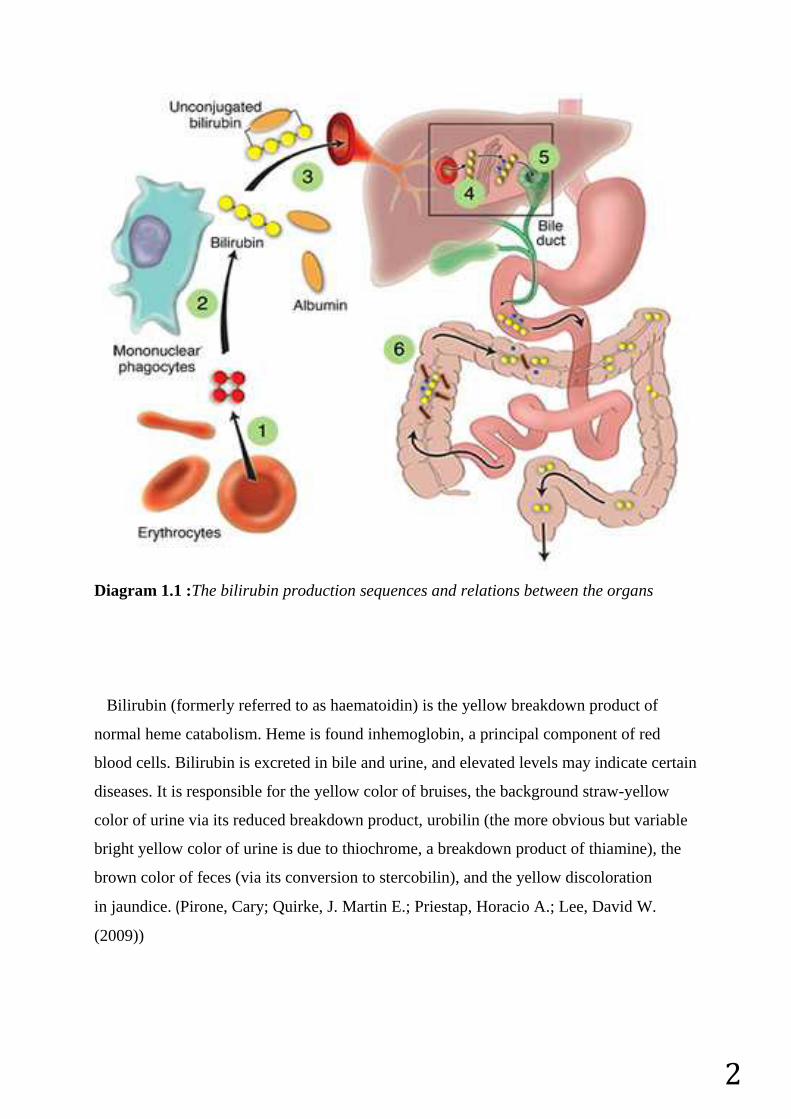
Diagram 1.1 :The bilirubin production sequences and relations between the organs
Bilirubin (formerly referred to as haematoidin) is the yellow breakdown product of
normal heme catabolism. Heme is found inhemoglobin, a principal component of red
blood cells. Bilirubin is excreted in bile and urine, and elevated levels may indicate certain
diseases. It is responsible for the yellow color of bruises, the background straw-yellow
color of urine via its reduced breakdown product, urobilin (the more obvious but variable
bright yellow color of urine is due to thiochrome, a breakdown product of thiamine), the
brown color of feces (via its conversion to stercobilin), and the yellow discoloration
in jaundice. (Pirone, Cary; Quirke, J. Martin E.; Priestap, Horacio A.; Lee, David W.
(2009))
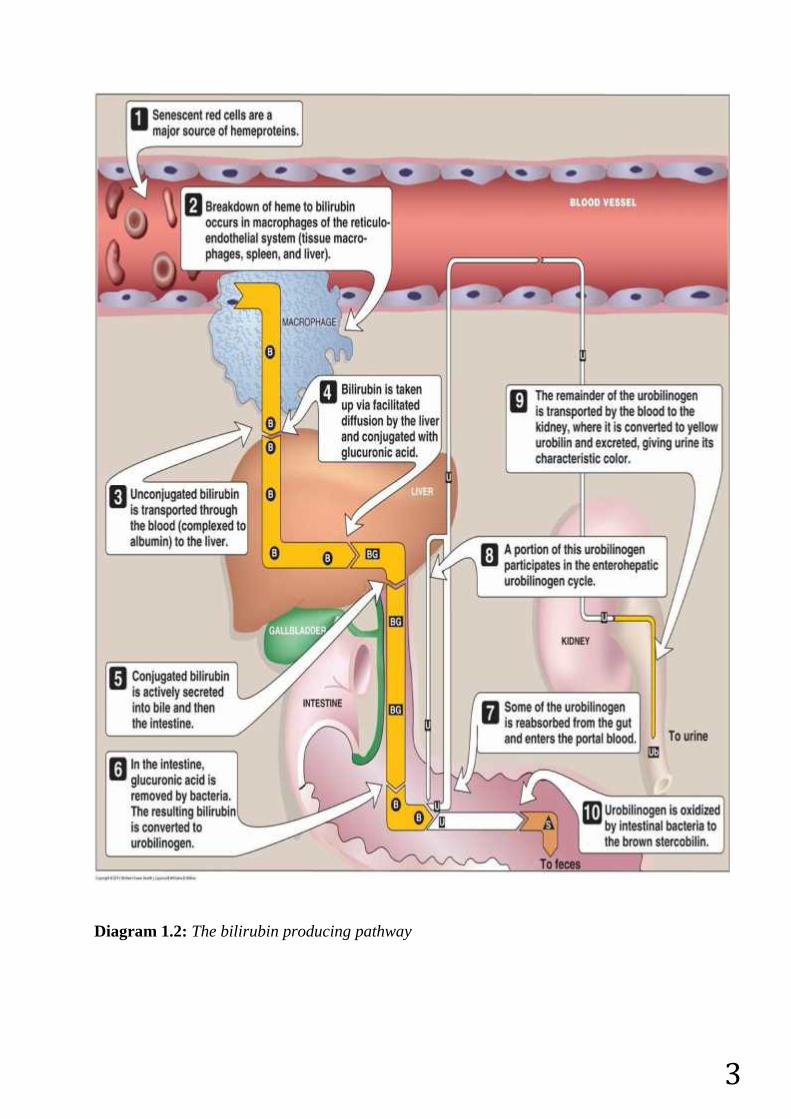
3Diagram 1.2: The bilirubin producing pathway
4
1.2 What is the bilirubin test?
1.3 Why it is done?
The bilirubin test is used to:
Check liver function and watch for signs of liver disease, such ashepatitis or cirrhosis,
or the effects of medicines that can damage the liver.
Find out if something is blocking the bile ducts. This may occur ifgallstones, tumors
of the pancreas, or other conditions are present.
Diagnose conditions that cause increased destruction of red blood cells, such as
hemolytic anemia or hemolytic disease of the newborn.
Help make decisions about whether newborn babies with neonatal jaundice need
treatment. These babies may need treatment with special lights, called phototherapy.
In rare cases, blood transfusions may be needed.
1.4 How to prepare?
Adults should not eat or drink for 4 hours before a bilirubin test.
No special preparation is needed for children before having a bilirubin test.
Tell your doctor if you:
Are taking any medicines.
Are allergic to any medicines.
Have had bleeding problems or take blood-thinners, such
as aspirin,clopidogrel (Plavix), or warfarin (Coumadin).
Are or might be pregnant.
Talk to your doctor about any concerns you have regarding the need for the test, its risks,
how it will be done, or what the results will mean. To help you understand the importance
of this test, fill out the medical test information form.
1.5 How it is done?
1.5.1 Blood sample from a heel stick
For a heel stick blood sample, several drops of blood are collected from the heel of your
baby. The skin of the heel is first cleaned with alcohol and then punctured with a small
sterile lancet. Several drops of blood are collected in a small tube. When enough blood
has been collected, a gauze pad or cotton ball is placed over the puncture site. Pressure is
maintained on the puncture site briefly, and then a small bandage is usually applied.
Instead of the standard heel stick, some hospitals may use a device called a transcutaneous
bilirubin meter to check a newborn's bilirubin level. This small handheld device measures
5
bilirubin levels when it is placed gently against the skin. With this device, there may be no
need to puncture the baby's skin. This is a screening test, and a blood sample will be
needed if your baby's bilirubin level is high.
1.5.2 Blood sample from a vein
The health professional taking a sample of your blood will:
Wrap an elastic band around your upper arm to stop the flow of blood. This makes
the veins below the band larger so it is easier to put a needle into the vein.
Clean the needle site with alcohol.
Put the needle into the vein. More than one needle stick may be needed.
Attach a tube to the needle to fill it with blood.
Remove the band from your arm when enough blood is collected.
Put a gauze pad or cotton ball over the needle site as the needle is removed.
Put pressure on the site and then put on a bandage.
1.6 How It Feels?
1.6.1 Blood sample from a heel stick
A brief pain, like a sting or a pinch, is usually felt when the lancet punctures the skin.
Your baby may feel a little discomfort with the skin puncture.
1.6.2 Blood sample from a vein
The blood sample is taken from a vein in your arm. An elastic band is wrapped around
your upper arm. It may feel tight. You may feel nothing at all from the needle, or you may
feel a quick sting or pinch.
1.7 Risks
1.7.1 Heel stick
There is very little chance of a problem from a heel stick. A small bruisemay develop at
the site.
1.7.2 Blood test
There is very little chance of a problem from having a blood sample taken from a vein.
You may get a small bruise at the site. You can lower the chance of bruising by
keeping pressure on the site for several minutes.
6
In rare cases, the vein may become swollen after the blood sample is taken. This
problem is called phlebitis. A warm compress can be used several times a day to
treat this.
Ongoing bleeding can be a problem for people with bleeding disorders. Aspirin,
warfarin (Coumadin), and other blood-thinning medicines can make bleeding more
likely. If you have bleeding or clotting problems, or if you take blood-thinning
medicine, tell your doctor before your blood sample is taken.
1.8 Results
A bilirubin test measures the amount of bilirubin in a blood sample. The results are
usually available in 1 to 2 hours.
1.8.1 Normal values in adults
The normal values listed here—called a reference range—are just a guide. These ranges
vary from lab to lab, and your lab may have a different range for what's normal. Your lab
report should contain the range your lab uses. Also, your doctor will evaluate your results
based on your health and other factors. This means that a value that falls outside the
normal values listed here may still be normal for you or your lab.
Bilirubin levels in adults
Bilirubin type Bilirubin level
Total bilirubin 0.0–1.4 mg/dL or 1.7–20.5 mcmol/L
Direct bilirubin 0.0–0.3 mg/dL or 1.7–5.1 mcmol/L
Indirect bilirubin 0.2–1.2 mg/dL or 3.4–20.5 mcmol/L
Table 1.1: Normal bilirubin levels
1.8.2 High values
High levels of bilirubin in the blood may be caused by:
Some infections, such as an infected gallbladder, or cholecystitis.
Some inherited diseases, such as Gilbert's syndrome, a condition that affects
how the liver processes bilirubin. Although jaundice may occur in some
people with Gilbert's syndrome, the condition is not harmful.
7
Diseases that cause liver damage, such as hepatitis, cirrhosis,
ormononucleosis.
Diseases that cause blockage of the bile ducts, such as gallstonesor cancer of
the pancreas.
Rapid destruction of red blood cells in the blood, such as fromsickle cell
disease or an allergic reaction to blood received during a transfusion (called
a transfusion reaction).
Medicines that may increase bilirubin levels. This includes manyantibiotics,
some types of birth control pills, diazepam (Valium),flurazepam,
indomethacin (Indocin), and phenytoin (Dilantin).
1.8.3 Low values
Low levels of bilirubin in the blood may be caused by:
Medicines that may decrease bilirubin levels. This includes vitamin
C,phenobarbital, and theophylline.
1.8.4 Normal values in newborns
Normal values in newborns depend on the age of the baby in hours and whether the baby
was premature or full term.
In a newborn, higher bilirubin is normal due to the stress of birth. Normal bilirubin in a
newborn would be under 5 mg/dL, but up to 60 percent of newborns have some kind of
jaundice and bilirubin levels above 5 mg/dL.
1.9 What affects the test?
Reasons you may not be able to have the test or why the results may not be helpful
(except in newborns) include:
Caffeine, which can lower bilirubin levels.
Not eating for a long period (fasting), which normally increases indirect bilirubin
levels.
Bilirubin can be measured in amniotic fluid if your doctor thinks that your unborn baby
may have a condition that destroys red blood cells (erythroblastosis fetalis). For more
information, see the topicAmniocentesis.
8
Bilirubin may also be measured in the urine in some cases. Normally, urine does not
contain any bilirubin. If bilirubin is detected in urine, additional testing may be needed to
determine the cause. High amounts of bilirubin in urine may indicate that the bilirubin is
not being removed from the body by the liver.
Using a transcutaneous bilirubin test, doctors can screen all newborns for jaundice. They
place a device gently against the skin to check bilirubin levels before a baby goes home
from the hospital.
1.10 Understanding the bilirubin
Jaundice typically occurs because newborns normally produce increased levels of
bilirubin which is referred to as "physiologic jaundice." Bilirubin, which is yellowish in
color, is produced when red blood cells are broken down. Bilirubin is removed from the
bloodstream by the liver. In newborns, the body may produce more bilirubin than the liver
can process.
Physiologic jaundice usually appears within a few days after birth and resolves within two
weeks. Other types of newborn jaundice can be due to prematurity, problems related
to breastfeeding, infection, blood type mismatch between mom and baby as well as other
blood or liver problems.
Since many mothers and babies leave the hospital soon after delivery, jaundice may not
appear until babies are at home. A newborn check is typically scheduled with your
pediatrician within the first few days of going home from the nursery to check for
jaundice.
It is important to contact your doctor if you notice signs of jaundice in your baby. If you
suspect jaundice you will likely need to see your doctor that same day. While jaundice is
usually very treatable, in the most extreme cases it can cause brain damage.
The ventricles then relax, and the heartbeat process starts all over again in the SA node.A
problem with any part of this process can cause an arrhythmia. For example, inatrial
fibrillation , a common type of arrhythmia, electrical signals travel through the atria in a
fast and disorganized way. This causes the atria to quiver instead of contract.
1.11 Abnormalıtıes of bılırubın1.11.1 Gilbert's Syndrome
Partial block in bilirubin conjugation
9
Benign elevation in total and unconjugated bilirubin
1.11.2 Criglar-Najjar Syndrome, Type I
Absence of bilirubin conjugation enzyme
Marked unconjugated hyperbilirubinemia & jaundice
May cause death in infancy
1.11.3 Criglar-Najjar Syndrome, Type II (Arias Syndrome)
Defect uncertain
Moderate hyperbilirubinemia
Bilirubin decreasese with phenobarbital treatment, which increases the amount and
activity ("induces") the conjugating enzymes in hepatocytes
1.11.4 Dubin-Johnson Syndrome
Defect in transport of bilirubin into bile
Mild conjugated and unconjugated hyperbilirubinemia; conjugated predominates
Jaundice may be precipitated by other illnesses
Urinary coproporphyrin I is elevated.
1.11.5 Rotor Syndrome
Defect in transport of bilirubin into bile
Mild conjugated hyperbilirubinemia
Jaundice may be precipitated by other illnesses
Serum bile acid levels are increased
1.12 Hyperbilirubinemia
Diseases that reduce the rate of secretion of conjugated bilirubin into the bile or the
flow of bile into the intestine produce a mixed or predominantly conjugated
hyperbilirubinemia due to the reflux of conjugates back into the plasma. Elevated
conjugated bilirubin levels usually indicate hepatobiliary disease.
Laboratory assays for bilirubin typically involve its cleavage in the presence of diazotized
sulfanilic acid to generate a colored azodipyrrole that can be assayed
spectrophotometrically. Because of its limited aqueous solubility, unconjugated bilirubin
reacts slowly in the absence of an accelerator, such as ethanol, whereas conjugated
bilirubin reacts rapidly. Total bilirubin is measured in the presence of an accelerator,
whereas directly reacting bilirubin is measured without an accelerator. Indirectly reacting
10
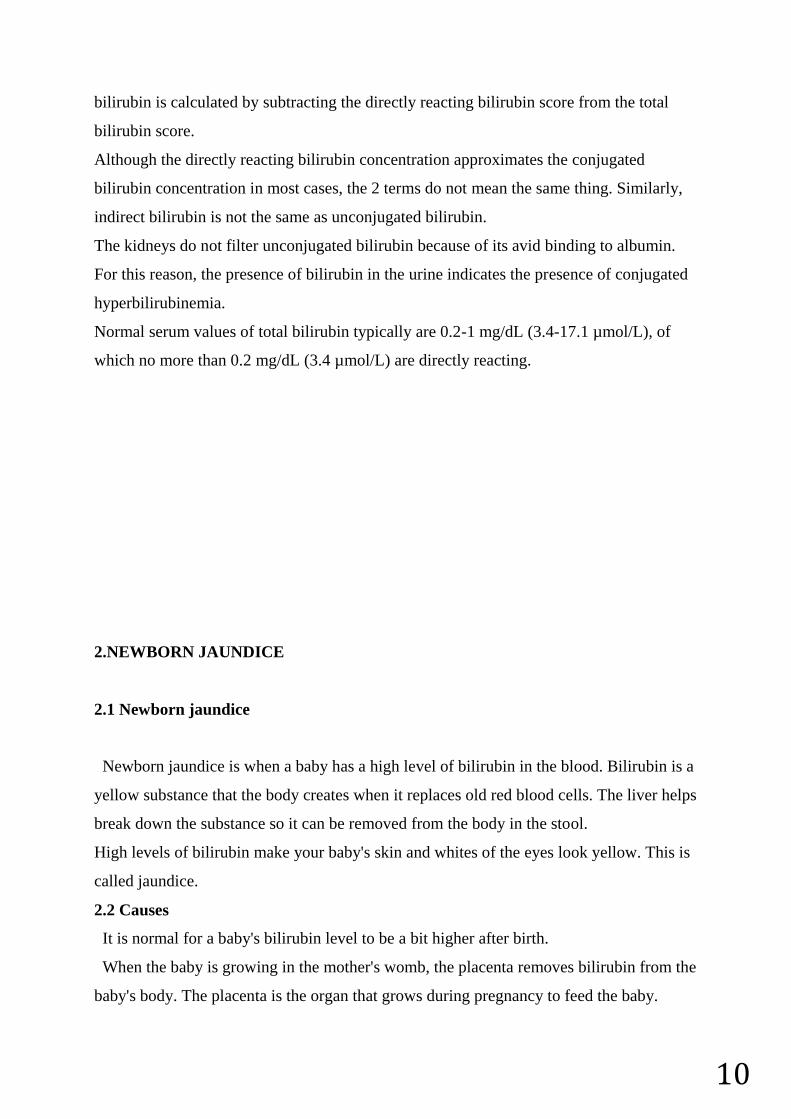
bilirubin is calculated by subtracting the directly reacting bilirubin score from the total
bilirubin score.
Although the directly reacting bilirubin concentration approximates the conjugated
bilirubin concentration in most cases, the 2 terms do not mean the same thing. Similarly,
indirect bilirubin is not the same as unconjugated bilirubin.
The kidneys do not filter unconjugated bilirubin because of its avid binding to albumin.
For this reason, the presence of bilirubin in the urine indicates the presence of conjugated
hyperbilirubinemia.
Normal serum values of total bilirubin typically are 0.2-1 mg/dL (3.4-17.1 µmol/L), of
which no more than 0.2 mg/dL (3.4 µmol/L) are directly reacting.
2.NEWBORN JAUNDICE
2.1 Newborn jaundice
Newborn jaundice is when a baby has a high level of bilirubin in the blood. Bilirubin is a
yellow substance that the body creates when it replaces old red blood cells. The liver helps
break down the substance so it can be removed from the body in the stool.
High levels of bilirubin make your baby's skin and whites of the eyes look yellow. This is
called jaundice.
2.2 Causes
It is normal for a baby's bilirubin level to be a bit higher after birth.
When the baby is growing in the mother's womb, the placenta removes bilirubin from the
baby's body. The placenta is the organ that grows during pregnancy to feed the baby.
11
After birth, the baby's liver starts doing this job. It may take some time for the baby’s liver
to be able to do this efficiently.
Most newborns have some yellowing of the skin, or jaundice. This is called
"physiological jaundice." It is often most noticeable when the baby is 2 - 4 days old. Most
of the time it does not cause problems and goes away within 2 weeks.
Two types of jaundice may occur in newborns who are breastfed. Both types are most
often harmless.
Breastfeeding jaundice is seen in breastfed babies during the first week of life. It is
more likely to occur when babies do not nurse well or the mother's milk is slow to
come in.
Breast milk jaundice may appear in some healthy, breastfed babies after day 7 of
life. It is likely to peak during weeks 2 and 3 but may last at low levels for a month
or more. The problem may be due to how substances in the breast milk affect the
breakdown of bilirubin in the liver. Breast milk jaundice is different than
breastfeeding jaundice.
Severe newborn jaundice may occur if your baby has a condition that increases the
number of red blood cells that need to be replaced in the body, such as:
Abnormal blood cell shapes
Blood type mismatch between the mother and baby
Bleeding underneath the scalp (cephalohematoma) caused by a difficult delivery
Higher levels of red blood cells, which is more common in small-for-gestational-
age babies and some twins
Infection
Lack (deficiency) of certain important proteins, called enzymes
Things that make it harder for the baby's body to remove bilirubin may also lead to more
severe jaundice, including:
Certain medicines
Infections present at birth, such as rubella, syphilis, and others
Diseases that affect the liver or biliary tract, such as cystic fibrosis or hepatitis
Low oxygen level (hypoxia)
Infections (such as sepsis)
Many different genetic or inherited disorders
12
Babies who are born too early (premature) are more likely to develop jaundice than full-
term babies.
2.3 Symptoms
Jaundice causes a yellow color of the skin. The color sometimes begins on the face and
then moves down to the chest, belly area, legs, and soles of the feet.
Sometimes, infants with a lot of jaundice may be very tired and feed poorly.
2.4 Exams and Tests
Doctors, nurses, and family members will watch for signs of jaundice at the hospital and
after the newborn goes home.
Any infant who appears jaundiced should have bilirubin levels measured right away.
This can be done with a blood test.
Many hospitals check total bilirubin levels on all babies at about 24 hours of age.
Hospitals use probes that can estimate the bilirubin level just by touching the skin. High
readings need to be confirmed with blood tests.
Tests that will likely be done include:
Complete blood count
Coomb's test
Reticulocyte count
Further testing may be needed for babies who need treatment or whose total bilirubin
levels are rising more quickly than expected.
2.5 Treatment
Treatment is not needed most of the time.
When treatment is needed, the type will depend on:
The baby's bilirubin level
How fast the level has been rising
Whether the baby was born early (babies born early are more likely to be treated at
lower bilirubin levels)
How old the baby is
A baby will need treatment if the bilirubin level is too high or is rising too quickly.
A baby with jaundice needs to be kept well hydrated with breast milk or formula.
Feed the baby often (up to 12 times a day) to encourage frequent bowel
movements. These help remove bilirubin through the stools.
13
Ask your doctor before giving your newborn extra formula.
Some newborns need to be treated before they leave the hospital. Others may need to go
back to the hospital when they are a few days old. Treatment in the hospital usually lasts 1
to 2 days.
Sometimes special blue lights are used on infants whose levels are very high. These
lights work by helping to break down bilirubin in the skin. This is called phototherapy.
The infant is placed under artificial light in a warm, enclosed bed to maintain
a constant temperature.
The baby will wear only a diaper and special eye shades to protect the eyes.
The American Academy of Pediatrics recommends that breastfeeding be continued
through phototherapy, if possible.
Rarely, the baby may have an intravenous (IV) line to deliver fluids.
If the bilirubin level is not too high or is not rising quickly, you can do phototherapy at
home with a fiberoptic blanket, which has tiny bright lights in it. You may also use a bed
that shines light up from the mattress.
You must keep the light therapy on your child's skin and feed your child every 2 to
3 hours (10 to 12 times a day).
A nurse will come to your home to teach you how to use the blanket or bed, and to
check on your child.
The nurse will return daily to check your child's weight, feedings, skin, and
bilirubin levels.
You will be asked to count the number of wet and dirty diapers.
In the most severe cases of jaundice, an exchange transfusion is required. In this
procedure, the baby's blood is replaced with fresh blood. Giving babies with very bad
jaundice intravenous immunoglobulin may also be effective at reducing bilirubin levels.
2.6 Outlook (Prognosis)
Newborn jaundice is not harmful most of the time. For most babies, jaundice will get
better without treatment within 1 to 2 weeks.
Very high levels of bilirubin can damage the brain. This is called kernicterus. However,
the condition is almost always diagnosed before levels become high enough to cause this
damage.
For babies who need treatment, the treatment is very often effective.
14
Possible Complications
Rare, but serious complications from high bilirubin levels include:
Cerebral palsy
Deafness
Kernicterus -- brain damage from very high bilirubin levels
2.7 When to Contact a Medical Professional ?
All babies should be seen by a health care provider in the first 5 days of life to check for
jaundice.
Infants who spend less than 24 hours in a hospital should be seen by age 72 hours.
Infants who are sent home between 24 and 48 hours should be seen again by age
96 hours.
Infants who are sent home between 48 and 72 hours should be seen again by age
120 hours.
Jaundice is an emergency if the baby has a fever, has become listless, or is not feeding
well. Jaundice may be dangerous in high-risk newborns.
Jaundice is generally NOT dangerous in babies who were born full term and who do not
have other medical problems. Call the infant's health care provider if:
Jaundice is severe (the skin is bright yellow)
Jaundice continues to increase after the newborn visit, lasts longer than 2 weeks, or
other symptoms develop
The feet, especially the soles, are yellow
2.8 Prevention
In newborns, some degree of jaundice is normal and probably not preventable. The risk
of serious jaundice can often be reduced by feeding babies at least 8 to 12 times a day for
the first several days and by carefully identifying infants at highest risk.
All pregnant women should be tested for blood type and unusual antibodies. If the
mother is Rh negative, follow-up testing on the infant's cord is recommended. This may
also be done if the mother's blood type is O+, but it is not needed if careful monitoring
takes place.
Careful monitoring of all babies during the first 5 days of life can prevent most
complications of jaundice. This includes:
Considering a baby's risk for jaundice
15
Checking bilirubin level in the first day or so
Scheduling at least one follow-up visit the first week of life for babies sent home
from the hospital in 72 hours
2.9 Alternative Names: Jaundice of the newborn; Neonatal hyperbilirubinemia; Bili
lights – jaundice.
3.PHOTOTHERAPY
3.1 Phototherapy
Phototherapy is the most common treatment for reducing highbilirubin levels that
cause jaundice in a newborn.
In the standard form of phototherapy, your baby lies in a bassinet or enclosed plastic crib
(incubator) and is exposed to a type of fluorescent light that is absorbed by your
baby's skin. During this process, the bilirubin in the baby's body is changed into another
form that can be more easily excreted in the stool and urine.
Effective treatments to decrease bilirubin levels in infants with severe jaundice include
phototherapy and exchange transfusion.
The effect of light on jaundice in neonates, and the ability of light to decrease serum bilirubin
levels, was first described by Cremer et al in 1958. This observation led to the development
of light sources for use in the treatment of infants with hyperbilirubinemia, a treatment now
referred to as phototherapy. Since its inception, phototherapy has been effectively used as a
relatively inexpensive and noninvasive method of treating neonatal hyperbilirubinemia.
16
The decline in the number or exchange transfusions in recent years is, at least in part,
likely a direct reflection of the effectiveness of phototherapy at treating
hyperbilirubinemia. In modern neonatal ICUs (NICUs) exchange transfusions are rare
and are only used as a rescue therapy to avoid kernicterus in newborns with severe
jaundice when phototherapy is inadequate.
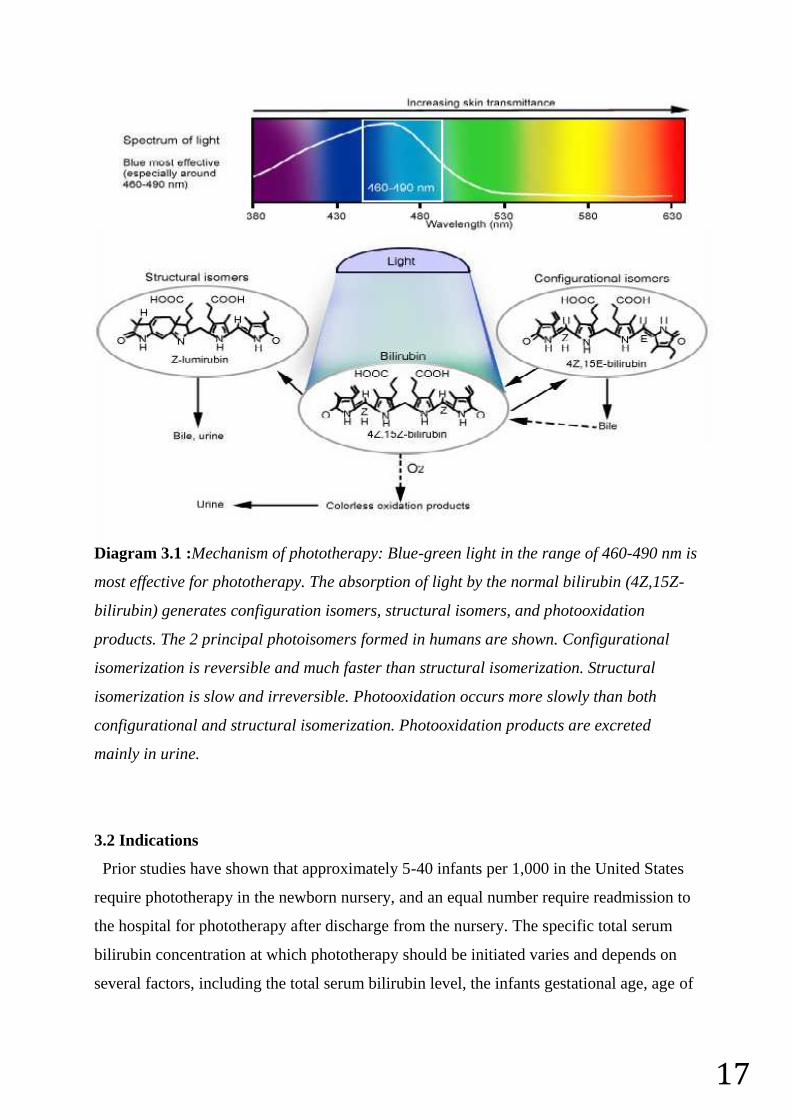
At its most basic, phototherapy refers to the use of light to convert bilirubin molecules in
the body into water soluble isomers that can be excreted by the body. The absorption of
light by normal bilirubin (4Z,15Z-bilirubin) results in the creation of 2 isomeric forms of
bilirubin: structural isomers and configurational isomers. The main structural isomer of
bilirubin is Z-lumirubin. The main configurational isomer of bilirubin is 4Z,15 E -
bilirubin. Configurational isomerization is reversible, and structural isomerization is
irreversible. Both the configurational and structural isomers of bilirubin are less lipophilic
than normal bilirubin and can be excreted into bile without undergoing glucuronidation in
the liver. Some of the configurational isomers of bilirubin, however, revert back to the
native form after excretion into bile and can be reabsorbed via enterohepatic circulation in
the gut. Structural bilirubin isomers, like Z-lumirubin, can also be excreted in the urine.
The absorptions of light by bilirubin also results in the generation of excited-state
bilirubin molecules that react with oxygen to produce colorless oxidation products, or
photooxidation products. This process occurs more slowly than configurational or
structural isomerization. Photooxidation products are primarily excreted in the urine. The
image below provides a schematic of the conversion of normal bilirubin to configurational
isomers, structural isomers, and photooxidation products and the respective routes of
excretion from the body.
17
Diagram 3.1 :Mechanism of phototherapy: Blue-green light in the range of 460-490 nm is
most effective for phototherapy. The absorption of light by the normal bilirubin (4Z,15Z-
bilirubin) generates configuration isomers, structural isomers, and photooxidation
products. The 2 principal photoisomers formed in humans are shown. Configurational
isomerization is reversible and much faster than structural isomerization. Structural
isomerization is slow and irreversible. Photooxidation occurs more slowly than both
configurational and structural isomerization. Photooxidation products are excreted
mainly in urine.
3.2 Indications
Prior studies have shown that approximately 5-40 infants per 1,000 in the United States
require phototherapy in the newborn nursery, and an equal number require readmission to
the hospital for phototherapy after discharge from the nursery. The specific total serum
bilirubin concentration at which phototherapy should be initiated varies and depends on
several factors, including the total serum bilirubin level, the infants gestational age, age of

18
the infant in hours at the time of testing, and any individual risk factors for
hyperbilirubinemia.
Risk factors for the development of severe hyperbilirubinemia and kernicterus include
isoimmune hemolytic disease, glucose-6-phosphate deficiency, asphyxia, significant
lethargy, temperature instability, sepsis, acidosis, and hypoalbuminemia (< 3g/dL). To aid
physicians in the decision on when to initiate phototherapy, the American Academy of
Pediatrics Subcommittee on Hyperbilirubinemia developed guidelines on the management
of hyperbilirubinemia in newborns 35 or more weeks’ gestation. This guideline includes
an algorithm for the management of jaundice in the newborn nursery as well as
guidelines for the initiation of phototherapy based on total serum bilirubin levels,
gestational age, age of the infant in hours, and individual risk factors.
No evidence-based guidelines are available on the indication for phototherapy in
premature infants less than 35 weeks’ gestation. However, several commonly used
reference texts provide tables. A commonly used rule of thumb in the NICU is to start
phototherapy when the total serum bilirubin level is greater than 5 times the birth weight.
Thus, in a 1-kg infant, phototherapy is started at a bilirubin level of 5mg/dL; in a 2-kg
infant, phototherapy is started at a bilirubin level of 10mg/dL and so on.
3.3 Contraindications
Few contraindications to phototherapy are recognized. These include the concomitant
use of photosensitizing medications, a diagnosis of congenital erythropoietic porphyria, or
a family history of porphyria. Infants with cholestatic jaundice and direct
hyperbilirubinemia who are exposed to phototherapy may experience a dark, gray-brown
discoloration of the skin, commonly known as ”bronze-baby syndrome.” The etiology of
this discoloration is unknown but is possibly due to porphyrin accumulation. The skin
discoloration that occurs with bronze-baby syndrome is transient and disappears with the
discontinuation of phototherapy. The presence of direct hyperbilirubinemia is not a
contraindication to phototherapy.
3.4 Technical Considerations
3.4.1 Important factors of the photoherapy

19
The 3 factors that affect the dose of phototherapy include the irradiance of light used,
the distance from the light source, and the amount of skin exposed. Standard phototherapy
is provided at an irradiance of 8-10 microwatts per square centimeter per nanometer
(mW/cm2 per nm). Intensive phototherapy is provided at an irradiance of 30 mW/cm2 per
nm or more (430–490 nm). For intensive phototherapy, an auxiliary light source should be
placed under the infant. The auxiliary light source could include a fiber-optic pad, a light-
emitting diode (LED) mattress, or a bank of special blue fluorescent tubes. Term and near-
term infants should receive phototherapy in a bassinet and the light source should be
brought as close as possible to the infant, typically within 10-15 cm. However, if halogen
or tungsten lights are used, providers should follow the manufacturer recommendation on
the distance of the light from the infant to avoid overheating. Preterm infant can be treated
in an incubator, but the light rays from the phototherapy device should be perpendicular to
the surface of the incubator to minimize light reflectance. Adapted from Maisel MJ,
McDonagh AD. Phototherapy for Neonatal Jaundice. N Engl J Med. 2008;358:920-928.
The effectiveness of phototherapy at converting bilirubin into configurational isomers,
structural isomers, and photooxidation products is determined by the dose of phototherapy
provided to the infant. The dose of phototherapy depends on several factors, including the
spectral wave length of light, the spectral irradiance delivered to the infant’s skin, and the
total spectral power (average spectral irradiance delivered across the surface area of the
infant). Factors that affect phototherapy are described in the image below.
20
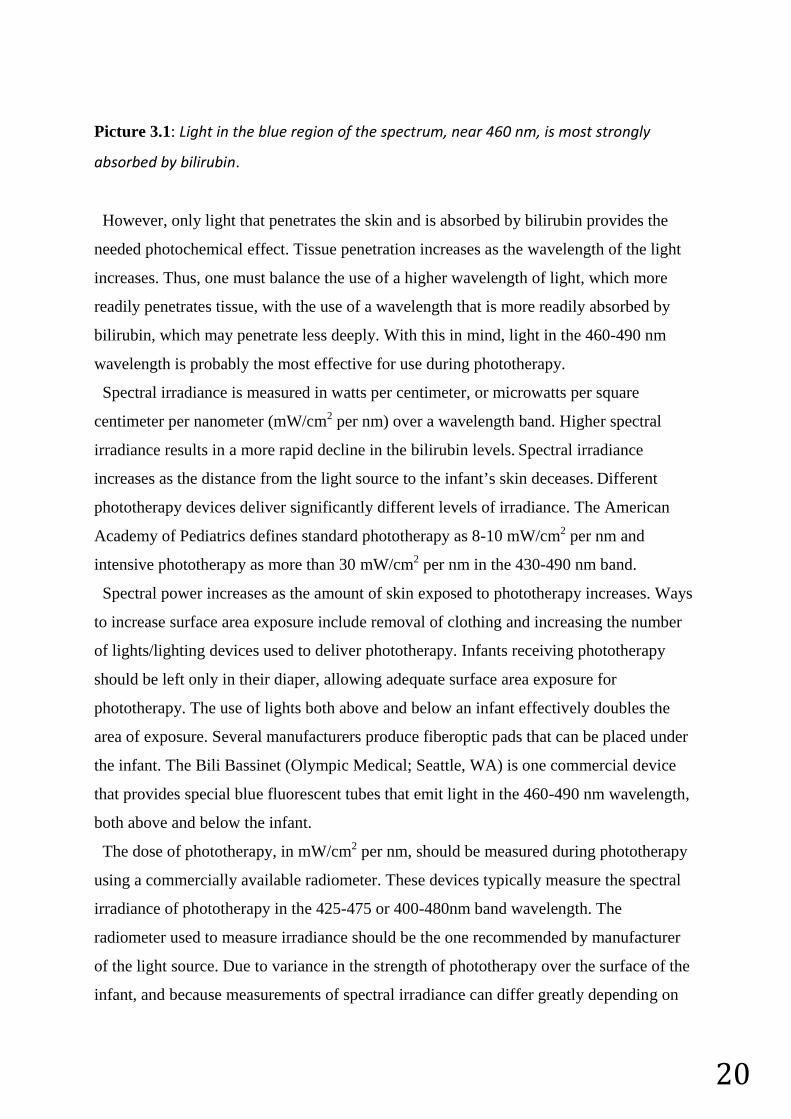
Picture 3.1: Light in the blue region of the spectrum, near 460 nm, is most strongly
absorbed by bilirubin.
However, only light that penetrates the skin and is absorbed by bilirubin provides the
needed photochemical effect. Tissue penetration increases as the wavelength of the light
increases. Thus, one must balance the use of a higher wavelength of light, which more
readily penetrates tissue, with the use of a wavelength that is more readily absorbed by
bilirubin, which may penetrate less deeply. With this in mind, light in the 460-490 nm
wavelength is probably the most effective for use during phototherapy.
Spectral irradiance is measured in watts per centimeter, or microwatts per square
centimeter per nanometer (mW/cm2 per nm) over a wavelength band. Higher spectral
irradiance results in a more rapid decline in the bilirubin levels. Spectral irradiance
increases as the distance from the light source to the infant’s skin deceases. Different
phototherapy devices deliver significantly different levels of irradiance. The American
Academy of Pediatrics defines standard phototherapy as 8-10 mW/cm2 per nm and
intensive phototherapy as more than 30 mW/cm2 per nm in the 430-490 nm band.
Spectral power increases as the amount of skin exposed to phototherapy increases. Ways
to increase surface area exposure include removal of clothing and increasing the number
of lights/lighting devices used to deliver phototherapy. Infants receiving phototherapy
should be left only in their diaper, allowing adequate surface area exposure for
phototherapy. The use of lights both above and below an infant effectively doubles the
area of exposure. Several manufacturers produce fiberoptic pads that can be placed under
the infant. The Bili Bassinet (Olympic Medical; Seattle, WA) is one commercial device
that provides special blue fluorescent tubes that emit light in the 460-490 nm wavelength,
both above and below the infant.
The dose of phototherapy, in mW/cm2 per nm, should be measured during phototherapy
using a commercially available radiometer. These devices typically measure the spectral
irradiance of phototherapy in the 425-475 or 400-480nm band wavelength. The
radiometer used to measure irradiance should be the one recommended by manufacturer
of the light source. Due to variance in the strength of phototherapy over the surface of the
infant, and because measurements of spectral irradiance can differ greatly depending on
21
where on the infant the measurement is made, taking several measures in different
locations on the infant and averaging the values is important.
3.5 Complication Prevention
Eye protection should be placed on all infants receiving phototherapy. The need for eye
protection is based on animal data that phototherapy may be damaging to the
retina. Various commercially available infant eye shields are available for use. In addition
to eye shields, many centers also prescribe lubricating eye drops (carboxymethylcellulose
sodium) for infant receiving phototherapy. The infant's temperature should be closely
monitored while receiving phototherapy. This is especially important in infant under
halogen lights because these emit significant amounts of heat and can cause hyperthermia.
Unclothed infants in basinets under fluorescent or light-emitting diode (LED) devices are
at risk for hypothermia, especially if they are in an area with a low ambient temperature.
Premature infants and infants unable to maintain body temperature in a basinet should be
placed on a radiant warmer or in an isolette while receiving phototherapy in order to
maintain normothermia.
The use of photosensitizing medications should be avoided while infants are receiving
phototherapy. Medications used in the newborn period that have been linked to phototoxic
reactions include nonsteroidal anti-inflammatory drugs (ibuprofen), diuretics (furosemide,
hydrochlorothiazide), and certain antibiotics (doxycycline, tetracycline, ciprofloxacin,
ofloxacin, levofloxacin, and sulfonamides). In general, however, photosensitivity from
medications are most likely to occur after exposure to light in the UV-A (320- 400 nm)
and UV-B (290-302 nm) ranges. Because phototherapy does not produce significant UV-
A or UV-B light, phototoxic reactions in infants receiving these medications are rare
3.6 Outcomes
Phototherapy has been safely used for the treatment of neonatal jaundice for over 40
years. Complications from phototherapy are rare and generally mild. The two most
notable complications include increased insensible water loss and cutaneous reactions in
infants with cholestatic jaundice receiving phototherapy.
Phototherapy with halogen spot lights can increase cutaneous blood flow and increase
insensible water loss through the skin. This is especially important in premature infants
22
whose skin barrier function is compromised due to immaturity and is more permeable to
water. Contemporary studies in premature infants undergoing phototherapy with halogen
spot lights have shown transepidermal water loss increases of 20-26%, despite constant
temperature and relative humidity. Phototherapy is thought to increases skin blood flow by
a mechanism known as photorelaxation. The pathway of this mechanism is not completely
understood but is believed to be caused by S-nitrosothiols mediated nitric oxide release.
Due to this increase in insensible water loss, recommendations have been made to
increase maintenance fluid by 10 mL/kg/d in premature infants exposed to conventional
phototherapy. Additional intravenous fluids are not required in term infants who are
maintaining adequate oral intake. Increases in transepidermal water loss in premature
infants have not been documented with LED-based phototherapy.
A dark, greyish-brown discoloration of the skin may develop in infants with cholestatic
jaundice and direct hyperbilirubinemia exposed to phototherapy. This reaction is
commonly referred to as bronzed-baby syndrome. This discoloration of the skin is
transient and resolves with cessation of phototherapy. Bolus and purpuric reactions of the
skin have also been reported in infants with severe cholestatic jaundice receiving
phototherapy. This is thought to be due to sensitization by accumulation of porphyrins
3.7 Patient Education & Consent
3.7.1 Patient instructions
According to the American Academy of Pediatrics Clinical Practice Guidelines on the
management of hyperbilirubinemia in infants 35 or more weeks’ gestation, all hospitals
should provide verbal or written information to parents explaining jaundice, the need to
monitor infants for jaundice, and details on how that monitoring should be done. An a
example of such a handout is provided by the American Academy of Pediatrics.
3.8 Patient Preparation
3.8.1 Positioning
Infants receiving phototherapy should be placed lying flat on a radiant warmer or in a
bassinet. Small or premature infants can remain in an infant incubator during
23
phototherapy. The infant should be naked with the exception of eye protection and a
diaper to maximize the surface area of skin exposed to light. The phototherapy device
should be placed at the side of the infant’s bed with the light shining on the infant and
covering as much surface area as possible.
When fluorescent tubes or LED devices are used, the infant should be placed as close as
possible to the light source, typically within 10 cm.[4] This increases the spectral irradiance
of the light delivered. Halogen-based devices emit greater amounts of heat than
fluorescent or LED devices and therefore need to be positioned at a greater distance from
the infant. Providers should follow the manufacturer’s recommendations on how far to
position the halogen light source from the infant.
Fiberoptic pads can be positioned directly underneath the infant to provide an additional
source of phototherapy. The fiberoptic pads do not emit significant heat. Due to their
relatively hard surface, phototherapy pads should be used with caution in extremely low
birth weight infants or other infants who are at risk for skin break down from pressure
sores.
If phototherapy is provided through the top of an infant, incubator the light source should
be kept perpendicular to the surface of the isolette to decrease light reflectance off the
plastic, which diminishes the amount of light that reaches the infant inside the isolette. In
cases of severe hyperbilirubinemia, white towels or aluminum foil can be placed around
the interior of the bassinet to reflect light back on the infant and increase surface area
exposure.
3.9 Monitoring & Follow up
Monitoring of serial bilirubin values in infants on phototherapy is important to confirm
that the therapy is effective. With intensive phototherapy (>30 mW/cm2per nm), a
decrease in bilirubin concentration by 30-40% can be expected within the first 24 hours.
The most significant drop in bilirubin concentration is typically seen within the first 4-6
hours of phototherapy. Thus, bilirubin concentrations are typically checked prior to the
start of phototherapy, after 4-6 hours of phototherapy to confirm effectiveness, and then
repeated at 12-24 hour intervals until levels are low enough to stop phototherapy.
Although no standard is noted for the discontinuation of phototherapy, current guidelines
suggest stopping phototherapy on infants 35 or more weeks’ gestation at birth readmitted
after their birth hospitalization when the levels of total bilirubin fall below 13-14 mg/dL.
24
For infants with hemolytic disease, and in those younger than 3-4 days, a ”rebound”
bilirubin should be checked within 24 hours after discontinuation of phototherapy.[4] This
24-hour rebound bilirubin check can also be considered in infants 35 or more weeks’
gestation at birth with nonhemolytic jaundice who are readmitted with
hyperbilirubinemia.
No evidenced-based guidelines to indicate when phototherapy should be discontinued in
premature infants. In general, phototherapy is stopped when the total serum bilirubin level
is several points lower than when it was started. Most practitioners routinely check a
rebound bilirubin in all premature infants within 24-48 hours after discontinuation of
phototherapy, or sooner if a hemolytic process is present.
3.10 Approach considerations
Determine if the infant requires phototherapy based on the infant total serum
bilirubin level, the gestation age, hours of life, and individual risk factors using
established guidelines form the American Academy of Pediatrics.[4]
Place infant on warmer or in bassinet with diaper on and eye protection in place.
Position phototherapy device at bedside with lights set at recommended distance
from the infant. For fluorescent and LED lights, this is as close as possible to the
infant’s skin, typically less than 10 cm.[4] If using a halogen spot light, the light
should be kept at the manufacturer recommended distance to avoid overheating.
Turn on the phototherapy lights.
Direct light towards the infant with exposure of maximal surface area. If halogen
spotlights are used, more than one light may be required to cover the entire infant
with light. This is typically done with one light directed at the chest and head, with
the second directed at the abdomen and legs.
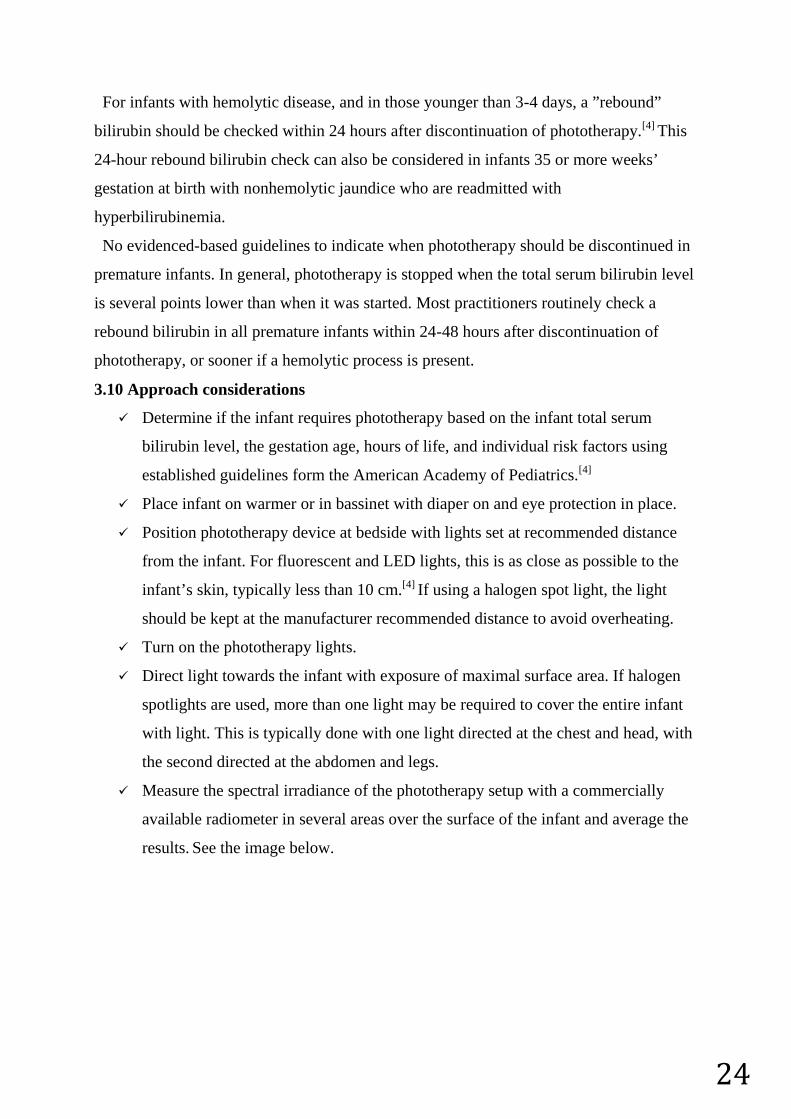
Measure the spectral irradiance of the phototherapy setup with a commercially
available radiometer in several areas over the surface of the infant and average the
results. See the image below.
25
Picture 3.2 : neoBLUE light-emitting diode (LED) phototherapy radiometer.
Follow serial bilirubin levels to ensure the phototherapy is effectively decreasing
the bilirubin level.
Intermittently repeat measurements of the spectral irradiance and maintain the
lights in the proper position to provide maximum benefit.
3.11 Device Summary
Several devices can be used to provide phototherapy. These include tungsten-halogen
lamps, fluorescent tubes, fiberoptic systems, and gallium nitride LED lights. All these
devices are capable of emitting light in the 430-490 nm band at standard spectral
irradiance levels of 8-10 mW/cm2 per nm. However, when intensive phototherapy is
required either ”special blue” fluorescent tubes or specially designed LED devices should
be used because these are the only devices that can reliably provide more than 30
mW/cm2 per nm in the 430-490 nm band.
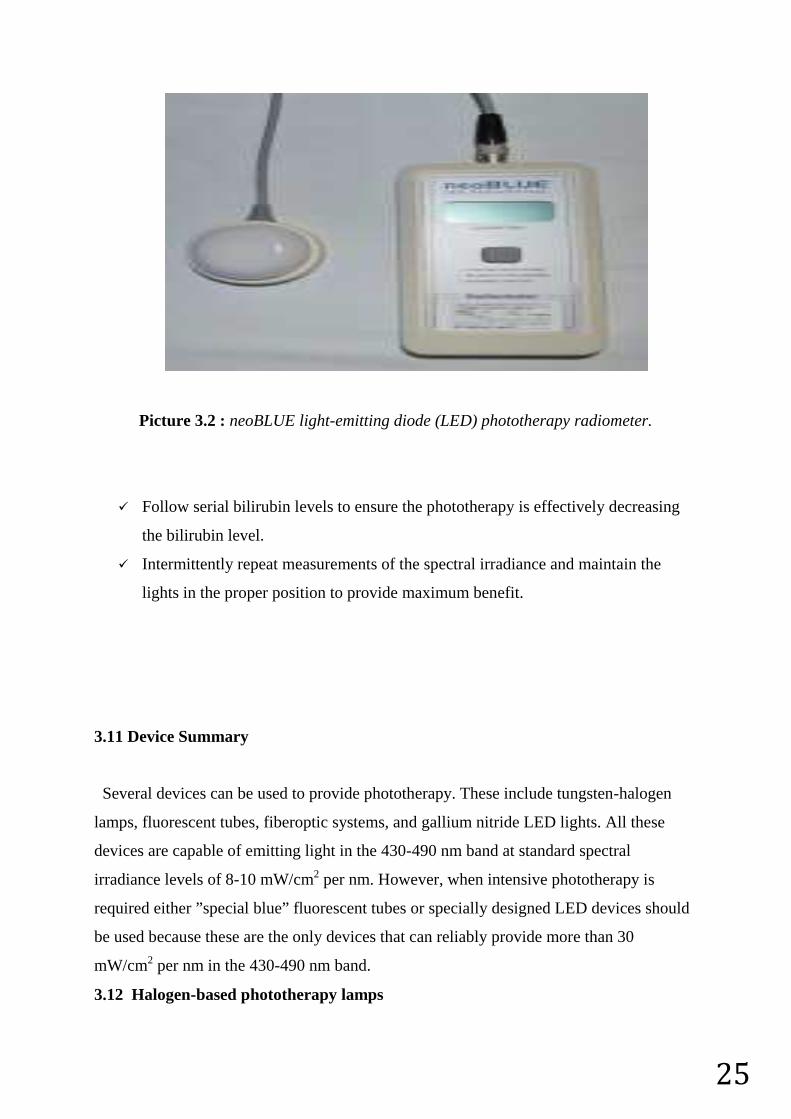
3.12 Halogen-based phototherapy lamps
26
Halogen-based phototherapy lamps, or spotlights, use a commercially available tungsten-
halogen light bulb and direct a strong beam of white/yellow light towards the infant.
These devices are typically free-standing on a pole, or available as part of a radiant
warmer. Halogen-based spot lights are the most heat producing of all the available
phototherapy lights. Care must be taken not to place the devices closer to the infant than
recommended by the manufacturer to avoid overheating the infant. Additionally, due to
the associated heat output, halogen lights may result in increased insensible water loss in
infants receiving phototherapy.
See the image below.
Picture 3.3 :Infant under Ohmeda halogen lamp with eye protection.
3.13 Fluorescent tubes
Fluorescent tubes used to deliver phototherapy have been classified as ”daylight,”
”blue,”’ and ”special blue.” A commercially available daylight tube is the F20T12/D
(General Electric, Westinghouse, Sylvania). A commercially available blue florescent
tube is the F20T12/B (General Electric, Westinghouse, Sylvania). Special blue fluorescent
tubes include those labeled TL52/20W (Philips, Endhoven, The Netherlands) or
F20T12/BB (General Electric, Westinghouse, Sylvania).
In prior clinical studies, only the special blue fluorescent tubes were able to reliably emit
light at more than 30 mW/cm2 per nm in the 430-490 nm band. Special blue tubes are
most effective because they emit light in the blue-green spectrum, which penetrates skin
27
well and is maximally absorbed by bilirubin. Fluorescent tubes are typically housed in a
commercially available device which holds 4-8 tubes that are 24 inches. The device is
typically attached to a pole and the height of the lighting device can be adjusted up and
down. One commercially available device, the Bili Bassinet (Olympic Medical; Seattle,
WA), contains special blue fluorescent tubes in a housing both above and below the
infant.
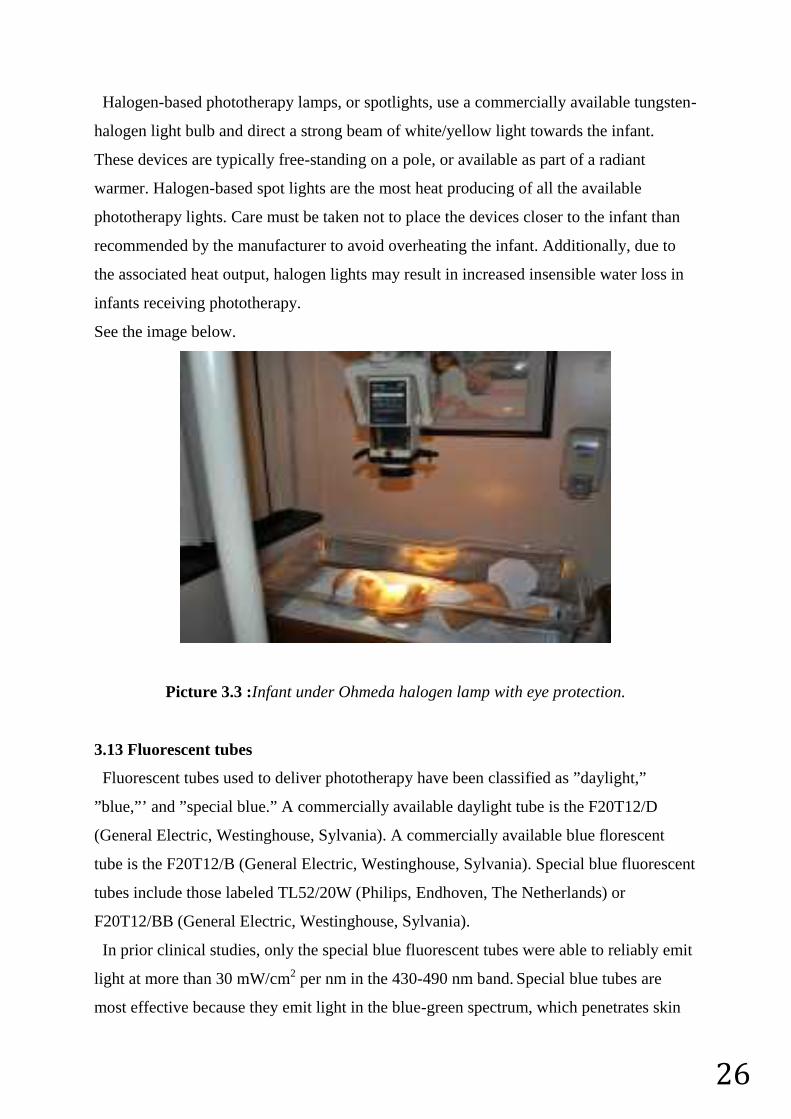
3.14 Fiberoptic phototherapy
Fiberoptic phototherapy devices deliver light form a high intensity lamp to a fiberoptic
blanket. These BiliBlanket devices are typically used in conjunction with overhead
halogen, fluorescent, or LED systems. These devices are also commonly used to provide
home phototherapy. A disadvantage of using fiberoptic pads is that they cover a fairly
small surface area. Therefore, 2-3 pads may be needed to provide effective
phototherapy. This is one reason why home phototherapy is reserved only for use in low-
risk infants with total bilirubin levels 2-3 mg/dL lower than that recommended for
intensive phototherapy. See the image below.
Picture 3.4: Infant under neoBLUE phototherapy light and lying on fiberoptic
phototherapy blanket.
3.15 LED phototherapy
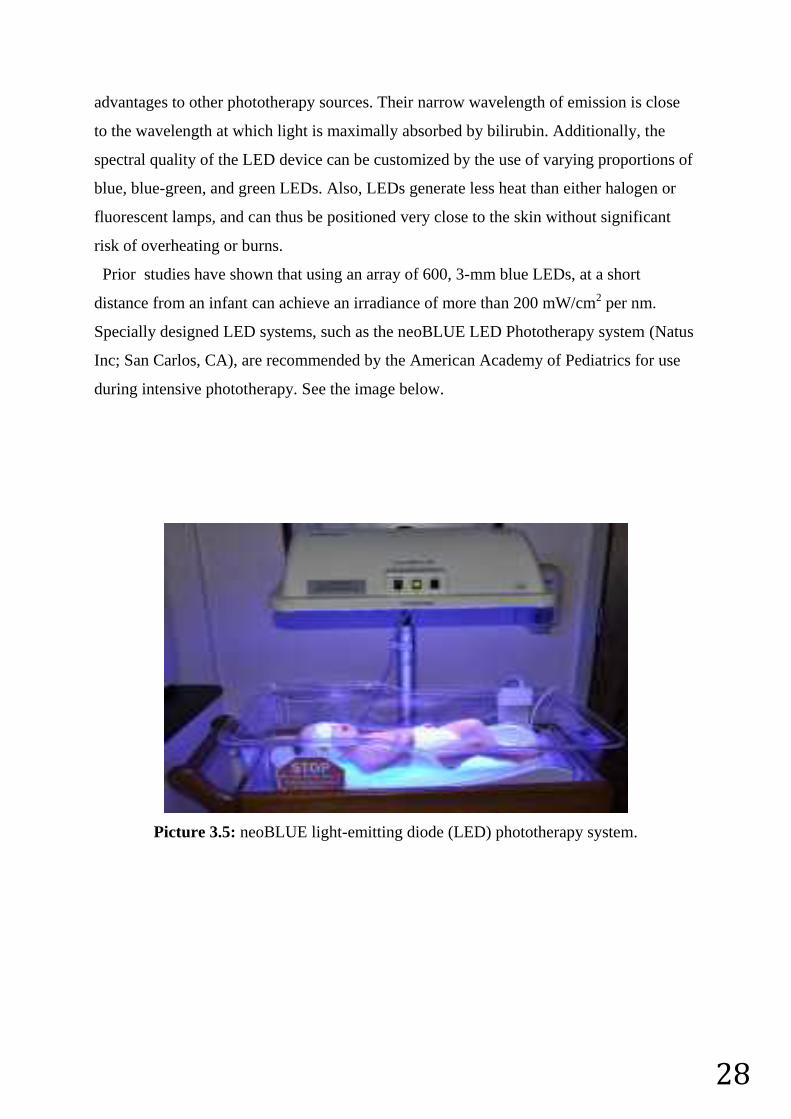
LED phototherapy systems, which use gallium nitride LEDs, are the newest devices used
to provide phototherapy. Gallium nitride LEDs emit high-intensity light in the blue-green
portion of the spectrum within a narrow wavelength (460-485 nm). LEDs offer some
28
advantages to other phototherapy sources. Their narrow wavelength of emission is close
to the wavelength at which light is maximally absorbed by bilirubin. Additionally, the
spectral quality of the LED device can be customized by the use of varying proportions of
blue, blue-green, and green LEDs. Also, LEDs generate less heat than either halogen or
fluorescent lamps, and can thus be positioned very close to the skin without significant
risk of overheating or burns.
Prior studies have shown that using an array of 600, 3-mm blue LEDs, at a short
distance from an infant can achieve an irradiance of more than 200 mW/cm2 per nm.
Specially designed LED systems, such as the neoBLUE LED Phototherapy system (Natus
Inc; San Carlos, CA), are recommended by the American Academy of Pediatrics for use
during intensive phototherapy. See the image below.
Picture 3.5: neoBLUE light-emitting diode (LED) phototherapy system.

29
30
4. ‘ARDUINO’ PROGRAMMABLE CIRCUIT BOARD
4.1 Arduino
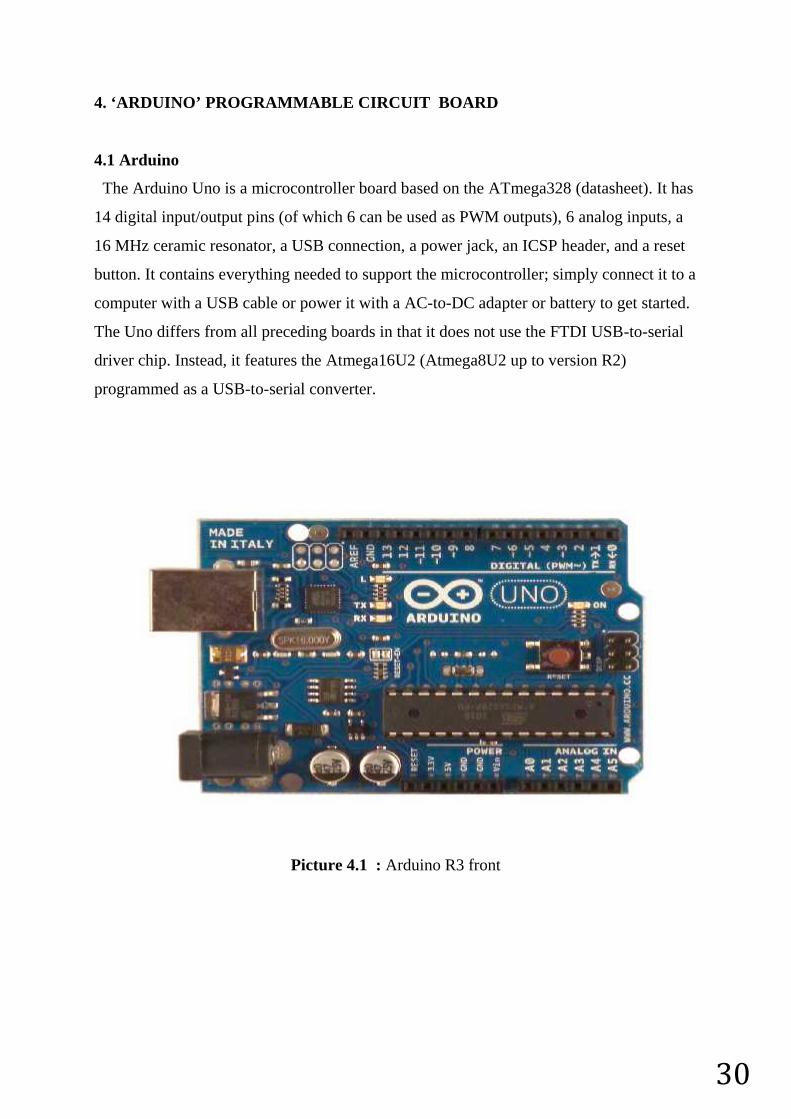
The Arduino Uno is a microcontroller board based on the ATmega328 (datasheet). It has
14 digital input/output pins (of which 6 can be used as PWM outputs), 6 analog inputs, a
16 MHz ceramic resonator, a USB connection, a power jack, an ICSP header, and a reset
button. It contains everything needed to support the microcontroller; simply connect it to a
computer with a USB cable or power it with a AC-to-DC adapter or battery to get started.
The Uno differs from all preceding boards in that it does not use the FTDI USB-to-serial
driver chip. Instead, it features the Atmega16U2 (Atmega8U2 up to version R2)
programmed as a USB-to-serial converter.
Picture 4.1 : Arduino R3 front
31
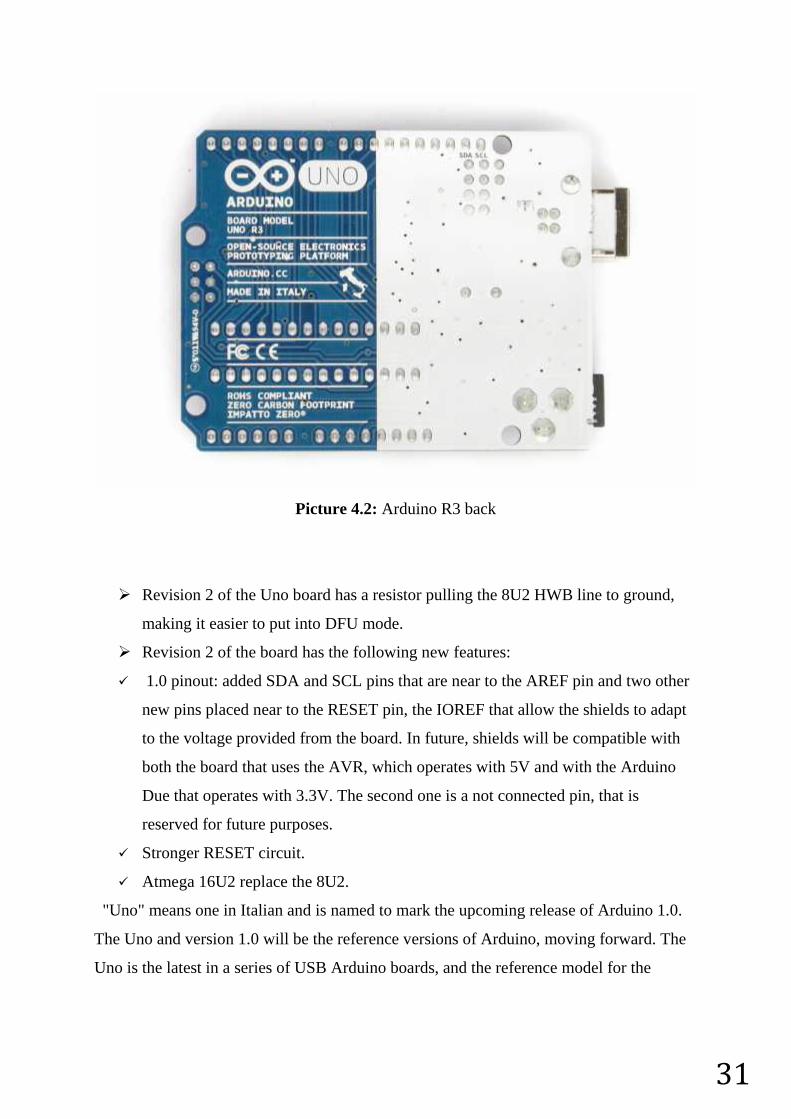
Picture 4.2: Arduino R3 back
Revision 2 of the Uno board has a resistor pulling the 8U2 HWB line to ground,
making it easier to put into DFU mode.
Revision 2 of the board has the following new features:
1.0 pinout: added SDA and SCL pins that are near to the AREF pin and two other
new pins placed near to the RESET pin, the IOREF that allow the shields to adapt
to the voltage provided from the board. In future, shields will be compatible with
both the board that uses the AVR, which operates with 5V and with the Arduino
Due that operates with 3.3V. The second one is a not connected pin, that is
reserved for future purposes.
Stronger RESET circuit.
Atmega 16U2 replace the 8U2.
"Uno" means one in Italian and is named to mark the upcoming release of Arduino 1.0.
The Uno and version 1.0 will be the reference versions of Arduino, moving forward. The
Uno is the latest in a series of USB Arduino boards, and the reference model for the
32
Arduino platform; for a comparison with previous versions, see the index of Arduino
boards.
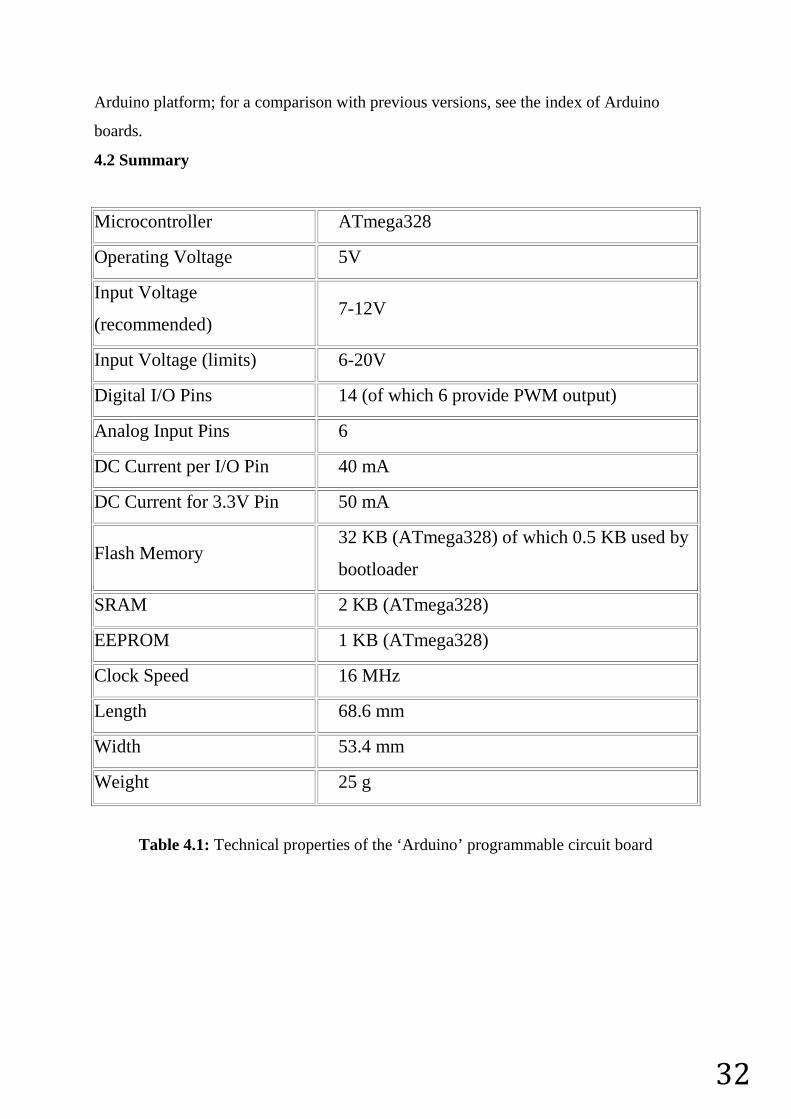
4.2 Summary
Microcontroller ATmega328
Operating Voltage 5V
Input Voltage
(recommended)7-12V
Input Voltage (limits) 6-20V
Digital I/O Pins 14 (of which 6 provide PWM output)
Analog Input Pins 6
DC Current per I/O Pin 40 mA
DC Current for 3.3V Pin 50 mA
Flash Memory32 KB (ATmega328) of which 0.5 KB used by
bootloader
SRAM 2 KB (ATmega328)
EEPROM 1 KB (ATmega328)
Clock Speed 16 MHz
Length 68.6 mm
Width 53.4 mm
Weight 25 g
Table 4.1: Technical properties of the ‘Arduino’ programmable circuit board
33
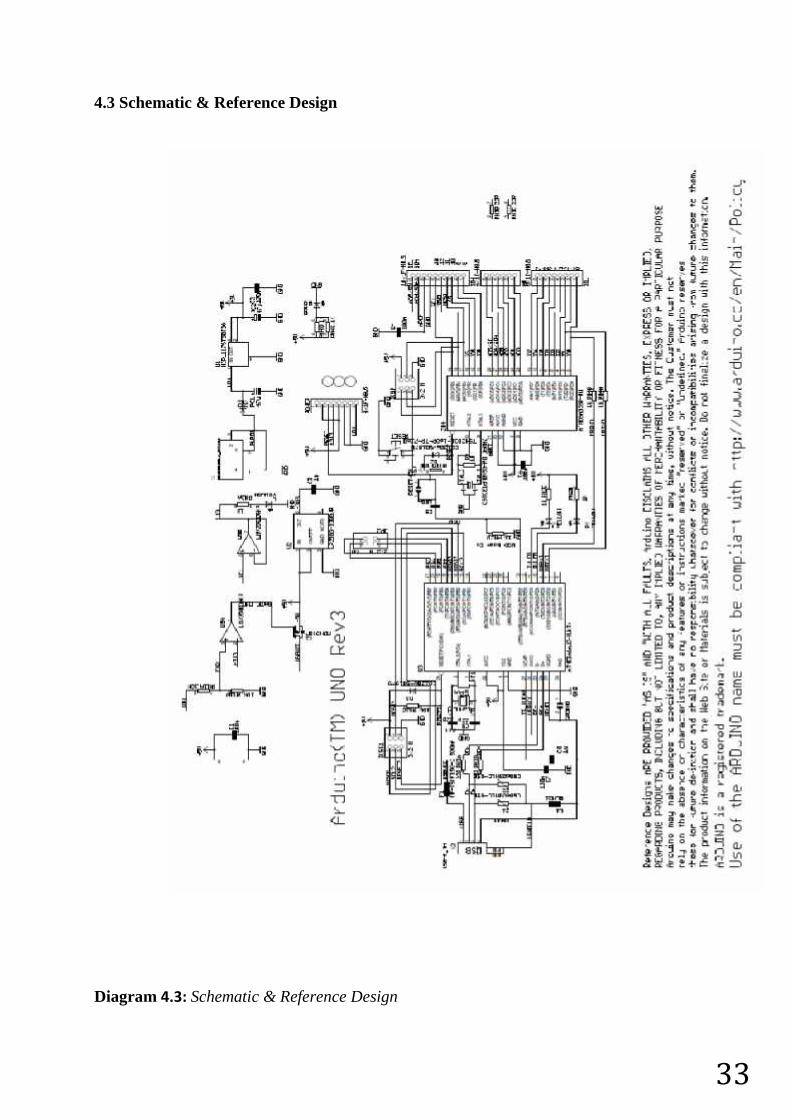
4.3 Schematic & Reference Design
Diagram 4.3: Schematic & Reference Design

34
Note: The Arduino reference design can use an Atmega8, 168, or 328, Current models
use an ATmega328, but an Atmega8 is shown in the schematic for reference. The pin
configuration is identical on all three processors.
4.4 Power
The Arduino Uno can be powered via the USB connection or with an external power
supply. The power source is selected automatically.
External (non-USB) power can come either from an AC-to-DC adapter (wall-wart) or
battery. The adapter can be connected by plugging a 2.1mm center-positive plug into the
board's power jack. Leads from a battery can be inserted in the Gnd and Vin pin headers
of the POWER connector.
The board can operate on an external supply of 6 to 20 volts. If supplied with less than
7V, however, the 5V pin may supply less than five volts and the board may be unstable. If
using more than 12V, the voltage regulator may overheat and damage the board. The
recommended range is 7 to 12 volts.
4.4.1 The power pins are as follows:
VIN. The input voltage to the Arduino board when it's using an external power
source (as opposed to 5 volts from the USB connection or other regulated power
source). You can supply voltage through this pin, or, if supplying voltage via the
power jack, access it through this pin.
5V.This pin outputs a regulated 5V from the regulator on the board. The board can
be supplied with power either from the DC power jack (7 - 12V), the USB
connector (5V), or the VIN pin of the board (7-12V). Supplying voltage via the 5V
or 3.3V pins bypasses the regulator, and can damage your board. We don't advise
it.
3V3. A 3.3 volt supply generated by the on-board regulator. Maximum current
draw is 50 mA.
GND. Ground pins.
IOREF. This pin on the Arduino board provides the voltage reference with which
the microcontroller operates. A properly configured shield can read the IOREF pin
voltage and select the appropriate power source or enable voltage translators on the
outputs for working with the 5V or 3.3V.
35
4.5 Memory
The ATmega328 has 32 KB (with 0.5 KB used for the bootloader). It also has 2 KB of
SRAM and 1 KB of EEPROM (which can be read and written with the EEPROM library).
4.6 Input and Output
Each of the 14 digital pins on the Uno can be used as an input or output,
using pinMode(), digitalWrite(), anddigitalRead() functions. They operate at 5 volts. Each
pin can provide or receive a maximum of 40 mA and has an internal pull-up resistor
(disconnected by default) of 20-50 kOhms. In addition, some pins have specialized
functions:
Serial: 0 (RX) and 1 (TX). Used to receive (RX) and transmit (TX) TTL serial
data. These pins are connected to the corresponding pins of the ATmega8U2 USB-
to-TTL Serial chip.
External Interrupts: 2 and 3. These pins can be configured to trigger an interrupt on
a low value, a rising or falling edge, or a change in value. See
the attachInterrupt() function for details.
PWM: 3, 5, 6, 9, 10, and 11. Provide 8-bit PWM output with
the analogWrite() function.
SPI: 10 (SS), 11 (MOSI), 12 (MISO), 13 (SCK). These pins support SPI
communication using the SPI library.
LED: 13. There is a built-in LED connected to digital pin 13. When the pin is
HIGH value, the LED is on, when the pin is LOW, it's off.
The Uno has 6 analog inputs, labeled A0 through A5, each of which provide 10 bits of
resolution (i.e. 1024 different values). By default they measure from ground to 5 volts,
though is it possible to change the upper end of their range using the AREF pin and
the analogReference() function. Additionally, some pins have specialized functionality:
TWI: A4 or SDA pin and A5 or SCL pin. Support TWI communication using
the Wire library.
There are a couple of other pins on the board:
AREF. Reference voltage for the analog inputs. Used with analogReference().
36
Reset. Bring this line LOW to reset the microcontroller. Typically used to add a
reset button to shields which block the one on the board.
4.7 Communication
The Arduino Uno has a number of facilities for communicating with a computer,
another Arduino, or other microcontrollers. The ATmega328 provides UART TTL (5V)
serial communication, which is available on digital pins 0 (RX) and 1 (TX).
An ATmega16U2 on the board channels this serial communication over USB and appears
as a virtual com port to software on the computer. The '16U2 firmware uses the standard
USB COM drivers, and no external driver is needed. However, on Windows, a .inf file is
required. The Arduino software includes a serial monitor which allows simple textual data
to be sent to and from the Arduino board. The RX and TX LEDs on the board will flash
when data is being transmitted via the USB-to-serial chip and USB connection to the
computer (but not for serial communication on pins 0 and 1).
A SoftwareSerial library allows for serial communication on any of the Uno's digital pins.
The ATmega328 also supports I2C (TWI) and SPI communication. The Arduino software
includes a Wire library to simplify use of the I2C bus; see the documentation for details.
For SPI communication, use the SPI library.
4.8 Programming
The Arduino Uno can be programmed with the Arduino software (download). Select
"Arduino Uno from the Tools > Board menu (according to the microcontroller on your
board). For details, see the reference and tutorials.
The ATmega328 on the Arduino Uno comes preburned with a bootloader that allows you
to upload new code to it without the use of an external hardware programmer. It
communicates using the original STK500 protocol (reference, C header files).
You can also bypass the bootloader and program the microcontroller through the ICSP
(In-Circuit Serial Programming) header using Arduino ISP or similar; see these
instructions for details.
The ATmega16U2 (or 8U2 in the rev1 and rev2 boards) firmware source code is available
37
The ATmega16U2/8U2 is loaded with a DFU bootloader, which can be activated by:
On Rev1 boards: connecting the solder jumper on the back of the board (near the
map of Italy) and then resetting the 8U2.
On Rev2 or later boards: there is a resistor that pulling the 8U2/16U2 HWB line to
ground, making it easier to put into DFU mode.
You can then use Atmel's FLIP software (Windows) or the DFU programmer (Mac OS X
and Linux) to load a new firmware. Or you can use the ISP header with an external
programmer (overwriting the DFU bootloader). See this user-contributed tutorial for more
information.
4.9 Automatic (Software) Reset
Rather than requiring a physical press of the reset button before an upload, the Arduino
Uno is designed in a way that allows it to be reset by software running on a connected
computer. One of the hardware flow control lines (DTR) of theATmega8U2/16U2 is
connected to the reset line of the ATmega328 via a 100 nanofarad capacitor. When this
line is asserted (taken low), the reset line drops long enough to reset the chip. The Arduino
software uses this capability to allow you to upload code by simply pressing the upload
button in the Arduino environment. This means that the bootloader can have a shorter
timeout, as the lowering of DTR can be well-coordinated with the start of the upload.
This setup has other implications. When the Uno is connected to either a computer
running Mac OS X or Linux, it resets each time a connection is made to it from software
(via USB). For the following half-second or so, the bootloader is running on the Uno.
While it is programmed to ignore malformed data (i.e. anything besides an upload of new
code), it will intercept the first few bytes of data sent to the board after a connection is
opened. If a sketch running on the board receives one-time configuration or other data
when it first starts, make sure that the software with which it communicates waits a
second after opening the connection and before sending this data.
The Uno contains a trace that can be cut to disable the auto-reset. The pads on either side
of the trace can be soldered together to re-enable it. It's labeled "RESET-EN".
You may also be able to disable the auto-reset by connecting a 110 ohm resistor from 5V
to the reset line; see this forum thread for details.
38
4.10 USB Overcurrent Protection
The Arduino Uno has a resettable polyfuse that protects your computer's USB ports from
shorts and overcurrent. Although most computers provide their own internal protection,
the fuse provides an extra layer of protection. If more than 500 mA is applied to the USB
port, the fuse will automatically break the connection until the short or overload is
removed.
4.11 Physical Characteristics
The maximum length and width of the Uno PCB are 2.7 and 2.1 inches respectively, with
the USB connector and power jack extending beyond the former dimension. Four screw
holes allow the board to be attached to a surface or case. Note that the distance between
digital pins 7 and 8 is 160 mil (0.16"), not an even multiple of the 100 mil spacing of the
other pins.
39
5.WHY DO WE NEED TO USE TIMER ON PHOTOTHERAPY?
5.1 At the normal conditions
Phototherapy is a harmless threatment since it is used properly. But it may be hazardous
for the baby if it is overused.
5.2 Main risks of the phototherapy
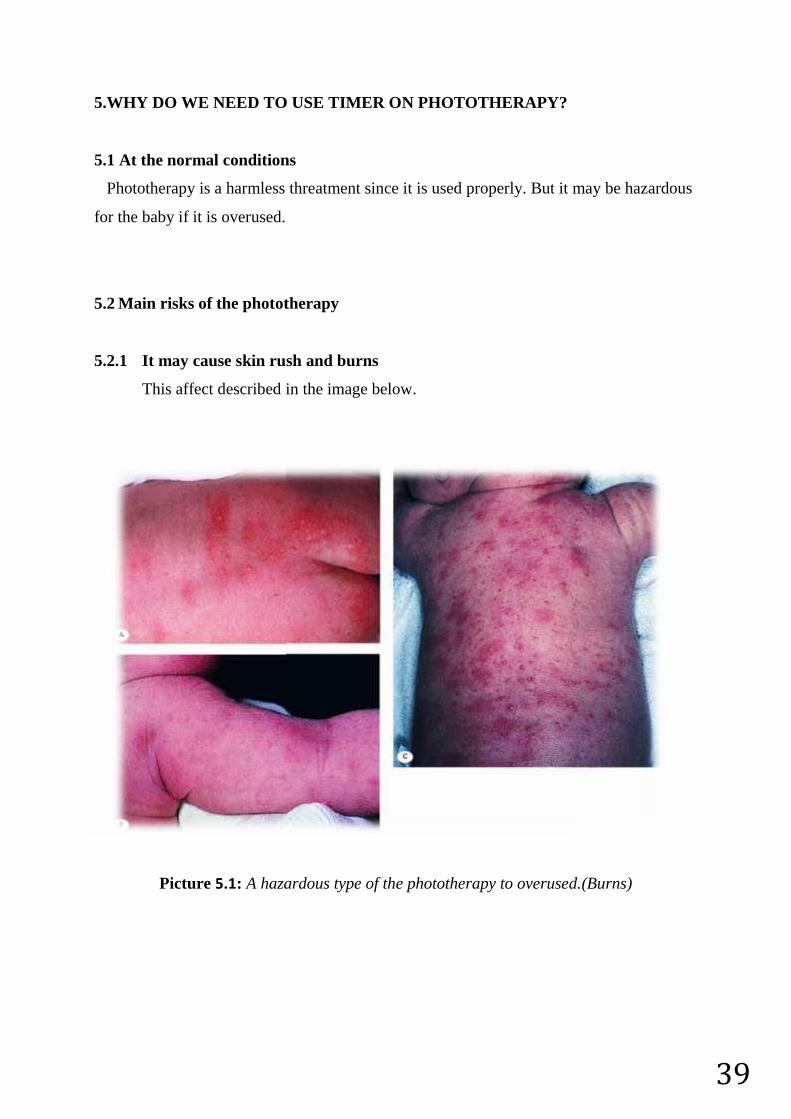
5.2.1 It may cause skin rush and burns
This affect described in the image below.
Picture 5.1: A hazardous type of the phototherapy to overused.(Burns)
39
5.WHY DO WE NEED TO USE TIMER ON PHOTOTHERAPY?
5.1 At the normal conditions
Phototherapy is a harmless threatment since it is used properly. But it may be hazardous
for the baby if it is overused.
5.2 Main risks of the phototherapy
5.2.1 It may cause skin rush and burns
This affect described in the image below.
Picture 5.1: A hazardous type of the phototherapy to overused.(Burns)
40
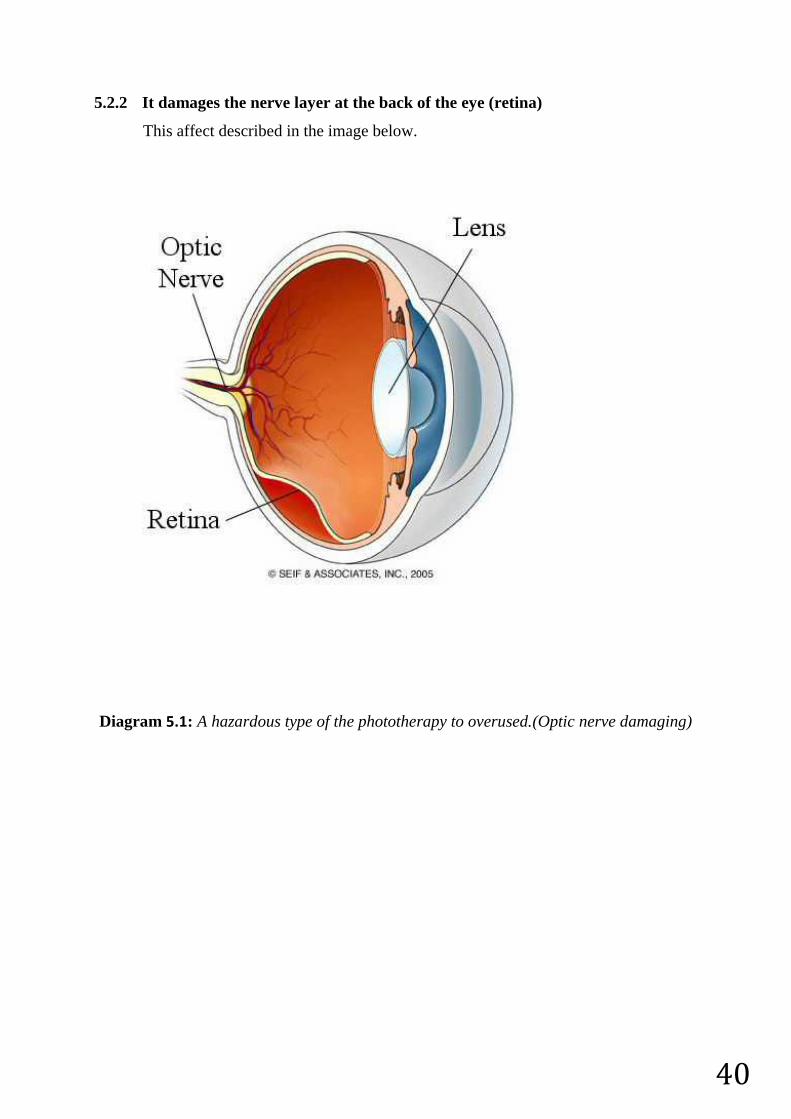
5.2.2 It damages the nerve layer at the back of the eye (retina)
This affect described in the image below.
Diagram 5.1: A hazardous type of the phototherapy to overused.(Optic nerve damaging)
41
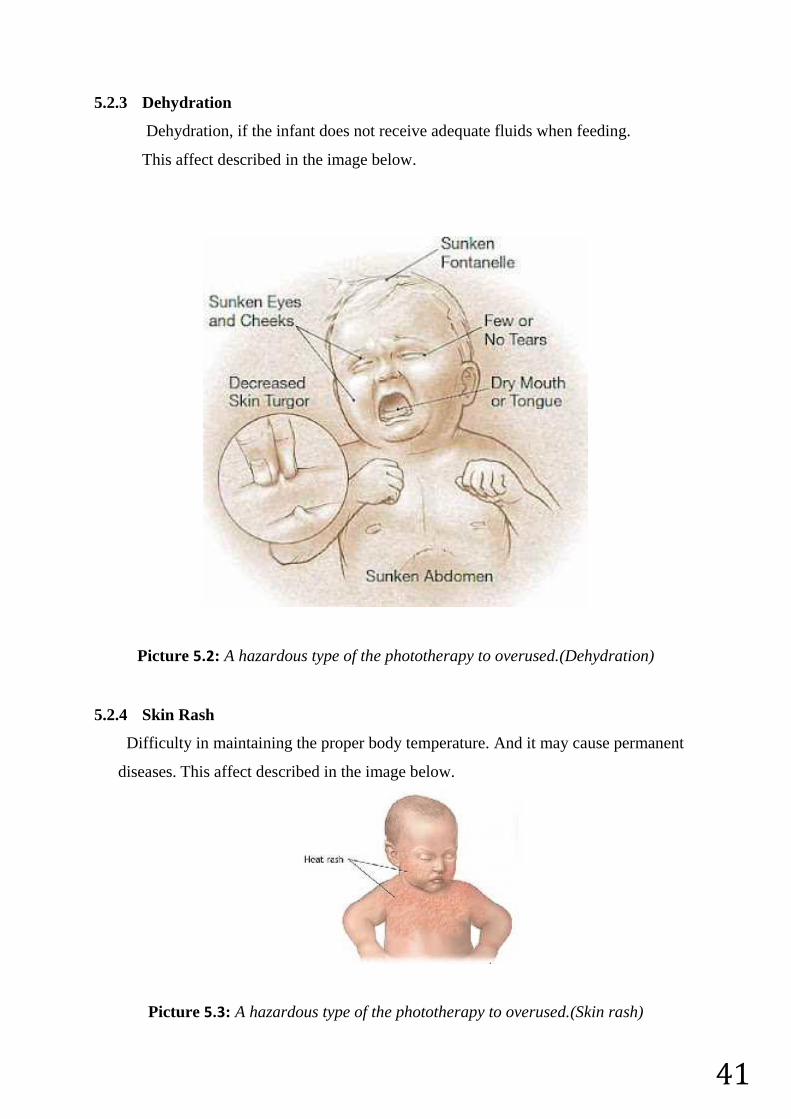
5.2.3 Dehydration
Dehydration, if the infant does not receive adequate fluids when feeding.
This affect described in the image below.
Picture 5.2: A hazardous type of the phototherapy to overused.(Dehydration)
5.2.4 Skin Rash
Difficulty in maintaining the proper body temperature. And it may cause permanent
diseases. This affect described in the image below.
Picture 5.3: A hazardous type of the phototherapy to overused.(Skin rash)
42
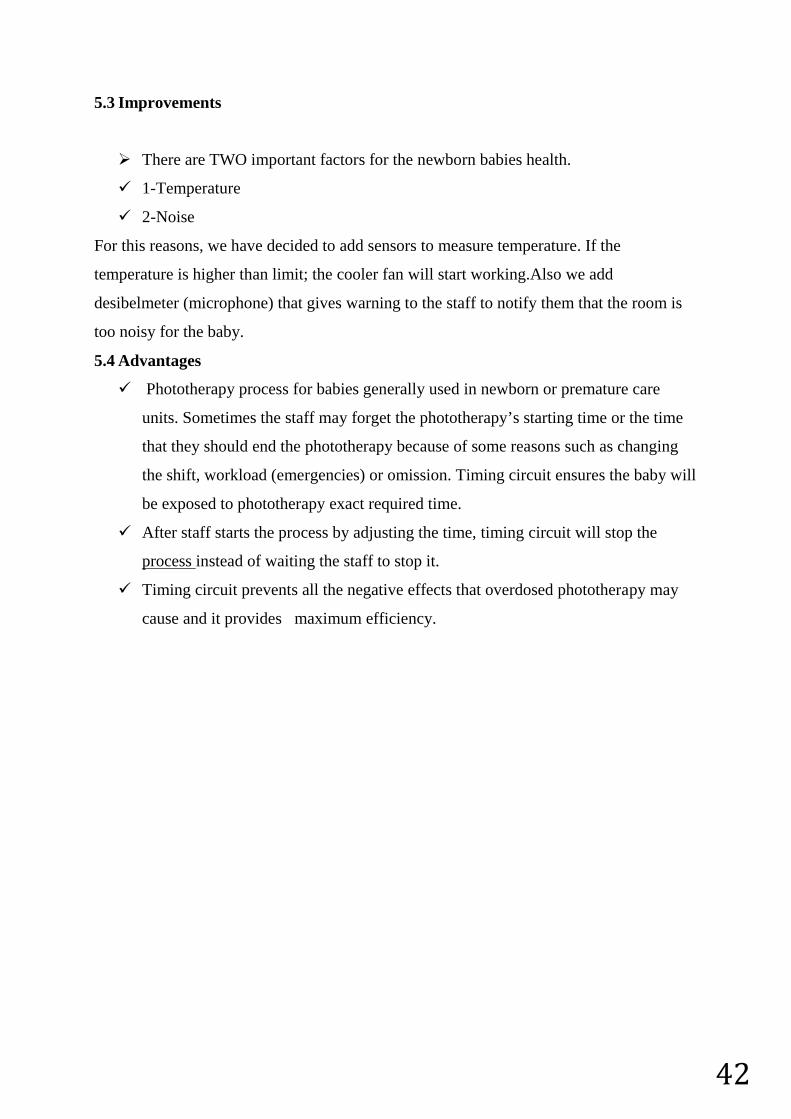
5.3 Improvements
There are TWO important factors for the newborn babies health.
1-Temperature
2-Noise
For this reasons, we have decided to add sensors to measure temperature. If the
temperature is higher than limit; the cooler fan will start working.Also we add
desibelmeter (microphone) that gives warning to the staff to notify them that the room is
too noisy for the baby.
5.4 Advantages
Phototherapy process for babies generally used in newborn or premature care
units. Sometimes the staff may forget the phototherapy’s starting time or the time
that they should end the phototherapy because of some reasons such as changing
the shift, workload (emergencies) or omission. Timing circuit ensures the baby will
be exposed to phototherapy exact required time.
After staff starts the process by adjusting the time, timing circuit will stop the
process instead of waiting the staff to stop it.
Timing circuit prevents all the negative effects that overdosed phototherapy may
cause and it provides maximum efficiency.
43
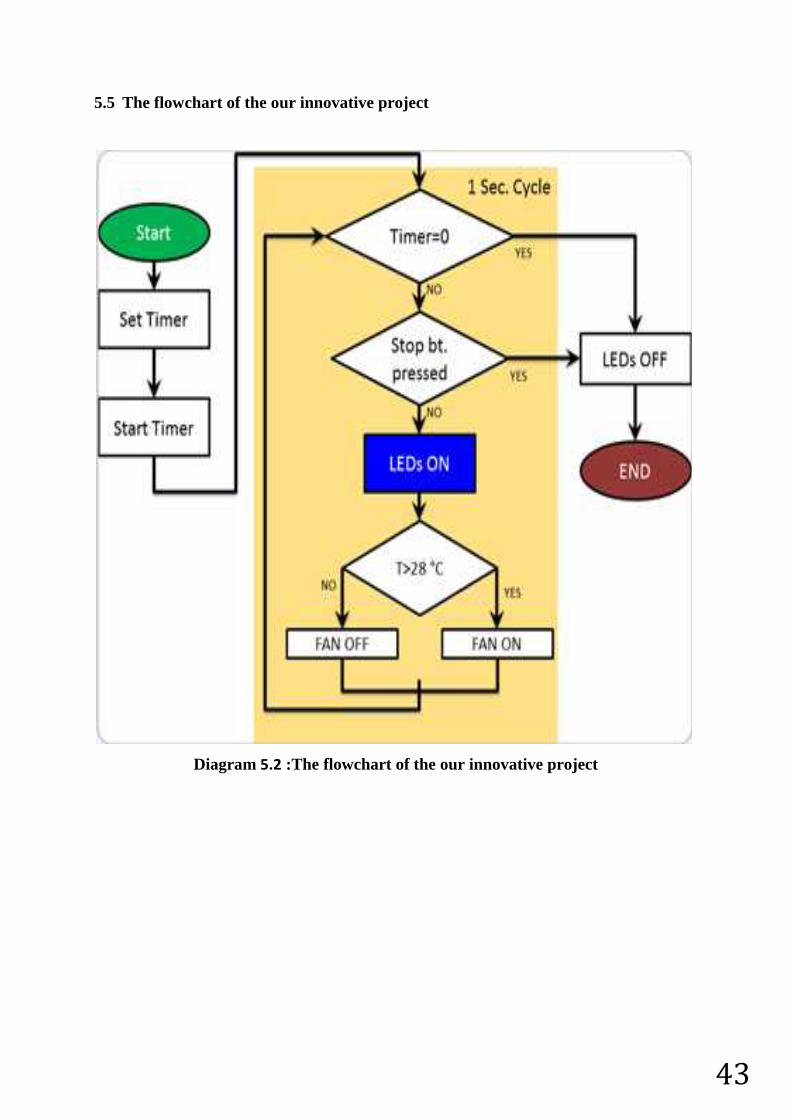
5.5 The flowchart of the our innovative project
Diagram 5.2 :The flowchart of the our innovative project
44
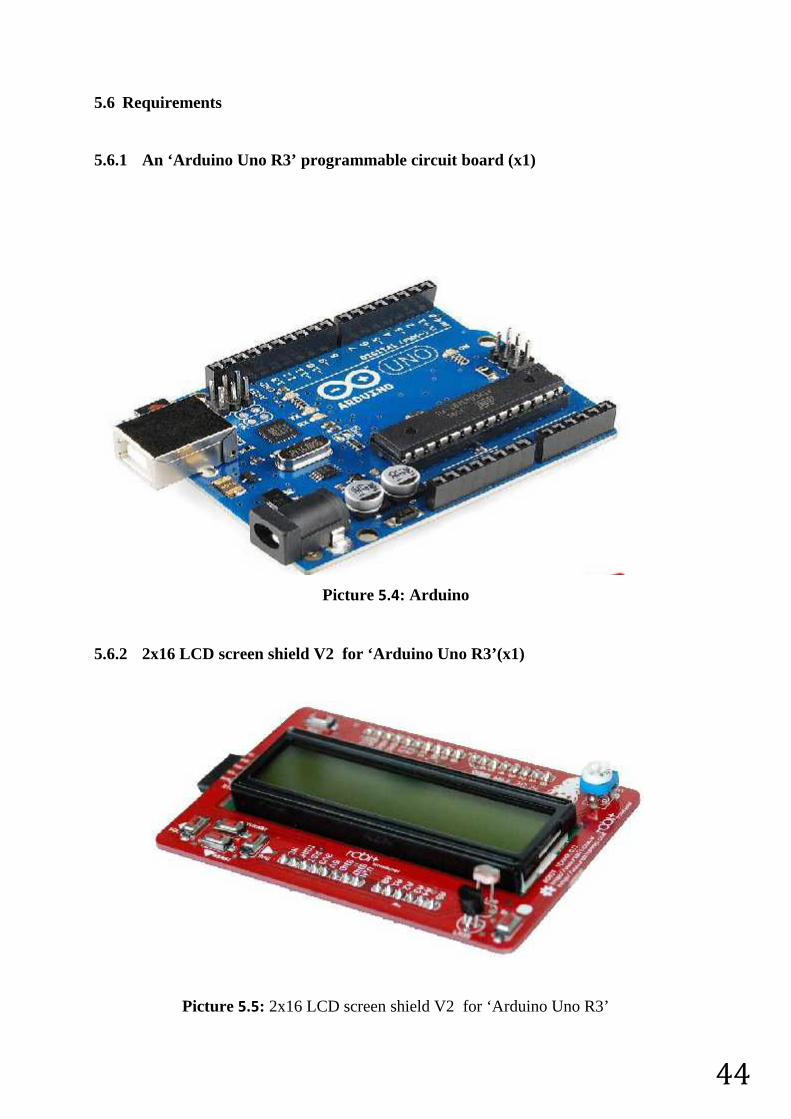
5.6 Requirements
5.6.1 An ‘Arduino Uno R3’ programmable circuit board (x1)
Picture 5.4: Arduino
5.6.2 2x16 LCD screen shield V2 for ‘Arduino Uno R3’(x1)
Picture 5.5: 2x16 LCD screen shield V2 for ‘Arduino Uno R3’
45
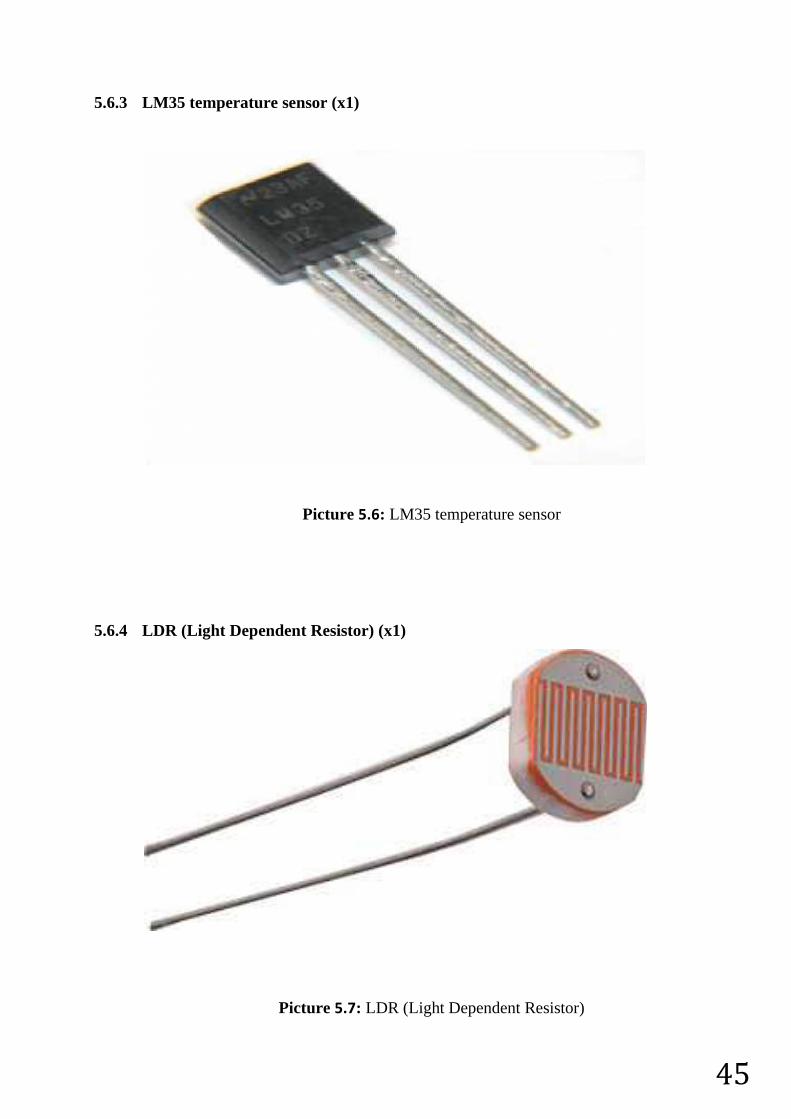
5.6.3 LM35 temperature sensor (x1)
Picture 5.6: LM35 temperature sensor
5.6.4 LDR (Light Dependent Resistor) (x1)
Picture 5.7: LDR (Light Dependent Resistor)

46
5.6.5 Sparkfun electret microphone (x1)
Picture 5.8: Sparkfun electret microphone
5.6.6 Relays (x2)
Picture 5.9: Relays
5.6.7 Adapter (220VAC to 12VDC) (x1)
Picture 5.10: Adapter (220VAC to 12VDC)
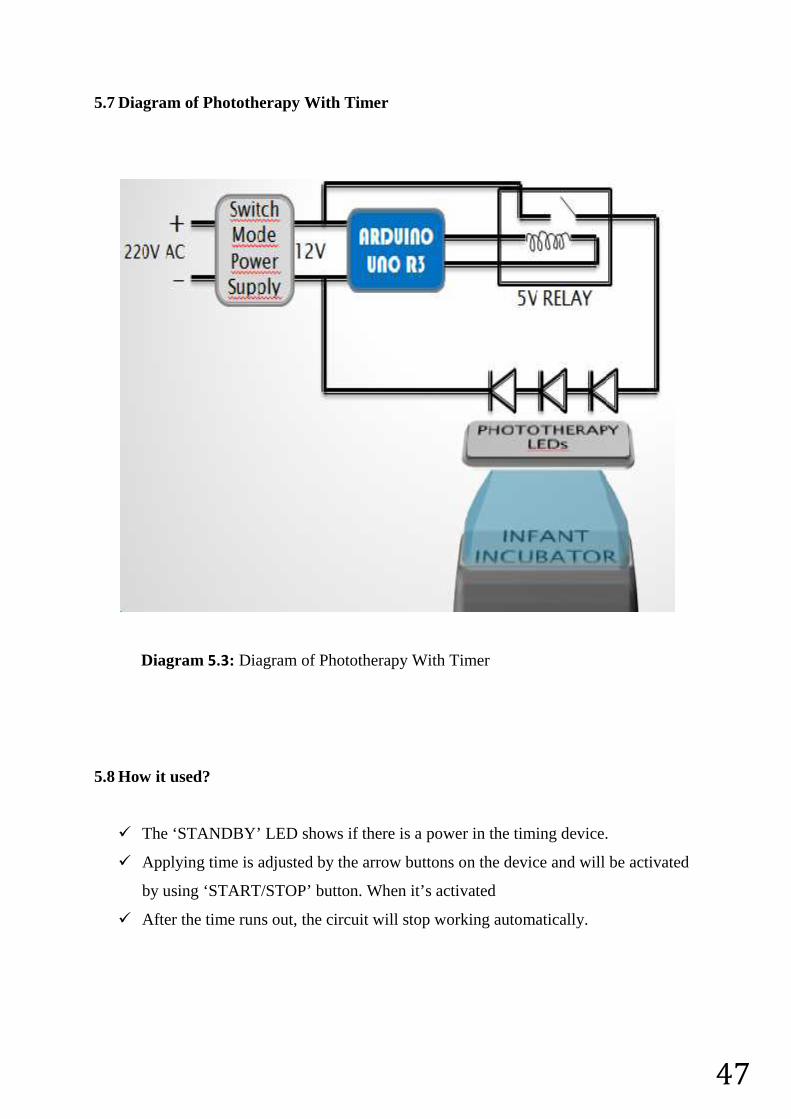
47
5.7 Diagram of Phototherapy With Timer
Diagram 5.3: Diagram of Phototherapy With Timer
5.8 How it used?
The ‘STANDBY’ LED shows if there is a power in the timing device.
Applying time is adjusted by the arrow buttons on the device and will be activated
by using ‘START/STOP’ button. When it’s activated
After the time runs out, the circuit will stop working automatically.
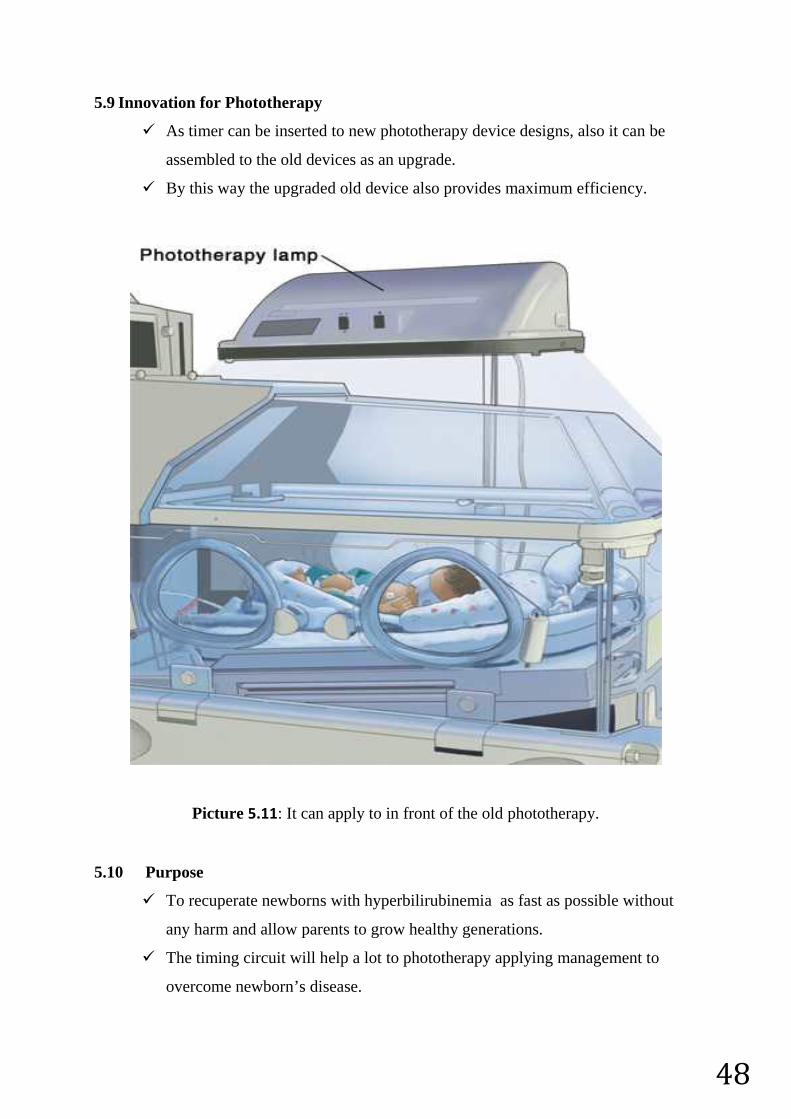
48
5.9 Innovation for Phototherapy
As timer can be inserted to new phototherapy device designs, also it can be
assembled to the old devices as an upgrade.
By this way the upgraded old device also provides maximum efficiency.
Picture 5.11: It can apply to in front of the old phototherapy.
5.10 Purpose
To recuperate newborns with hyperbilirubinemia as fast as possible without
any harm and allow parents to grow healthy generations.
The timing circuit will help a lot to phototherapy applying management to
overcome newborn’s disease.

49
REFERENCES1) http://www.mayoclinic.org/tests-procedures/bilirubin/basics/definition/prc-20019986
2) http://www.muschealth.com/lab/content.aspx?id=150157
3) http://www.nlm.nih.gov/medlineplus/ency/article/003479.htm
4) http://www.nlm.nih.gov/medlineplus/ency/article/001559.htm
5) http://www.webmd.com/parenting/baby/understanding-newborn-jaundice-basics
6) http://www.hepatitiscentral.com/hcv/labs/disorder.html
7) http://emedicine.medscape.com/article/178757-overview
8) http://www.webmd.com/digestive-disorders/bilirubin-15434
9) http://www.healthline.com/health/bilirubin-blood#Risks5
10) http://emedicine.medscape.com/article/1894477-overview#aw2aab6b2b2
11) http://arduino.cc/en/Main/arduinoBoardUno
12) http://www.pennmedicine.org/encyclopedia/ency_images/encymulti/images/en/7088.jpg
13) http://www.consultantlive.com/sites/default/files/peds/0805CFPDAVF4.jpg
14) http://upload.wikimedia.org/wikipedia/commons/c/c1/Structure_of_bilirubin.png
15) http://models.street-artists.org/wp-content/uploads/2010/05/bilirisk.png
16) http://www.nlm.nih.gov/medlineplus/ency/images/ency/fullsize/22694.jpg
17) http://www.newborn-baby-care.com/wp-
content/uploads/2014/02/Baby_Under_Phototherapy.jpg
18) http://4.bp.blogspot.com/-uyVi9uJA8M0/Tze6aVHfq-
I/AAAAAAAAAK0/sazyJ68w2aI/s1600/Baby_With_Phototherapy_blogspot.JPG
19) http://www.transitioning.org/wp-content/uploads/2012/05/wires-
maternity_full_600.jpg
20) http://img.medscape.com/pi/emed/ckb/clinical_procedures/79926-1413466-1894477-
2009779tn.jpg
21) http://www.rch.org.au/uploadedImages/Main/Content/rchcpg/Skin%20care%201.JPG
?n=1701
22) http://www.sw.org/misc/health/images/%7B2BA00BA1-2F4B-4D41-8A4D-
46278D9D0E41%7D.jpg
23) http://medicine.um.edu.my/images/fom/Acad%20Prog/medInfo/image/baby.jpg
24) http://profahmet.wordpress.com/dikkat/
25) http://www.mountainstar.kramesonline.com/HealthSheets/86055.img
26) http://www.medscape.com/viewarticle/809580
50
APPENDIX
THE COMPLETE PROGRAM LISTING
/*=======================================================================
KUVEZ V1.0
=======================================================================*/
#include <LiquidCrystal.h> // LCD library
/*=======================================================================
ADC DEFINING
=======================================================================*/
#define DS1307_ADDRESS 0x68
byte zero = 0x00; //workaround for issue #527
/*=======================================================================
BUTTON ADC DEFINING
=======================================================================*/
#define BUTTON_ADC_PIN A0 // A0 is the button ADC input
#define LCD_BACKLIGHT_PIN 2 // D2 controls LCD backlight
// ADC readings expected for the 5 buttons on the ADC input
#define RIGHT_10BIT_ADC 0 // right
#define UP_10BIT_ADC 64 // up
#define DOWN_10BIT_ADC 158 // down
#define LEFT_10BIT_ADC 288 // left
#define SELECT_10BIT_ADC 533 // select
#define BUTTONHYSTERESIS 10 // hysteresis for valid button sensing window
/*=======================================================================
BUTTON DEFINING
=======================================================================*/
#define BUTTON_NONE 0 //
51
#define BUTTON_RIGHT 1 //
#define BUTTON_UP 2 //
#define BUTTON_DOWN 3 //
#define BUTTON_LEFT 4 //
#define BUTTON_SELECT 5 //
/*=======================================================================
BACKLIGHT DEFINING
=======================================================================*/
#define LCD_BACKLIGHT_OFF() digitalWrite( LCD_BACKLIGHT_PIN, LOW )
#define LCD_BACKLIGHT_ON() digitalWrite( LCD_BACKLIGHT_PIN, HIGH )
#define LCD_BACKLIGHT(state) { if( state ){digitalWrite( LCD_BACKLIGHT_PIN, HIGH
);}else{digitalWrite( LCD_BACKLIGHT_PIN, LOW );} }
/*=======================================================================
BUTTON VARIABLES
=======================================================================*/
byte buttonJustPressed = false; //this will be true after a ReadButtons() call if triggered
byte buttonJustReleased = false; //this will be true after a ReadButtons() call if triggered
byte buttonWas = BUTTON_NONE; //used by ReadButtons() for detection of button
events
/*=======================================================================
TIMER VARIABLES
=======================================================================*/
int time[4]; // Time array
int time_fake[4]; // Fake Time Array
int cur = 3; // Cursor Variables
int start = 0; // Start- stop conrtol variable
/*=======================================================================
TEMPERATURE LDR & SOUND VARIABLES
=======================================================================*/
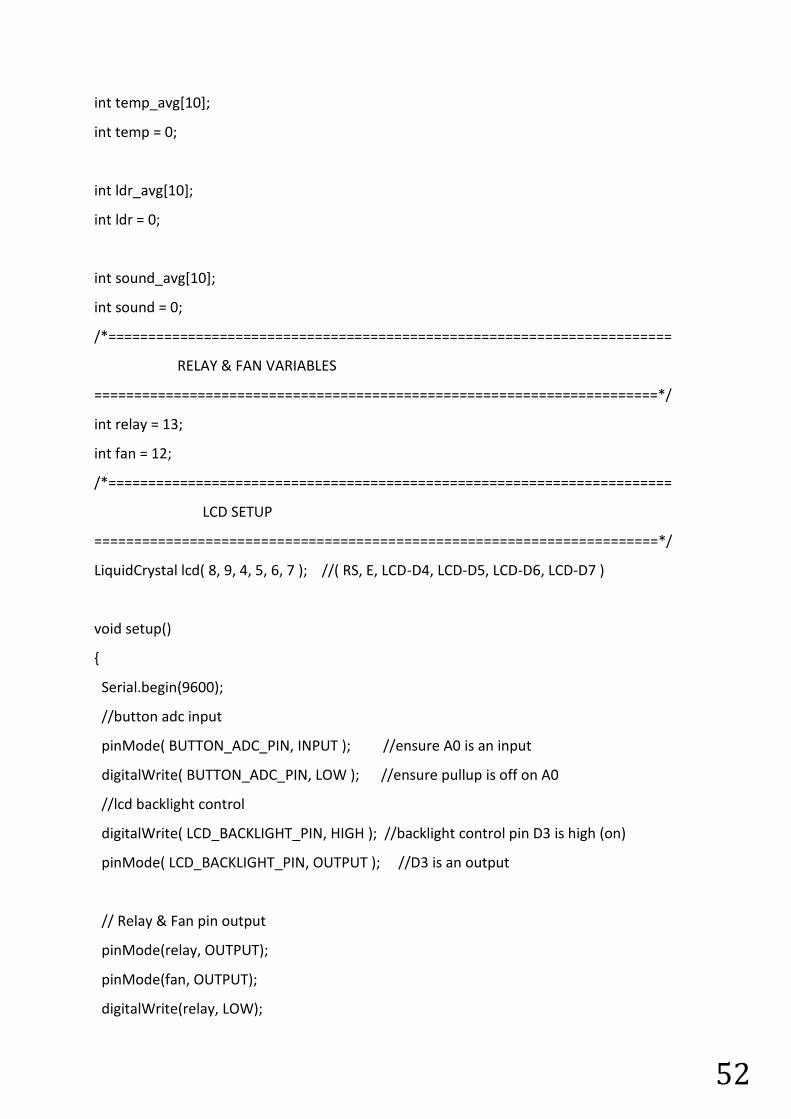
52
int temp_avg[10];
int temp = 0;
int ldr_avg[10];
int ldr = 0;
int sound_avg[10];
int sound = 0;
/*=======================================================================
RELAY & FAN VARIABLES
=======================================================================*/
int relay = 13;
int fan = 12;
/*=======================================================================
LCD SETUP
=======================================================================*/
LiquidCrystal lcd( 8, 9, 4, 5, 6, 7 ); //( RS, E, LCD-D4, LCD-D5, LCD-D6, LCD-D7 )
void setup()
{
Serial.begin(9600);
//button adc input
pinMode( BUTTON_ADC_PIN, INPUT ); //ensure A0 is an input
digitalWrite( BUTTON_ADC_PIN, LOW ); //ensure pullup is off on A0
//lcd backlight control
digitalWrite( LCD_BACKLIGHT_PIN, HIGH ); //backlight control pin D3 is high (on)
pinMode( LCD_BACKLIGHT_PIN, OUTPUT ); //D3 is an output
// Relay & Fan pin output
pinMode(relay, OUTPUT);
pinMode(fan, OUTPUT);
digitalWrite(relay, LOW);
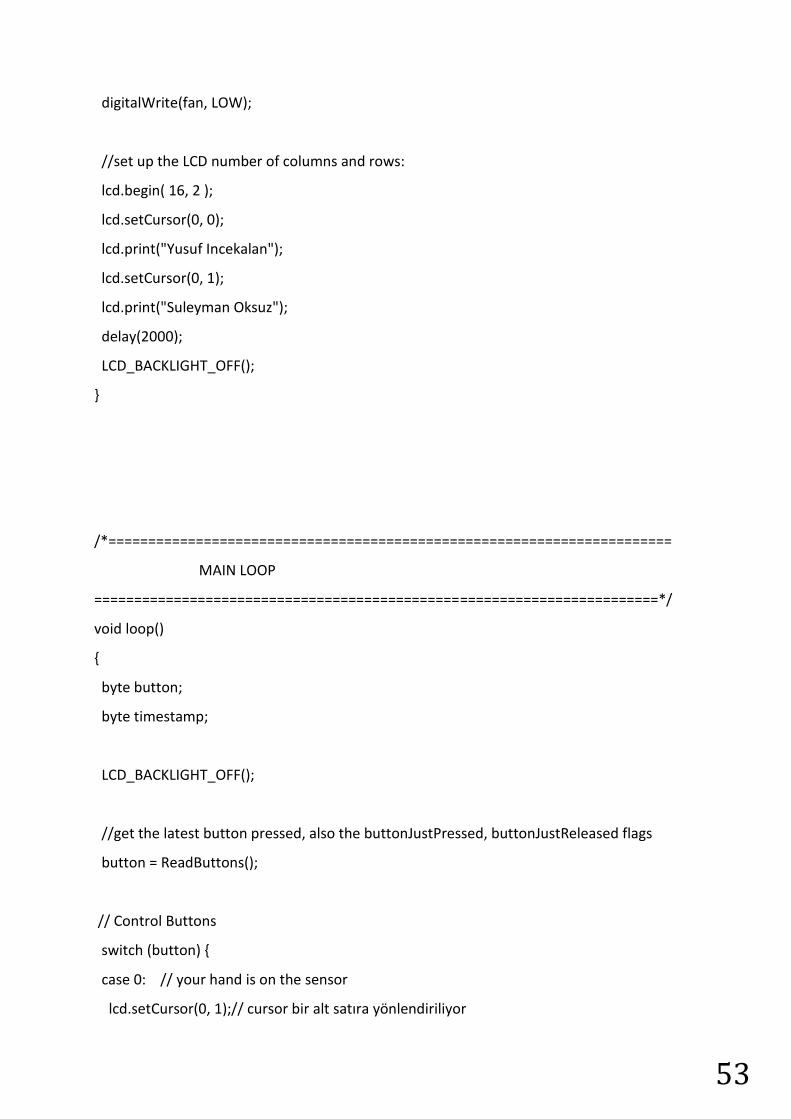
53
digitalWrite(fan, LOW);
//set up the LCD number of columns and rows:
lcd.begin( 16, 2 );
lcd.setCursor(0, 0);
lcd.print("Yusuf Incekalan");
lcd.setCursor(0, 1);
lcd.print("Suleyman Oksuz");
delay(2000);
LCD_BACKLIGHT_OFF();
}
/*=======================================================================
MAIN LOOP
=======================================================================*/
void loop()
{
byte button;
byte timestamp;
LCD_BACKLIGHT_OFF();
//get the latest button pressed, also the buttonJustPressed, buttonJustReleased flags
button = ReadButtons();
// Control Buttons
switch (button) {
case 0: // your hand is on the sensor
lcd.setCursor(0, 1);// cursor bir alt satıra yönlendiriliyor

54
if(start % 2 == 1){
print_time_fake();}
if(start % 2 == 0){
print_time();}
break;
case 1: // your hand is close to the sensor
lcd.setCursor(0, 1);// cursor bir alt satıra yönlendiriliyor
cur++;
if (cur < 0)
cur = 3;
else if (cur > 3)
cur = 0;
print_time();
curs();
break;
case 2: // your hand is a few inches from the sensor
lcd.setCursor(0, 1);// cursor bir alt satıra yönlendiriliyor
time[cur]++;
if (time[cur] < 0)
time[cur] = 0;
print_time();
LCD_BACKLIGHT_ON();
break;
case 3: // your hand is nowhere near the sensor
lcd.setCursor(0, 1);// cursor bir alt satıra yönlendiriliyor
time[cur]--;
if (time[cur] < 0)
time[cur] = 0;
print_time();
LCD_BACKLIGHT_ON();
break;
case 4: // your hand is nowhere near the sensor

55
lcd.setCursor(0, 1);// cursor bir alt satıra yönlendiriliyor
cur--;
if (cur < 0)
cur = 3;
else if (cur > 3)
cur = 0;
print_time();
curs();
break;
case 5: // your hand is nowhere near the sensor
//lcd.clear();
lcd.setCursor(0, 1);// cursor bir alt satıra yönlendiriliyor
LCD_BACKLIGHT_ON();
if(start % 2 == 0){
lcd.print (" START ");
lcd.print(" ");
delay(1000);
}
else if(start % 2 == 1){
lcd.print (" STOP ");
delay(1000);
}
start++;
break;
}
//clear the buttonJustPressed or buttonJustReleased flags, they've already done their job
now.
if( buttonJustPressed )
buttonJustPressed = false;
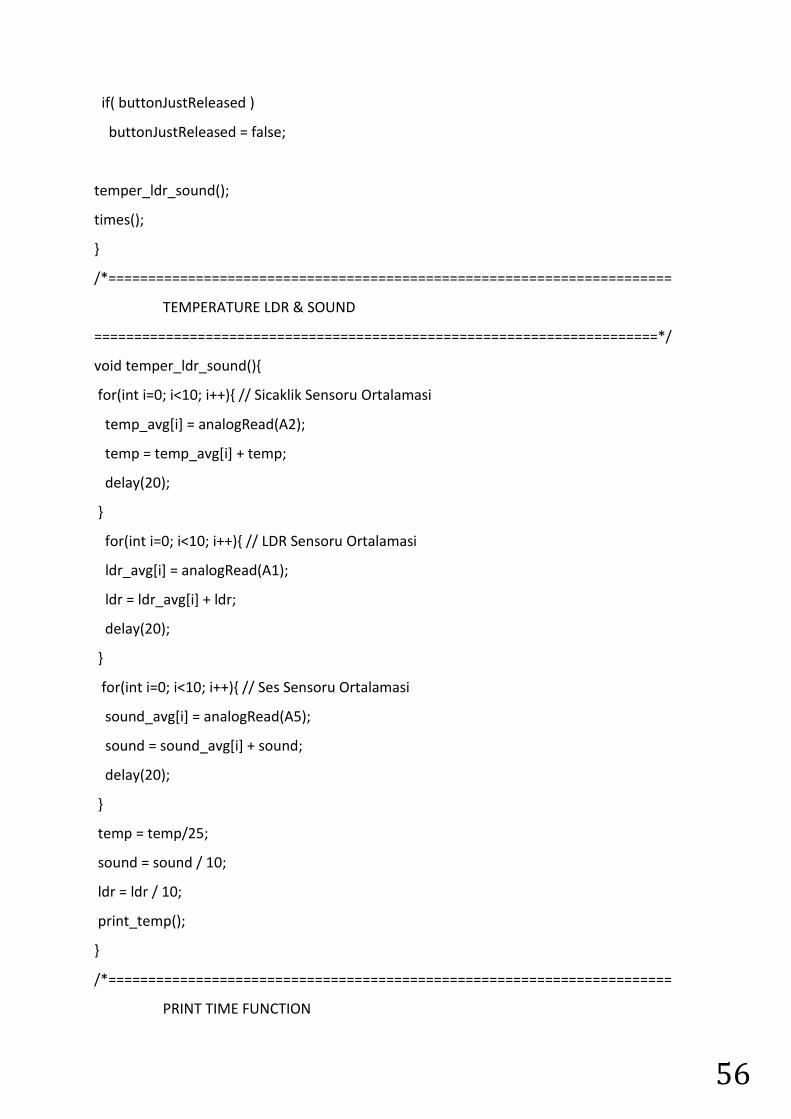
56
if( buttonJustReleased )
buttonJustReleased = false;
temper_ldr_sound();
times();
}
/*=======================================================================
TEMPERATURE LDR & SOUND
=======================================================================*/
void temper_ldr_sound(){
for(int i=0; i<10; i++){ // Sicaklik Sensoru Ortalamasi
temp_avg[i] = analogRead(A2);
temp = temp_avg[i] + temp;
delay(20);
}
for(int i=0; i<10; i++){ // LDR Sensoru Ortalamasi
ldr_avg[i] = analogRead(A1);
ldr = ldr_avg[i] + ldr;
delay(20);
}
for(int i=0; i<10; i++){ // Ses Sensoru Ortalamasi
sound_avg[i] = analogRead(A5);
sound = sound_avg[i] + sound;
delay(20);
}
temp = temp/25;
sound = sound / 10;
ldr = ldr / 10;
print_temp();
}
/*=======================================================================
PRINT TIME FUNCTION

57
=======================================================================*/
void print_time(){
lcd.setCursor(0,1);
lcd.print ("Timer: ");
lcd.print (time[0]);
lcd.print (time[1]);
lcd.print (":");
lcd.print (time[2]);
lcd.print (time[3]);
lcd.print (" ");
}
/*=======================================================================
PRINT TIME FAKE FUNCTION
=======================================================================*/
void print_time_fake(){
int timer = 0;
int tenmin = 0;
int minute = 0;
int tensec = 0;
int second = 0;
byte buttons;
for(int i=0; i<4; i++){
time_fake[i] = time[i];
}
while(((time_fake[0]*600) + (time_fake[1]*60) + (time_fake[2]*10) +
time_fake[3])!=timer){
int sec = ((time_fake[0]*600) + (time_fake[1]*60) + (time_fake[2]*10) + time_fake[3])-
timer;
buttons = ReadButtons();
lcd.setCursor(0,0);
temper_ldr_sound();
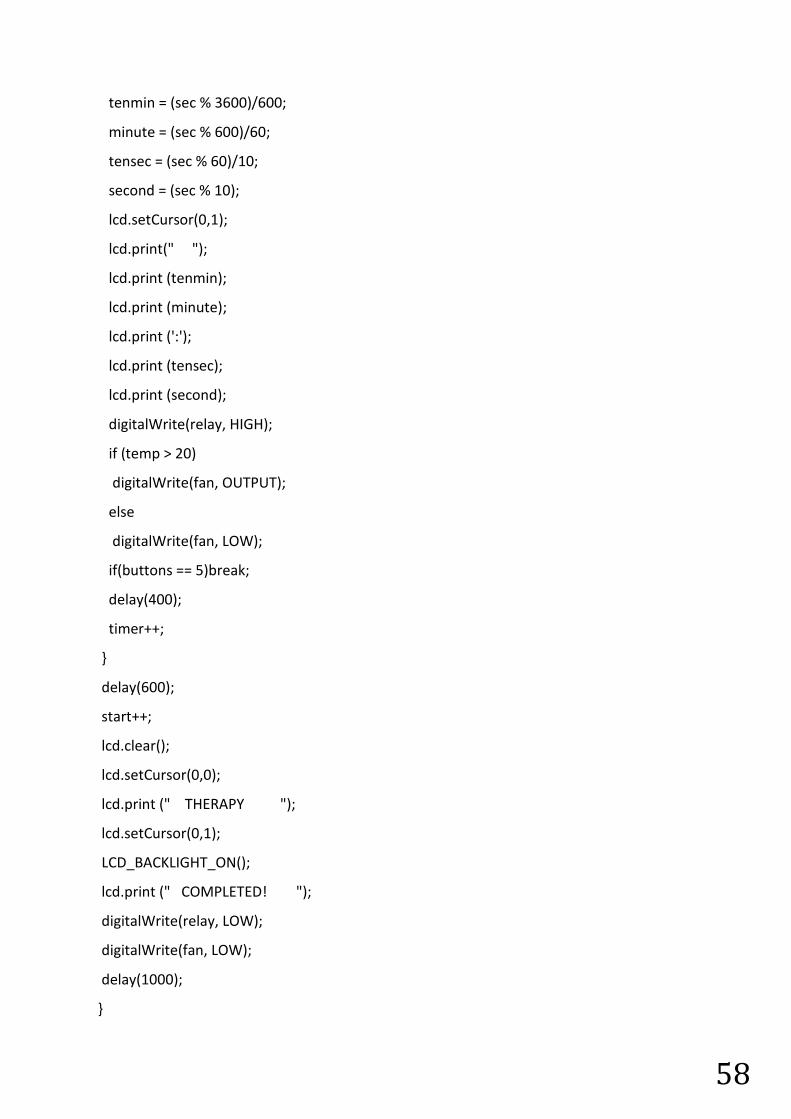
58
tenmin = (sec % 3600)/600;
minute = (sec % 600)/60;
tensec = (sec % 60)/10;
second = (sec % 10);
lcd.setCursor(0,1);
lcd.print(" ");
lcd.print (tenmin);
lcd.print (minute);
lcd.print (':');
lcd.print (tensec);
lcd.print (second);
digitalWrite(relay, HIGH);
if (temp > 20)
digitalWrite(fan, OUTPUT);
else
digitalWrite(fan, LOW);
if(buttons == 5)break;
delay(400);
timer++;
}
delay(600);
start++;
lcd.clear();
lcd.setCursor(0,0);
lcd.print (" THERAPY ");
lcd.setCursor(0,1);
LCD_BACKLIGHT_ON();
lcd.print (" COMPLETED! ");
digitalWrite(relay, LOW);
digitalWrite(fan, LOW);
delay(1000);
}

59
/*=======================================================================
PRINT TEMPERATURE FUNCTION
=======================================================================*/
void print_temp(){
lcd.clear();
lcd.print ("T:");
lcd.print (temp);
lcd.print ("'C");
lcd.print (" ");
lcd.print ("L:");
ldr=map(ldr,0,1023,0,100);
lcd.print (ldr);
lcd.print (" ");
lcd.print ("S:");
sound=map(sound,0,1023,0,100);
lcd.print (sound);
}
/*=======================================================================
TIME CONTROL FUNCTION
=======================================================================*/
void times(){
if(time[0] > 9)
time[0] = 0;
if(time[1] > 9)
time[1] = 0;
if(time[2] > 5){
time[2] = 0;
time[1]=time[1]+1;}
if(time[3] > 9){
time[3] = 0;
time[2]=time[2]+1;}

60
}
/*=======================================================================
CURSOR FUNCTION
=======================================================================*/
void curs(){
if(cur == 0){
lcd.setCursor(0, 1);
lcd.print ("Timer: ");
lcd.print ("_");
lcd.print (time[1]);
lcd.print (":");
lcd.print (time[2]);
lcd.print (time[3]);
lcd.print (" ");
LCD_BACKLIGHT_ON();}
else if(cur == 1){
lcd.setCursor(0, 1);
lcd.print ("Timer: ");
lcd.print (time[0]);
lcd.print ("_");
lcd.print (":");
lcd.print (time[2]);
lcd.print (time[3]);
lcd.print (" ");
LCD_BACKLIGHT_ON();}
else if(cur == 2){
lcd.setCursor(0, 1);
lcd.print ("Timer: ");
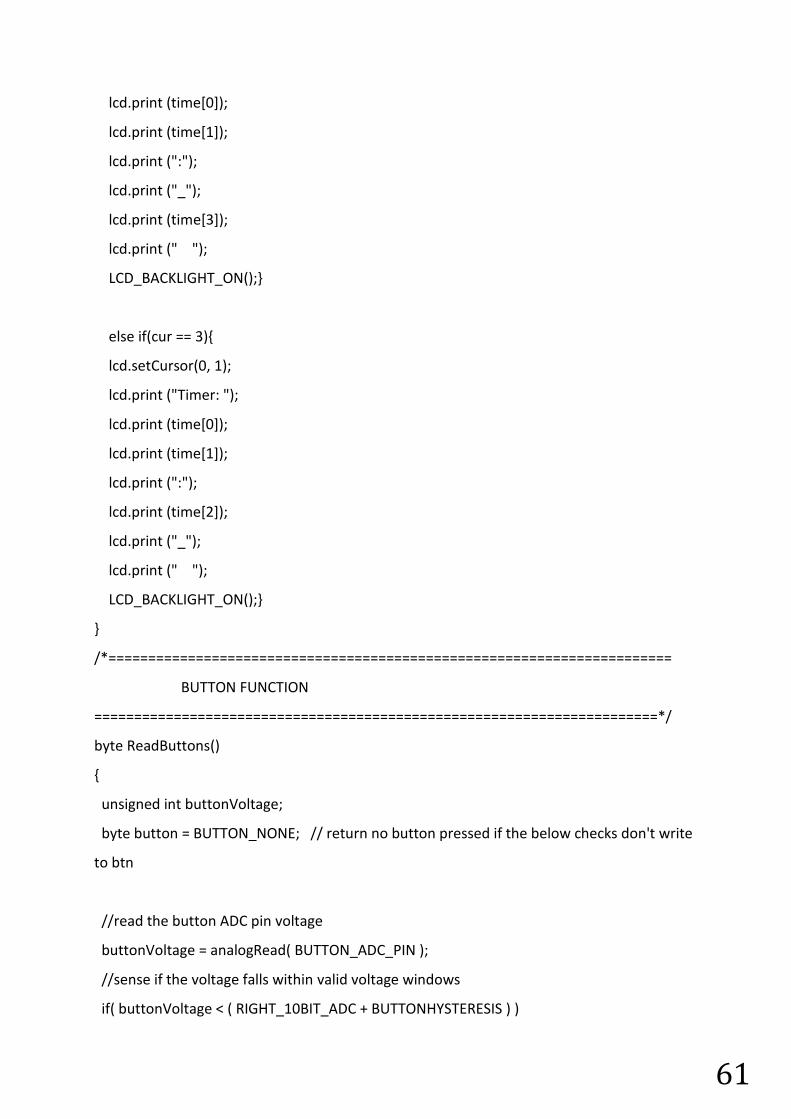
61
lcd.print (time[0]);
lcd.print (time[1]);
lcd.print (":");
lcd.print ("_");
lcd.print (time[3]);
lcd.print (" ");
LCD_BACKLIGHT_ON();}
else if(cur == 3){
lcd.setCursor(0, 1);
lcd.print ("Timer: ");
lcd.print (time[0]);
lcd.print (time[1]);
lcd.print (":");
lcd.print (time[2]);
lcd.print ("_");
lcd.print (" ");
LCD_BACKLIGHT_ON();}
}
/*=======================================================================
BUTTON FUNCTION
=======================================================================*/
byte ReadButtons()
{
unsigned int buttonVoltage;
byte button = BUTTON_NONE; // return no button pressed if the below checks don't write
to btn
//read the button ADC pin voltage
buttonVoltage = analogRead( BUTTON_ADC_PIN );
//sense if the voltage falls within valid voltage windows
if( buttonVoltage < ( RIGHT_10BIT_ADC + BUTTONHYSTERESIS ) )
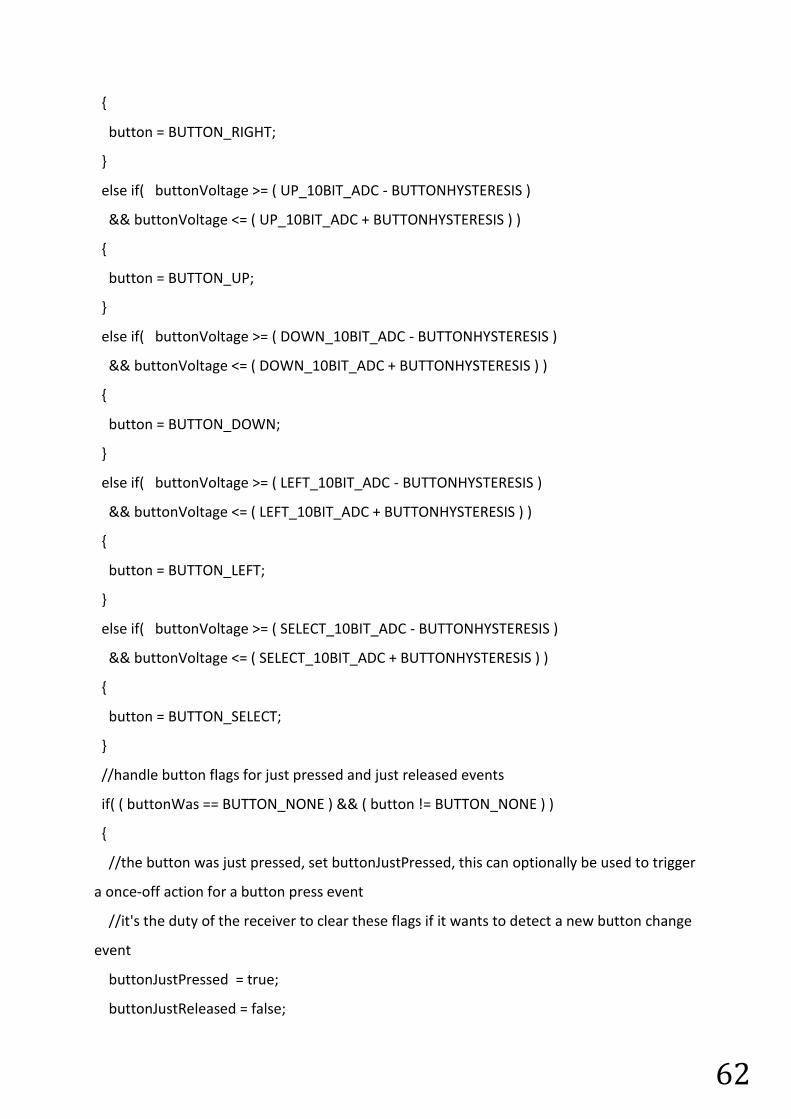
62
{
button = BUTTON_RIGHT;
}
else if( buttonVoltage >= ( UP_10BIT_ADC - BUTTONHYSTERESIS )
&& buttonVoltage <= ( UP_10BIT_ADC + BUTTONHYSTERESIS ) )
{
button = BUTTON_UP;
}
else if( buttonVoltage >= ( DOWN_10BIT_ADC - BUTTONHYSTERESIS )
&& buttonVoltage <= ( DOWN_10BIT_ADC + BUTTONHYSTERESIS ) )
{
button = BUTTON_DOWN;
}
else if( buttonVoltage >= ( LEFT_10BIT_ADC - BUTTONHYSTERESIS )
&& buttonVoltage <= ( LEFT_10BIT_ADC + BUTTONHYSTERESIS ) )
{
button = BUTTON_LEFT;
}
else if( buttonVoltage >= ( SELECT_10BIT_ADC - BUTTONHYSTERESIS )
&& buttonVoltage <= ( SELECT_10BIT_ADC + BUTTONHYSTERESIS ) )
{
button = BUTTON_SELECT;
}
//handle button flags for just pressed and just released events
if( ( buttonWas == BUTTON_NONE ) && ( button != BUTTON_NONE ) )
{
//the button was just pressed, set buttonJustPressed, this can optionally be used to trigger
a once-off action for a button press event
//it's the duty of the receiver to clear these flags if it wants to detect a new button change
event
buttonJustPressed = true;
buttonJustReleased = false;

63
}
if( ( buttonWas != BUTTON_NONE ) && ( button == BUTTON_NONE ) )
{
buttonJustPressed = false;
buttonJustReleased = true;
}
//save the latest button value, for change event detection next time round
buttonWas = button;
return( button );
}