Embed Size (px)
Citation preview
Sams Publishing, 800 East 96th Street, Indianapolis, Indiana 46240 USA
Jennifer FultonScott M. Fulton III
TeachYourself
Snapin a
Photoshop®
Elements 4
Adob
e®
00_067232850x_FM.qxd 11/9/05 10:44 AM Page iii
Adobe® Photoshop® Elements 4 in a SnapCopyright © 2006 by Sams Publishing
All rights reserved. No part of this book shall be reproduced, stored ina retrieval system, or transmitted by any means, electronic, mechani-cal, photocopying, recording, or otherwise, without written permissionfrom the publisher. No patent liability is assumed with respect to theuse of the information contained herein. Although every precautionhas been taken in the preparation of this book, the publisher andauthor assume no responsibility for errors or omissions. Nor is any lia-bility assumed for damages resulting from the use of the informationcontained herein.
International Standard Book Number: 0-672-32850-X
Library of Congress Catalog Card Number: 2005928914
Printed in the United States of America
First Printing: December 2005
08 07 06 05 4 3 2 1
TrademarksAll terms mentioned in this book that are known to be trademarks orservice marks have been appropriately capitalized. Sams Publishingcannot attest to the accuracy of this information. Use of a term in thisbook should not be regarded as affecting the validity of any trademarkor service mark.
Warning and DisclaimerEvery effort has been made to make this book as complete and asaccurate as possible, but no warranty or fitness is implied. The infor-mation provided is on an “as is” basis. The authors and the publishershall have neither liability nor responsibility to any person or entitywith respect to any loss or damages arising from the information con-tained in this book.
Bulk SalesSams Publishing offers excellent discounts on this book when orderedin quantity for bulk purchases or special sales. For more information,please contact
U.S. Corporate and Government Sales
1-800-382-3419
For sales outside of the United States, please contact
International Sales
Acquisitions EditorBetsy Brown
Development EditorAlice Martina Smith
Managing EditorCharlotte Clapp
Project EditorDan Knott
IndexerJulie Bess
Technical EditorDoug Nelson
PublishingCoordinatorVanessa Evans
MultimediaDeveloperDan Scherf
Book DesignerGary Adair
Page LayoutBronkella Publishing
iv
00_067232850x_FM.qxd 11/9/05 10:44 AM Page iv

13Blending PixelsTogether
IN THIS CHAPTER:
About Blend Modes100
067232850x CH13.qxd 11/9/05 10:50 AM Page Web:1
You’ll find that most editing procedures at some point involve putting somethingnew on top of something old. This is true whether you’re applying new paint to anold background, moving a new layer on top of an old layer, or creating a newshape to fit on top of an existing element of a photo. When you put somethingon top of something else, Photoshop Elements wants to know what it should do tocreate the result: Does the new stuff replace the old stuff completely? Or does thenew stuff blend with existing pixels, and if so, in what way should the pixels beblended? You can answer these fundamental questions in part with the Opacitysetting you choose for a tool or a layer; the opacity affects the transparency of thedata applied by the tool or on the layer, and thus, how much that data blocks thedata on layers below. You can also control how new data interacts with old databy changing a tool or layer’s blend mode. In this chapter, you’ll learn how thevarious blend modes work.
CHAPTER 13: Blending Pixels TogetherWeb:2
✔ BEFORE YOU BEGIN
About the Toolbox69
➜SEE ALSO
Create a New Image LayerDraw on a Photo with a PencilPaint an Area of a Photo with aBrushInstall a Color Profile64
73
72
54
100 About Blend Modes
All the tools that support blend modes have a Mode list on the Options bar fromwhich you can choose the blend mode to use. If you choose Normal, no blendingoccurs, and the pixels you apply with the tool totally block (overlay) those below.You can also set the blend mode for a layer by choosing the blend mode to usefrom the Mode list at the top of the Layers palette when that layer is selected.
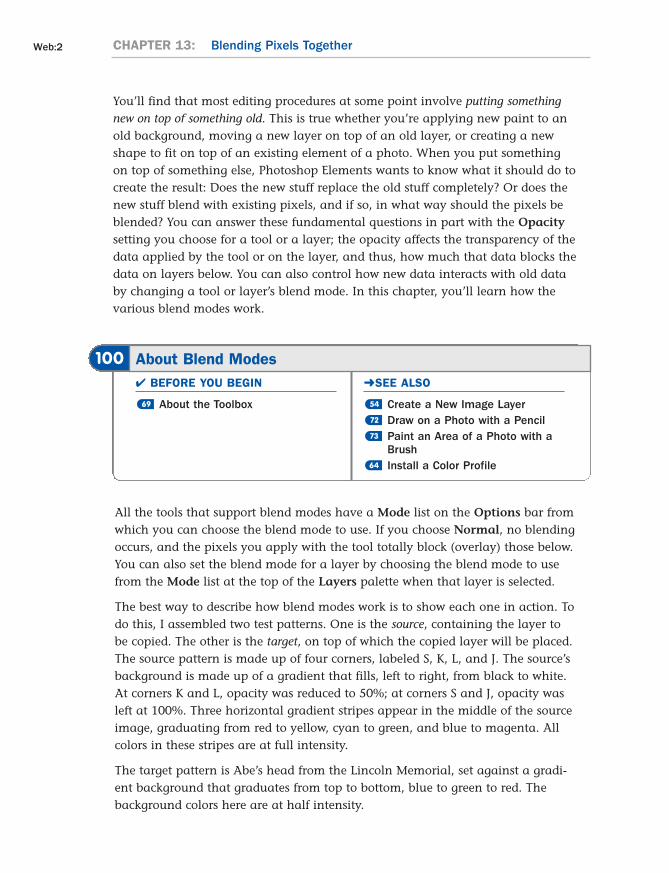
The best way to describe how blend modes work is to show each one in action. Todo this, I assembled two test patterns. One is the source, containing the layer tobe copied. The other is the target, on top of which the copied layer will be placed.The source pattern is made up of four corners, labeled S, K, L, and J. The source’sbackground is made up of a gradient that fills, left to right, from black to white.At corners K and L, opacity was reduced to 50%; at corners S and J, opacity wasleft at 100%. Three horizontal gradient stripes appear in the middle of the sourceimage, graduating from red to yellow, cyan to green, and blue to magenta. Allcolors in these stripes are at full intensity.
The target pattern is Abe’s head from the Lincoln Memorial, set against a gradi-ent background that graduates from top to bottom, blue to green to red. Thebackground colors here are at half intensity.
067232850x CH13.qxd 11/9/05 10:50 AM Page Web:2
About Blend Modes100 Web:3
The source image is a combination of colors and opacities. The target image is a photowith a gradient as a background.
100
Source Target
Some of the tools offer extra “modes” (not shown here, and not really blend modes) thatdo not apply to copying layers or selections. The Pencil, Brush, Paint Bucket, CloneStamp, Pattern Stamp, and Gradient tools offer the Behind mode, which paints orcopies pixels only on the transparent part of a layer. Using this mode is like painting onthe back of transparent areas of a sheet of acetate. The Pencil Brush and Paint Buckettools also offer the Clear mode, which causes the tool to paint transparency onto anarea, as if transparency were a paint. Neither mode works when painting on top of theBackground layer, which has no transparent base, so no part of it can be made trans-parent. The Healing Brush tool offers a Replace mode, which causes the tool to copypixels from the source, and not blend them with existing pixels, except along the veryedges of the brush.
With that setup out of the way, here are the blend modes used by PhotoshopElements. As you read the descriptions, compare the result figure shown next tothat that particular blend mode with the Normal result shown here.
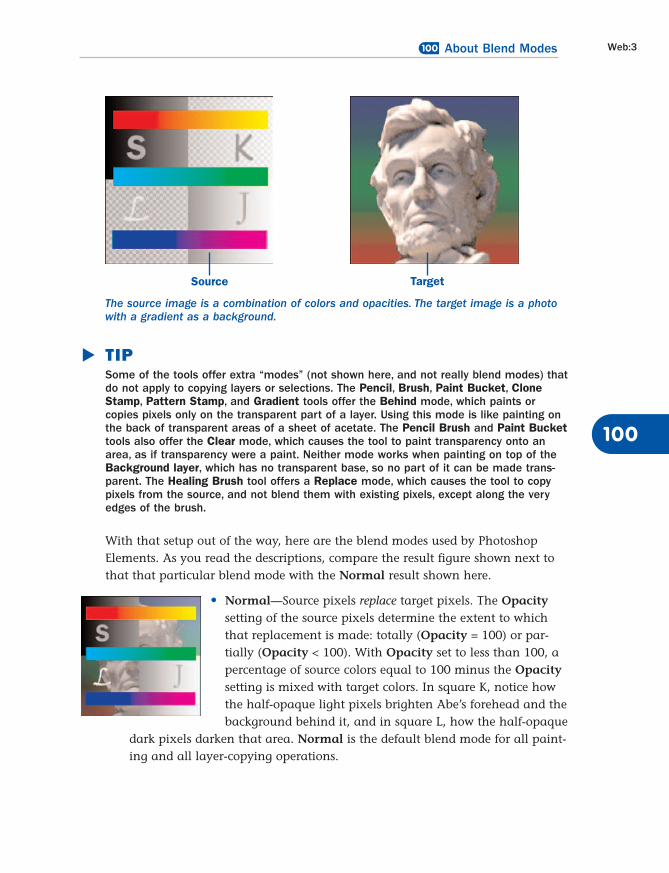
• Normal—Source pixels replace target pixels. The Opacitysetting of the source pixels determine the extent to whichthat replacement is made: totally (Opacity = 100) or par-tially (Opacity < 100). With Opacity set to less than 100, apercentage of source colors equal to 100 minus the Opacitysetting is mixed with target colors. In square K, notice howthe half-opaque light pixels brighten Abe’s forehead and thebackground behind it, and in square L, how the half-opaque
dark pixels darken that area. Normal is the default blend mode for all paint-ing and all layer-copying operations.
TIP.
067232850x CH13.qxd 11/9/05 10:50 AM Page Web:3
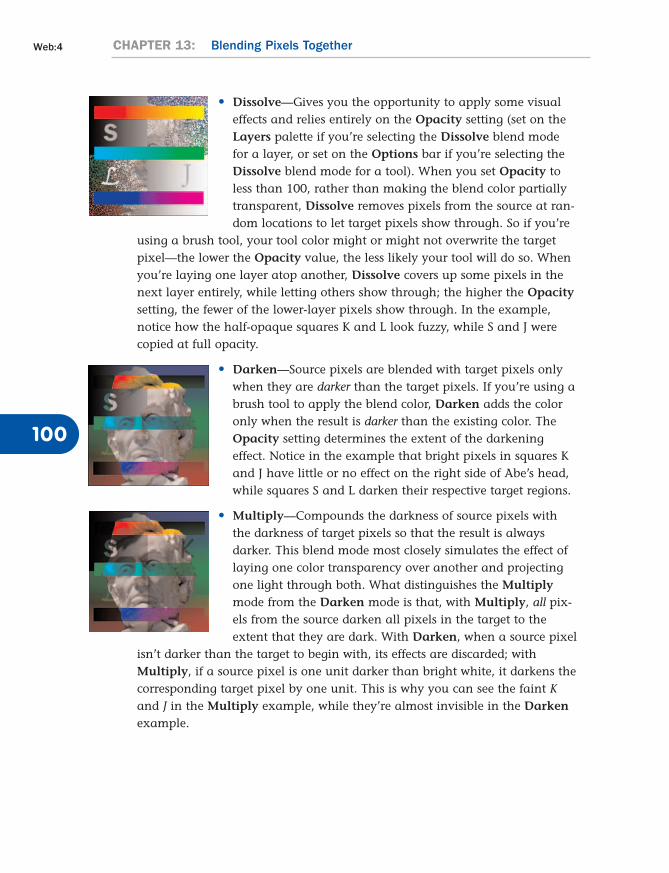
• Dissolve—Gives you the opportunity to apply some visualeffects and relies entirely on the Opacity setting (set on theLayers palette if you’re selecting the Dissolve blend modefor a layer, or set on the Options bar if you’re selecting theDissolve blend mode for a tool). When you set Opacity toless than 100, rather than making the blend color partiallytransparent, Dissolve removes pixels from the source at ran-dom locations to let target pixels show through. So if you’re
using a brush tool, your tool color might or might not overwrite the targetpixel—the lower the Opacity value, the less likely your tool will do so. Whenyou’re laying one layer atop another, Dissolve covers up some pixels in thenext layer entirely, while letting others show through; the higher the Opacitysetting, the fewer of the lower-layer pixels show through. In the example,notice how the half-opaque squares K and L look fuzzy, while S and J werecopied at full opacity.
• Darken—Source pixels are blended with target pixels onlywhen they are darker than the target pixels. If you’re using abrush tool to apply the blend color, Darken adds the coloronly when the result is darker than the existing color. TheOpacity setting determines the extent of the darkeningeffect. Notice in the example that bright pixels in squares Kand J have little or no effect on the right side of Abe’s head,while squares S and L darken their respective target regions.
• Multiply—Compounds the darkness of source pixels withthe darkness of target pixels so that the result is alwaysdarker. This blend mode most closely simulates the effect oflaying one color transparency over another and projectingone light through both. What distinguishes the Multiplymode from the Darken mode is that, with Multiply, all pix-els from the source darken all pixels in the target to theextent that they are dark. With Darken, when a source pixel
isn’t darker than the target to begin with, its effects are discarded; withMultiply, if a source pixel is one unit darker than bright white, it darkens thecorresponding target pixel by one unit. This is why you can see the faint Kand J in the Multiply example, while they’re almost invisible in the Darkenexample.
CHAPTER 13: Blending Pixels Together
100
Web:4
067232850x CH13.qxd 11/9/05 10:50 AM Page Web:4
About Blend Modes100 Web:5
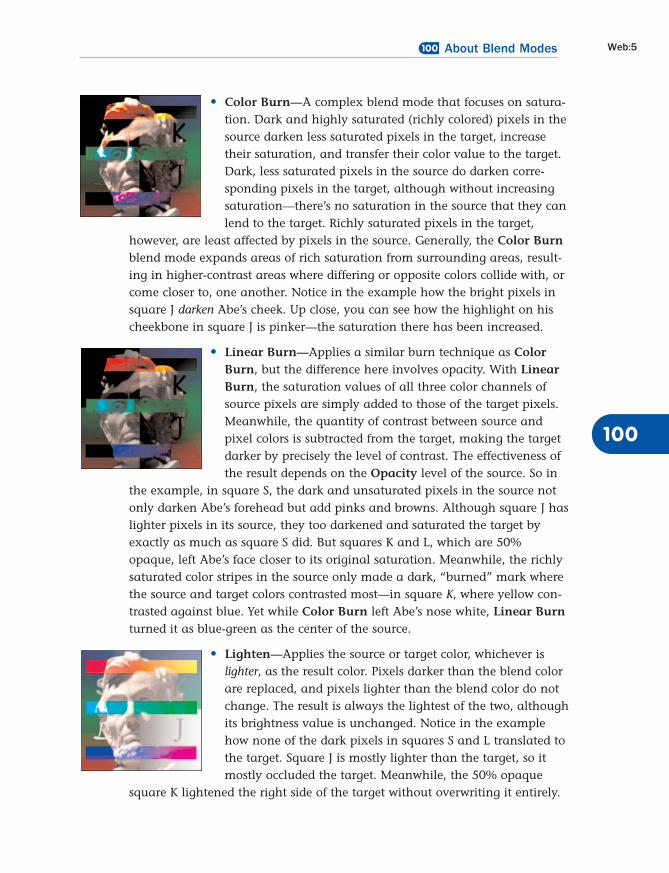
• Color Burn—A complex blend mode that focuses on satura-tion. Dark and highly saturated (richly colored) pixels in thesource darken less saturated pixels in the target, increasetheir saturation, and transfer their color value to the target.Dark, less saturated pixels in the source do darken corre-sponding pixels in the target, although without increasingsaturation—there’s no saturation in the source that they canlend to the target. Richly saturated pixels in the target,
however, are least affected by pixels in the source. Generally, the Color Burnblend mode expands areas of rich saturation from surrounding areas, result-ing in higher-contrast areas where differing or opposite colors collide with, orcome closer to, one another. Notice in the example how the bright pixels insquare J darken Abe’s cheek. Up close, you can see how the highlight on hischeekbone in square J is pinker—the saturation there has been increased.
• Linear Burn—Applies a similar burn technique as ColorBurn, but the difference here involves opacity. With LinearBurn, the saturation values of all three color channels ofsource pixels are simply added to those of the target pixels.Meanwhile, the quantity of contrast between source andpixel colors is subtracted from the target, making the targetdarker by precisely the level of contrast. The effectiveness ofthe result depends on the Opacity level of the source. So in
the example, in square S, the dark and unsaturated pixels in the source notonly darken Abe’s forehead but add pinks and browns. Although square J haslighter pixels in its source, they too darkened and saturated the target byexactly as much as square S did. But squares K and L, which are 50%opaque, left Abe’s face closer to its original saturation. Meanwhile, the richlysaturated color stripes in the source only made a dark, “burned” mark wherethe source and target colors contrasted most—in square K, where yellow con-trasted against blue. Yet while Color Burn left Abe’s nose white, Linear Burnturned it as blue-green as the center of the source.
• Lighten—Applies the source or target color, whichever islighter, as the result color. Pixels darker than the blend colorare replaced, and pixels lighter than the blend color do notchange. The result is always the lightest of the two, althoughits brightness value is unchanged. Notice in the examplehow none of the dark pixels in squares S and L translated tothe target. Square J is mostly lighter than the target, so itmostly occluded the target. Meanwhile, the 50% opaque
square K lightened the right side of the target without overwriting it entirely.
100
067232850x CH13.qxd 11/9/05 10:50 AM Page Web:5
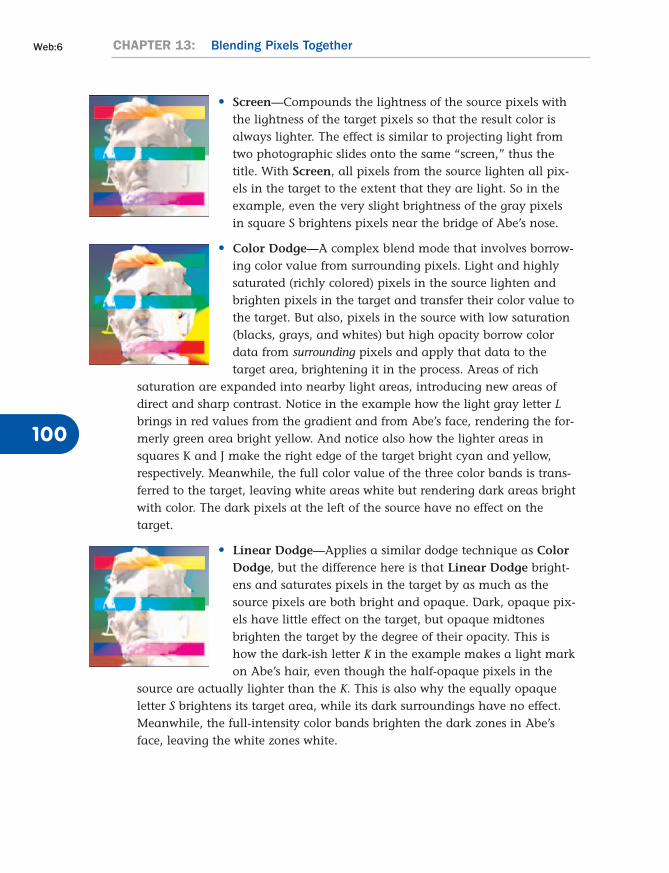
• Screen—Compounds the lightness of the source pixels withthe lightness of the target pixels so that the result color isalways lighter. The effect is similar to projecting light fromtwo photographic slides onto the same “screen,” thus thetitle. With Screen, all pixels from the source lighten all pix-els in the target to the extent that they are light. So in theexample, even the very slight brightness of the gray pixelsin square S brightens pixels near the bridge of Abe’s nose.
• Color Dodge—A complex blend mode that involves borrow-ing color value from surrounding pixels. Light and highlysaturated (richly colored) pixels in the source lighten andbrighten pixels in the target and transfer their color value tothe target. But also, pixels in the source with low saturation(blacks, grays, and whites) but high opacity borrow colordata from surrounding pixels and apply that data to the target area, brightening it in the process. Areas of rich
saturation are expanded into nearby light areas, introducing new areas ofdirect and sharp contrast. Notice in the example how the light gray letter Lbrings in red values from the gradient and from Abe’s face, rendering the for-merly green area bright yellow. And notice also how the lighter areas insquares K and J make the right edge of the target bright cyan and yellow,respectively. Meanwhile, the full color value of the three color bands is trans-ferred to the target, leaving white areas white but rendering dark areas brightwith color. The dark pixels at the left of the source have no effect on the target.
• Linear Dodge—Applies a similar dodge technique as ColorDodge, but the difference here is that Linear Dodge bright-ens and saturates pixels in the target by as much as thesource pixels are both bright and opaque. Dark, opaque pix-els have little effect on the target, but opaque midtonesbrighten the target by the degree of their opacity. This ishow the dark-ish letter K in the example makes a light markon Abe’s hair, even though the half-opaque pixels in the
source are actually lighter than the K. This is also why the equally opaqueletter S brightens its target area, while its dark surroundings have no effect.Meanwhile, the full-intensity color bands brighten the dark zones in Abe’sface, leaving the white zones white.
CHAPTER 13: Blending Pixels Together
100
Web:6
067232850x CH13.qxd 11/9/05 10:50 AM Page Web:6
About Blend Modes100 Web:7
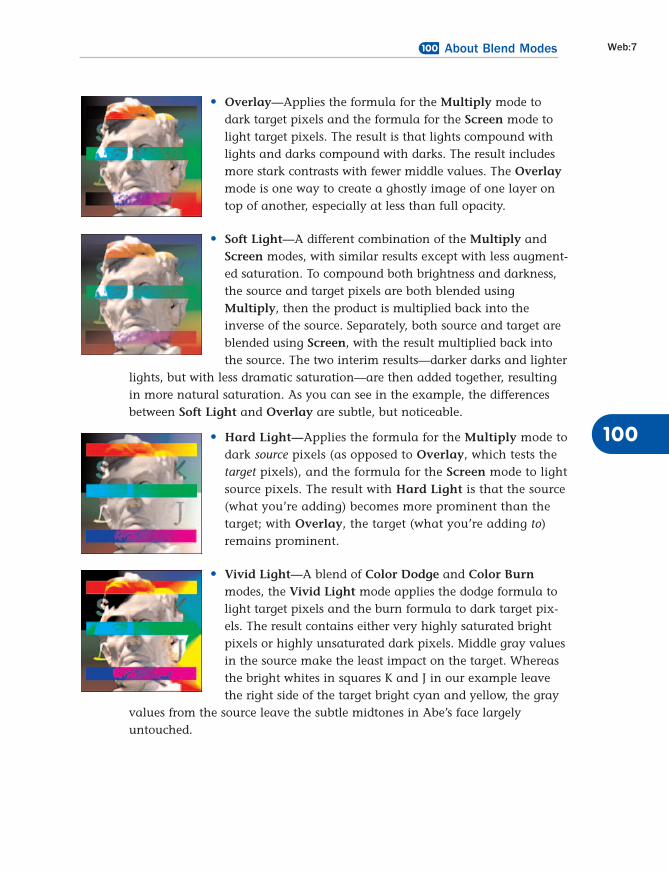
• Overlay—Applies the formula for the Multiply mode todark target pixels and the formula for the Screen mode tolight target pixels. The result is that lights compound withlights and darks compound with darks. The result includesmore stark contrasts with fewer middle values. The Overlaymode is one way to create a ghostly image of one layer ontop of another, especially at less than full opacity.
• Soft Light—A different combination of the Multiply andScreen modes, with similar results except with less augment-ed saturation. To compound both brightness and darkness,the source and target pixels are both blended usingMultiply, then the product is multiplied back into theinverse of the source. Separately, both source and target areblended using Screen, with the result multiplied back intothe source. The two interim results—darker darks and lighter
lights, but with less dramatic saturation—are then added together, resultingin more natural saturation. As you can see in the example, the differencesbetween Soft Light and Overlay are subtle, but noticeable.
• Hard Light—Applies the formula for the Multiply mode todark source pixels (as opposed to Overlay, which tests thetarget pixels), and the formula for the Screen mode to lightsource pixels. The result with Hard Light is that the source(what you’re adding) becomes more prominent than thetarget; with Overlay, the target (what you’re adding to)remains prominent.
• Vivid Light—A blend of Color Dodge and Color Burnmodes, the Vivid Light mode applies the dodge formula tolight target pixels and the burn formula to dark target pix-els. The result contains either very highly saturated brightpixels or highly unsaturated dark pixels. Middle gray valuesin the source make the least impact on the target. Whereasthe bright whites in squares K and J in our example leavethe right side of the target bright cyan and yellow, the gray
values from the source leave the subtle midtones in Abe’s face largelyuntouched.
100
067232850x CH13.qxd 11/9/05 10:50 AM Page Web:7
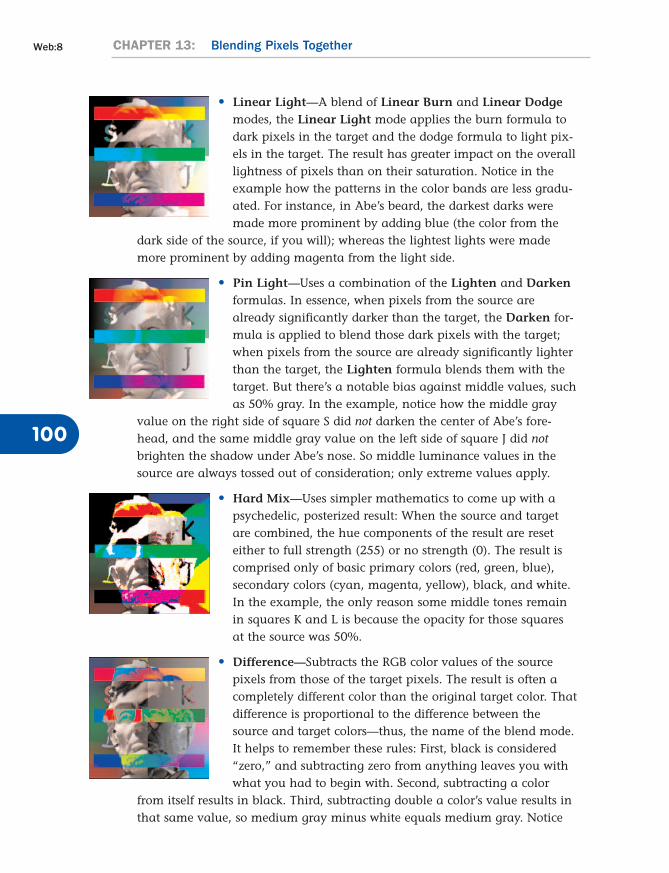
• Linear Light—A blend of Linear Burn and Linear Dodgemodes, the Linear Light mode applies the burn formula todark pixels in the target and the dodge formula to light pix-els in the target. The result has greater impact on the overalllightness of pixels than on their saturation. Notice in theexample how the patterns in the color bands are less gradu-ated. For instance, in Abe’s beard, the darkest darks weremade more prominent by adding blue (the color from the
dark side of the source, if you will); whereas the lightest lights were mademore prominent by adding magenta from the light side.
• Pin Light—Uses a combination of the Lighten and Darkenformulas. In essence, when pixels from the source arealready significantly darker than the target, the Darken for-mula is applied to blend those dark pixels with the target;when pixels from the source are already significantly lighterthan the target, the Lighten formula blends them with thetarget. But there’s a notable bias against middle values, suchas 50% gray. In the example, notice how the middle gray
value on the right side of square S did not darken the center of Abe’s fore-head, and the same middle gray value on the left side of square J did notbrighten the shadow under Abe’s nose. So middle luminance values in thesource are always tossed out of consideration; only extreme values apply.
• Hard Mix—Uses simpler mathematics to come up with apsychedelic, posterized result: When the source and targetare combined, the hue components of the result are reseteither to full strength (255) or no strength (0). The result iscomprised only of basic primary colors (red, green, blue),secondary colors (cyan, magenta, yellow), black, and white.In the example, the only reason some middle tones remainin squares K and L is because the opacity for those squaresat the source was 50%.
• Difference—Subtracts the RGB color values of the sourcepixels from those of the target pixels. The result is often acompletely different color than the original target color. Thatdifference is proportional to the difference between thesource and target colors—thus, the name of the blend mode.It helps to remember these rules: First, black is considered“zero,” and subtracting zero from anything leaves you withwhat you had to begin with. Second, subtracting a color
from itself results in black. Third, subtracting double a color’s value results inthat same value, so medium gray minus white equals medium gray. Notice
CHAPTER 13: Blending Pixels Together
100
Web:8
067232850x CH13.qxd 11/9/05 10:50 AM Page Web:8
About Blend Modes100 Web:9
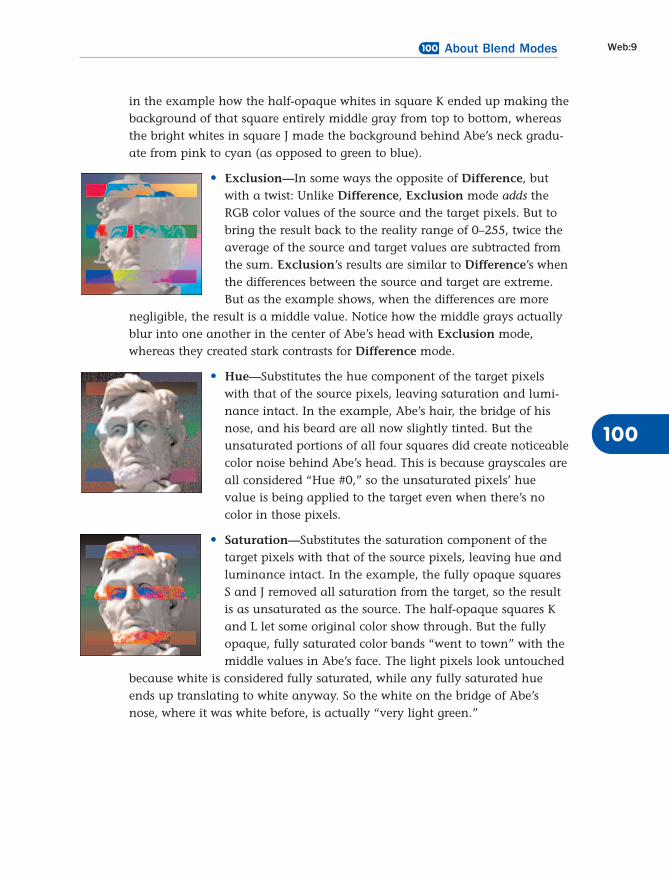
in the example how the half-opaque whites in square K ended up making thebackground of that square entirely middle gray from top to bottom, whereasthe bright whites in square J made the background behind Abe’s neck gradu-ate from pink to cyan (as opposed to green to blue).
• Exclusion—In some ways the opposite of Difference, butwith a twist: Unlike Difference, Exclusion mode adds theRGB color values of the source and the target pixels. But tobring the result back to the reality range of 0–255, twice theaverage of the source and target values are subtracted fromthe sum. Exclusion’s results are similar to Difference’s whenthe differences between the source and target are extreme.But as the example shows, when the differences are more
negligible, the result is a middle value. Notice how the middle grays actuallyblur into one another in the center of Abe’s head with Exclusion mode,whereas they created stark contrasts for Difference mode.
• Hue—Substitutes the hue component of the target pixelswith that of the source pixels, leaving saturation and lumi-nance intact. In the example, Abe’s hair, the bridge of hisnose, and his beard are all now slightly tinted. But theunsaturated portions of all four squares did create noticeablecolor noise behind Abe’s head. This is because grayscales areall considered “Hue #0,” so the unsaturated pixels’ huevalue is being applied to the target even when there’s nocolor in those pixels.
• Saturation—Substitutes the saturation component of thetarget pixels with that of the source pixels, leaving hue andluminance intact. In the example, the fully opaque squaresS and J removed all saturation from the target, so the resultis as unsaturated as the source. The half-opaque squares Kand L let some original color show through. But the fullyopaque, fully saturated color bands “went to town” with themiddle values in Abe’s face. The light pixels look untouched
because white is considered fully saturated, while any fully saturated hueends up translating to white anyway. So the white on the bridge of Abe’snose, where it was white before, is actually “very light green.”
100
067232850x CH13.qxd 11/9/05 10:50 AM Page Web:9
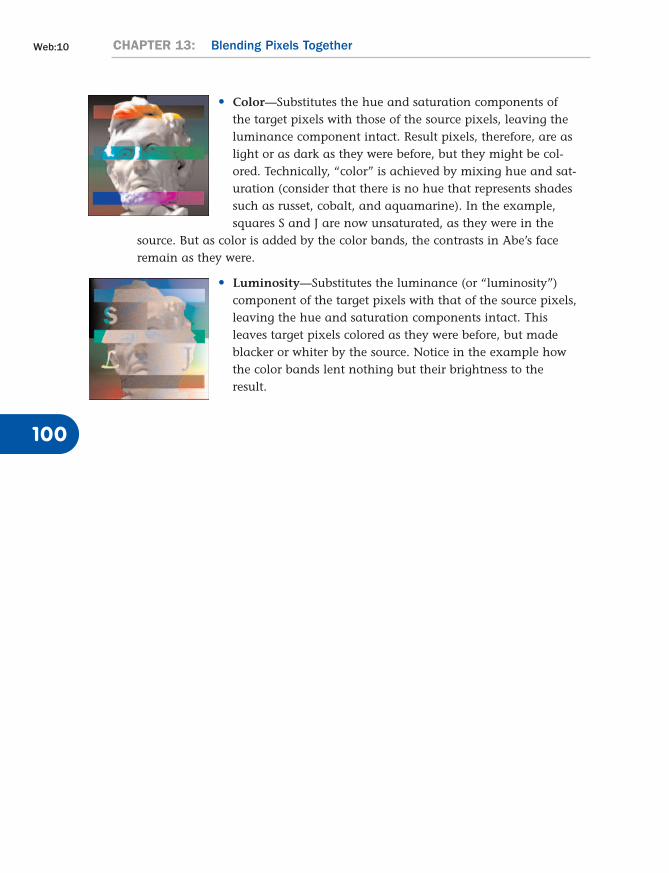
• Color—Substitutes the hue and saturation components ofthe target pixels with those of the source pixels, leaving theluminance component intact. Result pixels, therefore, are aslight or as dark as they were before, but they might be col-ored. Technically, “color” is achieved by mixing hue and sat-uration (consider that there is no hue that represents shadessuch as russet, cobalt, and aquamarine). In the example,squares S and J are now unsaturated, as they were in the
source. But as color is added by the color bands, the contrasts in Abe’s faceremain as they were.
• Luminosity—Substitutes the luminance (or “luminosity”)component of the target pixels with that of the source pixels,leaving the hue and saturation components intact. Thisleaves target pixels colored as they were before, but madeblacker or whiter by the source. Notice in the example howthe color bands lent nothing but their brightness to theresult.
CHAPTER 13: Blending Pixels Together
100
Web:10
067232850x CH13.qxd 11/9/05 10:50 AM Page Web:10