Embed Size (px)
Citation preview

Photo: Ireneus Stosik
…/…
2 x Clamcleat CL244 Aluminium cleat 2 x Clamcleat CL111 Plastic cleat clamp with shims and screws 2 x Seasure Pulleys2 x 2.0 m Length of 5mm Line1 x 3.0 m Length of 4mm Line
2 x taquets coinceurs CL244 taquet alu2 x taquets coinceurs CL111 clames plastiques avec cales et vis2 x poulies Seasure 2 x 2.0 m Longueur de bout 5mm 1 x 3.0 m Longueur de bout 4mm
1. Align the plastic clamps (CL111) about 20 cm aft of your rear hand position, and insert the aluminium cleats (CL244) with teeth facing forward. The plastic clamp should not be able to move on the boom arm, and the shims should be used if necessary. Screw the assembly together with the screws provided.
1. Aligner les coques plastiques (CL111) à une distance de 20 cm environ de votre main arrière, et insérer les taquets alu (CL244) (dents inclinées vers l’avant). Chaque coque plastique ne doit pas pouvoir bouger le long du bras du bôme et les cales doivent être utilisées si nécessaire. Visser le tout avec les vis fournies.
2. Take the 3m length of 4mm line, and secure one end to one pulley with a bowline. Thread the rope through the pulleys at the boom end and through the eyelet of the sail as per the picture. Two option:• Option 1: 2 pulleys for use directly with the eyelet of the sail OR • Option 2: 3 pulleys for greater advantage on the sail but requiring the addition of a double pulley block on the eyelet.Tie the other end of the line with a bowline to the remaining pulley. NOTE: When de-rigging your sail, the entire assembly should be left on the boom. Only one of these bowlines needs to be undone in order to remove your boom from the sail.
Parts List
Liste des pièces
To install the kit
Comment monter le kit
Installation Guide One Design Rig Adjustable Outhaul Kit
BIC Sport - RP 3716, Z.I. du Prat - 56037 Vannes Cedex - FRANCE - Tel: 33 (0)2 97 43 75 00 - Fax: 33 (0)2 97 43 75 01BIC Sport, S.A.S.U. au capital de 1.812.075 euros - B 781 626 957 - R.C.S. VANNES
www.bicsport.com
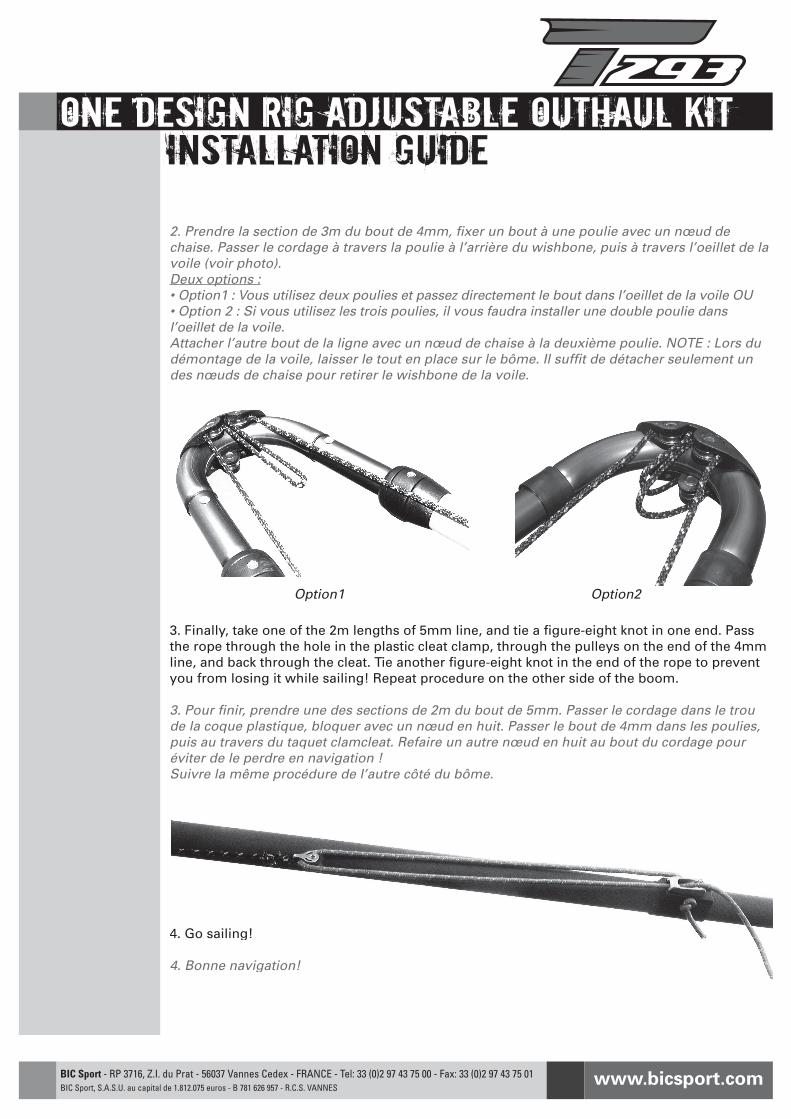
2. Prendre la section de 3m du bout de 4mm, fi xer un bout à une poulie avec un nœud de chaise. Passer le cordage à travers la poulie à l’arrière du wishbone, puis à travers l’oeillet de la voile (voir photo).Deux options :• Option1 : Vous utilisez deux poulies et passez directement le bout dans l’oeillet de la voile OU • Option 2 : Si vous utilisez les trois poulies, il vous faudra installer une double poulie dans l’oeillet de la voile.Attacher l’autre bout de la ligne avec un nœud de chaise à la deuxième poulie. NOTE : Lors du démontage de la voile, laisser le tout en place sur le bôme. Il suffi t de détacher seulement un des nœuds de chaise pour retirer le wishbone de la voile.
3. Finally, take one of the 2m lengths of 5mm line, and tie a fi gure-eight knot in one end. Pass the rope through the hole in the plastic cleat clamp, through the pulleys on the end of the 4mm line, and back through the cleat. Tie another fi gure-eight knot in the end of the rope to prevent you from losing it while sailing! Repeat procedure on the other side of the boom.
3. Pour fi nir, prendre une des sections de 2m du bout de 5mm. Passer le cordage dans le trou de la coque plastique, bloquer avec un nœud en huit. Passer le bout de 4mm dans les poulies, puis au travers du taquet clamcleat. Refaire un autre nœud en huit au bout du cordage pour éviter de le perdre en navigation ! Suivre la même procédure de l’autre côté du bôme.
4. Go sailing!
4. Bonne navigation!
4. Go sailing!
4. Bonne navigation!
One Design Rig Adjustable Outhaul Kit Installation Guide
BIC Sport - RP 3716, Z.I. du Prat - 56037 Vannes Cedex - FRANCE - Tel: 33 (0)2 97 43 75 00 - Fax: 33 (0)2 97 43 75 01BIC Sport, S.A.S.U. au capital de 1.812.075 euros - B 781 626 957 - R.C.S. VANNES
www.bicsport.com
Option1 Option2


![02 Rapid Rig Rig Up - Formatted Rev 2 08dec01[1]](https://img.pdfslide.us/doc/110x75/55cf8ed3550346703b960219/02-rapid-rig-rig-up-formatted-rev-2-08dec011.jpg)