Embed Size (px)
Citation preview
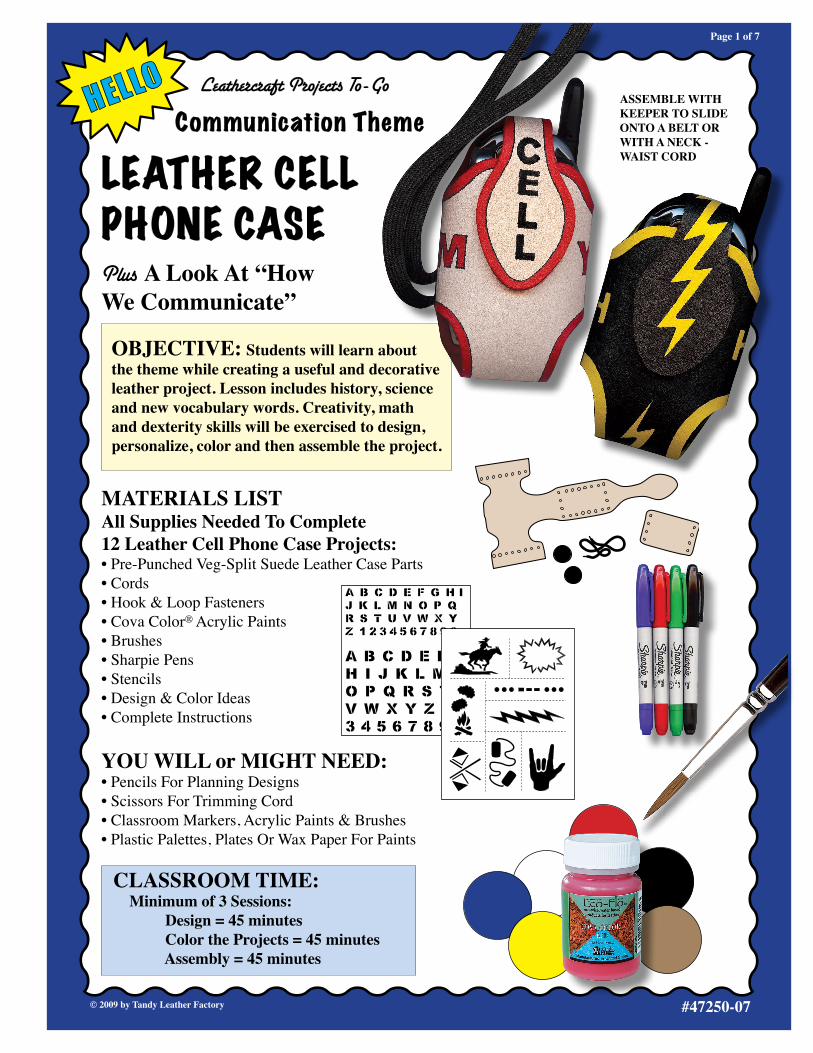
Page 1 of 7
Leathercraft Projects To-Go
Plus A Look At “How We Communicate”
Communication ThemeHELLO
MATERIALS LISTAll Supplies Needed To Complete 12 Leather Cell Phone Case Projects:• Pre-Punched Veg-Split Suede Leather Case Parts• Cords • Hook & Loop Fasteners • Cova Color® Acrylic Paints• Brushes• Sharpie Pens• Stencils• Design & Color Ideas• Complete Instructions
YOU WILL or MIGHT NEED:• Pencils For Planning Designs • Scissors For Trimming Cord• Classroom Markers, Acrylic Paints & Brushes• Plastic Palettes, Plates Or Wax Paper For Paints
A B C D E F G H I J K L M N O P Q R S T UV W X Y Z 1 2 3 4 5 6 7 8 9 0
A B C D E F G H I J K L M N O P Q R S T U V W X Y Z 1 2 3 4 5 6 7 8 9 0
EASY TO USELEATHERCRAFT
STENCIL
TANDYLEATHER FACTORY
C 2009
CLASSROOM TIME: Minimum of 3 Sessions: Design = 45 minutes Color the Projects = 45 minutes Assembly = 45 minutes
OBJECTIVE: Students will learn about the theme while creating a useful and decorative leather project. Lesson includes history, science and new vocabulary words. Creativity, math and dexterity skills will be exercised to design, personalize, color and then assemble the project.
COMMUNICATION STENCIL
LEATHER CELL PHONE CASE
ASSEMBLE WITH KEEPER TO SLIDE ONTO A BELT OR WITH A NECK - WAIST CORD
© 2009 by Tandy Leather Factory #47250-07

Page 2 of 7
MIXING COVA COLOR®
ACRYLIC PAINTSThe primary colors (red, yellow & blue) have been supplied in this Theme Bucket. The secondary colors (orange, green & purple) can be created as shown:
+ = Add more or less red or yellow to change the hue of the orange.
+ = Add more or less blue or yellow to change the hue of the green.
+ = Add more or less blue or red to change the hue of the purple.
+ = Add white to any color to make it lighter. Example shown = blue.
+ = Add black to any color to make it darker. Example shown = red.
Now try mixing the secondary colors together to get even more colors.
GETTING STARTED:SESSION 1 - Design:• Have students plan their designs on paper templates before putting them on
the leather.• Copy the blank template on page 5 and
hand out along with pencils for planning designs.• Cut stencils apart on dotted lines and hand out for planning designs. SESSIONS 2 - Color: • Hand out leather parts to students. • Share Sharpie Markers, paints & brushes
or use additional classroom supplies. Use plastic palettes, plates or wax paper for mixing paints.
(SEE PAGE 3 FOR SESSION 3)
Communication is a learned skill and there are two major categories: Auditory (verbal) methods such as speaking, singing and tone of voice. Second there is nonverbal or physicalmethods of communicating such as body language, sign language, touch, eye contact,use of writing and other symbols.
Communication is also the articulation (or expression) of a message through different media whether it be verbal or nonverbal. Historic media included smoke signals, letters by pony express, telegraph using Morse Code, telegrams, printing press handbills and newspapers, early telephones with party lines, and radio. More recent ways include radar, sonar, television, movies, satellites, cell phones, recorders, CDs, DVDs, computers, the internet and mental thought wave responders.
Most people are born with the ability to talk. However, the use of this ability must be learned. Words, tone of voice and volume must be learned. Some people are born deaf, so their ability to talk must be learned differently from those who hear, using sight and touch. Communication most often relies on learning to read, comparing and exploring with ones senses: sight, touch, taste, smell and hearing. Did You Know: The ancient Egyptians communicated to their people and enemies by constructing large intimidating temples and tombs decorated with carvings and picture writing called hieroglyphics. These were symbols communicating their strength and lasting power.
Hundreds and thousands of symbols have been used throughout history to communicate messages without using words. In medieval times, large churches were covered with carvings, stained glass picture windows and paintings which were used to communicate religious teachings because most of the population that attended services couldn’t read. Continued ...
How Do We Communicate?
© 2009 by Tandy Leather Factory
Page 3 of 7
NOTE: When using acrylic paints on leather, be sure the project is completely dry before starting to assemble the project.
GETTING STARTED continued:
SESSION 3 - Assembly:• Copy the Instructions on pages 6 & 7. Hand them out to each student along with the cord and fasteners.• Practice before class and then demonstrate the steps.
ABOUT THE LEATHER: The leather used for this project is called veg-split leather cut from cowhide. Both sides are rough or suede. The grain side (smooth top side) of this particular cut of leather has been removed.
Veg-split leather can be decorated with stencil designs or the students own creativity. The project for this lesson will be decorated using acrylic paints and colored markers.
Did You Know: Animals of all forms communicate between themselves and with communicates through response to touch, the sunand climate. Have you ever heard that you can tell if winter is over and spring has begun bywatching the trees bud and flowers bloom? Thisis a form of communication.
Did You Know: Commanders of ships communicated by means of flags, lanterns, lightsand the infamous “warning signal” which usuallymeant a “cannon shot across the bow”. Whencoming close to land, a light house’s mirroredlanterns communicated the position of the coast line to the ship. In times of emergency, flares were used to communicate the need for help and to mark a location for rescue. Did You Know: Air traffic controllers communicate with aircraft by means of radar and radio transmissions. Once on the land, the landing crew communicates with the pilots using flags and arm gestures. Our ways of communication continue to expand with new technology. It is our human job to learn how to interpret the messages better and respond appropriately to the communication.
History Continued:
VOCABULARY:Cowhide - The hide (skin) from a mature bovine (cow).
Flesh Side - The rough (suede) underside of leather.
Grain Side - The hair side of the leather with the hair removed. This side maybe tooled.
Tanning - The process using tannins to change a fresh animal hide into leather.
Tannins - Yellowish substance from oak bark and other plants used to tan leather.
Veg-Split - Vegetable-Tanned leather can be split (layered) into two pieces: one with the grain (top hair side) and one with the rough surface on both sides. Veg-split is the rough surfaced layer.

Page 4 of 7
RECYCLE ME! “I am your Theme Bucket - be sure to recycle me! I would like to end up in your closet with many of my friends. I could store art supplies, extra leather project parts, or even help you organize your files. Create a new label for me so I can help you find what is stored in me. But until it’s time to recycle, I am happy to bring fun & learning into your classroom by offering you Projects To-Go from Tandy Leather Factory.”
CREATE DESIGNS USING STENCIL PATTERNS & YOUR OWN IDEAS
Here are some color & design ideas shown on the project part. The leather can be left its natural color with just the designs in color or paint the backgrounds and designs different colors.
COLORING HINTS:To paint large areas, mix a Cova Color “wash” by diluting the color with water. Be sure to mix enough to do the entire project or keep a record of the proportions for mixing more.
To make bright or light colors stand out on a darker background, paint bright or light colors first. Then fill in background around them with a darker color. Or, put a wash over the area, let dry, then come back and paint the designs in white. Let white dry completely (few minutes), then add desired colors on top of the white.
CLASSROOM EXPANSION IDEAS: ~ Study the use of symbols, flags & Morse Code used for communication. ~ Study the oldest and newest forms of communication used by the students’ ancestors and families.
KN
S

© 2009 by Tandy Leather Factory
Page 5 of 7
TEMPLATE FOR PLANNING DESIGNSDemonstrate to the students how the cell phone leather piece folds and overlaps before trying to plan designs. Only the front part and tab will be be visible after the case is assembled, so plan designs accordingly.
The template below shows how the tab will overlap the front part.
TAB PART
DESIGNS WILL NOT BE VISIBLE PAST THIS DOTTED LINE
DESIGNS WILL NOT BE VISIBLE PAST THIS DOTTED LINE
FRONT PART
Be sure to plan BORDER designs around entire case even though not all will be visible.

Page 6 of 7
NECK CORD CASE ASSEMBLY INSTRUCTIONSBe sure project is completely dry before stitching.
1) Tie a knot in one end of cord.
2) Fold one side flap in and align holes with holes on back part (A).
3) Begin stitching in bottom hole, through aligned holes. Stitch in and out up to last hole. Tie a knot in cord close to hole and trim cord.
4) Tie a knot in the cut end of the remaining cord.
5) Fold other side of front in and align holes with holes on back (B). Stitch in and out up to last hole. Tie a knot close to hole and trim cord.
5) With remaining cord, make a neck cord by stitching through top center two holes (B). Be sure cord ends will be on the outside when the tab is closed. Tie long cord ends together in a knot at desired length of cord. Trim cord.
OPTIONAL BOTTOM TWO HOLES:Use remaining cord and stitch through bottom 2 holes, bringing cord ends out. Usethese cords as decoration or to help secure the case when wearing.
7) HOOK & LOOP FASTENER (C): • Peel paper off one side of joined hook & loop parts and position on underside of tab as shown. • Peel paper off other side of joined hook & loop. • Fold tab over. Press down to adhere
hook & loop to front of case.
START HEREWITH KNOTON INSIDE
A
B
C
OPTIONAL 2 HOLES
HOOK & LOOP ON UNDERSIDE OF TAB
TO STITCH OTHER SIDE, START HEREWITH KNOTON INSIDE
NECK CORD

© 2009 by Tandy Leather Factory
Page 7 of 7
BELT LOOP- CASE ASSEMBLY INSTRUCTIONSBe sure project is completely dry before stitching.
1) Only half of a cord is needed. Cut cord.
2) Place belt loop part over back part, aligning holes as shown (A).
3) Begin on inside of the back part top hole as shown (A). Stitch through first aligned holes leaving 6 inches of cord to tie off later. Stitch across top through belt loop & back part and then stop.
4) Fold flap on front part in and stitch through first hole on top corner of flap. Pull stitch tight to secure all 3 layers at the corner (B).
5) Stitch down the side through 2 layers only (back part and flap) as shown (B). Stitch through the bottom corner holes in the two layers and stop.
6) Now align the bottom of the belt loop part and stitch out through the belt loop corner hole. Pull stitch tight to bring all 3 layers together at the corner (B).
7) Stitch through the next two aligned holes in 2 layers only (belt loop and back part).
8) At the corner hole, fold the side flap in and stitch through all 3 layers (belt loop, back and flap). Pull stitch tight to secure corner (C).
9) Now stitch up the other side through 2 layers only (flap and back layers).
10) At last hole, stitch through flap and tie cord with the 6 inches left at the same corner
(C). Trim off excess cord.
SEE PAGE 6 FOR HOW TO ATTACH HOOK & LOOP FASTENER.
A
B
C
6”
START HEREWITH KNOTON INSIDE
TIE ENDS OF CORD TOGETHER IN A KNOT CLOSE TO HOLE & TRIM OFF EXCESS CORD