Embed Size (px)
Citation preview
PHIL’S MANDOLIN WORKSHOP NOTEBOOK Phil Williams, [email protected]
ROLE
The mandolinist in a traditional string band plays both lead and backup. In a band context, the mandolinist can play lead all the time, play backup all the time, or alternate lead and backup. In bluegrass bands the mandolin is used both as a lead and rhythm instrument, trading roles as needed for the tune’s arrangement. In old time bands, whether the mandolinist alternates lead and backup depends on the band’s approach to its music and the tune arrangement. There are many styles of playing the mandolin, ranging from the sweet tremolo of classical songs to the heavy down picking of blues and bluegrass. To a large degree, the type of music to be played determines the style to be used and the role of the mandolinist. In an old time band the most important role may be to learn and play the melody as a lead player. In a bluegrass band the lead playing, while important, may not contribute as much to the band sound as a dynamic backup style.
THE INSTRUMENTHistory and Types
The mandolin developed as a part of the lute family of instruments. These were derived from the oud, an instrument from the Middle East. These instruments are very old, dating back to at least 1,000 B.C. Lute family instruments have a pear shaped body made of strips of wood. Lute type instruments went through many permutations through the centuries. By the time of the Renaissance the lute, in its various forms, had become an established accompanying instrument. The smallest lute was called a “mandoline.” Like most of the rest of the lutes, the mandolin was double strung, having two or more strings sounded together for each note. By the 17th century, music was being written for the mandolin in its capacity as “lead lute.” By the 18th century the shape, size, and tuning of the mandolin were fairly well standardized and classical composers were writing pieces for it. Stradivarius even made mandolins. By the end of the 18th century the mandolin had gone from gut to metal strings and was played generally with a plectrum, rather than strummed with the fingers like a lute. This gave it even more punch for lead playing.
In the middle of the 18th century a mandolin having the strings attached to a tailpiece, rather than tied onto the bridge, was developed in Naples, Italy. This permitted higher string tension and volume than the older style and soon was adopted as the standard. The top also was bent back at an angle toward the tailpiece just behind the bridge. Up until this time the mandolin was tuned in 4ths, like the rest of the lute family, a tuning preserved in the guitar and bass to this day. The mandolin tuning was changed to tune it in 5ths with the strings corresponding in pitch and tuning to the strings of the violin.
While flat back mandolins were made as early as the 18th century, they did not gain popularity until the end of the 19th century. In the 1890’s Orville Gibson developed a mandolin with an arched, carved top and back which was much easier to hold than a round back mandolin and had greater power and projection. Other manufacturers started making flat back mandolins, some with carved tops and backs in the style pioneered by Gibson, and many with just a flat piece of wood on the back like a guitar. In 1922, Lloyd Loar, an acoustical engineer working for Gibson, designed a mandolin with f-holes, rather than the round soundhole customarily used. The mandolin designed by Loar, designated the “F-5” by Gibson, had other important structural changes, resulting in an instrument with much more power, volume, and tonal depth than its predecessors. The F-5 mandolin is the standard most often copied today.
Neapolitan Type. The Neapolitan type mandolin is the style also called “round back” or “potato bug.” It is relatively small, with a rounded, lute like back, made of several wood strips. The top is bent at an angle just after the bridge. The neck on most Neapolitan instruments is slim, with a scale length of about 13 1/4” and ten frets to the body. These instruments have a soft, pleasing sound and can be played easily. When set up properly with low action and the lighter gauge strings appropriate for the lightness of the instruments, they make a great instrument for playing fiddle tunes. Neapolitan mandolins with classical strings are used with orchestras in classical music and have adequate volume to carry in a concert hall. While great for playing fiddle tunes and in
old time string bands, they do not have the “punch” for bluegrass.
Flat Back Type. Most flat back mandolins, as distinct from the carved top and back instruments, have many of the characteristics of the Neapolitan type mandolin, but have a flat, rather than rounded, back. They are easier to hold, however, and may have a greater top area and a stiffer construction to give them greater volume. Flat back mandolins can be good for playing fiddle tunes, but most lack the punch for bluegrass.
Carved Top, Round Hole Type. The carved top, round hole mandolin was invented by Gibson and widely copied. It is characterized by a relatively thick top carved into an arch, like a violin top. The standard carved top mandolin has a round soundhole, fingerboard glued to the top, movable bridge, and tailpiece. The back also is carved on most carved top mandolins. Prominent older makers of carved top mandolins include Gibson, Lyon & Healy, and Bacon. These mandolins work very well for old time music and fiddle tunes and are preferred over the f-hole type for this by many players. They can be used in bluegrass, but lack the dynamic range and volume of the f-hole type mandolins. They usually are easy to play and have sufficient volume and dynamic range for band work.
Carved Top, F-Hole Type. Along with the development of the F-5 mandolin with its f-holes, Gibson also developed an f-hole mandolin without the body curls of the F-5, but with substantially the same body and neck construction. These mandolins have the general characteristics of the F-5, but are less ostentatious. They are easier to build than an F-5 type and can give one many of the benefits of an F-5 at lower cost. These instruments are characterized by a carved, arched top and back, but with f-holes in the top instead of a round soundhole. The fingerboard usually is cantilevered above the top to give the top a greater vibrating surface. The scale length, frets to the body, etc., generally will be the same as an F-5. This type of mandolin is being made by many makers today. Martin made a nice f-hole, carved top mandolin until about 1964.
The genuine carved top instrument should not be confused with the pressed or plywood top instruments made by companies such as Harmony, Kay, and others, and, more recently, some imports. These instruments usually are made to resemble a carved top, f-hole instrument, but have a top formed from a flat piece of wood steamed and pressed to form an arch. Often the top is plywood formed to an arch when it is laminated up. A plywood top instrument can be identified by looking at the edge of the top through an f-hole and spotting the center lamination. It can be difficult to identify some of the currently imported mandolins as having pressed tops. Some pressed top mandolins sound pretty good, but not as good as properly built solid top instruments.
Gibson “A” Model. The Gibson A model mandolin is one of the most common carved top round hole mandolins. This instrument has a 14” scale (distance from nut to bridge), 7 frets to the heel, and 12 frets to the body. It has a round soundhole and the fingerboard is glued to the top. The body is approximately 12” x 10” x 2 ½”. Gibson A model mandolins come in different grades of fanciness. The A model initially produced by Orville Gibson has no model designation, and has a label with a picture of Mr. Gibson on it. Later models were designed as styles “A - 0” “A - 1,” “A - 2,” “A - 3,” and “A - 4.” The style is written in pencil on the label in the blank headed “Style.” The A - 0 is plain, usually with ivoroid binding only around the top. The A - 3 has a fancy mother of pearl curlicue inlaid in the peghead. The A - 4 has binding on the top and back, a fancier binding on the top and sound hole, and tuning peg buttons inlaid with a mother of pearl clover like design. Gibson A mandolins came in a variety of finishes, including light maple, burgundy, and black. All Gibson A instruments sound substantially alike, though there are differences from instrument to instrument. Generally, the fancier A’s were made with better wood and there often is a noticeable difference between an A - 4 and lower numbered instruments.
Gibson “Army-Navy” Model. Toward the end of WWI the U.S. military asked Gibson to build an inex-pensive mandolin that could be furnished to the troops. The “Army-Navy” mandolin was designed and built with a simple round shape, flat back and top, a round soundhole, and no binding. Generally, they were finished with a brown stain. While these instruments were easy to build and quite basic, with no frills, they play well and sound
Page 2
good. Original Gibson Army-Navy instruments are somewhat rare. However, in recent years several makers have copied and marketed the Army-Navy, most notably, Flatiron. These instruments are good for fiddle tune playing, and actually work well for bluegrass.
Gibson “F” Model. The Gibson F model was invented by Orville Gibson at the end of the 19th cen-tury. He developed a mandolin having a body with a distinctive curl and points built into the sides. The original F model had a round soundhole and three points. Later, a shape having two points was settled upon. Like the A models, the F models were produced in several styles varying in fanciness. The style designations followed those of the A series. The F series has a 14” scale, 8 frets to the heel, 12 frets to the body, round sound hole and the fingerboard glued to the top. It plays substantially like an A model, and is a very good instrument for fiddle tunes and band work.
Gibson F-5 Model. The Gibson F-5 is the standard mandolin for bluegrass. The first F-5’s were produced in 1922. The F-5 has a 14” scale length, 12 frets to the heel, and 15 frets to the body. The body is approximately 12” x 10” x 2 1/4.” It is characterized by f-holes, rather than a round hole, and the curl and points of the Gibson F style. The fingerboard is cantilevered out over the top. Metal parts on original F-5’s often are gold plated, with pearl buttons on the tuners. The tuners on older style F-5’s have the post on the side of the gear farthest from the nut, as with other older Gibson mandolins. This permits a smaller peghead, but makes it more difficult to tune as the tuners wear. These instruments have great dynamic range, the most volume of any mandolin, and can take heavier gauge strings than other types. They can be made as easy or hard to play as one wants, though they generally sound best with heavy strings and a slightly high action. This is the one mandolin to have for bluegrass, and works well also for old time music and fiddle tunes.
Selecting an Instrument
Selecting a mandolin often is a matter of what one can find. If there is a choice, the instrument should be selected for the type of music to be played. The original Neapolitan round back mandolin is excellent for fiddle tunes; the flat back and round hole, carved mandolins are good for old time music and play easily; the f-hole mandolins, and especially the Gibson F-5 type instruments, are a must for bluegrass and have the power and dynamic range for band performance, but can be harder to play than the other types. There are now several good “entry level” mandolins selling from around $350 - $700 new. An older “name brand” instrument, such as a Gibson, Martin, Lyon & Healy, Bacon, etc. nearly always will provide satisfaction. Even if one of these needs repair, it may well be worth picking up. The action on these older instruments usually can be adjusted to make it play the way you want. If you need an F-5 model and cannot find or afford an old Gibson, consider getting an instrument from one of the many contemporary makers turning out good, affordable instruments. Many of the imports also have reasonable sound and playability at a relatively inexpensive price. The best new instruments, however, are handmade by makers producing relatively few instruments per year.
Some new instruments are made to appear to sound good right out of the box, but never develop with time. These generally are characterized, in the carved top models, by a relatively thin top which gives a bright “out front” and loud sound. The thinness of the top, however, prevents the bass from ever developing adequately. Other instruments may sound dull on first playing, but develop into great instruments after a few hours of playing. These often are characterized by a relatively thick top and a weak sounding bass when new, or when the instrument has not been played for a long time. A couple weeks or so of playing usually changes the tonal response of such an instrument markedly, bringing out much more in the bass range. Many players have found out that the tonal qualities of their instrument change over time to compliment their style of playing. Tuners
The tuners are mounted with the tuner posts sticking up vertically through the peghead. To put a string on the tuner post so it will tune up without pulling out, run the string through the hole leaving a little slack. Wrap the end of the string back around the post in the opposite direction from the way it turns in tuning up the string, Run it under the string where it goes into the hole, then pull up on the end to bend the string end around the string
Page 3
where it goes into the hole, making a sharp corner. Hold the end and turn the tuner key until the string is wound sufficiently on the post to cause the string to lock the loop made around it. Tune the string up the rest of the way and cut off the excess. Pull up on the strings and return them until they stay in tune. Tuner gears should be given a drop of oil every now and then and the screws holding the gears to the posts should be tightened. If the tuners have pearl buttons held on with screws, give these a check every now and then also.
There usually is some slop in the tuner gearing, which gets worse as the tuners wear. For this reason, always tune a string up to pitch, rather than down. Start with the string below pitch and gradually bring it up to pitch, making sure there is constant pressure on the tuning gears. If you go above pitch, first try pulling a little on the string to see if you can pull it down to pitch. If it is too far above pitch to make this work, tune below pitch and bring it up again. The gear slop left after tuning a string down to its pitch often is enough to cause the string to pull out of tune as it is played.
Nut
The nut is the block of bone, wood, or plastic at the upper end of the fingerboard where the strings run over to the tuners. It is slotted to hold and guide the strings. The slots must be just right or the strings will buzz or stick, or be too high off the fingerboard. The grooves in the nut should be no deeper than necessary to hold the strings - a little more than ½ the diameter of the string. The groove must be wide enough to permit the string to run back and forth over the nut without sticking when tuning, but not so wide that the string can rattle back and forth in it. The depth of the groove must be regulated carefully so that the string comes out across the fingerboard as close to it as possible without rattling against the fingerboard when played. There is no set distance for string height at the nut as this depends on the instrument and strings used. It is important to get this distance right, however, as too much string height at the nut makes the instrument harder to play than too much height at the bridge. A needle file can be used to deepen the grooves and lower the string, if special nut files are not available. If the string height is lowered to the point of buzzing, the groove can be built back up again with a mixture of bone filings or baking soda (ebony dust, if the nut is ebony) and epoxy or cyanoacrylate (“super glue”) glue. If you are uncertain about doing this work yourself, take your instrument to a professional repair person familiar with action adjustment and tell them what you want. The grooves in the nut can be “lubricated” by coating them with graphite from a pencil point to prevent the strings from sticking.
Neck and Fingerboard
The neck must be straight. Use a straight edge set on top of the fingerboard to check straightness. It should show just a little space between the strings and the frets toward the middle of the fingerboard. This small space is known as “relief” and is build into the neck shape to allow for string vibration. If the space between the middle frets and the string is too great, the neck may be warped. For a fast straightness check without a straight edge, fret a string on the first and last frets and look to see if it is above the frets in the middle. If it is up more than just a little, the neck should be straightened. Sometimes a neck warps back and the string hits the center frets before it is fretted fully at the ends. A warp usually can be removed easily with a tension rod adjustment, if your instrument is equipped with one. Loosen the strings to remove the tension and give the tension rod adjusting screw a turn to tighten it. Check on progress, and keep turning a little bit at a time until the warp is removed. If the neck is warped back, loosen the tension rod nut. If your instrument does not have a tension rod, it will have to go to a repair person. Fingerboards on most mandolins are flat. Some makers today have gone to curved fingerboards more like that on a violin.
After awhile grooves will be worn in the frets from playing. Every now and then it is necessary to dress the frets to get the grooves out. This can be done a few times before the frets get so bad they must be replaced. The frets can be dressed with emery cloth glued onto an absolutely flat block, such as a piece of wood or metal. After the emery board has been run back and forth enough times to get the grooves out, the frets will have sharp edges. These can be removed with a small file used carefully, with a thin piece of metal protecting the wood, or a piece of emery cloth wrapped around a finger and run up and down the fingerboard to knock the corners off the frets, or special fret files available from instrument tool suppliers. A high fret also can be taken down with the
Page 4
emery board or even a small file.
Bridge
The bridge is movable. The top of the bridge which is notched for the strings is called the “saddle.” The bottom of the bridge making contact with the top of the mandolin is the “foot,” or the “feet,” if it is the type having a cutout between the two ends that contact the instrument. The foot must make good contact with the top for sound transfer. If your bridge is not fitted so the foot makes good contact, take it to a qualified repair person. You can fit the bridge yourself by holding a piece of 120 grit sandpaper, grit up, on the top where the bridge goes, and carefully sanding the foot to conform to the curve of the top by moving it back and forth over the sandpaper, toward and away from the tailpiece. Be sure to hold the bridge firmly upright while doing this, and do not remove any more material than necessary for a proper fit.
The bridge must be positioned at the correct distance from the nut to enable the strings to play in tune when fretted. Theoretically, this is a distance from the nut to the bridge equal to twice the distance from the nut to the 12th fret. In practice, this distance may not work for all the strings due to the increased tension placed on them in fretting. For this reason mandolin bridges often have a “compensating” saddle, with a section clearly defined for each set of strings and slanted to the front or back of the bridge as may be needed. As a starting point, set the bridge with a ruler at what should be the proper distance. Tune up a 4 and a 1 string. Sound a harmonic on the string by just touching lightly right in the middle (over the 12 fret) without fretting it, while picking it. As soon as the note sounds, lift your finger from the string. This will sound a note an octave above the note of the open string, which also is what should be sounded by fretting the string on the 12 fret. Fret the string on the 12 fret and compare the pitch to that of the harmonic. If the harmonic is higher than the fretted note, the bridge must be moved closer to the tailpiece. If the harmonic is lower than the fretted note, the bridge must be moved away from the tailpiece. Adjust the bridge so the harmonic and 12 fret notes are the same for the 1 and 4 string. Then put on and tune up the rest of the strings. Check to see that the bridge is still set right for the 1 and 4, and then use the harmonic - 12th fret method to check the placement for the 2 and 3 strings. The above procedure also can be done with a tuning meter, checking it to see that the note is in tune for both the open string and the string fretted at the 12 fret. If the 1 and 4 string harmonic and 12th fret notes are in tune, but they are not in tune for the 2 and/or 3 string, you may have to split the difference and move the bridge a little to bring the inner strings more in tune. Or, you can look into a properly compensated saddle. Frequently, when the bridge is set properly the treble foot ends up slightly forward of the bass foot.
Sometimes a mandolin set up such that fretting on the 12th fret produces an in-tune octave with the open string nevertheless plays notes out of tune a little when fretted on the 5th or 7th fret. This can be frustrating, if you are playing primarily in first position and want the first position scales to be in tune. This can be checked with a good tuning meter. After the instrument is set up so the 12th fret octave is in tune, fret at the 5th fret and check to see if the note sounded also is in tune on the tuning meter. If it is not, you might want to reset the bridge so the 5th fret note is in tune, as this is going to be the octave of the next string below it. It is often more impor-tant that scales made over the first 5 to 7 frets play in tune that notes at the 12th fret of above.
The bridge height determines the string height above the fingerboard. The string height should be as low as possible for one’s style of playing. For fiddle tune playing the string height generally can be lower than for hard, down picked blues or bluegrass playing. If your mandolin has an adjustable bridge, changing the string height is just a matter of screwing the adjusters up or down. Be sure to loosen the strings before raising the adjusters. If your bridge does not have adjusters, you will have to lower the strings by cutting the string notches deeper and then filing the top of the saddle down so the notches are no deeper than the radius of the string. If a non-adjustable bridge is too low, it can be raised with a piece of thin veneer on the bottom. You also could get an adjustable bridge, though it always is great to play an old instrument on its original, non-adjustable bridge.
Tailpiece
The tailpiece has tabs to hold the loops on the end of the strings. Tailpieces on round back and older
Page 5
flat back style mandolins have the tabs on the end. The strings attach to the tabs and bend over the end of the tailpiece. On the Gibsons and similar mandolins the tailpiece extends out over the top for about two inches. This type of tailpiece has a sliding cover over the string tabs, which are on the top. On this type of tailpiece the strings may rattle against the cover or the front of the tailpiece. This rattling can be stopped by running the strings over a small strip of felt or leather placed under the strings, and bending the cover so it does not touch the strings. Check the screws holding the tailpiece on every now and then.
Top, Back, and Sides
The top, back, and sides should be cleaned and polished from time to time with a good grade of instrument polish. On hot days drape a clean handkerchief over the top to protect it from sweat from your right arm.
Pickguard
A pickguard usually is inlaid into the top of round back and non-carved flat back mandolins. The early Gibson carved top instruments had an inlaid pickguard. This was soon abandoned in favor of a pickguard raised off the top of the instrument. The pickguard on Gibsons is attached to the side with a bracket, with pins holding it to the side of the fingerboard. The F-5 pickguard bracket is screwed to the side. Some players remove the pickguard in the belief that the sound and projection of the instrument is increased. Few newly made carved top mandolins come with pickguards. The pickguard does protect the instrument, however, and I have not noticed any significant difference in sound whether it is on or off.
Strap
Straps often are attached to “A” style mandolins at the endpin and tied at the peghead just behind the nut. It is also possible to tie a thin “strap,” such as a leather boot lace, so it supports the mandolin at the heel rather than the peghead, by looping it under the neck at the heel, around and under the strings at the end of the fingerboard, and then back to the heel, where it is tied. The other end is tied to the end strap button. On an “F” style mandolin, the curl is a convenient place to attached a strap. Many mandolin players run the strap only over the right shoulder, though it can be run over the left shoulder with the head stuck through, if desired. Straps have a tendency to work loose from the endpin or strap screw when one least expects it. Every time you pick up the mandolin, check to see that the endpin is tight and the strap is attached firmly. Straps are available that adjust without the use of metal buckles. These present less of a chance of scratching the instrument when it is put in its case. An adequate strap can be made from a long leather thong shoelace. A thong strap can be made adjustable by tying a “taut line hitch” knot at the fingerboard end. Adjust the strap to hold the mandolin in the playing position suitable for you. Generally, it should permit your right arm to point right across the bridge and down the fingerboard. In playing, you can hold the mandolin tighter by applying a little pressure on the neck with your left hand to tension the mandolin against the strap.
Strings
Mandolin strings come in bronze, monel and aluminum metal wrap, and in various gauges (thicknesses). The type of strings to use is a personal choice and will affect tone and playability. Bronze strings have more of a “bark” than monel strings and are preferred by many bluegrass and string band players. Monel strings have a smoother sound and work well for most types of playing. Aluminum windings are now found only on classical mandolin strings, which are built like violin strings. These are available now primarily from Thomastik. They are significantly more expensive than “standard” mandolin strings, do not work well on f-hole style mandolins, but have no equal for great tone and projection on round hole and Neapolitan mandolins. The gauge should be matched to the instrument, with a heavier built instrument, such as an F-5, generally requiring a heavier gauge string. Typical gauges for heavy mandolin strings are 4th - .040, 3rd - .026, 2nd - .015, and 1st - .012; and for me-dium gauge, 4th - .034, 3rd - .024, 2nd - .014, and 1st - .010. Round back mandolins generally work better with lighter gauge strings and “classical” strings.
Page 6
As the strings are played on, the steel core crystallizes, making the string less flexible and harder to play. This can happen before the string is perceived to have gone “dead.” I notice this loss of flexibility first in the in-creased left hand pressure it takes to play a clean Bb or C chord up the neck in backup playing, and the increased wrist shock in picking the string. Change the strings as often as you need to maintain good playability. Wipe the strings and fingerboard with a clean cloth after playing.
Picks
Mandolin picks come in many sizes, shapes and materials. The less flexible the pick, the harder the string can be picked. A flexible pick enables one to play fast, but produces little volume or tone. Get a good pick selection and try them all. Use the ones that work for you. The pick used by a well known performer or by a friend may not be suitable for you and may slow you down. A variety of picks may be needed depending on the instrument, the strings, and the effect desired. For fiddle tunes a pick with a sharp point makes each note sound out clearly and distinctly. For bluegrass and blues a rounded pick gives a smooth, throaty sound. The mandolinist who played in the film version of Don Giovanni believed that the best pick was a tortoise shell with a point rounded to a radius equal to the distance between a string pair on the mandolin. The pick will have a substantial effect on your sound and ability to play. The choice of which pick to use strictly is up to you. Keep trying different picks as you may well find a pick that works better for you, at least for certain tunes, than the one you have been using.
PLAYING THEORY
Intervals and Frets
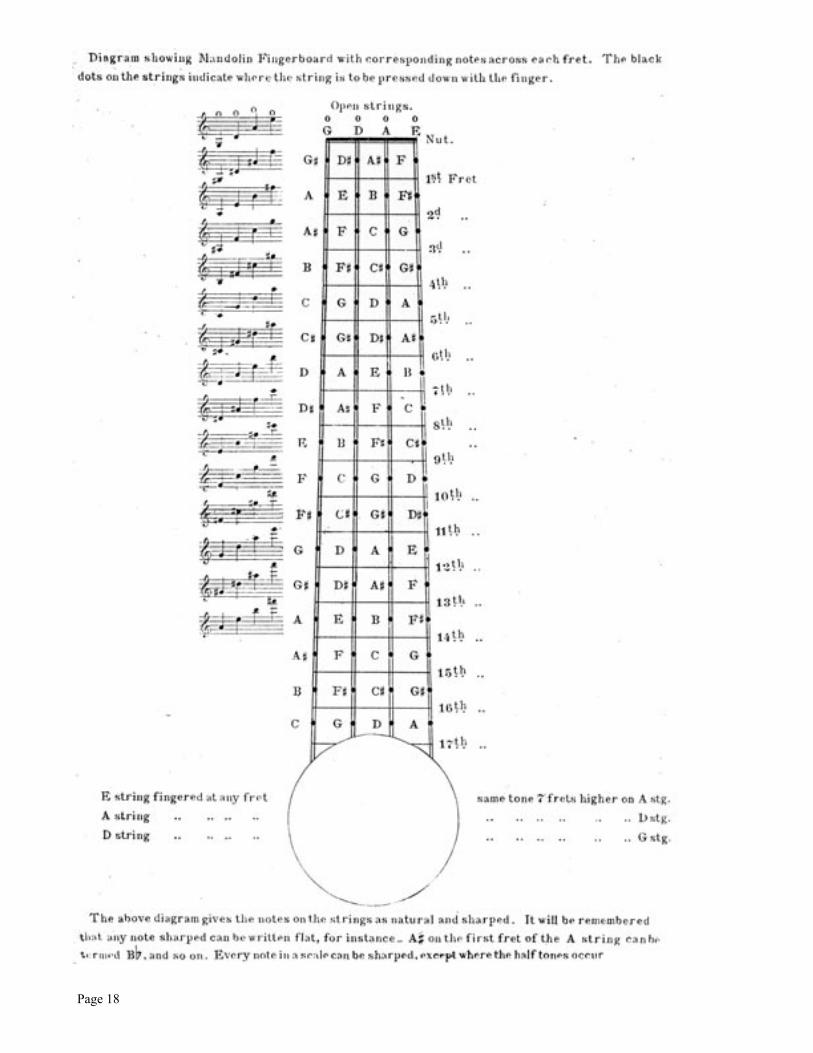
The Western musical scale is divided into intervals made up of half and whole tones. These intervals are made on a stringed instrument by shortening the string length by just enough to raise its pitch by the desired interval. On a fretted instrument, such as the mandolin, each fret position represents a half tone. Each half-step mark, or fret, is given a number, counting from the nut. The nut is “0,” the first fret “1,” and so on. These fret positions can then be referred to in locating notes and scales. By starting with the note of the open string and counting frets up the neck, the names of other notes up the string can be identified. For example, the first string is tuned to E. The first fret is one half step up from E, or F; the second fret is one half step above this, or F#, and so on up the fingerboard. Scales
Western music is built on a series of twelve notes. Each of these notes has a “pitch,” which can be specified scientifically as a particular frequency of vibration. The twelve notes divide up the vibration frequency range between the “root” note, or note on which the series of twelve notes is based, and the note having a vibration frequency of twice that frequency above it. This range is known as an “octave.” The vibration frequency of a note commonly is referred to as its “pitch” or “tone.” Each note differs by a “half step” from the note on each side of it. A “whole step” is two half steps. A “key” is a series of seven notes related to a “root” or “tonic” note, for which the key is named. This series is made up of whole and half steps in a predetermined order, depending on whether one is playing a major, minor, or modal scale.
For example, middle C has a frequency of 256 cycles per second (“cps”). The C one octave above middle C has a frequency of 512 cps. The frequency range between 256 cps and 512 cps is divided into twelve notes, each a half step apart. The piano keyboard offers a good illustration of this. Starting with middle C on the piano, the steps of the twelve notes are made by playing the white and black keys right up the keyboard in order. The seven notes comprising the C major scale, however, are only the white keys.
The frets on a mandolin are in the same relationship. Each fret is placed to sound a tone a half step above the fret below it. A whole tone is made by skipping a fret and playing the note two frets above the previous note.
Page 7
The notes of the scale are arranged in a progressive order starting with the root or tonic note. Each note of a scale is given a name relating to the number of scale steps it is away from the tonic note. Musicians often refer to a note or chord by the progressive order number. Getting used to referring to the notes or chords in a tune by these progressive order numbers is useful as it enables musicians to communicate rapidly the note or chord regardless of the key in which the tune is being played. For example, assume you are playing in C major. The notes are as follows: C = 1 or I, D = 2 or II, E = 3 or III, F = 4 or IV, G = 5 or V, A = 6 or VI, B = 7 or VII. If someone says “go to the 2,” you know they telling you to play a D. If the song is changed from the key of C to G, and you hear “go to the 2,” you know you are to play an A as that is the 2 note in the G scale. Backup players often communicate chords using the progressive order numbers of the scale rather than key names. The notes in this progressive order also are referred to by other names. The root note, or note on which the scale being used is based, is called the “root” or “tonic;” the next note above it the “supertonic” or “second dominant;” the third note is the “mediant;” the fourth note the “sub-dominant;” the fifth note the “dominant;” the sixth note the “submedi-ant;” the seventh note the “leading tone;” the eighth note the “octave.” Major Scale
The major scale has the following intervals, the number “1” referring to a whole step and “1/2” referring to a half-step above the note preceding it, and “0” referring to the tonic note: 0 - 1 - 1 - 1/2 - 1 - 1 - 1 - 1/2. In a major scale the half steps are between the 3 and 4 notes, and between the 7 and 8 notes. For example, the notes of the C major scale are C, D, E, F, G, A, B, C; of a D major scale - D, E, F#, G, A, B, C#, D.
Minor Scale
The harmonic minor scale has the following intervals: 0 - 1 - 1/2 - 1 - 1 - 1/2 - 1 1/2 - 1/2. The half steps are between the 2 and 3, 5 and 6, and 7 and 8 notes. The melodic minor scale has different intervals descending the scale from those played ascending. The intervals played going up the scale are: 0 - 1 - 1/2 - 1 - 1 - 1 - 1 - 1/2; while those played descending (“0” indicates the top note of the scale) are: 0 - 1 - 1 - 1/2 - 1 - 1 - 1/2 - 1. For example, a harmonic minor C scale would be C, D, D# (Eb), F, G, G# (Ab), B, C. A melodic minor ascending scale is C, D, D# (Eb), F, G, A, B, C; and descending - C, Bb, Ab, G, F, Eb, D, C.
Pentatonic Scales
Pentatonic scales, which were developed in ancient times based on natural harmonics, are used often in traditional music. In fact, the oldest playable musical instrument yet found, a Chinese bone flute over 9,000 years old, plays a pentatonic scale, similar to that often found in Bill Monroe’s bluegrass playing. This scale, as used in Scottish and Chinese folk music, among others, starting with the bottom note, has the following intervals: 0 - 1 - 1 - 1 1/2 - 1 - 1 1/2. This scale in C is C, D, E, G, A, C. These intervals correspond to the intervals of the black keys on the piano.
Another pentatonic scale used in bluegrass and blues has the following descending intervals, starting from the highest note as “0”: 0 - 1 - 1 1/2 - 1 - 1/2 - 2. These pentatonic scales, and variations thereof, appear regularly in traditional music and can be used as the basis for lead breaks in bluegrass. This scale in C is C, B�, G, F, E, C.
Chords
Chords are combinations of notes sounded together. There are nearly as many chords as there are note combination possibilities. Most of the time in bluegrass and old time music we are dealing with basic major and minor triad chords. This chord consists of the 1, 3 and 5 notes of the scale of the key of the chord sounded together. Adding other notes of the scale or substituting other notes makes a different sounding chord that adds color to the tune when properly used. Learning and understanding the chords and chord systems and relationships used in the type of music you are playing is essential. While traditional bluegrass and old time music can be played satisfactorily with few chords, progressive bluegrass and jazz can require knowledge of many chords and how to use them. There are hundreds of chord possibilities on the instrument. Chords on the mandolin can be Page 8
made using all four strings, three strings, or just two strings.
Standard Chord Progressions
As a tune is played, the melody line outlines a chord. The backup instruments play this chord in accom-panying the melody. As the melody changes to outline a different chord, the backup player must change chords. The succession of one chord by another is known as a “chord progression.” The music is defined and shaped to a large degree by the chord progression used. The mandolin, when providing backup chording, helps delineate the chord progression. A mandolin player must understand chords and chord progressions both for backup work and to be able to improvise lead parts.
The chord progression most commonly found is called “1 - 4 - 5.” The “1” refers to the root or tonic chord (the key in which the tune is being played). A “4” chord is the chord of the fourth note above the root note in the scale of the tonic chord. A “5” chord is the chord of the fifth note above the tonic. For example, in the key of G, G is the “1,” C is the “4,” and D is the “5.” The chord structure of a simple tune or phrase may be, for example: 1 - 4 - 1 - 5 - 1. Note that the 5 chord has the sound leading naturally to the 1 chord. Often a 2 chord is used just before a 5 chord. Sometimes the first change is to a 5 chord, followed by the 4 chord, and then back to the 1. Contemporary tunes often have progressions following the circle of fifths or a special chord progression giving the tune its particular character. Knowing how to follow progressions using only the 1, 2, 4, and 5 chords will get you through the majority of bluegrass and old time tunes without any special preparation. For tunes that are more complex, you will need to know the tune and its chord progression.
Circle of Fifths
Chord progressions based on the “circle of fifths” or “5 of 5” often are used in bluegrass and old time music. The circle of fifths is based on the fact that the chord based on the fifth note of the scale leads naturally to the tonic or root chord. Playing a series of chords, all of which are the 5 chord of the chord immediately following, produces a pleasing effect often found in Western music. The complete circle of fifths in sequence, starting with C major, is as follows:
(G#)(C#) C, F, Bb, Eb, Ab, Db, F#, B, E, A, D, G, C.
By learning how to play the circle of fifths progression, once you know the chord where the progression starts in a tune, you can play the rest of the progression automatically. It is common in bluegrass and old time music for the circle of fifths progression to start on the “6” chord and proceed around through the 2 and 5 back to the 1. Following are typical examples: G, E, A, D, G; C, A, D, G, C; D, B, E, A, D; A, F#, B, E, A.
Arpeggios
Arpeggios are simply the notes of a chord played one at a time in succession. For example, a major chord arpeggio would consist of playing the 1, 3, 5, and octave higher 1 notes in succession. It is useful to learn to play arpeggios in all chord positions as they form a basis for improvising lead playing from chord positions.
Time and Beat
A mandolinist must understand the time signature in which the tune is performed and the beat pattern that goes along with it. The time signature and beat pattern is reflected in how you tap your foot to the music. Most bluegrass and old time tunes are in one of three time signatures - straight (4/4 or 2/4), three-quarter (3/4), or six-eight (6/8). A straight time bluegrass tune usually has four beats per measure. This is written in printed music as four quarter notes followed by a vertical measure or bar line. The first and third beats are referred to as the “down” beats, and the second and fourth as “up” or “off” beats.
Page 9
Three-quarter time is the time of the waltz, redowa, mazurka, and many airs. A measure usually is written as three quarter notes followed by the bar line. The first beat is emphasized, with a secondary emphasis sometimes also given to the third beat. The usual picking style a lot of folks play for waltz accompaniment goes “boom - chuck - chuck”; i.e. bass note, followed by two brush strokes on higher strings. This, however, is not the timing generally used by experienced waltz players, especially on 19th century and Scandinavian waltzes.Often, the backup player may play only on the 1 and 3 beats, or only on the 1 beat.
Six-eight time most often is used for jigs. This is written as six eighth notes per measure, and may be written as two groups of three eighth notes each, or a quarter note followed by and eighth note. The down beats on a six-eight time jig fall on the 1st and 4th eighth notes, as if the measure has only two beats. A backup player can get by playing only on these down beats, though it is much more effective to play an emphasized downbeat on the 1st and 4th eighth notes and a de-emphasized off beat on the 3rd and 6th eighth notes.
Foot Tapping. If you are unsure of the timing and beat of a tune, tap your foot to it. Be sure you recognize the down beat. Get used to tapping your foot in the timing you will use to play the tune. It even helps to tap your foot while you are playing to help keep time. While tapping your foot, be aware of the down and up beat. The foot should hit the floor on the down beat and be at the top of its lift from the floor at the off beat. Foot taps in this notebook, when used to indicate timing, will be written as the number of the tap in the sequence on the down beat, with “up” indicating the up beat immediately following. The down and up beat foot taps in a straight time measure tapped the usual way would be written: tap 1, up 1, tap 2, up 2. Usually a straight time measure is tapped down only on the 1 and 3 quarter notes. Tapping in “double time” with four taps per measure instead of two helps dissect difficult rhythms. The down and up beat foot taps in a four beat measure (four quarter notes), tapped in “double time,” would be written: tap 1, up 1, tap 2, up 2, tap 3, up 3, tap 4, up 4.
Some tunes are “crooked,” having an extra beat or a beat left out somewhere. Sometimes a lead player adds or drops a beat unintentionally. By being able to identify the down beat through listening to the tune, you will better be able to adjust your picking pattern to keep in synchronization.
Tempo
The tempo of a tune is how fast it is played. This is referred to as “beats per minute.” A metronome is calibrated in beats per minute and these sometimes are indicated in printed music. Beats per minute are not often referred to in bluegrass and old time dancing, though it is useful to know the range of beats per minute for different types of dances. The important consideration is developing a sense of tempo so the tempo set for a tune is maintained throughout. There seems to be a tendency to speed up, and many times a tune started relatively slow will be going so fast by the end that it is hard to play. Practicing with a metronome or rhythm machine helps materially in pinpointing tempo problems and developing a good sense of tempo.
PLAYING TECHNIQUES
Notation, Diagrams, Tablature, Reading Music
In discussing playing techniques and theory, chords, and tunes in these Workshop Notes I use a simple number system to indicate the string being played, at which fret it is stopped, and which finger is used to fret the string. The first number indicates the string, the second number the fret, and the third number the finger. The strings are numbered 1, 2, 3, and 4, starting from the E, or highest pitched string as follows: E string = 1, A string = 2, D string = 3, and G string = 4. The frets are numbered starting from the nut, with the nut being “0” (open string, not fretted). The fingers are numbered: Index = 1, Middle = 2, Ring = 3, Little = 4. For example, “3-5-3” means that the 3rd, or D string, is fretted on the 5th fret by the ring finger. “3-0-0” means the 3rd string is played open without fretting.
Chords are diagramed on a graphic representation of the fingerboard with the horizontal lines representing
Page 10
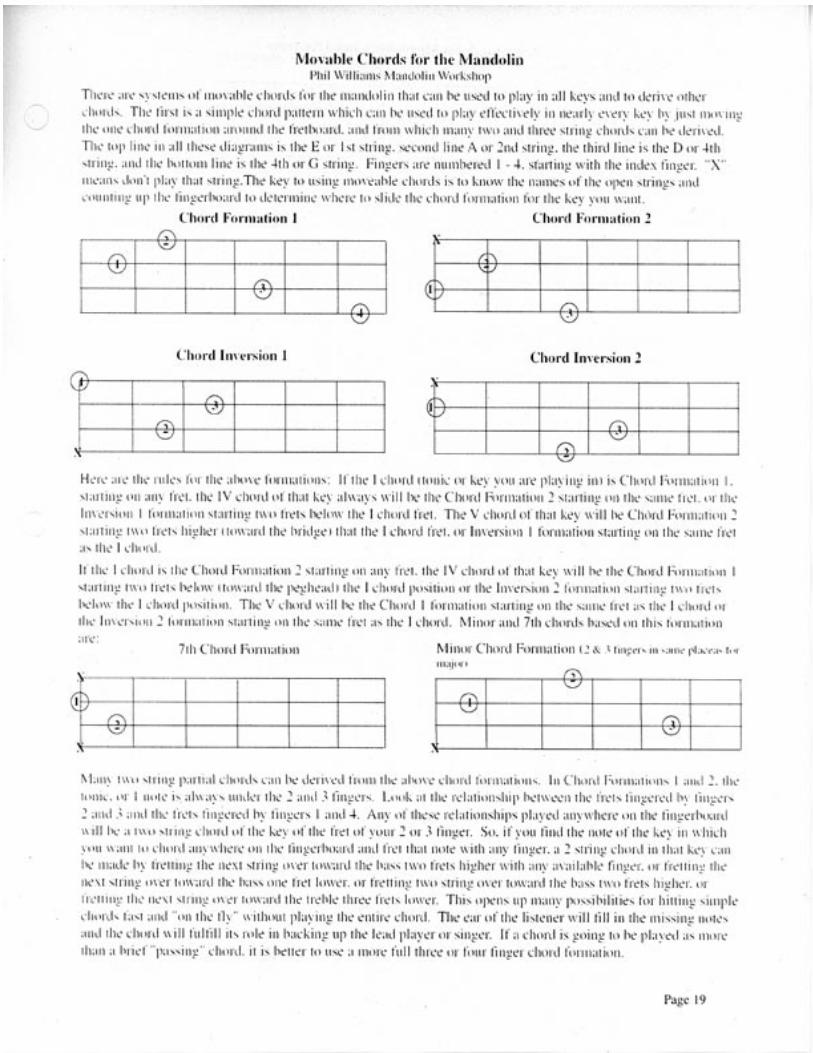
the strings and the vertical lines representing the frets. The top line is the first string. The first vertical line is the nut, unless it has a number written in above it to indicate that it is that numbered fret instead of the nut. A string not sounded is indicated with an “X” in diagrams. The same finger number shown on several strings for a chord indicates that this finger is used to push down all the strings shown for it. Sometimes two or more adjacent strings can be fretted with one finger.
Tunes suitable for the mandolin generally will be written in standard musical notation as for a fiddle. Mandolin books often have the tune in standard notation as well as mandolin tablature. Reading music in standard notation on the mandolin is easy and gives immediate access to many tunes. If you do not read standard music notation, use the accompanying tablature to learn the tune and also as a guide to learning how to read the corresponding note in standard notation. You will do yourself a great service and open the door to many hours of musical enjoyment by learning to read standard notation on the mandolin. This gives you access to the 1,000s of tunes in tunebooks published since the Middle Ages. Tablature is a very poor substitute for learning to read music. A method that served me well in learning to read music on the mandolin was to start with one key, like D, and find a version in standard notation that you can read, perhaps from a tune book that includes mandolin tab. Then learn the tune as written and play it over and over slowly, following the printed notes with your eyes until you can look at a note and immediately place your finger on the corresponding string and fret without looking at your mandolin. When you have learned one tune that way, go through an entire book of fiddle tunes and play all the ones in the key of D. Then start over with another key. After awhile you will be able to play from written music with ease. Sometimes in reading, a tune it will seem like there is something to it, but it just doesn’t seem to “click.” This is where listening to as many traditional players as you can comes into play. The written music for fiddle tunes is only a guide to one version of the tune. The timing and phrasing that brings the tune to life is not written in the notes. By listening to a lot of traditional players you get the feel of the different types of fiddle tunes. I have found that by playing the tune that doesn’t seem to “click” over and over, suddenly it will bring to mind an interpretation that you have picked up from listening to traditional players and the tune will “click” for you! I have also found that learning a tune is not a linear experience. You think you are getting nowhere, and then, suddenly, one day you find you can play the tune right off. Sometimes you just have to sleep on it!
Tuning
The strings of the mandolin are tuned in intervals of a fifth, the same as a violin: 1 = E; 2 = A, 3 = D, 4 = G. A string fretted on its 7 fret will sound the same note as the next higher string played open. For example, start by tuning the 4 string (both of them) to a G using a piano (G below middle C), other instrument, or tuning fork. Fret the 4 string on the 7 fret to sound a D and tune the 3 string to that; fret the 3 string on its 7 fret to sound an A and tune the 2 string to this; then fret the 2 string on its 7 fret to sound an E and tune the first string to this. An even easier way to tune is to use a tuning meter. Check the octaves by comparing the 4 string open to the 3 string fretted on the 5 fret, 3 string open with the 2 string fretted on the 5 fret, and 2 string open with the 1 string fretted on the 5 fret. If the octaves are off and all the strings are tuned properly to the meter, the bridge or the fretting may be off. You also can tune by harmonics. The harmonic sounded by just touching the string over the 7 fret and playing it without fretting should be the same as the harmonic played over the 12 fret on the next higher string.
Special Tunings
Just as fiddlers use “non-standard” tunings for the fiddle to play certain tunes, some mandolin tunes also require special tuning. Following are some special mandolin tunings, identified by the tune most commonly associated with them:
“Bonapart’s Retreat” “Black Mountain Blues” “Get Up John” (Individual Strings)1 = D 1 = C# 1 = D 5 = D2 = A 2 = A 2 = A 6 = D3 = D 3 = E 3 = A 7 = A4 = D below middle C 4 = A 4 = A 8 = F#
Page 11
Holding the Pick
The pick is held between the thumb and first finger of the right hand. There are many ways to hold the pick, and no one way is “right.” During the course of a tune the way of holding the pick may be changed to achieve different results. The usual way is to curl the 1 finger and hold the pick against the first joint. The rest of the fingers can be curled underneath to clear the strings when picking, or stuck out. I often curl the fingers under for full chord backup strumming, and straighten them out and rest the little finger on the pickguard for single note playing. Some players bend the 1 finger straight down from the second joint so the end of the finger runs straight down the pick. The pick should be held just tightly enough to do its job, but not too tight. You need to be able to control the degree to which the pick tips in plucking the string. The harder the pick is held, the less it will tip when the string is picked, and the greater power and volume will be achieved, together with greater stress on the hand and wrist. For faster noting, you may want to hold the pick a little looser so it can tip back and forth more easily.
Picking
There are three basic picking actions used on the mandolin. For playing runs and phrases the fastest, only a back and forth wrist motion is used. Rest the heel of the hand lightly on the bridge and move the wrist from side to side without any wrist rotation to pick the strings. Keep the pick parallel to the strings. This is the picking method most often used in playing reels and other fast fiddle tunes.
The picking action used for forceful down-picking, accenting, and phrasing, often in conjunction with the above “back and forth” wrist action is to rest your forearm on the edge of top just adjacent to the top edge of the tailpiece, with the heel of the hand slightly above the bridge where you would rest it in the picking method described above. The wrist doesn’t rest on the bridge, and picking is done by rotating the wrist in a “wobbling” motion to rotate the hand and direct the pick across the strings. This permits fast playing with the ability to play a heavily accented down-pick necessary for good phrasing and punch. This is the picking style used for backup chording and for the styling needed for blues and down-picked, Monroe style bluegrass playing.
The third approach is the “forearm smash” used to play chords and to get really heavily accented downbeats when a lot of power is required. The arm doesn’t rest on the instrument and the notes are sounded by flicking the wrist, like shaking down a thermometer, while carrying the hand across the instrument with a rapid arm motion from the elbow. This method doesn’t give much control over accuracy of hitting a single string without much practice, but really brings out the dynamic range of the instrument when this is needed.
Pay attention to your arm muscles when picking. While the basic picking action may seem to be using only a small group of muscles in the wrist, notice that the muscles all the way up the arm are affected. Raise your arm off the instrument and continue to play with just wrist motion. Note that you can use two kinds of wrist motions to pick the string - straight back and forth where your hand bends at the wrist and your wrist does not turn and the pick is always perpendicular to the strings, or a rotating motion where the hand and wrist are held fairly much in line and the hand, wrist, and forearm rotated to move the pick across the strings. Next, try strumming a chord across all the strings using the whole forearm pivoted from the elbow, coupled with the hand-wrist rotating movement. Notice that for all of these types of picking strokes muscles all the way up the arm and over the shoulder are involved. The hand and arm muscles should be relaxed at all times and the wrist loose. All of the above picking movements can be used in playing a tune as the speed, volume, and drive dictate.
Varying the tension with which the pick is held varies the way the pick sounds the string. Holding the pick hard makes a louder, more staccato sound than holding it loose. This can be used for varying the dynamics of the tune. A punchy note can be sounded on a down pick by tightening the grip on the pick just before the string is struck, snapping the pick across the string with a slight fast rotating wrist motion, and releasing the tension just after the note sounds. This gives the snap without too much stress on the thumb and finger muscles.
The picking pattern used has a major effect on how the tune sounds and even on its ease of playing. The
Page 12
usual pattern on the mandolin for playing most fiddle tunes is to pick one note on the down stroke, and another on the following up stroke. Usually the down stroke is used to play the down beat and the up stroke the follow-ing up beat. A one octave scale would be picked: Note 1 = down, 2 = up, 3 = down, 4 = up, 5 = down, 6 = up, 7 = down, 8 = up. A “down-up” picking pattern for a tune can be established in keeping with the tempo of the tune such that the right hand moves up and down at a constant rate while picking the tune as fingered by the left hand. I call this “running the motor.” The pick goes back and forth at the tempo of the tune, picking out the melody notes.
The down stroke can be made with more power than an up stroke, and usually with more accuracy. It has more “punch” than the upstroke. This can be used effectively for emphasis of a note or series of notes. Many classic bluegrass mandolin breaks use only down picking, and this is the basis for Monroe’s style. Play tunes using nothing but down strokes to develop this skill. It gives another tool for more flexibility in picking styles and patterns and better control over dynamics and phrasing.
The classic sound associated with the mandolin is the tremolo. This is playing a note using many rapid down and up picks. The dynamic range of the tremolo can be varied from very soft to quite loud by varying the picking pressure. The intensity also can be varied by changing the speed of the tremolo. As the mandolin has little sustain, a tremolo is about the only way a note can be sounded for more than a short time.
Fretting
Rest the side of the neck of the mandolin just below your index finger and grasp the other side of the neck with your thumb in a comfortable position such that you can curl the fingers in an arch over the fingerboard. Press the end of a finger down onto the string just behind the fret and push the string down until it is forced tightly against the fret and does not buzz when you pick it. It is not necessary to push the string down real hard to fret it adequately for most playing. Too tight a grip will cause you to lose speed and can result in tendinitis. Hold the string down for as long as you want the note to sound. To achieve a smooth, flowing transition from one note to another, try keeping the first note fretted while you fret and pick the second note, and so on. Raising the finger slightly will damp the string and stop it from sounding immediately. This is effective for achieving a staccato sound or adding emphasis at the end of a phrase to leave a slight space before hitting a heavy down pick to start the next phrase. Position the fingers close to the strings and spread apart to correspond to the positions you will have to fret to play in the key in which you are playing. It often helps to run the scale of the key of the tune to get your fingers in place before playing the tune. Most of the time finger strength alone is all that is required adequately to fret the note. Other times, and especially when using the little finger, more fretting strength can be obtained by throwing your left elbow out slightly while using the crook between the thumb and finger as a fulcrum to “lever” your finger down on the string.
SCALES
Running a scale is only a matter of playing one note after another with the proper number of frets in be-tween, and string crossings, to make the proper intervals for the scale. Once the fingering for a scale in one key is used, it can be transferred to any other key by starting on the 1 note of the key being played in. Following are the finger patterns for some scales in first position:
D major: 3-0-0, 3-2-1, 3-4-2, 3-5-3, 2-0-0, 2-2-1, 2-4-2, 2-5-3
G major: 3-5-3, 2-0-0, 2-2-1, 2-3-2, 2-5-3, 1-0-0, 1-2-1, 1-3-2
F major: 3-3-2, 3-5-3, 2-0-0, 2-1-1, 2-3-2, 2-5-3, 1-0-0, 1-2-1
Bb major: 4-3-2, 4-5-3, 3-0-0, 3-1-1, 3-3-2, 3-5-3, 2-0-0, 2-1-1 2-1-1, 2-3-2, 2-5-3, 2-6-4, 1-1-1, 1-3-2, 1-5-3, 1-6-4
Page 13
To play scales up the neck often requires starting the scale on a higher fret, or “position” than used when starting the scale near the nut. The same fret relationships apply as for the scales in “first” position. In running a scale up the neck using the system diagramed above for the D major scale, it helps to think of your 1 finger as if it were a capo across the fingerboard at the fret where the scale to be played starts. For example, a G major scale starting up the fingerboard on the 5th fret of the third string would be like this:
3-5-1, 3-7-2, 3-9-3; 3-10-4; 2-5-1; 2-7-2; 2-9-3; 2-10-4
An A major scale using the scale pattern for a G major scale as set forth above would be:
3-7-3; 3-9-4; 2-4-1; 2-5-2; 2-7-3; 2-9-4; 1-4-1; 1-5-2
CHORDS
Movable Chords
There is one chord fingering on the mandolin which can be used to play most tunes and from which nearly all the chords one needs for bluegrass and old time music can be derived. This chord form is the basis for quick access to backup chording as well as playing improvisational lead breaks in unfamiliar keys. Using this system, if you can find the root, or tonic chord of the key of the tune, you can play all the other chords in the progressions commonly used in traditional music without even knowing the keys of the chords you are playing. This chord system is diagramed and explained in the appended section entitled “Movable Chords for the Mandolin.” This section also includes diagrams for other mandolin chord systems and two note chords.
Backup Chording
The mandolin offers many rhythm possibilities. Its higher pitch and staccato sound can be heard above the other instruments and good rhythmic chording can add lots of drive to the band sound. The basic backup chording style on the mandolin consists of a full chord sounded on the up or off beat. The bass and guitar are playing bass lines on the down beat. The mandolin contrasts with this by chording on the up beat. Make a G chord. Start tapping your foot in a regular beat. When your foot is at its highest point off the floor, strum across all the strings to sound the chord. Practice this until your off beat chording is as regular as your down beat foot tap. The chord can be made more staccato by raising the fingers of your left hand slightly to dampen the strings just after the chord is sounded. Get onto a pattern of only fretting the strings long enough to sound the chord. The left hand movement of clamping and releasing the strings help keeps time, makes a cleaner backup sound, and helps prevent tendinitis of the left hand and wrist.
You also can chord like a guitar, playing a single note on tap 1, a chord on the upbeat, note on tap 2, etc. A variation of this is playing a full chord on tap 1, but holding it down to let it ring; then play the chord again on the upbeat, but this time raise the fingers to damp the strings. You also can chord with rapid down and up strokes, strumming across the strings down and then up on the same half beat. By varying the strumming and damping, and altering from one pattern to another, you can create lots of rhythmic variation and excitement. Bill Monroe once referred to the mandolin as the drum in a bluegrass band. He was referring to this ability of the mandolin to play many rhythm patterns in backup chording through a combination of strumming and string damping methods.
Cross-Picked Chording
A useful backup style, especially for waltzes and slow tunes, is cross-picking chords in a pattern similar to that played a three finger picked banjo. A simple cross-picking can be done as follows, the foot tapping set forth in double time: make and hold a standard G chord (3-5-3, 2-2-1, 1-3-2); tap 1 play string 3; up 1 - string 2; tap 2 - string 1; up 2 - string 3; tap 3 - string 2; up 3 - string 1; tap 4 - string 3; up 4 - string 2; tap 1 of the next measure - string 1; and so on. This pattern can be picked with all down picking, or with alternating down - up picking. It also can be varied by playing the strings in different orders.
Page 14
Charting
It is useful to “chart” a tune you do not know and use the chart to assist you in performing the tune. Often charts enable you to turn in a good performance without adequate rehearsal time. If you are sitting in with a band, tell them you want to chart all the tunes you do not know. They will appreciate your concern and desire to do a good job. It is far better to take the time to chart the tunes than to try to fake it. The chart is nothing more than the chord progression of the tune, with dots to indicate down beats, and measure bars. Charts can be made on sheets of paper in large printing and put on the floor, or on stick-on pads. Write the letter of the chord on the beat where it is first played, followed by a dot for each following beat on the same chord. Vertical lines are put in to mark the measures. Each phrase is given its own line. A sample chart for a tune in G, such as “Home Sweet Home,” with each note letter and dot representing a down beat, would look like this:
HOME SWEET HOME
//:G./C./G./../D./../G./..://
//:C./../G./../D./../G./..://
Note the repeat symbol (//:) at the start and (://) at the end of each phrase. This shows that the line is repeated and avoids having to write out the line a second time. Write the name of the tune on the chart.
RELAXED PLAYING
Learn to play as relaxed as you can. As soon as you feel any muscle tension, back off and see if you still can get the sound you want. There are times in picking and holding down strings to make chords or notes when you have to use pressure, and hence muscle tension, to get the job done. There are many times when you do not need a lot of muscle power. Tense the muscles only when you need to. Relax them when you do not need the tension. This is a skill that has to be learned, just like everything else about playing. It does not come naturally. In the heat of a jam session or performance it is normal to ignore what your body is doing as you are concentrating hard on getting the notes. This very concentration produces tension and tensed up muscles, which detracts from your ability to play your best. I noted during my earlier years of performing on mandolin that every time it was my turn to take a fast break in a performance, my wrist muscles would get so tense that by the end of the break I could hardly play the notes. After learning how to play completely relaxed, these same breaks could be played much better with no effort at all, and no stiff wrist. Here are some exercises that will help you play with minimum muscle tension:
1. Hold the pick the way you normally do. Grasp it tight, play a note and strum a chord. Note the way your muscles feel. As you grasp the pick, be aware of what muscles you are tightening. With your other hand, feel the muscles in your hand and arm as you grasp the pick. Then loosen your grip so you can just barely hold the pick. Note what muscles are relaxing. Do this until your mind can focus in on each muscle you are using to grip the pick and strike the note. Practice gripping and releasing and focus on each individual muscle. Get used to knowing what it feels like for the muscle to be tense and for it to be relaxed.
2. Grasp the pick as tightly as you are used to and pick and note and strum a chord. Listen closely to how it sounds and be aware of the grip and force you used to produce the sound. Grip the pick even tighter and strike the note and chord with even more force. Listen to how the note and chord sound and be aware of this in-creased grip and force. Then start holding the pick with less muscle tension and using less force to make the note. Again, listen carefully to the sound you are making as you continue to decrease the muscle tension you are using to play the notes. Relax to the point where you can barely hold the pick. You have noted in this exercise that the sound of the note and chord varies with how hard you hold the pick and how hard you strike the note. You want to work to get the sound you want with the least amount of muscle tension. Practice a lot using minimum muscle tension. While initially it may be difficult to get the sound you are used to getting with tensed muscles, after
Page 15
awhile you will find that you can get the same sound, or actually a better sound, with little muscle tension.
3. Note carefully the differences in sound of the notes with different grip and picking tensions. You will get a sharper attack and more powerful sound when the pick is gripped tightly and more force is used in making the note. Now back off all the way on muscle tension to the point where you can just hold the pick and strum the strings with as little muscle tension as you can. Note the difference in sound from when you used full muscle tension. This shows you the range of sounds you have available between full and minimum muscle tension. Get used to using only as much muscle tension as you need to make the sound you want. This helps with a sense of dynamics in your music, as well as saving your muscles and tendons from the effects of continual stress.
4. Try gripping the pick tightly only when you are striking the string. After the string has sounded, release your grip tension.
5. Apply these principals to your left hand work. Holding down a chord too long with too much tension can result in tendinitis at the base of your thumb and/or in your wrist. Most of the time you do not have to grip the neck tightly at all to make a good, clean chord. Try making chords without having your thumb on the neck at all. Get used to tensing the muscles to hold the strings down only at the moment you strike the strings with the pick and releasing your grip after the chord has sounded. If you release your grip slightly, the string will be damped against your fingers, giving the chord a short sustain and a snappy sound. This alternate press and release is what gives the “bark” to rhythm playing.
TENDINITIS AND OTHER PHYSICAL PROBLEMS
Tendinitis is a problem always lurking around the corner for string musicians. It can strike when you least expect it. It is caused by tearing and abrasions of a tendon due to overwork under conditions of high muscle stress. These are exactly the conditions created in playing the mandolin. Often it starts as a sharp pain located in one spot in the wrist area or elbow. If not taken care of right away, it can develop into a major problem involving months of intense pain and perhaps a total inability to play. Tendinitis can be avoided by warming up well before playing and playing relaxed. Warm up for at least ten minutes prior to playing, and preferably for a half-hour. The warm up is intended to get the tendons running smoothly and the muscles warm. It is not designed to build strength, so simple, non-stressful movements, such as flexing the wrist, arm, and fingers are all that is needed. A light duty squeeze ball or exercise putty also works well as a part of the routine. Some musicians warm up with Chinese Iron Ball Factory exercise balls. Work to build up muscle strength for playing with simple exercises done on a regular basis. Stretch your fingers out as far and hard as you can, then stretch them a bit more, relax, and repeat a few times a day. Grab a condensed soup can with your fingers, back of hand up, and raise and lower it about 20 times a day using only your wrist. Do arm strengthening weight lifting with fairly light weights, like 3 - 4 lbs. on a regular basis each day. Just a few repeats of these exercises each day gradually builds the muscles and helps prevent playing problems. Going gung ho with lots of repeats can be harmful and result in the very condition you are trying to avoid.
Watch how tightly you grip the flatpick as too tight a grip can strain the thumb muscles, resulting in tendinitis. If you feel your wrist or arm start to tighten while playing, back off and try to find a way to keep playing with the muscles relaxed. There are many muscles in the arm and hand and often you discover that you can use a set of muscles you have never before been aware of. A tight grip on the mandolin neck with the left hand also can result in muscle strain and accompanying tendinitis.
Sore fingers on the left hand after not playing for awhile are common. If your fingers get really sore, it is time to back off and rest for awhile. Once strain sets in, further playing will only deteriorate the situation further, rather than build up strength. The idea is to build up callouses on the fingertips. This is best done over a period of days. Sometimes blisters develop beneath the callouses if they are allowed to get too thick. While you want sufficient callouses to play without pain, from time to time you may have to shave down a callous with a sharp knife. Using hand lotion also helps with callous control.
Page 16
MIKING, PICKUPS, RECORDING
The standard method of miking a mandolin on stage is simply to put a good mike in front of the soundhole or one of the F-holes. Getting close enough to the mike to get good volume without feedback can be a little tricky with a mandolin as the right hand movement needs to be accommodated. Often it only is possible to hold the microphone far enough in front of the instrument to clear the right hand action. Some players of F-hole instruments put the microphone at the lower or upper F-hole depending on which placement keeps it out of the way of the right hand action. There is no one mike good for every mandolin or mandolinist. We have found that, generally, good quality small diaphragm condenser mikes work best in most situations, however, there are some dynamic mikes our there that also do an outstanding job. In sound system work the mike much be matched to the characteristics of the sound system, and the mike that works well in one sound system may not work so well in another. While you may have your favorite microphone, it is often wise to take the advice of an experienced sound person who is running sound for you as to what mike works best with his system.
Small mikes that can be attached to the instrument are getting more common. They take only a “snapshot” of the sound coming from a particular part of the instrument, so positioning is important. A principal drawback to using a clip-on mike on any instrument is that you can’t get away from it and so can’t use the distance from the mike to help control your dynamics. If you use a clip-on mike, by all means learn to play from soft to loud so you don’t get in the way of other musicians when it is not your turn to be the “star.” We have a firm policy of not using musicians with pickups or clip-on mikes in our bands, unless we are using a real electric instrument, as we have found that most musicians using pickups and clip-ons have never learned to control their dynamics and hinder creating a good band sound. Also, pickups and clip-ons never sound as good as a good mike used by a musician who knows how to “work” it.
There are pickups available for mandolins. The old DeArmond pickup uses a bracket attached across the strings in front of the tailpiece to hold a magnetic pickup under the strings at the end of the fingerboard. There have been some pickups mounted on pick guards. There are contact mike pickups that attach to the top with brackets. The newest style is the piezo electric bridge insert pickup. The magnetic pickups use the vibration of the strings themselves to produce electricity, like electric guitar pickups, and produce a sound similar to an electric guitar. The better pickups use a piezo electric transducer and are installed as a part of the bridge or mounted on some other vibrating surface of the instrument. The piezo pickup generates electricity by bending a crystal, and is mounted on a part of the instrument in such a way that the instrument’s vibrations are transferred to the crystal. Some pickup systems employ both a bridge installed piezo pickup and a small microphone mounted inside the instrument. The output from both the mike and pickup is mixed to try to achieve a reasonable balance between the electric and acoustic sound. Internally installed pickups often use a special endpin that also is a jack for the cord, rather than drilling a hole in the side of the instrument for a regular jack. Most mandolin bridge pickups have a jack which is mounted on the tailpiece, or clamped onto the instrument. While pickups are in wide use, especially where high volume levels must be achieved, they have two major drawbacks. In the first place, they never sound like the acoustic instrument. Some performers desire the acoustic - electric sound and use a pickup all the time as a part of their style. This usually does not work too well in traditional bluegrass and old time music. The other significant drawback to using a pickup is the lack of control of dynamics. A mandolinist can move in and out of the microphone as another tool to control the loudness of the instrument heard by the audience. This lets the mandolinist play with the power required for the right tonal quality and drive, but away from the mike to lower the volume to the right balance needed for a particular arrangement. One cannot move away from a pickup. The only way one can control volume is to play softer, which may detract from the styling, or use a volume control pedal to back off the volume through the sound system.
The same techniques used for sound reinforcement can be used for miking for recording, but the microphone can be further away from the instrument. Mandolins often are miked in a studio with a good quality condenser microphone. The microphone can be positioned where it sounds best to the engineer or producer for the tone desired. Sometimes the mike is put much further away from the instrument than would be possible in a performance situation.
Page 17
Page 18
Page 19
Page 20
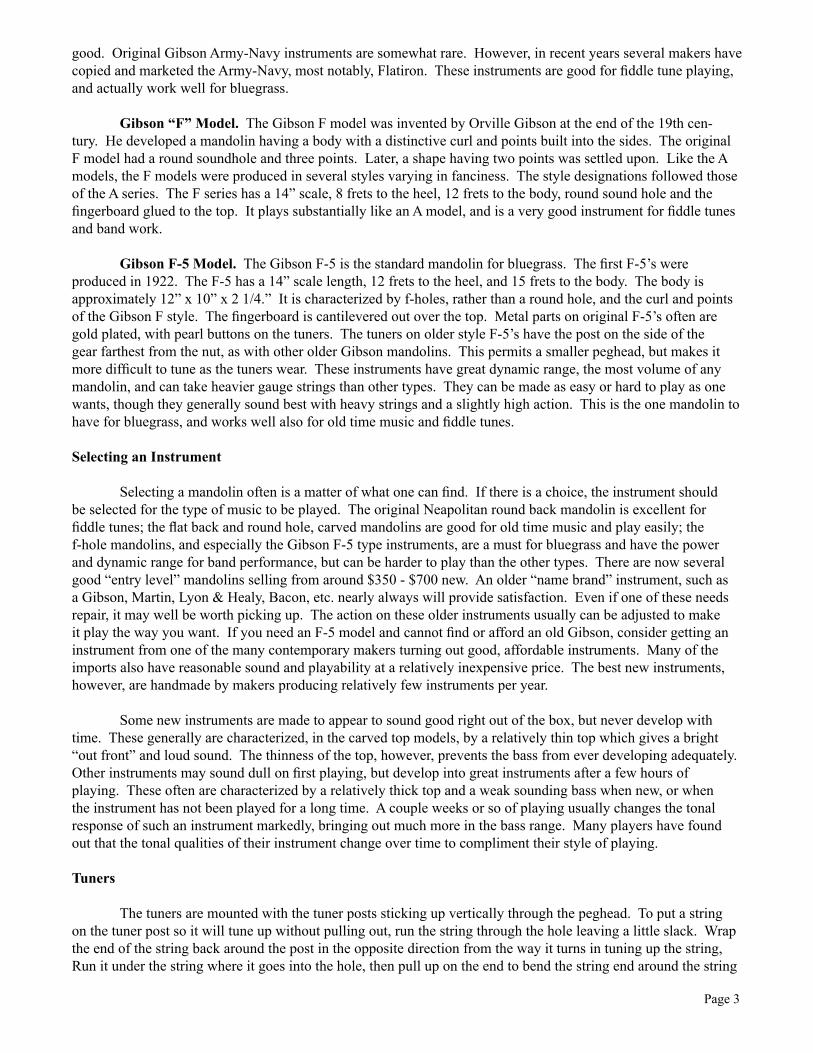
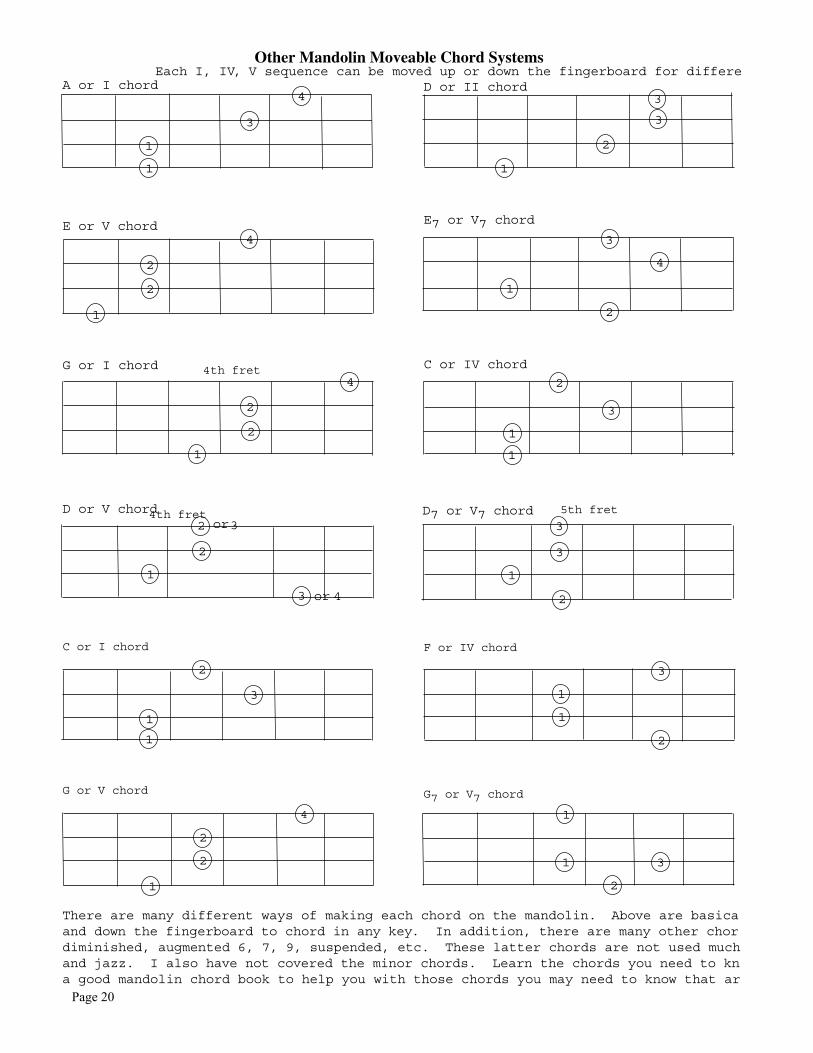
Other Mandolin Moveable Chord SystemsEach I, IV, V sequence can be moved up or down the fingerboard for differe
A or I chord D or II chord
E or V chord
1
1
1
1
1
2
2
2
2
3
3
3
3
3
4
4
4
E7 or V7 chord
G or I chord C or IV chord
D or V chord
4th fret
4th fret
1
1 1
1
1
2
2
2
2
2
3
3
4
4
or
or
D7 or V7 chord
1
2
3
35th fret
C or I chord F or IV chord
4
1
1
1
1
G or V chord G7 or V7 chord
1
1
2
2
2
2
2
3
3
3
There are many different ways of making each chord on the mandolin. Above are basicaand down the fingerboard to chord in any key. In addition, there are many other chordiminished, augmented 6, 7, 9, suspended, etc. These latter chords are not used muchand jazz. I also have not covered the minor chords. Learn the chords you need to kna good mandolin chord book to help you with those chords you may need to know that ar
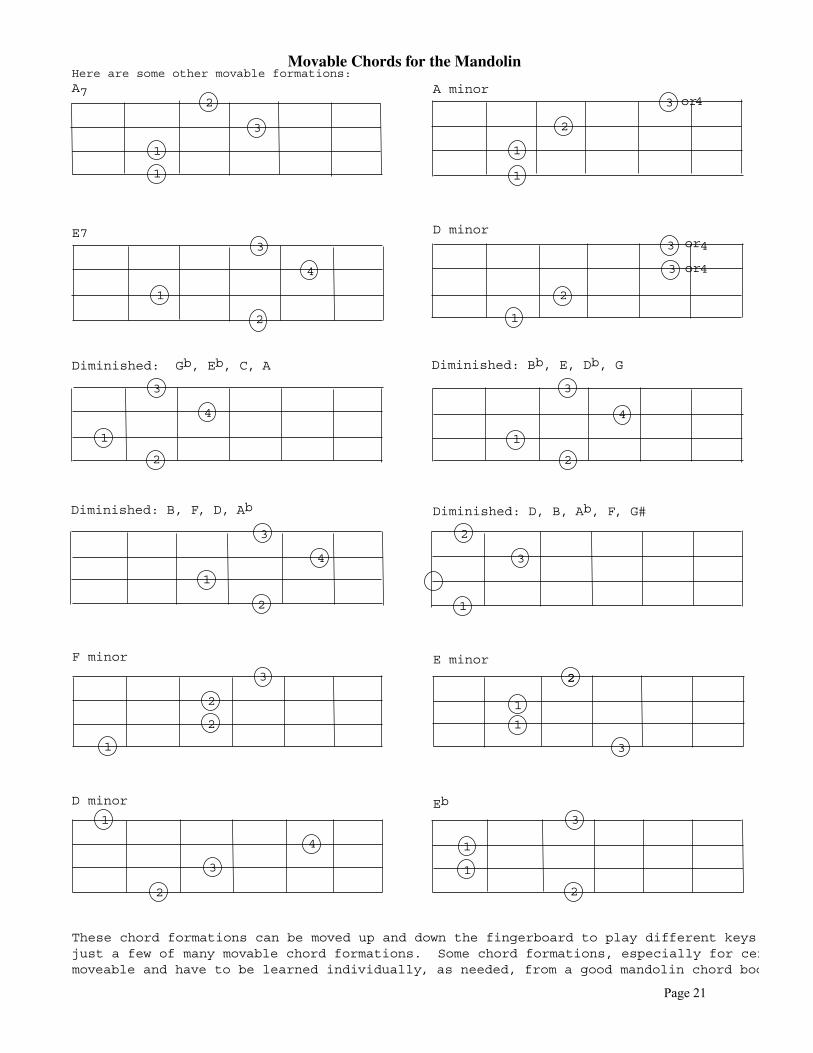
Movable Chords for the MandolinHere are some other movable formations:A7
1
1 1
1
1
1
2
2
2
2
2 2
3
3
3
3
3
4
4 4
44
A minoror
E7 D minor
or
Diminished: Gb, Eb, C, A Diminished: Bb, E, Db, G
Diminished: B, F, D, Ab
1
1
1
1
1
3
3
4
4
3
3
2
2
2
Diminished: D, B, Ab, F, G#
3 or4
F minor
1
3
3
E minor
1
1
2
1
2
2
1
D minor
3
Eb
2
2
These chord formations can be moved up and down the fingerboard to play different keys just a few of many movable chord formations. Some chord formations, especially for cermoveable and have to be learned individually, as needed, from a good mandolin chord boo
Page 21
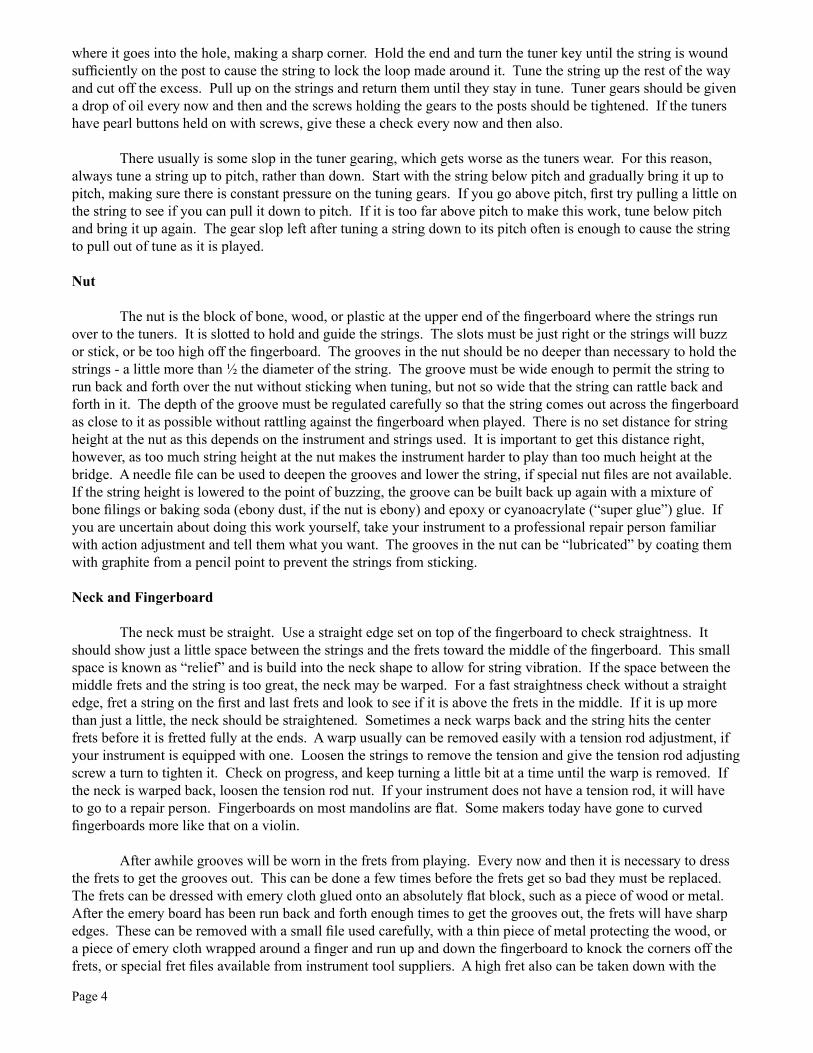
Movable Chords for the MandolinHere are some other movable formations:A7
1
1 1
1
1
1
2
2
2
2
2 2
3
3
3
3
3
4
4 4
44
A minoror
E7 D minor
or
Diminished: Gb, Eb, C, A Diminished: Bb, E, Db, G
Diminished: B, F, D, Ab
1
1
1
1
1
3
3
4
4
3
3
2
2
2
Diminished: D, B, Ab, F, G#
3 or4
F minor
1
3
3
E minor
1
1
2
1
2
2
1
D minor
3
Eb
2
2
These chord formations can be moved up and down the fingerboard to play different keys just a few of many movable chord formations. Some chord formations, especially for cermoveable and have to be learned individually, as needed, from a good mandolin chord boo
Page 22
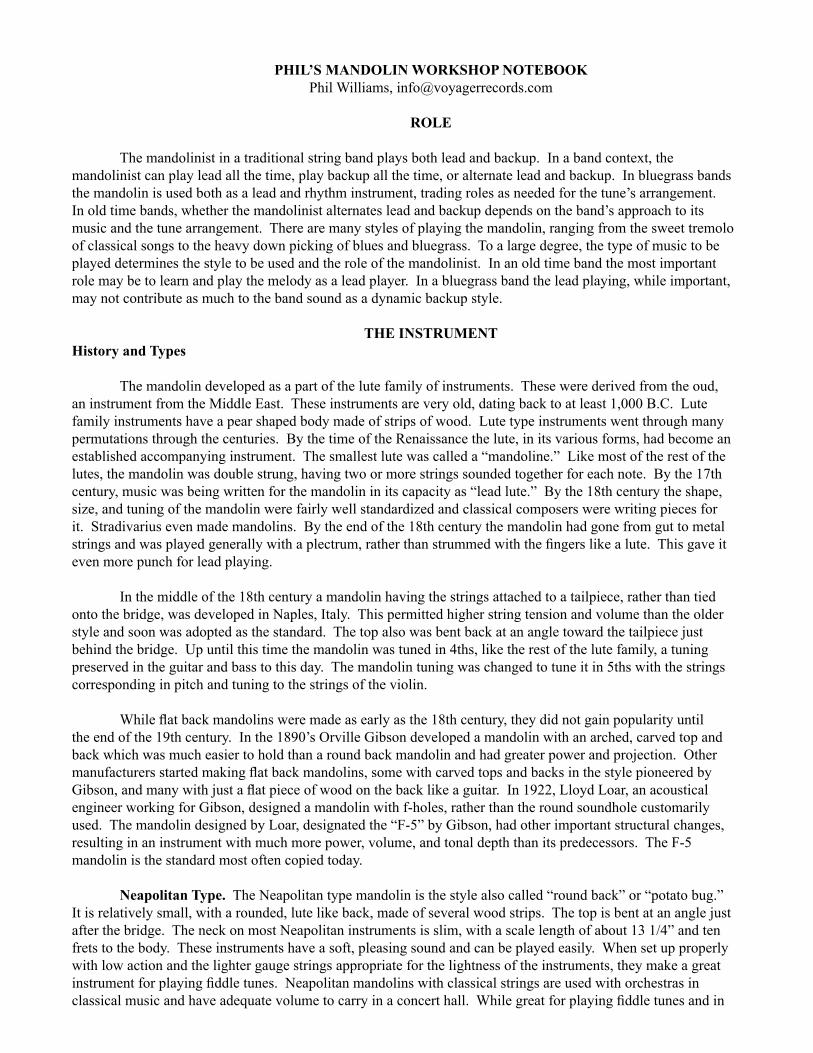
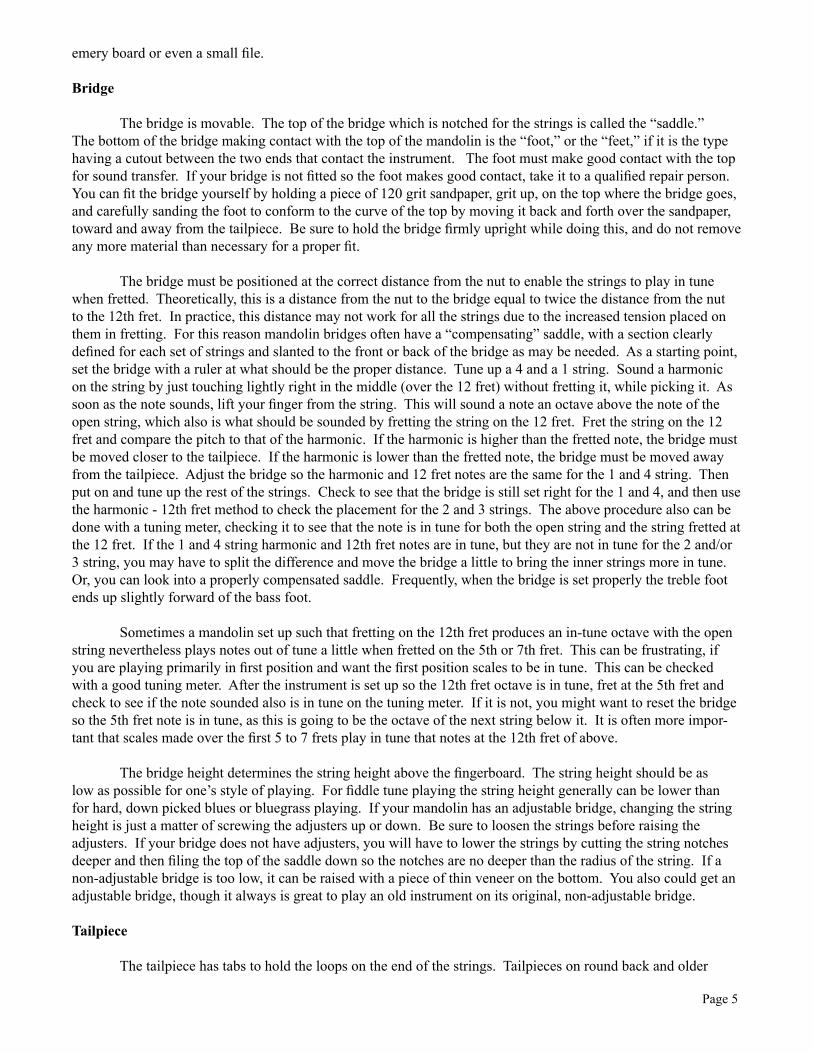
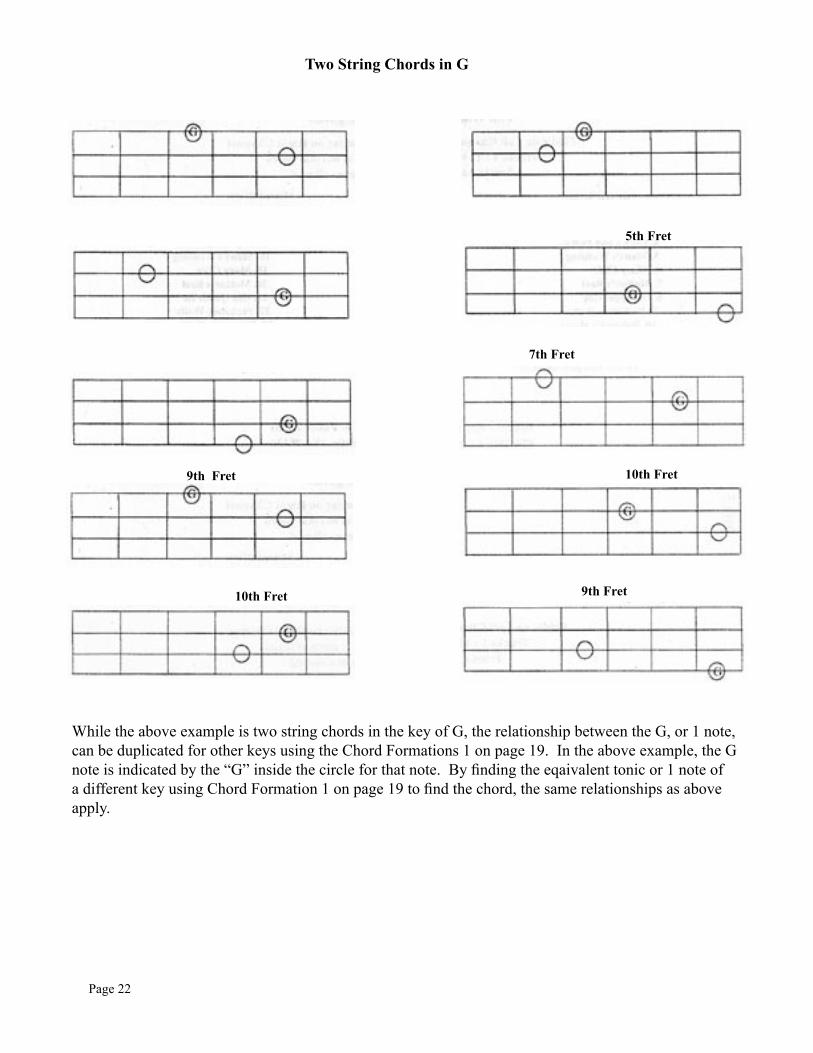
Two String Chords in G
5th Fret
9th Fret
7th Fret
10th Fret
10th Fret 9th Fret
While the above example is two string chords in the key of G, the relationship between the G, or 1 note, can be duplicated for other keys using the Chord Formations 1 on page 19. In the above example, the G note is indicated by the “G” inside the circle for that note. By finding the eqaivalent tonic or 1 note of a different key using Chord Formation 1 on page 19 to find the chord, the same relationships as above apply.