Embed Size (px)
Citation preview

PHILLIP FUTURES SDN BHD
Phillip Nova Desktop Version
User Guide
2 | P a g e
Contents Login Page ............................................................................................................................................... 3
Forget Password Page ............................................................................................................................. 4
Reset Password Page .............................................................................................................................. 6
Disclaimer Alert ....................................................................................................................................... 7
Desktop View Main Page (After Login) ................................................................................................... 9
A - Watchlist ...................................................................................................................................... 10
A1 - Change/Create watchlist ....................................................................................................... 11
A2 - Add contracts to watchlist ..................................................................................................... 12
A3 - Edit watchlist ......................................................................................................................... 13
A4 - Options to Place Order and View Market Depth or Chart ..................................................... 14
B - Panel View ................................................................................................................................... 16
B1 – Place Order Page ................................................................................................................... 16
B2 - Order Submission Confirmation ............................................................................................ 17
B3 – Market Depth Page ............................................................................................................... 18
B4 – Charting Option ..................................................................................................................... 19
C – Orders – Working orders............................................................................................................. 35
C1 – Amend Order Page ................................................................................................................ 36
C2 - Completed Orders Page ......................................................................................................... 39
C3 – Open Positions ...................................................................................................................... 40
D – Account Summary ....................................................................................................................... 41
E – Settings ........................................................................................................................................ 42
E1-Settings Button ........................................................................................................................ 43
E2 – Notification settings .............................................................................................................. 43
E3 – Language ............................................................................................................................... 44
E4 - Logout .................................................................................................................................... 44
Page notification ............................................................................................................................... 45
Resize Bar .......................................................................................................................................... 46
3 | P a g e
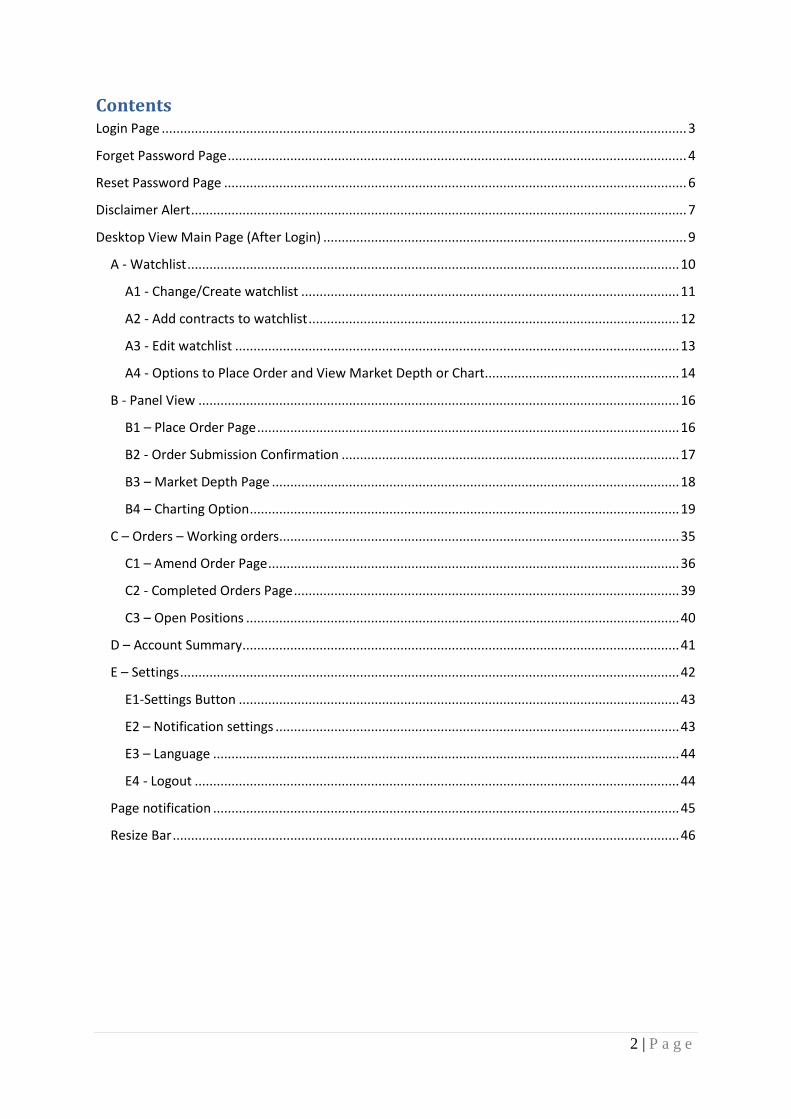
Login Page
1. User Login Detail to be fill
2. Enter 2FA OTP obtained from your Phillip Nova application. This fill is only for registered 2FA
users.
3. Login Button
4. Click forget Password to receive a link through email to reset to new password should user
fails to remember their existing password
5. Click reset password if user would like to change their existing password to a new password
6. Press and hold to view password
1
6
2
3
5 4
4 | P a g e
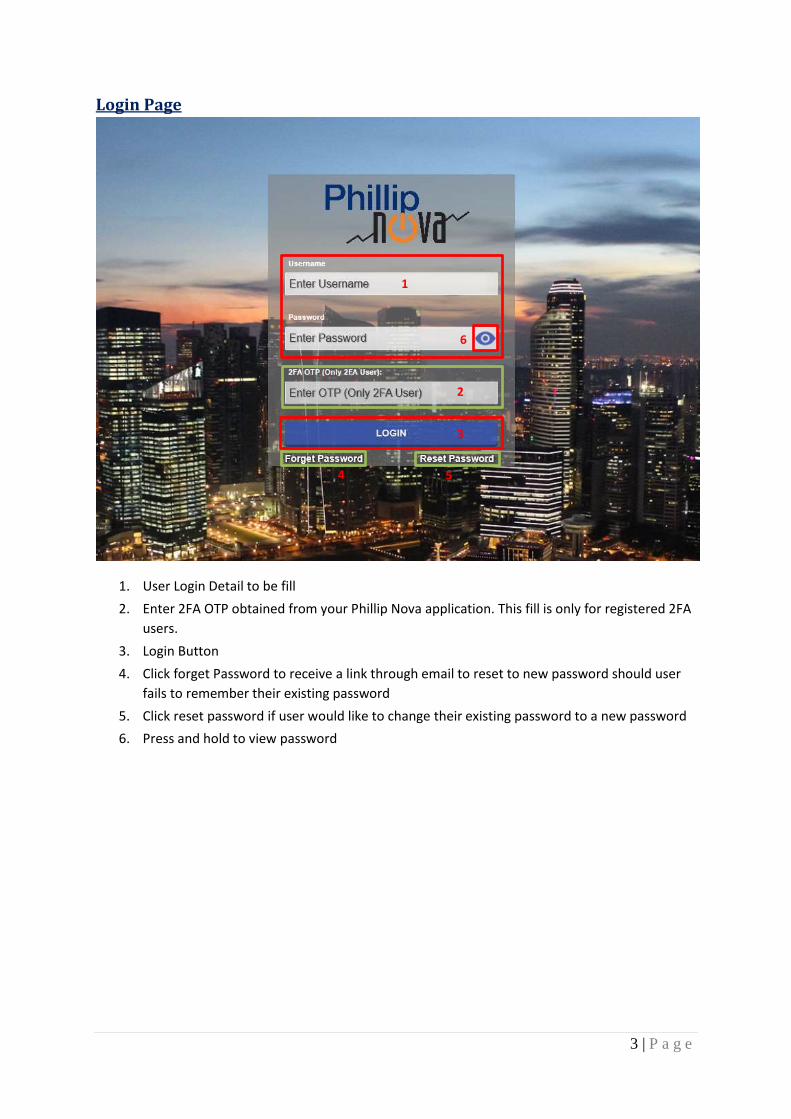
Forget Password Page
1. Field that require from user to reset their password.
*Username and email entered have to be the ones registered with Phillip Futures Sdn Bhd.
2. CAPTCHA verification
3. Submit Reset Password Request Button.
* Reset Password Email will be sent to the registered email if user keyed it in correctly.
1
2
3
5 | P a g e
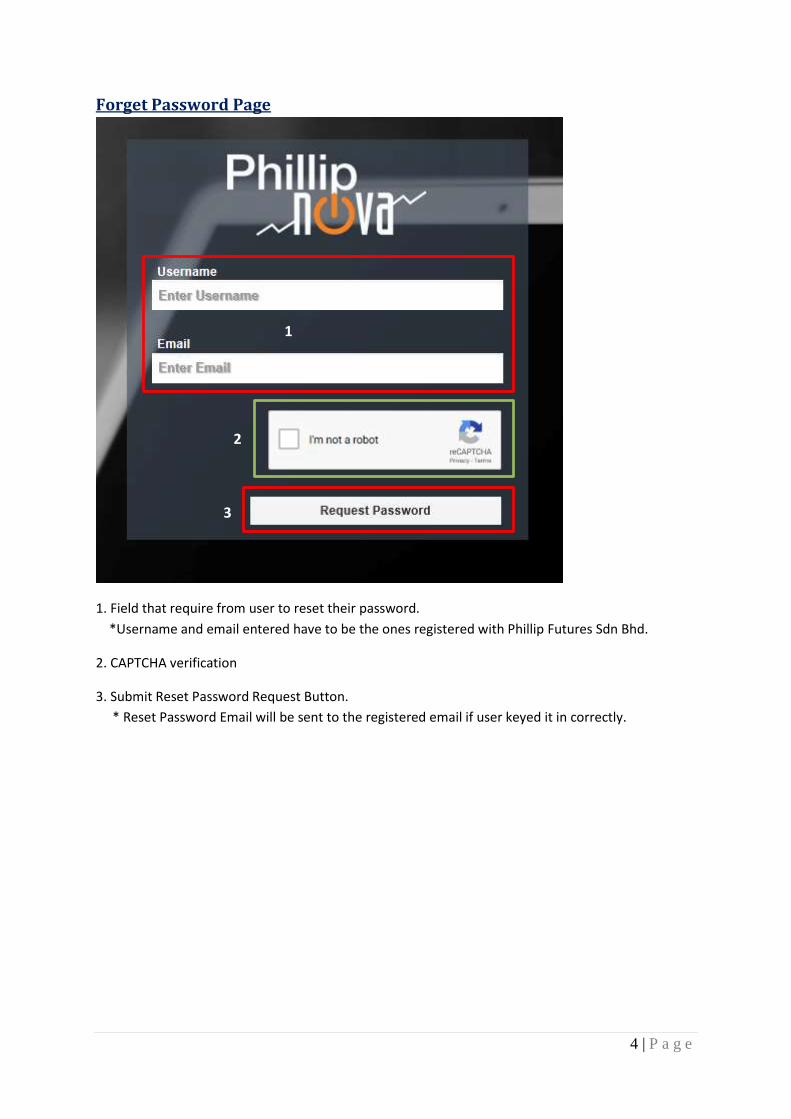
1. A message will pop up when the forget password request were successfully submitted where user
can check their email to reset their password by clicking on the link
6 | P a g e
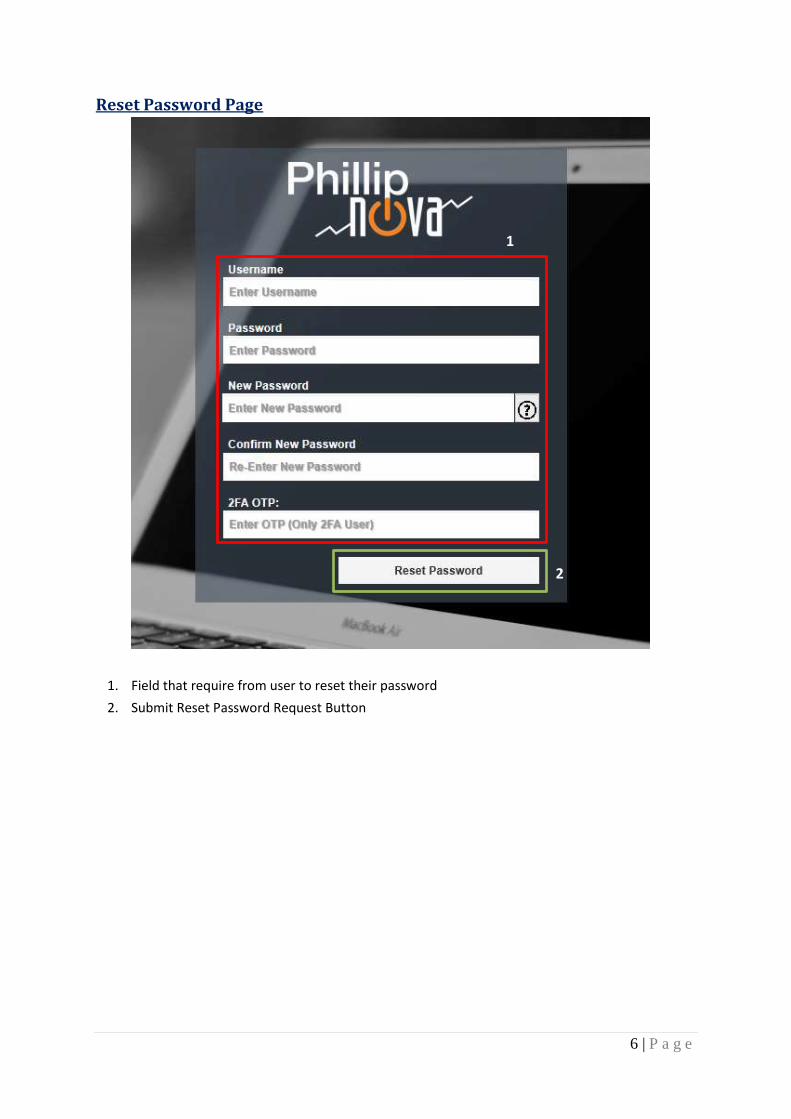
Reset Password Page
1. Field that require from user to reset their password
2. Submit Reset Password Request Button
1
2

7 | P a g e
Disclaimer Alert
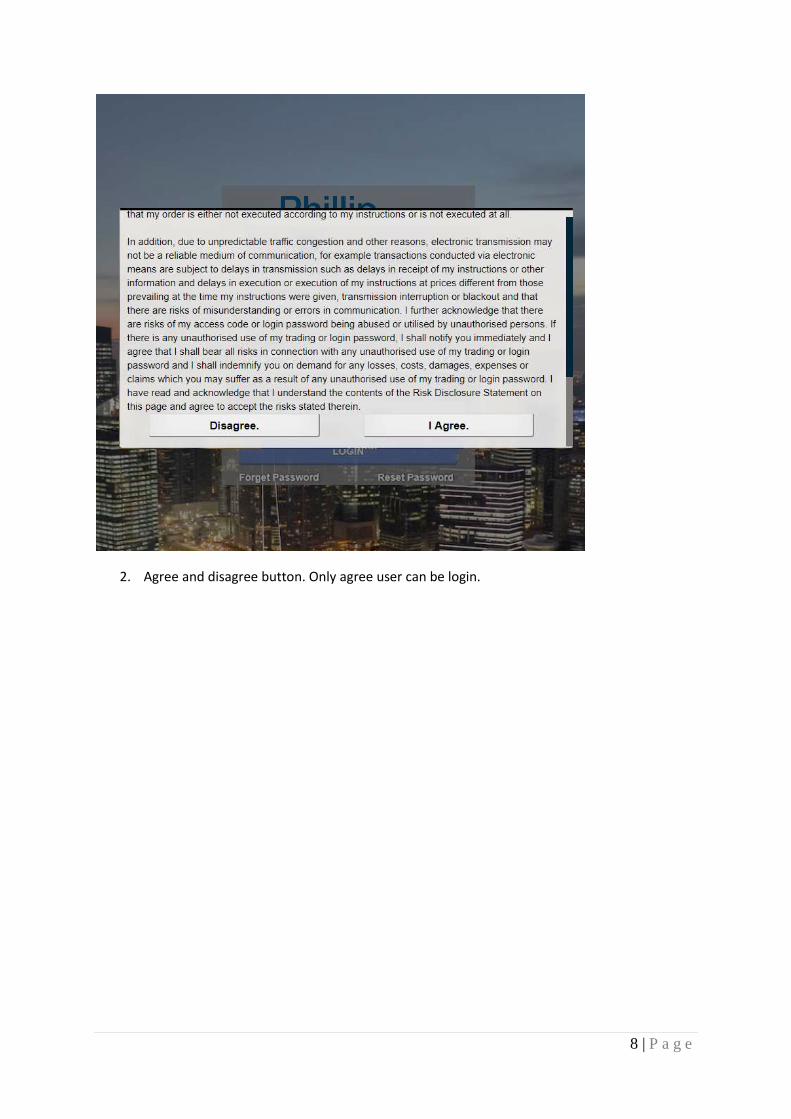
1. This is the Disclaimer Alert that require user to Accept it, when first times login.
8 | P a g e
2. Agree and disagree button. Only agree user can be login.
9 | P a g e
Desktop View Main Page (After Login)
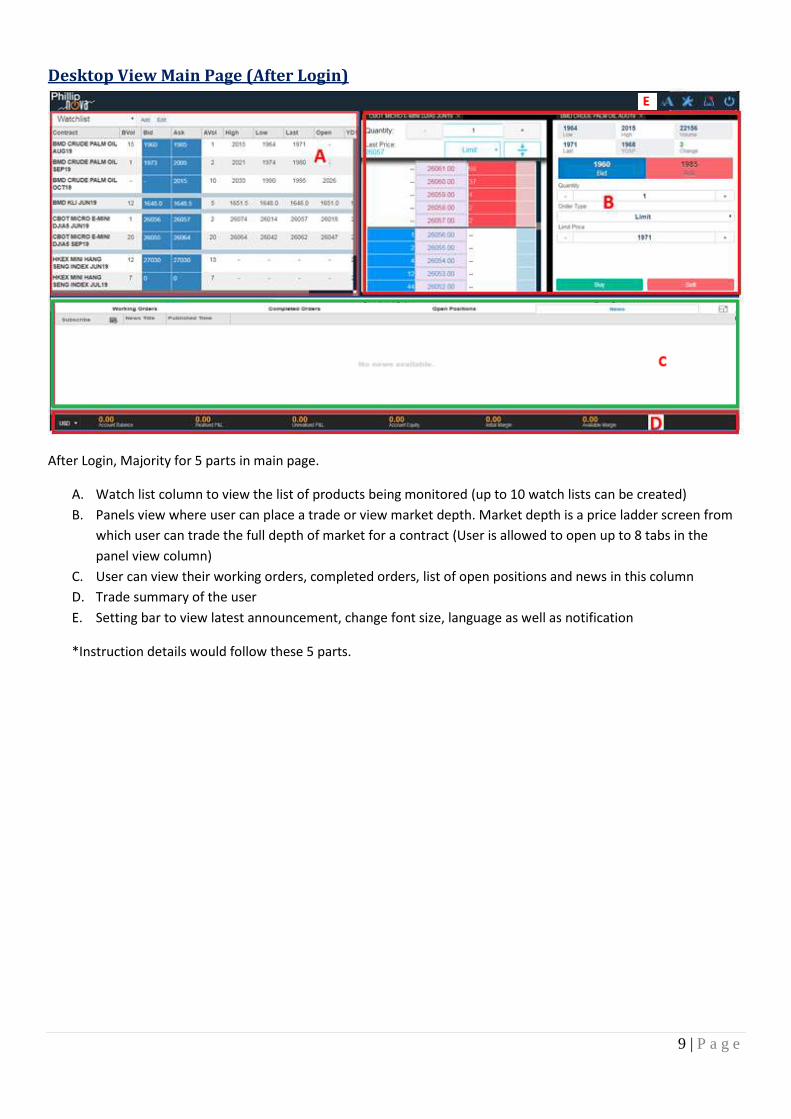
After Login, Majority for 5 parts in main page.
A. Watch list column to view the list of products being monitored (up to 10 watch lists can be created)
B. Panels view where user can place a trade or view market depth. Market depth is a price ladder screen from
which user can trade the full depth of market for a contract (User is allowed to open up to 8 tabs in the
panel view column)
C. User can view their working orders, completed orders, list of open positions and news in this column
D. Trade summary of the user
E. Setting bar to view latest announcement, change font size, language as well as notification
*Instruction details would follow these 5 parts.
10 | P a g e
A - Watchlist
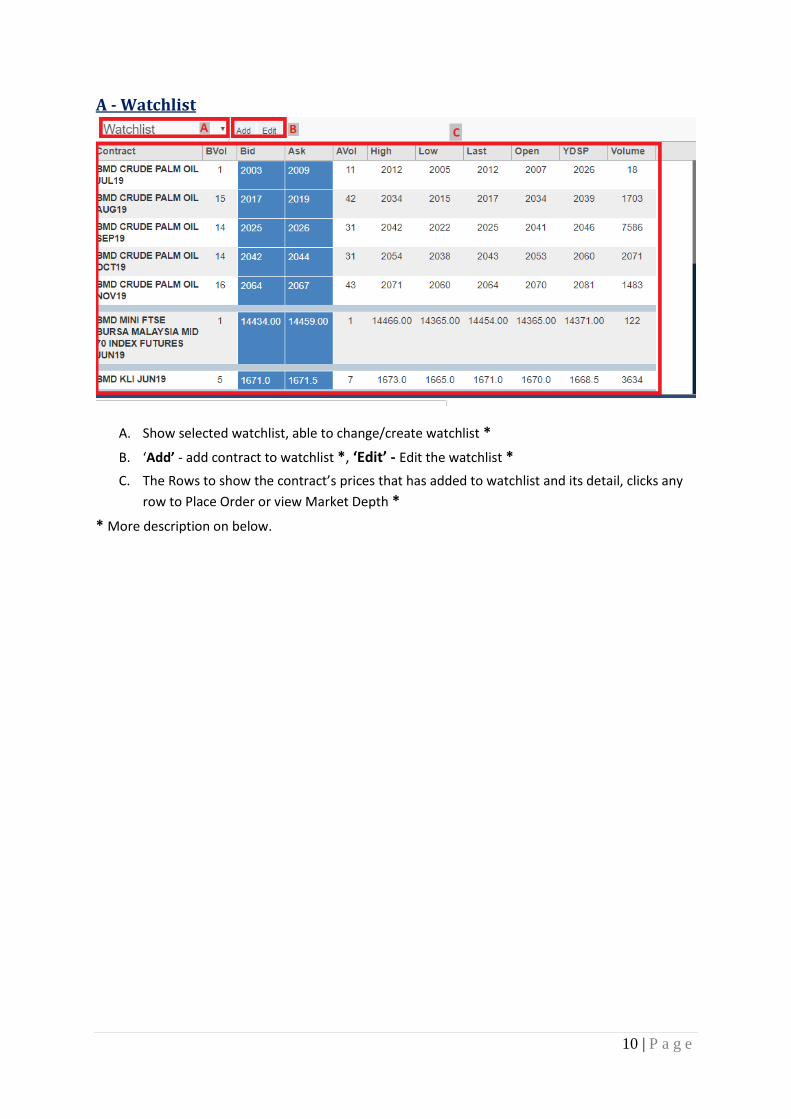
A. Show selected watchlist, able to change/create watchlist *
B. ‘Add’ - add contract to watchlist *, ‘Edit’ - Edit the watchlist *
C. The Rows to show the contract’s prices that has added to watchlist and its detail, clicks any
row to Place Order or view Market Depth *
* More description on below.
11 | P a g e
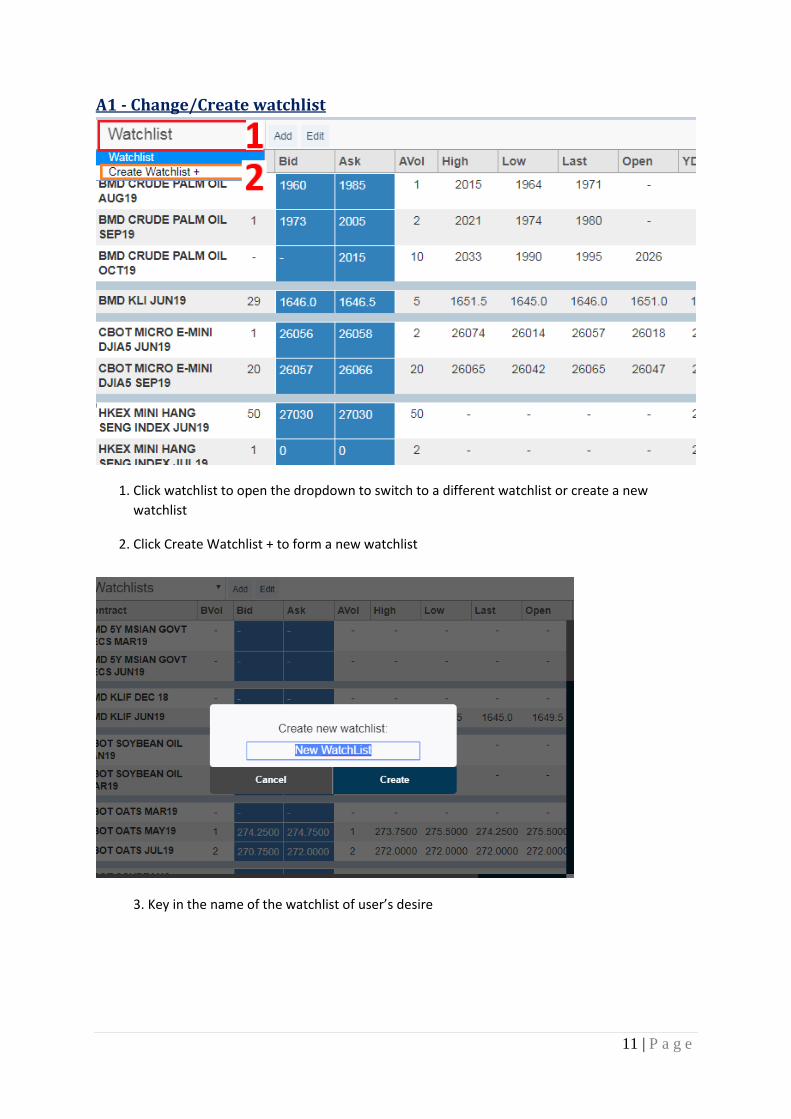
A1 - Change/Create watchlist
1. Click watchlist to open the dropdown to switch to a different watchlist or create a new
watchlist
2. Click Create Watchlist + to form a new watchlist
3. Key in the name of the watchlist of user’s desire

12 | P a g e
A2 - Add contracts to watchlist
Add watchlist page contains few layers filtering. I.e. product, exchange, contract month.
1. Back button, go back watchlist page.
2. Watchlist name, add product into this watchlist.
3. User can search the products they want to add to their watchlist
4. Select button to add the products to their watchlist
* Search page
5. Insert keyword to filter.
6. Back to main watchlist page.
13 | P a g e
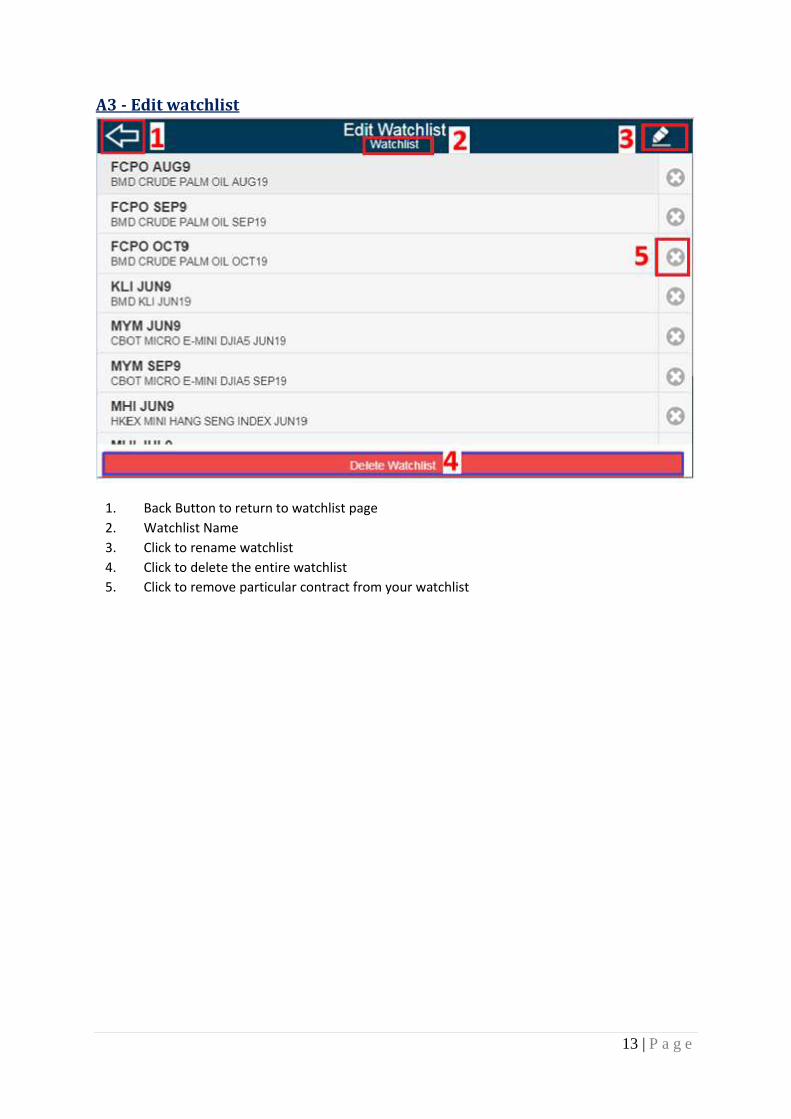
A3 - Edit watchlist
1. Back Button to return to watchlist page
2. Watchlist Name
3. Click to rename watchlist
4. Click to delete the entire watchlist
5. Click to remove particular contract from your watchlist
14 | P a g e
A4 - Options to Place Order, ViewMarket Depth or Chart
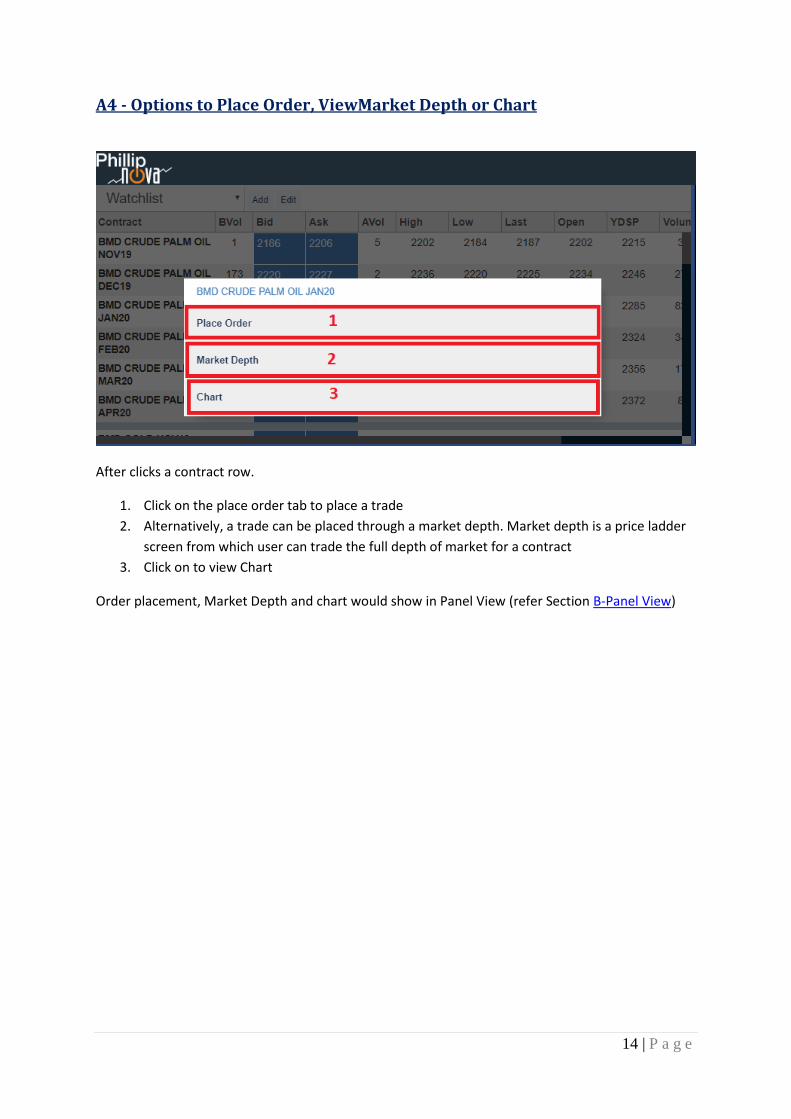
After clicks a contract row.
1. Click on the place order tab to place a trade
2. Alternatively, a trade can be placed through a market depth. Market depth is a price ladder
screen from which user can trade the full depth of market for a contract
3. Click on to view Chart
Order placement, Market Depth and chart would show in Panel View (refer Section B-Panel View)
15 | P a g e
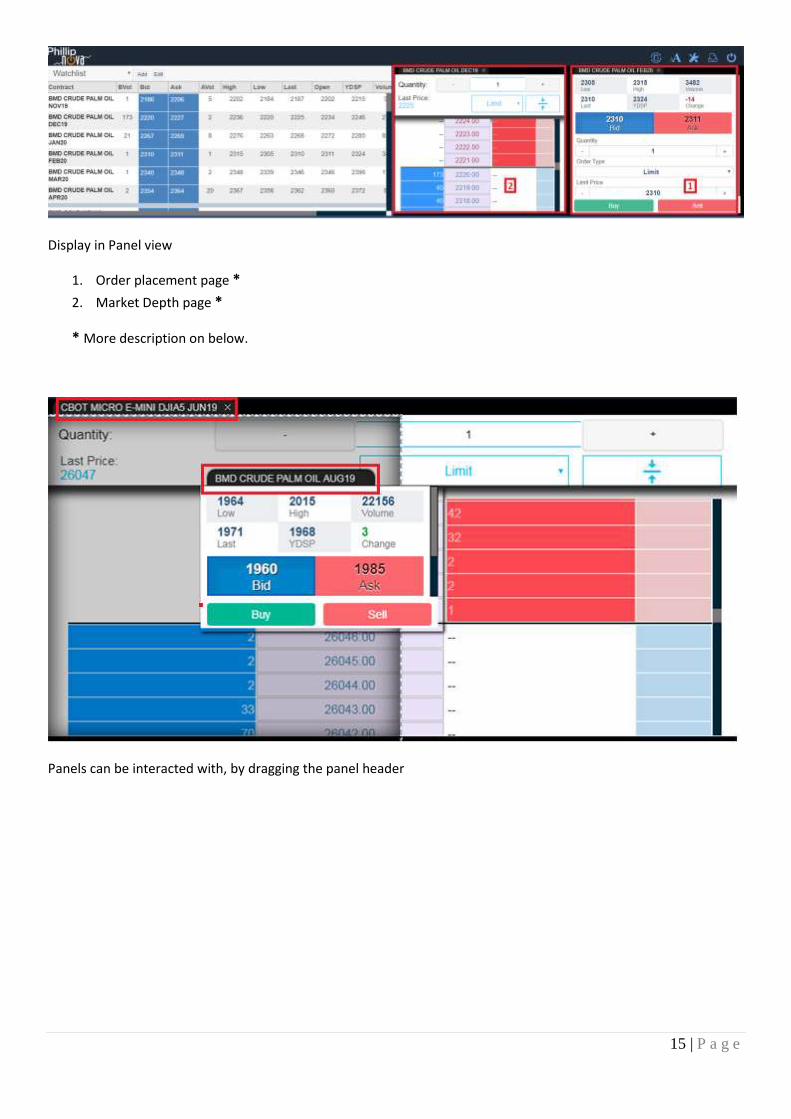
Display in Panel view
1. Order placement page *
2. Market Depth page *
* More description on below.
Panels can be interacted with, by dragging the panel header
16 | P a g e
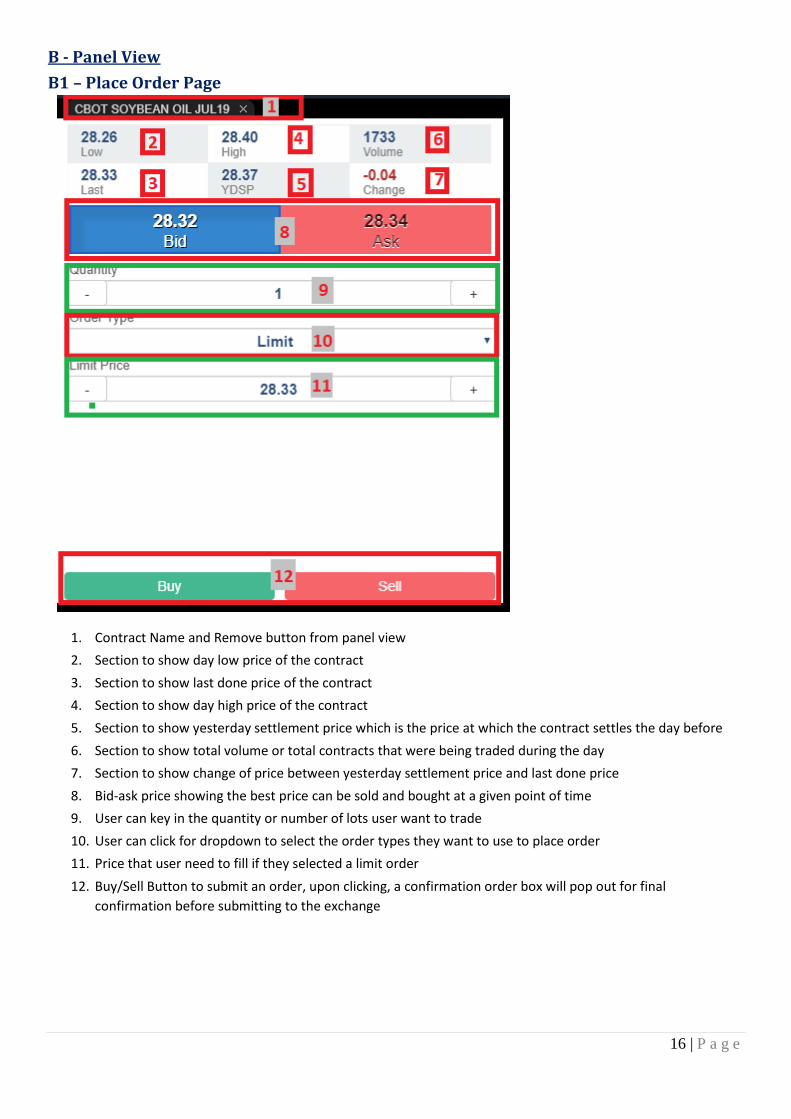
B - Panel View
B1 – Place Order Page
1. Contract Name and Remove button from panel view
2. Section to show day low price of the contract
3. Section to show last done price of the contract
4. Section to show day high price of the contract
5. Section to show yesterday settlement price which is the price at which the contract settles the day before
6. Section to show total volume or total contracts that were being traded during the day
7. Section to show change of price between yesterday settlement price and last done price
8. Bid-ask price showing the best price can be sold and bought at a given point of time
9. User can key in the quantity or number of lots user want to trade
10. User can click for dropdown to select the order types they want to use to place order
11. Price that user need to fill if they selected a limit order
12. Buy/Sell Button to submit an order, upon clicking, a confirmation order box will pop out for final
confirmation before submitting to the exchange

17 | P a g e
B2 - Order Submission Confirmation
After Click Buy/Sell
1. Confirmation order box for final confirmation before submitting to the exchange
2. The details of the order placed by the user
3. To cancel the order
4. To submit the order to the exchange
18 | P a g e
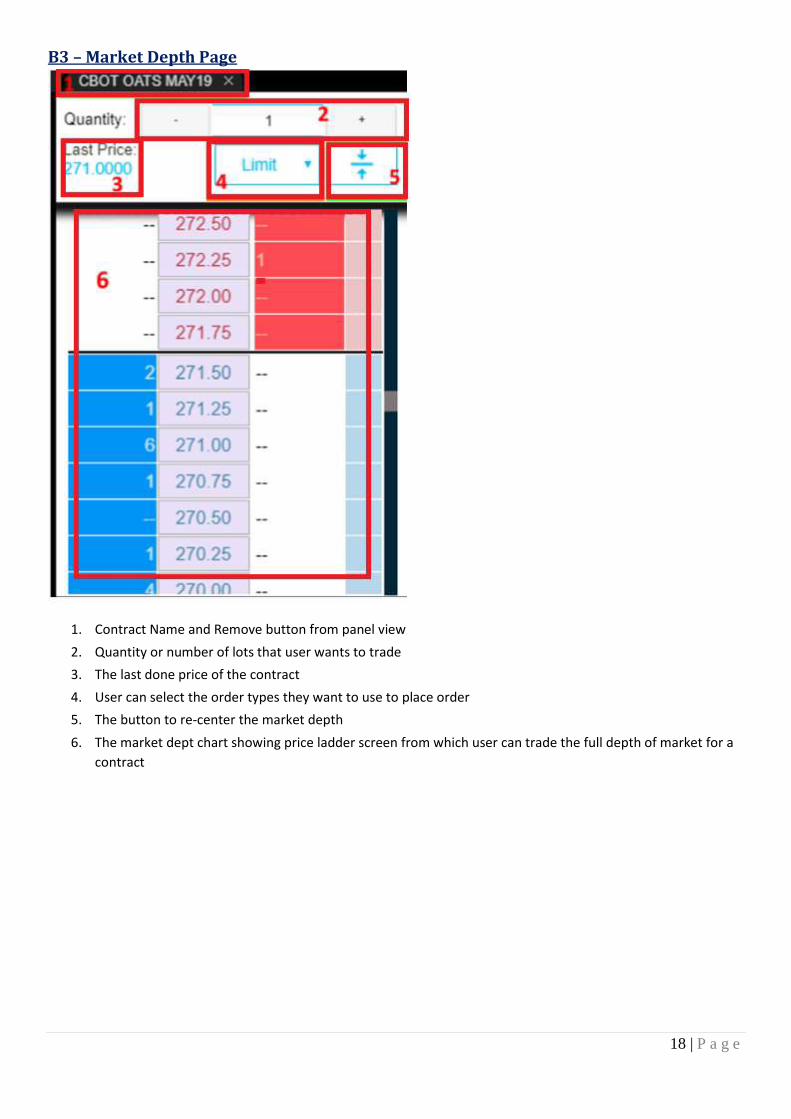
B3 – Market Depth Page
1. Contract Name and Remove button from panel view
2. Quantity or number of lots that user wants to trade
3. The last done price of the contract
4. User can select the order types they want to use to place order
5. The button to re-center the market depth
6. The market dept chart showing price ladder screen from which user can trade the full depth of market for a
contract
19 | P a g e
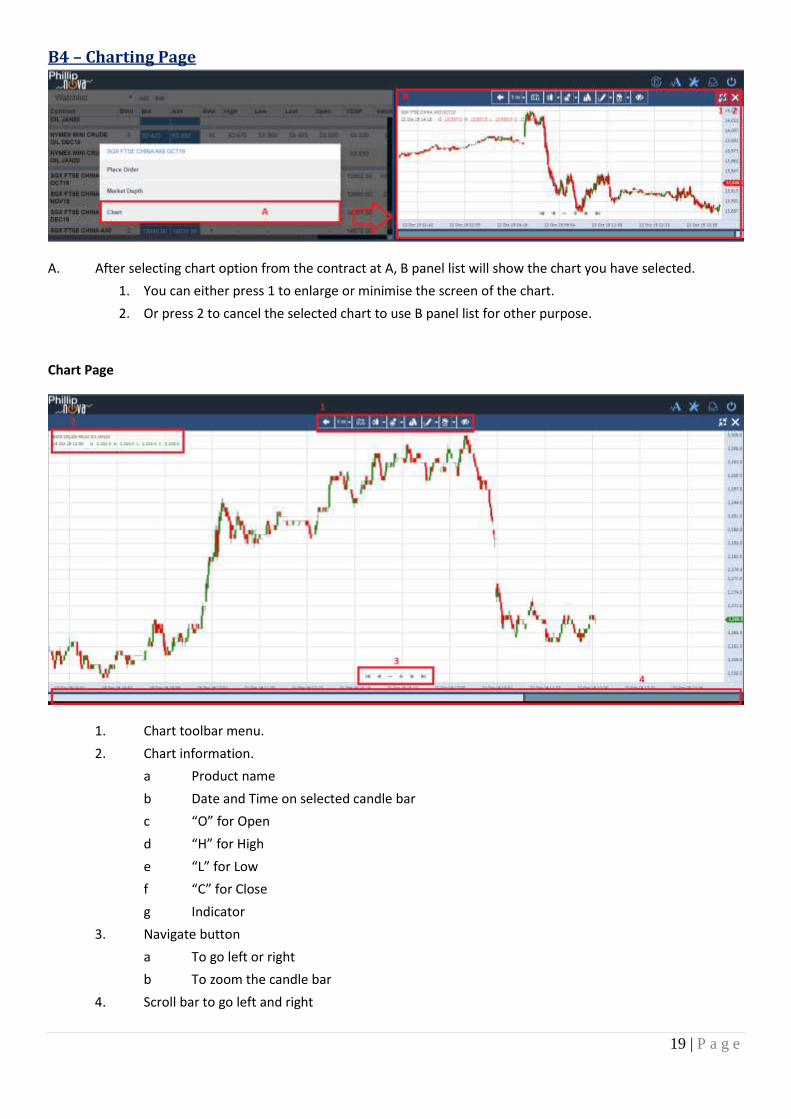
B4 – Charting Page
A. After selecting chart option from the contract at A, B panel list will show the chart you have selected.
1. You can either press 1 to enlarge or minimise the screen of the chart.
2. Or press 2 to cancel the selected chart to use B panel list for other purpose.
Chart Page
1. Chart toolbar menu.
2. Chart information.
a Product name
b Date and Time on selected candle bar
c “O” for Open
d “H” for High
e “L” for Low
f “C” for Close
g Indicator
3. Navigate button
a To go left or right
b To zoom the candle bar
4. Scroll bar to go left and right
20 | P a g e
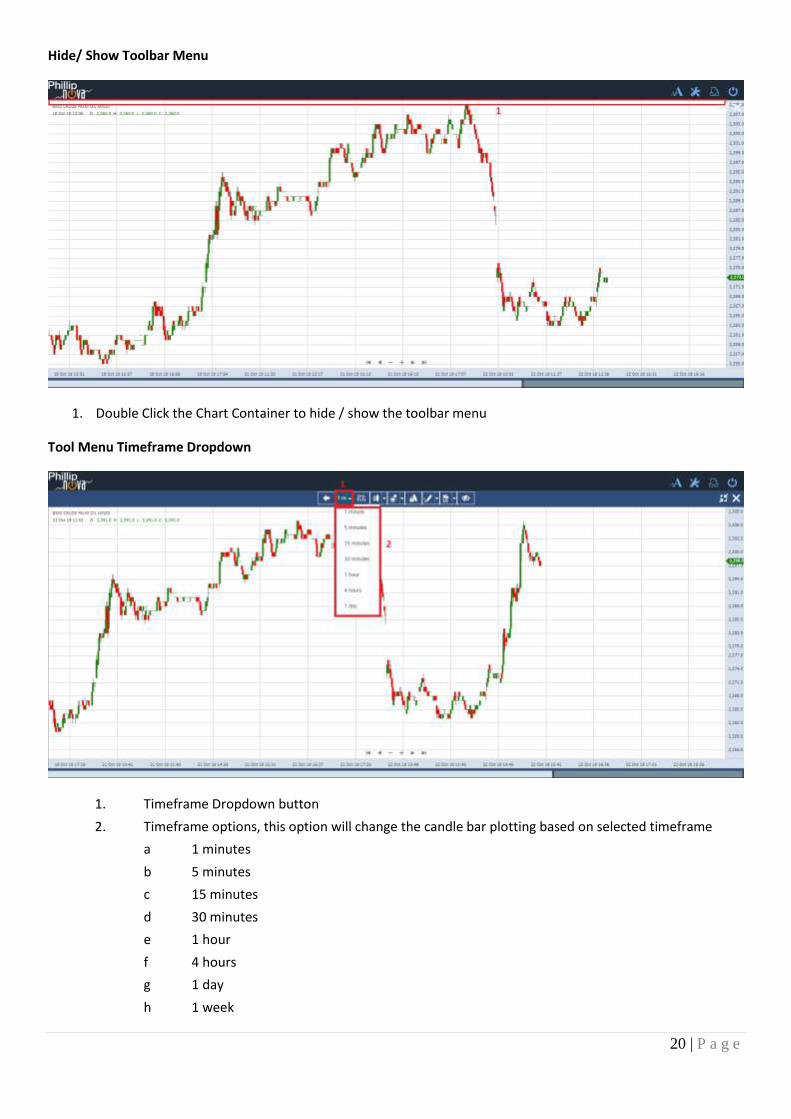
Hide/ Show Toolbar Menu
1. Double Click the Chart Container to hide / show the toolbar menu
Tool Menu Timeframe Dropdown
1. Timeframe Dropdown button
2. Timeframe options, this option will change the candle bar plotting based on selected timeframe
a 1 minutes
b 5 minutes
c 15 minutes
d 30 minutes
e 1 hour
f 4 hours
g 1 day
h 1 week
21 | P a g e
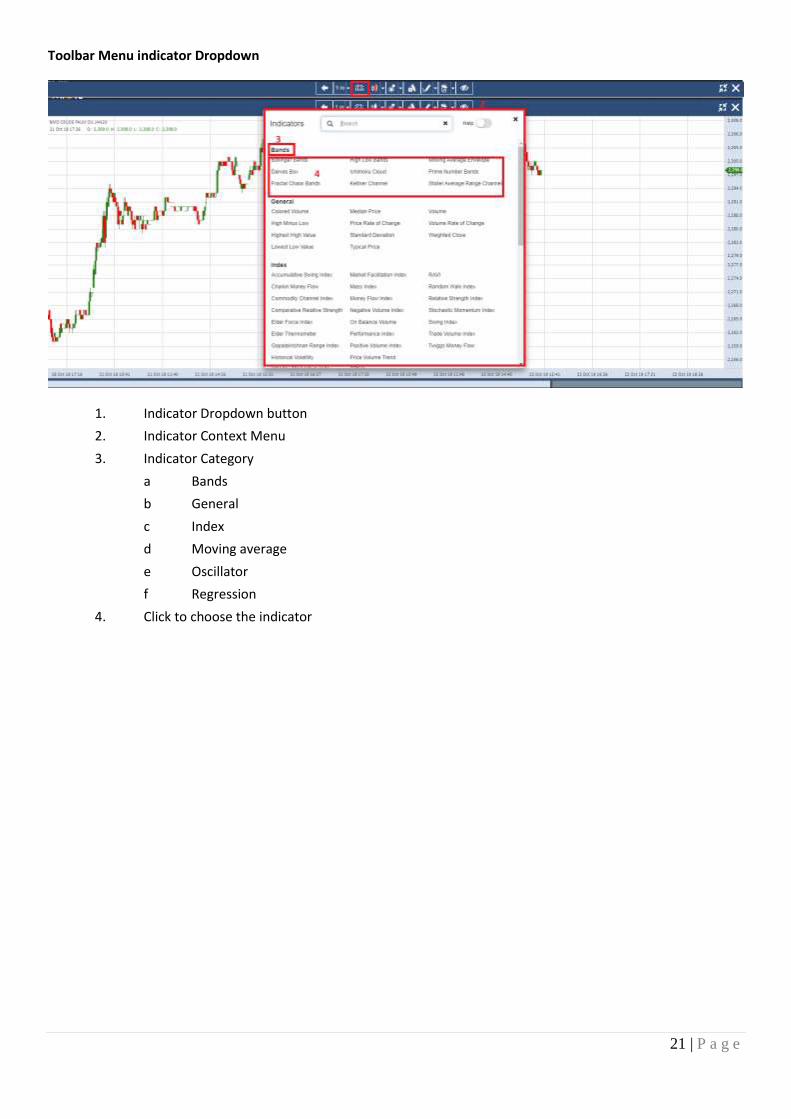
Toolbar Menu indicator Dropdown
1. Indicator Dropdown button
2. Indicator Context Menu
3. Indicator Category
a Bands
b General
c Index
d Moving average
e Oscillator
f Regression
4. Click to choose the indicator
22 | P a g e
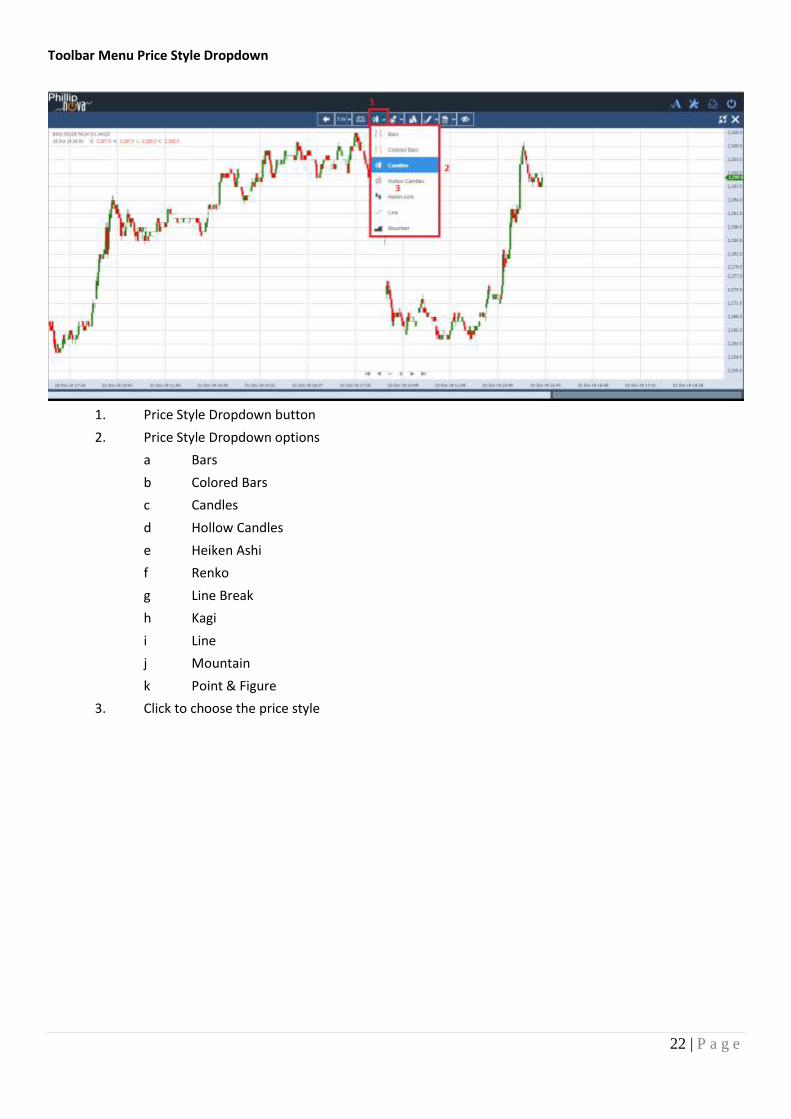
Toolbar Menu Price Style Dropdown
1. Price Style Dropdown button
2. Price Style Dropdown options
a Bars
b Colored Bars
c Candles
d Hollow Candles
e Heiken Ashi
f Renko
g Line Break
h Kagi
i Line
j Mountain
k Point & Figure
3. Click to choose the price style
23 | P a g e
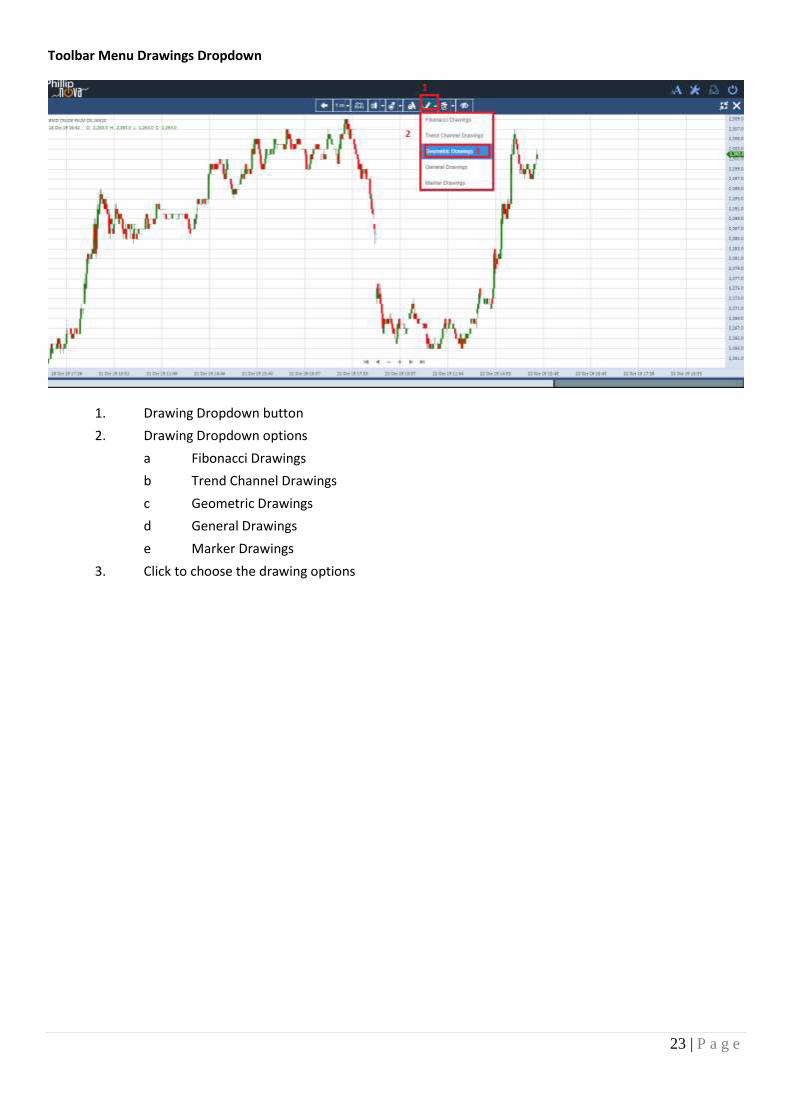
Toolbar Menu Drawings Dropdown
1. Drawing Dropdown button
2. Drawing Dropdown options
a Fibonacci Drawings
b Trend Channel Drawings
c Geometric Drawings
d General Drawings
e Marker Drawings
3. Click to choose the drawing options
24 | P a g e
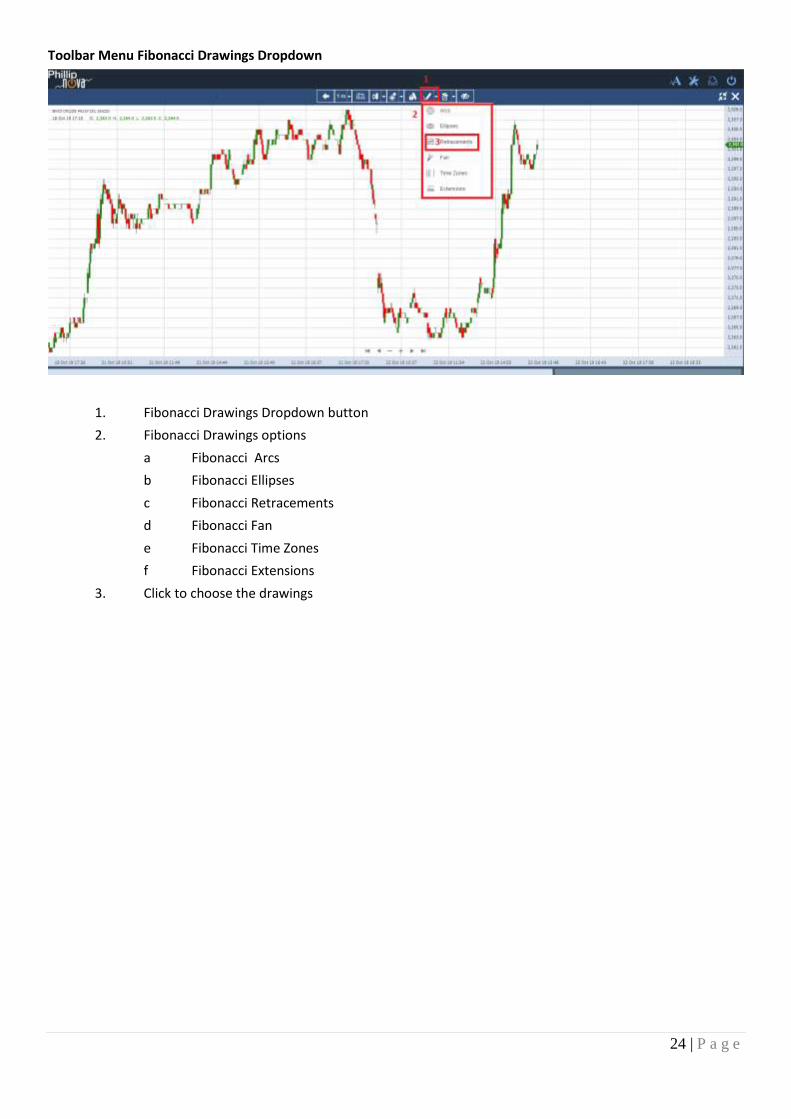
Toolbar Menu Fibonacci Drawings Dropdown
1. Fibonacci Drawings Dropdown button
2. Fibonacci Drawings options
a Fibonacci Arcs
b Fibonacci Ellipses
c Fibonacci Retracements
d Fibonacci Fan
e Fibonacci Time Zones
f Fibonacci Extensions
3. Click to choose the drawings
25 | P a g e
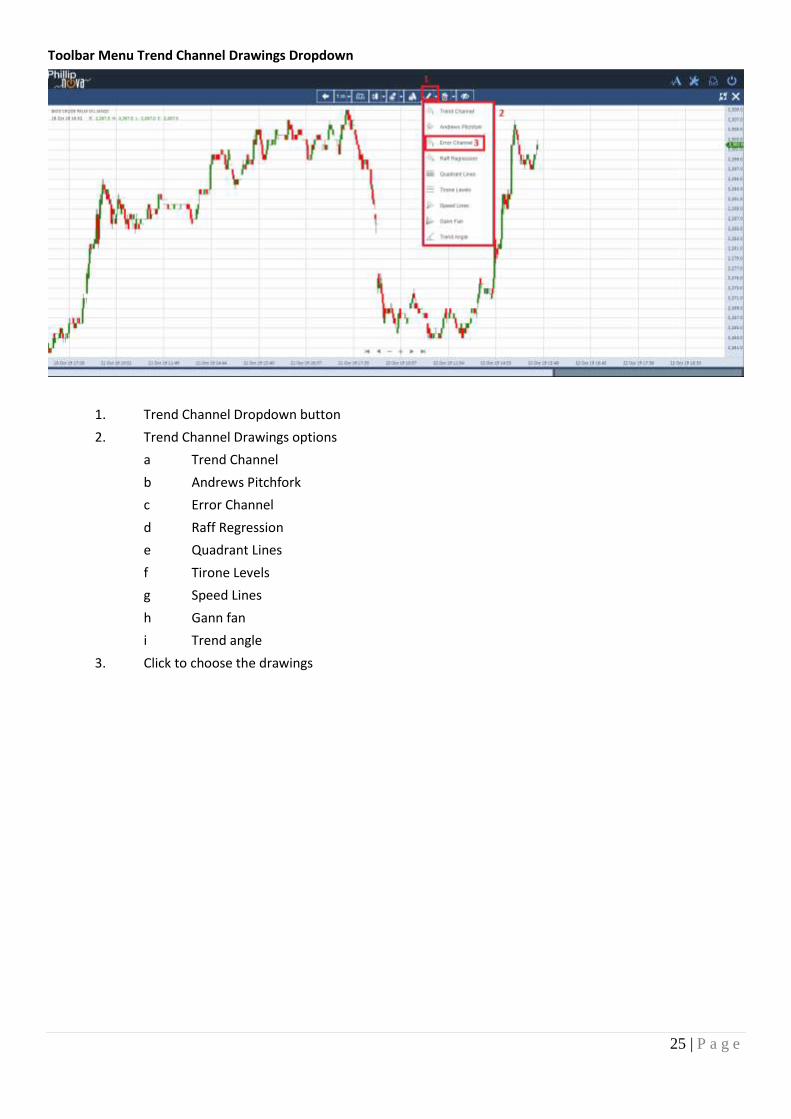
Toolbar Menu Trend Channel Drawings Dropdown
1. Trend Channel Dropdown button
2. Trend Channel Drawings options
a Trend Channel
b Andrews Pitchfork
c Error Channel
d Raff Regression
e Quadrant Lines
f Tirone Levels
g Speed Lines
h Gann fan
i Trend angle
3. Click to choose the drawings
26 | P a g e
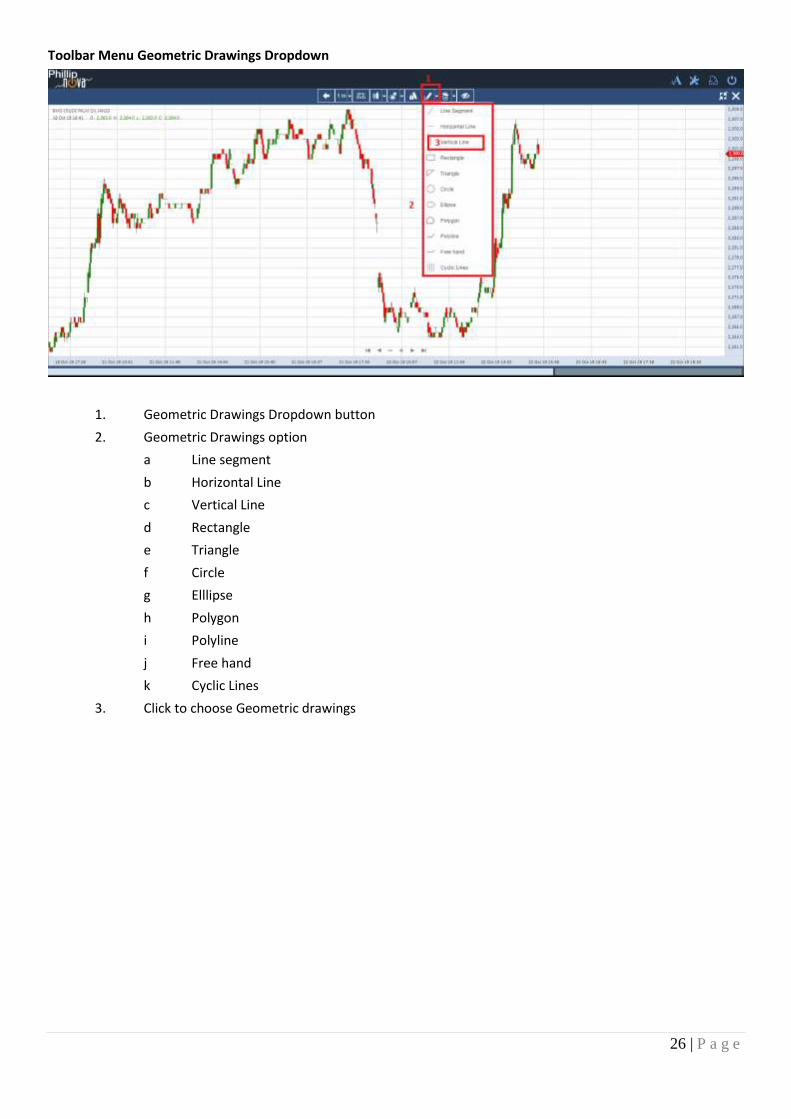
Toolbar Menu Geometric Drawings Dropdown
1. Geometric Drawings Dropdown button
2. Geometric Drawings option
a Line segment
b Horizontal Line
c Vertical Line
d Rectangle
e Triangle
f Circle
g Elllipse
h Polygon
i Polyline
j Free hand
k Cyclic Lines
3. Click to choose Geometric drawings
27 | P a g e
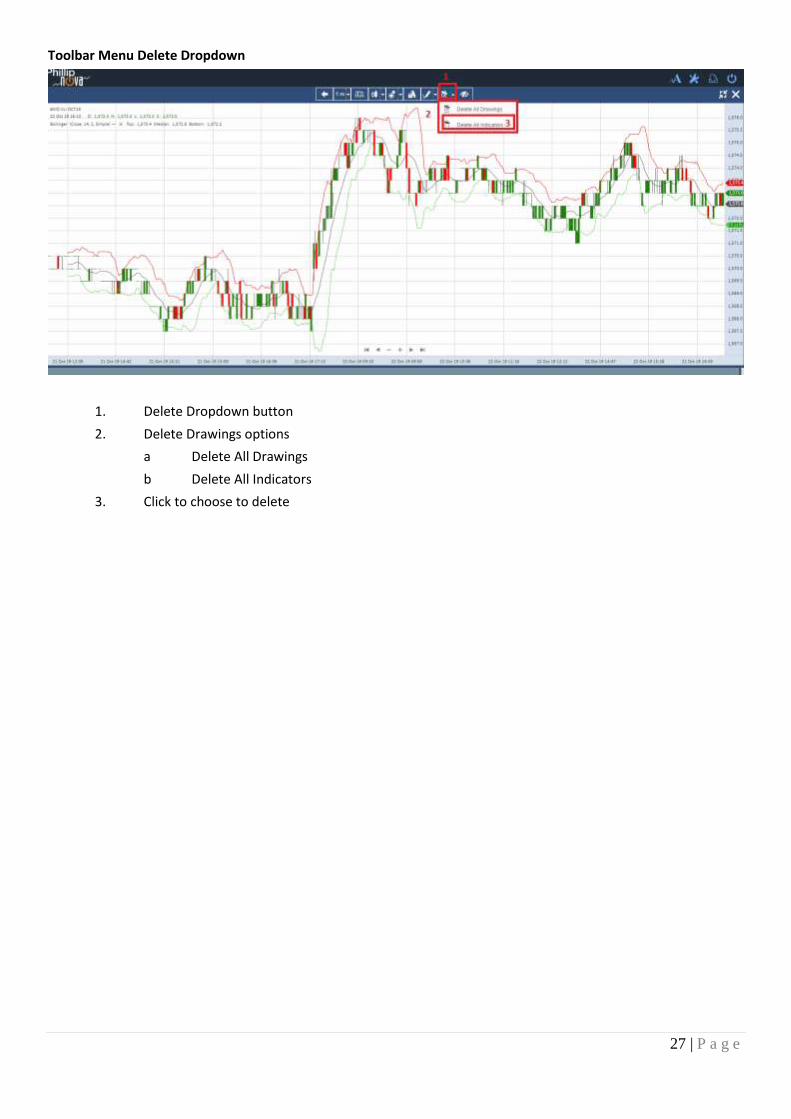
Toolbar Menu Delete Dropdown
1. Delete Dropdown button
2. Delete Drawings options
a Delete All Drawings
b Delete All Indicators
3. Click to choose to delete
28 | P a g e
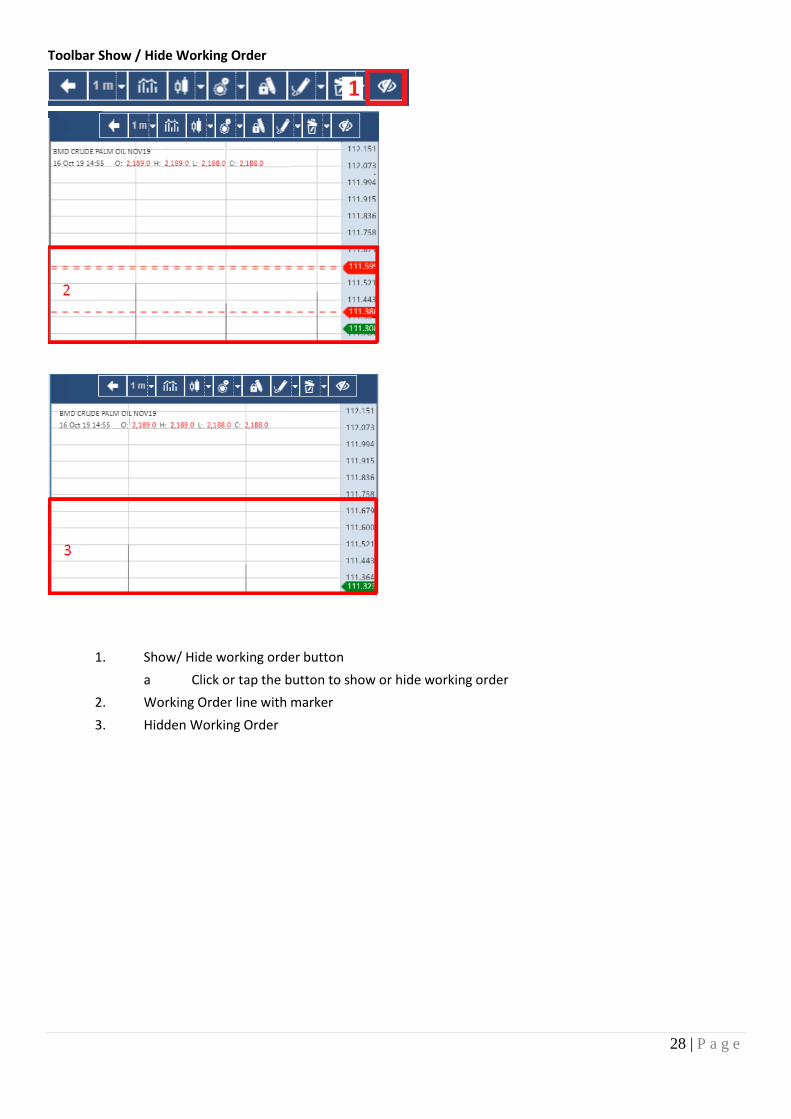
Toolbar Show / Hide Working Order
1. Show/ Hide working order button
a Click or tap the button to show or hide working order
2. Working Order line with marker
3. Hidden Working Order
29 | P a g e
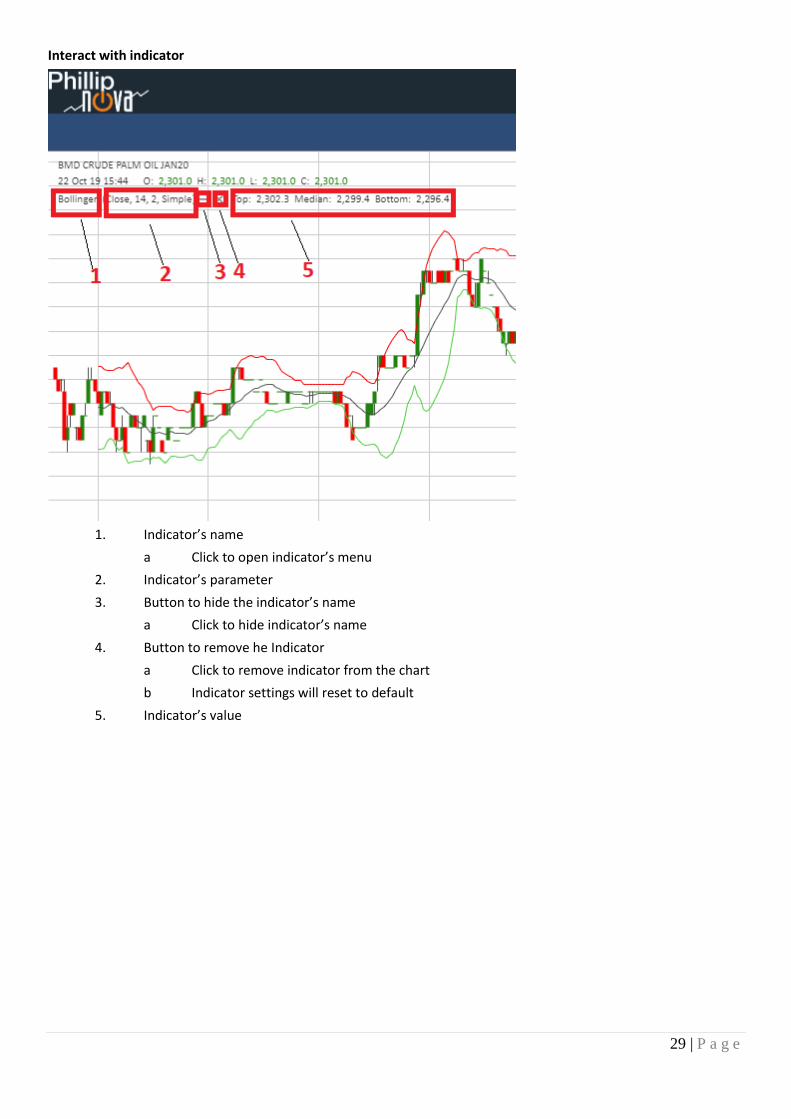
Interact with indicator
1. Indicator’s name
a Click to open indicator’s menu
2. Indicator’s parameter
3. Button to hide the indicator’s name
a Click to hide indicator’s name
4. Button to remove he Indicator
a Click to remove indicator from the chart
b Indicator settings will reset to default
5. Indicator’s value
30 | P a g e
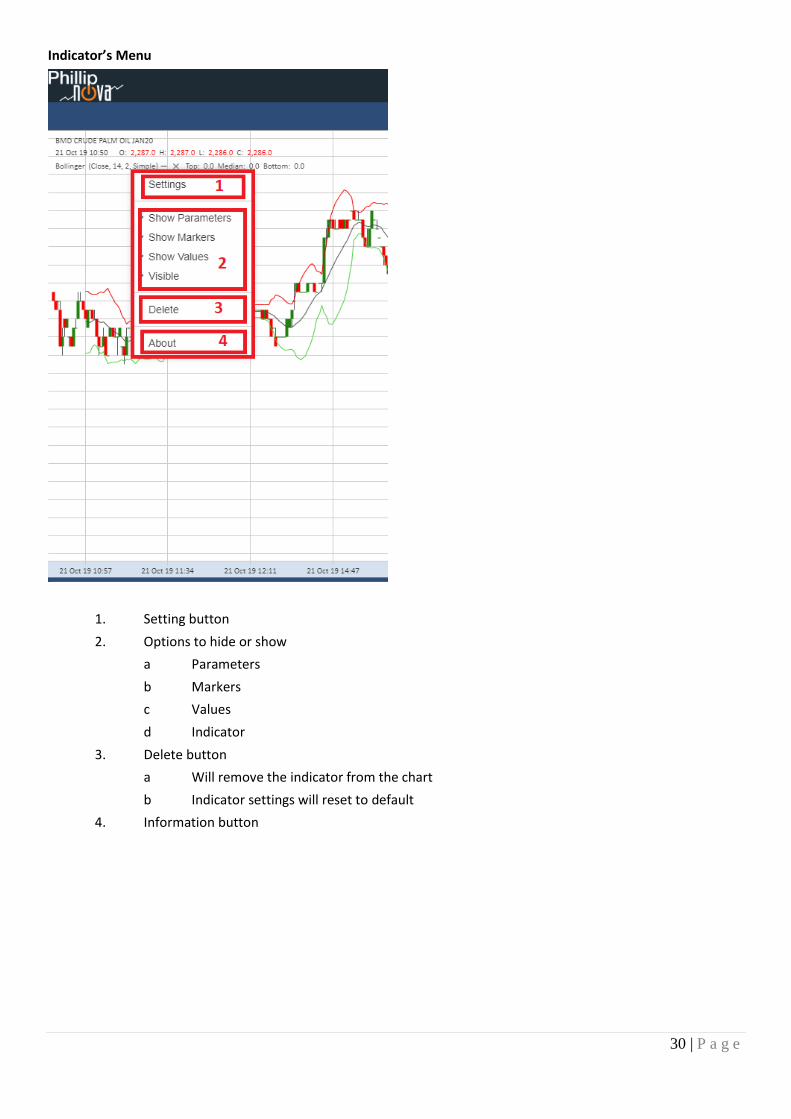
Indicator’s Menu
1. Setting button
2. Options to hide or show
a Parameters
b Markers
c Values
d Indicator
3. Delete button
a Will remove the indicator from the chart
b Indicator settings will reset to default
4. Information button
31 | P a g e
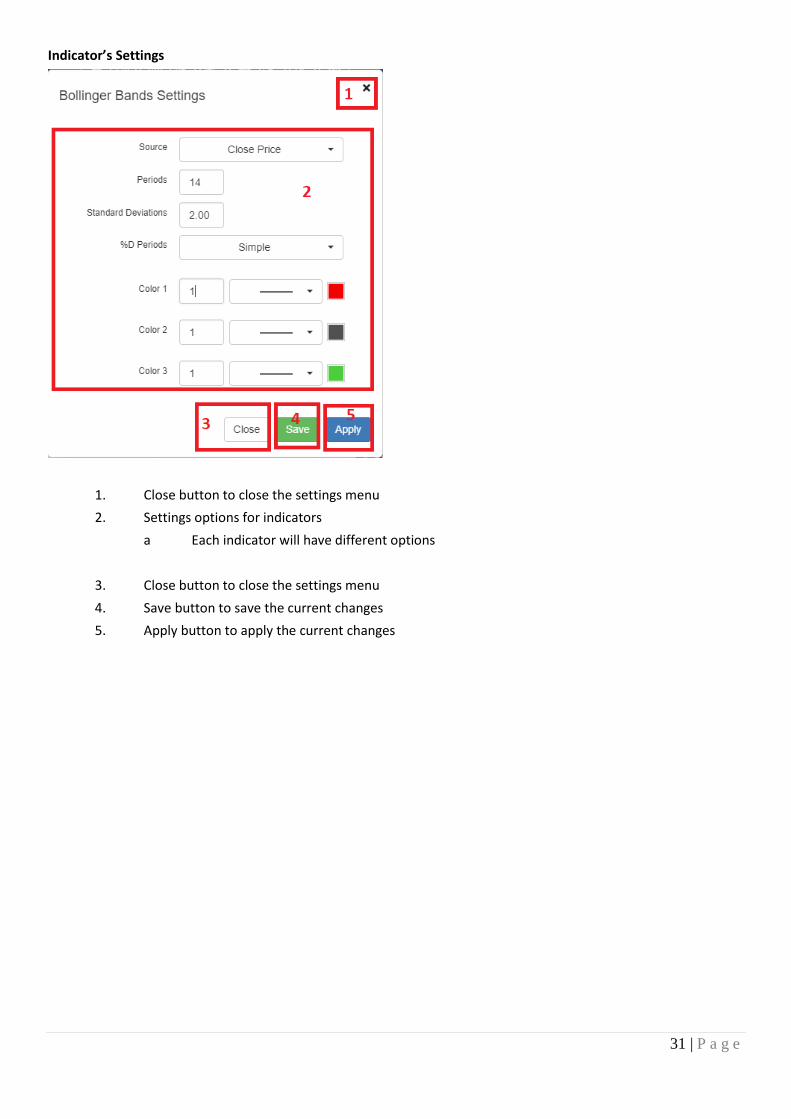
Indicator’s Settings
1. Close button to close the settings menu
2. Settings options for indicators
a Each indicator will have different options
3. Close button to close the settings menu
4. Save button to save the current changes
5. Apply button to apply the current changes
32 | P a g e
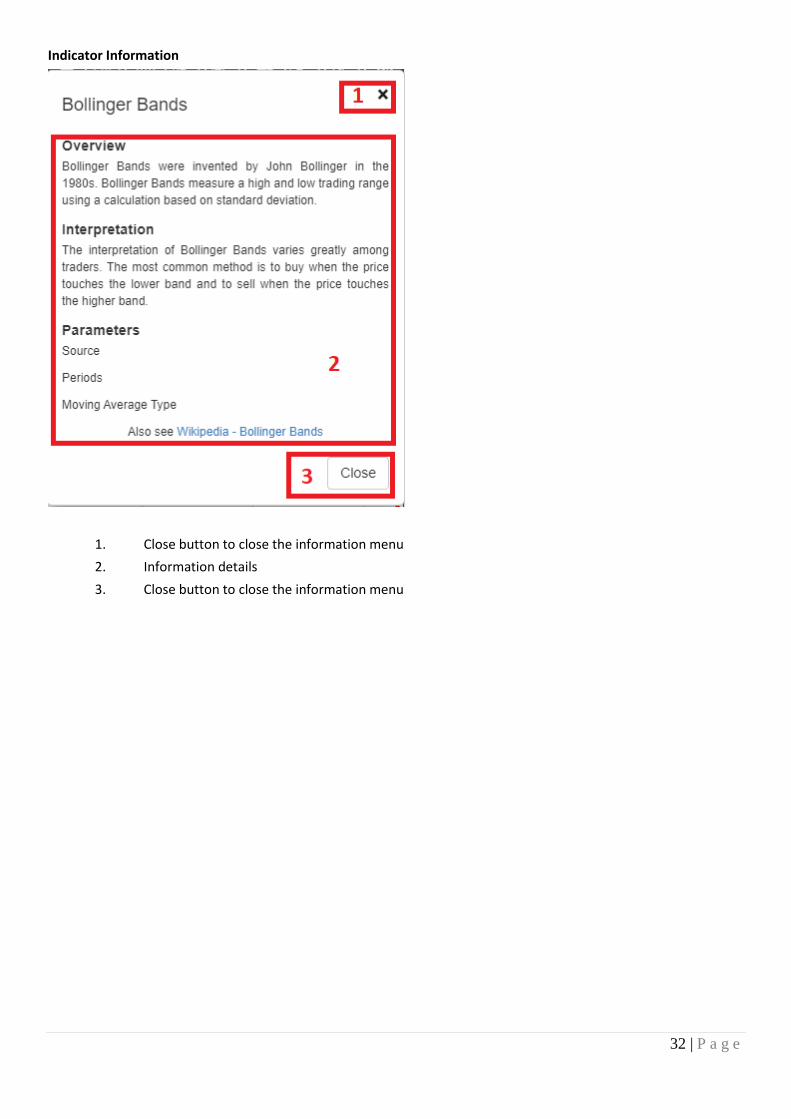
Indicator Information
1. Close button to close the information menu
2. Information details
3. Close button to close the information menu
33 | P a g e
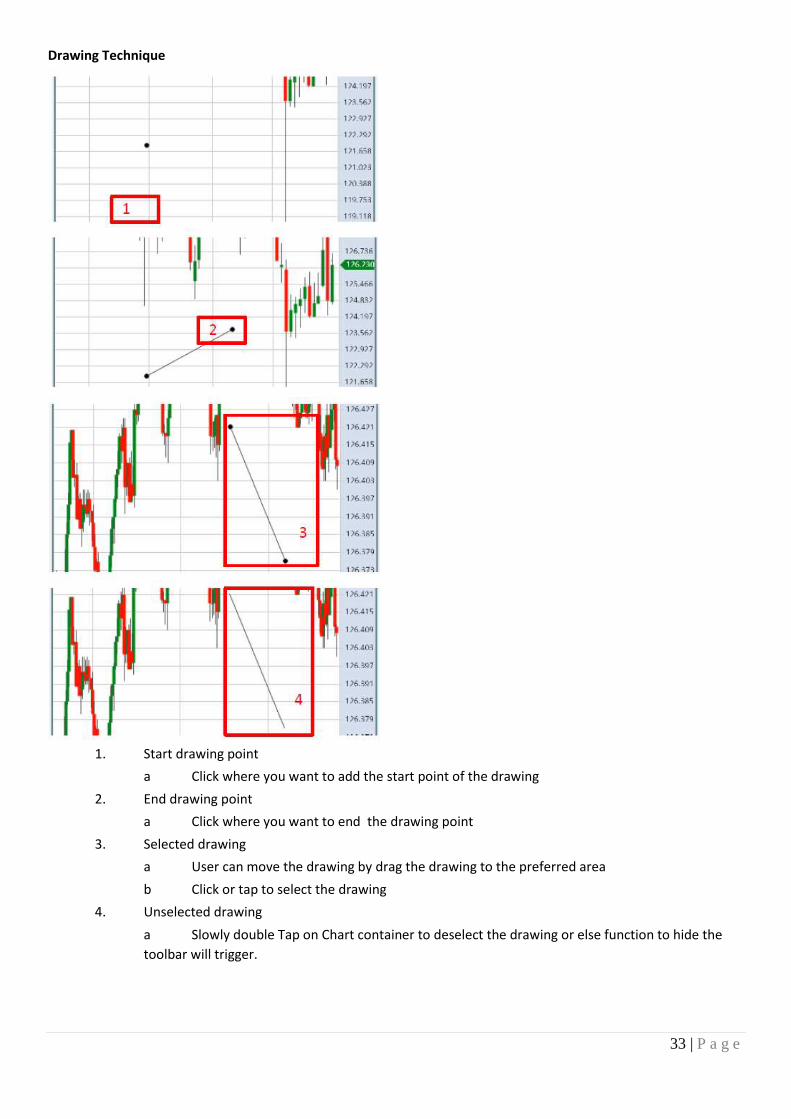
Drawing Technique
1. Start drawing point
a Click where you want to add the start point of the drawing
2. End drawing point
a Click where you want to end the drawing point
3. Selected drawing
a User can move the drawing by drag the drawing to the preferred area
b Click or tap to select the drawing
4. Unselected drawing
a Slowly double Tap on Chart container to deselect the drawing or else function to hide the
toolbar will trigger.
34 | P a g e
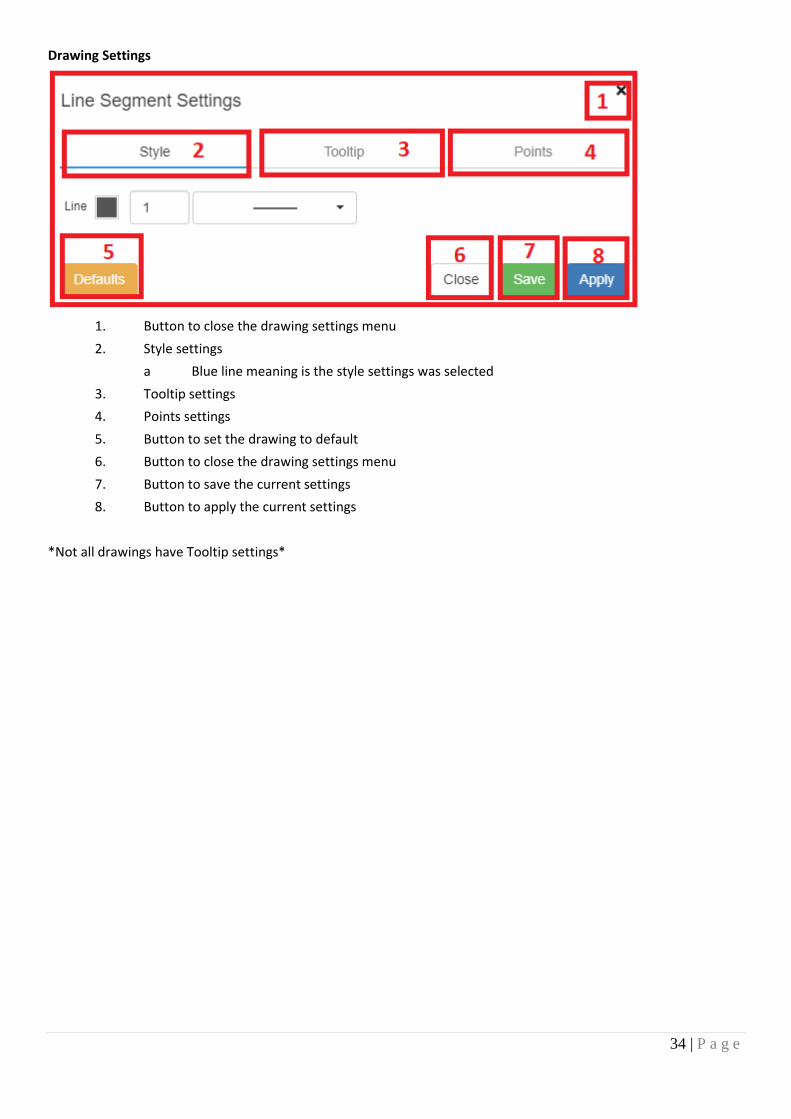
Drawing Settings
1. Button to close the drawing settings menu
2. Style settings
a Blue line meaning is the style settings was selected
3. Tooltip settings
4. Points settings
5. Button to set the drawing to default
6. Button to close the drawing settings menu
7. Button to save the current settings
8. Button to apply the current settings
*Not all drawings have Tooltip settings*
35 | P a g e
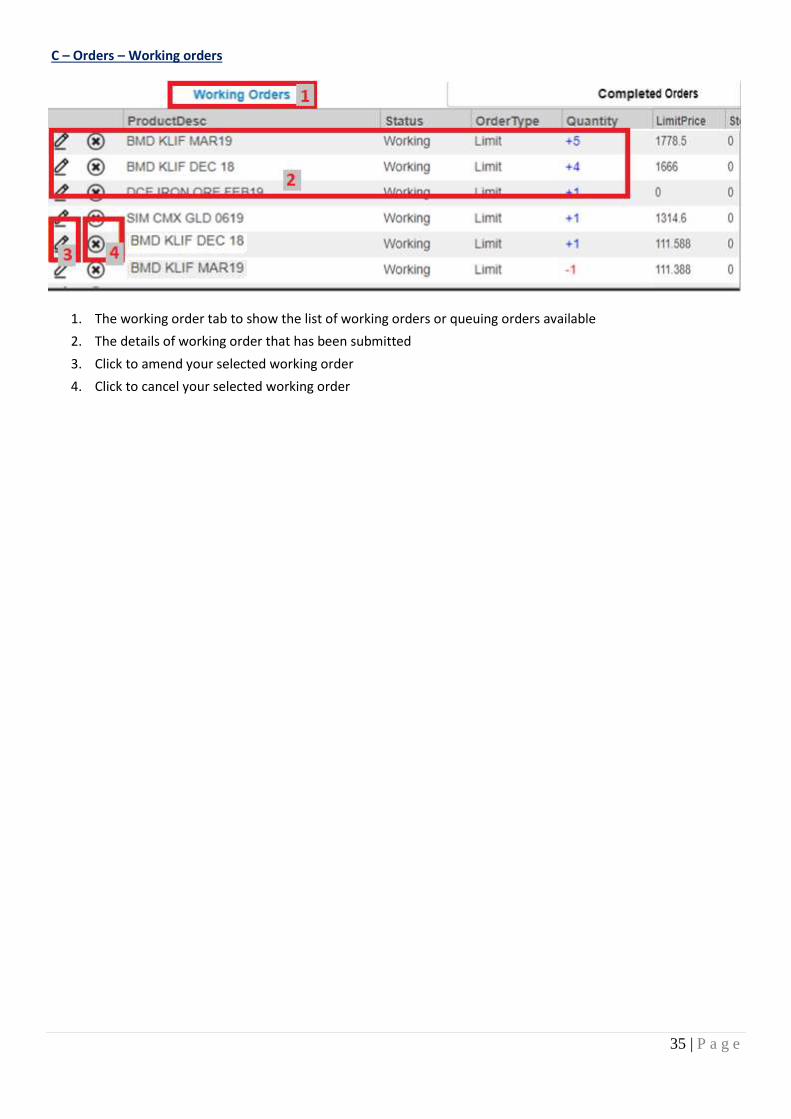
C – Orders – Working orders
1. The working order tab to show the list of working orders or queuing orders available
2. The details of working order that has been submitted
3. Click to amend your selected working order
4. Click to cancel your selected working order
36 | P a g e
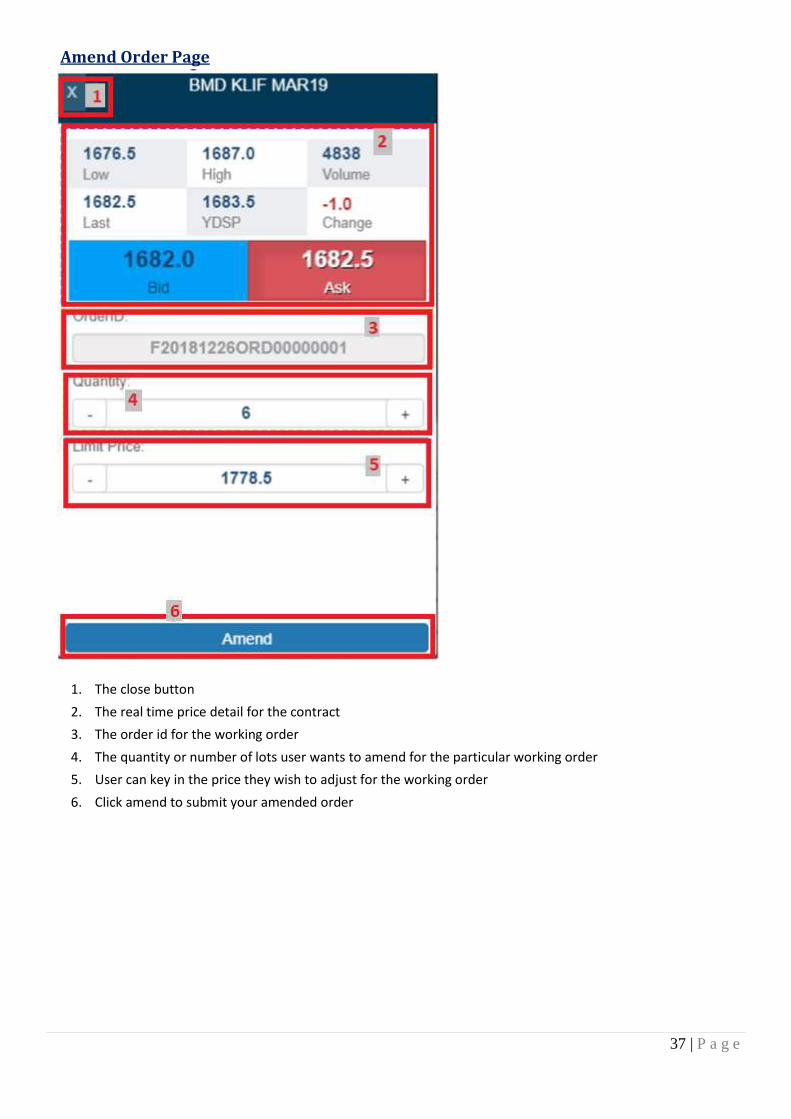
C1 – Amend Order Page
* After clicks amend from Orders, Amend page display as window mode.
37 | P a g e
Amend Order Page
1. The close button
2. The real time price detail for the contract
3. The order id for the working order
4. The quantity or number of lots user wants to amend for the particular working order
5. User can key in the price they wish to adjust for the working order
6. Click amend to submit your amended order
38 | P a g e
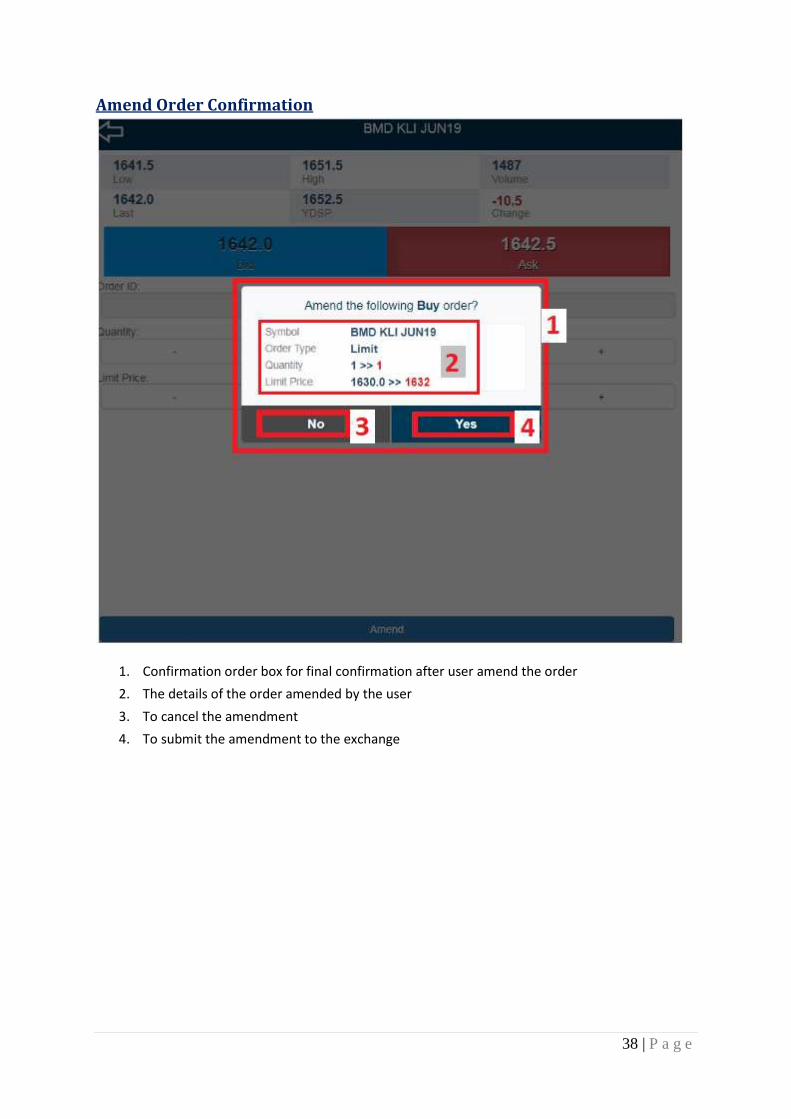
Amend Order Confirmation
1. Confirmation order box for final confirmation after user amend the order
2. The details of the order amended by the user
3. To cancel the amendment
4. To submit the amendment to the exchange
39 | P a g e
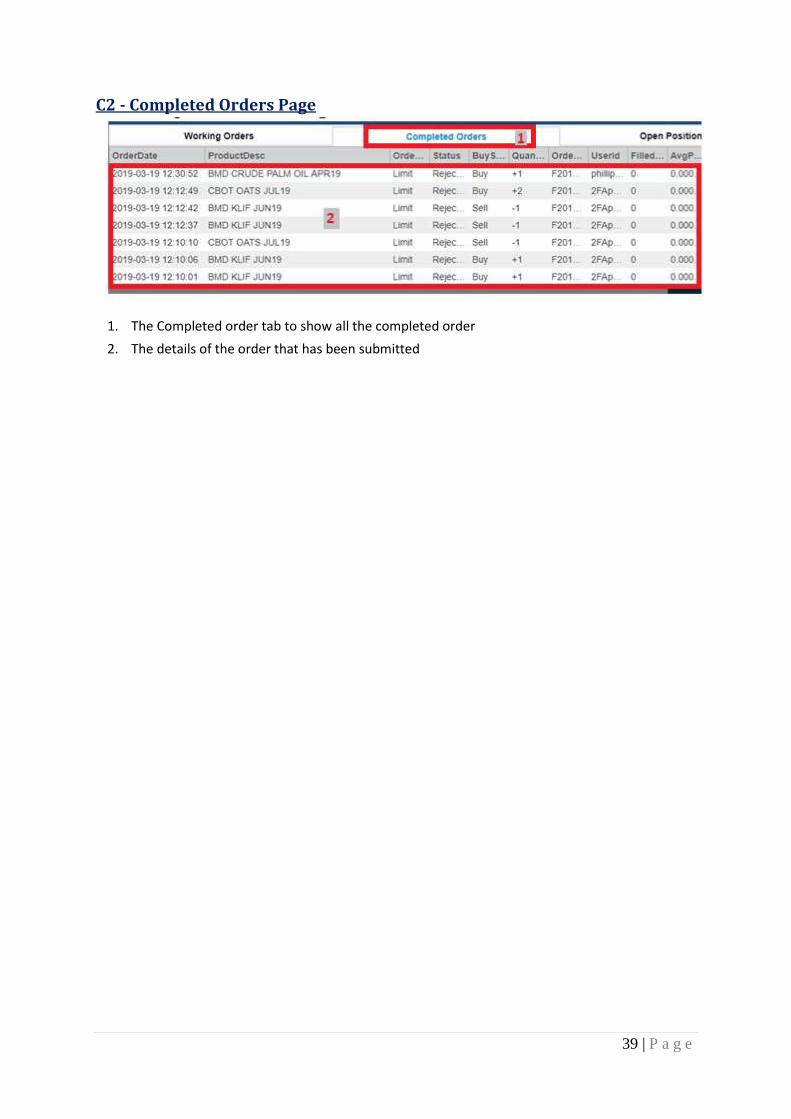
C2 - Completed Orders Page
1. The Completed order tab to show all the completed order
2. The details of the order that has been submitted
40 | P a g e
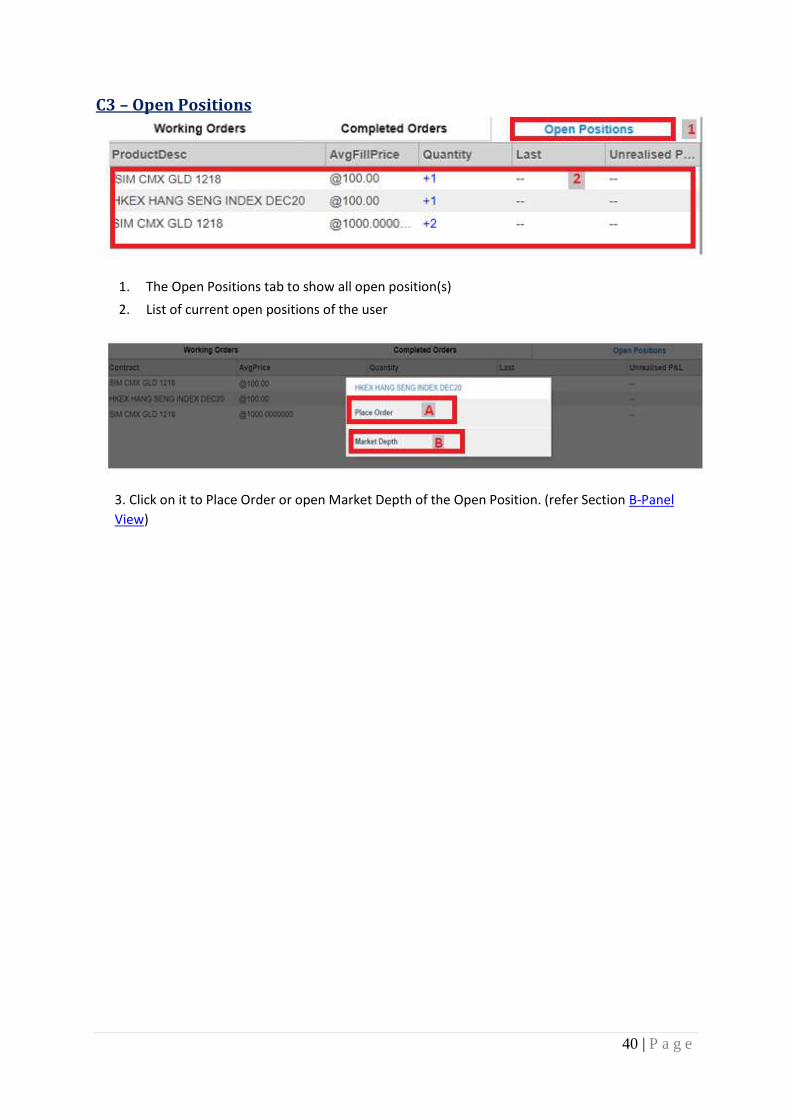
C3 – Open Positions
1. The Open Positions tab to show all open position(s)
2. List of current open positions of the user
3. Click on it to Place Order or open Market Depth of the Open Position. (refer Section B-Panel
View)
41 | P a g e
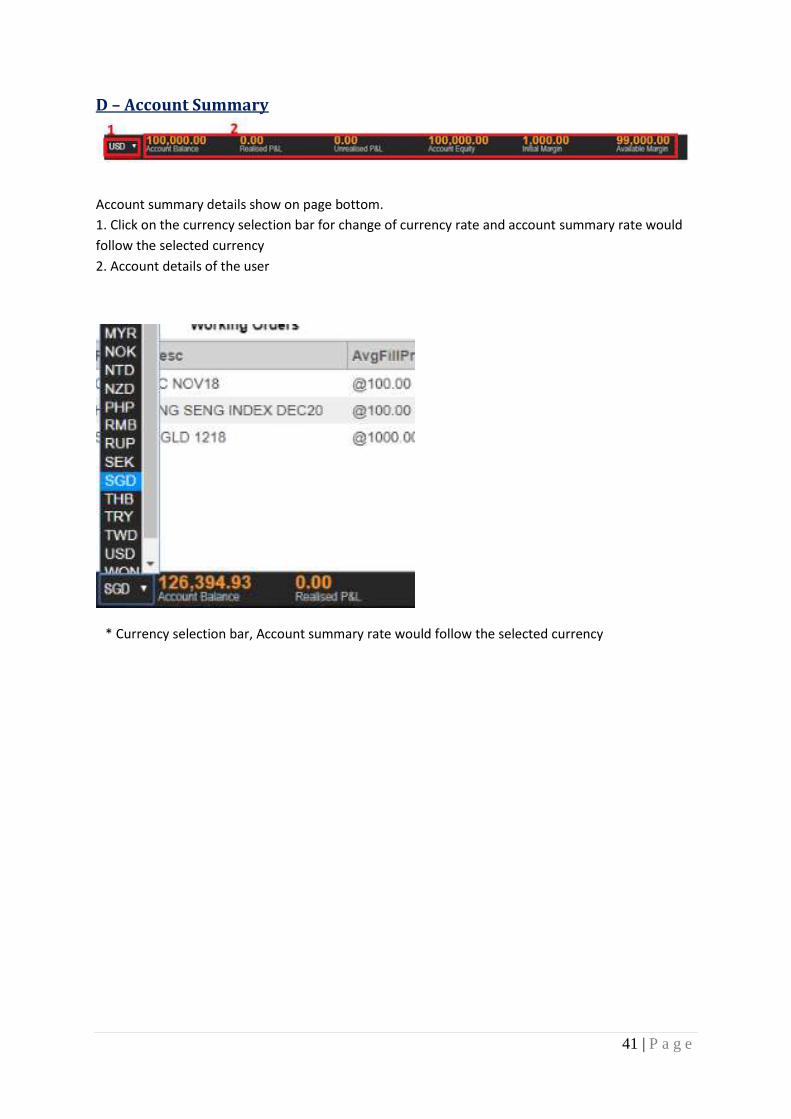
D – Account Summary
Account summary details show on page bottom.
1. Click on the currency selection bar for change of currency rate and account summary rate would
follow the selected currency
2. Account details of the user
* Currency selection bar, Account summary rate would follow the selected currency

42 | P a g e
E – Settings
In Main page left slider
1. Font size button for your platform *
2. Settings button for notification and language selection *
3. Click to view latest announcement
4. Logout button *
*More description on below
43 | P a g e
E1-Settings Button
After clicks Settings button:
1. Notification Settings for Phillip Nova.
2. Language Setting. User can choose their preferred language for the system.
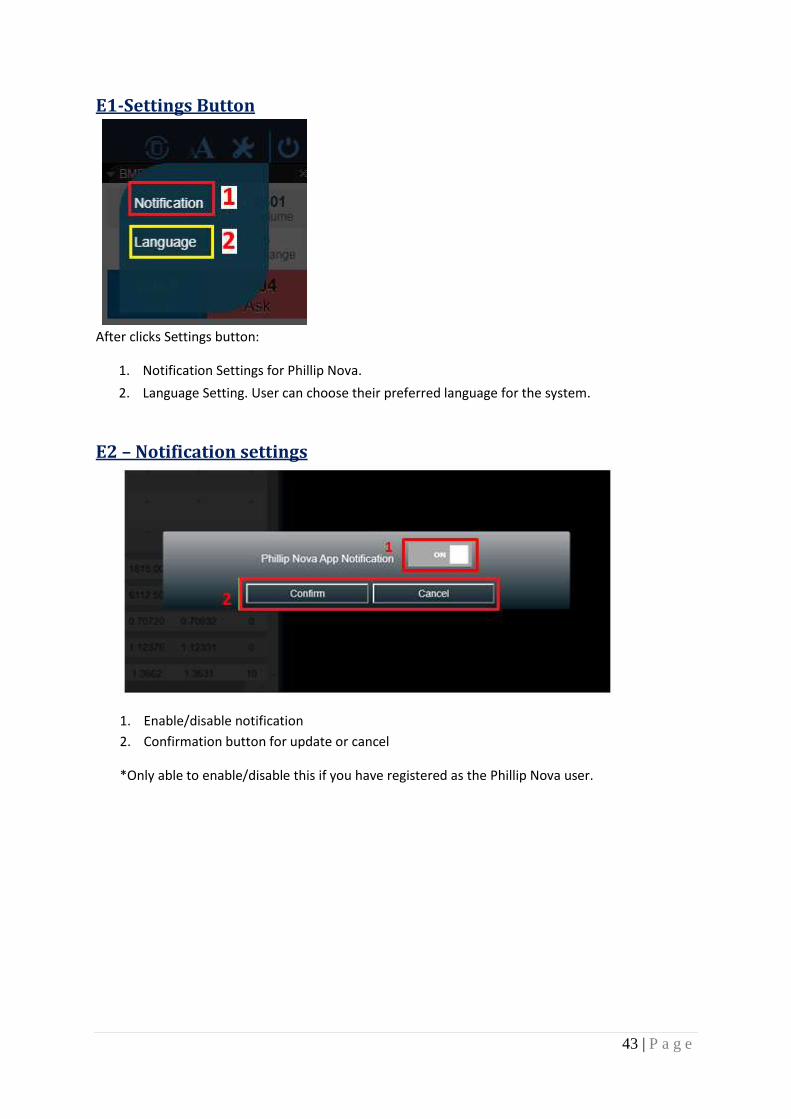
E2 – Notification settings
1. Enable/disable notification
2. Confirmation button for update or cancel
*Only able to enable/disable this if you have registered as the Phillip Nova user.

44 | P a g e
E3 – Language
1. Choose a preferred language.
2. Click confirm to save the preferred language.
E4 - Logout
* After clicks Logout button from slider bar
45 | P a g e
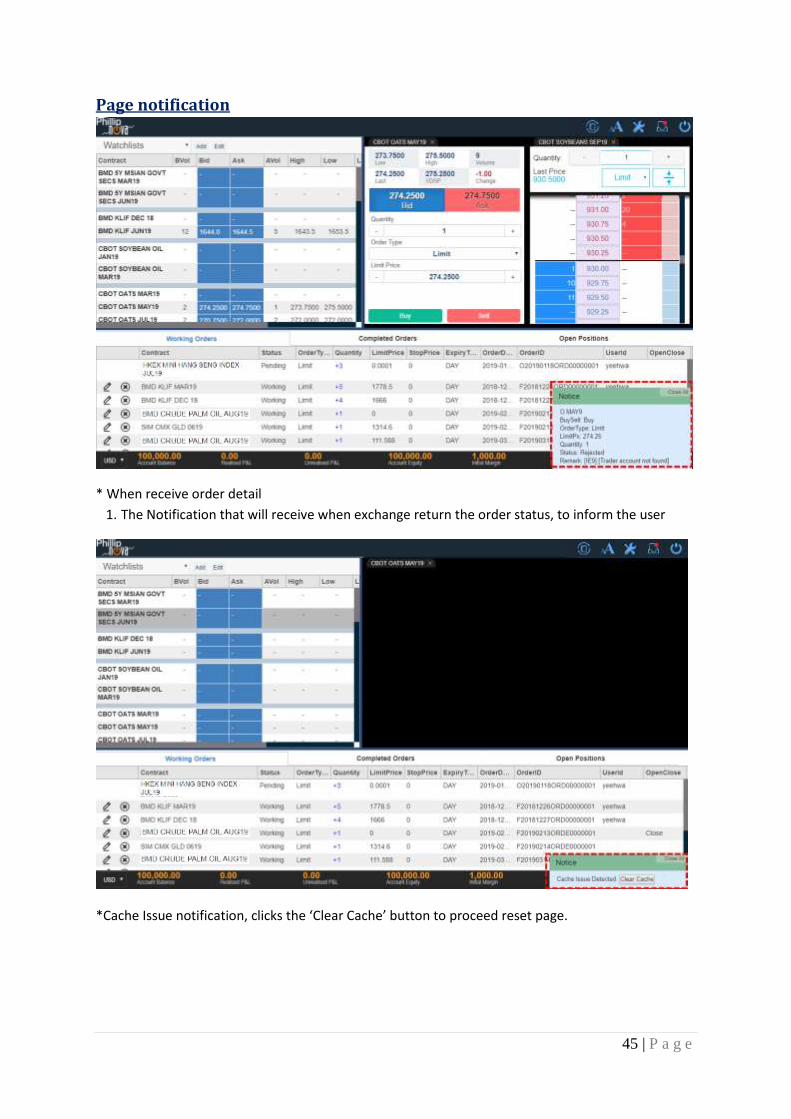
Page notification
* When receive order detail
1. The Notification that will receive when exchange return the order status, to inform the user
*Cache Issue notification, clicks the ‘Clear Cache’ button to proceed reset page.
46 | P a g e
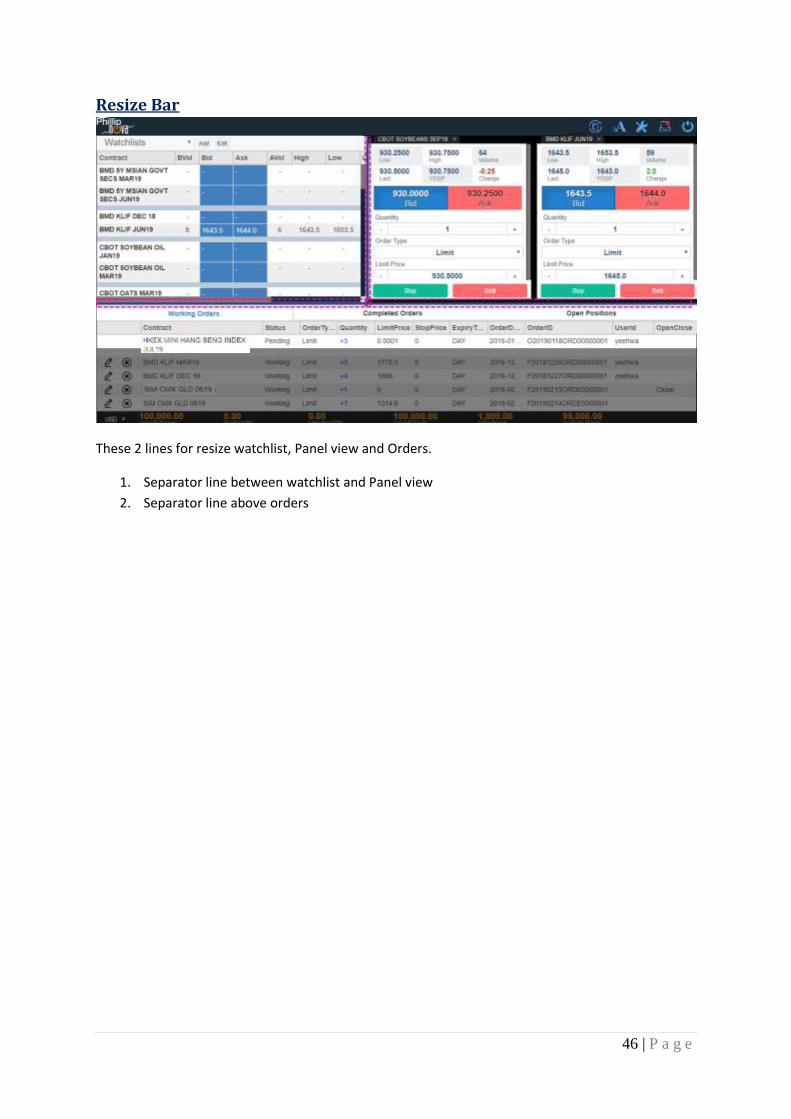
Resize Bar
These 2 lines for resize watchlist, Panel view and Orders.
1. Separator line between watchlist and Panel view
2. Separator line above orders