Embed Size (px)
Citation preview
Copyright 2015, Speech Recognition Solutions, LLC. All rights reserved.
www.SpeechRecSolutions.com
866-778-0524
Philips SpeechMike Premium: User Guide
Introduction
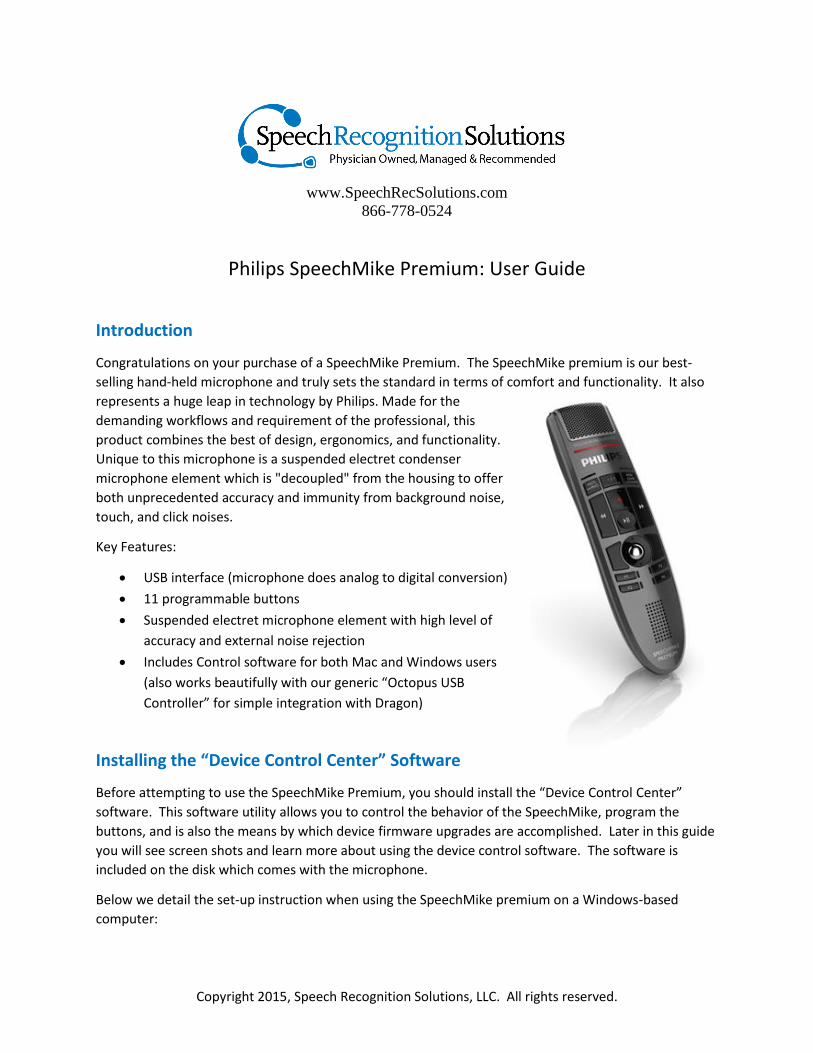
Congratulations on your purchase of a SpeechMike Premium. The SpeechMike premium is our best-
selling hand-held microphone and truly sets the standard in terms of comfort and functionality. It also
represents a huge leap in technology by Philips. Made for the
demanding workflows and requirement of the professional, this
product combines the best of design, ergonomics, and functionality.
Unique to this microphone is a suspended electret condenser
microphone element which is "decoupled" from the housing to offer
both unprecedented accuracy and immunity from background noise,
touch, and click noises.
Key Features:
USB interface (microphone does analog to digital conversion)
11 programmable buttons
Suspended electret microphone element with high level of
accuracy and external noise rejection
Includes Control software for both Mac and Windows users
(also works beautifully with our generic “Octopus USB
Controller” for simple integration with Dragon)
Installing the “Device Control Center” Software
Before attempting to use the SpeechMike Premium, you should install the “Device Control Center”
software. This software utility allows you to control the behavior of the SpeechMike, program the
buttons, and is also the means by which device firmware upgrades are accomplished. Later in this guide
you will see screen shots and learn more about using the device control software. The software is
included on the disk which comes with the microphone.
Below we detail the set-up instruction when using the SpeechMike premium on a Windows-based
computer:
Copyright 2015, Speech Recognition Solutions, LLC. All rights reserved.
1. Plug the USB end into any available USB port on your computer. If you are using a desktop
computer, be sure to use the rear USB ports. We recommend against use a USB splitter or
powered hub. Once inserted, drivers will be automatically installed by your operating system.
2. Insert the Philips CD included with the microphone into the CD/DVD drive. If the Philips Device
Control Center install doesn’t appear, browse the CD and launch the installer by double clicking
on the icon called PhilipsDeviceControlCenter.
3. Follow all remaining installation steps (all very intuitive).
Completing Initial Set-up with Dragon
If you are new to Dragon and using the SpeechMike Premium as your first microphone when setting up
your first user profile, there is nothing for you to do but select “USB microphone” as your sound source
when creating your user profile and then “SpeechMike Premium” in the next step. You can skip the rest
of this section.
For those switching from another microphone to the SpeechMike Premium, it is essential that you
follow a few keys steps to assure that Dragon knows you have switched to the SpeechMike Premium
and uses it as the preferred sound source. There are three ways you can integrate this microphone and
we recommend the first of these three methods:
1. Add the SpeechMike Premium as a new sound “source” to your existing Dragon user profile
(recommended) The advantage of this method is that it creates a separate version of your old
profile, based on the sound characteristic of the new microphone, but with all of the
personalized words and commands shared between the two (or more) versions of your profile.
2. Run the audio set-up wizard and, in effect, simply substitute the SpeechMike premium for your
old microphone
3. Create a new user profile based on the SpeechMike
The manner in which any of the above methods is accomplished depends upon the version of Dragon
you are using. Below we show the method employed in Dragon 13 and 12 when setting up the
SpeechMike Premium as a new sound source on your existing profile.
Add the SpeechMike Premium as a new “Source” to an Existing User Profile
Dragon 13 Dragon 12
1. Go to Profile > Manage Dictation
Sources
2. From the Manage Dictation Sources
window select your new audio source
(SpeechMike Premium)
3. Click “Add New Dictation Source”
4. Follow subsequent steps
1. Go to the Profile menu and select “Add
dictation source to the current User
Profile …”
2. On the next screen select the
appropriate type of sound source from
the drop-down menu
3. On the next screen select the actual
sound source
4. Follow all subsequent instructions
Copyright 2015, Speech Recognition Solutions, LLC. All rights reserved.
Button Programming: Two Options
The Philips SpeechMike Premium (and other Philips mics) can be programmed to control functions
within Dragon and other applications using two methods: 1) using the Philips “Device Control” software
that comes with the microphone and 2) using the SpeechWare Octopus USB Controller software.
Philips Device Control software: The advantage of the Philips Device Control software is that it
comes with your hardware and is available at no additional cost. The disadvantage
is that it is fairly cumbersome, unintuitive, and somewhat slower in controlling
Dragon functions. Even if you decide to use Octopus USB Controller to program
your SpeechMike, you’ll want to launch the Device Control software once in a
while to upgrade the firmware or make changes in the device configuration.
Octopus USB Controller (OUC): OUC costs $69.99 but is dramatically simpler and intuitive to
use. We have found that button release functions – such as turning the
microphone off with a button release – work with significantly less delay
using OUC. This is our preferred method of controlling the SpeechMike. Be
aware that you can download a fully functioning version of OUC and use it 5
times before needing to purchase an activation code. The only downside of
OUC is that it does not provide the means to upgrade the firmware on the
SpeechMike Premium. For this you will need to use the Device Control
Software.
This guide focuses entirely on using the Philips Device Control software. For more information on
Octopus USB Controller, please visit: http://store.speechrecsolutions.com/octopus-usb-controller-
p164.aspx To download a fully functioning version of Octopus USB Controller to try, please visit:
http://speechware.be/downloads/OctopusUSBController1_42InstallerSpeechRecSolutions.zip
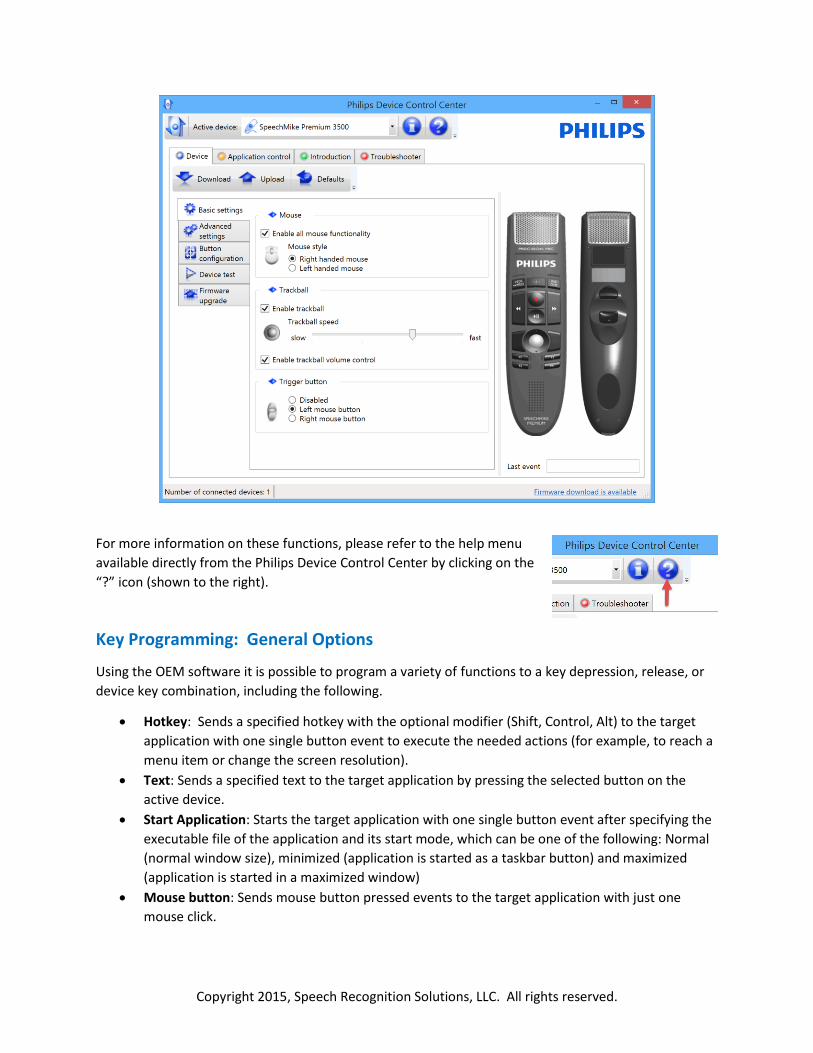
Customizing SpeechMike Keys and Settings
A variety of basic and advanced features of the SpeechMike Premium can be programmed using the
Device Control Center. Once opened you will see that general properties of the device are programmed
from the “Device” tab and that you will have both Basic and Advanced options which can be set. For
more information on these functions, please refer to the help menu available directly from the Philips
Device Control Center by clicking on the “?” icon (shown to the right).
The key steps in programming the device are as simple as this:
1. Alter the parameter you wish to change on either the Basic or Advanced tab
2. Click on the “Upload” button to transfer these changes to the device
Copyright 2015, Speech Recognition Solutions, LLC. All rights reserved.
For more information on these functions, please refer to the help menu
available directly from the Philips Device Control Center by clicking on the
“?” icon (shown to the right).
Key Programming: General Options
Using the OEM software it is possible to program a variety of functions to a key depression, release, or
device key combination, including the following.
Hotkey: Sends a specified hotkey with the optional modifier (Shift, Control, Alt) to the target
application with one single button event to execute the needed actions (for example, to reach a
menu item or change the screen resolution).
Text: Sends a specified text to the target application by pressing the selected button on the
active device.
Start Application: Starts the target application with one single button event after specifying the
executable file of the application and its start mode, which can be one of the following: Normal
(normal window size), minimized (application is started as a taskbar button) and maximized
(application is started in a maximized window)
Mouse button: Sends mouse button pressed events to the target application with just one
mouse click.
Copyright 2015, Speech Recognition Solutions, LLC. All rights reserved.
Dragon NaturallySpeaking command: Executes the selected Dragon NaturallySpeaking
command by clicking the specified button on the active device. Here you are also enabled to
specify your own commands by selecting User command and entering the command into the
text field.
Delay: Suspends the execution of a command for the specified time. Note: The specified time
must be between 10 and 30000 milliseconds.
In addition to each of the individual options listed above, it is possible to assign a series of steps into a
script which includes several steps in sequence and which is initiated with a single button push.
Regardless of your intended use, the key steps in programming a button on the SpeechMike are these:
1. From the Application Control tab, select the Target Application Profile (usually “default ..”) 2. In the list of buttons, navigate as needed to the button you wish to program 3. Click on the gray box to the right of either the pressed or released section for your desired
button – the Edit Operation window will appear 4. Delete any unwanted behavior by selecting it and clicking on the “delete” button 5. Click on the “Add” button to assign a new behavior to the button event 6. Select the desired behavior 7. If necessary add any specifics 8. Upload the settings to the active device by clicking the Upload menu item.
Programming Keys for Interaction with Dragon NaturallySpeaking
Specific Dragon-related functions, hot-keys or commands which can be programmed to any button are
listed below. When “User Command” is selected you are given the subsequent option of adding the text
used to verbally initiate your command.
Microphone on
Toggle Microphone
Microphone off and stop
Play from cursor
Playback toggle
Create new command
New word
Train word
Move cursor backward
Move cursor forward
Select words backward
Select words forward
Show collection menu or dialog
Show dictation box
Capitalize that
Compound words
Transcribe recording
Transfer
Tab forward
Next field
Previous field
Clear delimiting characters
Switch to normal mode
Switch to dictation mode
Switch to command mode
Switch to number mode
Switch to spell mode
User command
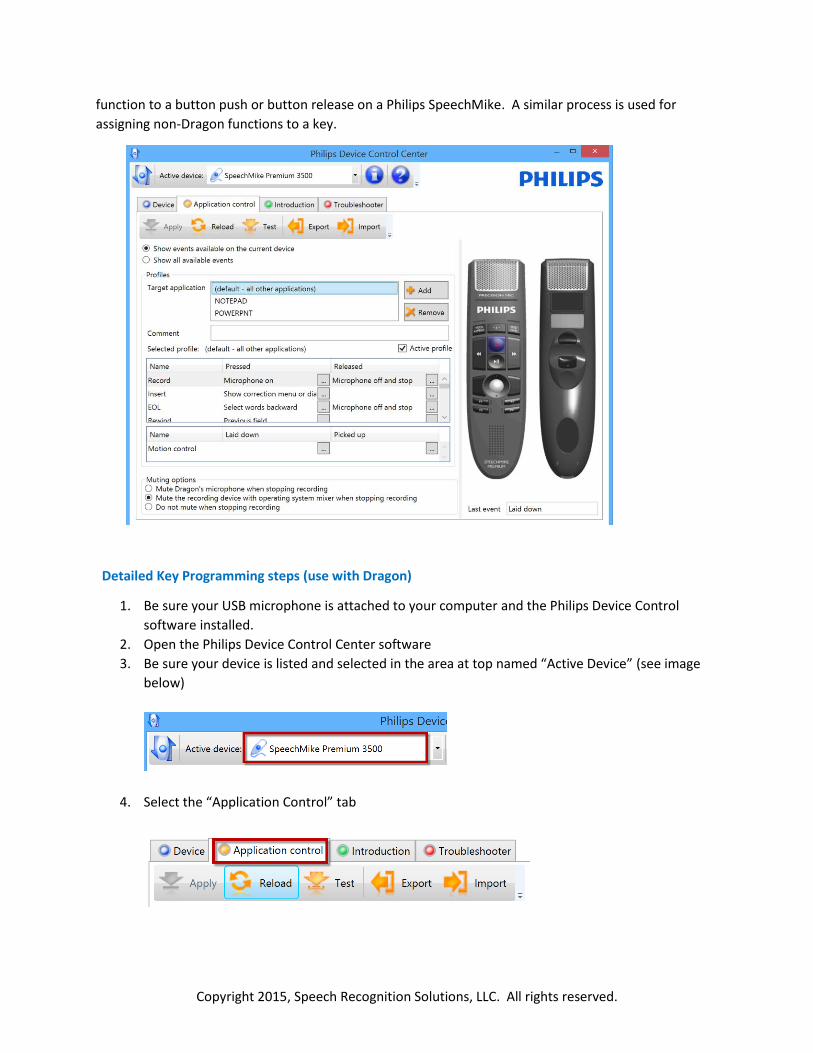
Refer to the diagram below and steps which follow in order to assign a Dragon NaturallySpeaking
Copyright 2015, Speech Recognition Solutions, LLC. All rights reserved.
function to a button push or button release on a Philips SpeechMike. A similar process is used for
assigning non-Dragon functions to a key.
Detailed Key Programming steps (use with Dragon)
1. Be sure your USB microphone is attached to your computer and the Philips Device Control
software installed.
2. Open the Philips Device Control Center software
3. Be sure your device is listed and selected in the area at top named “Active Device” (see image
below)
4. Select the “Application Control” tab
Copyright 2015, Speech Recognition Solutions, LLC. All rights reserved.
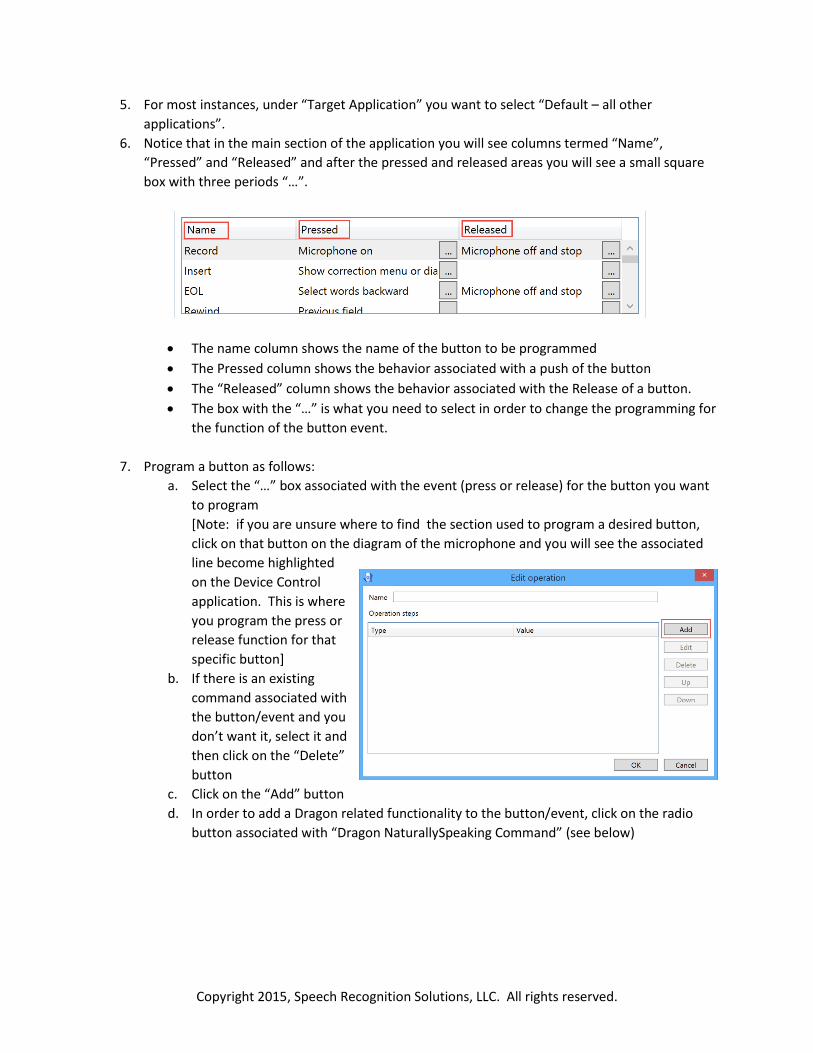
5. For most instances, under “Target Application” you want to select “Default – all other
applications”.
6. Notice that in the main section of the application you will see columns termed “Name”,
“Pressed” and “Released” and after the pressed and released areas you will see a small square
box with three periods “…”.
The name column shows the name of the button to be programmed
The Pressed column shows the behavior associated with a push of the button
The “Released” column shows the behavior associated with the Release of a button.
The box with the “…” is what you need to select in order to change the programming for
the function of the button event.
7. Program a button as follows:
a. Select the “…” box associated with the event (press or release) for the button you want
to program
[Note: if you are unsure where to find the section used to program a desired button,
click on that button on the diagram of the microphone and you will see the associated
line become highlighted
on the Device Control
application. This is where
you program the press or
release function for that
specific button]
b. If there is an existing
command associated with
the button/event and you
don’t want it, select it and
then click on the “Delete”
button
c. Click on the “Add” button
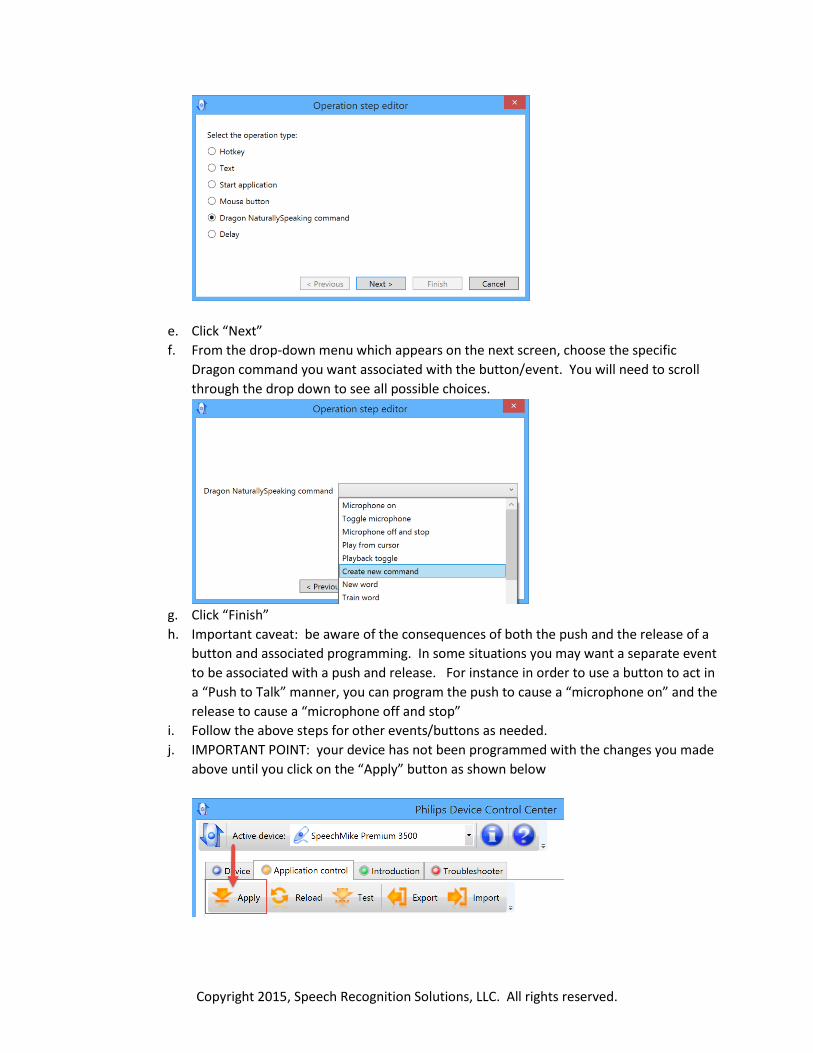
d. In order to add a Dragon related functionality to the button/event, click on the radio
button associated with “Dragon NaturallySpeaking Command” (see below)
Copyright 2015, Speech Recognition Solutions, LLC. All rights reserved.
e. Click “Next”
f. From the drop-down menu which appears on the next screen, choose the specific
Dragon command you want associated with the button/event. You will need to scroll
through the drop down to see all possible choices.
g. Click “Finish”
h. Important caveat: be aware of the consequences of both the push and the release of a
button and associated programming. In some situations you may want a separate event
to be associated with a push and release. For instance in order to use a button to act in
a “Push to Talk” manner, you can program the push to cause a “microphone on” and the
release to cause a “microphone off and stop”
i. Follow the above steps for other events/buttons as needed.
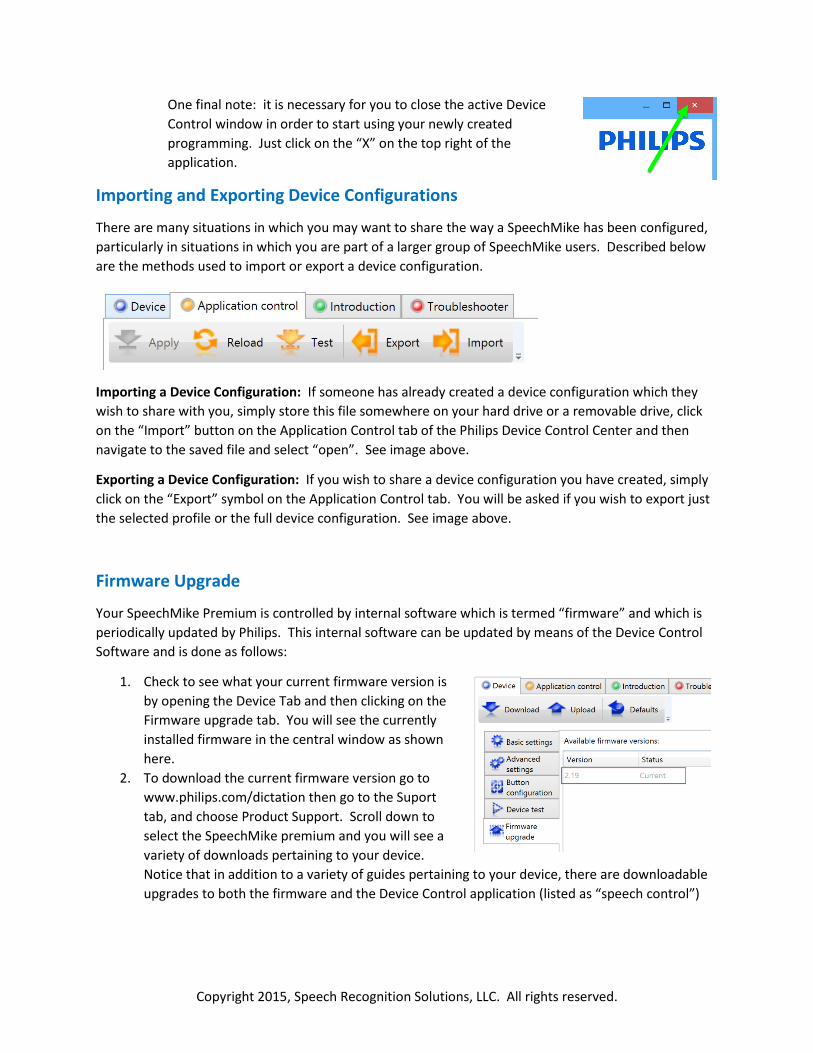
j. IMPORTANT POINT: your device has not been programmed with the changes you made
above until you click on the “Apply” button as shown below
Copyright 2015, Speech Recognition Solutions, LLC. All rights reserved.
One final note: it is necessary for you to close the active Device
Control window in order to start using your newly created
programming. Just click on the “X” on the top right of the
application.
Importing and Exporting Device Configurations
There are many situations in which you may want to share the way a SpeechMike has been configured,
particularly in situations in which you are part of a larger group of SpeechMike users. Described below
are the methods used to import or export a device configuration.
Importing a Device Configuration: If someone has already created a device configuration which they
wish to share with you, simply store this file somewhere on your hard drive or a removable drive, click
on the “Import” button on the Application Control tab of the Philips Device Control Center and then
navigate to the saved file and select “open”. See image above.
Exporting a Device Configuration: If you wish to share a device configuration you have created, simply
click on the “Export” symbol on the Application Control tab. You will be asked if you wish to export just
the selected profile or the full device configuration. See image above.
Firmware Upgrade
Your SpeechMike Premium is controlled by internal software which is termed “firmware” and which is
periodically updated by Philips. This internal software can be updated by means of the Device Control
Software and is done as follows:
1. Check to see what your current firmware version is
by opening the Device Tab and then clicking on the
Firmware upgrade tab. You will see the currently
installed firmware in the central window as shown
here.
2. To download the current firmware version go to
www.philips.com/dictation then go to the Suport
tab, and choose Product Support. Scroll down to
select the SpeechMike premium and you will see a
variety of downloads pertaining to your device.
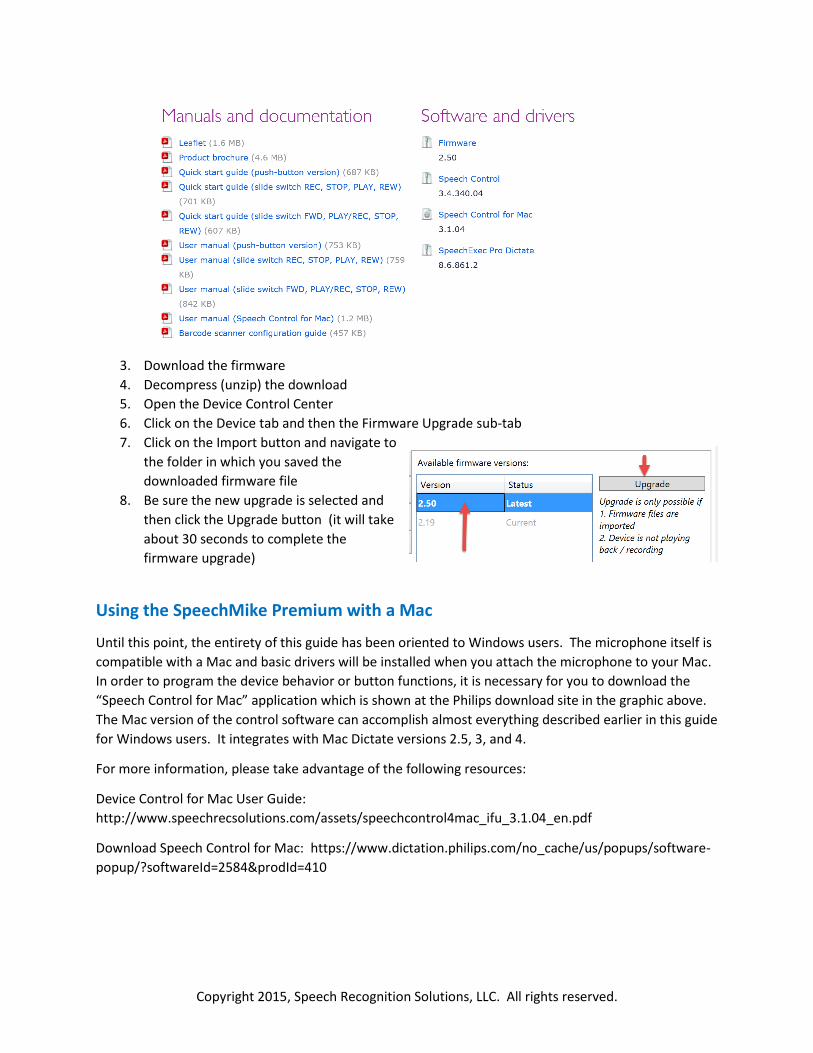
Notice that in addition to a variety of guides pertaining to your device, there are downloadable
upgrades to both the firmware and the Device Control application (listed as “speech control”)
Copyright 2015, Speech Recognition Solutions, LLC. All rights reserved.
3. Download the firmware
4. Decompress (unzip) the download
5. Open the Device Control Center
6. Click on the Device tab and then the Firmware Upgrade sub-tab
7. Click on the Import button and navigate to
the folder in which you saved the
downloaded firmware file
8. Be sure the new upgrade is selected and
then click the Upgrade button (it will take
about 30 seconds to complete the
firmware upgrade)
Using the SpeechMike Premium with a Mac
Until this point, the entirety of this guide has been oriented to Windows users. The microphone itself is
compatible with a Mac and basic drivers will be installed when you attach the microphone to your Mac.
In order to program the device behavior or button functions, it is necessary for you to download the
“Speech Control for Mac” application which is shown at the Philips download site in the graphic above.
The Mac version of the control software can accomplish almost everything described earlier in this guide
for Windows users. It integrates with Mac Dictate versions 2.5, 3, and 4.
For more information, please take advantage of the following resources:
Device Control for Mac User Guide:
http://www.speechrecsolutions.com/assets/speechcontrol4mac_ifu_3.1.04_en.pdf
Download Speech Control for Mac: https://www.dictation.philips.com/no_cache/us/popups/software-
popup/?softwareId=2584&prodId=410