Embed Size (px)
Citation preview
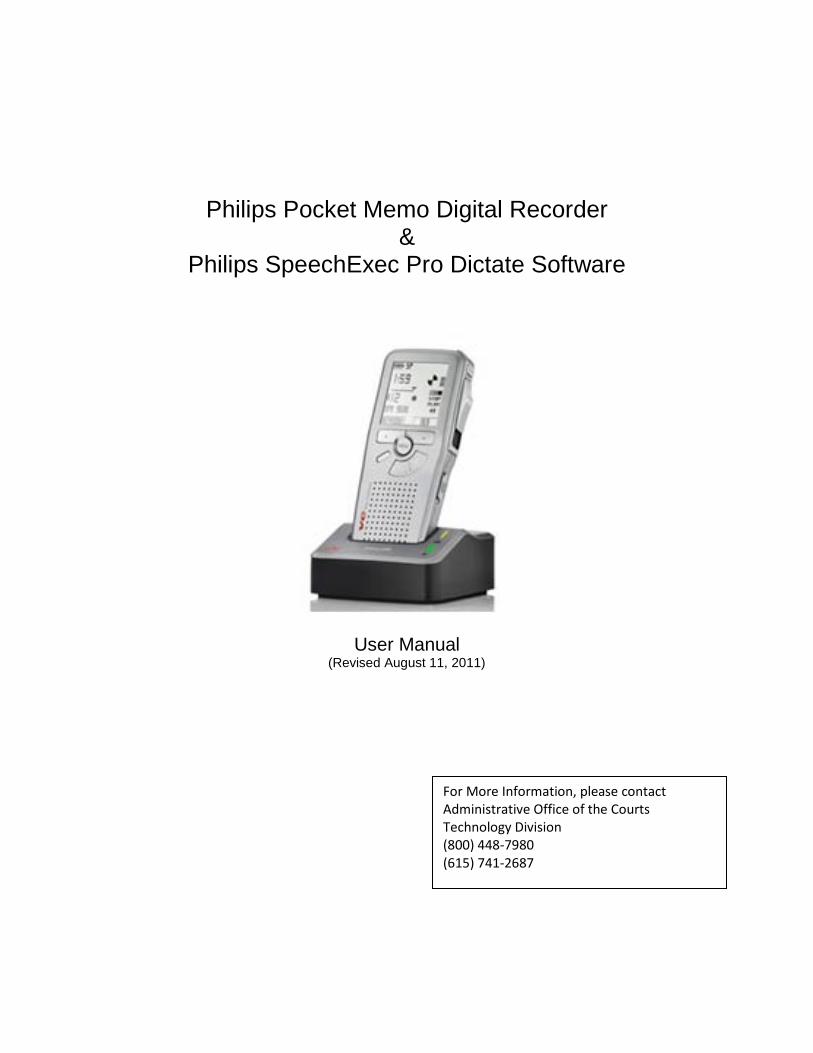
Philips Pocket Memo Digital Recorder &
Philips SpeechExec Pro Dictate Software
User Manual (Revised August 11, 2011)
For More Information, please contact Administrative Office of the Courts Technology Division (800) 448-7980 (615) 741-2687
Table of Contents About the Philips Digital Pocket Memo Recorder ....................................................................... 3 Understanding the Parts of the Recorder ................................................................................... 4 Getting Started ........................................................................................................................... 5
Install the batteries ................................................................................................................. 5 Memory Card .......................................................................................................................... 5 Recharge the batteries ........................................................................................................... 5
Using the docking station: ................................................................................................... 5 Using the USB Cable and Computer ................................................................................... 6
Activate Recorder ................................................................................................................... 6 Recording format .................................................................................................................... 7 Volume Setting ....................................................................................................................... 7 Microphone Sensitivity ............................................................................................................ 7 Power Save Mode .................................................................................................................. 8 Menu Settings ........................................................................................................................ 8
Transfer Settings from Computer to the DPM Device ................................................................. 8 Record ....................................................................................................................................... 9 Understanding the Display Indicators and Symbols ..................................................................10 Moving Between Recordings .....................................................................................................10 Add to a Recording ...................................................................................................................10 Finish (Lock) a Recording .........................................................................................................11 Delete a File ..............................................................................................................................11 Delete Part of a Recording ........................................................................................................11 Using Philips SpeechExec Software .........................................................................................12 Download Recording Files ........................................................................................................12 Burn a Copy on a CD Using Windows .......................................................................................14
Page 3 of 16
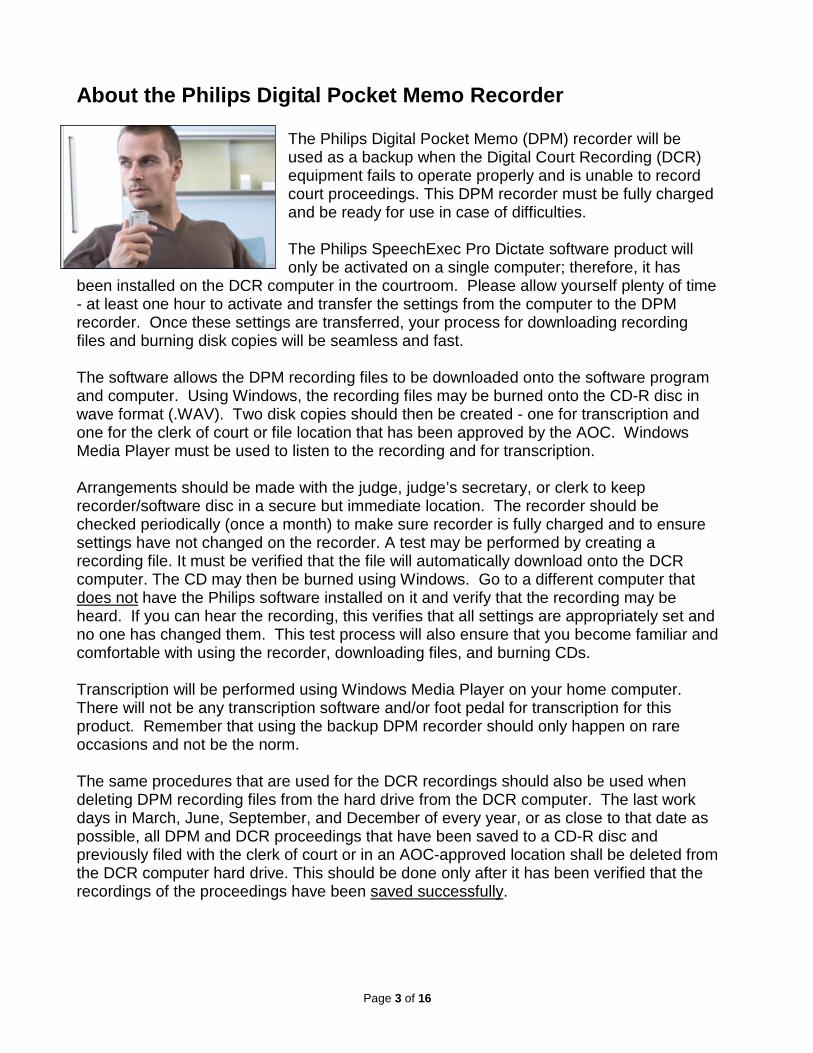
About the Philips Digital Pocket Memo Recorder The Philips Digital Pocket Memo (DPM) recorder will be used as a backup when the Digital Court Recording (DCR) equipment fails to operate properly and is unable to record court proceedings. This DPM recorder must be fully charged and be ready for use in case of difficulties. The Philips SpeechExec Pro Dictate software product will only be activated on a single computer; therefore, it has
been installed on the DCR computer in the courtroom. Please allow yourself plenty of time - at least one hour to activate and transfer the settings from the computer to the DPM recorder. Once these settings are transferred, your process for downloading recording files and burning disk copies will be seamless and fast. The software allows the DPM recording files to be downloaded onto the software program and computer. Using Windows, the recording files may be burned onto the CD-R disc in wave format (.WAV). Two disk copies should then be created - one for transcription and one for the clerk of court or file location that has been approved by the AOC. Windows Media Player must be used to listen to the recording and for transcription. Arrangements should be made with the judge, judge’s secretary, or clerk to keep recorder/software disc in a secure but immediate location. The recorder should be checked periodically (once a month) to make sure recorder is fully charged and to ensure settings have not changed on the recorder. A test may be performed by creating a recording file. It must be verified that the file will automatically download onto the DCR computer. The CD may then be burned using Windows. Go to a different computer that does not have the Philips software installed on it and verify that the recording may be heard. If you can hear the recording, this verifies that all settings are appropriately set and no one has changed them. This test process will also ensure that you become familiar and comfortable with using the recorder, downloading files, and burning CDs. Transcription will be performed using Windows Media Player on your home computer. There will not be any transcription software and/or foot pedal for transcription for this product. Remember that using the backup DPM recorder should only happen on rare occasions and not be the norm. The same procedures that are used for the DCR recordings should also be used when deleting DPM recording files from the hard drive from the DCR computer. The last work days in March, June, September, and December of every year, or as close to that date as possible, all DPM and DCR proceedings that have been saved to a CD-R disc and previously filed with the clerk of court or in an AOC-approved location shall be deleted from the DCR computer hard drive. This should be done only after it has been verified that the recordings of the proceedings have been saved successfully.

Page 4 of 16
Understanding the Parts of the Recorder
Smart Buttons The button function is represented directly above the button in the display. These functions change depending on the task you are performing.
Function Button The function button is used for activating the Insert Mode to make additions to a recording.
EOL (End of Letter) Button
Press this button when recording file requires no changes and file is complete. This marks the file as finished and locked. Pressing the button again removes the lock function and therefore be modified or deleted.
Slide Switch Move the slide switch up or down to match the corresponding commands within the display (Record, Stop, Play, and Rewind).
+/- buttons Use these buttons to navigate up/down the different display functions. These buttons also control the volume during playback.
Download Indicator LED The indicator lights blink when downloading and turn off when download is complete.
Charge Indicator LED The Indicator lights up green when charging. The green light blinks on/off when charging is complete.
Display
Smart Buttons
Menu Button
EOL (End of Letter) Button
Slide Switch
+/-, Menu Navigation and Volume Control
On/Off Switch
Download Indicator LED
Charge Indicator LED Docking Station
Fast Forward Button
Microphone Socket
Headphone Socket
Function Button
Page 5 of 16
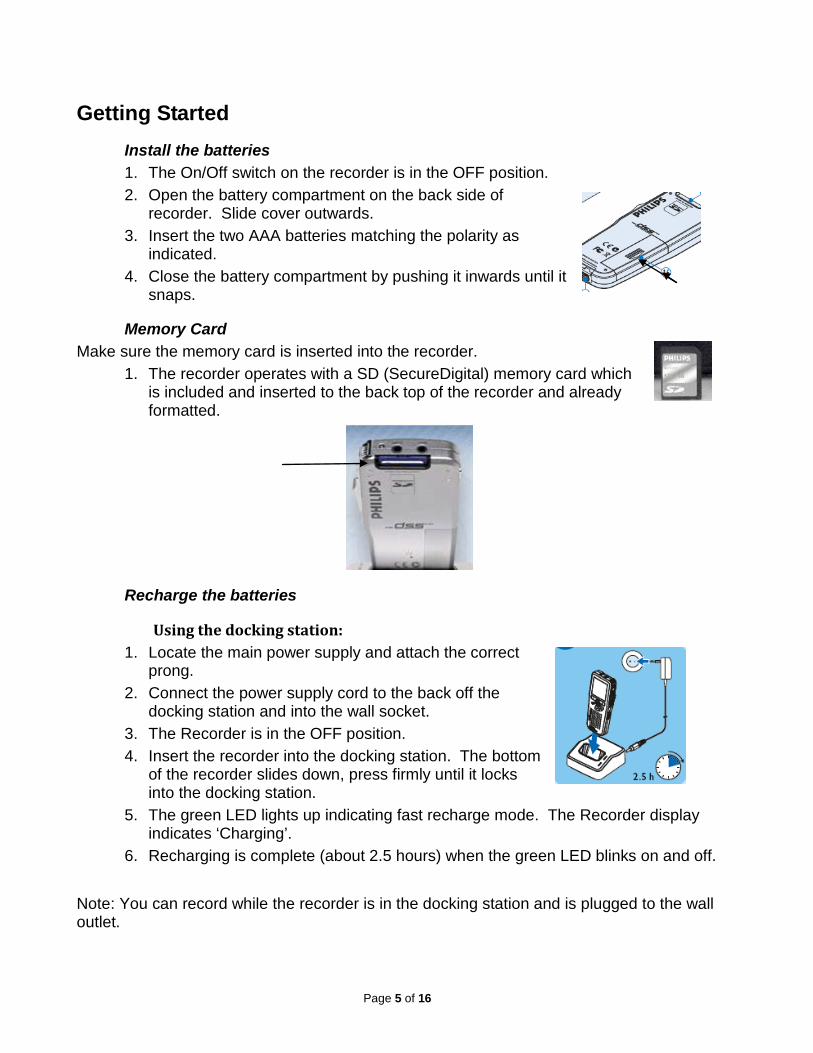
Getting Started Install the batteries 1. The On/Off switch on the recorder is in the OFF position. 2. Open the battery compartment on the back side of
recorder. Slide cover outwards. 3. Insert the two AAA batteries matching the polarity as
indicated. 4. Close the battery compartment by pushing it inwards until it
snaps.
Memory Card Make sure the memory card is inserted into the recorder.
1. The recorder operates with a SD (SecureDigital) memory card which is included and inserted to the back top of the recorder and already formatted.
Recharge the batteries
Using the docking station: 1. Locate the main power supply and attach the correct
prong. 2. Connect the power supply cord to the back off the
docking station and into the wall socket. 3. The Recorder is in the OFF position. 4. Insert the recorder into the docking station. The bottom
of the recorder slides down, press firmly until it locks into the docking station.
5. The green LED lights up indicating fast recharge mode. The Recorder display indicates ‘Charging’.
6. Recharging is complete (about 2.5 hours) when the green LED blinks on and off. Note: You can record while the recorder is in the docking station and is plugged to the wall outlet.

Page 6 of 16
Using the USB Cable and Computer 1. Locate the USB cable and connect the small flat end into the
charging station. 2. Plug the larger flat end of the cable into the USB port on the
computer. 3. The Recorder is in the OFF position. 4. Insert the recorder into the docking station. The bottom of the
recorder slides down, press firmly until it locks into the docking station.
5. The green LED lights up indicating fast recharge mode. The Recorder display indicates ‘Charging’.
6. Recharging is complete (about 2.5 hours) when the green LED blinks on and off.
Note: You do not have to use the docking station when charging to the computer. Just plug the small flat end into the bottom of the recorder. When connected to the computer you will not be able to record.
Activate Recorder 1. Turn recorder on by sliding the ON/OFF switch to the ON position.
When turning ‘On’ the recorder for the first time you will be prompted to set the ‘Language’.
2. The language will already be selected and highlighted (INT) for international language.
3. Look at the recorder display for OK and press the corresponding smart button. Next the recorder will prompt you to set the date and time.
4. Press the + plus or – minus buttons to change the value for the year, month, day or time settings.
5. Press the corresponding smart buttons to advance to the left or right of the entry.
6. Press the + plus or – minus buttons to select a 12 hour (non-military) or 24 hour clock (military time).
7. If a 12 hour clock is selected set the AM or PM settings. 8. The display window will show OK in the middle press the [Menu] button to
accept your changes. 9. If you make a mistake and need to change your settings then press the [Menu]
button. 10. Press the + plus or – minus buttons to scroll to ‘Setup’ then press the [Menu]
button again or the [Enter] smart button to get into the Setup sub menu. 11. Press the + plus or – minus buttons to scroll through the menu list. Locate the
‘Date/Time’ then press the [Menu] button again or the [Enter] smart button to get into the ‘Date/Time’ settings.
12. Once the Date/Time settings are correct then press the [OK] smart button to save settings.
Page 7 of 16
13. Once settings are correct then press the [Menu] button to save those changes. Lastly, press the [Back] smart button to get out of the sub menu and main menu.
Recording format The recording format determines the audio quality of recordings and affects the number of audio files that can fit on the memory card. QP – Quality Play requires 1 megabyte for 5 minutes of recording. SP – Standard Play requires 1 megabyte for 10 minutes of recording. Note: A memory card has storage capacities of up to 32 GB (gigabytes) over 100 hours of recording time. 1. Press the [Menu] button while the recorder is on the ‘Stop’ position. 2. Press the + plus or – minus buttons to scroll to the ‘Setup’ menu option. Press
the [Menu] button again or the [Enter] smart button to go to the submenu. 3. Press the + plus or – minus buttons to scroll to ‘Record Format’ and press the
[Menu] button again or the [Enter] smart button. 4. Press the + plus or – minus buttons to choose between ‘QP’ or ‘SP’. 5. Press the [OK] smart button to save settings. 6. Press the [Back] smart button to get out of the sub menu and main menu.
Volume Setting 1. Press the [Menu] button while the recorder is on the ‘Stop’ position. 2. Press the + plus or – minus buttons to scroll to the ‘Setup’ menu option. Press
the [Menu] button again or the [Enter] smart button to go to the submenu. 3. Press the + plus or – minus buttons to scroll to ‘Volume’ and press the [Menu]
button again or the [Enter] smart button. 4. Press the + plus or – minus buttons to get it just below the halfway mark on the
Min side. 5. Press the [OK] smart button to save settings. 6. Press the [Back] smart button to get out of the sub menu and main menu.
Microphone Sensitivity Set the microphone sensitivity for the environment. Since the recorder is going to be used for a hearing set this on High - Conference.
High – Conference (used when recording at a conference) Medium – Dictation (used when recording dictation in a normal environment) Low – Private (used when recording dictation in a noisy environment)
1. Press the [Menu] button while the recorder is on the ‘Stop’ position. 2. Press the + plus or – minus buttons to scroll to ‘Setup’ menu list and press the
[Menu] button again or the [Enter] smart button to go to the ‘Setup’ submenu.
Page 8 of 16
3. Press the + plus or – minus buttons to scroll to ‘Microphone’. Then press the [Menu] button again or the [Enter] smart button to get into the microphone settings.
4. Press the + plus or – minus buttons to choose ‘High’. 5. Press the [OK] smart button to save those settings. 6. Press the [Back] smart button to get out of the sub menu and main menu.
Power Save Mode After 60 minutes of inactivity, the recorder automatically goes into power-save mode or to sleep. The LCD screen will display the date and time. Just press any button to reactivate the recorder. If the recorder is not used for more than two hours, it will turn off. Turn the unit on by moving the ON/OFF switch to the OFF position then back to the ON position.
Menu Settings 1. Press the [Menu] button while the recorder is on the ‘Stop’ position. 2. Press the + plus or – minus buttons to scroll through the menu. 3. Then press the [Menu] button again or the [Enter] smart button to go into the
submenu. 4. Press the + plus or – minus buttons to scroll to menu option in the sub menu list. 5. Then press the [Menu] button again or the [Enter] smart button to go into the
menu option selected. 6. Press the + plus or – minus buttons to select the function. 7. Press the [OK] smart button to save settings. 8. Press the [Back] smart button to get out of the sub menu and main menu lists.
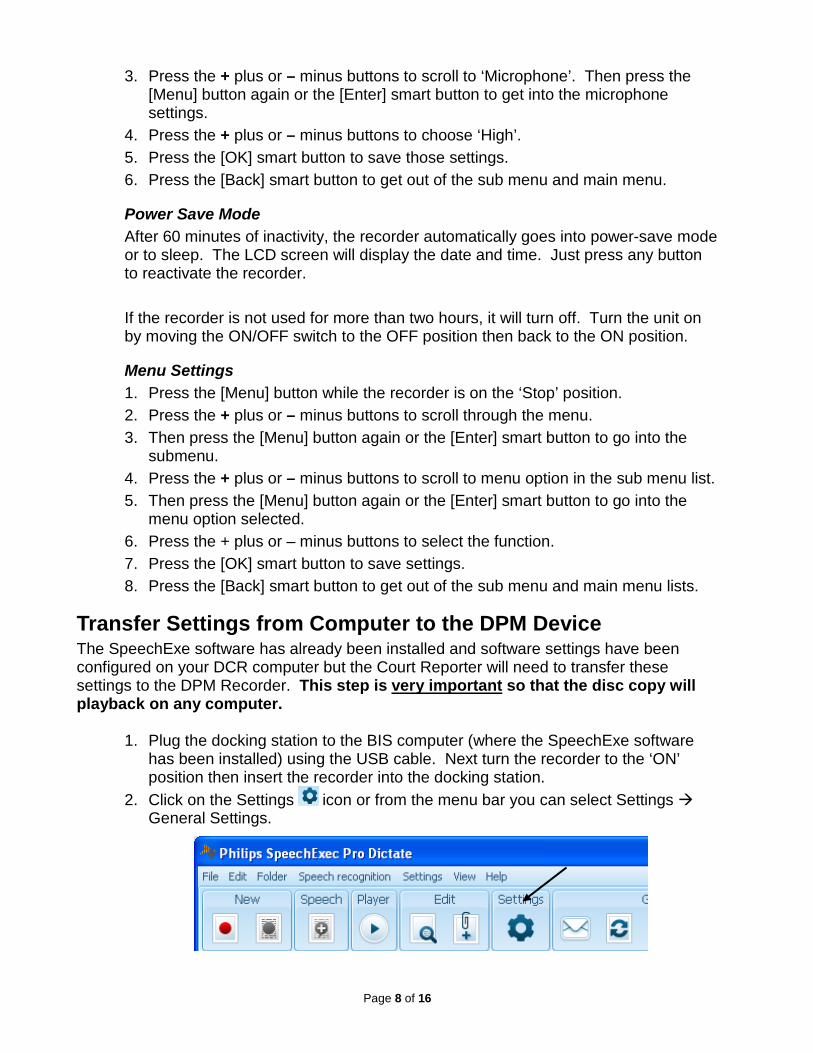
Transfer Settings from Computer to the DPM Device The SpeechExe software has already been installed and software settings have been configured on your DCR computer but the Court Reporter will need to transfer these settings to the DPM Recorder. This step is very important so that the disc copy will playback on any computer.
1. Plug the docking station to the BIS computer (where the SpeechExe software has been installed) using the USB cable. Next turn the recorder to the ‘ON’ position then insert the recorder into the docking station.
2. Click on the Settings icon or from the menu bar you can select Settings General Settings.
Page 9 of 16
3. Click on the DPM/DT Configuration option from the left hand menu. 4. Click on the DPM Settings option.
a. Look at the right pane and locate the Transfer settings from/to DPM section.
5. Next click on Transfer Settings to Device link. 6. The system will display a pop-up message informing you have successfully
transferred settings to the DPM device. 7. Remove the recorder from the docking station. You are ready to record. 8. Perform a test by recording a message on the recorder; lock your recording file.
and download the file onto the computer; burn a CD then play it back on a different PC and verify the recording can be heard.
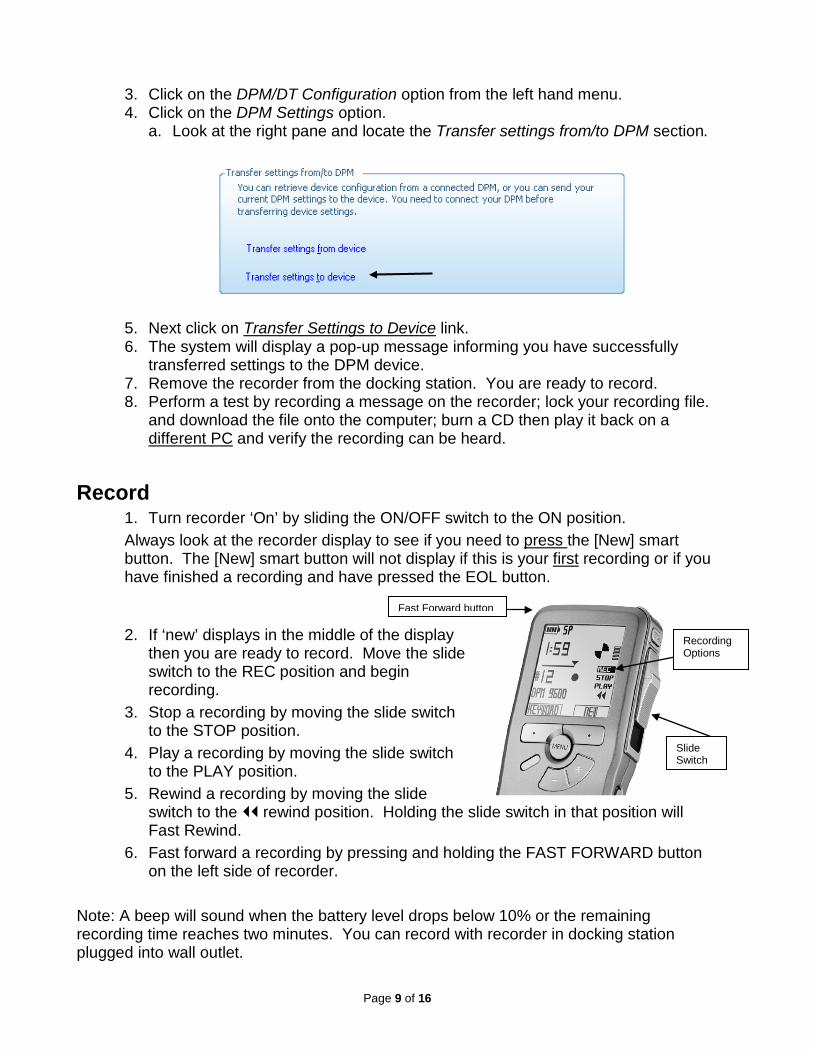
Record 1. Turn recorder ‘On’ by sliding the ON/OFF switch to the ON position. Always look at the recorder display to see if you need to press the [New] smart button. The [New] smart button will not display if this is your first recording or if you have finished a recording and have pressed the EOL button.
2. If ‘new’ displays in the middle of the display then you are ready to record. Move the slide switch to the REC position and begin recording.
3. Stop a recording by moving the slide switch to the STOP position.
4. Play a recording by moving the slide switch to the PLAY position.
5. Rewind a recording by moving the slide switch to the rewind position. Holding the slide switch in that position will Fast Rewind.
6. Fast forward a recording by pressing and holding the FAST FORWARD button on the left side of recorder.
Note: A beep will sound when the battery level drops below 10% or the remaining recording time reaches two minutes. You can record with recorder in docking station plugged into wall outlet.
Recording Options
Slide Switch
Fast Forward button
Page 10 of 16
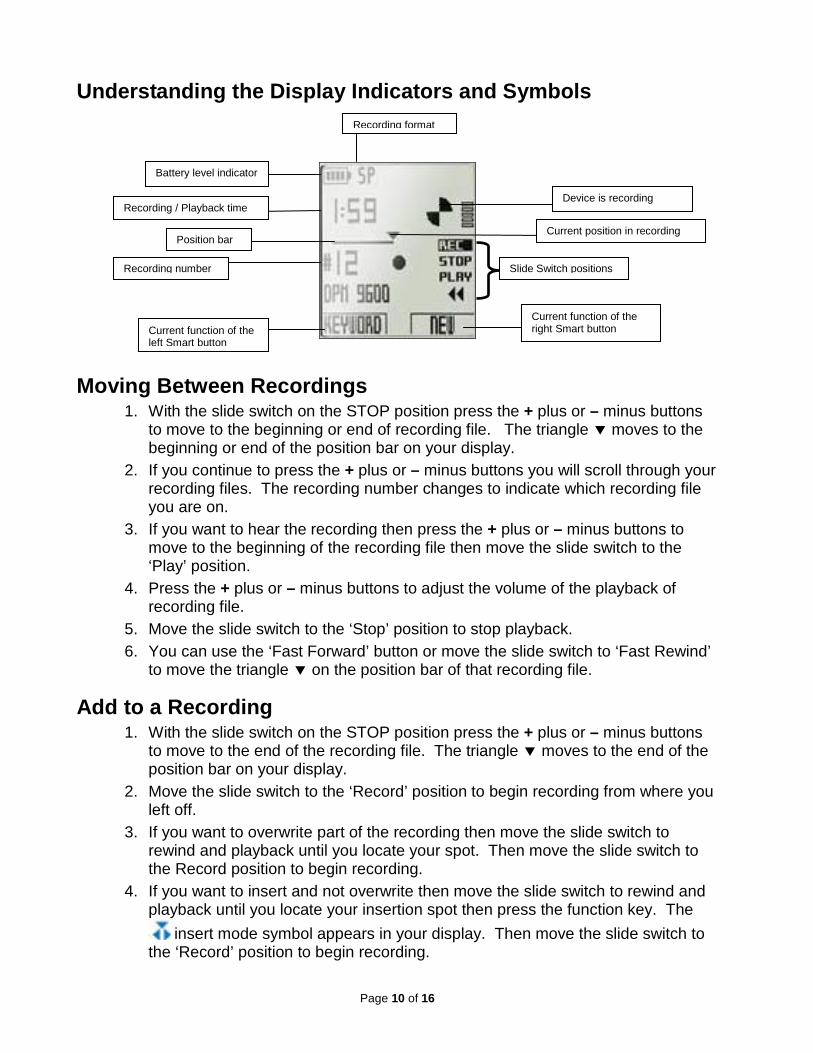
Understanding the Display Indicators and Symbols
Moving Between Recordings 1. With the slide switch on the STOP position press the + plus or – minus buttons
to move to the beginning or end of recording file. The triangle moves to the beginning or end of the position bar on your display.
2. If you continue to press the + plus or – minus buttons you will scroll through your recording files. The recording number changes to indicate which recording file you are on.
3. If you want to hear the recording then press the + plus or – minus buttons to move to the beginning of the recording file then move the slide switch to the ‘Play’ position.
4. Press the + plus or – minus buttons to adjust the volume of the playback of recording file.
5. Move the slide switch to the ‘Stop’ position to stop playback. 6. You can use the ‘Fast Forward’ button or move the slide switch to ‘Fast Rewind’
to move the triangle on the position bar of that recording file.
Add to a Recording 1. With the slide switch on the STOP position press the + plus or – minus buttons
to move to the end of the recording file. The triangle moves to the end of the position bar on your display.
2. Move the slide switch to the ‘Record’ position to begin recording from where you left off.
3. If you want to overwrite part of the recording then move the slide switch to rewind and playback until you locate your spot. Then move the slide switch to the Record position to begin recording.
4. If you want to insert and not overwrite then move the slide switch to rewind and playback until you locate your insertion spot then press the function key. The
insert mode symbol appears in your display. Then move the slide switch to the ‘Record’ position to begin recording.
Slide Switch positions
Current function of the right Smart button
Current position in recording
Device is recording
Recording format
Battery level indicator
Recording / Playback time
Position bar
Recording number
Current function of the left Smart button
Page 11 of 16
5. Once you are done inserting, press the function key to return to the overwrite mode. Recording files are recorded in overwrite mode by default.
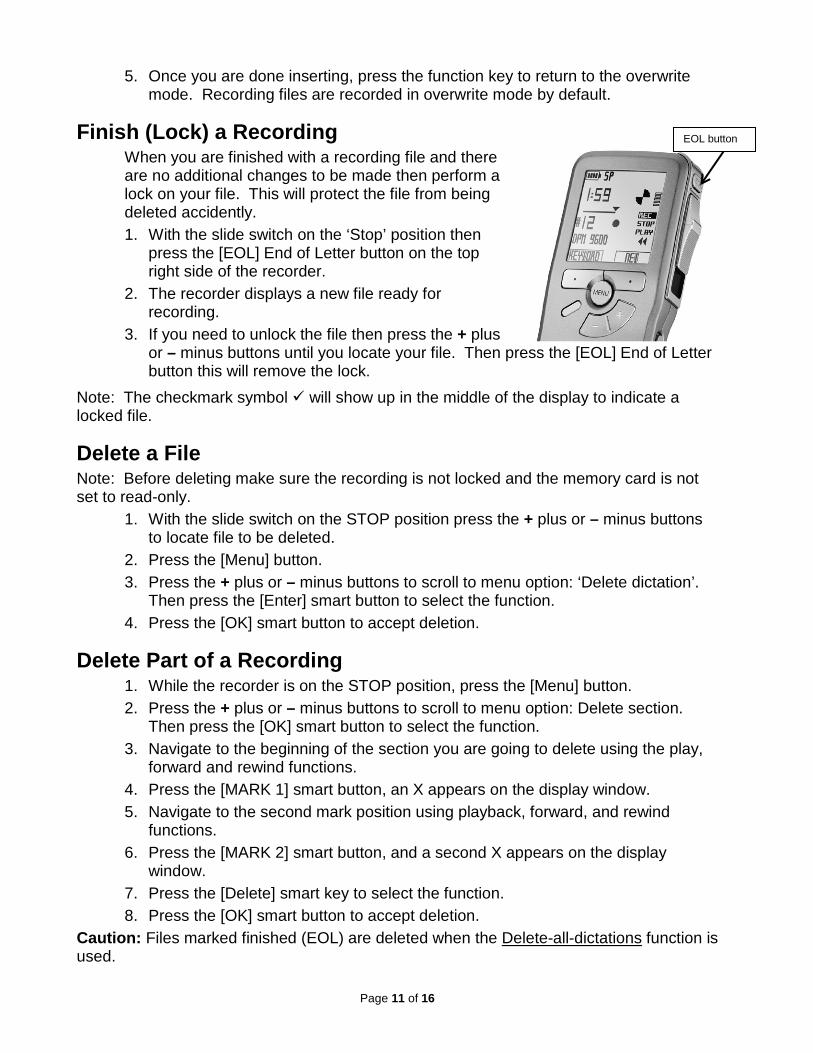
Finish (Lock) a Recording When you are finished with a recording file and there are no additional changes to be made then perform a lock on your file. This will protect the file from being deleted accidently. 1. With the slide switch on the ‘Stop’ position then
press the [EOL] End of Letter button on the top right side of the recorder.
2. The recorder displays a new file ready for recording.
3. If you need to unlock the file then press the + plus or – minus buttons until you locate your file. Then press the [EOL] End of Letter button this will remove the lock.
Note: The checkmark symbol will show up in the middle of the display to indicate a locked file.
Delete a File Note: Before deleting make sure the recording is not locked and the memory card is not set to read-only.
1. With the slide switch on the STOP position press the + plus or – minus buttons to locate file to be deleted.
2. Press the [Menu] button. 3. Press the + plus or – minus buttons to scroll to menu option: ‘Delete dictation’.
Then press the [Enter] smart button to select the function. 4. Press the [OK] smart button to accept deletion.
Delete Part of a Recording 1. While the recorder is on the STOP position, press the [Menu] button. 2. Press the + plus or – minus buttons to scroll to menu option: Delete section.
Then press the [OK] smart button to select the function. 3. Navigate to the beginning of the section you are going to delete using the play,
forward and rewind functions. 4. Press the [MARK 1] smart button, an X appears on the display window. 5. Navigate to the second mark position using playback, forward, and rewind
functions. 6. Press the [MARK 2] smart button, and a second X appears on the display
window. 7. Press the [Delete] smart key to select the function. 8. Press the [OK] smart button to accept deletion.
Caution: Files marked finished (EOL) are deleted when the Delete-all-dictations function is used.
EOL button
Page 12 of 16
Using Philips SpeechExec Software The Philips SpeechExec software will enable the user to download the recording files onto the dictation software program and computer. This program will be configured to automatically convert the recording file formats from (.dss) into a wave format (.wav). Then the user will burn a copy of the wave file (.wav) onto a CD-R disc. The disk copy will use Windows Media Player for playback and transcription.
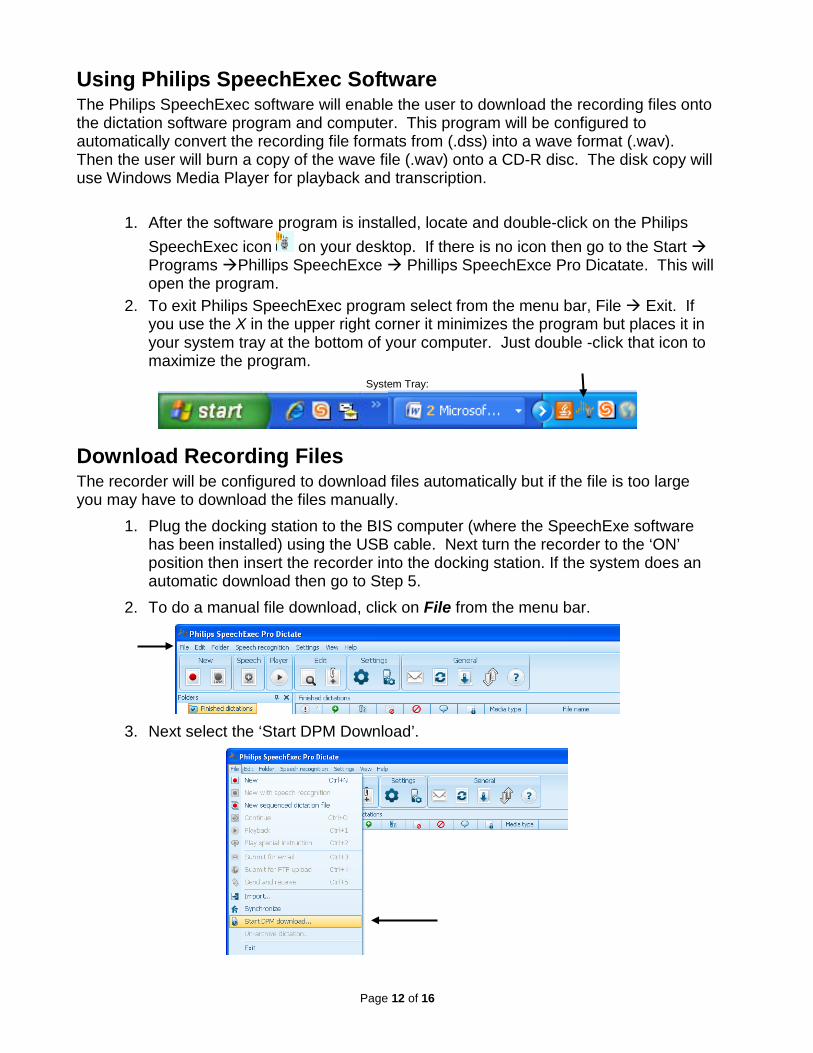
1. After the software program is installed, locate and double-click on the Philips SpeechExec icon on your desktop. If there is no icon then go to the Start Programs Phillips SpeechExce Phillips SpeechExce Pro Dicatate. This will open the program.
2. To exit Philips SpeechExec program select from the menu bar, File Exit. If you use the X in the upper right corner it minimizes the program but places it in your system tray at the bottom of your computer. Just double -click that icon to maximize the program.
System Tray:
Download Recording Files The recorder will be configured to download files automatically but if the file is too large you may have to download the files manually.
1. Plug the docking station to the BIS computer (where the SpeechExe software has been installed) using the USB cable. Next turn the recorder to the ‘ON’ position then insert the recorder into the docking station. If the system does an automatic download then go to Step 5.
2. To do a manual file download, click on File from the menu bar.
3. Next select the ‘Start DPM Download’.
Page 13 of 16
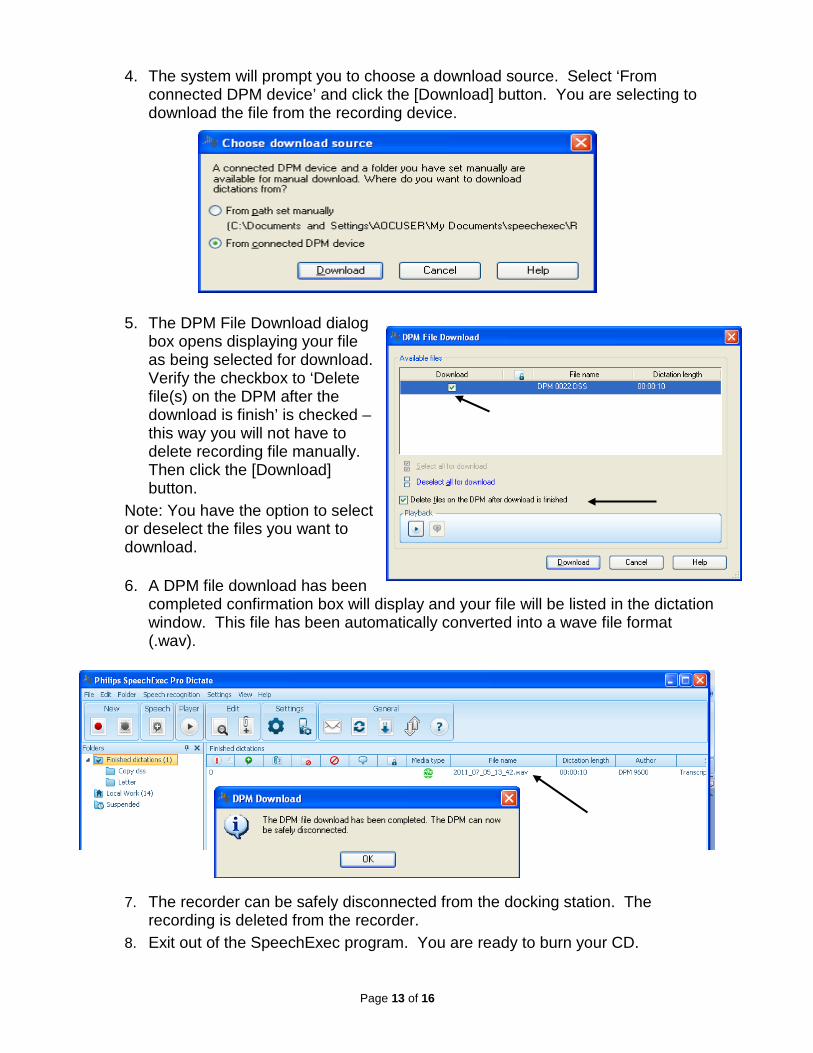
4. The system will prompt you to choose a download source. Select ‘From connected DPM device’ and click the [Download] button. You are selecting to download the file from the recording device.
5. The DPM File Download dialog box opens displaying your file as being selected for download. Verify the checkbox to ‘Delete file(s) on the DPM after the download is finish’ is checked – this way you will not have to delete recording file manually. Then click the [Download] button.
Note: You have the option to select or deselect the files you want to download.
6. A DPM file download has been completed confirmation box will display and your file will be listed in the dictation window. This file has been automatically converted into a wave file format (.wav).
7. The recorder can be safely disconnected from the docking station. The recording is deleted from the recorder.
8. Exit out of the SpeechExec program. You are ready to burn your CD.
Page 14 of 16
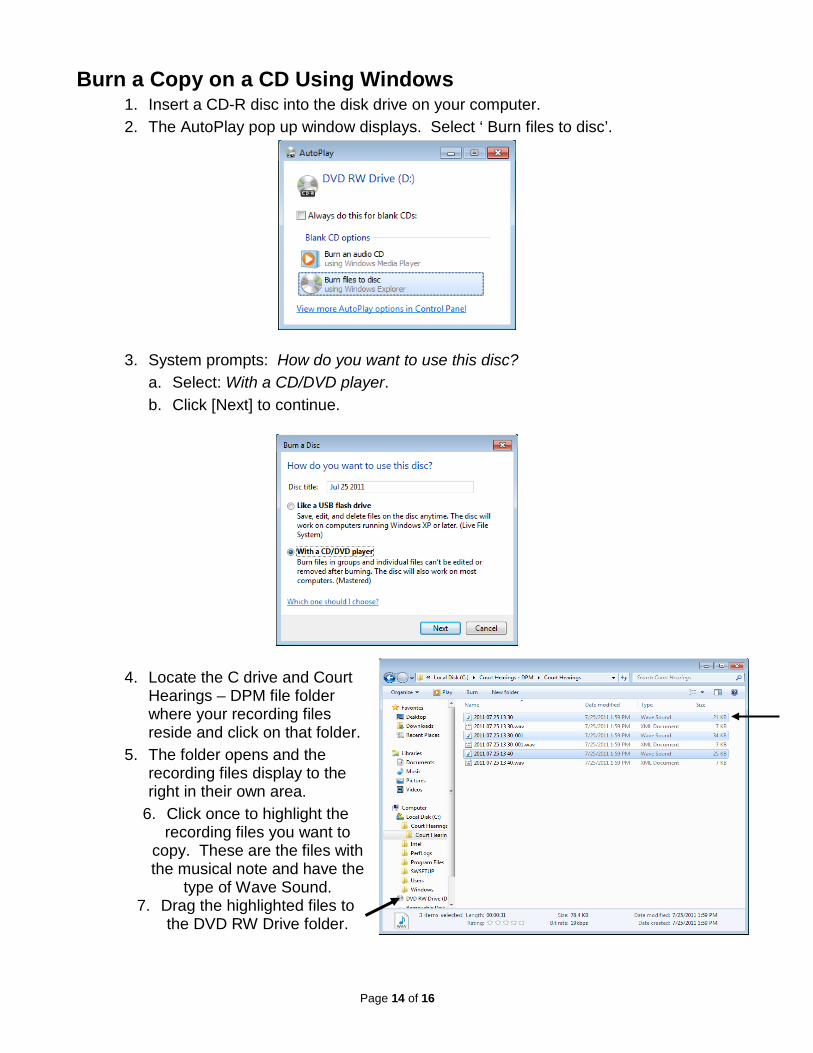
Burn a Copy on a CD Using Windows 1. Insert a CD-R disc into the disk drive on your computer. 2. The AutoPlay pop up window displays. Select ‘ Burn files to disc’.
3. System prompts: How do you want to use this disc? a. Select: With a CD/DVD player. b. Click [Next] to continue.
4. Locate the C drive and Court Hearings – DPM file folder where your recording files reside and click on that folder.
5. The folder opens and the recording files display to the right in their own area.
6. Click once to highlight the recording files you want to
copy. These are the files with the musical note and have the
type of Wave Sound. 7. Drag the highlighted files to
the DVD RW Drive folder.
Page 15 of 16
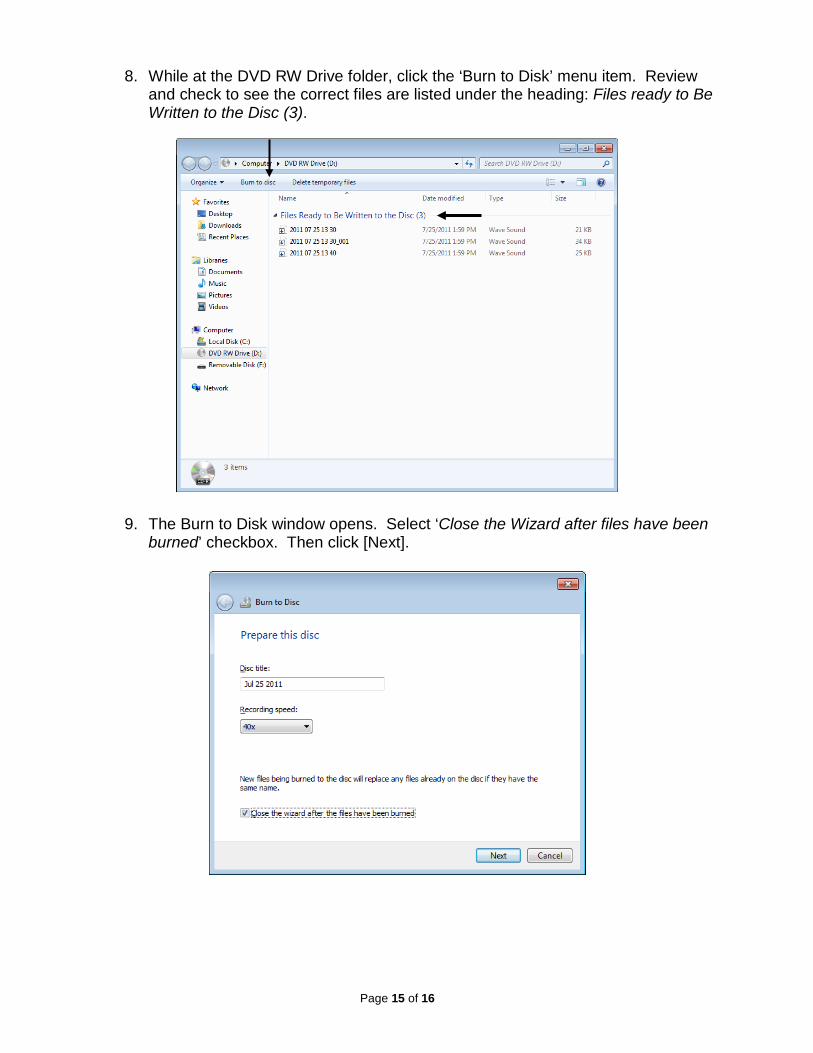
8. While at the DVD RW Drive folder, click the ‘Burn to Disk’ menu item. Review and check to see the correct files are listed under the heading: Files ready to Be Written to the Disc (3).
9. The Burn to Disk window opens. Select ‘Close the Wizard after files have been
burned’ checkbox. Then click [Next].
Page 16 of 16
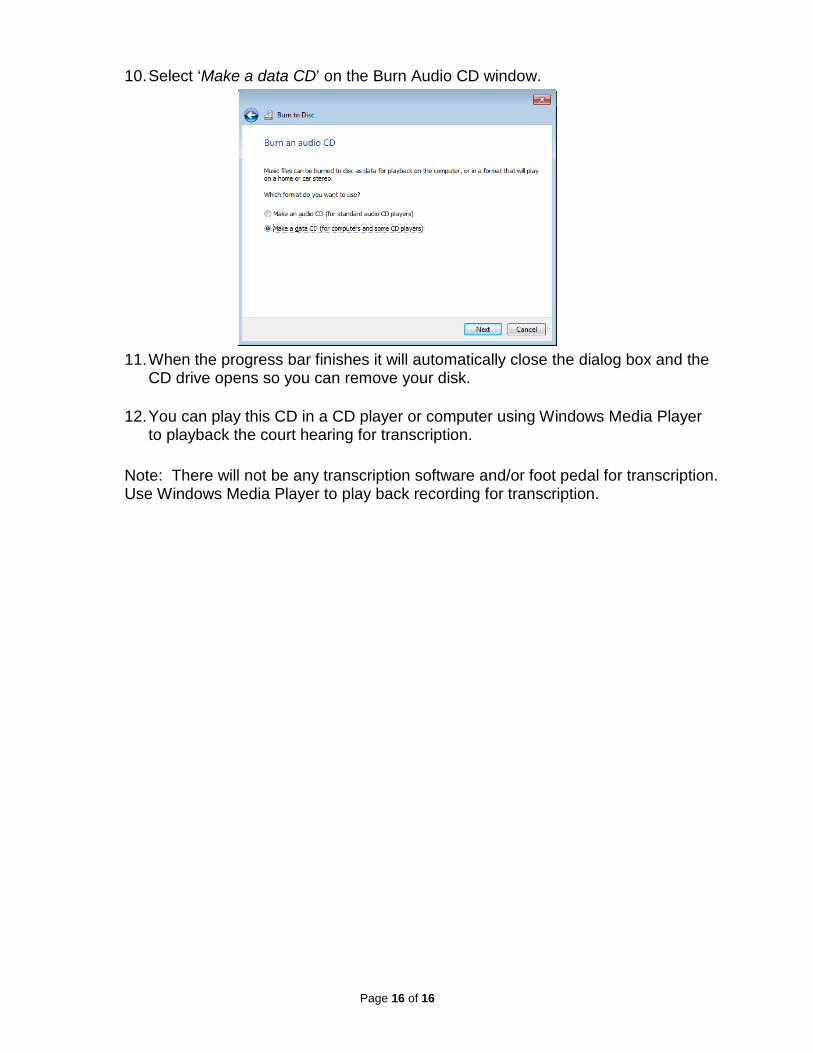
10. Select ‘Make a data CD’ on the Burn Audio CD window.
11. When the progress bar finishes it will automatically close the dialog box and the
CD drive opens so you can remove your disk.
12. You can play this CD in a CD player or computer using Windows Media Player to playback the court hearing for transcription.
Note: There will not be any transcription software and/or foot pedal for transcription. Use Windows Media Player to play back recording for transcription.