Embed Size (px)
Citation preview
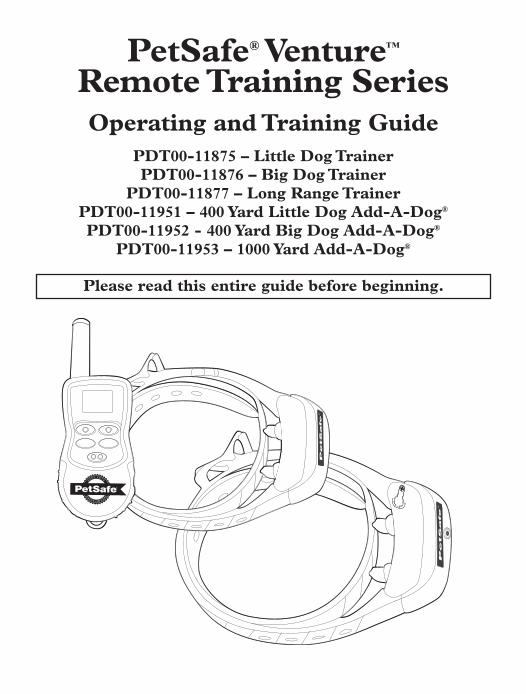
PetSafe® Venture™
Remote Training SeriesOperating and Training Guide
PDT00-11875 – Little Dog TrainerPDT00-11876 – Big Dog Trainer
PDT00-11877 – Long Range TrainerPDT00-11951 – 400 Yard Little Dog Add-A-Dog®
PDT00-11952 - 400 Yard Big Dog Add-A-Dog®
PDT00-11953 – 1000 Yard Add-A-Dog®
Please read this entire guide before beginning.
2 1-800-732-2677
Thank you for choosing PetSafe®, the best selling brand of electronic training solutions in the world. Our mission is to ensure your pet’s safety by providing you the tools and techniques to successfully train your pet. If you have any questions, please contact the Customer Care Center or visit our website at www.petsafe.net.
Table of ContentsComponents .............................................................................................. 3Other Items You May Need ......................................................................... 3How the System Works ............................................................................... 3Key Defi nitions .......................................................................................... 4Operating Guide ...................................................................................... 6
Prepare the Remote Transmitter............................................................... 6Prepare the Receiver Collar ..................................................................... 7Fit the Receiver Collar ............................................................................. 9Two Dog System ....................................................................................10To Pair Dog 1 Receiver Collar and the Remote Transmitter .....................12
Training Guide .......................................................................................13General Tips ..........................................................................................13Teaching Your Pet the Positive Tone .........................................................13Find the Best Stimulation Level for Your Pet ............................................13+2 Boost ................................................................................................14Teaching Basic Obedience ......................................................................14Eliminating Unwanted Behavior .............................................................16
Frequently Asked Questions ..................................................................19Troubleshooting ......................................................................................20Test Light Instructions ..............................................................................20Accessories ..............................................................................................21Terms of Use and Limitation of Liability ....................................................21FCC .........................................................................................................21Perchlorate Battery ....................................................................................22Non-Transferrable Limited Warranty .........................................................22
www.petsafe.net 3
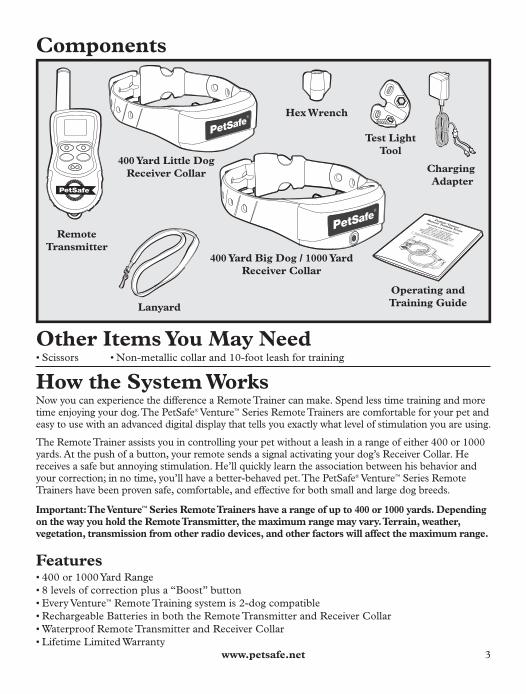
Components
RemoteTransmitter
Test LightTool
Hex Wrench
Charging Adapter
Lanyard
Operating andTraining Guide
400 Yard Little DogReceiver Collar
400 Yard Big Dog / 1000 YardReceiver Collar
PetSafe ® Venture ™
Remote Training Series
Operating and Training Guide
PDT00-11875 – Little Dog Trainer
PDT00-11876 – Big Dog Trainer
PDT00-11877 – Long Range Trainer
PDT00-11951 – 400 Yard Little Dog Add-A-Dog
PDT00-11952 - 400 Yard Big Dog Add-A-Dog
PDT00-11953 – 1000 Yard Add-A-Dog
Please read this entire guide before beginning.
Other Items You May NeedScissors• Non-metallic collar and 10-foot leash for training•
How the System WorksNow you can experience the difference a Remote Trainer can make. Spend less time training and more time enjoying your dog. The PetSafe® Venture™ Series Remote Trainers are comfortable for your pet and easy to use with an advanced digital display that tells you exactly what level of stimulation you are using.
The Remote Trainer assists you in controlling your pet without a leash in a range of either 400 or 1000 yards. At the push of a button, your remote sends a signal activating your dog’s Receiver Collar. He receives a safe but annoying stimulation. He’ll quickly learn the association between his behavior and your correction; in no time, you’ll have a better-behaved pet. The PetSafe® Venture™ Series Remote Trainers have been proven safe, comfortable, and effective for both small and large dog breeds.
Important: The Venture™ Series Remote Trainers have a range of up to 400 or 1000 yards. Depending on the way you hold the Remote Transmitter, the maximum range may vary. Terrain, weather, vegetation, transmission from other radio devices, and other factors will affect the maximum range.
Features400 or 1000 Yard Range• 8 levels of correction plus a “Boost” button• Every Venture• ™ Remote Training system is 2-dog compatible Rechargeable Batteries in both the Remote Transmitter and Receiver Collar• Waterproof Remote Transmitter and Receiver Collar• Lifetime Limited Warranty•
4 1-800-732-2677
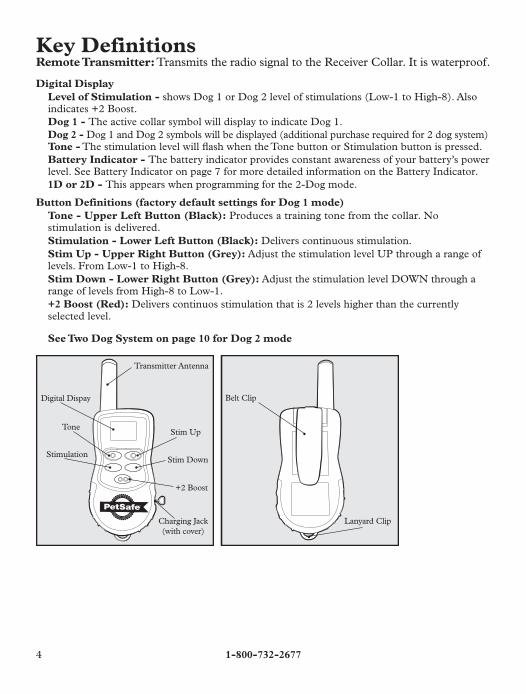
Key DefinitionsRemote Transmitter: Transmits the radio signal to the Receiver Collar. It is waterproof.
Digital Display Level of Stimulation - shows Dog 1 or Dog 2 level of stimulations (Low-1 to High-8). Also indicates +2 Boost.Dog 1 - The active collar symbol will display to indicate Dog 1.Dog 2 - Dog 1 and Dog 2 symbols will be displayed (additional purchase required for 2 dog system) Tone - The stimulation level will fl ash when the Tone button or Stimulation button is pressed. Battery Indicator - The battery indicator provides constant awareness of your battery’s power level. See Battery Indicator on page 7 for more detailed information on the Battery Indicator. 1D or 2D - This appears when programming for the 2-Dog mode.
Button Definitions (factory default settings for Dog 1 mode)Tone - Upper Left Button (Black): Produces a training tone from the collar. No stimulation is delivered. Stimulation - Lower Left Button (Black): Delivers continuous stimulation. Stim Up - Upper Right Button (Grey): Adjust the stimulation level UP through a range of levels. From Low-1 to High-8. Stim Down - Lower Right Button (Grey): Adjust the stimulation level DOWN through a range of levels from High-8 to Low-1. +2 Boost (Red): Delivers continuos stimulation that is 2 levels higher than the currently selected level.
See Two Dog System on page 10 for Dog 2 mode
Digital Dispay
ToneStim Up
Charging Jack(with cover)
Transmitter Antenna
StimulationStim Down
+2 Boost
Lanyard Clip
Belt Clip
www.petsafe.net 5
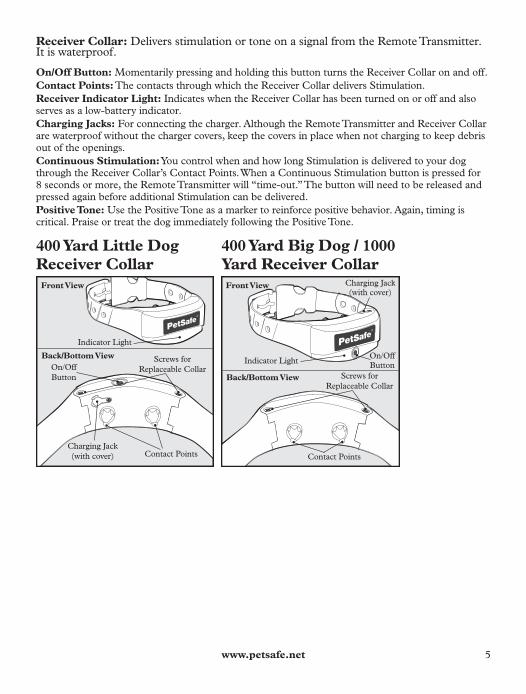
Receiver Collar: Delivers stimulation or tone on a signal from the Remote Transmitter. It is waterproof.
On/Off Button: Momentarily pressing and holding this button turns the Receiver Collar on and off. Contact Points: The contacts through which the Receiver Collar delivers Stimulation. Receiver Indicator Light: Indicates when the Receiver Collar has been turned on or off and also serves as a low-battery indicator.Charging Jacks: For connecting the charger. Although the Remote Transmitter and Receiver Collar are waterproof without the charger covers, keep the covers in place when not charging to keep debris out of the openings. Continuous Stimulation: You control when and how long Stimulation is delivered to your dog through the Receiver Collar’s Contact Points. When a Continuous Stimulation button is pressed for 8 seconds or more, the Remote Transmitter will “time-out.” The button will need to be released and pressed again before additional Stimulation can be delivered.Positive Tone: Use the Positive Tone as a marker to reinforce positive behavior. Again, timing is critical. Praise or treat the dog immediately following the Positive Tone.
Charging Jack(with cover) Contact Points
On/OffButton
Screws forReplaceable Collar
Indicator Light
Front View
Back/Bottom View
Charging Jack(with cover)
On/OffButton
Front View
Back/Bottom View
Indicator Light
Contact Points
Screws forReplaceable Collar
400 Yard Little Dog Receiver Collar
400 Yard Big Dog / 1000 Yard Receiver Collar
6 1-800-732-2677
Operating GuidePrepare the Remote TransmitterCharge the Remote Transmitter
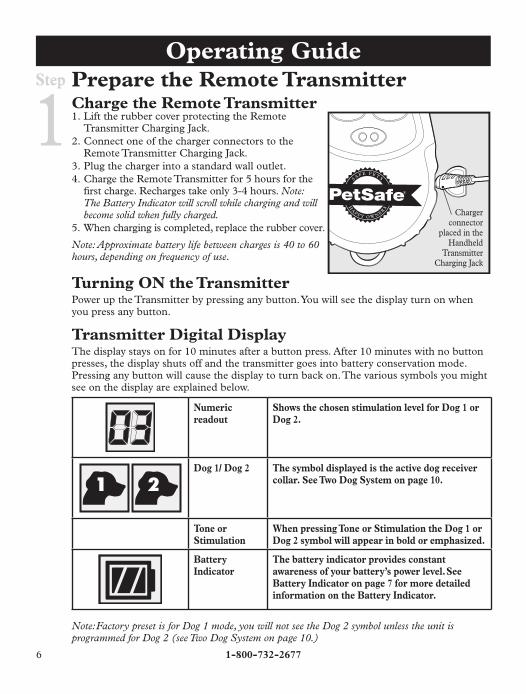
Lift the rubber cover protecting the Remote 1. Transmitter Charging Jack.Connect one of the charger connectors to the 2. Remote Transmitter Charging Jack.Plug the charger into a standard wall outlet.3. Charge the Remote Transmitter for 5 hours for the 4. fi rst charge. Recharges take only 3-4 hours. Note: The Battery Indicator will scroll while charging and will become solid when fully charged.When charging is completed, replace the rubber cover.5.
Note: Approximate battery life between charges is 40 to 60 hours, depending on frequency of use.
Charger connector
placed in the Handheld
Transmitter Charging Jack
Turning ON the TransmitterPower up the Transmitter by pressing any button. You will see the display turn on when you press any button.
Transmitter Digital DisplayThe display stays on for 10 minutes after a button press. After 10 minutes with no button presses, the display shuts off and the transmitter goes into battery conservation mode. Pressing any button will cause the display to turn back on. The various symbols you might see on the display are explained below.
Numeric readout
Shows the chosen stimulation level for Dog 1 or Dog 2.
Dog 1/ Dog 2 The symbol displayed is the active dog receiver collar. See Two Dog System on page 10.
Tone or Stimulation
When pressing Tone or Stimulation the Dog 1 or Dog 2 symbol will appear in bold or emphasized.
Battery Indicator
The battery indicator provides constant awareness of your battery’s power level. See Battery Indicator on page 7 for more detailed information on the Battery Indicator.
Note: Factory preset is for Dog 1 mode, you will not see the Dog 2 symbol unless the unit is programmed for Dog 2 (see Two Dog System on page 10.)
Step
1
www.petsafe.net 7
Battery IndicatorBattery is at 2⁄3 to Full capacity. Transmitter is fully functional.
Battery is at 1⁄3 capacity. Transmitter is still fully functional.
Battery is at 1⁄6 capacity. Transmitter will operate the Receiver, but recharge or replace Transmitter battery as soon as possible.
Battery is almost dead. Transmitter is unable to operate the Receiver.
When the Battery Indicator shows the low battery symbol (1⁄6 capacity), recharge your Transmitter soon. When just the battery outline is displayed, the Transmitter’s battery is unable to power transmissions to the Receiver. Transmitter must be recharged to regain operation.
Remote Transmitter Functions for Dog 1Transmitter Function Button Color Digital Display Response
Upper Left Button Black Tone Only
Lower Left Button Black Stimulation Only
Upper Right Button Grey Correction level Up
Lower Right Button Grey Correction level down
Boost Button Red +2 above selected correction level
See Two Dog System on page 10 for remote transmitter functions in Dog 2 mode.
Venture Transmitter Belt ClipTo remove:
Press down and hold the Release on the Belt Clip.1. Press upward on the Release and slide the belt clip out of the insert.2.
To replace:Slide the Belt Clip into the insert until it clicks. 1.
Prepare the Receiver CollarCharge the Receiver Collar
Lift the rubber cover protecting the Receiver Collar Charging Jack. 1. Connect the charger connector to the Receiver Collar Charging Jack.2. Plug the charger into a standard wall outlet.3.
Step
2
8 1-800-732-2677
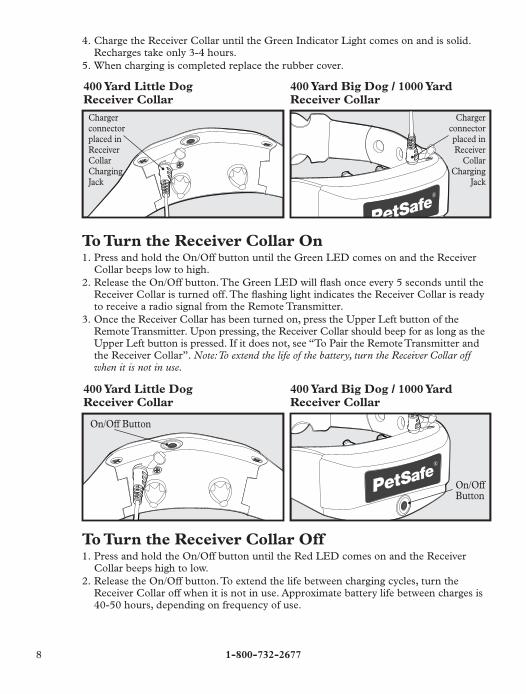
Charge the Receiver Collar until the Green Indicator Light comes on and is solid. 4. Recharges take only 3-4 hours. When charging is completed replace the rubber cover.5.
400 Yard Little Dog Receiver Collar
400 Yard Big Dog / 1000 Yard Receiver Collar
Charger connector placed in ReceiverCollar Charging Jack
Charger connector placed in Receiver
Collar Charging
Jack
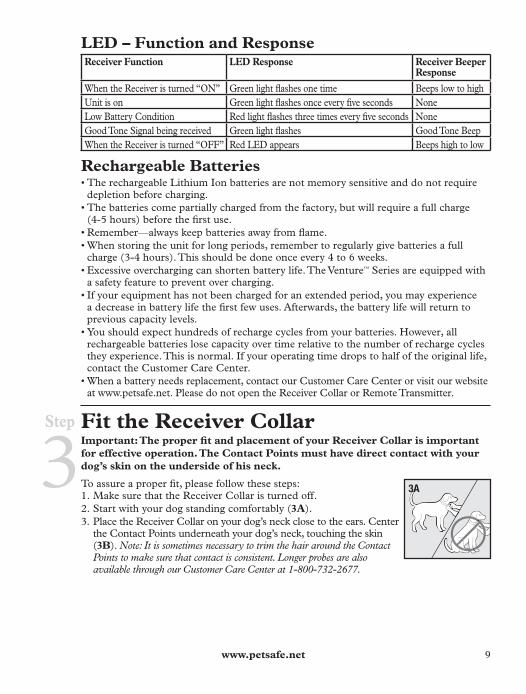
To Turn the Receiver Collar OnPress and hold the On/Off button until the Green LED comes on and the Receiver 1. Collar beeps low to high.Release the On/Off button. The Green LED will fl ash once every 5 seconds until the 2. Receiver Collar is turned off. The fl ashing light indicates the Receiver Collar is ready to receive a radio signal from the Remote Transmitter.Once the Receiver Collar has been turned on, press the Upper Left button of the 3. Remote Transmitter. Upon pressing, the Receiver Collar should beep for as long as the Upper Left button is pressed. If it does not, see “To Pair the Remote Transmitter and the Receiver Collar”. Note: To extend the life of the battery, turn the Receiver Collar off when it is not in use.
400 Yard Little Dog Receiver Collar
400 Yard Big Dog / 1000 Yard Receiver Collar
On/Off Button
On/OffButton
To Turn the Receiver Collar OffPress and hold the On/Off button until the Red LED comes on and the Receiver 1. Collar beeps high to low.Release the On/Off button. To extend the life between charging cycles, turn the 2. Receiver Collar off when it is not in use. Approximate battery life between charges is 40-50 hours, depending on frequency of use.
www.petsafe.net 9
LED – Function and Response Receiver Function LED Response Receiver Beeper
Response
When the Receiver is turned “ON” Green light fl ashes one time Beeps low to highUnit is on Green light fl ashes once every fi ve seconds None Low Battery Condition Red light fl ashes three times every fi ve seconds NoneGood Tone Signal being received Green light fl ashes Good Tone BeepWhen the Receiver is turned “OFF” Red LED appears Beeps high to low
Rechargeable BatteriesThe rechargeable Lithium Ion batteries are not memory sensitive and do not require • depletion before charging.The batteries come partially charged from the factory, but will require a full charge • (4-5 hours) before the fi rst use. Remember—always keep batteries away from fl ame.• When storing the unit for long periods, remember to regularly give batteries a full • charge (3-4 hours). This should be done once every 4 to 6 weeks.Excessive overcharging can shorten battery life. The Venture• ™ Series are equipped with a safety feature to prevent over charging.If your equipment has not been charged for an extended period, you may experience • a decrease in battery life the fi rst few uses. Afterwards, the battery life will return to previous capacity levels.You should expect hundreds of recharge cycles from your batteries. However, all • rechargeable batteries lose capacity over time relative to the number of recharge cycles they experience. This is normal. If your operating time drops to half of the original life, contact the Customer Care Center.When a battery needs replacement, contact our Customer Care Center or visit our website • at www.petsafe.net. Please do not open the Receiver Collar or Remote Transmitter.
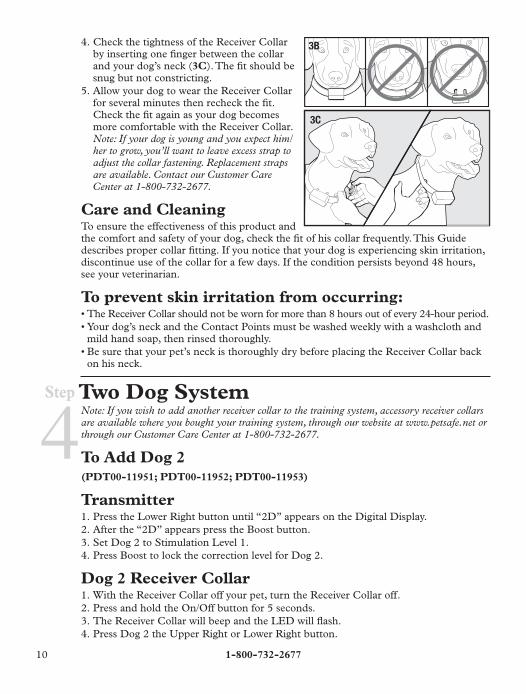
Fit the Receiver CollarImportant: The proper fi t and placement of your Receiver Collar is important for effective operation. The Contact Points must have direct contact with your dog’s skin on the underside of his neck.
To assure a proper fi t, please follow these steps:Make sure that the Receiver Collar is turned off. 1. Start with your dog standing comfortably (2. 3A).Place the Receiver Collar on your dog’s neck close to the ears. Center 3. the Contact Points underneath your dog’s neck, touching the skin (3B). Note: It is sometimes necessary to trim the hair around the Contact Points to make sure that contact is consistent. Longer probes are also available through our Customer Care Center at 1-800-732-2677.
3A
Step
3
10 1-800-732-2677
Check the tightness of the Receiver Collar 4. by inserting one fi nger between the collar and your dog’s neck (3C). The fi t should be snug but not constricting.Allow your dog to wear the Receiver Collar 5. for several minutes then recheck the fi t. Check the fi t again as your dog becomes more comfortable with the Receiver Collar. Note: If your dog is young and you expect him/her to grow, you’ll want to leave excess strap to adjust the collar fastening. Replacement straps are available. Contact our Customer Care Center at 1-800-732-2677.
Care and CleaningTo ensure the effectiveness of this product and
3C
3B
the comfort and safety of your dog, check the fi t of his collar frequently. This Guide describes proper collar fi tting. If you notice that your dog is experiencing skin irritation, discontinue use of the collar for a few days. If the condition persists beyond 48 hours, see your veterinarian.
To prevent skin irritation from occurring:The Receiver Collar should not be worn for more than 8 hours out of every 24-hour period.• Your dog’s neck and the Contact Points must be washed weekly with a washcloth and • mild hand soap, then rinsed thoroughly.Be sure that your pet’s neck is thoroughly dry before placing the Receiver Collar back • on his neck.
Two Dog SystemNote: If you wish to add another receiver collar to the training system, accessory receiver collars are available where you bought your training system, through our website at www.petsafe.net or through our Customer Care Center at 1-800-732-2677.
To Add Dog 2(PDT00-11951; PDT00-11952; PDT00-11953)
TransmitterPress the Lower Right button until “2D” appears on the Digital Display.1. After the “2D” appears press the Boost button.2. Set Dog 2 to Stimulation Level 1.3. Press Boost to lock the correction level for Dog 2.4.
Dog 2 Receiver CollarWith the Receiver Collar off your pet, turn the Receiver Collar off.1. Press and hold the On/Off button for 5 seconds.2. The Receiver Collar will beep and the LED will fl ash.3. Press Dog 2 the Upper Right or Lower Right button.4.
Step
4
www.petsafe.net 11
The Receiver Collar will respond and pair.5. If the Receiver Collar does not beep twice, please contact the Customer Care Center at 6. 1-800-732-2677.
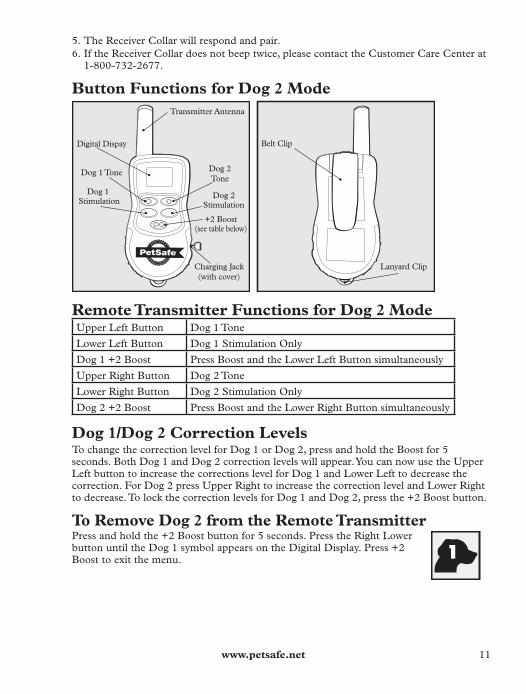
Button Functions for Dog 2 Mode
Digital Dispay
Dog 1 Tone Dog 2Tone
Charging Jack(with cover)
Transmitter Antenna
Dog 1 Stimulation
Dog 2Stimulation
+2 Boost(see table below)
Lanyard Clip
Belt Clip
Remote Transmitter Functions for Dog 2 ModeUpper Left Button Dog 1 Tone
Lower Left Button Dog 1 Stimulation Only
Dog 1 +2 Boost Press Boost and the Lower Left Button simultaneously
Upper Right Button Dog 2 Tone
Lower Right Button Dog 2 Stimulation Only
Dog 2 +2 Boost Press Boost and the Lower Right Button simultaneously
Dog 1/Dog 2 Correction LevelsTo change the correction level for Dog 1 or Dog 2, press and hold the Boost for 5 seconds. Both Dog 1 and Dog 2 correction levels will appear. You can now use the Upper Left button to increase the corrections level for Dog 1 and Lower Left to decrease the correction. For Dog 2 press Upper Right to increase the correction level and Lower Right to decrease. To lock the correction levels for Dog 1 and Dog 2, press the +2 Boost button.
To Remove Dog 2 from the Remote TransmitterPress and hold the +2 Boost button for 5 seconds. Press the Right Lower button until the Dog 1 symbol appears on the Digital Display. Press +2 Boost to exit the menu.
12 1-800-732-2677
To Pair Dog 1 Receiver Collar and the Remote TransmitterIf your Receiver Collar does not beep when the Upper Left button of the Remote Transmitter is pressed, or if you feel the Receiver Collar is not responding to the Remote Transmitter:
With the Receiver Collar off your pet, turn the Receiver Collar off.1. Press and hold the On/Off button for 5 seconds.2. The Receiver Collar will beep and the LED will fl ash.3. Press any Transmitter button.4. The Receiver Collar will respond and pair.5. If the Receiver Collar does not beep twice, please contact the Customer Care Center 6. at 1-800-732-2677
Note: Pairing is for Dog 1 only
Step
5

www.petsafe.net 13
Training GuideGeneral Tips
Eliminate one misbehavior or teach one obedience command at a time. If you move too fast with • training, your pet may become confused.Be consistent. Correct your pet every time he misbehaves.• Unless you can supervise him, it is recommended that you restrict your pet from situations in • which he has a history of misbehaving. However, setting up a situation as a training session can dramatically improve your chances of success.If your pet reacts to the tones by hiding or acting fearful, redirect his attention to a simple and • appropriate behavior, such as the “sit” command.Pets should be at least 6 months old before using the Trainer.• Only let responsible family members use the Trainer. It is not a toy!• Other pets in hearing range will be affected by the training tones. Therefore, training sessions • should be conducted out of hearing range of other pets.Never use the Remote Trainer to correct or eliminate any form of aggressive behavior. We • recommend you contact your local veterinarian or professional trainer to determine if your pet might be aggressive.Training instructions in this guide are written for use with the Transmitter being programmed to • Dog 1. Adjust the instructions to fi t your desired training mode.
Teaching Your Pet the Positive ToneBefore using the Trainer to correct your pet, spend 10 to 15 minutes per day for 2 or 3 days helping him create the association of the tone with reward and praise. To accomplish this:
Push the Tone button for 2 consecutive seconds. 1. Release the button and immediately reward your pet with verbal praise, petting, or a small food 2. reward. Spend 3 to 5 seconds on your rewarding. Wait a few minutes and repeat holding the Tone button for 2 seconds following with praise.3.
Vary the reward to prevent your pet from anticipating a specifi c type. This stage of training is complete when your pet obviously anticipates a reward when he hears the positive tone.
Find the Best Stimulation Level for Your PetImportant: Always start at the lowest level and work your way up.
The Remote Trainer has 8 different Stimulation Levels. This allows you to choose the Stimulation that is best for your pet.
Once you have placed the Receiver Collar on your pet, it is time to fi nd the Stimulation Level that is best for him. This is called the Recognition Level.
A slight change in your pet’s behavior, such as looking around in curiosity, scratching at his collar, or fl icking his ears, indicates the Recognition Level that is best for him.
Follow the steps below to fi nd your pet’s Recognition Level:Starting at Level 1 on the Digital Display, press the Stimulation button continuously for 1 to 2 seconds. 1. If your pet shows no reaction, repeat the Stimulation level several times before moving up to the 2. next level.
14 1-800-732-2677
YOUR PET SHOULD NOT VOCALIZE OR PANIC WHEN RECEIVING STIMULATION. 3. IF THIS HAPPENS, THE STIMULATION LEVEL IS TOO HIGH AND YOU NEED TO GO BACK TO THE PREVIOUS LEVEL AND REPEAT THE PROCESS.Move up through the Stimulation levels until your pet reliably responds to the Stimulation.4. If your pet continues to show no response at Level 8, check the fi t of the Receiver Collar. If 5. your pet has long or thick hair, contact our Customer Care Center 1-800-732-2677 to obtain a longer set of probes. Then go back to #1 and repeat the process. If this still does not yield any results, your pet’s hair will need to be trimmed around the Contact Points.
If all of these steps have been done and your pet continues to show no reaction to the Stimulation, see the “Test Light Instructions” section.
If after completing all of these steps your dog still does not indicate he is feeling the Stimulation, please contact Customer Care Center or visit our website at www.petsafe.net.
+2 BoostA press of the button sends a signal to the collar to issue a correction that is 2 levels higher than the currently selected level. For example, if the correction level is set at Level 2, a touch of the Boost control will correct at Level 4. Some trainers like instant access to a higher setting for circumstances where the dog may not respond to lower levels, such as around high distraction. The system will not correct higher than level 10.
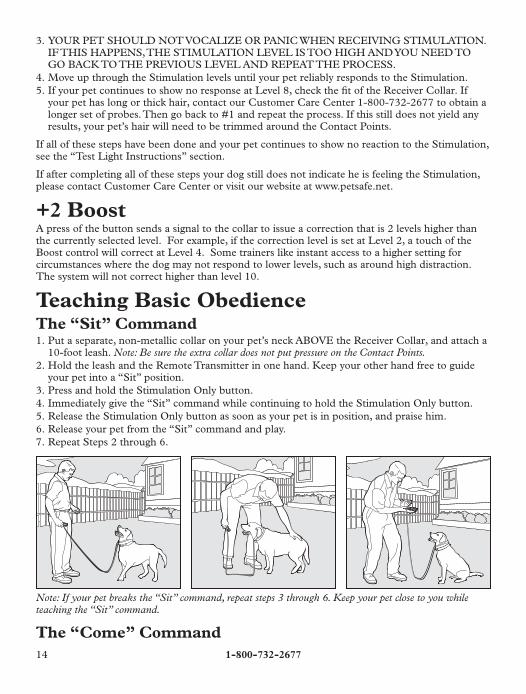
Teaching Basic ObedienceThe “Sit” Command
Put a separate, non-metallic collar on your pet’s neck ABOVE the Receiver Collar, and attach a 1. 10-foot leash. Note: Be sure the extra collar does not put pressure on the Contact Points.Hold the leash and the Remote Transmitter in one hand. Keep your other hand free to guide 2. your pet into a “Sit” position.Press and hold the Stimulation Only button.3. Immediately give the “Sit” command while continuing to hold the Stimulation Only button.4. Release the Stimulation Only button as soon as your pet is in position, and praise him.5. Release your pet from the “Sit” command and play.6. Repeat Steps 2 through 6.7.
Note: If your pet breaks the “Sit” command, repeat steps 3 through 6. Keep your pet close to you while teaching the “Sit” command.
The “Come” Command

www.petsafe.net 15
Put a separate, non-metallic collar on your pet’s 1. neck ABOVE the Receiver Collar, and attach a 10-foot leash. Note: Be sure the extra collar does not put pressure on the Contact Points.Hold your leash in one hand and the Remote 2. Transmitter in the other.Wait for your pet to walk away from you. 3. Using the Recognition Level for your pet, press and hold the Stimulation Only button on your Remote Transmitter.Immediately give the command “Come” while 4. continuing to hold the Stimulation Only button.Using the leash, gently guide your pet toward 5. you until he begins to come in your direction.Immediately release the Stimulation Only 6. button as soon as your pet steps towards you, and praise him enthusiastically.Quickly move backwards as your pet begins to 7. come back to you, praising him the entire time.Praise your pet when he returns to you.8. Repeat Steps 3 through 8.9. Once your pet responds readily to the 10. “Come” command several times, back away from him without giving a command. When your pet turns toward you, give the command “Come” (WITHOUT STIMULATION) and praise him while you continue to back up. Praise your pet when he returns to you.Use your leash to prevent your pet from 11. running past you. If your pet manages to run past you, repeat Steps 3 through 8.
The “Stay” CommandPut a separate, non-metallic collar on your pet’s neck ABOVE the Receiver Collar, and attach a 1. 10-foot leash. Note: Be sure the extra collar does not put pressure on the Contact Points.Put your pet on his bed. Hold your leash in one hand and the Remote Transmitter in the other.2. Staying within 3 feet, walk the perimeter of the bed. Do not say anything to your pet.3. If your pet tries to leave the bed, press and hold the Stimulation Only button and give the 4. “Stay” command. Continue to hold the button until your pet is back on his bed. If necessary, use the leash to guide your pet onto his place.Praise your pet when he is back on his bed.5. Once your pet has settled for a few seconds, release him and play calmly.6. Repeat steps 1 through 5.7.
16 1-800-732-2677
Eliminating Unwanted BehaviorJumping UpPets typically jump up to get attention. If you do not want your pet to jump on you, then friends or members of the family should not encourage this behavior. That means every time your pet jumps on someone, he should be reprimanded or redirected to an alternate and acceptable behavior, for which he can receive praise.
Note: It is best if your pet fi rst understands the “Sit” command.
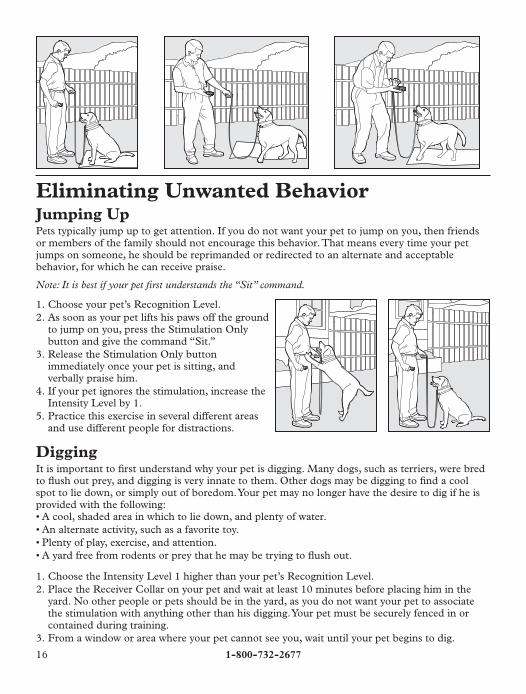
Choose your pet’s Recognition Level.1. As soon as your pet lifts his paws off the ground 2. to jump on you, press the Stimulation Only button and give the command “Sit.”Release the Stimulation Only button 3. immediately once your pet is sitting, and verbally praise him.If your pet ignores the stimulation, increase the 4. Intensity Level by 1.Practice this exercise in several different areas 5. and use different people for distractions.
DiggingIt is important to fi rst understand why your pet is digging. Many dogs, such as terriers, were bred to fl ush out prey, and digging is very innate to them. Other dogs may be digging to fi nd a cool spot to lie down, or simply out of boredom. Your pet may no longer have the desire to dig if he is provided with the following:
A cool, shaded area in which to lie down, and plenty of water.• An alternate activity, such as a favorite toy.• Plenty of play, exercise, and attention.• A yard free from rodents or prey that he may be trying to fl ush out.•
Choose the Intensity Level 1 higher than your pet’s Recognition Level.1. Place the Receiver Collar on your pet and wait at least 10 minutes before placing him in the 2. yard. No other people or pets should be in the yard, as you do not want your pet to associate the stimulation with anything other than his digging. Your pet must be securely fenced in or contained during training.From a window or area where your pet cannot see you, wait until your pet begins to dig.3.
www.petsafe.net 17
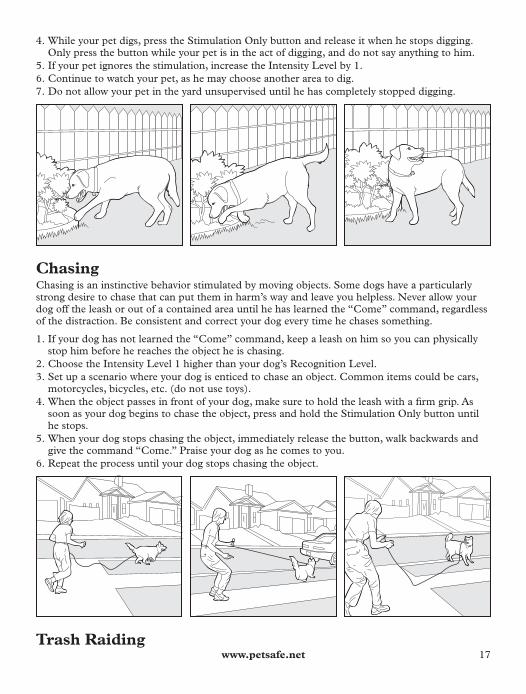
While your pet digs, press the Stimulation Only button and release it when he stops digging. 4. Only press the button while your pet is in the act of digging, and do not say anything to him.If your pet ignores the stimulation, increase the Intensity Level by 1.5. Continue to watch your pet, as he may choose another area to dig.6. Do not allow your pet in the yard unsupervised until he has completely stopped digging.7.
Chasing Chasing is an instinctive behavior stimulated by moving objects. Some dogs have a particularly strong desire to chase that can put them in harm’s way and leave you helpless. Never allow your dog off the leash or out of a contained area until he has learned the “Come” command, regardless of the distraction. Be consistent and correct your dog every time he chases something.
If your dog has not learned the “Come” command, keep a leash on him so you can physically 1. stop him before he reaches the object he is chasing.Choose the Intensity Level 1 higher than your dog’s Recognition Level.2. Set up a scenario where your dog is enticed to chase an object. Common items could be cars, 3. motorcycles, bicycles, etc. (do not use toys).When the object passes in front of your dog, make sure to hold the leash with a fi rm grip. As 4. soon as your dog begins to chase the object, press and hold the Stimulation Only button until he stops.When your dog stops chasing the object, immediately release the button, walk backwards and 5. give the command “Come.” Praise your dog as he comes to you.Repeat the process until your dog stops chasing the object.6.
Trash Raiding
18 1-800-732-2677
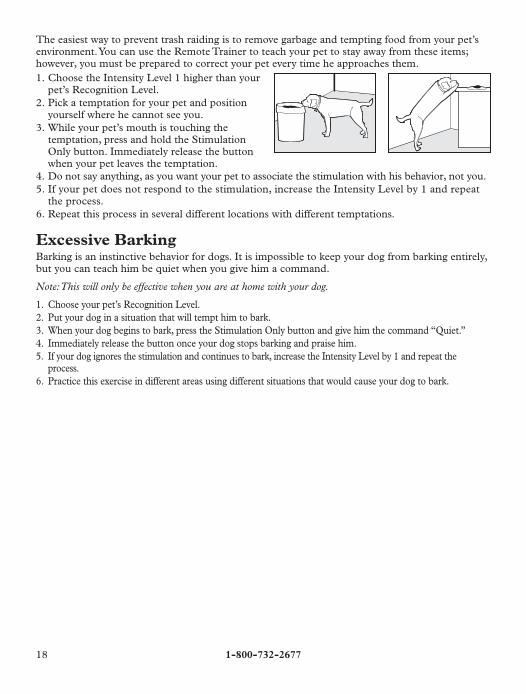
The easiest way to prevent trash raiding is to remove garbage and tempting food from your pet’s environment. You can use the Remote Trainer to teach your pet to stay away from these items; however, you must be prepared to correct your pet every time he approaches them.
Choose the Intensity Level 1 higher than your 1. pet’s Recognition Level.Pick a temptation for your pet and position 2. yourself where he cannot see you.While your pet’s mouth is touching the 3. temptation, press and hold the Stimulation Only button. Immediately release the button when your pet leaves the temptation.Do not say anything, as you want your pet to associate the stimulation with his behavior, not you.4. If your pet does not respond to the stimulation, increase the Intensity Level by 1 and repeat 5. the process.Repeat this process in several different locations with different temptations.6.
Excessive BarkingBarking is an instinctive behavior for dogs. It is impossible to keep your dog from barking entirely, but you can teach him be quiet when you give him a command.
Note: This will only be effective when you are at home with your dog.
Choose your pet’s Recognition Level.1. Put your dog in a situation that will tempt him to bark.2. When your dog begins to bark, press the Stimulation Only button and give him the command “Quiet.”3. Immediately release the button once your dog stops barking and praise him.4. If your dog ignores the stimulation and continues to bark, increase the Intensity Level by 1 and repeat the 5. process.Practice this exercise in different areas using different situations that would cause your dog to bark.6.
www.petsafe.net 19
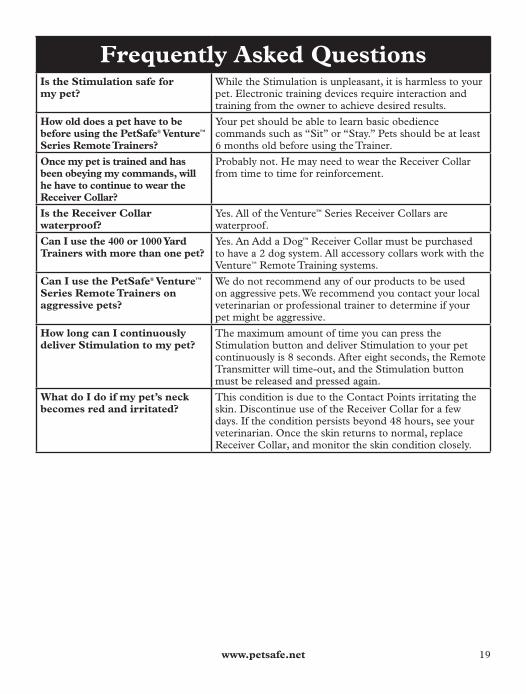
Frequently Asked QuestionsIs the Stimulation safe for my pet?
While the Stimulation is unpleasant, it is harmless to your pet. Electronic training devices require interaction and training from the owner to achieve desired results.
How old does a pet have to be before using the PetSafe® Venture™ Series Remote Trainers?
Your pet should be able to learn basic obedience commands such as “Sit” or “Stay.” Pets should be at least 6 months old before using the Trainer.
Once my pet is trained and has been obeying my commands, will he have to continue to wear the Receiver Collar?
Probably not. He may need to wear the Receiver Collar from time to time for reinforcement.
Is the Receiver Collar waterproof?
Yes. All of the Venture™ Series Receiver Collars are waterproof.
Can I use the 400 or 1000 Yard Trainers with more than one pet?
Yes. An Add a Dog™ Receiver Collar must be purchased to have a 2 dog system. All accessory collars work with the Venture™ Remote Training systems.
Can I use the PetSafe® Venture™ Series Remote Trainers on aggressive pets?
We do not recommend any of our products to be used on aggressive pets. We recommend you contact your local veterinarian or professional trainer to determine if your pet might be aggressive.
How long can I continuously deliver Stimulation to my pet?
The maximum amount of time you can press the Stimulation button and deliver Stimulation to your pet continuously is 8 seconds. After eight seconds, the Remote Transmitter will time-out, and the Stimulation button must be released and pressed again.
What do I do if my pet’s neck becomes red and irritated?
This condition is due to the Contact Points irritating the skin. Discontinue use of the Receiver Collar for a few days. If the condition persists beyond 48 hours, see your veterinarian. Once the skin returns to normal, replace Receiver Collar, and monitor the skin condition closely.
20 1-800-732-2677
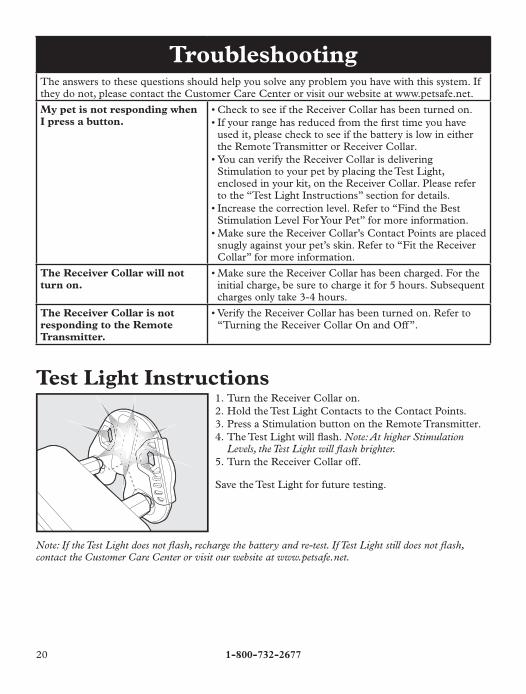
TroubleshootingThe answers to these questions should help you solve any problem you have with this system. If they do not, please contact the Customer Care Center or visit our website at www.petsafe.net.
My pet is not responding when I press a button.
Check to see if the Receiver Collar has been turned on.• If your range has reduced from the fi rst time you have • used it, please check to see if the battery is low in either the Remote Transmitter or Receiver Collar.You can verify the Receiver Collar is delivering • Stimulation to your pet by placing the Test Light, enclosed in your kit, on the Receiver Collar. Please refer to the “Test Light Instructions” section for details.Increase the correction level. Refer to “Find the Best • Stimulation Level For Your Pet” for more information.Make sure the Receiver Collar’s Contact Points are placed • snugly against your pet’s skin. Refer to “Fit the Receiver Collar” for more information.
The Receiver Collar will not turn on.
Make sure the Receiver Collar has been charged. For the • initial charge, be sure to charge it for 5 hours. Subsequent charges only take 3-4 hours.
The Receiver Collar is not responding to the Remote Transmitter.
Verify the Receiver Collar has been turned on. Refer to • “Turning the Receiver Collar On and Off”.
Test Light InstructionsTurn the Receiver Collar on.1. Hold the Test Light Contacts to the Contact Points.2. Press a Stimulation button on the Remote Transmitter.3. The Test Light will fl ash. 4. Note: At higher Stimulation Levels, the Test Light will fl ash brighter.Turn the Receiver Collar off.5.
Save the Test Light for future testing.
Note: If the Test Light does not fl ash, recharge the battery and re-test. If Test Light still does not fl ash, contact the Customer Care Center or visit our website at www.petsafe.net.
www.petsafe.net 21
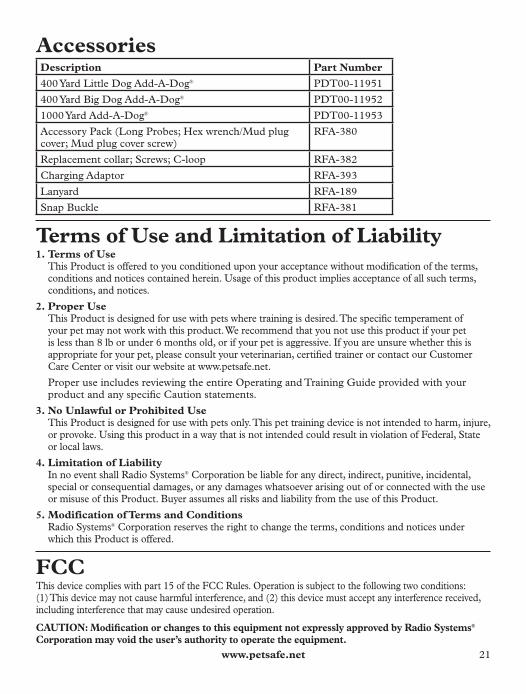
Accessories Description Part Number
400 Yard Little Dog Add-A-Dog® PDT00-11951
400 Yard Big Dog Add-A-Dog® PDT00-11952
1000 Yard Add-A-Dog® PDT00-11953
Accessory Pack (Long Probes; Hex wrench/Mud plug cover; Mud plug cover screw)
RFA-380
Replacement collar; Screws; C-loop RFA-382
Charging Adaptor RFA-393
Lanyard RFA-189
Snap Buckle RFA-381
Terms of Use and Limitation of LiabilityTerms of Use 1. This Product is offered to you conditioned upon your acceptance without modifi cation of the terms, conditions and notices contained herein. Usage of this product implies acceptance of all such terms, conditions, and notices.
Proper Use 2. This Product is designed for use with pets where training is desired. The specifi c temperament of your pet may not work with this product. We recommend that you not use this product if your pet is less than 8 lb or under 6 months old, or if your pet is aggressive. If you are unsure whether this is appropriate for your pet, please consult your veterinarian, certifi ed trainer or contact our Customer Care Center or visit our website at www.petsafe.net.
Proper use includes reviewing the entire Operating and Training Guide provided with your product and any specifi c Caution statements.
No Unlawful or Prohibited Use 3. This Product is designed for use with pets only. This pet training device is not intended to harm, injure, or provoke. Using this product in a way that is not intended could result in violation of Federal, State or local laws.
Limitation of Liability 4. In no event shall Radio Systems® Corporation be liable for any direct, indirect, punitive, incidental, special or consequential damages, or any damages whatsoever arising out of or connected with the use or misuse of this Product. Buyer assumes all risks and liability from the use of this Product.
Modification of Terms and Conditions 5. Radio Systems® Corporation reserves the right to change the terms, conditions and notices under which this Product is offered.
FCCThis device complies with part 15 of the FCC Rules. Operation is subject to the following two conditions: (1) This device may not cause harmful interference, and (2) this device must accept any interference received, including interference that may cause undesired operation.
CAUTION: Modifi cation or changes to this equipment not expressly approved by Radio Systems® Corporation may void the user’s authority to operate the equipment.
22 1-800-732-2677
NOTE: This equipment has been tested and found to comply with the limits for a Class B digital device, pursuant to part 15 of the FCC Rules. These limits are designed to provide reasonable protection against harmful interference in a residential installation. This equipment generates, uses, and can radiate radio frequency energy and, if not installed and used in accordance with the instructions, may cause harmful interference to radio communications. However, there is no guarantee that interference will not occur in a specifi c installation. If interference does occur to radio or television reception, which can be determined by turning the equipment off and on, the user is encouraged to try to correct the interference by one or more of the following measures:
Reorient or relocate the receiving antenna.• Increase the separation between the equipment and the receiver.• Connect the equipment to an outlet on a circuit different from that to which the receiver is connected.• Consult customer care, the dealer, or an experienced radio/TV technician for help.•
This Class B digital apparatus complies with Canadian ICES-003.Cet appareil numérique de la classe B est con forme à la norme NMB-003 du Canada.
Perchlorate BatteryPerchlorate Material – special handling may apply. See www.dtsc.ca.gov/hazardouswaste/perchlorate.
Non-Transferrable Limited WarrantyWHAT IS COVERED: Radio Systems® Corporation d/b/a PetSafe® (hereinafter referred to as “PetSafe®”) warrants to the original retail consumer purchaser, and not any other purchaser or subsequent owner, that its PetSafe® electronic product, when subject to normal and proper residential use, will be free from defects in material or workmanship for the life of the product. When serviced by PetSafe® Customer Service, PetSafe® covers labor for the fi rst year of ownership; after the fi rst year, a service charge will apply for the repair or replacement of the product. The limited warranty is non-transferrable and shall automatically terminate if the original retail consumer purchaser resells the PetSafe® product or transfers the property on which the PetSafe® product is installed. In the event of defect, these are your exclusive remedies.
PROPER PRODUCT USE: This product is designed only for use with domesticated animals; do not use this product for any other purpose. However, the specifi c temperament of your animal may not work with this product. We recommend that you do not use this product if your animal is aggressive. If you are unsure whether this product is appropriate for your animal, please consult with your veterinarian or certifi ed trainer before you use this product. Please see the instruction manual for additional important information.
WHAT IS NOT COVERED: This non-transferrable limited warranty does not provide protection against, and PetSafe® will have no liability under this non-transferrable limited warranty for any failure, defect or damage caused by events and situations beyond normal residential exposure conditions, including, but not limited to: commercial use, misuse, abuse, neglect, improper installation or installation not in accordance with PetSafe®’s instructions, use of non-PetSafe® accessories, impacts of foreign objects, acts of God, abnormal or improper use, improper storage, attempted repair or service by anyone other than PetSafe® Customer Service, accident, alteration, defects in or failure of the surface the PetSafe® product is installed in or upon, discoloration or other damage caused by pollution, sunlight, other environmental conditions, mold, dirt, mildew, or exposure to harmful chemicals and any other cause not involving manufacturing defects in the PetSafe® product. Furthermore, this non-transferrable limited warranty does not cover damage to or defects in the products caused by any animal.
Under no circumstances will PetSafe® be liable for any non-PetSafe® labor charges or any expenses whatsoever in connection with the removal, repair or installation of either the original or replacement component(s).

www.petsafe.net 23
REGISTERING THE PRODUCT: Within thirty (30) days of purchase, please go to www.petsafe.net to register your purchase. You may be required to provide proof of purchase to obtain warranty coverage. Please keep this information in a safe place.
MAKING A WARRANTY CLAIM: To obtain warranty service, call the PetSafe® Customer Care Center at 1-800-732-2677 (US), 1-800-457-3911 (Canada) for assistance.
Pursuant to this non-transferrable limited warranty, PetSafe® will replace the part with a new or refurbished part. This non-transferrable limited warranty will then apply to either the new or refurbished part for the remainder of the original non-transferrable limited warranty period.
EXCLUSIONS: REPLACEMENT AS PROVIDED UNDER THIS NON-TRANSFERRABLE LIMITED WARRANTY IS THE EXCLUSIVE REMEDY OF THE CONSUMER. NEITHER LABOR TO REMOVE THE PART NOR LABOR TO INSTALL THE REFURBISHED OR REPLACED PART IS COVERED.
THIS NON-TRANSFERRABLE LIMITED WARRANTY IS IN LIEU OF ALL OTHER EXPRESS WARRANTIES. PetSafe® EXPRESSLY DISCLAIMS AND EXCLUDES ALL OTHER WARRANTIES, EXPRESS OR IMPLIED, INCLUDING WITHOUT LIMITATION, THE WARRANTIES OF MERCHANTABILITY AND FITNESS FOR A PARTICULAR PURPOSE. PetSafe® ALSO DISCLAIMS AND EXCLUDES ALL LIABILITY FOR INCIDENTAL, CONSEQUENTIAL, PUNITIVE, DIRECT, INDIRECT, SPECIAL OR ANY OTHER DAMAGES ARISING OUT OF OR CONNECTED WITH THE PURCHASE, USE OR MISUSE OF THIS PRODUCT OR FOR THE BREACH OF ANY EXPRESS OR IMPLIED WARRANTIES OR BREACH OF CONTRACT OR OTHERWISE. PURCHASER ASSUMES ALL RISKS AND LIABILITIES FROM THE USE OR MISUSE OF THIS PRODUCT. PetSafe® DOES NOT AUTHORIZE ANY OTHER PERSON OR AGENT TO MAKE ANY OTHER EXPRESS OR IMPLIED WARRANTIES.
FURTHERMORE, PetSafe® WILL NOT BE LIABLE FOR ANY LOSS, DAMAGE OR INJURY RESULTING FROM DELAY IN DELIVERY OF REPLACEMENT PARTS OR FOR ANY FAILURE BY PetSafe® TO PERFORM COVERED REPAIR WORK DUE TO CIRCUMSTANCES BEYOND PetSafe®’s CONTROL.
GOVERNING LAW: This non-transferrable limited warranty shall be governed by the law of the State of Tennessee, U.S.A., and by the laws of the United States of America, excluding their confl icts of laws principles. Furthermore, the United Nations Convention on Contracts for the International Sale of Goods is hereby excluded in its entirety from application to this non-transferrable limited warranty. Jurisdiction and venue shall be exclusive to the courts of Knox County, Tennessee.
These warranties give you specifi c legal rights, and you may also have other rights that vary from state to state. Some states do not allow the exclusion or limitation of incidental or consequential damages, so the above limitation or exclusion may not apply to you.

Radio Systems® Corporation10427 Electric Ave.
Knoxville, TN 379321-800-732-2677www.petsafe.net
400-1045
©2008 Radio Systems® Corporation