Embed Size (px)
Citation preview
1
PET TUTOR® USER MANUAL

2
Smart Animal Training Systems, LLC 133 W Market St. Suite 360 Indianapolis IN 46204-2801 www.SmartAnimalTraining.com Copyright © 2014 Smart Animal Training Systems LLC All rights reserved. Pet Tutor® User Manual April 2014
3
CONTENTS
COMPANY STATEMENTS........................................................................................................................................... 4 VISION ............................................................................................................................................................................ 4 MISSION ......................................................................................................................................................................... 4 VALUES .......................................................................................................................................................................... 4
HOW THE PET TUTOR® WORKS ............................................................................................................................ 5 WHAT’S IN THE BOX? ................................................................................................................................................. 6
THE FEEDER ................................................................................................................................................................... 7 About the Buttons on the Feeder ............................................................................................................................... 9 The Pet Tutor® pre-programmed factory settings ................................................................................................. 10
THE REMOTE ................................................................................................................................................................ 11 The Remote Functions: (Button actions: Quick press=1 beep, hold=2 beeps, long hold=3 beeps) ......................... 12 Pairing the remote to a feeder ................................................................................................................................. 13 Re-calibration of the feeder’s treat detectors.......................................................................................................... 13
THE UNIVERSAL CRATE MOUNT ................................................................................................................................. 14 PREPARING THE PET TUTOR® ............................................................................................................................. 15 QUICK START - OPERATING THE PET TUTOR® .............................................................................................. 15 CARE AND CLEANING .............................................................................................................................................. 16 THE PET TUTOR® CONTROL CENTER PROGRAM FOR COMPUTERS..................................................... 17
CONNECTING THE PET TUTOR® TO THE CONTROL CENTER ....................................................................................... 17 Timers: ..................................................................................................................................................................... 17 TOD (Time Of Day) Triggers ..................................................................................................................................... 18 Internet .................................................................................................................................................................... 18 Logger...................................................................................................................................................................... 19 Diagnostic Screen .................................................................................................................................................... 19
TRAINING TIPS............................................................................................................................................................ 19 FREQUENTLY ASKED QUESTIONS ....................................................................................................................... 20 SPECIFICATIONS........................................................................................................................................................ 21 IMPORTANT HEALTH INFORMATION AND SAFETY PRECAUTIONS........................................................ 21
SAFETY PRECAUTIONS FOR AC ADAPTER ................................................................................................................... 22 Servicing of Double- Insulated Products ................................................................................................................. 22
SAFETY PRECAUTIONS FOR THE PET TUTOR® REMOTE.............................................................................................. 22 If the battery leaks ................................................................................................................................................... 22
SAFETY PRECAUTIONS FOR DIRECT SUNLIGHT ........................................................................................................... 23 TO REPLACE BATTERIES ........................................................................................................................................ 23
IMPORTANT: BATTERY INFORMATION......................................................................................................................... 23 TO PLUG THE PET TUTOR® TO AN OUTLET.................................................................................................... 24 FCC STATEMENT........................................................................................................................................................ 24 IC STATEMENT (INDUSTRY CANADA) ................................................................................................................ 24 ONE YEAR NON-TRANSFERABLE LIMITED WARRANTY ............................................................................. 25 CUSTOMER CARE ...................................................................................................................................................... 27 QUICK START YOUR PET TUTOR® ...................................................................................................................... 28
Remote Buttons Quick Reference ............................................................................................................................ 28

4
COMPANY STATEMENTS
VISION The Smart Animal Training Systems products strive to be such easy and effective animal-teaching devices that positive reinforcement becomes the most widely used method of animal trainers and guardians.
MISSION The Pet Tutor® provides a positive reinforcement training method through the use of simple, reliable and adaptable technology that enhances the training experience of trainers, guardians and their pets.
VALUES - We believe that all pets deserve respect and humane treatment. - We believe learning science has proven the effectiveness of positive reinforcement methods and they
apply equally well to pets, working/service animals and zoo animals. - We believe technology, when correctly applied, can facilitate the learning process between pets and their
caregiver. - We believe animals are always learning so teaching should be able to happen wherever they are.

5
HOW THE PET TUTOR® WORKS
- The Pet Tutor® is an advanced Smart Remote Training System to deliver treats or dry food. - It dispenses treats through a remote using wireless technology. - It has sound and movement sensors and utilizes smart technology.
Pet Tutor® combines multiple functions on the same unit to TRAIN your dog, PLAY with your dog and FEED your dog with timed meal deliveries:
- TRAIN your dog with the most advanced technology with either manual or automated reinforcement. Reward your dog remotely while in the same room or over the Internet.
- PLAY with your dog with expandable capabilities for enrichment. With the ‘chase feed’ feature your dog will engage in chasing activity, turning meal time into play time. With the movement sensor you can turn different toys and objects into fun, interactive and energy-burning games.
- FEED your dog with the internal clock that can be pre-program for how much you feed, when you feed and how you feed your dog’s meals.
The Pet Tutor®’s remote control can manually trigger from one to three feeders or can be set to automatically treat via sound or movement sensors. Internal programs are also available for automated training protocols. Connecting the remote to a laptop allows you to customize your settings such as timers, reward intervals, sensitivity of the remote’s movement, activation of the bark mode, setting the time of day triggers, and provides many advanced capabilities, such as keeping a log of the dog’s training activity. The program also allows you to remotely trigger the feeder over the Internet. Pet Tutor® comes with a highly versatile mounting design which can be used virtually anywhere the animal is located. The floor base provides both ‘bowl’ and ‘chase feed’ treat delivery options; you can set it on an object above your pet’s reach. With the Universal Crate Mount you can attach the Pet Tutor® to a crate or kennel. Utilizing the stainless steel handle, you can also hang the Pet Tutor® from a hook, a tree, over kennels or outdoors (not water proof). The feeder attaches to the floor base or crate mount with its one hand quarter-turn twist lock system. The Pet Tutor® adapts automatically to different types and sizes of treats allowing for the use of a mixture of dry kibble and treats. When the treats are dispensed, a light is activated, providing a visual marker to the animal. You can also choose to set a marker tone or leave the delivery of the treats completely silent. The Pet Tutor®:
- Is flexible for almost any situation (e.g.: portable, manual or automatic operation, etc.)
- Is suitable for professional trainers and pet guardians (professional grade materials and design, but easy-use for average consumer)
- Is an effective, positive and humane training method (using only positive reinforcement)
- Offers a variety of input mechanisms to address many training scenarios - Is expandable with future software and hardware accessories.
6
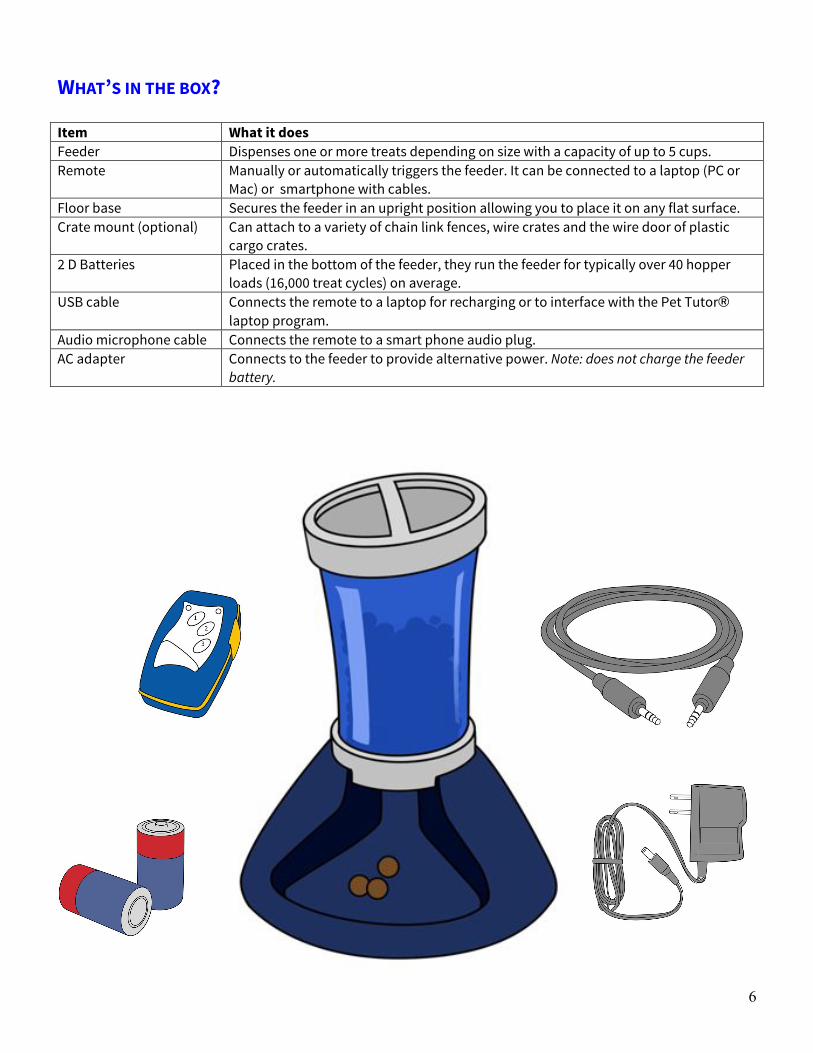
WHAT’S IN THE BOX? Item What it does Feeder Dispenses one or more treats depending on size with a capacity of up to 5 cups. Remote Manually or automatically triggers the feeder. It can be connected to a laptop (PC or
Mac) or smartphone with cables. Floor base Secures the feeder in an upright position allowing you to place it on any flat surface. Crate mount (optional) Can attach to a variety of chain link fences, wire crates and the wire door of plastic
cargo crates. 2 D Batteries Placed in the bottom of the feeder, they run the feeder for typically over 40 hopper
loads (16,000 treat cycles) on average. USB cable Connects the remote to a laptop for recharging or to interface with the Pet Tutor®
laptop program. Audio microphone cable Connects the remote to a smart phone audio plug. AC adapter Connects to the feeder to provide alternative power. Note: does not charge the feeder
battery.
7
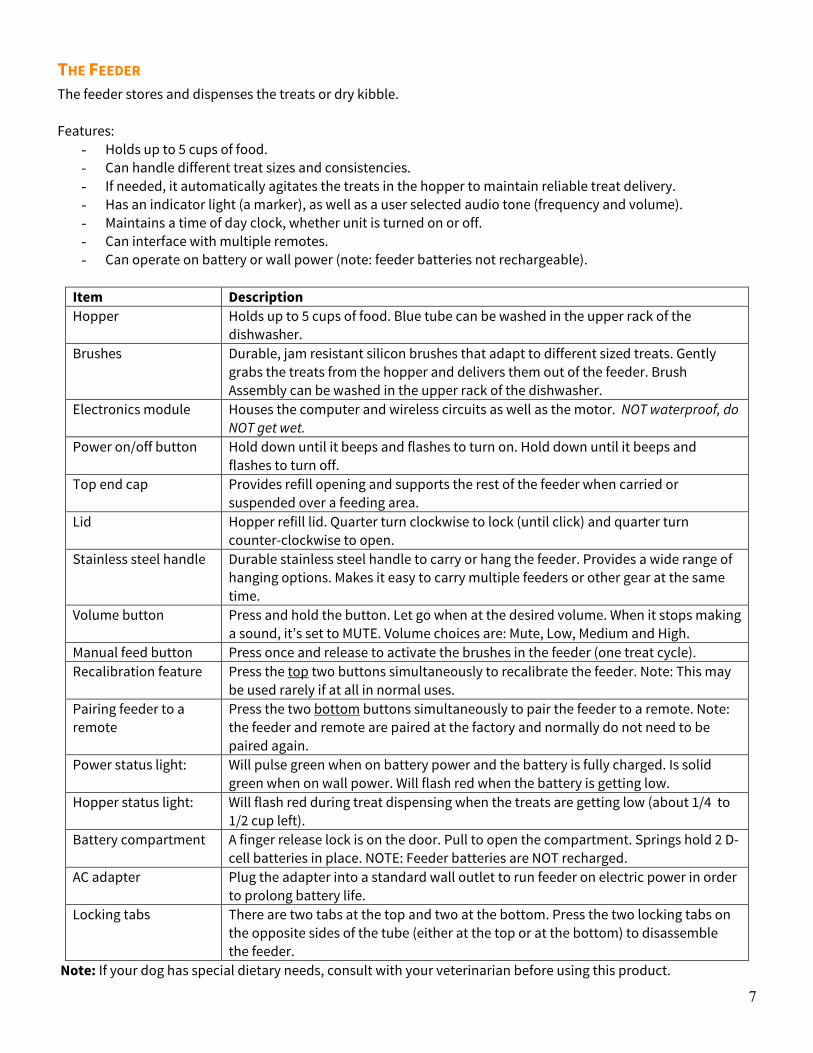
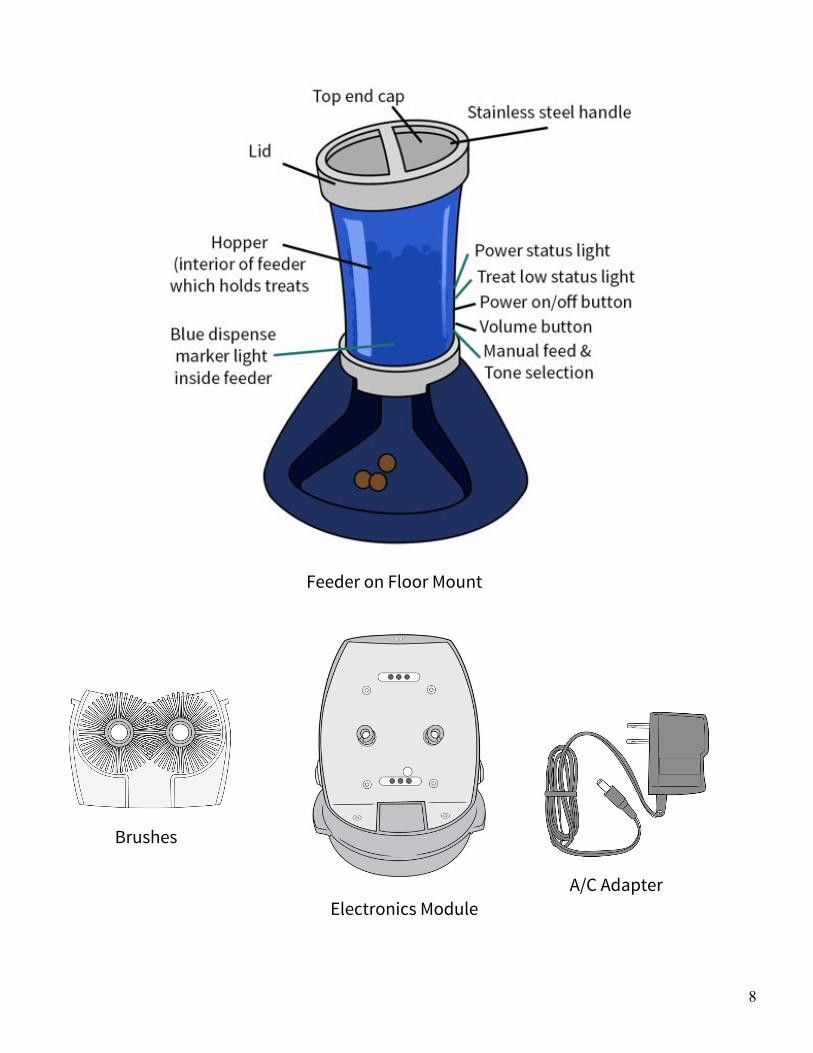
THE FEEDER The feeder stores and dispenses the treats or dry kibble. Features:
- Holds up to 5 cups of food. - Can handle different treat sizes and consistencies. - If needed, it automatically agitates the treats in the hopper to maintain reliable treat delivery. - Has an indicator light (a marker), as well as a user selected audio tone (frequency and volume). - Maintains a time of day clock, whether unit is turned on or off. - Can interface with multiple remotes. - Can operate on battery or wall power (note: feeder batteries not rechargeable).
Item Description Hopper Holds up to 5 cups of food. Blue tube can be washed in the upper rack of the
dishwasher. Brushes Durable, jam resistant silicon brushes that adapt to different sized treats. Gently
grabs the treats from the hopper and delivers them out of the feeder. Brush Assembly can be washed in the upper rack of the dishwasher.
Electronics module Houses the computer and wireless circuits as well as the motor. NOT waterproof, do NOT get wet.
Power on/off button Hold down until it beeps and flashes to turn on. Hold down until it beeps and flashes to turn off.
Top end cap Provides refill opening and supports the rest of the feeder when carried or suspended over a feeding area.
Lid Hopper refill lid. Quarter turn clockwise to lock (until click) and quarter turn counter-clockwise to open.
Stainless steel handle Durable stainless steel handle to carry or hang the feeder. Provides a wide range of hanging options. Makes it easy to carry multiple feeders or other gear at the same time.
Volume button Press and hold the button. Let go when at the desired volume. When it stops making a sound, it’s set to MUTE. Volume choices are: Mute, Low, Medium and High.
Manual feed button Press once and release to activate the brushes in the feeder (one treat cycle). Recalibration feature Press the top two buttons simultaneously to recalibrate the feeder. Note: This may
be used rarely if at all in normal uses. Pairing feeder to a remote
Press the two bottom buttons simultaneously to pair the feeder to a remote. Note: the feeder and remote are paired at the factory and normally do not need to be paired again.
Power status light: Will pulse green when on battery power and the battery is fully charged. Is solid green when on wall power. Will flash red when the battery is getting low.
Hopper status light: Will flash red during treat dispensing when the treats are getting low (about 1/4 to 1/2 cup left).
Battery compartment A finger release lock is on the door. Pull to open the compartment. Springs hold 2 D-cell batteries in place. NOTE: Feeder batteries are NOT recharged.
AC adapter Plug the adapter into a standard wall outlet to run feeder on electric power in order to prolong battery life.
Locking tabs There are two tabs at the top and two at the bottom. Press the two locking tabs on the opposite sides of the tube (either at the top or at the bottom) to disassemble the feeder.
Note: If your dog has special dietary needs, consult with your veterinarian before using this product.
8
Electronics Module
Brushes
A/C Adapter
Feeder on Floor Mount
9
About the Buttons on the Feeder Button/Light & Action Button/Status Indicator What It Means
Top light pulses green Operating on battery and battery is sufficient.
Top light pulses red Operating on battery and battery is getting low.
Power: Turn feeder on/off: Press and hold for about 3 seconds until it beeps and flashes.
Top light is solid green Running off of the AC adapter.
Volume: Press and release for desired volume (Mute, Low, Medium, High).
None/listen to the sound Selected sound will act as a marker signal that precedes the delivery of the treat.
Feeder Status Light: Check hopper for treat quantity.
Flashes red as the treats are dispensed if the hopper is low.
The feeder is running low on treats (less than 1/4 to 1/2 cup left).
Power + Volume: Recalibrate the feeder: If the feeder repeatedly dispenses more than 5-6 treats, the unit needs recalibration. Empty all treats out of the hopper and press the manual button multiple times until the feeder is completely empty. Make sure the lid is on the top of the feeder. Hold the top and middle button until you hear a beep.
Beeps, red and green light flicker (for 30 seconds). The power light will begin to slowly pulse again indicating calibration complete.
The sensors may need to recalibrate if you see too many treats dispensed.
Volume + Manual Feed: Pair the feeder to a remote. Remote and feeder are paired at the factory. You will only need to pair the feeder to a new remote or a second remote.
See section ‘Pairing a remote to the feeder’.
For a remote to trigger a feeder it must first be paired to the feeder. New remotes may be paired to the same feeder. One remote may also be paired to up to three different feeders.
10
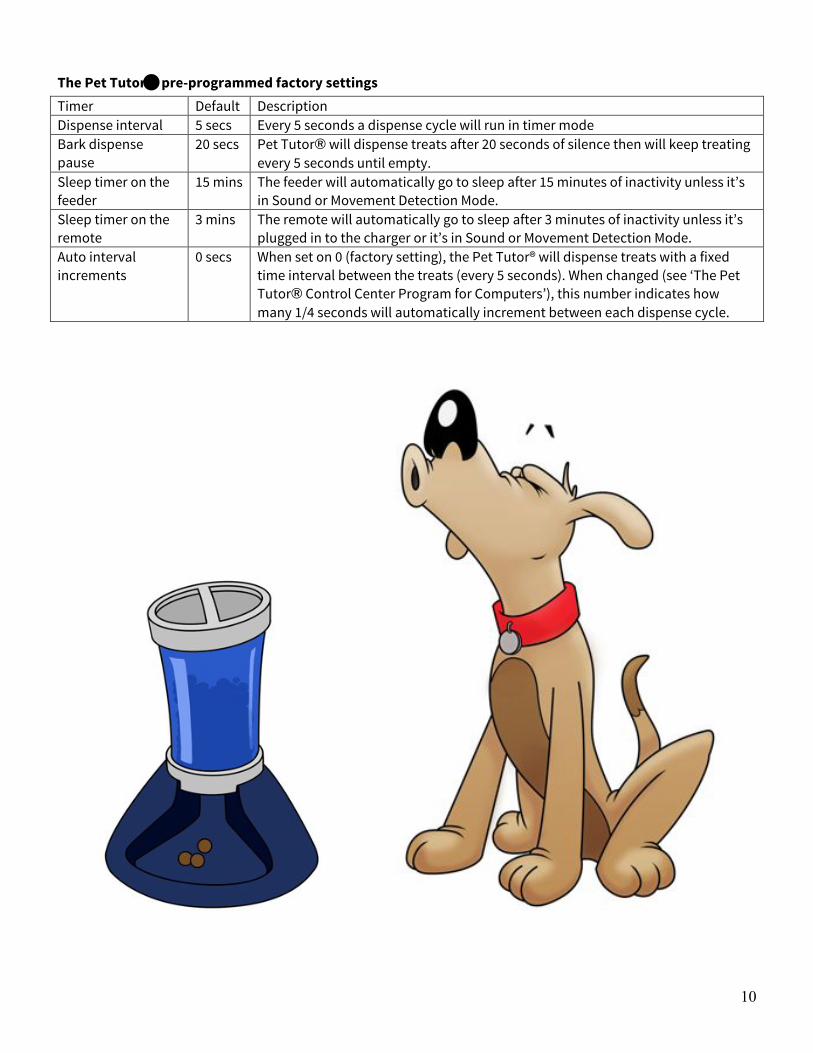
The Pet Tutor® pre-programmed factory settings Timer Default Description Dispense interval 5 secs Every 5 seconds a dispense cycle will run in timer mode Bark dispense pause
20 secs Pet Tutor® will dispense treats after 20 seconds of silence then will keep treating every 5 seconds until empty.
Sleep timer on the feeder
15 mins The feeder will automatically go to sleep after 15 minutes of inactivity unless it’s in Sound or Movement Detection Mode.
Sleep timer on the remote
3 mins The remote will automatically go to sleep after 3 minutes of inactivity unless it’s plugged in to the charger or it’s in Sound or Movement Detection Mode.
Auto interval increments
0 secs When set on 0 (factory setting), the Pet Tutor® will dispense treats with a fixed time interval between the treats (every 5 seconds). When changed (see ‘The Pet Tutor® Control Center Program for Computers’), this number indicates how many 1/4 seconds will automatically increment between each dispense cycle.
11
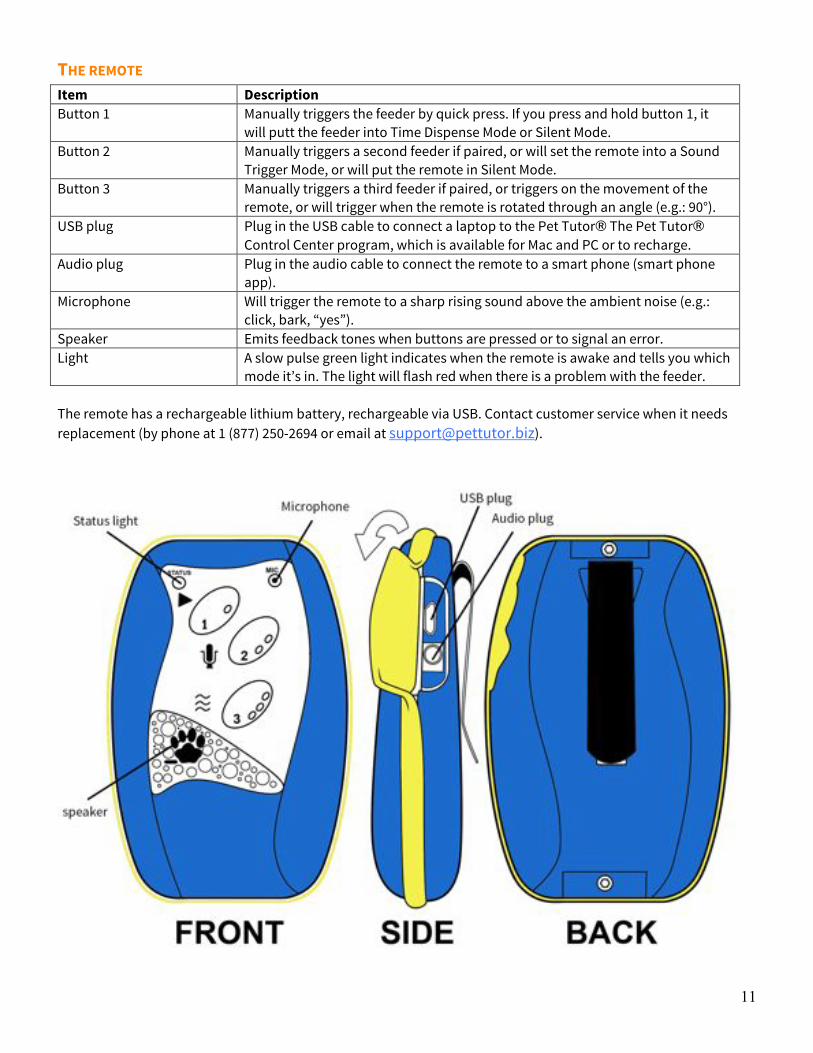
THE REMOTE Item Description Button 1 Manually triggers the feeder by quick press. If you press and hold button 1, it
will putt the feeder into Time Dispense Mode or Silent Mode. Button 2 Manually triggers a second feeder if paired, or will set the remote into a Sound
Trigger Mode, or will put the remote in Silent Mode. Button 3 Manually triggers a third feeder if paired, or triggers on the movement of the
remote, or will trigger when the remote is rotated through an angle (e.g.: 90°). USB plug Plug in the USB cable to connect a laptop to the Pet Tutor® The Pet Tutor®
Control Center program, which is available for Mac and PC or to recharge. Audio plug Plug in the audio cable to connect the remote to a smart phone (smart phone
app). Microphone Will trigger the remote to a sharp rising sound above the ambient noise (e.g.:
click, bark, “yes”). Speaker Emits feedback tones when buttons are pressed or to signal an error. Light A slow pulse green light indicates when the remote is awake and tells you which
mode it’s in. The light will flash red when there is a problem with the feeder. The remote has a rechargeable lithium battery, rechargeable via USB. Contact customer service when it needs replacement (by phone at 1 (877) 250-2694 or email at [email protected]).
12
The Remote Functions: (Button actions: Quick press=1 beep, hold=2 beeps, long hold=3 beeps) Button Modes How to What it does To cancel
Manual: Remotely control the delivery of the treats. 1 press = 1 dispense cycle
Quick press and release of button. Remote single beep.
Will run 1 dispense cycle on the feeder. A marker sound will be triggered on the remote and on the feeder (if not muted).
N/A
Automatic Timer: the feeder automatically and continuously dispenses the treats on a programmed interval.
Hold button until 2 beeps and the status light double blinks.
Dispenses treats automatically on the programmed dispense interval. Feeder runs without the remote nearby, until empty. Interval is user programmable (see Pet Tutor® Control Center).
Quick press
1
Silent mode 1: Automatically reduce barking by rewarding the dog for silence. Similar to Auto Timer except pauses if sound triggered.
Long Hold button until 3 beeps and status light triple blink.
The remote will activate the Pet Tutor®’s timer mode after 20 seconds of silence from the dog (you can change this time with the Pet Tutor® Control Center). If the dog barks, the treat dispensing stops and the protocol starts all over again.
Quick press
Sound Trigger: Will trigger feeder on sound using microphone in remote. Hands free training/internet train.
Hold button until 2 beeps.
The remote will trigger one dispense cycle on the feeder to a sharp sound above the ambient noise (e.g.: click, bark, “yes”).
Quick press
2 Silent mode 2 TOD (Time Of Day): to automatically reduce barking by rewarding the dog for silence. Same as Silent Mode 1 except used with TOD Triggers(see Pet Tutor Control Center)
Long Hold button until 3 beeps.
The remote will activate the Pet Tutor®’s timer mode after 20 seconds of silence of the dog. If the dog barks, the treat dispensing stops and the protocol starts all over again.
Quick press
Movement trigger: Senses movement or vibration of the remote to trigger feeder. (Note: does NOT detect dog movement nearby)
Hold button until 2 beeps and the status light double blinks.
The remote will trigger one dispense cycle. For enrichment option when placed in a toy, or on any object that will trigger the feeder when moved.
Quick press
3 Orientation trigger: Senses rotation of remote through set angle such as 90°
Long Hold button until 3 beeps and status light triple blinks.
For special applications (e.g.: wrist movement for people with limited mobility) (Modifiable with Pet Tutor®’s Control Center).
Quick press
Notes: * For multi-feeder configurations Quick Press on buttons 2 or 3 will manually trigger the feeder #2 or #3 once they are paired into the remote (see pairing instructions).
13
Depending on various conditions, the remote will trigger the feeder at a distance of approximately 50-100 ft.
Pairing the remote to a feeder The remote and the feeder you have received are already paired at the factory and should not require additional pairing. However, if the remote or feeder is replaced or a new one is added, the pairing process will be needed. Note: One remote can be paired to up to 3 feeders and one feeder can be paired with up to 3 remotes. Initial pairing of the Feeder to a Smart Remote (must be done in this order):
1. On the Remote: simultaneously press and hold buttons 2 + 3 until the remote beeps, then release both buttons.
2. On the Feeder: simultaneously press and hold ‘Volume’ + ‘Manual Feed’ buttons until the feeder beeps then release both buttons.
3. Wait for a beep from the feeder to indicate the pairing process is complete. Do not press any buttons during this process.
4. To confirm feeder and remote are paired, Quick press and release button 1 on the remote to dispense a treat. If this does not work you may have to clear the pairing (see ‘To clear prior pairing’) in the remote and feeder and repeat the above steps.
Note: The remote can be paired with up to 3 feeders. The process above is repeated for each feeder added to the remote. The remote will automatically assign the first paired feeder to button 1, the second paired feeder to button 2 and the third paired feeder to button 3. To start over and clear out the pairing assignments, see the procedure below.
To clear pairing memory to (start over): You will need to clear the pairing memory any time a remote or feeder is replaced or if the pairing step was not successful.
1. On the Remote: simultaneously press and hold buttons 2+3 until the remote beeps then release both buttons. Then immediately go to step 2 while remote status light is flashing.
2. On the Remote: repeat step 1; i.e.: simultaneously press and hold buttons 2+3 until the remote beeps then release both buttons. The remote pairing is now cleared and ready for fresh pairing (see ‘Initial Pairing of a Feeder to a Smart Remote’) after you have cleared the pairing memory on the feeder.
3. On the Feeder: simultaneously press and hold ‘Volume’ + ‘Manual Feed’ buttons until the feeder beeps then release both buttons.
4. On the Feeder: repeat step 3; i.e.: simultaneously press and hold ‘Volume’ + ‘Manual Feed’ buttons until the feeder beeps then release both buttons. The feeder pairing memory is now cleared and ready for fresh pairing (see ‘Initial Pairing of a Feeder to a Smart Remote’).
Re-calibration of the feeder’s treat detectors With medium size treats, the Pet Tutor® will typically dispense 1-3 treats at a time. With very small treats, it may dispense up to 4-5 treats. The Pet Tutor® has two sensors located above and below the brushes that detect treats as they go through the chute. The sensitivity of those sensors is set at the factory and typically would not require re-calibration. When using very small treats or dark colored treats a re-calibration of the detectors may sometimes improve the precision of the number of kibble dispensed at every dispense cycle. If a large number of treats is consistently dispensed, this procedure may help reduce that number.
1. Remove all treats from the hopper and the brushes.
14
2. Turn the feeder on then cycle the unit several times to ensure there are no treats in the brushes (quick press of the power button on the feeder).
3. Set the feeder on a firm flat surface or on the floor or crate mount. 4. Simultaneously press and hold the volume and power buttons for about 7 seconds, until the unit beeps
and the power and status lights begin to flash. As soon as you hear the beep and see the lights flash release both buttons. The unit will automatically cycle the brushes and the status and power lights will continue to flash for about 30 seconds during the calibration. Do not move the unit or press any buttons during this time.
5. Once the calibration is complete, the power light will return to a slow flash. You can then add treats into the hopper and run a few cycles (quick press of the power button on the feeder) to test the precision of the dispense.
THE FLOOR BASE Item Description Bowl The bowl collects the treats as dispensed by the feeder. Chase feed Allows the treats to roll across the floor, into a crate or off a counter or table. Attachment brackets Stainless steel brackets hold the feeder in bowl or chase feed positions You can set the unit on the Floor Base in two ways: facing the bowl or the chase feed. The treats shoot out the side of the feeder where the Pet Tutor® logo is facing. While holding the device upright, simply lock it into the locking brackets with a clockwise quarter turn. The placement of the logo determines if the treats will shoot into the bowl or the chase feed. The Floor Base can be set on any flat surface.
THE UNIVERSAL CRATE MOUNT Note: The crate mount is under development and coming soon.
15
PREPARING THE PET TUTOR®
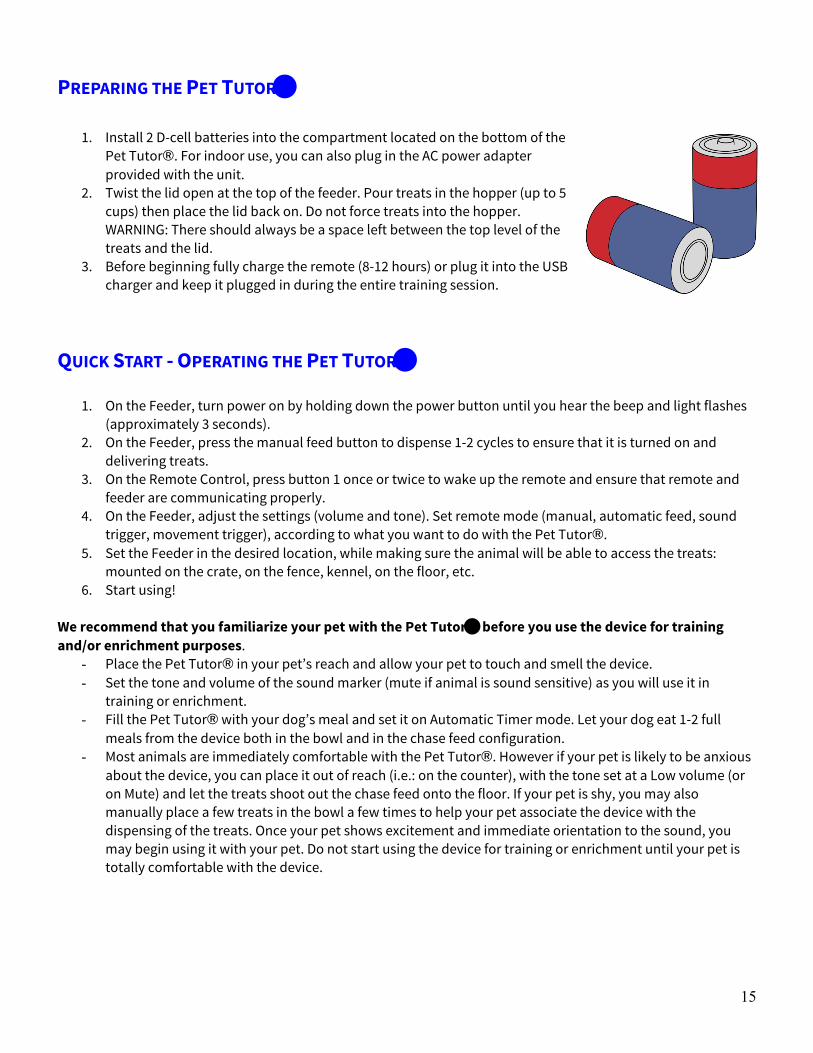
1. Install 2 D-cell batteries into the compartment located on the bottom of the Pet Tutor®. For indoor use, you can also plug in the AC power adapter provided with the unit.
2. Twist the lid open at the top of the feeder. Pour treats in the hopper (up to 5 cups) then place the lid back on. Do not force treats into the hopper. WARNING: There should always be a space left between the top level of the treats and the lid.
3. Before beginning fully charge the remote (8-12 hours) or plug it into the USB charger and keep it plugged in during the entire training session.
QUICK START - OPERATING THE PET TUTOR®
1. On the Feeder, turn power on by holding down the power button until you hear the beep and light flashes (approximately 3 seconds).
2. On the Feeder, press the manual feed button to dispense 1-2 cycles to ensure that it is turned on and delivering treats.
3. On the Remote Control, press button 1 once or twice to wake up the remote and ensure that remote and feeder are communicating properly.
4. On the Feeder, adjust the settings (volume and tone). Set remote mode (manual, automatic feed, sound trigger, movement trigger), according to what you want to do with the Pet Tutor®.
5. Set the Feeder in the desired location, while making sure the animal will be able to access the treats: mounted on the crate, on the fence, kennel, on the floor, etc.
6. Start using!
We recommend that you familiarize your pet with the Pet Tutor® before you use the device for training and/or enrichment purposes.
- Place the Pet Tutor® in your pet’s reach and allow your pet to touch and smell the device. - Set the tone and volume of the sound marker (mute if animal is sound sensitive) as you will use it in
training or enrichment. - Fill the Pet Tutor® with your dog’s meal and set it on Automatic Timer mode. Let your dog eat 1-2 full
meals from the device both in the bowl and in the chase feed configuration. - Most animals are immediately comfortable with the Pet Tutor®. However if your pet is likely to be anxious
about the device, you can place it out of reach (i.e.: on the counter), with the tone set at a Low volume (or on Mute) and let the treats shoot out the chase feed onto the floor. If your pet is shy, you may also manually place a few treats in the bowl a few times to help your pet associate the device with the dispensing of the treats. Once your pet shows excitement and immediate orientation to the sound, you may begin using it with your pet. Do not start using the device for training or enrichment until your pet is totally comfortable with the device.

16
CARE AND CLEANING - Feeder: Turn the Feeder off and empty the hopper of all the treats. Press on the two locking tabs at the
bottom of the blue feeder tube and gently pull it upward by the handle to unlock the tube from the electronics module. For easier separation of the blue tube from the electronics module, you may lock the Pet Tutor® into the floor base. Press on the two locking tabs at the top of the blue tube and gently separate the top end cap from the blue tube. You can hand wash both the blue tube and the end cap. You may also place the blue tube in the top rack of your dishwasher and hand-wash the end cap separately.
- Brushes (Feeder): Gently pull the brush assembly (see
illustration) off of the electronics module. DO NOT ATTEMPT TO LOOSEN THE STAINLESS STEEL SCREWS ON THE BRUSHES. You can hand wash the brush assembly or put it in the top rack of the dishwashers. Once clean, put the assembly back onto the electronics module, and with the brushes facing you, align the tabs in the brushes with the notches in the drive posts on the electronics module. When aligned gently push the brushes back onto the electronics module. The brush assembly will easily slip over the posts if properly aligned. Do not force. ALWAYS CONFIRM THE BRUSHES ARE DRY BEFORE PLACING THEM ON TO THE ELECTRONICS MODULE.
- Electronics module (Feeder): Make sure the Pet Tutor® is turned
off. With a lightly dampened cloth or paper towel wipe off the stainless steel plate. DO NOT SUBMERGE THE ELECTRONICS MODULE. WATER WILL DAMAGE THE ELECTRONICS. Dry all parts thoroughly before reassembling them.
- Floor base: Hand wash with warm, soapy water and dry thoroughly. DO NOT PLACE IN THE DISHWASHER. DO NOT PUT ON TOP OF A HOT ELEMENT.
- Crate mount: Wipe the chute out with a damp cloth.
- Remote: Wipe off with hand sanitizing wipe or computer
wipe. AVOID THE MIC AND SPEAKER ON THE REMOTE. DO NOT LET YOUR PET PLAY WITH THE REMOTE.

17
THE PET TUTOR® CONTROL CENTER PROGRAM FOR COMPUTERS You can access the Pet Tutor® Control Center after you download the program and plug in the remote to your computer using the USB cable provided. You will first need to download the Pet Tutor® Control Center from our website www.PetTutor.biz. The Control Center allows you to change factory settings, set time of day triggers, trigger the unit from the Internet, log activities and facilitate factory trouble-shooting. The blue ‘feed’ button at the top right of the screen triggers one dispense cycle on the feeder.
CONNECTING THE PET TUTOR® TO THE CONTROL CENTER 1. With the USB cable, connect the micro USB jack to the remote and the USB jack to the computer. 2. Turn on the feeder then press button 1 on the remote to wake up the remote and ensure it is
communicating to the feeder. 3. Open the application on your computer. 4. Select the remote from the drop down at the top right hand corner, then press the connect button. A
window should open and confirm that the application is connecting to the feeder. The ‘connect’ button should now say ‘disconnect’.
5. Hit the ‘Feed’ button to check that it’s all working. The unit should dispense a treat. 6. You should see the current settings of the Pet Tutor® under the ‘current’ column. 7. You can now start to use the Control Center
Timers: Function Factory default settings User programmable settings
min - max Dispense interval 5 seconds 5 – 1800 seconds (i.e.: 30 minutes) Auto Interval Increment 0 seconds 0 – 20 1/4 seconds Bark Dispense Pause 20 seconds 5-1800 seconds (i.e.: 30 minutes) Feeder Sleep Timer 15 minutes 15-2888 minutes (i.e.: 48 hours) Remote Sleep Timer 3 minutes 1-2888 minutes (i.e.: 48 hours) To change the settings enter the new value under the column ‘New’, then press the button on the right corresponding to that setting to update Pet Tutor®. If you click on the ‘reset factory default’ button, the program will reset all the factory default to the Pet Tutor®.

18
TOD (Time Of Day) Triggers A TOD trigger when activated will cause the feeder to begin dispensing treats at the prescribed time. This will occur whether or not the feeder is turned on. If it’s turned off, the feeder will turn on to start the pre-set operation. There are four TOD triggers that can be set independently. Each trigger has the following: Setting Description Enable ‘On’ or ‘Off’ enables the trigger. Bark Pause ‘On’ or ‘Off’ will activate the bark pause when the remote is also in the
corresponding mode. Start time of TOD trigger Set the time of day that you want that trigger to start. Enter the hours in the first
field, the minutes in the second field. Quantity Set the amount of food in cups that you want the feeder to dispense when the TOD
trigger is activated. Dispense interval Set the number of seconds you want between dispense cycles. Once you have set your parameters, each TOD trigger needs to be uploaded independently by pressing the corresponding ‘Update Trigger’ button on the right. The time the feeder is set to appears at the bottom left of the page. The current feeder time is only updated when you press the ‘Read Pet Tutor®’ button. You can change the time of the feeder by entering the hours and minutes in the ‘New Feeder Time’ boxes, then pressing the ‘Set New Time’ button. With the ‘Cycles Per Cup’ button you can set the approximate number of Pet Tutor® dispense cycles required to dispense a cup of treats. A typical value is 110, but that value will change depending on the size and shape of the treats. An easy way to count the number of treats per cup is to fill the feeder with a cup of food, then press the ‘Count Cycles’ button (auto-calibrate). The ‘Read Pet Tutor®’ button reads all the current values that are programmed in the device and displays them on the screen.
Internet The ‘Big Ass Feed’ button is identical to the ‘Feed’ button on the top right of the screen but much larger to make it easier to activate even when looking at a small screen.

19
Logger This page logs all the activity of the Pet Tutor® as long as the remote is plugged in. You can review when and how many dispense cycles have been delivered, as well as any potential errors. In ‘Silent’ mode, any gap in time will indicate when the dog has barked. You can save the data collected into a file by clicking on the ‘Save log’ button. To clear the data click on the ‘Clear log’ button.
Diagnostic Screen This screen is available for customer support use. Through Team view, your customer support will be able to help you over the Internet and diagnose any issues. It allows customer support to read the detail status of the feeder and the remote.
TRAINING TIPS For training tips and ideas, visit our website www.PetTutor.biz
20
FREQUENTLY ASKED QUESTIONS Can I use any treats in the Pet Tutor®?
The Pet Tutor® is set to automatically adapt to many shapes and sizes. However, when the food is too soft or wet, it can stick together and form lumps too large to go through the opening. Do not use wet food (canned or raw). For best results use dry kibble or a mixture of kibble and other semi moist treats.
How many treats will the Pet Tutor® dispense?
The number of treats dispensed at once may vary with the size of treats. With larger size treats (up to 3/4 of an inch in diameter) only one will go through most of the time. With very small treats (like puppy food), more treats are likely to be dispensed per cycle.
Does the unit jam? Pet Tutor® was designed to be very resistant to jamming. In hundreds of thousands of cycles, with a typical size kibble, the feeder has not jammed.
I have multiple pets, can I still use the Pet Tutor®?
We highly recommend that you use the Pet Tutor® for only one animal at a time. If you have multiple pets, you will need to separate them. If you have one Pet Tutor® per animal however, you will be able to train multiple pets at once. You may for instance reward all of them at once for staying on their place mat. Note: if you have pets with food guarding tendencies, keep them separate from the others.
My remote light is not coming on when I press the button.
Make sure that your remote is fully charged. If so, your remote might have gone to sleep to save the battery.
Why is my remote flashing red?
When the feeder is empty or not responding, the remote will flash a red light. Go check the feeder.
How long will the remote run once fully charged?
When on continuously, the remote will last 8-9 hours.
How long will the feeder run on batteries?
With factory default settings, typical 2 D cell batteries will run the unit about 40 hopper loads of treats.
How far can I be with the remote and still operate the feeder?
The distance will vary according to the conditions (indoors, outdoors, mounted on the crate or on the floor) and can vary between 50- 100 ft. Barriers such as walls or metallic surfaces will decrease the distance.
What is the capacity of the feeder?
The feeder can hold up to 5 cups of food.
What if my pet wants to chew the unit?
The unit can be used in a number of ways to prevent chewing including: hanging, setting on a counter to dispense on the floor or use the chase feed option to dispense away from the unit. You can also reverse mount the unit and keep it inside a crate while your pet is loose in the house.
What material is the unit made from?
The plastic in contact with food is made of a strong polycarbonate material which is food safe. The feeder tube and the brushes are dishwasher safe. The interior food slide and the handle are stainless steel.
21
SPECIFICATIONS Remote Item Comment
Range Feeder-Remote 50-100 feet depending on
conditions
Battery 880mAh, 3.6V Li-ion (Lithium Ion)
Rechargeable Over 500 charges
Number of feeders Simultaneous control 3 feeders
Feeder Item Comment
Feeder capacity 5 cups kibble
Battery 2 D-cell Approx 16,000 dispense cycles
depending on conditions
Wall power Wall Charger Input: 110-120 V 50-60 Hz 0.15A
Output: 5V 1A
Important: Please read all of the information before using the Pet Tutor®.
IMPORTANT HEALTH INFORMATION AND SAFETY PRECAUTIONS When using this product, the safety precautions below must be taken to avoid possible legal liabilities and damages. Retain and follow all product safety and operating instructions. Observe all warnings in the operating instructions on the product. To reduce the risk of bodily injury, electric shock, fire and damage to the equipment, observe the following precautions. CAUTION: The Pet Tutor® and its accessories are only intended for working with pets. Do not use for working with humans (children or adults). Using the Pet Tutor® products in a manner other than specified in the user manual may cause injury. Do not leave the Pet Tutor® products accessible to your pet(s) when unsupervised. When setting your Pet Tutor® to work in your absence, make sure to leave the feeder and the remote out of reach of your pet (i.e.: on a counter, outside a crate or kennel). To reduce the risk of injury, close supervision is necessary when the product is used near children.
22
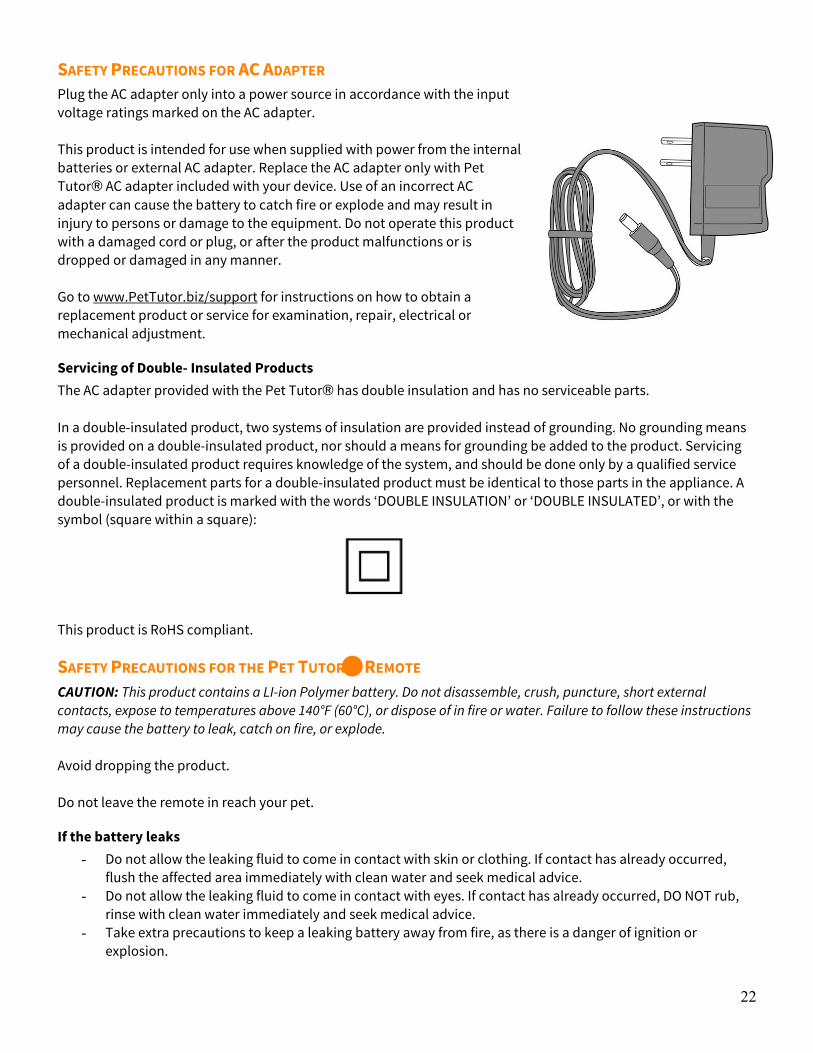
SAFETY PRECAUTIONS FOR AC ADAPTER Plug the AC adapter only into a power source in accordance with the input voltage ratings marked on the AC adapter. This product is intended for use when supplied with power from the internal batteries or external AC adapter. Replace the AC adapter only with Pet Tutor® AC adapter included with your device. Use of an incorrect AC adapter can cause the battery to catch fire or explode and may result in injury to persons or damage to the equipment. Do not operate this product with a damaged cord or plug, or after the product malfunctions or is dropped or damaged in any manner. Go to www.PetTutor.biz/support for instructions on how to obtain a replacement product or service for examination, repair, electrical or mechanical adjustment.
Servicing of Double- Insulated Products The AC adapter provided with the Pet Tutor® has double insulation and has no serviceable parts. In a double-insulated product, two systems of insulation are provided instead of grounding. No grounding means is provided on a double-insulated product, nor should a means for grounding be added to the product. Servicing of a double-insulated product requires knowledge of the system, and should be done only by a qualified service personnel. Replacement parts for a double-insulated product must be identical to those parts in the appliance. A double-insulated product is marked with the words ‘DOUBLE INSULATION’ or ‘DOUBLE INSULATED’, or with the symbol (square within a square): This product is RoHS compliant.
SAFETY PRECAUTIONS FOR THE PET TUTOR® REMOTE CAUTION: This product contains a LI-ion Polymer battery. Do not disassemble, crush, puncture, short external contacts, expose to temperatures above 140°F (60°C), or dispose of in fire or water. Failure to follow these instructions may cause the battery to leak, catch on fire, or explode. Avoid dropping the product. Do not leave the remote in reach your pet.
If the battery leaks - Do not allow the leaking fluid to come in contact with skin or clothing. If contact has already occurred,
flush the affected area immediately with clean water and seek medical advice. - Do not allow the leaking fluid to come in contact with eyes. If contact has already occurred, DO NOT rub,
rinse with clean water immediately and seek medical advice. - Take extra precautions to keep a leaking battery away from fire, as there is a danger of ignition or
explosion.

23
SAFETY PRECAUTIONS FOR DIRECT SUNLIGHT Keep this product away from extreme temperatures. Do not leave the product inside a vehicle or in a place where the temperature exceeds 140°F (60°C), such as on a car dashboard, window sill, or behind glass that is exposed to direct sunlight or strong ultraviolet light for extended periods of time. This may damage the product and overheat the battery which may result in fire or explosion.
- Keep the Device Dry. Keep the docking station and related components dry. - If the docking station gets wet, unplug it immediately to reduce the risk of electric shock and damage. Do
not use device if water damage is visible. It is recommended to purchase a replacement device. Contact Customer Care at www.PetTutor.biz for advice. Water damage may not be covered under the warranty.
- Accessories. Use only the accessories approved by Smart Animal Training Systems, LLC. with the Pet Tutor® products. Use of any unauthorized accessories with the product may damage the products or cause injury and will invalidate the warranty.
TO REPLACE BATTERIES To open the compartment located under the feeder, pull the tab to unlatch the battery compartment door. Insert 2 D alkaline batteries. Reposition cover by pushing the lid in place until it clicks. CAUTION:
1. As with all small batteries, the batteries used with this product should be kept away from small children who still put things in their mouths. If they are swallowed, promptly see a doctor and have the doctor phone (202) 625-3333 collect. In other countries, have the doctor call your local poison control center.
2. Make sure the batteries are inserted correctly and always follow the Pet Tutors® and battery manufacturers’ instructions;
3. Do not mix old batteries and new batteries in alkaline, standard (carbon zinc) or rechargeable (nickel-cadmium) batteries.
IMPORTANT: BATTERY INFORMATION Please retain this information for future reference. Batteries should be replaced by an adult. CAUTION:
1. Always follow the instructions carefully. Use only batteries specified and be sure to insert item correctly by matching the + and – polarity markings.
2. Do not mix old and new batteries or standard (carbon-zing) with alkaline batteries. 3. Remove exhausted or dead batteries from the product. 4. Remove batteries if product is not to be used for a long time. 5. Do not short-circuit the supply terminals. 6. Should this product cause, or be affected by, local electrical interference, move it away from other
electrical equipment. Reset (switching off and back on again or removing and reinserting batteries) if necessary.

24
7. RECHARGEABLE BATTERIES: Do not mix these with any other types of batteries. Always remove from the product before recharging. Recharge batteries under adult supervision. DO NOT RECHARGE OTHER TYPES OF BATTERIES.
8. As with all small items, these batteries should be kept away from children, if swallowed, seek medical attention immediately.
TO PLUG THE PET TUTOR® TO AN OUTLET When you don’t want to use batteries or need to operate the Pet Tutor® for an extended period of time and want to conserve your batteries, you can plug the device directly to an electrical outlet with the AC adapter.
1. Plug the two prongs of the AC adapter into a standard wall outlet. 2. Plug the jack into the corresponding plug on the bottom of the feeder. 3. Turn the feeder on and operate.
FCC STATEMENT For regulatory identification purposes, your product number is: Feeder FCC ID: 2AB7I-FEEDER01 Remote FCC ID: 2AB7I-REMOTE01 This device complies with 47 CFR part 15 of the FCC Rules. Operation is subject to the following two conditions: (1) This device may not cause harmful interference, and (2) this device must accept any interference received, including interference that may cause undesired operation. This equipment has been tested and found to comply with the limits for a Class B digital device, pursuit to 47 CFR Part 15 of the FCC Rules. These limits are designed to provide reasonable protection against harmful interference in a residential installation. This equipment generates, uses and can radiate radio frequency energy, and, if not installed and used in accordance with the instructions, may cause harmful interference to radio communications. However, there is no guarantee that interference will not occur in a particular installation. If this equipment does cause harmful interference to radio or television reception, which can be determined by turning the equipment off and on, the user is encouraged to try to correct the interference by one or more of the following measures:
- Reorient or relocate the receiving antenna. - Increase the separation between the equipment and the receiver. - Consult the dealer or an experienced radio/TV technician for help.
SAVE THESE INSTRUCTIONS
IC STATEMENT (INDUSTRY CANADA) For regulatory identification purposes, your product number is: Feeder IC: 11848A-FEEDER01 Remote IC: 11848A-REMOTE01 This device complies with Industry Canada licence-exempt RSS standard(s). Operation is subject to the following two conditions: (1) this device may not cause interference, and (2) this device must accept any interference, including interference that may cause undesired operation of the device. Cet appareil est conforme à la norme RSS Industrie Canada exempt de licence. Son fonctionnement est soumis aux deux conditions suivantes: (1) cet appareil ne doit pas provoquer

25
d’interférences et (2) cet appareil doit accepter toute interférence, y compris les interférences pouvant causer un mauvais fonctionnement du dispositive.
ONE YEAR NON-TRANSFERABLE LIMITED WARRANTY WHAT IS COVERED? Smart Animal Training Systems, LLC. (hereinafter referred to as ‘SATS’), owner of the PetTutor® products, warrants to the original retail consumer purchaser, and not any other purchaser or subsequent owner, that its PetTutor® product, when subject to normal and proper residential use, will be free from defects in material or workmanship for a period of one (1) year from the purchase date. An ‘original retail consumer purchaser’ is a person or entity who originally purchases the product, or a gift recipient of a new product that is unopened and in its original packaging. When serviced by SATS Customer Service, SATS covers labor and parts for the first year of ownership; after the first year, a service or upgrade charge will apply relative to replacement of the product, with new or refurbished items at SATS’ sole discretion. The limited warranty is non-transferrable and shall automatically terminate if the original retail consumer purchaser resells the SATS product or transfers the property on which the SATS product is installed. In the event of defect, these are your exclusive remedies. PROPER PRODUCT USE This product is designed only for use with domesticated animals; do not use this product for any other purpose. However, the specific temperament of your animal may not work with this product. We recommend that you do not use this product if your animal is aggressive. If you are unsure whether this product is appropriate for your animal, please consult with your veterinarian or certified trainer before using this product. Please see the instruction manual for additional important information. WHAT IS NOT COVERED? This non-transferrable limited warranty does not provide protection against, and SATS will have no liability under this non-transferrable limited warranty for any damage to or defects in the products caused by any animal, loss of product(s), failure, defect or damage caused by events and situations beyond normal residential exposure conditions, including, but not limited to: commercial use, misuse, abuse, neglect, improper installation or installation not in accordance with SATS’s instructions, use of non-SATS accessories, impacts of foreign objects, acts of God, abnormal or improper use, improper storage, attempted repair or service by anyone other than SATS Customer Service, accident, alteration, defects in or failure of the surface the SATS product is installed in or upon, discoloration or other damage caused by pollution, sunlight, other environmental conditions, mold, dirt, mildew, or exposure to harmful chemicals and any other cause not involving manufacturing defects in the SATS product. Under no circumstances will SATS be liable for any non-SATS labor charges or any expenses whatsoever in connection with the removal, repair or installation of either the original or replacement component(s) relative to in- ground fence installation, kennel installation, pet door installation and other permanent, semi-permanent, or fixture type installations on the retail consumer purchaser’s property. REGISTERING THE PRODUCT Within thirty (30) days of purchase, please go to www.pettutor.biz/register to register your purchase. A sales receipt shall be required to obtain warranty coverage. Please keep this information in a safe place. MAKING A WARRANTY CLAIM To obtain warranty service, call the PetTutor® Customer Care center. In the United States at (877) 250-2694. Or email: [email protected]

26
Pursuant to this non-transferrable limited warranty, SATS will replace the part with a new or refurbished part. This non-transferrable limited warranty will then apply to either the new or refurbished part for the remainder of the original non-transferrable limited warranty period. DISCLAIMERS REPLACEMENT AS PROVIDED UNDER THIS NON-TRANSFERRABLE LIMITED WARRANTY IS THE EXCLUSIVE REMEDY OF THE CONSUMER. NEITHER LABOR TO REMOVE THE PART NOR LABOR TO INSTALL THE REFURBISHED OR REPLACED PART IS COVERED. THIS NON-TRANSFERRABLE LIMITED WARRANTY IS IN LIEU OF ALL OTHER EXPRESS OR IMPLIED WARRANTIES. SATS EXPRESSLY DISCLAIMS AND EXCLUDES ALL OTHER WARRANTIES, EXPRESS OR IMPLIED, INCLUDING WITHOUT LIMITATION, THE WARRANTIES OF MERCHANTABILITY AND FITNESS FOR A PARTICULAR PURPOSE. SATS ALSO DISCLAIMS AND EXCLUDES ALL LIABILITY FOR INCIDENTAL, CONSEQUENTIAL, PUNITIVE, DIRECT, INDIRECT, SPECIAL OR ANY OTHER DAMAGES ARISING OUT OF OR CONNECTED WITH THE PURCHASE, USE OR MISUSE OF THIS PRODUCT OR FOR THE BREACH OF ANY EXPRESS OR IMPLIED WARRANTIES OR BREACH OF CONTRACT OR OTHERWISE. PURCHASER ASSUMES ALL RISKS AND LIABILITIES FROM THE USE OR MISUSE OF THIS PRODUCT. SATS DOES NOT AUTHORIZE ANY OTHER PERSON OR AGENT TO MAKE ANY OTHER EXPRESS OR IMPLIED WARRANTIES. FURTHERMORE, SATS WILL NOT BE LIABLE FOR ANY LOSS, DAMAGE OR INJURY RESULTING FROM DELAY IN DELIVERY OF REPLACEMENT PARTS OR FOR ANY FAILURE BY SATS TO PERFORM COVERED REPAIR WORK DUE TO CIRCUMSTANCES BEYOND SATS’S CONTROL. GOVERNING LAW This non-transferrable limited warranty shall be governed by the law of the State of Indiana, U.S.A., and by the laws of the United States of America, excluding any conflicts of laws principles that would result in a change of exclusive jurisdiction and venue from the federal and state courts of Indianapolis, Indiana. Furthermore, the United Nations Convention on Contracts for the International Sale of Goods is hereby excluded in its entirety from application to this non-transferrable limited warranty. These warranties give you specific legal rights, and you may also have other rights that vary from state to state or country to country. Some states or countries do not allow the exclusion or limitation of incidental or consequential damages, so the above limitation or exclusion may not apply to you.

27
CUSTOMER CARE For answers 24 hours a day, 7 days a week, please visit the Online Support Center (add link). The Answer Center (add link) helps you find answers to common questions. Online Video Tutorials (add link) will show you how to get started in the Support section. For additional support, please call 1 (877) 250-2694 or email at [email protected] to speak with a customer service representative.
28
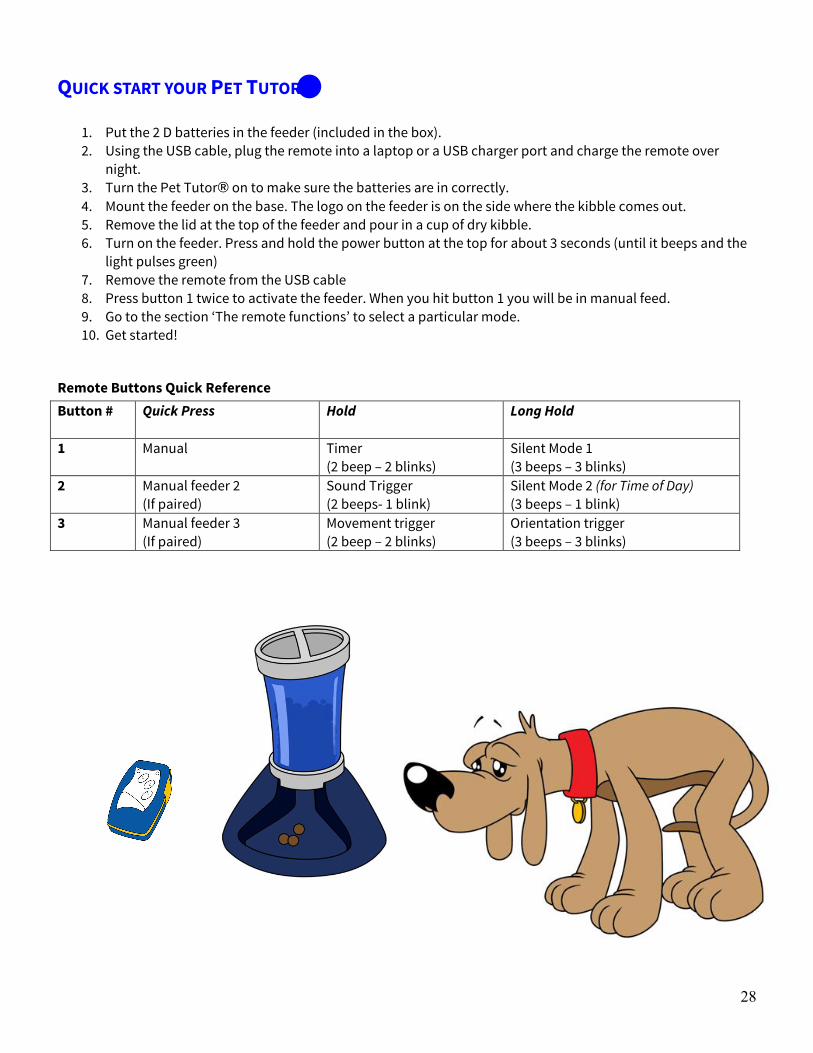
QUICK START YOUR PET TUTOR®
1. Put the 2 D batteries in the feeder (included in the box). 2. Using the USB cable, plug the remote into a laptop or a USB charger port and charge the remote over
night. 3. Turn the Pet Tutor® on to make sure the batteries are in correctly. 4. Mount the feeder on the base. The logo on the feeder is on the side where the kibble comes out. 5. Remove the lid at the top of the feeder and pour in a cup of dry kibble. 6. Turn on the feeder. Press and hold the power button at the top for about 3 seconds (until it beeps and the
light pulses green) 7. Remove the remote from the USB cable 8. Press button 1 twice to activate the feeder. When you hit button 1 you will be in manual feed. 9. Go to the section ‘The remote functions’ to select a particular mode. 10. Get started!
Remote Buttons Quick Reference Button # Quick Press Hold
Long Hold
1 Manual Timer (2 beep – 2 blinks)
Silent Mode 1 (3 beeps – 3 blinks)
2 Manual feeder 2 (If paired)
Sound Trigger (2 beeps- 1 blink)
Silent Mode 2 (for Time of Day) (3 beeps – 1 blink)
3 Manual feeder 3 (If paired)
Movement trigger (2 beep – 2 blinks)
Orientation trigger (3 beeps – 3 blinks)