Embed Size (px)
Citation preview
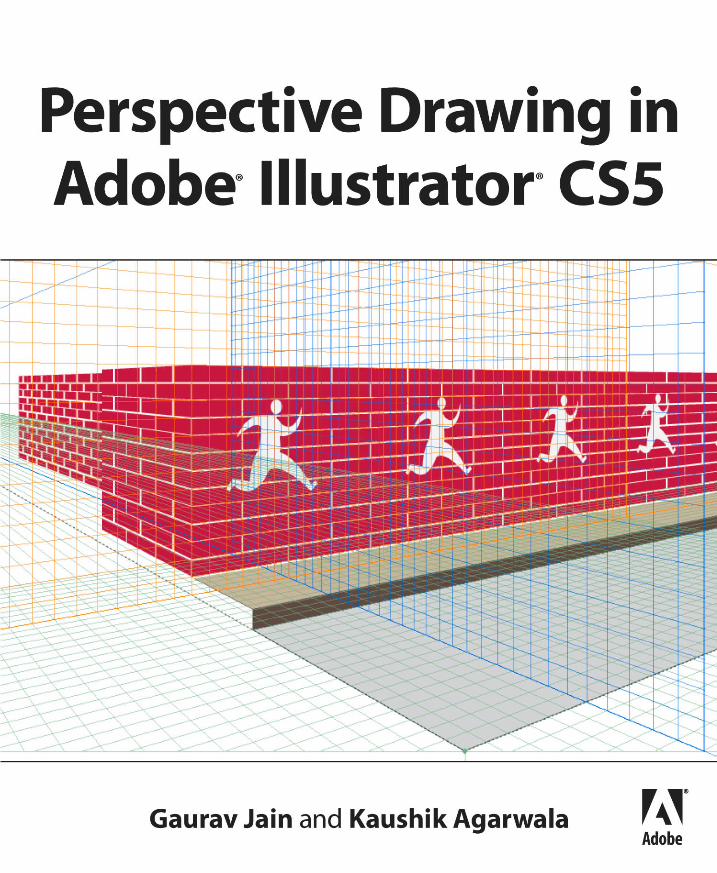
Perspective Drawing in Adobe® Illustrator® CS5
by Gaurav Jain and Kaushik Agarwala

Perspective Drawing in Adobe® Illustrator® CS5Gaurav Jain and Kaushik Agarwala
© 2011 Adobe Systems Incorporated and its licensors. All rights reserved.
If this guide is distributed with software that includes an end user agreement, this guide, as well as the software described in it, is furnished under license and may be used or copied only in accordance with the terms of such license. Except as permitted by any such license, no part of this guide may be repro-duced, stored in a retrieval system, or transmitted, in any form or by any means, electronic, mechani-cal, recording, or otherwise, without the prior written permission of Adobe Systems Incorporated. Please note that the content in this guide is protected under copyright law even if it is not distributed with software that includes an end user license agreement.
The content of this guide is furnished for informational use only, is subject to change without notice, and should not be construed as a commitment by Adobe Systems Incorporated. Adobe Systems Incorporated assumes no responsibility or liability for any errors or inaccuracies that may appear in the informational content contained in this guide.
Please remember that existing artwork or images that you may want to include in your project may be protected under copyright law. The unauthorized incorporation of such material into your new work could be a violation of the rights of the copyright owner. Please be sure to obtain any permission required from the copyright owner.
Any references to company names in sample files are for demonstration purposes only and are not intended to refer to any actual organization.
Adobe, the Adobe logo, and Illustrator are registered trademarks of Adobe Systems Incorporated in the United States and/or other countries.
Apple, Mac OS, and Macintosh, are trademarks of Apple, registered in the U.S. and other coun-tries. Microsoft, Windows, and Internet Explorer are either registered trademarks or trademarks of Microsoft Corporation in the U.S. and/or other countries. Java and JavaScript are registered trademarks of Sun Microsystems. All other trademarks are the property of their respective owners.
Adobe Systems Incorporated, 345 Park Avenue, San Jose, California 95110-2704, USA
Notice to U.S. Government End Users. The Software and Documentation are “Commercial Items,” as that term is defined at 48 C.F.R. §2.101, consisting of “Commercial Computer Software” and “Commercial Computer Software Documentation,” as such terms are used in 48 C.F.R. §12.212 or 48 C.F.R. §227.7202, as applicable. Consistent with 48 C.F.R. §12.212 or 48 C.F.R. §§227.7202-1 through 227.7202-4, as applicable, the Commercial Computer Software and Commercial Computer Software Documentation are being licensed to U.S. Government end users (a) only as Commercial Items and (b) with only those rights as are granted to all other end users pursuant to the terms and conditions herein. Unpublished-rights reserved under the copyright laws of the United States. Adobe Systems Incorporated, 345 Park Avenue, San Jose, CA 95110-2704, USA. For U.S. Government End Users, Adobe agrees to comply with all applicable equal opportunity laws including, if appropriate, the provisions of Executive Order 11246, as amended, Section 402 of the Vietnam Era Veterans Readjustment Assistance Act of 1974 (38 USC 4212), and Section 503 of the Rehabilitation Act of 1973, as amended, and the regula-tions at 41 CFR Parts 60-1 through 60-60, 60-250, and 60-741. The affirmative action clause and regula-tions contained in the preceding sentence shall be incorporated by reference.
Adobe Press books are published by Peachpit, a division of Pearson Education located in Berkeley, California. For the latest on Adobe Press books, go to www.adobepress.com. To report errors, please send a note to [email protected]. For information on getting permission for reprints and excerpts, contact [email protected].
Acquisitions Editor: Victor GavendaProject Editor: Rebecca FreedTechnical Editor: Jean-Claude Tremblay
Production Editor: Tracey CroomCompositor: Kim Scott, Bumpy DesignCover Design: Charlene Charles-Will
ISBN-13: 978-0-321-73341-2ISBN-10: 0-321-73341-X

About the AuthorsGaurav Jain is a computer scientist on the Adobe Illustrator team based in Noida, India. He has worked in the software industry for about seven years, in areas such as mobile application development and wireless techologies such as 1x-EVDO. For the last five years he has worked with Adobe Systems on desktop applications including InDesign, Acrobat, and Illustrator. He has a couple of patents pending related to vector drawing algorithms.
Kaushik Agrawala is a lead software quality engineer on the Adobe Illustra-tor team based in Noida, India. He has worked with Adobe Systems for the last four years on desktop applications such as InDesign, InCopy, Acrobat, and Illustrator. Kaushik is a print and color management expert and worked with Kodak for about four years in sales and technical support roles.
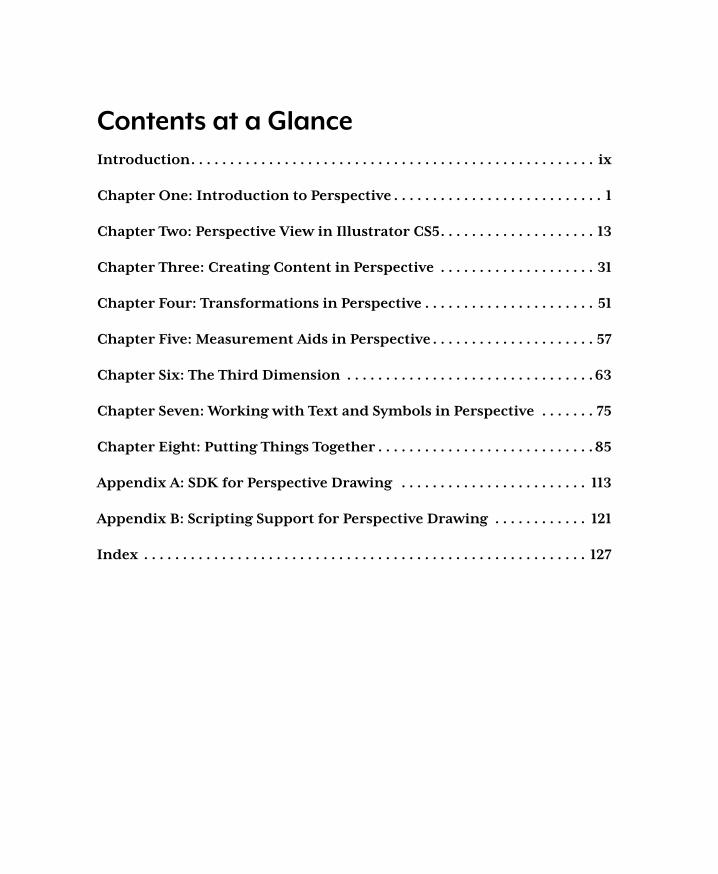
Contents at a GlanceIntroduction. . . . . . . . . . . . . . . . . . . . . . . . . . . . . . . . . . . . . . . . . . . . . . . . . . . . . ix
Chapter.One:.Introduction.to.Perspective. . . . . . . . . . . . . . . . . . . . . . . . . . . . 1
Chapter.Two:.Perspective.View.in.Illustrator.CS5. . . . . . . . . . . . . . . . . . . . . 13
Chapter.Three:.Creating.Content.in.Perspective . . . . . . . . . . . . . . . . . . . . . 31
Chapter.Four:.Transformations.in.Perspective. . . . . . . . . . . . . . . . . . . . . . . 51
Chapter.Five:.Measurement.Aids.in.Perspective. . . . . . . . . . . . . . . . . . . . . . 57
Chapter.Six:.The.Third.Dimension . . . . . . . . . . . . . . . . . . . . . . . . . . . . . . . . . 63
Chapter.Seven:.Working.with.Text.and.Symbols.in.Perspective . . . . . . . . 75
Chapter.Eight:.Putting.Things.Together. . . . . . . . . . . . . . . . . . . . . . . . . . . . . 85
Appendix.A:.SDK.for.Perspective.Drawing. . . . . . . . . . . . . . . . . . . . . . . . . . 113
Appendix.B:.Scripting.Support.for.Perspective.Drawing . . . . . . . . . . . . . 121
Index.. . . . . . . . . . . . . . . . . . . . . . . . . . . . . . . . . . . . . . . . . . . . . . . . . . . . . . . . . . 127

Table of ContentsIntroduction . . . . . . . . . . . . . . . . . . . . . . . . . . . . . . . . . . . . . . . . . . . . . . . . . . . . . . . . . . . . . . . . . . .ix
Chapter One: Introduction to Perspective . . . . . . . . . . . . . . . . . . . . . . . . . . . . . . . . . . . . . . . . .1
Basic Concepts . . . . . . . . . . . . . . . . . . . . . . . . . . . . . . . . . . . . . . . . . . . . . . . . . . . . . . . . . . 2Terms and Definitions . . . . . . . . . . . . . . . . . . . . . . . . . . . . . . . . . . . . . . . . . . . . . . . . . . . 5Determining the Location of Vanishing Points . . . . . . . . . . . . . . . . . . . . . . . . . . . . . . 8
Steps to Establish Vanishing Points . . . . . . . . . . . . . . . . . . . . . . . . . . . . . . . . . . . . . .10
Chapter Two: Perspective View in Illustrator CS5 . . . . . . . . . . . . . . . . . . . . . . . . . . . . . . . . 13
Defining a Perspective View . . . . . . . . . . . . . . . . . . . . . . . . . . . . . . . . . . . . . . . . . . . . . .14Creating a Perspective Grid . . . . . . . . . . . . . . . . . . . . . . . . . . . . . . . . . . . . . . . . . . . . . .16
Using Perspective Grid Presets . . . . . . . . . . . . . . . . . . . . . . . . . . . . . . . . . . . . . . . . .16Using the Define Grid Command . . . . . . . . . . . . . . . . . . . . . . . . . . . . . . . . . . . . . . .19
Editing a Perspective Grid . . . . . . . . . . . . . . . . . . . . . . . . . . . . . . . . . . . . . . . . . . . . . . . .19Using Perspective Grid Widgets for Interactive Editing . . . . . . . . . . . . . . . . . . . 20Precise Grid Editing Using Numerical Inputs . . . . . . . . . . . . . . . . . . . . . . . . . . . . 28
Setting the Perspective Grid . . . . . . . . . . . . . . . . . . . . . . . . . . . . . . . . . . . . . . . . . . . . . 28
Chapter Three: Creating Content in Perspective . . . . . . . . . . . . . . . . . . . . . . . . . . . . . . . . . 31
Drawing Shapes in Perspective. . . . . . . . . . . . . . . . . . . . . . . . . . . . . . . . . . . . . . . . . . . .31Snapping Aids for Drawing Shapes in Perspective . . . . . . . . . . . . . . . . . . . . . . . . . . 34
Snap to Perspective Grid . . . . . . . . . . . . . . . . . . . . . . . . . . . . . . . . . . . . . . . . . . . . . . 34Snap to Perspective Construction Guides . . . . . . . . . . . . . . . . . . . . . . . . . . . . . . . 34
Perspective-Aware Tools . . . . . . . . . . . . . . . . . . . . . . . . . . . . . . . . . . . . . . . . . . . . . . . . 38Drawing in Normal 2D Space Then Bringing Objects Into Perspective . . . . . . . . 39Art Types that Cannot Be Brought into Perspective . . . . . . . . . . . . . . . . . . . . . . . . . .41Flat Objects on Canvas Versus Objects in Perspective . . . . . . . . . . . . . . . . . . . . . . . 42Attaching Objects to Perspective . . . . . . . . . . . . . . . . . . . . . . . . . . . . . . . . . . . . . . . . . 45Editing Objects in Perspective . . . . . . . . . . . . . . . . . . . . . . . . . . . . . . . . . . . . . . . . . . . 47Release with Perspective . . . . . . . . . . . . . . . . . . . . . . . . . . . . . . . . . . . . . . . . . . . . . . . . 48
Chapter Four: Transformations in Perspective . . . . . . . . . . . . . . . . . . . . . . . . . . . . . . . . . . . 51
Perspective Bounding Box . . . . . . . . . . . . . . . . . . . . . . . . . . . . . . . . . . . . . . . . . . . . . . . 52Marquee Selection in Perspective . . . . . . . . . . . . . . . . . . . . . . . . . . . . . . . . . . . . . . . . 54Transform Operations in Perspective . . . . . . . . . . . . . . . . . . . . . . . . . . . . . . . . . . . . . 54Snapping Aids in Perspective Transformations . . . . . . . . . . . . . . . . . . . . . . . . . . . . . 56
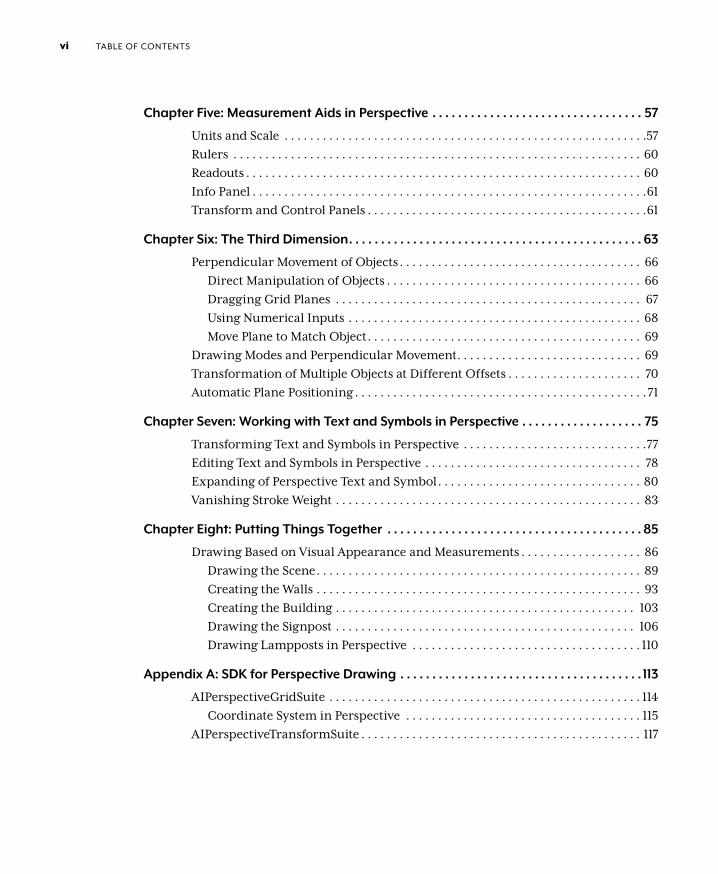
table of contentsvi
Chapter Five: Measurement Aids in Perspective . . . . . . . . . . . . . . . . . . . . . . . . . . . . . . . . . 57
Units and Scale . . . . . . . . . . . . . . . . . . . . . . . . . . . . . . . . . . . . . . . . . . . . . . . . . . . . . . . . .57Rulers . . . . . . . . . . . . . . . . . . . . . . . . . . . . . . . . . . . . . . . . . . . . . . . . . . . . . . . . . . . . . . . . 60Readouts . . . . . . . . . . . . . . . . . . . . . . . . . . . . . . . . . . . . . . . . . . . . . . . . . . . . . . . . . . . . . . 60Info Panel . . . . . . . . . . . . . . . . . . . . . . . . . . . . . . . . . . . . . . . . . . . . . . . . . . . . . . . . . . . . . .61Transform and Control Panels . . . . . . . . . . . . . . . . . . . . . . . . . . . . . . . . . . . . . . . . . . . .61
Chapter Six: The Third Dimension . . . . . . . . . . . . . . . . . . . . . . . . . . . . . . . . . . . . . . . . . . . . . . 63
Perpendicular Movement of Objects . . . . . . . . . . . . . . . . . . . . . . . . . . . . . . . . . . . . . . 66Direct Manipulation of Objects . . . . . . . . . . . . . . . . . . . . . . . . . . . . . . . . . . . . . . . . 66Dragging Grid Planes . . . . . . . . . . . . . . . . . . . . . . . . . . . . . . . . . . . . . . . . . . . . . . . . 67Using Numerical Inputs . . . . . . . . . . . . . . . . . . . . . . . . . . . . . . . . . . . . . . . . . . . . . . 68Move Plane to Match Object . . . . . . . . . . . . . . . . . . . . . . . . . . . . . . . . . . . . . . . . . . . 69
Drawing Modes and Perpendicular Movement . . . . . . . . . . . . . . . . . . . . . . . . . . . . . 69Transformation of Multiple Objects at Different Offsets . . . . . . . . . . . . . . . . . . . . . 70Automatic Plane Positioning . . . . . . . . . . . . . . . . . . . . . . . . . . . . . . . . . . . . . . . . . . . . . .71
Chapter Seven: Working with Text and Symbols in Perspective . . . . . . . . . . . . . . . . . . . 75
Transforming Text and Symbols in Perspective . . . . . . . . . . . . . . . . . . . . . . . . . . . . .77Editing Text and Symbols in Perspective . . . . . . . . . . . . . . . . . . . . . . . . . . . . . . . . . . 78Expanding of Perspective Text and Symbol . . . . . . . . . . . . . . . . . . . . . . . . . . . . . . . . 80Vanishing Stroke Weight . . . . . . . . . . . . . . . . . . . . . . . . . . . . . . . . . . . . . . . . . . . . . . . . 83
Chapter Eight: Putting Things Together . . . . . . . . . . . . . . . . . . . . . . . . . . . . . . . . . . . . . . . . 85
Drawing Based on Visual Appearance and Measurements . . . . . . . . . . . . . . . . . . . 86Drawing the Scene . . . . . . . . . . . . . . . . . . . . . . . . . . . . . . . . . . . . . . . . . . . . . . . . . . . 89Creating the Walls . . . . . . . . . . . . . . . . . . . . . . . . . . . . . . . . . . . . . . . . . . . . . . . . . . . 93Creating the Building . . . . . . . . . . . . . . . . . . . . . . . . . . . . . . . . . . . . . . . . . . . . . . . 103Drawing the Signpost . . . . . . . . . . . . . . . . . . . . . . . . . . . . . . . . . . . . . . . . . . . . . . . 106Drawing Lampposts in Perspective . . . . . . . . . . . . . . . . . . . . . . . . . . . . . . . . . . . . 110
Appendix A: SDK for Perspective Drawing . . . . . . . . . . . . . . . . . . . . . . . . . . . . . . . . . . . . . . 113
AIPerspectiveGridSuite . . . . . . . . . . . . . . . . . . . . . . . . . . . . . . . . . . . . . . . . . . . . . . . . . 114Coordinate System in Perspective . . . . . . . . . . . . . . . . . . . . . . . . . . . . . . . . . . . . . 115
AIPerspectiveTransformSuite . . . . . . . . . . . . . . . . . . . . . . . . . . . . . . . . . . . . . . . . . . . . 117

table of contents vii
Appendix B: Scripting Support for Perspective Drawing . . . . . . . . . . . . . . . . . . . . . . . . . . 121
Define a Grid Using Presets . . . . . . . . . . . . . . . . . . . . . . . . . . . . . . . . . . . . . . . . . . . . . .122Show or Hide the Grid . . . . . . . . . . . . . . . . . . . . . . . . . . . . . . . . . . . . . . . . . . . . . . . . . .122Set the Active Plane . . . . . . . . . . . . . . . . . . . . . . . . . . . . . . . . . . . . . . . . . . . . . . . . . . . . .123Draw on a Perspective Grid . . . . . . . . . . . . . . . . . . . . . . . . . . . . . . . . . . . . . . . . . . . . . .123Bring Objects into Perspective . . . . . . . . . . . . . . . . . . . . . . . . . . . . . . . . . . . . . . . . . . .125

This page intentionally left blank

ix
Introduction
This book is intended for users of Adobe Illustrator CS5. It describes the basics of linear perspective and discusses in detail the feature set available in Illustrator CS5 for drawing a scene in perspective.
Adobe Illustrator CS5 offers a completely new form of vector drawing— perspective or “3D-like” drawing. We were motivated to write this book because we wanted users to have enough background with perspective to take full advantage of the advanced features in Illustrator CS5. The scores of questions asked by prerelease testers of Illustrator CS5 confirmed that this training is needed.
Perspective drawing is a relatively specialized domain pursued by techni-cal artists and draftsmen; while Illustrator caters to a wide array of profes-sionals and hobbyists from traditional graphic designers and artists to web and interactive designers. With this book we have tried to bridge the gap between the two. By covering both linear perspective concepts and Illustra-tor techniques, we have tried to make this book as self-contained as possible; however, basic understanding of Adobe Illustrator is assumed.
As the release of CS5 neared, we realized that the Illustrator Help or User Guide can introduce this new feature set to users, but it may not be enough to answer all the whys and wherefores that power users will inevitably ask! We have tried to provide useful tips and insights into implementation wher-ever appropriate to provide a deeper understanding of the feature. We sin-cerely hope that our endeavor enables new as well as experienced Illustrator users to quickly grab the concepts and use the tools and commands in a pro-ductive, efficient, and creative manner.

This page intentionally left blank
49
4Transformations in Perspective
Now that you are aware of setting the Perspective View/Grid and creating artwork in perspective different ways, the next step is transforming objects in perspective.
This is where the Perspective Selection tool comes into play: It doesn’t just select the objects in perspective (as the name suggests), but also handles some basic transformations including movement, scaling, and movement through planes (perpendicular movement).
For transformations in perspective you need to use Perspective Selection tool. Of course, for transformations that are not available in perspective, such as rotation, you can always make the transformation in the flat (2D) version of the object, and then use the Perspective Selection tool to put it into perspective. This allows all the transformations to work in perspective either directly (using the Perspective Selection tool) or indirectly.
The upcoming discussion talks in detail about the transformations in Perspective.
If you are new to drawing in perspective, you may find it tricky to distin-guish the tools that follow the rules of perspective drawing and the ones that do not. For example, when you move an object toward the vanishing point of the plane it is lying on, you expect it to gradually reduce in size following certain rules of mathematics. Strictly speaking, Illustrator doesn’t provide a “perspective” mode in which you use all the regular tools and commands to draw and transform objects in perspective. Although you can draw flat
ChaPTer 4: TransformaTions in PersPeCTive50
objects and bring them into perspective only when the grid is visible, you can move and scale perspective objects using the Perspective Selection tool whether the grid is visible or hidden.
Remember that drawing in perspective with the Line and Rectangle group tools is tied to grid visibility (and the currently active grid), whereas trans-formation in perspective is independent of grid visibility and is tied to the Perspective Selection tool.
It is also important to understand that objects drawn or brought into per-spective are no different from a flat instance of the same art type. For exam-ple, the Control panel and the Layers panel show a rectangle in perspective as path. Thus it is tricky to determine whether an object is in perspective or not, especially if it has an irregular shape. This is where the perspective-bounding box comes to the rescue.
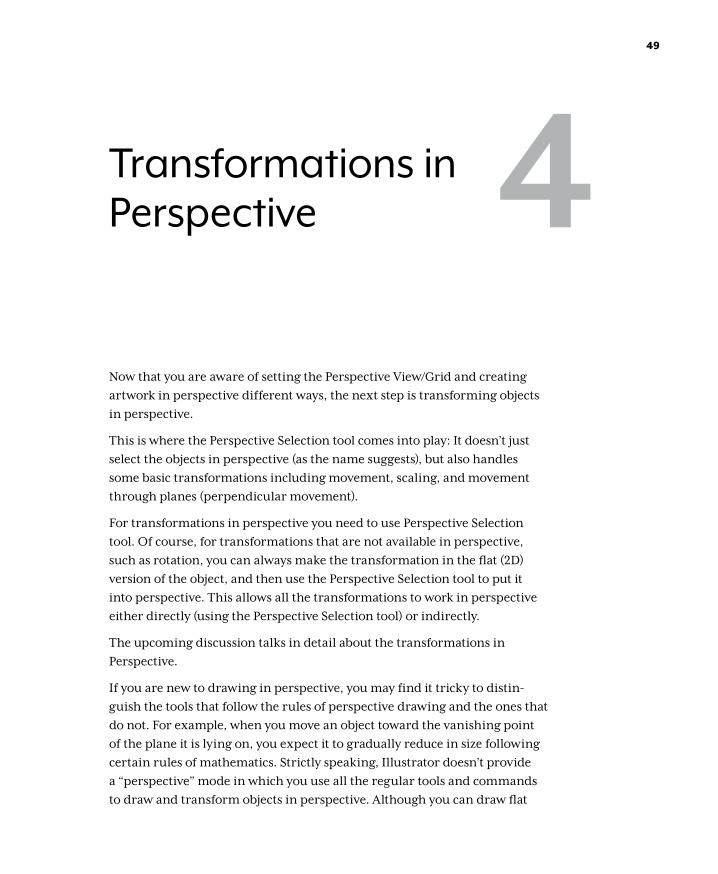
Perspective Bounding BoxThe only visual cue to indicate that an object is in perspective is the perspec-tive bounding box, which is displayed when such an object is selected with the Perspective Selection tool. The perspective bounding box is an anno-tation just like the regular bounding box, with eight handles for scaling. One can differentiate between regular and perspective bounding boxes by looking at the handles. On regular bounding boxes the handles are hollow ( Figure 4.1a); on perspective bounding boxes they are filled with the same color as the plane color on which the object belongs (Figure 4.1b).
Figure 4.1 A regular bounding box (a) and a perspective bounding box (b).
PersPeCTive Bounding Box 51
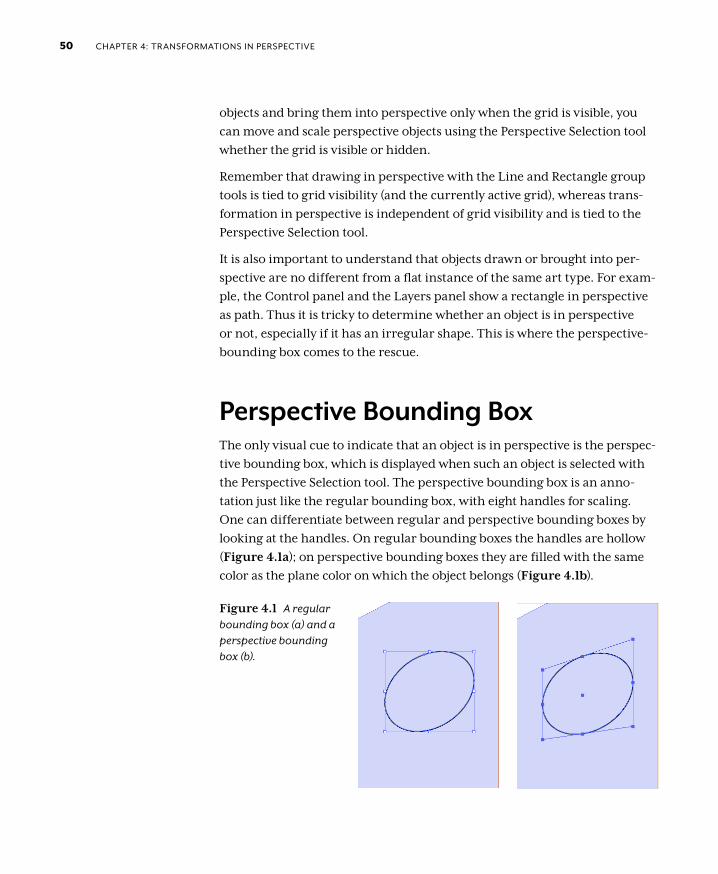
Additionally, a perspective bounding box displays the perspective center of the selection. When multiple objects are selected using the Perspective Selec-tion tool, the centers of individual objects are not shown. The box responds to the Show/Hide Bounding Box command, just like a regular bounding box. If you need to scale the object in perspective, make sure the bounding box is not hidden, or you won’t be able to do so.
Insight into implementation
The perspective bounding box is basically the normal bounding box of the object in perspective. The normal bounding box of an object may or may not be same as the geometric (enclosing) box for that object. But the perspective bounding box always represents the geometric box of the object in perspec-tive. That’s why the perspective bounding box is always a shape similar to the same size rectangle in perspective.
Figure 4.2 A perspective bounding box with multiple objects selected. The center point represents the center of the perspective bounding box, not that of any of the objects.
ChaPTer 4: TransformaTions in PersPeCTive52
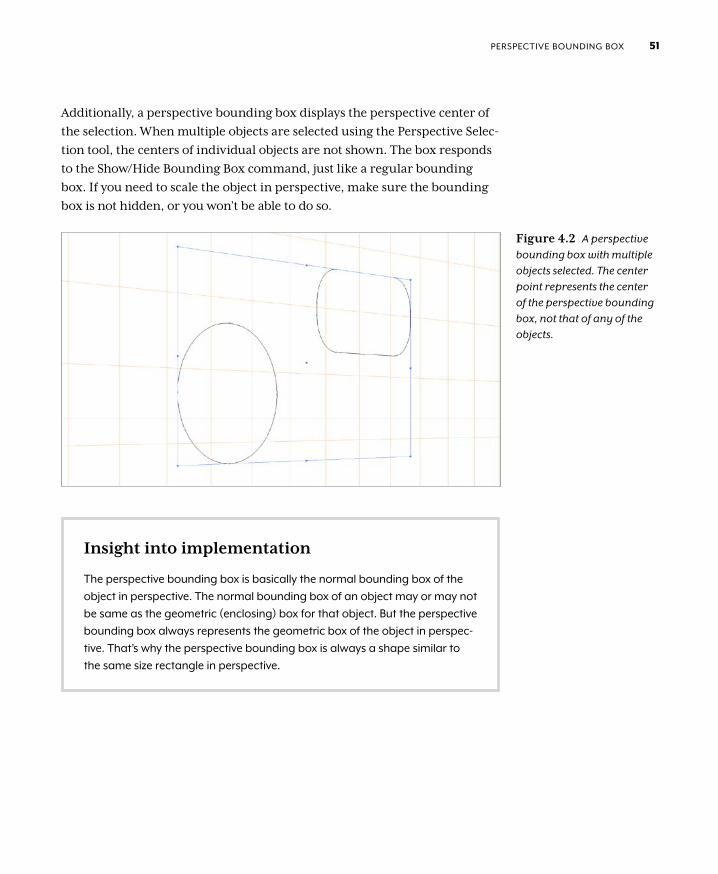
Marquee Selection in PerspectiveTo facilitate the selection of multiple objects, Illustrator lets you drag out a marquee in perspective. With the Perspective Selection tool you always start drawing a rectangular marquee—regardless of which grid is currently active—that lets you select objects across different planes. Using the keys 1, 2, or 3 after you have started dragging lets you draw a marquee that resembles a rectangle in perspective and selects objects in one plane (Figure 4.3).
Transform Operations in PerspectiveUsing the Perspective Selection tool and the perspective bounding box, you can do the following:
1. Move the perspective object on its plane by dragging with Perspective Selection tool.
2. Change the perspective of an object (that is, move it to a different plane by pressing 1, 2, or 3 while dragging to choose the left vertical, horizon-tal or the right vertical grids. Switching to a different plane works only if the grid is visible.
Figure 4.3 Using the Perspective Marquee by pressing 3 selects only the objects on the right vertical plane on the grid (the ellipse and the rounded rectangle).
Transform oPeraTions in PersPeCTive 53
3. Scale by dragging any of the perspective bounding box handles. There are eight of these handles available on the corners and edges. These let you scale the object in one, two, or both dimensions, like a normal bounding box.
4. Move the object on its plane using arrow keys. The perspective object moves on its plane when selected with the Perspective Selection tool and if the grid is visible. Both conditions must be true for the arrow keys to work in perspective. Movement in perspective using arrow keys is not tied to the Keyboard Increment value in the preferences. If snapping to the Perspective Grid is off, each stroke of an arrow key moves the selected object by 1/10th of the cell width. Shift plus the arrow key moves the object the width of a full cell. If Snap to Perspective Grid is on, the object moves the minimum distance that would cause any of its bound-aries to snap to Perspective Grid lines.
5. Move the perspective object perpendicular to its plane by pressing 5 while dragging. See Chapter 6, “The Third Dimension,” for details.
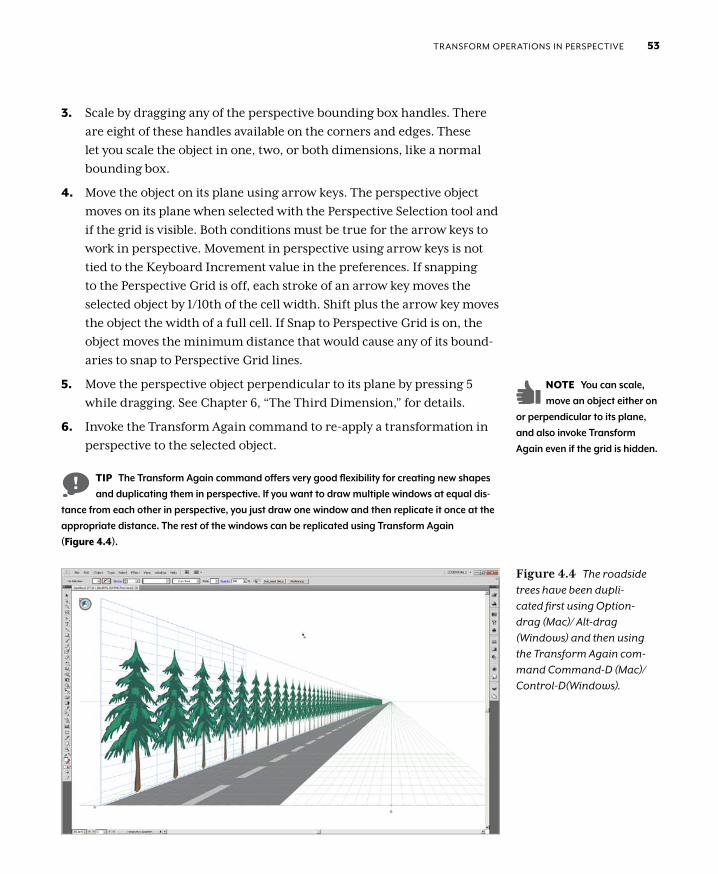
6. Invoke the Transform Again command to re-apply a transformation in perspective to the selected object.
TIP The Transform Again command offers very good flexibility for creating new shapes and duplicating them in perspective. If you want to draw multiple windows at equal dis-
tance from each other in perspective, you just draw one window and then replicate it once at the appropriate distance. The rest of the windows can be replicated using Transform Again (Figure4.4).
NOTE You can scale, move an object either on
or perpendicular to its plane, and also invoke Transform Again even if the grid is hidden.
Figure 4.4 The roadside trees have been dupli-cated first using Option-drag (Mac)/ Alt-drag (Windows) and then using the Transform Again com-mand Command-D (Mac)/Control-D(Windows).
ChaPTer 4: TransformaTions in PersPeCTive54
7. Use the Alt (Windows)/Option (Mac) key to create a copy of the object you are moving or to scale the object from its center. Use the Shift key to constrain a shape’s proportions (width to height) when scaling or to constrain movement along angles of 0 degrees (horizontal axis), 45 degrees, or 90 degrees (vertical axis). Remember that the Shift keypress is not registered if you switch planes or apply perpendicular movement.
You cannot move or scale objects on different grid planes at the same time. The object where you do mouse-down determines the active grid. When you try to apply some transformation on a selection of objects across different planes on the grid, only objects on the active grid plane are transformed.
If you select multiple objects by Shift-clicking, the plane of the last selected object becomes the active plane.
Snapping Aids in Perspective TransformationsWhen View > Perspective Grid > Snap to Grid is enabled, moving or scaling a selection snaps the edges of the perspective bounding box to the gridlines. The snapping tolerance is 1/5th of the cell width. This is not the same as the Snapping Tolerance value in the application preferences. Since the snapping tolerance in perspective is not an absolute distance, it effectively dimin-ishes toward the vanishing point. If this were not so, any transformation of objects close to the vanishing points would result in unintentional snap-ping. Movement by arrow keys with the Snap to Grid option enabled results in snapping of an edge of the perspective bounding box that is closest to a gridline. Snapping does not happen when you switch planes or apply per-pendicular movement.
TIP When you select multiple objects across
different planes, the perspec-tive bounding box is displayed for the objects selected in the currently active plane. Only the anchors and edges of objects on other planes are highlighted to indicate they are selected.