Embed Size (px)
Citation preview

1
Personal Protective Equipment Manual (PPE)
Environmental Health and Safety Facilities Management and Development
2
Table of contents 1. Introduction 4
2. Legislation 4
3. Responsibility 4
3.1 Employer Responsibilities 4
3.2 Supervisor Responsibilities 4
3.3 Worker Responsibilities 4
4. Signage 5
5. Training 5
6. PPE and hazard control 5
7. Selection of PPE 6
7.1 Guidelines for selection: 6
A) Match PPE to Hazard 6
B) Involve Workers/Users 6
C) Check the Fit 6
D) Training 6
E) Maintenance 7
F) Review 7
8. Body Protection (Protective Clothing) 7
8.1 High-visibility safety apparel (HVSA): 7
8.1.1 Classes 8
8.1.2 Selection Criteria 9
Size/Coverage: 9
Fit: 9
Brightness: 10
Design: 10
Colour: 10

Environmental Health and Safety Facilities Management and Development
3
Care/Maintenance: 10
8.2 Lab Coats: 10
9. Hand Protection 13
9.1 Glove Selection Guidelines 14
9.2 Chemical Glove Selection Guidelines 16
9.3 Use and Care of Gloves 17
9.4 Glove removal 18
9.5 Latex Allergies 19
10. Foot Protection 19
10.1 Footwear Selection 20
11. Eye and Face Protection 23
12. Head Protection 23
12.1 Classification 24
12.3 Components 25
12.4 Use and Maintenance 25
13. Hearing Protection 26
13.1 Wearing Soft Foam Ear plugs 27
14. Respiratory Protection 29
14.1 Types of Respirators 29
14.1.1 Air-purifying respirators 29
14.1.2 Supplied-air respirators 31
14.2 Selection, use and care of respirators 31
14.3 Fit-testing 32
14.4 Proper Fit 32
14.4.1 Negative-pressure seal check 32
14.4.2 Positive-pressure seal check 33
15. PPE Availability 33
Appendix 1 35

Environmental Health and Safety Facilities Management and Development
4
1. Introduction Personal protective equipment is a general term referring to any equipment that is worn by a worker to protect against hazards and injuries. Some examples are respirators, gloves, ear plugs, hard hats, safety goggles, and safety shoes or boots.
2. Legislation Section 25(1) under the Occupational Health and Safety Act (OHSA) requires employers to
● provide equipment, materials, and protective devices ● make sure they are used as prescribed ● maintain them in good condition
The OHSA also requires workers to use or wear the equipment, protective devices or clothing that has been prescribed by regulations, e.g., Regulation 851 (Industrial Establishments, sections 79-86) . Hence, all faculty, staff, students, visitors, and volunteers performing tasks or entering areas that require specific Personal Protective Equipment (PPE) should wear the appropriate PPE.
3. Responsibility 3.1 Employer Responsibilities Employers have a legal responsibility to ensure that:
● The appropriate Personal Protective Equipment as prescribed in the regulations is provided;
● PPE provided is maintained in good condition; ● PPE provided is used as prescribed; ● Workers are provided information, instruction and supervision on the use and care of
required PPE; ● they comply with the regulations or standards limiting the exposure of a worker to
biological, chemical, or physical agents as prescribed in the regulation; and ● Every reasonable precaution is taken to protect the health and safety of the worker.
3.2 Supervisor Responsibilities Supervisors have a legal responsibility to ensure that:
● Workers use and wear properly, the appropriate PPE (including protective clothing) that the employer requires to be used or worn;
● Workers are trained in the use and care of required PPE before they wear or use the protective equipment;
● Records of this training are maintained and kept in an accessible location; ● Workers are informed of the existence of any potential or actual danger to the health and
safety of which the supervisor is aware; ● Every reasonable precaution is taken to protect the health and safety of the worker.
3.3 Worker Responsibilities Workers have a legal responsibility to ensure that:

Environmental Health and Safety Facilities Management and Development
5
● They use or wear properly the PPE that the employer requires to be used or worn; ● They inspect PPE regularly before each use; ● Absences or defects in any PPE of which the worker is aware and may endanger
themselves or another worker is reported to their supervisor or employer immediately; ● They do not use PPE in a manner that may endanger themselves or others.
4. Signage Workspaces with specific PPE requirements must have signage posted upon entry of the area and/or near the source of hazards outlining the PPE required. PPE signs remind users to wear protective gear in the workplace. EHS can be consulted to help choose the right signage for your area. Please see Appendix 1 for examples of hazard specific signs.
5. Training Prior to conducting work or being in a PPE prescribed area requiring the use of PPE, workers/students shall be trained in the following:
● When PPE is necessary ● What type is necessary ● How it is to be worn ● What its limitations are ● Proper care, maintenance, life expectancy and disposal
Supervisor must provide training to ensure the worker/student is able to demonstrate, upon completion of the training, the above-mentioned information. Any type of training format can be used as long as a hands-on session is incorporated. The Supervisor must have documentation of this training and proof that the training information was understood. Ryerson also offers a PPE awareness eLearning training. Please visit www.ryerson.ca/facilities-management-development/environmental-health-safety/hazards-at-work/personal-protective-equipment/ for details of the training.
To reduce the risk of entanglement:
● Keep long hair tied back or tucked under a hat ● Keep zippers and buttons done up ● Make sure clothing fits close to the body ● Eliminate drawstrings and other dangling pieces from clothing ● Remove hanging threads and fix tears in clothing to prevent entanglement ● Remove jewellery
6. PPE and hazard control The standard approach to dealing with potential hazards must include a risk assessment to determine the requirement for PPE use. There are five basic ways to control hazards, where elimination is always the first control to consider. After that, proceed down the hierarchy until the control of last resort being PPE.
1. Elimination (remove the hazard from the work site) 2. Substitution (use a less harmful chemical) 3. Engineering (isolate equipment/set guards) 4. Administration (provide training/maintenance)

Environmental Health and Safety Facilities Management and Development
6
5. Personal Protective Equipment (provide gloves/goggles) The use of PPE does not prevent accidents or eliminate hazards. Make every effort to control all hazards at the source. Training is also important. PPE cannot achieve its full-protection potential without worker knowledge and cooperation.
Several controls may have to be put in place. Certain hazards may require multiple PPE solutions. Wearing PPE should not add to the hazard or create a new hazard. For instance, proper glove selection can prevent skin damage, but gloves worn while working with moving equipment can create an entanglement hazard. Using different types of protection at the same time i.e. hard hat, earmuffs and goggles, should not increase the risk to the worker.
PPE design criteria cannot cover all eventualities. Do not use PPE when its usage creates hazards greater than those for which it is designed. Take uncertainties into account when evaluating potential hazards.
7. Selection of PPE Once the need for PPE has been established, the next task is to select the proper type. Two criteria need to be determined:
● Degree of Protection ● Appropriate Design
7.1 Guidelines for selection: A) Match PPE to Hazard Choose the right PPE to match the hazard. In some jobs, workers continually perform the same task. In other jobs workers may be face different hazards. For instance, a welder requires protection against welding gases (respirator), harmful light rays (welder’s goggles), and molten metal and flying chips (gloves, welding hood, welding helmet).
B) Involve Workers/Users To ensure that the fit, comfort, and acceptability of the PPE, involve workers/users in valuations of PPE. Allow for personal preferences and flexibility with choice of PPE, as long as it meets the required legislation and standards.
C) Check the Fit It is important to fit each user with PPE individually. Certain fitting programs require qualified personnel. Some types of equipment, like respirators, require annual fit testing to ensure they fit the face of the individual worker. Show workers how to wear and maintain PPE at the time of fitting.
D) Training Workers and their supervisors need training in when, where, why, and how to use the equipment to achieve the necessary level of protection. All workers need training, whether exposed on a regular or occasional basis, for example, in emergencies or with temporary work in dangerous areas.

Environmental Health and Safety Facilities Management and Development
7
Training includes:
● How to fit and wear PPE. ● Why the PPE is necessary. ● How to adjust it for maximum protection. ● How to care for the PPE.
E) Maintenance Wearing poorly maintained or malfunctioning PPE can be as dangerous than not wearing any protection. Without proper maintenance, the effectiveness of PPE cannot be assured. The most important part of maintenance is the need for continuing inspection. Discard PPE not performing to manufacturers’ specifications. Set up procedures to enable workers to obtain replacement parts for damaged PPE and keep it clean.
Maintenance includes: inspection, care, cleaning, repair, and storage.
F) Review Monitor the effectiveness of the PPE program by inspecting the equipment and auditing procedures. Evaluate whether the equipment is used regularly and appropriately. Review the program at least annually. Review critical areas more frequently. Review and compare production and safety performance records.
8. Body Protection (Protective Clothing) 8.1 High-visibility safety apparel (HVSA): For all work done outside, or working in low-light conditions (e.g. power shutdowns), on roofs, or near vehicular traffic - high-visibility clothing is recommended to increase visibility. Examples of employees who may require high visibility clothing include Maintenance and Operations (Facilities Management & Development) employees and contractors.
The CSA standard Z96-15 (high-visibility safety apparel) should be referred to when determining the appropriate level of high-visibility safety apparel. The CSA standard recommends that a hazard assessment be carried out on each job site to evaluate the workplace or work site for known or potential hazards a worker can encounter while performing a job or task. This assessment helps determine the risk to workers of being hit by moving vehicles and the environmental conditions under which work is performed. When doing a hazard assessment where High-Visibility Safety Apparel (HVSA) might be required, be sure to consider:
● the type and nature of the work being carried out - including the tasks of both the HVSA wearer and any drivers
● whether workers will be exposed to heat and/or flames (if so, flame-resistant HVSA would be required)
● work conditions, such as indoor or outdoor work, temperature, work rates, traffic flow, traffic volume, visibility, etc.,
● the workplace environment and the background workers must be seen in (e.g. is the visual area behind the workers simple, complex, urban, rural, highway, filled with equipment, cluttered)

Environmental Health and Safety Facilities Management and Development
8
● how long the worker is exposed to various traffic hazards, including traffic speeds, lighting conditions and how the natural light might be affected by changing weather (sunlight, overcast sky, fog, rain, or snow)
● factors that affect warning distances and times, such as the size of vehicles, their potential speeds, the ability to stop quickly, and surface conditions
● if there are any engineering and administrative hazard controls already in place (e.g. barriers)
● any distractions that could draw workers attention away from hazards
● the sightlines of vehicle operators, especially when vehicles are operated in reverse
● if certain jobs, or the function being done, need to be "visually" identifiable from other workers in the area
HVSA is clothing (e.g. “5-point tear away” vests, bibs, shirts or coveralls) that workers can wear to improve their visibility and to alert drivers or others of a worker's presence. HVSA is needed if you work when there is low light and poor visibility, especially if you are working around moving vehicles (cars, trucks or other machinery traveling under their own power - e.g., forklifts, backhoes, etc). High-visibility items allow you to be seen by the drivers of those vehicles sooner and more readily. This fact increases your safety at work. The human eye responds best to large, contrasting, bright or moving objects. Worker visibility is enhanced by high colour contrast between clothing and the work environment against which it is seen.
HSVA is typically made from polyester and uses various types of materials to achieve high-visibility.
Fluorescent material takes a portion of invisible ultraviolet light from sunlight, and through special pigments, sends it back to the viewer as more visible light. This material only functions where there is a source of natural sunlight. Fluorescent material will appear brighter than the same coloured non-fluorescent material, especially under low natural light (e.g., cloud cover, fog, dusk, dawn, etc.). This property offers daytime visibility enhancement not present with other colours. These materials enhance daytime visibility, especially at dawn and dusk. Fluorescent colours provide the greatest contrast against most backgrounds.
Retroreflective material is created to return light in the direction of the light's source. This property will let a driver to see the light being reflected from the retroreflective material on a person's garment (as long as the person is standing in the light's beam). Retroreflective materials are most effective under low-light level conditions. While retroreflective materials can still reflect in the daylight, there is little difference between the light reflected from the garment's material and the surrounding environment. This lack of contrast makes retroreflective materials ineffective for enhanced visibility during (sunny) daytime conditions.
In contrast, reflective materials bounce light off of its surface so that it can be seen. While the term "reflective" is not used in the CSA standard, it is typically defined as a material or object that has the ability to "throw back" light (or sound). Most surfaces are already light reflective.
8.1.1 Classes
The CSA standard sets out levels of retroreflective performance, the colours and luminosity of background materials, and how much of the body should be covered by the high-visibility

Environmental Health and Safety Facilities Management and Development
9
components. There are also special requirements for garments that provide electrical flash and flame protection.
CSA lists three classes of garments based on body coverage provided. Each class covers the torso (waist to neck) and/or limbs according to the minimum body coverage areas specified for each class.
● Class 1 provides the lowest recognized coverage and good visibility
● Class 2 provides moderate body coverage and superior visibility
● Class 3 provides the greatest body coverage and visibility under poor light conditions and at great distance.
8.1.2 Selection Criteria
Size/Coverage:
● Large, bright garments are more visible than small ones. Coverage all around the body (360° full body coverage) provides better visibility in all viewing directions.
● Stripes of colours that contrast (have a distinct colour difference) with the background material to provide good visibility. Stripes on the arms and legs can provide visual clues about the motion of the person wearing the garment.
● When background material is bright-coloured or fluorescent material, it is intended to be highly visible, but is not intended to provide retroreflective performance.
● Other requirements such as flame resistance, thermal performance, water resistance, durability, comfort, tear-away features, material breathability and flexibility that are applicable to the job.
Employers should select the colour and stripe combination that provides the preferred contrast and visual indication of movement.
Fit:
● For safety and best performance, garments should be fitted to the person. Don't forget to consider the bulk of clothing that might be worn underneath the garments, and how the garment should be worn (i.e., done up properly around the body with no loose or dangling components). The garments should sit correctly on your body and stay in place during your work.
● The apparel should be comfortable to wear - the parts of the apparel that come into direct contact with the worker should not be rough, have sharp edges, or projections that could cause excessive irritation or injuries. The apparel should also be lightweight.
● Garments should be selected and worn so that no other clothing or equipment covers the high-visibility materials (e.g., glove gauntlets, equipment belts, and high-cut boots).

Environmental Health and Safety Facilities Management and Development
10
Brightness:
● Daylight - Bright colours are more visible than dull colours under daylight conditions (e.g. fluorescent materials are suitable for daylight).
● Low light conditions - Fluorescent colours are more effective than bright colours under low light (e.g. dawn and dusk). Under these conditions, reflective materials are also suggested.
● Dark conditions/worksites - Greater retroreflectivity provides greater visibility under low light conditions. Retroreflective materials provide high-visibility conditions and are preferred over bright colours. Fluorescent materials are ineffective at night and less visible than white fabrics.
Design: To comply with the CSA Standard, the HVSA should meet the following criteria for the stripes/bands:
1. A waist-level horizontal stripe/band that goes completely around the HVSA.
2. Two vertical stripes on the front passing over the shoulders and down to the waist.
3. A symmetric "X" on the back extending from the shoulders to the waist.
4. For Class 3 apparel, stripes/bands encircling both arms and both legs are added.
Colour:
For all classes, the CSA standard specifies both the colour of the background and the stripes/bands. Class 1 (e.g., harness style) must have a minimum of 0.14 metres squared of background material. Background material should be one of fluorescent yellow-green, fluorescent orange-red or fluorescent red; or one of bright yellow-green, or bright orange-red.
Care/Maintenance:
● Keep your high-visibility apparel clean and well-maintained. Contaminated or dirty retroreflective materials provide lower visibility.
● Replace garments that show signs of wear and tear, soiling, or contamination as it will no longer be able to provide acceptable levels of visibility.
Purchasers of HVSA should get proof that the materials used and the design of the garment meet the requirements of the CSA Standard.
8.2 Lab Coats: In laboratories, members must wear a laboratory coat when inside the lab, and especially when handling hazardous materials. Lab coats protect clothing and prevent contact with hazardous materials. The lab worker must select the coat in consideration of the materials they will be working with and the degree of protection involved with the operation being conducted. For instance, when working with pyrophoric or highly-flammable materials, a fire-resistant lab coat is best. Table 1 provides a general outline of common laboratory coat materials available and their corresponding usage. Ryerson bookstore sells certain types of lab coats. If possible, coat
Environmental Health and Safety Facilities Management and Development
11
hooks should be installed near the exit to remind lab workers to remove their lab coats before leaving the lab.
Lab coats are not designed to be the equivalent of chemical protection suits for major chemical handling or emergencies. There are also no specific requirements in standards or guidelines for the type of protection that a lab coat is to provide.
Aprons may be used in certain lab scenarios but should only be used in addition to lab coats to ensure proper protection of arms. Coveralls are not recommended in lab settings as they are generally difficult to remove in case of emergency.
Laboratory coats should:
● Never be worn outside of the active laboratory area (i.e. cafeterias, libraries, or other common areas) except when transporting materials through a hallway to another designated lab area
● Fit properly
● Be fastened with snaps at all times while in the lab (snaps are preferred to buttons as they allow for quick removal in the event of an emergency)
● Be cleaned regularly and separately from all other clothing
● Fully cover the arms to the wrist – short sleeve lab coats are not permitted in wet labs
● Be tucked into the glove or secured at the wrist to prevent exposing the skin between the lab coat at the glove as well as to prevent the sleeve from catching on equipment or coming in contact with other hazards in the working area
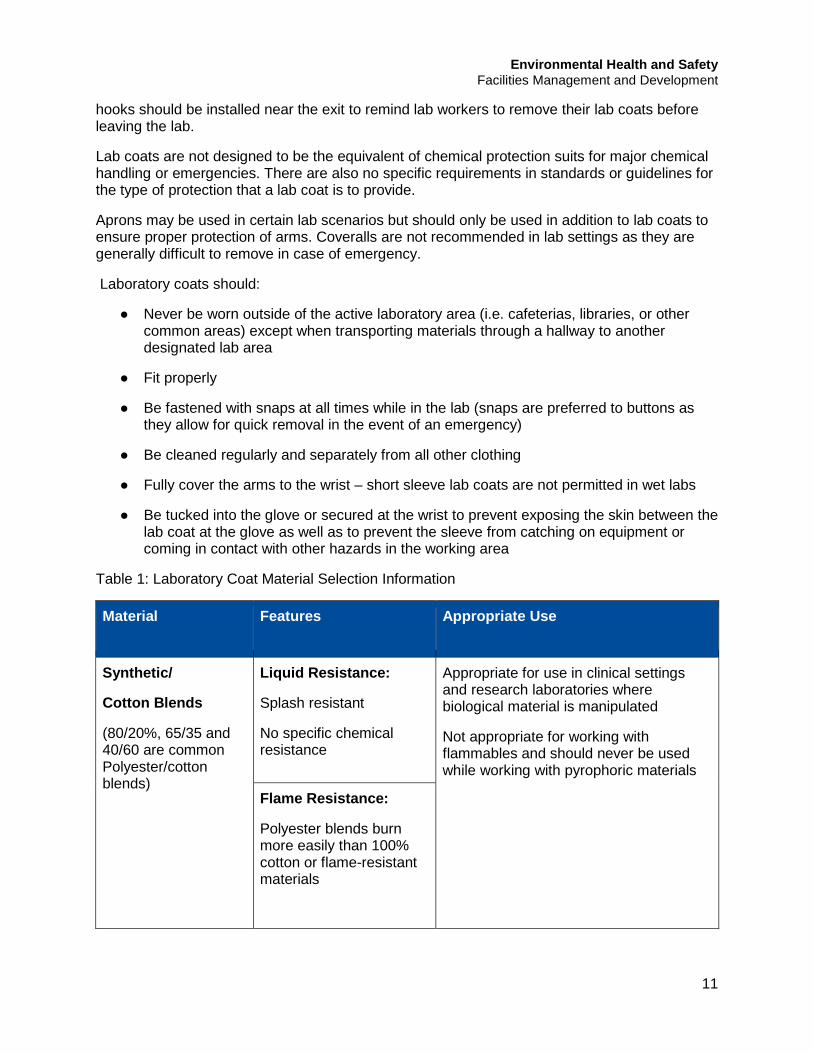
Table 1: Laboratory Coat Material Selection Information
Material Features Appropriate Use
Synthetic/
Cotton Blends
(80/20%, 65/35 and 40/60 are common Polyester/cotton blends)
Liquid Resistance:
Splash resistant
No specific chemical resistance
Appropriate for use in clinical settings and research laboratories where biological material is manipulated
Not appropriate for working with flammables and should never be used while working with pyrophoric materials
Flame Resistance:
Polyester blends burn more easily than 100% cotton or flame-resistant materials

Environmental Health and Safety Facilities Management and Development
12
Comfort:
Yes- Lightweight/breathable
100% Cotton Liquid Resistance:
Not splash resistant
No specific chemical resistance
Appropriate for use in clinical settings and research laboratories where there is light flammable liquid or open flame use
Should be supplemented with a chemical splash apron when corrosive material is handled
Affordable compromise for chemical safety than the more expensive Fire Resistant lab coats
Flame Resistance:
No, but superior to synthetic blends for fire-resistance
Comfort:
Yes- Lightweight/breathable
100% Cotton Flame-resistant treated
Liquid Resistance:
Not splash resistant
No specific chemical resistance
Appropriate for use in research laboratories where substantial fire risk exists from flammable material handling or open flame use.
Laundering will not damage the FR coating over typical use life (specific manufacturer recommendations must be followed)
Costlier than a traditional 100% cotton lab coat
Fire Resistance:
Yes. Flame-resistant (FR) fabrics are intended to resist ignition, prevent the spread of flames away from the immediate area of high heat impingement, and to self-extinguish almost immediately upon removal of the ignition source

Environmental Health and Safety Facilities Management and Development
13
Comfort:
Yes- Lightweight/breathable
Nomex®: Liquid Resistance:
Yes.
More expensive, but recommended for use in research laboratories where there is extreme fire danger from open flame, electrical arc flash, and pyrophoric material.
Flame Resistance:
Yes. When in contact with direct flame or extreme heat, fibers in the protective clothing enlarge, enabling greater distance between the user’s skin and heat source
Comfort:
Yes - Breathable, but bulkier than polyester blends or 100% cotton materials
Source: http://www.ehs.columbia.edu/ppeLabCoatInformationTable.html, January 18, 2017
9. Hand Protection In circumstances where hands may be exposed to corrosive or toxic materials, materials of unknown toxicity, sharp objects and materials of extreme hot and cold temperatures, proper hand protection must be worn. Hand protection is designed to protect hands against a variety of hazards. The protection can be provided in different ways, barrier creams, finger guards, hand pads, mitts, and gloves. There are different types of gloves for different types of work, such as gloves for handling chemicals, oil-based products, abrasive materials, etc. The right type of protection must be worn for the work performed. Gloves must be used to provide protection against chemical, radiation or biological agents, exposure to extreme temperatures, and abrasions or lacerations.
Supervisors are responsible to ensure protective gloves appropriate for the task being performed appropriate for the task being performed are supplied to the worker and that worker wears the protective gloves properly when working.

Environmental Health and Safety Facilities Management and Development
14
Selecting the right glove should be based on a thorough evaluation of the materials handled, the hazard involved, and the duration of the work.
Not every job requires gloves – never wear gloves working with or around reciprocating or rotating machine parts.
9.1 Glove Selection Guidelines Table 2 provides a list of potential hazards, along with the recommended protective glove material. When selecting gloves, always refer to the product safety data sheet (SDS) for the specific glove type. This will ensure that the most accurate information on the gloves’ physical and chemical resistance properties are obtained. Additionally, most glove manufacturers and other reputable sources offer glove compatibility charts on their website to aid in the glove selection process.
Table 2: Glove Selection Based on Specific Type of Hazards
Hazard Type Degree of Hazard Protective Material
Abrasions Severe Reinforced heavy rubber, staple-reinforced heavy leather
Moderate Rubber, plastic, leather, polyester, nylon, cotton
Sharp Edged Objects Severe Metal mesh, staple-reinforced heavy leather, Kevlar-steel mesh
Moderate Leather, terry cloth (Aramid fibre)
Mild with Delicate Work Lightweight leather, polyester, nylon, cotton
Chemicals and Fluids Risk varies according to the chemical, its concentration, and time of contact among other factors. Refer SDS or glove manufacturer data
Dependent on specific chemicals being handled. Common glove types include natural rubber, neoprene, nitrile rubber, polyvinyl chloride, polyvinyl alcohol, and butyl rubber.

Environmental Health and Safety Facilities Management and Development
15
This link provides a tool from Ansell Guardian to help users select gloves based on chemicals.
Cold Leather, insulated plastic or rubber, wool, cotton, cold resistant specialty fabrics (e.g. Zetex). Loose fitting gloves for liquid nitrogen or carbon dioxide.
Heat High temperatures
(> 350°C)
Heat-resistant specialty fabrics - ZetexTM
Medium high temperatures (up to 350°C)
Nomex, Kevlar, Zetex, heat-resistant leather with linings
Warm temperatures
(up to 200°C)
Nomex, Kevlar, Zetex, heat-resistant leather, terry cloth (Aramid fiber)
Less warm temperatures
(up to 100°C)
Chrome-tanned leather, terry cloth
Electricity Rubber-insulating gloves and mitts tested to appropriate voltage (CSA Standard Z259.4-M1979) with leather outer glove
General Duty Low risk Cotton, terry cloth, leather, rubber plastic
Environmental Health and Safety Facilities Management and Development
16
Product Contamination
Thin-film plastic, lightweight leather, cotton, polyester, nylon
Source: http://www.ccohs.ca/oshanswers/prevention/ppe/gloves.html, January 18, 2017
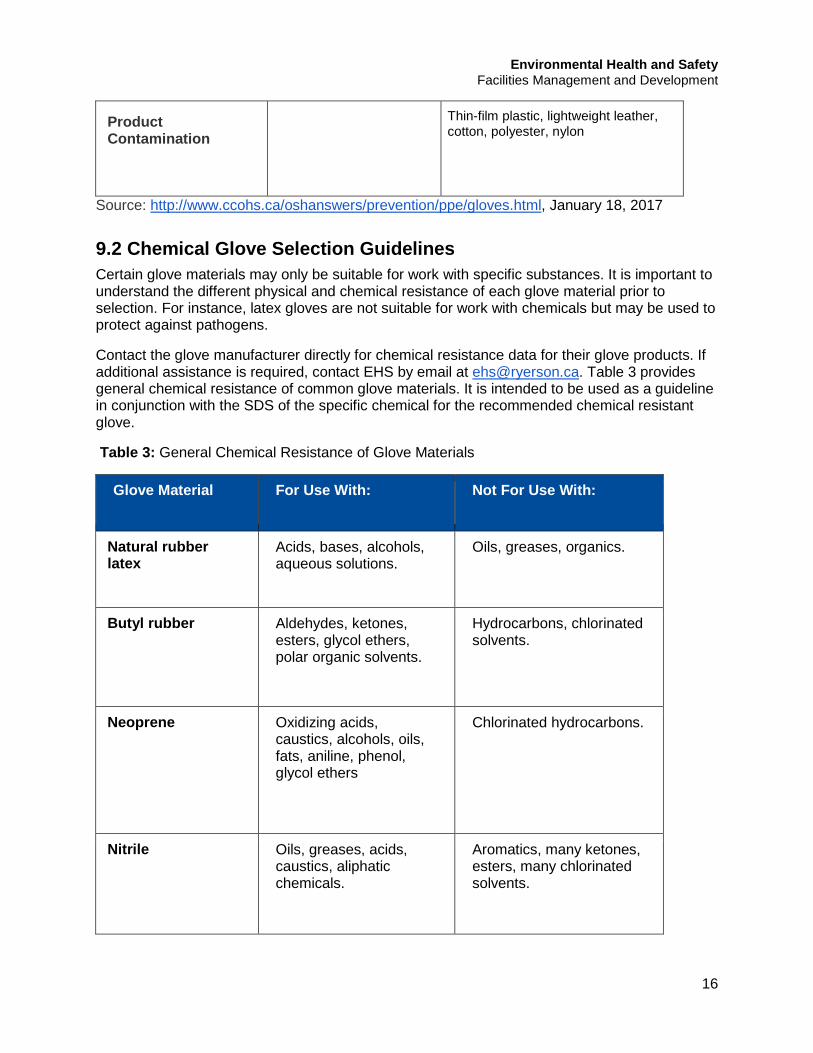
9.2 Chemical Glove Selection Guidelines Certain glove materials may only be suitable for work with specific substances. It is important to understand the different physical and chemical resistance of each glove material prior to selection. For instance, latex gloves are not suitable for work with chemicals but may be used to protect against pathogens.
Contact the glove manufacturer directly for chemical resistance data for their glove products. If additional assistance is required, contact EHS by email at [email protected]. Table 3 provides general chemical resistance of common glove materials. It is intended to be used as a guideline in conjunction with the SDS of the specific chemical for the recommended chemical resistant glove.
Table 3: General Chemical Resistance of Glove Materials
Glove Material For Use With: Not For Use With:
Natural rubber latex
Acids, bases, alcohols, aqueous solutions.
Oils, greases, organics.
Butyl rubber Aldehydes, ketones, esters, glycol ethers, polar organic solvents.
Hydrocarbons, chlorinated solvents.
Neoprene Oxidizing acids, caustics, alcohols, oils, fats, aniline, phenol, glycol ethers
Chlorinated hydrocarbons.
Nitrile Oils, greases, acids, caustics, aliphatic chemicals.
Aromatics, many ketones, esters, many chlorinated solvents.

Environmental Health and Safety Facilities Management and Development
17
Polyvinyl alcohol (PVA)
Aliphatic, aromatics, chlorinated solvents, ketones (except acetone), esters, ethers.
Acids, alcohols, bases.
Polyvinyl chloride (PVC)
Strong acids and bases, salts, other aqueous solutions, alcohols, glycol ethers.
Aromatics, hydrocarbons, chlorinated solvents, aldehydes, ketones, nitro compounds.
Fluoroelastomer (Viton®)
Aromatic and chlorinated solvents, aliphatic and alcohols.
Some ketones, esters, amines.
Silver Shield™
(Norfoil™, 4H™)
Wide range of solvents, acids and bases.
Source: https://ehs.utoronto.ca/wp-content/uploads/2015/10/Hand-Protection-Gloves.pdf
9.3 Use and Care of Gloves ● Inspect gloves for discoloration, holes, stiffness, and tears before each use ● If the glove is not at an acceptable level of quality to provide adequate safety protection,
it should be discarded and replaced ● Inflate rubber gloves in order to test for leaks ● Ensure that the glove is properly fitted to allow for as much dexterity and mobility ● The duration of which a glove may be used depends on the specific glove characteristics
such as thickness and permeation rate ● Always remove gloves before leaving the laboratory and entering a hallway– unless
transporting hazardous chemicals to another designated area ● If transporting chemicals, be mindful not to touch any door knobs, elevator buttons, etc.
with gloves on to avoid chemical contamination (see below for transport instruction) ● Gloves should be used only for the task it is required for (i.e. do not perform
miscellaneous tasks such as answering the phone with a glove on) ● Wash hands directly after each use of gloves ● Do not reuse disposable gloves ● Store reusable gloves in a way that prevents external exposure (i.e. sealed Ziploc bag)
and follow the manufacturer’s instructions

Environmental Health and Safety Facilities Management and Development
18
● Before deciding to re-use chemical-resistant gloves, consider the toxicity of the chemicals involved, duration of exposure, storage, and temperature
● Some materials such as latex may cause allergic reactions to users- where possible, alternatives should be available
In situations where a contaminated item or chemical needs to be transported you can either:
● place contaminated item or substance in a clean container with a lid or on a cart, remove both gloves, then transport
● request assistance from another person to open the door for you while carrying the contaminated item or chemical with gloved hands; or
● remove glove from only one hand to open doors with and use the other hand still protected by the glove to carry the contaminated object
9.4 Glove removal 1. With both hands gloved, grasp the outside of one glove at the top of your wrist.
2. Peel off this first glove, peeling away from your body and from wrist to fingertips, turning the glove inside out.
3. Hold the glove you just removed in your gloved hand.
4. With your ungloved hand, peel off the second glove by inserting your fingers inside the glove at the top of your wrist.
5. Turn the second glove inside out while tilting it away from your body, leaving the first glove inside the second.

Environmental Health and Safety Facilities Management and Development
19
6. Dispose of gloves following safe work procedures, wash hands and do not reuse the gloves.
A printable version of the gloves removal instructions is provided by Public Health Ontario: www.publichealthontario.ca/en/eRepository/ECT_Steps_Gloves_Doffing_2013.pdf
9.5 Latex Allergies Allergies to latex rubber have been identified as a serious concern for workers who become sensitized to latex gloves and other natural rubber-containing products such as medical supplies. Although the symptoms vary from case to case, the most common reaction to latex products is the development of dry, itchy, and irritated areas on the skin, usually the hands.
Other reactions may include rashes and skin blisters which can spread away from the area of skin touched by the latex. This reaction is similar to a poison ivy reaction.
Latex allergy can be prevented by protecting users from latex exposure. Employers should:
● Use alternative non-latex products.
● Ensure that users use good work and housekeeping practices to remove latex-containing dust from the workplace including avoiding contact with eyes and face, hand washing after glove removal, and using HEPA vacuums to clean up dust.
● Provide workers with education programs about latex allergy.
Persons allergic to latex rubber products should consult an allergist to find out if they are actually allergic to latex (natural) rubber or to chemicals that are in synthetic rubbers. They should also advise their physicians and dentists so that alternate products can be used.
10. Foot Protection Safety footwear is designed to protect feet against a variety of injuries. Impact, compression, and puncture are the most common types. Footwear should be chosen according to the hazard and should be properly rated.
When there is danger of slipping, wear slip-resistant safety shoes or boots, depending on the requirements of the environment and type of work. Always wear safety boots/shoes when there is danger of falling objects or stepping on sharp objects. Wear the correct type of safety footwear for the job. You can refer to CSA Z195.1-16 Guideline on Selection, Care, and Use of Protective Footwear for additional information.
All members working in a lab/workshop/machine shop or studio must wear closed toe footwear at all times. Shoes must cover the entire foot and is recommended to be made of durable material, such as leather. Sandals, flip-flops, and other open-toed shoes are not permitted within the previously mentioned areas as it exposes the feet to hazards such as chemicals and sharp

Environmental Health and Safety Facilities Management and Development
20
objects. High-heeled shoes are strongly advised against as they increase the risk of the worker of tripping or falling.
10.1 Footwear Selection Footwear must be chosen based on the hazards that are present. Assess the workplace and work activities for:
● Materials handled or used by the worker. ● Risk of objects falling onto or striking the feet. ● Any material or equipment that might roll over the feet. ● Any sharp or pointed objects that might cut the top of the feet. ● Objects that may penetrate the bottom or side of the foot. ● Possible exposure to corrosive or irritating substances. ● Possible explosive atmospheres including the risk of static electrical discharges. ● Risk of damage to sensitive electronic components or equipment due to the discharge of
static electricity. ● Risk of coming into contact with energized conductors of low to moderate voltage (e.g.,
220 volts or less). Also, evaluate the risk:
● to ankles from uneven walking surfaces or rough terrain. ● of foot injury due to exposure to extreme hot or cold. ● of slips and falls on slippery walking surfaces. ● of exposure to water or other liquids that may penetrate the footwear causing damage to
the foot and the footwear. ● of exposure to rotating or abrasive machinery (e.g., chainsaws or grinders).
For optimal comfort:
● Walk in new footwear to test it out and ensure it is comfortable. Expect to use certain footwear during long periods of standing.
● Footwear should have ample toe room to allow freedom of movement for the toes. ● Ensure a snug fit while making allowances for extra socks or special arch supports when
buying footwear. The footwear should fit snugly around the heel and ankle when laced. ● Lace up footwear fully. The shoe must have a fastening across the instep to prevent the
foot from slipping when walking. 6” or 8” safety footwear provides additional support against ankle injury.
To maintain the integrity of your footwear and to gain the best shelf life:
● Inspect footwear regularly for damage. Look for things such as cracks in soles, breaks in leather, exposed toe caps, etc.
● It is extremely important to repair or replace worn or defective footwear. ● If possible, use protective coating to make footwear water-resistant. ● If footwear has been exposed to sole penetration or impact, it may not show visible signs
of damage. It is advised that you replace the footwear after events such as these. Safety footwear protects against varying hazards. The symbols in Table 4 indicate the level of protection different footwear offers.
The footwear containing the green triangle is intended for heavy industrial work environments, especially that of construction where sharp objects, such as nails, are present.

Environmental Health and Safety Facilities Management and Development
21
● The yellow triangle is intended for light industrial work environments requiring puncture protection and toe protection.
● The white rectangle with the orange Greek letter omega is intended for industrial work environments where accidental contact with live electrical conductors can occur. However, it is important to note that electrical shock resistance deteriorates with wear and in a wet environment.
● The yellow rectangle with the black SD letters is intended for work environments where a static discharge can create a hazard for workers or equipment. This equipment must not be used where contact with live electrical conductors can occur.
● Lastly, the red rectangle with the white C letter is for environments where low-power electrical charges can create a hazard for workers or equipment. And again, this footwear should not be used where contact with live electrical conductors can occur.
Once the hazards and conditions have been considered, the other important factors that will affect usage of this footwear is the fit and care of it.
Table 4: Protective Footwear markings
Outside Label Criteria Intended Applications
Green triangle indicates sole puncture protection with a Grade 1 protective toe cap.
For heavy industrial work environments, especially that of construction where sharp objects (such as nails) are present.
Yellow triangle indicates sole puncture protection with a Grade 2 protective toe cap.
For light industrial work environments requiring puncture protection as well as toe protection.
Blue rectangle indicates a Grade 1 protective toe cap with no puncture-resistant sole.
For industrial work environments not requiring puncture protection.
Grey rectangle indicates a Grade 2 protective toe cap with no puncture-resistant sole.
For industrial and non-industrial work environments not requiring puncture protection.

Environmental Health and Safety Facilities Management and Development
22
White rectangle with orange Greek letter omega indicates electric-shock protective footwear.
For industrial work environments where accidental contact with live electrical conductors can occur. Warning: Electrical shock resistance deteriorates with wear and in a wet environment.
Yellow rectangle with black SD letters indicates static-dissipative footwear.
For industrial work environments where a static discharge can create a hazard for workers or equipment. Warning: This footwear should not be used where contact with live electrical conductors can occur.
Yellow rectangle indicates sole puncture protection with a Grade 2 protective toe cap. (super-static dissipative footwear)
For industrial work environments where a static discharge can create a hazard for workers or equipment. Warning: This footwear should not be used where contact with live electrical conductors can occur.
Red rectangle with white C letter indicates electrically conductive footwear.
For industrial work environments where low-power electrical changes can create a hazard for workers or equipment. Warning: This footwear should not be used where contact with live electrical conductors can occur.
Dark grey rectangle with M letter indicates metatarsal protection. Note: Toe protection is required for all metatarsal protective footwear.
For industrial work environments where heavy objects can hurt the metatarsal region of the foot.
White label with green fir tree symbol footwear provides protection when using chainsaws.
For forestry workers and others who work with or around hand-held chainsaws and other cutting tools.
Source: Footwear, CCOHS, www.ccohs.ca/oshanswers/prevention/ppe/footwear.html, July 26,
2017

Environmental Health and Safety Facilities Management and Development
23
11. Eye and Face Protection Eye protection is required where there is a danger of flying objects, particles, liquids, sprays, or other matter entering the eyes. Eyewear should be impact resistant and can take many forms including:
● Safety glasses (with attached side shields), ● Chemical splash goggles, or ● Full-face protection (face shield)
Non-prescription safety glasses will be supplied to staff, which in the course of their duties, must enter work areas requiring safety eyeglasses. CSA-certified safety glasses have plastic polycarbonate lenses which are stronger than regular lenses, are impact-resistant, and come in prescription and non-prescription forms. Safety frames are stronger than streetwear frames and are often heat resistant and are designed to prevent lenses from being pushed into the eyes.
Eye and face protection should be worn while in or near the vicinity of a work area where the following are present:
● Welding, cutting, and brazing ● Sawing ● Grinding ● Spray painting ● Sunlight ● Dusty environments ● Chemical gases, vapours, or liquids ● Swinging chains or ropes
● Harmful light ● Splashing ● Moving particles ● Sharp objects ● Explosions ● Exposure to UV or IR radiation ● Any other situation that could cause
injury to the eye
Eye protection should be chosen based on an assessment of the risk and splash impact involved. The CSA standards (Z94.3-15 - Eye and face protectors & Z94.3.1-16 - Guideline for selection, use, and care of eye and face protectors) for approved eye protection should be referred to when determining the appropriate level of eye and face protection required:
1. Minor splash hazards and light work: Safety glasses with protective side shields are sufficient
2. Moderate hazards and higher risk of splashing: Safety goggles should be worn 3. Severe hazards involving risk of ruptures or high splash hazards: Face shields
should be worn in conjunction with either safety glasses or goggles depending on the level of risk
4. Ultraviolet Light (UV) exposure: UV protective eyewear should be worn
12. Head Protection Hard hats and helmets are types of protection that are to be used if there is a hazard of head injury. Head injuries can occur under various circumstances including as the result of a slip or fall, working in confined areas, where there are low ceilings or passage heights, or where there may be falling objects.
The correct headwear is needed for the job. For example, for exterior construction sites at the University, hard hats are required. For interior construction or work involving risk of head injury, the Project Manager/supervisor will determine the requirement for hard hats.

Environmental Health and Safety Facilities Management and Development
24
Situations that could cause injury may be when working:
● Below other workers or machinery ● Around or under conveyor belts ● Around exposed energized conductors ● Where there may be overhead obstructions
If head protection is required, establish a complete safety protection program including selection, fit testing, training, maintenance, and inspection. Refer to CSA Standard Z94.1-15 (Industrial Protective Headwear - Performance, Selection, Care, and Use) for additional information.
12.1 Classification Hard hats can be classified on the echelons: types and classes. There are two main types of hard hats: Type 1 and Type 2.
● Type 1 - protection from impact and penetration at the crown (top) and ● Type 2 - protection from impact, penetration at the crown (top) and laterally (sides)
A Type 1 hat will protect a worker from a blow on the top of the head. A piece of wood falling, for example, from a superior story. The Type 1 hat doesn’t offer any lateral protection. This is where the Type 1 comes into the play. Type 2 hats offers a full head protection.
Classes are applied to electrical hard hats:
● Class E (20 000 V electrical rating) - non-conducting material (electrical trades) ● Class G (2200 V electrical rating) - non-conducting material (general trades) ● Class C (no electrical rating)
E hard hats can protect workers against a voltage of up to 20,000 volts or even more. The E in the denomination stands for “Electrical.” Bear in mind that only your head is protected with a Class E hard hat, by no means your entire body. Make sure you wear properly insulated equipment.
G hard hats are for general use, hence the “G.” Their protection against high voltages is less efficient than that of electrical hard hats. If you’re working with low voltages, a class G hard hat is perfect, as it can keep you safe if the voltage does not exceed 2,000 volts.
The C stands for “Conductive.” This type of hard hat protects the wearer against impact. Do not use a C class hard hat if you’re working with electricity. It’s a life hazard since most hard hats in this class are made of or at least contain some aluminum.
12.2 Colours
Hard hat stickers and colour serve a purpose.
● Grey - Worn by people who visit the construction site ● Blue - Electricians ● Green - Inspectors ● Yellow - Common workers ● Brown - Workers who deal with high temperatures ● White - Site managers
As for the stickers, they represent common messages like “Caution,” “Stop,” “Danger” and several other notices.

Environmental Health and Safety Facilities Management and Development
25
12.3 Components Headwear consists of a shell and the suspension. These work together as a system and both need regular inspection and maintenance.
● Do not transport headwear in rear windows of vehicles. Heat and UV light can damage the material, making it brittle and less protective.
● Inspect headwear before each use. ● Always check with the manufacturer when adding or using accessories (such as non-
metallic stickers, tape, bandanas, handkerchiefs). ● Winter liners should be inspected to ensure they do not interfere with fit of headwear. ● Do not draw the chin strap over the brim or peak of the headwear. ● Do not wear baseball style hats under the headwear as it interferes with the suspension. ● Only wear the hard hat with the peak at the back, if the suspension has been adjusted
so the nape strap remains at the back of the head. Check with the manufacturer to ensure the headwear was designed to be worn this way.
Source: CCOHS, http://images.ccohs.ca/oshanswers/K05-1.gif March 12, 2008
12.4 Use and Maintenance The care and maintenance of headwear are needed if the headwear is to protect as designed. Normal use and by heat, cold, chemicals and ultraviolet rays affect the headwear’s lifespan. Clean the suspension and shell regularly according to the manufacturer's' instructions.
Headwear Shell
The shell is rigid and light, and shaped to deflect falling objects. Correct maintenance is important.
● Inspect and replace a shell that shows signs of wear, scratches or gouges. Shells exposed to heat, sunlight and chemicals can become stiff or brittle. A visible pattern of tiny cracks may develop. Over time, weathered hats can become dull in colour or have a chalky appearance.
● Replace headwear when any of the above signs of wear start to appear. ● Replace headwear that has been struck, even if no damage is visible.

Environmental Health and Safety Facilities Management and Development
26
● Remove and destroy any headwear if its protective abilities are in doubt. ● Do not drill holes, alter or modify the shell. Alterations may reduce the protection
provided by the headwear. ● Do not paint the plastic shell. Paint solvents can make plastic headwear brittle and more
susceptible to cracks. Paint can also hide cracks that may develop. Instead, use reflective marking tape to make numbers or symbols for identification purposes. Some headwear may be painted, but check with the manufacturer for approval.
● Do not use winter liners that contain metal or electrically conductive material under Class G or E headwear.
● Do not use metal labels on Class G or E headwear. Headwear Suspension
● The suspension system is as important as the shell. It holds the shell away from the head and acts as a shock-absorber. It also holds the shell in place on the head and allows air to flow freely.
● Adjust headband size so that headwear will stay on when the wearer is bending over, but not so tight that it leaves a mark on the forehead.
● Ensure that the suspension is in good condition. The main purpose of the suspension is to absorb energy.
● Look closely for cracked or torn adjustment slots, frayed material or other signs of wear. ● Check the suspension lugs carefully. Long periods of normal use can damage the
suspension. Perspiration and hair oils can speed up the deterioration of suspension materials.
● Replace the suspension if it has torn or broken threads. ● Do not put anything between the suspension and the shell. There must be a clearance
inside the headwear. In case of a blow to the head, that space helps absorb shock. ● Do not use a suspension made by one manufacturer with products made by another
manufacturer. ● Do not change or alter any of the suspension, liner or shell.
13. Hearing Protection Appropriate hearing protection must be worn must be worn by students, staff, faculty, and visitors in all areas whenever there is a hazard of hearing injury. There are three basic types of ear protection:
● earplugs - inserted to block the ear canal; may be pre-molded or moldable (foam ear plugs). Ear plugs are sold as disposable products or reusable plugs.
● semi-insert ear plugs - consist of two ear plugs held over the ends of the ear canal by a rigid headband
● and earmuffs - consist of sound-attenuating material and soft ear cushions that fit around the ear and hard outer cups. They are held together by a headband.
Supervisors are responsible to ensure hearing protection appropriate for the task being performed is supplied to the worker and that worker wears the hearing protection properly when working. In cases where users are operating heavy machinery or devices that produce loud noises that exceed 85 dBA, hearing conservation (e.g. engineering controls, signage, hearing protection, training) will apply. Depending on the sound level, ear plugs or earmuffs may be required. For additional information regarding heating protection, please refer to the CSA standard Z94.2-14 -Hearing protection devices - Performance, selection, care, and use.

Environmental Health and Safety Facilities Management and Development
27
The following table summarises the differences between earplugs and earmuffs:
Comparison of Hearing Protection
Ear Plugs Ear Muffs
Advantages: ● small and easily carried ● convenient to use with other
personal protection equipment (can be worn with ear muffs)
● more comfortable for long-term wear in hot, humid work areas
● convenient for use in confined work areas
Advantages: ● less attenuation variability among users ● designed so that one size fits most head
sizes ● easily seen at a distance to assist in the
monitoring of their use ● not easily misplaced or lost ● may be worn with minor ear infections
Disadvantages: ● requires more time to fit ● more difficult to insert and
remove ● require good hygiene
practices ● may irritate the ear canal ● easily misplaced ● more difficult to see and
monitor usage
Disadvantages: ● less portable and heavier ● more inconvenient for use with other personal
protective equipment. ● more uncomfortable in hot, humid work area ● more inconvenient for use in confined work
areas ● may interfere with the wearing of safety or
prescription glasses: wearing glasses results in breaking the seal between the ear muff and the skin and results in decreased hearing protection.
13.1 Wearing Soft Foam Ear plugs To get the best protection from your soft foam earplugs, remember to roll, pull, and hold when putting them in. Use clean hands to keep from getting dirt and germs into your ears.
1. Roll the earplug up into a small, thin "snake" with your fingers. You can use one or both hands.

Environmental Health and Safety Facilities Management and Development
28
2. Pull the top of your ear up and back with your opposite hand to straighten out your ear canal. The rolled-up earplug should slide right in.
3. Hold the earplug in with your finger. Count to 20 or 30 aloud while waiting for the plug to expand and fill the ear canal. Your voice will sound muffled when the plug has made a good seal.
Check the fit when you're all done. Most of the foam body of the earplug should be within the
ear canal. Try cupping your hands tightly over your ears. If sounds are much more muffled with
your hands in place, the earplug may not be sealing properly. Take the earplug out and try
again.
Correct Fit: when properly inserted, the bottom edge of earplug is located at the opening of the ear canal.
Incorrect Fit: A portion of the earplug not in the ear canal will reduce effectiveness.

Environmental Health and Safety Facilities Management and Development
29
14. Respiratory Protection Respiratory protective devices vary and are used to protect a worker from contact with airborne contaminants such as dusts, fumes, fogs, mists, gases, vapours, and aerosols or an oxygen-deficient environment. Respirators may be air-purifying or air-supplying devices. It is essential the wearer be properly instructed for safe use and fit.
The use of respirators should only be resorted to in cases of emergency (e.g. hazardous spills or leaks outside of the fume hood) or when alternative approaches, such as ventilation and permanent engineering controls, are deemed insufficient to control inhalation exposures. When chemicals are used within a fume hood, respirators are not required.
14.1 Types of Respirators The two main types are air-purifying respirators (APRs) and supplied-air respirators (SARs).
14.1.1 Air-purifying respirators Air-purifying respirators can remove contaminants in the air that you breathe by filtering out particulates (e.g., dusts, metal fumes, mists). Other APRs purify air by adsorbing gases or vapours on a sorbent (adsorbing material) in a cartridge or canister. They are tight-fitting and are available in several forms:
● Mouth bit respirator (fits in the mouth and comes with a nose clip to hold nostrils closed - for escape purposes only)
● Quarter-mask (covering the nose and mouth)

Environmental Health and Safety Facilities Management and Development
30
● Half-face mask (covering the face from the nose to below the chin)
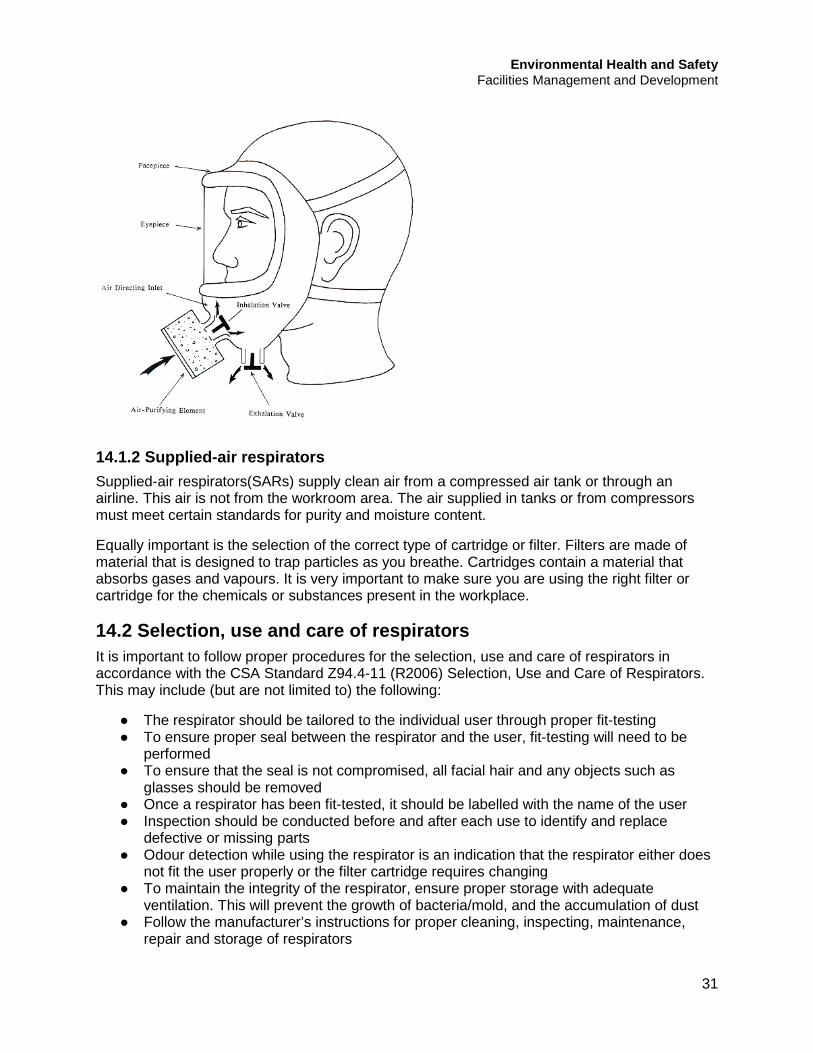
● Full facepiece (covering the face from above the eyes to below the chin)
Environmental Health and Safety Facilities Management and Development
31
14.1.2 Supplied-air respirators Supplied-air respirators(SARs) supply clean air from a compressed air tank or through an airline. This air is not from the workroom area. The air supplied in tanks or from compressors must meet certain standards for purity and moisture content.
Equally important is the selection of the correct type of cartridge or filter. Filters are made of material that is designed to trap particles as you breathe. Cartridges contain a material that absorbs gases and vapours. It is very important to make sure you are using the right filter or cartridge for the chemicals or substances present in the workplace.
14.2 Selection, use and care of respirators It is important to follow proper procedures for the selection, use and care of respirators in accordance with the CSA Standard Z94.4-11 (R2006) Selection, Use and Care of Respirators. This may include (but are not limited to) the following:
● The respirator should be tailored to the individual user through proper fit-testing ● To ensure proper seal between the respirator and the user, fit-testing will need to be
performed ● To ensure that the seal is not compromised, all facial hair and any objects such as
glasses should be removed ● Once a respirator has been fit-tested, it should be labelled with the name of the user ● Inspection should be conducted before and after each use to identify and replace
defective or missing parts ● Odour detection while using the respirator is an indication that the respirator either does
not fit the user properly or the filter cartridge requires changing ● To maintain the integrity of the respirator, ensure proper storage with adequate
ventilation. This will prevent the growth of bacteria/mold, and the accumulation of dust ● Follow the manufacturer’s instructions for proper cleaning, inspecting, maintenance,
repair and storage of respirators

Environmental Health and Safety Facilities Management and Development
32
● Medical clearance must be given prior to an individual being allowed to work in a situation where a respirator is required
● The decision to purchase and use a respirator should be made in consultation with the Ryerson EHS office and the SDS.
When selecting a respirator, there are several things to consider. Respirators are rated in the following categories: N Series, which mean not resistant to oil; R Series, which means resistant to oil; and P Series, which means oil-proof. A mask with an N95 rating is not resistant to oil and has a 95 per cent filter-efficiency rating. Filter efficiency means the percentage of particulates removed by the filter. There are three levels of filter efficiency: 95 percent, 99 percent and 99.97 percent. The higher the efficiency, the lower the leakage.
There are many different types and sizes of disposable respirators or dust masks available — so be sure to find one that is comfortable for you. Also ensure you only select a product with NIOSH or CSA Group certification. These respirators should be discarded after one use.
Respirators must be stored in a clean dry place in a tight container or a sealed plastic bag when not in use, so they are protected from dust, sunlight, extreme heat and cold, moisture, chemicals, and physical damage. Keep respirators in a convenient location close to where they are to be used.
14.3 Fit-testing Loose-fitting respirators, like surgical masks, do not require a tight seal with the face to provide protection. Therefore, they do not need to be fit tested.
For tight fitting respirators, fit testing is required before using a respirator for the first time. A qualitative fit test is the most common type of test and covers most of the regularly used workplace masks such as N95, half face and full face respirators. The test involves the taste sensitivity of the person being tested and can be applied to any type of mask that does not have its own separate air supply. The tests can only be performed by a qualified instructor.
Please contact EHS at [email protected] to schedule a fit-testing session. There is no eating, smoking, or drinking about 20 minutes before the test. Unfortunately, if you have any facial hair, you will have to shave. This is because when you have facial hair, the respirators/masks cannot properly secure to the skin on your face and you will loose the seal between the respirator and skin and fail the test.
14.4 Proper Fit To ensure a proper fit, a fit check should be performed each time a respirator is worn. Test for fit every time you put the respirator on and throughout your shift. Two easy tests can show whether most reusable respirators fit right and don’t leak.
14.4.1 Negative-pressure seal check 1. Place the mask over your mouth and nose, and adjust straps so that the mask fits
comfortably (snug, not overly tight). 2. Block the air inlets by placing your hands over the respirator so that no air can enter.
These are usually the filter openings on the sides of the facepiece. 3. Breathe in and hold your breath. 4. If there are no leaks, the facepiece should collapse slightly and stay like that while you
hold your breath for 10 seconds.
Environmental Health and Safety Facilities Management and Development
33
5. If the mask does not collapse against your face or immediately releases, re-adjust the straps and repeat steps 1 through 4.
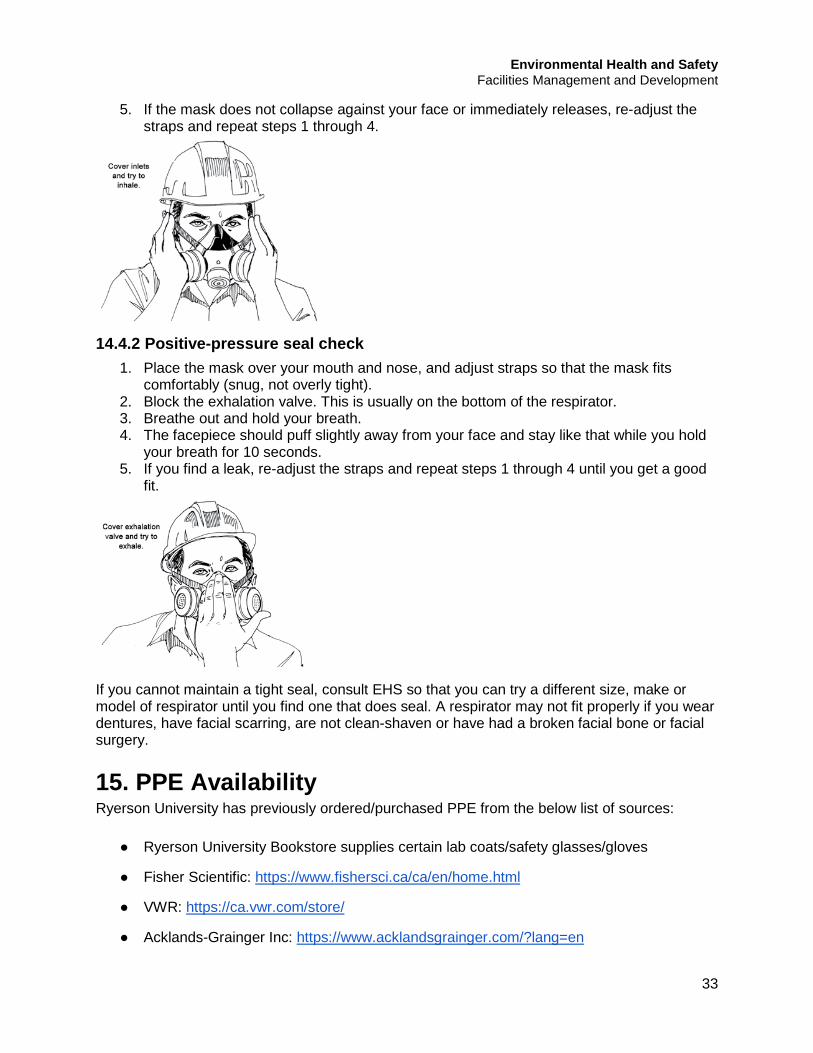
14.4.2 Positive-pressure seal check 1. Place the mask over your mouth and nose, and adjust straps so that the mask fits
comfortably (snug, not overly tight). 2. Block the exhalation valve. This is usually on the bottom of the respirator. 3. Breathe out and hold your breath. 4. The facepiece should puff slightly away from your face and stay like that while you hold
your breath for 10 seconds. 5. If you find a leak, re-adjust the straps and repeat steps 1 through 4 until you get a good
fit.
If you cannot maintain a tight seal, consult EHS so that you can try a different size, make or model of respirator until you find one that does seal. A respirator may not fit properly if you wear dentures, have facial scarring, are not clean-shaven or have had a broken facial bone or facial surgery.
15. PPE Availability Ryerson University has previously ordered/purchased PPE from the below list of sources:
● Ryerson University Bookstore supplies certain lab coats/safety glasses/gloves
● Fisher Scientific: https://www.fishersci.ca/ca/en/home.html
● VWR: https://ca.vwr.com/store/
● Acklands-Grainger Inc: https://www.acklandsgrainger.com/?lang=en

Environmental Health and Safety Facilities Management and Development
34
● Nitrile Gloves can also be purchased at retail stores (i.e. Shoppers Drug Mart)
● Uline: www.uline.ca

Environmental Health and Safety Facilities Management and Development
35
Appendix 1
Here are some examples of PPE pictograms based on hazards.

Environmental Health and Safety Facilities Management and Development
36