Embed Size (px)
Citation preview

perma STAR VARIOOperators pocket guide
perma STAR VARIOperma STAR VARIO - 7 - - 8 -
LC 60 120 250
- - I LC 60 120 250
- - I LC 60 120 250
- - I
III 1
=
=
=
LC S60
LC L250
OFF
OK
>
J
K
L
+60°C140°F-10°C+14°F
perma STAR VARIOperma STAR VARIO - 7 - - 8 -
LC 60 120 250
- - I LC 60 120 250
- - I LC 60 120 250
- - I
III 1
=
=
=
LC S60
LC L250
OFF
OK
>
J
K
L
+60°C140°F-10°C+14°F
CLICK!=OK
21 3
The perma STAR VARIO is set and controlled via a simple to navigate menu using a single SET button. The menu is intuitive and requires minimal manipulation after the initial setting.
Features which support simple operation and error minimisation include:
Initial set screen A new lubricator displays on the LCD. This forces users to set the time and lubricant canister size before the lubricator can be turned on.
Automatic restart When the lubricant canister and battery set is changed the lubricator automatically restarts meaning that there is no need to use the SET button when serving lubricators.
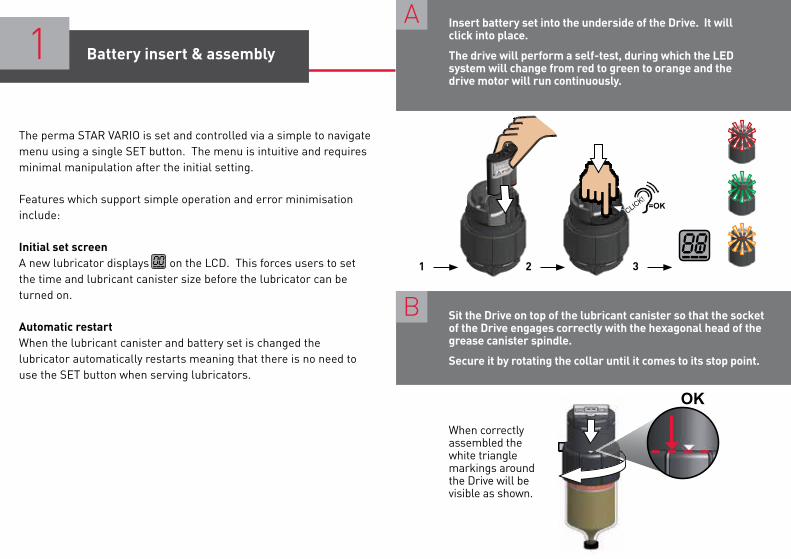
Insert battery set into the underside of the Drive. It will click into place.
The drive will perform a self-test, during which the LED system will change from red to green to orange and the drive motor will run continuously.
Sit the Drive on top of the lubricant canister so that the socket of the Drive engages correctly with the hexagonal head of the grease canister spindle.
Secure it by rotating the collar until it comes to its stop point.
When correctly assembled the white triangle markings around the Drive will be visible as shown.
B
ABattery insert & assembly1
perma STAR VARIOperma STAR VARIO - 7 - - 8 -
LC 60 120 250
- - I LC 60 120 250
- - I LC 60 120 250
- - I
III 1
=
=
=
LC S60
LC L250
OFF
OK
>
J
K
L
+60°C140°F-10°C+14°F
LC 60 120 250
- -LC 60 120 250
- -LC 60 120 250
- -
perma STAR VARIOperma STAR VARIO - 7 - - 8 -
LC 60 120 250
- - I LC 60 120 250
- - I LC 60 120 250
- - I
III 1
=
=
=
LC S60
LC L250
OFF
OK
>
J
K
L
+60°C140°F-10°C+14°F
new Drive Unit which has not been set
perma STAR VARIOperma STAR VARIO - 7 - - 8 -
LC 60 120 250
- - I LC 60 120 250
- - I LC 60 120 250
- - I
III 1
=
=
=
LC S60
LC L250
OFF
OK
>
J
K
L
+60°C140°F-10°C+14°F
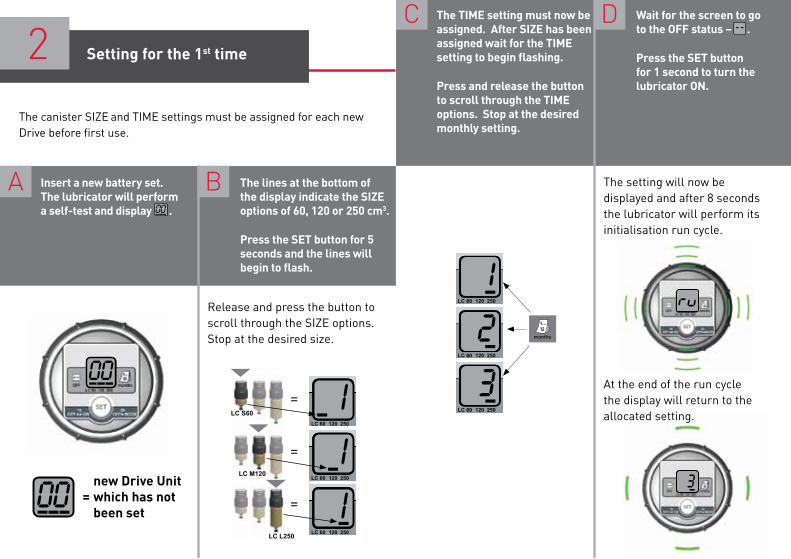
The canister SIZE and TIME settings must be assigned for each new Drive before first use.
B
D
A
C
Insert a new battery set. The lubricator will perform a self-test and display .
The TIME setting must now be assigned. After SIZE has been assigned wait for the TIME setting to begin flashing.
Press and release the button to scroll through the TIME options. Stop at the desired monthly setting.
The lines at the bottom of the display indicate the SIZE options of 60, 120 or 250 cm3.
Press the SET button for 5 seconds and the lines will begin to flash.
Wait for the screen to go to the OFF status – .
Press the SET button for 1 second to turn the lubricator ON.
perma STAR VARIOperma STAR VARIO - 7 - - 8 -
LC 60 120 250
- - I LC 60 120 250
- - I LC 60 120 250
- - I
III 1
=
=
=
LC S60
LC L250
OFF
OK
>
J
K
L
+60°C140°F-10°C+14°F
perma STAR VARIOperma STAR VARIO - 7 - - 8 -
LC 60 120 250
- - I LC 60 120 250
- - I LC 60 120 250
- - I
III 1
=
=
=
LC S60
LC L250
OFF
OK
>
J
K
L
+60°C140°F-10°C+14°F
The setting will now be displayed and after 8 seconds the lubricator will perform its initialisation run cycle.
Release and press the button to scroll through the SIZE options. Stop at the desired size.
Setting for the 1st time2
At the end of the run cycle the display will return to the allocated setting.
perma STAR VARIOperma STAR VARIO - 7 - - 8 -
LC 60 120 250
- - I LC 60 120 250
- - I LC 60 120 250
- - I
III 1
=
=
=
LC S60
LC L250
OFF
OK
>
J
K
L
+60°C140°F-10°C+14°F
LC 60 120 250
- -LC 60 120 250
- -LC 60 120 250
- -
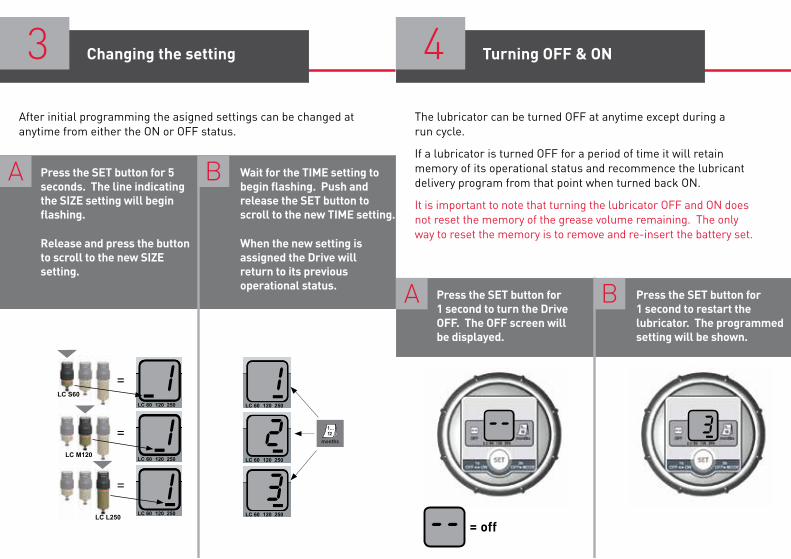
After initial programming the asigned settings can be changed at anytime from either the ON or OFF status.
The lubricator can be turned OFF at anytime except during a run cycle.
If a lubricator is turned OFF for a period of time it will retain memory of its operational status and recommence the lubricant delivery program from that point when turned back ON.
It is important to note that turning the lubricator OFF and ON does not reset the memory of the grease volume remaining. The only way to reset the memory is to remove and re-insert the battery set.
BA Press the SET button for 5 seconds. The line indicating the SIZE setting will begin flashing.
Release and press the button to scroll to the new SIZE setting.
Wait for the TIME setting to begin flashing. Push and release the SET button to scroll to the new TIME setting.
When the new setting is assigned the Drive will return to its previous operational status. BA Press the SET button for
1 second to turn the Drive OFF. The OFF screen will be displayed.
Press the SET button for 1 second to restart the lubricator. The programmed setting will be shown.
perma STAR VARIOperma STAR VARIO - 7 - - 8 -
LC 60 120 250
- - I LC 60 120 250
- - I LC 60 120 250
- - I
III 1
=
=
=
LC S60
LC L250
OFF
OK
>
J
K
L
+60°C140°F-10°C+14°F
perma STAR VARIOperma STAR VARIO - 7 - - 8 -
LC 60 120 250
- - I LC 60 120 250
- - I LC 60 120 250
- - I
III 1
=
=
=
LC S60
LC L250
OFF
OK
>
J
K
L
+60°C140°F-10°C+14°F
off
Changing the setting Turning OFF & ON3 4
Dispensing rate options5
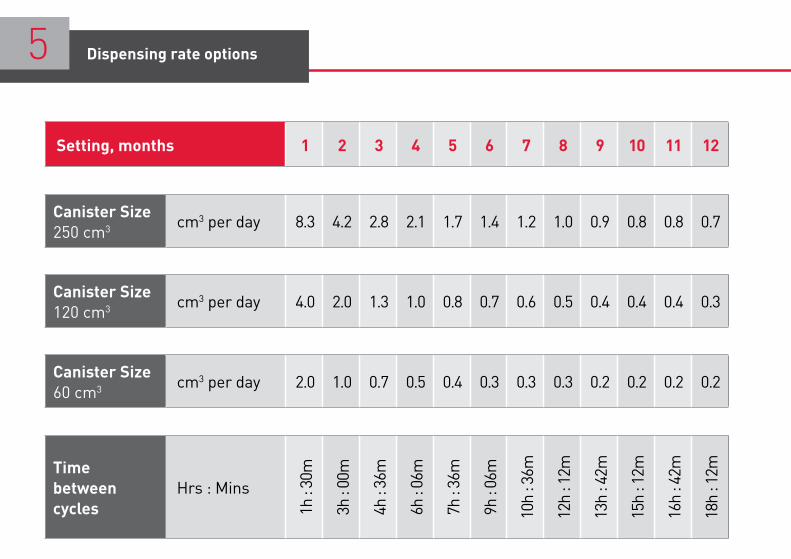
Canister Size 250 cm3 cm3 per day 8.3 4.2 2.8 2.1 1.7 1.4 1.2 1.0 0.9 0.8 0.8 0.7
Canister Size 120 cm3 cm3 per day 4.0 2.0 1.3 1.0 0.8 0.7 0.6 0.5 0.4 0.4 0.4 0.3
Canister Size 60 cm3 cm3 per day 2.0 1.0 0.7 0.5 0.4 0.3 0.3 0.3 0.2 0.2 0.2 0.2
Time between cycles
Hrs : Mins
1h :
30m
3h :
00m
4h :
36m
6h :
06m
7h :
36m
9h :
06m
10h
: 36m
12h
: 12m
13h
: 42m
15h
: 12m
16h
: 42m
18h
: 12m
Setting, months 1 2 3 4 5 6 7 8 9 10 11 12
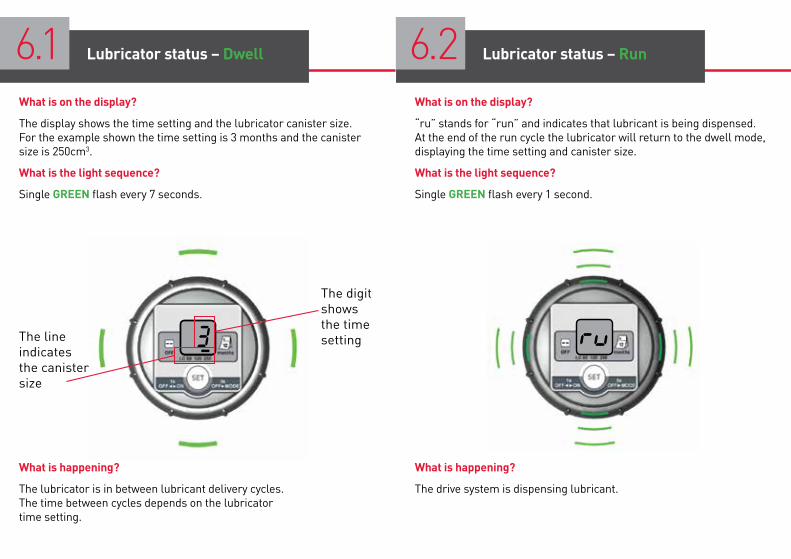
What is on the display?
The display shows the time setting and the lubricator canister size. For the example shown the time setting is 3 months and the canister size is 250cm3.
What is the light sequence?
Single GREEN flash every 7 seconds.
The digit shows the time settingThe line
indicates the canister size
What is on the display?
“ru” stands for “run” and indicates that lubricant is being dispensed. At the end of the run cycle the lubricator will return to the dwell mode, displaying the time setting and canister size.
What is the light sequence?
Single GREEN flash every 1 second.
What is happening?
The drive system is dispensing lubricant.
What is happening?
The lubricator is in between lubricant delivery cycles. The time between cycles depends on the lubricator time setting.
Lubricator status – Dwell Lubricator status – Run6.1 6.2
What is on the display?
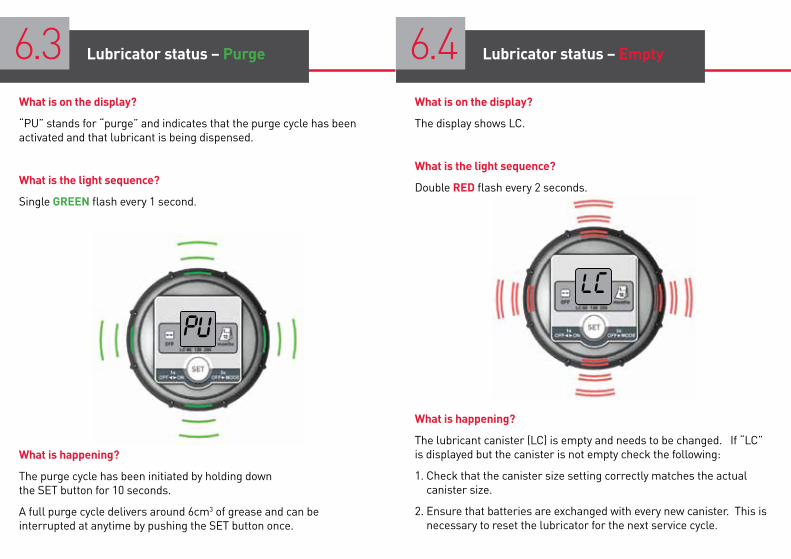
“PU” stands for “purge” and indicates that the purge cycle has been activated and that lubricant is being dispensed.
What is the light sequence?
Single GREEN flash every 1 second.
What is happening?
The purge cycle has been initiated by holding down the SET button for 10 seconds.
A full purge cycle delivers around 6cm3 of grease and can be interrupted at anytime by pushing the SET button once.
What is on the display?
The display shows LC.
What is the light sequence?
Double RED flash every 2 seconds.
What is happening?
The lubricant canister (LC) is empty and needs to be changed. If “LC” is displayed but the canister is not empty check the following:
1. Check that the canister size setting correctly matches the actual canister size.
2. Ensure that batteries are exchanged with every new canister. This is necessary to reset the lubricator for the next service cycle.
Lubricator status – Purge Lubricator status – Empty6.3 6.4
What is on the display?
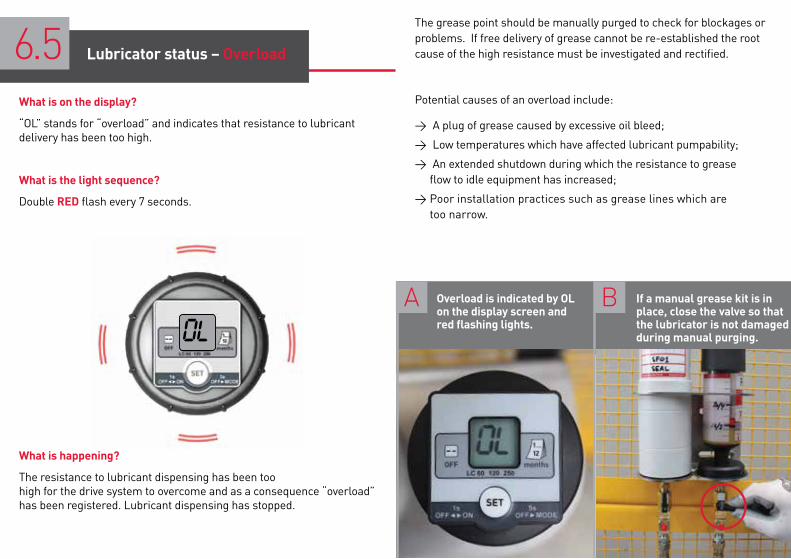
“OL” stands for “overload” and indicates that resistance to lubricant delivery has been too high.
What is the light sequence?
Double RED flash every 7 seconds.
What is happening?
The resistance to lubricant dispensing has been too high for the drive system to overcome and as a consequence “overload” has been registered. Lubricant dispensing has stopped.
The grease point should be manually purged to check for blockages or problems. If free delivery of grease cannot be re-established the root cause of the high resistance must be investigated and rectified.
Potential causes of an overload include:
> A plug of grease caused by excessive oil bleed;
> Low temperatures which have affected lubricant pumpability;
> An extended shutdown during which the resistance to grease flow to idle equipment has increased;
> Poor installation practices such as grease lines which are too narrow.
A BOverload is indicated by OL on the display screen and red flashing lights.
If a manual grease kit is in place, close the valve so that the lubricator is not damaged during manual purging.
5.5Lubricator status – Overload6.5
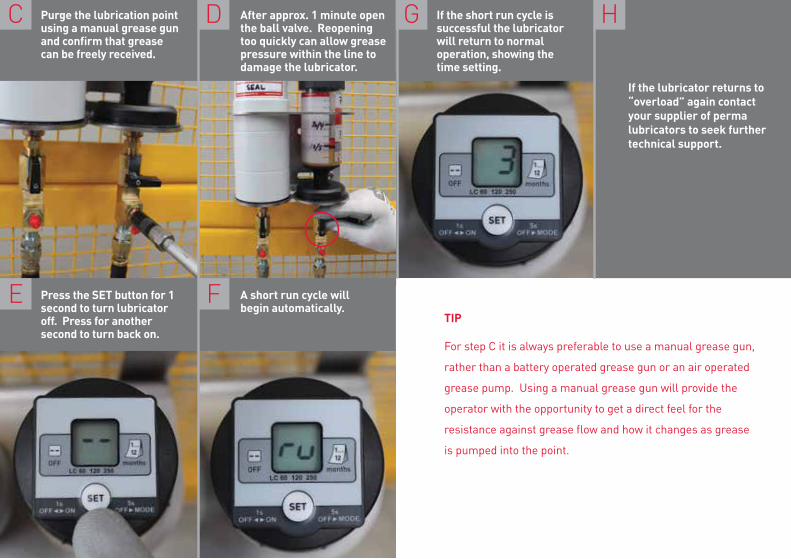
E
C G
F
D H
Press the SET button for 1 second to turn lubricator off. Press for another second to turn back on.
Purge the lubrication point using a manual grease gun and confirm that grease can be freely received.
If the short run cycle is successful the lubricator will return to normal operation, showing the time setting.
A short run cycle will begin automatically.
After approx. 1 minute open the ball valve. Reopening too quickly can allow grease pressure within the line to damage the lubricator.
If the lubricator returns to “overload” again contact your supplier of perma lubricators to seek further technical support.
TIP
For step C it is always preferable to use a manual grease gun,
rather than a battery operated grease gun or an air operated
grease pump. Using a manual grease gun will provide the
operator with the opportunity to get a direct feel for the
resistance against grease flow and how it changes as grease
is pumped into the point.
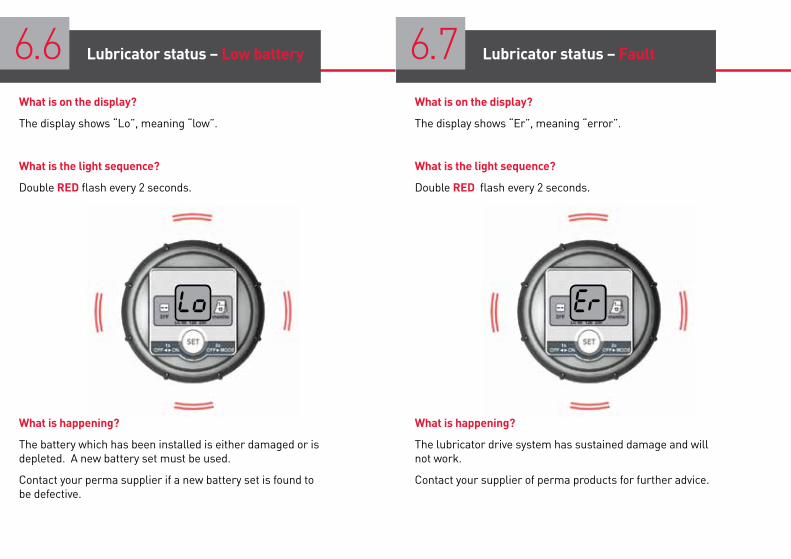
What is on the display?
The display shows “Lo”, meaning “low”.
What is the light sequence?
Double RED flash every 2 seconds.
What is happening?
The battery which has been installed is either damaged or is depleted. A new battery set must be used.
Contact your perma supplier if a new battery set is found to be defective.
What is on the display?
The display shows “Er”, meaning “error”.
What is the light sequence?
Double RED flash every 2 seconds.
What is happening?
The lubricator drive system has sustained damage and will not work.
Contact your supplier of perma products for further advice.
5.5 5.5Lubricator status – Low battery Lubricator status – Fault6.6 6.7
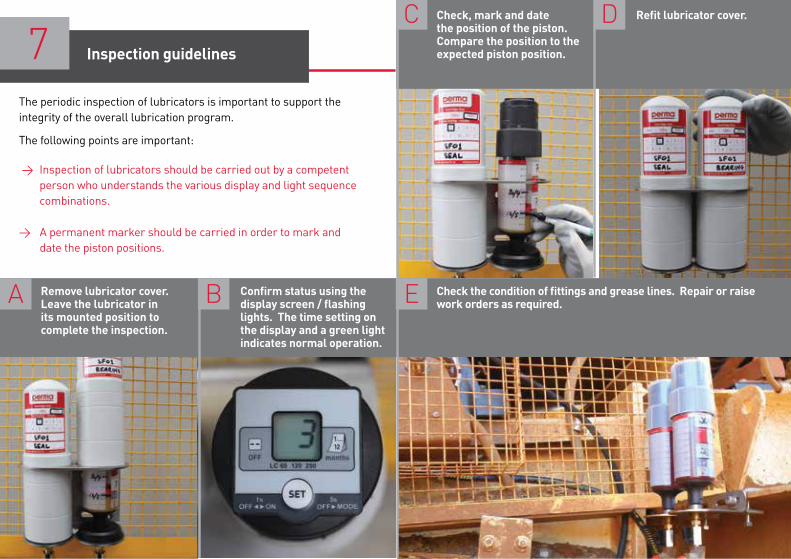
The periodic inspection of lubricators is important to support the integrity of the overall lubrication program.
The following points are important:
> Inspection of lubricators should be carried out by a competent person who understands the various display and light sequence combinations.
> A permanent marker should be carried in order to mark and date the piston positions.
E
C
A
D
B Check the condition of fittings and grease lines. Repair or raise work orders as required.
Check, mark and date the position of the piston. Compare the position to the expected piston position.
Remove lubricator cover. Leave the lubricator in its mounted position to complete the inspection.
Refit lubricator cover.
Confirm status using the display screen / flashing lights. The time setting on the display and a green light indicates normal operation.
Inspection guidelines7
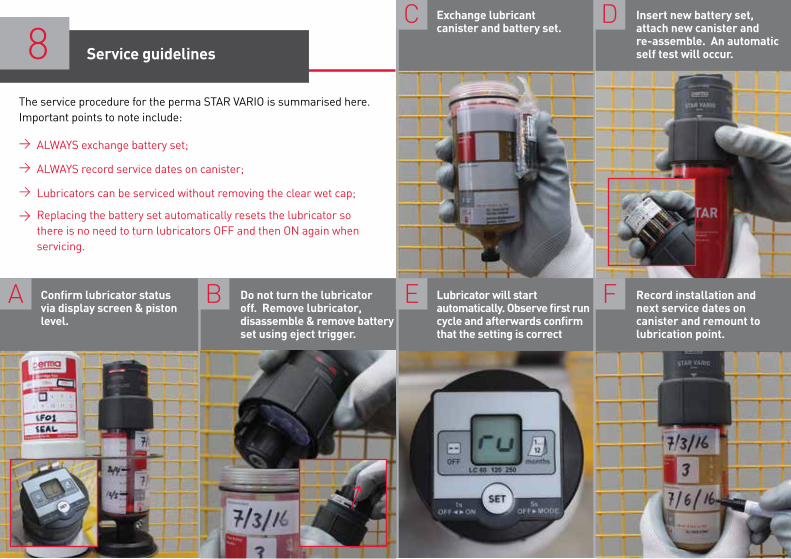
The service procedure for the perma STAR VARIO is summarised here. Important points to note include:
> ALWAYS exchange battery set;
> ALWAYS record service dates on canister;
> Lubricators can be serviced without removing the clear wet cap;
> Replacing the battery set automatically resets the lubricator so there is no need to turn lubricators OFF and then ON again when servicing.
E
C
A F
D
B Lubricator will start automatically. Observe first run cycle and afterwards confirm that the setting is correct
Exchange lubricant canister and battery set.
Confirm lubricator status via display screen & piston level.
Record installation and next service dates on canister and remount to lubrication point.
Insert new battery set, attach new canister and re-assemble. An automatic self test will occur.
Do not turn the lubricator off. Remove lubricator, disassemble & remove battery set using eject trigger.
Service guidelines8