Embed Size (px)
Citation preview
• Was the sample deep red in color and free of watery fluid?• Was the drop large enough (at least 0.5 µL)?• Did the reaction site fill with enough blood all at once?
IF NOT, REPEAT TEST.
The meter will count down and display result in 7 seconds.CONSIDER YOUR RESULT.
REPEAT ALTERNATE SITE TEST:• IF the blood sample appeared to be diluted with clear fluid.• IF you did not vigorously rub the test site.• IF the test was accidentally marked as a “Control” result.• IF your result was not consistent with how you feel.• IF the blood drop was not large enough to fill the reaction site.
Any of the above situations can lead to an inaccurate test result.
If the repeated alternate site result is still not consistent with how you feel, confirm your blood glucose level with fingertip testing.
< <
a) Remove GLUCOCARD Vital test strip from the bottle. Immediately replace the bottle cap tightly. Insert test strip as shown in diagram. Be sure to align test strip with test strip port.
b) Make sure all parts of the display screen appear.
Test Strip Port
Contact Bars
Reaction Site
Sample Application Tip
Insert strip into meter this way
IMPORTANT!
EnoughBlood
Not EnoughBlood
Too MuchBlood
EnoughBlood
Not EnoughBlood
Pick up the meter. Touch the end of the test strip to the blood sample until the reaction site is full. Immediately remove the meter and test strip from the blood drop.
Step 4
TROUBLESHOOTINGStep 1
Step 2
PERFORMING A BLOOD GLUCOSE TEST
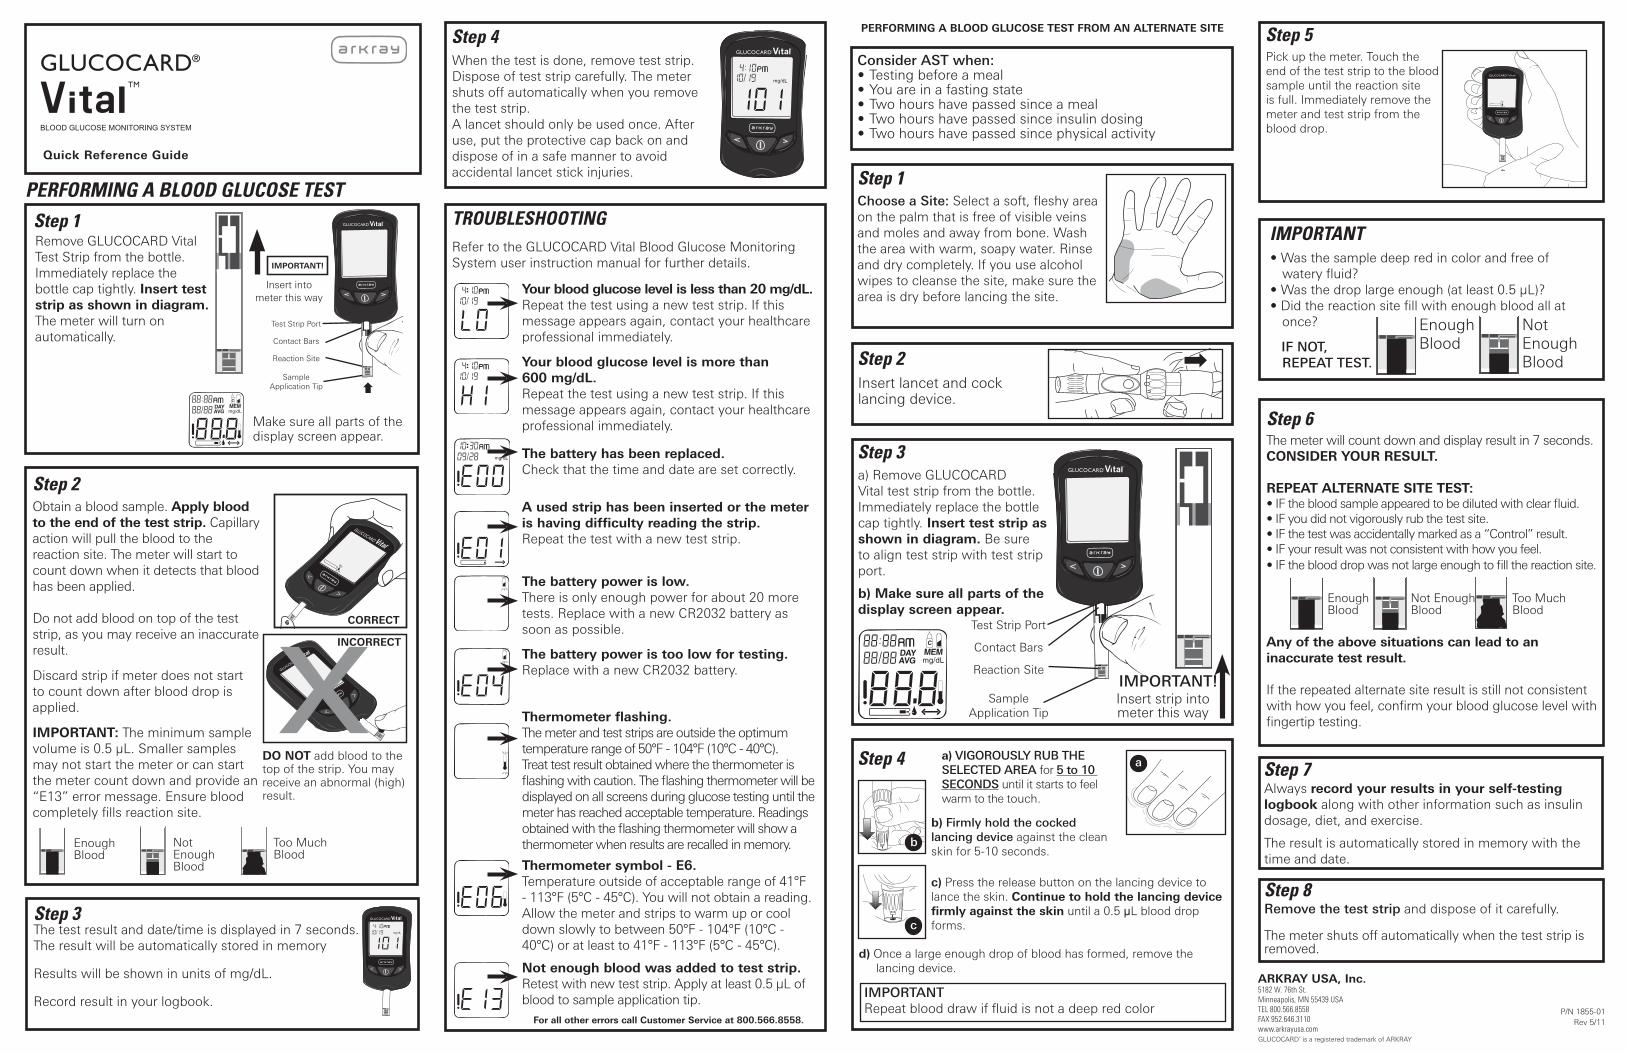
Remove GLUCOCARD Vital Test Strip from the bottle. Immediately replace the bottle cap tightly. Insert test strip as shown in diagram. The meter will turn on automatically.
Choose a Site: Select a soft, fleshy area on the palm that is free of visible veins and moles and away from bone. Wash the area with warm, soapy water. Rinse and dry completely. If you use alcohol wipes to cleanse the site, make sure the area is dry before lancing the site.
Step 1
Insert lancet and cock lancing device.
Step 2
Step 3
d) Once a large enough drop of blood has formed, remove the lancing device.
Step 4
b) Firmly hold the cocked lancing device against the clean skin for 5-10 seconds.
a) VIGOROUSLY RUB THE SELECTED AREA for 5 to 10 SECONDS until it starts to feel warm to the touch.
IMPORTANTRepeat blood draw if fluid is not a deep red color
c) Press the release button on the lancing device to lance the skin. Continue to hold the lancing device firmly against the skin until a 0.5 µL blood drop forms.
a
b
c
Step 5
Step 6
Always record your results in your self-testing logbook along with other information such as insulin dosage, diet, and exercise.
The result is automatically stored in memory with the time and date.
Step 7
Step 8Remove the test strip and dispose of it carefully.
The meter shuts off automatically when the test strip is removed.
IMPORTANT
Manufactured for
ARKRAY USA, Inc.5182 W. 76th St.Minneapolis, MN 55439 USATEL 800.566.8558FAX 952.646.3110www.arkrayusa.comGLUCOCARD® is a registered trademark of ARKRAY
P/N 1855-01Rev 5/11
When the test is done, remove test strip. Dispose of test strip carefully. The meter shuts off automatically when you remove the test strip.A lancet should only be used once. After use, put the protective cap back on and dispose of in a safe manner to avoid accidental lancet stick injuries.
Obtain a blood sample. Apply blood to the end of the test strip. Capillary action will pull the blood to the reaction site. The meter will start to count down when it detects that blood has been applied.
Do not add blood on top of the test strip, as you may receive an inaccurate result.
Discard strip if meter does not start to count down after blood drop is applied.
IMPORTANT: The minimum sample volume is 0.5 µL. Smaller samples may not start the meter or can start the meter count down and provide an “E13” error message. Ensure blood completely fills reaction site.
The test result and date/time is displayed in 7 seconds. The result will be automatically stored in memory
Results will be shown in units of mg/dL.
Record result in your logbook.
DO NOT add blood to the top of the strip. You may receive an abnormal (high) result.
Insert into meter this way
Make sure all parts of the display screen appear.
Refer to the GLUCOCARD Vital Blood Glucose Monitoring System user instruction manual for further details.
For all other errors call Customer Service at 800.566.8558.
Your blood glucose level is less than 20 mg/dL. Repeat the test using a new test strip. If this message appears again, contact your healthcare professional immediately.
The battery power is too low for testing.Replace with a new CR2032 battery.
The battery power is low.There is only enough power for about 20 more tests. Replace with a new CR2032 battery as soon as possible.
EnoughBlood
NotEnoughBlood
Too MuchBlood
CORRECT
INCORRECT
< <
IMPORTANT!
Step 3
Your blood glucose level is more than 600 mg/dL.Repeat the test using a new test strip. If this message appears again, contact your healthcare professional immediately.
The battery has been replaced.Check that the time and date are set correctly.
A used strip has been inserted or the meter is having difficulty reading the strip.Repeat the test with a new test strip.
Thermometer flashing.The meter and test strips are outside the optimum temperature range of 50°F - 104°F (10°C - 40°C). Treat test result obtained where the thermometer is flashing with caution. The flashing thermometer will be displayed on all screens during glucose testing until the meter has reached acceptable temperature. Readings obtained with the flashing thermometer will show a thermometer when results are recalled in memory.
Thermometer symbol - E6.Temperature outside of acceptable range of 41°F - 113°F (5°C - 45°C). You will not obtain a reading. Allow the meter and strips to warm up or cool down slowly to between 50°F - 104°F (10°C - 40°C) or at least to 41°F - 113°F (5°C - 45°C).
Not enough blood was added to test strip.Retest with new test strip. Apply at least 0.5 µL of blood to sample application tip.
Test Strip Port
Contact Bars
Reaction Site
Sample Application Tip
Consider AST when:• Testing before a meal• You are in a fasting state• Two hours have passed since a meal• Two hours have passed since insulin dosing• Two hours have passed since physical activity
PERFORMING A BLOOD GLUCOSE TEST FROM AN ALTERNATE SITE
Quick Reference Guide