Embed Size (px)
Citation preview
Perfecting the Art of Porcelain Restorations Pacific Dental Conference…Vancouver BC, April 2010
AACD Annual Meeting, Grapevine TX, April 2010
Jack D Griffin, Jr DMD MAGD Diplomat American Board of Aesthetic Dentistry
Accredited American Academy of Cosmetic Dentistry
Thank you for choosing to spend your time with us. We know that there are many choices in continuing education and we sincerely want this to be one of the best experiences in dental CE today. Our goal is to help you gain greater understanding, confidence, and skill that will allow you to take your practice to the next level in cosmetic dentistry. Please let us know if there is anything we can do to help you in this experience as we learn to take your practice to a higher level with cosmetic dentistry. Thank you to Bisco and Jurim Dental Studio for making this course possible. These two companies are pioneers in adhesive and cosmetic dentistry and provide service that few others can match. Please let us know what we can do to help you in this interactive educational experience.
Success is where preparation meets opportunity.
©All materials in this manual are protected…please don’t copy without permission
2
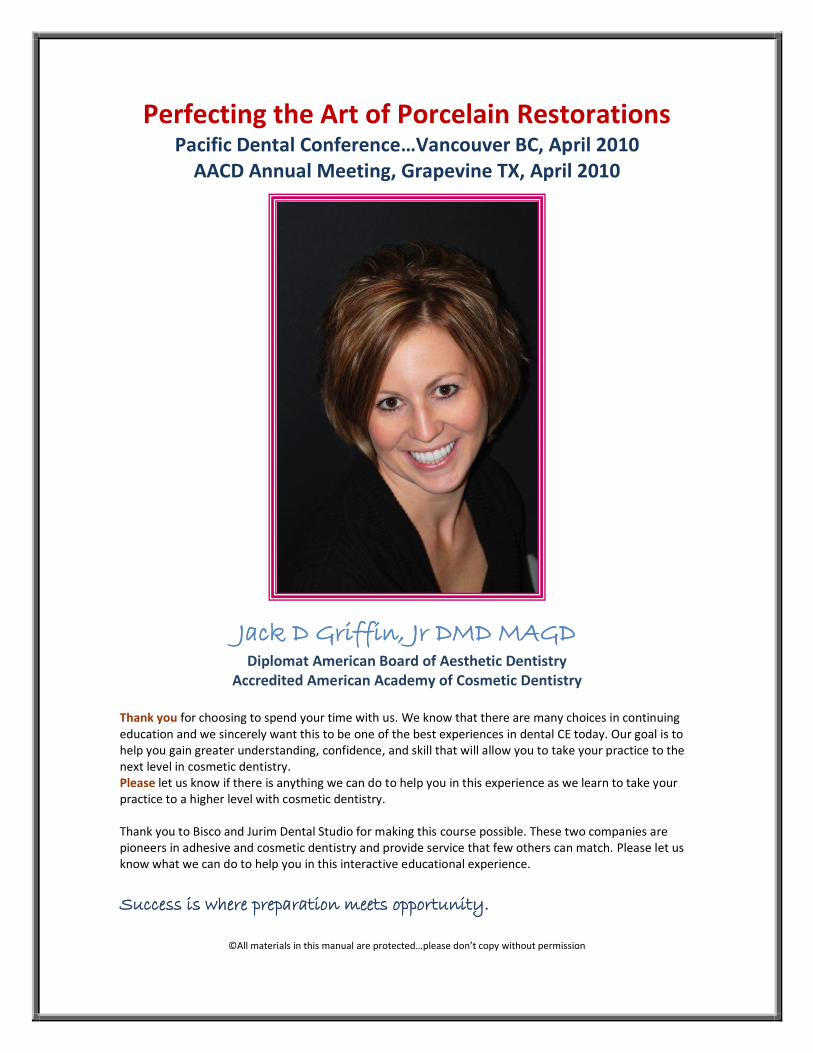
Smile Design Of course, what constitutes beauty is subjective, for instance Europeans look at tooth color
and shape different that Americans. However, there are basic principles that if followed
will help make anterior restoration cases end up with a more predictable and accepted
result. These are the basics of smile design.
These factors should be
considered in every cosmetic
case before prepping any
tooth. Photos may be
analyzed, lab technician
consulted, and a plan made to
incorporated correction of all
of these aspects into
treatment. These principles
should be carried throughout
treatment from tooth
preparation, mock up,
temporization, restoration
fabrication, and case finish.
Failure to enhance any of
these areas could compromise
the case outcome.
UEmbrasures
The incisal embrasures widen going
distal. They broaden and extend more
towards the contact giving the
appearance of more tooth
“separation”. The ceramist controls
this in the final restorations and
developing this concept in
temporaries can make them much
more pleasing.
UGingival Heights
Teeth emerge from the gingiva at
differing levels with the lateral
incisors about 1mm more incisal than
the centrals and cuspids. This can be
altered by periodontal therapy with
basic gingival recontouring or by
osseous flap alterations and crown
lengthening. This is much more of a
factor in patients who have a “gummy smile” during a natural, full smile and may be ignored
if no soft tissue shows.
3
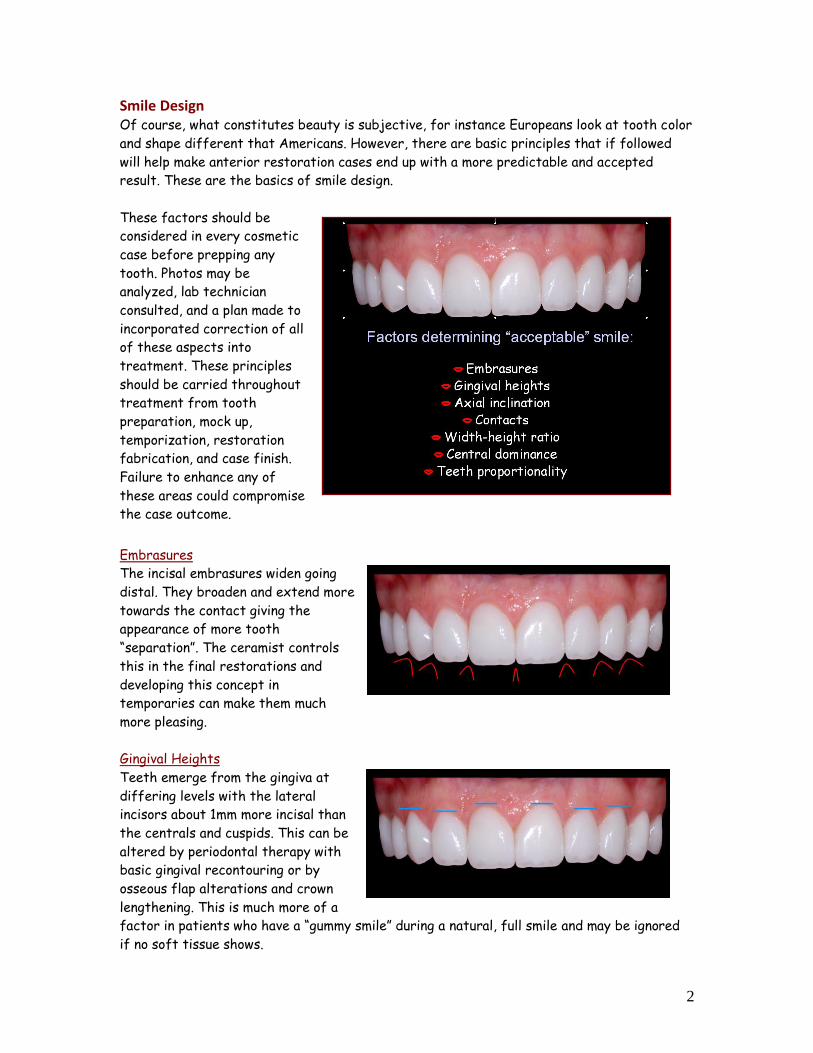
UAxial Inclination
The centrals are more vertical and
the incisal edges or buccal cusp tips
appear to move palatally moving
posteriorly. Axial inclination must be
factored into tooth preparation so
that the technician has space to
contour porcelain that is not over-
bulky.
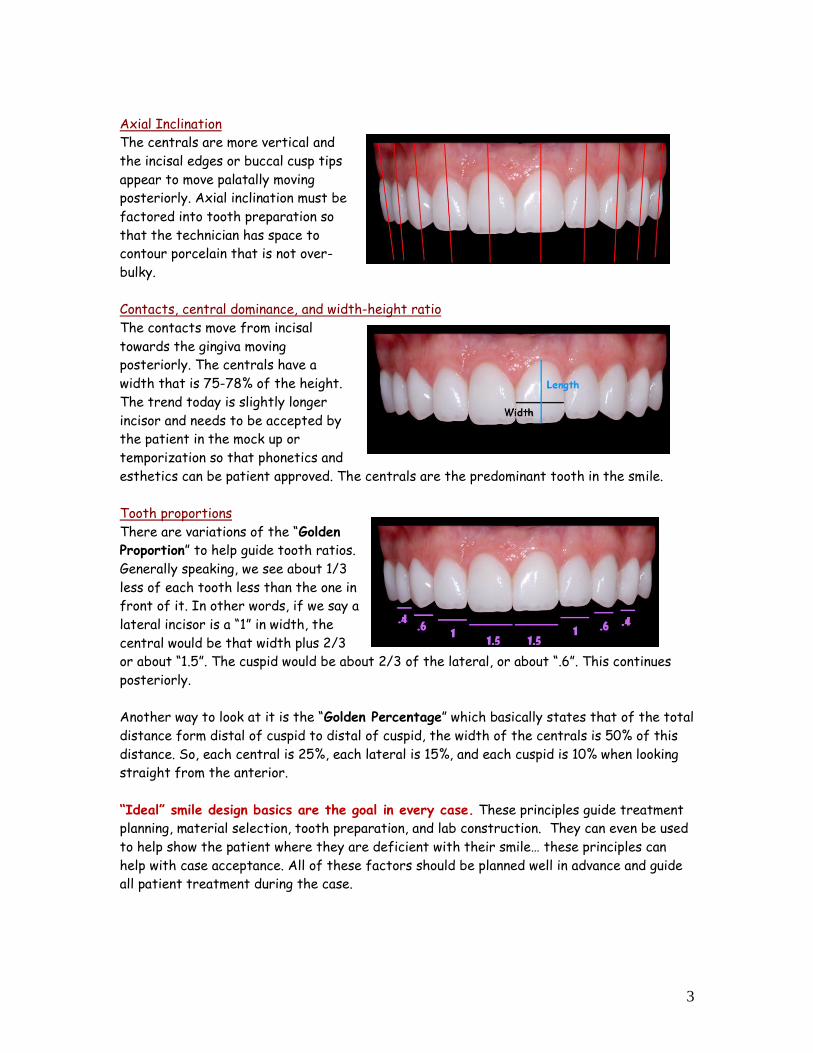
UContacts, central dominance, and width-height ratio
The contacts move from incisal
towards the gingiva moving
posteriorly. The centrals have a
width that is 75-78% of the height.
The trend today is slightly longer
incisor and needs to be accepted by
the patient in the mock up or
temporization so that phonetics and
esthetics can be patient approved. The centrals are the predominant tooth in the smile.
UTooth proportions
There are variations of the “Golden
Proportion” to help guide tooth ratios.
Generally speaking, we see about 1/3
less of each tooth less than the one in
front of it. In other words, if we say a
lateral incisor is a “1” in width, the
central would be that width plus 2/3
or about “1.5”. The cuspid would be about 2/3 of the lateral, or about “.6”. This continues
posteriorly.
Another way to look at it is the “Golden Percentage” which basically states that of the total
distance form distal of cuspid to distal of cuspid, the width of the centrals is 50% of this
distance. So, each central is 25%, each lateral is 15%, and each cuspid is 10% when looking
straight from the anterior.
“Ideal” smile design basics are the goal in every case. These principles guide treatment
planning, material selection, tooth preparation, and lab construction. They can even be used
to help show the patient where they are deficient with their smile… these principles can
help with case acceptance. All of these factors should be planned well in advance and guide
all patient treatment during the case.
4
Case preparation and Visualization The final cosmetic case outcome will only be as good as the weakest link of the following: understanding of patient desires, proper case planning, laboratory selection, proper material selection. Thorough records, consultation, and planning must be made before touching a bur to the teeth.
Full mouth x-rays, panorex, bitewings Occlusal analysis Soft tissue analysis – probing, gummy smile, perio defects, frenum pull, etc Full series of digital photographs Review of patient expectations Communication with patient regarding treatment plan and case limitations Study models, pre-treatment bite registration Pre-operative shade and final desired shade, signature in chart by patient Lab communication, wax up, reduction guide, material selection
Before any tooth preparation, the outcome should be visualized. Studying the pre-op photos, consultation with the lab technician and a pre-treatment wax up can be critical in this area. None of this can happen without complete records. Once the practitioner, ceramist, and patient are all in agreement with the pre-operative analysis and goals, treatment can begin. Soft-tissue handling Often overlooked in cosmetic cases are the soft-tissues. If gingival tissues are not handled well, the case will ultimately fail. Bulky margins, rough finish, incomplete cement clean-up, bonding failure, biologic width violation, and improper hygiene can all lead to recession, inflammation, or tissue irritation. Retraction techniques are often needed to control fluid leakage and to provide accurate marginal interpretation by the ceramist. It must be stressed that choosing materials for bleeding and retraction can influence case success. Those materials with iron (ferric sulfate hemostatic agents, blood, bacteria) should be avoided as the iron may penetrate the tooth and cause darkening under the restorations as can blood on the tooth. Cord that is too large or placed with too much pressure may cause unexpected tissue tearing or recession.
1. Cord … gentle insertion, error on small size, braided may pack better 2. Hemostatic agents … no iron containing materials, aluminum chloride for mild or moderate bleeding (i.e.
ViscoStat Clear), epinephrine cord (i.e. GingiBraid) work well for minor bleeding 3. Retraction paste … clay material with non iron hemostatic agent (i.e. Expasyl, Traxodent) work well in many
veneer cases 4. Laser … conservative troughing at low wattage can be predictable in most situations 5. Combination of above … i.e. cord with retraction paste, paste with laser, etc
Gingival re-contouring must be considered in every case. The laser has certainly made this more acceptable by clinician and patient than traditional periodontal techniques. In cases where there is sufficient attached tissue and where other periodontal conditions are stable, the laser can be a great adjunct to cosmetic outcomes. There are many choices in lasers today and this discussion will be limited because of space and clinician experience. The diode laser is most often used for minor gingivoplasty because of its relative in-expense, ease of use, versatility, and predictability. The following is a simplified outline of its use (NOTE: it must be stressed that the clinician must gain additional training in laser techniques, indications, and basic periodontal principles): Analyze the photos to determine ideal gingival levels. Measure sulcular depths and “sound” (probe to) bone. Biologic width == minimum soft tissue superior to the crestal bone of the alveolar process that will allow
healthy tissue. Generally, can remove soft tissue to 3mm from bony crest to insure tissue health. Any more and there is risk chronic inflammation and possible recession.
Use wattage minimal wattage levels. Analyze initial shaping by having patient sit up in chair and evaluate. Do bony crown lengthening and grafts when needed and let them become stable (2-3 months) before doing
final preparation margins and impressions.
5
Tooth preparation The more tooth structure we save now, the more treatment options we will have later. The preparation goal as in every aspect of dentistry is the removal of the minimum amount of tooth removal needed to achieve the treatment goals. These are the basics for “ideal” all ceramic tooth preparation: Feldspathic…0.5mm reduction (when needed) Pressable…0.8mm reduction (when needed) No sharp internal line angles … reduce potential fracture stress points For veneers, the darker the color being masked the more subgingival and the more lingual the veneer
preparation must be For diastemas, incorrect midlines, or cants the preparation must be more lingual and subgingival Preparation should start at the midline and worked posteriorly to “distalize” tooth size discrepancies and
spacing problems Incisal reduction needed when shortening length of tooth or when adding incisal character for teeth pre-
operatively of acceptable length Reduce evenly to give ceramist consistent thickness of veneers when possible
Breaking contact for anterior veneers is often needed……
1. To correct midline position or cant 2. When interproximal restorations are to be covered 3. When significantly changing tooth color … more than 2-4 shades 4. Tooth proportion problems exist 5. Interproximal decay 6. When one or more teeth are lingually positioned
Minimal tooth invasion should be the goal. We would all benefit from no tooth preparation if the result was best: less sensitivity, less office time, more profitability, increased patients (?). That said, dentistry has come full circle with “no-prep” veneers which were common 20 years ago and are now back in style because of marketing. It must be stressed that reduction must be strategic and in moderation to fit the properties of the porcelain selected and esthetic goals of the case. If done well, the results with reduction can be superior. Limitations of no preparation veneers are that the minimal labial position is limited to the most facially positioned tooth, hiding darker colors is more difficult, creating natural incisal character may be impossible without adding substantial length, covering interproximal restorations is impossible, and providing a smooth lab glazed margin is hard to do. One must also be careful to consider the long term cosmetics, marginal integrity, and soft-tissue response and evaluate this technique by comparing long term (5-10 year) follow up. Prudent case selection for no-prep is wise. Lab selection and communication
COMMUNICATION is KEY … photos + models + feedback == great case An experienced lab that understands esthetics is critical. They can be an invaluable resource during case planning, provide guidance during material selection and tooth preparation, and provide restorations that help us meet patient expectations. The lab should have experience with a variety of restorative materials and above all be willing to discuss treatment options and planning to optimize outcome. If they aren’t willing to share ideas and experience with a cosmetic case, they are useless. By the same token, if the dentist has the attitude “I have the degree, how dare they suggest changes to my plan” then we are being self-centered instead of patient-centered. The best results are achieved by open communication and working together. It is critical to develop a rapport with you technician so that communication can be free flowing and egos are set aside for excellent treatment. The ceramist will only create restorations proportional to the quality of work we give them. Obviously, void free impressions, accurate occlusal records, and excellent tooth preparation are needed but we must
6
be diligent in our case materials and consistent in what we send to the lab. The following check list should be done for every case sent: Written description of case history, treatment, and expectations Impressions or models
o Pre-op o Preps o Opposing o Mock-up or accepted temps
Photos or digital images (CD, card, e-mail) o Pre-op o Prep shades o Bite alignment guide o Mock-up or accepted temps
You cannot expect work back from the lab better than what you give them. Allow an experienced technician the right to discuss things with you if preps, impressions, or materials requested would give a compromised result. Esthetic preview and temporization Perhaps the most overlooked aspect to happy patients and satisfied doctors is the “esthetic preview”. This can be done as a pre-treatment mock up or with the transitional (temps) restorations. The goal is to check esthetics, phonetics, and to give the patient a basic idea of shape and shade of the final restorations. Mock ups can be done for several reasons. First, they can provide a basic idea of shape and size so that phonetics and esthetics can be evaluated before numbing and tooth reduction. Secondly, they can be easily modified to achieve basic shape goals and to be used as a “fixed” reduction guide on the teeth. Lastly, the mock up can be impressed and a matrix made for temporary fabrication.
I. Before numbing the patient, etch the incisal areas and rinse well, no bonding agent II. If wax up done, load matrix with provisional material in shade similar to what patient wants,
apply to teeth, remove matrix once set, do minor adjusting III. If no wax up, use flowable to make incisal height “cones”, use composite to complete mock-up,
shape, cure, do minor adjusting IV. Sit patient up, photograph, evaluate phonetics and esthetics … make corrections until happy then
photograph and take impression for temp matrix and for lab to refer to Transitional or temporary are certainly alive and dynamic. They are an irreplaceable tool for case success and should be considered “transitional pre-view” restorations as they can provide valuable feedback for restoration shape, length, and color. Like the mock-up, temps today are made from composite and can easily be modified to change length, color, and texture. Most importantly, we make them of a shade that is close to what the patient is wanting so that there are no surprised later.
I. From the lab wax up or direct mock up a putty impression is made … the putty is mixed and placed into a try with no adhesive and an impression is taken of the mock-up in the mouth or of the wax up on the model
II. The putty is taken out of the tray … the mechanical retention “nubs” may have to be cut off before removing from the tray
III. UTemp choice #1U: “Immediate Dentinal Sealing” The more dentin exposed with dentin adhesives has been noted to reduce leakage and sensitivity and can be done instead of the above step …
a. retract and hemostatic agent as needed to control bleeding and soft-tissue b. etch, bond, and cure the teeth just as you would do for final porcelain cementation c. wipe the uncured resin from the teeth with alcohol on a micro brush and 2X2, rinse well
and repeat d. apply separating medium (ProV Coat – BISCO), air thin

7
UTemp choice #2U: “Spot Etch” normally provides enough retention to keep the transitional in place while reducing leakage …
e. once final prep impressions are taken, the teeth should be cleaned with a chlorhexidine on a micro brush
f. then spot etched on the facial in a 2mm diameter circle with phosphoric acid g. rinse well h. place bonding agent to the teeth, air thin, and cure i. wipe air inhibited layer with alcohol micro brush j. proceed with step “V” below
IV. Fill the matrix with automix temp material (i.e. Luxatemp, PerfecTemp) by placing the tip at the bottom of the matrix … fill the matrix without lifting it up so that voids are reduced
V. Place on the teeth and let set until cured then peal the matrix off of the teeth … the temps will be help on primarily with mechanical retention
VI. Repair voids or add “character” composite after placing bonding agent VII. Shape with disks and burs as needed, finalize occlusion
VIII. To provide an excellent, smooth, void free surface….Etch entire temp surface, rinse well, place thin layer of BisCover over entire surface, brush towards gingival with light pressure, light cure
Photography Photography is often overlooked as merely a marketing tool and it would not be an exaggeration to say that photography is a critical part to ultimate case success. There are several reasons to become efficient with excellent photography: Analysis of case … pre-op photos studied before prepping case, away from operatory
distractions and bias. For difficult cases send to the ceramist before prepping case. Patient consult … often patient don’t realize what treatment is needed until seeing themselves
on a large monitor, often patients only look from straight on forward position, emphasize what they don’t usually see like the smile from the side….great motivator to include more teeth in tx
Lab communication … allow ceramist to EXPERINCE the case, include all pre-op images, treatment images, mock-up and temporary images.
Treatment images … show the bite alignment guide to show your alignment, show temporaries or mock-up accepted by patient to give ceramist idea on shape and position
Post-cementation images … check for cement removal, places that need to be contoured, and evaluate overall work for needed corrections
Post op images … 2-3 weeks after final cement removal, analysis of techniques and materials, marketing
Photographic Equipment should be purchased that is in proportion to the quality of work you are trying to do. That said, there must be some limit. For instance, do you have space and time to set up a dedicated portrait studio? Do you have to become proficient with posterior photography? Do you have time to manipulate photos to make up for inferior techniques or equipment? It doesn’t have to be overwhelming, overly time consuming, or very expensive. The following are efficient photography “must haves”:
1. Camera … SLR, 100-105mm macro lens, macro ring flash 2. Retractors … self or patient holding 3. Warm water … water bath or microwave to prevent mirror fogging and aid retractor insertion 4. Mirrors … glass or metal 5. Contrastor … black or grey to prevent un-natural flash bounce 6. Background … felt on wall, movable board, muslin
Camera can be one of several high quality bodies. Canon (5D, Rebel, 40d, 50d…) and Nikon (D200, D300, D700…) control most of the market. Both companies offer cameras that can capture great images with proper set up:
8
Probably best to by package from dental camera dealer (i.e. Photomed, Norman Camera, CliniPix) … they charge slightly more than assembling your own system but support is worth it
Use “A” or “M” mode – “A” aperature priority mode is simple and requires only changing the “f/stop” as you move closer to the subject … this controls the light entering the camera which may be the single most important factor in quality image capture
Understand histograms to make sure your f/stop settings are giving proper exposure Set camera to high resolution settings – capture in RAW or high quality (low compression) jpeg
images Use flash that can control light manually or with “TTL” metering
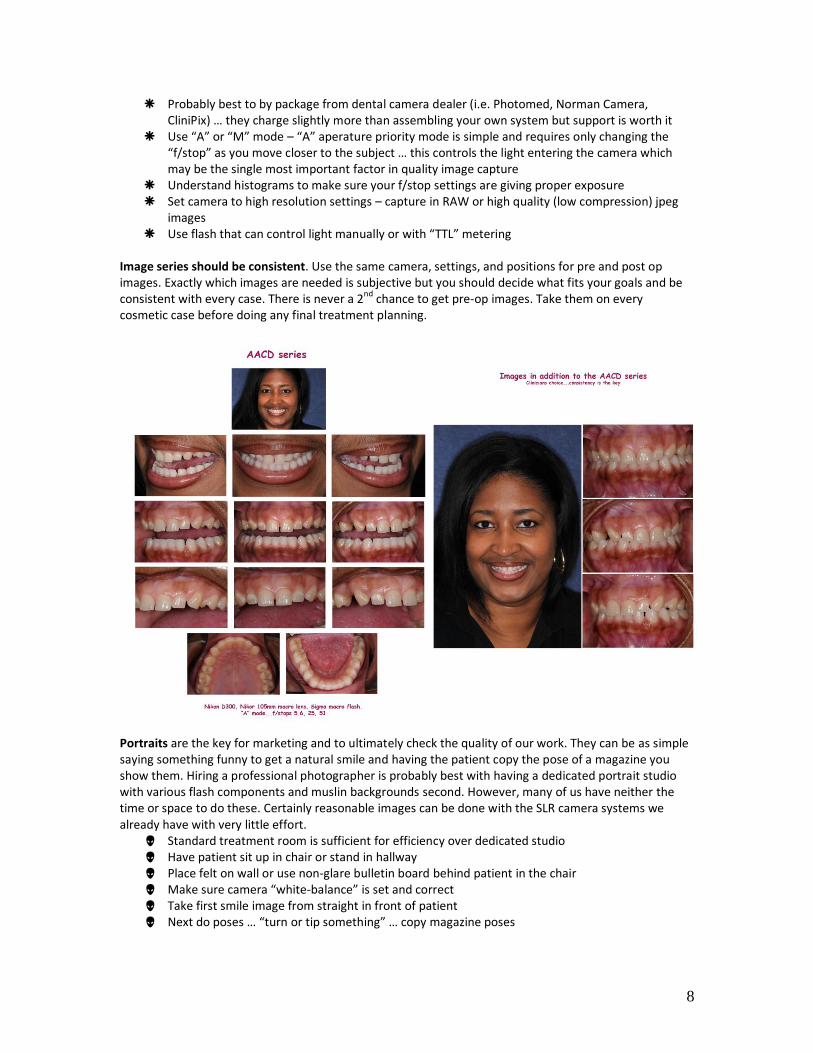
Image series should be consistent. Use the same camera, settings, and positions for pre and post op images. Exactly which images are needed is subjective but you should decide what fits your goals and be consistent with every case. There is never a 2nd chance to get pre-op images. Take them on every cosmetic case before doing any final treatment planning.
Portraits are the key for marketing and to ultimately check the quality of our work. They can be as simple saying something funny to get a natural smile and having the patient copy the pose of a magazine you show them. Hiring a professional photographer is probably best with having a dedicated portrait studio with various flash components and muslin backgrounds second. However, many of us have neither the time or space to do these. Certainly reasonable images can be done with the SLR camera systems we already have with very little effort. Standard treatment room is sufficient for efficiency over dedicated studio Have patient sit up in chair or stand in hallway Place felt on wall or use non-glare bulletin board behind patient in the chair Make sure camera “white-balance” is set and correct Take first smile image from straight in front of patient Next do poses … “turn or tip something” … copy magazine poses
9
Marketing cosmetic dentistry Knowing how to do perfect veneers is useless if there aren’t patients willing to have treatment done in your office. Marketing can take many forms and can cost an unlimited amount of money only to give disappointing results. There are high end cosmetic practices in every larger town that uses PR firms to put their practices on TV, radio, and even billboards. While there is certainly the potential for a high return on investment (ROI), the cost may be prohibitive for many practitioners. We will focus on a few basic forms that are fairly inexpensive yet give a high return on the investment dollar. Internal marketing to your existing patients with your own cases may be the single best way to increase your cosmetic cases in your office. The investment is minimal. Marketing with photography is fairly simple if your results are good. Even if results aren’t “perfect” changes are usually dramatic enough to make patients want the cosmetic dentistry that you like to provide. Purchasing cosmetic dentistry is and emotional experience and anything you can do to “heighten” the emotional experience while remaining professional will increase your case acceptance. Before and after images given to patient -- printed or digital, their friends and family will see
these, refreshes the memory of how bad the smile looked before treatment … can be framed or matted to make more professional looking
Make office portfolio album – prints or digital photo album that can quickly be shown to patients with interest in cosmetic dentistry or placed in reception area to spark interest
Wall art – quality portrait prints of patients done in your office, allows patients the ability to see what you and your staff can do
PowerPoint digital presentation with before and after images of your cosmetic cases – best done in consultation room away from operatory distractions, set to music in room with comfortable chair and dimmed lights create an environment that elevates the mood to say “yes”
Web site development is crucial to many cosmetic offices. Development must be done by a company that makes professional sites and can position the site high in search engines for those surfing for cosmetic practices in your area. There are many factors that influence the positioning in search engines. Layout, wording, content, and host diligence in positioning are all factors. There are many factors influencing the success of the site: Professional appearance – since we are professionals we need the site to be organized with a
look that is proportional to the quality of work you are trying to perform … have site mirror the look, feel, and image of your practice … list credentials, affiliations, and advanced training that may separate you from other dentists in your area
Great gallery – taking quality before and after images on all cosmetic cases will give you a portfolio of gallery images that will be the backbone of your site … the images can be merely before and after portraits or may include close up images explaining treatment performed
Concise information – describe the basics of treatment with some information like expectations, treatment choices, and what they can expect but don’t go into too much detail … web sites visitors are looked at mainly because of color and photos with detailed information looked at secondarily
Use a company with a portfolio of professional practices – you can use some of them to pattern your site after … make sure you understand clearly the web site design fee, hosting fees, content update fees, portfolio update fees and how they will position you in search portals
Management of the Esthetically Conscious Patient It matters not that the margins are perfect, the anatomy is text book, or that the result is world-class, if the patient isn’t pleased your life can be miserable. It can be a daunting task to create beauty in a patient’s mind once advertising, the internet, their friends, and their own visualization have skewed what they see. It matters not that the margins are perfect, the anatomy is perfect, and the result is world class

10
if the patient isn’t happy. Not meeting patient expectations can make for a miserable practice life. From the first cosmetic consult through delivery of the restorations we are careful in our description and promises. We must exude confidence to our patient while tempering expectations.
1. Never imply “perfection”, “permanent”, or “exactly”. We are “working together to create a smile ideal and custom for your teeth and smile”.
2. Show the patient before and after cases that you and your staff have done so there is no misconception of what can be done in your office. If you have an office portfolio in an album or PowerPoint let the patient point out the characteristics of teeth that they like the most and use that as a “rough template” for their makeover.
3. Before treatment, encourage the patient to help with shade selection (from photos of old cases, shade guide, etc) and have them sign in the chart of the shade they selected.
4. For the mock-up (without anesthesia) allow the patient to pre-view and listen to their concerns, make corrections, and take photos and impressions to communicate these likes and dislikes with the lab.
5. Stress that the provisional’s are a basic and “rough” idea of what we are going for in the final restorations and they are an important “trial” for the final restorations. Use a shade that is similar to the color chosen and shape will be similar to what we are trying to achieve.
6. After cementation, stress to the patient that work is not finished. Further clean up, bite adjustments, and flossing will be done in 1 week. Avoid the temptation to hand the patient a hand mirror for the first look. Let them stand and go to a wall mounted mirror for a “not-so-close” view while cement pieces and irritated gums are present.
7. Let the patient know that “someone in the family or that you are close to will say they are ‘too long’, ‘too white’, or ‘too straight’ simply because they are used to seeing you with your old smile…changes will take time to adapt to for everyone”.
8. Let the patient know that we will make NO CHANGES to length or appearance for 2 weeks to allow time to adapt. After that we can adjust the porcelain SLIGHTLY to alter length and shape if needed.
9. Most importantly be POSITIVE … you and the staff need to tell the patient how good they look. Remind them of how they looked before by showing the pre-op photos and point out the changes that have been made.
Success is where preparation meets opportunity. Educational experiences like this help give you the preparation needed to succeed when opportunity arises. Keep learning…materials and techniques seem to change overnight and sharing the experience of other practitioners is invaluable. There are many terrific educational resources today……commit yourself to a life time of learning. By sticking to an organized sequence of treatment and keeping meticulous attention to detail, every practitioner can experience great rewards in cosmetic dentistry. What a great time to practice.
THANK YOU very much for listening during this presentation…it is an honor to be able to share with you. Jack D Griffin, Jr DMD MAGD [email protected] U HUwww.eurekasmile.comUH ©All materials in this manual are protected…please don’t copy without permission
11
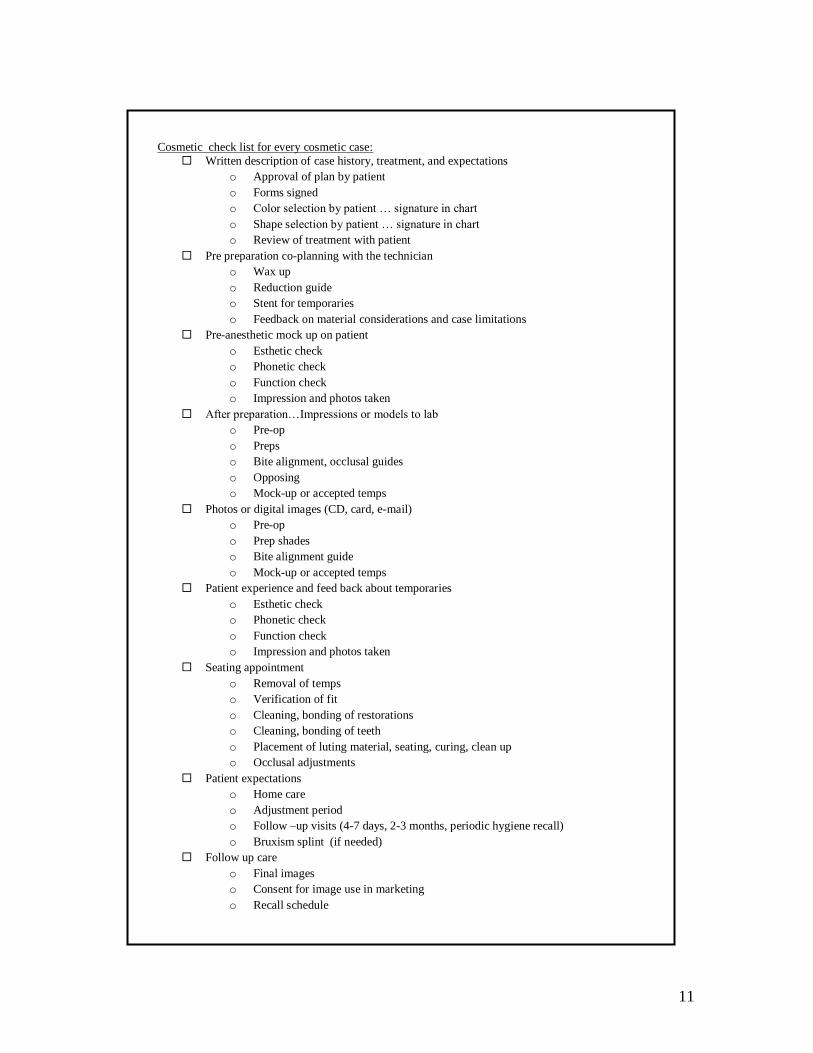
UCosmetic check list for every cosmetic case:
Written description of case history, treatment, and expectations
o Approval of plan by patient
o Forms signed
o Color selection by patient … signature in chart
o Shape selection by patient … signature in chart
o Review of treatment with patient
Pre preparation co-planning with the technician
o Wax up
o Reduction guide
o Stent for temporaries
o Feedback on material considerations and case limitations
Pre-anesthetic mock up on patient
o Esthetic check
o Phonetic check
o Function check
o Impression and photos taken
After preparation…Impressions or models to lab
o Pre-op
o Preps
o Bite alignment, occlusal guides
o Opposing
o Mock-up or accepted temps
Photos or digital images (CD, card, e-mail)
o Pre-op
o Prep shades
o Bite alignment guide
o Mock-up or accepted temps
Patient experience and feed back about temporaries
o Esthetic check
o Phonetic check
o Function check
o Impression and photos taken
Seating appointment
o Removal of temps
o Verification of fit
o Cleaning, bonding of restorations
o Cleaning, bonding of teeth
o Placement of luting material, seating, curing, clean up
o Occlusal adjustments
Patient expectations
o Home care
o Adjustment period
o Follow –up visits (4-7 days, 2-3 months, periodic hygiene recall)
o Bruxism splint (if needed)
Follow up care
o Final images
o Consent for image use in marketing
o Recall schedule