Embed Size (px)
Citation preview

Percutaneous Compression Plate (PCCP) for the Fixation of Intertrochanteric
Fractures using Computerized Fluoroscopic Navigation System
Yoram Weil MD
Department of Orthopedic Surgery, Hadassah University Hospital, Jerusalem
May 23, 2005
1. Summary
This Document specifies the need for a fluoroscopic based computerized navigation system
dedicated for the treatment of intertrochanteric fractures. The Gottfried Percutaneous
Compression Plating (PCCP) was chosen as the implant of choice for this procedure due to
its minimally invasive nature and satisfactory clinical results. The first part of this
document discusses PCCP generally as a modality for the treatment of hip fractures, and
specifically including the details of the surgical technique. In the second part the
implementation of the fluoroscopic based computerized navigation system to the PCCP as
a proposal and a working plan is specified

1. Introduction – Hip fractures and PCCP
1.1 General
Hip fracture has become a modern "epidemic". The incidence of hip fractures is increasing
throughout the world. The annual number is estimated to rise from 1.7 million 1990 to 6.3
million by the year 20501.
In the United States alone more than 200,000 intertrochanteric fractures occur each year and
the annual cost of treating hip fractures is about 8 billion dollars annually2.
Despite the existing surgical treatment the mortality from hip fracture is still high and
reported about 15-20% in the first year post fracture. In a recent study it was demonstrated
that among a subset of patients aged 65-84 with severe co-morbidities the mortality is tripled
due to the fracture3.
It is agreed upon that surgical treatment is preferred non operative treatment in reducing
morbidity and mortality4. A rigid fixation that allows immediate weight bearing is the
treatment strategy. Medical complications after internal fixation are fewer and less serious
than those after nonoperative treatment.
1.2 Existing Fixation Devices:
The standard implants for operative fixation of intertrochanteric fractures are:
1. The compression hip screw and side plate
1. The cehpalomedullary nail such as the gamma nail or proximal femoral nail (PFN).
The Compression Hip Screw (hence CHS) was introduced in the 1970’s. Its advantages are
the introduction of a sliding hip fixation device that allowed “controlled collapse” of the
fracture on weight bearing, thus decreasing the risk of implant protrusion into the joint, as
was seen in fixed angle devices previously, with a high degree of success.
This technique is a simple and safe method of fixing intertrochanteric fractures. However, it
is not free of technical complications such as cutting out of the hip screw, traumatic drilling

to the lateral femoral cortex that causes “collapse”, and medial displacement5. The failure
rate of all implants is between 4% to 16% In addition, the use of an open technique harbors
the risk of bleeding, infection and morbidity caused by the surgical exposure.
Intramedullary devices such as the gamma nail or the proximal femoral nail (PFN) have the
potential of a less invasive approach and similar biomechanical stability achieved by a hip
screw. Although these devices are used in several centers with high success rate, most studies
have failed to demonstrate any potential advantage of the intramedullary hip screw over the
sliding hip screw. However, more complications were seen in the latter as reported in a
recent metanalysis6. Intramedullary hip screw of the first generation had a high risk of a
distal fracture due to a stress rising effect of the distal locking bolts6. Furthermore, the
intramedullary hip devices are not a truly “minimally invasive” devices since bleeding and
damage to the endosteal blood supply occur while violating the medullary canal.
1.3 Percutaneous Compression Plate (PCCP) – Overview
The Percutaneous Compression Plate was introduced by Gottfried in the late 90's. The
principle of fixing intertrochanteric fractures is identical to that of the compression hip screw.
It relies on a telescoping mechanism that allows controlled collapse of the fracture allowing
immediate weight bearing. The rationale for its development was minimally invasive
surgery, double axis fixation to prevent neck rotation, and a superior extension of the side
plate to support the lateral cortex. Instead of using a large bore screw, two more slender neck
screws are inserted to prevent damage to the lateral femoral cortex (Fig. 1), which according
to Gottfried, is responsible for the "collapse" phenomenon7. The “collapse” occurs when no
lateral buttress exists for the fracture, thus over-impaction and medial displacement of the
distal fragment occurs (Fig 2.). The PCCP device is inserted percutaneously via two small
incisions (3 cm) and is equipped with a distal cutting edge to ease its insertion (Fig 1)
Biomechanical testing of the apparatus yielded comparable torsional and bending stiffness to
that of other hip screw systems8 (Fig 1).

At our institution, Hadassah medical Centre in Jerusalem, a retrospective study comparing
108 cases of PCCP to 155 controls of CHS was performed9. The study reports significantly
less bleeding, significantly shorter operative time and significantly less serious medical
complications especially cardiovascular. Other studies and a prospective study performed at
our institution and now being processed, support these findings10.

Since the procedure is entirely percutaneous, the initial prerequisite for its successful
completion is an anatomic or near anatomic reduction of the intertrochanteric fracture. This
is achievable in most cases and the Posterior Reduction Device (PORD) was developed to
prevent the posterior sag of the fracture seen on lateral view.
Despite its advantages, the PCCP has some shortcoming including:
Fig 1. The PCCP device radiograph as seen on the AP view.
a. Two 9 mm telescopic screws are used instead of a large bore screw, b. Proximal extension of the plate protecting the lateral femoral cortex c. A distal cutting edge of the plate permitting percutaneous insertion. d. 3-D image of the device
a
b
c
Fig 2. “collapse” of an unstable intertrochanteric fracture fixed with a CHS. According to Gottfried, this phenomenon, occurs not only with posteromedial instability as classically described but with lack of lateral cortical support (note the broken greater trochanter)
d

1. Some degree of failure in very unstable fracture extending below the lesser trochanter
2. The system is not "user friendly" and uses many parts and steps compared to the well
known CHS systems.
3. The initial positioning of the plate and main guide wire can be tedious and time
consuming and is the "rate limiting step" of the procedure.
In the next section, the operative technique is specified step by step with appropriate Figures.
For further reading the reader is referred to the manual of the system published by
OrthofixTM11.
2. Surgical Technique
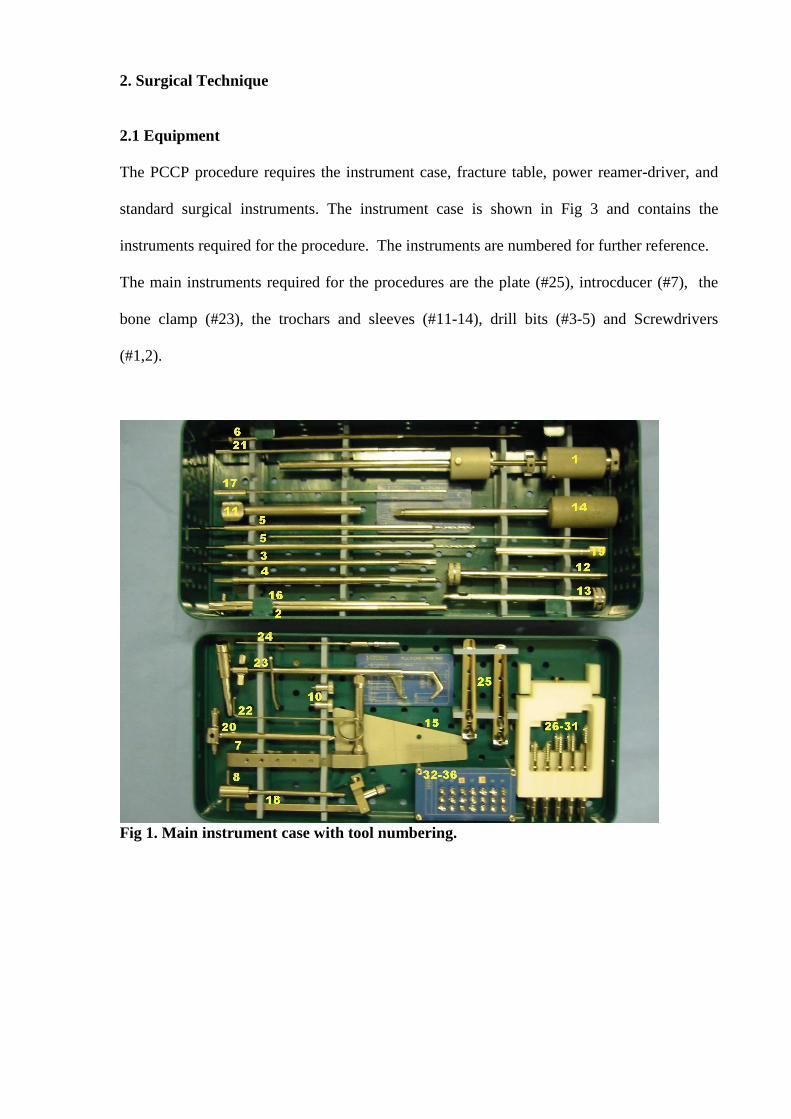
2.1 Equipment The PCCP procedure requires the instrument case, fracture table, power reamer-driver, and
standard surgical instruments. The instrument case is shown in Fig 3 and contains the
instruments required for the procedure. The instruments are numbered for further reference.
The main instruments required for the procedures are the plate (#25), introcducer (#7), the
bone clamp (#23), the trochars and sleeves (#11-14), drill bits (#3-5) and Screwdrivers
(#1,2).
Fig 1. Main instrument case with tool numbering.

2. 2 Main Stages of the surgical technique:
1. Closed reduction of the fracture using the fracture table and the posterior reduction device
2. Introduction of the Plate.
1. Position the plate.
2. Make the first incision.
3. Insert the plate.
3. Placement of the Bone Clamp
1. Make the second incision.
2. Assemble the bone clamp adapter
3. Insert the bone clamp
4. Verify the plate position and correct if necessary.
4. Insertion the first (inferior) hip screw.
1. Assemble and insert the sleeve.
2. Insert the main guide.
3. Adjust the main guide’s position.
4. Measurement of screw’s length.
5. Drilling the first neck screw.
6. Assemble and place the neck screw using the neck screwdriver.
5. Plate Shaft screw placement and drilling
1. Insert the first shaft screw
2. Insert the remaining the shaft screws.
6. Place the superior (second) hip screw
7. Conclude surgery: Disassemble the introducer, close the wound and finish the procedure.

2.3 Closed Reduction of the fracture
Anatomic or near anatomic closed reduction is a pre-requisite to the performance of the
PCCP procedure. The patient is placed on a fracture table. The fractured limb is placed in a
neutral position and neutral rotation.
Traction is then applied until a 130-135º neck shaft angle (the angle between the longitudinal
axis of the femoral neck and the longitudinal axis of the femoral shaft) is achieved in the AP
view (Fig 4). The posterior reduction device is placed under the thigh (Fig 5a) so posterior
sagging of the fracture can be elevated by rotating the nut (Fig 5b) until satisfactory lateral
view as achieved (Fig 6)
Fig 4 – AP view showing neck-shaft angle of 130-135. The darker rectangle represents the
posterior reduction device.
Neck shaft angle should be at 130-135 º

Fig 5: (a) the PORD (posterior reduction device) is placed under the thigh to prevent posterior sagging of the fracture; (b) The posterior reduction device can be elevated or lowered until satisfactory lateral fracture alignment is reached
Figure 6: A satisfactory closed reduction on the lateral view. 2.4 Introduction of the Plate
The first step in performing the PCCP procedure is the percutaneous placement of the side
plate. The plate is coupled with an introducer (part # 7 in the instrument case) that allows the
percutaneous drilling and placement of all screws by the means of sleeves and trochars. Thus,
all system components position on the sagital and coronal planes are dictated by the primary
plate position.
2.4.1 Plate position: The exact position of the plate is crucial for the procedure since it
strictly dictates the hip screw position. The plate’s superior part should be situated
just below the ridge of the greater trochanter on AP view (Fig 7) and on lateral
position on the femoral shaft flush with the bone aiming to the center of the femoral
neck.
a b

Fig 7 desired plate position on the AP view – superior plate position is just below the ridge
of the greater trochanter.
2.4.2 Plan of the first incision: The first incision should allow the plate to be percutaneously
placed in its ideal position with minimal soft tissue dissection. In order to achieve precise
location, the aiming guide is placed under fluoroscopic guidance and should be at the level
of the lesser trochanter (Fig 8a and Fig 8b). A spinal needle is then placed on the femoral
shaft in the same position and a lateral view verifies its position on the midshaft of the femur
(Fig 8c and d).

Fig 8(a) the aiming guide is placed under fluoroscopic control and its desired position n(b) is the level of the lesser trochanter on the AP fluoroscopic view. (c) a spinal needle is placed on the same level of the aiming guide. Its position on the lateral fluoroscopic view should be in the middle of the femoral shaft (d).
2.4.3 The actual placement of the plate: The skin is incised 2cm proximal to the spinal
needle along with the fascia lata. The muscles are detached from the bone by blunt
dissection with Mayo scissors. (Fig 9a). The plate is assembled to the introducer (part
#7 in the instrument case) and inserted with the plate sharp edge perpendicular to the
bone (Fig 9b & 9c). The sharp edge acts as a periosteal elevator. After this action the
plate is rotated to the parallel axis of the bone and slides beneath the muscle, (Figs 9d
and 9e). an AP view (Fig 7) is taken to verify the position of the plate – exactly
inferior to the ridge of the greater trochanter.
a b
c d
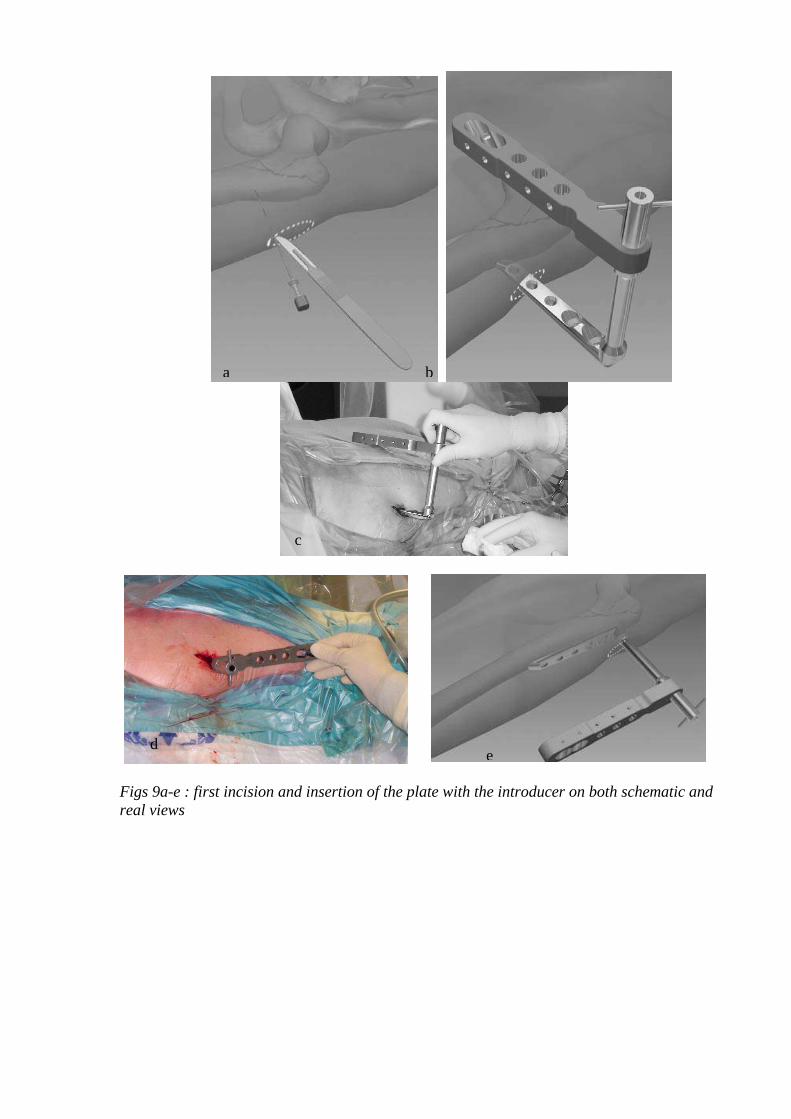
Figs 9a-e : first incision and insertion of the plate with the introducer on both schematic and real views
a b
c
e d

2.5 Placement of the Bone Clamp In order to fixate the plate to the femur a specially developed percutaneous bone plate
(misnamed by the manufacturer “bone hook”) is inserted via a second incision. It is then.
inserted and tightened as follows:
2.5.1. The second incision: The second incision is made by placing a scalpel through the
second hole in the introducer. The introducer is then lowered and a 2cm incision
between the first and second holes is performed (Fig 10a)
2.5.2 Assembly of the bone clamp adaptor:: This part (# 18) is mounted to the second hole
of the introducer (Fig 10b)
Fig 10: (a) The 2nd incision is performed as described. (b) The bone clamp adaptor is
mounted on the second hole of the introducer.
2.5.3. Insertion of the bone clamp: The bone clamp has a proximal jaw used to hold the
plate and a distal jaw for holding the medial femoral shaft. The proximal jaw is
controlled by the inner (forked) handle and the distal jaw is controlled by the outer
handle (Fig 11a). The bone clamp is introduced with both jaws closed into the second
incision at 45 degrees parallel to the bone axis (Fig 11b) it is then pushed with two
handles closed beyond the femoral shaft (Fig 11c), the inner jaw is then opened, two
handles are then rotated perpendicular to the bone and the inner jaw is pressed against
the plate. The wing screw is then closed to tighten the bone clamp which is now
assembled in its place (Fig 11d)
a b

Fig 11a-f the bone clamp. (a). structure of the bone clamp and its 2 jaws and handles. (b) The insertion is done at 45 degrees to the axis of the bone with jaws closed and then advanced (c). The distal jaw is advanced medially beyond the femur (d). Then, both jaws are rotated perpendicular to the introducer (e). (f) The proximal jaw (represented by the forked handle) is tightened and the wing screw is rotated distally (arrow) and fastened.
45º oblique insertion��
a
b
c
e f
Proximal jaw
Distal jaw
Wing screw
d c

2.5.4 Verification and repositioning of the plate: The plate with the bone clamp are
repositioned by loosening the wing screw of the bone clamp and move the plate in the
desired position until both AP and lateral views (Fig 12) are satisfactory.
a b Fig. 12– The correct position of the plate with attached bone clamp is verified by AP (a) and Lateral (b) fluoroscopy. As mentioned above, the proximal part of the plate should be immediately below the greater trochanter in the AP view and the plate should be aligned with the femoral shaft in the Lateral view. 2.6 Insertion of the first (inferior) neck screw.
2.6.1 Assembly and insertion of the sleeves: The trochar (#14) is assembled into the main
sleeve (#11) (Fig13a). They are inserted to the most distal oblique hole in the
introducer with the aid of the skin retractor (Fig 13b). The trochar is removed and the
first sleeve (#12) is screwed into the main sleeve and a bolt (#10) is placed on the
superior surface of the introducer. The main guide is then drilled into the bone (Fig
13c)

Fig 13(a) assembly of the main guide and trochar and (b) insertion to the most distant oblique hole using a skin retractor. (c) The first sleeve (oblique arrow) is screwed into the main sleeve and secured by a superior bolt (top arrow). The main guide is drilled into the bone. 2.6.2. Insertion of the Main guide: The position of the main guide of the inferior neck screw
should be close to the calcar femorale on an AP view (Fig 14a-b) and in the middle of
the femoral neck and head on the lateral view (Fig 14c-d).
a
c
b

Fig. 14 – The optimal position for the main guide is close to the calcar femorale in the AP view (a,b) And on the middle of the neck, targeting the middle of the femoral head on the Lateral view (c,d). The guide should reach the subchondral bone of the femoral head. 2.6.3 Adjustment and correction of the main guide’s position: If a satisfactory position is
not reached there are several options:
2.6.3.1 The plate should be repositioned by releasing the wing screw.
2.6.3.2 The reduction is not satisfactory in the AP view: the neck shaft angle is either
in too varus (Fig 15a) or valgus position (Fig 15b). The traction is then
tightened or released accordingly. (Fig 15)
ba
c

Fig 15 a-b – a too varus position will cause a too superior position of the main guide so traction should be increased in order to properly place the guide. A too valgus position will cause a too inferior position of the main guide so traction should be decreased.
2.6.3.3 The guide is not centrally in the femoral neck on the lateral view despite a
good position of the plate: This can be solved by either elevating or
lowering the system while drilling the main guide (Figs 16 a to d)
Fig 16 (a) the guide is too anterior in the head so the introducer is elevated (b) while
drilling the main guide. (c) the guide is too posterior in the femoral head so the introducer
is lowered (d) while drilling the main guide.
2.6.4 Measurement of screw’s length - The triangular depth gage is used to measure the
length of the neck screw (Fig 17a and b) by applying the straight part to the main
sleeve and reading the number in the area (circle in 17 b)). Then, to further secure the
a b
c d
a b

system the short wire (#24) is drilled into the butterfly screw of the introducer (Fig
17b)
a
c Fig. 17 – (a and b) The length of the screw is then measured by the triangular depth gauge (part #15) as shown. (c) The short wire (part #24) is drilled into the most proximal hole in the introducer to secure it. 2.6.5 Drilling the first neck screw: The main guide is removed and the first sleeve (#12) is
replaced with a second sleeve, designated with two stripes (part #16, Fig 18a). The
first drill (part #3) is drilled to its entire length under fluoroscopic control (Fig 18b).
It should be noted that at this point, the position might change mainly due to some
rotation, as seen in the Lateral view. In this case, the hand should be either elevated
or lowered as in drilling the main guide on Figures 16b and 16d. The second sleeve is
removed and the third drill (9 mm, fig 18c) is drilled directly into the main sleeve.
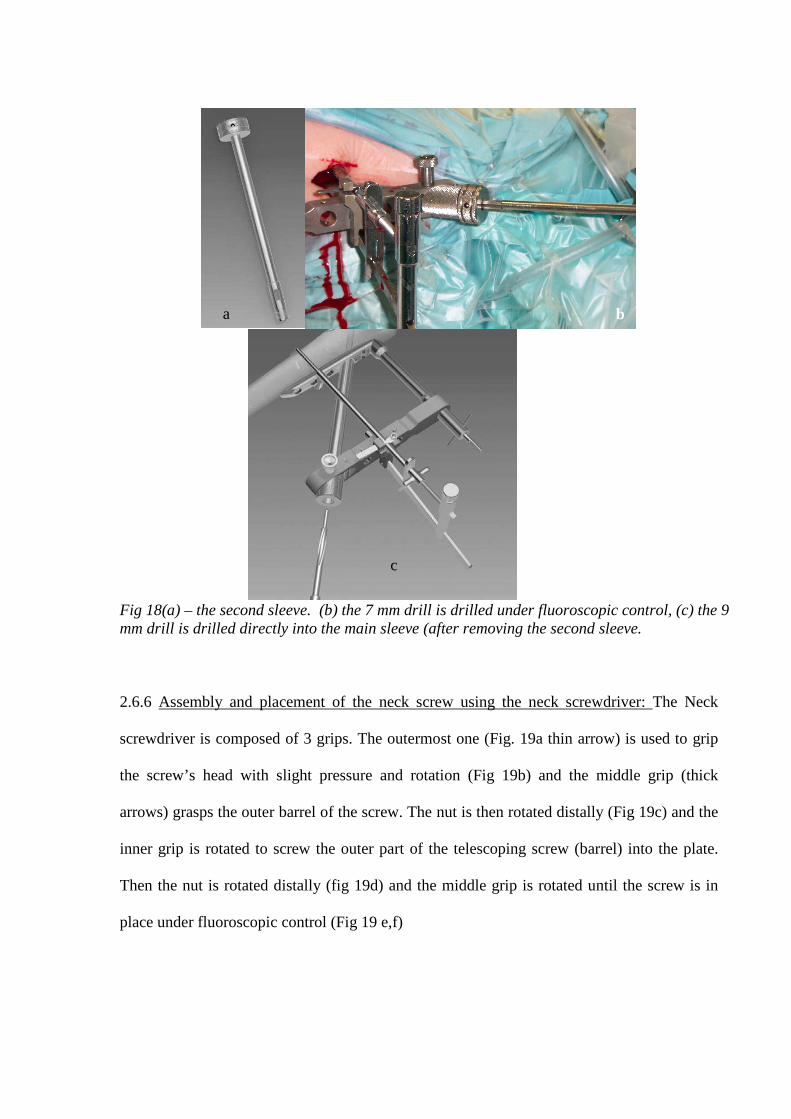
Fig 18(a) – the second sleeve. (b) the 7 mm drill is drilled under fluoroscopic control, (c) the 9 mm drill is drilled directly into the main sleeve (after removing the second sleeve. 2.6.6 Assembly and placement of the neck screw using the neck screwdriver: The Neck
screwdriver is composed of 3 grips. The outermost one (Fig. 19a thin arrow) is used to grip
the screw’s head with slight pressure and rotation (Fig 19b) and the middle grip (thick
arrows) grasps the outer barrel of the screw. The nut is then rotated distally (Fig 19c) and the
inner grip is rotated to screw the outer part of the telescoping screw (barrel) into the plate.
Then the nut is rotated distally (fig 19d) and the middle grip is rotated until the screw is in
place under fluoroscopic control (Fig 19 e,f)
a b
c

Fig 19 (a) screwdriver structure Mounting the screw (b), Position of nut in the two stages of screwing (c,d), and final position (e,f))
bd
c
e f

2.7 Plate Shaft screw placement and drilling 2.7.1 The first shaft screw. The next step in the procedure is fixating the plate to the
femoral shaft by the shaft screw.The first shaft screw is inserted either in the first or
the third hole in the introducer. The trochar with its dedicated sleeve (#19 and #20.
Fig 20a) are inserted with the aid of the skin retractor (Fig 20b.) The shaft drill is
used to drill the screws (#5), depth is measured using the shaft depth gauge (Fig20c)
and the screw is mounted on the power driven screwdriver (#2, Fig 20e). The screw is
driven into the plate and tightened manually.
Fig 20 (a and b) insertion of the trochar and sleeve for the shaft screw. (c,d) drilling and depth measuring of the shaft screws. (e) mounting the shaft screw on the power screwdriver
a b
c d
e

2.7.2 Placing the remaining two shaft screws: The bone clamp is removed by reversing the
steps of section 2.5.3 (Fig 21a and b) and the two remaining screws are placed as
described in section 2.7.1.
Fig 21 a and b – Removal of the bone clamp 2.8 Placement of the superior (second) hip screw The short wire (#24) must be removed now and the main guide is drilled again into the
superior oblique hole. The same steps as described in section 2.6 are repeated but this time
the positioning is already dictated by the almost assembled construct.
2.9 Disassembly of the introducer, wound closure and termination of the procedure:
An impactor (#2) is used to widen the screw thread though the main guide on both neck
screws (Fig 22a). Final fluoroscopic views are taken to verify the position of the construct (b
and c)
The introducer is dismounted by rotating the nut screw counterclockwise (Fig 22b). Final
fluoroscopic images are taken to view the system in its place (Fig 22c, d, e) The wounds are
irrigated and closed over a suction drain left for 24 hours. Full weight bearing is
immediately allowed.
a b

Figs 22 a Impacting te screw threads with a mallet, removal of introduce (b), and final fluoroscopies to check position. ( c, d) The PCCP is mow in place (e) 2.7 Timing, difficulty and learning curve Timing of the procedure is variable and depends on the type of fracture and surgeon’s
experience. In the first 150 cases in our institution operative timing was around 1 hour but
c
ba
d
e

significantly shortened afterwards. It is now estimated to 30-40 minutes for simple fractures.
In the author’s opinion the most difficult stages for the novice PCCP surgeon are stages 3-4
(as outlined in section 2.2) with a special emphasis on inserting the bone clamp and adjusting
the plate for a perfect position of the inferior hip screw. The Bone Clamp insertion is a
technical skill that is acquired due time. The placement of the plate in the correct AP and
Lateral position depends mainly on the closed reduction – a 135 degrees of neck shaft angle
in the reduced fracture would greatly facilitate the adjustment in the AP position, while
maintaining a straight lateral reduction and correcting for the anteversion by slightly
internally rotating the leg would facilitate main guide insertion on the lateral plane. A
thorough understanding of stages 2.4.3 is necessary to for a successful performance of this
task.

3. Fluoroscopy based Computerized Navigation systems in Orthopedic Trauma
Surgery
Fluoroscopy based computerized navigation systems have been developed in orthopedic
trauma and joint replacement. Commercial systems are now available from Medtronic,
Brainlab, Sofamor-Danek. While performing the task no actual fluoroscopy is taking place
while a computer based system keep on tracking the instrument, computing its spatial
relation with the patient and depicting the instrument on the computer screen based on the
fluoroscopic images taken previously. Aside from actually tracing surgical tools such as
drills, broaches, pins etc’ measurements and calculations
These techniques have three potential advantages over conventional fluoroscopy:
1. Precise placement of surgical instruments and implants.
2. Simultaneous real-time, multi-projections view while performing the surgical task
3. Significantly less amount of radiation.
Orthopedic trauma tasks utilizing this technique include the insertion of hip cannulated
screws for internal fixation of hip fractures, percutaneous fixation of pelvic ring and
acetabular fractures, and assisting intramedullary nailing in the determination of entry point
and locking screws.
The process of fluoroscopy based computerized navigation utilizes a calibration target placed
on the C-arm fluoroscope, a computer, a reference frame, a probe and optical tracking
camera. (Fig 23)

Fig 23 a. A fluoroscopic navigation workstation containing the computer and the optical tracking system. (b) a typical screen shot of virtual fluoroscopy in antegrade intramedullary nailing of the femur – the purple line represents the actual tool and the green line the trajectory. 3.1 Protocol
The process usually begins with the insertion of a rigid reference array containing several
IREDS into a bone in the patient’s body that is within fixed distance and angle to the
operated part – for example within the same bone fragment or across an immobilized joint in
an external fixator or a traction table (Fig 24a)
The C-arm fluoroscope is equipped with a targeting frame containing IREDs that can be
traced by the optical tracking device (Fig 24 b). The optical tracking device must be
triangulated with both C-arm and reference frame in order to acquired the fluoroscopic
images (Fig 24)

fig 24 (a) a reference frame is drilled into a fixed point in the patient (in this case – the iliac crest). The C –arm is mounted with a calibration target (b) containing infra-red emitting diodes (IREDS). Both elements must be tracked in order to acquire anatomy image
Multiple fluoroscopic images are then taken. These images are stored and registered in the
computer’s memory, each point on the fluoroscopic image is now spatially recognized by the
tracking system and the computer.
The next step is to activate a drill guide attached to an IRED frame (Fig 25)
Fig 25. verification of a probe containing a sleeve for drilling.
The actual navigation process is the tracking of the probe and its depiction on all the images
activated previously. The implant is then placed according to the virtual image without the
need for real-time fluoroscopy. Final verification images are taken at the end of the
navigation process.
a
b

The fluoroscopy based navigation systems is an “augmented flurosocpic system” that enables
to
1. Enhance the precision of implant placement since the surgical tool can be directed on
all projections simultaneously.
2. Save significant amount of radiation both to the patient and to the surgical team.
3. Reduce operative time after a short learning curve.
4. Eliminate the need for extensile surgical approaches.
5. Help plan surgical incisions

3. The Rationale of Adapting Fluoroscopic Navigation to Hip fracture surgery
Minimally Invasive Surgery (MIS) is gaining popularity in orthopedic surgery. It has several
advantages over extensile approaches:
1. Decreased tissue damage with less bleeding and infection.
2. Decreased pain.
3. Faster rehabilitation and shorter hospital stay.
This approach is of utmost importance given the fact that the patients’ suffering from hip
fractures are the aged and the frail, and reducing the complications associated with open
surgery can be life saving.
Preliminary results from PCCP studies available suggest that there is decreased bleeding,
transfusion need and morbidity compared to CHS systems9,10.
The PCCP have some pitfalls that make it technically demanding compared to the CHS:
1. Anatomical closed reduction must be achieved
a. The fracture should be reduced in the AP plane with a neck shaft angle of 135
degrees.
b. On the lateral view the fracture must be anatomically aligned. Therefore the
posterior reduction device is provided.
2. Positioning of the plate must be precise in order to place the neck screws in the
desired position. Therefore steps 2.5 and 2.6 require the intensive use of fluoroscopy
and are critical: an error in one of them can render the whole procedure unsuccessful.
Since the operation is entirely percutaneous placing the incisions in their optimal
location would facilitate the placement of the plate. Step 2.6.3 in the surgical technique
is sometimes repeatedly performed until satisfactory plate positioning is achieved.
3. Placing the main guide – There is some discrepancy between the anticipated desired
plate position and the actual main guide when inserted (step 2.6). Then, usually
maneuvering of the plate in the AP (superior or inferior translation) or in the lateral

view (either rising or lowering the plate or rotating it) solves the problem. Traction or
release of the table also can be performed. These steps are described in section 2.6.3
of the surgical technique. Usually several attempts to insert the main guide are made
until a satisfactory position is achieved. Therefore unnecessary drill holes are
created, and the main guide can be drifted into them causing further difficulties
4. When drilling the first screw, since the system is not a cannulated one, the drilling
path can be different from the main guide’s path in a few millimeters
5. Following these steps if the plate is in its correct position and the first neck screw is
in placed the rest of the procedure is a mere technicality.
Computerized Fluoroscopic navigation system can trace objects in relation to patient’s
anatomy and applying them to acquired fluoroscopic images. Computerized navigation
systems’ can also trace bony parts in relation to each other and perform measurement on the
fluoroscopic images of distances and angles.
Therefore, such navigation system can solve some of the above problems targeting the
following:
1. Closed reduction – identity of the three dimensional relations of the bony fragments
of the fracture and re-align them without using the fluoroscope. Measuring the neck
shaft angle may assist in applying the PCCP device later on.
2. Locating the optimal place for the first incision – existing navigation systems can
draw a virtual trajectory from a probe so an estimated AP and Lateral point of the
entry can be drawn on the screen prior to the actual incision. This saves time and
radiation.
3. Placing the plate, main guide and screws – A computerized navigation software can
identify any point of the patient anatomy in space and draw it on the computer screen.
It can also recognize the implant which is a fixed device and by tracking the plate it
can be placed ideally on the femoral shaft at the first attempt. The guide and screws
are of course in a fixed relation to the plate. Thus proper positioning of the plate

while drawing a virtual image of the entire implant including neck screws, can be
sufficient for definitive implant positioning, and to proceed directly to the drilling of
the first hip screw. This will eliminate a few steps in the process, especially the
readjustment and drilling that occur constantly in step 2.6.3. Furthermore, by
constantly tracking the plate the fine adjustment of the position of the main guide on
both AP and Lateral views can prevent unnecessary drill holes which weaken the
already osteoporotic bone and will cause difficulty in placing the guide correctly.
In summary, the PCCP limiting steps are the closed reduction, point of incision and most
importantly placing the plate and neck screw correctly. These steps can be greatly
facilitated by the use of “augmented fluoroscopy” or computerized navigation systems.

4. User Requirements
The surgeon who wishes to fix intertrochanteric fracture with PCCP has several goals:
1. Rigid and stable fixation after an accurate closed reduction.
2. Minimally invasive surgery applying minimum dissection and soft tissue damage
as possible.
3. A minimum of operative time and technical complication – taking in account that
surgical teams performing these procedure are in a varying amount of technical
skills during different hours of the day.
4. Maximal precision in placing the implant and avoiding complications of
misplacement.
A guidance system can address all these points and can improve hip fracture surgery in
attaining these goals as follows:
1. Closed Reduction
a. Ideally, both fragments of the fracture should be tracked and by AP and
Lateral fluoroscopic views until they are anatomically aligned in a 130-135º
neck shaft angle reduction. In existing systems such a requirement is
technically difficult mostly because of the placement of a reference frame in
the femoral neck or head. So the closed reduction in the proposed system
could be done on fluoroscopic control.
b. A template depicting 135º neck shaft angle scheme should be drawn on the
AP fluoroscopic image and a template depicting a straight line from the
femoral shaft to the femoral head on the lateral view should be drawn as well.
This can greatly assist the reduction.
2. Planning the Incision: by placing a probe on the patient’s skin while navigating – the
trajectory of the probe is seen on the femoral shaft in both AP and lateral views so the
superior end of the plate is at the superior margin of the incision. This kind of pre-

planning is already being done in intramedullary nailing and in cannulated hip screw
placement (Fig 26)
Fig 26 – determination of the entry point by placing the probe on the skin. By looking at the tool’s trajectory the surgeon can move the tool until the desired point is reached.
2. Inserting the plate while navigating: The system should “recognize” and track the plate
and draw it with addition to the screws in the AP and Lateral Projections. The plate is
now moved freely until the navigation yield a picture which is identical with the final
result¸ as seen in Figures 27-28. All positioning corrections are done prior to the drilling
and when the desired position is reached the plate is affixed firmly with the bone clamp
and short wire.
Screw length is measured by the computer (red trajectory) as is done today. The shaft
screws can be also measured. At this point the surgery resumes in is standard fashion as
described in Section 2.
The detailed protocol for a navigation-based PCCP surgery is described in the next
section.

a b
Fig 27 (a) AP and (b) lateral views of a virtual plate with the screws while navigating.
Movements in all planes are displayed simultaneously. In this case the implant is too inferior
on the AP view and posteriorly rotated on the lateral view
a b
Fig 28: The plate repositioned in a satisfactory position in both AP and lateral views

1.2 Is a 135 angle + lateral alignment
reached?
no
2.1 Attach Reference Frame either to iliac crest or to the femur 2.2 Acquire AP and Lateral
Images 2.3 Remove Fluoroscope
Unsuccessful Closed Reduction
Resume to open surgery
2.4 Verify Probe with reference and tracking camera
2.5 Determine point of first incision by using a pointer tracker on patient’s skin
3.1 Perform first incision 3.2 Insert plate subperiostealy 3.3 Verify vision contact of plate, reference and tracking camera
Yes
3.1 Navigate plate to desired position
Acquire Anatomy images again
1. Perform Closed reduction with a 135º template on the screen using live image fluroscopy
5. Flow chart of a navigation based PCCP

yes
4.1 perform 2nd incision 4.2 insert bone clamp 4.3 repeat steps 3.1-3.2
4.4 Tighten Bone Clamp 4.5. Fixate Short wire under navigation control
5. Display: AP and Lateral verification fluoroscopy
5.1 Do Fluoro and Navigation Match?
No
Yes
6.0 Measure screw length 6.1 drill and place 1st neck screw 6.2 place shaft screws 7. irrigate and close wound over suction drain
End Of Procedure
3.2 Are plate and screw position satisfactory?
no

6.0 System Setup
As mentioned earlier, The PCCP device is mounted with a frame (called the introducer, #7)
that is tightly screwed to the plate by a means of butterfly screw (#8). Given that the
relations between the plate and its added components are all with an invariable relation to the
introducer (fig 29). The practical meaning of this that the exact place of the plate can be
derived from the exact place of the introducer, so an IRED frame (instrument tracker)
attached to the introducer can give the exact information of the plate’s position together with
its added components.
Fig. 29: The introducer (arrow) is fixed to the plate in a constant fashion so the position of
the neck screw can be always predicted (red dotted line)
For matters of accuracy it is better to place the instrument tracker on a position near to the
plate’s center. We found the best position in the superior hole of the superior shaft screw
(fig 30) since this shaft screw can be drilled after the placement of the neck screw and
inferior shaft screw – at this stage the system is stable and navigation is not needed anymore
(see workflow section 5.0)
Constant

Fig 30 – an optical tracker is mounted on the PCCP introducer. Its position is at the hole of
the most superior shaft screw and it is tightened to it firmly.
6.1 OR Setup
Since experience of hundreds cases of computerized navigation trauma surgery had been
accumulated recently routine OR setup according to the manufacturer’s instruction and the
nature of surgery had been developed. Using the standard setup as for cannulated hip screw
or pelvic screw insertion is sufficient for the PCCP procedure and it is described in figures
31-32.

Fig 31: Setup of the OR in cannulated pelvic screws: a. The optical tracking device, b. The
central computer, c. The c-arm mounted with targeting frame. The surgeon stands on the
involved side.
Fig 32: close-up on the operative field. The c-arm is above the involved side. A bone tracker
(reference array) is drilled into the involved area, and the computer touch screen is covered
with sterile polyethylene which enables its operation by the surgeon who is holding a tracked
instrument
a
b
c
b
a
c

7.0 References
1. Cooper C, Campion G, Melton J III. Hip fractures in the elderly: a world-wide projection. Osteoporos Int 1992;2:285-9.
2. LaVelle DG Fracture of the hip in Campbell operative orthopaedics 10th Ed. Mosby; 10th edition (December 2002)
3. Richmond J, Aharonoff GB, Zuckerman JD, Koval KJ, Mortality Risk After Hip Fracture, J Orthop Trauma, 2003 17(1):53-56
4. Horowitz BG: Retrospective analysis of hip fractures, Surg Gynecol Obstet 123:565, 1966
5. Davis TR, Shel JL, Hosman A Simpson M, Porter BB, Checketts RG, Intertrochanteric hip fractures: mechanical failure after internal fixation JBJS(Br) 1989;72-B:21-23
6. Parker MJ; Handoll HH Cochrane Database Syst Rev 2002;(4):CD000093 (ISSN: 1469-493X)
7. Gottfried Y Percutaneous Plating of intertrochanteric fractures J Orthop Trauma 2000;14:490-495.
8. Gotfried Y, Cohen B, Rotem A Biomechanical Evaluation of the Percutaneous Compression Plating System for Hip Fractures, J Orthop Trauma, 2002,(9): 644-650.
9. Peyser A, Weil Y, Borcke L, Manor O, Mosheiff R, Liebergalll M, Percutaneous Compression Plating versus Compression Hip Screw Fixation for the Treatment of Intertrochanteric hip fractures. Submitted 2003.
10. Janzing HM, Houben BJ, Brandt SE, et al. The Gotfried Percutaneous Compression Plate versus the Dynamic Hip Screw in the treatment of pertrochanteric hip fractures: minimal invasive treatment reduces operative time and postoperative pain. J Trauma. 2002; 52:293-298.
11. R. Mosheiff, A. Khoury, Y. Weil, M. Liebergall “First generation of fluoroscopic navigation in�percutaneous pelvic surgery”, J Orthop Trauma. In press.
12. Y. Weil, M. Liebergall, A. Khoury, R. Mosheiff. “The use of computerized fluoroscopic navigation for removal of pelvic screws” American Journal of Orthopedics. In press
��