Embed Size (px)
Citation preview
Perceptive Connector for Infor Lawson AP Invoice Automation Installation and Setup Guide Version: 1.2.x Written by: Product Knowledge, R&D Date: August 2016

© 2015 Lexmark International Technology, S.A. All rights reserved.
Lexmark is a trademark of Lexmark International Technology, S.A., or its subsidiaries, registered in the U.S. and/or other countries. All other trademarks are the property of their respective owners. No part of this publication may be reproduced, stored, or transmitted in any form without the prior written permission of Lexmark.
Percept i ve Connec to r fo r I n for Lawson AP Invo ice Au tomat ion Ins ta l la t i on and Setup Guide
3
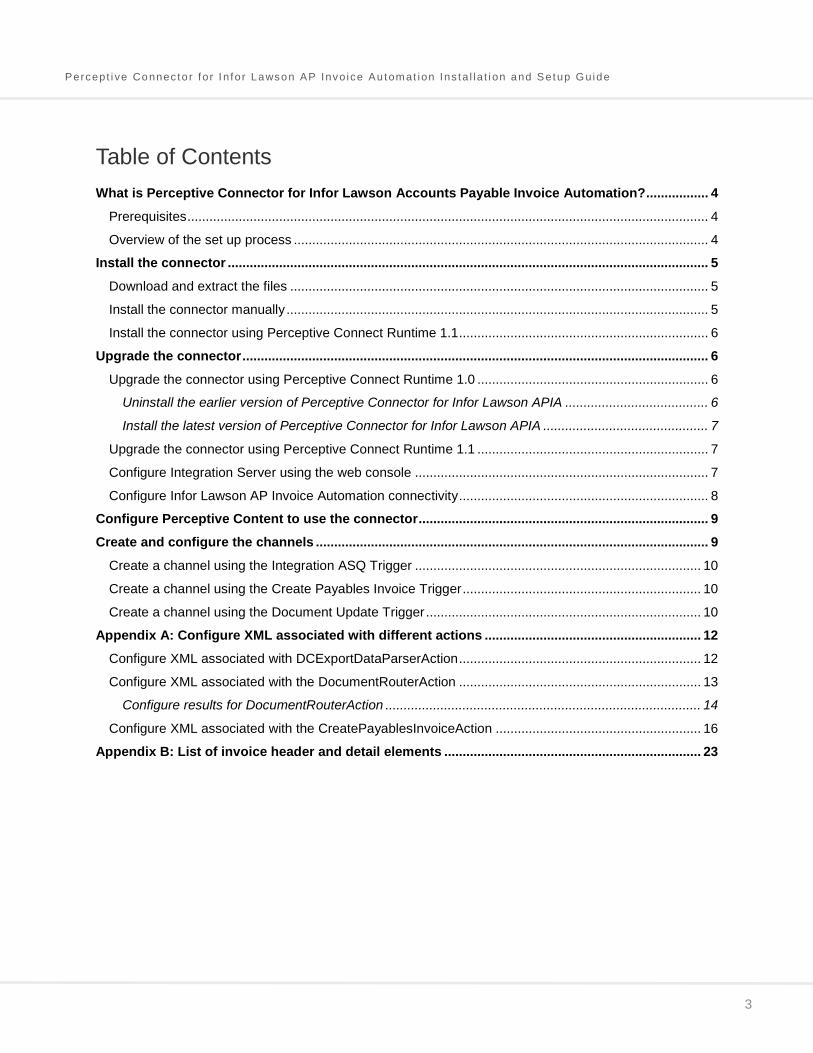
Table of Contents What is Perceptive Connector for Infor Lawson Accounts Payable Invoice Automation? ................. 4
Prerequisites .............................................................................................................................................. 4
Overview of the set up process ................................................................................................................. 4 Install the connector ................................................................................................................................... 5
Download and extract the files .................................................................................................................. 5
Install the connector manually ................................................................................................................... 5
Install the connector using Perceptive Connect Runtime 1.1 .................................................................... 6 Upgrade the connector ............................................................................................................................... 6
Upgrade the connector using Perceptive Connect Runtime 1.0 ............................................................... 6 Uninstall the earlier version of Perceptive Connector for Infor Lawson APIA ....................................... 6
Install the latest version of Perceptive Connector for Infor Lawson APIA ............................................. 7
Upgrade the connector using Perceptive Connect Runtime 1.1 ............................................................... 7
Configure Integration Server using the web console ................................................................................ 7
Configure Infor Lawson AP Invoice Automation connectivity .................................................................... 8 Configure Perceptive Content to use the connector ............................................................................... 9
Create and configure the channels ........................................................................................................... 9
Create a channel using the Integration ASQ Trigger .............................................................................. 10
Create a channel using the Create Payables Invoice Trigger ................................................................. 10
Create a channel using the Document Update Trigger ........................................................................... 10 Appendix A: Configure XML associated with different actions ........................................................... 12
Configure XML associated with DCExportDataParserAction .................................................................. 12
Configure XML associated with the DocumentRouterAction .................................................................. 13 Configure results for DocumentRouterAction ...................................................................................... 14
Configure XML associated with the CreatePayablesInvoiceAction ........................................................ 16 Appendix B: List of invoice header and detail elements ...................................................................... 23
Percept i ve Connec to r fo r I n for Lawson AP Invo ice Au tomat ion Ins ta l la t i on and Setup Guide
4
What is Perceptive Connector for Infor Lawson Accounts Payable Invoice Automation?
Perceptive Connector for Infor Lawson APIA (Accounts Payable Invoice Automation) integrates Perceptive Content and Infor Lawson APIA, facilitating the exchange of invoice metadata and images captured in Perceptive Content and automating the invoice creation process in APIA.
The Infor Lawson connector relies upon Perceptive Connect Runtime, which provides independent messaging and data exchange between applications. Perceptive Connect Runtime acts as a connector hub that allows you to configure, create, and maintain operation mapping between Perceptive products and Infor Lawson APIA without the need to access the file system. This guide outlines the procedures to install and configure the connector on Perceptive Connect Runtime. For more information on installing Perceptive Connect Runtime, refer to the Perceptive Connect Runtime Installation Guide.
Prerequisites You must have the following software installed on the target system before you can use the connector.
• For ImageNow version 6.7
• ImageNow Client and Server, version 6.7
• Perceptive Integration Server, version 6.7
• For Perceptive Content, version 7.0
• Perceptive Content Client and Server, version 7.0
• Perceptive Integration Server, version 7.0
• Java, version 1.7 (64-bit) or version 1.8 (64-bit)
• Perceptive Connect Runtime, version 1.1
• Content Connector 1.0
• Infor Lawson AP Invoice Automation version 9.1.0 (for use with Infor Lawson Financials 9.0.1) or version 10.1.0 (for use with Infor Lawson Financials 10.0.x)
• Google Chrome is the recommended web browser.
Overview of the set up process To install and configure the Perceptive Connector for Infor Lawson AP Invoice Automation, complete the following sections.
• Install the connector
• Configure Perceptive Content to use the connector
• Create and configure the channels
Percept i ve Connec to r fo r I n for Lawson AP Invo ice Au tomat ion Ins ta l la t i on and Setup Guide
5
Install the connector The PerceptiveConnectorForInforLawson-1.2.3.zip file includes the files required to integrate the Perceptive Connector for Infor Lawson AP Invoice Automation, Perceptive Content, and your Infor Lawson APIA. You can install the connector using Perceptive Connect Runtime, version 1.0 or version 1.1.
Note You must install the connector on the same computer as the Perceptive Connect Runtime service.
Download and extract the files To download the ZIP folder and extract the files, complete the following steps.
1. Go to the Perceptive Software website at www.perceptivesoftware.com and log in to the Customer Portal.
2. In the Product Downloads page, search for the PerceptiveConnectorForInforLawson-1.2.3.zip file.
3. Download the file. Your computer must have access to Perceptive Connect Runtime Web Console, located at http://<Perceptive Connect Runtime machine name>:<port number>.
Note You must extract the contents of the ZIP file to install Perceptive Connector for Infor Lawson on Perceptive Connect Runtime 1.0.
Install the connector manually You can install the Infor Lawson Connector and related files manually from the Perceptive Connect Runtime Web Console page on both, Perceptive Connect Runtime 1.0 and Perceptive Connect Runtime 1.1. To install the Infor Lawson Connector, complete the following steps.
Important If you want to install Infor Lawson Connector on Perceptive Connect Runtime 1.1, you must first uninstall Perceptive Connect Runtime 1.0 and install Perceptive Connect Runtime 1.1. However, uninstalling the earlier version of Perceptive Connect Runtime uninstalls all Perceptive products installed on Perceptive Connect Runtime. Before you uninstall Perceptive Connect Runtime 1.0, ensure that you have the latest versions of Perceptive products that are compatible with Perceptive Connect Runtime 1.1.
1. From the temporary directory where the PerceptiveConnectorForInforLawson-1.2.3.zip file is extracted, navigate to the script folder and copy the following files to the [drive:]\inserver6\script directory.
• GetDCExportObject.js
• LawsonUpdateNotes.js
• Util_Debug.js
2. Copy the PerceptiveConnectExtensions.js from [drive:]\Perceptive Connect\script file to the [drive:]\inserver6\script directory.
3. In a browser, type the Web Console address in the format http://<Perceptive Connect machine name>:<port>/connect.
Note The Perceptive Connect Runtime service runs on port 80 by default. Each instance of Perceptive Connect Runtime that runs on a single host machine requires a unique port number.
4. In the browser dialog box, enter your user name and password. The default user name is admin and the default password is admin.
Percept i ve Connec to r fo r I n for Lawson AP Invo ice Au tomat ion Ins ta l la t i on and Setup Guide
6
5. In Perceptive Connect Runtime Web Console, under Perceptive Connect, click View Bundles.
6. In the Bundles page, click Install/Update and complete the following steps.
1. In the Upload/Install Bundles dialog box, click Choose File, navigate to the PerceptiveConnectorForInforLawsonAPIA-1.2.3.jar file, and click Open.
2. Select the Start Bundle check box and click Install or Update.
3. Restart Perceptive Connect Runtime service.
Install the connector using Perceptive Connect Runtime 1.1 You can install the Infor Lawson Connector from the Upload new bundles page in Perceptive Connect Runtime 1.1. To install the Infor Lawson Connector using Perceptive Connect Runtime 1.1, complete the following steps.
1. In a browser, type the Dashboard address in the format http://<Perceptive Connect Runtime machine name>:<port>.
2. Click Install a Connector.
3. In Perceptive Connect Runtime, on the Upload new bundles page, drag the PerceptiveConnectorForInforLawsonAPIA-1.2.3.jar file to the DRAG FILES HERE box. Perceptive Connect Runtime extracts and installs the bundles included in the ZIP file automatically and displays the number of installed bundles in the Pending box.
4. In the Pending box, click Accept to complete the installation.
Result The installation summary appears in the Completed box.
Upgrade the connector
Upgrade the connector using Perceptive Connect Runtime 1.0 To upgrade from a previous version of Perceptive Connector for Infor Lawson APIA, complete the following steps.
1. Uninstall the earlier version of Perceptive Connector for Infor Lawson APIA
2. Install the latest version of Perceptive Connector for Infor Lawson APIA
Uninstall the earlier version of Perceptive Connector for Infor Lawson APIA To uninstall the earlier version of Perceptive Connector for Infor Lawson APIA, complete the following steps.
1. In Perceptive Connect Runtime Web Console, under Perceptive Connect, click View Bundles.
2. In the Bundles page, click the Stop button next to the PerceptiveConnectorForInforLawsonAPIA bundle.
3. Click the Uninstall button next to the PerceptiveConnectorForInforLawsonAPIA bundle.
Percept i ve Connec to r fo r I n for Lawson AP Invo ice Au tomat ion Ins ta l la t i on and Setup Guide
7
Install the latest version of Perceptive Connector for Infor Lawson APIA To install the latest version of Perceptive Connector for Infor Lawson APIA, complete the following steps.
1. Locate the temporary directory you created in the Download and extract the files section.
2. In Perceptive Connect Runtime Web Console, under Perceptive Connect, click View Bundles.
3. In the Bundles page, click Install/Update and complete the following steps.
1. In the Upload/Install Bundles dialog box, click Choose File, navigate to the PerceptiveConnectorForInforLawsonAPIA-1.2.3.jar file in the extracted directory, and click Open.
2. Select the Start Bundle check box and click Install or Update.
3. Restart Perceptive Connect Runtime service.
4. Under Perceptive Connect, click View Configuration.
5. In the View Configurations page, under General, click Infor Lawson APIA Configuration.
6. In the Infor Lawson APIA Configuration dialog box, click Unbind.
7. In the confirmation pop-up, click OK.
8. Click Save.
Upgrade the connector using Perceptive Connect Runtime 1.1 To upgrade from an earlier version of Perceptive Connector for Infor Lawson APIA using Perceptive Connect Runtime 1.1, complete the following steps.
1. Upgrade your existing Perceptive Connect Runtime version 1.0 to 1.1. For steps on how to upgrade Perceptive Connect Runtime, refer to the “Upgrade the Connect Runtime” section under “Install Connect Runtime” topic of Perceptive Connect Runtime Online Installation Help.
2. Download and install Content Connector 1.0. For addition information on how to download and install Content Connector, refer to the Perceptive Content Connector Installation Guide for the respective version.
3. Download the PerceptiveConnectorForInforLawson-1.2.3.zip file. For additional information, refer to the Download and extract the files section.
4. Follow the installation steps mentioned under Install the connector using Perceptive Connect Runtime 1.1.
Configure Integration Server using the web console Complete the following steps to provide Integration Server credentials in Perceptive Connect Runtime Web Console.
1. Log in to Perceptive Connect Runtime Web Console.
2. Under Perceptive Connect, click View Configuration. In the View Configuration page, in the
Perceptive Content Connector section, click the Edit the configuration values button next to Connection Manager.
3. In the Connection Manager dialog box, complete the following steps.
1. In the Connection Provider Target list, select Integration Server 6.7.
Percept i ve Connec to r fo r I n for Lawson AP Invo ice Au tomat ion Ins ta l la t i on and Setup Guide
8
2. In the User Name box, type the user name of the service or admin account that is used to access Perceptive Content through Integration Server.
3. In the Password box, type your password.
4. Click Save.
Configure Infor Lawson AP Invoice Automation connectivity You can configure multiple Infor Lawson APIA connections in the connector. To configure the Infor Lawson APIA connection, complete the following steps.
1. In Perceptive Connect Runtime Web Console, under Perceptive Connect, click View Configuration.
2. In the View Configuration page, under Perceptive Content Connector, click Integration Server 6.7 Connection.
3. In the Integration Server 6.7 Connection dialog box, ensure that the Integration Server URL box displays the correct URL.
4. Navigate to the View Configuration page. Under General, click the Edit the configuration values
button next to Infor Lawson APIA Configuration.
5. In the Infor Lawson APIA Configuration dialog box, complete the following steps.
1. In the Invoice Header wsdl box, enter the Infor Lawson wsdl for Invoice header posting.
2. In the Invoice Detail wsdl box, enter the Infor Lawson wsdl for Invoice line posting.
3. In the Header Namespace box, enter the Infor Lawson header namespace.
Note To locate the header namespace, copy the Infor Lawson wsdl for Invoice header posting from the Invoice Header wsdl box and open it in an Internet browser. In the wsdl XML, under <definitions> element, copy the value for the targetNamespace attribute.
4. In the Detail Namespace box, enter the Infor Lawson detail namespace.
Note To locate the header namespace, copy the Infor Lawson wsdl for Invoice line posting from the Invoice Detail wsdl box and open it in an Internet browser. In the wsdl XML, under <definitions> element, copy the value for the targetNamespace attribute.
5. In the Base URL Indicator list, select the appropriate version name of WebNow or Perceptive Web.
6. In the Perceptive Web url box, type the Perceptive Web URL that facilitates viewing of invoice.
7. In the WebNow url box, type the WebNow URL that facilitates viewing of invoice.
8. Select the Anonymous login check box to allow users to view invoices stored in Perceptive Content from Infor Lawson APIA without logging in.
9. Select the Enabling Success Message check box to enable adding of success messages to the Notes box of the Perceptive Content document.
10. Select the Enabling Error Messages check box to enable adding of error messages to the Notes box of the Perceptive Content document.
11. Click Save.
Percept i ve Connec to r fo r I n for Lawson AP Invo ice Au tomat ion Ins ta l la t i on and Setup Guide
9
Configure Perceptive Content to use the connector Perceptive Content workflow with Envoy services facilitates back-end integration of Perceptive Content with your Infor Lawson AP Invoice Automation application. The Integration automated system queue you implement in your workflow process sends a web service notification using the Envoy service operation name you define.
The Infor Lawson application receives the data you configure. After this process is complete, your Infor Lawson APIA sends a success or failure response using Perceptive Integration Server. Perceptive Content can route the file forward in the Perceptive Content workflow for additional processing.
For additional information, refer to the “Configure Perceptive Content” section in the Perceptive Connector for Infor Lawson AP Invoice Automation Integration Guide.
Create and configure the channels A channel is a combination of a trigger, an action, and one or more results. You create and configure channels using the Perceptive Connect Runtime Web Console. When you create a channel, you first select a trigger and then select a compatible action available with the connector. Finally, you map the channel to write the results to Perceptive Content. The following table provides a list of triggers you need to create and the actions you need to associate to allow Infor Lawson connector to map data processed between Infor Lawson APIA and Perceptive Content.
Trigger Action
Integration ASQ Trigger DCExportDataParserAction
Create Payables Invoice Trigger CreatePayablesInvoiceAction
Document Update Trigger DocumentRouterAction
The triggers and associated actions are interdependent and enable the connector to process invoice data in Infor Lawson APIA, and update custom properties of the invoice document in Perceptive Content after successful processing of data.
Note You can configure Infor Lawson connector to work with or without Perceptive Intelligent Capture. If you require both the options, you must create two integration ASQ channels – one to process invoices using Perceptive Intelligent Capture and the other to process invoices without it. Both the channels must be associated with the same action.
The Integration ASQ Trigger initiates the DCExportDataParserAction as soon as it receives a document ID. In the connector, the parser action processes the invoice data and maps the result to LawsonCreateInvoice mapping file. This initiates the Create Payables Invoice Trigger to perform the associated CreatePayablesInvoiceAction. Because of this action, the invoice “header” and “detail” information is sent to Infor Lawson APIA, where it is processed and the output is generated. In the connector, the SOAP server endpoint for Lawson Update Invoice service updates when the invoice information is successfully processed in Infor Lawson APIA. This initiates the Document Update Trigger that performs the DocumentRouterAction and the results display in the custom properties of the document in Perceptive Content.
Note For non-US customers, when the connector updates a date type custom property of a Perceptive Content document, for example, Due Date, the date might change to the previous day.
Percept i ve Connec to r fo r I n for Lawson AP Invo ice Au tomat ion Ins ta l la t i on and Setup Guide
10
Create a channel using the Integration ASQ Trigger To create the channel, complete the following steps.
1. In Perceptive Connect Runtime Dashboard, under Business Administrators, click Create a channel. The browser redirects you to the Configure the channel trigger page.
2. In the Select a trigger list, select the Integration ASQ Trigger.
3. In the Workflow Queue ID box, specify the queue ID. To know the queue ID of the Integration ASQ, complete the following steps.
1. In Perceptive Content, click Manage to open Perceptive Content Management Console.
2. In the Perceptive Content Management Console, in the left pane, click Workflow. On the Workflow tab, click Modify.
3. In the Perceptive Content Workflow Designer, double-click the Integration queue to view the queue properties
4. Under Details, note the ID value. For example, 321YY2N_00026RFDM000006.
4. Click Next.
5. To associate an action with the trigger, in the Select an action list, select the DCExportDataParserAction. A configurable XML appears. For more information about configuring the XML, refer to Configure XML associated with DCExportDataParserAction.
6. Click Next.
7. In the Configure the channel results page, click Save Channel.
8. In the popup that appears, click OK to enable the channel.
Note If you use Perceptive Intelligent Capture along with Perceptive Connector for Infor Lawson APIA, you may be required to create two integration ASQs and configure two different channels – one to process invoices using Perceptive Intelligent Capture and the other to process invoices without Perceptive Intelligent Capture.
Create a channel using the Create Payables Invoice Trigger To create the channel, complete the following steps.
1. In the Select a trigger list, select the Create Payables Invoice Trigger.
2. Click Next.
3. In the Select an action list, select the CreatePayablesInvoiceAction. A configurable XML appears. For more information about configuring the XML, refer to Configure XML associated with the CreatePayablesInvoiceAction.
4. Click Next.
5. Under Configure the channel results page, click Save Channel.
6. In the popup that appears, click OK to enable the channel.
Create a channel using the Document Update Trigger To create the channel, complete the following steps.
1. In the Select a trigger list, select the Document Update Trigger.
Percept i ve Connec to r fo r I n for Lawson AP Invo ice Au tomat ion Ins ta l la t i on and Setup Guide
11
2. Click Next.
3. In the Select an action list, select the DocumentRouterAction. A configurable XML appears. For more information about configuring the XML, refer to Configure XML associated with the DocumentRouterAction.
4. Click Next after you configure the XML associated with DocumentRouterAction.
5. Under Configure the channel results, in the wizard box, modify the XML that allows mapping of results to Perceptive Content document properties or indexes.
6. Click Save Channel.
7. In the popup that appears, click OK to enable the channel.
Percept i ve Connec to r fo r I n for Lawson AP Invo ice Au tomat ion Ins ta l la t i on and Setup Guide
12
Appendix A: Configure XML associated with different actions
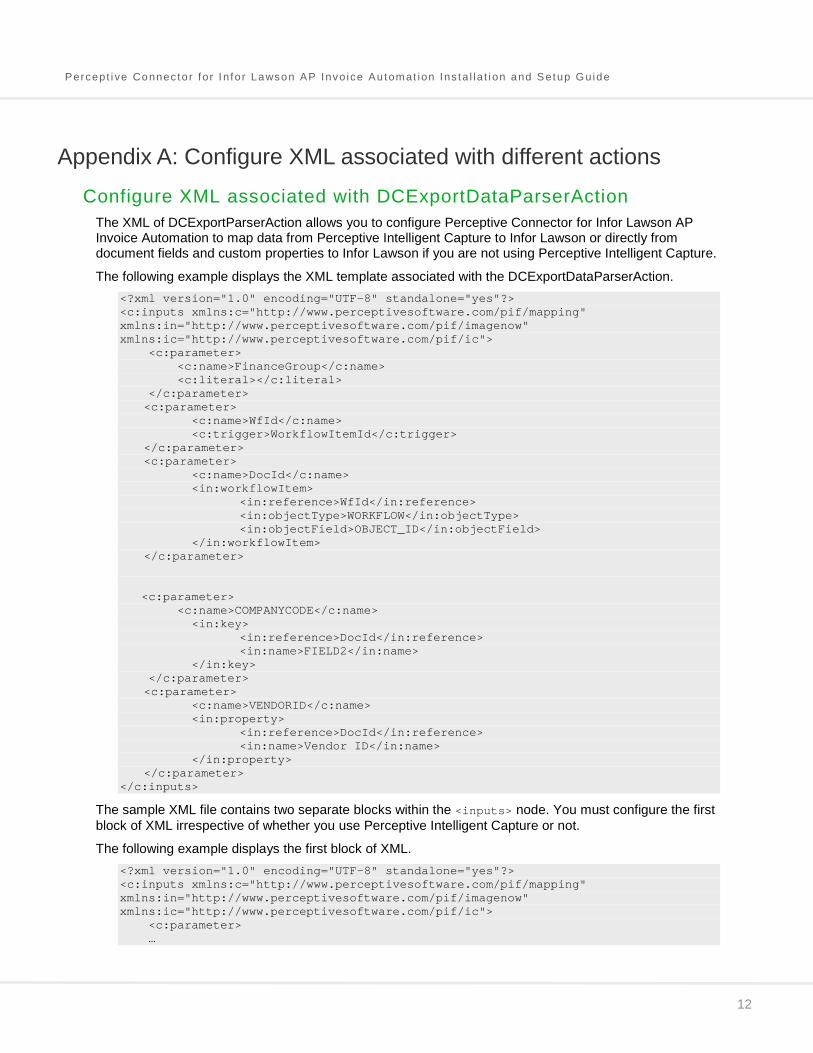
Configure XML associated with DCExportDataParserAction The XML of DCExportParserAction allows you to configure Perceptive Connector for Infor Lawson AP Invoice Automation to map data from Perceptive Intelligent Capture to Infor Lawson or directly from document fields and custom properties to Infor Lawson if you are not using Perceptive Intelligent Capture.
The following example displays the XML template associated with the DCExportDataParserAction. <?xml version="1.0" encoding="UTF-8" standalone="yes"?> <c:inputs xmlns:c="http://www.perceptivesoftware.com/pif/mapping" xmlns:in="http://www.perceptivesoftware.com/pif/imagenow" xmlns:ic="http://www.perceptivesoftware.com/pif/ic"> <c:parameter> <c:name>FinanceGroup</c:name> <c:literal></c:literal> </c:parameter> <c:parameter> <c:name>WfId</c:name> <c:trigger>WorkflowItemId</c:trigger> </c:parameter> <c:parameter> <c:name>DocId</c:name> <in:workflowItem> <in:reference>WfId</in:reference> <in:objectType>WORKFLOW</in:objectType> <in:objectField>OBJECT_ID</in:objectField> </in:workflowItem> </c:parameter> <c:parameter> <c:name>COMPANYCODE</c:name> <in:key> <in:reference>DocId</in:reference> <in:name>FIELD2</in:name> </in:key> </c:parameter> <c:parameter> <c:name>VENDORID</c:name> <in:property> <in:reference>DocId</in:reference> <in:name>Vendor ID</in:name> </in:property> </c:parameter> </c:inputs>
The sample XML file contains two separate blocks within the <inputs> node. You must configure the first block of XML irrespective of whether you use Perceptive Intelligent Capture or not.
The following example displays the first block of XML. <?xml version="1.0" encoding="UTF-8" standalone="yes"?> <c:inputs xmlns:c="http://www.perceptivesoftware.com/pif/mapping" xmlns:in="http://www.perceptivesoftware.com/pif/imagenow" xmlns:ic="http://www.perceptivesoftware.com/pif/ic"> <c:parameter> …
Percept i ve Connec to r fo r I n for Lawson AP Invo ice Au tomat ion Ins ta l la t i on and Setup Guide
13
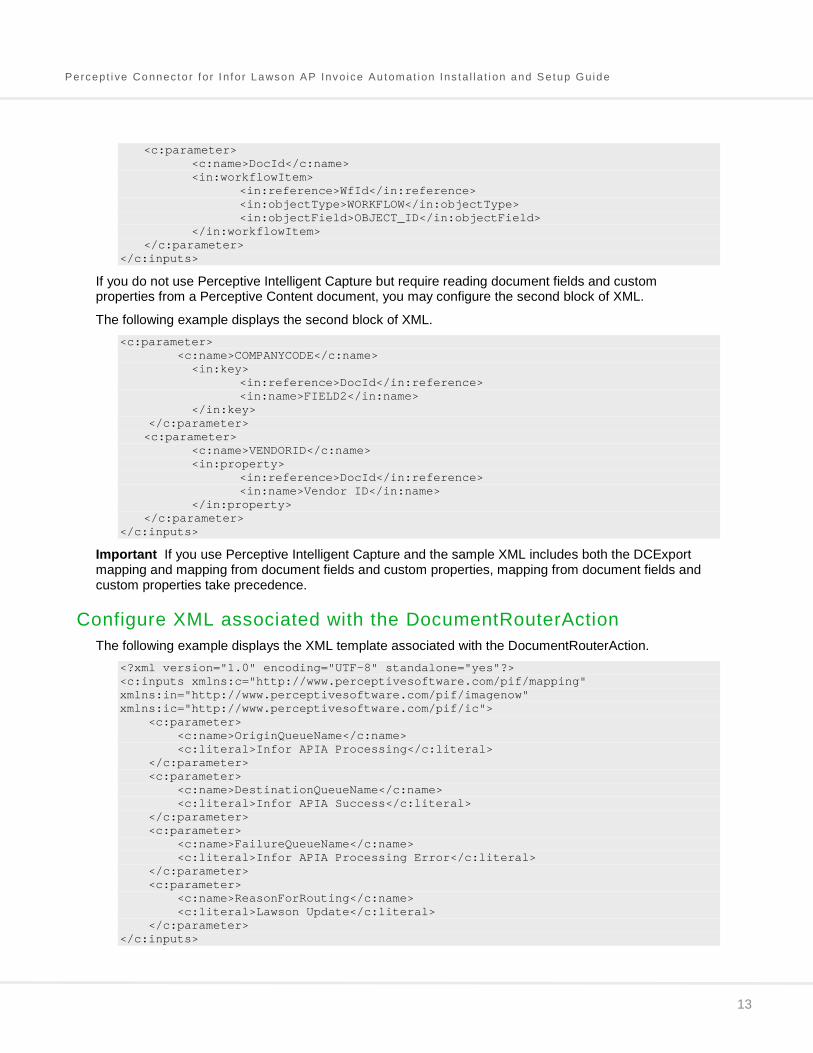
<c:parameter> <c:name>DocId</c:name> <in:workflowItem> <in:reference>WfId</in:reference> <in:objectType>WORKFLOW</in:objectType> <in:objectField>OBJECT_ID</in:objectField> </in:workflowItem> </c:parameter> </c:inputs>
If you do not use Perceptive Intelligent Capture but require reading document fields and custom properties from a Perceptive Content document, you may configure the second block of XML.
The following example displays the second block of XML. <c:parameter> <c:name>COMPANYCODE</c:name> <in:key> <in:reference>DocId</in:reference> <in:name>FIELD2</in:name> </in:key> </c:parameter> <c:parameter> <c:name>VENDORID</c:name> <in:property> <in:reference>DocId</in:reference> <in:name>Vendor ID</in:name> </in:property> </c:parameter> </c:inputs>
Important If you use Perceptive Intelligent Capture and the sample XML includes both the DCExport mapping and mapping from document fields and custom properties, mapping from document fields and custom properties take precedence.
Configure XML associated with the DocumentRouterAction The following example displays the XML template associated with the DocumentRouterAction.
<?xml version="1.0" encoding="UTF-8" standalone="yes"?> <c:inputs xmlns:c="http://www.perceptivesoftware.com/pif/mapping" xmlns:in="http://www.perceptivesoftware.com/pif/imagenow" xmlns:ic="http://www.perceptivesoftware.com/pif/ic"> <c:parameter> <c:name>OriginQueueName</c:name> <c:literal>Infor APIA Processing</c:literal> </c:parameter> <c:parameter> <c:name>DestinationQueueName</c:name> <c:literal>Infor APIA Success</c:literal> </c:parameter> <c:parameter> <c:name>FailureQueueName</c:name> <c:literal>Infor APIA Processing Error</c:literal> </c:parameter> <c:parameter> <c:name>ReasonForRouting</c:name> <c:literal>Lawson Update</c:literal> </c:parameter> </c:inputs>
Percept i ve Connec to r fo r I n for Lawson AP Invo ice Au tomat ion Ins ta l la t i on and Setup Guide
14
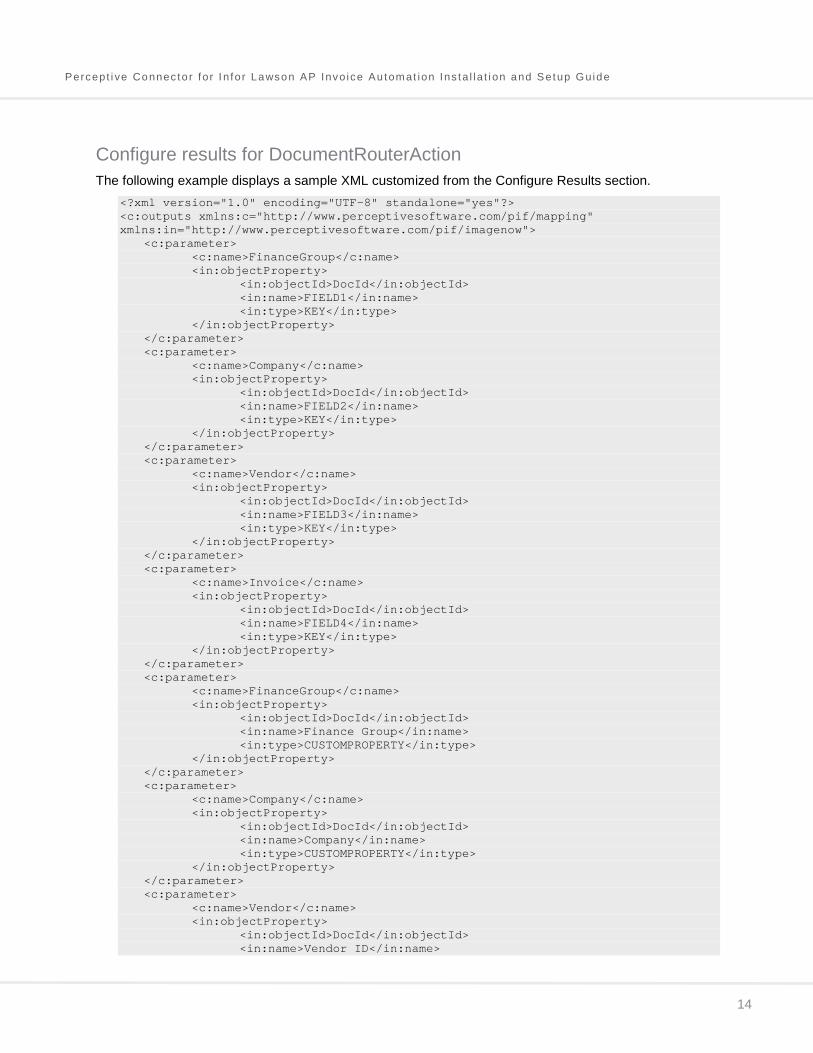
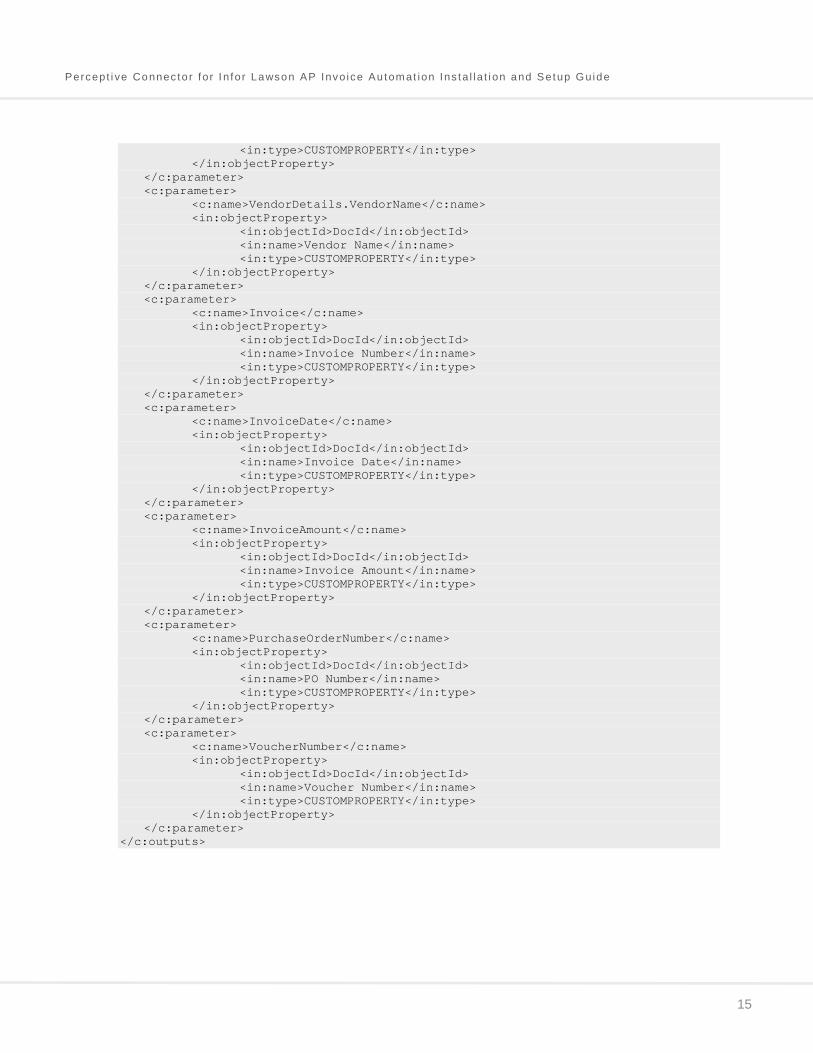
Configure results for DocumentRouterAction The following example displays a sample XML customized from the Configure Results section.
<?xml version="1.0" encoding="UTF-8" standalone="yes"?> <c:outputs xmlns:c="http://www.perceptivesoftware.com/pif/mapping" xmlns:in="http://www.perceptivesoftware.com/pif/imagenow"> <c:parameter> <c:name>FinanceGroup</c:name> <in:objectProperty> <in:objectId>DocId</in:objectId> <in:name>FIELD1</in:name> <in:type>KEY</in:type> </in:objectProperty> </c:parameter> <c:parameter> <c:name>Company</c:name> <in:objectProperty> <in:objectId>DocId</in:objectId> <in:name>FIELD2</in:name> <in:type>KEY</in:type> </in:objectProperty> </c:parameter> <c:parameter> <c:name>Vendor</c:name> <in:objectProperty> <in:objectId>DocId</in:objectId> <in:name>FIELD3</in:name> <in:type>KEY</in:type> </in:objectProperty> </c:parameter> <c:parameter> <c:name>Invoice</c:name> <in:objectProperty> <in:objectId>DocId</in:objectId> <in:name>FIELD4</in:name> <in:type>KEY</in:type> </in:objectProperty> </c:parameter> <c:parameter> <c:name>FinanceGroup</c:name> <in:objectProperty> <in:objectId>DocId</in:objectId> <in:name>Finance Group</in:name> <in:type>CUSTOMPROPERTY</in:type> </in:objectProperty> </c:parameter> <c:parameter> <c:name>Company</c:name> <in:objectProperty> <in:objectId>DocId</in:objectId> <in:name>Company</in:name> <in:type>CUSTOMPROPERTY</in:type> </in:objectProperty> </c:parameter> <c:parameter> <c:name>Vendor</c:name> <in:objectProperty> <in:objectId>DocId</in:objectId> <in:name>Vendor ID</in:name>
Percept i ve Connec to r fo r I n for Lawson AP Invo ice Au tomat ion Ins ta l la t i on and Setup Guide
15
<in:type>CUSTOMPROPERTY</in:type> </in:objectProperty> </c:parameter> <c:parameter> <c:name>VendorDetails.VendorName</c:name> <in:objectProperty> <in:objectId>DocId</in:objectId> <in:name>Vendor Name</in:name> <in:type>CUSTOMPROPERTY</in:type> </in:objectProperty> </c:parameter> <c:parameter> <c:name>Invoice</c:name> <in:objectProperty> <in:objectId>DocId</in:objectId> <in:name>Invoice Number</in:name> <in:type>CUSTOMPROPERTY</in:type> </in:objectProperty> </c:parameter> <c:parameter> <c:name>InvoiceDate</c:name> <in:objectProperty> <in:objectId>DocId</in:objectId> <in:name>Invoice Date</in:name> <in:type>CUSTOMPROPERTY</in:type> </in:objectProperty> </c:parameter> <c:parameter> <c:name>InvoiceAmount</c:name> <in:objectProperty> <in:objectId>DocId</in:objectId> <in:name>Invoice Amount</in:name> <in:type>CUSTOMPROPERTY</in:type> </in:objectProperty> </c:parameter> <c:parameter> <c:name>PurchaseOrderNumber</c:name> <in:objectProperty> <in:objectId>DocId</in:objectId> <in:name>PO Number</in:name> <in:type>CUSTOMPROPERTY</in:type> </in:objectProperty> </c:parameter> <c:parameter> <c:name>VoucherNumber</c:name> <in:objectProperty> <in:objectId>DocId</in:objectId> <in:name>Voucher Number</in:name> <in:type>CUSTOMPROPERTY</in:type> </in:objectProperty> </c:parameter> </c:outputs>

Percept i ve Connec to r fo r I n for Lawson AP Invo ice Au tomat ion Ins ta l la t i on and Setup Guide
16
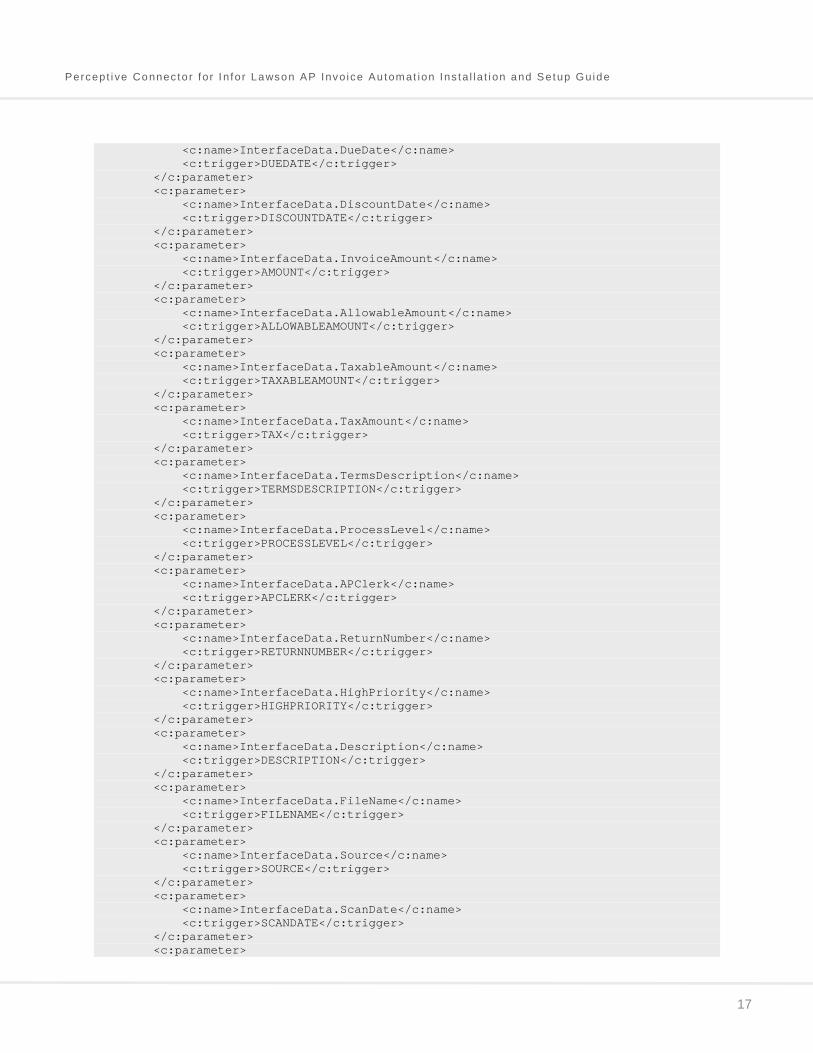
Configure XML associated with the CreatePayablesInvoiceAction The following example displays the XML template associated with the CreatePayablesInvoiceAction. <?xml version="1.0" encoding="UTF-8" standalone="yes"?> <c:inputs xmlns:c="http://www.perceptivesoftware.com/pif/mapping" xmlns:in="http://www.perceptivesoftware.com/pif/imagenow"> <c:parameter> <c:name>FinanceGroup</c:name> <c:trigger>FINANCEGROUP</c:trigger> </c:parameter> <c:parameter> <c:name>FailureQueueName</c:name> <c:literal>Infor APIA Submit Error</c:literal> </c:parameter> <c:parameter> <c:name>InterfaceData.ImageIndex</c:name> <c:trigger>IMAGENOWDOCID</c:trigger> </c:parameter> <c:parameter> <c:name>InterfaceData.Company</c:name> <c:trigger>COMPANYCODE</c:trigger> </c:parameter> <c:parameter> <c:name>InterfaceData.VendorGroup</c:name> <c:trigger>VENDORGROUP</c:trigger> </c:parameter> <c:parameter> <c:name>InterfaceData.Vendor</c:name> <c:trigger>VENDORID</c:trigger> </c:parameter> <c:parameter> <c:name>InterfaceData.VendorName</c:name> <c:trigger>VENDORNAME</c:trigger> </c:parameter> <c:parameter> <c:name>InterfaceData.Invoice</c:name> <c:trigger>INVOICENO</c:trigger> </c:parameter> <c:parameter> <c:name>InterfaceData.InvoiceType</c:name> <c:trigger>INVOICETYPE</c:trigger> </c:parameter> <c:parameter> <c:name>InterfaceData.PoCode</c:name> <c:trigger>POCODE</c:trigger> </c:parameter> <c:parameter> <c:name>InterfaceData.PoNumber</c:name> <c:trigger>PONUMBER</c:trigger> </c:parameter> <c:parameter> <c:name>InterfaceData.PoRelease</c:name> <c:trigger>PORELEASE</c:trigger> </c:parameter> <c:parameter> <c:name>InterfaceData.InvoiceDate</c:name> <c:trigger>INVOICEDATE</c:trigger> </c:parameter> <c:parameter>
Percept i ve Connec to r fo r I n for Lawson AP Invo ice Au tomat ion Ins ta l la t i on and Setup Guide
17
<c:name>InterfaceData.DueDate</c:name> <c:trigger>DUEDATE</c:trigger> </c:parameter> <c:parameter> <c:name>InterfaceData.DiscountDate</c:name> <c:trigger>DISCOUNTDATE</c:trigger> </c:parameter> <c:parameter> <c:name>InterfaceData.InvoiceAmount</c:name> <c:trigger>AMOUNT</c:trigger> </c:parameter> <c:parameter> <c:name>InterfaceData.AllowableAmount</c:name> <c:trigger>ALLOWABLEAMOUNT</c:trigger> </c:parameter> <c:parameter> <c:name>InterfaceData.TaxableAmount</c:name> <c:trigger>TAXABLEAMOUNT</c:trigger> </c:parameter> <c:parameter> <c:name>InterfaceData.TaxAmount</c:name> <c:trigger>TAX</c:trigger> </c:parameter> <c:parameter> <c:name>InterfaceData.TermsDescription</c:name> <c:trigger>TERMSDESCRIPTION</c:trigger> </c:parameter> <c:parameter> <c:name>InterfaceData.ProcessLevel</c:name> <c:trigger>PROCESSLEVEL</c:trigger> </c:parameter> <c:parameter> <c:name>InterfaceData.APClerk</c:name> <c:trigger>APCLERK</c:trigger> </c:parameter> <c:parameter> <c:name>InterfaceData.ReturnNumber</c:name> <c:trigger>RETURNNUMBER</c:trigger> </c:parameter> <c:parameter> <c:name>InterfaceData.HighPriority</c:name> <c:trigger>HIGHPRIORITY</c:trigger> </c:parameter> <c:parameter> <c:name>InterfaceData.Description</c:name> <c:trigger>DESCRIPTION</c:trigger> </c:parameter> <c:parameter> <c:name>InterfaceData.FileName</c:name> <c:trigger>FILENAME</c:trigger> </c:parameter> <c:parameter> <c:name>InterfaceData.Source</c:name> <c:trigger>SOURCE</c:trigger> </c:parameter> <c:parameter> <c:name>InterfaceData.ScanDate</c:name> <c:trigger>SCANDATE</c:trigger> </c:parameter> <c:parameter>
Percept i ve Connec to r fo r I n for Lawson AP Invo ice Au tomat ion Ins ta l la t i on and Setup Guide
18
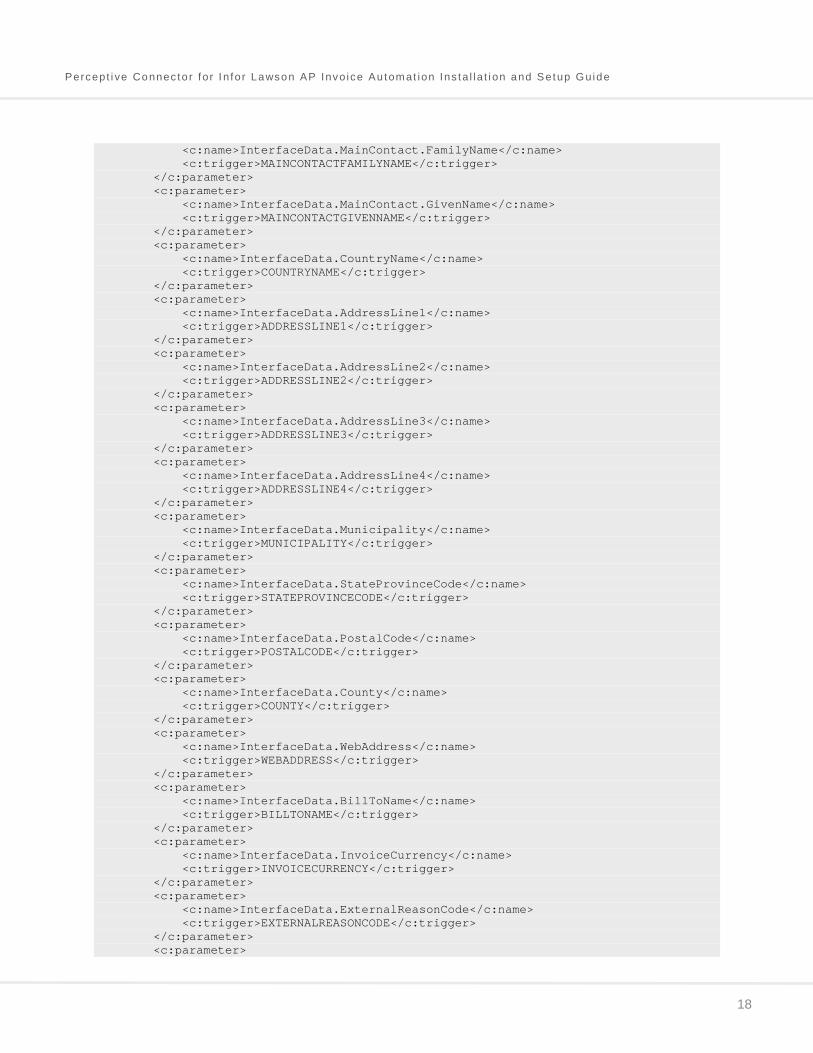
<c:name>InterfaceData.MainContact.FamilyName</c:name> <c:trigger>MAINCONTACTFAMILYNAME</c:trigger> </c:parameter> <c:parameter> <c:name>InterfaceData.MainContact.GivenName</c:name> <c:trigger>MAINCONTACTGIVENNAME</c:trigger> </c:parameter> <c:parameter> <c:name>InterfaceData.CountryName</c:name> <c:trigger>COUNTRYNAME</c:trigger> </c:parameter> <c:parameter> <c:name>InterfaceData.AddressLine1</c:name> <c:trigger>ADDRESSLINE1</c:trigger> </c:parameter> <c:parameter> <c:name>InterfaceData.AddressLine2</c:name> <c:trigger>ADDRESSLINE2</c:trigger> </c:parameter> <c:parameter> <c:name>InterfaceData.AddressLine3</c:name> <c:trigger>ADDRESSLINE3</c:trigger> </c:parameter> <c:parameter> <c:name>InterfaceData.AddressLine4</c:name> <c:trigger>ADDRESSLINE4</c:trigger> </c:parameter> <c:parameter> <c:name>InterfaceData.Municipality</c:name> <c:trigger>MUNICIPALITY</c:trigger> </c:parameter> <c:parameter> <c:name>InterfaceData.StateProvinceCode</c:name> <c:trigger>STATEPROVINCECODE</c:trigger> </c:parameter> <c:parameter> <c:name>InterfaceData.PostalCode</c:name> <c:trigger>POSTALCODE</c:trigger> </c:parameter> <c:parameter> <c:name>InterfaceData.County</c:name> <c:trigger>COUNTY</c:trigger> </c:parameter> <c:parameter> <c:name>InterfaceData.WebAddress</c:name> <c:trigger>WEBADDRESS</c:trigger> </c:parameter> <c:parameter> <c:name>InterfaceData.BillToName</c:name> <c:trigger>BILLTONAME</c:trigger> </c:parameter> <c:parameter> <c:name>InterfaceData.InvoiceCurrency</c:name> <c:trigger>INVOICECURRENCY</c:trigger> </c:parameter> <c:parameter> <c:name>InterfaceData.ExternalReasonCode</c:name> <c:trigger>EXTERNALREASONCODE</c:trigger> </c:parameter> <c:parameter>
Percept i ve Connec to r fo r I n for Lawson AP Invo ice Au tomat ion Ins ta l la t i on and Setup Guide
19
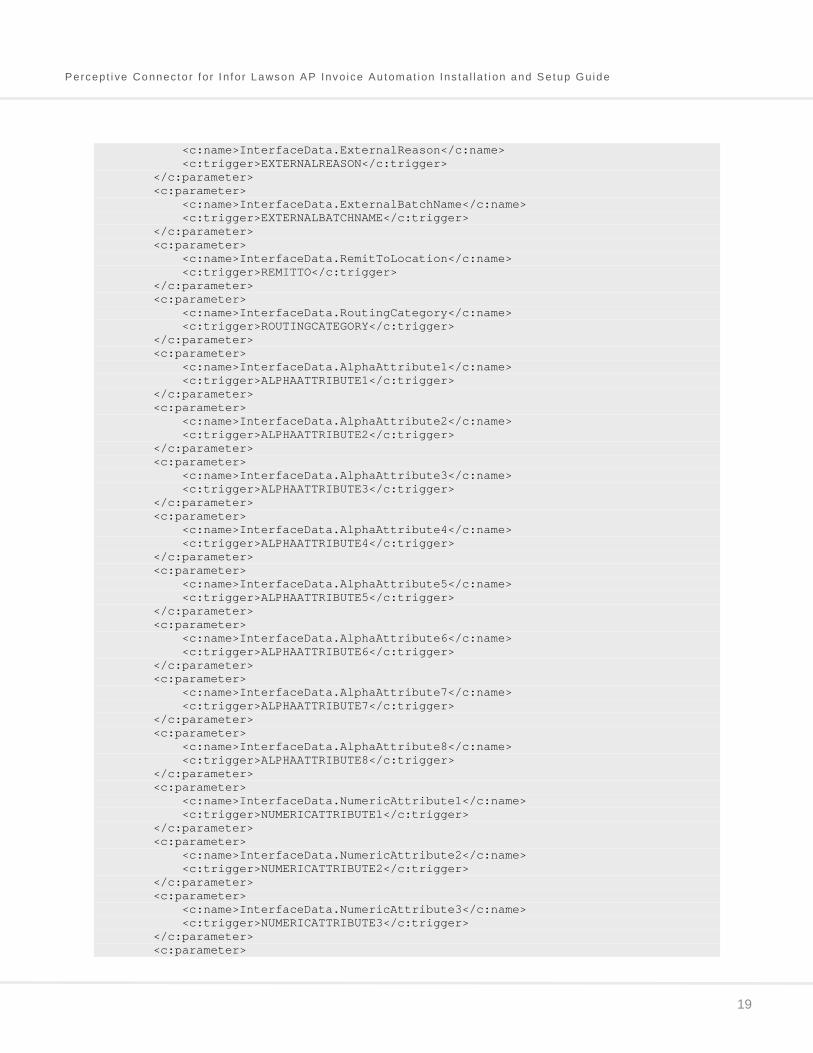
<c:name>InterfaceData.ExternalReason</c:name> <c:trigger>EXTERNALREASON</c:trigger> </c:parameter> <c:parameter> <c:name>InterfaceData.ExternalBatchName</c:name> <c:trigger>EXTERNALBATCHNAME</c:trigger> </c:parameter> <c:parameter> <c:name>InterfaceData.RemitToLocation</c:name> <c:trigger>REMITTO</c:trigger> </c:parameter> <c:parameter> <c:name>InterfaceData.RoutingCategory</c:name> <c:trigger>ROUTINGCATEGORY</c:trigger> </c:parameter> <c:parameter> <c:name>InterfaceData.AlphaAttribute1</c:name> <c:trigger>ALPHAATTRIBUTE1</c:trigger> </c:parameter> <c:parameter> <c:name>InterfaceData.AlphaAttribute2</c:name> <c:trigger>ALPHAATTRIBUTE2</c:trigger> </c:parameter> <c:parameter> <c:name>InterfaceData.AlphaAttribute3</c:name> <c:trigger>ALPHAATTRIBUTE3</c:trigger> </c:parameter> <c:parameter> <c:name>InterfaceData.AlphaAttribute4</c:name> <c:trigger>ALPHAATTRIBUTE4</c:trigger> </c:parameter> <c:parameter> <c:name>InterfaceData.AlphaAttribute5</c:name> <c:trigger>ALPHAATTRIBUTE5</c:trigger> </c:parameter> <c:parameter> <c:name>InterfaceData.AlphaAttribute6</c:name> <c:trigger>ALPHAATTRIBUTE6</c:trigger> </c:parameter> <c:parameter> <c:name>InterfaceData.AlphaAttribute7</c:name> <c:trigger>ALPHAATTRIBUTE7</c:trigger> </c:parameter> <c:parameter> <c:name>InterfaceData.AlphaAttribute8</c:name> <c:trigger>ALPHAATTRIBUTE8</c:trigger> </c:parameter> <c:parameter> <c:name>InterfaceData.NumericAttribute1</c:name> <c:trigger>NUMERICATTRIBUTE1</c:trigger> </c:parameter> <c:parameter> <c:name>InterfaceData.NumericAttribute2</c:name> <c:trigger>NUMERICATTRIBUTE2</c:trigger> </c:parameter> <c:parameter> <c:name>InterfaceData.NumericAttribute3</c:name> <c:trigger>NUMERICATTRIBUTE3</c:trigger> </c:parameter> <c:parameter>
Percept i ve Connec to r fo r I n for Lawson AP Invo ice Au tomat ion Ins ta l la t i on and Setup Guide
20
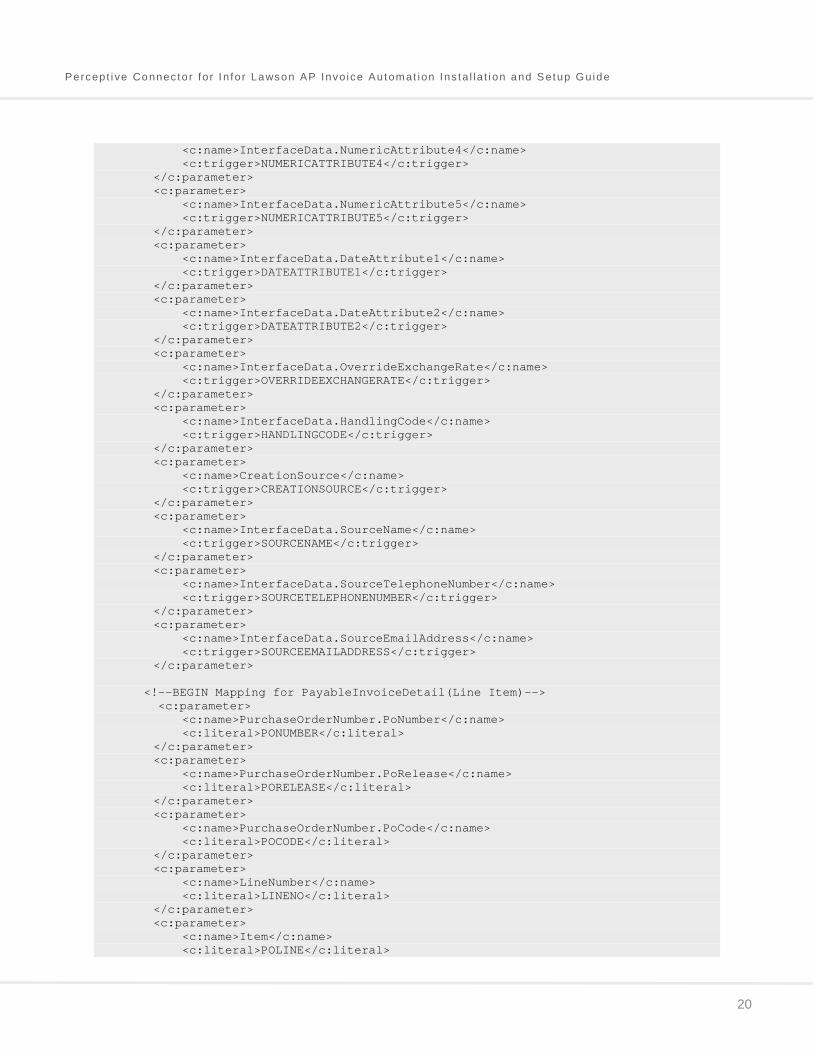
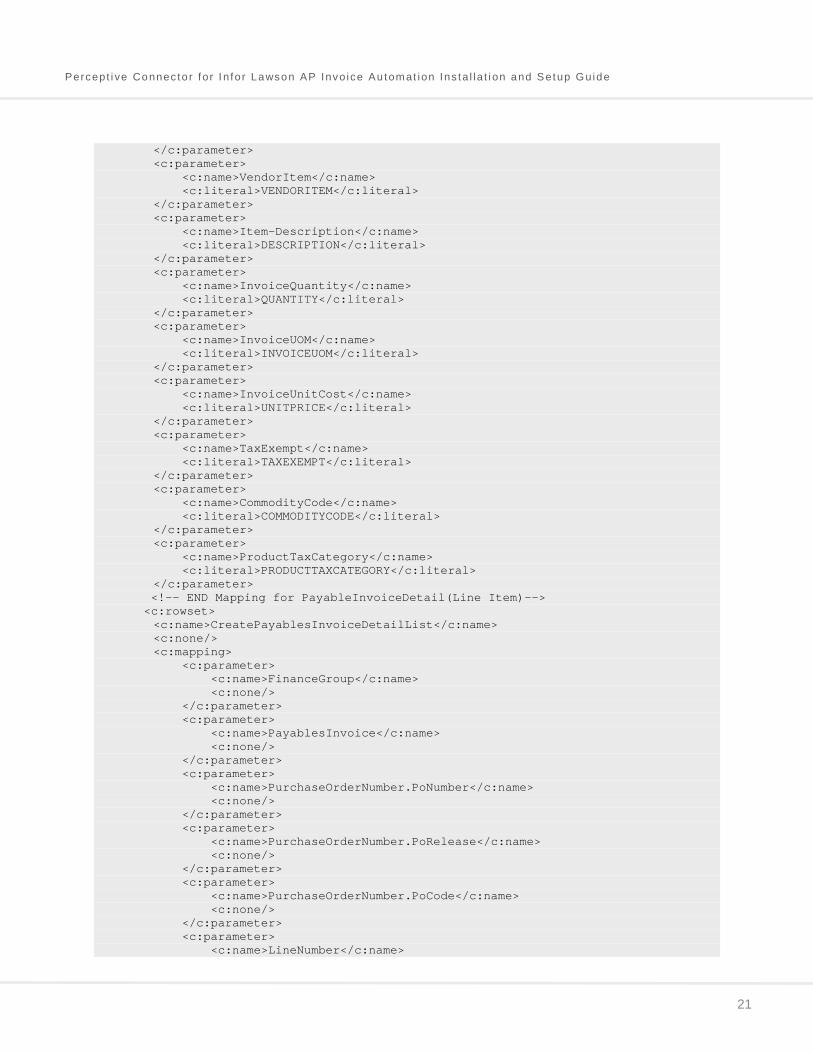
<c:name>InterfaceData.NumericAttribute4</c:name> <c:trigger>NUMERICATTRIBUTE4</c:trigger> </c:parameter> <c:parameter> <c:name>InterfaceData.NumericAttribute5</c:name> <c:trigger>NUMERICATTRIBUTE5</c:trigger> </c:parameter> <c:parameter> <c:name>InterfaceData.DateAttribute1</c:name> <c:trigger>DATEATTRIBUTE1</c:trigger> </c:parameter> <c:parameter> <c:name>InterfaceData.DateAttribute2</c:name> <c:trigger>DATEATTRIBUTE2</c:trigger> </c:parameter> <c:parameter> <c:name>InterfaceData.OverrideExchangeRate</c:name> <c:trigger>OVERRIDEEXCHANGERATE</c:trigger> </c:parameter> <c:parameter> <c:name>InterfaceData.HandlingCode</c:name> <c:trigger>HANDLINGCODE</c:trigger> </c:parameter> <c:parameter> <c:name>CreationSource</c:name> <c:trigger>CREATIONSOURCE</c:trigger> </c:parameter> <c:parameter> <c:name>InterfaceData.SourceName</c:name> <c:trigger>SOURCENAME</c:trigger> </c:parameter> <c:parameter> <c:name>InterfaceData.SourceTelephoneNumber</c:name> <c:trigger>SOURCETELEPHONENUMBER</c:trigger> </c:parameter> <c:parameter> <c:name>InterfaceData.SourceEmailAddress</c:name> <c:trigger>SOURCEEMAILADDRESS</c:trigger> </c:parameter> <!--BEGIN Mapping for PayableInvoiceDetail(Line Item)--> <c:parameter> <c:name>PurchaseOrderNumber.PoNumber</c:name> <c:literal>PONUMBER</c:literal> </c:parameter> <c:parameter> <c:name>PurchaseOrderNumber.PoRelease</c:name> <c:literal>PORELEASE</c:literal> </c:parameter> <c:parameter> <c:name>PurchaseOrderNumber.PoCode</c:name> <c:literal>POCODE</c:literal> </c:parameter> <c:parameter> <c:name>LineNumber</c:name> <c:literal>LINENO</c:literal> </c:parameter> <c:parameter> <c:name>Item</c:name> <c:literal>POLINE</c:literal>
Percept i ve Connec to r fo r I n for Lawson AP Invo ice Au tomat ion Ins ta l la t i on and Setup Guide
21
</c:parameter> <c:parameter> <c:name>VendorItem</c:name> <c:literal>VENDORITEM</c:literal> </c:parameter> <c:parameter> <c:name>Item-Description</c:name> <c:literal>DESCRIPTION</c:literal> </c:parameter> <c:parameter> <c:name>InvoiceQuantity</c:name> <c:literal>QUANTITY</c:literal> </c:parameter> <c:parameter> <c:name>InvoiceUOM</c:name> <c:literal>INVOICEUOM</c:literal> </c:parameter> <c:parameter> <c:name>InvoiceUnitCost</c:name> <c:literal>UNITPRICE</c:literal> </c:parameter> <c:parameter> <c:name>TaxExempt</c:name> <c:literal>TAXEXEMPT</c:literal> </c:parameter> <c:parameter> <c:name>CommodityCode</c:name> <c:literal>COMMODITYCODE</c:literal> </c:parameter> <c:parameter> <c:name>ProductTaxCategory</c:name> <c:literal>PRODUCTTAXCATEGORY</c:literal> </c:parameter> <!-- END Mapping for PayableInvoiceDetail(Line Item)--> <c:rowset> <c:name>CreatePayablesInvoiceDetailList</c:name> <c:none/> <c:mapping> <c:parameter> <c:name>FinanceGroup</c:name> <c:none/> </c:parameter> <c:parameter> <c:name>PayablesInvoice</c:name> <c:none/> </c:parameter> <c:parameter> <c:name>PurchaseOrderNumber.PoNumber</c:name> <c:none/> </c:parameter> <c:parameter> <c:name>PurchaseOrderNumber.PoRelease</c:name> <c:none/> </c:parameter> <c:parameter> <c:name>PurchaseOrderNumber.PoCode</c:name> <c:none/> </c:parameter> <c:parameter> <c:name>LineNumber</c:name>
Percept i ve Connec to r fo r I n for Lawson AP Invo ice Au tomat ion Ins ta l la t i on and Setup Guide
22
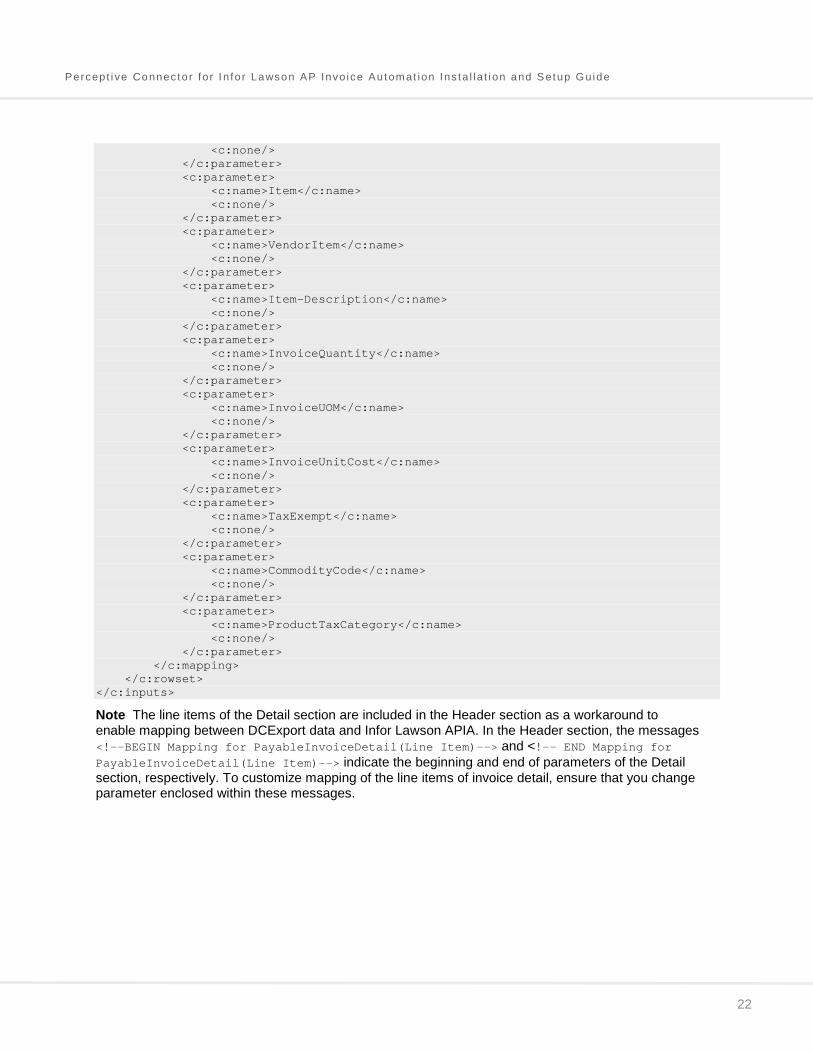
<c:none/> </c:parameter> <c:parameter> <c:name>Item</c:name> <c:none/> </c:parameter> <c:parameter> <c:name>VendorItem</c:name> <c:none/> </c:parameter> <c:parameter> <c:name>Item-Description</c:name> <c:none/> </c:parameter> <c:parameter> <c:name>InvoiceQuantity</c:name> <c:none/> </c:parameter> <c:parameter> <c:name>InvoiceUOM</c:name> <c:none/> </c:parameter> <c:parameter> <c:name>InvoiceUnitCost</c:name> <c:none/> </c:parameter> <c:parameter> <c:name>TaxExempt</c:name> <c:none/> </c:parameter> <c:parameter> <c:name>CommodityCode</c:name> <c:none/> </c:parameter> <c:parameter> <c:name>ProductTaxCategory</c:name> <c:none/> </c:parameter> </c:mapping> </c:rowset> </c:inputs>
Note The line items of the Detail section are included in the Header section as a workaround to enable mapping between DCExport data and Infor Lawson APIA. In the Header section, the messages <!--BEGIN Mapping for PayableInvoiceDetail(Line Item)--> and <!-- END Mapping for PayableInvoiceDetail(Line Item)--> indicate the beginning and end of parameters of the Detail section, respectively. To customize mapping of the line items of invoice detail, ensure that you change parameter enclosed within these messages.
Percept i ve Connec to r fo r I n for Lawson AP Invo ice Au tomat ion Ins ta l la t i on and Setup Guide
23
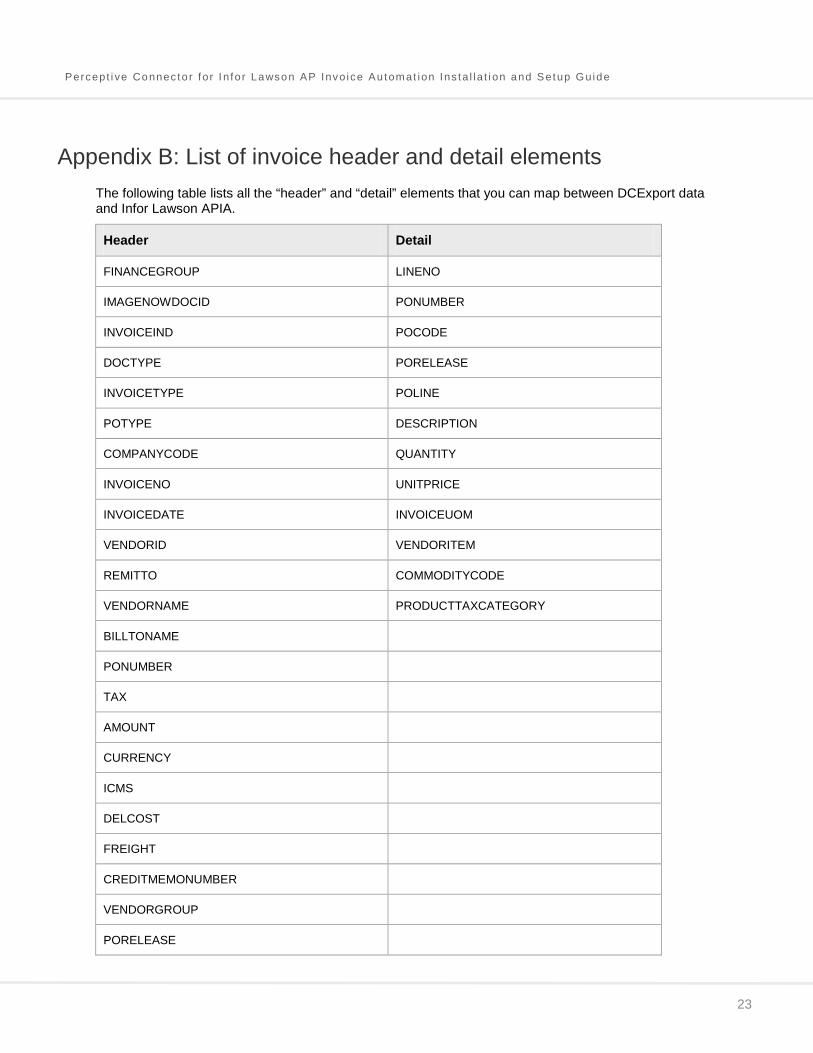
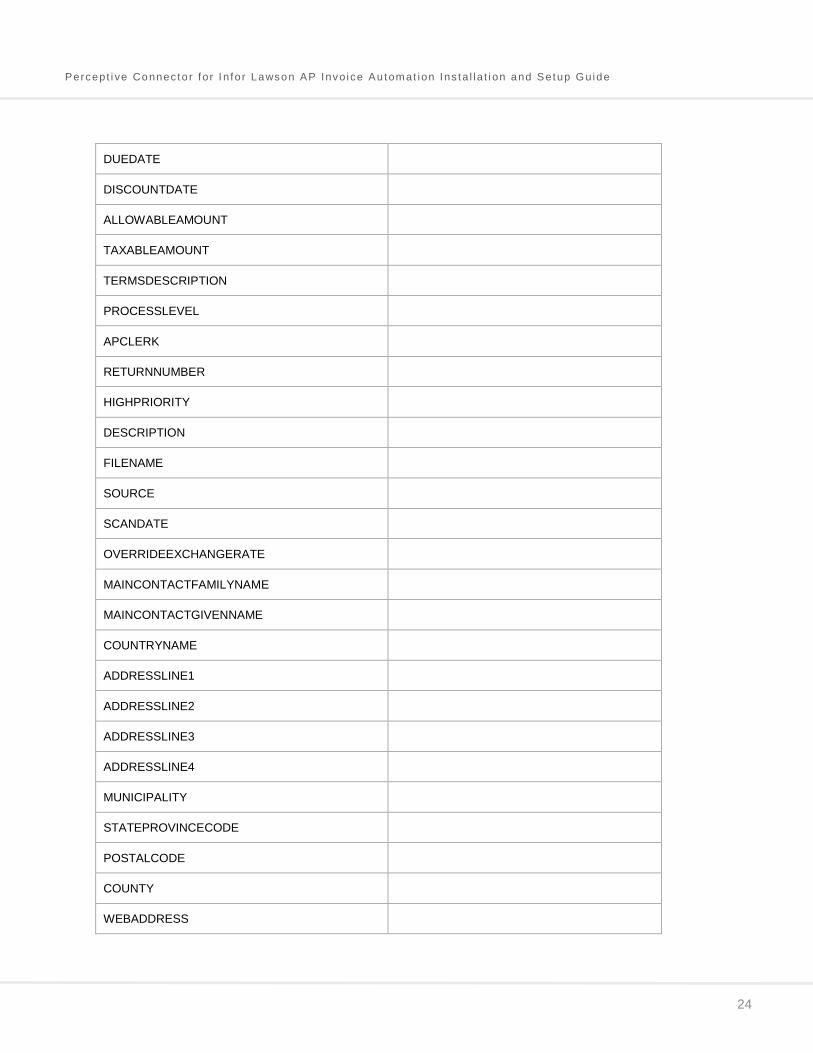
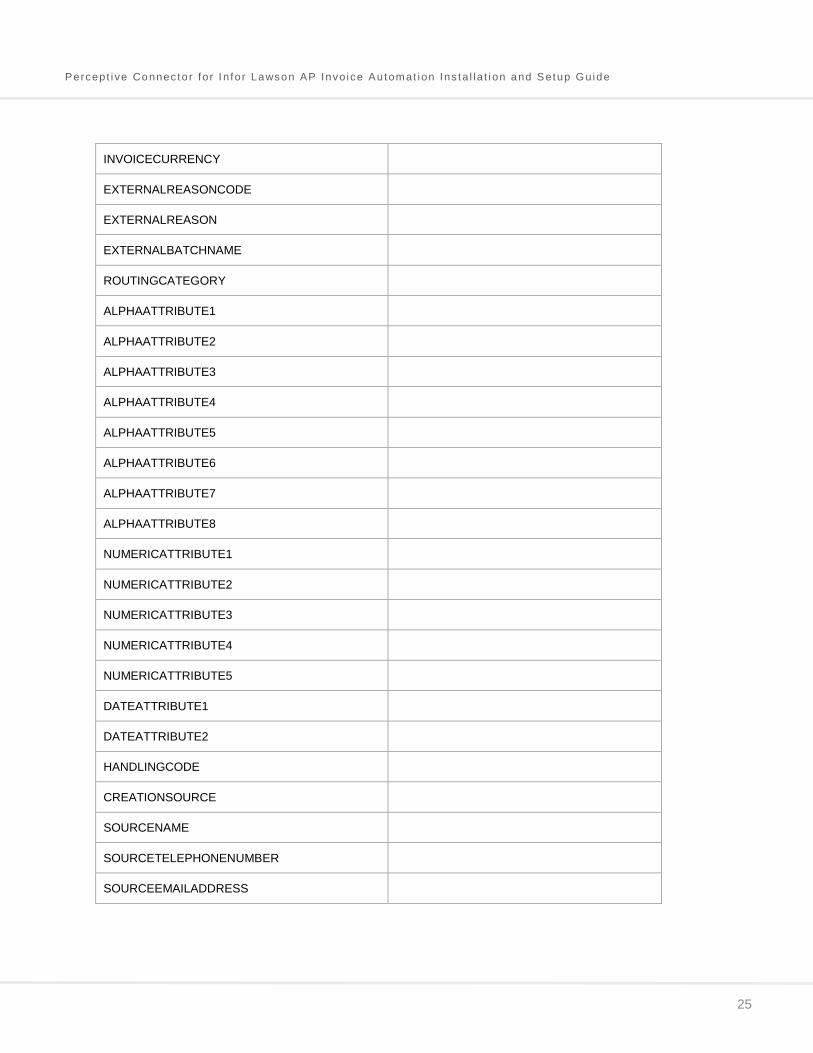
Appendix B: List of invoice header and detail elements The following table lists all the “header” and “detail” elements that you can map between DCExport data and Infor Lawson APIA.
Header Detail
FINANCEGROUP LINENO
IMAGENOWDOCID PONUMBER
INVOICEIND POCODE
DOCTYPE PORELEASE
INVOICETYPE POLINE
POTYPE DESCRIPTION
COMPANYCODE QUANTITY
INVOICENO UNITPRICE
INVOICEDATE INVOICEUOM
VENDORID VENDORITEM
REMITTO COMMODITYCODE
VENDORNAME PRODUCTTAXCATEGORY
BILLTONAME
PONUMBER
TAX
AMOUNT
CURRENCY
ICMS
DELCOST
FREIGHT
CREDITMEMONUMBER
VENDORGROUP
PORELEASE
Percept i ve Connec to r fo r I n for Lawson AP Invo ice Au tomat ion Ins ta l la t i on and Setup Guide
24
DUEDATE
DISCOUNTDATE
ALLOWABLEAMOUNT
TAXABLEAMOUNT
TERMSDESCRIPTION
PROCESSLEVEL
APCLERK
RETURNNUMBER
HIGHPRIORITY
DESCRIPTION
FILENAME
SOURCE
SCANDATE
OVERRIDEEXCHANGERATE
MAINCONTACTFAMILYNAME
MAINCONTACTGIVENNAME
COUNTRYNAME
ADDRESSLINE1
ADDRESSLINE2
ADDRESSLINE3
ADDRESSLINE4
MUNICIPALITY
STATEPROVINCECODE
POSTALCODE
COUNTY
WEBADDRESS
Percept i ve Connec to r fo r I n for Lawson AP Invo ice Au tomat ion Ins ta l la t i on and Setup Guide
25
INVOICECURRENCY
EXTERNALREASONCODE
EXTERNALREASON
EXTERNALBATCHNAME
ROUTINGCATEGORY
ALPHAATTRIBUTE1
ALPHAATTRIBUTE2
ALPHAATTRIBUTE3
ALPHAATTRIBUTE4
ALPHAATTRIBUTE5
ALPHAATTRIBUTE6
ALPHAATTRIBUTE7
ALPHAATTRIBUTE8
NUMERICATTRIBUTE1
NUMERICATTRIBUTE2
NUMERICATTRIBUTE3
NUMERICATTRIBUTE4
NUMERICATTRIBUTE5
DATEATTRIBUTE1
DATEATTRIBUTE2
HANDLINGCODE
CREATIONSOURCE
SOURCENAME
SOURCETELEPHONENUMBER
SOURCEEMAILADDRESS