Embed Size (px)
Citation preview

PeopleSoft v9.2 Accounts Payable Financials Supply Chain Management (FSCM)
Training Guide
Contact Information:
SpearMC Consulting, Inc. 1-866-SPEARMC
[email protected] www.SpearMC.com
© 2014 SpearMC Consulting PeopleSoft v9.2 Accounts Payable Page 2
TABLE OF CONTENTS
PURPOSE ...................................................................................................... 5
CHAPTER 1 - ENTER SUPPLIER INFORMATION ........................................................ 7
Topic 1: Enter Identifying Information ............................................................................................... 7
Topic 2: Enter Address Information ................................................................................................. 12
Topic 3: Enter Location Information ................................................................................................. 13
Topic 4: Enter Contact Information .................................................................................................. 31
CHAPTER 2 – MAINTAIN SUPPLIER INFORMATION................................................. 32
CHAPTER 3 – APPROVE SUPPLIERS .................................................................... 34
CHAPTER 4 – UNDERSTANDING VOUCHERS ......................................................... 35
Topic 1: Overview ............................................................................................................................. 35
Topic 2: Vouchering Configuration Considerations .......................................................................... 36
CHAPTER 5 – ONLINE VOUCHERS ...................................................................... 39
Topic 1: Overview ............................................................................................................................. 39
Topic 2: Entering Online Vouchers ................................................................................................... 40
Topic 3: Payment Terms ................................................................................................................... 43
Topic 4: Withholding Information .................................................................................................... 45
Topic 5: Entering Invoice Lines ......................................................................................................... 45
Topic 6: Entering Payment Information ........................................................................................... 47
Topic 7: Scheduling Payments Manually .......................................................................................... 49
Topic 8: Selecting Voucher Attributes .............................................................................................. 51
Topic 9: Viewing Summary Page ...................................................................................................... 52
CHAPTER 6 – TEMPLATE VOUCHERS .................................................................. 53
Topic 1: Overview ............................................................................................................................. 53
Topic 2: Creating Template Vouchers .............................................................................................. 53
Topic 3: Using Template Vouchers ................................................................................................... 55
CHAPTER 7 – CONTROL GROUPS ...................................................................... 57
Topic 1: Overview ............................................................................................................................. 57
Topic 2: Entering Control Groups ..................................................................................................... 58
Topic 3: Updating Control Group Status .......................................................................................... 64
© 2014 SpearMC Consulting PeopleSoft v9.2 Accounts Payable Page 3
Topic 4: Deleting Control Group Status ............................................................................................ 65
Topic 5: Using Control Groups .......................................................................................................... 67
CHAPTER 8 – POSTING VOUCHERS .................................................................... 68
Topic 1: Overview ............................................................................................................................. 68
Topic 2: Voucher Posting .................................................................................................................. 70
Topic 3: Evaluating Posting Accounting Entries ............................................................................... 72
Topic 4: Viewing Journal Details ....................................................................................................... 72
Topic 5: Unposting Vouchers ............................................................................................................ 73
CHAPTER 9 – PAYMENT PROCESSING ................................................................. 75
Topic 1: Understanding Payments .................................................................................................... 75
Topic 2: Pay Cycles ............................................................................................................................ 76
Topic 3: Creating Pay Cycles ............................................................................................................. 78
Topic 4: Pay Cycle Manager .............................................................................................................. 84
Topic 5: Payment Creation ............................................................................................................... 87
Topic 6: Payment Approval............................................................................................................... 88
Topic 7: Print Checks and Complete Cycle ....................................................................................... 88
Topic 8: Positive Payment ................................................................................................................ 89
Topic 9: Troubleshooting Pay Cycles ................................................................................................ 90
Topic 10: Resetting and Restarting Pay Cycles ............................................................................... 91
Topic 11: Payment Posting.............................................................................................................. 92
Topic 12: Cancelling Payments ....................................................................................................... 94
CHAPTER 10 – MANUAL CHECKS ...................................................................... 96
CHAPTER 11 – EXPRESS CHECKS ....................................................................... 99
CHAPTER 12 – EDI VOUCHER LOAD ................................................................ 101
Topic 1: EDI Overview ..................................................................................................................... 101
Topic 2: Inbound EDI Voucher Mapping ......................................................................................... 102
Topic 3: Inbound EC Agent ............................................................................................................. 103
Topic 4: Voucher Build .................................................................................................................... 104
CHAPTER 13 – JOURNAL GENERATOR .............................................................. 109
Topic 1: Overview of PeopleSoft AP to PeopleSoft GL Interface ................................................... 109
Topic 2: Evaluating Posting Accounting Entries ............................................................................. 109
Topic 3: Journal Generator Configuration ...................................................................................... 110
© 2014 SpearMC Consulting PeopleSoft v9.2 Accounts Payable Page 4
Topic 4: Journal Generator Processing ........................................................................................... 113
Topic 5: GL Inquiry on AP Data ....................................................................................................... 116
CHAPTER 14 – MATCHING ............................................................................ 118
Topic 1: Overview ........................................................................................................................... 118
Topic 2: Matching Configuration .................................................................................................... 119
CHAPTER 15– BANK RECONCILIATION ............................................................. 122
Topic 1: Overview Example ............................................................................................................ 122
Topic 2: Bank Reconciliation - Configuration ................................................................................. 123
CHAPTER 16– 1099 WITHHOLDING ................................................................ 124
Topic 1: Supplier Setup ................................................................................................................... 124
Topic 2: Post Withholdings ............................................................................................................. 125
Topic 3: Withholding Mismatch ..................................................................................................... 125
Topic 4: Withholding Adjustments ................................................................................................. 126
Topic 5: Update Supplier Withholding ........................................................................................... 127
Topic 6: Update Withholdings ........................................................................................................ 129
Topic 7: Year End Processing .......................................................................................................... 129
Topic 8: Inquiries ............................................................................................................................ 134
APPENDIX 1– PEOPLESOFT SUPPLIER TABLES ..................................................... 136
APPENDIX 2– AP VOUCHER FLOW .................................................................. 137
© 2014 SpearMC Consulting PeopleSoft v9.2 Accounts Payable Page 5
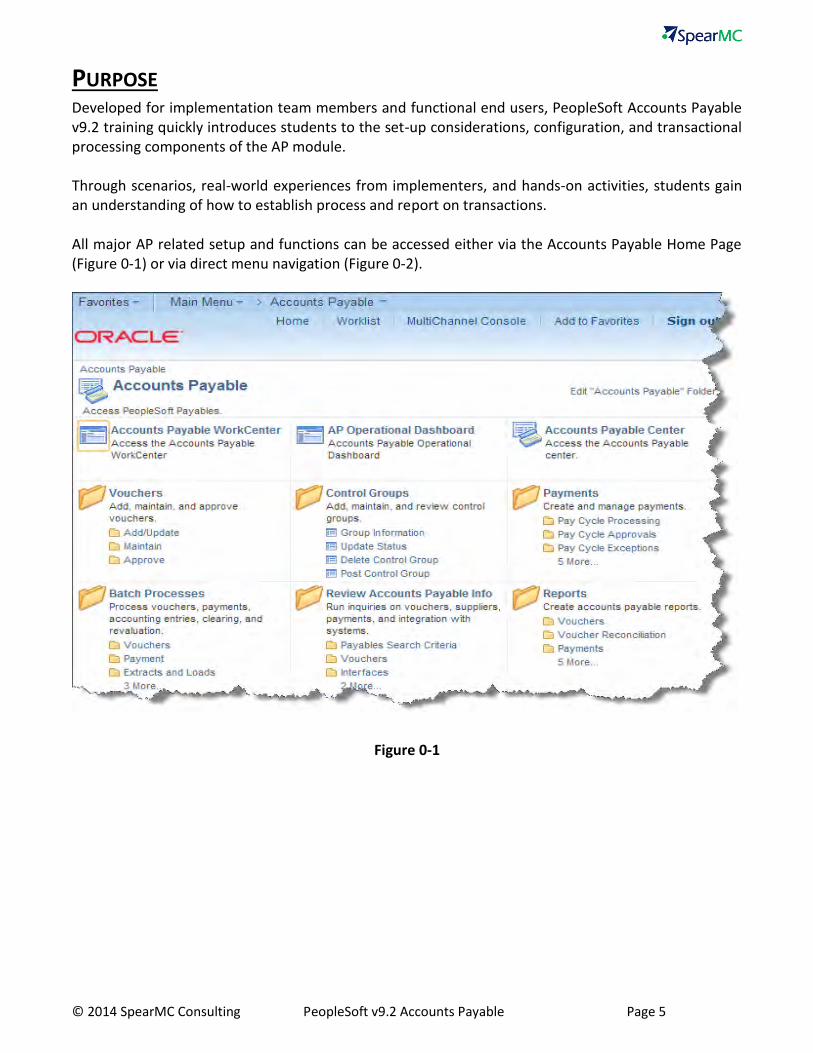
PURPOSE Developed for implementation team members and functional end users, PeopleSoft Accounts Payable v9.2 training quickly introduces students to the set-up considerations, configuration, and transactional processing components of the AP module. Through scenarios, real-world experiences from implementers, and hands-on activities, students gain an understanding of how to establish process and report on transactions. All major AP related setup and functions can be accessed either via the Accounts Payable Home Page (Figure 0-1) or via direct menu navigation (Figure 0-2).
Figure 0-1
© 2014 SpearMC Consulting PeopleSoft v9.2 Accounts Payable Page 6
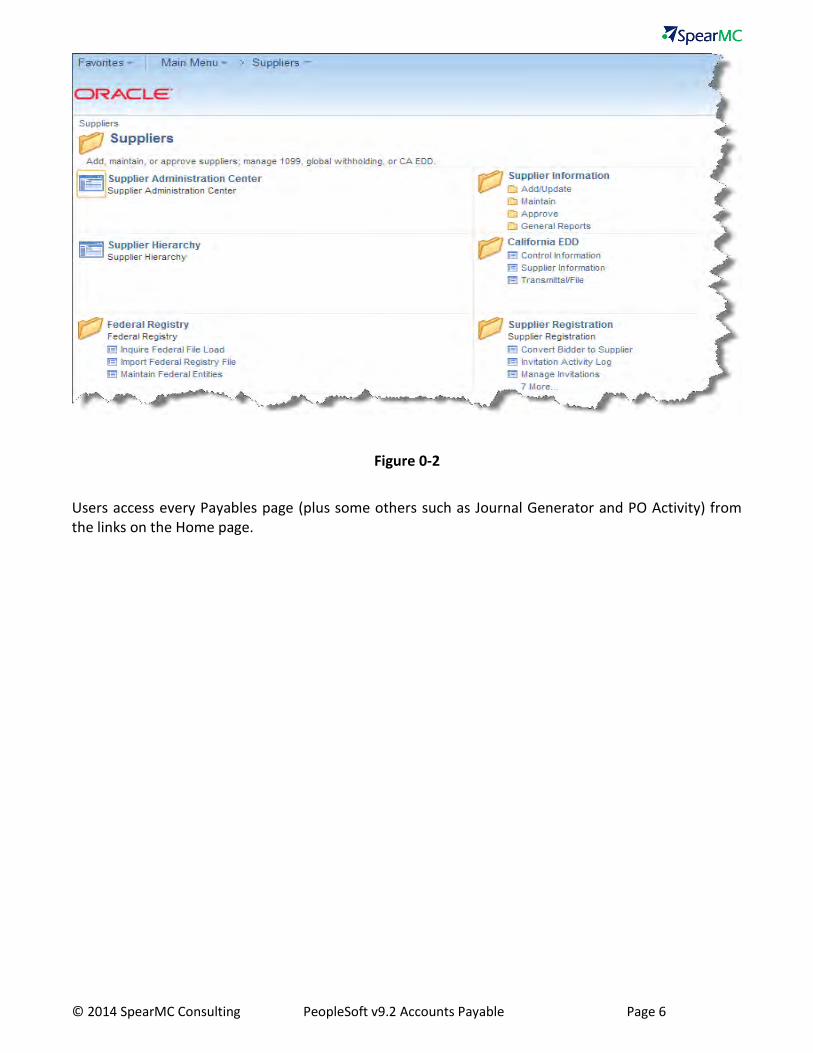
Figure 0-2
Users access every Payables page (plus some others such as Journal Generator and PO Activity) from the links on the Home page.
© 2014 SpearMC Consulting PeopleSoft v9.2 Accounts Payable Page 7
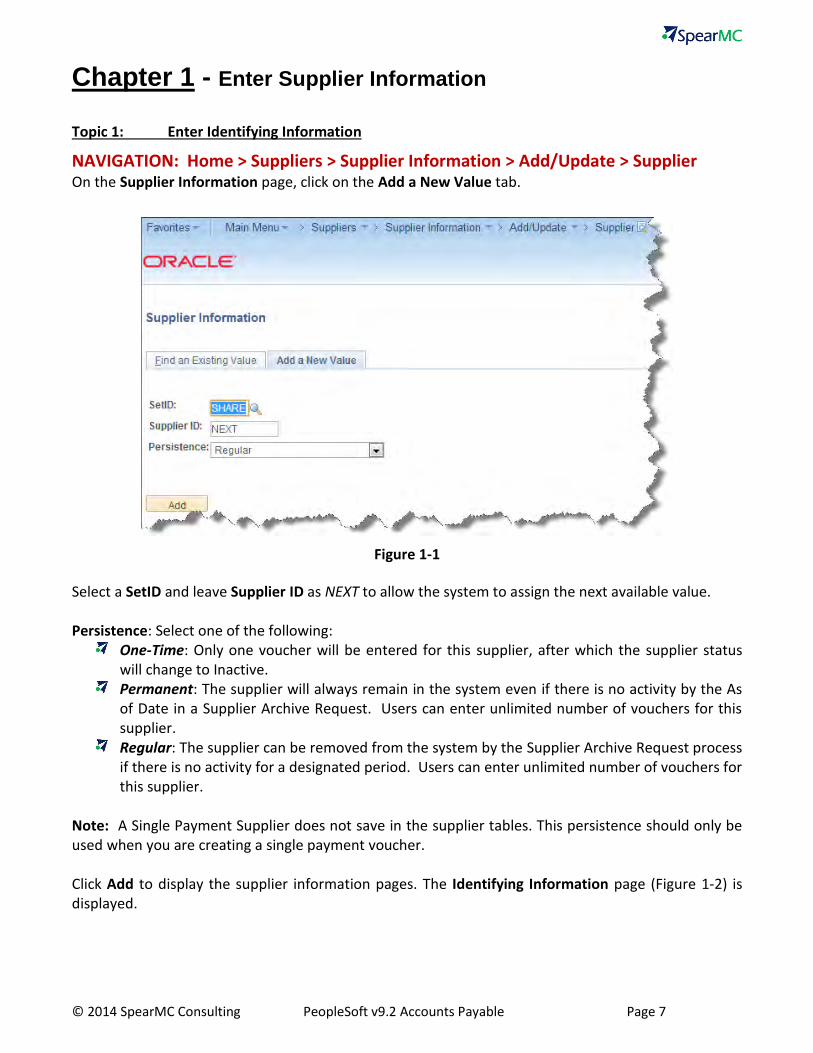
Chapter 1 - Enter Supplier Information
Topic 1: Enter Identifying Information
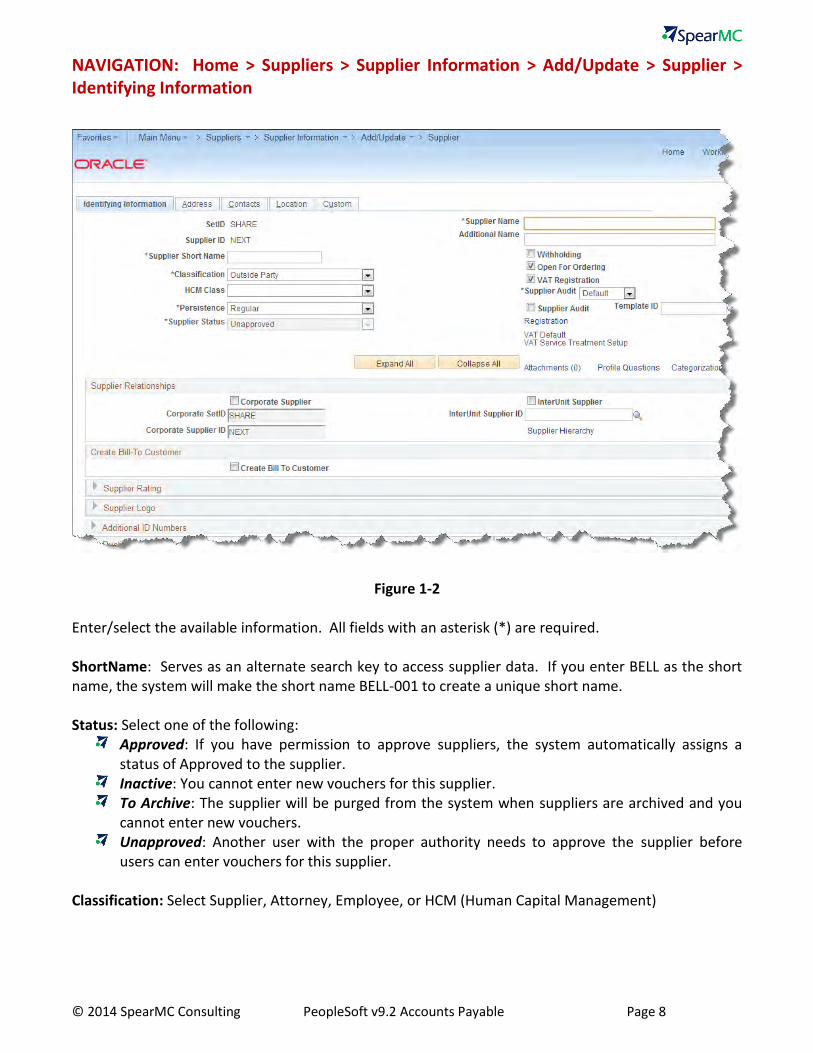
NAVIGATION: Home > Suppliers > Supplier Information > Add/Update > Supplier On the Supplier Information page, click on the Add a New Value tab.
Figure 1-1
Select a SetID and leave Supplier ID as NEXT to allow the system to assign the next available value. Persistence: Select one of the following:
One-Time: Only one voucher will be entered for this supplier, after which the supplier status will change to Inactive.
Permanent: The supplier will always remain in the system even if there is no activity by the As of Date in a Supplier Archive Request. Users can enter unlimited number of vouchers for this supplier.
Regular: The supplier can be removed from the system by the Supplier Archive Request process if there is no activity for a designated period. Users can enter unlimited number of vouchers for this supplier.
Note: A Single Payment Supplier does not save in the supplier tables. This persistence should only be used when you are creating a single payment voucher. Click Add to display the supplier information pages. The Identifying Information page (Figure 1-2) is displayed.
© 2014 SpearMC Consulting PeopleSoft v9.2 Accounts Payable Page 8
NAVIGATION: Home > Suppliers > Supplier Information > Add/Update > Supplier > Identifying Information
Figure 1-2
Enter/select the available information. All fields with an asterisk (*) are required. ShortName: Serves as an alternate search key to access supplier data. If you enter BELL as the short name, the system will make the short name BELL-001 to create a unique short name. Status: Select one of the following:
Approved: If you have permission to approve suppliers, the system automatically assigns a status of Approved to the supplier.
Inactive: You cannot enter new vouchers for this supplier. To Archive: The supplier will be purged from the system when suppliers are archived and you
cannot enter new vouchers. Unapproved: Another user with the proper authority needs to approve the supplier before
users can enter vouchers for this supplier. Classification: Select Supplier, Attorney, Employee, or HCM (Human Capital Management)
© 2014 SpearMC Consulting PeopleSoft v9.2 Accounts Payable Page 9
HR Class: Only required if you select HCM as the classification for this supplier. Select one of the following:
Garn Pay: Garnishment Payee Gen Deduct: General Deductions Gen Prov: General Provider Ins Prov: Insurance Provider Nat’l Prov: National Provider Part Prov: Partner Provider Tax Col: Tax Collector
Withholding: If you will be entering withholding or 1099 information for this supplier, select this checkbox. This must be selected to report 1099 information for this supplier. Open for Ordering: Select to designate the supplier open for purchasing goods and services. If this field is unchecked, users will be unable to enter purchase orders for this supplier.
Corporate Supplier ID: Select to associate the supplier that you are creating with a corporate supplier. Select a corporate supplier ID.
InterUnit Supplier: Select to identify this supplier as an InterUnit supplier. Specify the business unit that represents this supplier and select an InterUnit supplier ID. Create Bill To Customer: Select this checkbox if you want the system to automatically create a bill to customer using the supplier information upon saving the supplier.
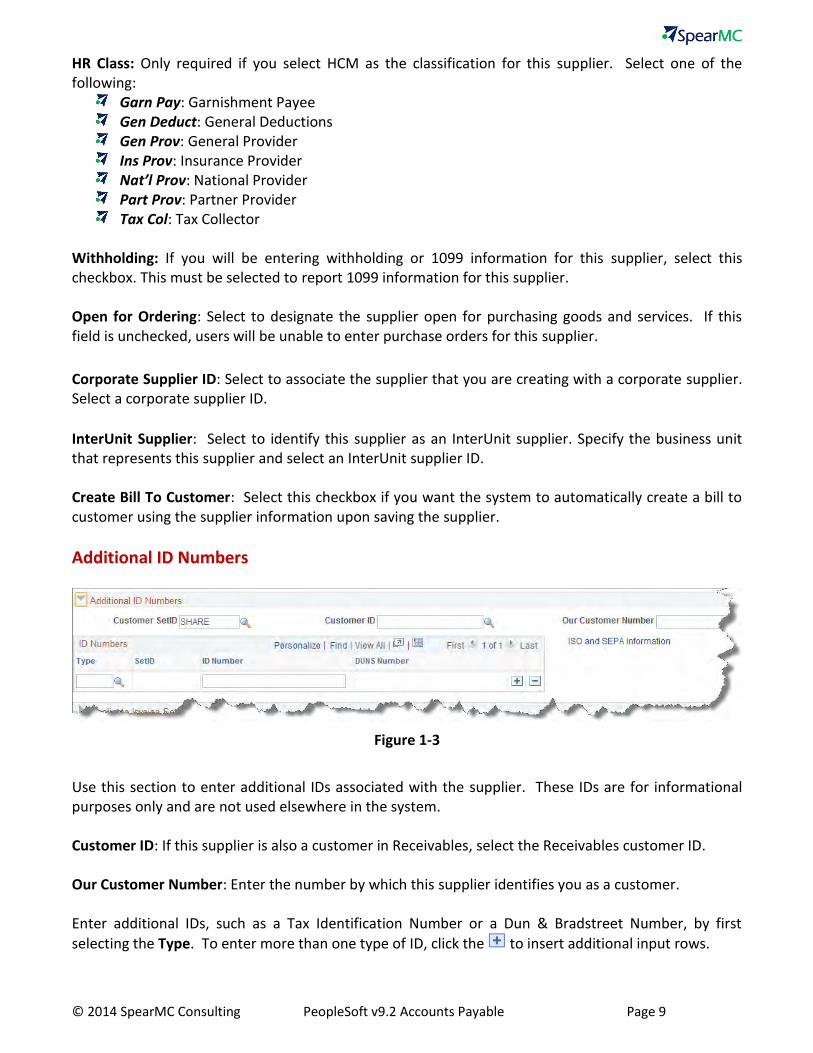
Additional ID Numbers
Figure 1-3
Use this section to enter additional IDs associated with the supplier. These IDs are for informational purposes only and are not used elsewhere in the system. Customer ID: If this supplier is also a customer in Receivables, select the Receivables customer ID. Our Customer Number: Enter the number by which this supplier identifies you as a customer. Enter additional IDs, such as a Tax Identification Number or a Dun & Bradstreet Number, by first
selecting the Type. To enter more than one type of ID, click the to insert additional input rows.
© 2014 SpearMC Consulting PeopleSoft v9.2 Accounts Payable Page 10
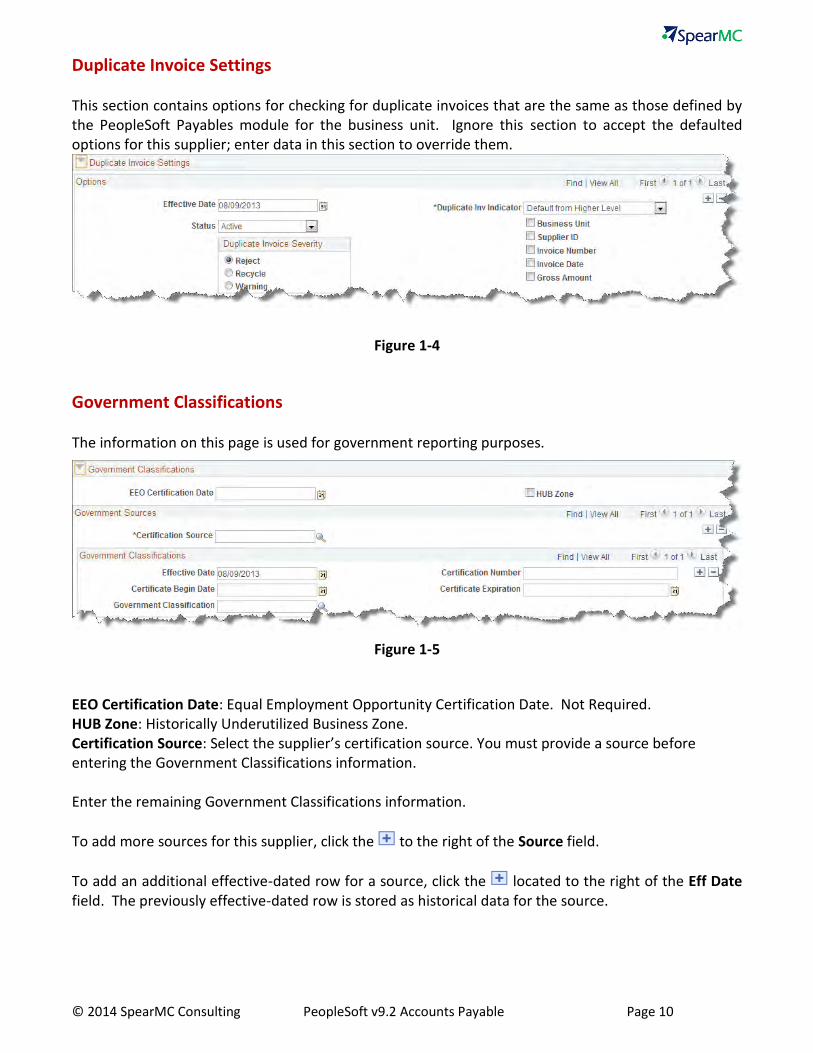
Duplicate Invoice Settings This section contains options for checking for duplicate invoices that are the same as those defined by the PeopleSoft Payables module for the business unit. Ignore this section to accept the defaulted options for this supplier; enter data in this section to override them.
Figure 1-4
Government Classifications The information on this page is used for government reporting purposes.
Figure 1-5
EEO Certification Date: Equal Employment Opportunity Certification Date. Not Required. HUB Zone: Historically Underutilized Business Zone. Certification Source: Select the supplier’s certification source. You must provide a source before entering the Government Classifications information. Enter the remaining Government Classifications information.
To add more sources for this supplier, click the to the right of the Source field.
To add an additional effective-dated row for a source, click the located to the right of the Eff Date field. The previously effective-dated row is stored as historical data for the source.
© 2014 SpearMC Consulting PeopleSoft v9.2 Accounts Payable Page 11
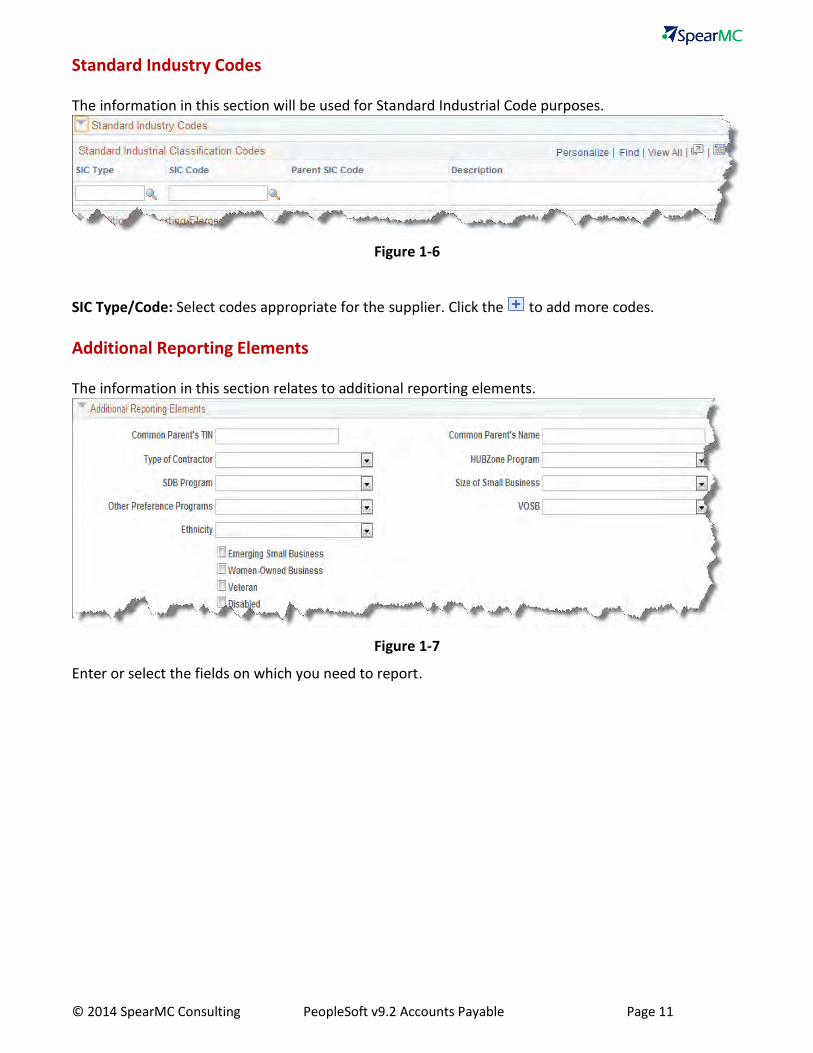
Standard Industry Codes The information in this section will be used for Standard Industrial Code purposes.
Figure 1-6
SIC Type/Code: Select codes appropriate for the supplier. Click the to add more codes.
Additional Reporting Elements The information in this section relates to additional reporting elements.
Figure 1-7
Enter or select the fields on which you need to report.
© 2014 SpearMC Consulting PeopleSoft v9.2 Accounts Payable Page 12
Topic 2: Enter Address Information
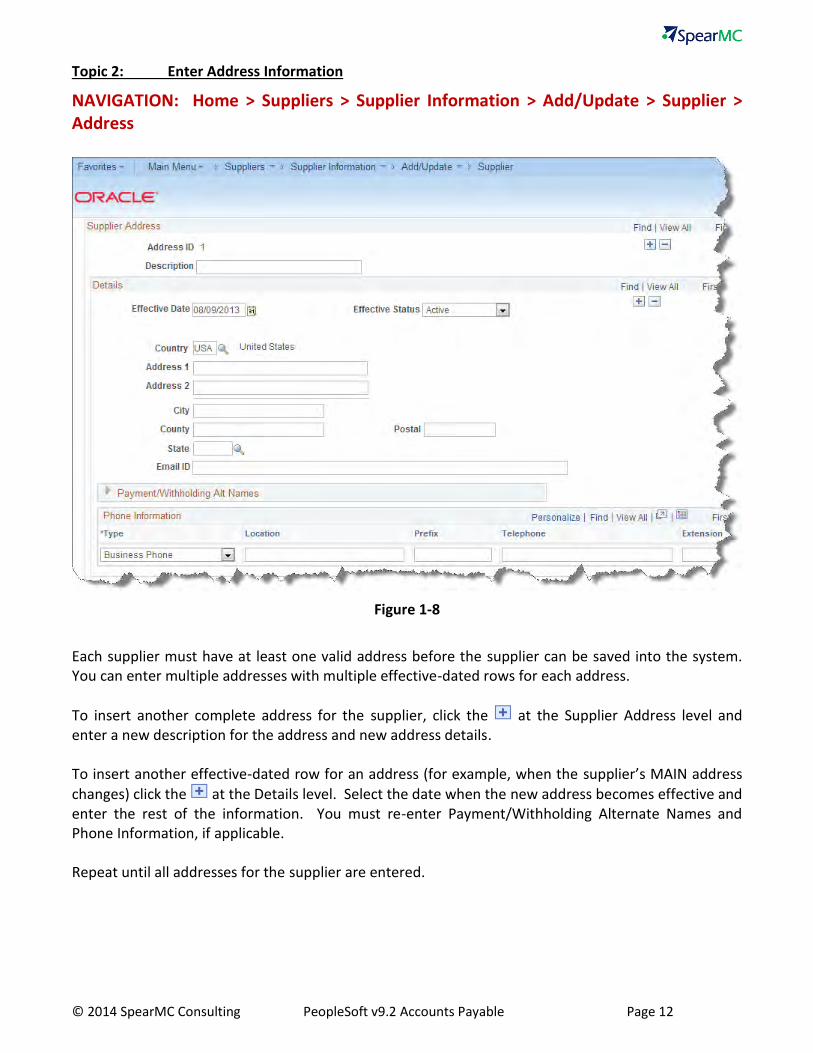
NAVIGATION: Home > Suppliers > Supplier Information > Add/Update > Supplier > Address
Figure 1-8
Each supplier must have at least one valid address before the supplier can be saved into the system. You can enter multiple addresses with multiple effective-dated rows for each address.
To insert another complete address for the supplier, click the at the Supplier Address level and enter a new description for the address and new address details. To insert another effective-dated row for an address (for example, when the supplier’s MAIN address
changes) click the at the Details level. Select the date when the new address becomes effective and enter the rest of the information. You must re-enter Payment/Withholding Alternate Names and Phone Information, if applicable. Repeat until all addresses for the supplier are entered.
© 2014 SpearMC Consulting PeopleSoft v9.2 Accounts Payable Page 13
A valid address in USA or CAN must consist of Address1, City, and State/Province. Addresses in other countries require Address1 and a City. If you leave Address1 blank, but enter information in the Address2 line, the address is still considered incomplete.
Descr: Enter a description for the address (i.e. MAIN, ORDERING, RETURNING, etc.) and select an Addr Type for this address. Email ID: This is the address that used when you dispatch via email PeopleSoft Purchasing (for purchase orders, RFQs, etc). Separate multiple addresses with a semicolon. Phone Information: Select a Phone Type and enter the telephone number that applies to this address and phone type. Note that the Prefix field is for international prefixes only. Enter the entire 10 digit
phone number in the Telephone field. Phone Types may not be duplicated. Click the to add more telephone numbers.
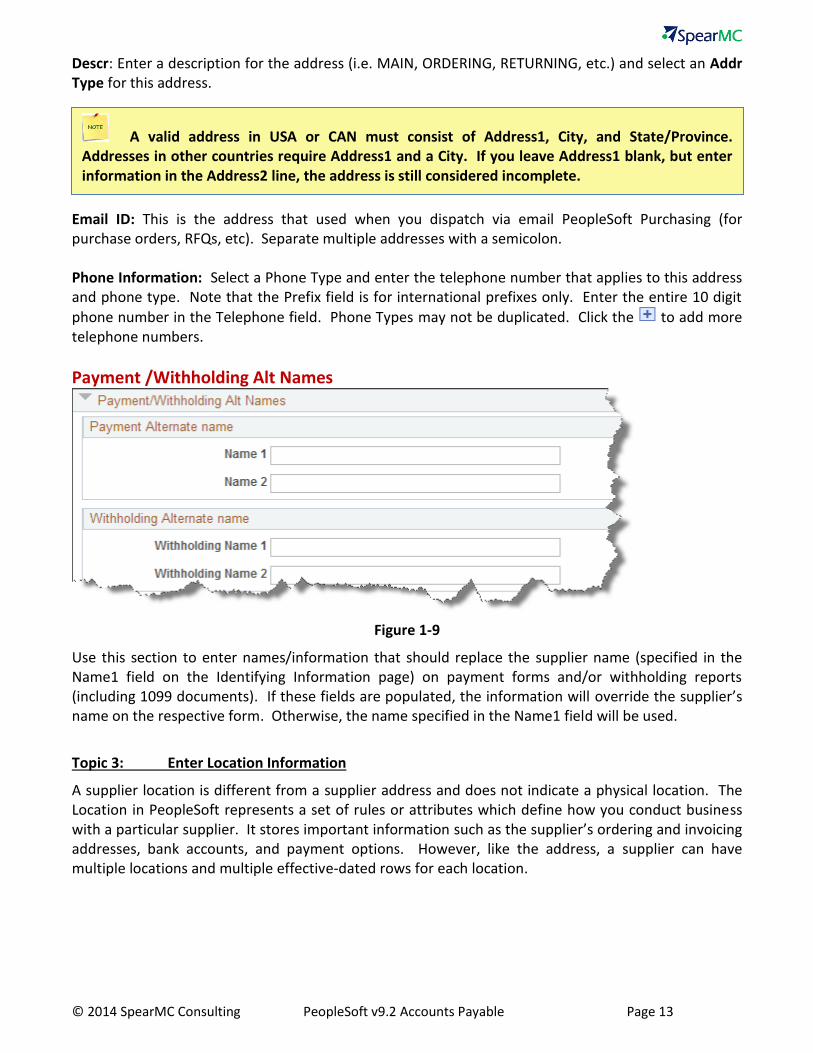
Payment /Withholding Alt Names
Figure 1-9
Use this section to enter names/information that should replace the supplier name (specified in the Name1 field on the Identifying Information page) on payment forms and/or withholding reports (including 1099 documents). If these fields are populated, the information will override the supplier’s name on the respective form. Otherwise, the name specified in the Name1 field will be used.
Topic 3: Enter Location Information
A supplier location is different from a supplier address and does not indicate a physical location. The Location in PeopleSoft represents a set of rules or attributes which define how you conduct business with a particular supplier. It stores important information such as the supplier’s ordering and invoicing addresses, bank accounts, and payment options. However, like the address, a supplier can have multiple locations and multiple effective-dated rows for each location.
© 2014 SpearMC Consulting PeopleSoft v9.2 Accounts Payable Page 14
Overview
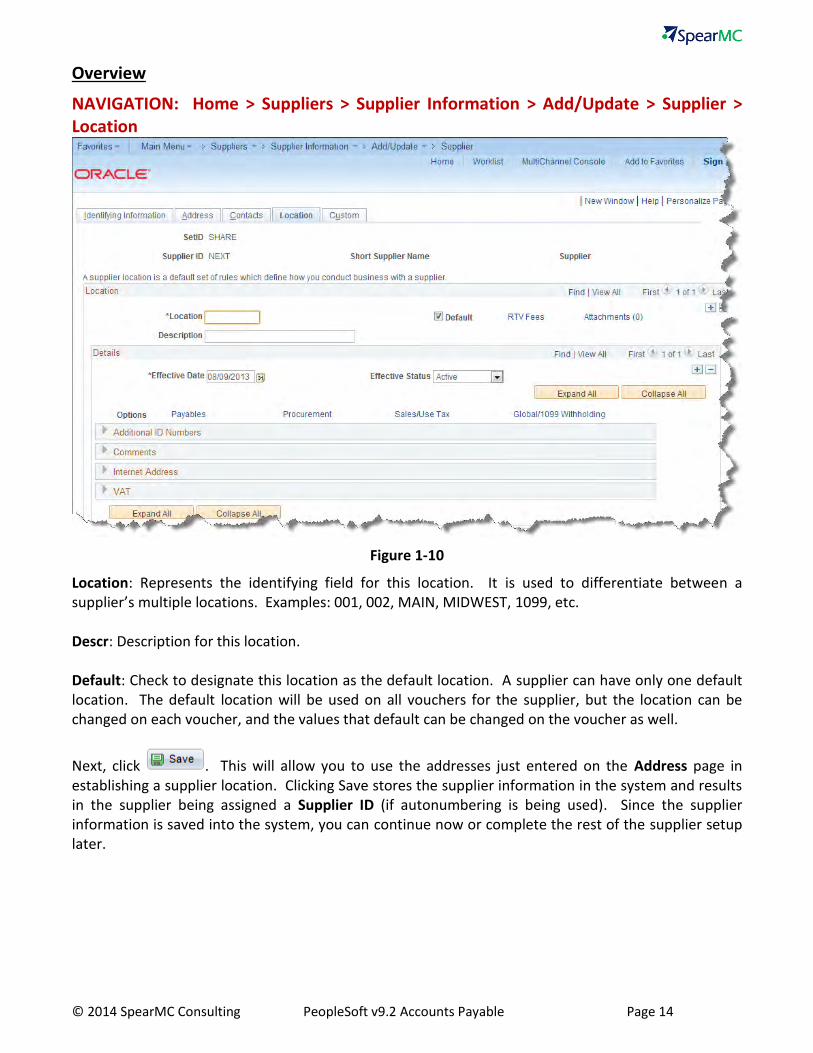
NAVIGATION: Home > Suppliers > Supplier Information > Add/Update > Supplier > Location
Figure 1-10
Location: Represents the identifying field for this location. It is used to differentiate between a supplier’s multiple locations. Examples: 001, 002, MAIN, MIDWEST, 1099, etc. Descr: Description for this location. Default: Check to designate this location as the default location. A supplier can have only one default location. The default location will be used on all vouchers for the supplier, but the location can be changed on each voucher, and the values that default can be changed on the voucher as well.
Next, click . This will allow you to use the addresses just entered on the Address page in establishing a supplier location. Clicking Save stores the supplier information in the system and results in the supplier being assigned a Supplier ID (if autonumbering is being used). Since the supplier information is saved into the system, you can continue now or complete the rest of the supplier setup later.

© 2014 SpearMC Consulting PeopleSoft v9.2 Accounts Payable Page 15
If you choose to continue later, record the Supplier ID and/or ShortName, and follow these 5 steps to return to this spot when ready:
Navigate to: Suppliers > Supplier Setup/Maintenance > Supplier Information On the Find an Existing Value tab, enter the Supplier ID or ShortName Check the Correct History box (if you need to override the existing effective-dated information) Click Search Click on the Location tab
Eff Date: Effective date for the location must be the same as or after the effective date for an address in order for the address to be used in the location.
Additional Information
Figure 1-11
Enter ID numbers that are different that the ones entered on the Identifying Information page.
Comments
Figure 1-12
Enter comments about the supplier.
© 2014 SpearMC Consulting PeopleSoft v9.2 Accounts Payable Page 16
Internet Address
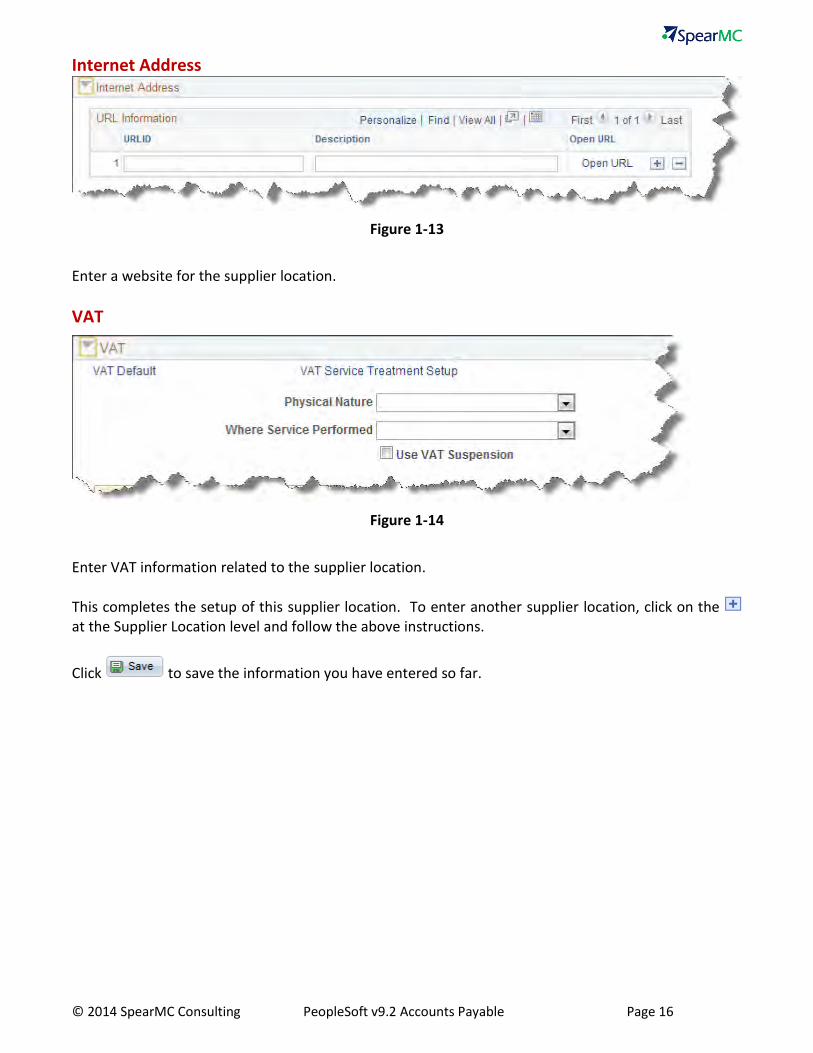
Figure 1-13
Enter a website for the supplier location.
VAT
Figure 1-14
Enter VAT information related to the supplier location.
This completes the setup of this supplier location. To enter another supplier location, click on the at the Supplier Location level and follow the above instructions.
Click to save the information you have entered so far.
© 2014 SpearMC Consulting PeopleSoft v9.2 Accounts Payable Page 17
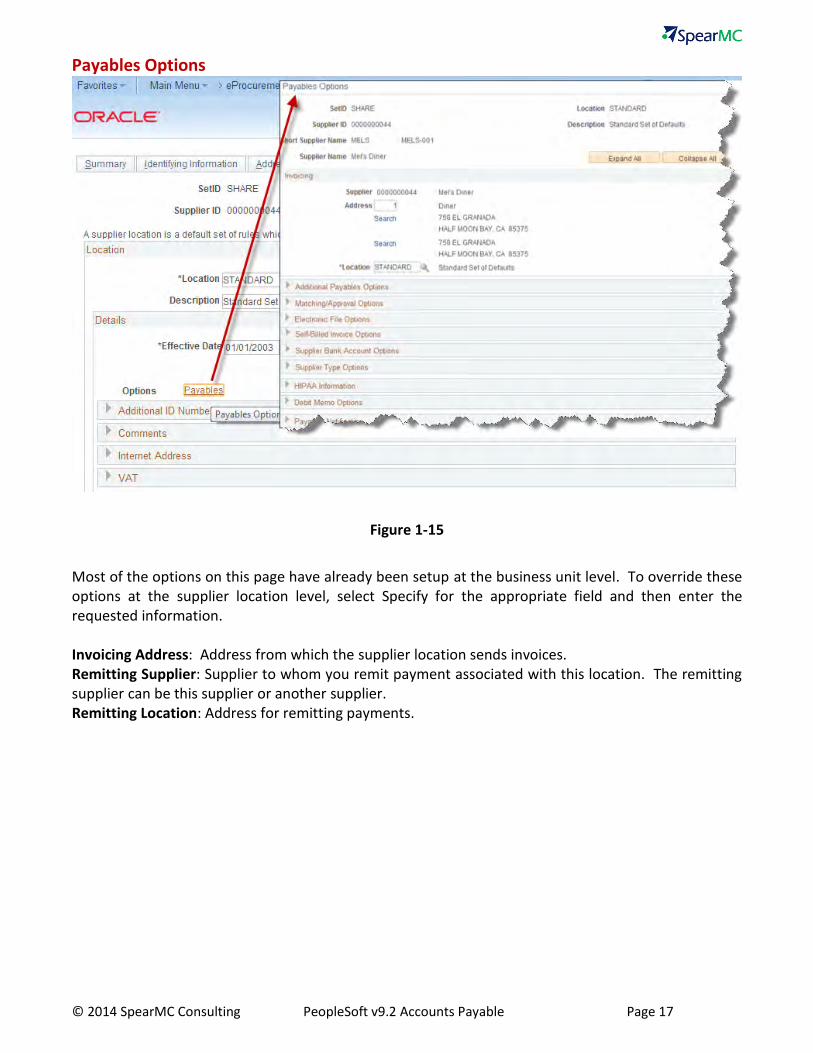
Payables Options
Figure 1-15
Most of the options on this page have already been setup at the business unit level. To override these options at the supplier location level, select Specify for the appropriate field and then enter the requested information. Invoicing Address: Address from which the supplier location sends invoices. Remitting Supplier: Supplier to whom you remit payment associated with this location. The remitting supplier can be this supplier or another supplier. Remitting Location: Address for remitting payments.