Embed Size (px)
Citation preview

PeopleSoft User Guide: PeopleSoft Tips
Updated 3/2019 Ctrl+Home to Table of Contents Page 1 of 30
PEOPLESOFT TIPS
TABLE OF CONTENTS
Overview ............................................................................................................ 3
The UVM Portal page (MyUVM) .......................................................................... 3
Navigate PeopleSoft ........................................................................................... 3
Main Menu in PeopleSoft ........................................................................................................ 3
Sort the Main Menu ................................................................................................................ 4
Cascading Menu ...................................................................................................................... 6
Breadcrumb Trail Menu .......................................................................................................... 7
Search ...................................................................................................................................... 7
Searches: Maximum Number of Rows .................................................................................... 9
Processing Indicator ................................................................................................................ 9
Navigation Personalizations .............................................................................. 10
Changing Navigation Personalizations .................................................................................. 10
Favorites in PeopleSoft ..................................................................................... 11
Add to Favorites .................................................................................................................... 11
Edit Favorites ......................................................................................................................... 13
Recently Used ........................................................................................................................ 14
My Favorite Queries .............................................................................................................. 15
Link from Financials to Human Resources ............................................................................ 16
PeopleTools ...................................................................................................... 16
Process Monitor .................................................................................................................... 16
Process Monitor Process List ................................................................................................. 17
Report Manager .................................................................................................................... 18
Auto Row Highlighting ........................................................................................................... 20
Lookup Fields: Pop-Up Functions .......................................................................................... 20
Lookup Fields: AutoComplete ............................................................................................... 20

PeopleSoft User Guide: PeopleSoft Tips
Updated 3/2019 Ctrl+Home to Table of Contents Page 2 of 30
Turn off Autocomplete .......................................................................................................... 21
Save Warning Pop-Up Window ............................................................................................. 22
Browser Errors .................................................................................................. 22
Print Screen Capabilities ................................................................................... 22
Mozilla Firefox browser users ............................................................................................... 22
Internet Explorer browser users ........................................................................................... 23
PeopleSoft Human Resources Tips .................................................................... 23
Email Reports ......................................................................................................................... 23
Customizing Manager Search Options .................................................................................. 24
PeopleSoft Financials Tips ................................................................................. 26
Personalize Grids ................................................................................................................... 26
Search for Transactions ......................................................................................................... 28
Accounting Tags ..................................................................................................................... 29
Resources/Help ................................................................................................ 29
Help ........................................................................................................................................ 29
Training .................................................................................................................................. 30
Relevant UVM Departments ................................................................................................. 30
Suggestions? Updates? .......................................................................................................... 30
PeopleSoft User Guide: PeopleSoft Tips
Updated 3/2019 Ctrl+Home to Table of Contents Page 3 of 30
Overview
This document highlights tips for navigating and working more efficiently in PeopleSoft. Most of the tips and tricks in this document apply to both the Human Resources (HR) and Financial (Financials) systems, with the exception of Journal Tips, which is specific to PeopleSoft Financials.
The UVM Portal page (MyUVM)
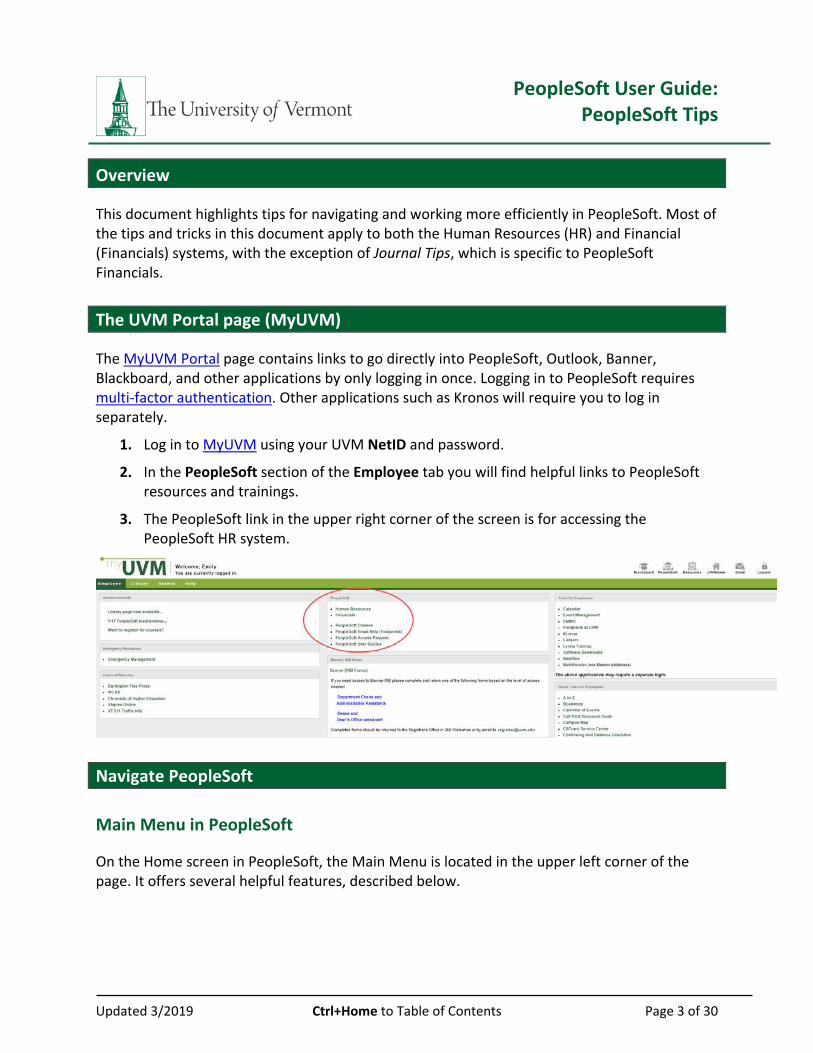
The MyUVM Portal page contains links to go directly into PeopleSoft, Outlook, Banner, Blackboard, and other applications by only logging in once. Logging in to PeopleSoft requires multi-factor authentication. Other applications such as Kronos will require you to log in separately.
1. Log in to MyUVM using your UVM NetID and password.
2. In the PeopleSoft section of the Employee tab you will find helpful links to PeopleSoft resources and trainings.
3. The PeopleSoft link in the upper right corner of the screen is for accessing the PeopleSoft HR system.
Navigate PeopleSoft
Main Menu in PeopleSoft
On the Home screen in PeopleSoft, the Main Menu is located in the upper left corner of the page. It offers several helpful features, described below.

PeopleSoft User Guide: PeopleSoft Tips
Updated 3/2019 Ctrl+Home to Table of Contents Page 4 of 30
Sort the Main Menu
The Main Menu contains menu items; some lead directly to transaction pages, and some lead to sub-menus in a hierarchical format.
Click the Main Menu to see a list of sub menus.
Toggle the menu items’ sort order if desired. Click the black up/down triangle icons to reorder in ascending alpha, descending alpha, or the original PeopleSoft menu sort order.
The sub-menus will have a folder icon to the left.
On the right of each sub menu, you will see arrows that indicate that more sub-menus and pages are available.
If an item does not have an arrow to the right, and has a blue page icon instead of a yellow folder, it does not have expandable sub-menus below it.

PeopleSoft User Guide: PeopleSoft Tips
Updated 3/2019 Ctrl+Home to Table of Contents Page 5 of 30
In this example, under Employee Self-Service, there are 4 sub-menus containing additional items, such as UVM Self Service Additions, and 4 other available pages, such as User Defaults.
For users with a lengthy menu, arrows will appear at the top and bottom of the menu box, to allow scrolling.

PeopleSoft User Guide: PeopleSoft Tips
Updated 3/2019 Ctrl+Home to Table of Contents Page 6 of 30
Cascading Menu
Click the name of a menu item to display its sub-folder(s), which will cascade to the right. Or to view a menu item’s contents, click the folder icon to the left of the item name. Click the Menu Item Name to cascade to sub-menu items:
OR click the Menu Item Folder Icon to display contents:
Contents of the Travel and Expenses Menu:
PeopleSoft User Guide: PeopleSoft Tips
Updated 3/2019 Ctrl+Home to Table of Contents Page 7 of 30
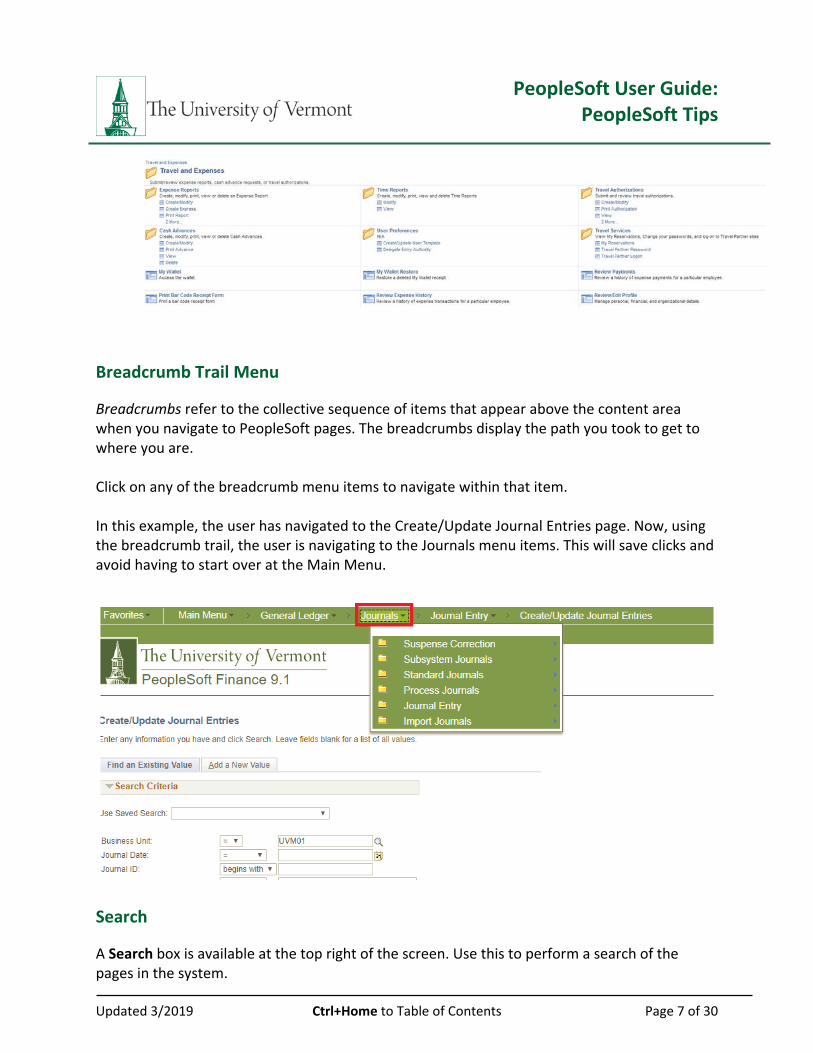
Breadcrumb Trail Menu
Breadcrumbs refer to the collective sequence of items that appear above the content area when you navigate to PeopleSoft pages. The breadcrumbs display the path you took to get to where you are. Click on any of the breadcrumb menu items to navigate within that item. In this example, the user has navigated to the Create/Update Journal Entries page. Now, using the breadcrumb trail, the user is navigating to the Journals menu items. This will save clicks and avoid having to start over at the Main Menu.
Search
A Search box is available at the top right of the screen. Use this to perform a search of the pages in the system.

PeopleSoft User Guide: PeopleSoft Tips
Updated 3/2019 Ctrl+Home to Table of Contents Page 8 of 30
1. Enter keywords separated by a space. Press Enter or click the >> button on the right side of the box to view the search results.
2. The View Search Results page is displayed with a list of possible matches. This page uses PeopleSoft’s Fluid layout, so it looks slightly different from other pages in PeopleSoft. Click on a link to go to that page.

PeopleSoft User Guide: PeopleSoft Tips
Updated 3/2019 Ctrl+Home to Table of Contents Page 9 of 30
Searches: Maximum Number of Rows
Depending on the search criteria a user provides, PeopleSoft searches and reports can potentially return hundreds or thousands of lines of data.
To avoid searching for too much data at once, PeopleSoft will automatically limit the maximum number of rows of data returned. Wherever there is a limit or “Max Rows” field presented on a screen, the user can specify the number of values returned, up to the limit. In many cases, the maximum is 300 rows.
This search example is from PeopleSoft Financials Main Menu > Accounts Payable > Review Accounts Payable Info > Vouchers > Voucher
Processing Indicator
A spinning graphic indicates that the system is processing information. This will appear on PeopleSoft pages when performing system tasks such as searching and saving.

PeopleSoft User Guide: PeopleSoft Tips
Updated 3/2019 Ctrl+Home to Table of Contents Page 10 of 30
Navigation Personalizations
The Navigation Personalizations area of PeopleSoft My Preferences allows you to customize certain default settings about how PeopleSoft behaves, such as the order in which main menu items display, the maximum number of rows that display, and which elements are included when tabbing through a page.
The My Preferences page uses PeopleSoft’s Fluid layout, so it looks slightly different than other PeopleSoft pages.
Changing Navigation Personalizations
Navigate to: Main Menu > My Preferences
1. On the My Preferences page, click Navigation Personalizations.
2. A list of items to personalize will appear.
PeopleSoft User Guide: PeopleSoft Tips
Updated 3/2019 Ctrl+Home to Table of Contents Page 11 of 30
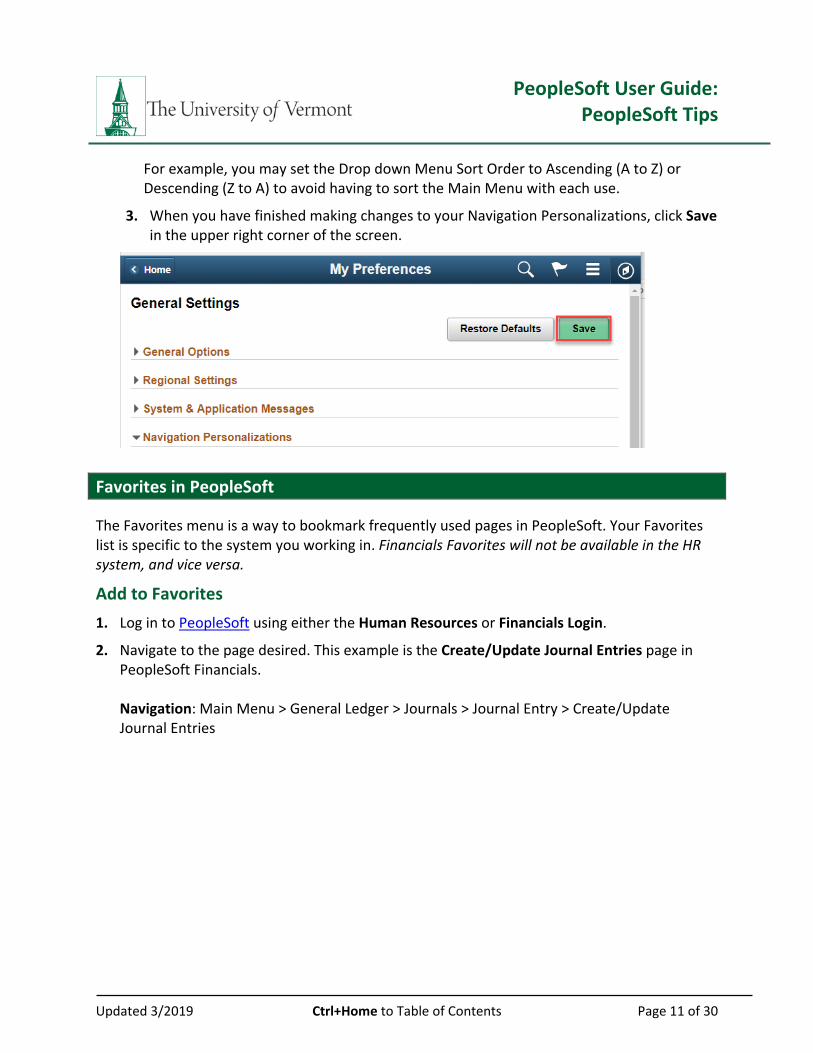
For example, you may set the Drop down Menu Sort Order to Ascending (A to Z) or Descending (Z to A) to avoid having to sort the Main Menu with each use.
3. When you have finished making changes to your Navigation Personalizations, click Save in the upper right corner of the screen.
Favorites in PeopleSoft
The Favorites menu is a way to bookmark frequently used pages in PeopleSoft. Your Favorites list is specific to the system you working in. Financials Favorites will not be available in the HR system, and vice versa.
Add to Favorites
1. Log in to PeopleSoft using either the Human Resources or Financials Login.
2. Navigate to the page desired. This example is the Create/Update Journal Entries page in PeopleSoft Financials. Navigation: Main Menu > General Ledger > Journals > Journal Entry > Create/Update Journal Entries

PeopleSoft User Guide: PeopleSoft Tips
Updated 3/2019 Ctrl+Home to Table of Contents Page 12 of 30
3. Click Favorites at the top left corner of the screen. In the My Favorites section, click Add to
Favorites. Add to Favorites is also located in the top right corner of the screen.
Add to Favorites in the Favorites menu:
Add to Favorites is also available here:

PeopleSoft User Guide: PeopleSoft Tips
Updated 3/2019 Ctrl+Home to Table of Contents Page 13 of 30
4. Give the favorite a Description and click OK. The default description will be the PeopleSoft page name.
Edit Favorites
1. Edit favorites under the Favorites menu at the top. Click Edit Favorites to make changes to the saved list of favorites.
2. Reorder the list by numbering each item in the Sequence number fields. Rename a favorite by updating the description in the Favorite column. Remove an item by clicking the minus sign button to the right of the item.
3. When done editing favorites, click Save.

PeopleSoft User Guide: PeopleSoft Tips
Updated 3/2019 Ctrl+Home to Table of Contents Page 14 of 30
Recently Used
Recently Used is located under the Favorites menu at the top left of the screen. Recently used pages are available above the My Favorites section of the drop-down list. When you access a page, it is added to the Recently Used list. To access a page from the Recently Used menu, click the page name.

PeopleSoft User Guide: PeopleSoft Tips
Updated 3/2019 Ctrl+Home to Table of Contents Page 15 of 30
My Favorite Queries
The Query Manager and Query Viewer search pages can include a list of queries called My Favorite Queries. If you use certain queries often, you can put the queries in this list for easy access. Financials favorite queries will not be available in the HR system, and vice versa.
1. Log in to PeopleSoft using either the Human Resources or Financial Login.
2. Navigate to: Main Menu > Reporting Tools > Query > Query Viewer.
3. Search for the query to add as a favorite.
4. In the list of results, click the Favorite link next to the selected query.
5. The list of favorite queries will appear on the Query Manager and Query Viewer search page
in the My Favorite Queries section at the bottom of the page.
Remove Individual query favorites by clicking the corresponding minus sign button in the Remove column, or the remove all with the Clear Favorite List button.

PeopleSoft User Guide: PeopleSoft Tips
Updated 3/2019 Ctrl+Home to Table of Contents Page 16 of 30
Link from Financials to Human Resources
Users can navigate from PeopleSoft Financials directly into PeopleSoft Human Resources and vice versa.
PeopleTools
Process Monitor The Process Monitor is a page that allows you to see what reports or other processes you have requested in the system. When you are viewing or entering data on a page, the Process Monitor is not involved. When you run a report or you need to run a process, such as budget checking, the Process Monitor will track the status of your process.
The Process Monitor page uses PeopleSoft’s “Fluid” layout.
Some reports and processes will take longer than others to run. Processing time depends on the amount of data being retrieved/processed, and the overall volume of system usage at runtime.
There is typically a link to the Process Monitor on run control pages, as shown below in the Closeout Report in Financials. After clicking Run and returning to the run control page, use this link to access the Process Monitor.

PeopleSoft User Guide: PeopleSoft Tips
Updated 3/2019 Ctrl+Home to Table of Contents Page 17 of 30
The Process Monitor is also available by navigating as shown below, or by clicking Process Monitor in the upper right of the screen.
Navigation: Main Menu > PeopleTools > Process Scheduler > Process Monitor
Or, click Process Monitor in the upper right:
Process Monitor Process List
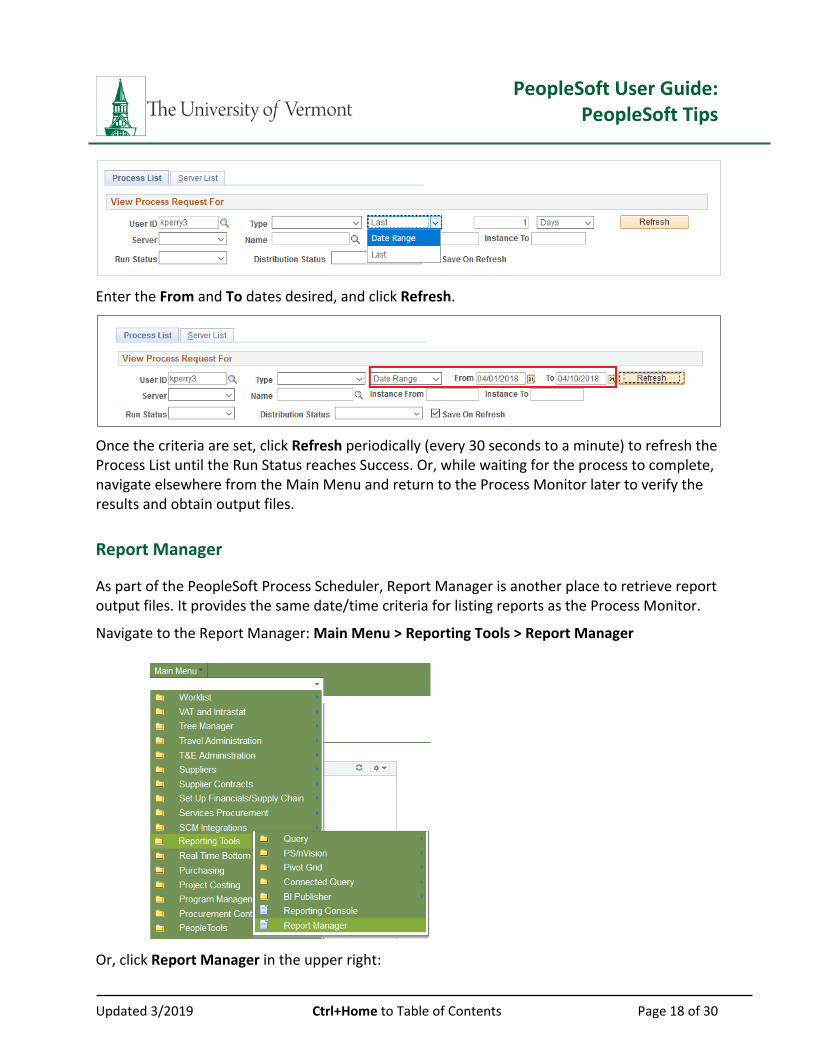
By default, PeopleSoft displays 14 days of reports in the Process List. Change the number and unit of time (days, hours, minutes, years) to refine the list as needed.
Or, select Date Range instead of “Last” to search by a range of dates.
PeopleSoft User Guide: PeopleSoft Tips
Updated 3/2019 Ctrl+Home to Table of Contents Page 18 of 30
Enter the From and To dates desired, and click Refresh.
Once the criteria are set, click Refresh periodically (every 30 seconds to a minute) to refresh the Process List until the Run Status reaches Success. Or, while waiting for the process to complete, navigate elsewhere from the Main Menu and return to the Process Monitor later to verify the results and obtain output files.
Report Manager
As part of the PeopleSoft Process Scheduler, Report Manager is another place to retrieve report output files. It provides the same date/time criteria for listing reports as the Process Monitor.
Navigate to the Report Manager: Main Menu > Reporting Tools > Report Manager
Or, click Report Manager in the upper right:
PeopleSoft User Guide: PeopleSoft Tips
Updated 3/2019 Ctrl+Home to Table of Contents Page 19 of 30
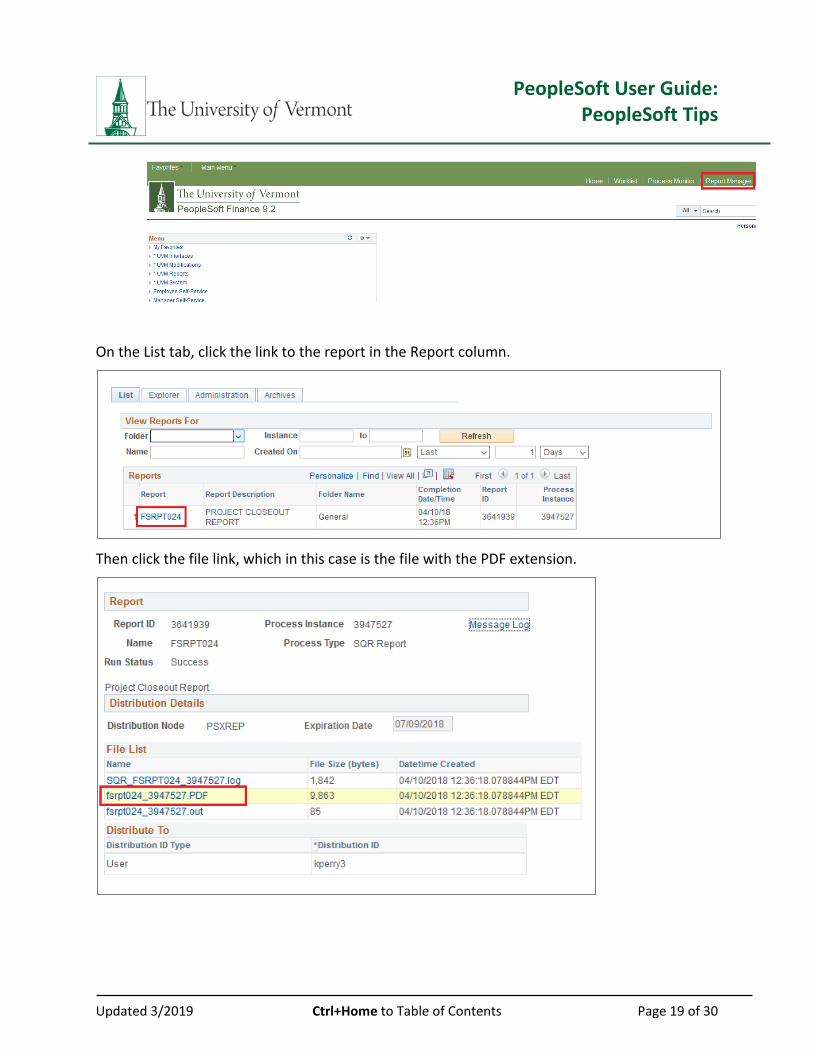
On the List tab, click the link to the report in the Report column.
Then click the file link, which in this case is the file with the PDF extension.

PeopleSoft User Guide: PeopleSoft Tips
Updated 3/2019 Ctrl+Home to Table of Contents Page 20 of 30
Auto Row Highlighting
PeopleSoft grids and tables are shaded with alternating light and dark colors to help differentiate between rows of data.
In addition to the dark/light row shading, a light yellow color highlights the row over which the user hovers the mouse.
Lookup Fields: Pop-Up Functions
When the magnifying glass is selected a Lookup window appears. The background is grayed-out and results (up to 300) are displayed on-screen without having to navigate away from the main search page.
Lookup Fields: AutoComplete
As mentioned above, the lookup icon (magnifying glass) allows the user to see lists of available values for many PeopleSoft fields.
PeopleSoft also offers type-ahead functionality, also known as autocomplete, on fields with a lookup icon.

PeopleSoft User Guide: PeopleSoft Tips
Updated 3/2019 Ctrl+Home to Table of Contents Page 21 of 30
As text is entered, the system displays a list of the available values. Users can continue typing as they normally would, or they can make their selection directly from the list.
Turn off Autocomplete
If desired, users can disable the autocomplete functionality. To disable the functionality in both Human Resources and Financials, repeat these steps for both systems.
1. Log into PeopleSoft and navigate to Main Menu > My Preferences. This page uses PeopleSoft’s Fluid design, so it looks slightly different from other PeopleSoft pages.
2. Select Navigation Personalizations.

PeopleSoft User Guide: PeopleSoft Tips
Updated 3/2019 Ctrl+Home to Table of Contents Page 22 of 30
3. In the Autocomplete field, click the slider to toggle the value from Yes to No.
4. Click Save.
Save Warning Pop-Up Window
Many PeopleSoft screens display a save warning when users have entered data on a page, and attempt to navigate elsewhere without saving.
Click Yes to return to the page to save, or click No to discard the changes made.
Browser Errors
The browser’s navigation buttons should not be used when working in PeopleSoft. In particular, users should avoid using the browser’s Back button, and instead use the navigation options provided in the PeopleSoft application.
See the Browser Tips User Guide (PDF) to fix errors that occur in PeopleSoft that are directly related to a specific internet browser.
Print Screen Capabilities
Mozilla Firefox browser users
Here are two suggestions for printing the active screen:

PeopleSoft User Guide: PeopleSoft Tips
Updated 3/2019 Ctrl+Home to Table of Contents Page 23 of 30
Print:
1. Click on the Firefox menu in the top-right corner.
2. Select Print.
3. Adjust the page settings if necessary, then click on the Print button.
Print Frame:
1. Right-click somewhere in the desired frame.
2. Select This Frame.
3. Select Print Frame.
4. The data portion of the screen should print.
5. Close this tab after printing.
Internet Explorer browser users
Print Frame:
1. Right-click inside the desired frame.
2. Choose Select All.
3. Right-click a highlighted area and select Print Preview.
4. Select Landscape icon.
5. Under the As laid out on the screen drop-down, select As selected on the screen.
6. Choose Shrink To Fit or 80% to show all of the desired fields.
7. Click the Print button.
PeopleSoft Human Resources Tips
Email Reports
Emailing reports from PeopleSoft is an efficient way to send reports without having to wait in the Process Monitor. Follow these instructions to e-mail an HR report.
1. Log in to PeopleSoft Human Resources
2. Navigate to: Main Menu > UVM Reports > Payroll Reports and open a report.
3. Enter the necessary criteria and click Run.
4. On the Process Scheduler Request page, in the Process List section, select Email from the *Type drop-down list.

PeopleSoft User Guide: PeopleSoft Tips
Updated 3/2019 Ctrl+Home to Table of Contents Page 24 of 30
Click the OK button to run the report and to send as an email attachment.
5. When the message from PeopleSoft appears in the user’s email inbox, the report will be the attached .pdf file.
Time and Labor Customization Screens
Customizing Manager Search Options
1. Log in to PeopleSoft Human Resources
2. Navigate to: Main Menu > Manager Self Service > Time Management > Manager Search Options.

PeopleSoft User Guide: PeopleSoft Tips
Updated 3/2019 Ctrl+Home to Table of Contents Page 25 of 30
3. There are several options for customizing the search screen. You can search by criteria that you choose not to have listed in the results, and vice versa.
4. Save search criteria if desired.
NOTE: Be careful about saving criteria here. No results will be displayed if searching by Position Number and Supervisor ID simultaneously.
5. Choose Auto Populate Results for search results to appear automatically when entering Manager Self Service. Choose Prompt for Results to use the Get Employees button to bring up search results.
6. Choose Collapse Criteria to show the results without the search page on the screen. Choose Expand Criteria to show the results underneath the search page.

PeopleSoft User Guide: PeopleSoft Tips
Updated 3/2019 Ctrl+Home to Table of Contents Page 26 of 30
7. Click Save.
PeopleSoft Financials Tips
Personalize Grids
Many screens in PeopleSoft display grids of data that allow personalization; the user can change the order of the columns, the data sort order, which columns are frozen, and which columns are hidden. Users can share personalizations with other users or copy another user's settings for their own use. You control these settings on the Personalize Column and Sort Order page, which you open by clicking the Personalize link in the navigation header of the grid. Any personalizations that you make to a grid remain in place until you change them.
This example uses the grid on the Journal Lines tab of a Journal Entry, which many users opt to personalize to add efficiency and ease of use.
1. Log in to PeopleSoft Financials
2. Navigate to: Main Menu > General Ledger > Journals > Journal Entry > Create/Update Journal Entries.
3. Find an existing value, or Add a new value (for more information on journals see the Journal Entry User Guide (PDF).
4. Click the Journal Lines tab.
5. Click the Personalize link on the right of the Lines grid header. You may need to scroll to
the right to find it.

PeopleSoft User Guide: PeopleSoft Tips
Updated 3/2019 Ctrl+Home to Table of Contents Page 27 of 30
6. Click a column name in the Column Order list, then click the up/down arrows to change its position.
In this example, to move Account, click on it and then click the up or down arrow as desired.
Hide or Freeze columns by clicking the column name, then click the Hidden and/or Frozen checkboxes. To add a column by which your journal lines should sort, click the column name, and click the right arrow to add that column to the Sort Order column.
Click Preview to see the new order of the journal columns before saving changes.

PeopleSoft User Guide: PeopleSoft Tips
Updated 3/2019 Ctrl+Home to Table of Contents Page 28 of 30
7. Click OK to save the changes.
The personalize order of columns will be retained until it you change it. Copy, Share, and Delete settings are available once personalizations are saved.
Search for Transactions
When searching for a transaction where the transaction ID/number is known, use the % (percent sign) in front of the numbers to replace the zeros, or change the search operator from begins with to contains. The following screenshots use journal entries as an example, but the functionality can be used to search for any PeopleSoft transaction.
Using the %:
Using contains:

PeopleSoft User Guide: PeopleSoft Tips
Updated 3/2019 Ctrl+Home to Table of Contents Page 29 of 30
Accounting Tags
Accounting Tags make entering frequently used chartstrings more efficient in PeopleSoft. Accounting Tags allow users to define a set of chartfield values and assign that set a specific name. The Accounting Tag can be selected in applicable areas of PeopleSoft Financials to automatically populate that chartstring.
There are two types of Accounting Tags: single line and multiple line.
1. Single Line tags are used in the General Ledger for Journal Entries and PurCard journals, and in Commitment Control for budget journals and budget transfers.
2. Multiple Line tags are not available for use at this time.
For more information about how to create and use Accounting Tags, see the Accounting Tags User Guide (PDF).
Resources/Help
Help
If you have questions about information in this document, or, if after reading it, you cannot find the information you need, please submit a PeopleSoft help desk ticket in Footprints.

PeopleSoft User Guide: PeopleSoft Tips
Updated 3/2019 Ctrl+Home to Table of Contents Page 30 of 30
Training
• Professional Development & Training Classes
Relevant UVM Departments
• Office of Operational Excellence
Suggestions? Updates?
Send an e-mail to [email protected].