Embed Size (px)
Citation preview
PeopleSoft End-User Training
PURCHASING SUPERUSER PARTICIPANT GUIDE
SEPTEMBER, 2011
COPYRIGHT & TRADEMARKS
Copyright © 1998, 2009, Oracle and/or its affiliates. All rights reserved.
Oracle is a registered trademark of Oracle Corporation and/or its affiliates. Other names
may be trademarks of their respective owners.
This software and related documentation are provided under a license agreement
containing restrictions on use and disclosure and are protected by intellectual property
laws. Except as expressly permitted in your license agreement or allowed by law, you
may not use, copy, reproduce, translate, broadcast, modify, license, transmit, distribute,
exhibit, perform, publish or display any part, in any form, or by any means. Reverse
engineering, disassembly, or decompilation of this software, unless required by law for
interoperability, is prohibited.
The information contained herein is subject to change without notice and is not warranted
to be error-free. If you find any errors, please report them to us in writing.
If this software or related documentation is delivered to the U.S. Government or anyone
licensing it on behalf of the U.S. Government, the following notice is applicable:
U.S. GOVERNMENT RIGHTS
Programs, software, databases, and related documentation and technical data delivered to
U.S. Government customers are “commercial computer software” or “commercial
technical data” pursuant to the applicable Federal Acquisition Regulation and agency-
specific supplemental regulations. As such, the use, duplication, disclosure, modification,
and adaptation shall be subject to the restrictions and license terms set forth in the
applicable Government contract, and, to the extent applicable by the terms of the
Government contract, the additional rights set forth in FAR 52.227-19, Commercial
Computer Software License (December 2007). Oracle USA, Inc., 500 Oracle Parkway,
Redwood City, CA 94065.
This software is developed for general use in a variety of information management
applications. It is not developed or intended for use in any inherently dangerous
applications, including applications which may create a risk of personal injury. If you use
this software in dangerous applications, then you shall be responsible to take all
appropriate fail-safe, backup, redundancy and other measures to ensure the safe use of
this software. Oracle Corporation and its affiliates disclaim any liability for any damages
caused by use of this software in dangerous applications.
This software and documentation may provide access to or information on content,
products and services from third parties. Oracle Corporation and its affiliates are not
responsible for and expressly disclaim all warranties of any kind with respect to third
party content, products and services. Oracle Corporation and its affiliates will not be
responsible for any loss, costs, or damages incurred due to your access to or use of third
party content, products or services.
Training Guide
Page iii
Table of Contents Purchasing SuperUser ...................................................................................................... 1
Manage Purchase Orders and Encumbrances ........................................................................ 3 View and Print the Procurement Budgetary Activity Report to HTML ................................................. 3 View and Print the Procurement Budgetary Activity Report to Excel .................................................. 21 Run the CLEANUP_PO_ACTIVITY Query ........................................................................................ 39
Inquire on a PO ........................................................................................................................ 51 View and Analyze the PO Activity Summary Page.............................................................................. 51 View the Receipts Page for a PO Line .................................................................................................. 67 View the Voucher Inquiry Page for a PO Line ..................................................................................... 73 View the Payment Inquiry Page for a PO Line ..................................................................................... 79 Inquire on a Purchase Order to Determine the Receiving Options ....................................................... 83 Inquire on a PO Document Status Page ................................................................................................ 89
Cancel POs .............................................................................................................................. 109 Cancel a PO without an Associated Req from the PO Header ............................................................ 109 Cancel a PO with an Associated Req from the PO Header ................................................................. 127 Close a PO from the PO Recon Workbench ....................................................................................... 145
Close Purchase Orders .......................................................................................................... 151 Close a PO to Release the Remaining Encumbrance .......................................................................... 151 Close a Range of POs from PO Recon Workbench ............................................................................ 157
Manage Requisition Encumbrances ..................................................................................... 165 View and Print the Req and PO Budgetary Activity Report in HTML .............................................. 165 View and Print the Req and PO Budgetary Activity Report in Excel ................................................. 173 Run the CLEANUP_REQ_ACTIVITY Query ................................................................................... 181
Cancel a Requisitions ............................................................................................................. 187 Cancel a Requisition from the Req Header ......................................................................................... 187 Close a Requisition from the Req Recon Workbench ........................................................................ 197
Finalize a Purchase Orders ................................................................................................... 203 Finalize a PO to Release the Remaining Pre-Encumbrance ............................................................... 203 Close a Requisition to Release Remaining Pre-Encumbrance ............................................................ 209 Close a Range of Requisitions from Req Recon Workbench ............................................................. 215
Finalize the PO Voucher........................................................................................................ 221 Finalize the PO Voucher ..................................................................................................................... 221
Attach a Document to a Requisition, RFQ or Purchase Order ......................................... 235 Attach a Document to a Requisition, RFQ or Purchase Order ............................................................ 235
Remove the PC Business Unit Defaults from a Requisition ............................................... 241 Remove the PC Business Unit Defaults from a Requisition ............................................................... 241
Appendix ................................................................................................................................. 247 Understanding Budget Control Exceptions......................................................................................... 247
Understanding Exception Handling and Notification ..................................................................................... 247 Errors and Warnings ....................................................................................................................................... 247 Errors .............................................................................................................................................................. 247 Warnings ......................................................................................................................................................... 251
Frequently Asked Questions ................................................................................................. 255 Requisition Frequently Asked Questions ............................................................................................ 255 Purchase Order Frequently Asked Questions ..................................................................................... 259
Training Guide
Page iv
RFQ Frequently Asked Questions ..................................................................................................... 265 Receipts Frequently Asked Questions................................................................................................ 267
Training Guide
Page 1
Purchasing SuperUser Purchasing SuperUsers Guide
Welcome to the PeopleSoft 9.0 Purchasing SuperUsers module. This module contains the
concepts and procedures involved in managing encumbrances and pre-encumbrances in order to
assist the Purchasing Dept in closing or adjusting remaining balances as needed.
Participant Objectives
At the end of this module you will be able to:
1. Understand the tools available to Manage Encumbrances.
2. View/Print the Procurement Budgetary Activity Report.
3. View the PO Activity Summary page where the Receipts, Vouchers and other information
used to conduct your analysis is located.
4. View the Receipt IDs and Receipts page for any Receipt listed on the PO Activity Summary
Page.
5. View the Voucher IDs and Voucher Inquiry page for any Invoice (Voucher) listed on the PO
Activity Summary page.
6. View the Payment Reference ID and Payment pages for any Payment listed on the Voucher
Inquiry page.
7. View the Purchase Order pages to determine the Match Rule applied to the PO to determine if
the PO needs to be
received in the PeopleSoft system.
8. View the PO Document Status page to access and view the documents associated with a PO
during its life cycle.
9. View/Print the Requisition Budgetary Activity Report.
10. Cancel a Receipt line when the PO Should not have been received into the PeopleSoft
system.
Encumbrance accounting allows an organization to track items from the time the organization
expresses intent to purchase them until the time of the purchase and payment. Encumbrance
accounting involves pre-encumbrances, encumbrances and expenditures.
A pre-encumbrance is the intent to buy a product or service. Although it is a commitment to the
department's budget, it is not a final or binding commitment with the vendor. A pre-encumbrance
is created by a requisition. A pre-encumbrance becomes an encumbrance when the requisitioned
item becomes a commitment to purchase goods or services (typically through a contract) and a
purchase order is issued. Once the purchase order is issued, the pre-encumbrance is reversed.
An encumbrance becomes expenditure when payment is issued by Accounts Payables. Once the
payment is issued, the encumbrance is reversed. On occasion there is a remaining encumbrance
amount. This manual will provide the end-user the tools needed to ensure the remaining
encumbrance amount of a PO line is adjusted or canceled if necessary. On occasion, the end-user
may need to request the remaining pre-encumbrance amount for a Requisition line be adjusted or
canceled by Purchasing.
NOTE: All of the functions shown in this guide should be performed in the PeopleSoft
Financial's Production Database.

Training Guide
Page 2
Training Guide
Page 3
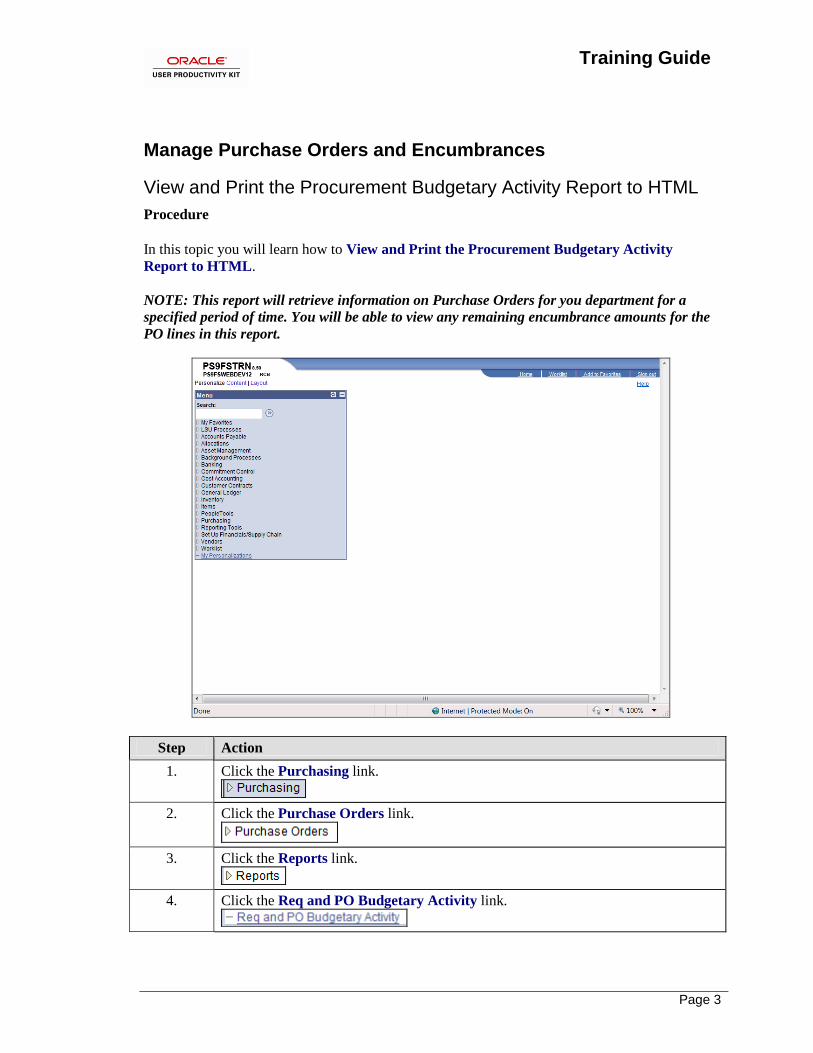
Manage Purchase Orders and Encumbrances
View and Print the Procurement Budgetary Activity Report to HTML
Procedure
In this topic you will learn how to View and Print the Procurement Budgetary Activity
Report to HTML.
NOTE: This report will retrieve information on Purchase Orders for you department for a
specified period of time. You will be able to view any remaining encumbrance amounts for the
PO lines in this report.
Step Action
1. Click the Purchasing link.
2. Click the Purchase Orders link.
3. Click the Reports link.
4. Click the Req and PO Budgetary Activity link.
Training Guide
Page 4
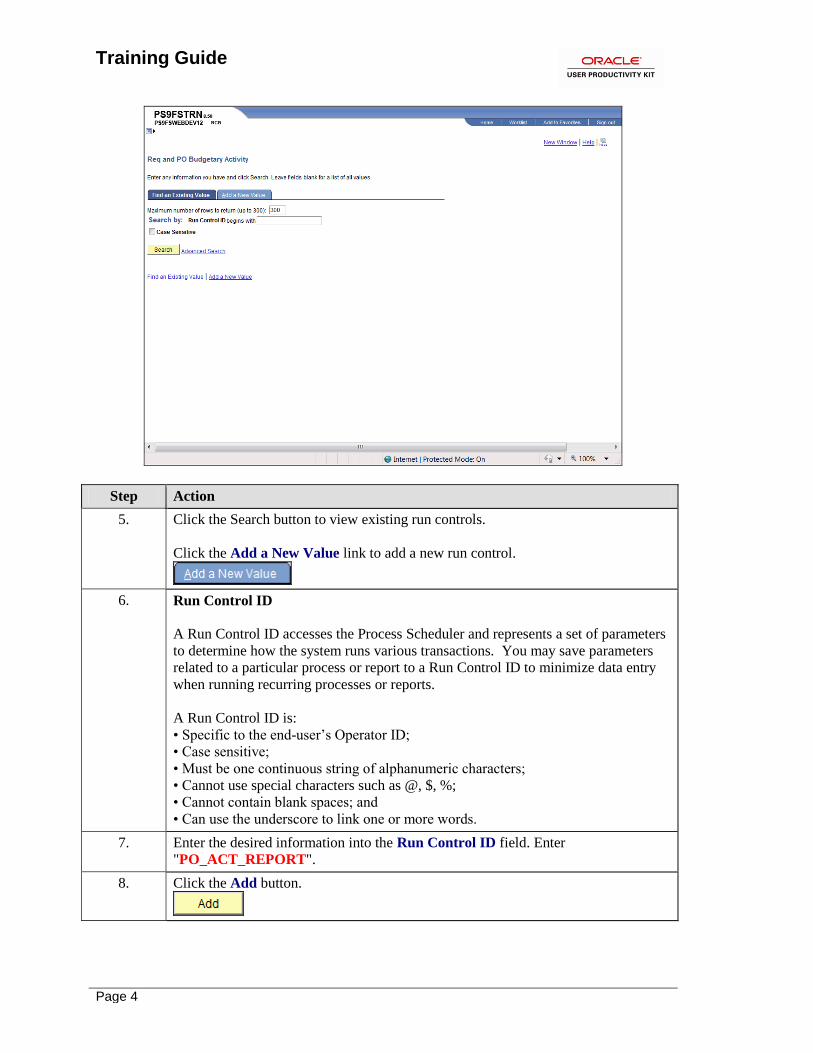
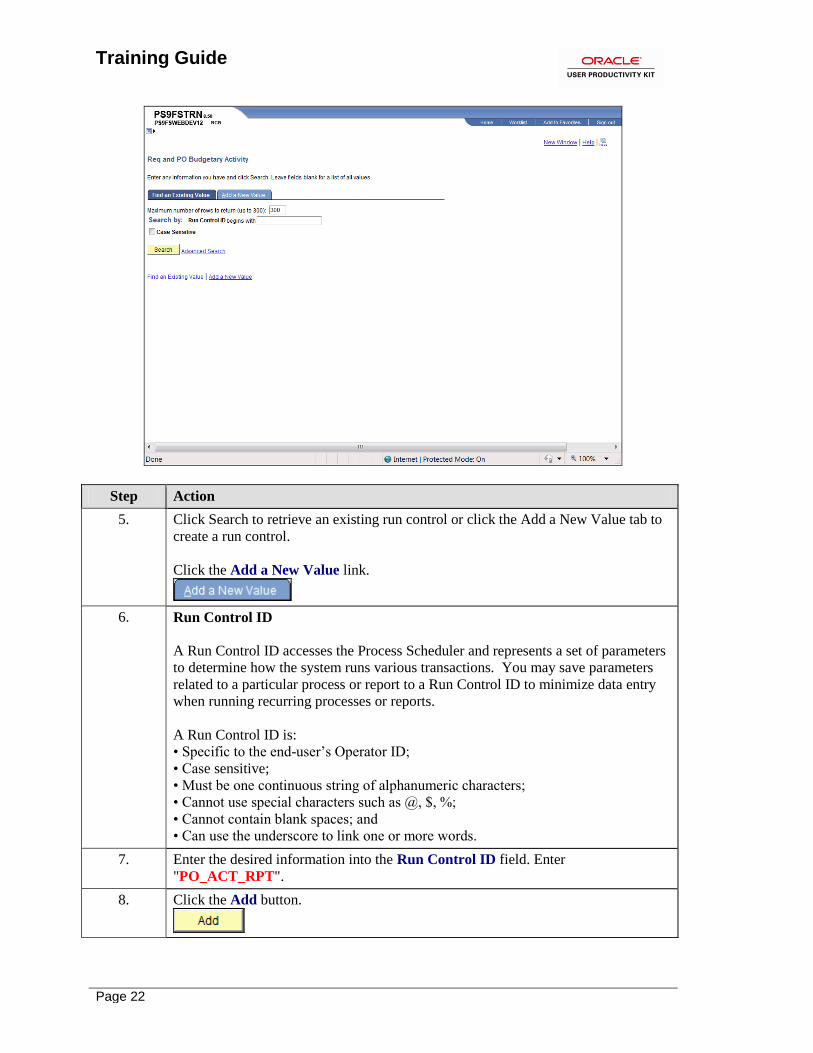
Step Action
5. Click the Search button to view existing run controls.
Click the Add a New Value link to add a new run control.
6. Run Control ID
A Run Control ID accesses the Process Scheduler and represents a set of parameters
to determine how the system runs various transactions. You may save parameters
related to a particular process or report to a Run Control ID to minimize data entry
when running recurring processes or reports.
A Run Control ID is:
• Specific to the end-user’s Operator ID;
• Case sensitive;
• Must be one continuous string of alphanumeric characters;
• Cannot use special characters such as @, $, %;
• Cannot contain blank spaces; and
• Can use the underscore to link one or more words.
7. Enter the desired information into the Run Control ID field. Enter
"PO_ACT_REPORT".
8. Click the Add button.
Training Guide
Page 5
Step Action
9. The first time you enter the Req-PO Budgetary Activity page you will select the
report parameters. The selected parameters will be saved to the Run Control ID and
will display in the page the next time you access it.
So that you do not retrieve all POs for all Business Units, the minimum required
parameters will be entered: Business Unit, the Dept ID or Project/Grant.
If the Project/Grant is entered, there is no need to enter any other chartstring
information since the Project/Grant is linked to only one chartstring.
Training Guide
Page 6
Step Action
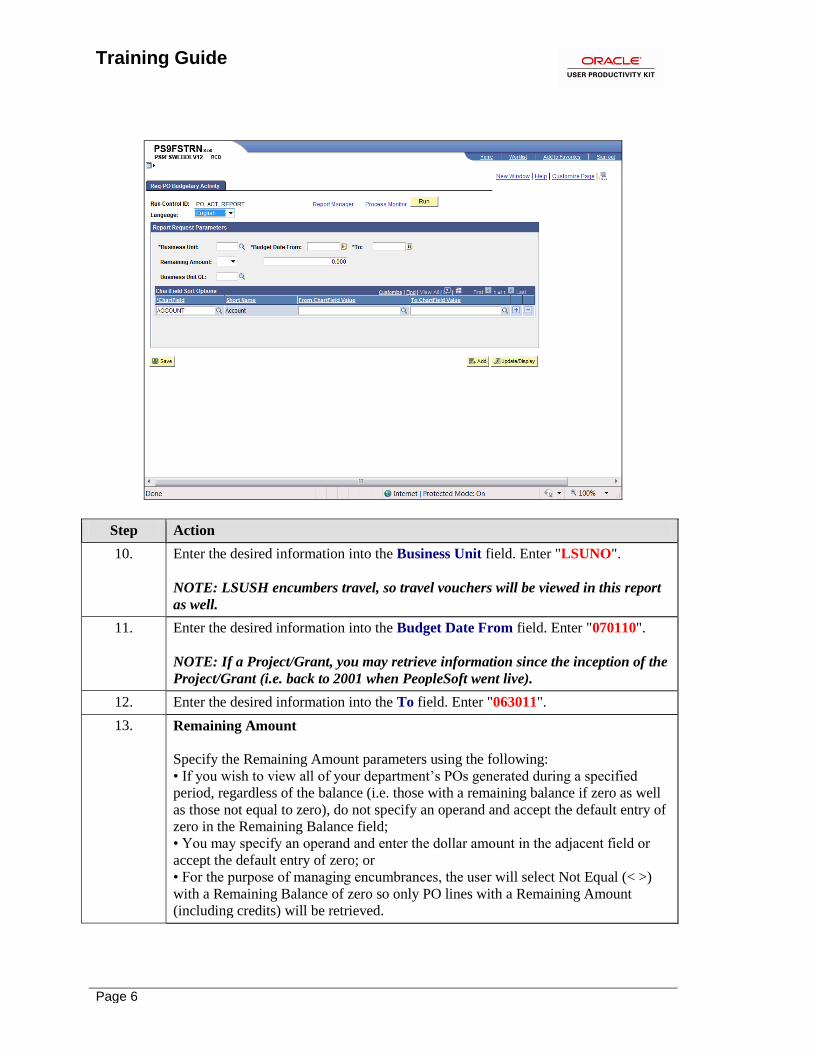
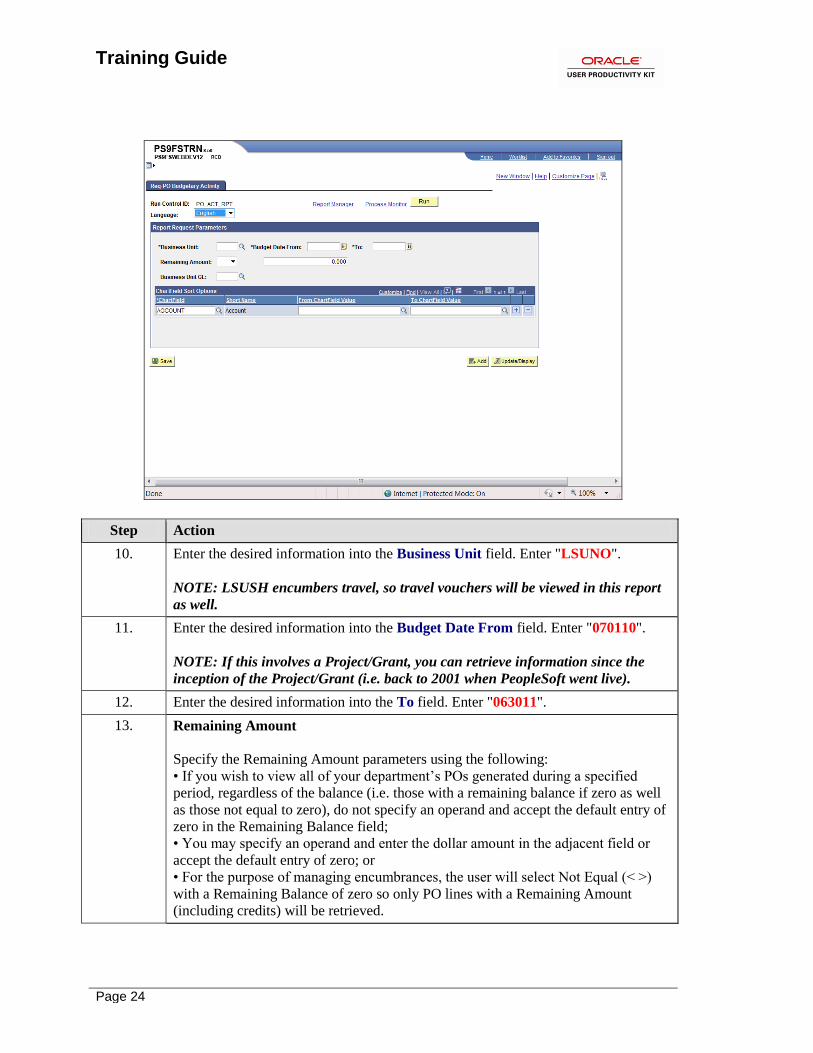
10. Enter the desired information into the Business Unit field. Enter "LSUNO".
NOTE: LSUSH encumbers travel, so travel vouchers will be viewed in this report
as well.
11. Enter the desired information into the Budget Date From field. Enter "070110".
NOTE: If a Project/Grant, you may retrieve information since the inception of the
Project/Grant (i.e. back to 2001 when PeopleSoft went live).
12. Enter the desired information into the To field. Enter "063011".
13. Remaining Amount
Specify the Remaining Amount parameters using the following:
• If you wish to view all of your department’s POs generated during a specified
period, regardless of the balance (i.e. those with a remaining balance if zero as well
as those not equal to zero), do not specify an operand and accept the default entry of
zero in the Remaining Balance field;
• You may specify an operand and enter the dollar amount in the adjacent field or
accept the default entry of zero; or
• For the purpose of managing encumbrances, the user will select Not Equal (< >)
with a Remaining Balance of zero so only PO lines with a Remaining Amount
(including credits) will be retrieved.
Training Guide
Page 7
Step Action
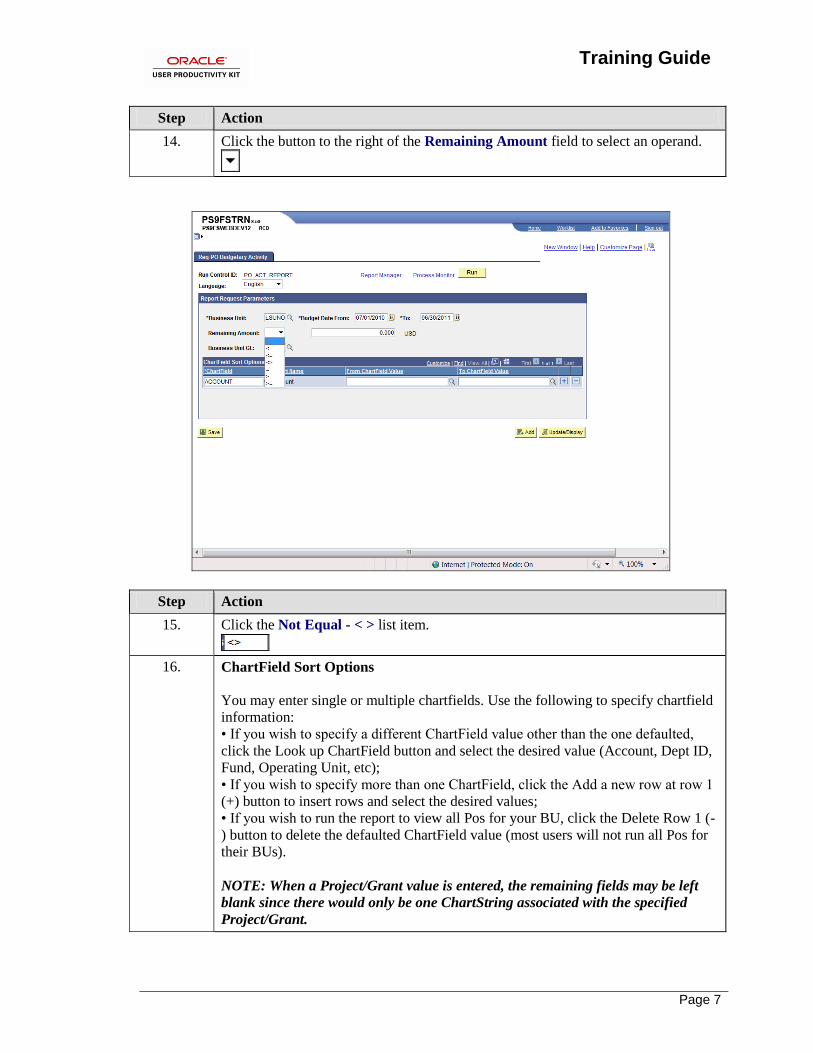
14. Click the button to the right of the Remaining Amount field to select an operand.
Step Action
15. Click the Not Equal - < > list item.
16. ChartField Sort Options
You may enter single or multiple chartfields. Use the following to specify chartfield
information:
• If you wish to specify a different ChartField value other than the one defaulted,
click the Look up ChartField button and select the desired value (Account, Dept ID,
Fund, Operating Unit, etc);
• If you wish to specify more than one ChartField, click the Add a new row at row 1
(+) button to insert rows and select the desired values;
• If you wish to run the report to view all Pos for your BU, click the Delete Row 1 (-
) button to delete the defaulted ChartField value (most users will not run all Pos for
their BUs).
NOTE: When a Project/Grant value is entered, the remaining fields may be left
blank since there would only be one ChartString associated with the specified
Project/Grant.
Training Guide
Page 8
Step Action
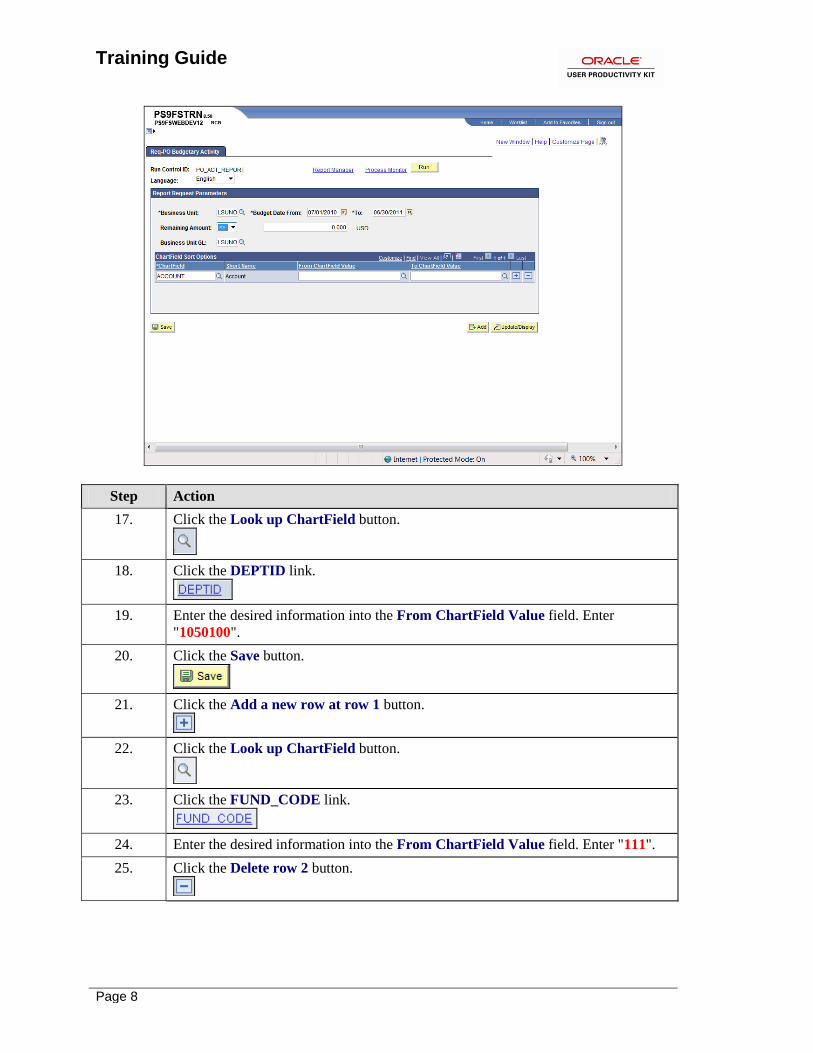
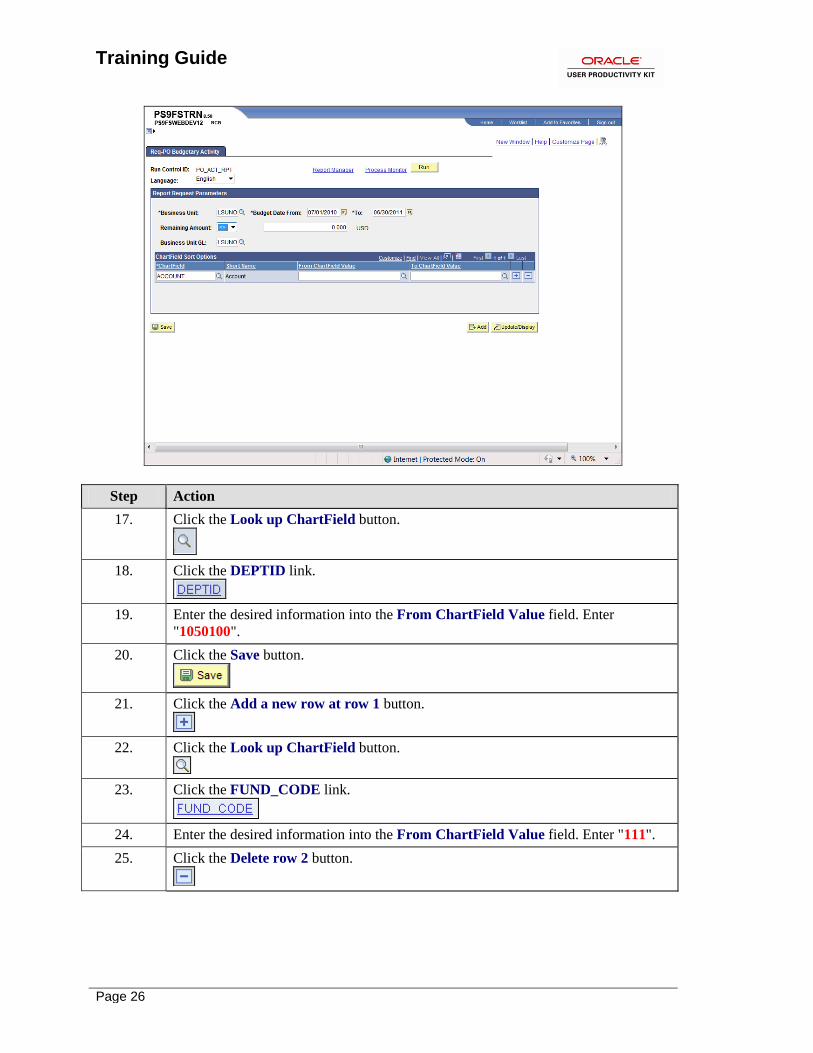
17. Click the Look up ChartField button.
18. Click the DEPTID link.
19. Enter the desired information into the From ChartField Value field. Enter
"1050100".
20. Click the Save button.
21. Click the Add a new row at row 1 button.
22. Click the Look up ChartField button.
23. Click the FUND_CODE link.
24. Enter the desired information into the From ChartField Value field. Enter "111".
25. Click the Delete row 2 button.
Training Guide
Page 9
Step Action
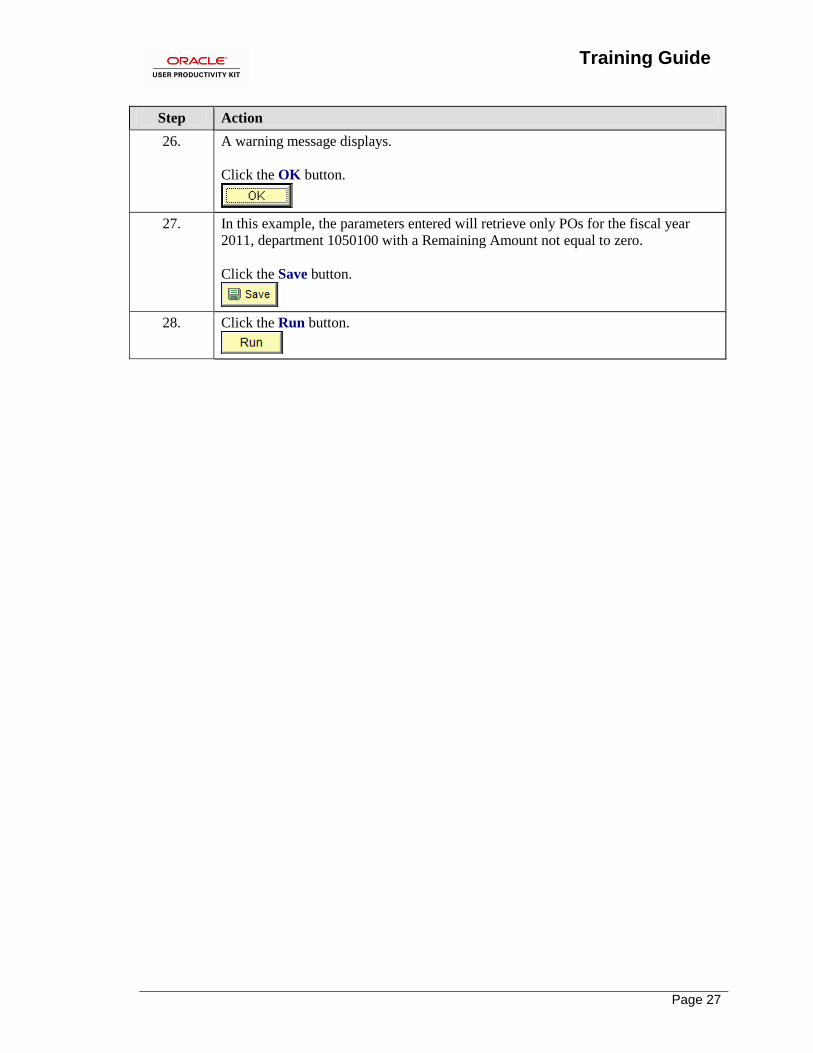
26. A warning message displays.
Click the OK button.
27. In this example, the parameters entered will retrieve only POs for the fiscal year
2011, department 1050100 with a Remaining Amount not equal to zero.
Click the Save button.
28. Click the Run button.
Training Guide
Page 10
Step Action
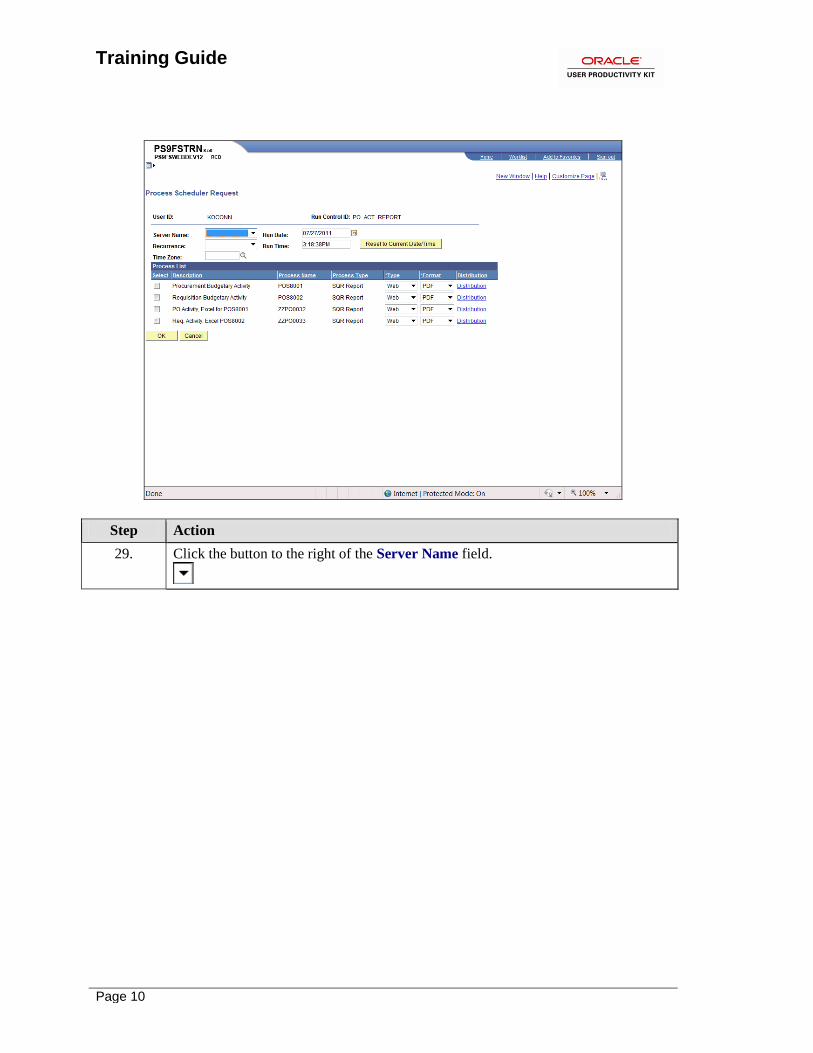
29. Click the button to the right of the Server Name field.
Training Guide
Page 11
Step Action
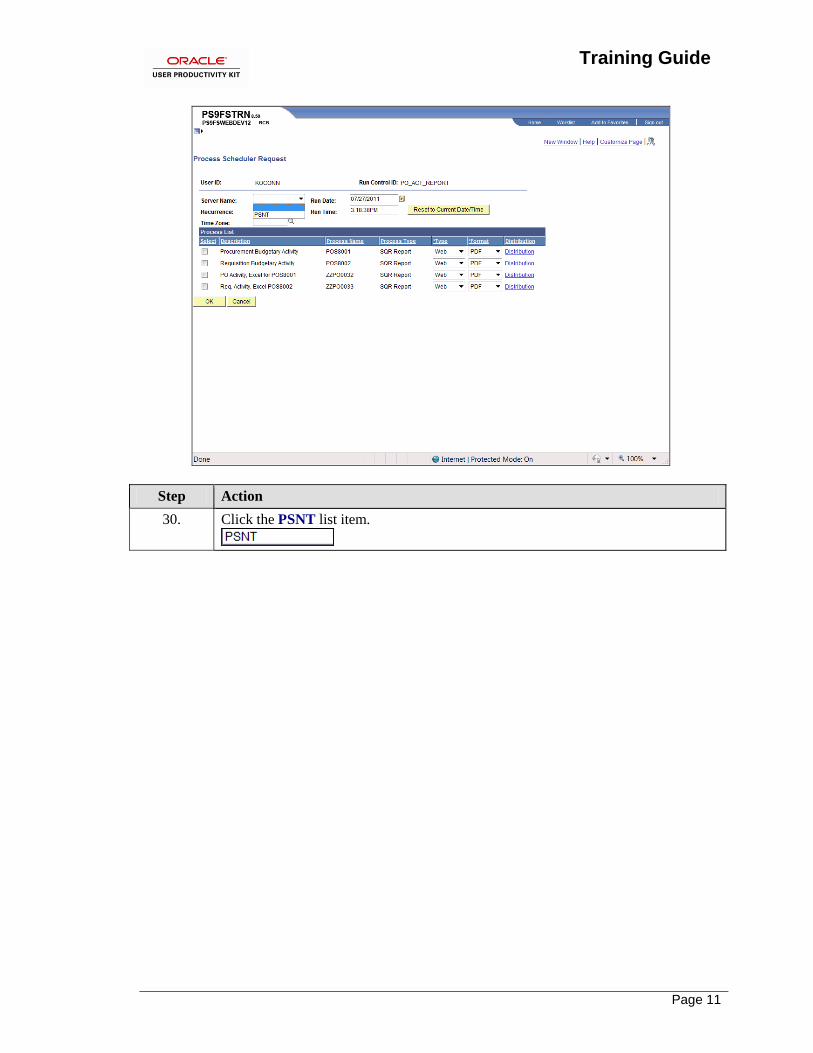
30. Click the PSNT list item.

Training Guide
Page 12
Step Action
31. Click the Procurement Budgetary Activity option in the Process List section.
32. Click the OK button.

Training Guide
Page 13
Step Action
33. Click the Process Monitor link.

Training Guide
Page 14
Step Action
34. Click the Refresh button until the Runs Status = Success and the Distribution Status
= Posted.
35. Click the Go back to Req and PO Budgetary Activity link.
Training Guide
Page 15
Step Action
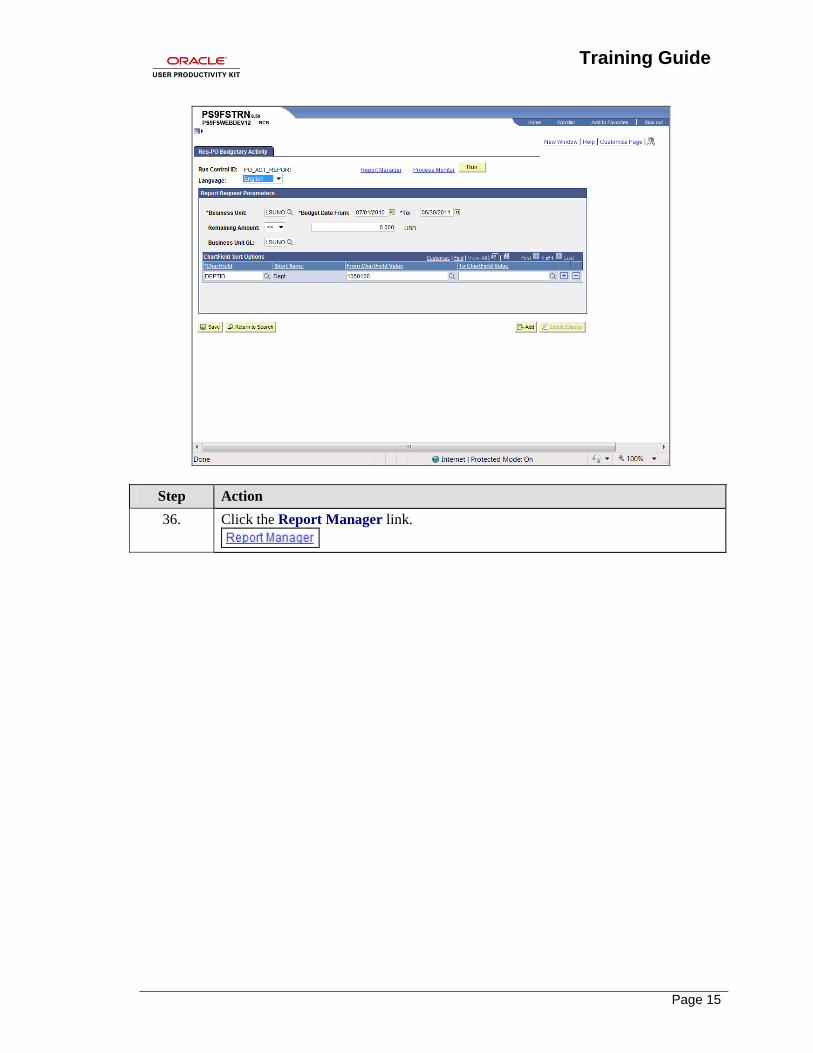
36. Click the Report Manager link.

Training Guide
Page 16
Step Action
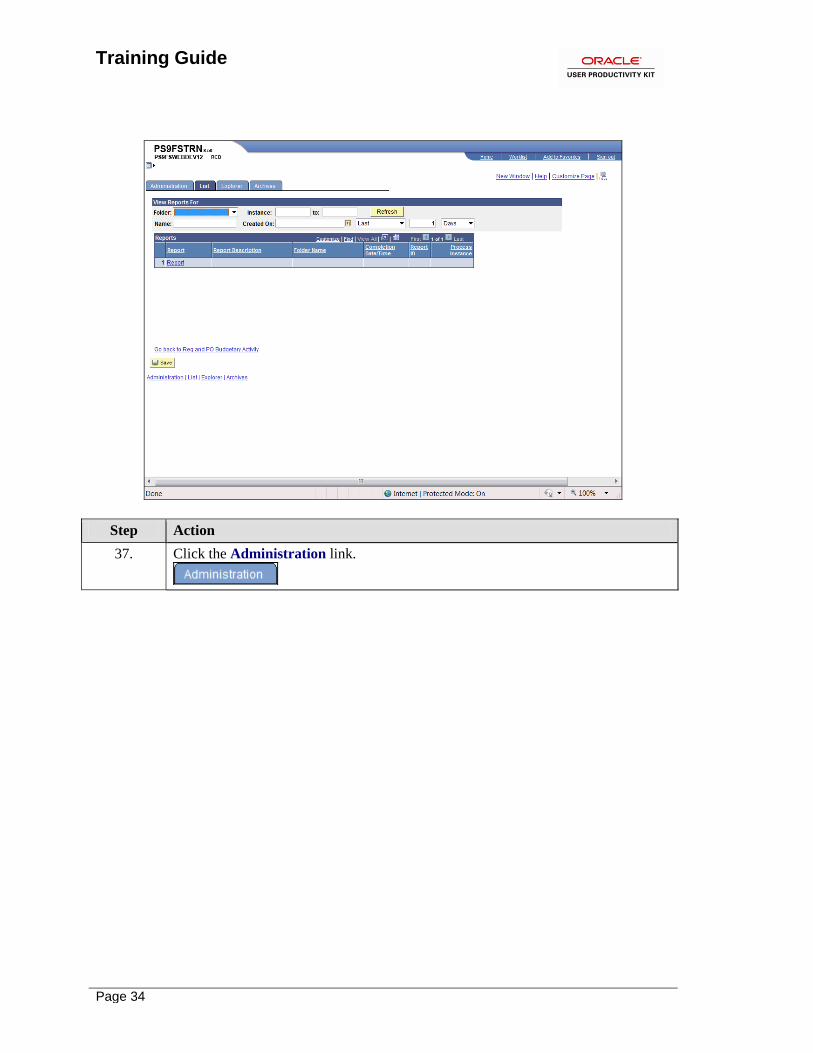
37. Click the Administration link.
Training Guide
Page 17
Step Action
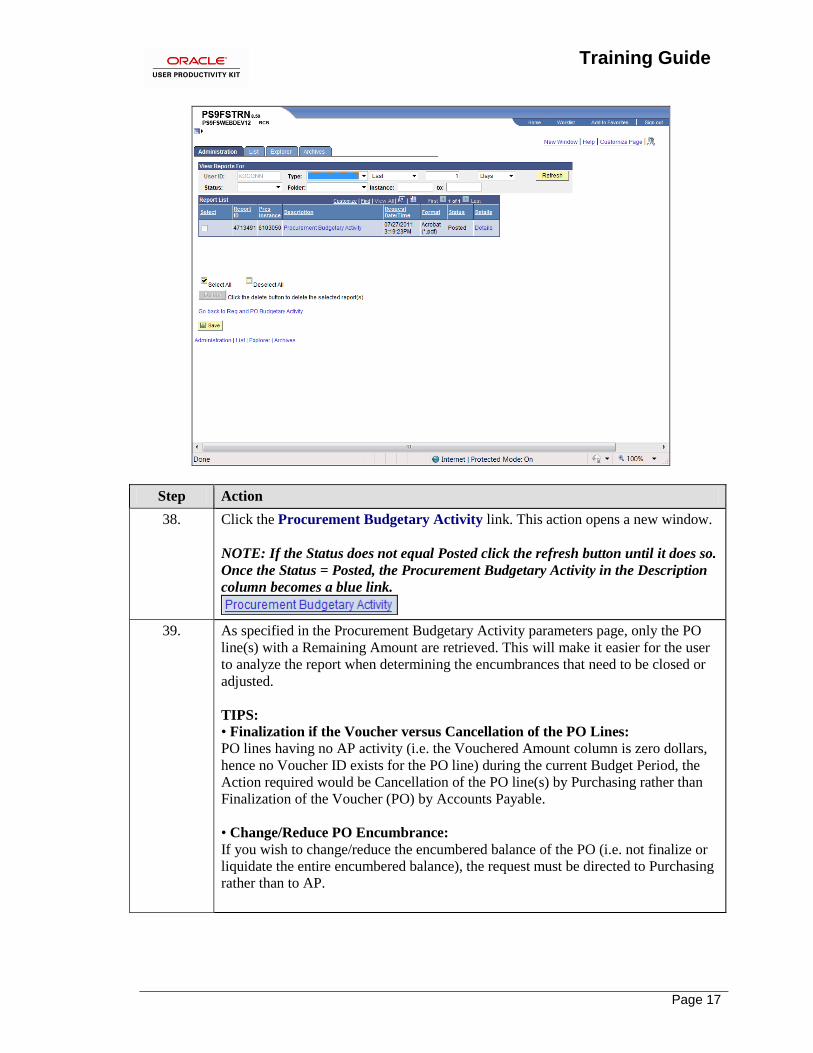
38. Click the Procurement Budgetary Activity link. This action opens a new window.
NOTE: If the Status does not equal Posted click the refresh button until it does so.
Once the Status = Posted, the Procurement Budgetary Activity in the Description
column becomes a blue link.
39. As specified in the Procurement Budgetary Activity parameters page, only the PO
line(s) with a Remaining Amount are retrieved. This will make it easier for the user
to analyze the report when determining the encumbrances that need to be closed or
adjusted.
TIPS: • Finalization if the Voucher versus Cancellation of the PO Lines:
PO lines having no AP activity (i.e. the Vouchered Amount column is zero dollars,
hence no Voucher ID exists for the PO line) during the current Budget Period, the
Action required would be Cancellation of the PO line(s) by Purchasing rather than
Finalization of the Voucher (PO) by Accounts Payable.
• Change/Reduce PO Encumbrance:
If you wish to change/reduce the encumbered balance of the PO (i.e. not finalize or
liquidate the entire encumbered balance), the request must be directed to Purchasing
rather than to AP.
Training Guide
Page 18
Step Action
40. The number of pages included in the report is displayed on the toolbar. You can also
enlarge/reduce the picture size by clicking the - or + sign or changing the
percentage.
41. The Procurement Budgetary Activity Report is comprised of the following columns
viewed from left to right:
PO ID - PeopleSoft auto-generated PO number and/or Confirmation Purchase
Order. Any other value would denote a converted PO that was created prior to
PeopleSoft.
Line/Sched/Dist: Line - Line ID # on the PO (should be the same on the Requisition);
Schedule - Number of the scheduled deliveries; and
Dist - ChartString of the department paying for the item
Dept - Department number from Chart of Accounts
Class - Class number from Chart if Accounts
Project/Grant - Project number from Chart of Account if applicable
42. Procurement Budgetary Activity Report (continued)
Vendor - ID number of the Vendor on the PO
Vendor Name - Name of the Vendor associated with Vendor ID
Req ID - Source of the PO if it exists. The Requisition ID may not appear on this
report if one of the following occurred:
• If a change was made to the PO, usually the ChartString of the PO, the PO and
Requisition may become disconnected; or
• If the Requisition was hand-written (i.e. the Requisition was entered into the
PeopleSoft system by Purchasing as a Purchase Order rather than by the Requester
as a Requisition)
43. Procurement Budgetary Activity Report (continued)
Original PO Amount - The total dollar amount of the PO line. PeopleSoft
calculates the amount based on the total of the item quantity and the item price
Liquidated Amount - The dollar amount of the PO line that has been paid (i.e. the
reversal of the encumbrance)
Remaining Amount - Amount not spent from the PO) (Original Amount -
Liquidated Amount = Remaining Amount)
Vouchered Amount - The dollar amount of the PO line that has been invoiced and
paid to the vendor.
Training Guide
Page 19
Step Action
44. Click the Printer button to print the report or select File, Print on the toolbar.
You can Save the report by clicking Save As or e-mail the report by clicking Send,
Page by E-mail.
45. Click the Close button.
Training Guide
Page 20
Step Action
46. Click the Home link.
47. This completes View and Print the Procurement Budgetary Activity Report to
HTML.
End of Procedure.
Training Guide
Page 21
View and Print the Procurement Budgetary Activity Report to Excel
Procedure
In this topic you will learn how to View and Print the Procurement Budgetary Activity
Report in Excel.
NOTE: This report will retrieve information on Purchase Orders for your department for a
specified time period. You will be able to view any remaining encumbrance amounts for the PO
lines in this report.
Step Action
1. Click the Purchasing link.
2. Click the Purchase Orders link.
3. Click the Reports link.
4. Click the Req and PO Budgetary Activity link.
Training Guide
Page 22
Step Action
5. Click Search to retrieve an existing run control or click the Add a New Value tab to
create a run control.
Click the Add a New Value link.
6. Run Control ID
A Run Control ID accesses the Process Scheduler and represents a set of parameters
to determine how the system runs various transactions. You may save parameters
related to a particular process or report to a Run Control ID to minimize data entry
when running recurring processes or reports.
A Run Control ID is:
• Specific to the end-user’s Operator ID;
• Case sensitive;
• Must be one continuous string of alphanumeric characters;
• Cannot use special characters such as @, $, %;
• Cannot contain blank spaces; and
• Can use the underscore to link one or more words.
7. Enter the desired information into the Run Control ID field. Enter
"PO_ACT_RPT".
8. Click the Add button.
Training Guide
Page 23
Step Action
9. The first time you enter the Req-PO Budgetary Activity page you will select the
report parameters. The selected parameters will be saved to the Run Control ID and
will display in the page the next time you access it.
So that you do not retrieve all POs for all Business Units, the minimum required
parameters will be entered: Business Unit, the Dept ID or Project/Grant.
If the Project/Grant is entered, there is no need to enter any other chartstring
information since the Project/Grant is linked to only one chartstring.
Training Guide
Page 24
Step Action
10. Enter the desired information into the Business Unit field. Enter "LSUNO".
NOTE: LSUSH encumbers travel, so travel vouchers will be viewed in this report
as well.
11. Enter the desired information into the Budget Date From field. Enter "070110".
NOTE: If this involves a Project/Grant, you can retrieve information since the
inception of the Project/Grant (i.e. back to 2001 when PeopleSoft went live).
12. Enter the desired information into the To field. Enter "063011".
13. Remaining Amount
Specify the Remaining Amount parameters using the following:
• If you wish to view all of your department’s POs generated during a specified
period, regardless of the balance (i.e. those with a remaining balance if zero as well
as those not equal to zero), do not specify an operand and accept the default entry of
zero in the Remaining Balance field;
• You may specify an operand and enter the dollar amount in the adjacent field or
accept the default entry of zero; or
• For the purpose of managing encumbrances, the user will select Not Equal (< >)
with a Remaining Balance of zero so only PO lines with a Remaining Amount
(including credits) will be retrieved.

Training Guide
Page 25
Step Action
14. Click the button to the right of the Remaining Amount field.
Step Action
15. Click the Not Equal - < > list item.
16. ChartField Sort Options
You may enter single or multiple chartfields. Use the following to specify chartfield
information:
• If you wish to specify a different ChartField value other than the one defaulted,
click the Look up ChartField button and select the desired value (Account, Dept ID,
Fund, Operating Unit, etc);
• If you wish to specify more than one ChartField, click the Add a new row at row 1
(+) button to insert rows and select the desired values;
• If you wish to run the report to view all Pos for your BU, click the Delete Row 1 (-
) button to delete the defaulted ChartField value (most users will not run all Pos for
their BUs).
NOTE: When a Project/Grant value is entered, the remaining fields may be left
blank since there would only be one ChartString associated with the specified
Project/Grant.
Training Guide
Page 26
Step Action
17. Click the Look up ChartField button.
18. Click the DEPTID link.
19. Enter the desired information into the From ChartField Value field. Enter
"1050100".
20. Click the Save button.
21. Click the Add a new row at row 1 button.
22. Click the Look up ChartField button.
23. Click the FUND_CODE link.
24. Enter the desired information into the From ChartField Value field. Enter "111".
25. Click the Delete row 2 button.
Training Guide
Page 27
Step Action
26. A warning message displays.
Click the OK button.
27. In this example, the parameters entered will retrieve only POs for the fiscal year
2011, department 1050100 with a Remaining Amount not equal to zero.
Click the Save button.
28. Click the Run button.

Training Guide
Page 28
Step Action
29. Click the button to the right of the Server Name field.

Training Guide
Page 29
Step Action
30. Click the PSNT list item.
Training Guide
Page 30
Step Action
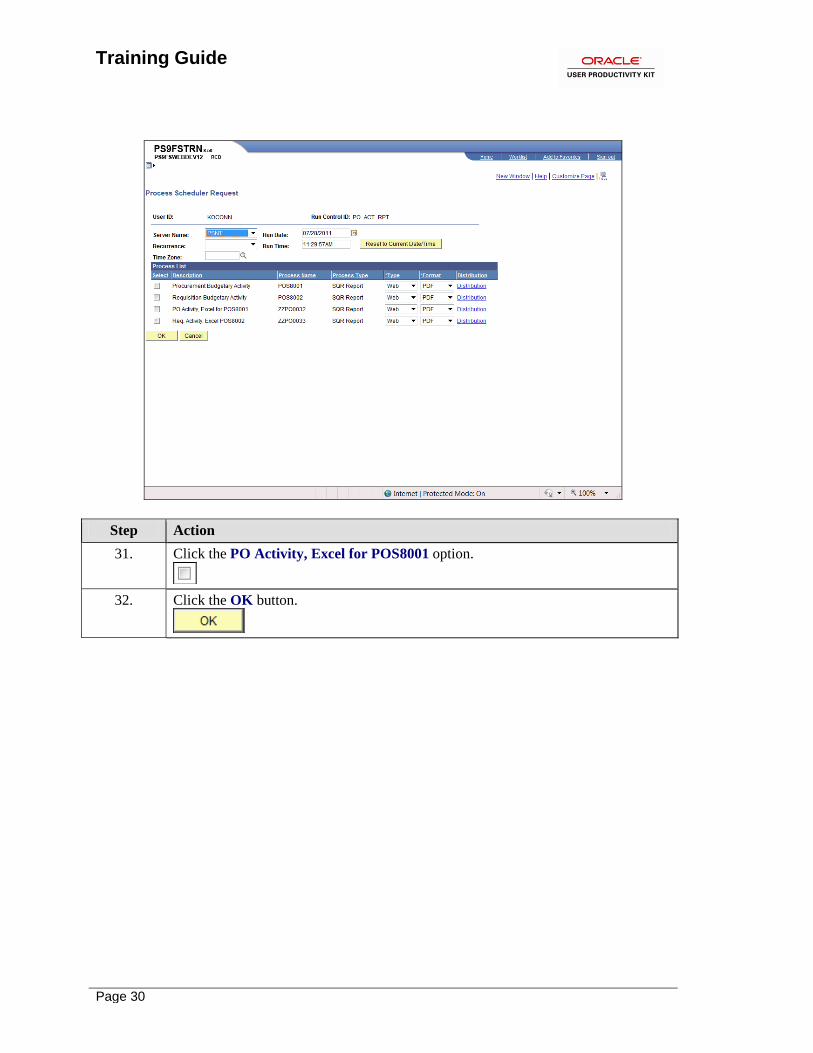
31. Click the PO Activity, Excel for POS8001 option.
32. Click the OK button.
Training Guide
Page 31
Step Action
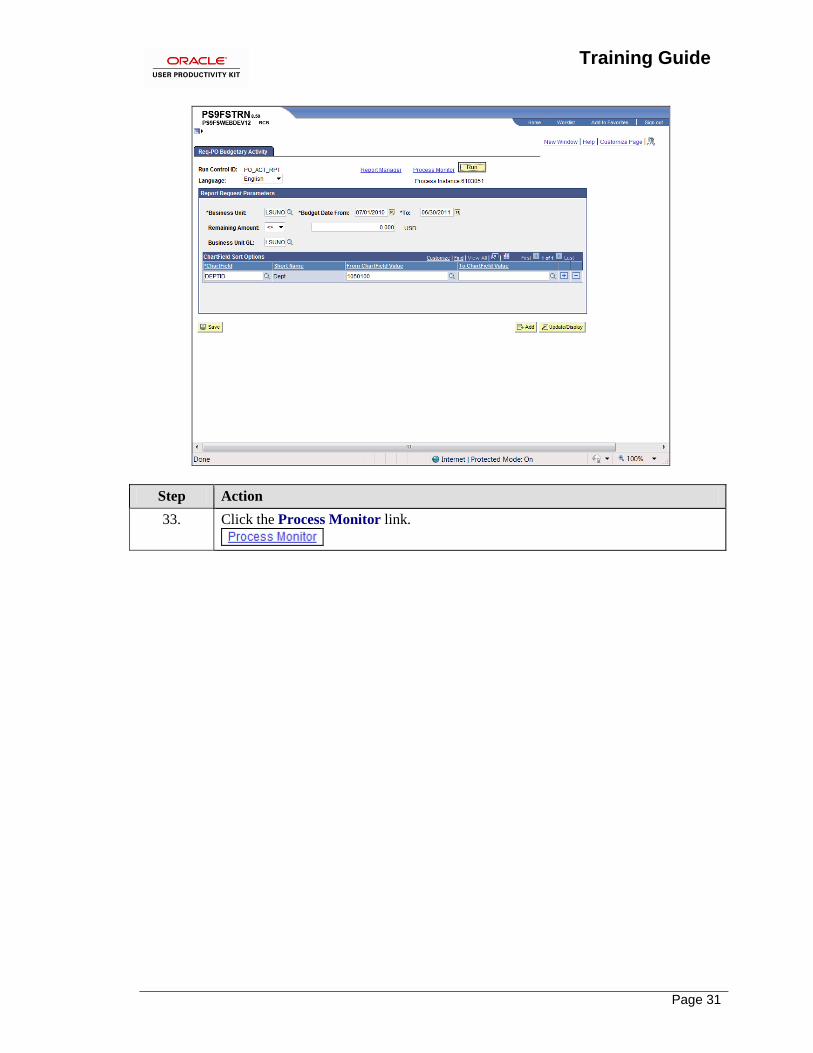
33. Click the Process Monitor link.
Training Guide
Page 32
Step Action
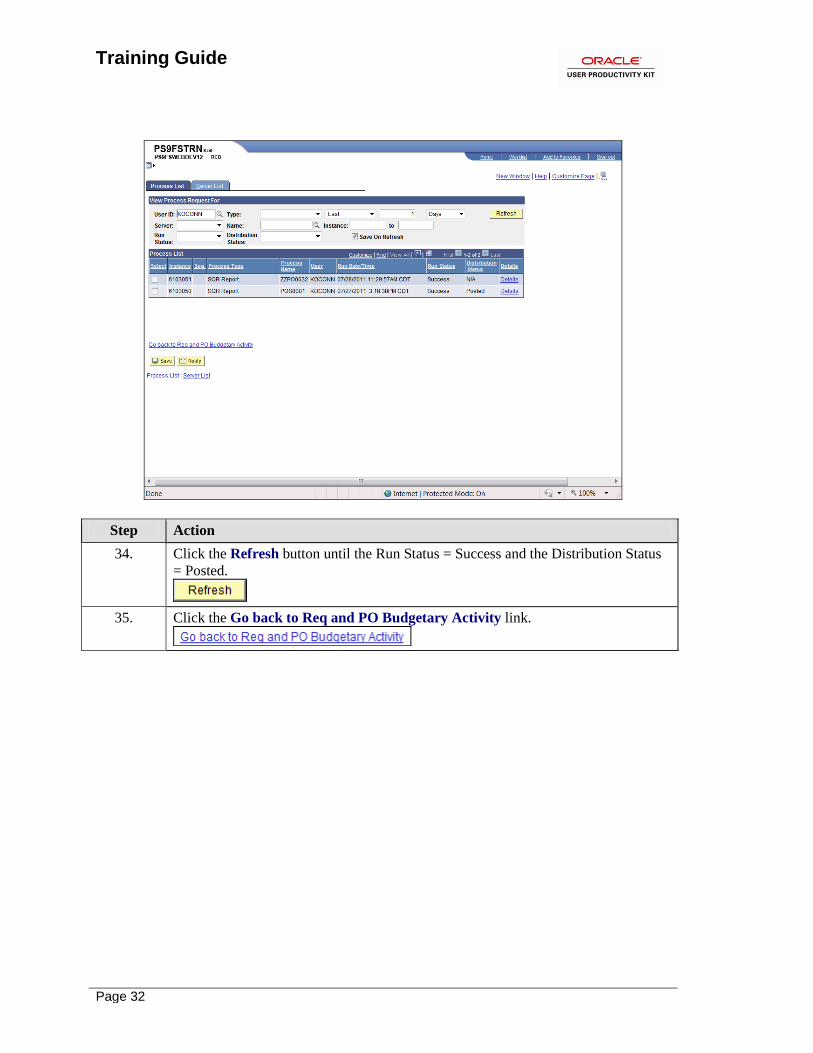
34. Click the Refresh button until the Run Status = Success and the Distribution Status
= Posted.
35. Click the Go back to Req and PO Budgetary Activity link.

Training Guide
Page 33
Step Action
36. Click the Report Manager link.
Training Guide
Page 34
Step Action
37. Click the Administration link.
Training Guide
Page 35
Step Action
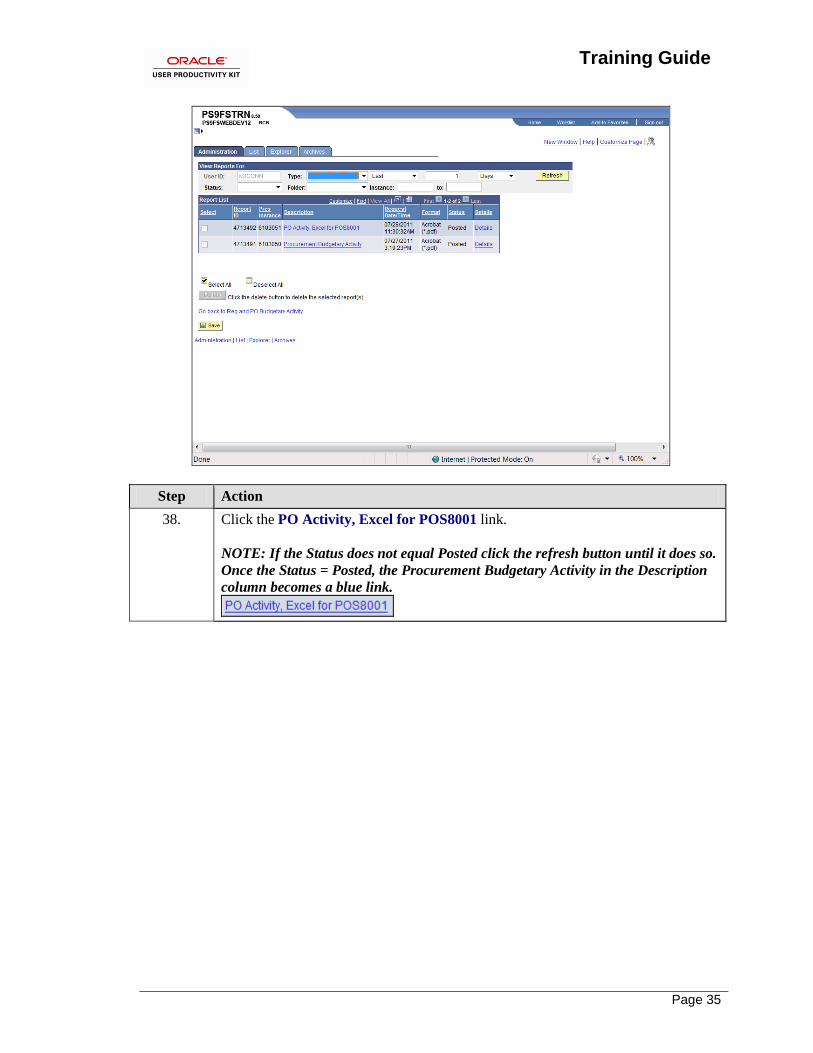
38. Click the PO Activity, Excel for POS8001 link.
NOTE: If the Status does not equal Posted click the refresh button until it does so.
Once the Status = Posted, the Procurement Budgetary Activity in the Description
column becomes a blue link.
Training Guide
Page 36
Step Action
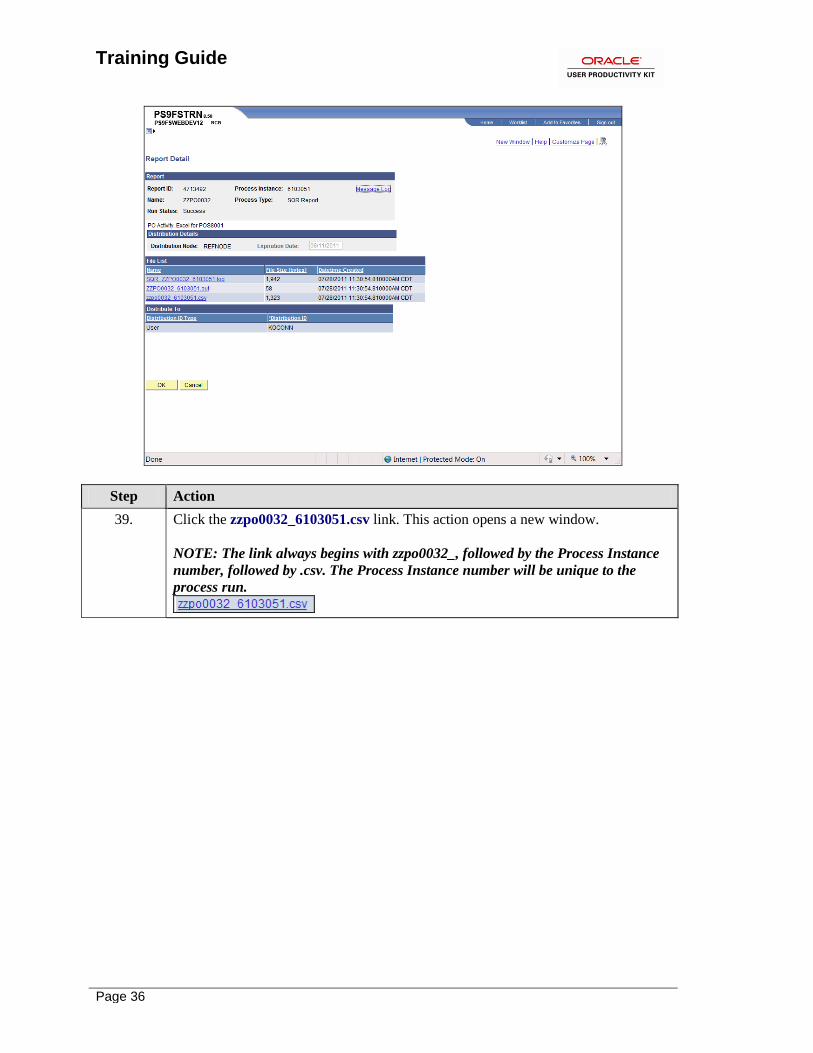
39. Click the zzpo0032_6103051.csv link. This action opens a new window.
NOTE: The link always begins with zzpo0032_, followed by the Process Instance
number, followed by .csv. The Process Instance number will be unique to the
process run.
Training Guide
Page 37
Step Action
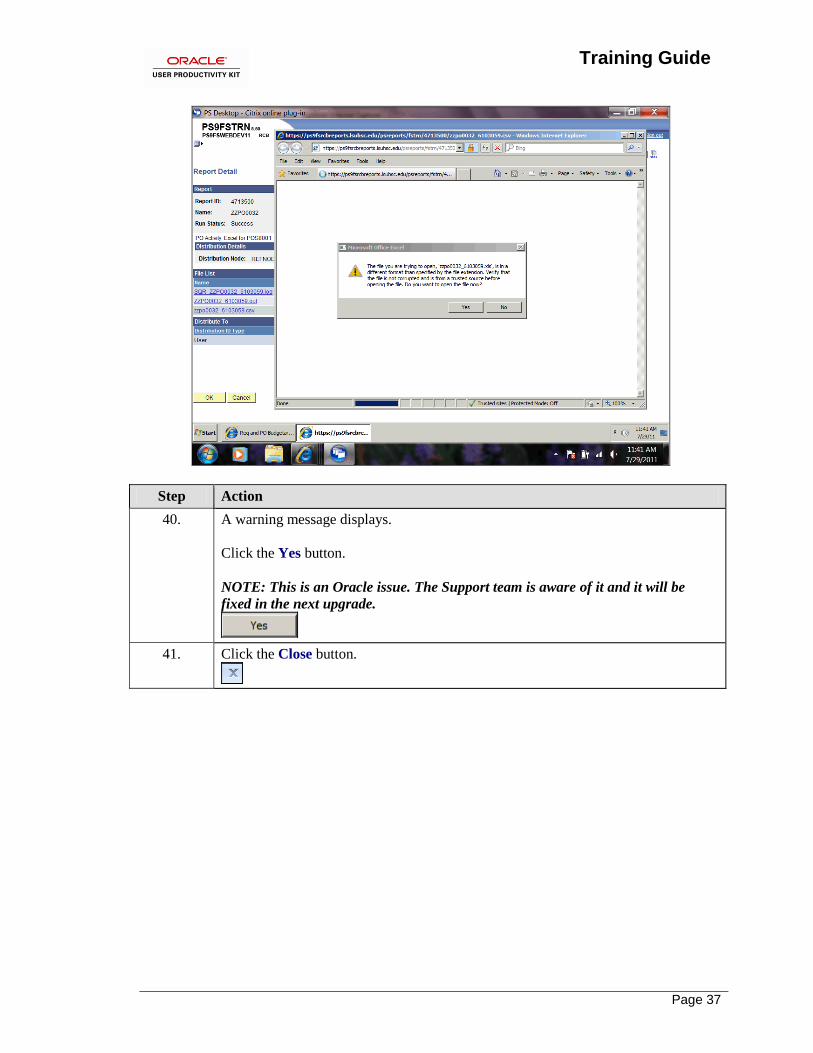
40. A warning message displays.
Click the Yes button.
NOTE: This is an Oracle issue. The Support team is aware of it and it will be
fixed in the next upgrade.
41. Click the Close button.
Training Guide
Page 38
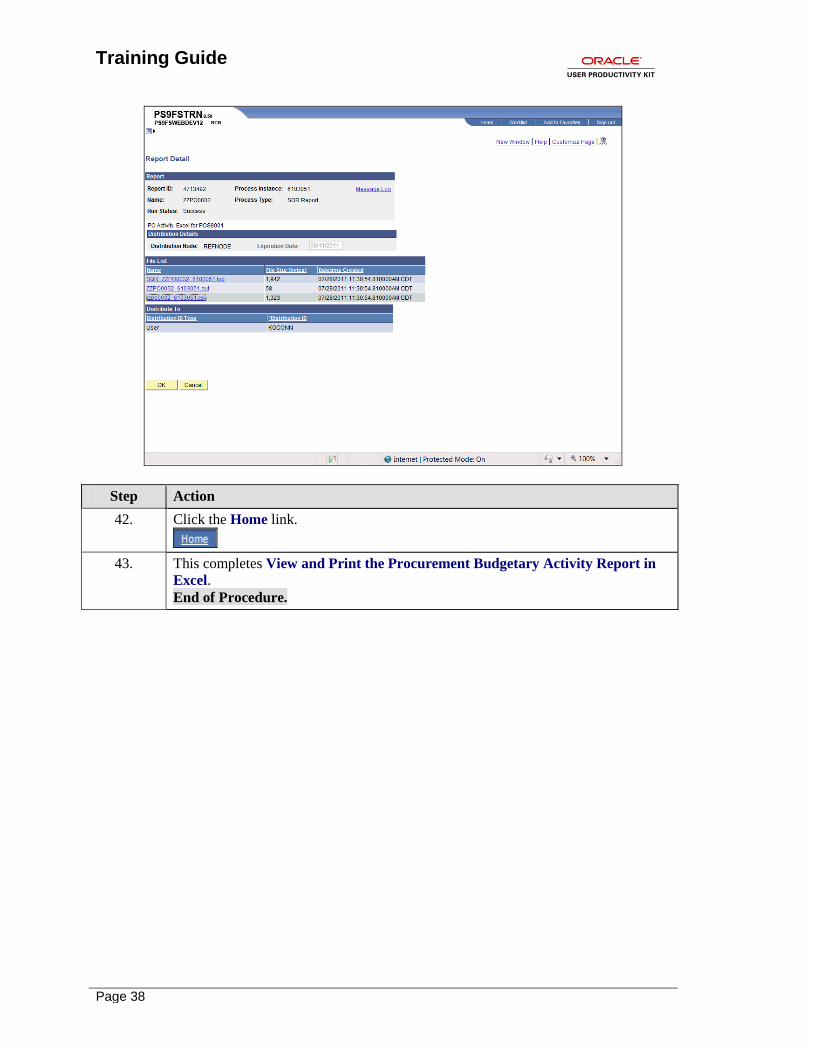
Step Action
42. Click the Home link.
43. This completes View and Print the Procurement Budgetary Activity Report in
Excel.
End of Procedure.
Training Guide
Page 39
Run the CLEANUP_PO_ACTIVITY Query The CLEANUP_PO_ACTIVITY query is a public query within the PeopleSoft system. It has
been designed and developed to provide users with the information needed for managing
encumbrances. When running the query, the information can be displayed in three formats:
HTML, Excel or CSV Text File. Most users will not use the CSV text File option.
The HTML format displays the data in a specified order. It does not allow for manipulation of the
data (i.e. moving columns).
You may elect to run the data to Excel or to CSV. Both will display in an Excel spreadsheet. The
data displays in the same order as viewed in HTML, but can be manipulated in the spreadsheet.
NOTE: This query must be run the PS 9 Report database. It cannot be run in the PS9
Production database.
Training Guide
Page 40
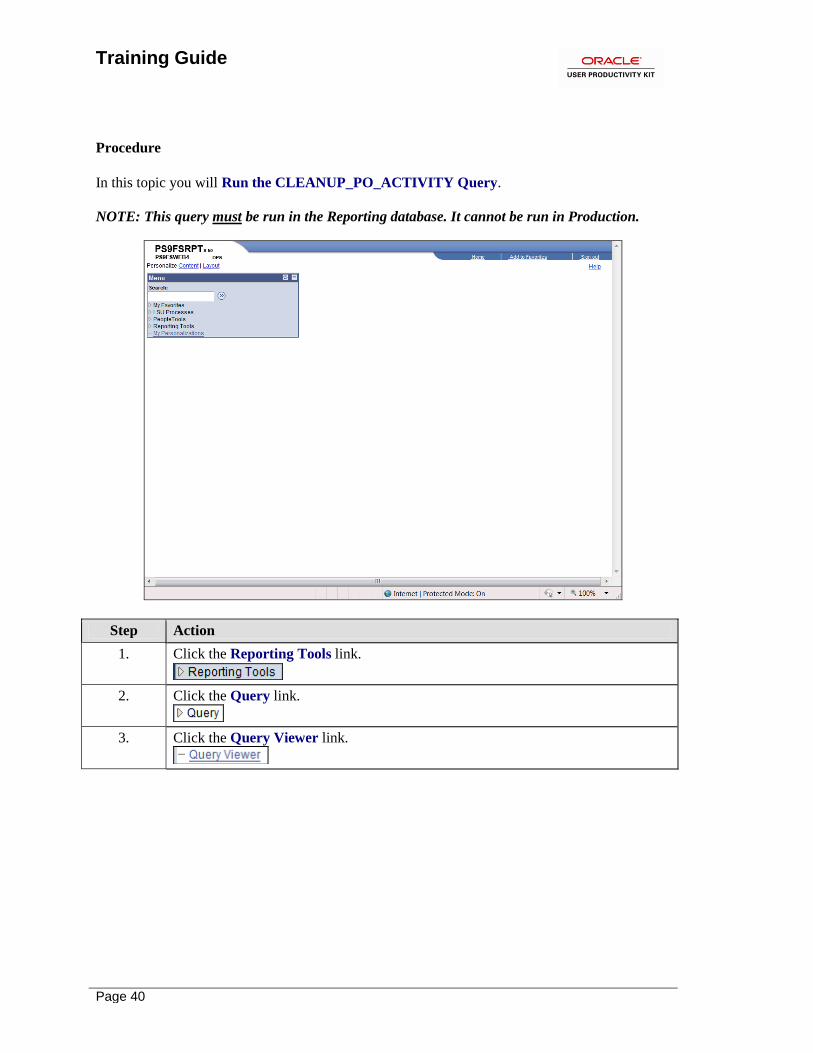
Procedure
In this topic you will Run the CLEANUP_PO_ACTIVITY Query.
NOTE: This query must be run in the Reporting database. It cannot be run in Production.
Step Action
1. Click the Reporting Tools link.
2. Click the Query link.
3. Click the Query Viewer link.
Training Guide
Page 41
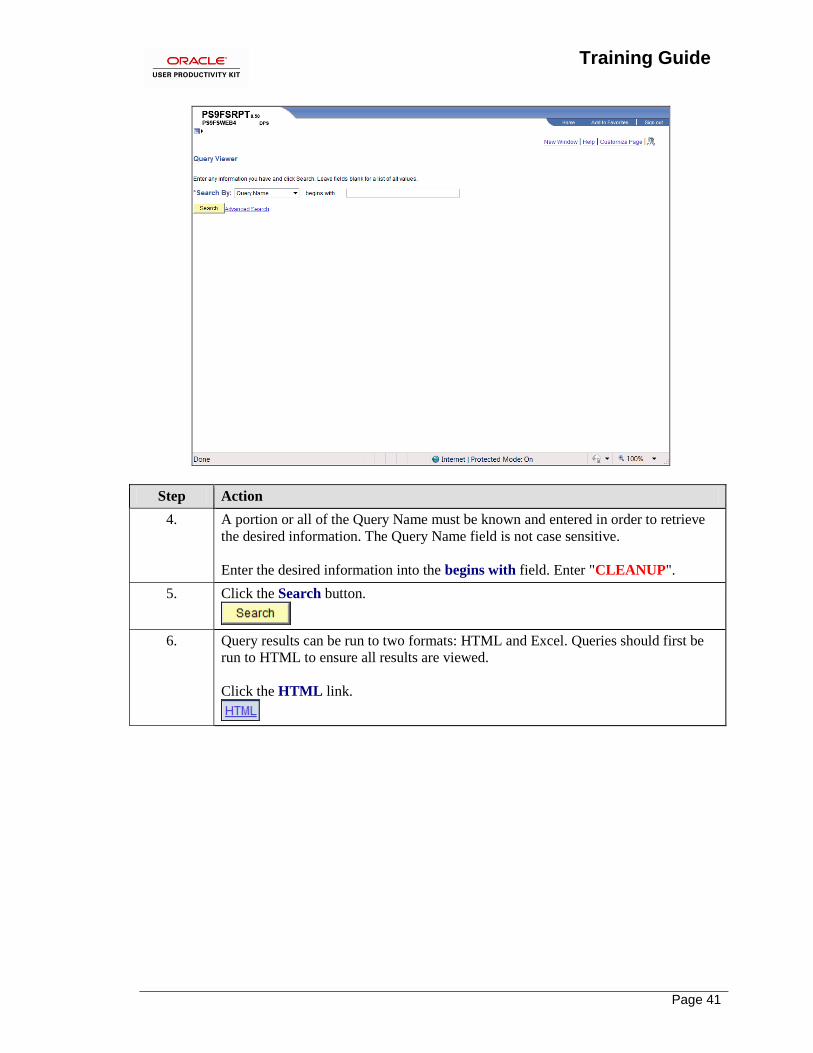
Step Action
4. A portion or all of the Query Name must be known and entered in order to retrieve
the desired information. The Query Name field is not case sensitive.
Enter the desired information into the begins with field. Enter "CLEANUP".
5. Click the Search button.
6. Query results can be run to two formats: HTML and Excel. Queries should first be
run to HTML to ensure all results are viewed.
Click the HTML link.
Training Guide
Page 42
Step Action
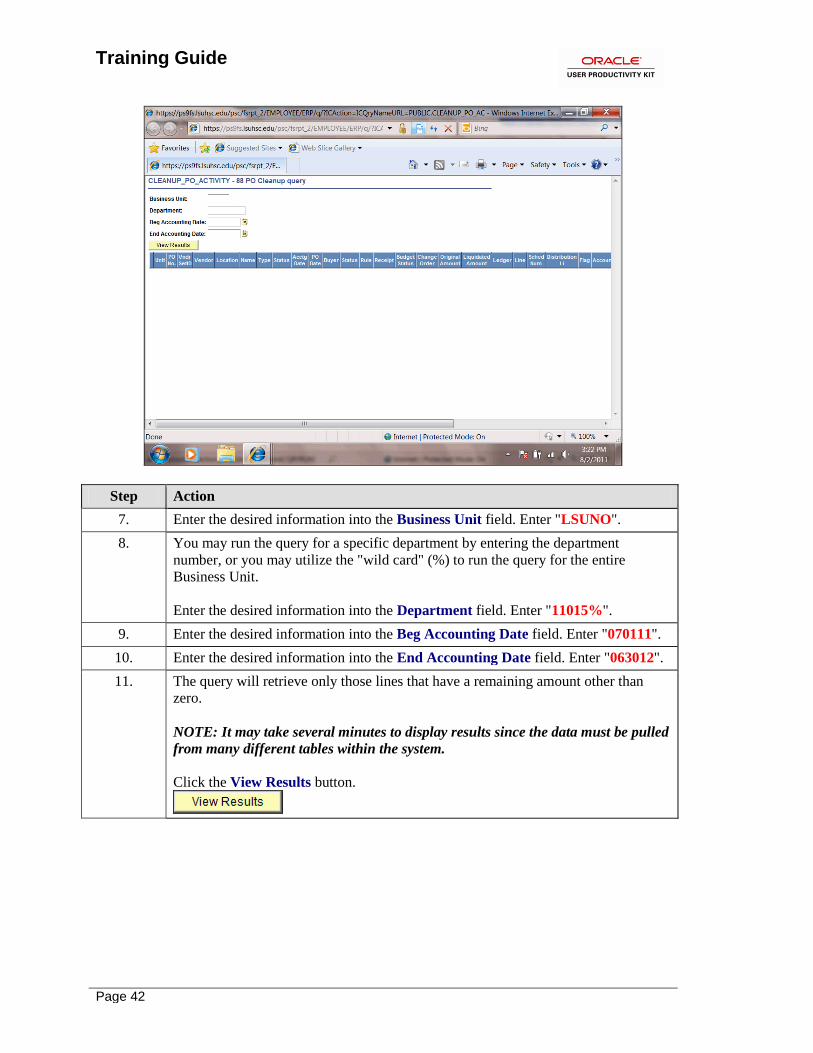
7. Enter the desired information into the Business Unit field. Enter "LSUNO".
8. You may run the query for a specific department by entering the department
number, or you may utilize the "wild card" (%) to run the query for the entire
Business Unit.
Enter the desired information into the Department field. Enter "11015%".
9. Enter the desired information into the Beg Accounting Date field. Enter "070111".
10. Enter the desired information into the End Accounting Date field. Enter "063012".
11. The query will retrieve only those lines that have a remaining amount other than
zero.
NOTE: It may take several minutes to display results since the data must be pulled
from many different tables within the system.
Click the View Results button.

Training Guide
Page 43
Step Action
12. The query results will display at the bottom of the page. Only the first 100 lines
displaying for view.
Click the Right button of the scrollbar to view additional information.
13. In this example only 10 lines have been retrieved. When working in Production if
more than 100 lines are retrieved, click the right arrow to view the next page.
14. Results can be downloaded from HTML to Excel by clicking the Excel Spreadsheet
link. This will open a new window.
Click the Excel Spreadsheet link.
15. Click the Open button.
Training Guide
Page 44
Step Action
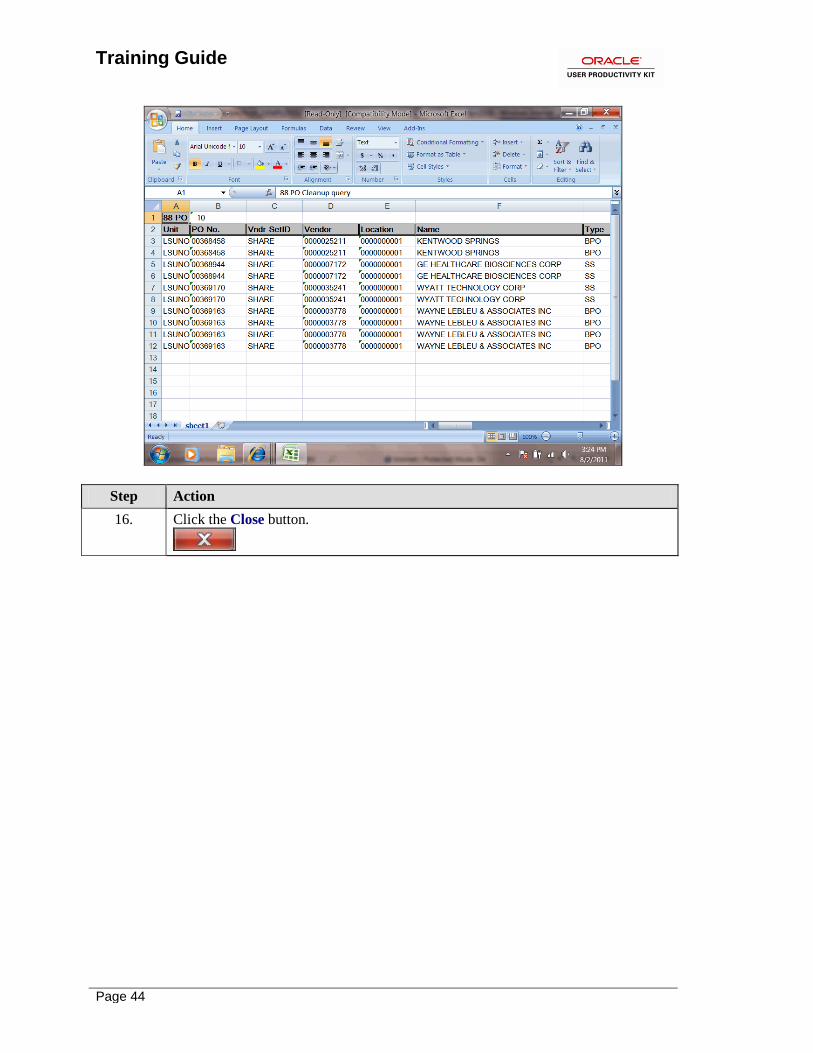
16. Click the Close button.
Training Guide
Page 45
Step Action
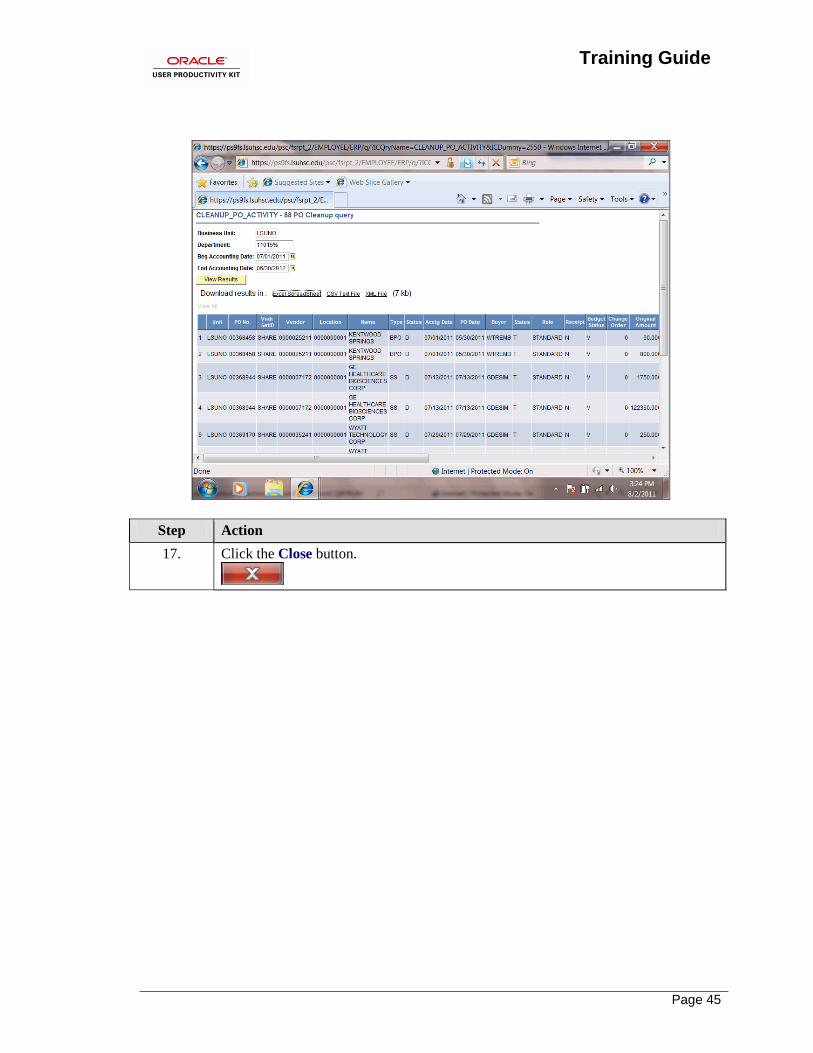
17. Click the Close button.
Training Guide
Page 46
Step Action
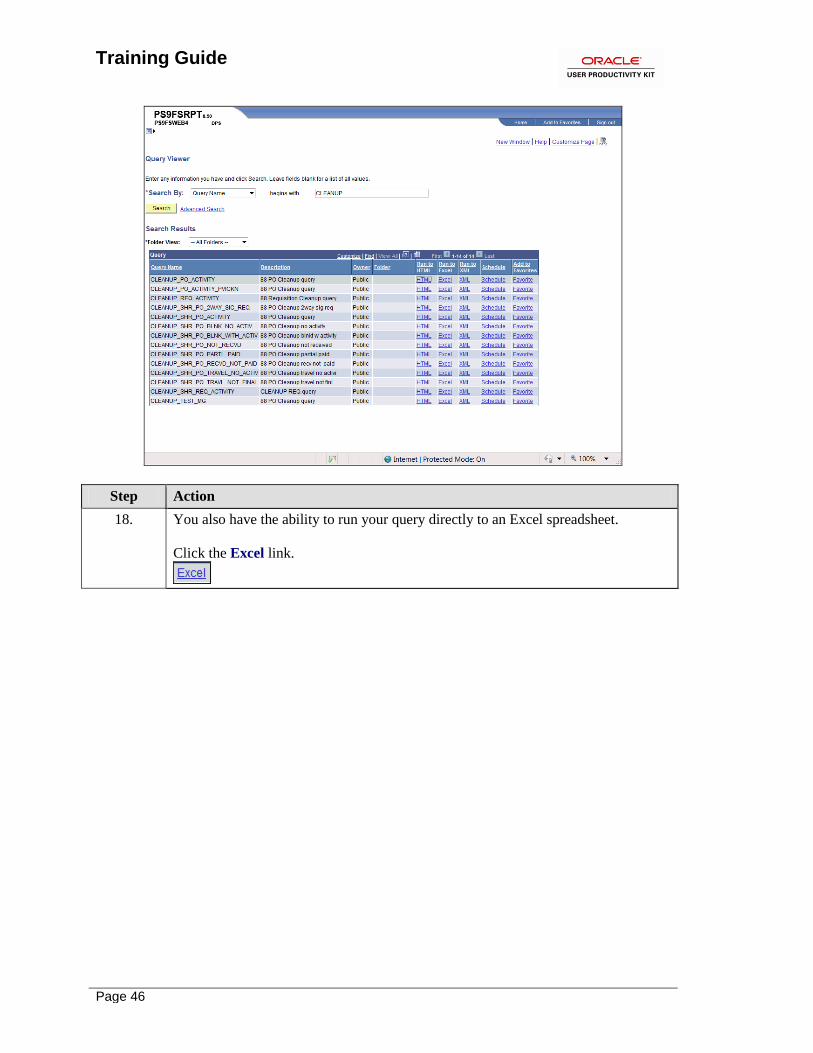
18. You also have the ability to run your query directly to an Excel spreadsheet.
Click the Excel link.
Training Guide
Page 47
Step Action
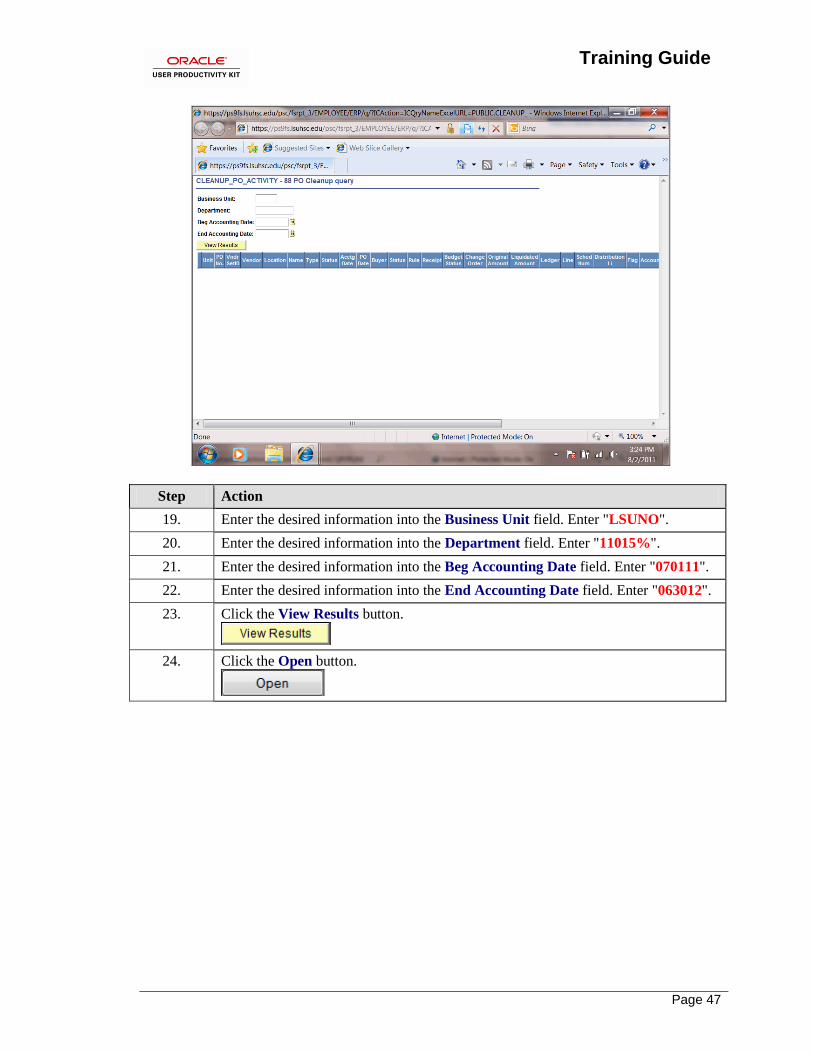
19. Enter the desired information into the Business Unit field. Enter "LSUNO".
20. Enter the desired information into the Department field. Enter "11015%".
21. Enter the desired information into the Beg Accounting Date field. Enter "070111".
22. Enter the desired information into the End Accounting Date field. Enter "063012".
23. Click the View Results button.
24. Click the Open button.
Training Guide
Page 48
Step Action
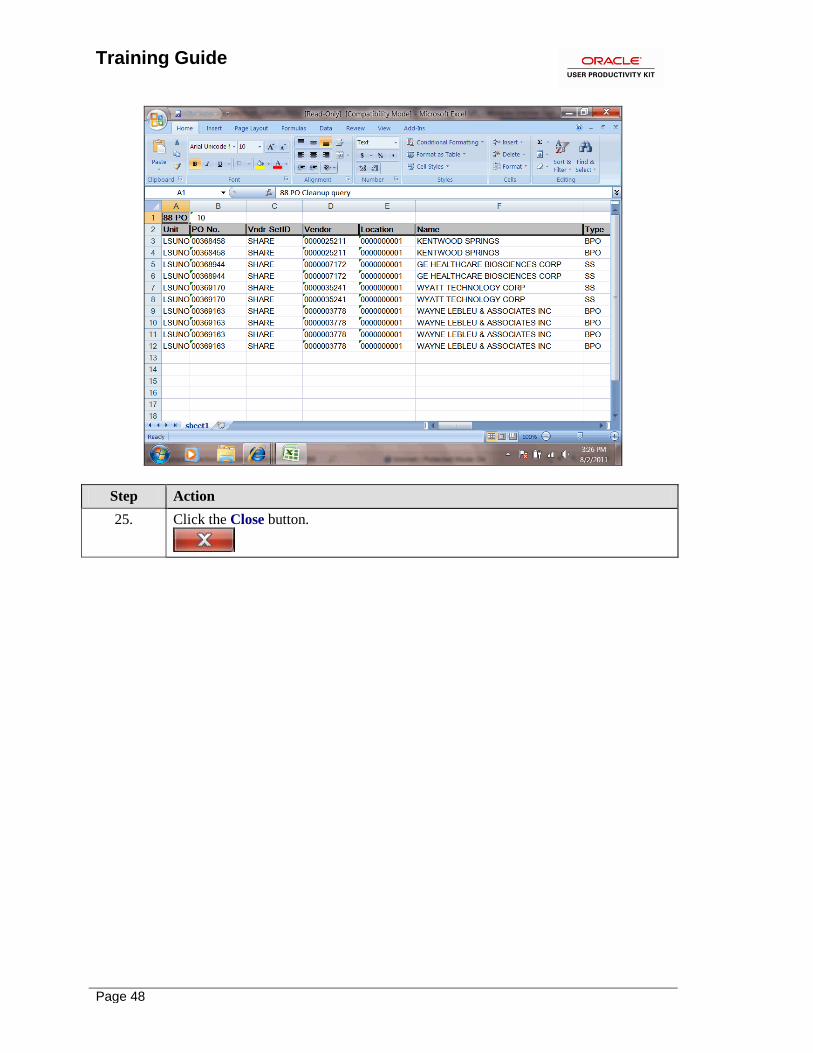
25. Click the Close button.
Training Guide
Page 49
Step Action
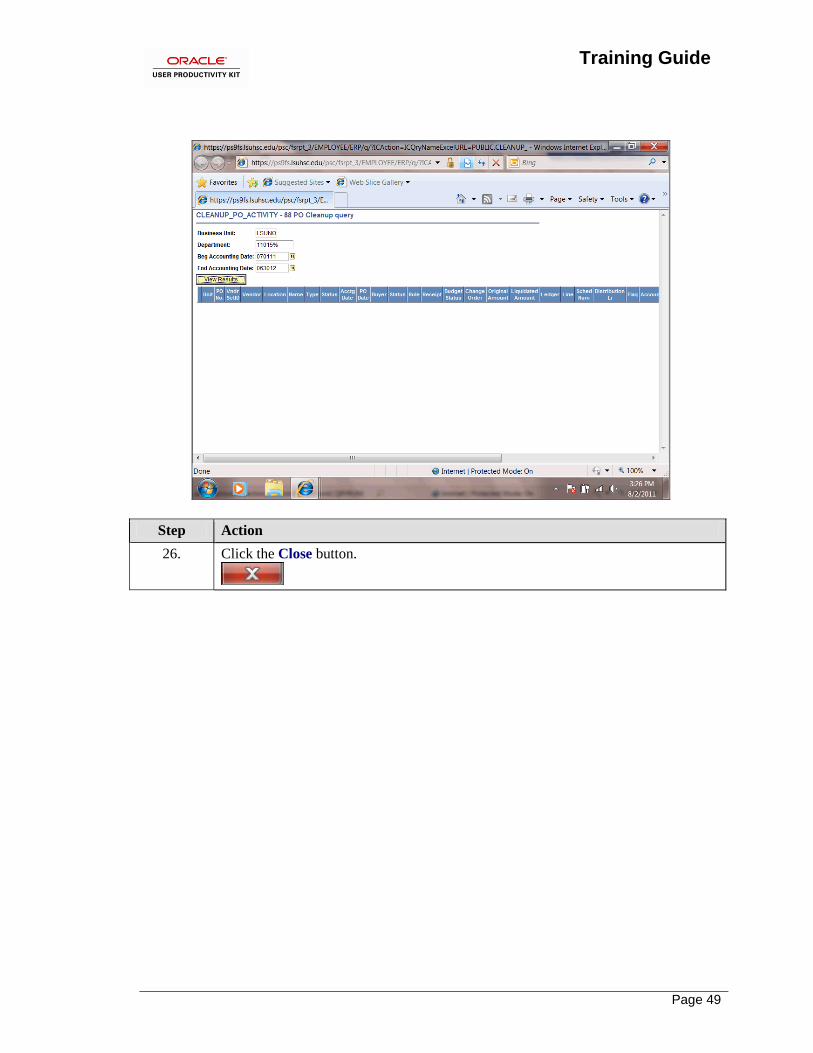
26. Click the Close button.
Training Guide
Page 50
Step Action
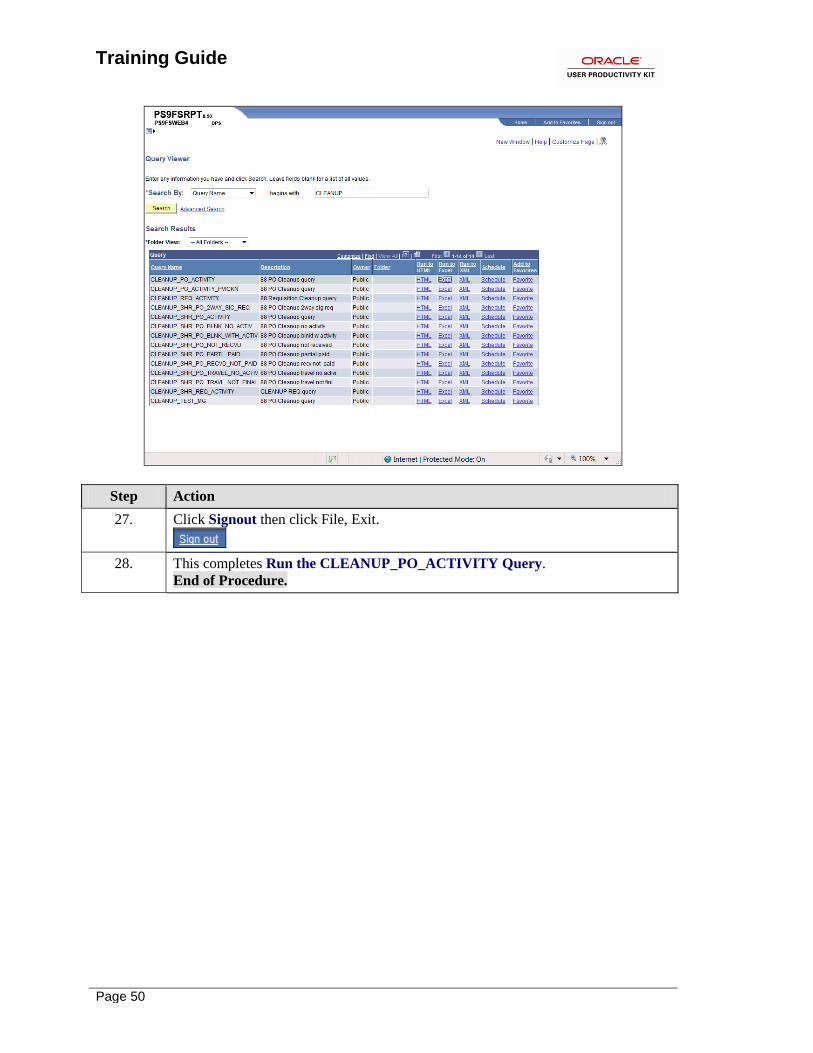
27. Click Signout then click File, Exit.
28. This completes Run the CLEANUP_PO_ACTIVITY Query.
End of Procedure.
Training Guide
Page 51
Inquire on a PO The PO Activity Summary page is the only tool available that will display all voucher activity
(i.e. Voucher IDs and Voucher Line Numbers) for a PO line. This information must be provided
to Accounts Payable to finalize the Voucher.
The PO Activity Summary page indicates the following:
• Whether or not the Receipt(s) has been entered in the PeopleSoft system for the PO line(s) with
a listing of the Receipt
IDs; and
• Whether or not an Invoice(s) (i.e. Voucher) has been paid by Accounts Payable for the PO
line(s) with a listing of the
Voucher IDs and Voucher Line Numbers.
View and Analyze the PO Activity Summary Page
Procedure
In this topic you will learn how to View and Analyze the PO Activity Summary.
NOTE: The PO Activity Summary can be used to determine why there is a remaining
encumbrance amount on a PO line.
Training Guide
Page 52
Step Action
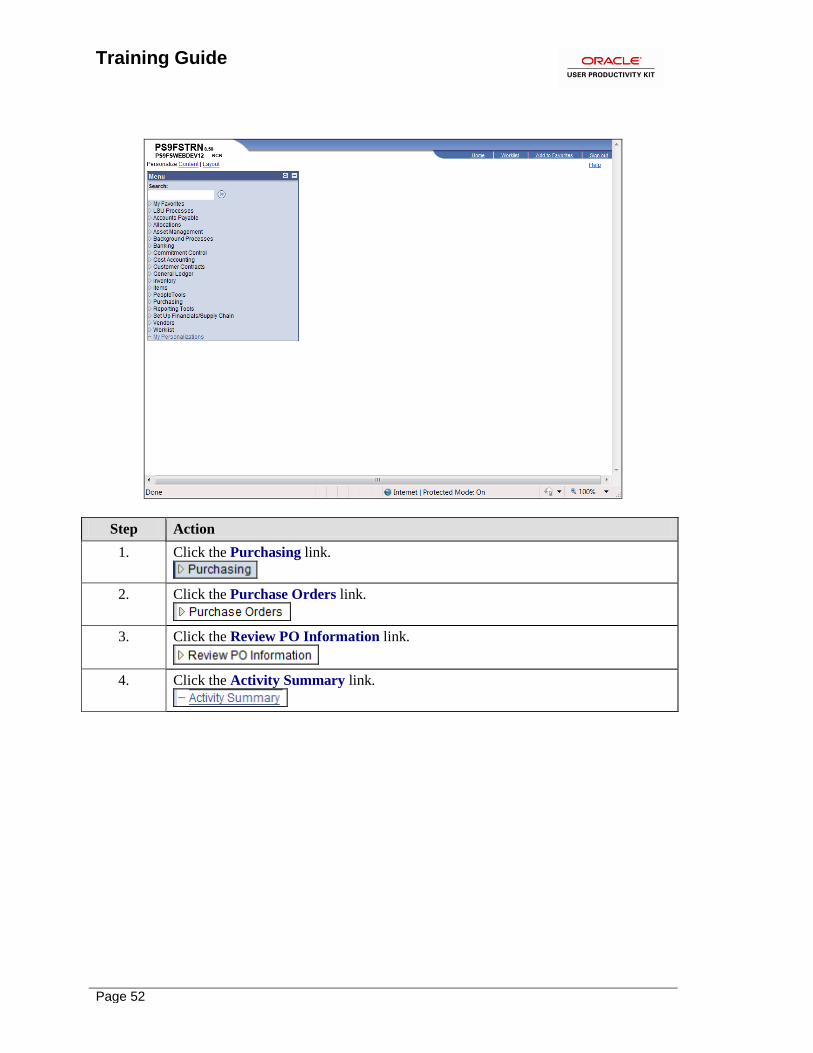
1. Click the Purchasing link.
2. Click the Purchase Orders link.
3. Click the Review PO Information link.
4. Click the Activity Summary link.
Training Guide
Page 53
Step Action
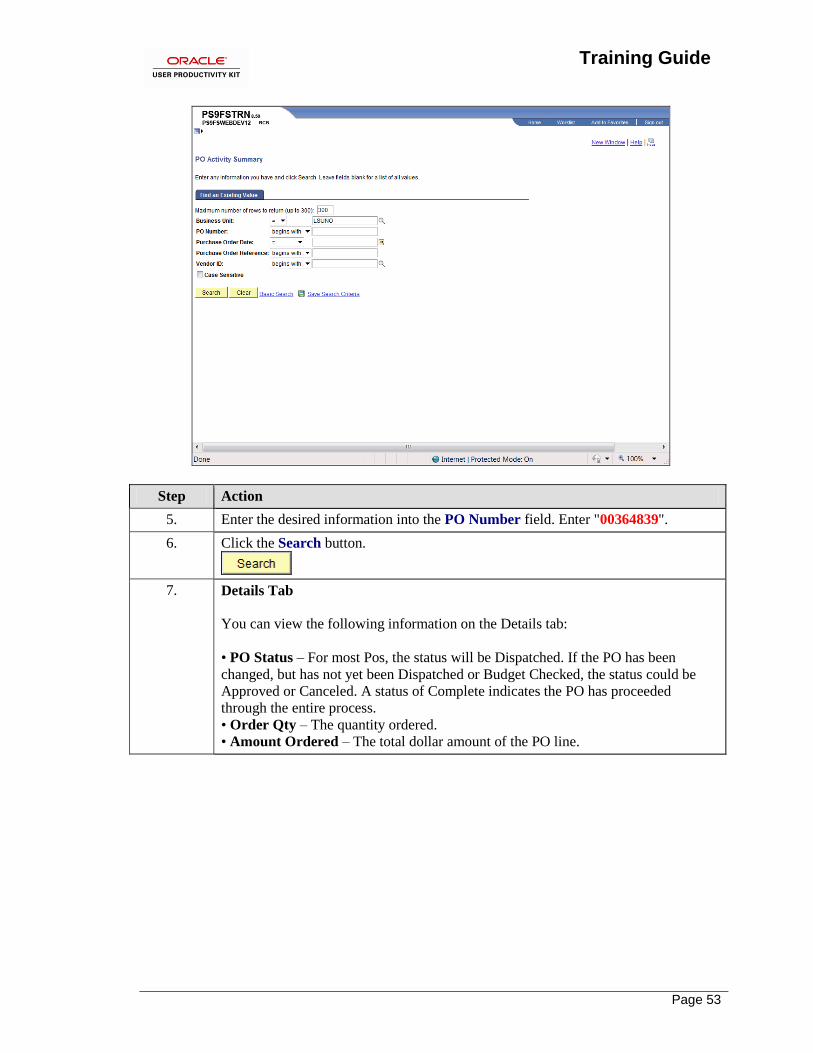
5. Enter the desired information into the PO Number field. Enter "00364839".
6. Click the Search button.
7. Details Tab
You can view the following information on the Details tab:
• PO Status – For most Pos, the status will be Dispatched. If the PO has been
changed, but has not yet been Dispatched or Budget Checked, the status could be
Approved or Canceled. A status of Complete indicates the PO has proceeded
through the entire process.
• Order Qty – The quantity ordered.
• Amount Ordered – The total dollar amount of the PO line.
Training Guide
Page 54
Step Action
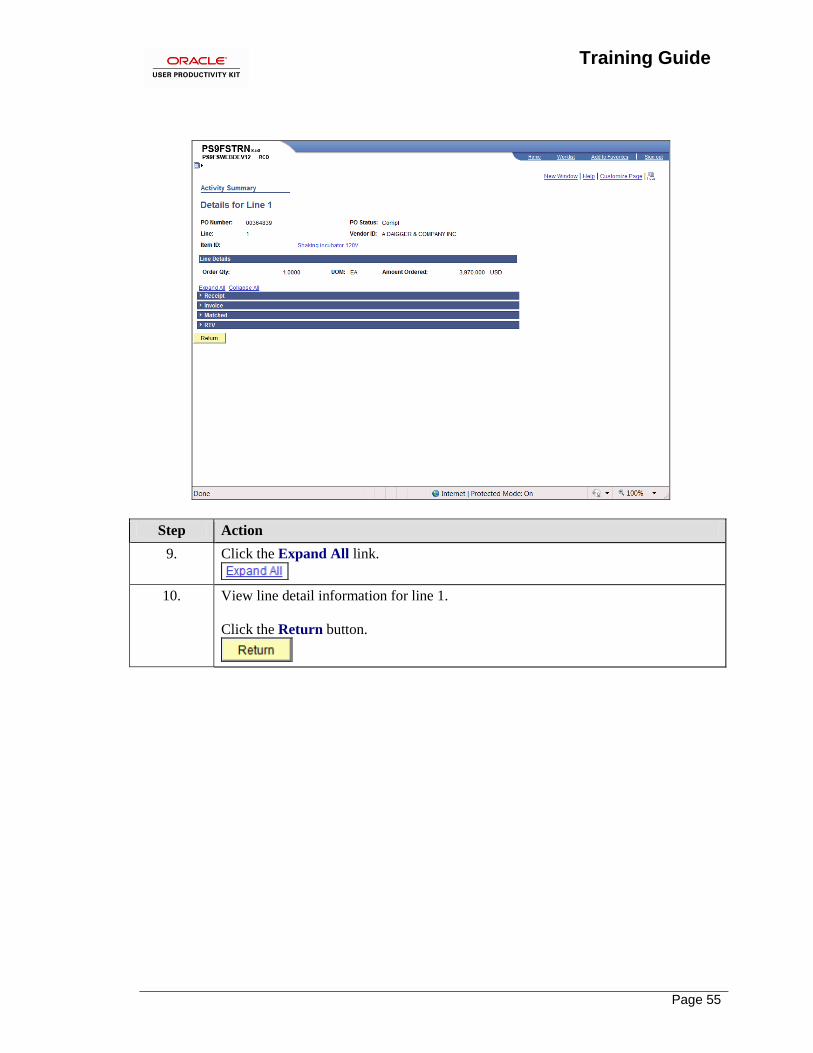
8. Click the Line Details for line 1 button.
Training Guide
Page 55
Step Action
9. Click the Expand All link.
10. View line detail information for line 1.
Click the Return button.
Training Guide
Page 56
Step Action
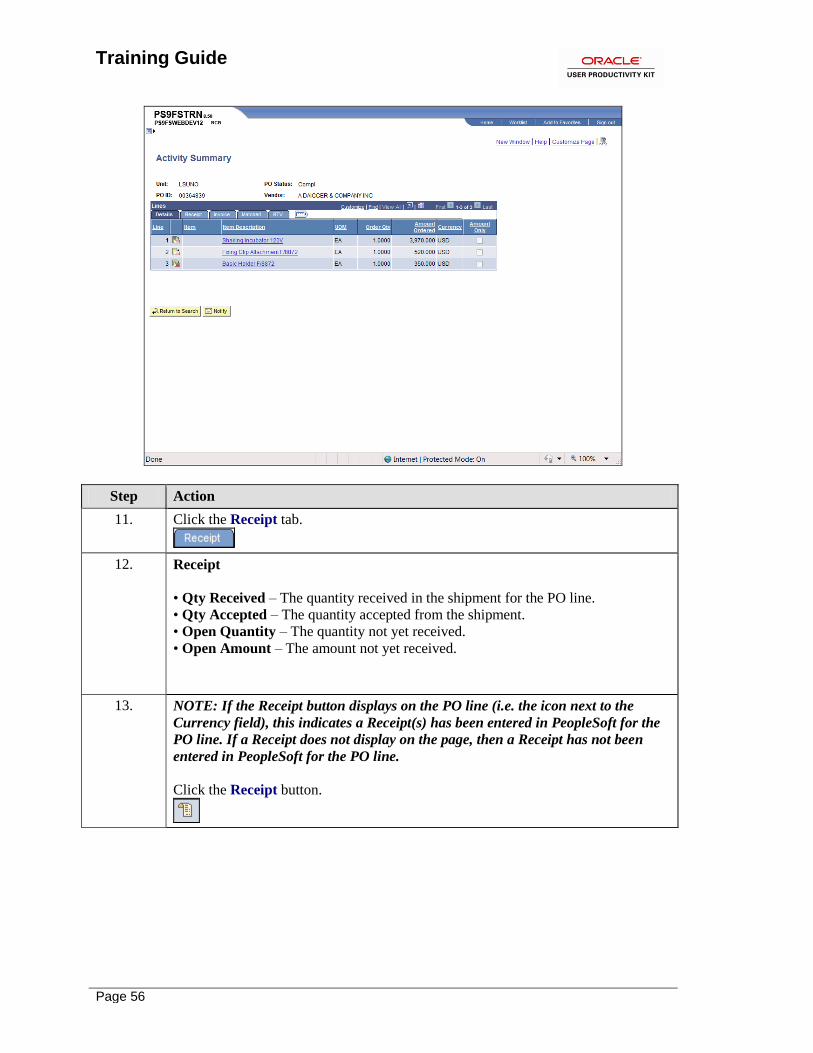
11. Click the Receipt tab.
12. Receipt
• Qty Received – The quantity received in the shipment for the PO line.
• Qty Accepted – The quantity accepted from the shipment.
• Open Quantity – The quantity not yet received.
• Open Amount – The amount not yet received.
13. NOTE: If the Receipt button displays on the PO line (i.e. the icon next to the
Currency field), this indicates a Receipt(s) has been entered in PeopleSoft for the
PO line. If a Receipt does not display on the page, then a Receipt has not been
entered in PeopleSoft for the PO line.
Click the Receipt button.
Training Guide
Page 57
Step Action
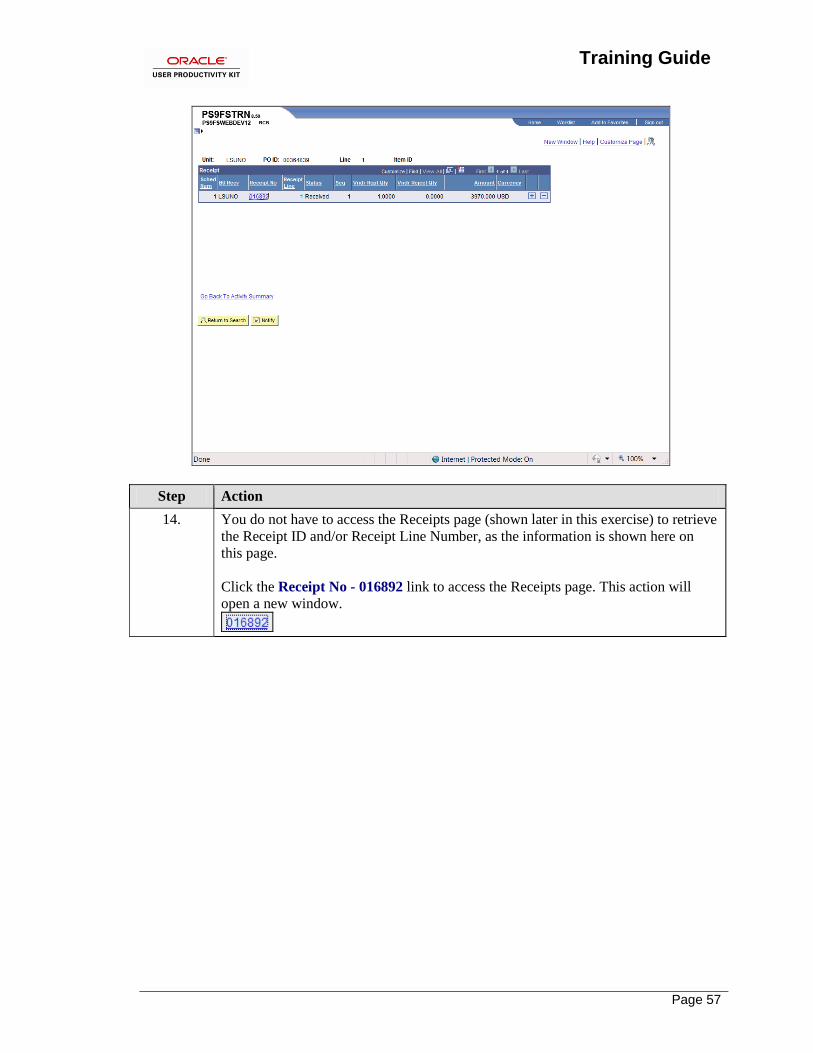
14. You do not have to access the Receipts page (shown later in this exercise) to retrieve
the Receipt ID and/or Receipt Line Number, as the information is shown here on
this page.
Click the Receipt No - 016892 link to access the Receipts page. This action will
open a new window.
Training Guide
Page 58
Step Action
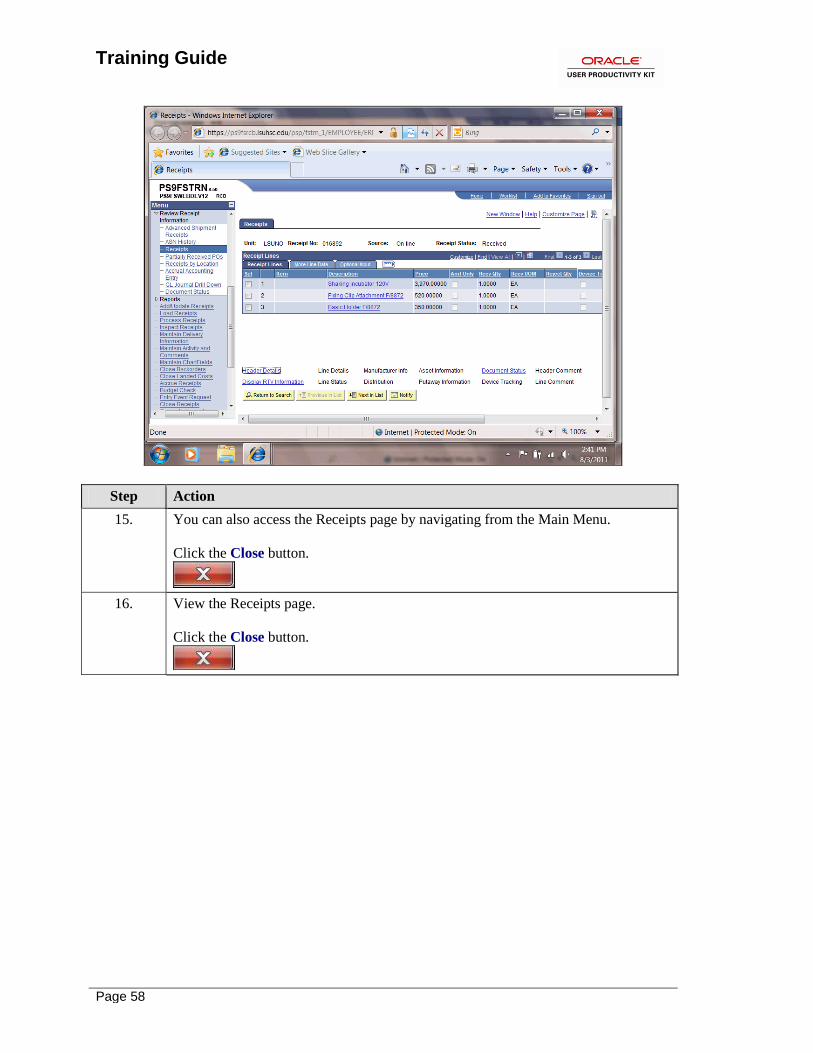
15. You can also access the Receipts page by navigating from the Main Menu.
Click the Close button.
16. View the Receipts page.
Click the Close button.
Training Guide
Page 59
Step Action
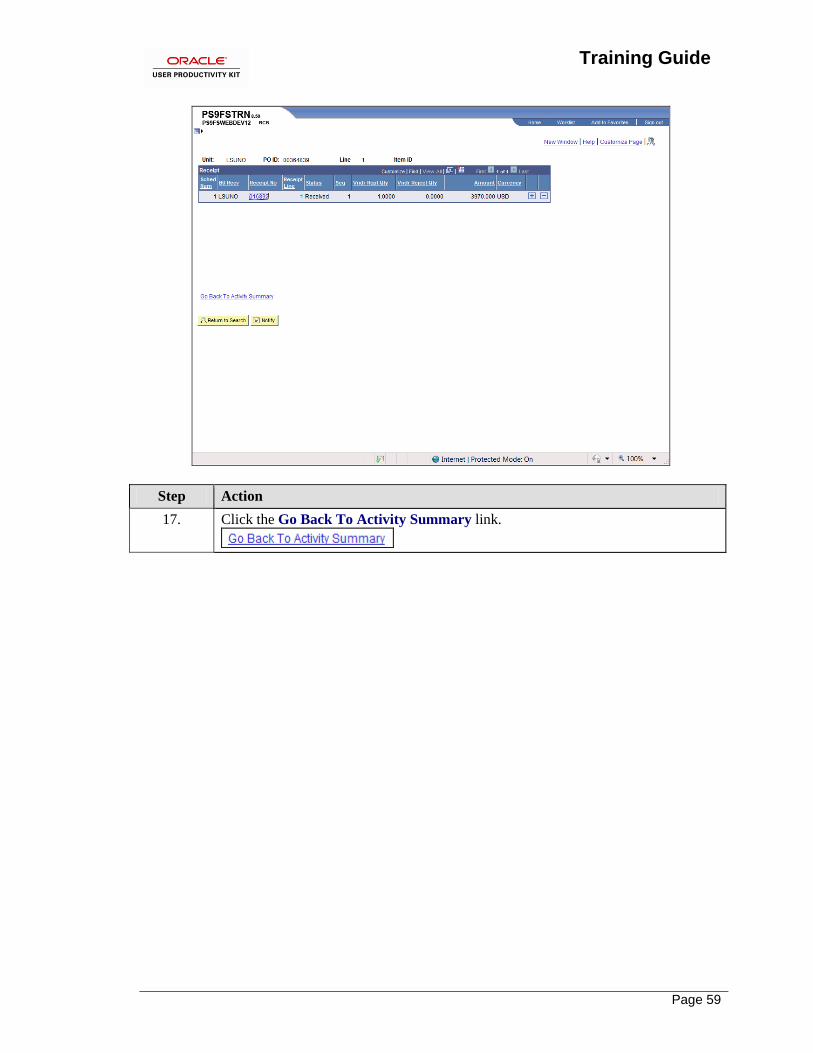
17. Click the Go Back To Activity Summary link.
Training Guide
Page 60
Step Action
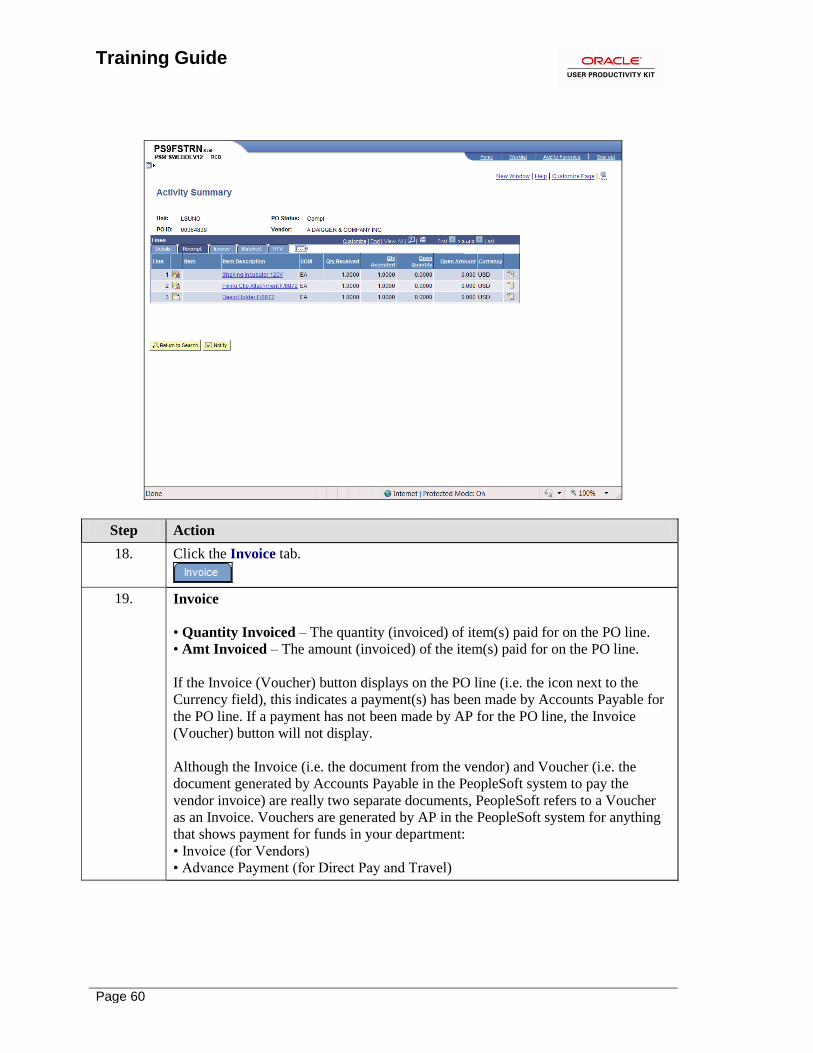
18. Click the Invoice tab.
19. Invoice
• Quantity Invoiced – The quantity (invoiced) of item(s) paid for on the PO line.
• Amt Invoiced – The amount (invoiced) of the item(s) paid for on the PO line.
If the Invoice (Voucher) button displays on the PO line (i.e. the icon next to the
Currency field), this indicates a payment(s) has been made by Accounts Payable for
the PO line. If a payment has not been made by AP for the PO line, the Invoice
(Voucher) button will not display.
Although the Invoice (i.e. the document from the vendor) and Voucher (i.e. the
document generated by Accounts Payable in the PeopleSoft system to pay the
vendor invoice) are really two separate documents, PeopleSoft refers to a Voucher
as an Invoice. Vouchers are generated by AP in the PeopleSoft system for anything
that shows payment for funds in your department:
• Invoice (for Vendors)
• Advance Payment (for Direct Pay and Travel)
Training Guide
Page 61
Step Action
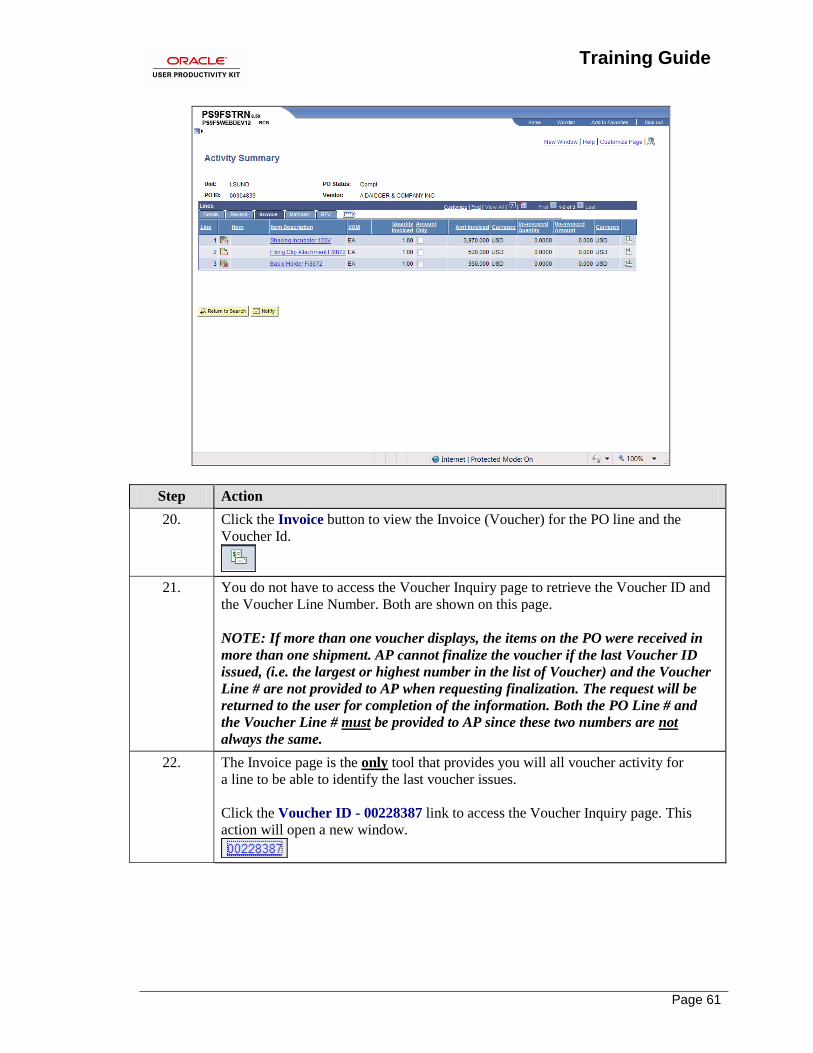
20. Click the Invoice button to view the Invoice (Voucher) for the PO line and the
Voucher Id.
21. You do not have to access the Voucher Inquiry page to retrieve the Voucher ID and
the Voucher Line Number. Both are shown on this page.
NOTE: If more than one voucher displays, the items on the PO were received in
more than one shipment. AP cannot finalize the voucher if the last Voucher ID
issued, (i.e. the largest or highest number in the list of Voucher) and the Voucher
Line # are not provided to AP when requesting finalization. The request will be
returned to the user for completion of the information. Both the PO Line # and
the Voucher Line # must be provided to AP since these two numbers are not
always the same.
22. The Invoice page is the only tool that provides you will all voucher activity for
a line to be able to identify the last voucher issues.
Click the Voucher ID - 00228387 link to access the Voucher Inquiry page. This
action will open a new window.
Training Guide
Page 62
Step Action
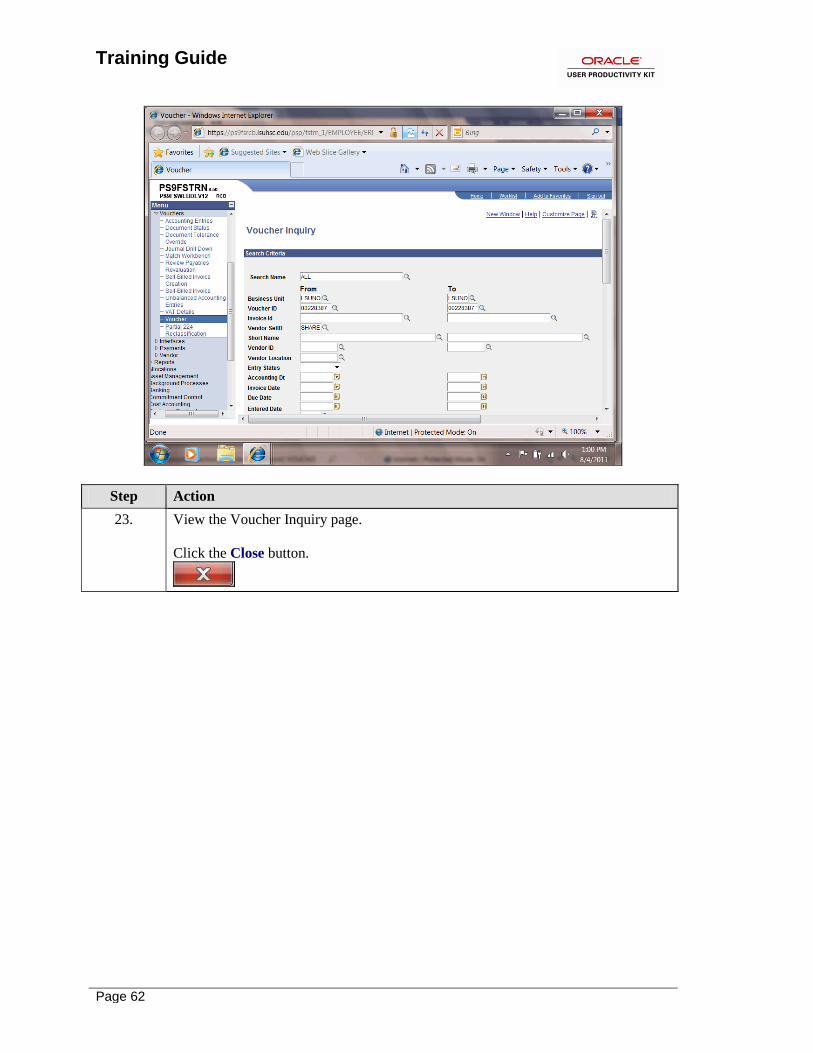
23. View the Voucher Inquiry page.
Click the Close button.

Training Guide
Page 63
Step Action
24. Click the Activity Summary link.
Training Guide
Page 64
Step Action
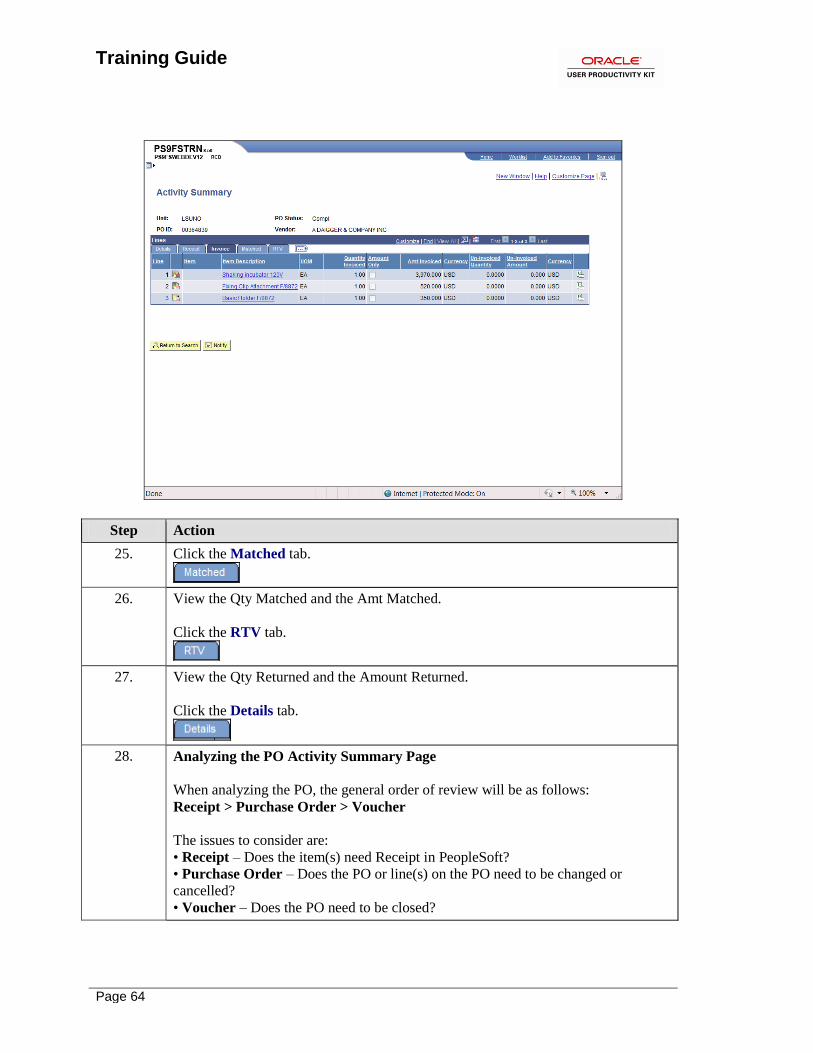
25. Click the Matched tab.
26. View the Qty Matched and the Amt Matched.
Click the RTV tab.
27. View the Qty Returned and the Amount Returned.
Click the Details tab.
28. Analyzing the PO Activity Summary Page
When analyzing the PO, the general order of review will be as follows:
Receipt > Purchase Order > Voucher
The issues to consider are:
• Receipt – Does the item(s) need Receipt in PeopleSoft?
• Purchase Order – Does the PO or line(s) on the PO need to be changed or
cancelled?
• Voucher – Does the PO need to be closed?
Training Guide
Page 65
Step Action
29. Four scenarios have been found to occur when analyzing the PO Activity Summary
Page. These four scenarios arise from the Receipt (scenario 1 & 2), Purchase
Order (scenario 3) and/or Voucher (scenario 4) are as follows:
1. The PO line has been received (i.e. a Receipt was entered in the PeopleSoft
system) and vouchered (i.e. paid in Accounts Payable), but there is a Remaining
Amount;
2. The PO lines item(s) were ordered and physically received in the Department, but
not vouchered (i.e. paid by Accounts payable);
3. The PO line(s) need to be cancelled and/or changed; and/or
4. The Receipt, Invoice and matched quantities are equal, but the dollar amount
invoiced is less than (<) the PO line amount on any of the PO line(s).
Analyzing these four scenarios is shown in the steps that follow.
30. Receipt
1. The PO line has been received (i.e. a Receipt was entered in the PeopleSoft
system) and vouchered (i.e. paid by Accounts Payable), but there is a Remaining
Amount:
Solution: The PO should be closed by Purchasing.
31. Receipt
2. The PO line item(s) were ordered and physically received in the Department, but
not vouchered (i.e. paid by Accounts Payable).
Solution: Determine if AP has an outstanding invoice to be paid. If there is an
outstanding invoice, AP should proceed with payment. If there is no invoice, the PO
should be closed through PO Reconciliation workbench by someone in Purchasing.
32. Purchase Order
3. The PO line(s) need to be canceled and/or changed.
Solution: Contact Purchasing (i.e. the Buyer) to request the PO line(s) be canceled
and/or changed.
33. Voucher
4. The Receipt, Invoice and matched quantities are equal, but the dollar amount
invoiced is less than (<) the PO line amount on any of the PO line(s).
Solution: The PO can be closed through PO Reconciliation Workbench by
Purchasing.
Training Guide
Page 66
Step Action
34. For tips on analyzing all encumbrance amount on departmental accounts, including
additional information regarding the fours scenarios discussed above, see:
• The Access the CLEANUP Public Queries that Augment the Procurement and
Requisition Budgetary Activity Reports handout; or
• The PeopleSoft Support Website:
http://www.lsuhsc.edu/ps/support/info%20release20fin.aspx
Information Release #11(R) - LSUSH – Encumbrance Analysis Tips and
Information Release #44 – LSUNO – Encumbrance Analysis Tips.
35. Click the Home link.
36. This completes View and Analyze the PO Activity Summary.
End of Procedure.
Training Guide
Page 67
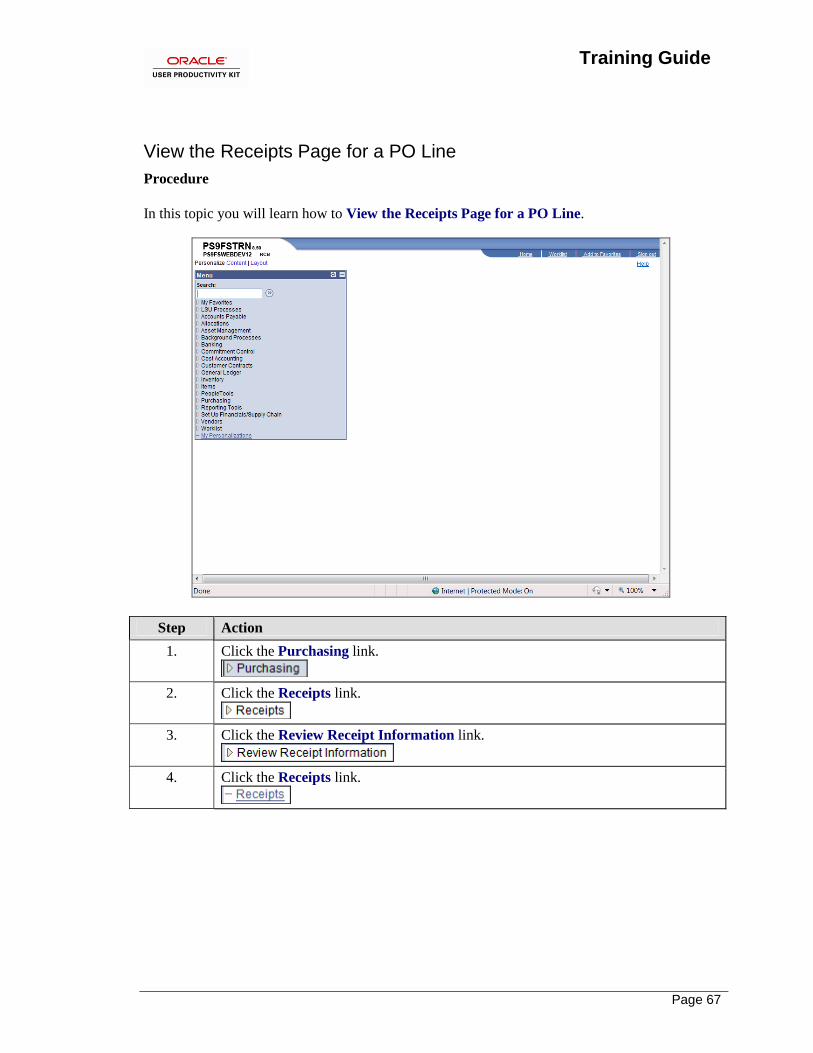
View the Receipts Page for a PO Line
Procedure
In this topic you will learn how to View the Receipts Page for a PO Line.
Step Action
1. Click the Purchasing link.
2. Click the Receipts link.
3. Click the Review Receipt Information link.
4. Click the Receipts link.
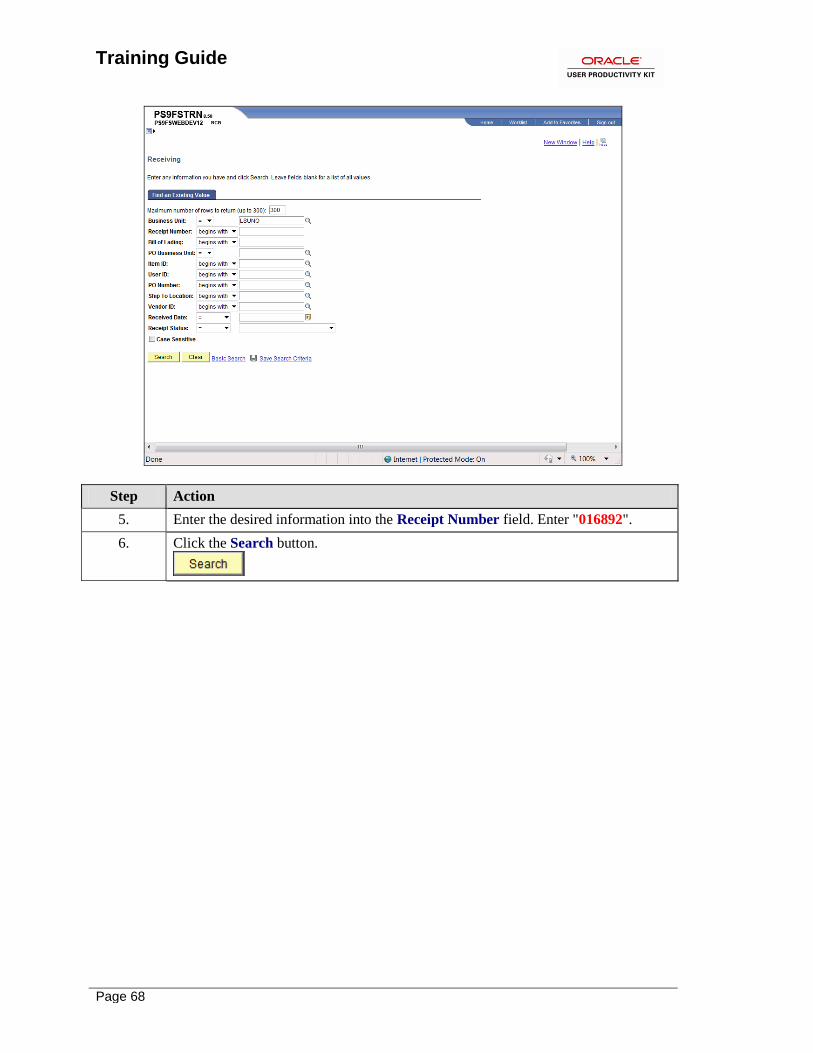
Training Guide
Page 68
Step Action
5. Enter the desired information into the Receipt Number field. Enter "016892".
6. Click the Search button.
Training Guide
Page 69
Step Action
7. Click the Show all columns button.
Training Guide
Page 70
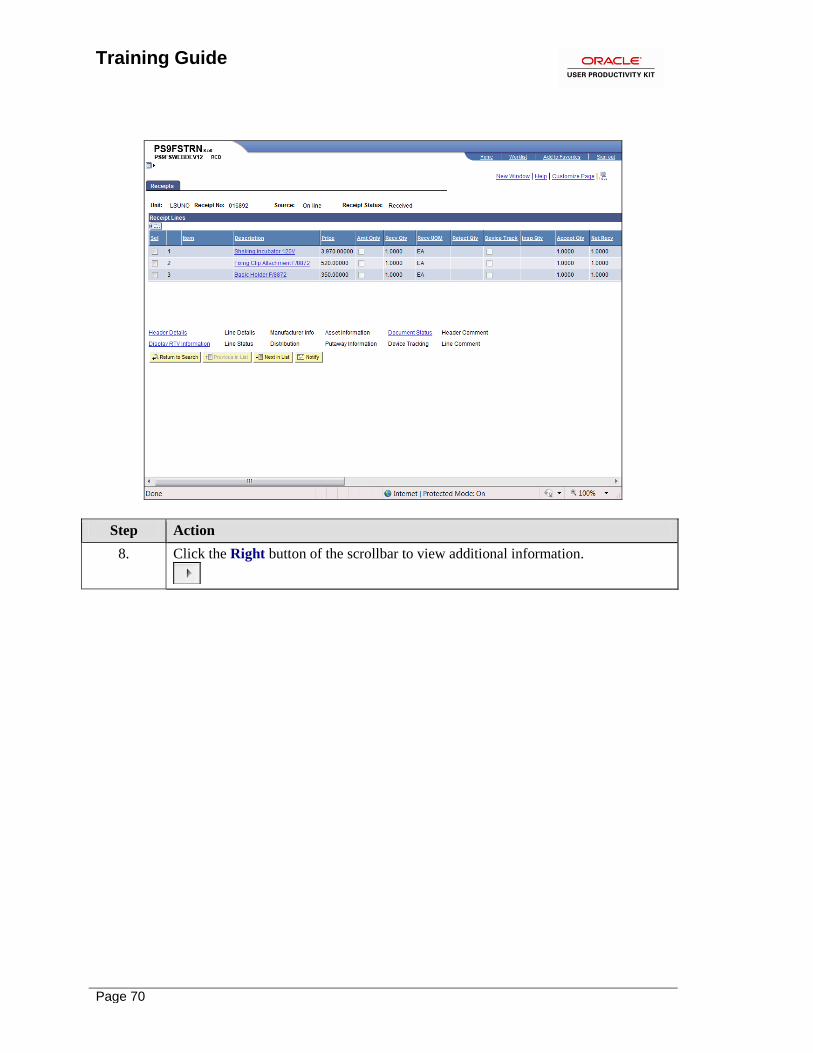
Step Action
8. Click the Right button of the scrollbar to view additional information.
Training Guide
Page 71
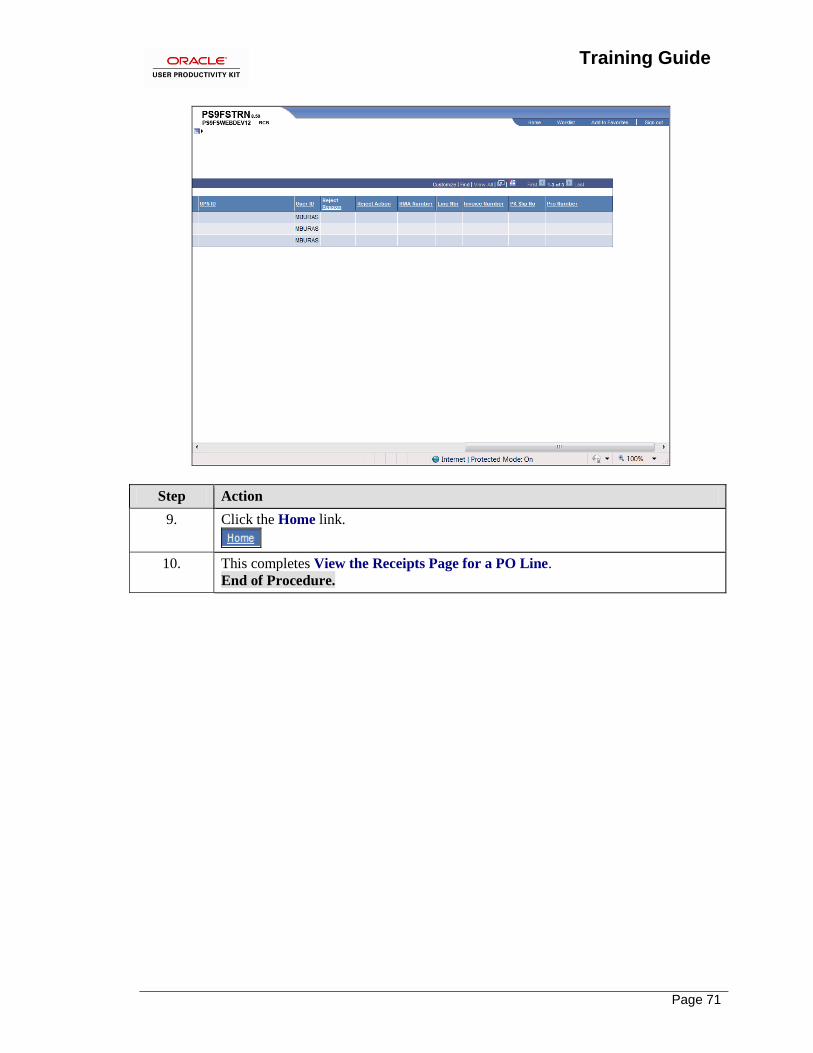
Step Action
9. Click the Home link.
10. This completes View the Receipts Page for a PO Line.
End of Procedure.

Training Guide
Page 72

Training Guide
Page 73
View the Voucher Inquiry Page for a PO Line
Procedure
In this topic you will learn how to View the Voucher Inquiry Page for a PO Line.
Step Action
1. Click the Accounts Payable link.
2. Click the Review Accounts Payable Info link.
3. Click the Vouchers link.
4. Click the Voucher link.
Training Guide
Page 74
Step Action
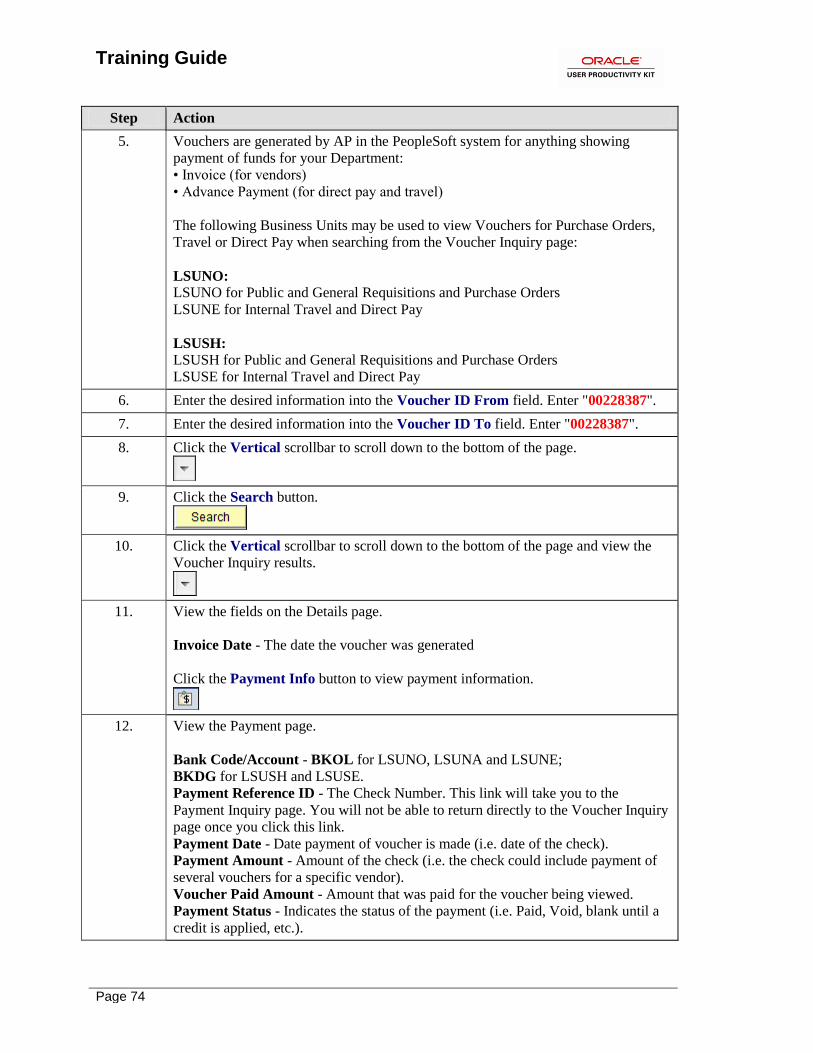
5. Vouchers are generated by AP in the PeopleSoft system for anything showing
payment of funds for your Department:
• Invoice (for vendors)
• Advance Payment (for direct pay and travel)
The following Business Units may be used to view Vouchers for Purchase Orders,
Travel or Direct Pay when searching from the Voucher Inquiry page:
LSUNO: LSUNO for Public and General Requisitions and Purchase Orders
LSUNE for Internal Travel and Direct Pay
LSUSH: LSUSH for Public and General Requisitions and Purchase Orders
LSUSE for Internal Travel and Direct Pay
6. Enter the desired information into the Voucher ID From field. Enter "00228387".
7. Enter the desired information into the Voucher ID To field. Enter "00228387".
8. Click the Vertical scrollbar to scroll down to the bottom of the page.
9. Click the Search button.
10. Click the Vertical scrollbar to scroll down to the bottom of the page and view the
Voucher Inquiry results.
11. View the fields on the Details page.
Invoice Date - The date the voucher was generated
Click the Payment Info button to view payment information.
12. View the Payment page.
Bank Code/Account - BKOL for LSUNO, LSUNA and LSUNE;
BKDG for LSUSH and LSUSE.
Payment Reference ID - The Check Number. This link will take you to the
Payment Inquiry page. You will not be able to return directly to the Voucher Inquiry
page once you click this link.
Payment Date - Date payment of voucher is made (i.e. date of the check).
Payment Amount - Amount of the check (i.e. the check could include payment of
several vouchers for a specific vendor).
Voucher Paid Amount - Amount that was paid for the voucher being viewed.
Payment Status - Indicates the status of the payment (i.e. Paid, Void, blank until a
credit is applied, etc.).
Training Guide
Page 75
Step Action
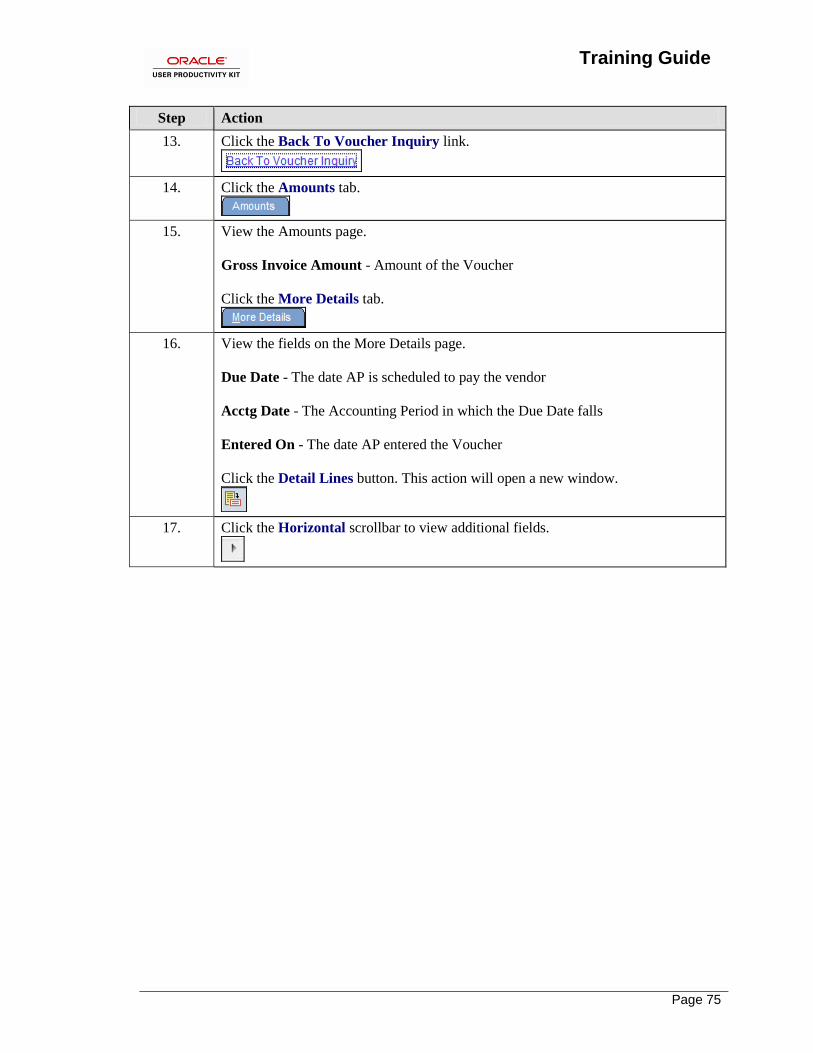
13. Click the Back To Voucher Inquiry link.
14. Click the Amounts tab.
15. View the Amounts page.
Gross Invoice Amount - Amount of the Voucher
Click the More Details tab.
16. View the fields on the More Details page.
Due Date - The date AP is scheduled to pay the vendor
Acctg Date - The Accounting Period in which the Due Date falls
Entered On - The date AP entered the Voucher
Click the Detail Lines button. This action will open a new window.
17. Click the Horizontal scrollbar to view additional fields.

Training Guide
Page 76
Step Action
18. View additional fields.
Click the Close button.

Training Guide
Page 77
Step Action
19. Click the Home link.
20. This completes View the Voucher Inquiry Page for a PO line.
End of Procedure.

Training Guide
Page 78
Training Guide
Page 79
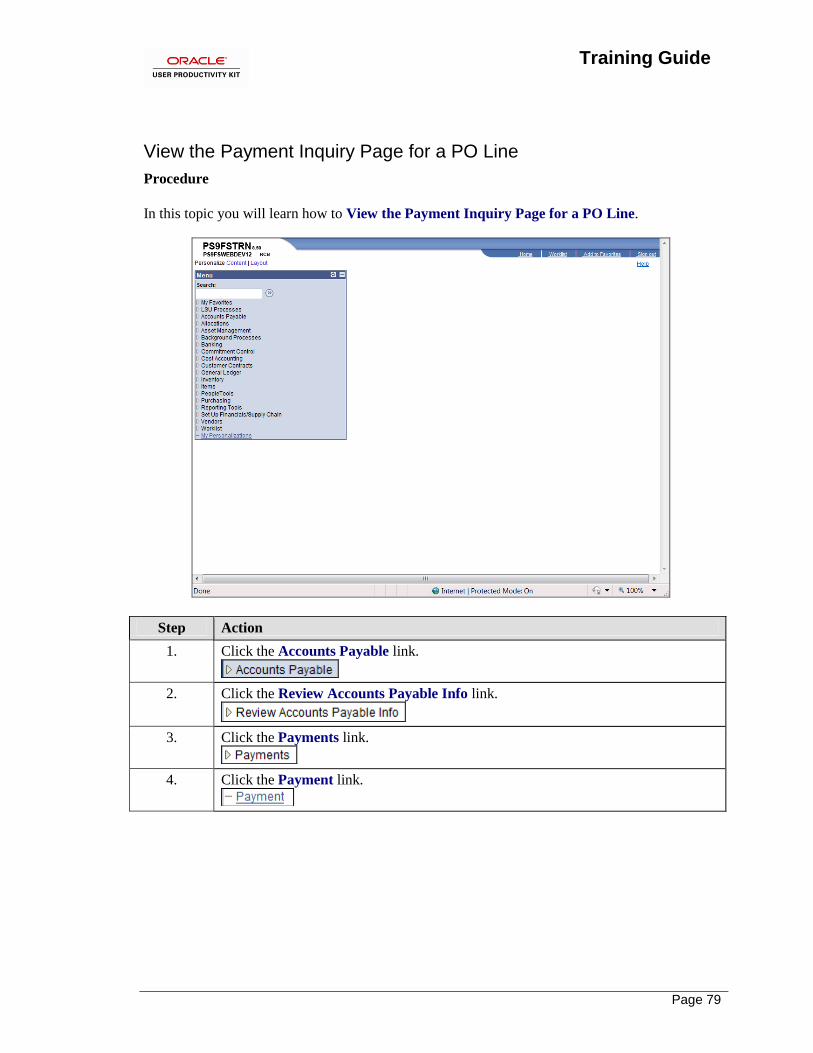
View the Payment Inquiry Page for a PO Line
Procedure
In this topic you will learn how to View the Payment Inquiry Page for a PO Line.
Step Action
1. Click the Accounts Payable link.
2. Click the Review Accounts Payable Info link.
3. Click the Payments link.
4. Click the Payment link.
Training Guide
Page 80
Step Action
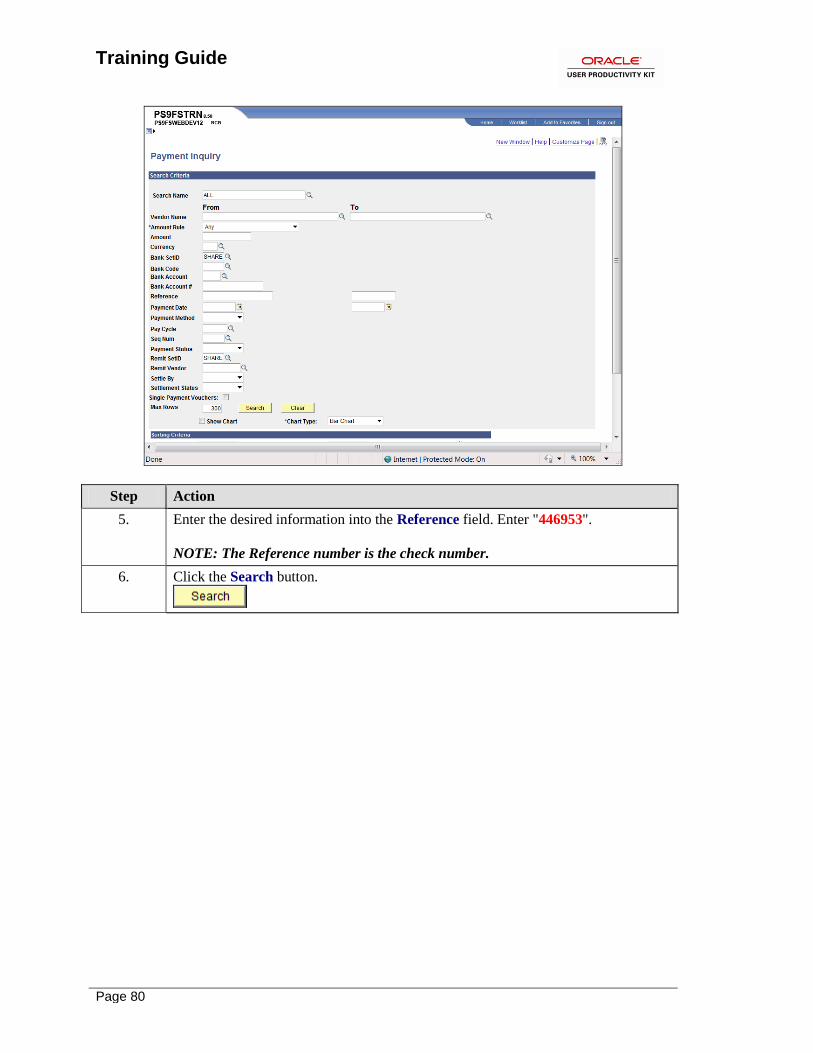
5. Enter the desired information into the Reference field. Enter "446953".
NOTE: The Reference number is the check number.
6. Click the Search button.
Training Guide
Page 81
Step Action
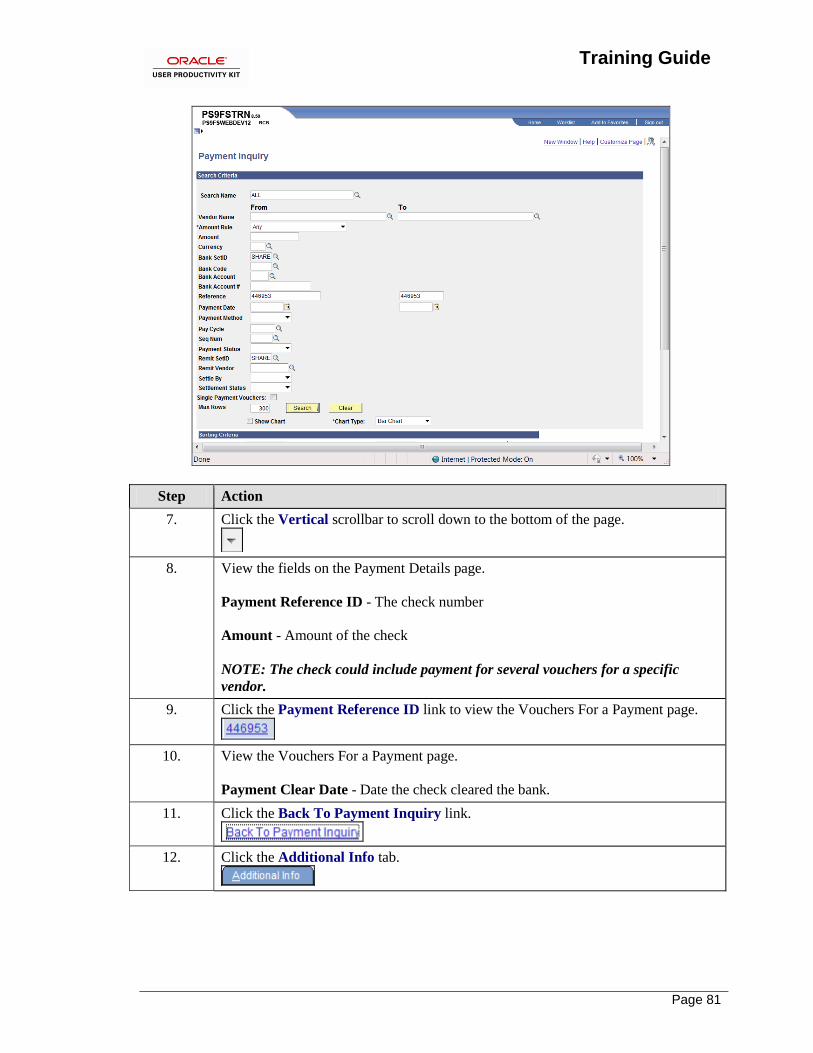
7. Click the Vertical scrollbar to scroll down to the bottom of the page.
8. View the fields on the Payment Details page.
Payment Reference ID - The check number
Amount - Amount of the check
NOTE: The check could include payment for several vouchers for a specific
vendor.
9. Click the Payment Reference ID link to view the Vouchers For a Payment page.
10. View the Vouchers For a Payment page.
Payment Clear Date - Date the check cleared the bank.
11. Click the Back To Payment Inquiry link.
12. Click the Additional Info tab.
Training Guide
Page 82
Step Action
13. View the fields on the Additional info page.
Click the Vendor Details tab.
14. View the fields on the Vendor Details page.
NOTE: This is the Remit Address where the check was mailed.
Click the Financial Gateway tab.
15. Click the Home link.
16. This completes View the Payment Inquiry Page for a PO Line.
End of Procedure.
Training Guide
Page 83
Inquire on a Purchase Order to Determine the Receiving Options
Procedure
In this topic you will learn how to Inquire on a Purchase Order to Determine the Receiving
Option.
Step Action
1. You will need to determine whether a Purchase Order needs to be received in the
PeopleSoft system in order for payment to be processed by Accounts Payable. In
this exercise you will identify the Receiving Option for the specified item.

Training Guide
Page 84
Step Action
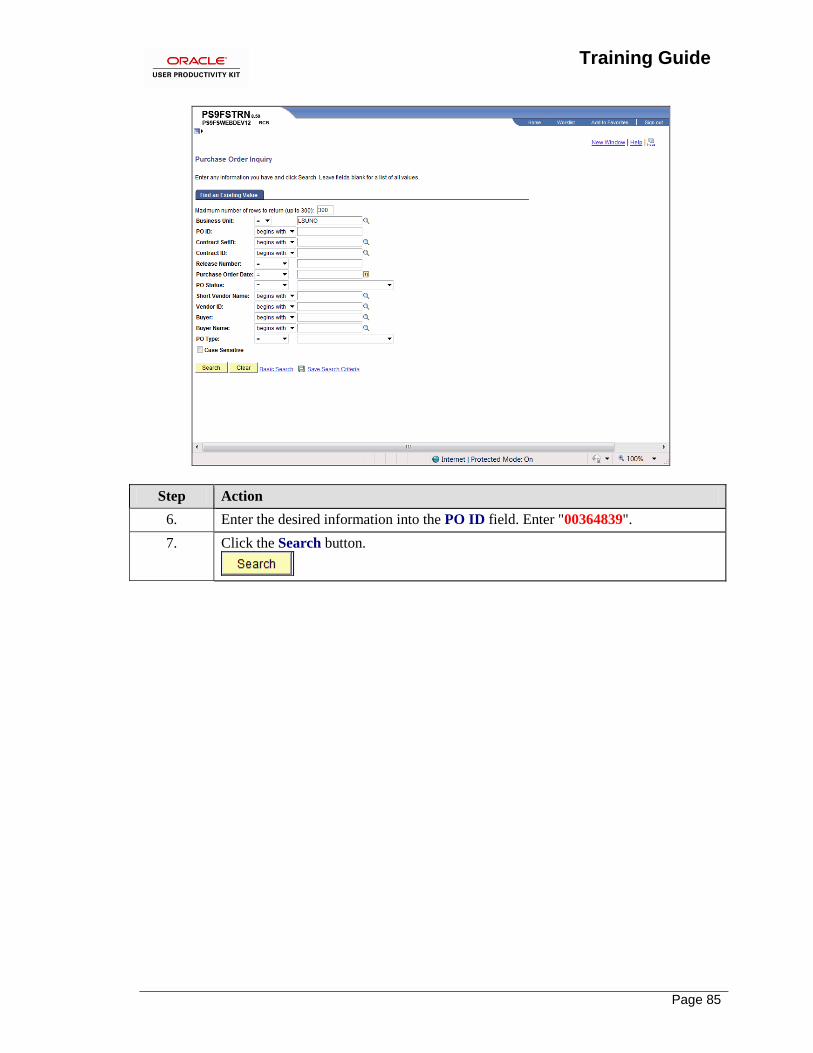
2. Click the Purchasing link.
3. Click the Purchase Orders link.
4. Click the Review PO Information link.
5. Click the Purchase Orders link.
Training Guide
Page 85
Step Action
6. Enter the desired information into the PO ID field. Enter "00364839".
7. Click the Search button.
Training Guide
Page 86
Step Action
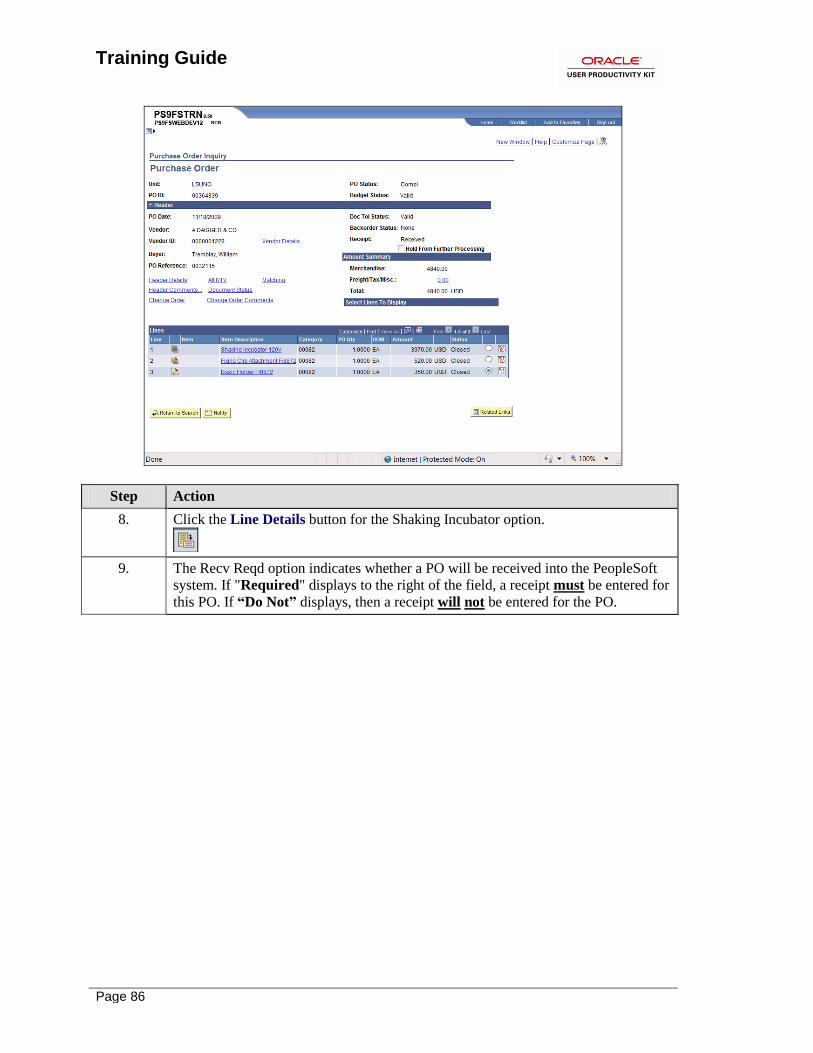
8. Click the Line Details button for the Shaking Incubator option.
9. The Recv Reqd option indicates whether a PO will be received into the PeopleSoft
system. If "Required" displays to the right of the field, a receipt must be entered for
this PO. If “Do Not” displays, then a receipt will not be entered for the PO.
Training Guide
Page 87
Step Action
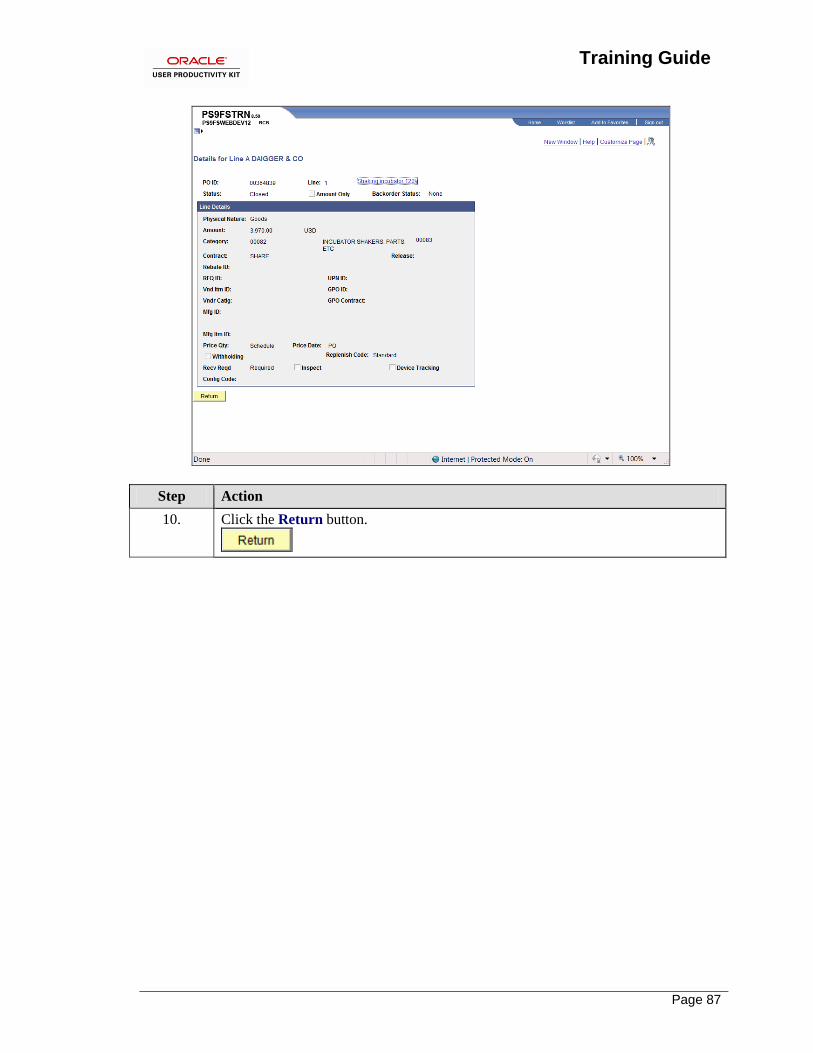
10. Click the Return button.

Training Guide
Page 88
Step Action
11. Click the Home link.
12. This completes Inquire on a Purchase Order to Determine the Receiving
Option.
End of Procedure.
Training Guide
Page 89
Inquire on a PO Document Status Page
Procedure
In this topic you will learn how to Inquire on the PO Document Status Page.
Step Action
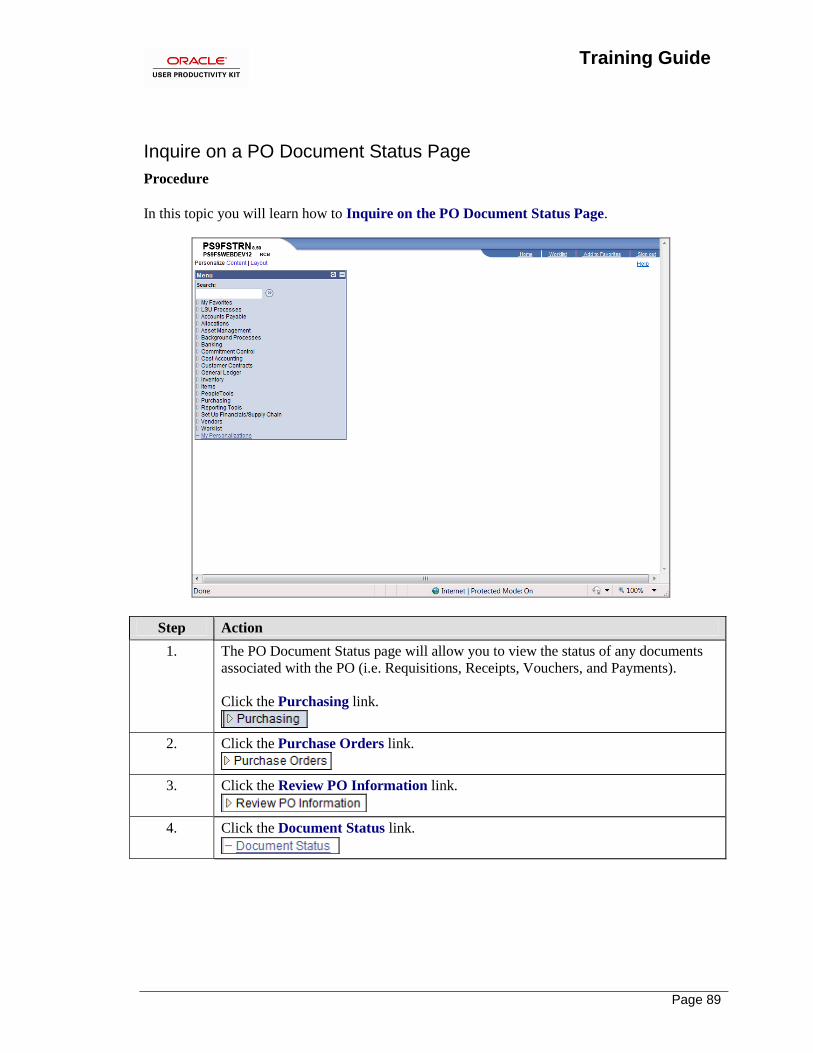
1. The PO Document Status page will allow you to view the status of any documents
associated with the PO (i.e. Requisitions, Receipts, Vouchers, and Payments).
Click the Purchasing link.
2. Click the Purchase Orders link.
3. Click the Review PO Information link.
4. Click the Document Status link.

Training Guide
Page 90
Step Action
5. Enter the desired information into the PO Number field. Enter "00364839".
6. Click the Search button.
7. View the PO Document Status page.
From the Document Status page you can view the Inquiry pages for all Document
Types (i.e. Requisition, PO, Receipt, Voucher and Payment).
NOTE: You can only access the Voucher and Payment Inquiry pages if you have
the proper security.
Training Guide
Page 91
Step Action
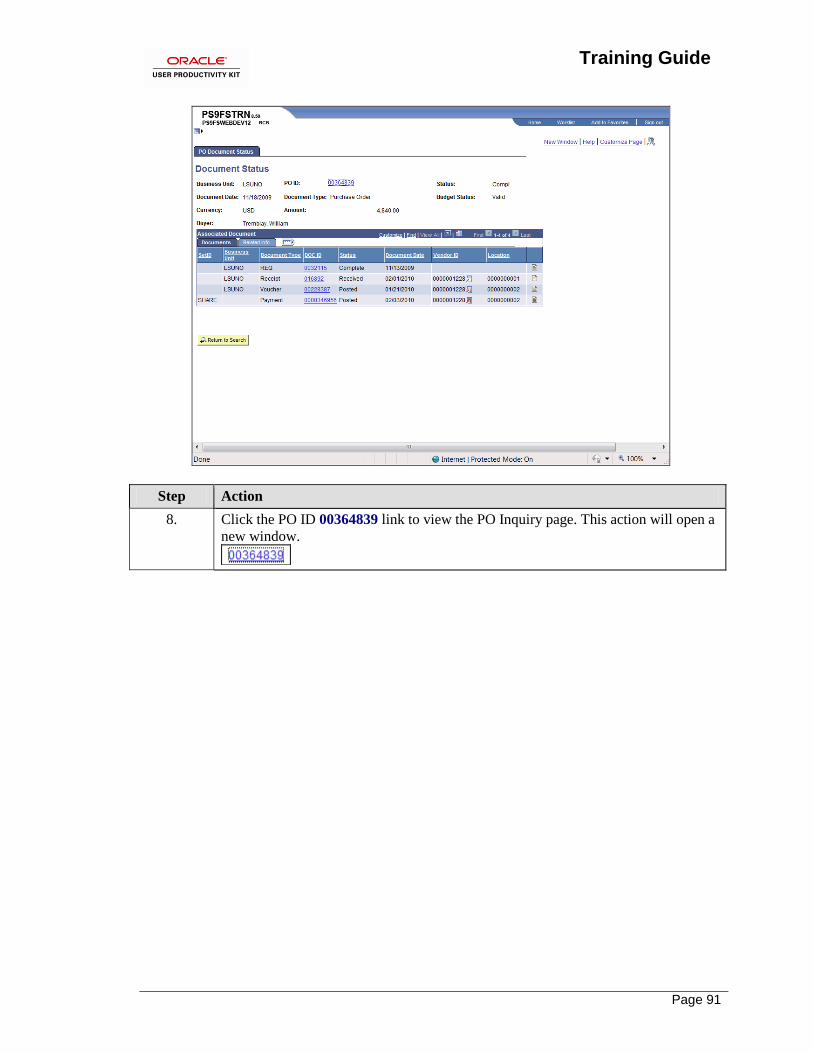
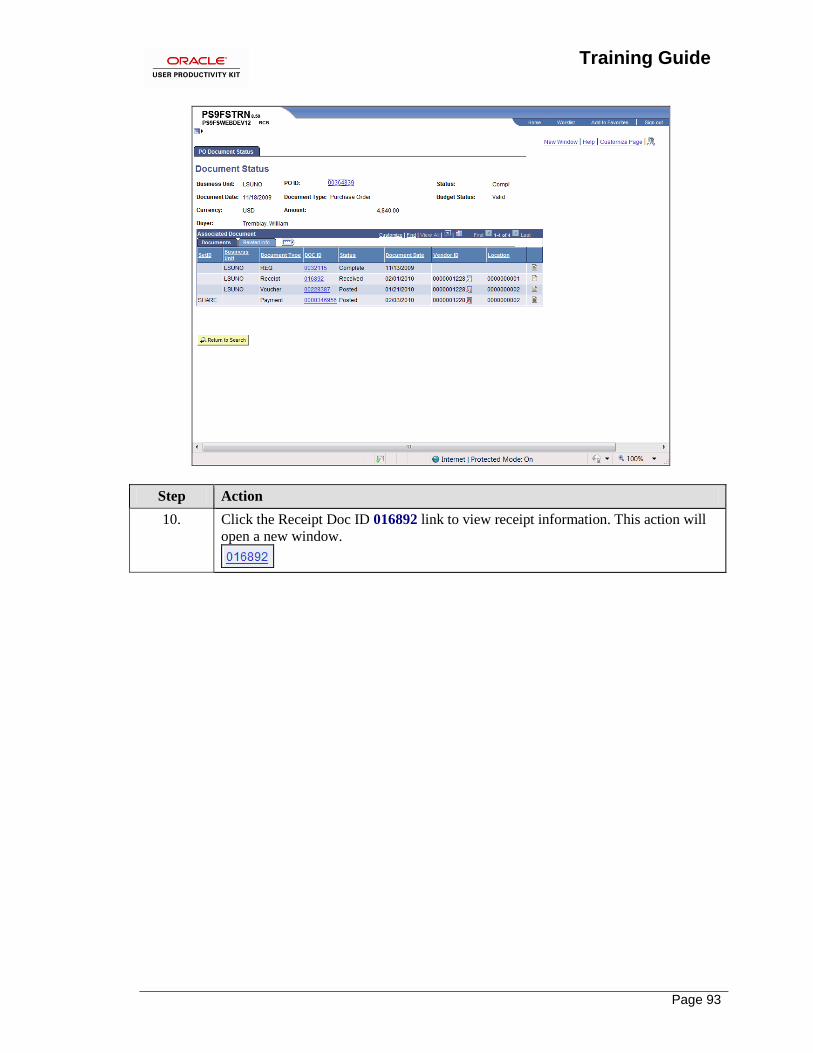
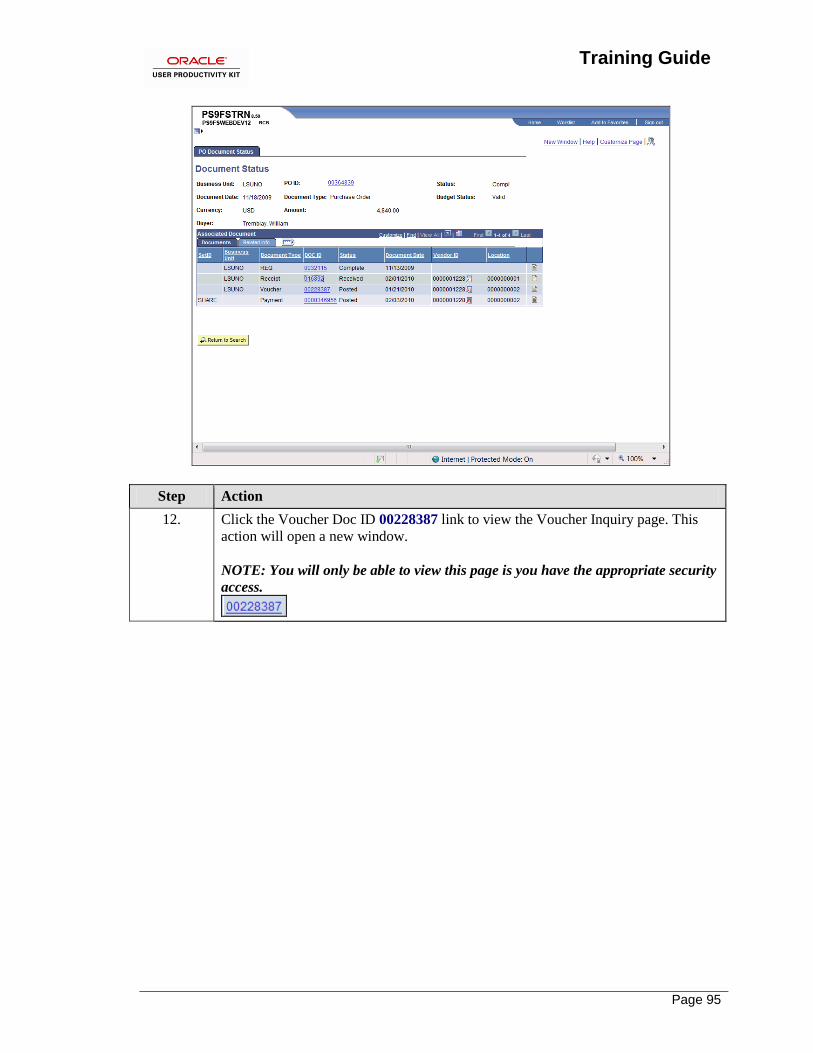
8. Click the PO ID 00364839 link to view the PO Inquiry page. This action will open a
new window.
Training Guide
Page 92
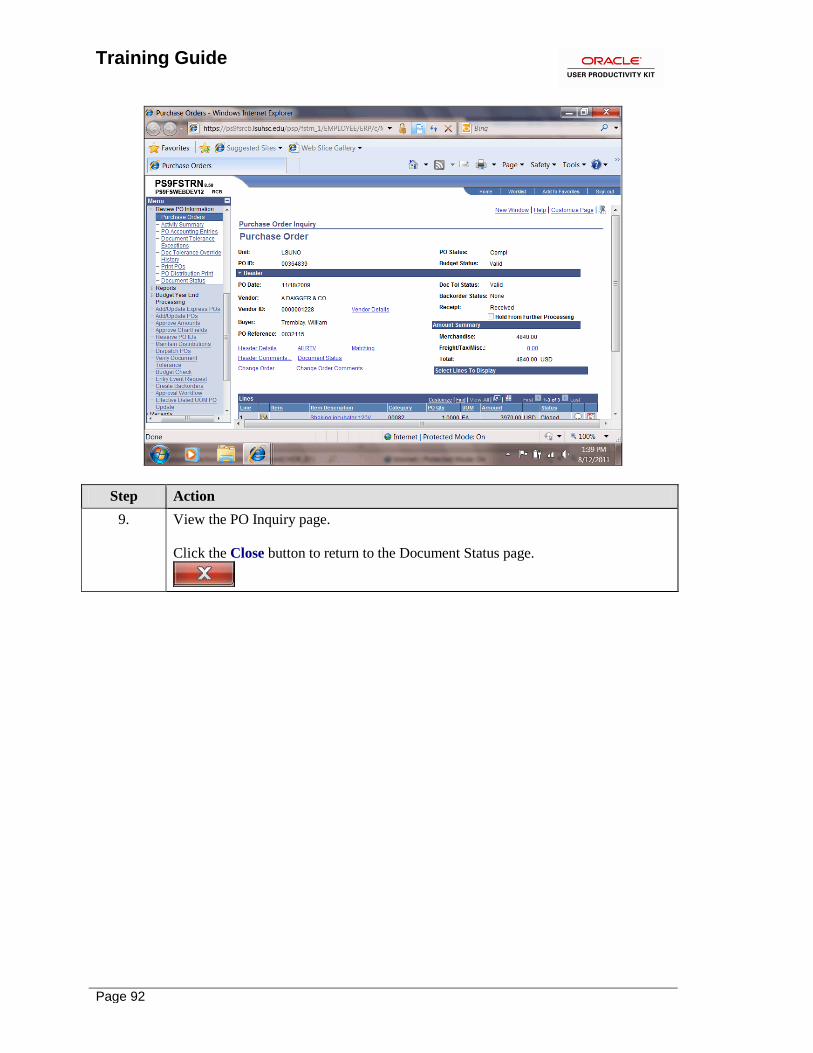
Step Action
9. View the PO Inquiry page.
Click the Close button to return to the Document Status page.
Training Guide
Page 93
Step Action
10. Click the Receipt Doc ID 016892 link to view receipt information. This action will
open a new window.
Training Guide
Page 94
Step Action
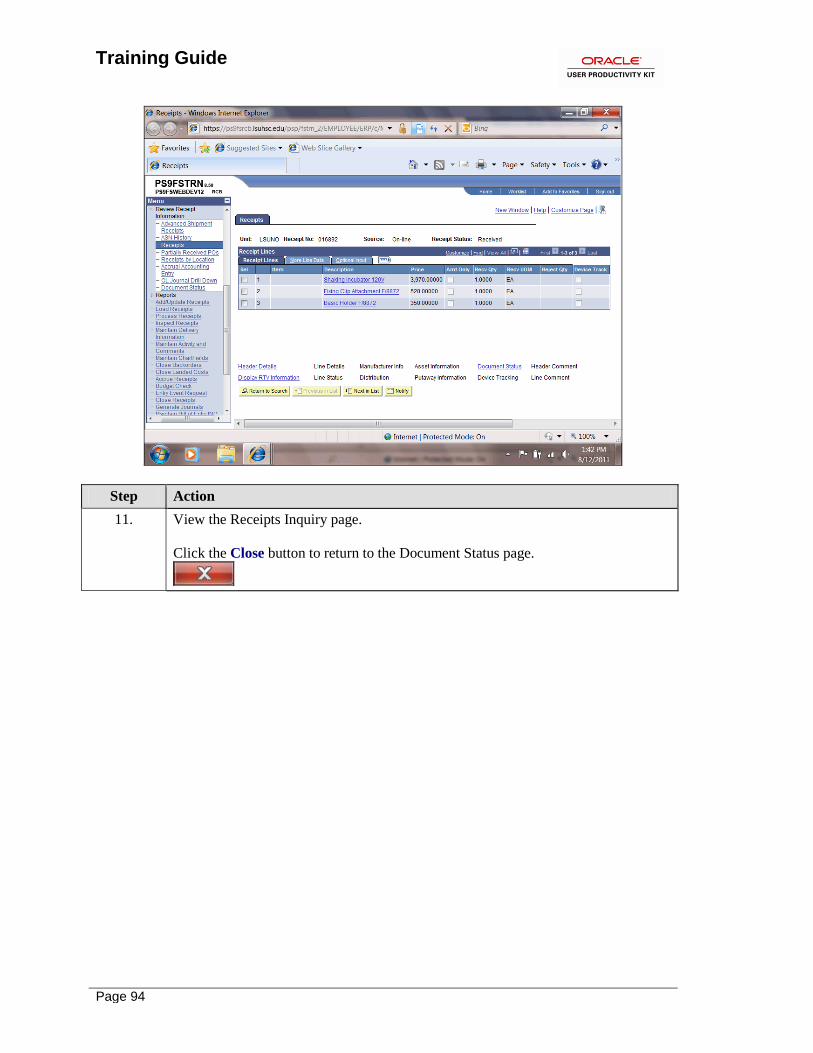
11. View the Receipts Inquiry page.
Click the Close button to return to the Document Status page.
Training Guide
Page 95
Step Action
12. Click the Voucher Doc ID 00228387 link to view the Voucher Inquiry page. This
action will open a new window.
NOTE: You will only be able to view this page is you have the appropriate security
access.
Training Guide
Page 96
Step Action
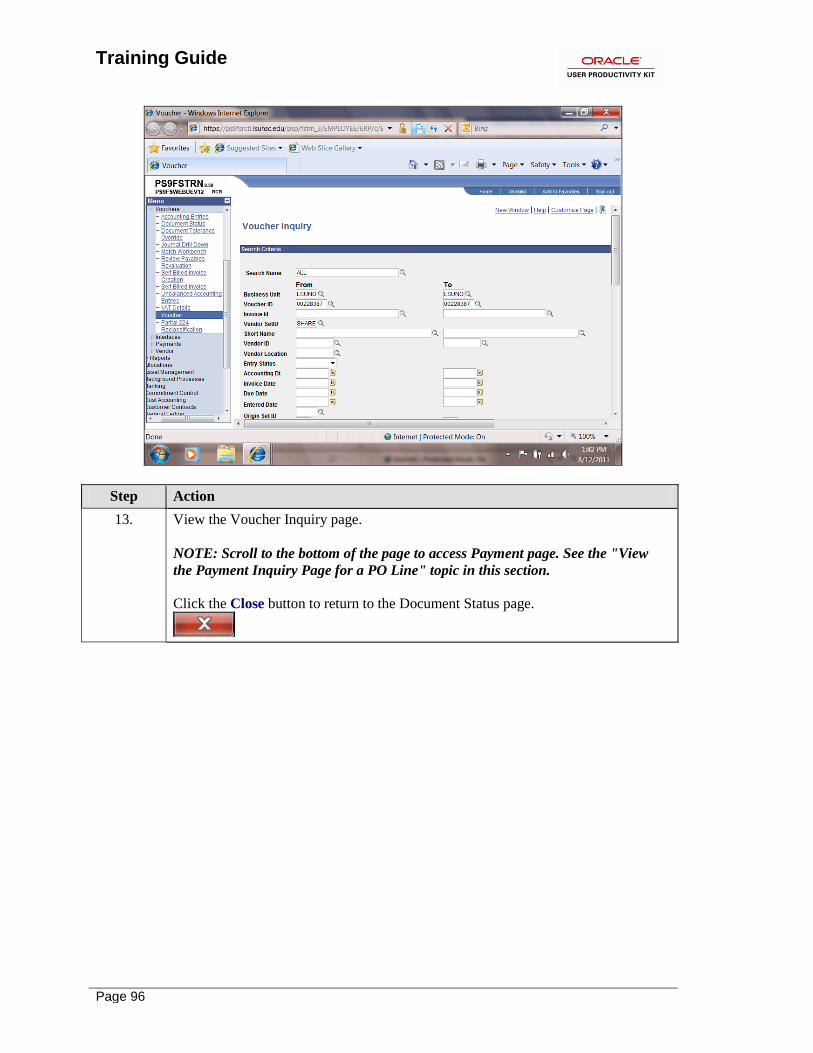
13. View the Voucher Inquiry page.
NOTE: Scroll to the bottom of the page to access Payment page. See the "View
the Payment Inquiry Page for a PO Line" topic in this section.
Click the Close button to return to the Document Status page.
Training Guide
Page 97
Step Action
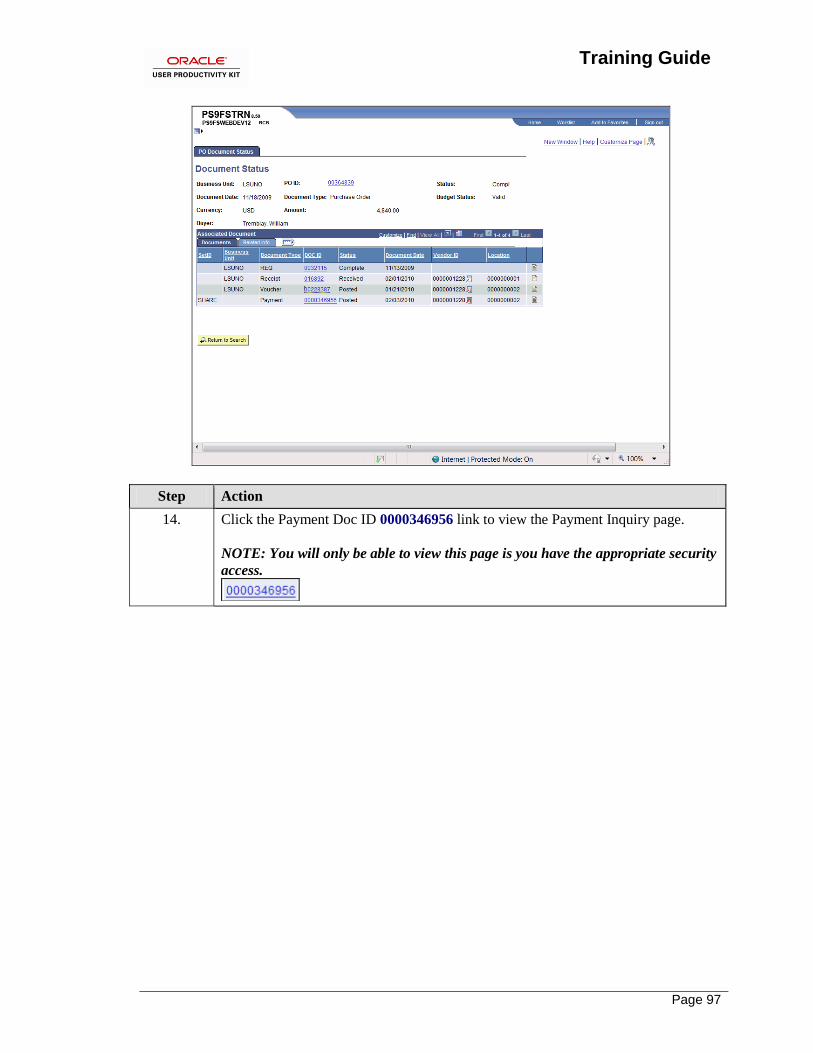
14. Click the Payment Doc ID 0000346956 link to view the Payment Inquiry page.
NOTE: You will only be able to view this page is you have the appropriate security
access.
Training Guide
Page 98
Step Action
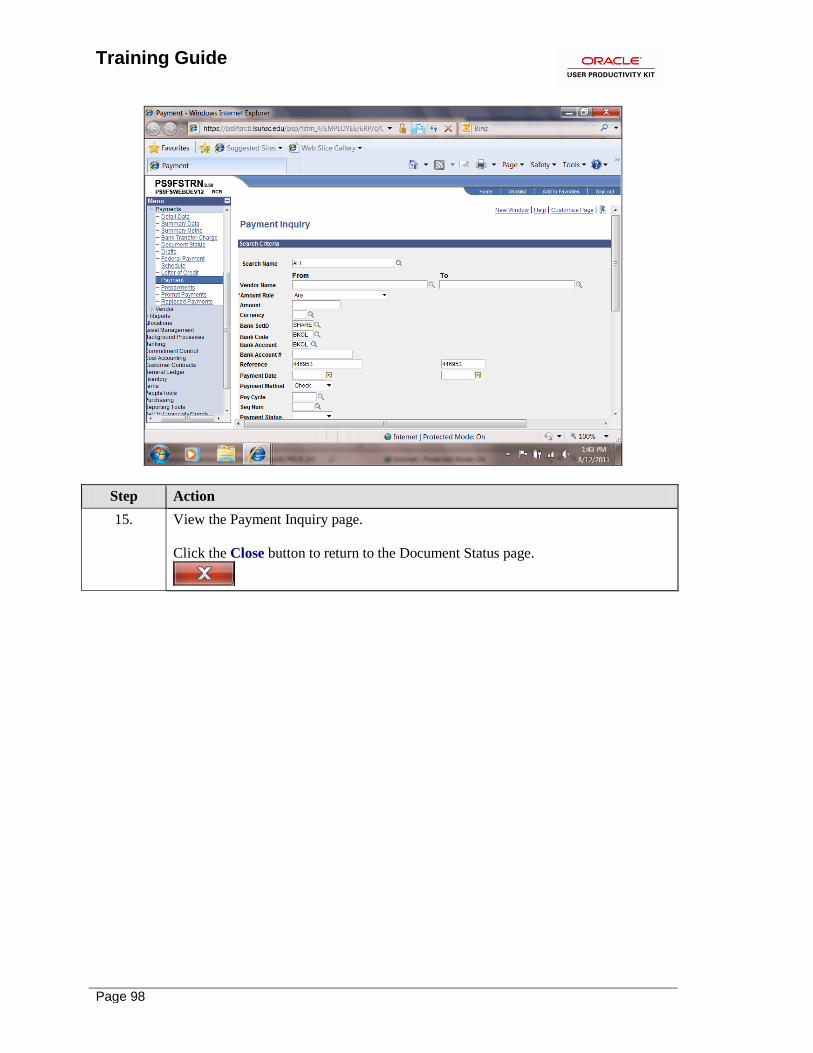
15. View the Payment Inquiry page.
Click the Close button to return to the Document Status page.
Training Guide
Page 99
Step Action
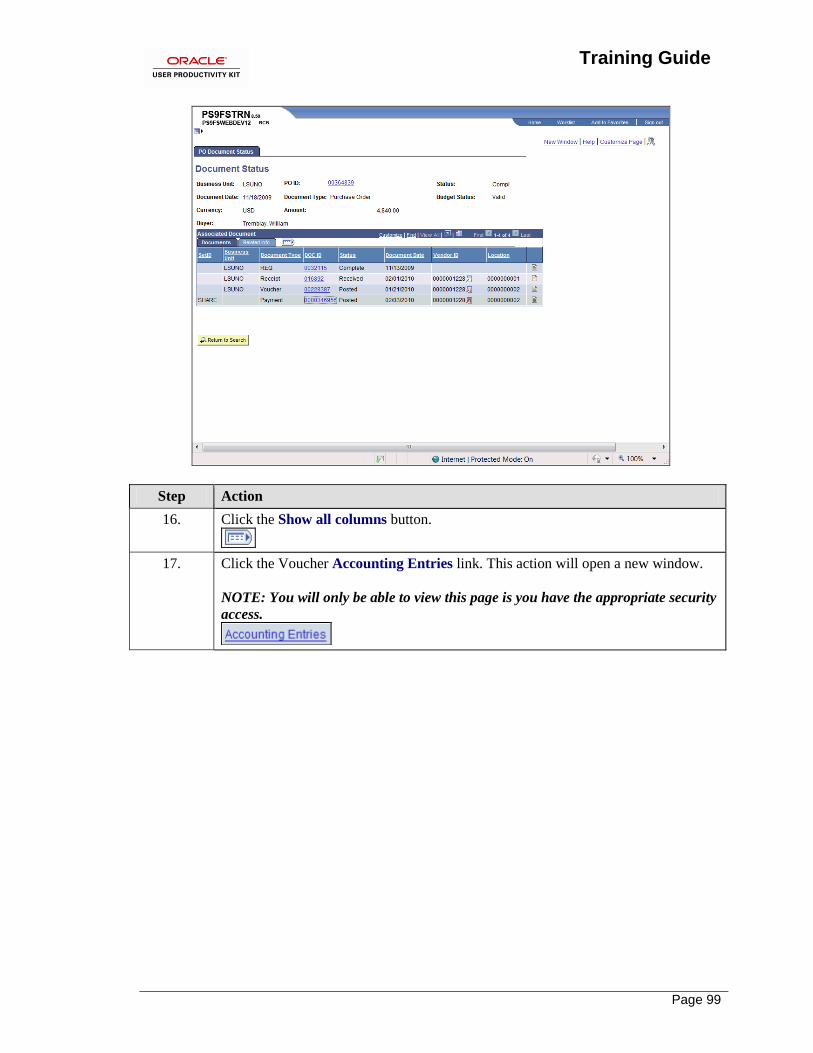
16. Click the Show all columns button.
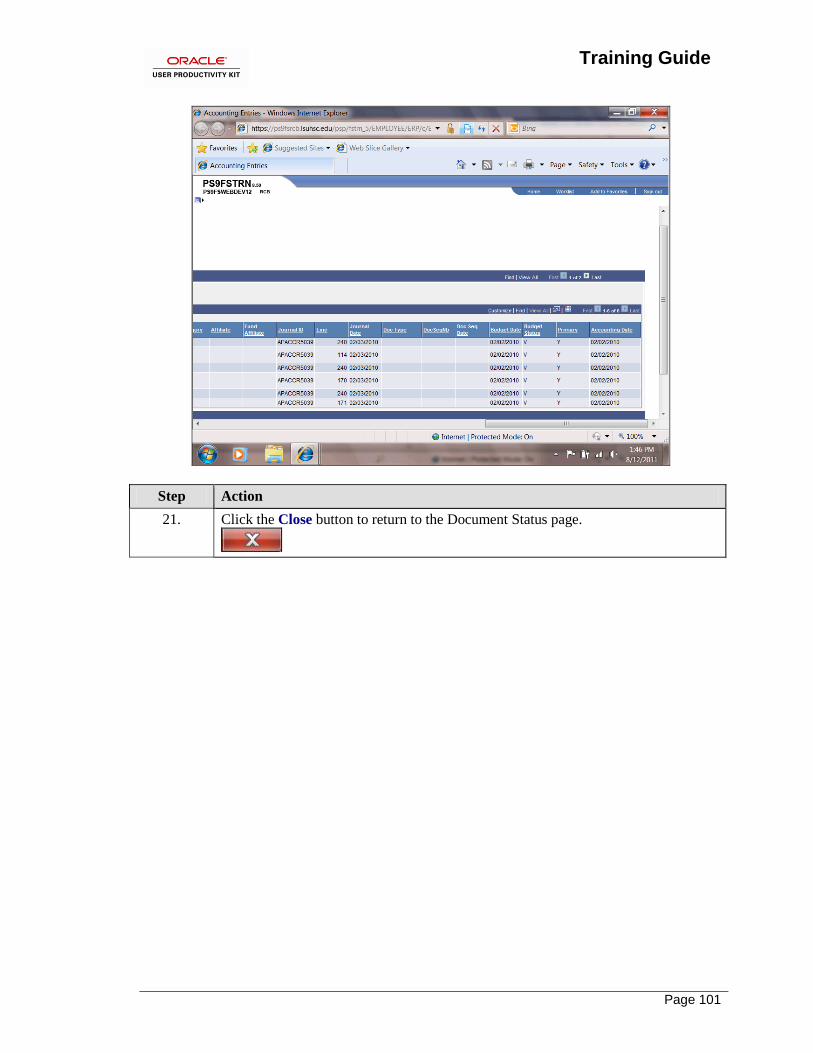
17. Click the Voucher Accounting Entries link. This action will open a new window.
NOTE: You will only be able to view this page is you have the appropriate security
access.

Training Guide
Page 100
Step Action
18. Click the Show all columns button.
19. Click the Right scrollbar to view additional columns.
20. Click the Right scrollbar to view additional columns.
Training Guide
Page 101
Step Action
21. Click the Close button to return to the Document Status page.
Training Guide
Page 102
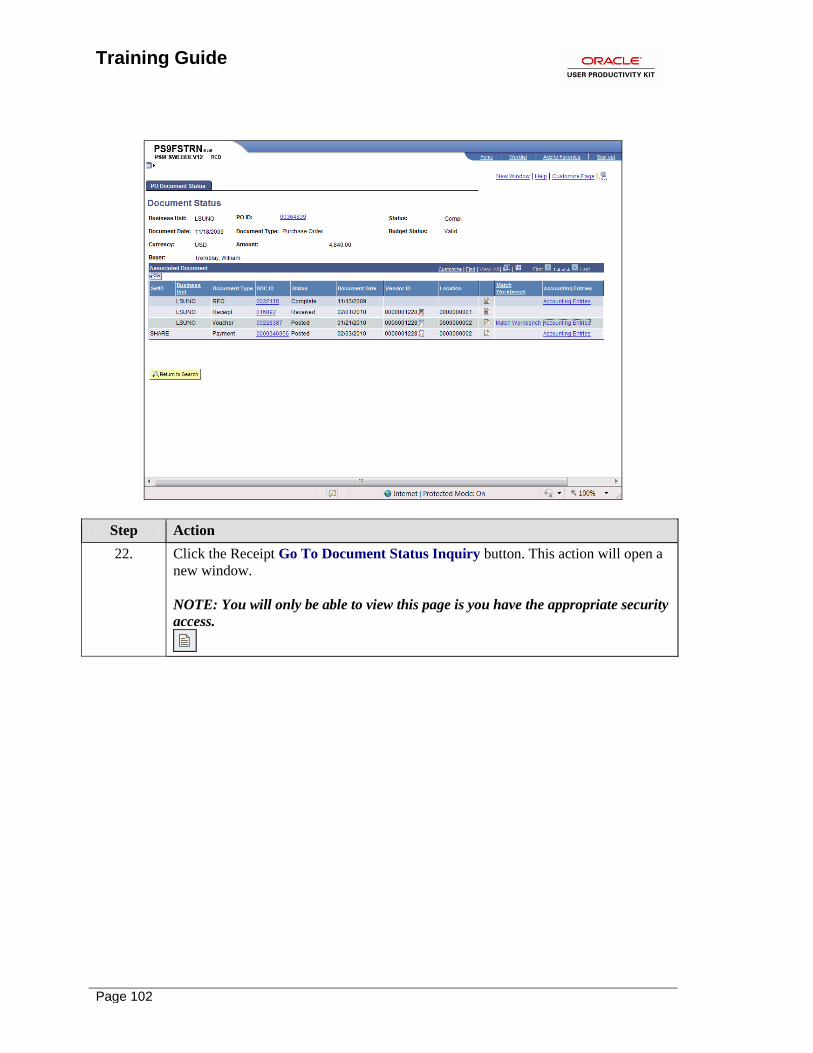
Step Action
22. Click the Receipt Go To Document Status Inquiry button. This action will open a
new window.
NOTE: You will only be able to view this page is you have the appropriate security
access.

Training Guide
Page 103
Step Action
23. Click the Voucher Go To Document Status Inquiry button. This action will open a
new window.
NOTE: You will only be able to view this page is you have the appropriate security
access.
Training Guide
Page 104
Step Action
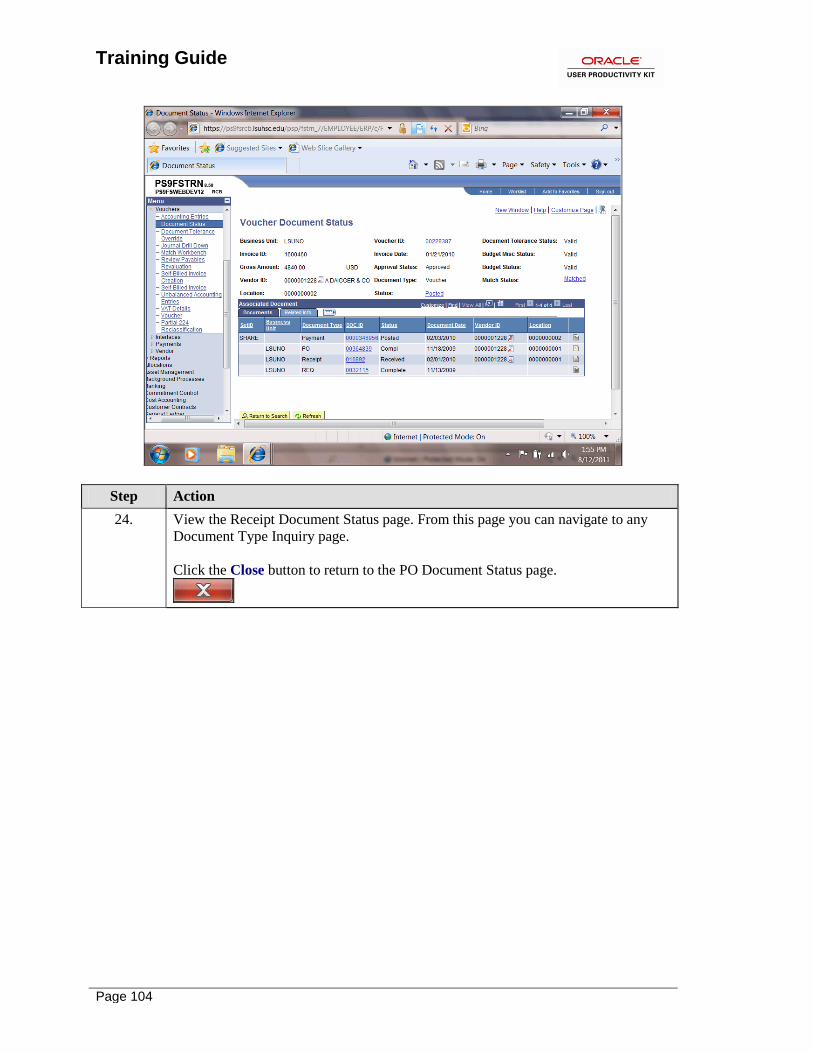
24. View the Receipt Document Status page. From this page you can navigate to any
Document Type Inquiry page.
Click the Close button to return to the PO Document Status page.
Training Guide
Page 105
Step Action
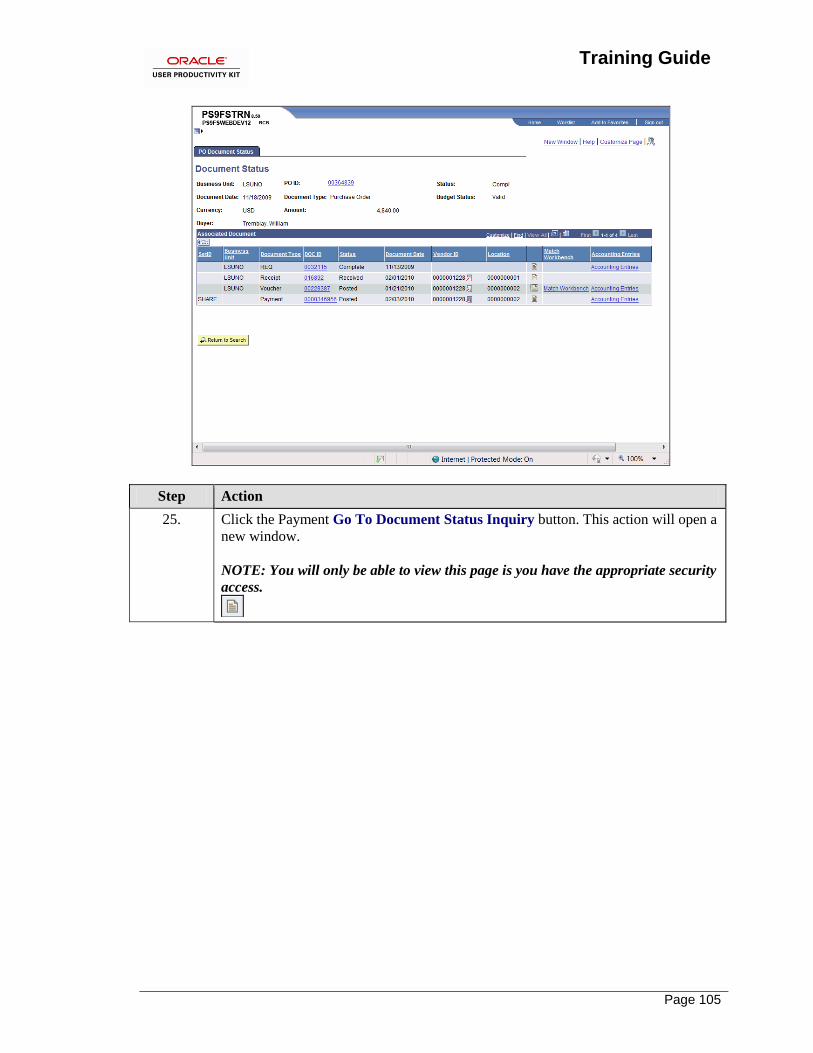
25. Click the Payment Go To Document Status Inquiry button. This action will open a
new window.
NOTE: You will only be able to view this page is you have the appropriate security
access.
Training Guide
Page 106
Step Action
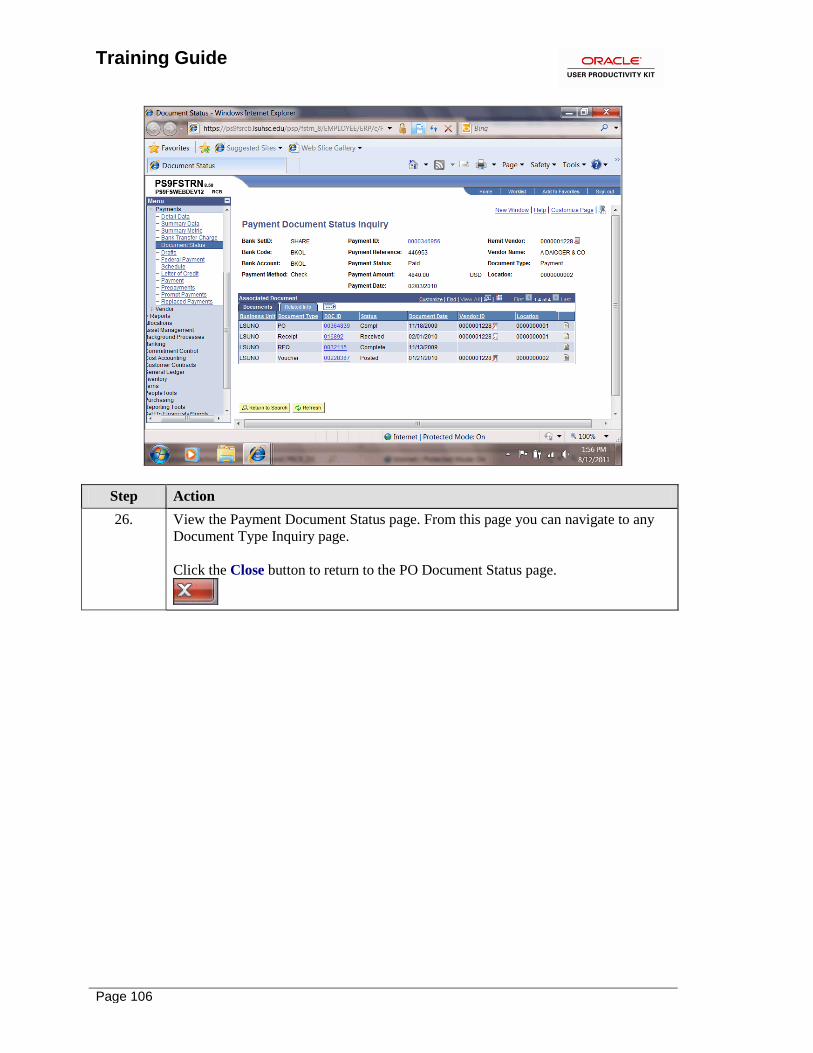
26. View the Payment Document Status page. From this page you can navigate to any
Document Type Inquiry page.
Click the Close button to return to the PO Document Status page.
Training Guide
Page 107
Step Action
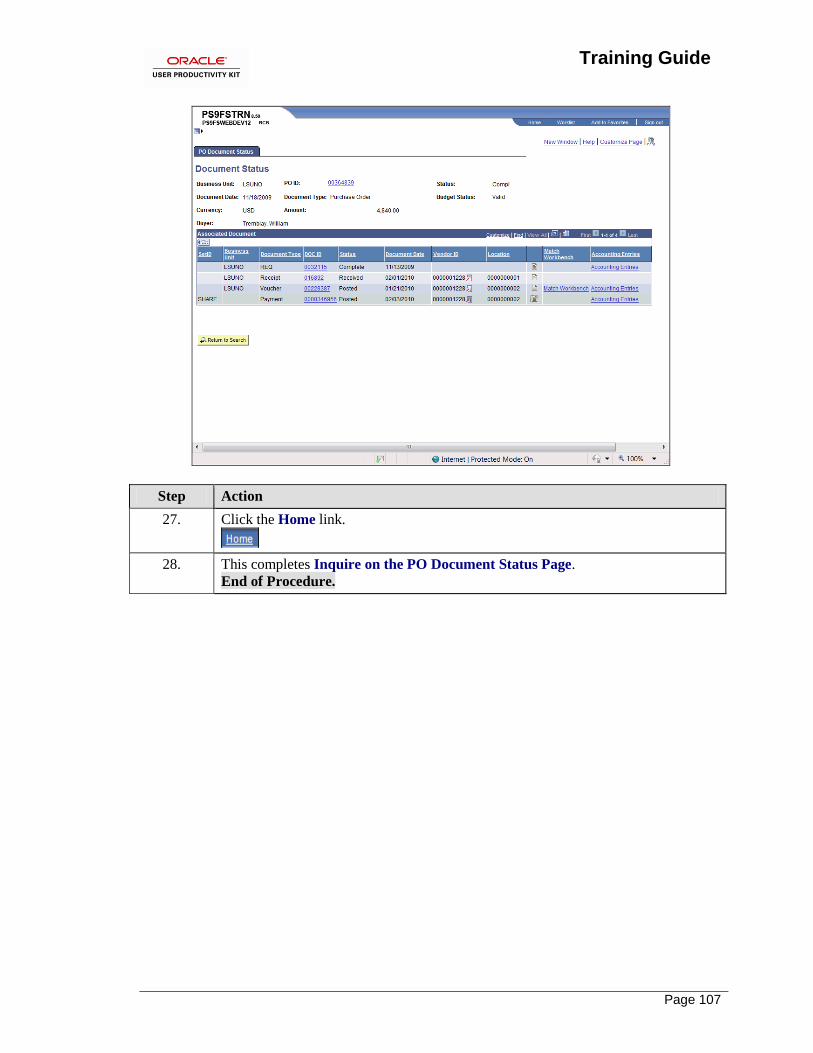
27. Click the Home link.
28. This completes Inquire on the PO Document Status Page.
End of Procedure.

Training Guide
Page 108
Training Guide
Page 109
Cancel POs
Cancel a PO without an Associated Req from the PO Header
Procedure
In this topic you will learn how to Cancel a PO without an Associated Req from the PO
Header.
Step Action
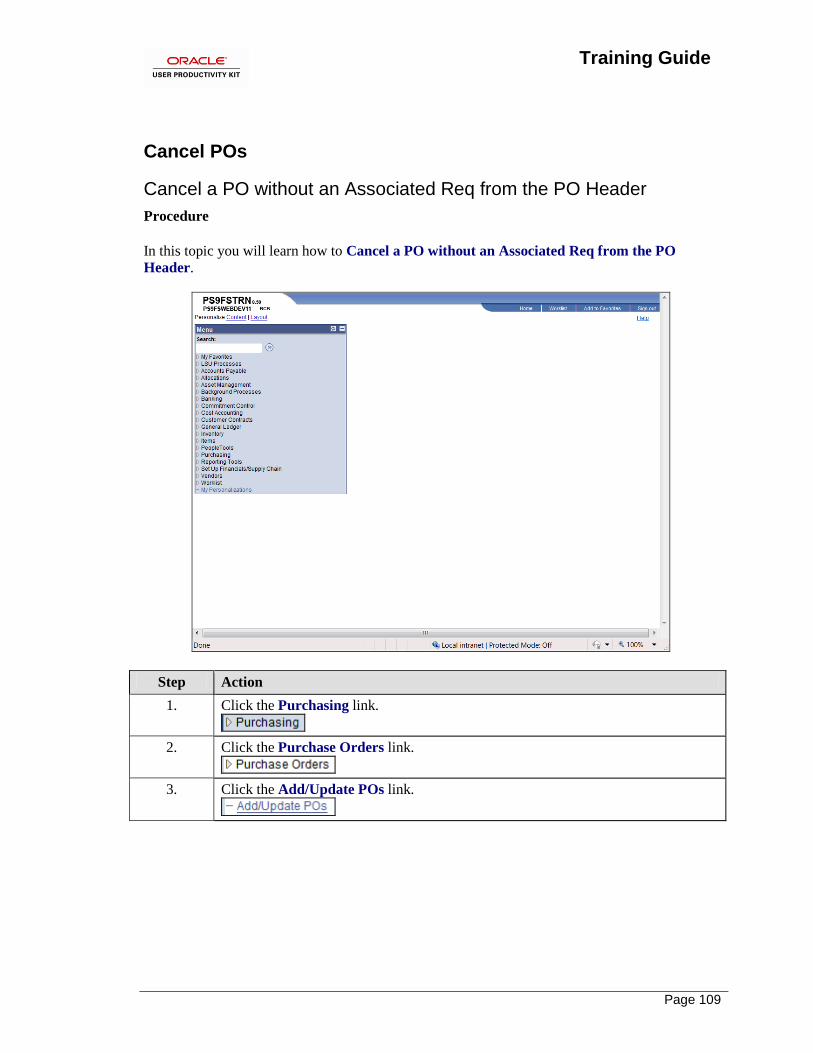
1. Click the Purchasing link.
2. Click the Purchase Orders link.
3. Click the Add/Update POs link.

Training Guide
Page 110
Step Action
4. Click the Find an Existing Value tab.
5. Enter the desired information into the PO ID field. Enter "00368577A".
6. Click the Search button.
Training Guide
Page 111
Step Action
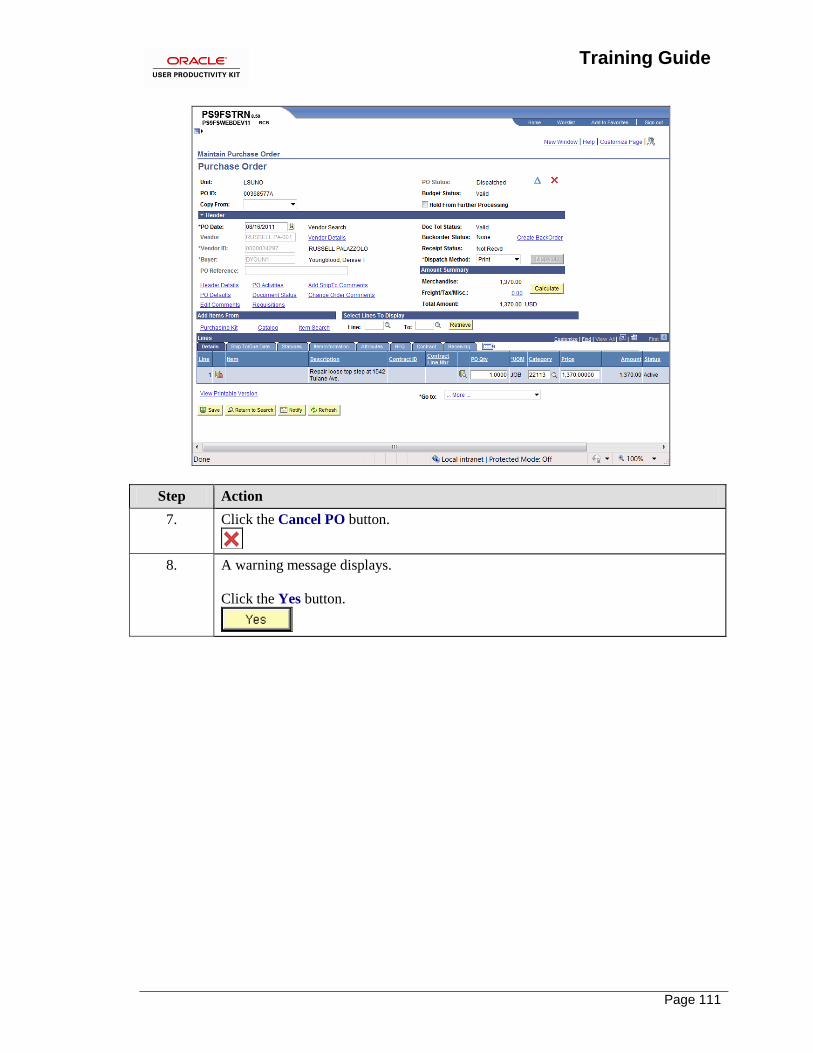
7. Click the Cancel PO button.
8. A warning message displays.
Click the Yes button.
Training Guide
Page 112
Step Action
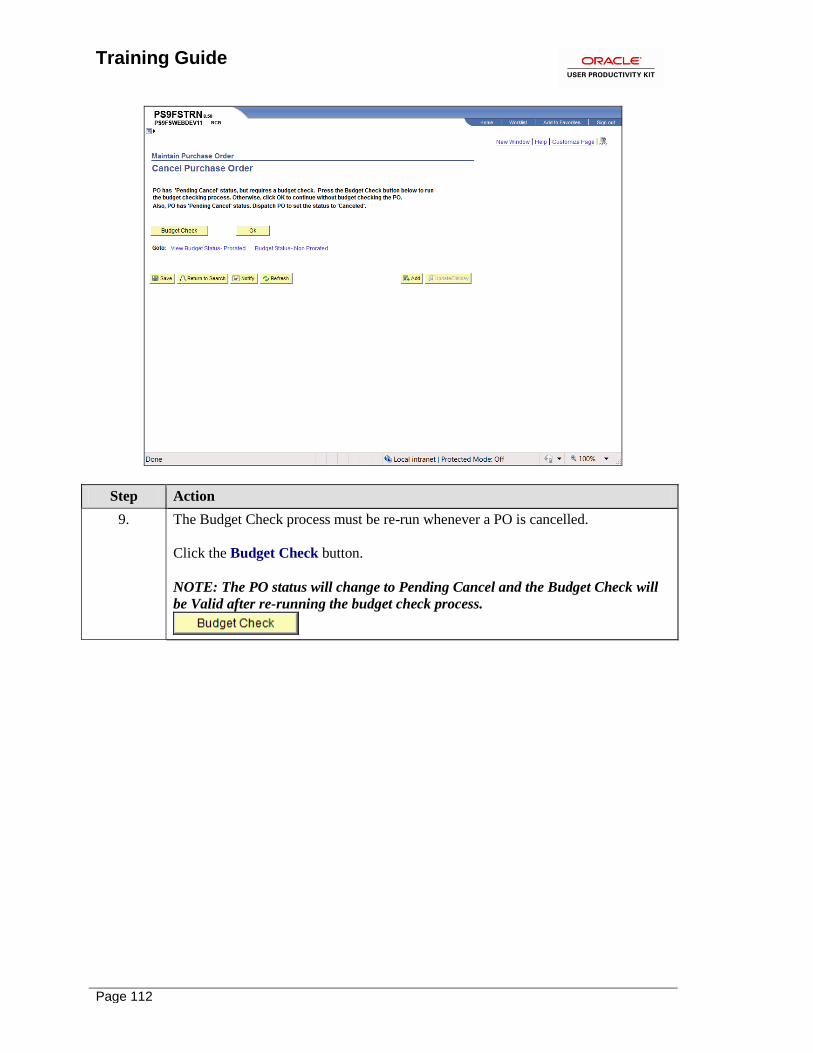
9. The Budget Check process must be re-run whenever a PO is cancelled.
Click the Budget Check button.
NOTE: The PO status will change to Pending Cancel and the Budget Check will
be Valid after re-running the budget check process.
Training Guide
Page 113
Step Action
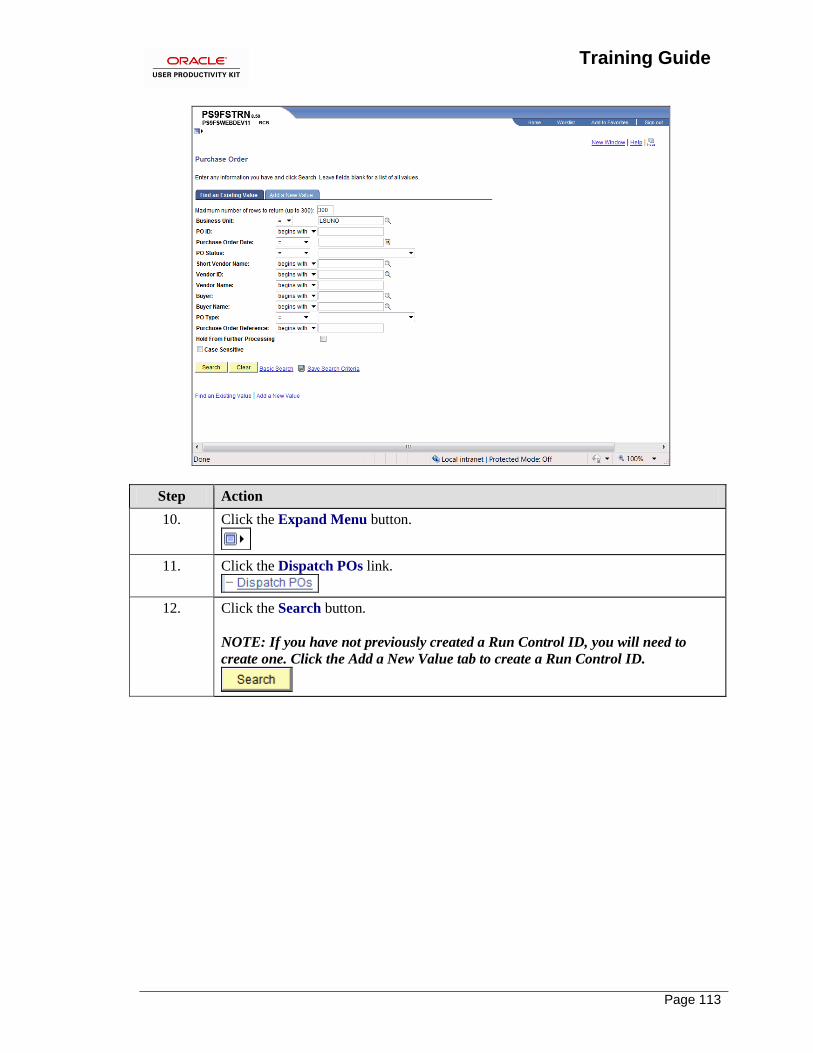
10. Click the Expand Menu button.
11. Click the Dispatch POs link.
12. Click the Search button.
NOTE: If you have not previously created a Run Control ID, you will need to
create one. Click the Add a New Value tab to create a Run Control ID.
Training Guide
Page 114
Step Action
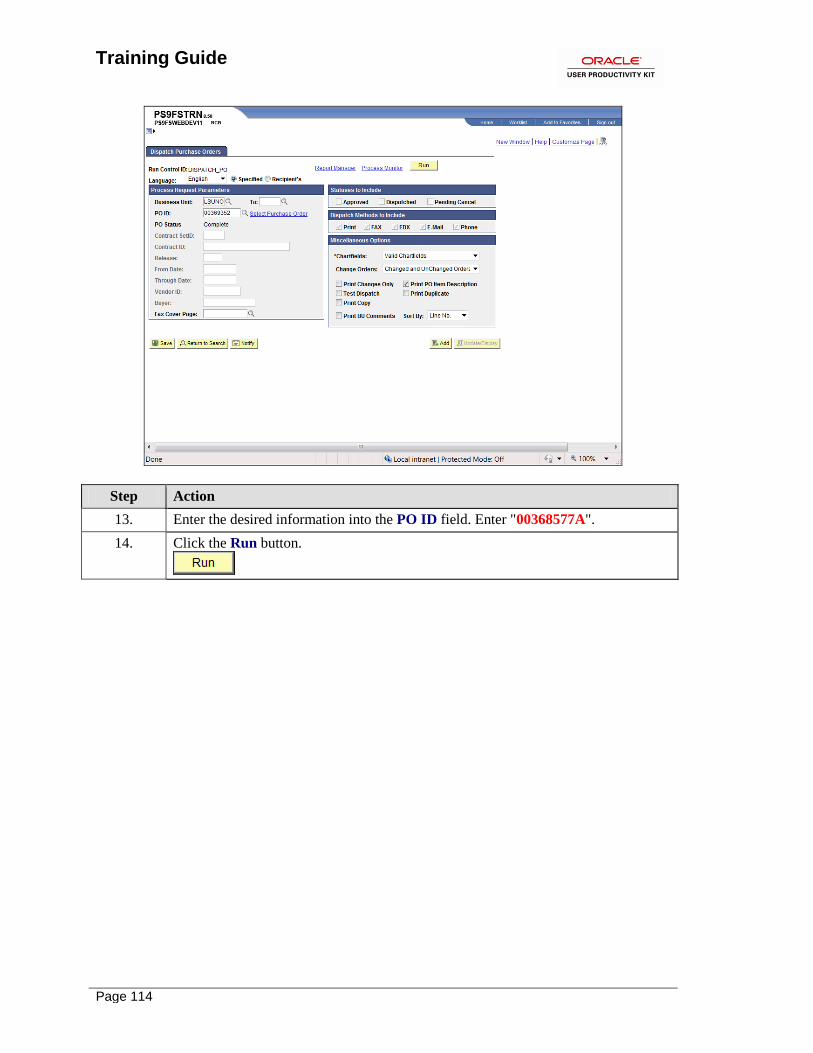
13. Enter the desired information into the PO ID field. Enter "00368577A".
14. Click the Run button.
Training Guide
Page 115
Step Action
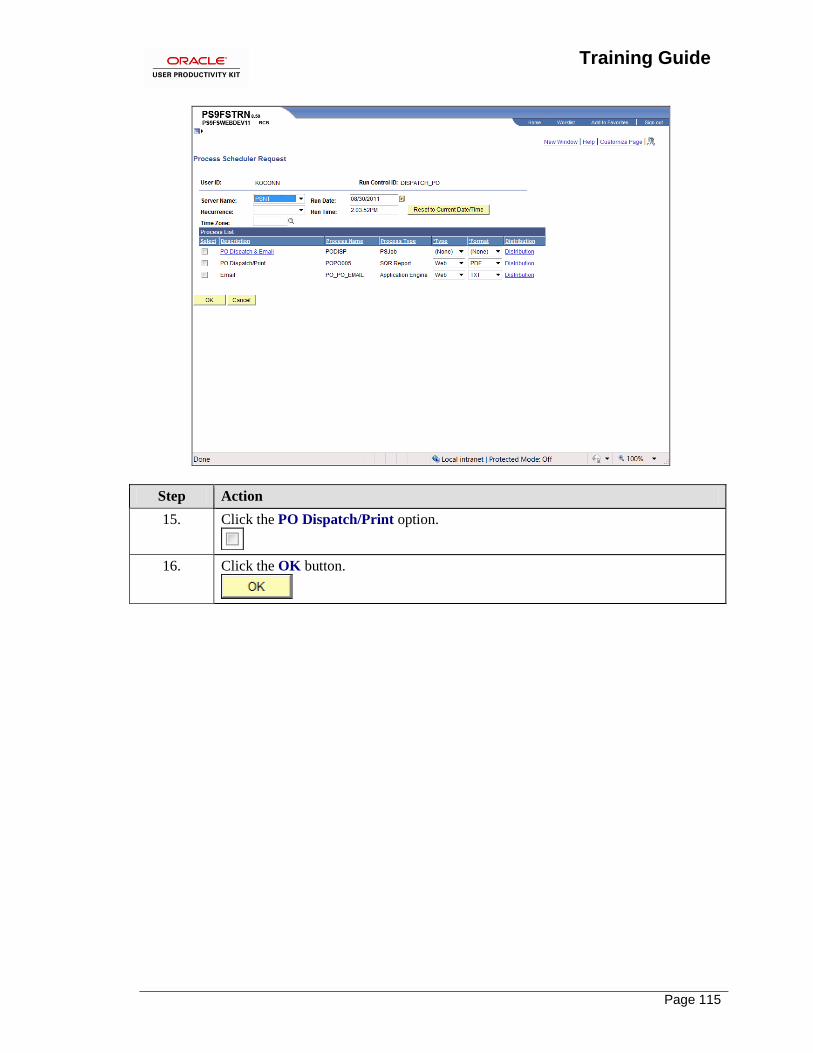
15. Click the PO Dispatch/Print option.
16. Click the OK button.
Training Guide
Page 116
Step Action
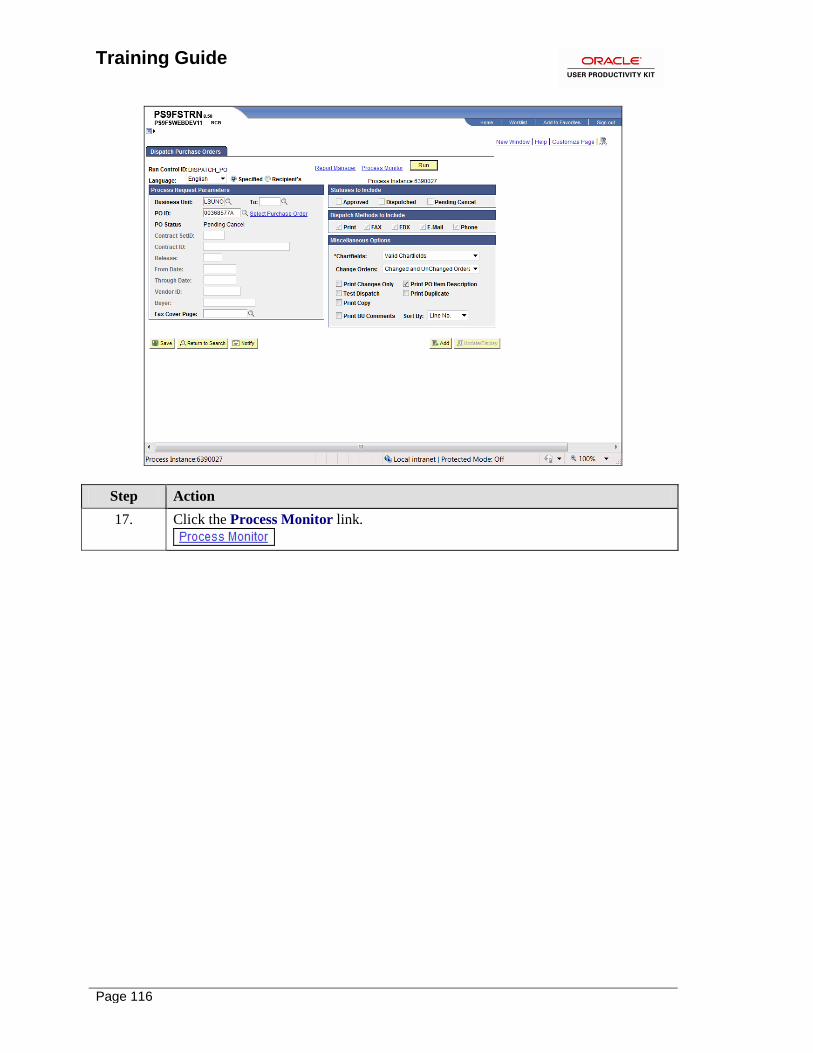
17. Click the Process Monitor link.
Training Guide
Page 117
Step Action
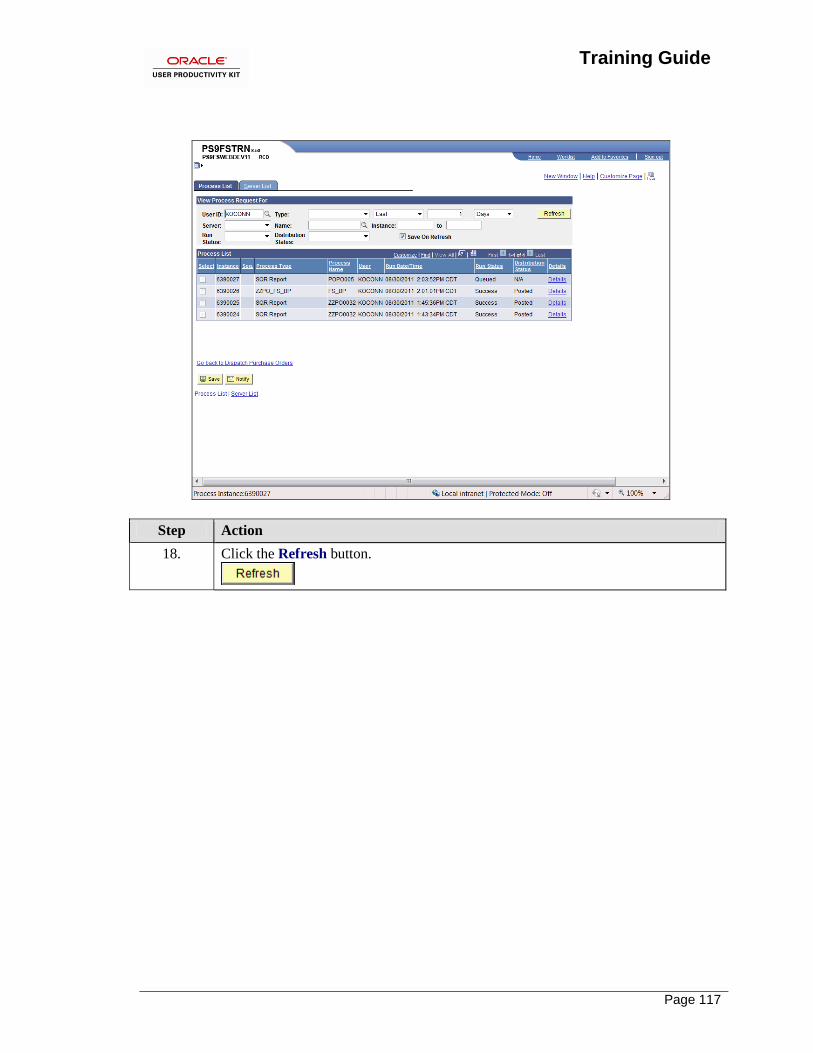
18. Click the Refresh button.

Training Guide
Page 118
Step Action
19. Click the Go back to Dispatch Purchase Orders link.
Training Guide
Page 119
Step Action
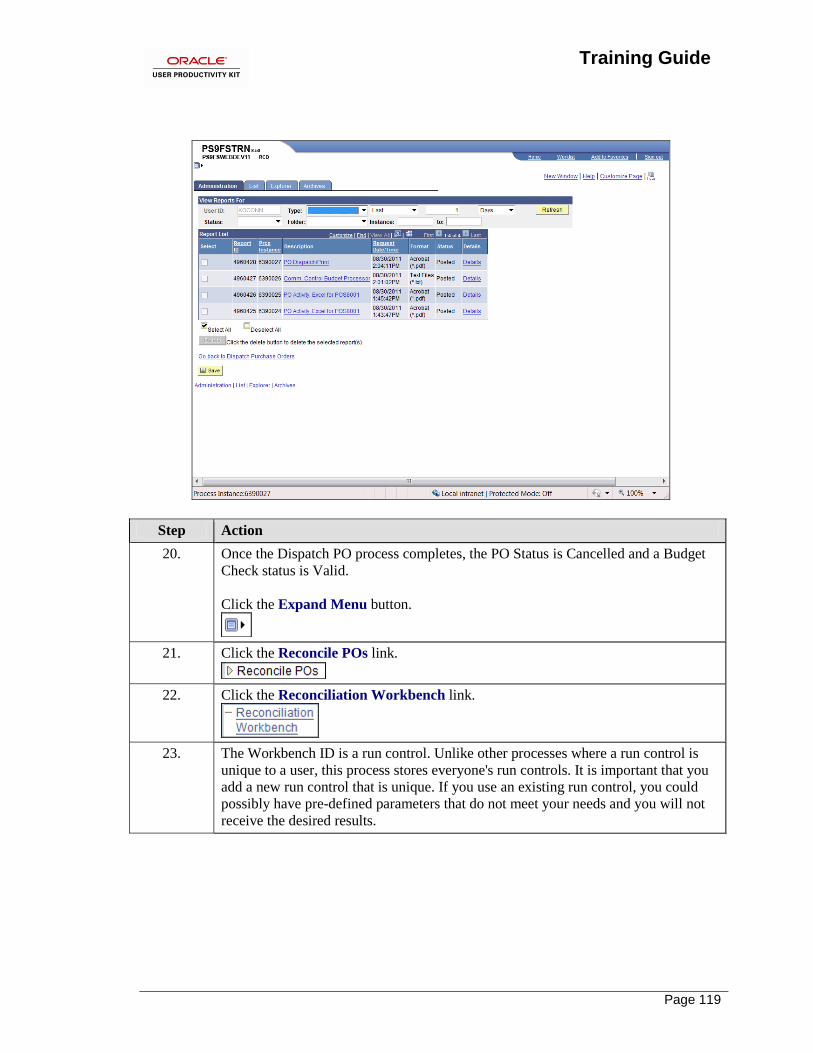
20. Once the Dispatch PO process completes, the PO Status is Cancelled and a Budget
Check status is Valid.
Click the Expand Menu button.
21. Click the Reconcile POs link.
22. Click the Reconciliation Workbench link.
23. The Workbench ID is a run control. Unlike other processes where a run control is
unique to a user, this process stores everyone's run controls. It is important that you
add a new run control that is unique. If you use an existing run control, you could
possibly have pre-defined parameters that do not meet your needs and you will not
receive the desired results.
Training Guide
Page 120
Step Action
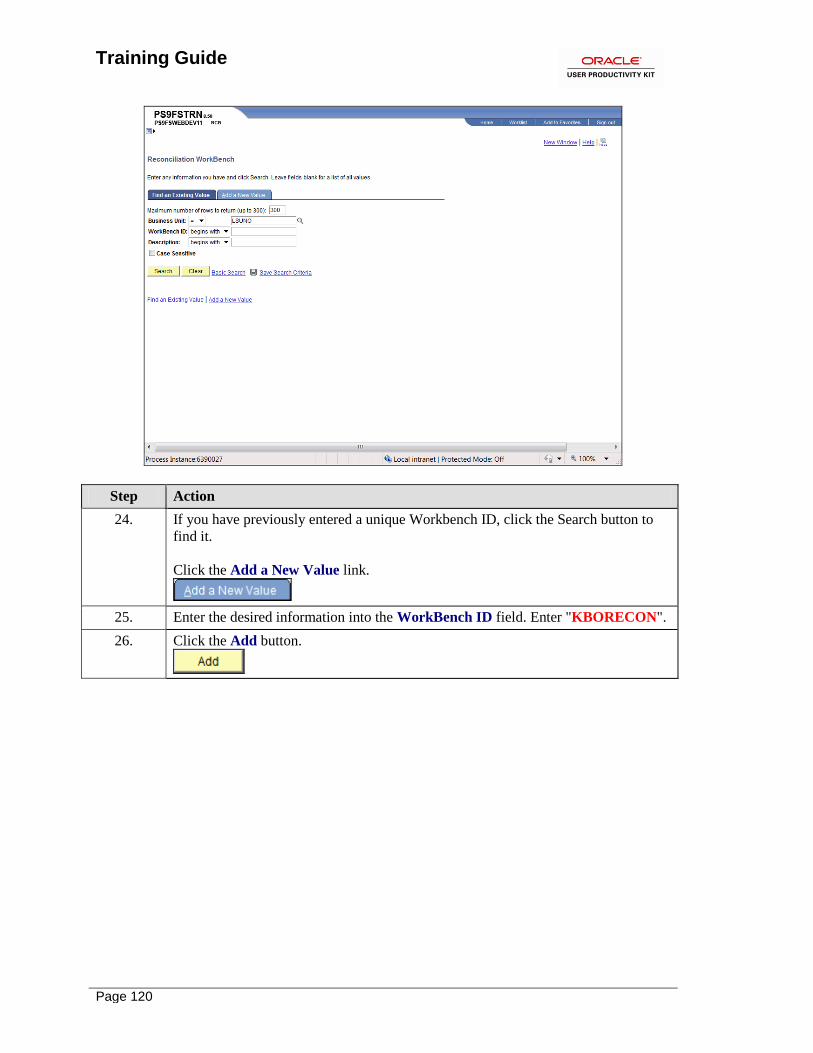
24. If you have previously entered a unique Workbench ID, click the Search button to
find it.
Click the Add a New Value link.
25. Enter the desired information into the WorkBench ID field. Enter "KBORECON".
26. Click the Add button.
Training Guide
Page 121
Step Action
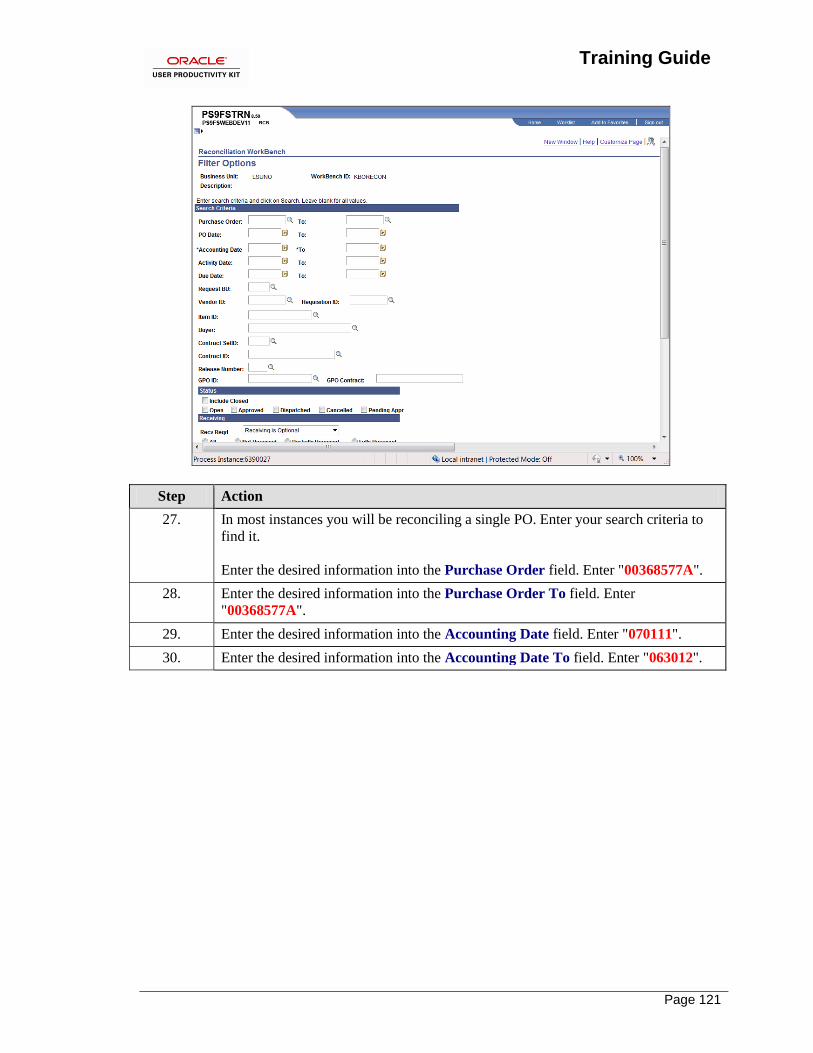
27. In most instances you will be reconciling a single PO. Enter your search criteria to
find it.
Enter the desired information into the Purchase Order field. Enter "00368577A".
28. Enter the desired information into the Purchase Order To field. Enter
"00368577A".
29. Enter the desired information into the Accounting Date field. Enter "070111".
30. Enter the desired information into the Accounting Date To field. Enter "063012".
Training Guide
Page 122
Step Action
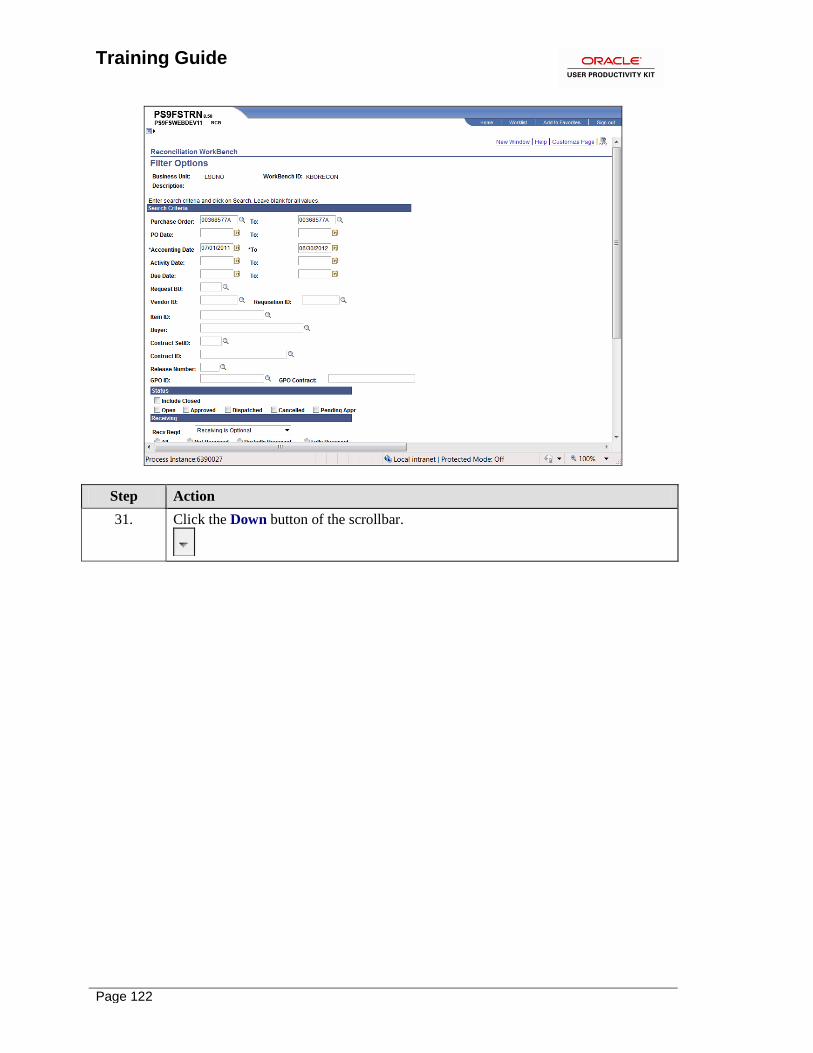
31. Click the Down button of the scrollbar.
Training Guide
Page 123
Step Action
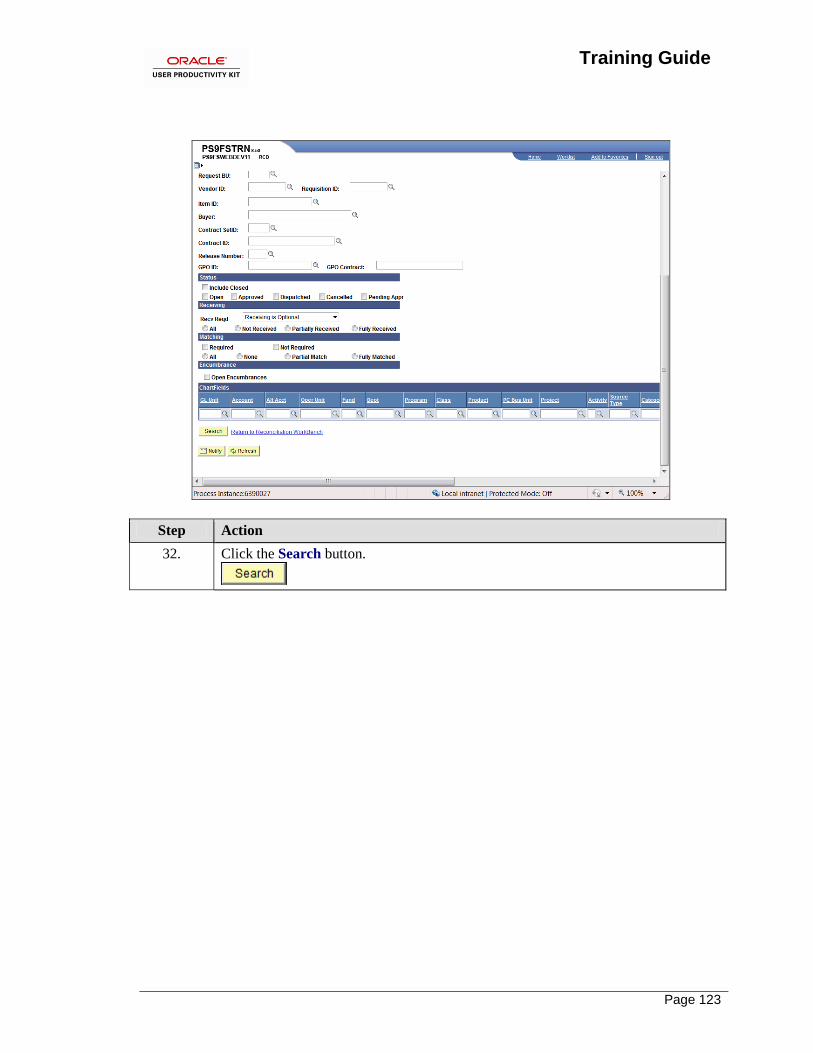
32. Click the Search button.
Training Guide
Page 124
Step Action
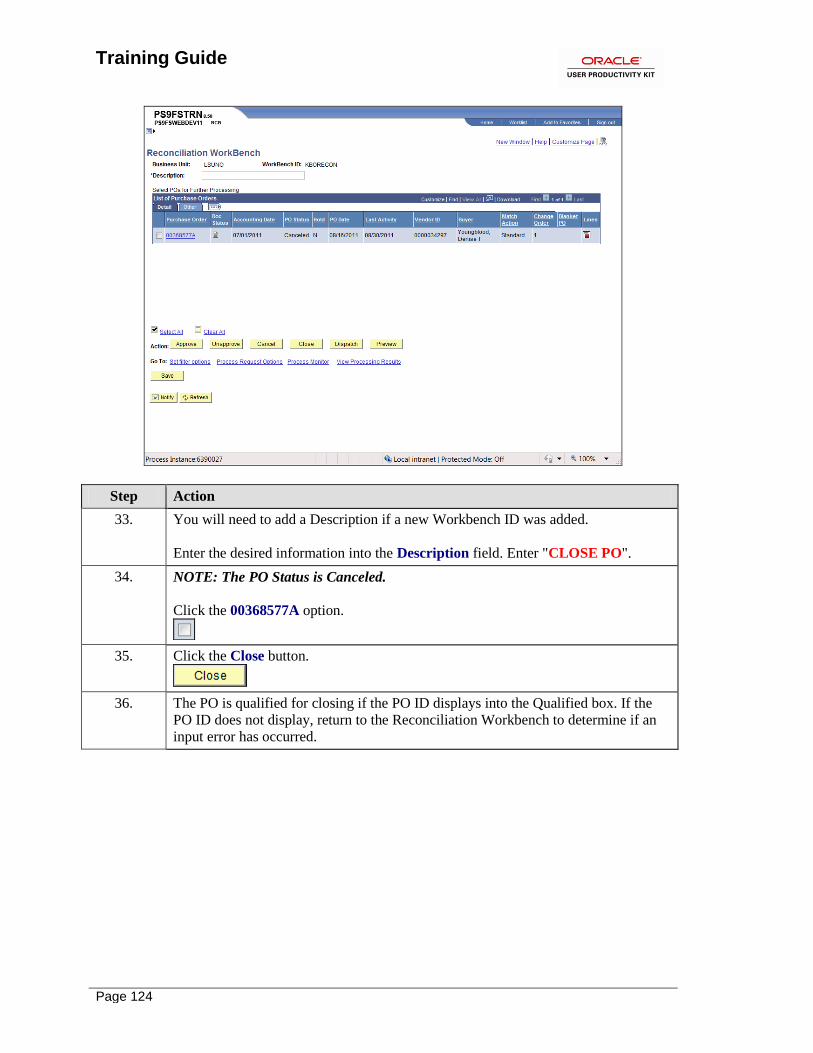
33. You will need to add a Description if a new Workbench ID was added.
Enter the desired information into the Description field. Enter "CLOSE PO".
34. NOTE: The PO Status is Canceled.
Click the 00368577A option.
35. Click the Close button.
36. The PO is qualified for closing if the PO ID displays into the Qualified box. If the
PO ID does not display, return to the Reconciliation Workbench to determine if an
input error has occurred.
Training Guide
Page 125
Step Action
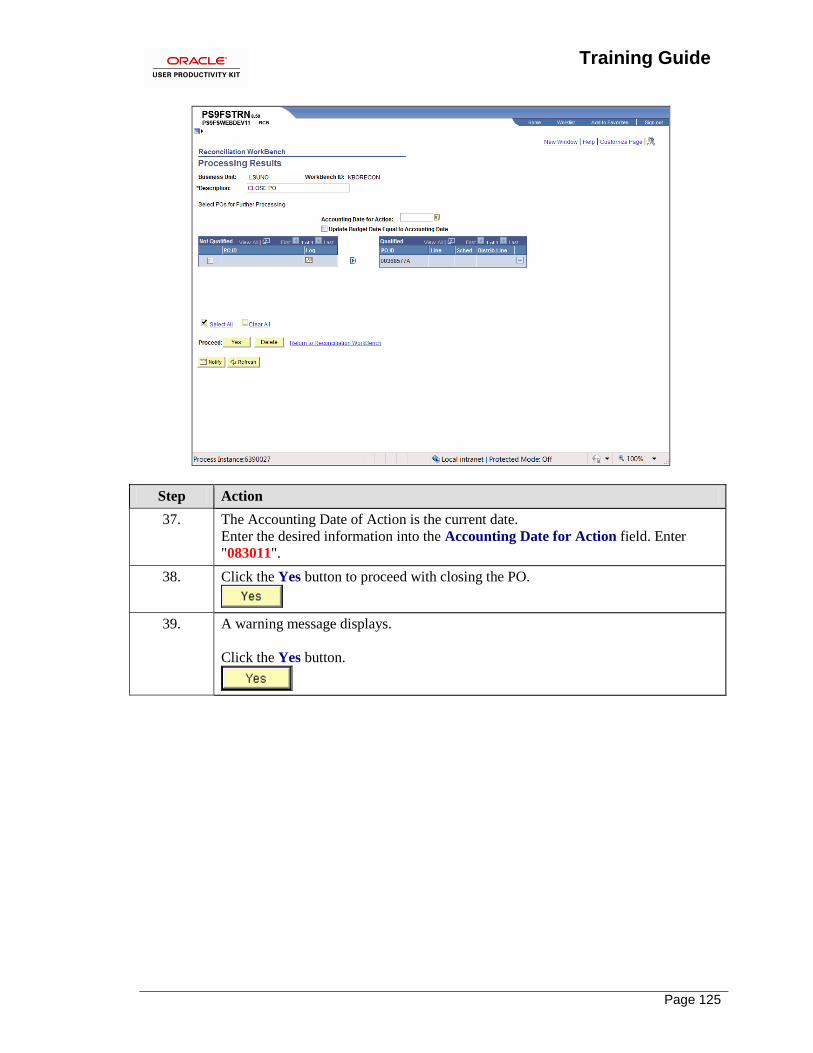
37. The Accounting Date of Action is the current date.
Enter the desired information into the Accounting Date for Action field. Enter
"083011".
38. Click the Yes button to proceed with closing the PO.
39. A warning message displays.
Click the Yes button.
Training Guide
Page 126
Step Action
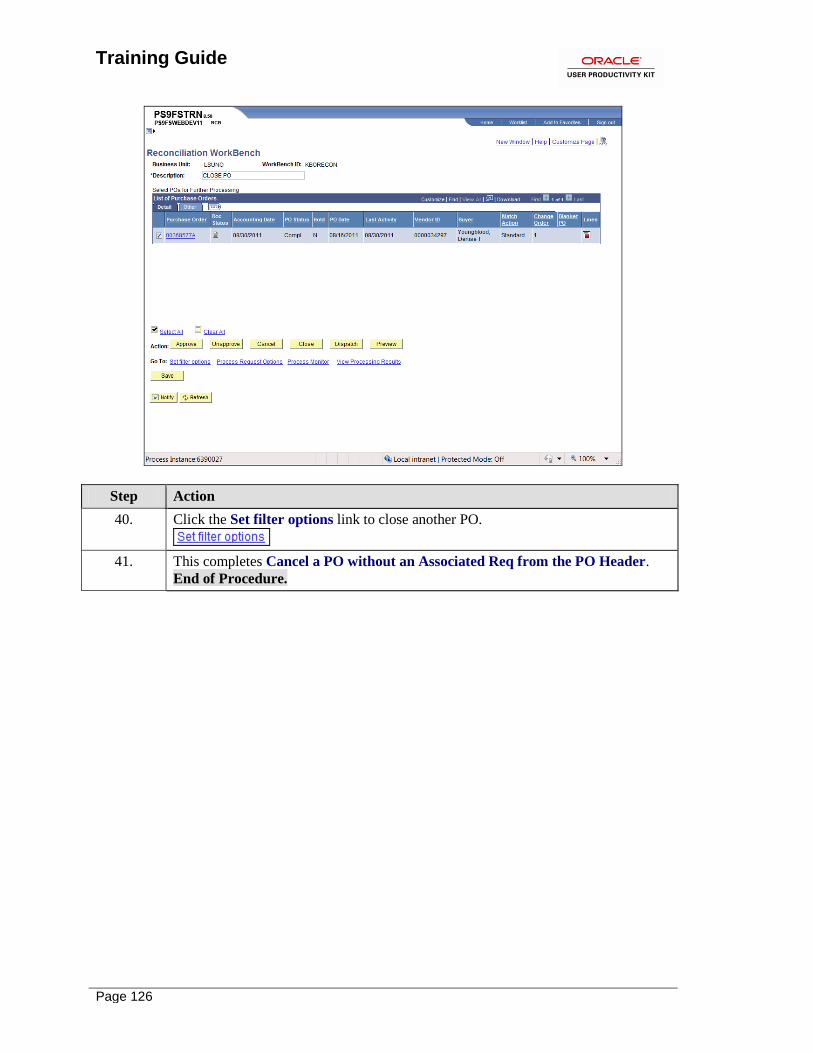
40. Click the Set filter options link to close another PO.
41. This completes Cancel a PO without an Associated Req from the PO Header.
End of Procedure.
Training Guide
Page 127
Cancel a PO with an Associated Req from the PO Header
Procedure
In this topic you will learn how to Cancel a PO with an Associated Req from the PO Header.
Step Action
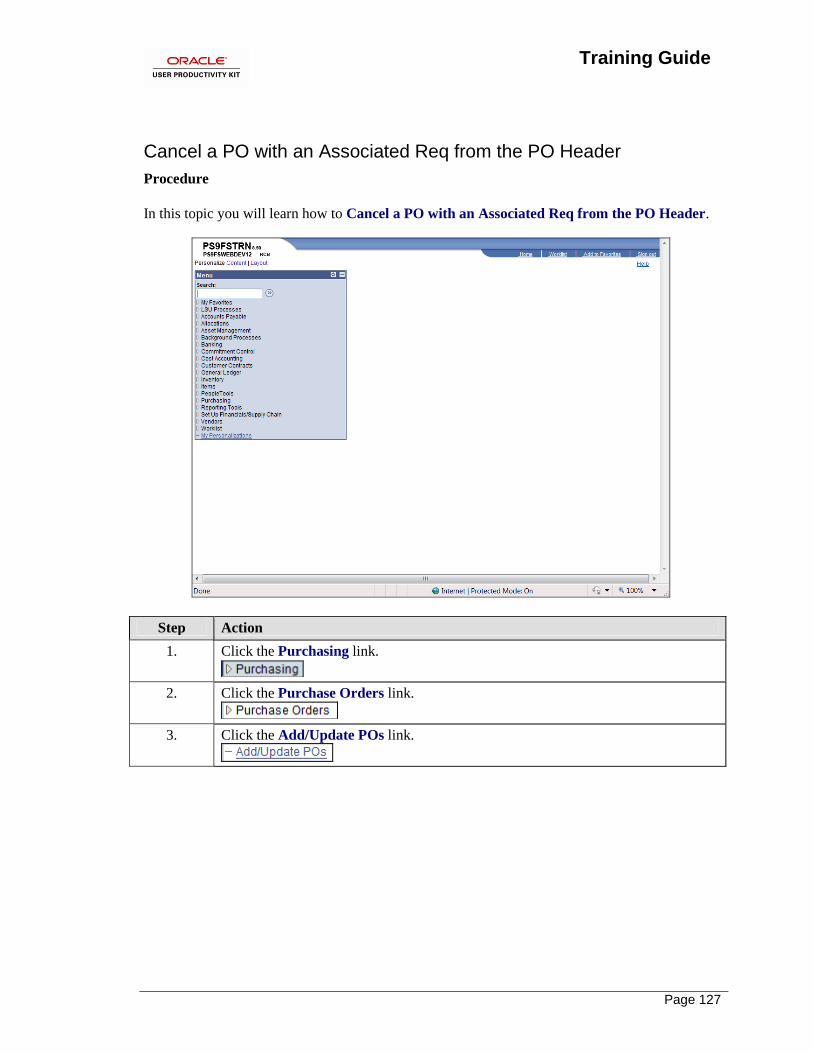
1. Click the Purchasing link.
2. Click the Purchase Orders link.
3. Click the Add/Update POs link.
Training Guide
Page 128
Step Action
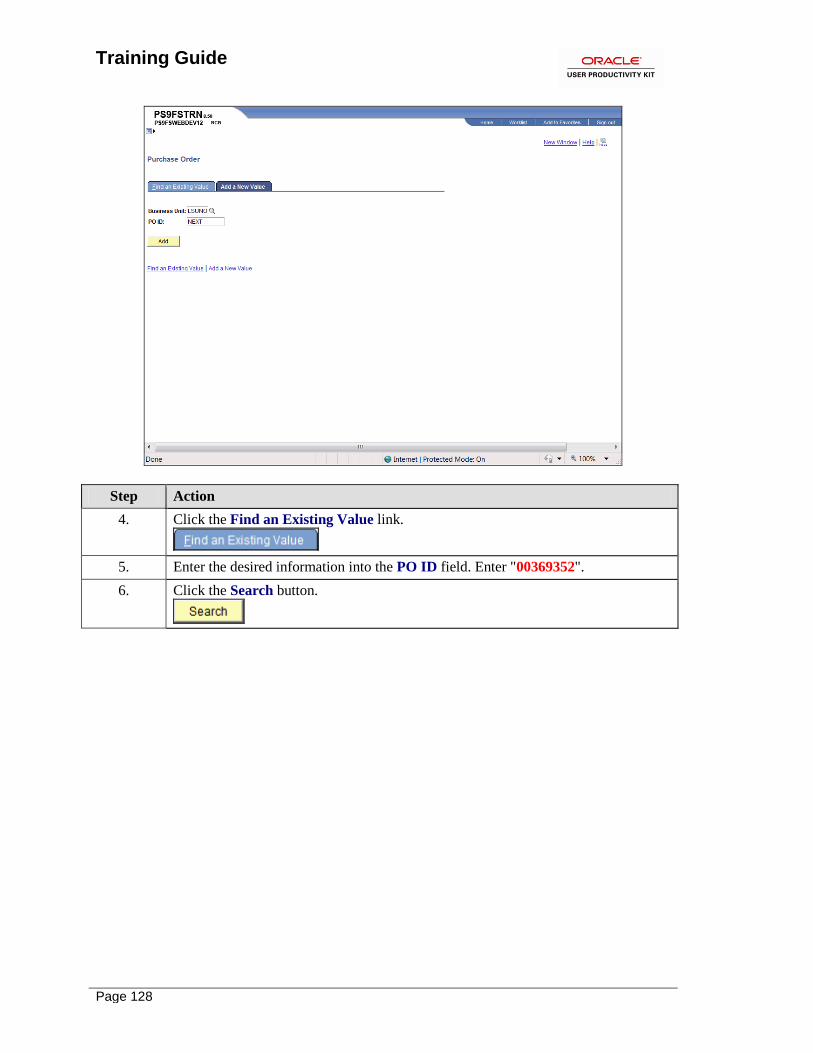
4. Click the Find an Existing Value link.
5. Enter the desired information into the PO ID field. Enter "00369352".
6. Click the Search button.
Training Guide
Page 129
Step Action
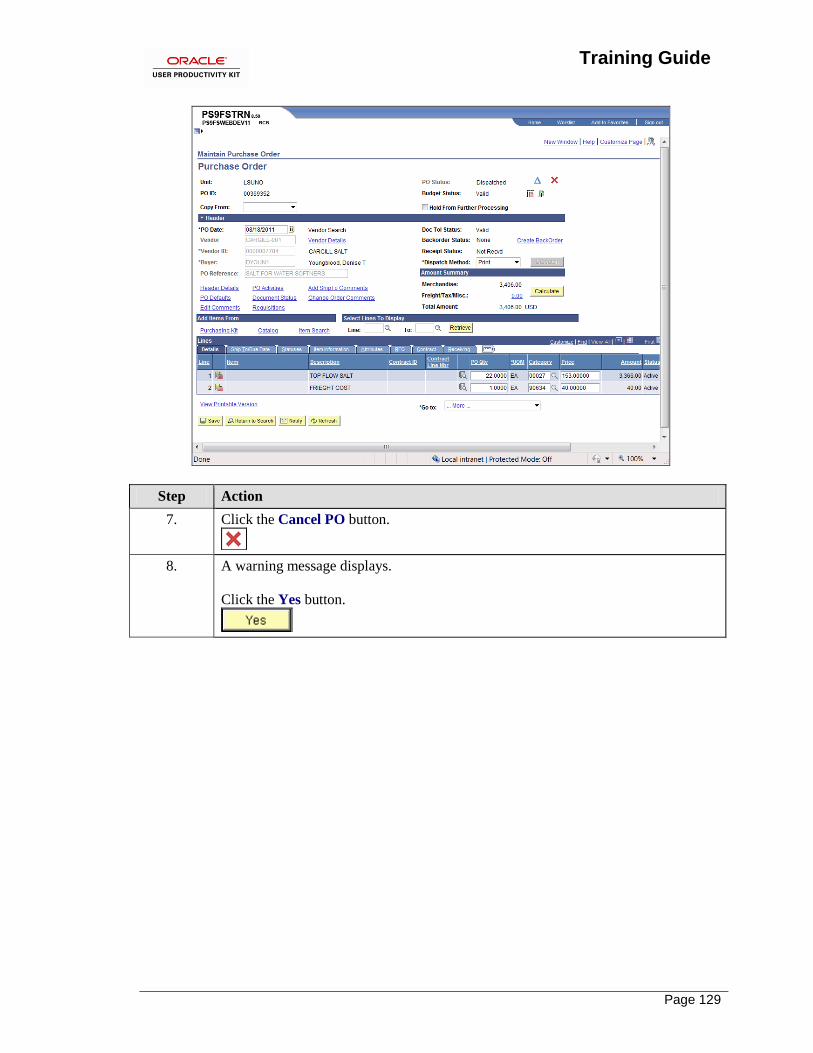
7. Click the Cancel PO button.
8. A warning message displays.
Click the Yes button.
Training Guide
Page 130
Step Action
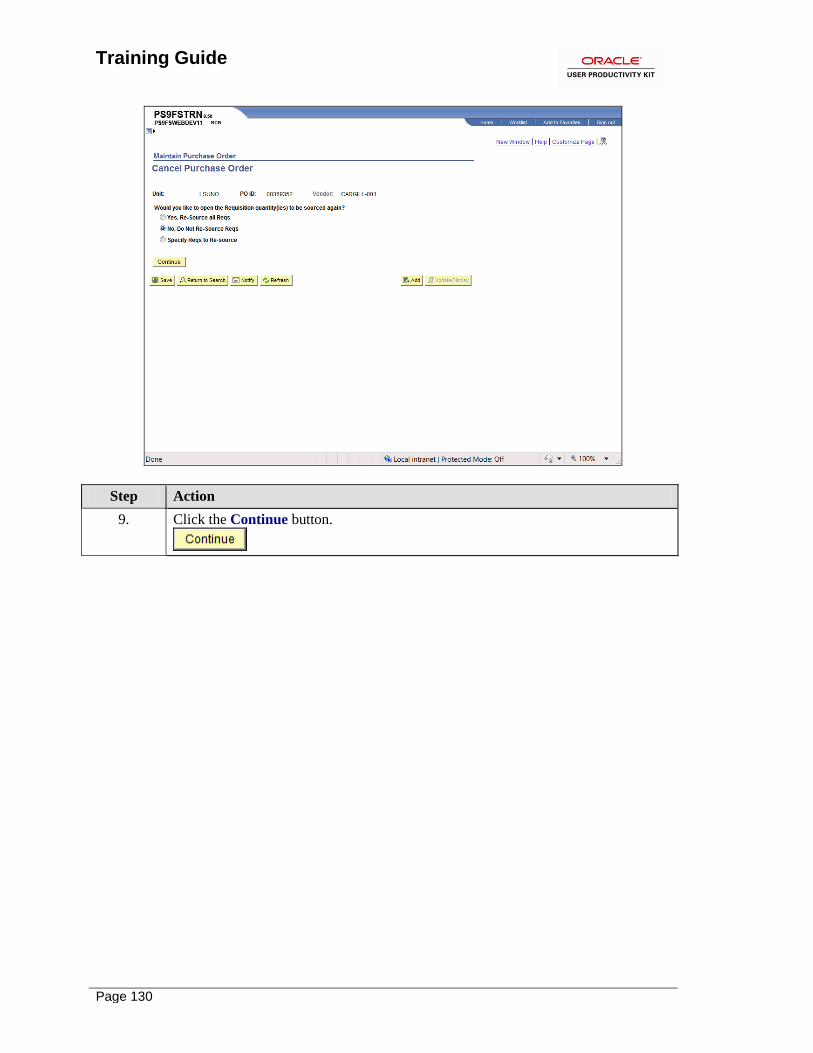
9. Click the Continue button.
Training Guide
Page 131
Step Action
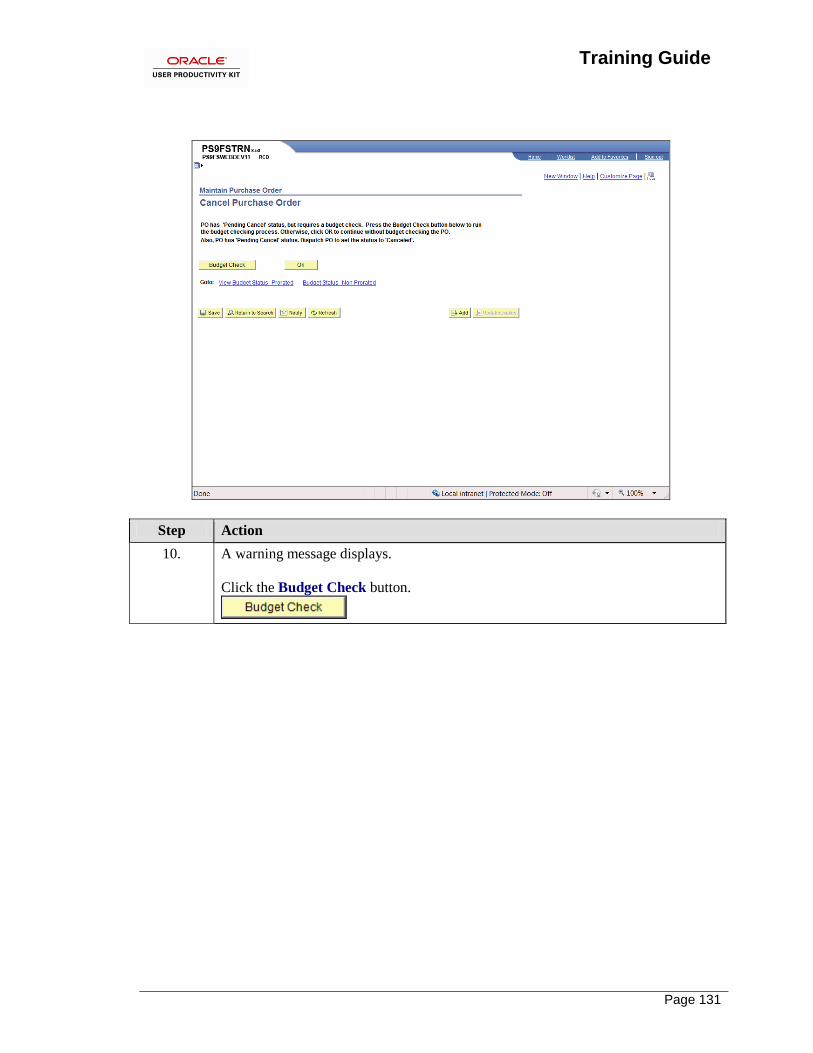
10. A warning message displays.
Click the Budget Check button.
Training Guide
Page 132
Step Action
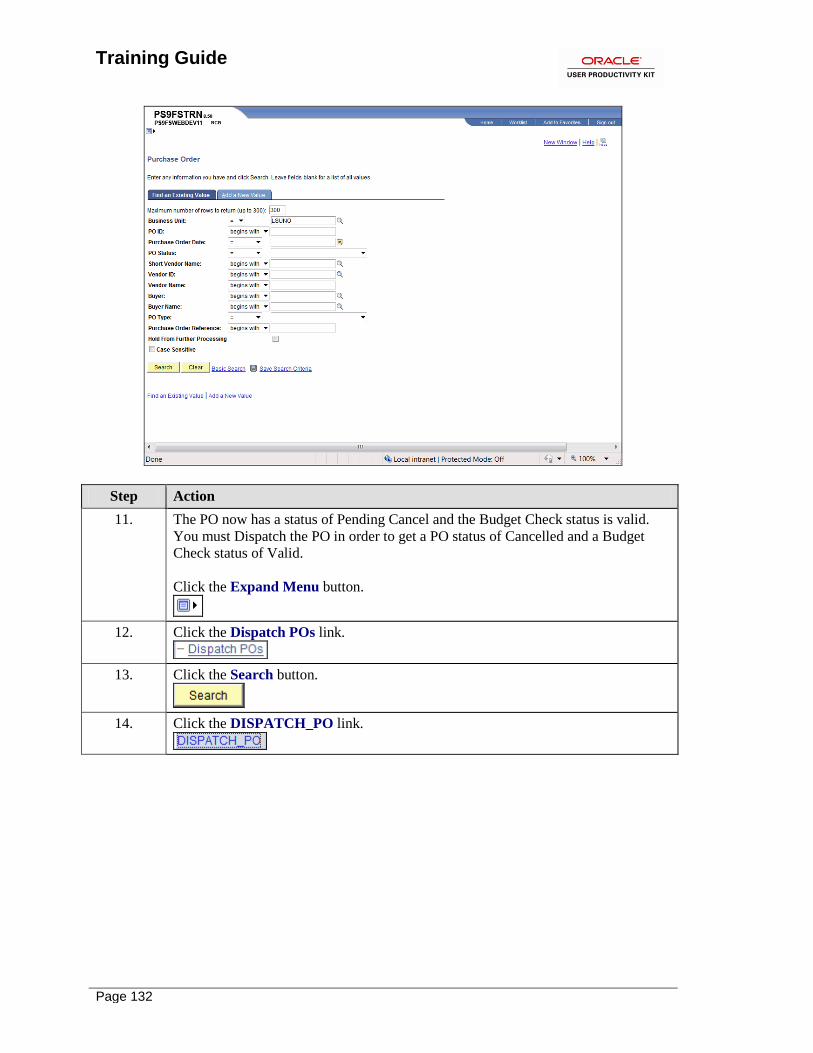
11. The PO now has a status of Pending Cancel and the Budget Check status is valid.
You must Dispatch the PO in order to get a PO status of Cancelled and a Budget
Check status of Valid.
Click the Expand Menu button.
12. Click the Dispatch POs link.
13. Click the Search button.
14. Click the DISPATCH_PO link.
Training Guide
Page 133
Step Action
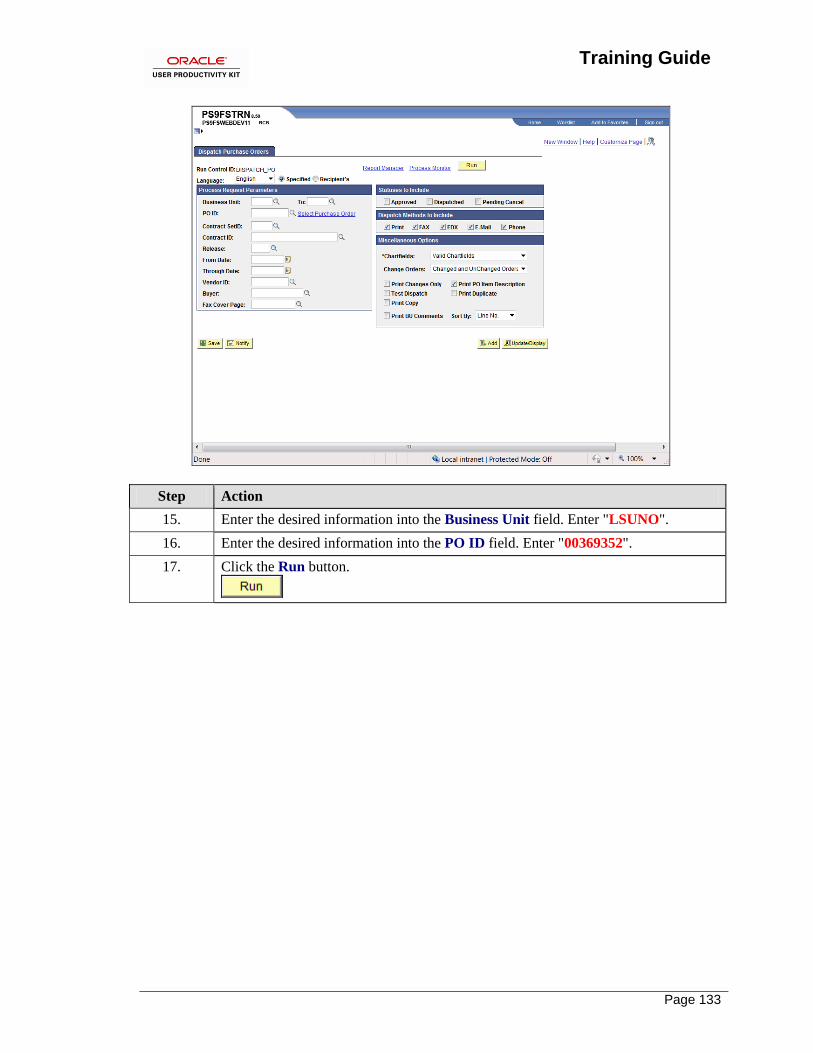
15. Enter the desired information into the Business Unit field. Enter "LSUNO".
16. Enter the desired information into the PO ID field. Enter "00369352".
17. Click the Run button.
Training Guide
Page 134
Step Action
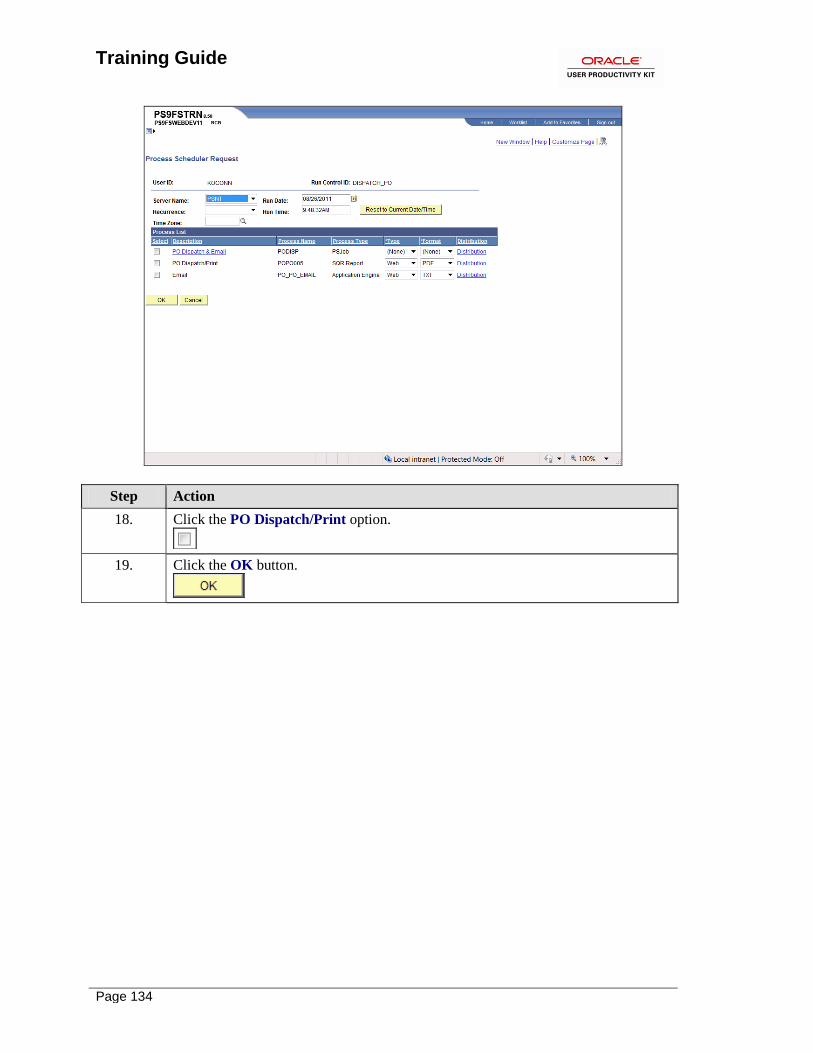
18. Click the PO Dispatch/Print option.
19. Click the OK button.
Training Guide
Page 135
Step Action
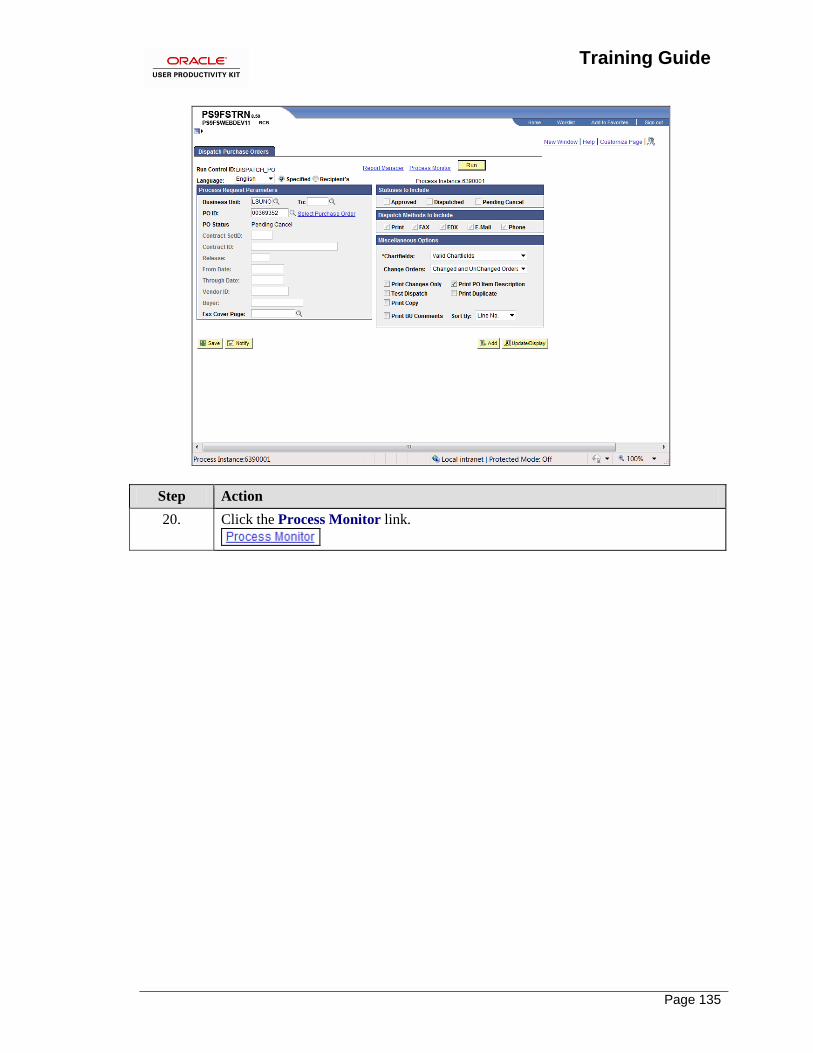
20. Click the Process Monitor link.

Training Guide
Page 136
Step Action
21. Click the Refresh button until Run Status = Success and Distribution Status =
Posted.
22. Click the Go back to Dispatch Purchase Orders link.
Training Guide
Page 137
Step Action
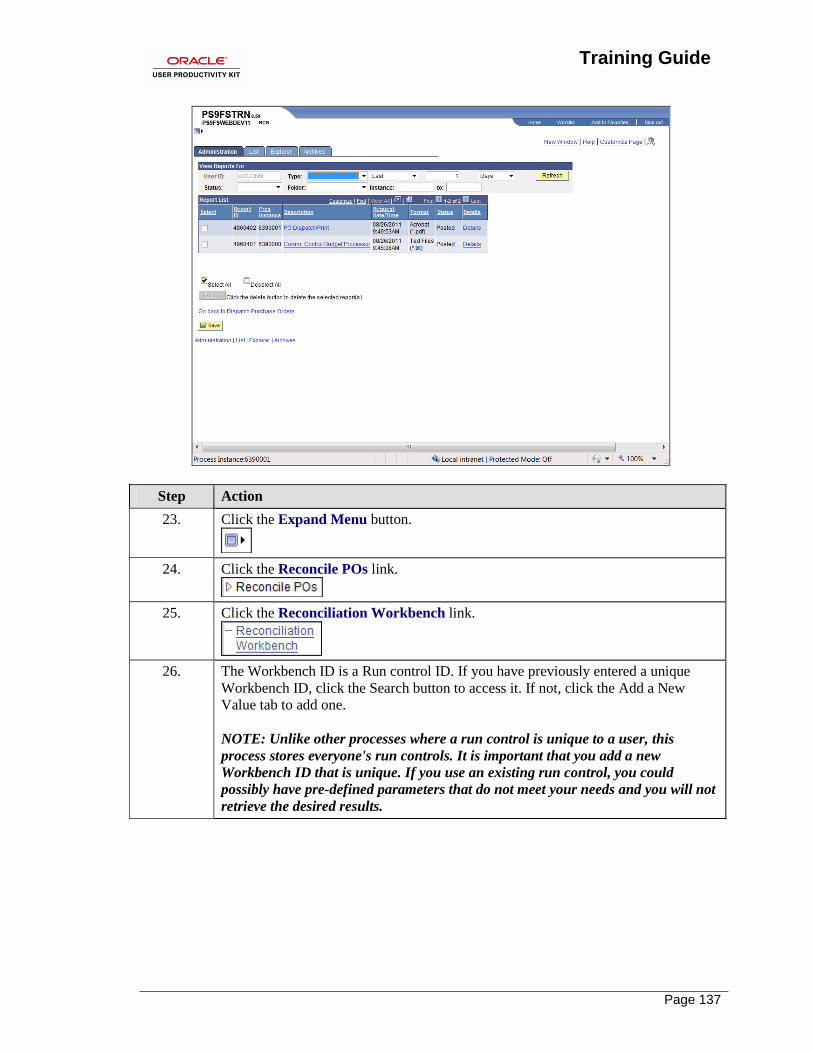
23. Click the Expand Menu button.
24. Click the Reconcile POs link.
25. Click the Reconciliation Workbench link.
26. The Workbench ID is a Run control ID. If you have previously entered a unique
Workbench ID, click the Search button to access it. If not, click the Add a New
Value tab to add one.
NOTE: Unlike other processes where a run control is unique to a user, this
process stores everyone's run controls. It is important that you add a new
Workbench ID that is unique. If you use an existing run control, you could
possibly have pre-defined parameters that do not meet your needs and you will not
retrieve the desired results.
Training Guide
Page 138
Step Action
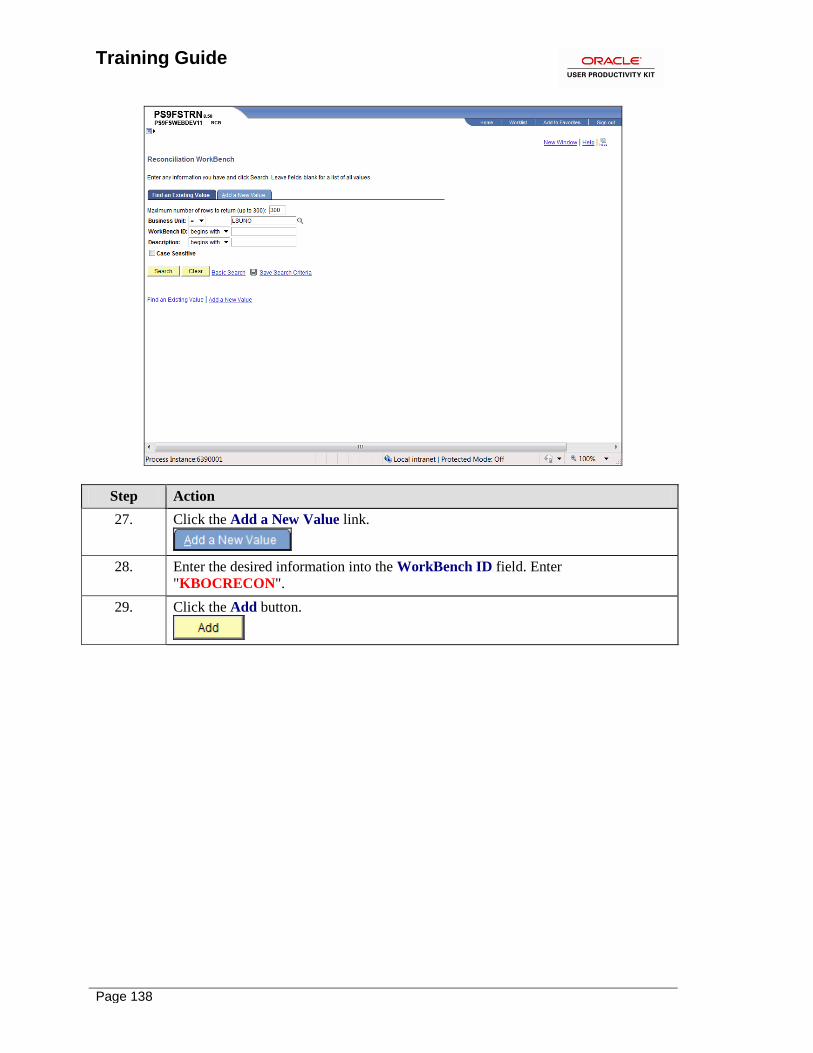
27. Click the Add a New Value link.
28. Enter the desired information into the WorkBench ID field. Enter
"KBOCRECON".
29. Click the Add button.
Training Guide
Page 139
Step Action
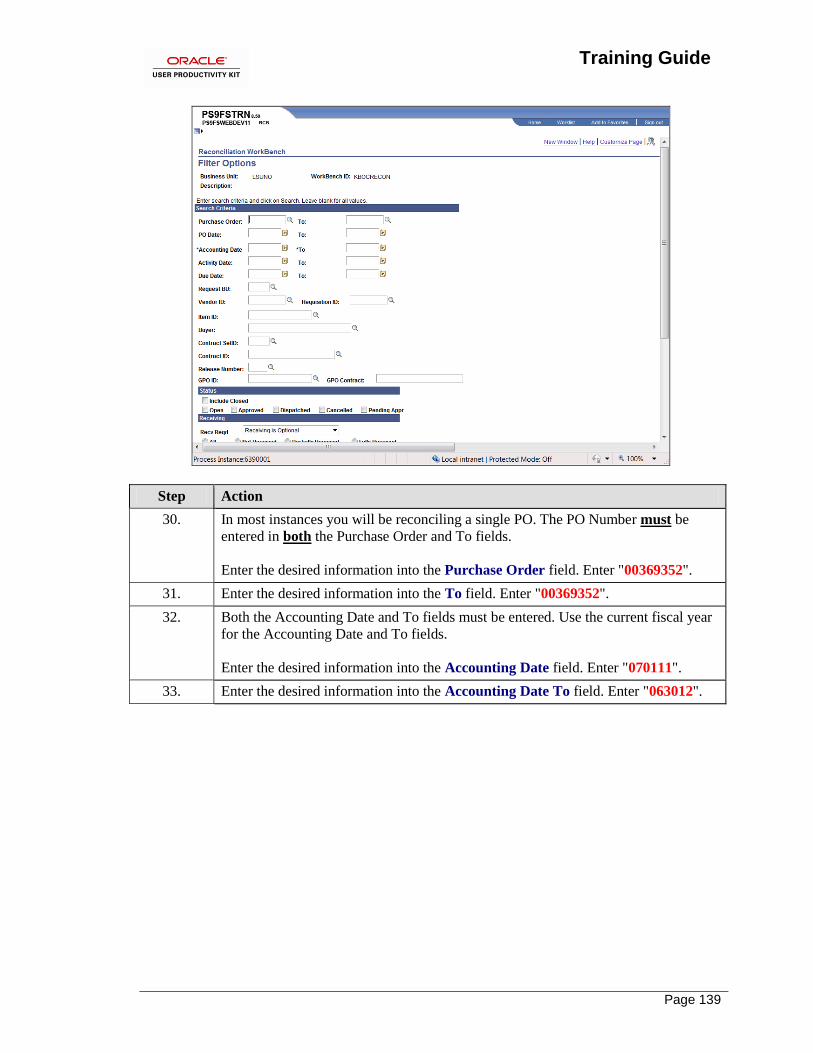
30. In most instances you will be reconciling a single PO. The PO Number must be
entered in both the Purchase Order and To fields.
Enter the desired information into the Purchase Order field. Enter "00369352".
31. Enter the desired information into the To field. Enter "00369352".
32. Both the Accounting Date and To fields must be entered. Use the current fiscal year
for the Accounting Date and To fields.
Enter the desired information into the Accounting Date field. Enter "070111".
33. Enter the desired information into the Accounting Date To field. Enter "063012".

Training Guide
Page 140
Step Action
34. Click the Down button of the scrollbar.

Training Guide
Page 141
Step Action
35. Click the Search button.
Training Guide
Page 142
Step Action
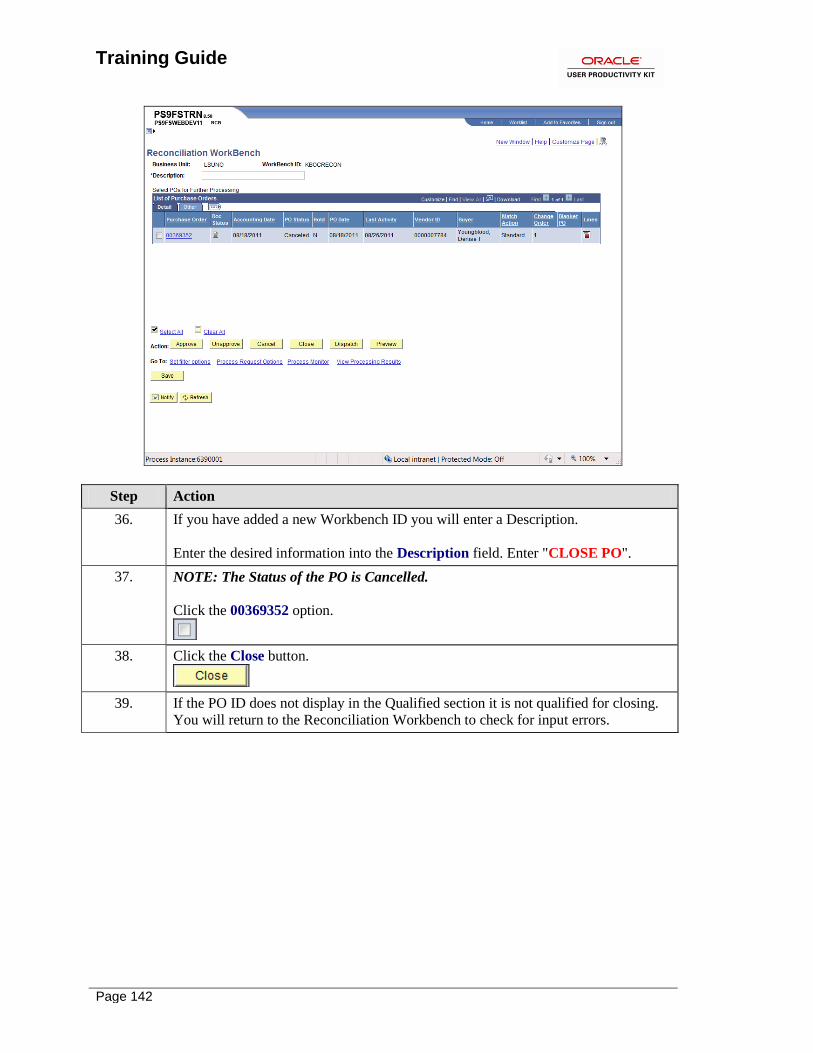
36. If you have added a new Workbench ID you will enter a Description.
Enter the desired information into the Description field. Enter "CLOSE PO".
37. NOTE: The Status of the PO is Cancelled.
Click the 00369352 option.
38. Click the Close button.
39. If the PO ID does not display in the Qualified section it is not qualified for closing.
You will return to the Reconciliation Workbench to check for input errors.
Training Guide
Page 143
Step Action
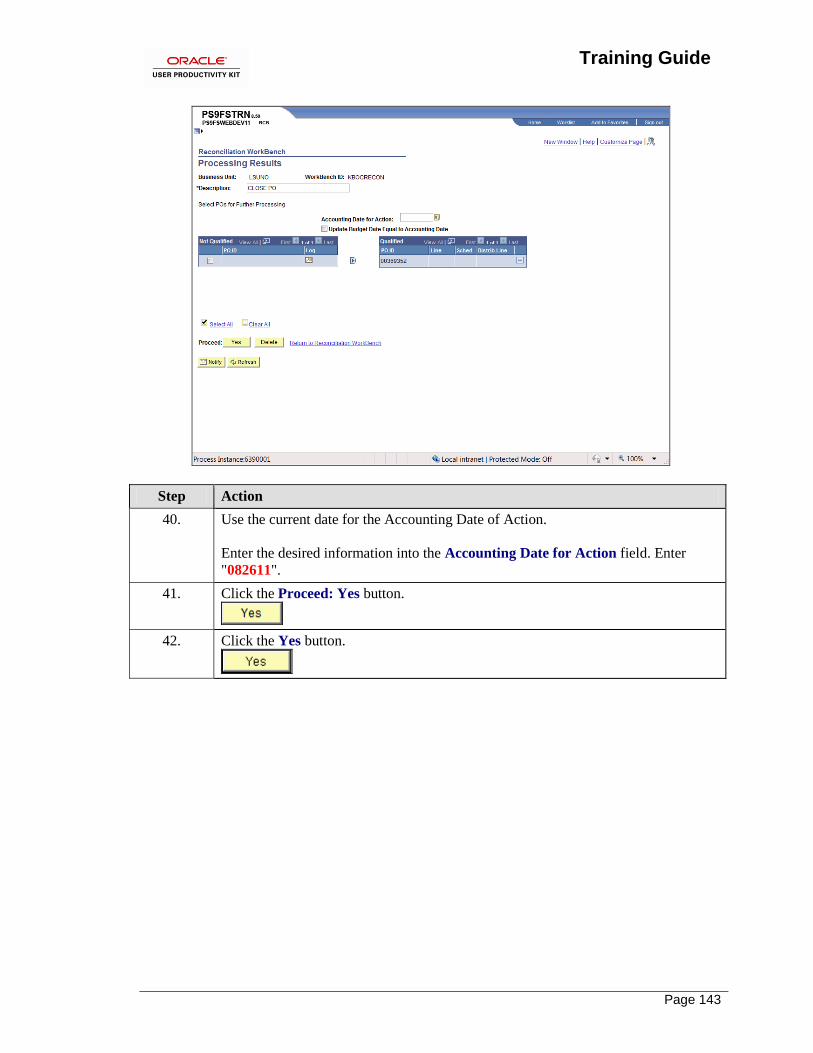
40. Use the current date for the Accounting Date of Action.
Enter the desired information into the Accounting Date for Action field. Enter
"082611".
41. Click the Proceed: Yes button.
42. Click the Yes button.
Training Guide
Page 144
Step Action
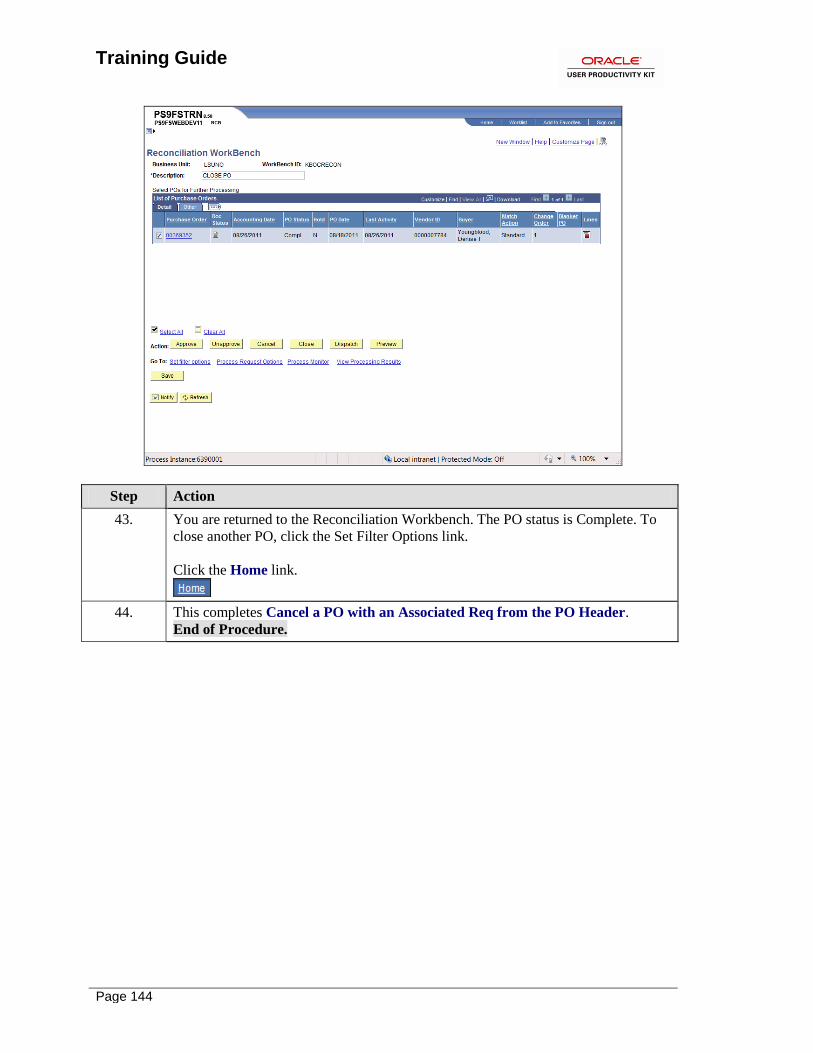
43. You are returned to the Reconciliation Workbench. The PO status is Complete. To
close another PO, click the Set Filter Options link.
Click the Home link.
44. This completes Cancel a PO with an Associated Req from the PO Header.
End of Procedure.
Training Guide
Page 145
Close a PO from the PO Recon Workbench
Procedure
In this topic you will learn how to Close a PO from the PO Recon Workbench.
Step Action
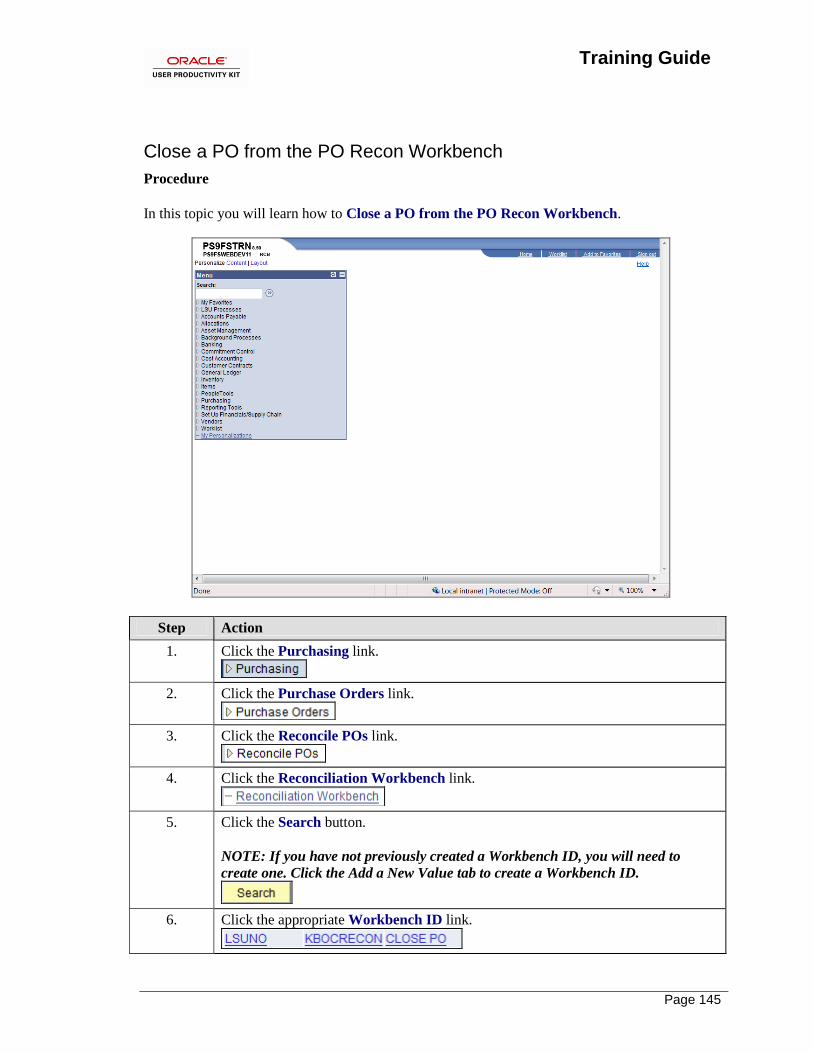
1. Click the Purchasing link.
2. Click the Purchase Orders link.
3. Click the Reconcile POs link.
4. Click the Reconciliation Workbench link.
5. Click the Search button.
NOTE: If you have not previously created a Workbench ID, you will need to
create one. Click the Add a New Value tab to create a Workbench ID.
6. Click the appropriate Workbench ID link.
Training Guide
Page 146
Step Action
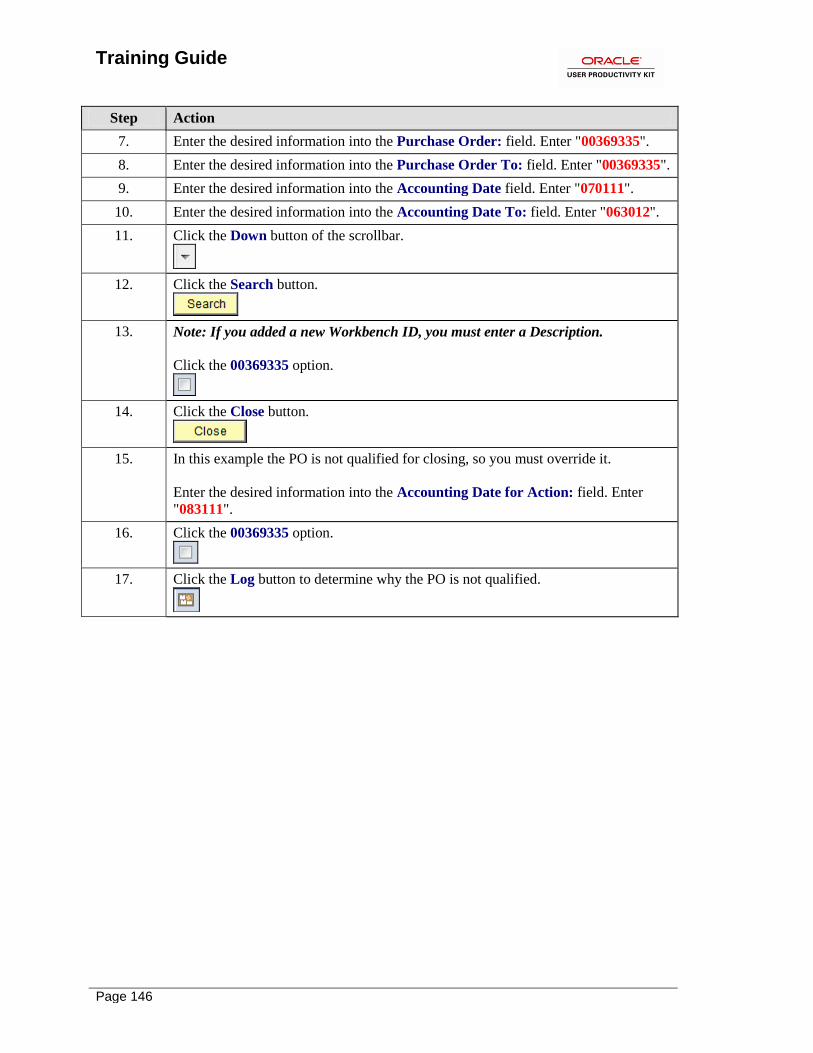
7. Enter the desired information into the Purchase Order: field. Enter "00369335".
8. Enter the desired information into the Purchase Order To: field. Enter "00369335".
9. Enter the desired information into the Accounting Date field. Enter "070111".
10. Enter the desired information into the Accounting Date To: field. Enter "063012".
11. Click the Down button of the scrollbar.
12. Click the Search button.
13. Note: If you added a new Workbench ID, you must enter a Description.
Click the 00369335 option.
14. Click the Close button.
15. In this example the PO is not qualified for closing, so you must override it.
Enter the desired information into the Accounting Date for Action: field. Enter
"083111".
16. Click the 00369335 option.
17. Click the Log button to determine why the PO is not qualified.
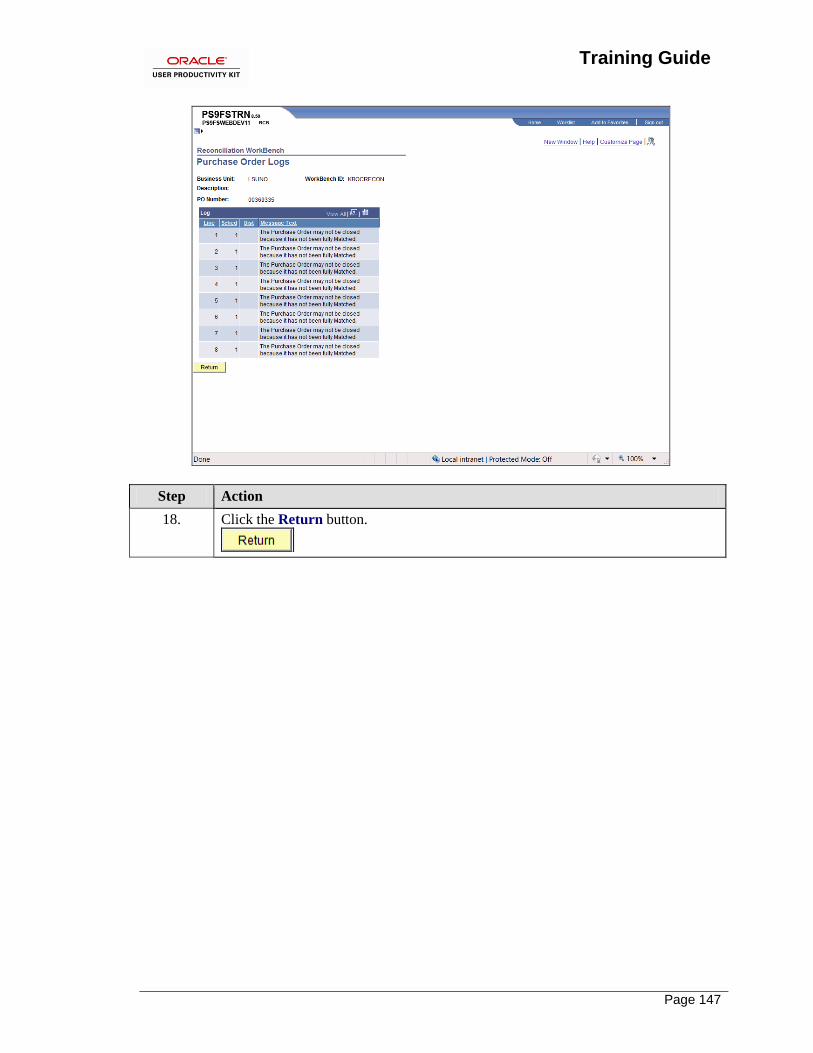
Training Guide
Page 147
Step Action
18. Click the Return button.
Training Guide
Page 148
Step Action
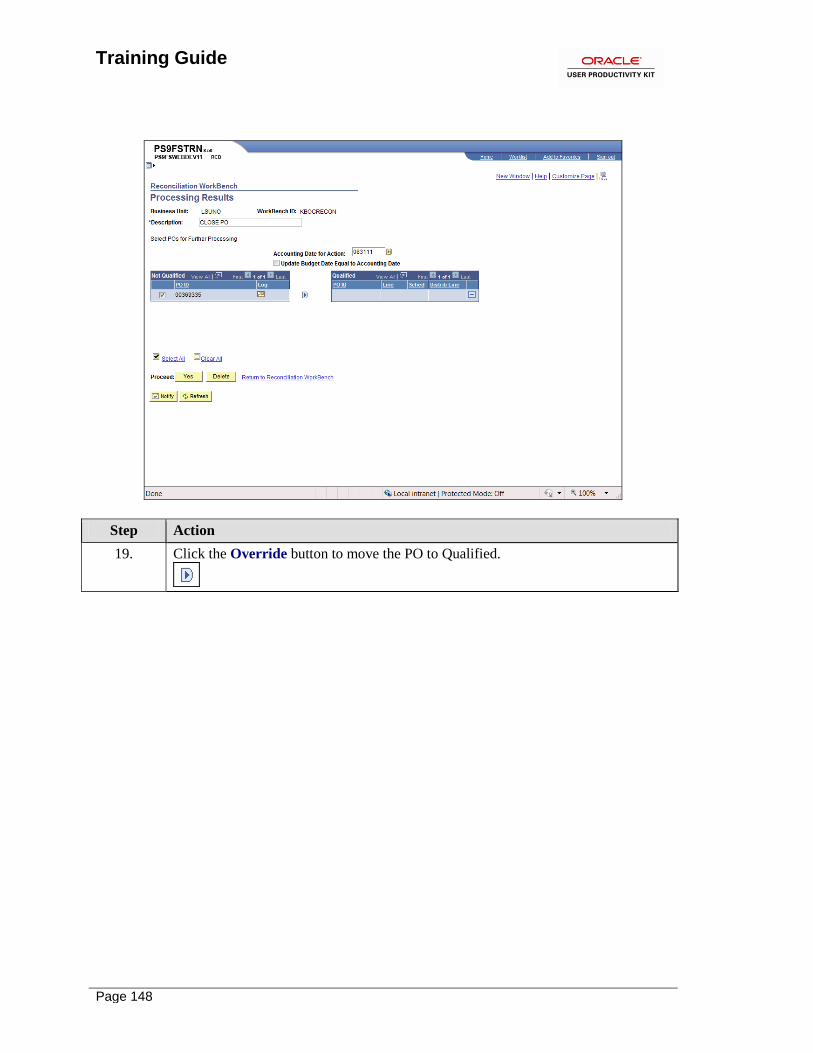
19. Click the Override button to move the PO to Qualified.
Training Guide
Page 149
Step Action
20. Click the Yes button to proceed with the closing process.
21. Click the Yes button.
22. You are returned to the Reconciliation Workbench page. The PO status is now
Complete.
You must Budget Check the PO by navigating to:
Purchasing > Purchase Orders > Budget Check
23. To close another PO, click the Set Filter Options link.
NOTE: If your PO originated from a requisition, canceling the PO will result in
making the requisition available for sourcing. If you no longer need the
requisition, cancel it from the Req Header or from the Reconciliation Workbench.
Training Guide
Page 150
Step Action
24. Click the Home link.
25. This completes Close a PO from the PO Recon Workbench.
End of Procedure.
Training Guide
Page 151
Close Purchase Orders
Close a PO to Release the Remaining Encumbrance
Procedure
In this topic you will learn how to Close a PO to Release the Remaining Encumbrance.
Step Action
1. Accounts Payable no longer finalizes the last voucher on a PO to reverse the
remaining encumbrance. A business decision was made requiring the remaining
encumbrance to be liquidated by closing the PO. The PO will be closed by the
Purchasing SuperUser.
The exception to this policy is when a PO has multiple lines and not all lines of the
PO are ready to be finalized. In that situation, it is acceptable for AP to finalize the
last voucher for the affected PO lines.
NOTE: In this scenario the remaining encumbrance on all lines of the PO are
ready to be reversed.
Training Guide
Page 152
Step Action
2. Click the Purchasing link.
3. Click the Purchase Orders link.
4. Click the Reconcile POs link.
5. Click the Reconciliation Workbench link.
Training Guide
Page 153
Step Action
6. Click the Search button to select an existing WorkBench ID.
NOTE: If an existing WorkBench ID is not available, click the Add a New Value
tab to create one. It is important that you add an ID that is unique since all run
controls are stored for this process.
7. Click the appropriate WorkBench ID link.
Training Guide
Page 154
Step Action
8. The search criteria entered for you last reconciliation will default. The Purchase
Order and Purchase Order To fields will need to be changed.
Enter the desired information into the Purchase Order field. Enter "00369354".
9. Enter the desired information into the To field. Enter "00369354".
10. Enter the desired information into the Accounting Date field. Enter "070111".
11. Enter the desired information into the Accounting Date To: field. Enter "063012".
Training Guide
Page 155
Step Action
12. Click the Down button of the scrollbar.
13. Click the Search button.
14. Click the 00369354 option.
15. Click the Close button.
16. The PO is not eligible for closing.
Click the Log button to view the reason the PO is not eligible for closing.
17. Below are some examples of messages you may receive when clicking the Log
button. POs with these messages can be overwritten and closed.
POs with Receiving Required On though not received.
The PO may not be closed because it has not been fully Matched.
POs with Receiving Required Off and Due Date not <= Calculated PO Close Date.
Training Guide
Page 156
Step Action
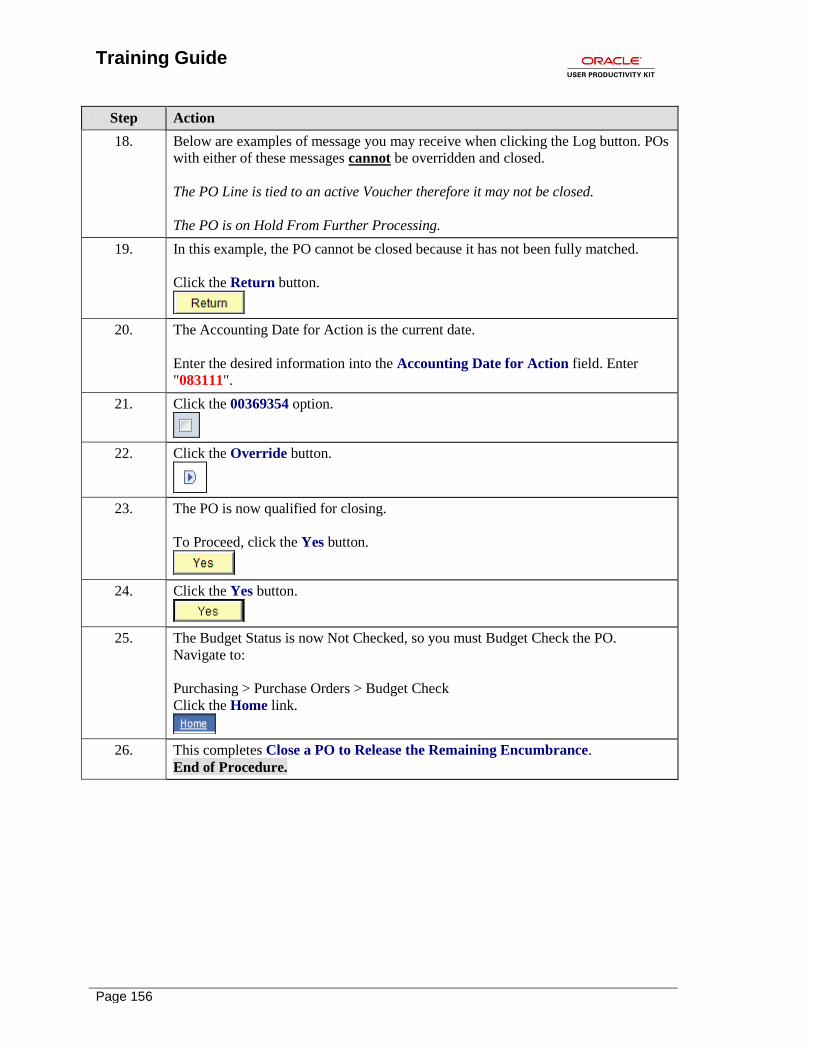
18. Below are examples of message you may receive when clicking the Log button. POs
with either of these messages cannot be overridden and closed.
The PO Line is tied to an active Voucher therefore it may not be closed.
The PO is on Hold From Further Processing.
19. In this example, the PO cannot be closed because it has not been fully matched.
Click the Return button.
20. The Accounting Date for Action is the current date.
Enter the desired information into the Accounting Date for Action field. Enter
"083111".
21. Click the 00369354 option.
22. Click the Override button.
23. The PO is now qualified for closing.
To Proceed, click the Yes button.
24. Click the Yes button.
25. The Budget Status is now Not Checked, so you must Budget Check the PO.
Navigate to:
Purchasing > Purchase Orders > Budget Check
Click the Home link.
26. This completes Close a PO to Release the Remaining Encumbrance.
End of Procedure.
Training Guide
Page 157
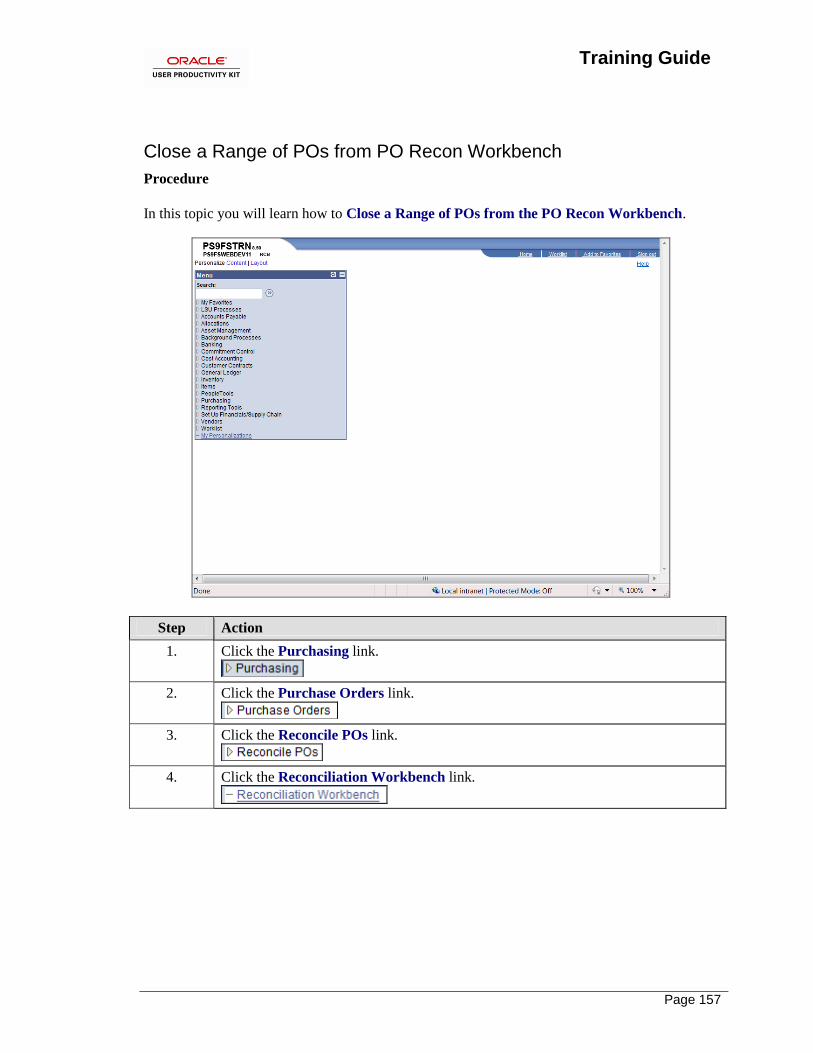
Close a Range of POs from PO Recon Workbench
Procedure
In this topic you will learn how to Close a Range of POs from the PO Recon Workbench.
Step Action
1. Click the Purchasing link.
2. Click the Purchase Orders link.
3. Click the Reconcile POs link.
4. Click the Reconciliation Workbench link.
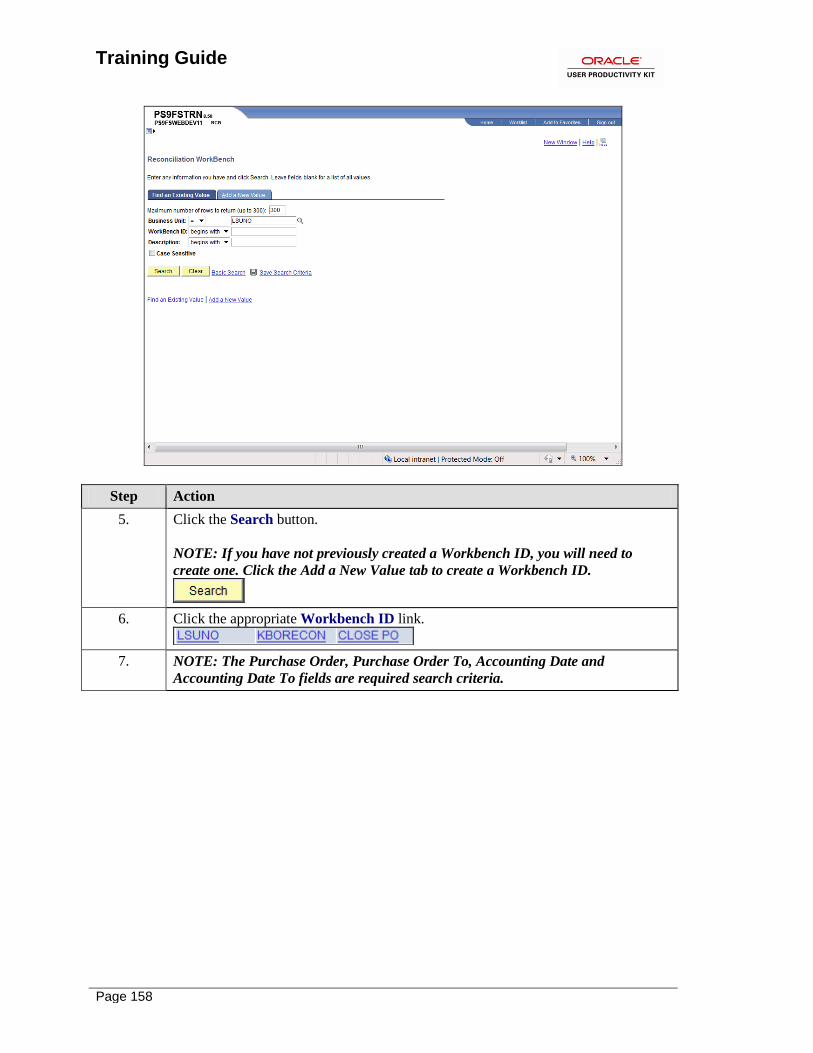
Training Guide
Page 158
Step Action
5. Click the Search button.
NOTE: If you have not previously created a Workbench ID, you will need to
create one. Click the Add a New Value tab to create a Workbench ID.
6. Click the appropriate Workbench ID link.
7. NOTE: The Purchase Order, Purchase Order To, Accounting Date and
Accounting Date To fields are required search criteria.
Training Guide
Page 159
Step Action
8. Enter the desired information into the Purchase Order field. Enter "00355337E".
NOTE: The beginning PO number must be smaller than the ending PO number.
9. Enter the desired information into the Purchase Order To: field. Enter
"00364884B".
10. Enter the desired information into the Accounting Date field. Enter "070111".
11. Enter the desired information into the Accounting Date To: field. Enter "063012".
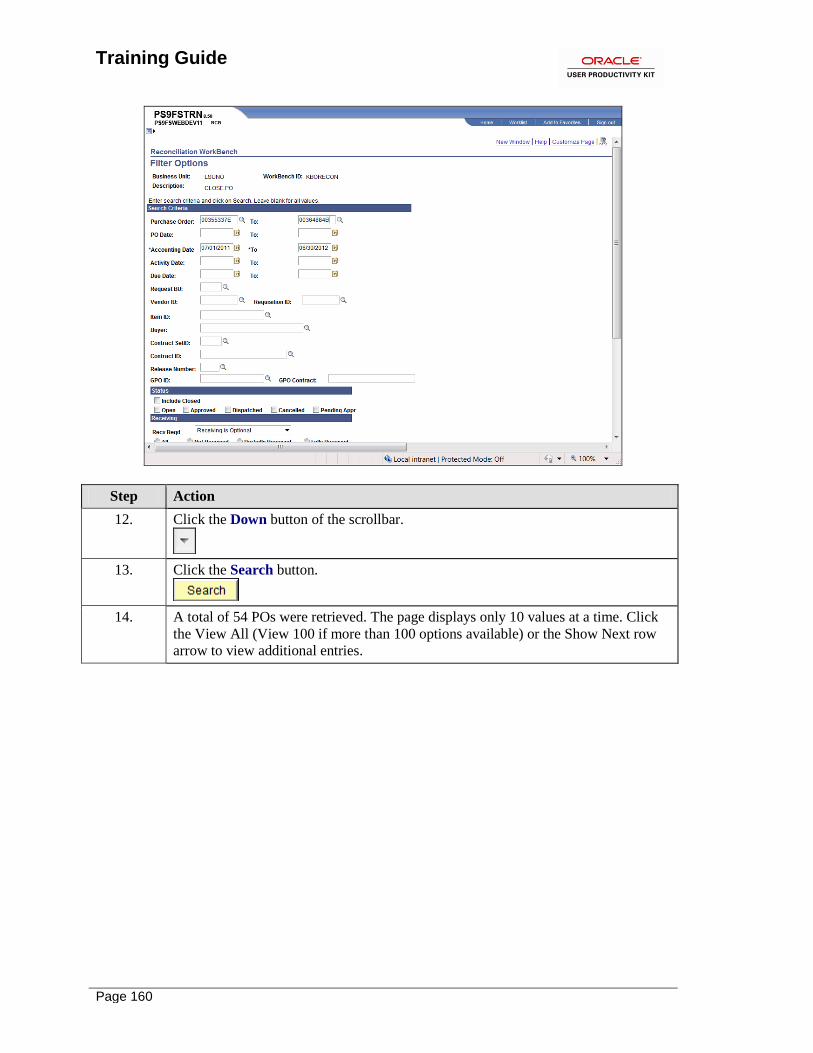
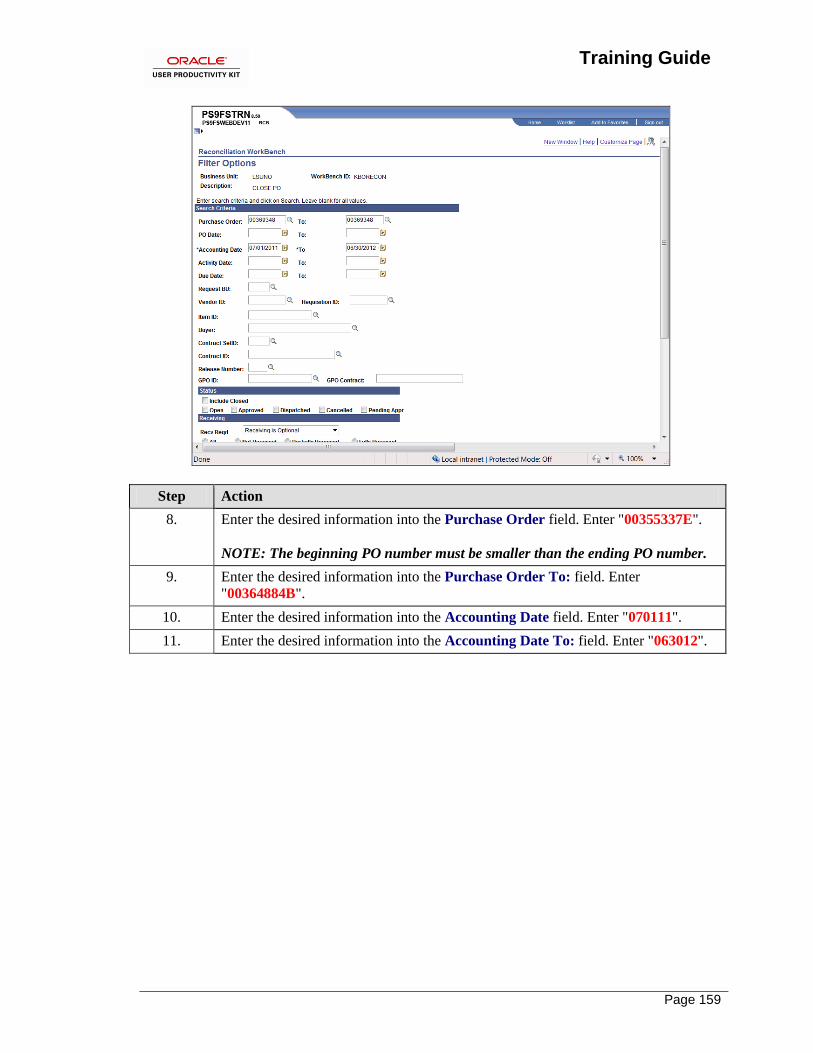
Training Guide
Page 160
Step Action
12. Click the Down button of the scrollbar.
13. Click the Search button.
14. A total of 54 POs were retrieved. The page displays only 10 values at a time. Click
the View All (View 100 if more than 100 options available) or the Show Next row
arrow to view additional entries.
Training Guide
Page 161
Step Action
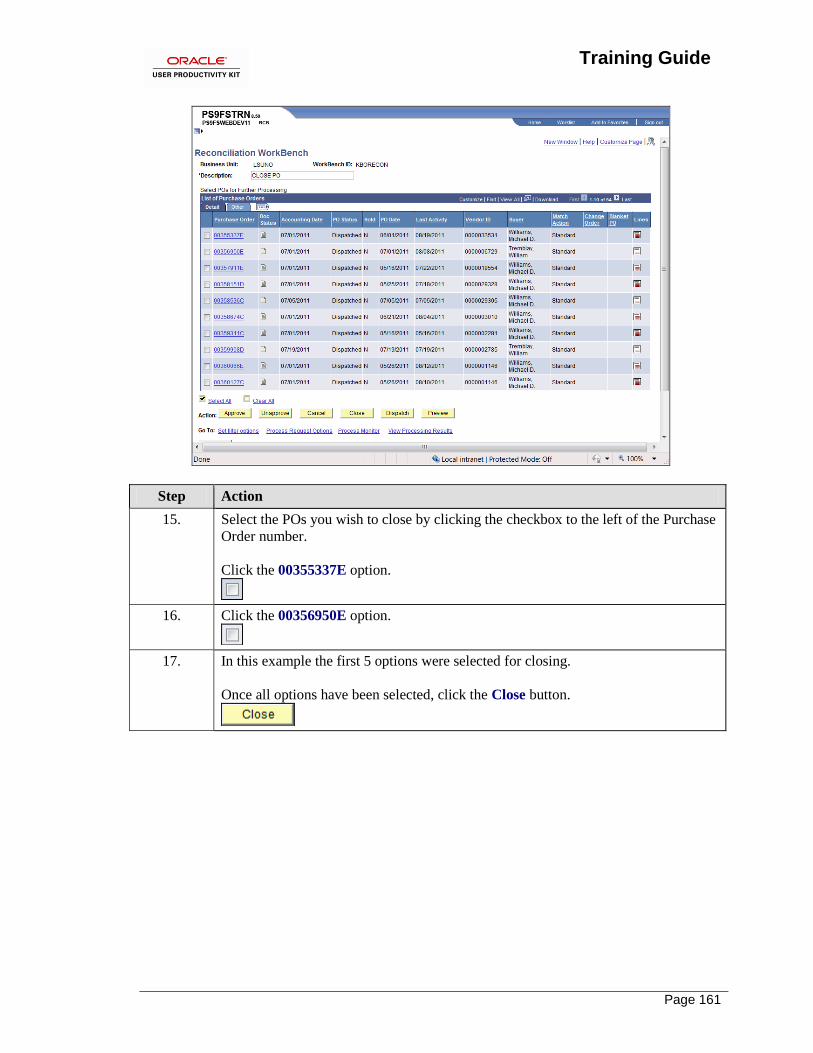
15. Select the POs you wish to close by clicking the checkbox to the left of the Purchase
Order number.
Click the 00355337E option.
16. Click the 00356950E option.
17. In this example the first 5 options were selected for closing.
Once all options have been selected, click the Close button.
Training Guide
Page 162
Step Action
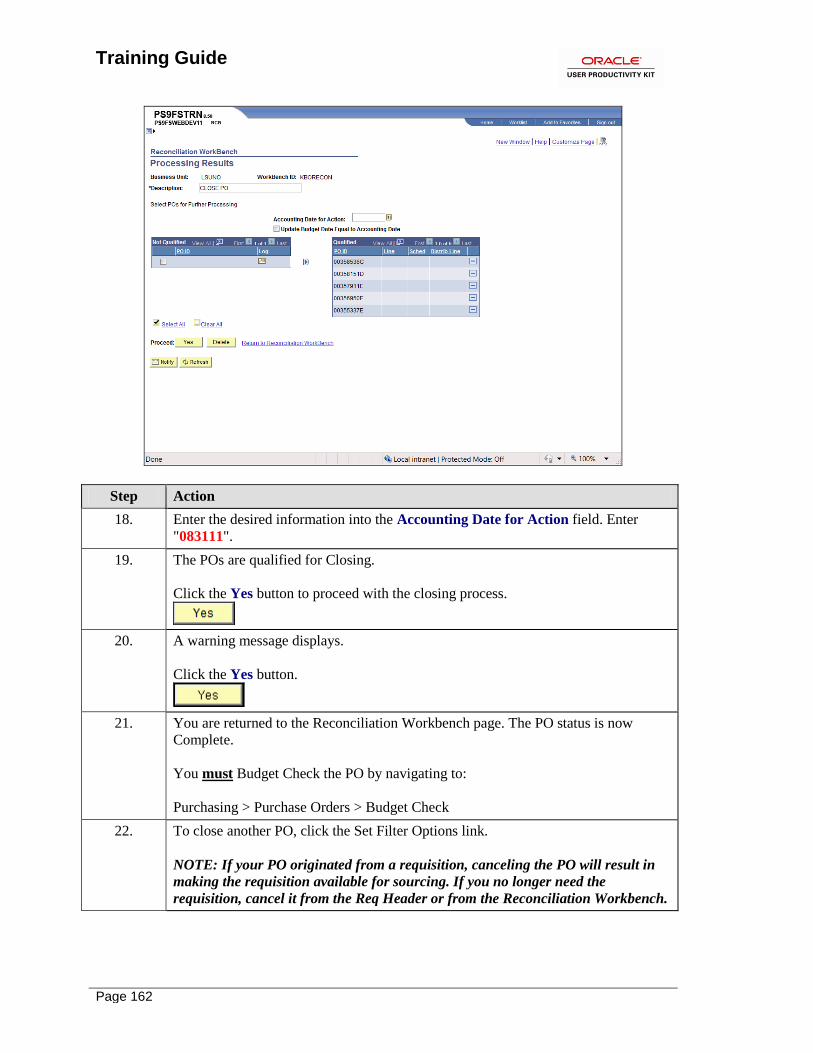
18. Enter the desired information into the Accounting Date for Action field. Enter
"083111".
19. The POs are qualified for Closing.
Click the Yes button to proceed with the closing process.
20. A warning message displays.
Click the Yes button.
21. You are returned to the Reconciliation Workbench page. The PO status is now
Complete.
You must Budget Check the PO by navigating to:
Purchasing > Purchase Orders > Budget Check
22. To close another PO, click the Set Filter Options link.
NOTE: If your PO originated from a requisition, canceling the PO will result in
making the requisition available for sourcing. If you no longer need the
requisition, cancel it from the Req Header or from the Reconciliation Workbench.
Training Guide
Page 163
Step Action
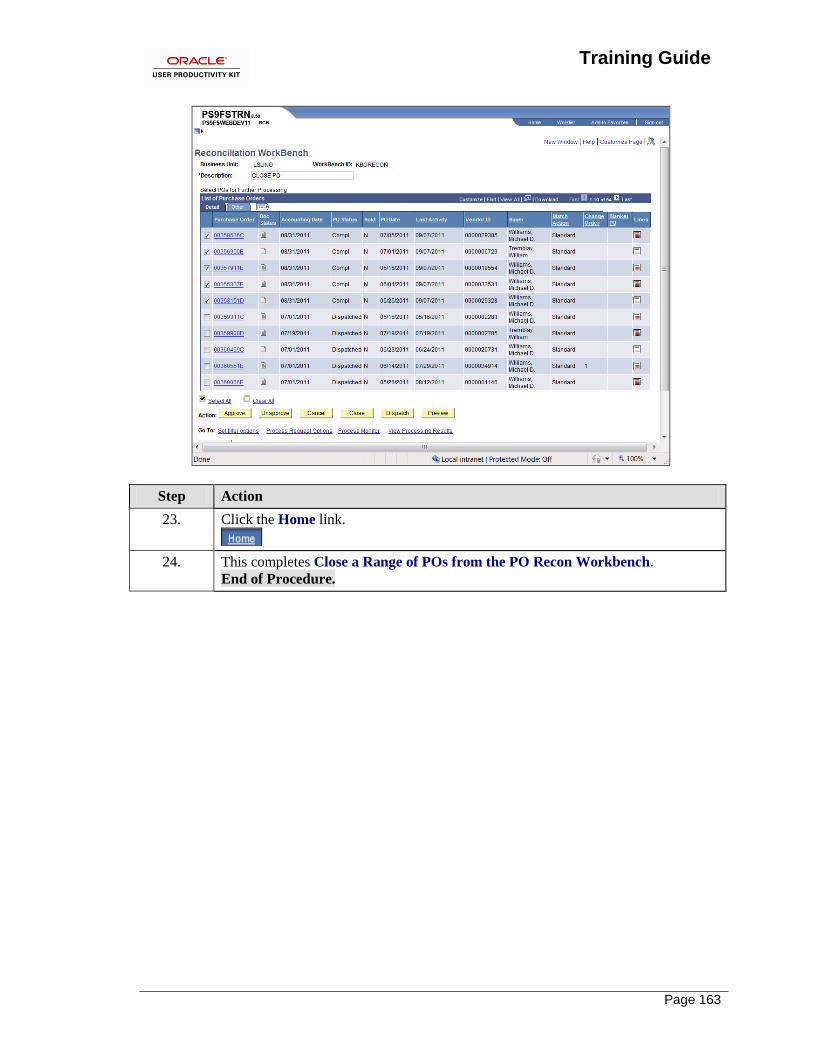
23. Click the Home link.
24. This completes Close a Range of POs from the PO Recon Workbench.
End of Procedure.
Training Guide
Page 164
Training Guide
Page 165
Manage Requisition Encumbrances
View and Print the Req and PO Budgetary Activity Report in HTML The Requisition Budgetary Activity report allows you to view remaining requisition pre-
encumbrance amounts. The report provides information on Requisitions submitted to Purchasing
from your Department for the current fiscal year.
Procedure
In this topic you will learn how to View and Print the Req and PO Budgetary Activity Report
in HTML.
Step Action
1. Click the Purchasing link.
2. Click the Purchase Orders link.
3. Click the Reports link.
Training Guide
Page 166
Step Action
4. Click the Req and PO Budgetary Activity link.
5. A Run Control ID allows you to access the Process Scheduler and represents a set of
parameters that determine how the system runs various transactions. A Run Control
ID is:
• Specific to the user’s Operator ID;
• Case Sensitive;
• One continuous string of alphanumeric characters;
• Cannot contain any blank spaces between words; and
• Can utilize the Underscore to link characters or words together.
A Run Control must be added the first time a report is run. Thereafter, the same Run
Control ID can be used when running subsequent reports. On the Find an Existing
Value tab you will click the Search button to find existing Run Control IDs.
6. If you have already created a Run Control ID, click the Search button to find it.
Click the Add a New Value tab.
7. Enter the desired information into the Employee-facing registry content field.
Enter "REQ_ACTIVITY_REPORT".
8. Click the Add button.
Training Guide
Page 167
Step Action
9. You will enter or select your report parameters using the fields contained in the
Report Request Parameters section. The minimum entries required to retrieve
information are Business Unit and Dept ID or Project/Grant. If a Project/Grant
number is entered, there is no need to enter additional ChartString information.
NOTE: Parameters from the last time you ran the report will default if you use an
existing Run Control ID.
10. Enter the desired information into the Business Unit field. Enter "LSUNO".
11. To view all documents for a specified fiscal year, enter 07-01-XX to 06-30-XX in
the Budget Date From and To fields.
NOTE: If you are retrieving information on a Project/Grant, you can retrieve data
from the inception of the Project/Grant (i.e. back to 2001 when PeopleSoft went
live).
Enter the desired information into the Budget Date From field. Enter "070111".
12. Enter the desired information into the Budget Date To field. Enter "063012".
13. The user must specify the Remaining Amount operand based on the following:
• If you wish to view all of your department’s requisitions generated during a
specified period, regardless of the balance (i.e. those with a Remaining Balance
equal or not equal to zero), do not specify an operand and accept the default entry of
zero in the Remaining Balance field;
• You may specify an operand and enter the dollar amount in the adjacent field or
accept the default entry of zero; or
• For the purpose of managing encumbrances, the user will select “Not equal” (< >)
to a Remaining Amount of zero so that only the requisition lines with a Remaining
Amount (including credits) will be retrieved.
14. Click the button to the right of the Remaining Amount field.
15. Click the Not Equal (< >) list item.
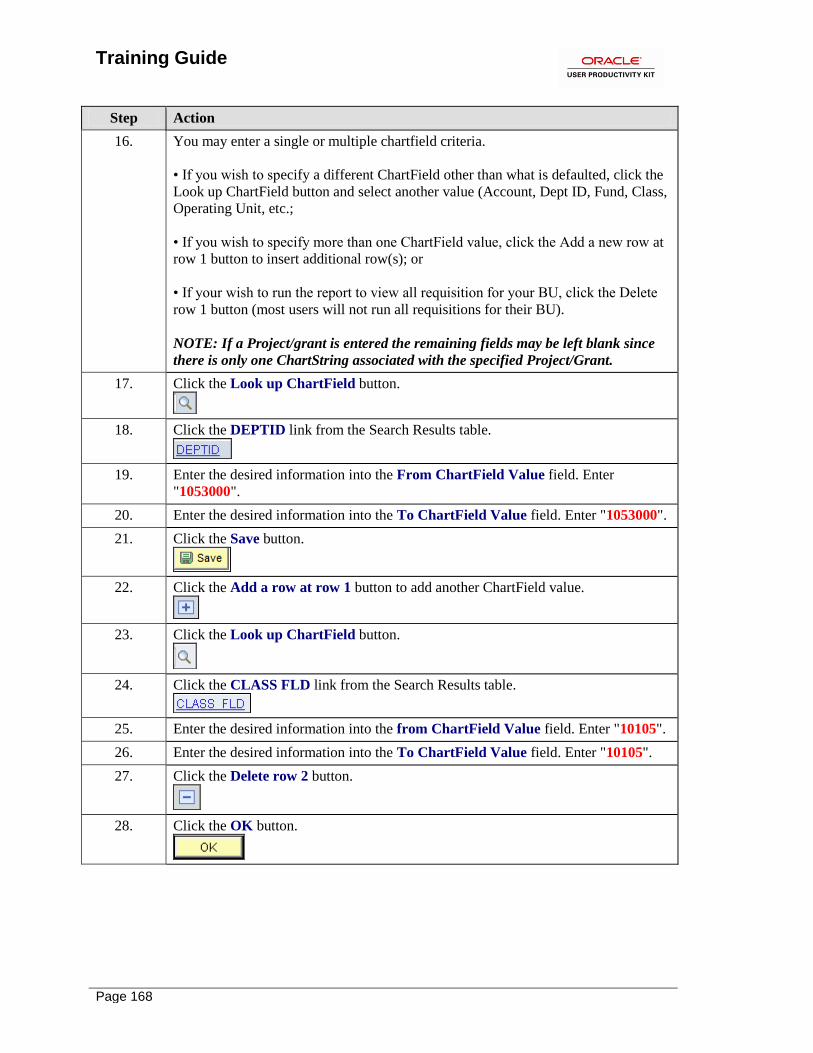
Training Guide
Page 168
Step Action
16. You may enter a single or multiple chartfield criteria.
• If you wish to specify a different ChartField other than what is defaulted, click the
Look up ChartField button and select another value (Account, Dept ID, Fund, Class,
Operating Unit, etc.;
• If you wish to specify more than one ChartField value, click the Add a new row at
row 1 button to insert additional row(s); or
• If your wish to run the report to view all requisition for your BU, click the Delete
row 1 button (most users will not run all requisitions for their BU).
NOTE: If a Project/grant is entered the remaining fields may be left blank since
there is only one ChartString associated with the specified Project/Grant.
17. Click the Look up ChartField button.
18. Click the DEPTID link from the Search Results table.
19. Enter the desired information into the From ChartField Value field. Enter
"1053000".
20. Enter the desired information into the To ChartField Value field. Enter "1053000".
21. Click the Save button.
22. Click the Add a row at row 1 button to add another ChartField value.
23. Click the Look up ChartField button.
24. Click the CLASS FLD link from the Search Results table.
25. Enter the desired information into the from ChartField Value field. Enter "10105".
26. Enter the desired information into the To ChartField Value field. Enter "10105".
27. Click the Delete row 2 button.
28. Click the OK button.
Training Guide
Page 169
Step Action
29. Click the Save button.
NOTE: In this example, the values entered on the Req-PO Budgetary Activity
page will retrieve only those requisitions with a Remaining Amount not equal to
zero.
30. Click the Run button.
31. Click the button to the right of the Server Name field.
32. Click the PSNT list item.
33. Click the Requisition Budgetary Activity option from the Process List.
34. Click the OK button.
35. Click the Process Monitor link.
36. Click the Refresh button until the Run Status = Success and the Distribution Status
= Posted.
37. Click the Go back to Req and PO Budgetary Activity link.
38. Click the Report Manager link.
39. Click the Administration tab.
40. Click the Requisition Budgetary Activity link. This action opens a new window.
41. As specified on the Re Budgetary Activity page, only those requisitions with a
Remaining Amount are retrieved and displayed in the report. This makes it easier for
users to analyze the report when determining pre-encumbrances needing to be
closed or adjusted.
TIP: If a user finds that a pre-encumbrance remains even after the PO has been
built, he/she should contact Purchasing (i.e. the Buyer associated with the PO) for
assistance rather than AP.
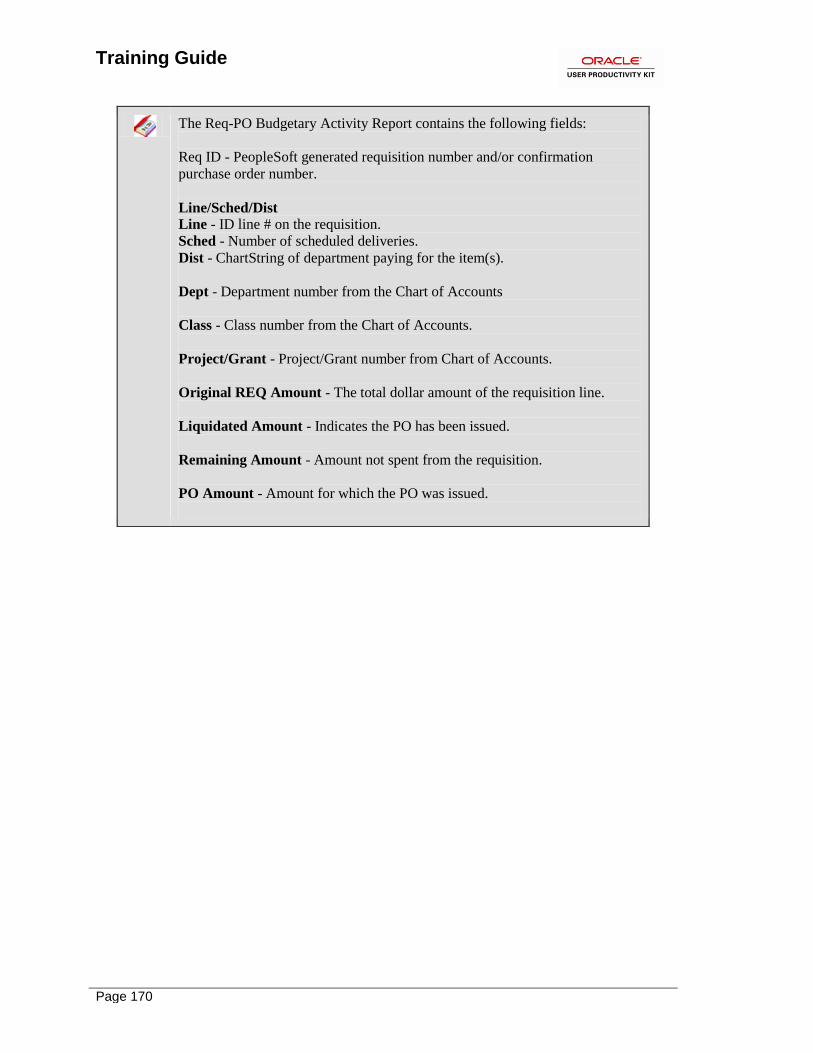
Training Guide
Page 170
The Req-PO Budgetary Activity Report contains the following fields:
Req ID - PeopleSoft generated requisition number and/or confirmation
purchase order number.
Line/Sched/Dist Line - ID line # on the requisition.
Sched - Number of scheduled deliveries.
Dist - ChartString of department paying for the item(s).
Dept - Department number from the Chart of Accounts
Class - Class number from the Chart of Accounts.
Project/Grant - Project/Grant number from Chart of Accounts.
Original REQ Amount - The total dollar amount of the requisition line.
Liquidated Amount - Indicates the PO has been issued.
Remaining Amount - Amount not spent from the requisition.
PO Amount - Amount for which the PO was issued.
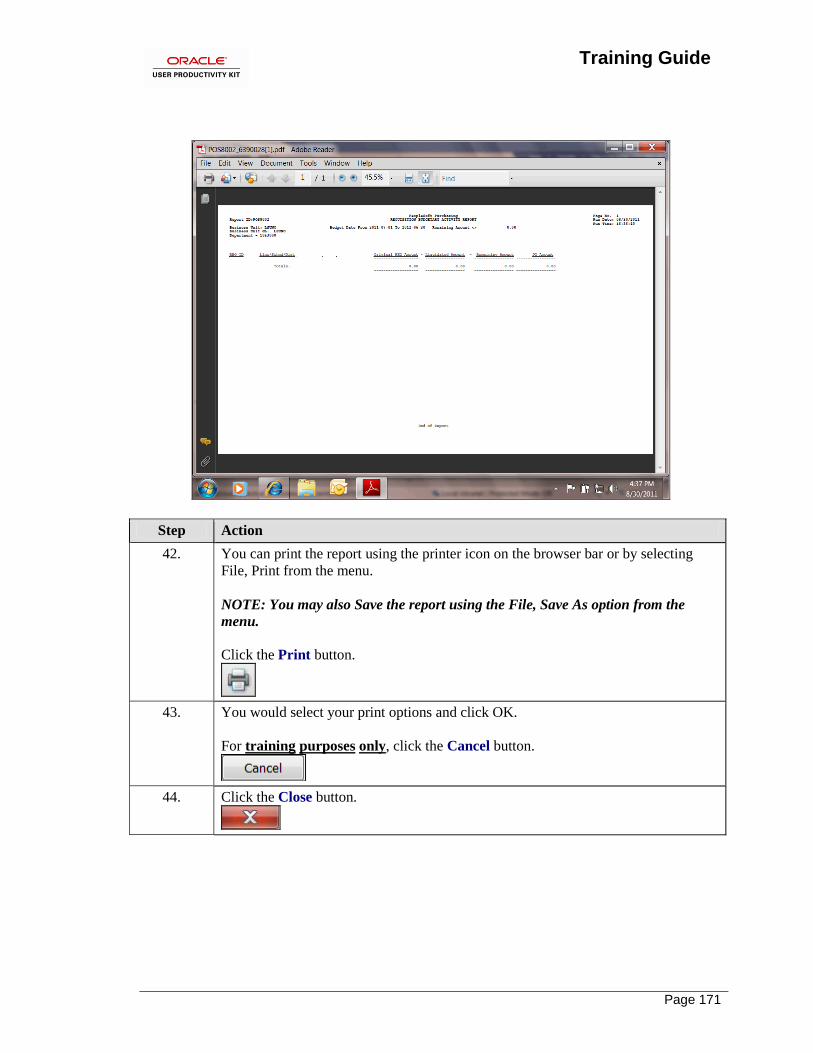
Training Guide
Page 171
Step Action
42. You can print the report using the printer icon on the browser bar or by selecting
File, Print from the menu.
NOTE: You may also Save the report using the File, Save As option from the
menu.
Click the Print button.
43. You would select your print options and click OK.
For training purposes only, click the Cancel button.
44. Click the Close button.
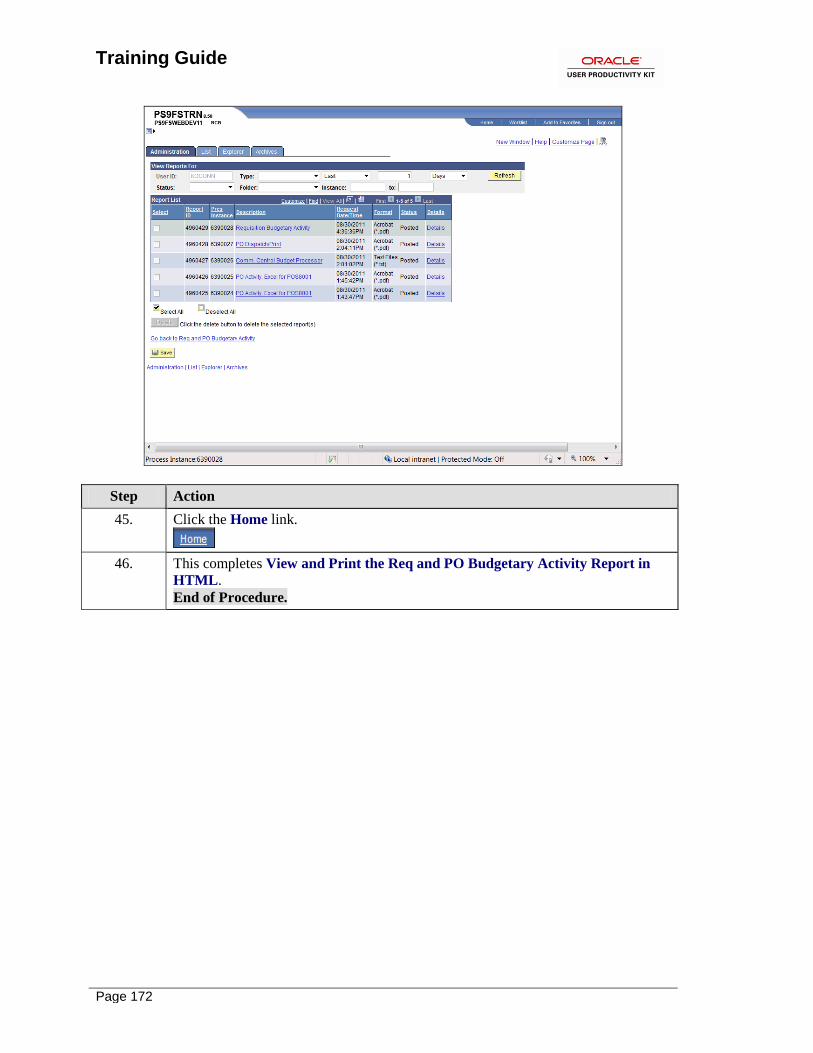
Training Guide
Page 172
Step Action
45. Click the Home link.
46. This completes View and Print the Req and PO Budgetary Activity Report in
HTML.
End of Procedure.
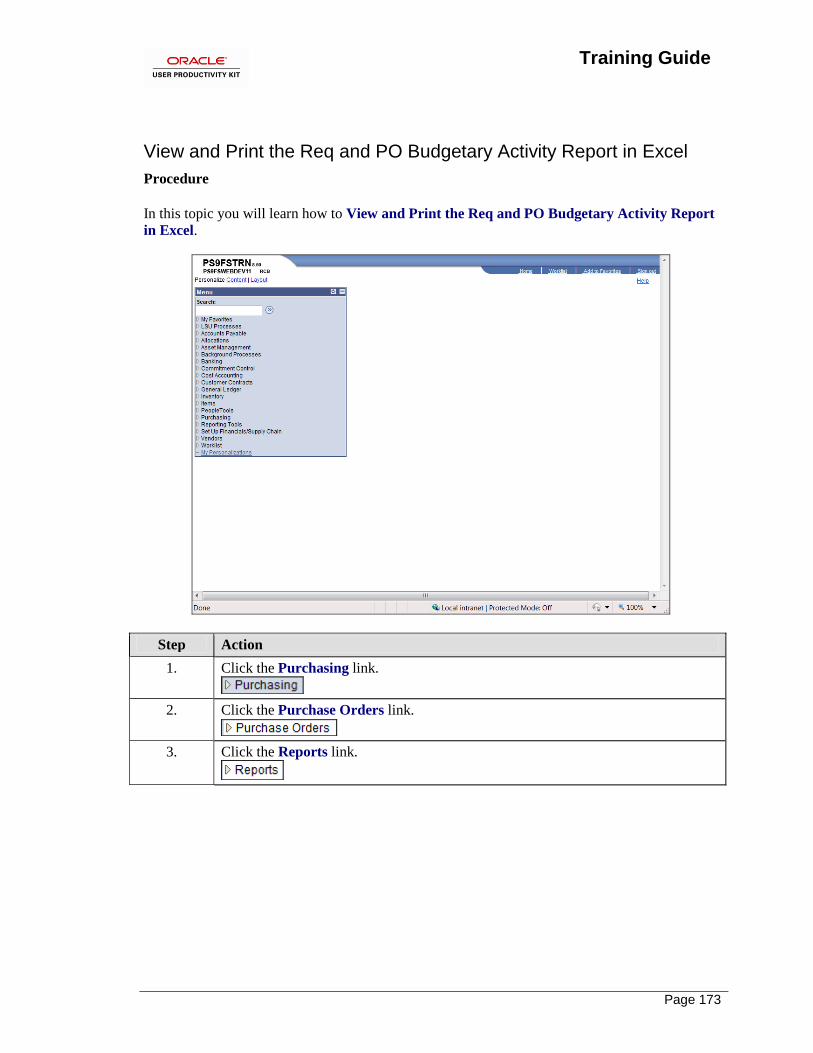
Training Guide
Page 173
View and Print the Req and PO Budgetary Activity Report in Excel
Procedure
In this topic you will learn how to View and Print the Req and PO Budgetary Activity Report
in Excel.
Step Action
1. Click the Purchasing link.
2. Click the Purchase Orders link.
3. Click the Reports link.
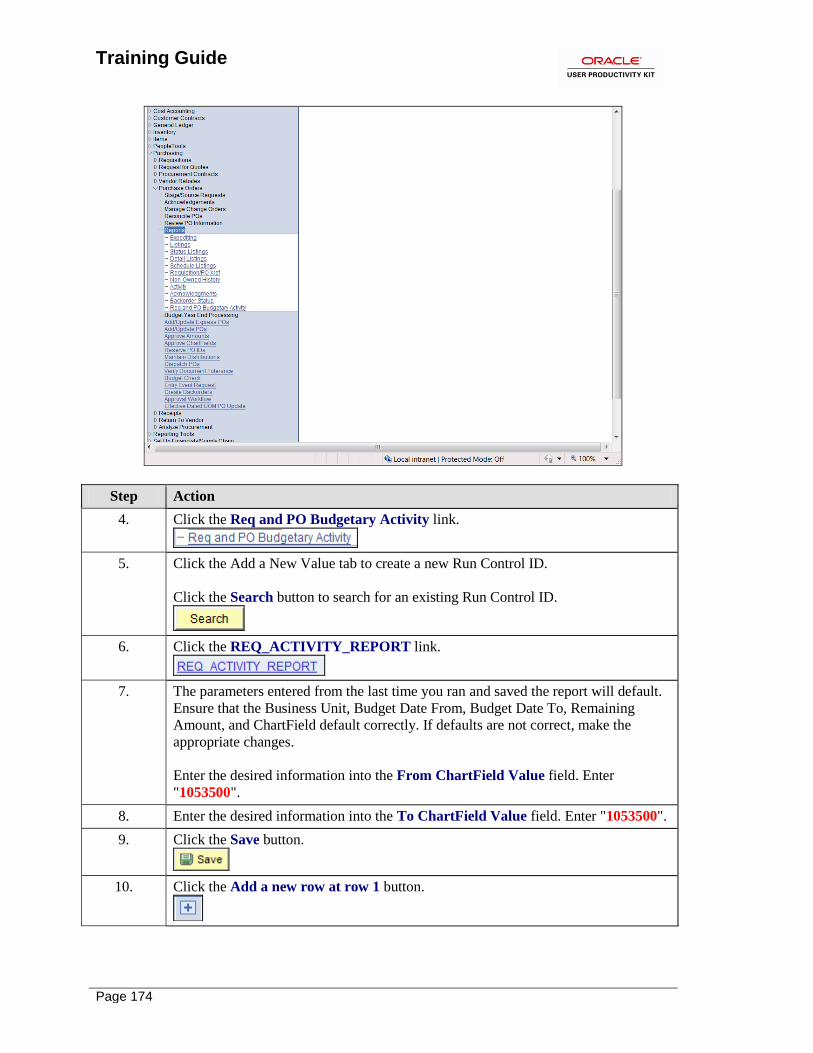
Training Guide
Page 174
Step Action
4. Click the Req and PO Budgetary Activity link.
5. Click the Add a New Value tab to create a new Run Control ID.
Click the Search button to search for an existing Run Control ID.
6. Click the REQ_ACTIVITY_REPORT link.
7. The parameters entered from the last time you ran and saved the report will default.
Ensure that the Business Unit, Budget Date From, Budget Date To, Remaining
Amount, and ChartField default correctly. If defaults are not correct, make the
appropriate changes.
Enter the desired information into the From ChartField Value field. Enter
"1053500".
8. Enter the desired information into the To ChartField Value field. Enter "1053500".
9. Click the Save button.
10. Click the Add a new row at row 1 button.
Training Guide
Page 175
Step Action
11. Click the Look up ChartField button.
12. Click the FUND CODE link from the Search Results table.
13. Enter the desired information into the From ChartField Value field. Enter "111".
14. Enter the desired information into the To ChartField Value field. Enter "111".
15. Click the Delete row 2 button.
16. A warning message displays.
Click the OK button.
17. Click the Save button.
NOTE: In this example, the values entered on the Req-PO Budgetary Activity
page will retrieve only those requisitions with a Remaining Amount not equal to
zero.
18. Click the Run button.
19. Click the Req. Activity, Excel POS8002 option.
NOTE: Verify the Server Name is PSNT.
20. Click the OK button.
21. Click the Process Monitor link.
22. Click the Refresh button until the Run Status = Success and the Distribution Status
= Posted.
23. Click the Go back to Req and PO Budgetary Activity link.
24. Click the Report Manager link.
25. Click the Administration tab.

Training Guide
Page 176
Step Action
26. Click the Req. Activity, Excel POS8002 link.
27. Click the zzpo0033_6390029.cvs link.
28. Click the Open button.
29. As specified in the Req-PO Budgetary Activity Parameter page, only the requisition
line(s) with a Remaining Amount are retrieved. This makes it easier for a user to
analyze the report when determining the pre-encumbrances needing to be closed or
adjusted.
TIP: If a user finds a pre-encumbrance remains even after the PO has been built,
he/she should contact Purchasing (i.e. the Buyer associated with the PO) for
assistance rather than AP.
The Req-PO Budgetary Activity Report contains the following fields:
Req ID - PeopleSoft generated requisition number and/or confirmation
purchase order number.
Line/Sched/Dist Line - ID line # on the requisition.
Sched - Number of scheduled deliveries.
Dist - ChartString of department paying for the item(s).
Dept - Department number from the Chart of Accounts
Class - Class number from the Chart of Accounts.
Project/Grant - Project/Grant number from Chart of Accounts.
Original REQ Amount - The total dollar amount of the requisition line.
Liquidated Amount - Indicates the PO has been issued.
Remaining Amount - Amount not spent from the requisition.
PO Amount - Amount for which the PO was issued.
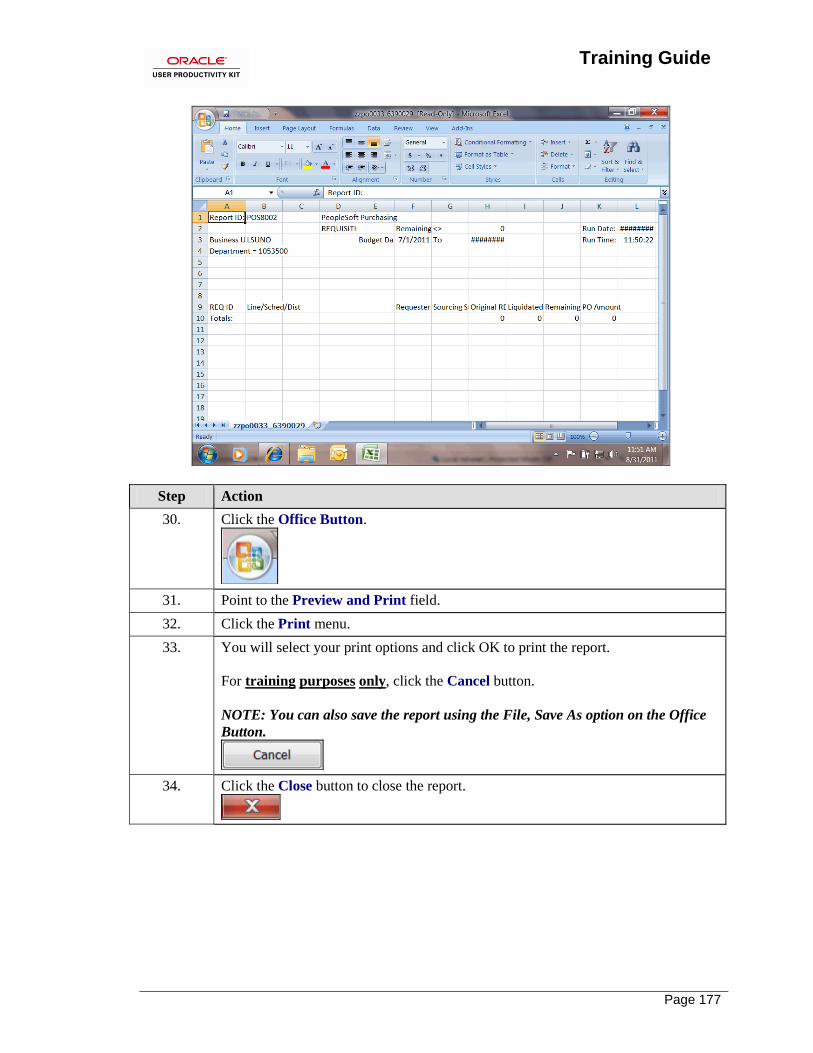
Training Guide
Page 177
Step Action
30. Click the Office Button.
31. Point to the Preview and Print field.
32. Click the Print menu.
33. You will select your print options and click OK to print the report.
For training purposes only, click the Cancel button.
NOTE: You can also save the report using the File, Save As option on the Office
Button.
34. Click the Close button to close the report.
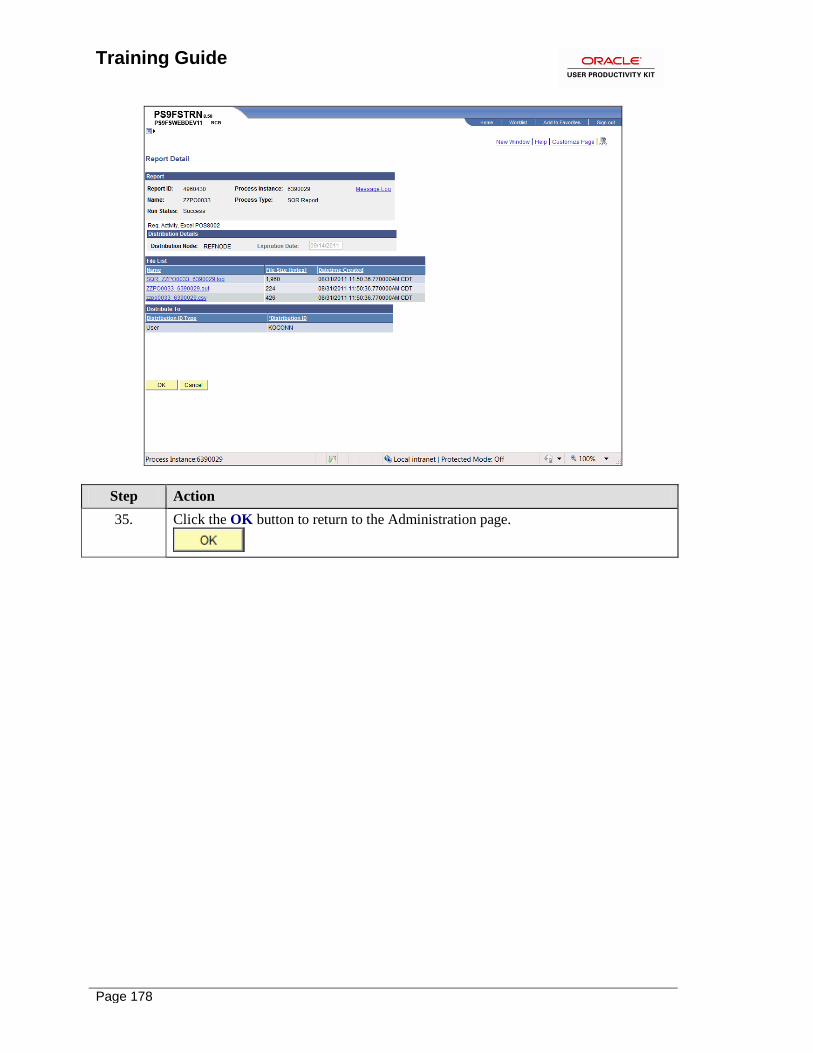
Training Guide
Page 178
Step Action
35. Click the OK button to return to the Administration page.
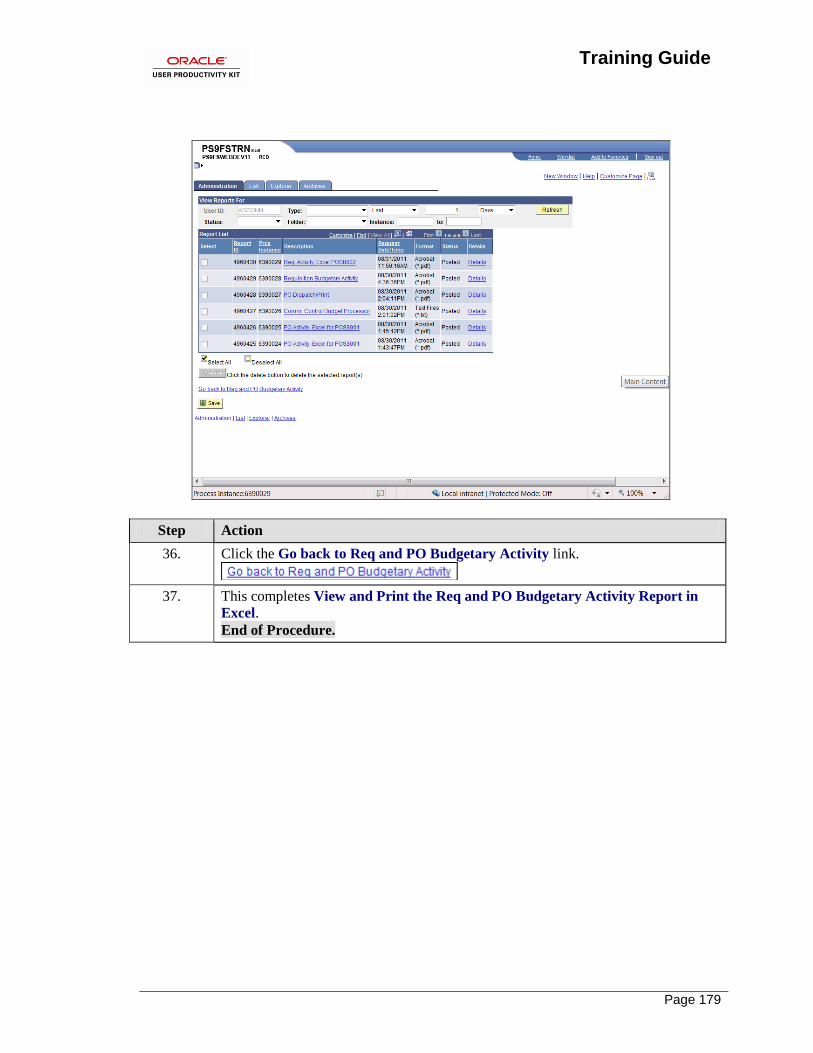
Training Guide
Page 179
Step Action
36. Click the Go back to Req and PO Budgetary Activity link.
37. This completes View and Print the Req and PO Budgetary Activity Report in
Excel.
End of Procedure.

Training Guide
Page 180

Training Guide
Page 181
Run the CLEANUP_REQ_ACTIVITY Query
Procedure
In this topic you will learn how to Run the CLEANUP_REQ_ACTIVITY Query.
Step Action
1. Click the Reporting Tools link.
2. Click the Query link.
3. Click the Query Viewer link.
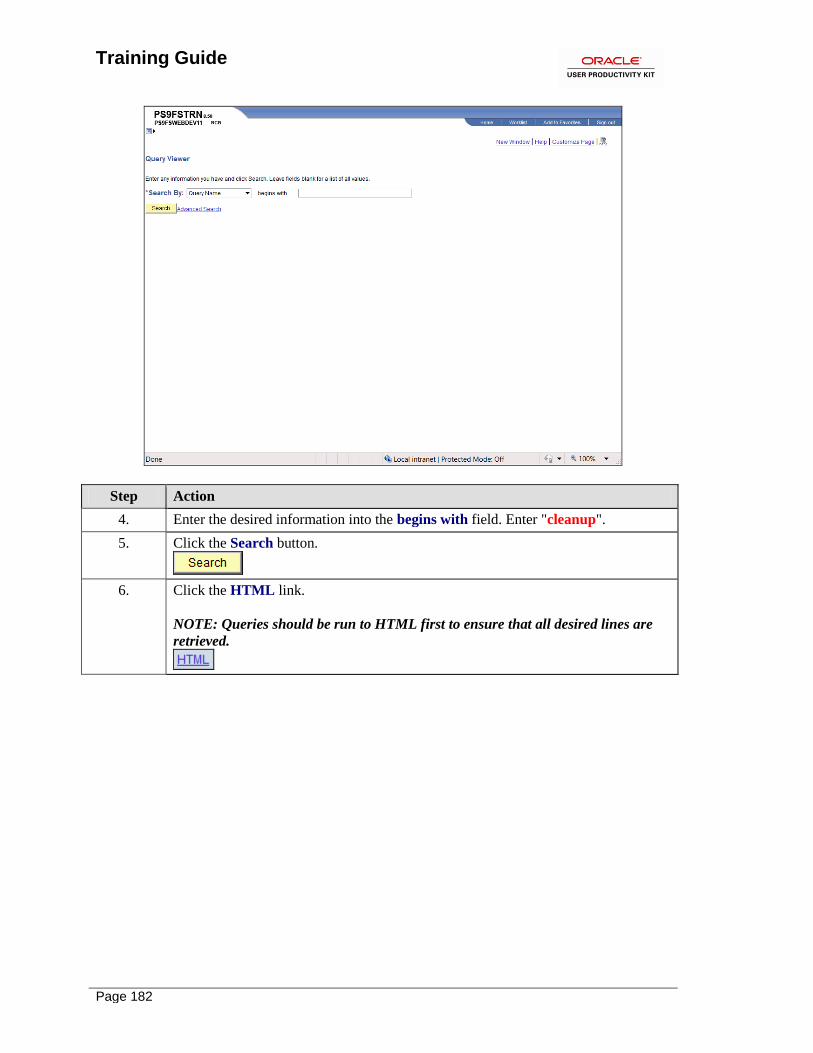
Training Guide
Page 182
Step Action
4. Enter the desired information into the begins with field. Enter "cleanup".
5. Click the Search button.
6. Click the HTML link.
NOTE: Queries should be run to HTML first to ensure that all desired lines are
retrieved.
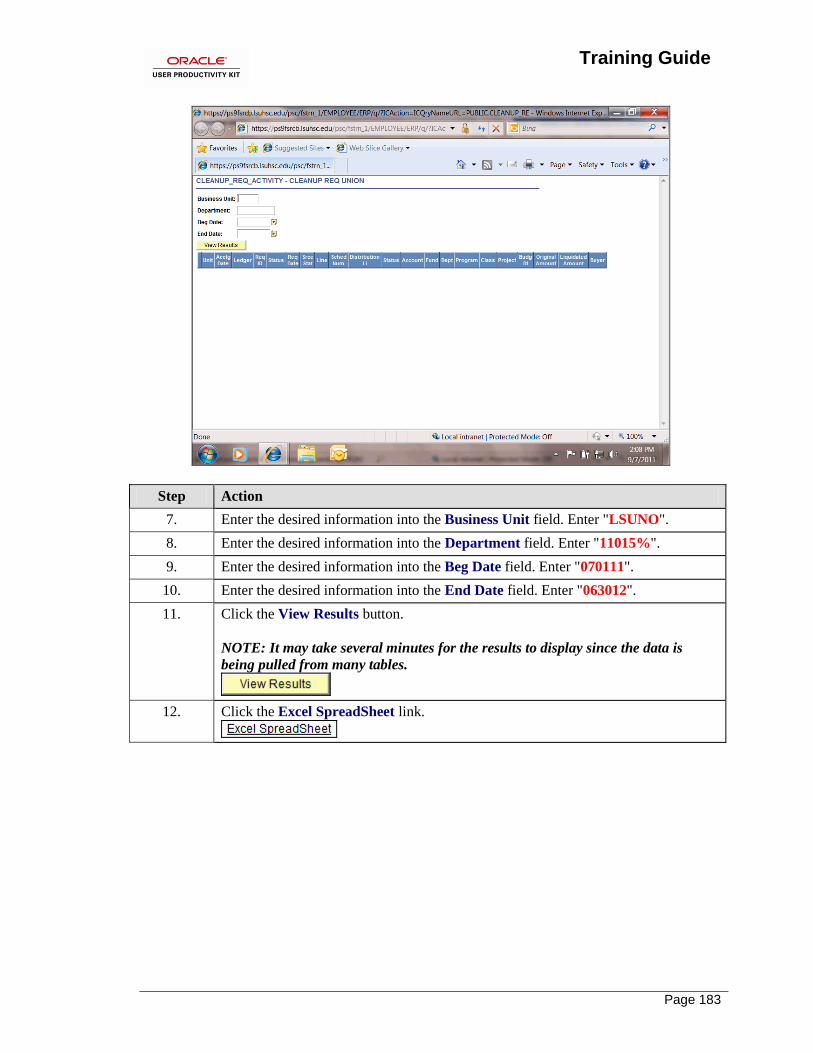
Training Guide
Page 183
Step Action
7. Enter the desired information into the Business Unit field. Enter "LSUNO".
8. Enter the desired information into the Department field. Enter "11015%".
9. Enter the desired information into the Beg Date field. Enter "070111".
10. Enter the desired information into the End Date field. Enter "063012".
11. Click the View Results button.
NOTE: It may take several minutes for the results to display since the data is
being pulled from many tables.
12. Click the Excel SpreadSheet link.
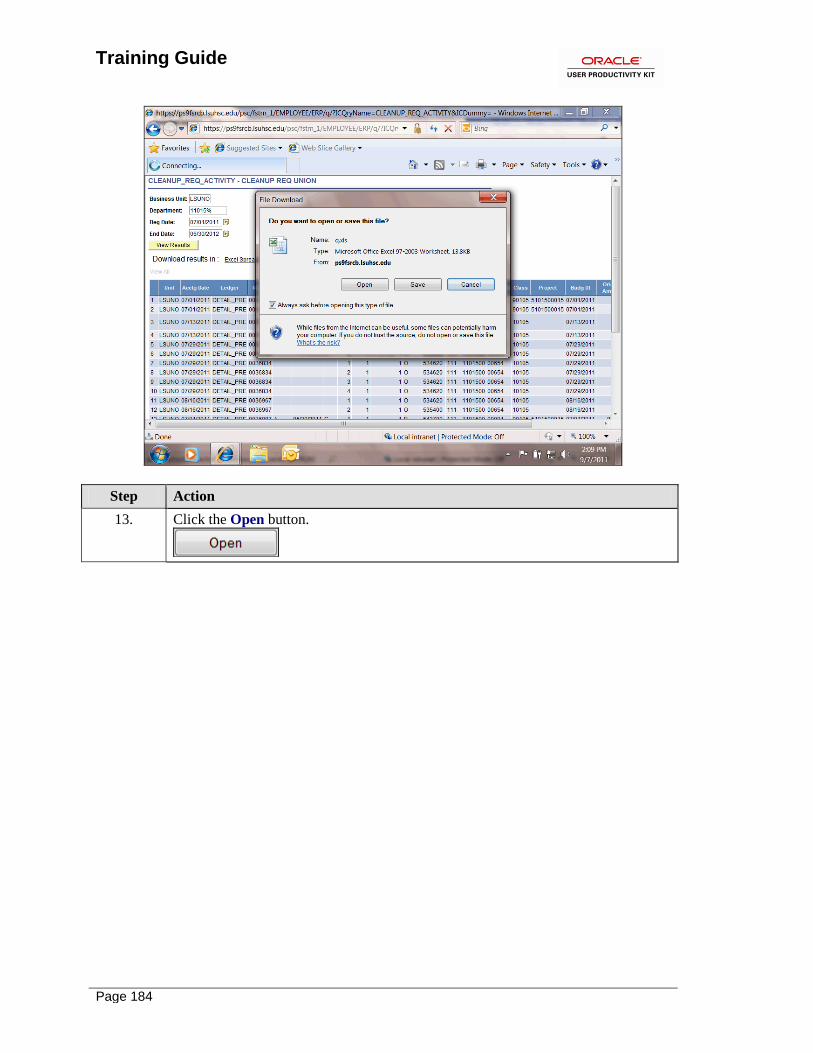
Training Guide
Page 184
Step Action
13. Click the Open button.
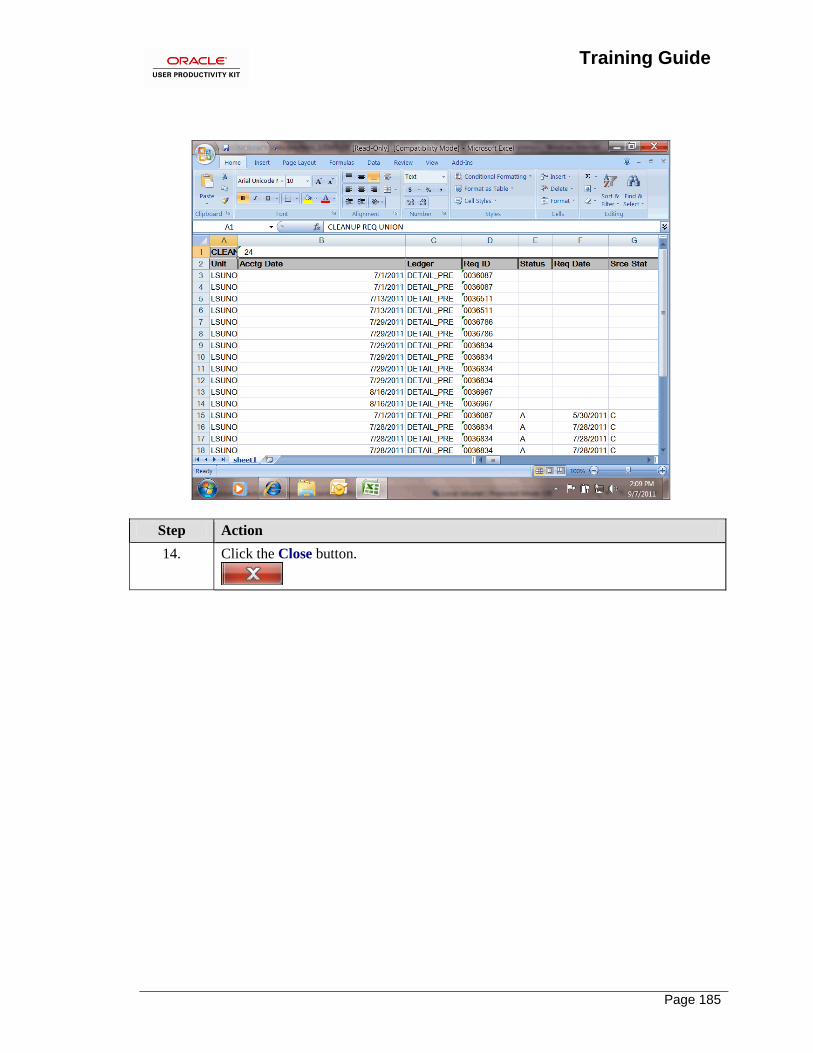
Training Guide
Page 185
Step Action
14. Click the Close button.
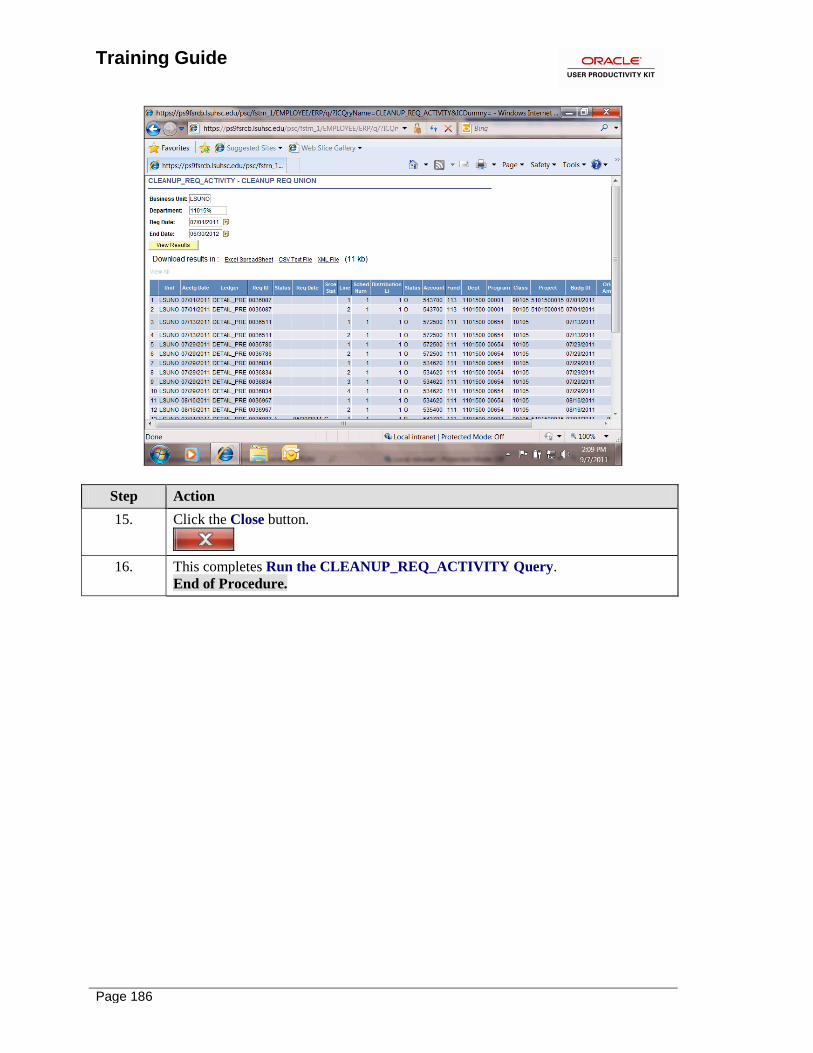
Training Guide
Page 186
Step Action
15. Click the Close button.
16. This completes Run the CLEANUP_REQ_ACTIVITY Query.
End of Procedure.
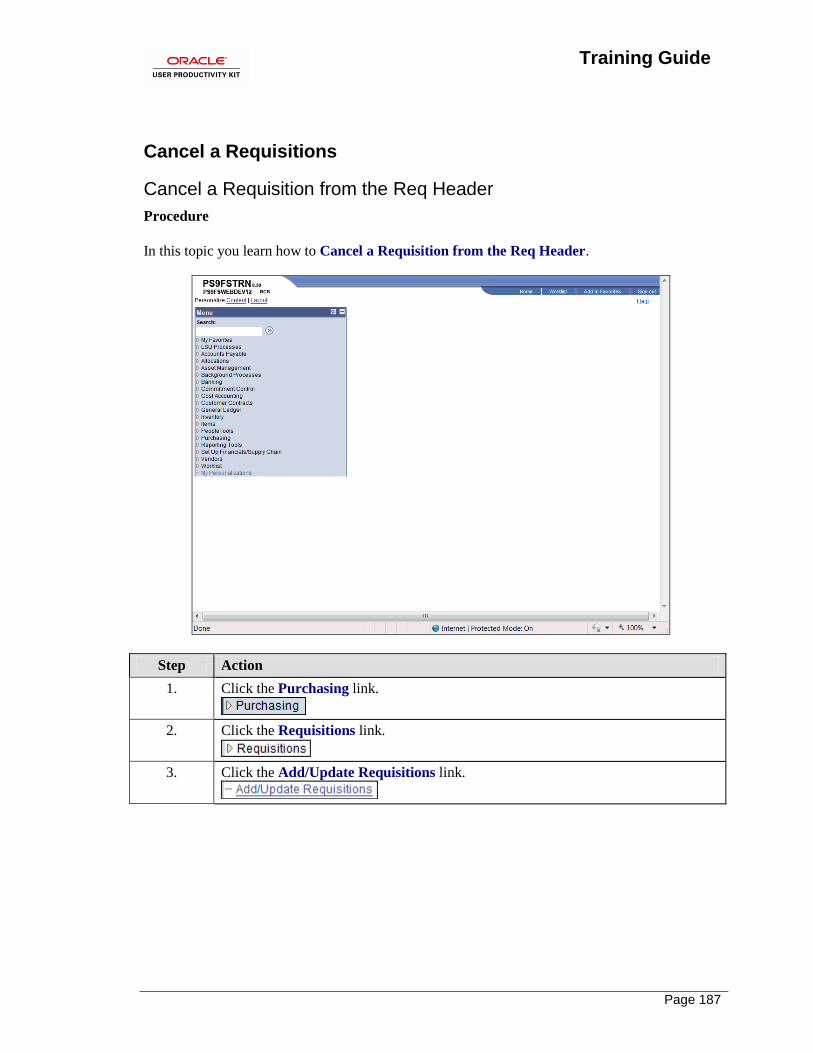
Training Guide
Page 187
Cancel a Requisitions
Cancel a Requisition from the Req Header
Procedure
In this topic you learn how to Cancel a Requisition from the Req Header.
Step Action
1. Click the Purchasing link.
2. Click the Requisitions link.
3. Click the Add/Update Requisitions link.
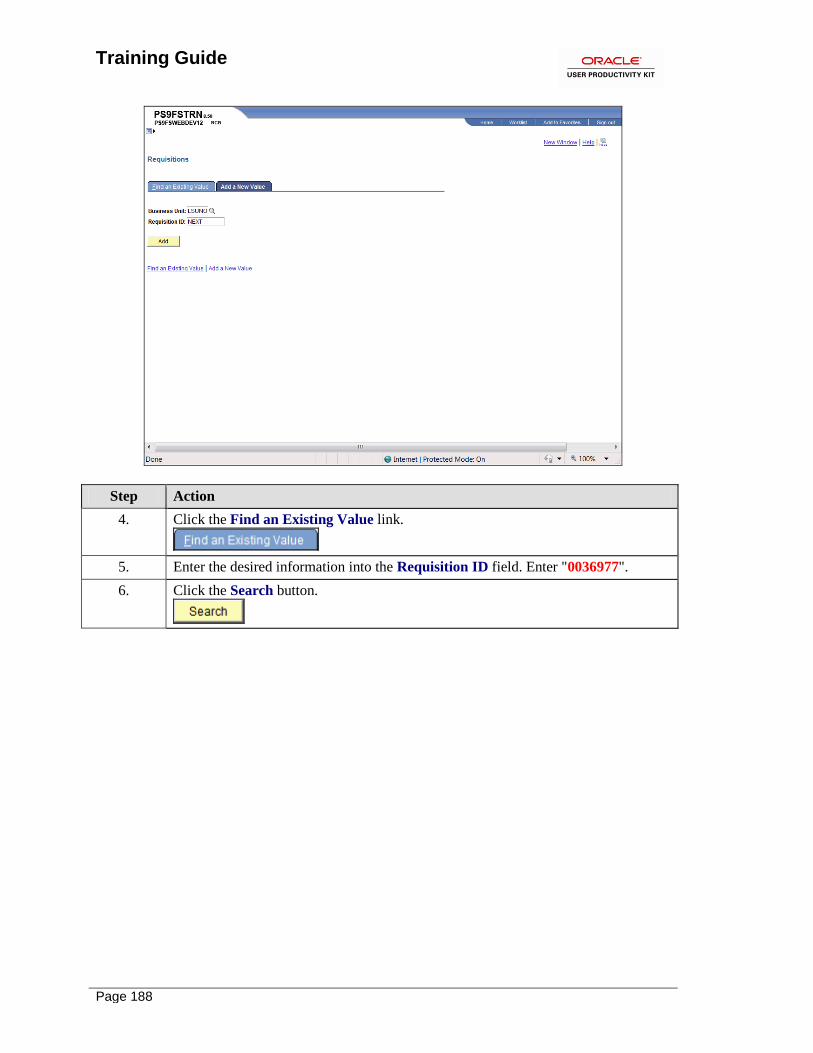
Training Guide
Page 188
Step Action
4. Click the Find an Existing Value link.
5. Enter the desired information into the Requisition ID field. Enter "0036977".
6. Click the Search button.
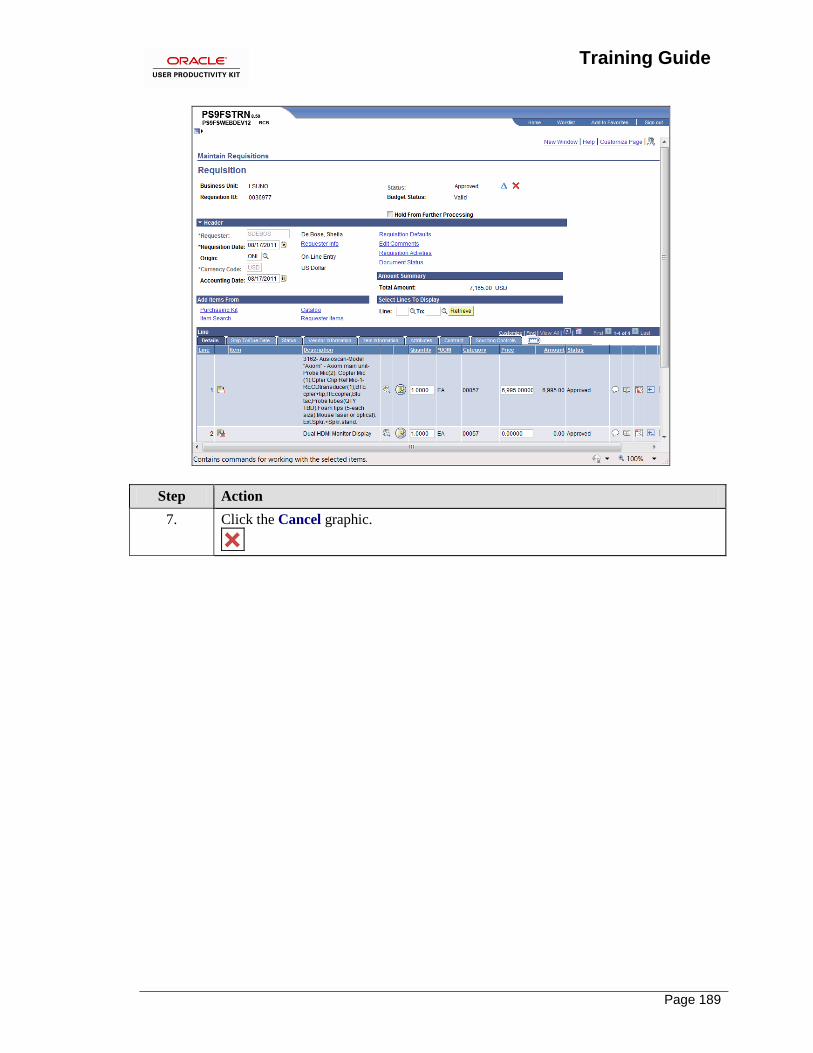
Training Guide
Page 189
Step Action
7. Click the Cancel graphic.
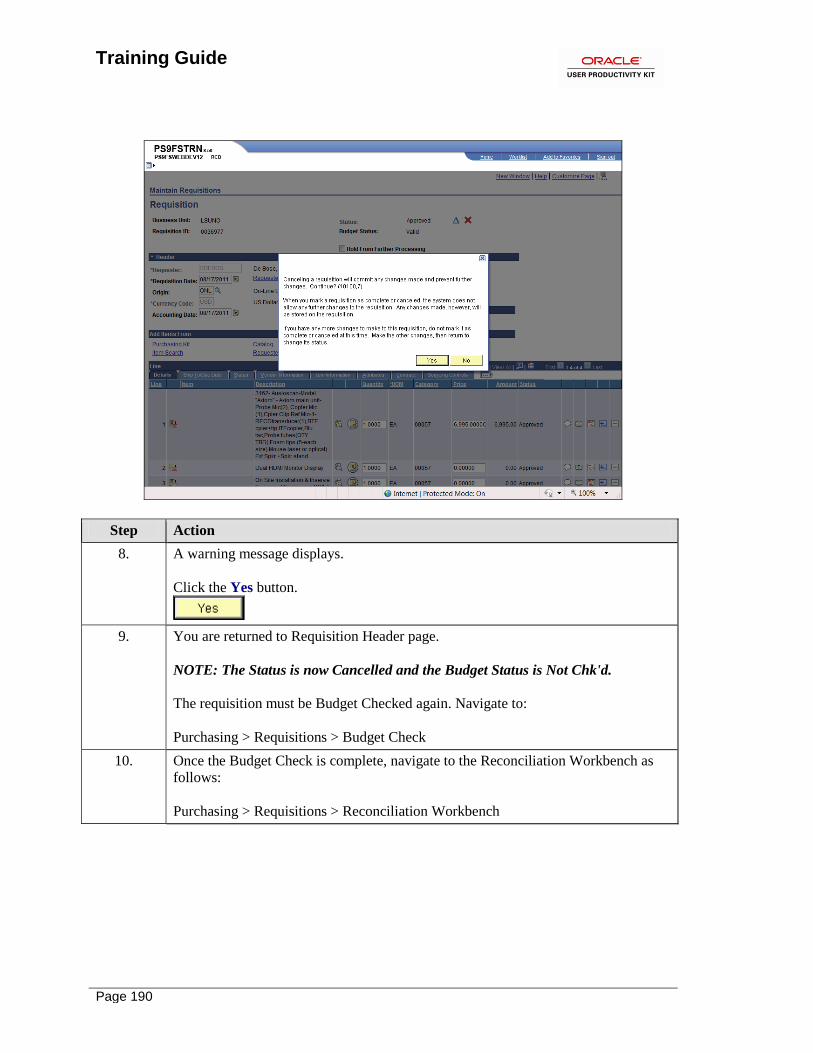
Training Guide
Page 190
Step Action
8. A warning message displays.
Click the Yes button.
9. You are returned to Requisition Header page.
NOTE: The Status is now Cancelled and the Budget Status is Not Chk'd.
The requisition must be Budget Checked again. Navigate to:
Purchasing > Requisitions > Budget Check
10. Once the Budget Check is complete, navigate to the Reconciliation Workbench as
follows:
Purchasing > Requisitions > Reconciliation Workbench
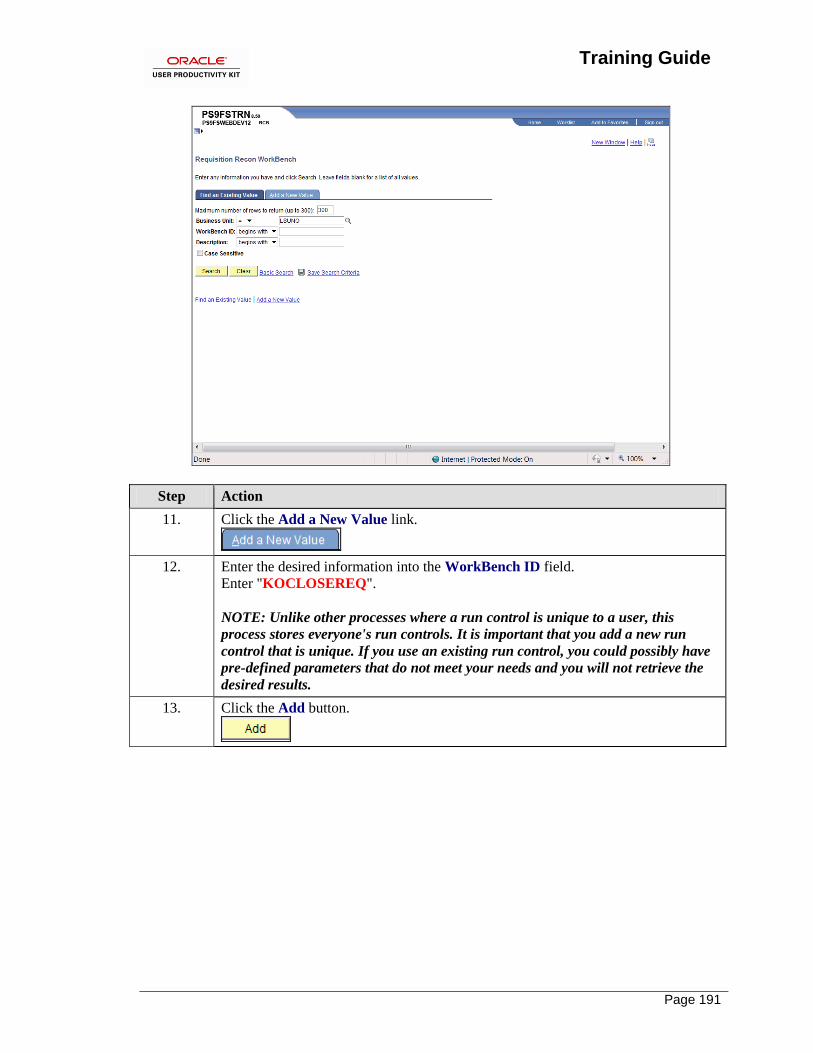
Training Guide
Page 191
Step Action
11. Click the Add a New Value link.
12. Enter the desired information into the WorkBench ID field.
Enter "KOCLOSEREQ".
NOTE: Unlike other processes where a run control is unique to a user, this
process stores everyone's run controls. It is important that you add a new run
control that is unique. If you use an existing run control, you could possibly have
pre-defined parameters that do not meet your needs and you will not retrieve the
desired results.
13. Click the Add button.
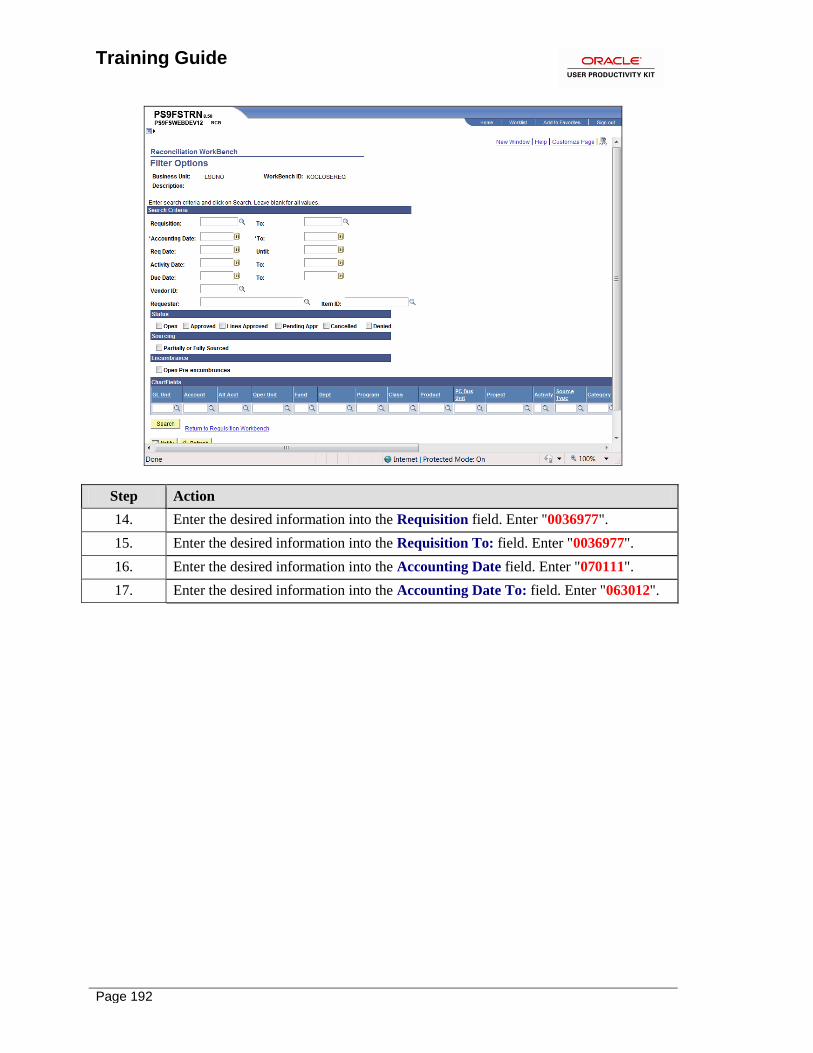
Training Guide
Page 192
Step Action
14. Enter the desired information into the Requisition field. Enter "0036977".
15. Enter the desired information into the Requisition To: field. Enter "0036977".
16. Enter the desired information into the Accounting Date field. Enter "070111".
17. Enter the desired information into the Accounting Date To: field. Enter "063012".
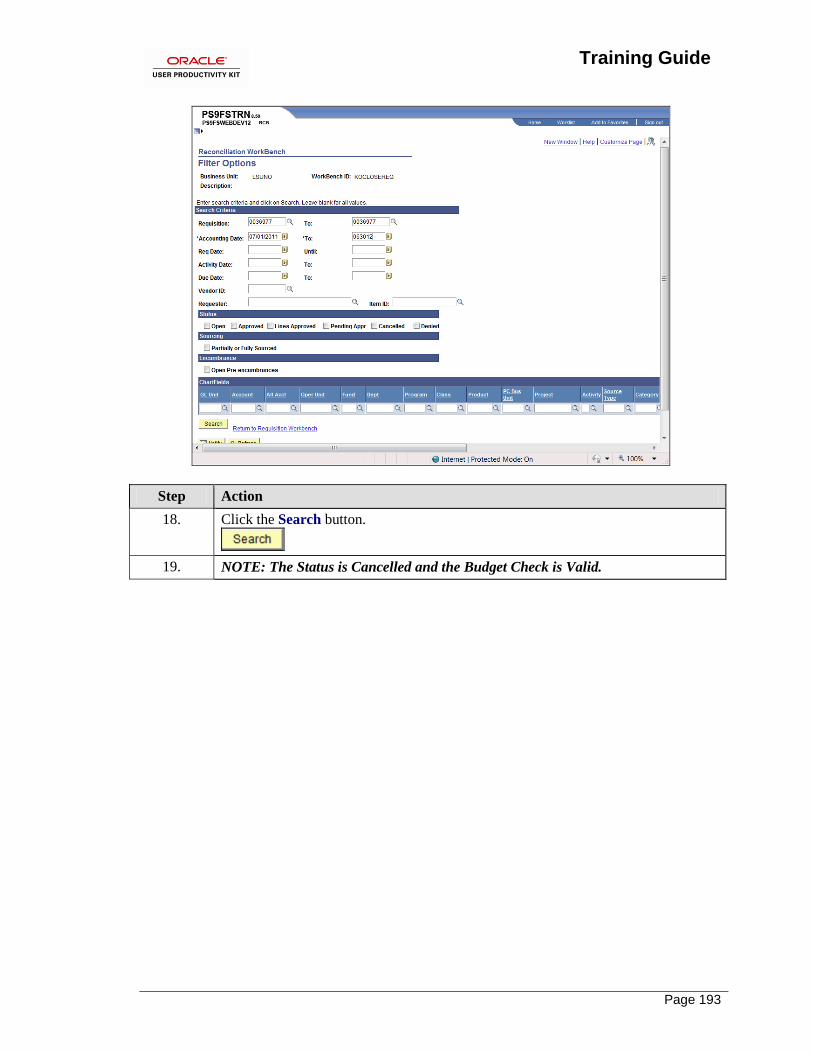
Training Guide
Page 193
Step Action
18. Click the Search button.
19. NOTE: The Status is Cancelled and the Budget Check is Valid.
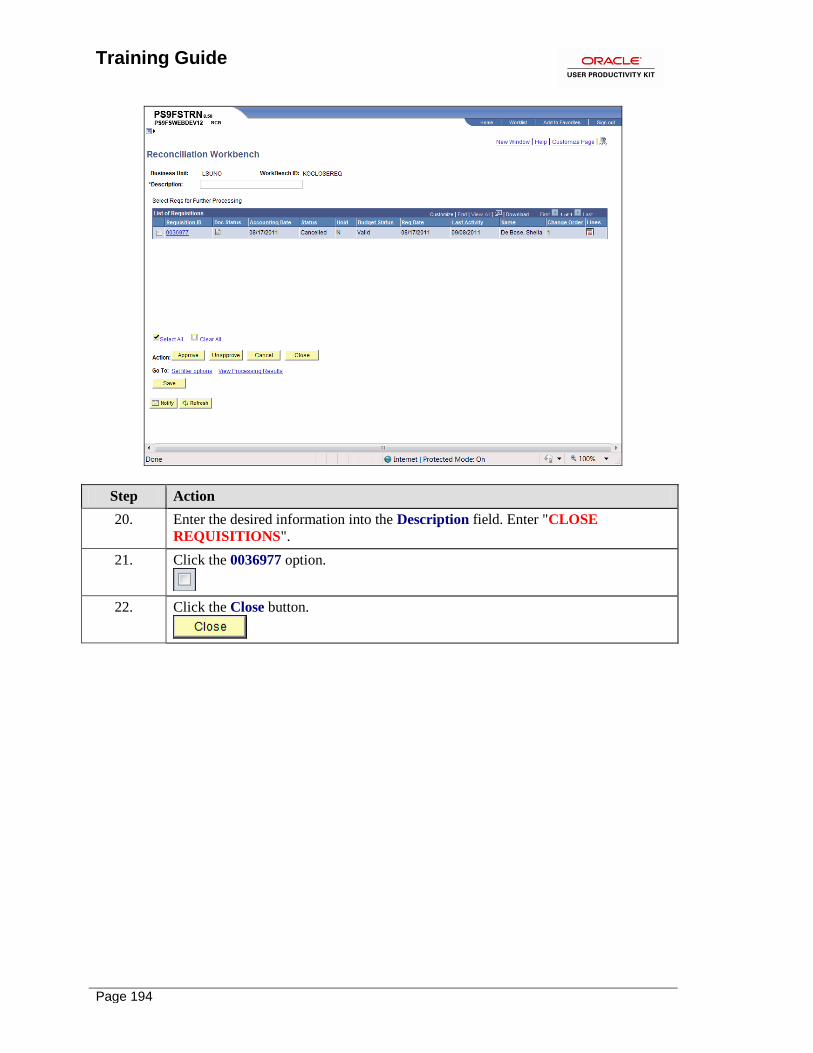
Training Guide
Page 194
Step Action
20. Enter the desired information into the Description field. Enter "CLOSE
REQUISITIONS".
21. Click the 0036977 option.
22. Click the Close button.
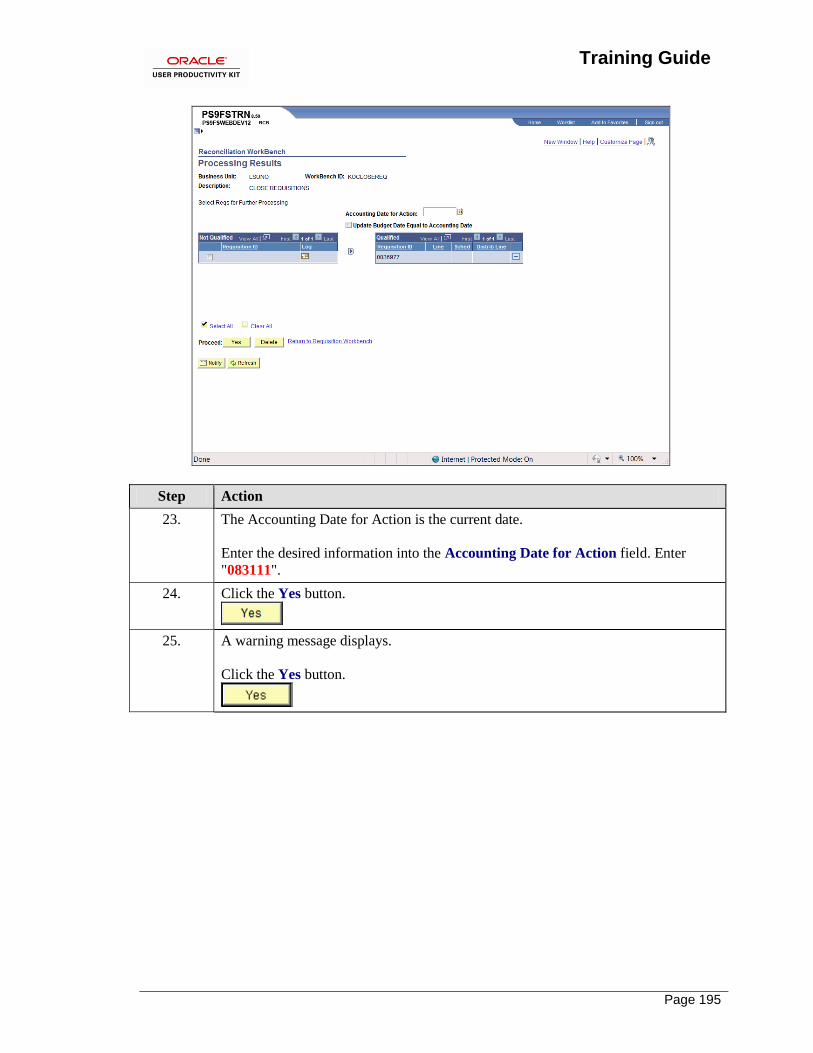
Training Guide
Page 195
Step Action
23. The Accounting Date for Action is the current date.
Enter the desired information into the Accounting Date for Action field. Enter
"083111".
24. Click the Yes button.
25. A warning message displays.
Click the Yes button.
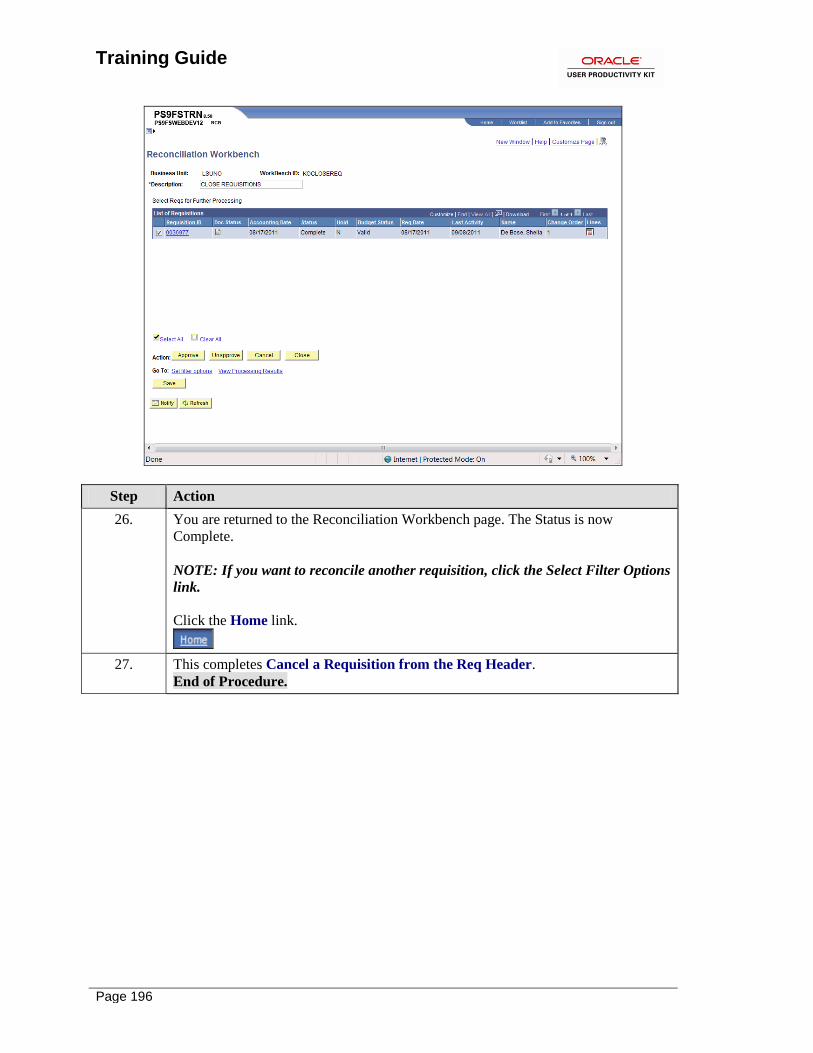
Training Guide
Page 196
Step Action
26. You are returned to the Reconciliation Workbench page. The Status is now
Complete.
NOTE: If you want to reconcile another requisition, click the Select Filter Options
link.
Click the Home link.
27. This completes Cancel a Requisition from the Req Header.
End of Procedure.

Training Guide
Page 197
Close a Requisition from the Req Recon Workbench
Procedure
In this topic you will learn how to Close a Requisition from the Req Recon Workbench.
Step Action
1. Click the Purchasing link.
2. Click the Requisitions link.
3. Click the Reconcile Requisitions link.
4. Click the Reconciliation Workbench link.
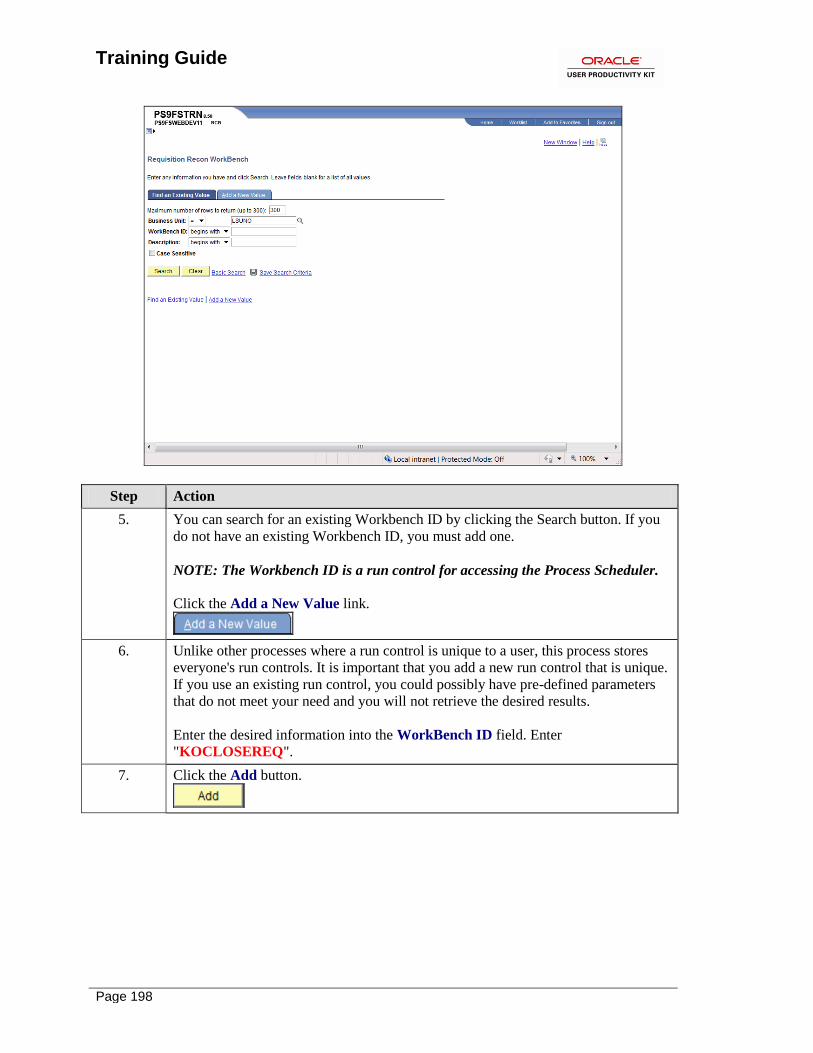
Training Guide
Page 198
Step Action
5. You can search for an existing Workbench ID by clicking the Search button. If you
do not have an existing Workbench ID, you must add one.
NOTE: The Workbench ID is a run control for accessing the Process Scheduler.
Click the Add a New Value link.
6. Unlike other processes where a run control is unique to a user, this process stores
everyone's run controls. It is important that you add a new run control that is unique.
If you use an existing run control, you could possibly have pre-defined parameters
that do not meet your need and you will not retrieve the desired results.
Enter the desired information into the WorkBench ID field. Enter
"KOCLOSEREQ".
7. Click the Add button.
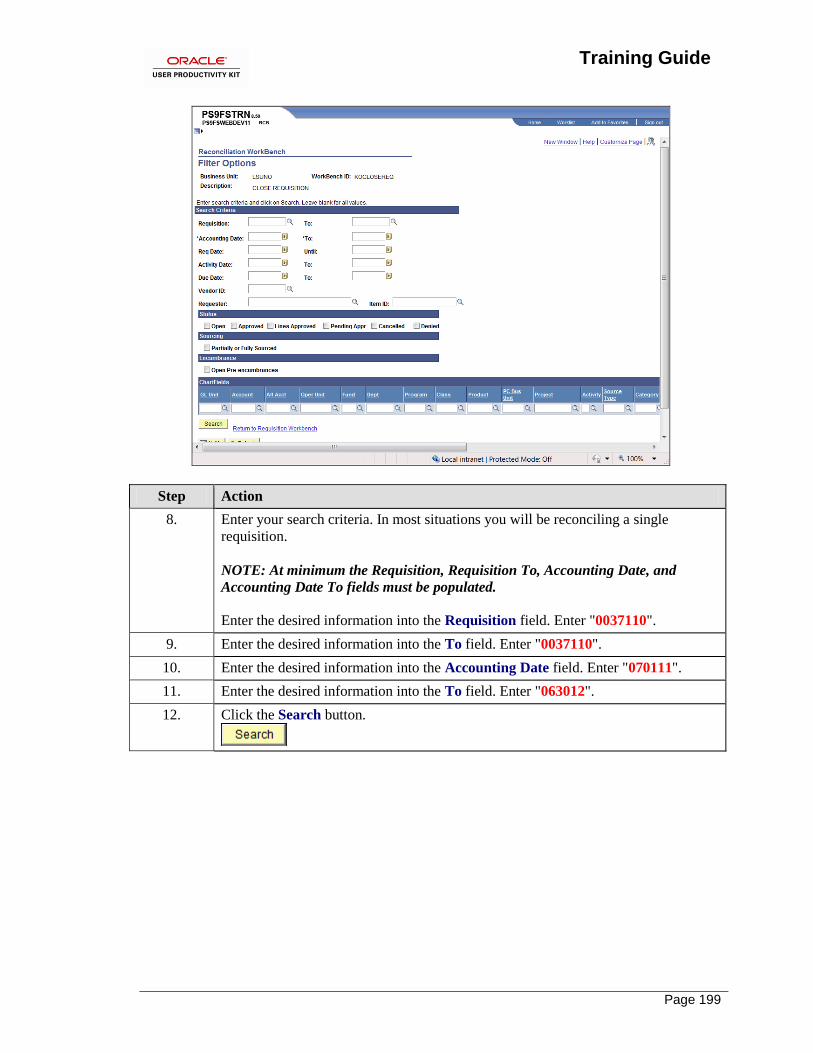
Training Guide
Page 199
Step Action
8. Enter your search criteria. In most situations you will be reconciling a single
requisition.
NOTE: At minimum the Requisition, Requisition To, Accounting Date, and
Accounting Date To fields must be populated.
Enter the desired information into the Requisition field. Enter "0037110".
9. Enter the desired information into the To field. Enter "0037110".
10. Enter the desired information into the Accounting Date field. Enter "070111".
11. Enter the desired information into the To field. Enter "063012".
12. Click the Search button.

Training Guide
Page 200
Step Action
13. Enter the desired information into the Description field. Enter "CLOSE
REQUISITION".
14. NOTE: The Status = Approved and the Budget Status = Valid.
Click the 0037110 option.
15. Click the Close button.

Training Guide
Page 201
Step Action
16. The requisition is qualified for closing. The Accounting Date of Action is the current
date.
Enter the desired information into the Accounting Date for Action field. Enter
"091511".
17. If the requisition is Not Qualified, you can click the Log button to determine why.
Below are examples of messages that you might receive when clicking the Log
button. Requisitions with these messages can be overridden and closed:
The Requisition may not be closed because it has not been fully sourced.
18. If the requisition is Not Qualified, you can click the Log button to determine why.
Below are examples of messages that you might receive when clicking the Log
button. Requisitions with these messages cannot be overridden and closed:
The Requisition is associated with a Purchase Order that has not been closed.
The Requisition is associated with a PO that has been closed or canceled but not
budget checked.
19. Click the Yes button.
20. Click the Yes button.
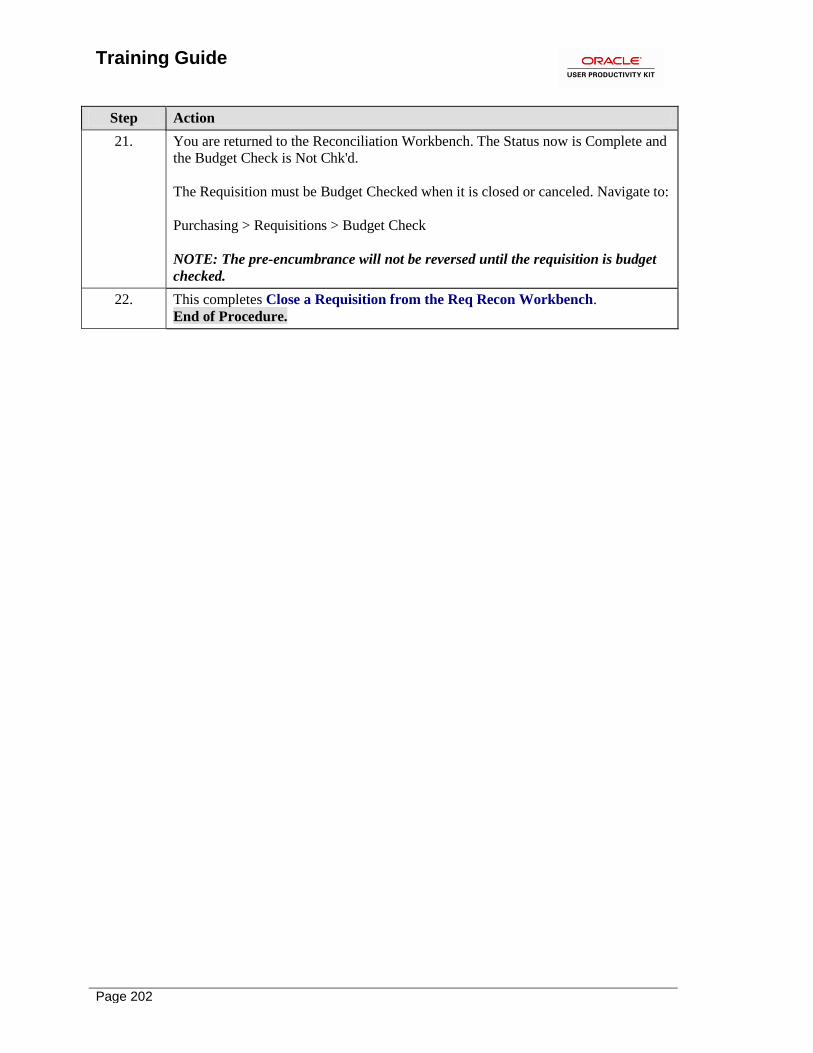
Training Guide
Page 202
Step Action
21. You are returned to the Reconciliation Workbench. The Status now is Complete and
the Budget Check is Not Chk'd.
The Requisition must be Budget Checked when it is closed or canceled. Navigate to:
Purchasing > Requisitions > Budget Check
NOTE: The pre-encumbrance will not be reversed until the requisition is budget
checked.
22. This completes Close a Requisition from the Req Recon Workbench.
End of Procedure.
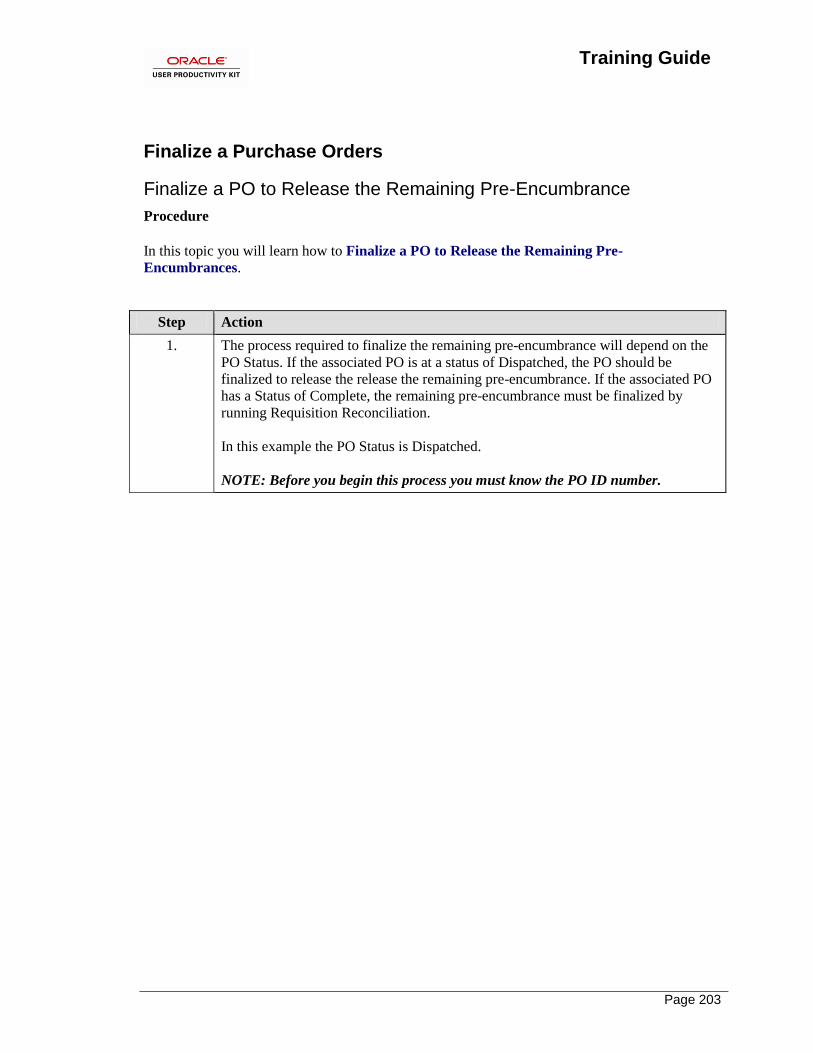
Training Guide
Page 203
Finalize a Purchase Orders
Finalize a PO to Release the Remaining Pre-Encumbrance
Procedure
In this topic you will learn how to Finalize a PO to Release the Remaining Pre-
Encumbrances.
Step Action
1. The process required to finalize the remaining pre-encumbrance will depend on the
PO Status. If the associated PO is at a status of Dispatched, the PO should be
finalized to release the release the remaining pre-encumbrance. If the associated PO
has a Status of Complete, the remaining pre-encumbrance must be finalized by
running Requisition Reconciliation.
In this example the PO Status is Dispatched.
NOTE: Before you begin this process you must know the PO ID number.
Training Guide
Page 204
Step Action
2. Click the Purchasing link.
3. Click the Purchase Orders link.
4. Click the Add/Update POs link.
Training Guide
Page 205
Step Action
5. Click the Find an Existing Value link.

Training Guide
Page 206
Step Action
6. Enter the desired information into the PO ID field. Enter "00355337E".
7. Click the Search button.
8. Click the Finalize Document button.
NOTE: The Finalize Document button is the pink sheet of paper with arrows icon
to the right of the Budget Status.
9. A warning message displays.
Click the Yes button.
10. The PO Status is still Dispatched, but the Budget Status is now Not Chk'd. The PO
must be Budget Checked again.
Click the Budget Check button.
Training Guide
Page 207
Step Action
11. Click the Refresh button until the Run Status = Success and the Distribution Status
= Posted.
12. Click the Go back to Purchase Order link.
13. The PO Status is Dispatched and the Budget Status is Valid.
14. Click the Home link.
15. This completes Finalize a PO to Release the Remaining Pre-Encumbrance.
End of Procedure.

Training Guide
Page 208

Training Guide
Page 209
Close a Requisition to Release Remaining Pre-Encumbrance
Procedure
In this topic you will learn how to Close a Requisition to Release the Remaining Pre-
Encumbrance.
Step Action
1. Click the Purchasing link.
2. Click the Requisitions link.
3. Click the Reconcile Requisitions link.
4. Click the Reconciliation Workbench link.
Training Guide
Page 210
Step Action
5. Click the Add a New Value tab to add a new Workbench ID.
Click the Search button to search for an existing Workbench ID.
6. Click the appropriate Workbench ID link.
Training Guide
Page 211
Step Action
7. When using an existing Workbench ID, the Requisition, Requisition To, Accounting
Date and Accounting Date To fields are populated. The Requisition and Requisition
To field's information will change. The Accounting Date and Accounting Date To
fields may, or may not, need to be changed.
Enter the desired information into the Requisition field. Enter "0037103".
8. Enter the desired information into the To field. Enter "0037103".
9. Enter the desired information into the Accounting Date field. Enter "070111".
10. Enter the desired information into the Accounting Date To: field. Enter "063112".
11. Click the Search button.
Training Guide
Page 212
Step Action
12. Click the 0037103 option.
13. Click the Close button.
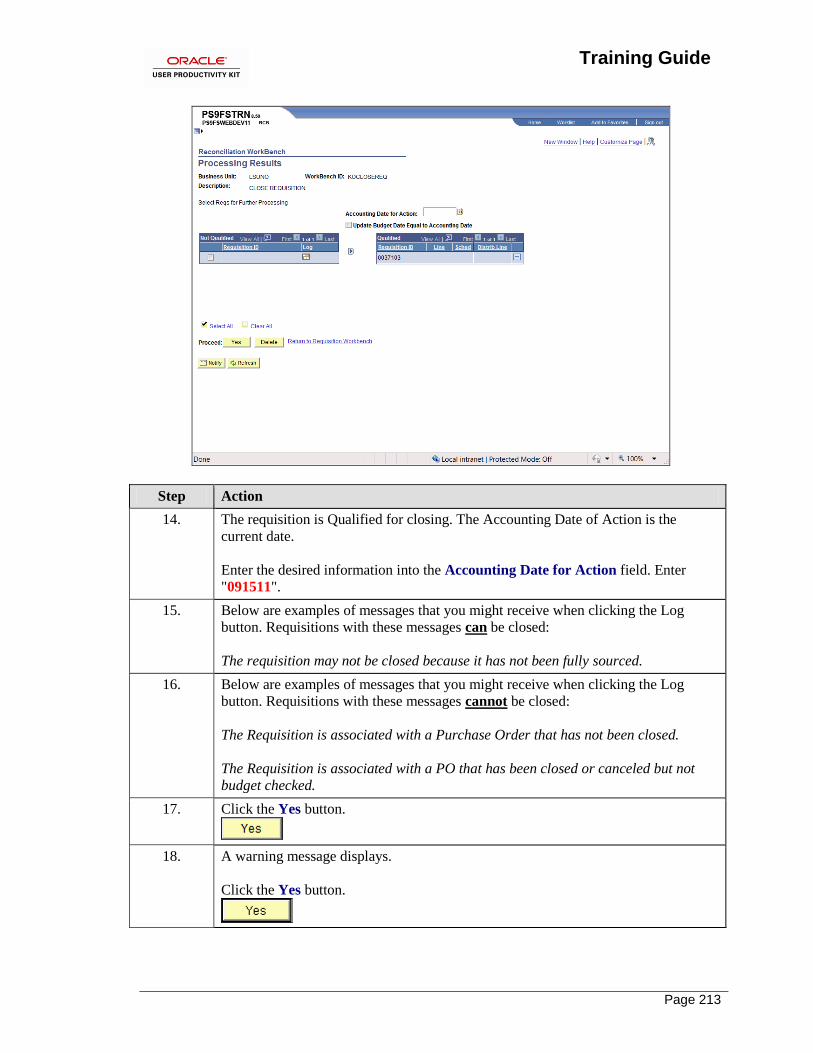
Training Guide
Page 213
Step Action
14. The requisition is Qualified for closing. The Accounting Date of Action is the
current date.
Enter the desired information into the Accounting Date for Action field. Enter
"091511".
15. Below are examples of messages that you might receive when clicking the Log
button. Requisitions with these messages can be closed:
The requisition may not be closed because it has not been fully sourced.
16. Below are examples of messages that you might receive when clicking the Log
button. Requisitions with these messages cannot be closed:
The Requisition is associated with a Purchase Order that has not been closed.
The Requisition is associated with a PO that has been closed or canceled but not
budget checked.
17. Click the Yes button.
18. A warning message displays.
Click the Yes button.
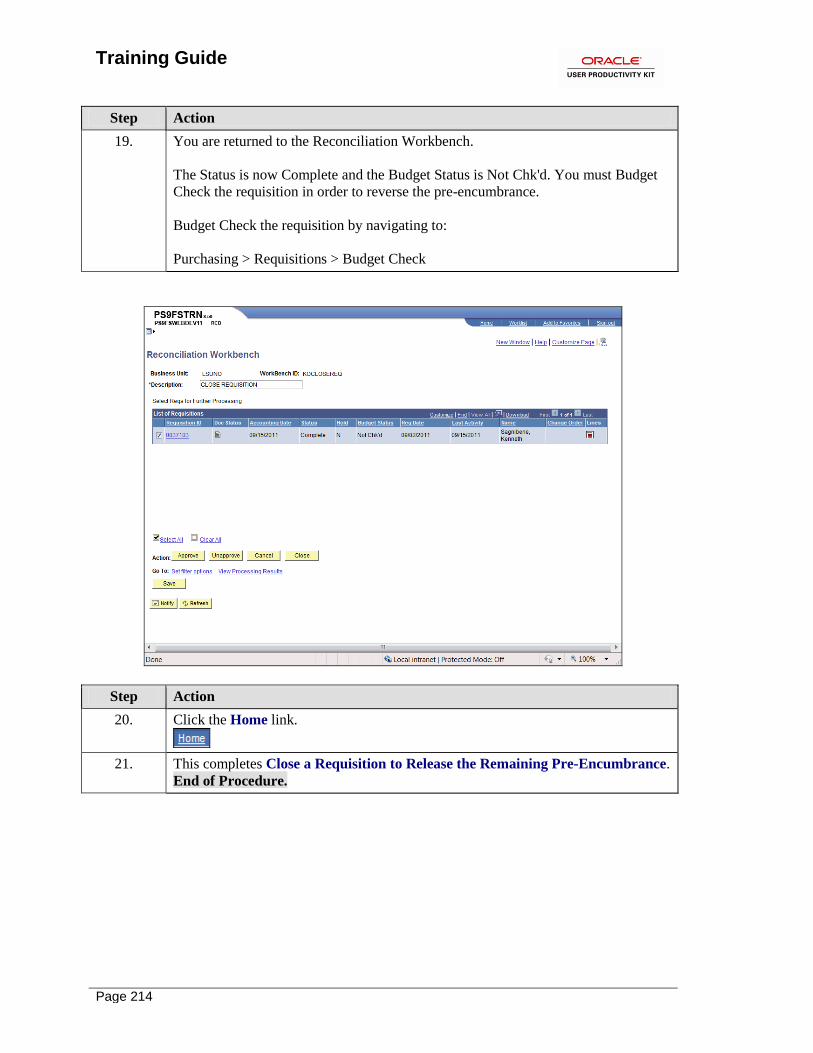
Training Guide
Page 214
Step Action
19. You are returned to the Reconciliation Workbench.
The Status is now Complete and the Budget Status is Not Chk'd. You must Budget
Check the requisition in order to reverse the pre-encumbrance.
Budget Check the requisition by navigating to:
Purchasing > Requisitions > Budget Check
Step Action
20. Click the Home link.
21. This completes Close a Requisition to Release the Remaining Pre-Encumbrance.
End of Procedure.
Training Guide
Page 215
Close a Range of Requisitions from Req Recon Workbench
Procedure
In this topic you will learn how to Close a Range of Requisitions from the Req Recon
Workbench.
Step Action
1. Click the Purchasing link.
2. Click the Requisitions link.
3. Click the Reconcile Requisitions link.
4. Click the Reconciliation Workbench link.
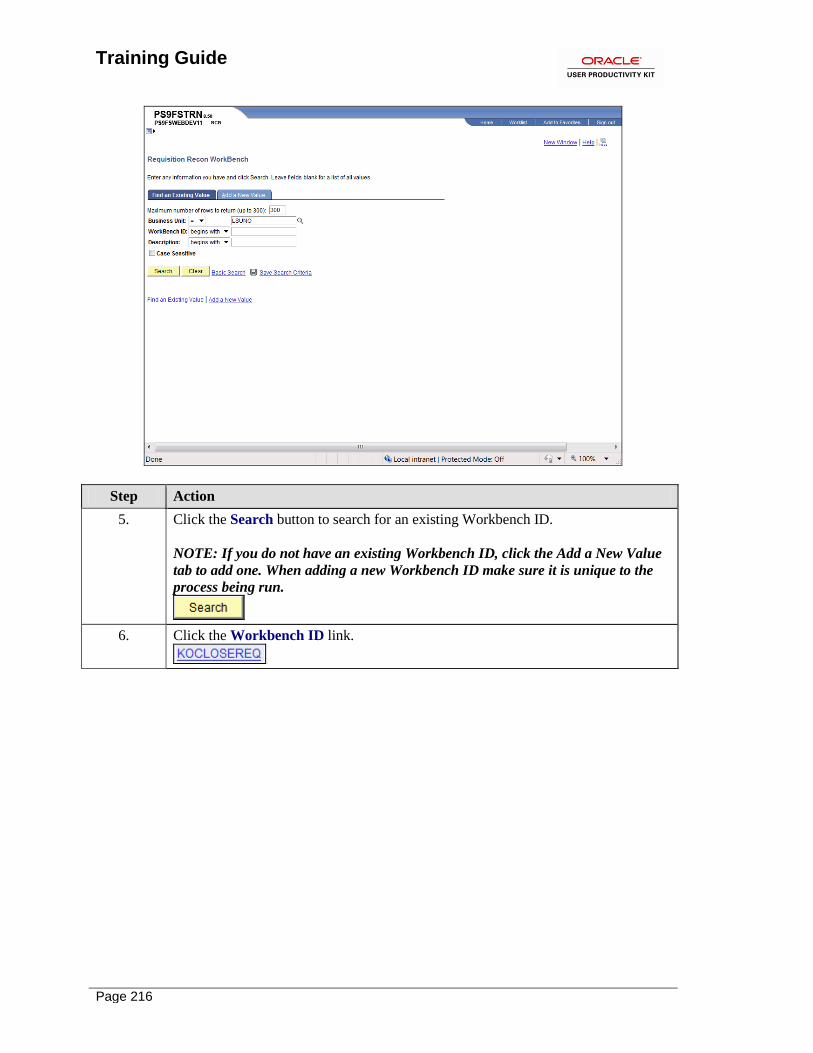
Training Guide
Page 216
Step Action
5. Click the Search button to search for an existing Workbench ID.
NOTE: If you do not have an existing Workbench ID, click the Add a New Value
tab to add one. When adding a new Workbench ID make sure it is unique to the
process being run.
6. Click the Workbench ID link.
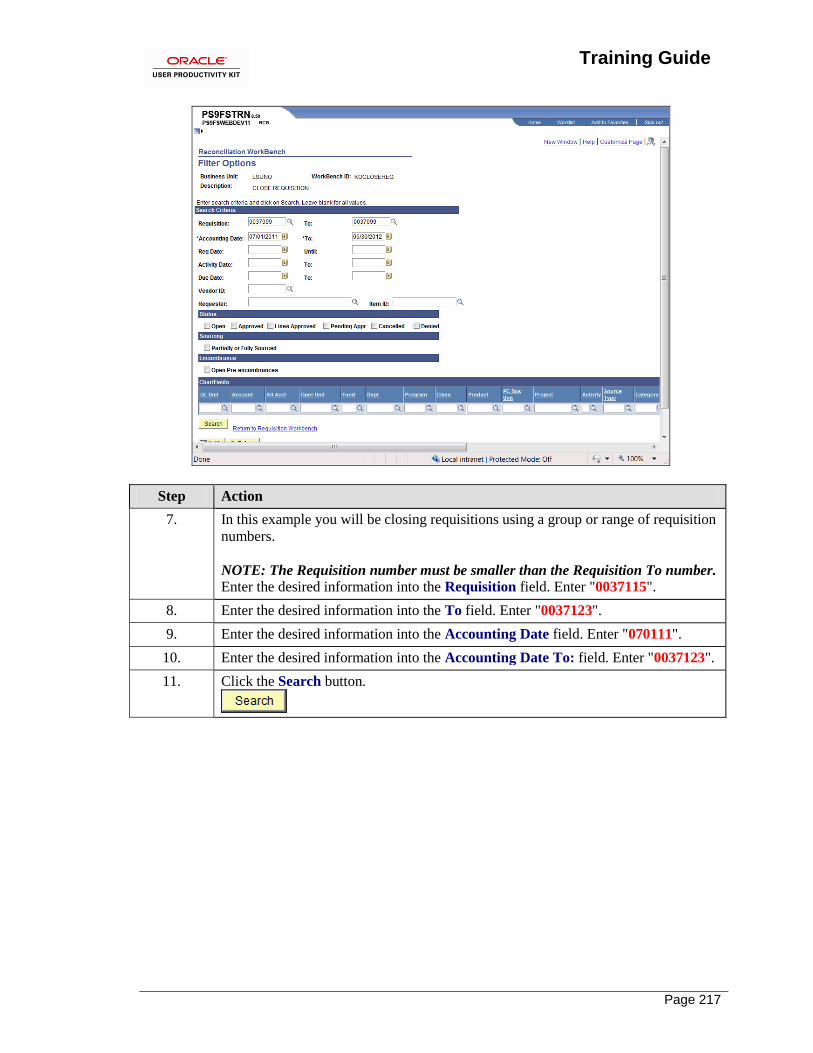
Training Guide
Page 217
Step Action
7. In this example you will be closing requisitions using a group or range of requisition
numbers.
NOTE: The Requisition number must be smaller than the Requisition To number. Enter the desired information into the Requisition field. Enter "0037115".
8. Enter the desired information into the To field. Enter "0037123".
9. Enter the desired information into the Accounting Date field. Enter "070111".
10. Enter the desired information into the Accounting Date To: field. Enter "0037123".
11. Click the Search button.
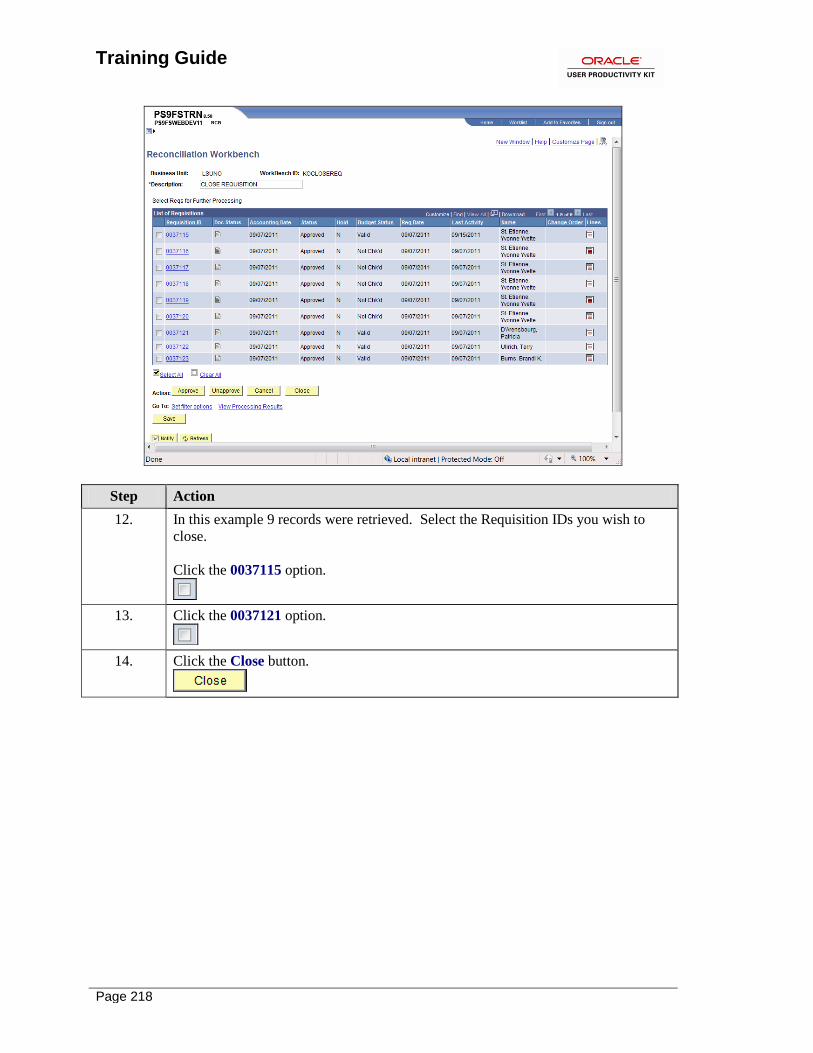
Training Guide
Page 218
Step Action
12. In this example 9 records were retrieved. Select the Requisition IDs you wish to
close.
Click the 0037115 option.
13. Click the 0037121 option.
14. Click the Close button.
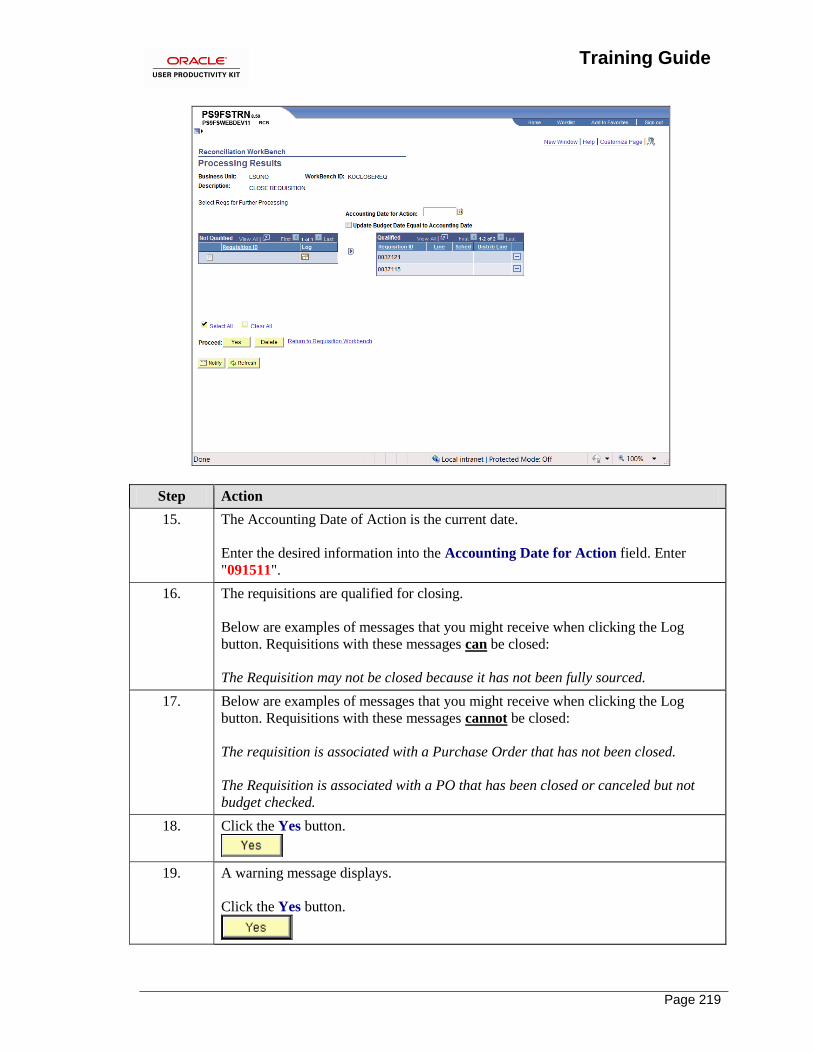
Training Guide
Page 219
Step Action
15. The Accounting Date of Action is the current date.
Enter the desired information into the Accounting Date for Action field. Enter
"091511".
16. The requisitions are qualified for closing.
Below are examples of messages that you might receive when clicking the Log
button. Requisitions with these messages can be closed:
The Requisition may not be closed because it has not been fully sourced.
17. Below are examples of messages that you might receive when clicking the Log
button. Requisitions with these messages cannot be closed:
The requisition is associated with a Purchase Order that has not been closed.
The Requisition is associated with a PO that has been closed or canceled but not
budget checked.
18. Click the Yes button.
19. A warning message displays.
Click the Yes button.
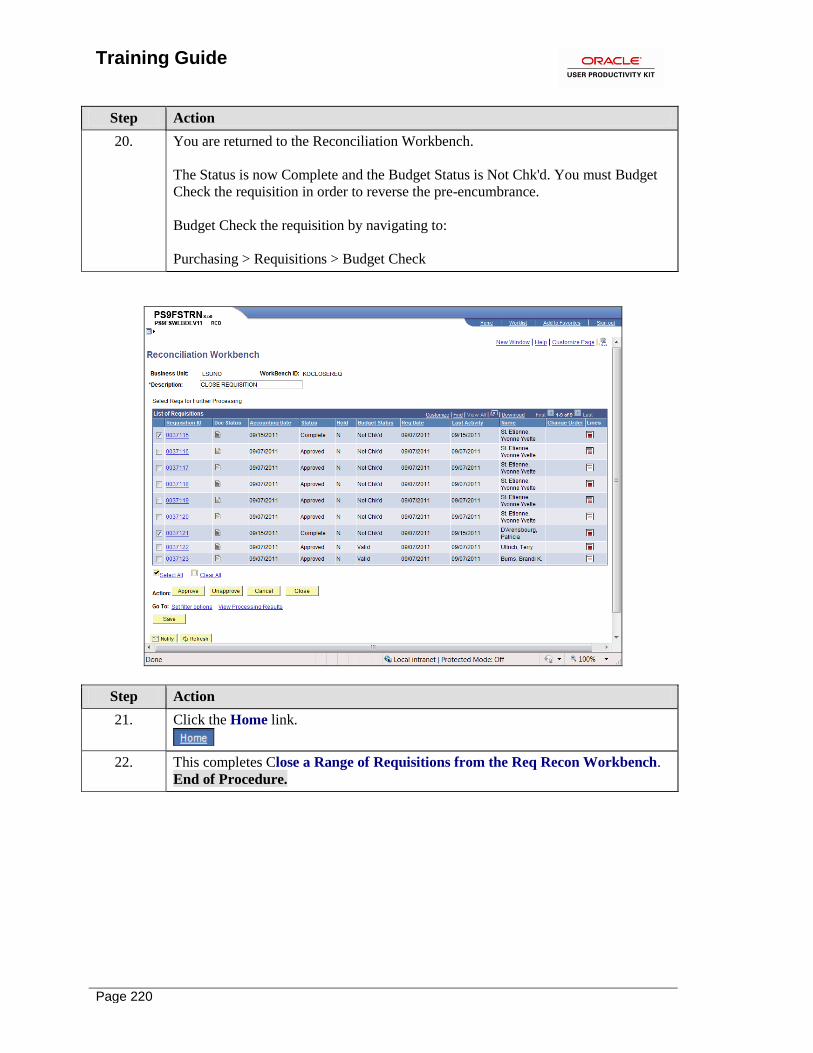
Training Guide
Page 220
Step Action
20. You are returned to the Reconciliation Workbench.
The Status is now Complete and the Budget Status is Not Chk'd. You must Budget
Check the requisition in order to reverse the pre-encumbrance.
Budget Check the requisition by navigating to:
Purchasing > Requisitions > Budget Check
Step Action
21. Click the Home link.
22. This completes Close a Range of Requisitions from the Req Recon Workbench.
End of Procedure.
Training Guide
Page 221
Finalize the PO Voucher
Finalize the PO Voucher When a user determines that the last payment has been made on a purchase order, the purchase
order will be closed by Purchasing. Accounts Payable will not finalize the last voucher. Accounts
Payable should notify their purchasing SuperUser that the PO is ready to be finalized.
The exception to this policy is if the PO contains several lines and not all lines of the PO are
ready to be finalized. In this case, Accounts Payable will finalize the last voucher for the PO line
in question.
Things to Remember
• When you use a Reversal Voucher, the encumbrance is put back into the Budget so it can be
reused. When you finalize a line on a PO Voucher, you are taking the encumbered amount out of
the Budget so it is no longer available to use.
• Finalizing a Voucher if a PO has already been completed by PO Reconciliation will have no
effect because all remaining funds were released when the PO was closed. To see if your PO is
complete, navigate using the options below and enter your Business Unit: Purchasing >
Purchase Orders > Review PO Information > Purchase Orders
• Finalizing a PO on a Voucher only finalizes the lines that were copied into that specific
voucher. If a PO line has never been vouchered against, then a change order is required to cancel
that individual line.
• Purchase Orders that are distributed by amount are considered fully vouchered when the amount
of a voucher, or combination of vouchers, equals the amount that has been encumbered (original
amount +/- the amount of any change orders against the PO).
• There are two finalized buttons: one at the top of the lines and/or one for each line. The Finalize
button on the invoice information page, in the upper right, above the Post Status is used to
finalize the entire PO. The Finalize button to the right of each line is to finalize only that line.
• If you check finalize on the voucher, it does not “close” the PO, however it will return any
unexpended funding back to your budget once the Budget Check is run. This is a less complicated
method of returning monies to your budget.
• As stated above, finalizing the voucher will return any unexpended funding back to your budget
once the Budget Check is run. No PO change order is required.
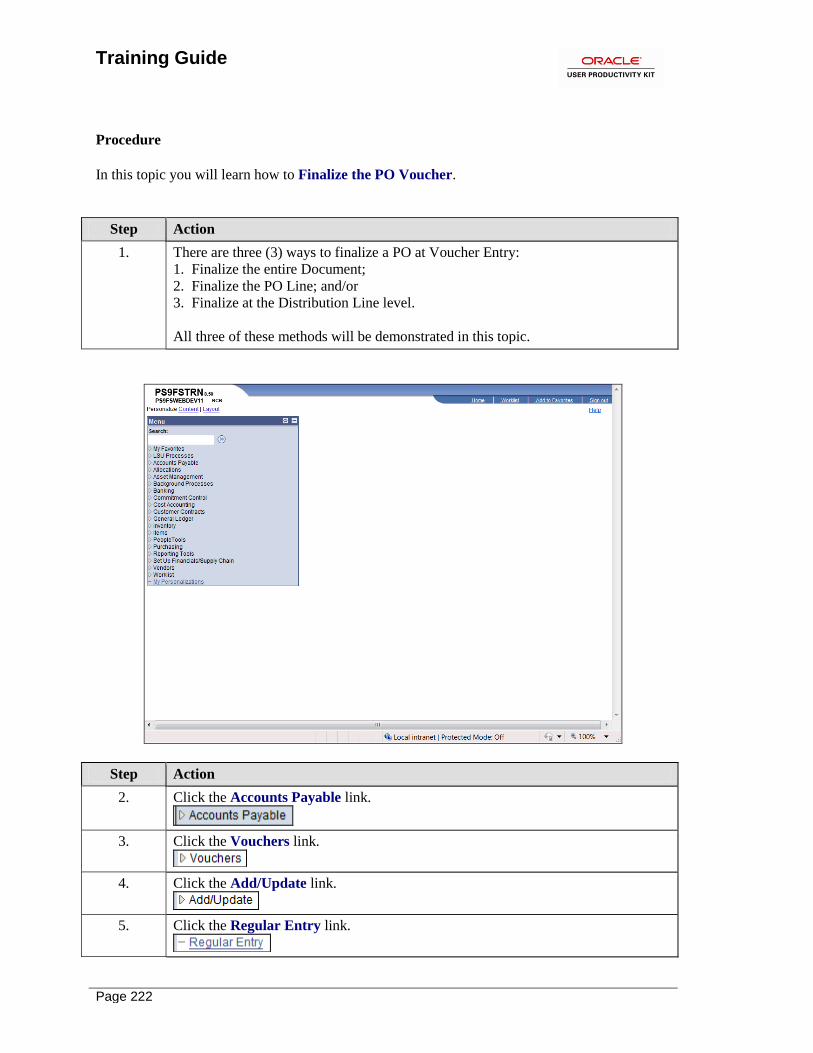
Training Guide
Page 222
Procedure
In this topic you will learn how to Finalize the PO Voucher.
Step Action
1. There are three (3) ways to finalize a PO at Voucher Entry:
1. Finalize the entire Document;
2. Finalize the PO Line; and/or
3. Finalize at the Distribution Line level.
All three of these methods will be demonstrated in this topic.
Step Action
2. Click the Accounts Payable link.
3. Click the Vouchers link.
4. Click the Add/Update link.
5. Click the Regular Entry link.
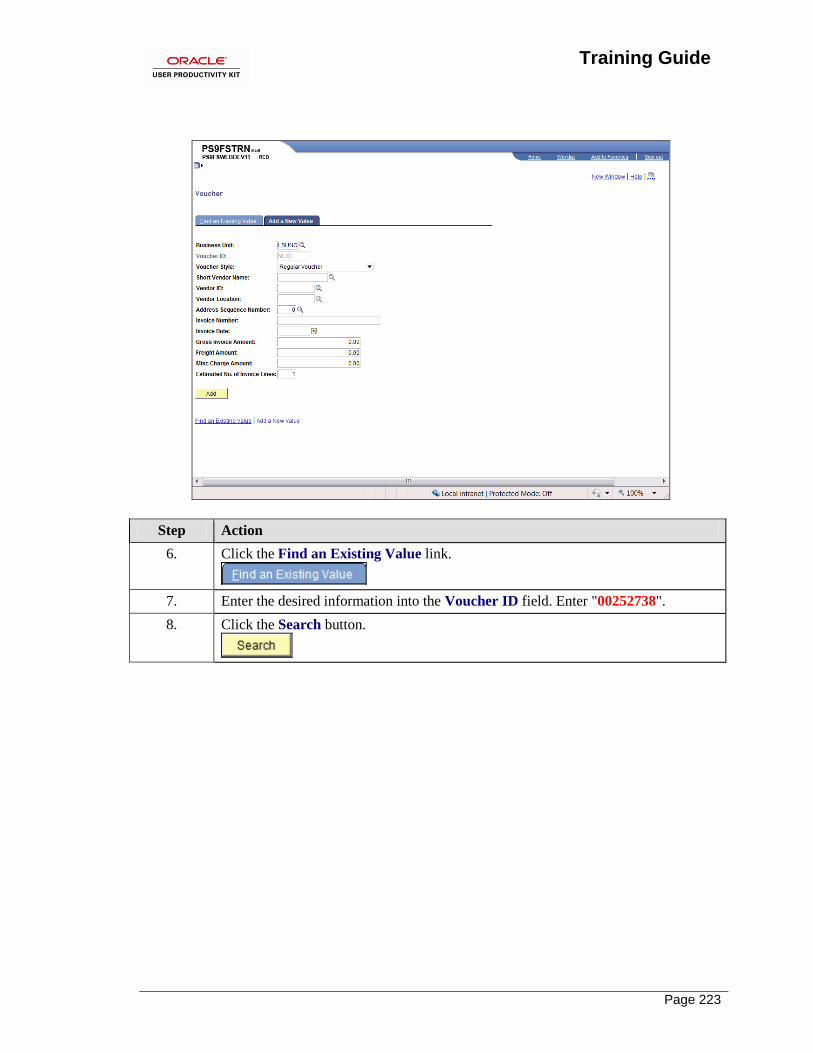
Training Guide
Page 223
Step Action
6. Click the Find an Existing Value link.
7. Enter the desired information into the Voucher ID field. Enter "00252738".
8. Click the Search button.
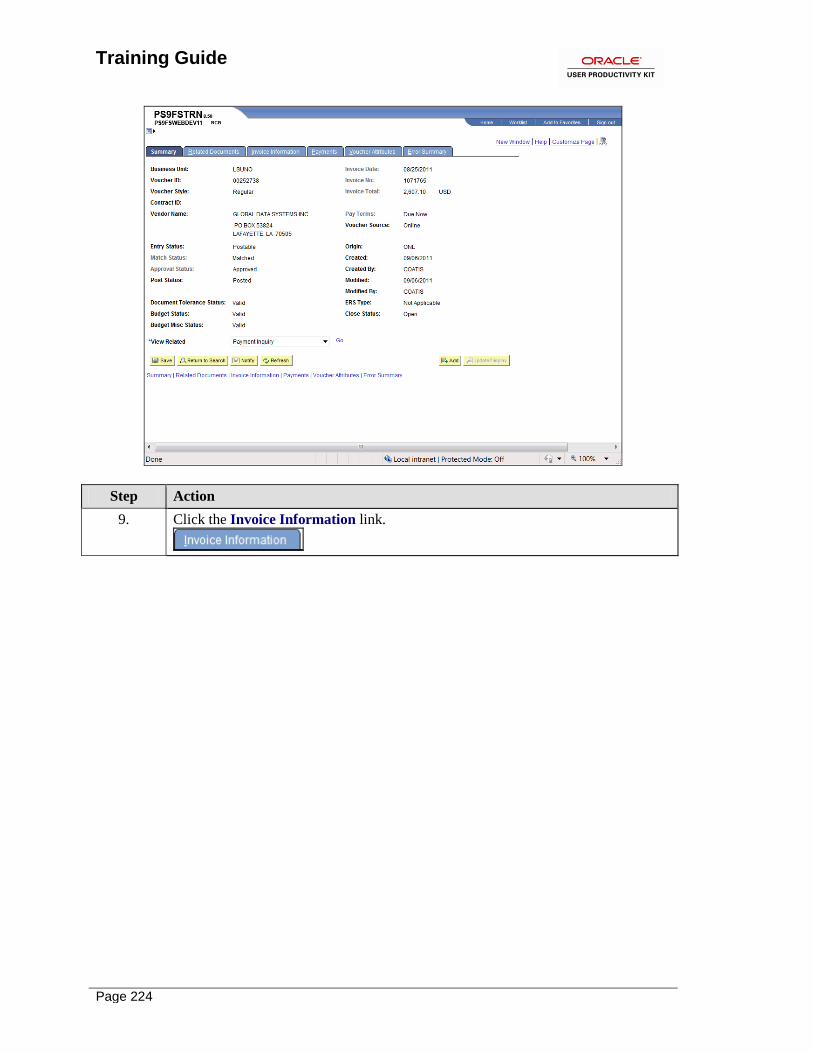
Training Guide
Page 224
Step Action
9. Click the Invoice Information link.
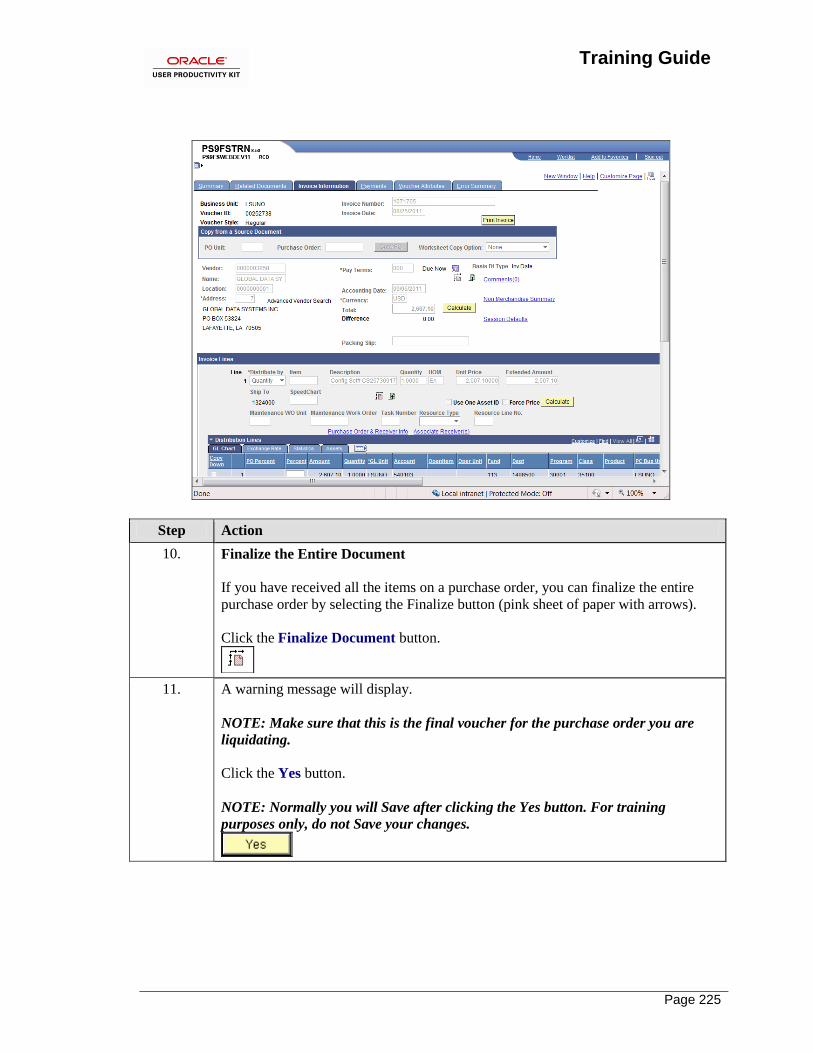
Training Guide
Page 225
Step Action
10. Finalize the Entire Document
If you have received all the items on a purchase order, you can finalize the entire
purchase order by selecting the Finalize button (pink sheet of paper with arrows).
Click the Finalize Document button.
11. A warning message will display.
NOTE: Make sure that this is the final voucher for the purchase order you are
liquidating.
Click the Yes button.
NOTE: Normally you will Save after clicking the Yes button. For training
purposes only, do not Save your changes.
Training Guide
Page 226
Step Action
12. If finalization is done in error, there is a chance to reverse the action using the Undo
Finalize (green sheet of paper with one arrow) button located to the right of the
Finalize button.
Click the Undo Finalize button.
13. A warning message displays.
Click the Yes button.
This completes Finalize the Entire Document.
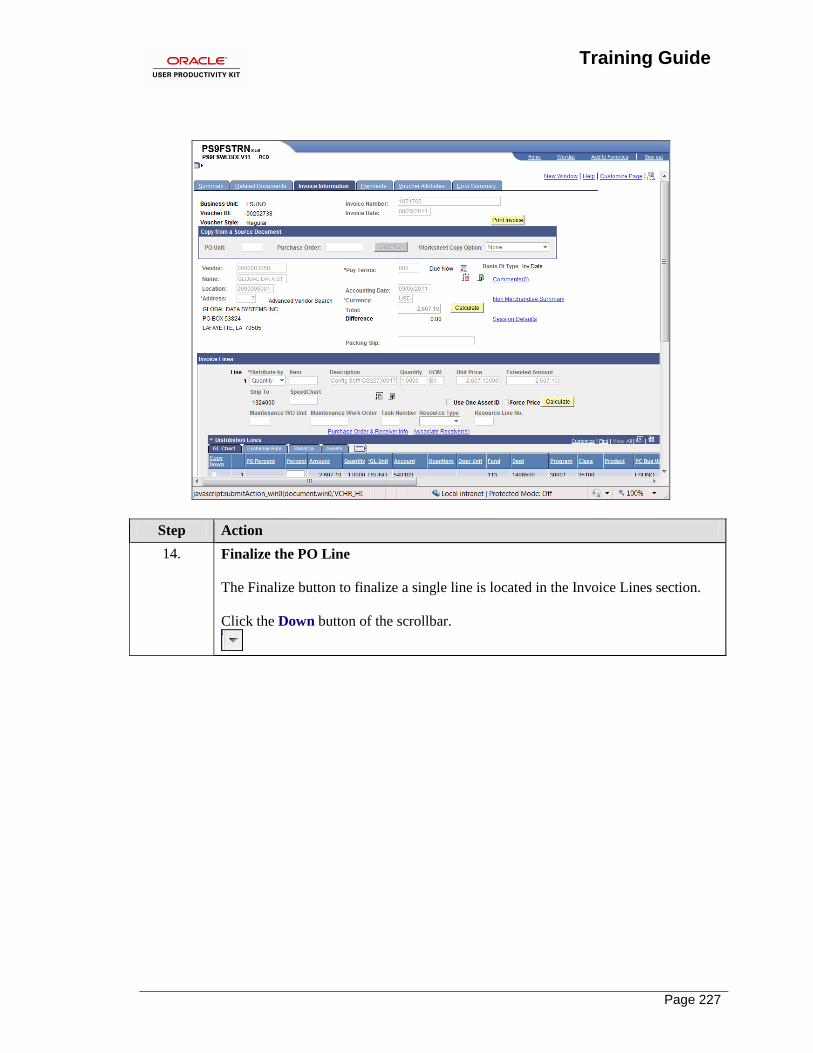
Training Guide
Page 227
Step Action
14. Finalize the PO Line
The Finalize button to finalize a single line is located in the Invoice Lines section.
Click the Down button of the scrollbar.
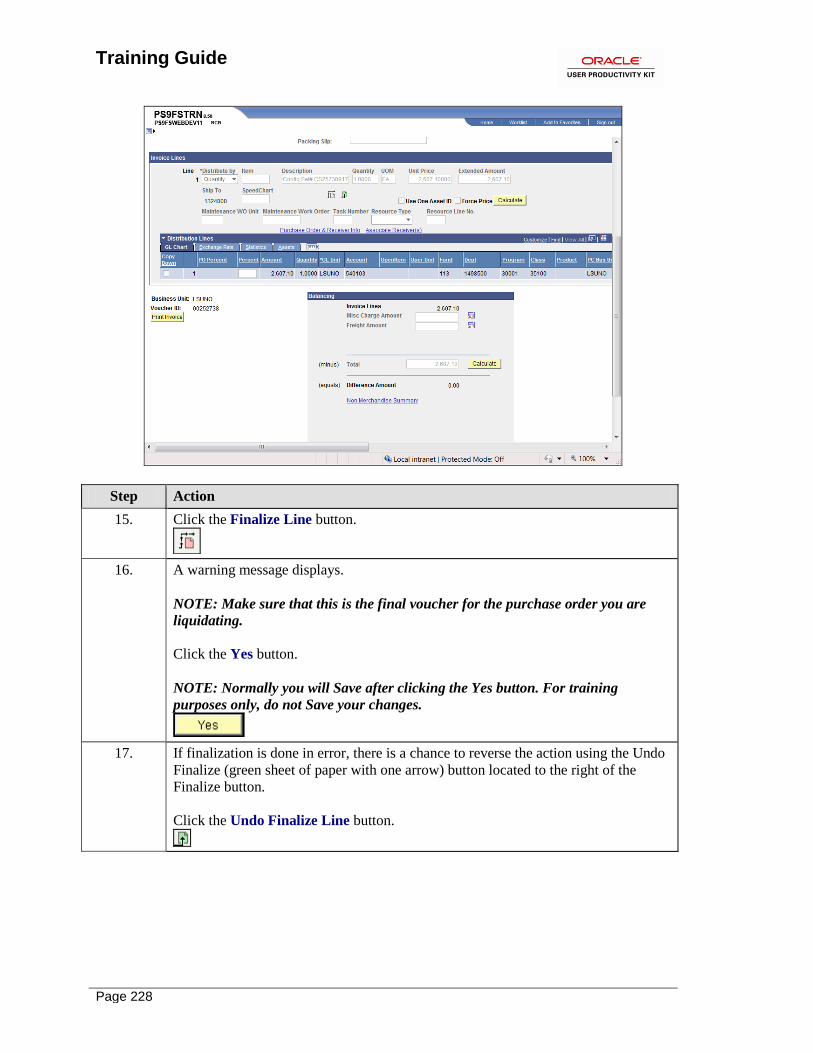
Training Guide
Page 228
Step Action
15. Click the Finalize Line button.
16. A warning message displays.
NOTE: Make sure that this is the final voucher for the purchase order you are
liquidating.
Click the Yes button.
NOTE: Normally you will Save after clicking the Yes button. For training
purposes only, do not Save your changes.
17. If finalization is done in error, there is a chance to reverse the action using the Undo
Finalize (green sheet of paper with one arrow) button located to the right of the
Finalize button.
Click the Undo Finalize Line button.
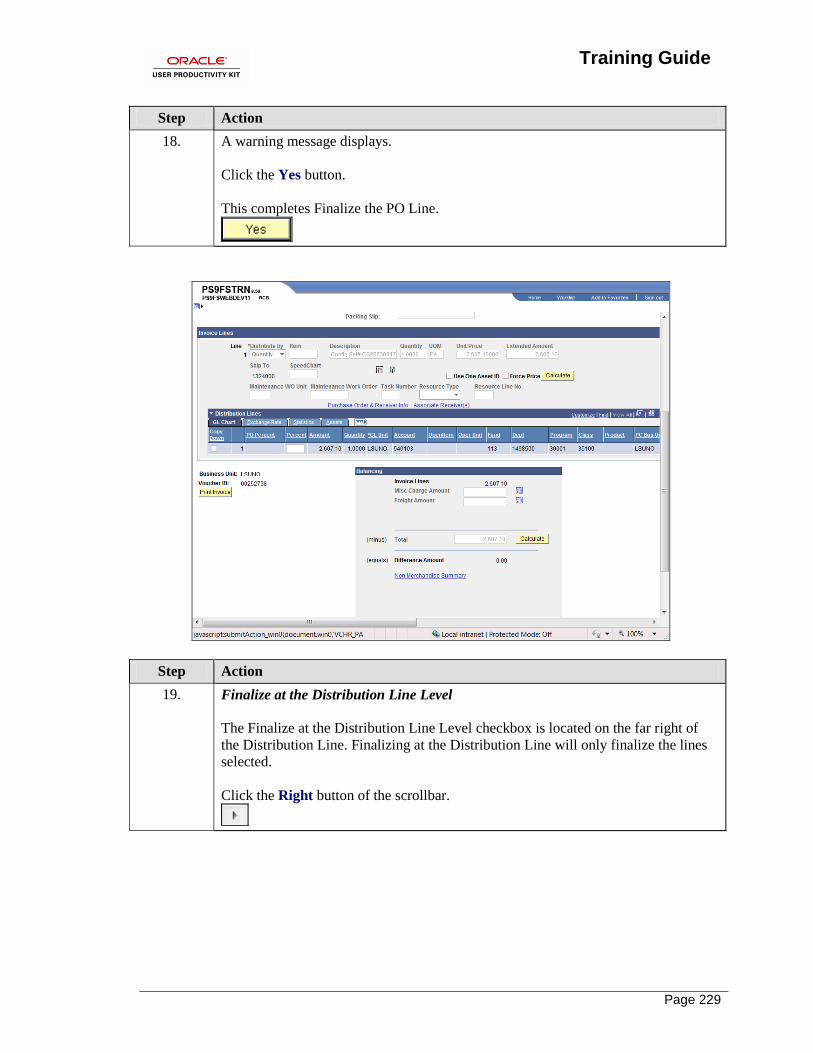
Training Guide
Page 229
Step Action
18. A warning message displays.
Click the Yes button.
This completes Finalize the PO Line.
Step Action
19. Finalize at the Distribution Line Level
The Finalize at the Distribution Line Level checkbox is located on the far right of
the Distribution Line. Finalizing at the Distribution Line will only finalize the lines
selected.
Click the Right button of the scrollbar.
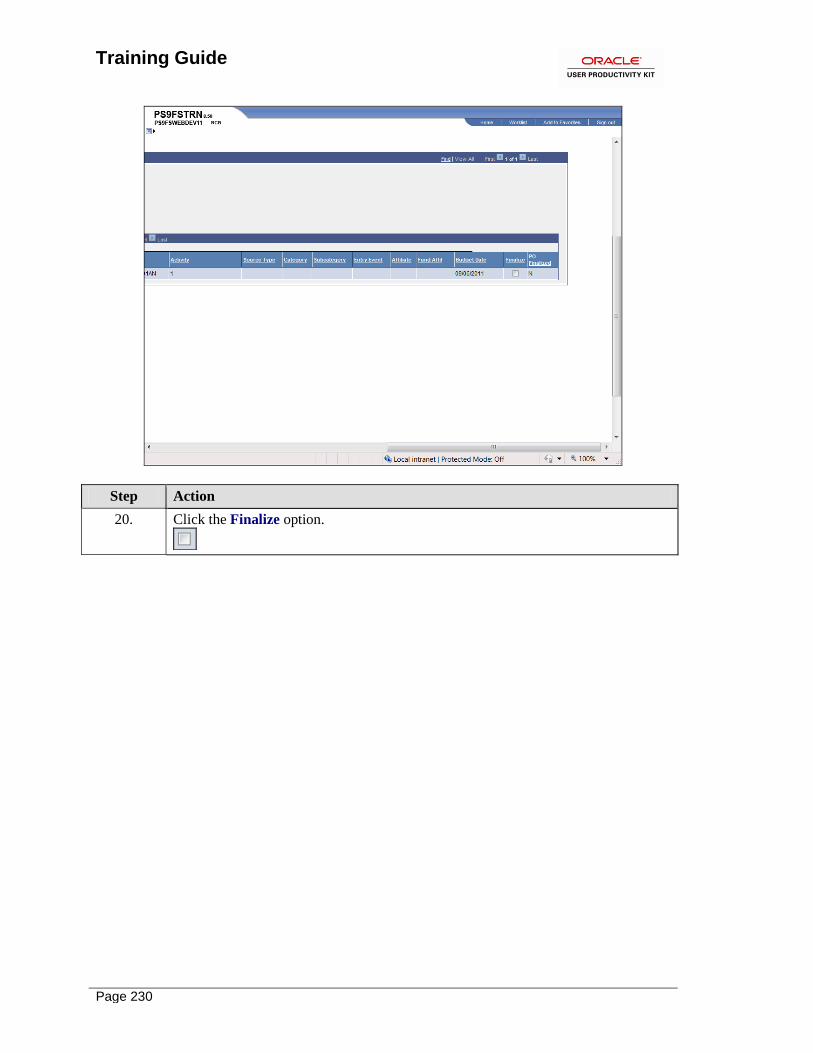
Training Guide
Page 230
Step Action
20. Click the Finalize option.
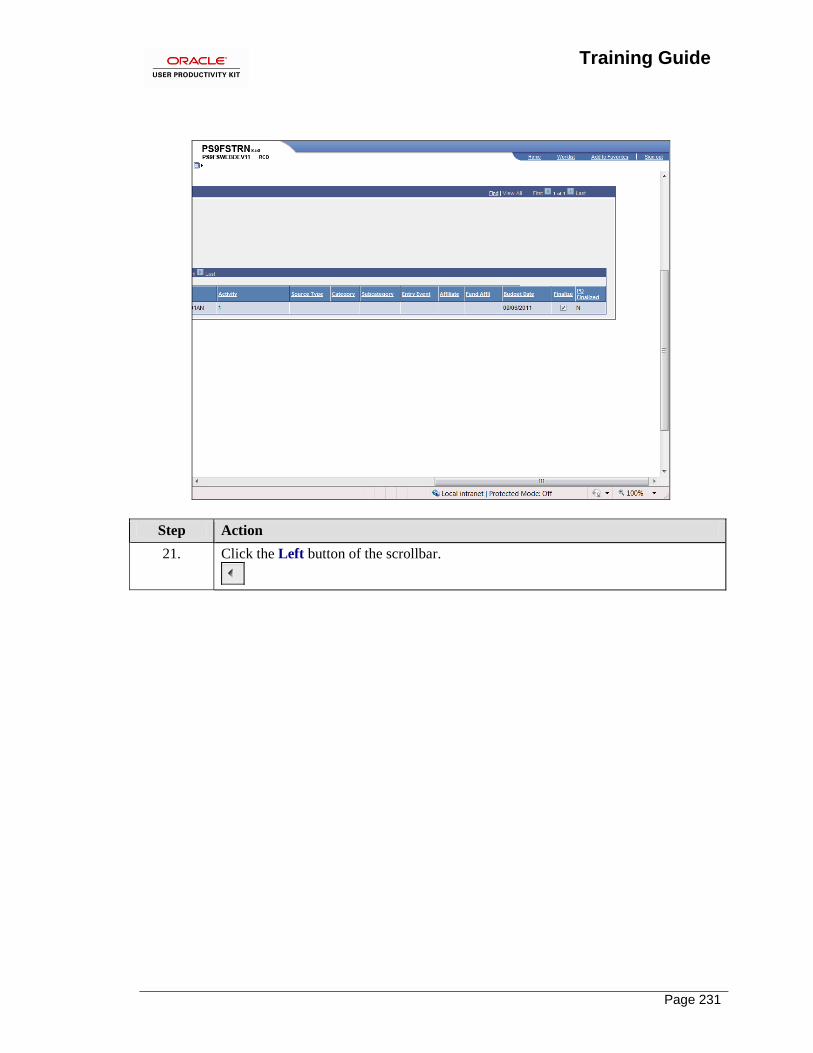
Training Guide
Page 231
Step Action
21. Click the Left button of the scrollbar.
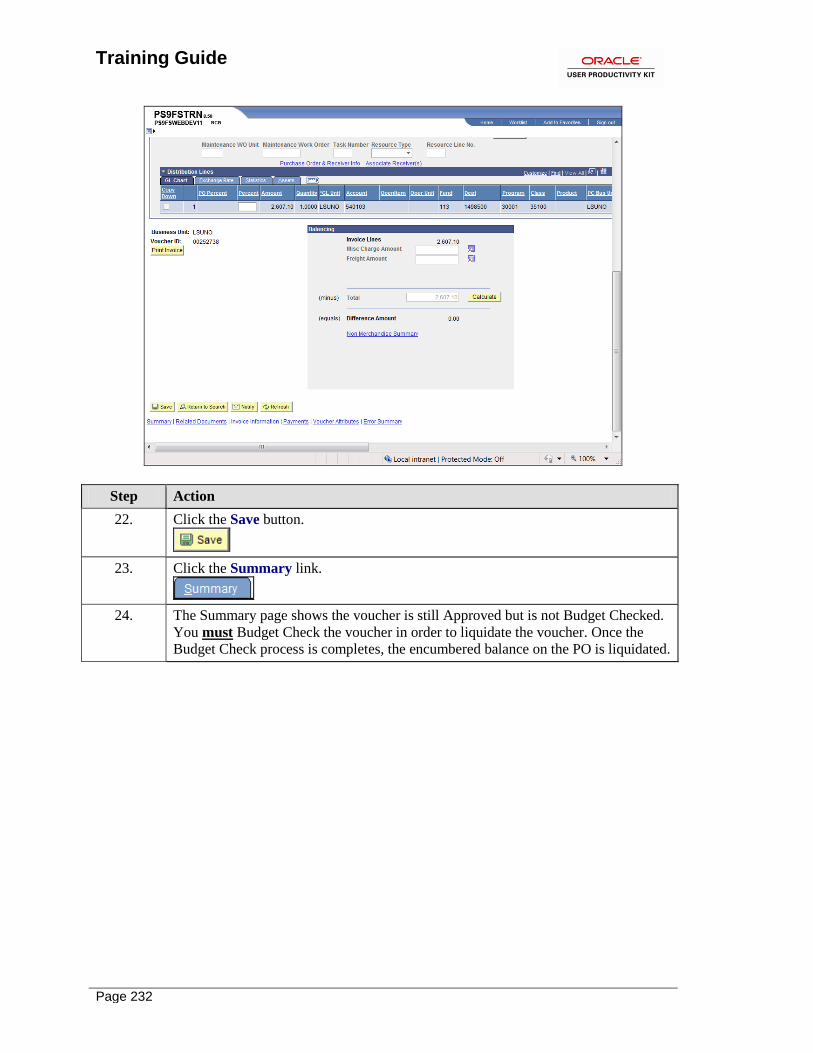
Training Guide
Page 232
Step Action
22. Click the Save button.
23. Click the Summary link.
24. The Summary page shows the voucher is still Approved but is not Budget Checked.
You must Budget Check the voucher in order to liquidate the voucher. Once the
Budget Check process is completes, the encumbered balance on the PO is liquidated.
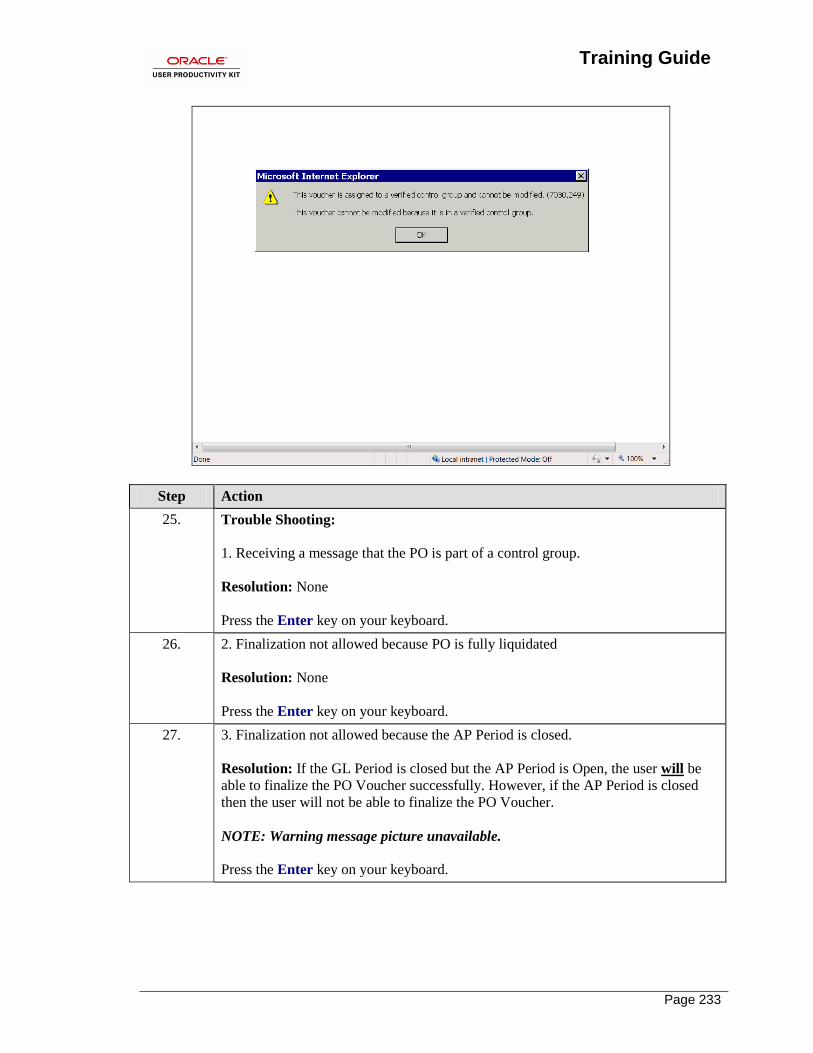
Training Guide
Page 233
Step Action
25. Trouble Shooting:
1. Receiving a message that the PO is part of a control group.
Resolution: None
Press the Enter key on your keyboard.
26. 2. Finalization not allowed because PO is fully liquidated
Resolution: None
Press the Enter key on your keyboard.
27. 3. Finalization not allowed because the AP Period is closed.
Resolution: If the GL Period is closed but the AP Period is Open, the user will be
able to finalize the PO Voucher successfully. However, if the AP Period is closed
then the user will not be able to finalize the PO Voucher.
NOTE: Warning message picture unavailable.
Press the Enter key on your keyboard.
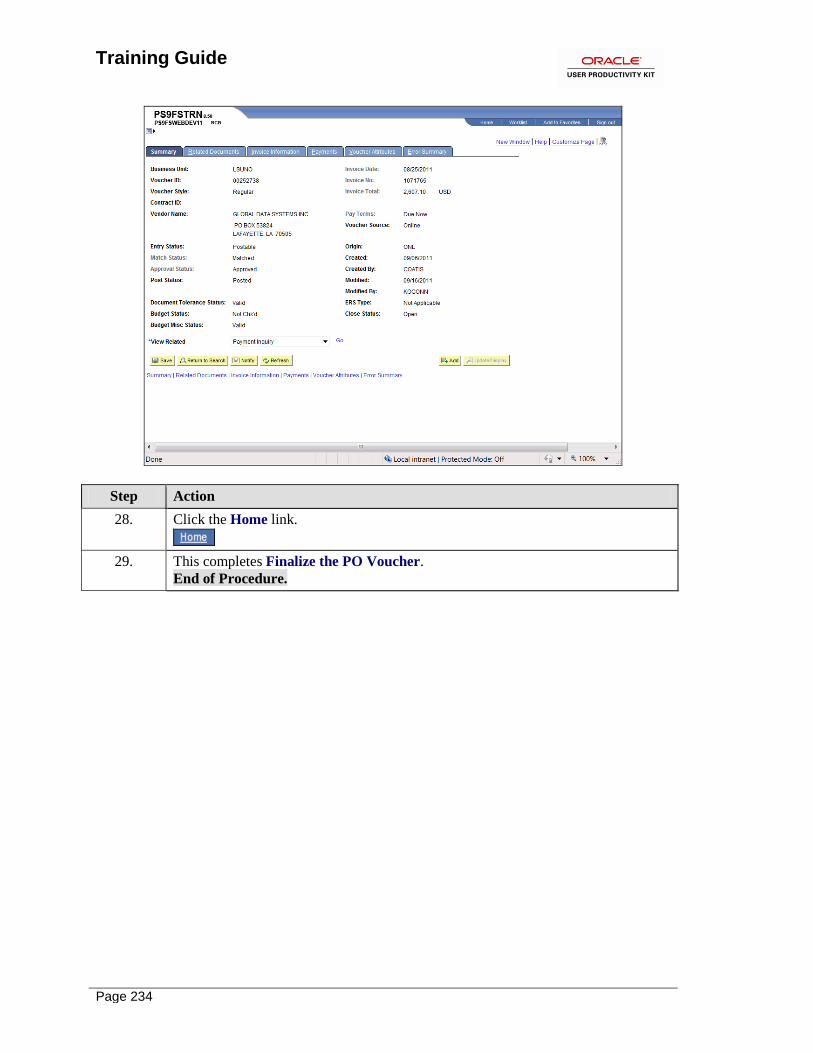
Training Guide
Page 234
Step Action
28. Click the Home link.
29. This completes Finalize the PO Voucher.
End of Procedure.
Training Guide
Page 235
Attach a Document to a Requisition, RFQ or Purchase Order
Attach a Document to a Requisition, RFQ or Purchase Order
Procedure
In this topic you will learn how to Attach a Document to a Requisitions, RFQ or Purchase
Order.
NOTE: For demonstration purposes the exercise outlines how to attach a document to a
requisition. The procedure is the same when attaching a document to a RFQ or PO.
Step Action
1. NOTE: Although PeopleSoft allows you to attach a document to a specific
Requisition, RFQ or PO, the document will not print when the Requisition, RFQ
or PO is dispatched or printed. You must print the attachment separately if you
wish to attach it to a hard copy of your document.
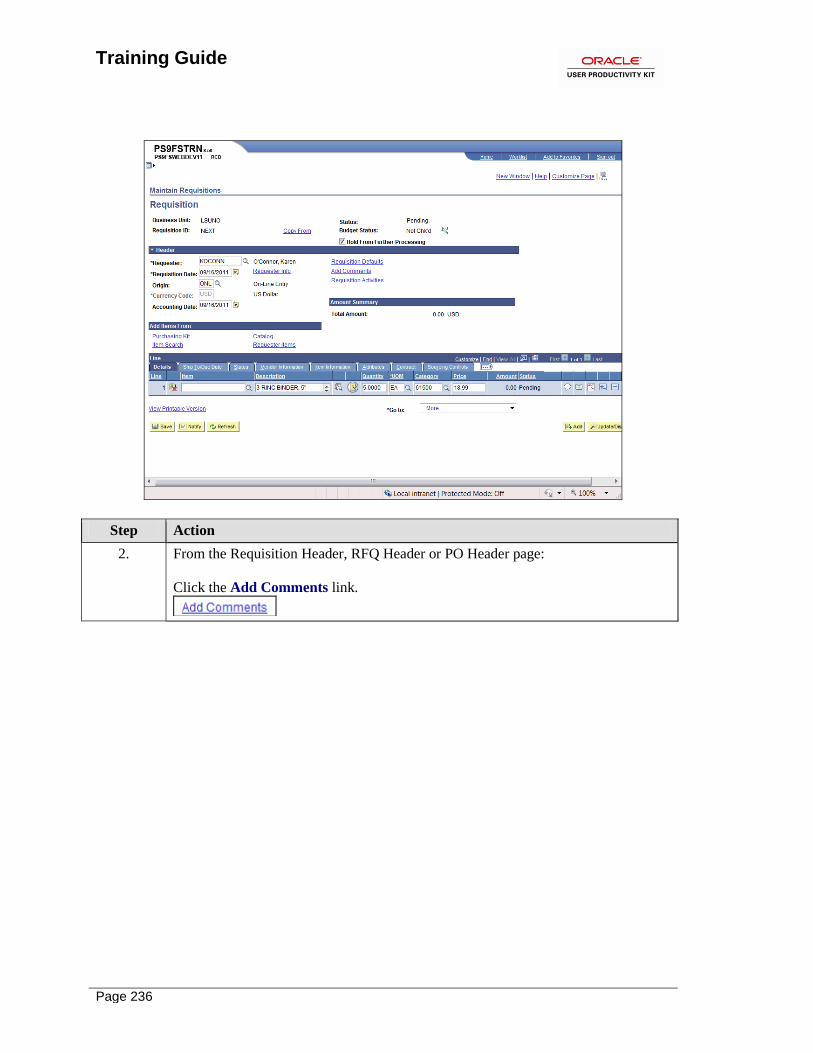
Training Guide
Page 236
Step Action
2. From the Requisition Header, RFQ Header or PO Header page:
Click the Add Comments link.
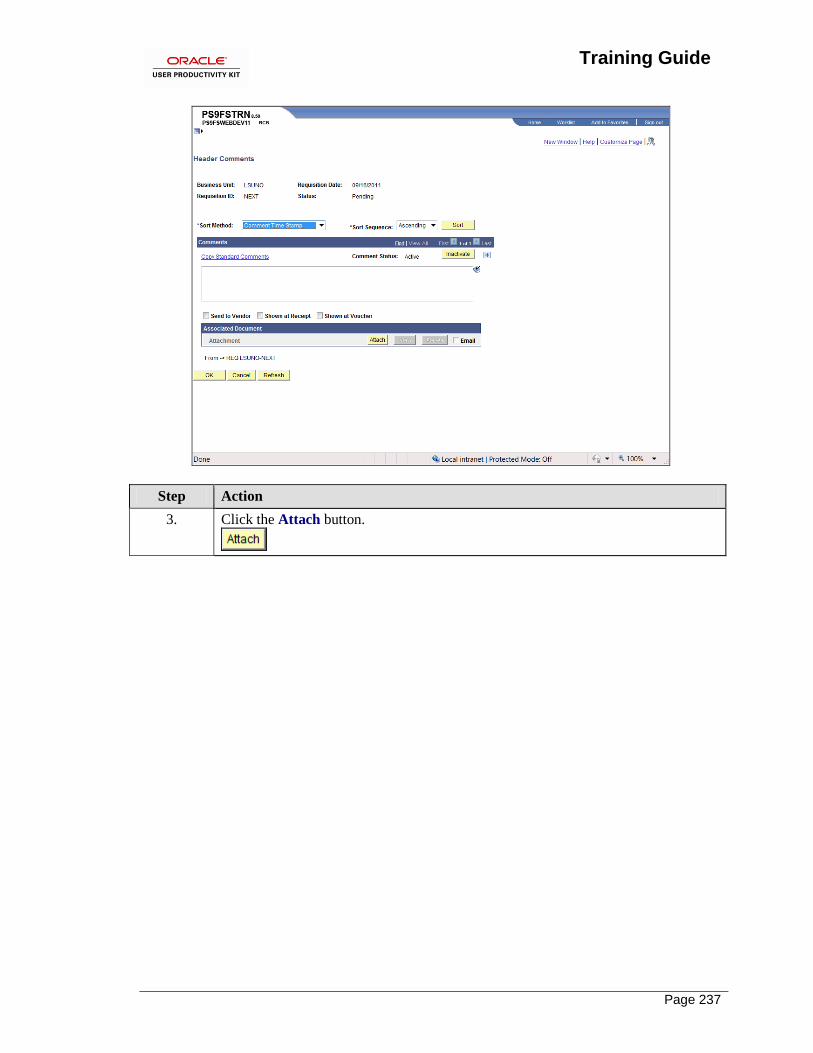
Training Guide
Page 237
Step Action
3. Click the Attach button.
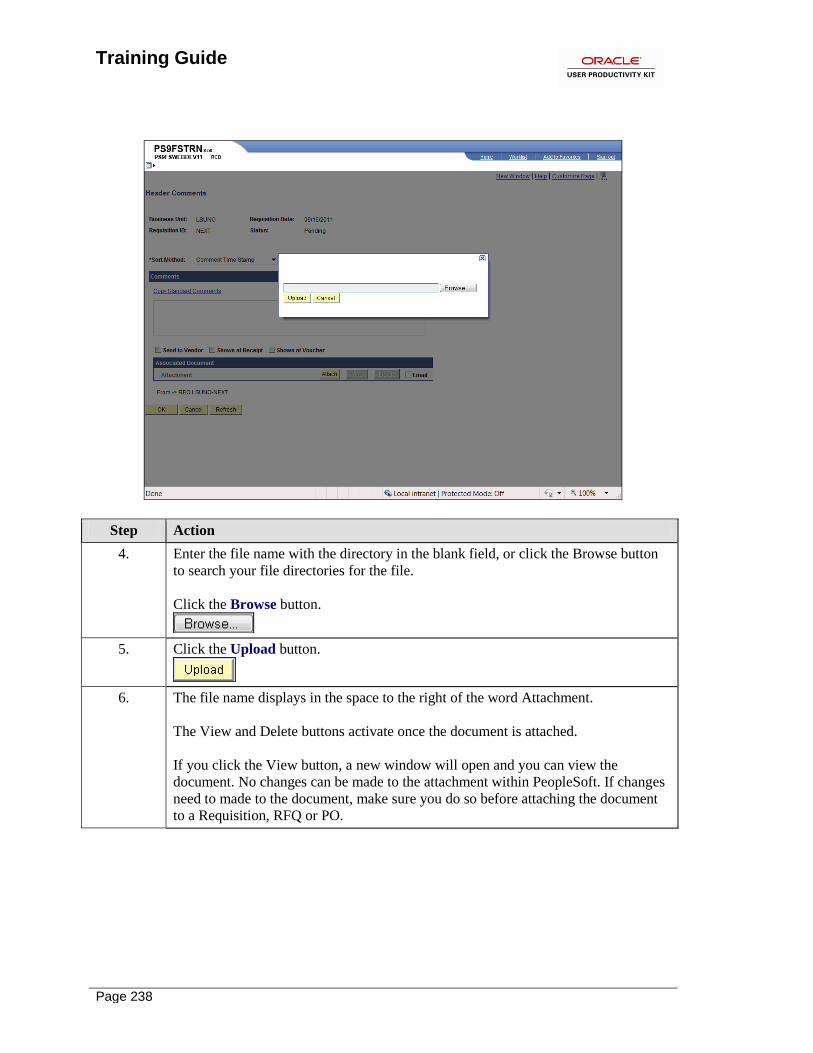
Training Guide
Page 238
Step Action
4. Enter the file name with the directory in the blank field, or click the Browse button
to search your file directories for the file.
Click the Browse button.
5. Click the Upload button.
6. The file name displays in the space to the right of the word Attachment.
The View and Delete buttons activate once the document is attached.
If you click the View button, a new window will open and you can view the
document. No changes can be made to the attachment within PeopleSoft. If changes
need to made to the document, make sure you do so before attaching the document
to a Requisition, RFQ or PO.
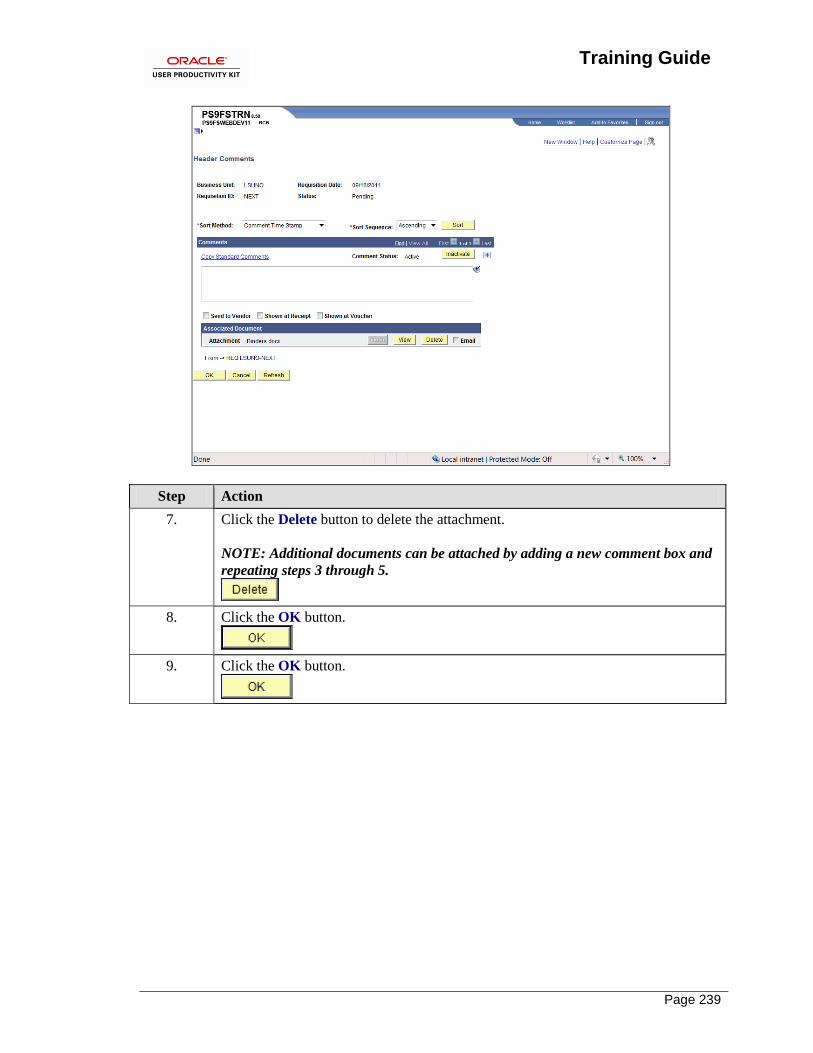
Training Guide
Page 239
Step Action
7. Click the Delete button to delete the attachment.
NOTE: Additional documents can be attached by adding a new comment box and
repeating steps 3 through 5.
8. Click the OK button.
9. Click the OK button.
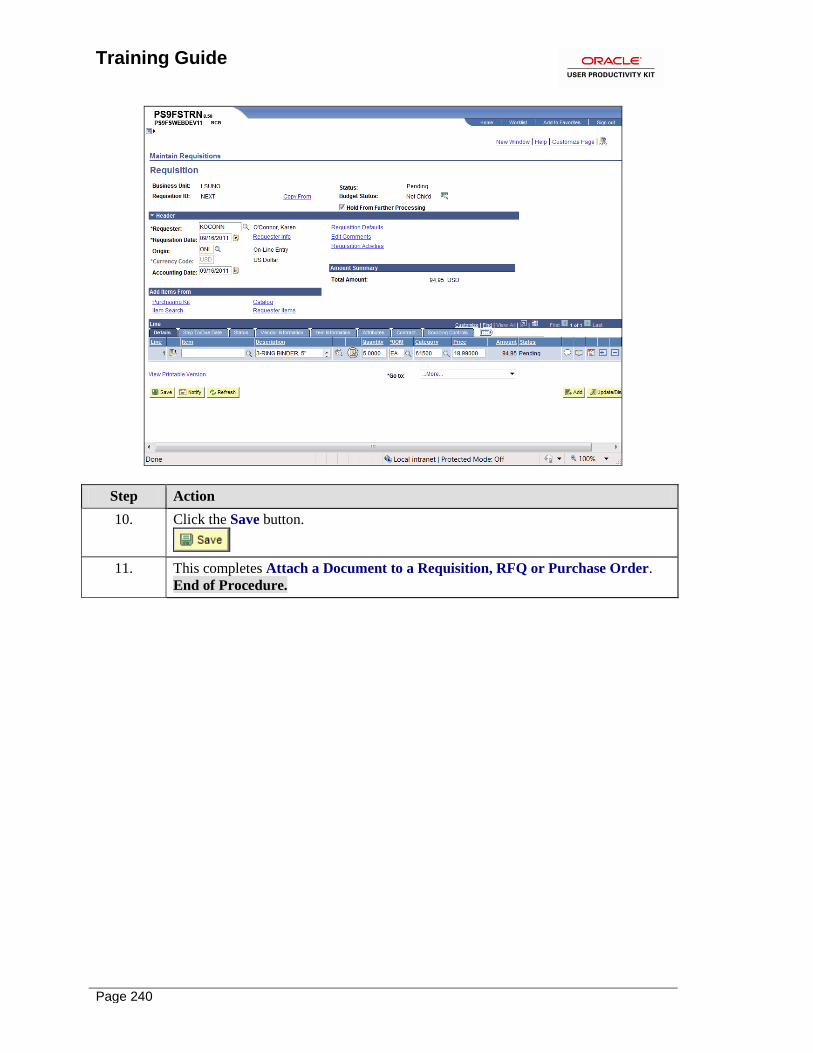
Training Guide
Page 240
Step Action
10. Click the Save button.
11. This completes Attach a Document to a Requisition, RFQ or Purchase Order.
End of Procedure.
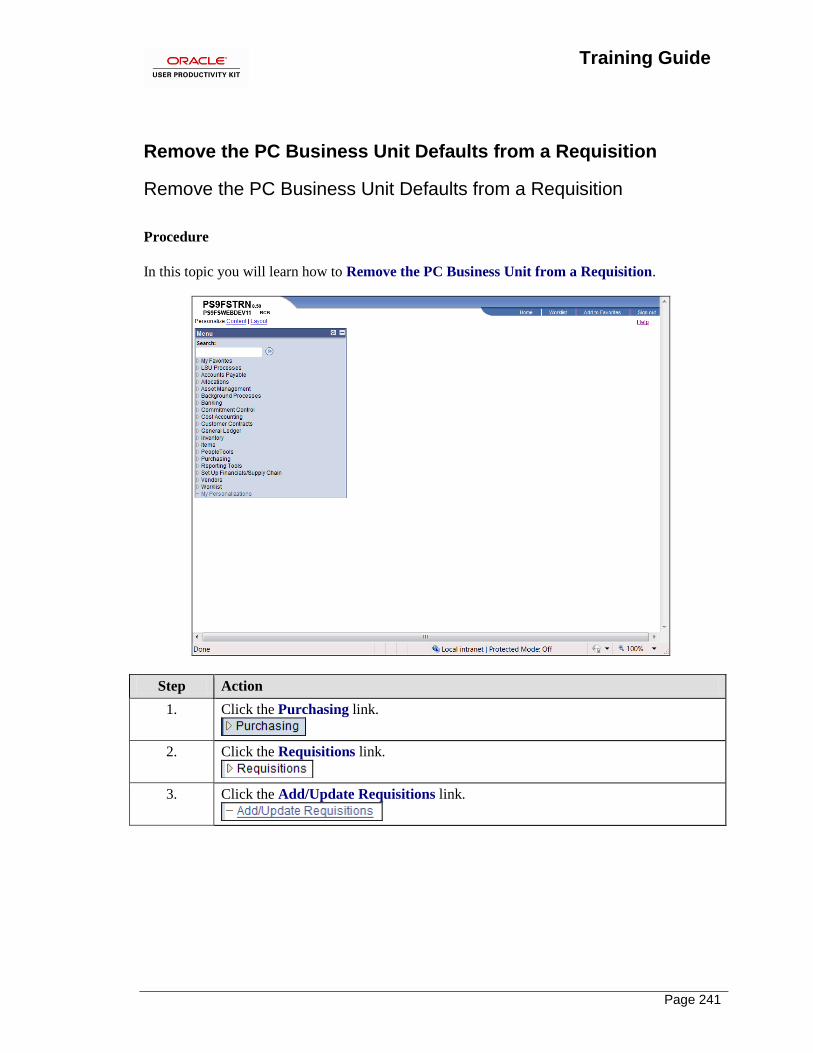
Training Guide
Page 241
Remove the PC Business Unit Defaults from a Requisition
Remove the PC Business Unit Defaults from a Requisition
Procedure
In this topic you will learn how to Remove the PC Business Unit from a Requisition.
Step Action
1. Click the Purchasing link.
2. Click the Requisitions link.
3. Click the Add/Update Requisitions link.

Training Guide
Page 242
Step Action
4. Click the Find an Existing Value link.
5. Enter the desired information into the Requisition ID field. Enter "0081667".
6. Click the Search button.
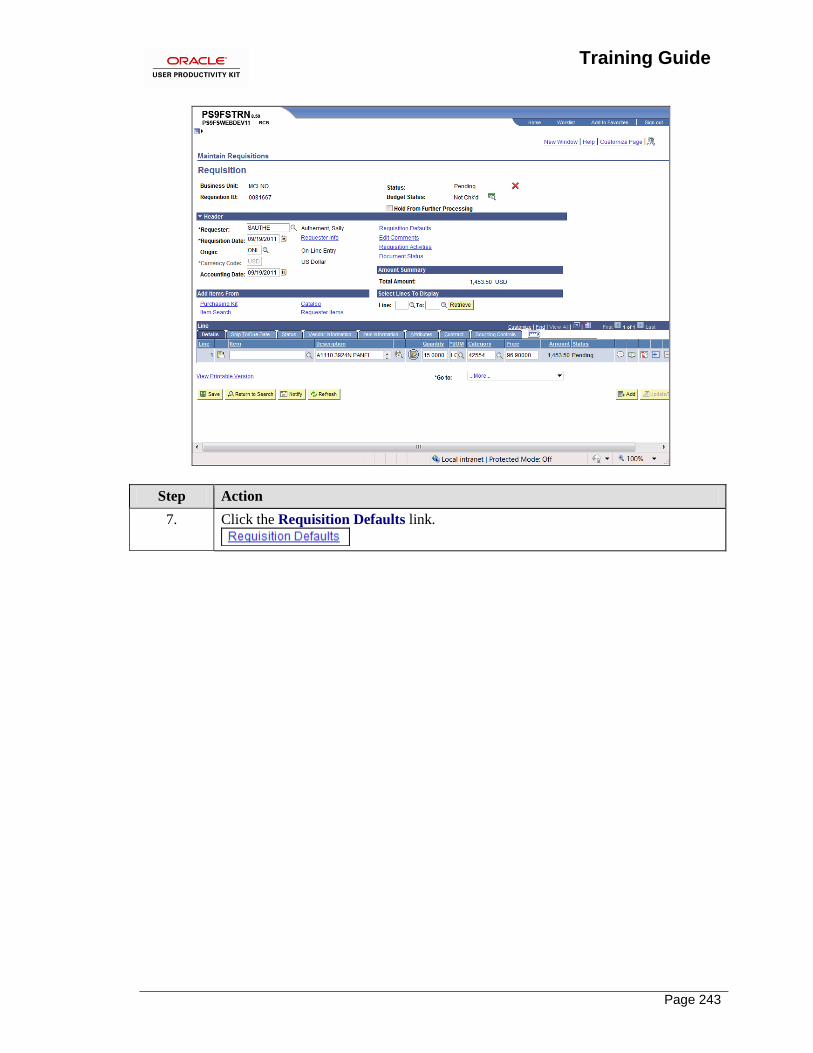
Training Guide
Page 243
Step Action
7. Click the Requisition Defaults link.
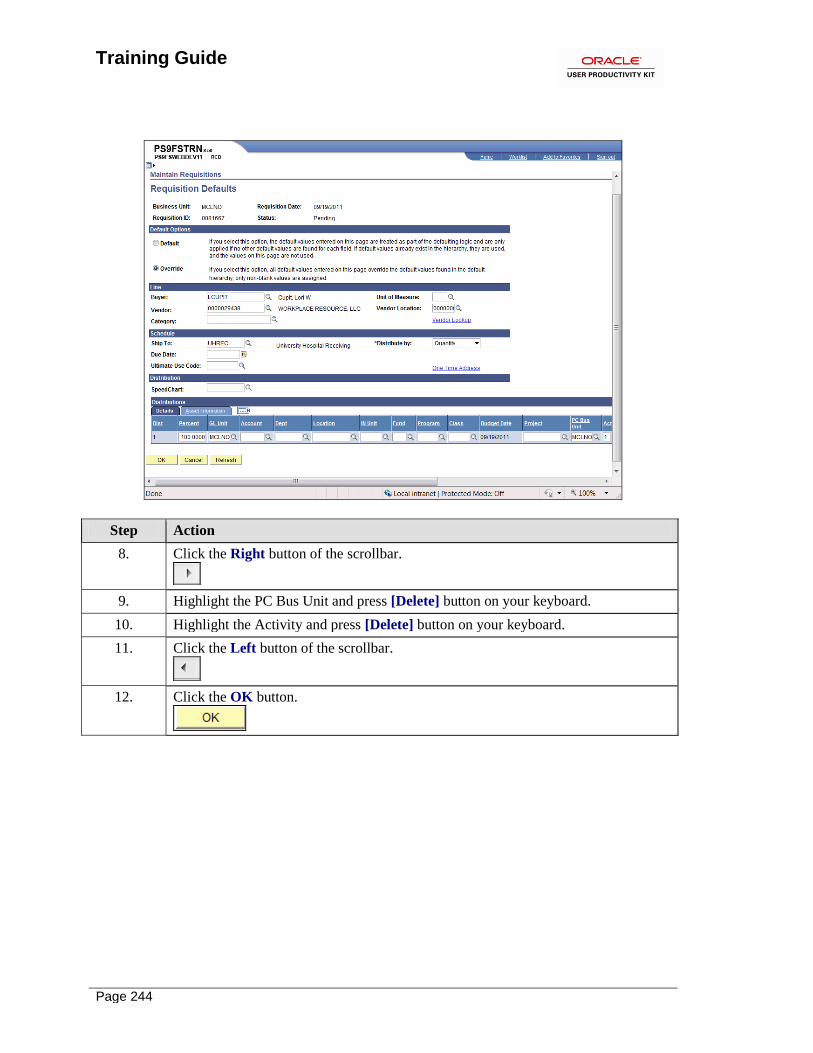
Training Guide
Page 244
Step Action
8. Click the Right button of the scrollbar.
9. Highlight the PC Bus Unit and press [Delete] button on your keyboard.
10. Highlight the Activity and press [Delete] button on your keyboard.
11. Click the Left button of the scrollbar.
12. Click the OK button.

Training Guide
Page 245
Step Action
13. Click the Mark All link.
14. Click the OK button.
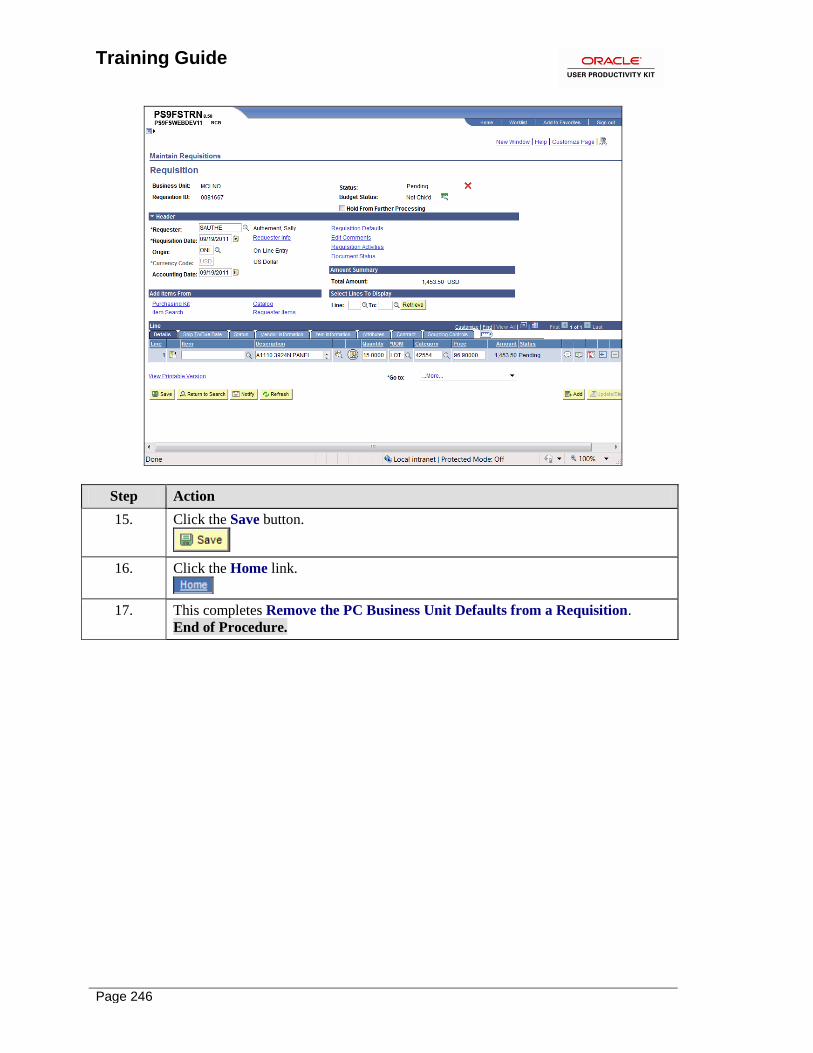
Training Guide
Page 246
Step Action
15. Click the Save button.
16. Click the Home link.
17. This completes Remove the PC Business Unit Defaults from a Requisition.
End of Procedure.
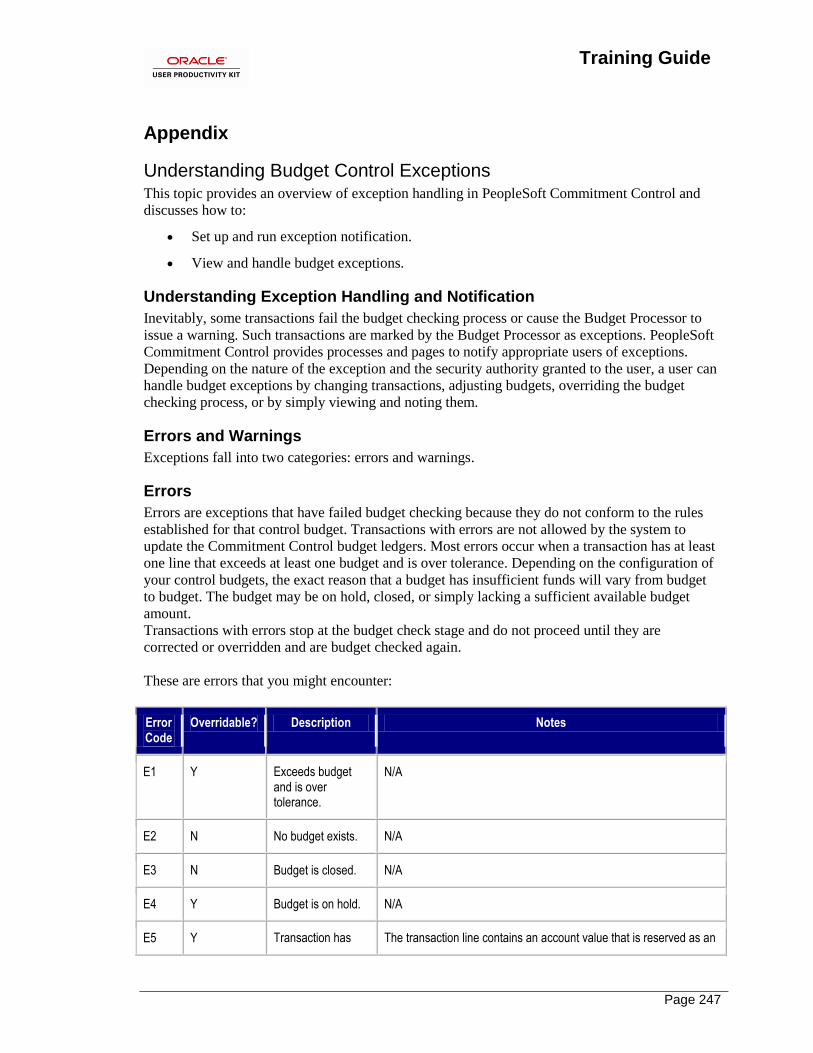
Training Guide
Page 247
Appendix
Understanding Budget Control Exceptions This topic provides an overview of exception handling in PeopleSoft Commitment Control and
discusses how to:
Set up and run exception notification.
View and handle budget exceptions.
Understanding Exception Handling and Notification
Inevitably, some transactions fail the budget checking process or cause the Budget Processor to
issue a warning. Such transactions are marked by the Budget Processor as exceptions. PeopleSoft
Commitment Control provides processes and pages to notify appropriate users of exceptions.
Depending on the nature of the exception and the security authority granted to the user, a user can
handle budget exceptions by changing transactions, adjusting budgets, overriding the budget
checking process, or by simply viewing and noting them.
Errors and Warnings
Exceptions fall into two categories: errors and warnings.
Errors
Errors are exceptions that have failed budget checking because they do not conform to the rules
established for that control budget. Transactions with errors are not allowed by the system to
update the Commitment Control budget ledgers. Most errors occur when a transaction has at least
one line that exceeds at least one budget and is over tolerance. Depending on the configuration of
your control budgets, the exact reason that a budget has insufficient funds will vary from budget
to budget. The budget may be on hold, closed, or simply lacking a sufficient available budget
amount.
Transactions with errors stop at the budget check stage and do not proceed until they are
corrected or overridden and are budget checked again.
These are errors that you might encounter:
Error Code
Overridable? Description Notes
E1 Y Exceeds budget and is over tolerance.
N/A
E2 N No budget exists. N/A
E3 N Budget is closed. N/A
E4 Y Budget is on hold. N/A
E5 Y Transaction has The transaction line contains an account value that is reserved as an
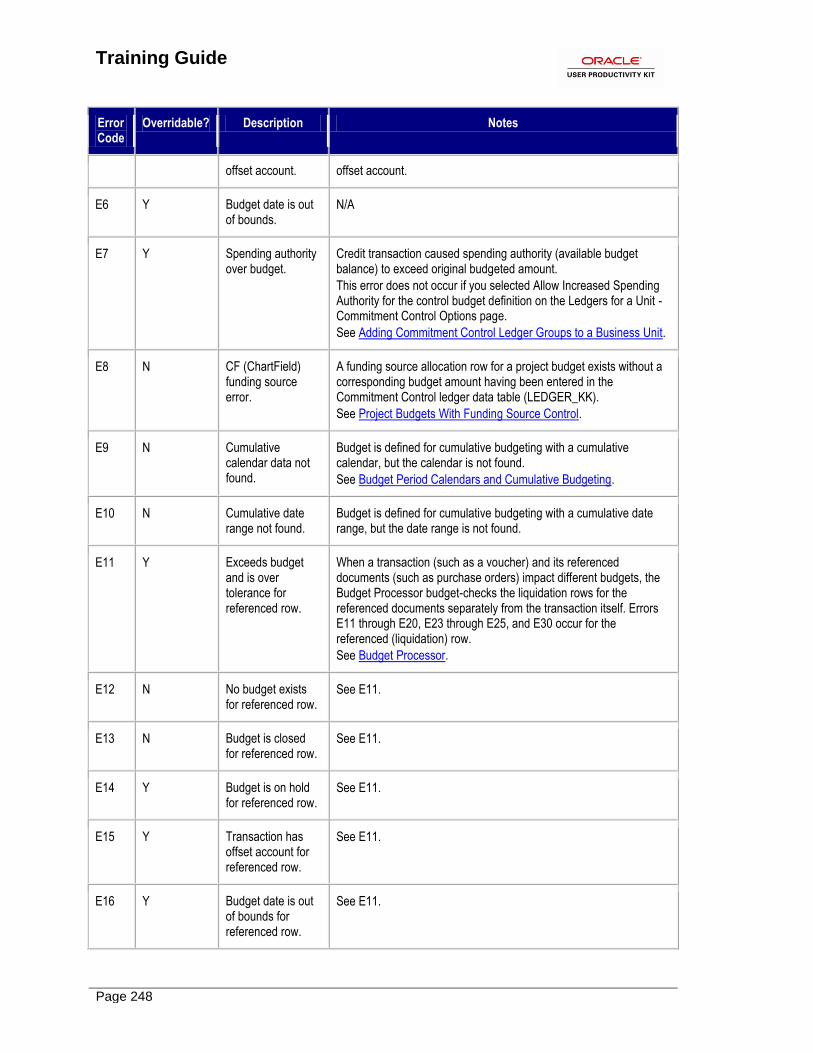
Training Guide
Page 248
Error Code
Overridable? Description Notes
offset account. offset account.
E6 Y Budget date is out of bounds.
N/A
E7 Y Spending authority over budget.
Credit transaction caused spending authority (available budget balance) to exceed original budgeted amount.
This error does not occur if you selected Allow Increased Spending Authority for the control budget definition on the Ledgers for a Unit - Commitment Control Options page.
See Adding Commitment Control Ledger Groups to a Business Unit.
E8 N CF (ChartField) funding source error.
A funding source allocation row for a project budget exists without a corresponding budget amount having been entered in the Commitment Control ledger data table (LEDGER_KK).
See Project Budgets With Funding Source Control.
E9 N Cumulative calendar data not found.
Budget is defined for cumulative budgeting with a cumulative calendar, but the calendar is not found.
See Budget Period Calendars and Cumulative Budgeting.
E10 N Cumulative date range not found.
Budget is defined for cumulative budgeting with a cumulative date range, but the date range is not found.
E11 Y Exceeds budget and is over tolerance for referenced row.
When a transaction (such as a voucher) and its referenced documents (such as purchase orders) impact different budgets, the Budget Processor budget-checks the liquidation rows for the referenced documents separately from the transaction itself. Errors E11 through E20, E23 through E25, and E30 occur for the referenced (liquidation) row.
See Budget Processor.
E12 N No budget exists for referenced row.
See E11.
E13 N Budget is closed for referenced row.
See E11.
E14 Y Budget is on hold for referenced row.
See E11.
E15 Y Transaction has offset account for referenced row.
See E11.
E16 Y Budget date is out of bounds for referenced row.
See E11.
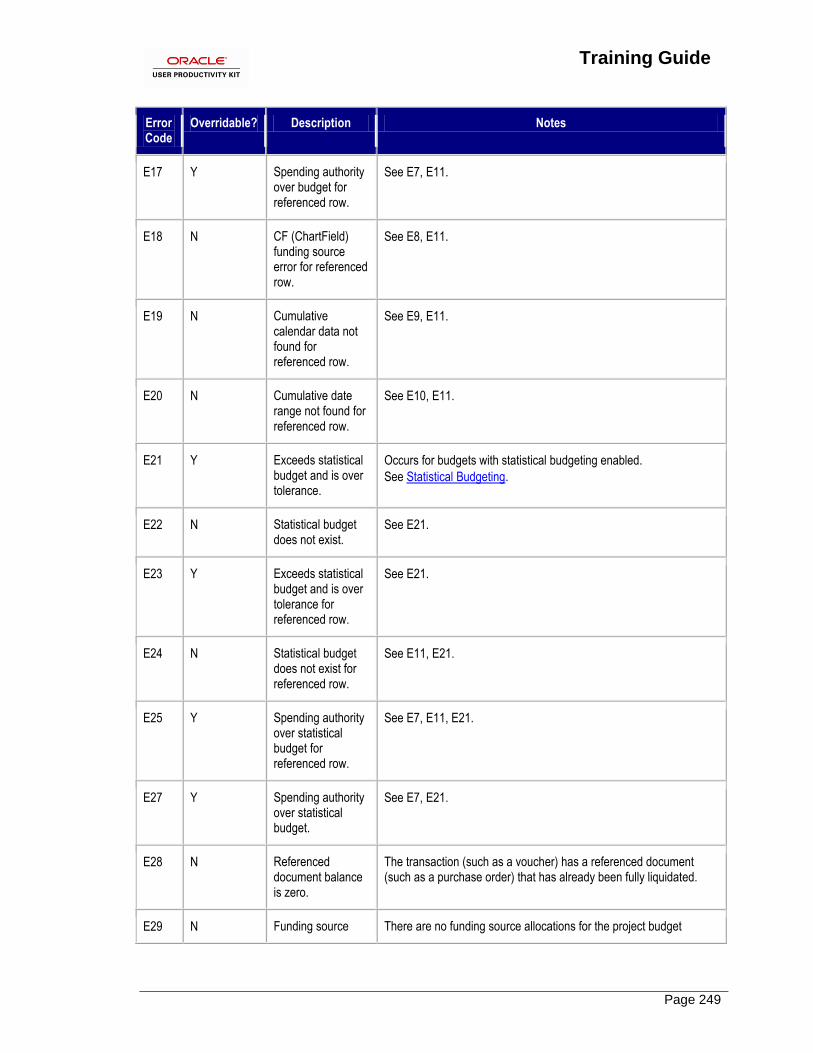
Training Guide
Page 249
Error Code
Overridable? Description Notes
E17 Y Spending authority over budget for referenced row.
See E7, E11.
E18 N CF (ChartField) funding source error for referenced row.
See E8, E11.
E19 N Cumulative calendar data not found for referenced row.
See E9, E11.
E20 N Cumulative date range not found for referenced row.
See E10, E11.
E21 Y Exceeds statistical budget and is over tolerance.
Occurs for budgets with statistical budgeting enabled.
See Statistical Budgeting.
E22 N Statistical budget does not exist.
See E21.
E23 Y Exceeds statistical budget and is over tolerance for referenced row.
See E21.
E24 N Statistical budget does not exist for referenced row.
See E11, E21.
E25 Y Spending authority over statistical budget for referenced row.
See E7, E11, E21.
E27 Y Spending authority over statistical budget.
See E7, E21.
E28 N Referenced document balance is zero.
The transaction (such as a voucher) has a referenced document (such as a purchase order) that has already been fully liquidated.
E29 N Funding source There are no funding source allocations for the project budget
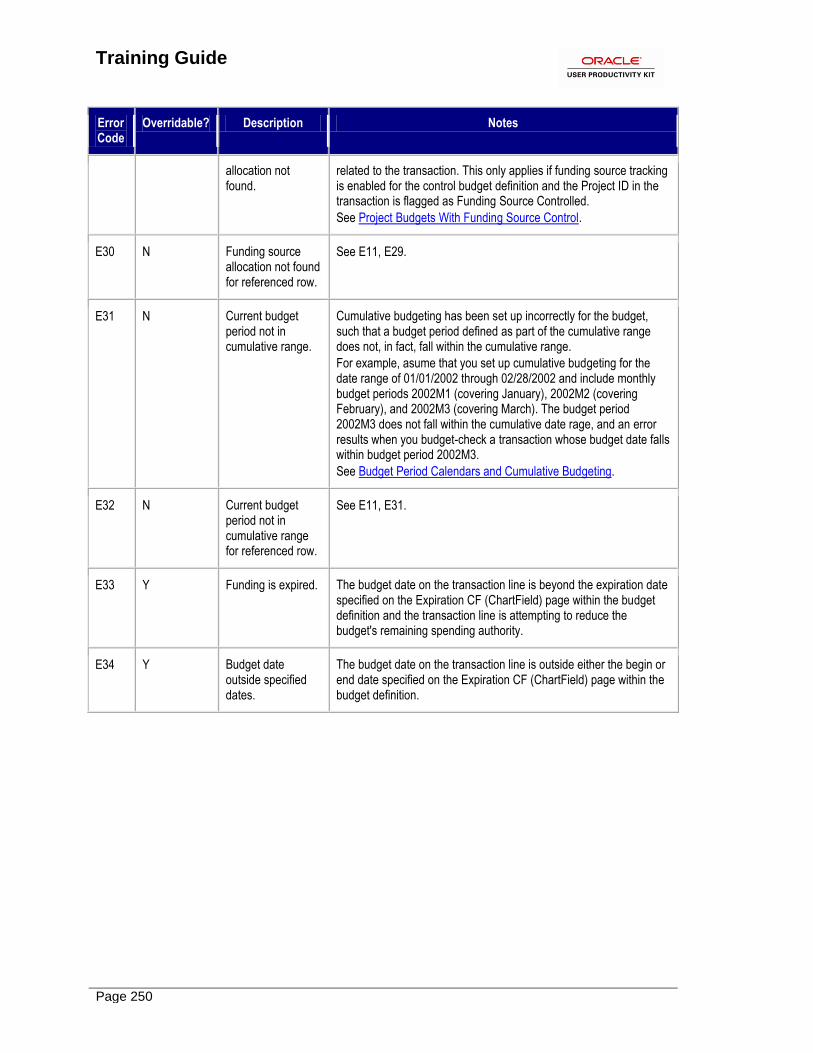
Training Guide
Page 250
Error Code
Overridable? Description Notes
allocation not found.
related to the transaction. This only applies if funding source tracking is enabled for the control budget definition and the Project ID in the transaction is flagged as Funding Source Controlled.
See Project Budgets With Funding Source Control.
E30 N Funding source allocation not found for referenced row.
See E11, E29.
E31 N Current budget period not in cumulative range.
Cumulative budgeting has been set up incorrectly for the budget, such that a budget period defined as part of the cumulative range does not, in fact, fall within the cumulative range.
For example, asume that you set up cumulative budgeting for the date range of 01/01/2002 through 02/28/2002 and include monthly budget periods 2002M1 (covering January), 2002M2 (covering February), and 2002M3 (covering March). The budget period 2002M3 does not fall within the cumulative date rage, and an error results when you budget-check a transaction whose budget date falls within budget period 2002M3.
See Budget Period Calendars and Cumulative Budgeting.
E32 N Current budget period not in cumulative range for referenced row.
See E11, E31.
E33 Y Funding is expired. The budget date on the transaction line is beyond the expiration date specified on the Expiration CF (ChartField) page within the budget definition and the transaction line is attempting to reduce the budget's remaining spending authority.
E34 Y Budget date outside specified dates.
The budget date on the transaction line is outside either the begin or end date specified on the Expiration CF (ChartField) page within the budget definition.
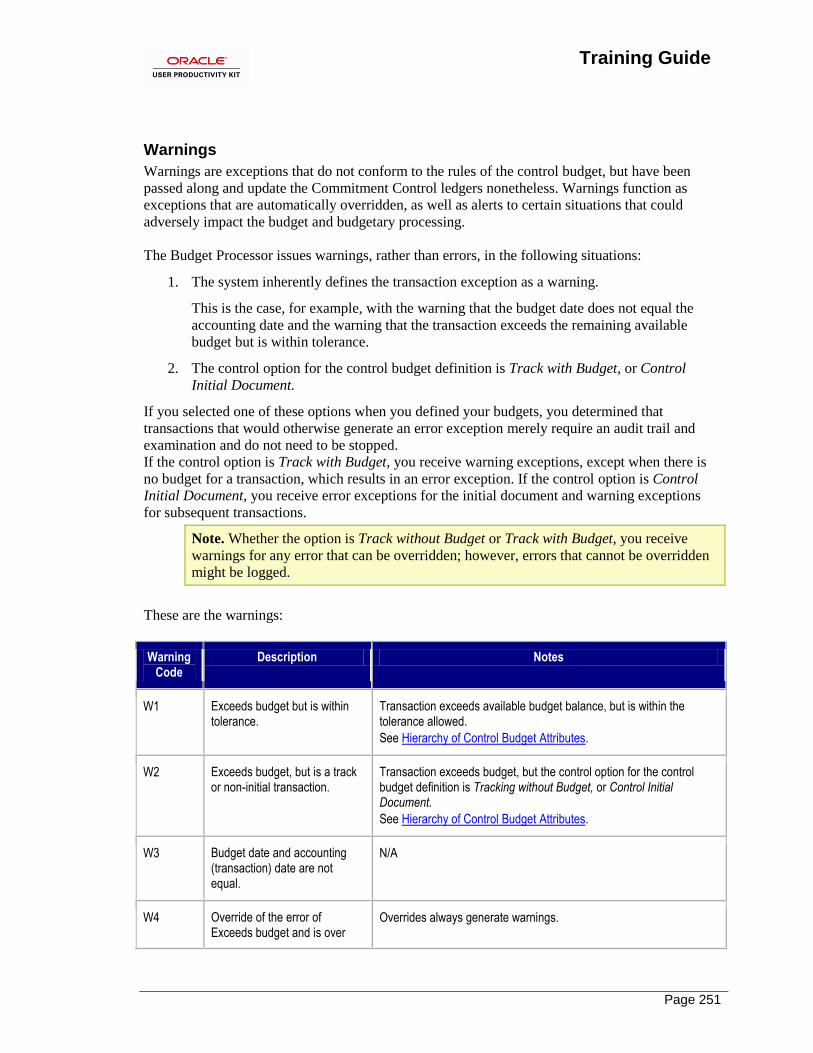
Training Guide
Page 251
Warnings
Warnings are exceptions that do not conform to the rules of the control budget, but have been
passed along and update the Commitment Control ledgers nonetheless. Warnings function as
exceptions that are automatically overridden, as well as alerts to certain situations that could
adversely impact the budget and budgetary processing.
The Budget Processor issues warnings, rather than errors, in the following situations:
1. The system inherently defines the transaction exception as a warning.
This is the case, for example, with the warning that the budget date does not equal the
accounting date and the warning that the transaction exceeds the remaining available
budget but is within tolerance.
2. The control option for the control budget definition is Track with Budget, or Control
Initial Document.
If you selected one of these options when you defined your budgets, you determined that
transactions that would otherwise generate an error exception merely require an audit trail and
examination and do not need to be stopped.
If the control option is Track with Budget, you receive warning exceptions, except when there is
no budget for a transaction, which results in an error exception. If the control option is Control
Initial Document, you receive error exceptions for the initial document and warning exceptions
for subsequent transactions.
Note. Whether the option is Track without Budget or Track with Budget, you receive
warnings for any error that can be overridden; however, errors that cannot be overridden
might be logged.
These are the warnings:
Warning Code
Description Notes
W1 Exceeds budget but is within tolerance.
Transaction exceeds available budget balance, but is within the tolerance allowed.
See Hierarchy of Control Budget Attributes.
W2 Exceeds budget, but is a track or non-initial transaction.
Transaction exceeds budget, but the control option for the control budget definition is Tracking without Budget, or Control Initial Document.
See Hierarchy of Control Budget Attributes.
W3 Budget date and accounting (transaction) date are not equal.
N/A
W4 Override of the error of Exceeds budget and is over
Overrides always generate warnings.
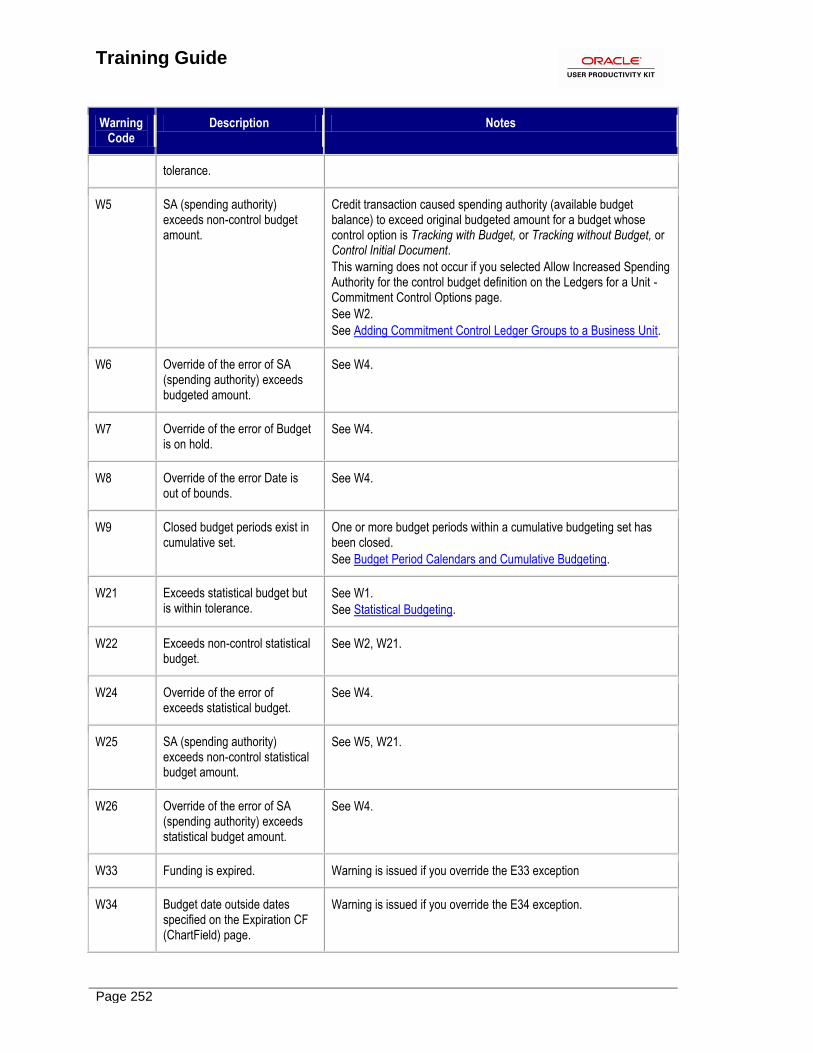
Training Guide
Page 252
Warning Code
Description Notes
tolerance.
W5 SA (spending authority) exceeds non-control budget amount.
Credit transaction caused spending authority (available budget balance) to exceed original budgeted amount for a budget whose control option is Tracking with Budget, or Tracking without Budget, or Control Initial Document.
This warning does not occur if you selected Allow Increased Spending Authority for the control budget definition on the Ledgers for a Unit - Commitment Control Options page.
See W2.
See Adding Commitment Control Ledger Groups to a Business Unit.
W6 Override of the error of SA (spending authority) exceeds budgeted amount.
See W4.
W7 Override of the error of Budget is on hold.
See W4.
W8 Override of the error Date is out of bounds.
See W4.
W9 Closed budget periods exist in cumulative set.
One or more budget periods within a cumulative budgeting set has been closed.
See Budget Period Calendars and Cumulative Budgeting.
W21 Exceeds statistical budget but is within tolerance.
See W1.
See Statistical Budgeting.
W22 Exceeds non-control statistical budget.
See W2, W21.
W24 Override of the error of exceeds statistical budget.
See W4.
W25 SA (spending authority) exceeds non-control statistical budget amount.
See W5, W21.
W26 Override of the error of SA (spending authority) exceeds statistical budget amount.
See W4.
W33 Funding is expired. Warning is issued if you override the E33 exception
W34 Budget date outside dates specified on the Expiration CF (ChartField) page.
Warning is issued if you override the E34 exception.
Training Guide
Page 253
Note. Early warnings, or notifications that a predefined percentage of a budget has been
committed for spending or spent, are not exceptions. You set them up on the Notify Preferences
page.

Training Guide
Page 254
Training Guide
Page 255
Frequently Asked Questions
Requisition Frequently Asked Questions
QUESTION ANSWER
I built a requisition and saved it but my
requisition did not build to my
approver’s worklist. What did I do
wrong?
There are a couple of situations that would result
in the requisition not moving to the worklist.
1) If the requisition is “on hold from further
processing” it will not move to the worklist.
Uncheck the hold flag if it is checked.
2) The application engine job that moves
requisitions to the worklist runs every 15
minutes throughout the day, beginning at 7:00
a.m. and ending at 5:00 p.m. on the hour, 15
minute, half hour, and forty-five minute marks.
Wait until the next scheduled time and then
check the worklist again. If the requisition is
still not on the approver’s worklist open a help
desk ticket. You will need to supply the BU,
Req ID, and UserID of the user whose worklist
the requisition should have built to.
My requisition will not budget check.
Why:
There are a few situations that would result in
your requisition not budget checking.
1) Verify that the requisition is not on hold
2) Verify that the requisition is at a status of
approved. Until the requisition is approved it
will not budget check.
3) If the budget check status is error navigate to
the Commitment Control pages to see why the
requisition failed budget check.
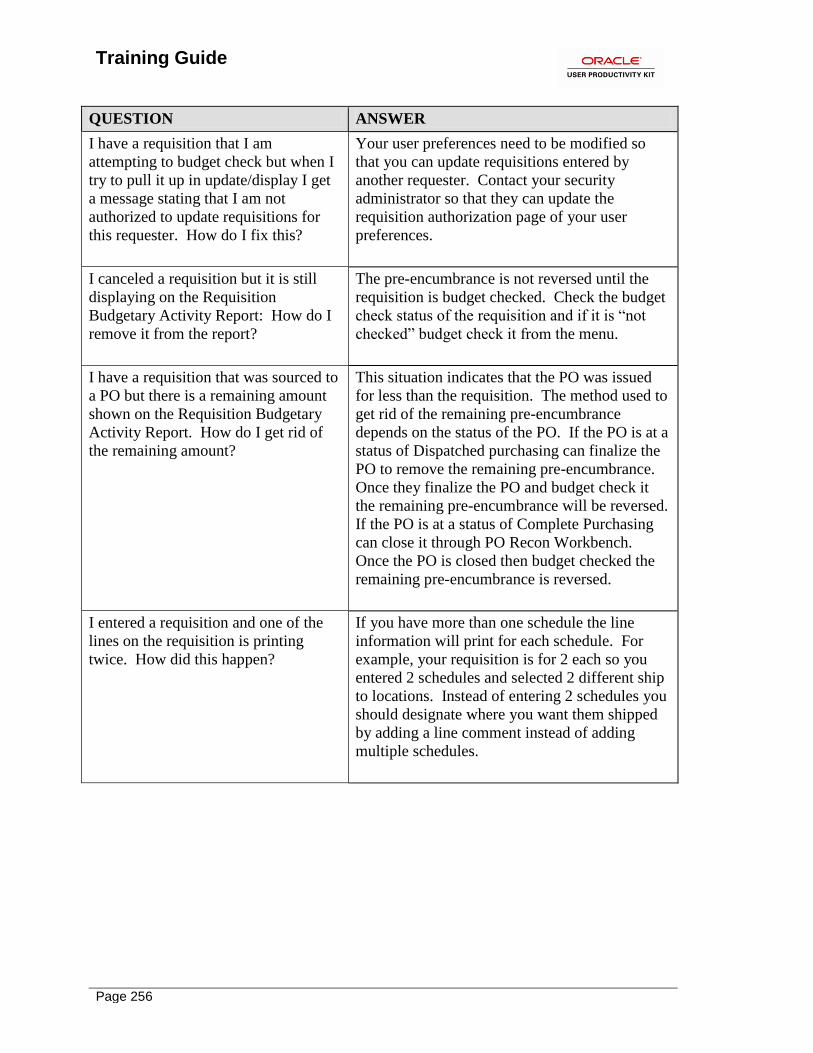
Training Guide
Page 256
QUESTION ANSWER
I have a requisition that I am
attempting to budget check but when I
try to pull it up in update/display I get
a message stating that I am not
authorized to update requisitions for
this requester. How do I fix this?
Your user preferences need to be modified so
that you can update requisitions entered by
another requester. Contact your security
administrator so that they can update the
requisition authorization page of your user
preferences.
I canceled a requisition but it is still
displaying on the Requisition
Budgetary Activity Report: How do I
remove it from the report?
The pre-encumbrance is not reversed until the
requisition is budget checked. Check the budget
check status of the requisition and if it is “not
checked” budget check it from the menu.
I have a requisition that was sourced to
a PO but there is a remaining amount
shown on the Requisition Budgetary
Activity Report. How do I get rid of
the remaining amount?
This situation indicates that the PO was issued
for less than the requisition. The method used to
get rid of the remaining pre-encumbrance
depends on the status of the PO. If the PO is at a
status of Dispatched purchasing can finalize the
PO to remove the remaining pre-encumbrance.
Once they finalize the PO and budget check it
the remaining pre-encumbrance will be reversed.
If the PO is at a status of Complete Purchasing
can close it through PO Recon Workbench.
Once the PO is closed then budget checked the
remaining pre-encumbrance is reversed.
I entered a requisition and one of the
lines on the requisition is printing
twice. How did this happen?
If you have more than one schedule the line
information will print for each schedule. For
example, your requisition is for 2 each so you
entered 2 schedules and selected 2 different ship
to locations. Instead of entering 2 schedules you
should designate where you want them shipped
by adding a line comment instead of adding
multiple schedules.
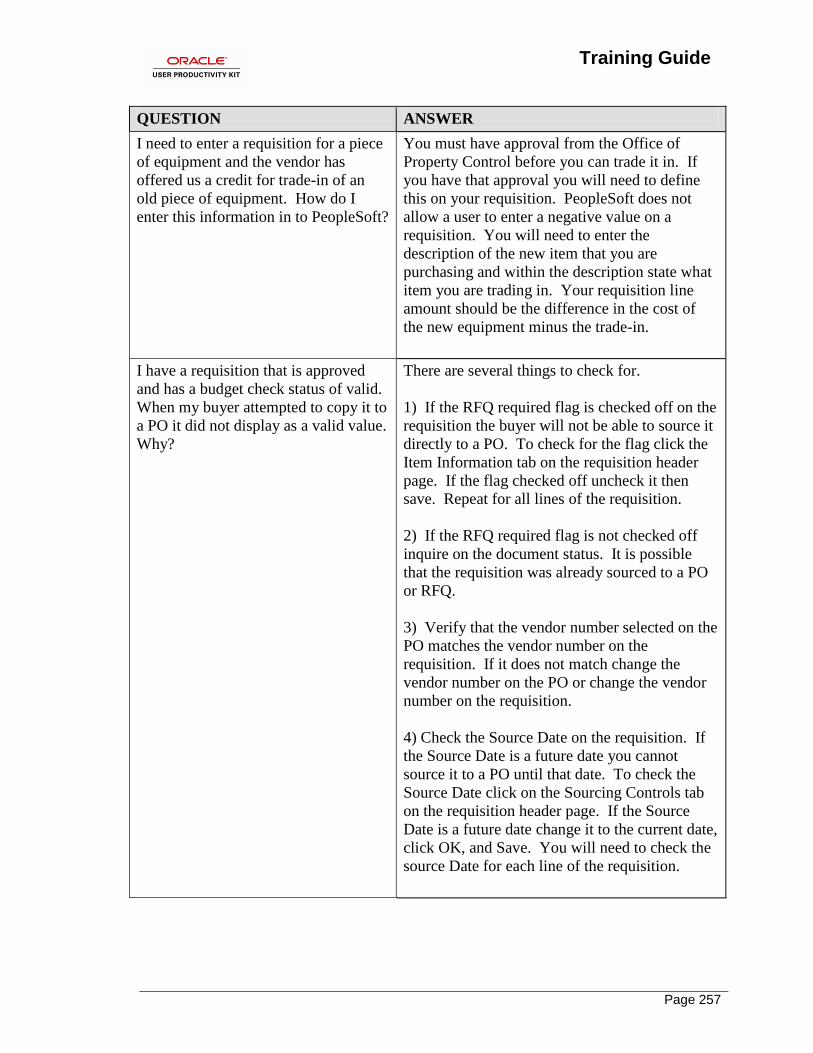
Training Guide
Page 257
QUESTION ANSWER
I need to enter a requisition for a piece
of equipment and the vendor has
offered us a credit for trade-in of an
old piece of equipment. How do I
enter this information in to PeopleSoft?
You must have approval from the Office of
Property Control before you can trade it in. If
you have that approval you will need to define
this on your requisition. PeopleSoft does not
allow a user to enter a negative value on a
requisition. You will need to enter the
description of the new item that you are
purchasing and within the description state what
item you are trading in. Your requisition line
amount should be the difference in the cost of
the new equipment minus the trade-in.
I have a requisition that is approved
and has a budget check status of valid.
When my buyer attempted to copy it to
a PO it did not display as a valid value.
Why?
There are several things to check for.
1) If the RFQ required flag is checked off on the
requisition the buyer will not be able to source it
directly to a PO. To check for the flag click the
Item Information tab on the requisition header
page. If the flag checked off uncheck it then
save. Repeat for all lines of the requisition.
2) If the RFQ required flag is not checked off
inquire on the document status. It is possible
that the requisition was already sourced to a PO
or RFQ.
3) Verify that the vendor number selected on the
PO matches the vendor number on the
requisition. If it does not match change the
vendor number on the PO or change the vendor
number on the requisition.
4) Check the Source Date on the requisition. If
the Source Date is a future date you cannot
source it to a PO until that date. To check the
Source Date click on the Sourcing Controls tab
on the requisition header page. If the Source
Date is a future date change it to the current date,
click OK, and Save. You will need to check the
source Date for each line of the requisition.
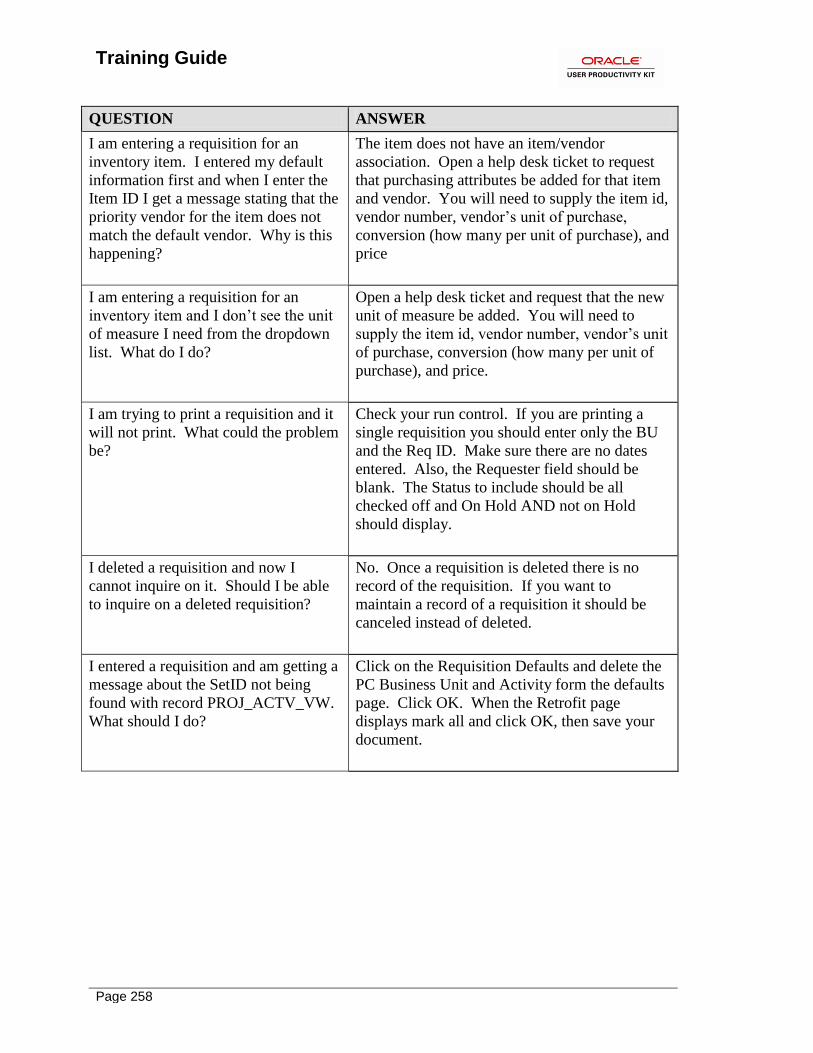
Training Guide
Page 258
QUESTION ANSWER
I am entering a requisition for an
inventory item. I entered my default
information first and when I enter the
Item ID I get a message stating that the
priority vendor for the item does not
match the default vendor. Why is this
happening?
The item does not have an item/vendor
association. Open a help desk ticket to request
that purchasing attributes be added for that item
and vendor. You will need to supply the item id,
vendor number, vendor’s unit of purchase,
conversion (how many per unit of purchase), and
price
I am entering a requisition for an
inventory item and I don’t see the unit
of measure I need from the dropdown
list. What do I do?
Open a help desk ticket and request that the new
unit of measure be added. You will need to
supply the item id, vendor number, vendor’s unit
of purchase, conversion (how many per unit of
purchase), and price.
I am trying to print a requisition and it
will not print. What could the problem
be?
Check your run control. If you are printing a
single requisition you should enter only the BU
and the Req ID. Make sure there are no dates
entered. Also, the Requester field should be
blank. The Status to include should be all
checked off and On Hold AND not on Hold
should display.
I deleted a requisition and now I
cannot inquire on it. Should I be able
to inquire on a deleted requisition?
No. Once a requisition is deleted there is no
record of the requisition. If you want to
maintain a record of a requisition it should be
canceled instead of deleted.
I entered a requisition and am getting a
message about the SetID not being
found with record PROJ_ACTV_VW.
What should I do?
Click on the Requisition Defaults and delete the
PC Business Unit and Activity form the defaults
page. Click OK. When the Retrofit page
displays mark all and click OK, then save your
document.
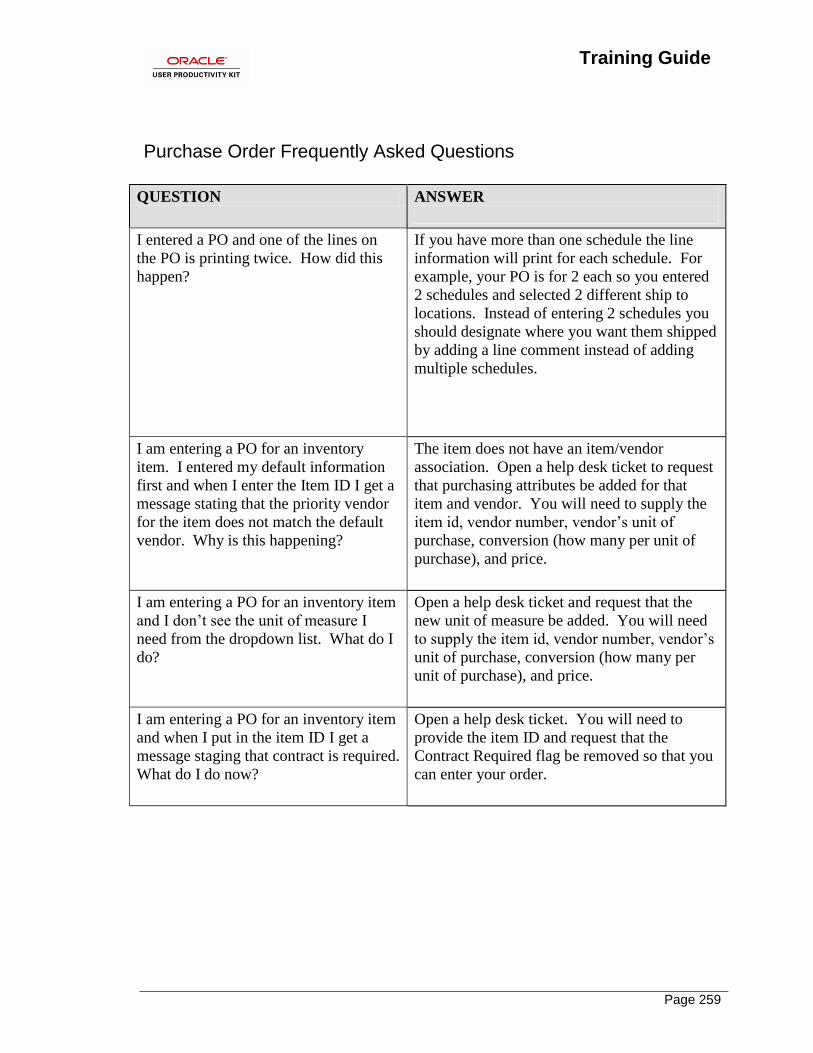
Training Guide
Page 259
Purchase Order Frequently Asked Questions
QUESTION ANSWER
I entered a PO and one of the lines on
the PO is printing twice. How did this
happen?
If you have more than one schedule the line
information will print for each schedule. For
example, your PO is for 2 each so you entered
2 schedules and selected 2 different ship to
locations. Instead of entering 2 schedules you
should designate where you want them shipped
by adding a line comment instead of adding
multiple schedules.
I am entering a PO for an inventory
item. I entered my default information
first and when I enter the Item ID I get a
message stating that the priority vendor
for the item does not match the default
vendor. Why is this happening?
The item does not have an item/vendor
association. Open a help desk ticket to request
that purchasing attributes be added for that
item and vendor. You will need to supply the
item id, vendor number, vendor’s unit of
purchase, conversion (how many per unit of
purchase), and price.
I am entering a PO for an inventory item
and I don’t see the unit of measure I
need from the dropdown list. What do I
do?
Open a help desk ticket and request that the
new unit of measure be added. You will need
to supply the item id, vendor number, vendor’s
unit of purchase, conversion (how many per
unit of purchase), and price.
I am entering a PO for an inventory item
and when I put in the item ID I get a
message staging that contract is required.
What do I do now?
Open a help desk ticket. You will need to
provide the item ID and request that the
Contract Required flag be removed so that you
can enter your order.
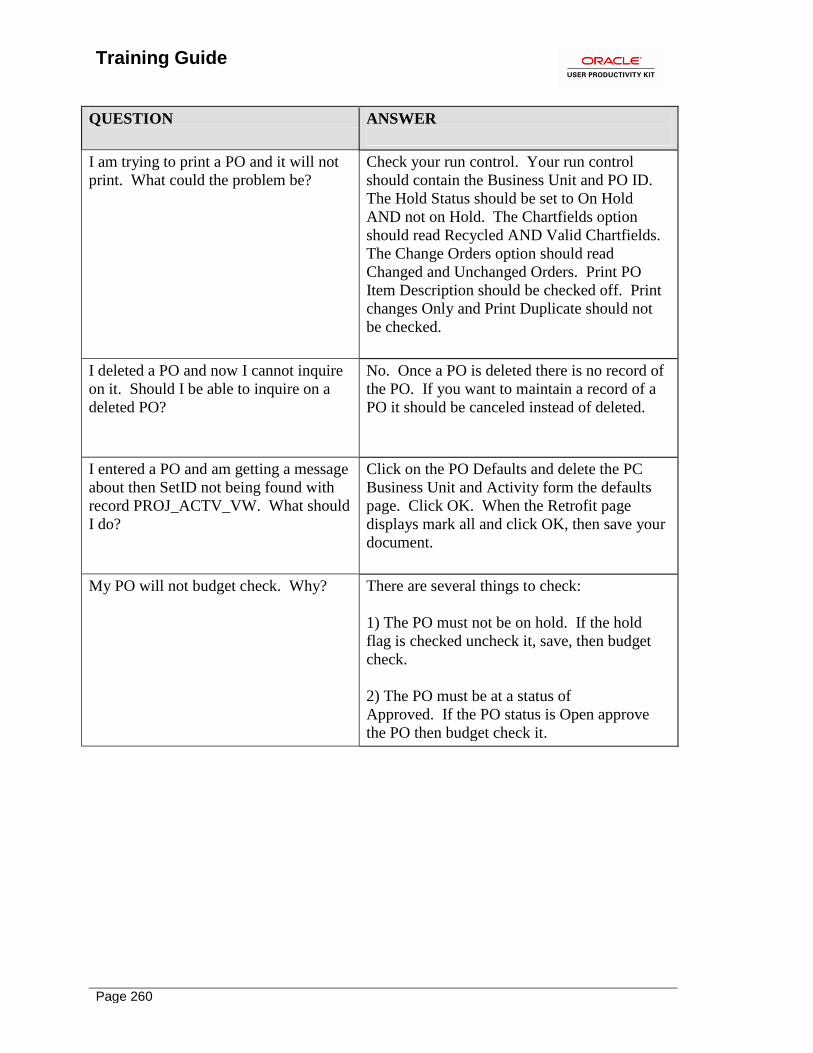
Training Guide
Page 260
QUESTION ANSWER
I am trying to print a PO and it will not
print. What could the problem be?
Check your run control. Your run control
should contain the Business Unit and PO ID.
The Hold Status should be set to On Hold
AND not on Hold. The Chartfields option
should read Recycled AND Valid Chartfields.
The Change Orders option should read
Changed and Unchanged Orders. Print PO
Item Description should be checked off. Print
changes Only and Print Duplicate should not
be checked.
I deleted a PO and now I cannot inquire
on it. Should I be able to inquire on a
deleted PO?
No. Once a PO is deleted there is no record of
the PO. If you want to maintain a record of a
PO it should be canceled instead of deleted.
I entered a PO and am getting a message
about then SetID not being found with
record PROJ_ACTV_VW. What should
I do?
Click on the PO Defaults and delete the PC
Business Unit and Activity form the defaults
page. Click OK. When the Retrofit page
displays mark all and click OK, then save your
document.
My PO will not budget check. Why? There are several things to check:
1) The PO must not be on hold. If the hold
flag is checked uncheck it, save, then budget
check.
2) The PO must be at a status of
Approved. If the PO status is Open approve
the PO then budget check it.
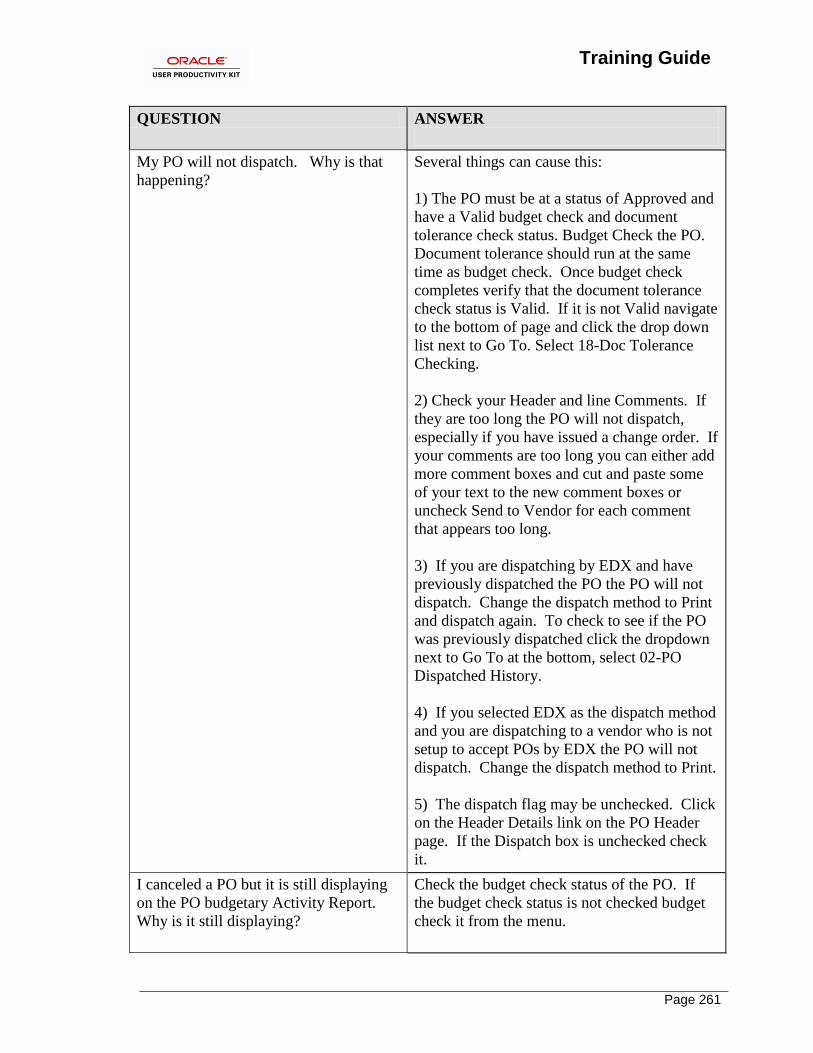
Training Guide
Page 261
QUESTION ANSWER
My PO will not dispatch. Why is that
happening?
Several things can cause this:
1) The PO must be at a status of Approved and
have a Valid budget check and document
tolerance check status. Budget Check the PO.
Document tolerance should run at the same
time as budget check. Once budget check
completes verify that the document tolerance
check status is Valid. If it is not Valid navigate
to the bottom of page and click the drop down
list next to Go To. Select 18-Doc Tolerance
Checking.
2) Check your Header and line Comments. If
they are too long the PO will not dispatch,
especially if you have issued a change order. If
your comments are too long you can either add
more comment boxes and cut and paste some
of your text to the new comment boxes or
uncheck Send to Vendor for each comment
that appears too long.
3) If you are dispatching by EDX and have
previously dispatched the PO the PO will not
dispatch. Change the dispatch method to Print
and dispatch again. To check to see if the PO
was previously dispatched click the dropdown
next to Go To at the bottom, select 02-PO
Dispatched History.
4) If you selected EDX as the dispatch method
and you are dispatching to a vendor who is not
setup to accept POs by EDX the PO will not
dispatch. Change the dispatch method to Print.
5) The dispatch flag may be unchecked. Click
on the Header Details link on the PO Header
page. If the Dispatch box is unchecked check
it.
I canceled a PO but it is still displaying
on the PO budgetary Activity Report.
Why is it still displaying?
Check the budget check status of the PO. If
the budget check status is not checked budget
check it from the menu.
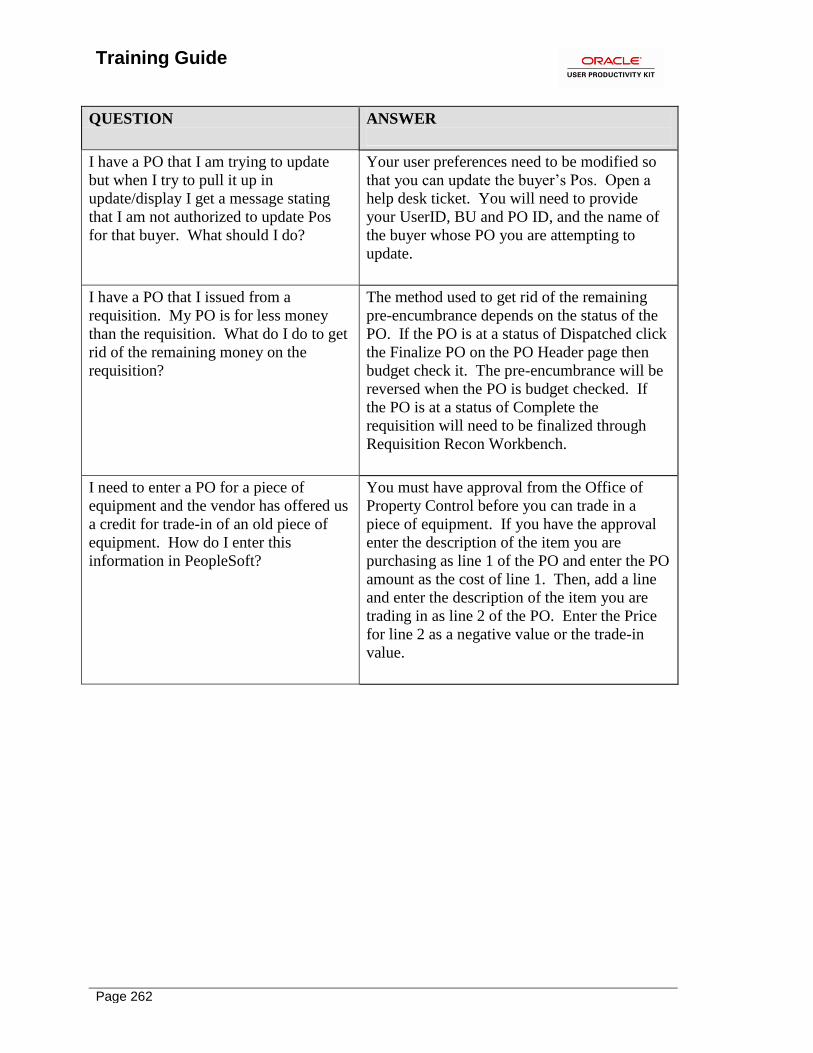
Training Guide
Page 262
QUESTION ANSWER
I have a PO that I am trying to update
but when I try to pull it up in
update/display I get a message stating
that I am not authorized to update Pos
for that buyer. What should I do?
Your user preferences need to be modified so
that you can update the buyer’s Pos. Open a
help desk ticket. You will need to provide
your UserID, BU and PO ID, and the name of
the buyer whose PO you are attempting to
update.
I have a PO that I issued from a
requisition. My PO is for less money
than the requisition. What do I do to get
rid of the remaining money on the
requisition?
The method used to get rid of the remaining
pre-encumbrance depends on the status of the
PO. If the PO is at a status of Dispatched click
the Finalize PO on the PO Header page then
budget check it. The pre-encumbrance will be
reversed when the PO is budget checked. If
the PO is at a status of Complete the
requisition will need to be finalized through
Requisition Recon Workbench.
I need to enter a PO for a piece of
equipment and the vendor has offered us
a credit for trade-in of an old piece of
equipment. How do I enter this
information in PeopleSoft?
You must have approval from the Office of
Property Control before you can trade in a
piece of equipment. If you have the approval
enter the description of the item you are
purchasing as line 1 of the PO and enter the PO
amount as the cost of line 1. Then, add a line
and enter the description of the item you are
trading in as line 2 of the PO. Enter the Price
for line 2 as a negative value or the trade-in
value.
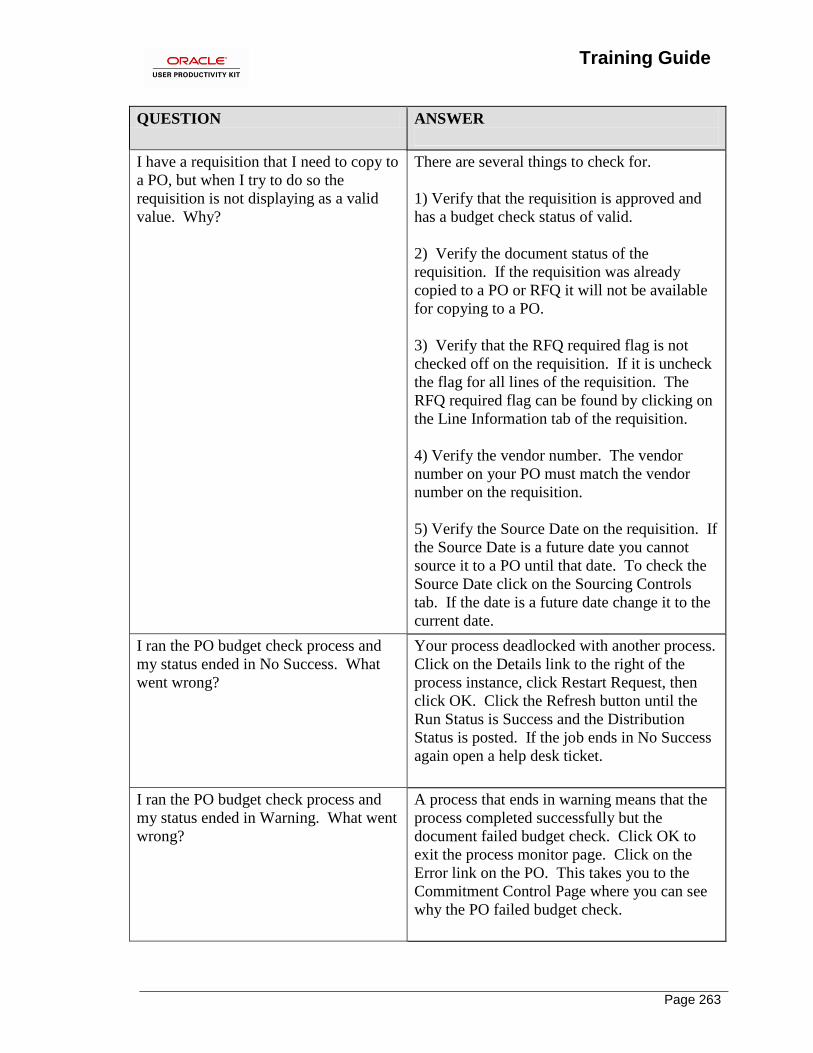
Training Guide
Page 263
QUESTION ANSWER
I have a requisition that I need to copy to
a PO, but when I try to do so the
requisition is not displaying as a valid
value. Why?
There are several things to check for.
1) Verify that the requisition is approved and
has a budget check status of valid.
2) Verify the document status of the
requisition. If the requisition was already
copied to a PO or RFQ it will not be available
for copying to a PO.
3) Verify that the RFQ required flag is not
checked off on the requisition. If it is uncheck
the flag for all lines of the requisition. The
RFQ required flag can be found by clicking on
the Line Information tab of the requisition.
4) Verify the vendor number. The vendor
number on your PO must match the vendor
number on the requisition.
5) Verify the Source Date on the requisition. If
the Source Date is a future date you cannot
source it to a PO until that date. To check the
Source Date click on the Sourcing Controls
tab. If the date is a future date change it to the
current date.
I ran the PO budget check process and
my status ended in No Success. What
went wrong?
Your process deadlocked with another process.
Click on the Details link to the right of the
process instance, click Restart Request, then
click OK. Click the Refresh button until the
Run Status is Success and the Distribution
Status is posted. If the job ends in No Success
again open a help desk ticket.
I ran the PO budget check process and
my status ended in Warning. What went
wrong?
A process that ends in warning means that the
process completed successfully but the
document failed budget check. Click OK to
exit the process monitor page. Click on the
Error link on the PO. This takes you to the
Commitment Control Page where you can see
why the PO failed budget check.
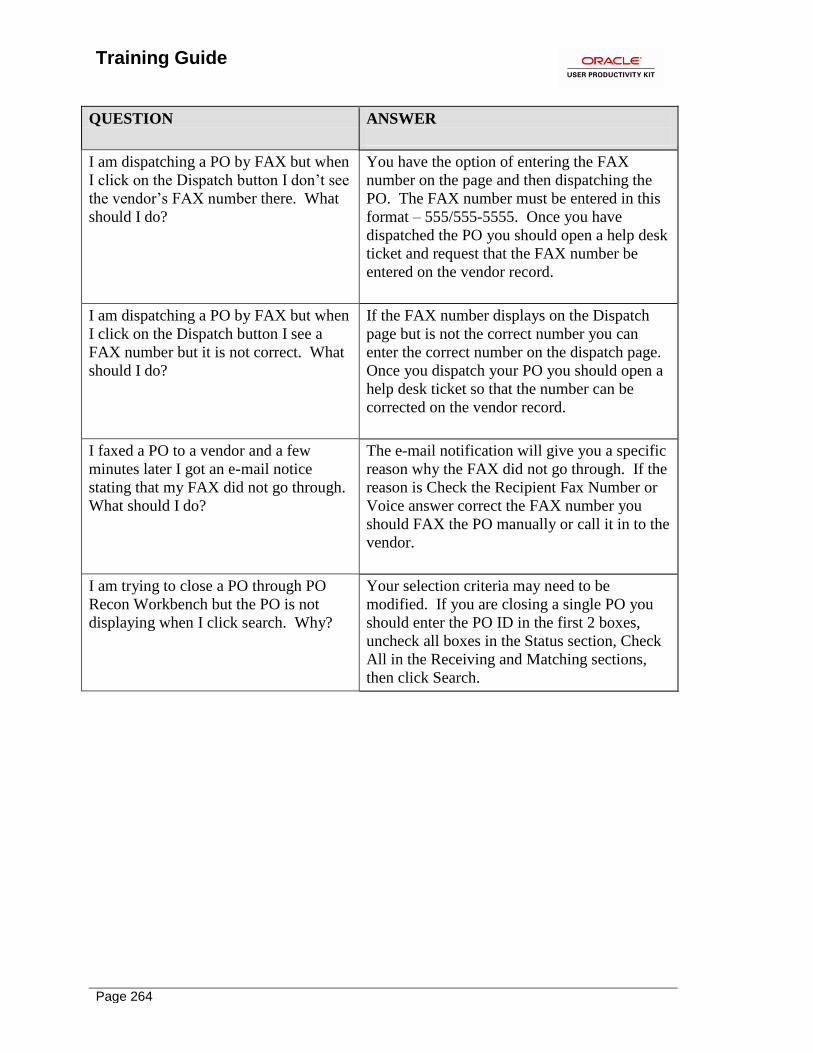
Training Guide
Page 264
QUESTION ANSWER
I am dispatching a PO by FAX but when
I click on the Dispatch button I don’t see
the vendor’s FAX number there. What
should I do?
You have the option of entering the FAX
number on the page and then dispatching the
PO. The FAX number must be entered in this
format – 555/555-5555. Once you have
dispatched the PO you should open a help desk
ticket and request that the FAX number be
entered on the vendor record.
I am dispatching a PO by FAX but when
I click on the Dispatch button I see a
FAX number but it is not correct. What
should I do?
If the FAX number displays on the Dispatch
page but is not the correct number you can
enter the correct number on the dispatch page.
Once you dispatch your PO you should open a
help desk ticket so that the number can be
corrected on the vendor record.
I faxed a PO to a vendor and a few
minutes later I got an e-mail notice
stating that my FAX did not go through.
What should I do?
The e-mail notification will give you a specific
reason why the FAX did not go through. If the
reason is Check the Recipient Fax Number or
Voice answer correct the FAX number you
should FAX the PO manually or call it in to the
vendor.
I am trying to close a PO through PO
Recon Workbench but the PO is not
displaying when I click search. Why?
Your selection criteria may need to be
modified. If you are closing a single PO you
should enter the PO ID in the first 2 boxes,
uncheck all boxes in the Status section, Check
All in the Receiving and Matching sections,
then click Search.
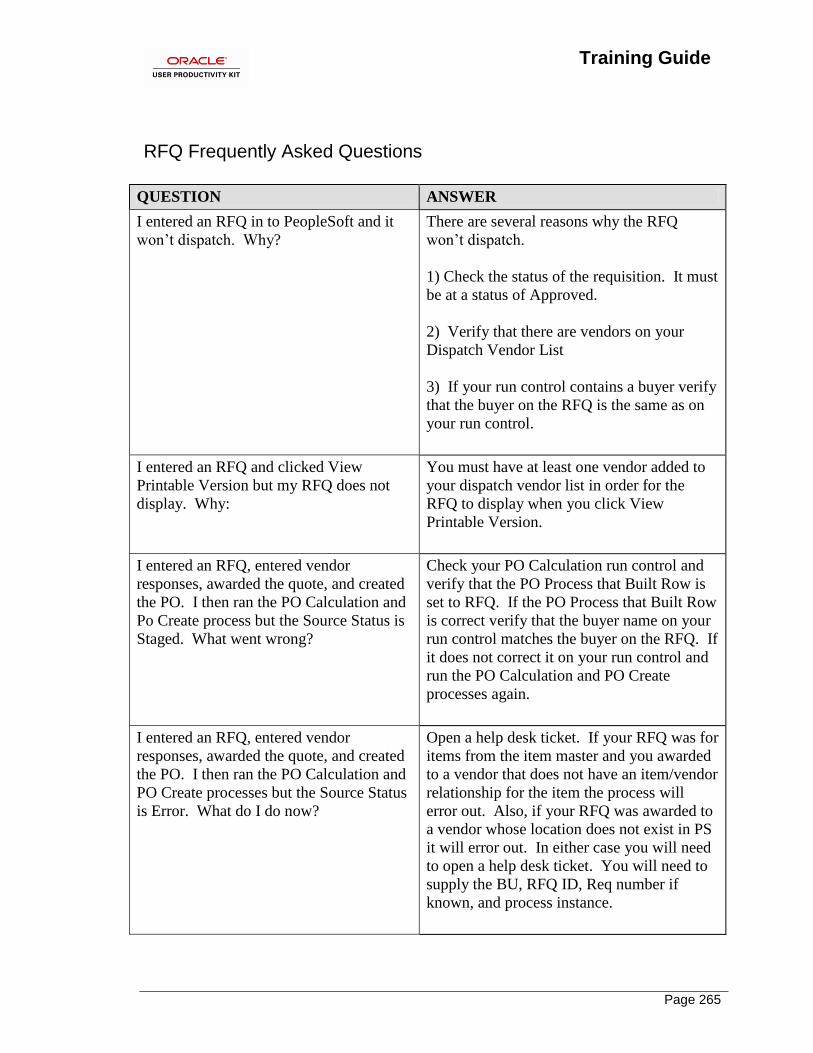
Training Guide
Page 265
RFQ Frequently Asked Questions
QUESTION ANSWER
I entered an RFQ in to PeopleSoft and it
won’t dispatch. Why?
There are several reasons why the RFQ
won’t dispatch.
1) Check the status of the requisition. It must
be at a status of Approved.
2) Verify that there are vendors on your
Dispatch Vendor List
3) If your run control contains a buyer verify
that the buyer on the RFQ is the same as on
your run control.
I entered an RFQ and clicked View
Printable Version but my RFQ does not
display. Why:
You must have at least one vendor added to
your dispatch vendor list in order for the
RFQ to display when you click View
Printable Version.
I entered an RFQ, entered vendor
responses, awarded the quote, and created
the PO. I then ran the PO Calculation and
Po Create process but the Source Status is
Staged. What went wrong?
Check your PO Calculation run control and
verify that the PO Process that Built Row is
set to RFQ. If the PO Process that Built Row
is correct verify that the buyer name on your
run control matches the buyer on the RFQ. If
it does not correct it on your run control and
run the PO Calculation and PO Create
processes again.
I entered an RFQ, entered vendor
responses, awarded the quote, and created
the PO. I then ran the PO Calculation and
PO Create processes but the Source Status
is Error. What do I do now?
Open a help desk ticket. If your RFQ was for
items from the item master and you awarded
to a vendor that does not have an item/vendor
relationship for the item the process will
error out. Also, if your RFQ was awarded to
a vendor whose location does not exist in PS
it will error out. In either case you will need
to open a help desk ticket. You will need to
supply the BU, RFQ ID, Req number if
known, and process instance.
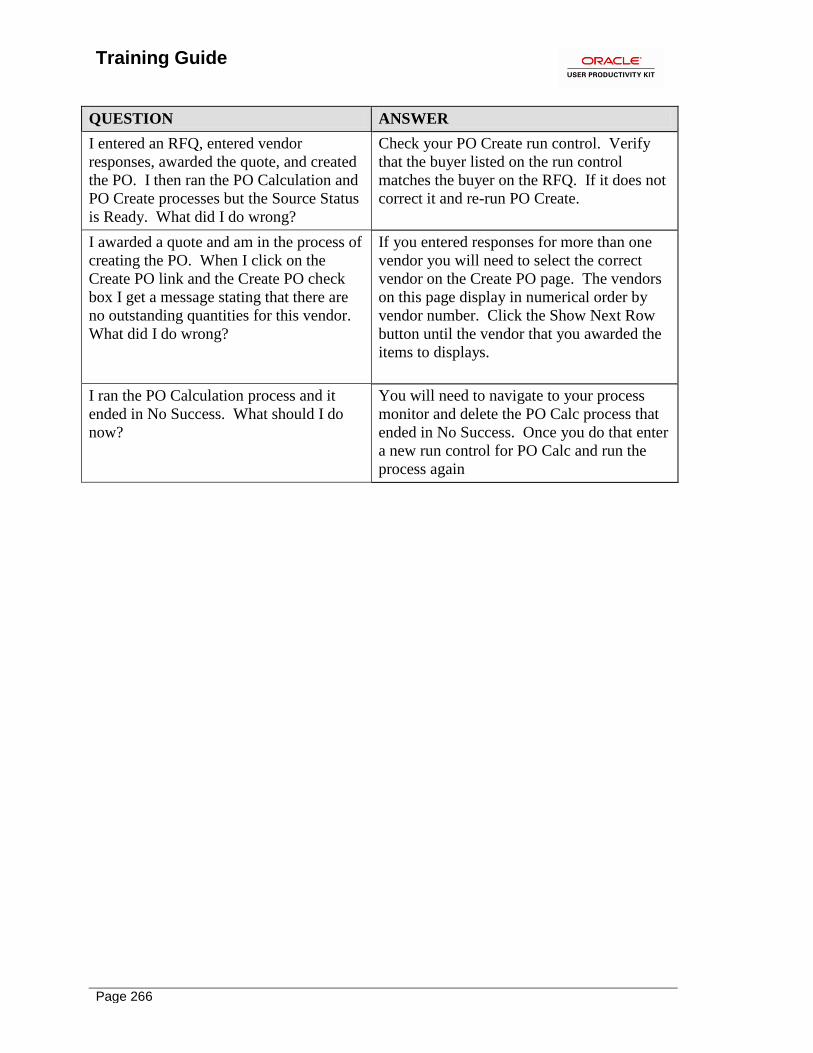
Training Guide
Page 266
QUESTION ANSWER
I entered an RFQ, entered vendor
responses, awarded the quote, and created
the PO. I then ran the PO Calculation and
PO Create processes but the Source Status
is Ready. What did I do wrong?
Check your PO Create run control. Verify
that the buyer listed on the run control
matches the buyer on the RFQ. If it does not
correct it and re-run PO Create.
I awarded a quote and am in the process of
creating the PO. When I click on the
Create PO link and the Create PO check
box I get a message stating that there are
no outstanding quantities for this vendor.
What did I do wrong?
If you entered responses for more than one
vendor you will need to select the correct
vendor on the Create PO page. The vendors
on this page display in numerical order by
vendor number. Click the Show Next Row
button until the vendor that you awarded the
items to displays.
I ran the PO Calculation process and it
ended in No Success. What should I do
now?
You will need to navigate to your process
monitor and delete the PO Calc process that
ended in No Success. Once you do that enter
a new run control for PO Calc and run the
process again
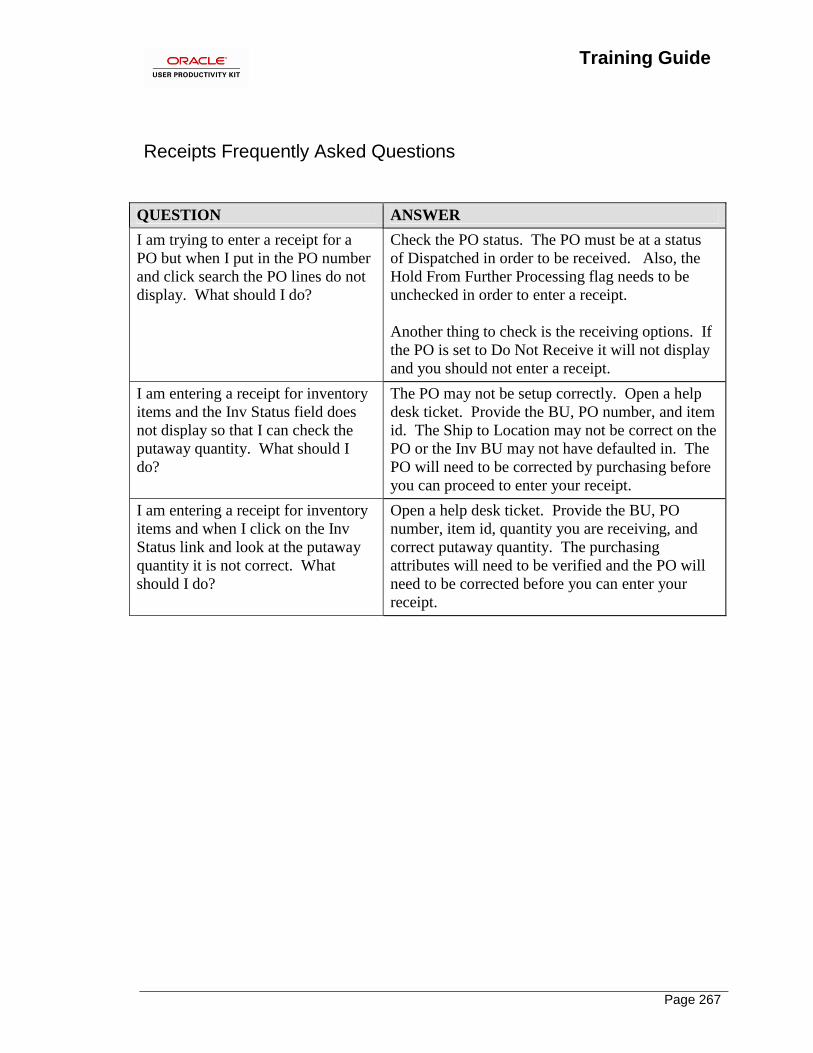
Training Guide
Page 267
Receipts Frequently Asked Questions
QUESTION ANSWER
I am trying to enter a receipt for a
PO but when I put in the PO number
and click search the PO lines do not
display. What should I do?
Check the PO status. The PO must be at a status
of Dispatched in order to be received. Also, the
Hold From Further Processing flag needs to be
unchecked in order to enter a receipt.
Another thing to check is the receiving options. If
the PO is set to Do Not Receive it will not display
and you should not enter a receipt.
I am entering a receipt for inventory
items and the Inv Status field does
not display so that I can check the
putaway quantity. What should I
do?
The PO may not be setup correctly. Open a help
desk ticket. Provide the BU, PO number, and item
id. The Ship to Location may not be correct on the
PO or the Inv BU may not have defaulted in. The
PO will need to be corrected by purchasing before
you can proceed to enter your receipt.
I am entering a receipt for inventory
items and when I click on the Inv
Status link and look at the putaway
quantity it is not correct. What
should I do?
Open a help desk ticket. Provide the BU, PO
number, item id, quantity you are receiving, and
correct putaway quantity. The purchasing
attributes will need to be verified and the PO will
need to be corrected before you can enter your
receipt.

![INDEX [] installing 5 status 11 superuser 11 syncing 22 ... mwtm webutil 95 mwtm who 96 mwtm xtermpath 96 generating ... Index User Guide for Cisco](https://img.pdfslide.us/doc/110x75/5b05de467f8b9a58148c0820/index-installing-5-status-11-superuser-11-syncing-22-mwtm-webutil-95-mwtm.jpg)