Embed Size (px)
Citation preview

PeopleSoft: Hire Transactions
Processing a Hire Transaction: Revised 12/09/2015 Page 2 of 49
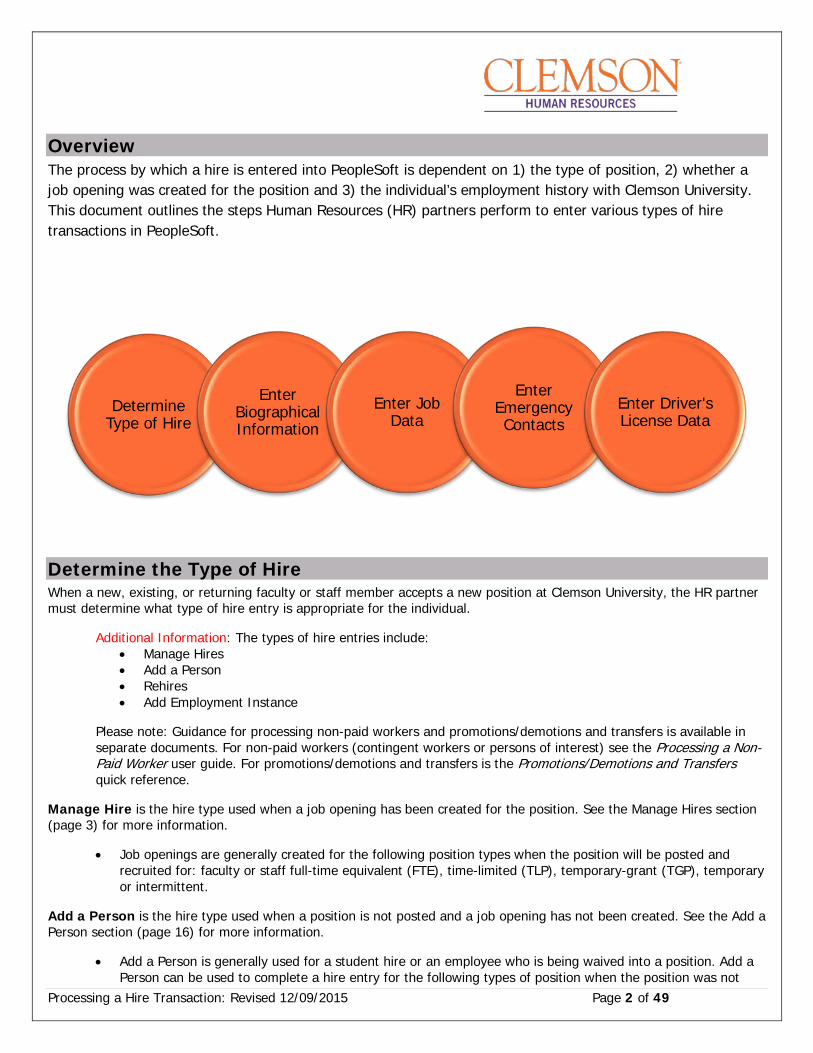
Overview The process by which a hire is entered into PeopleSoft is dependent on 1) the type of position, 2) whether a job opening was created for the position and 3) the individual’s employment history with Clemson University. This document outlines the steps Human Resources (HR) partners perform to enter various types of hire transactions in PeopleSoft.
Determine the Type of Hire When a new, existing, or returning faculty or staff member accepts a new position at Clemson University, the HR partner must determine what type of hire entry is appropriate for the individual.
Additional Information: The types of hire entries include: • Manage Hires • Add a Person • Rehires • Add Employment Instance
Please note: Guidance for processing non-paid workers and promotions/demotions and transfers is available in separate documents. For non-paid workers (contingent workers or persons of interest) see the Processing a Non-Paid Worker user guide. For promotions/demotions and transfers is the Promotions/Demotions and Transfers quick reference.
Manage Hire is the hire type used when a job opening has been created for the position. See the Manage Hires section (page 3) for more information.
• Job openings are generally created for the following position types when the position will be posted and recruited for: faculty or staff full-time equivalent (FTE), time-limited (TLP), temporary-grant (TGP), temporary or intermittent.
Add a Person is the hire type used when a position is not posted and a job opening has not been created. See the Add a Person section (page 16) for more information.
• Add a Person is generally used for a student hire or an employee who is being waived into a position. Add a Person can be used to complete a hire entry for the following types of position when the position was not
Determine Type of Hire
Enter Biographical Information
Enter Job Data
Enter Emergency Contacts
Enter Driver's License Data
Processing a Hire Transaction: Revised 12/09/2015 Page 3 of 49
posted or recruited for: faculty or staff full-time equivalent (FTE), time-limited (TLP), temporary-grant (TGP), temporary or intermittent.
Rehire is the hire type used when the individual being hired into the position has previously worked for Clemson University and a job opening has not been created for the position. See the Rehire section (page 28) for more information. Note: If a job opening has been created, please use Manage Hires to process this hire transaction.
Add Employment Instance is the hire type used to add an additional job for an employee who is already employed by Clemson University. See the Add Employee Instance section (page 37) for more information.
• Add Employment Instance is generally used for student employees who are working multiple part-time jobs across several departments.
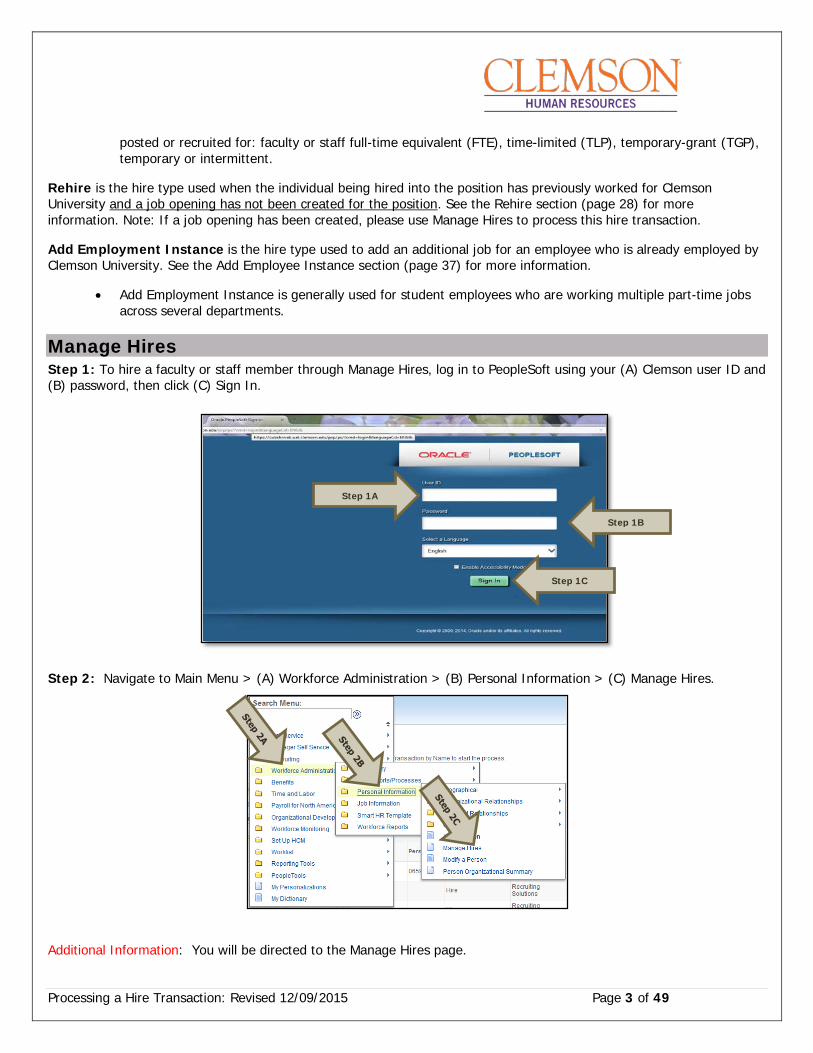
Manage Hires Step 1: To hire a faculty or staff member through Manage Hires, log in to PeopleSoft using your (A) Clemson user ID and (B) password, then click (C) Sign In.
Step 2: Navigate to Main Menu > (A) Workforce Administration > (B) Personal Information > (C) Manage Hires.
Additional Information: You will be directed to the Manage Hires page.
Step 1B
Step 1C
Step 1A
Processing a Hire Transaction: Revised 12/09/2015 Page 4 of 49
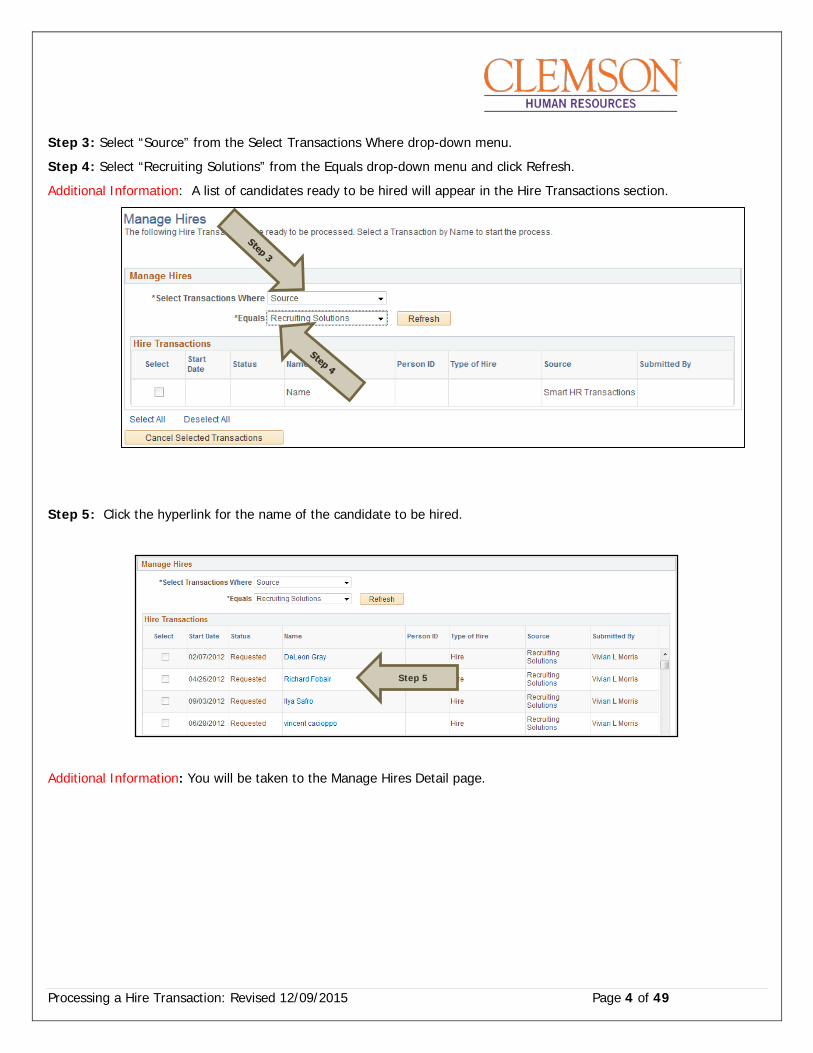
Step 3: Select “Source” from the Select Transactions Where drop-down menu.
Step 4: Select “Recruiting Solutions” from the Equals drop-down menu and click Refresh.
Additional Information: A list of candidates ready to be hired will appear in the Hire Transactions section.
Step 5: Click the hyperlink for the name of the candidate to be hired.
Additional Information: You will be taken to the Manage Hires Detail page.
Step 5
Processing a Hire Transaction: Revised 12/09/2015 Page 5 of 49
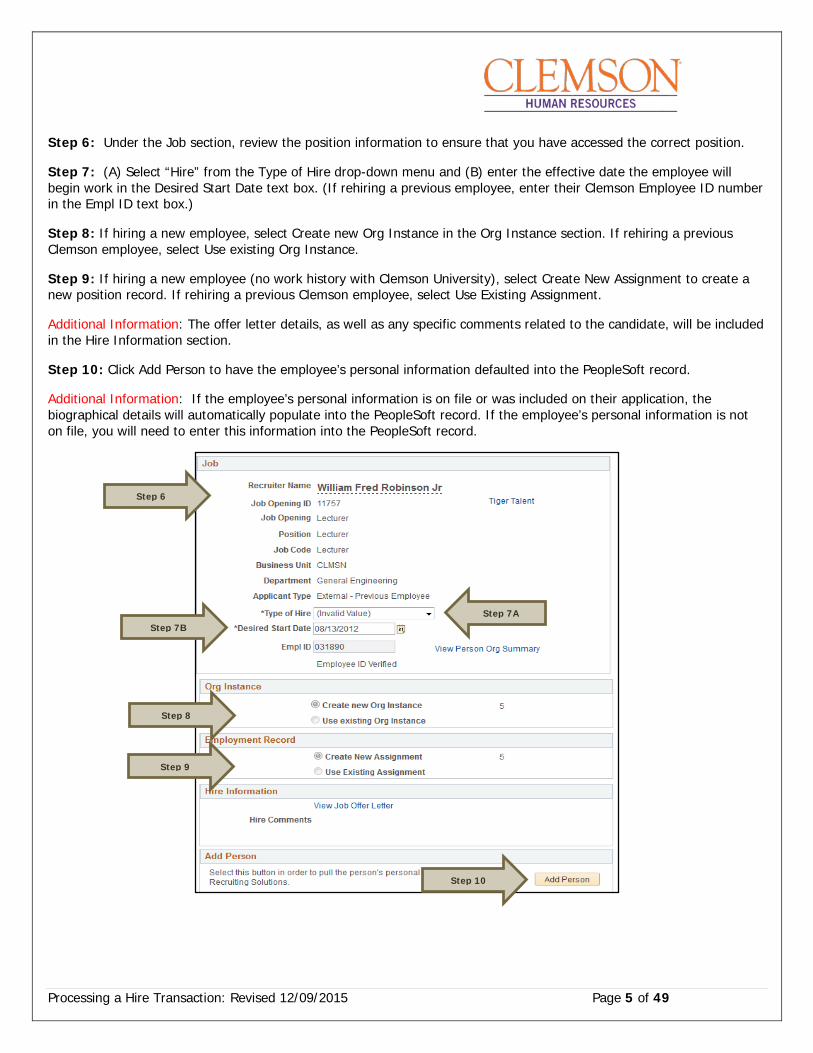
Step 6: Under the Job section, review the position information to ensure that you have accessed the correct position.
Step 7: (A) Select “Hire” from the Type of Hire drop-down menu and (B) enter the effective date the employee will begin work in the Desired Start Date text box. (If rehiring a previous employee, enter their Clemson Employee ID number in the Empl ID text box.)
Step 8: If hiring a new employee, select Create new Org Instance in the Org Instance section. If rehiring a previous Clemson employee, select Use existing Org Instance.
Step 9: If hiring a new employee (no work history with Clemson University), select Create New Assignment to create a new position record. If rehiring a previous Clemson employee, select Use Existing Assignment.
Additional Information: The offer letter details, as well as any specific comments related to the candidate, will be included in the Hire Information section.
Step 10: Click Add Person to have the employee’s personal information defaulted into the PeopleSoft record.
Additional Information: If the employee’s personal information is on file or was included on their application, the biographical details will automatically populate into the PeopleSoft record. If the employee’s personal information is not on file, you will need to enter this information into the PeopleSoft record.
Step 7A Step 7B
Step 10
Step 8
Step 9
Step 6
Processing a Hire Transaction: Revised 12/09/2015 Page 6 of 49
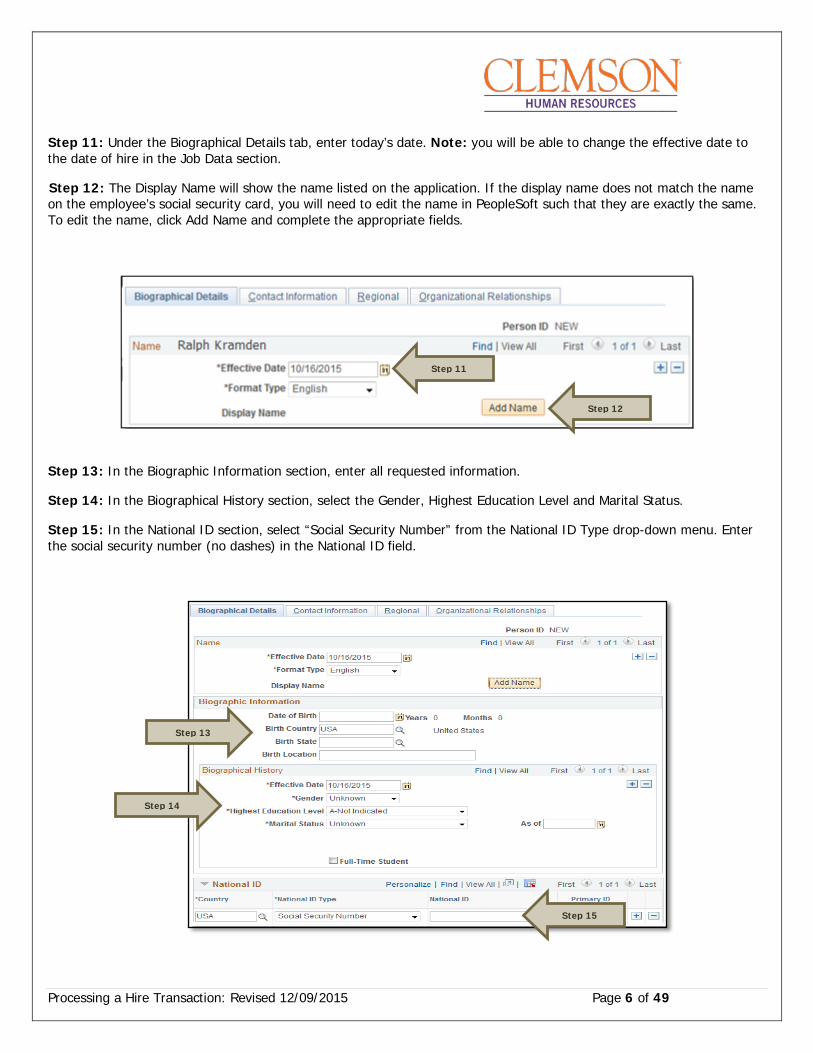
Step 11: Under the Biographical Details tab, enter today’s date. Note: you will be able to change the effective date to the date of hire in the Job Data section.
Step 12: The Display Name will show the name listed on the application. If the display name does not match the name on the employee’s social security card, you will need to edit the name in PeopleSoft such that they are exactly the same. To edit the name, click Add Name and complete the appropriate fields.
Step 13: In the Biographic Information section, enter all requested information.
Step 14: In the Biographical History section, select the Gender, Highest Education Level and Marital Status.
Step 15: In the National ID section, select “Social Security Number” from the National ID Type drop-down menu. Enter the social security number (no dashes) in the National ID field.
Step 11
Step 12
Step 13
Step 14
Step 15
Processing a Hire Transaction: Revised 12/09/2015 Page 7 of 49
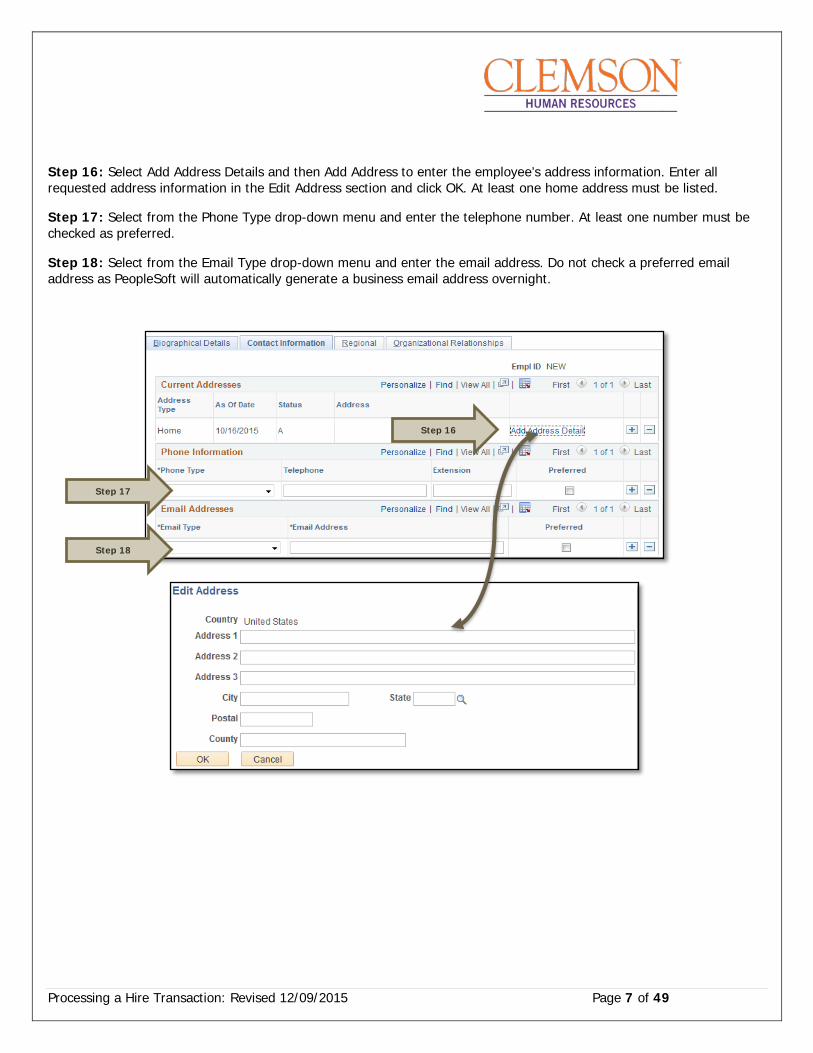
Step 16: Select Add Address Details and then Add Address to enter the employee’s address information. Enter all requested address information in the Edit Address section and click OK. At least one home address must be listed.
Step 17: Select from the Phone Type drop-down menu and enter the telephone number. At least one number must be checked as preferred.
Step 18: Select from the Email Type drop-down menu and enter the email address. Do not check a preferred email address as PeopleSoft will automatically generate a business email address overnight.
Step 16
Step 17
Step 18
Processing a Hire Transaction: Revised 12/09/2015 Page 8 of 49
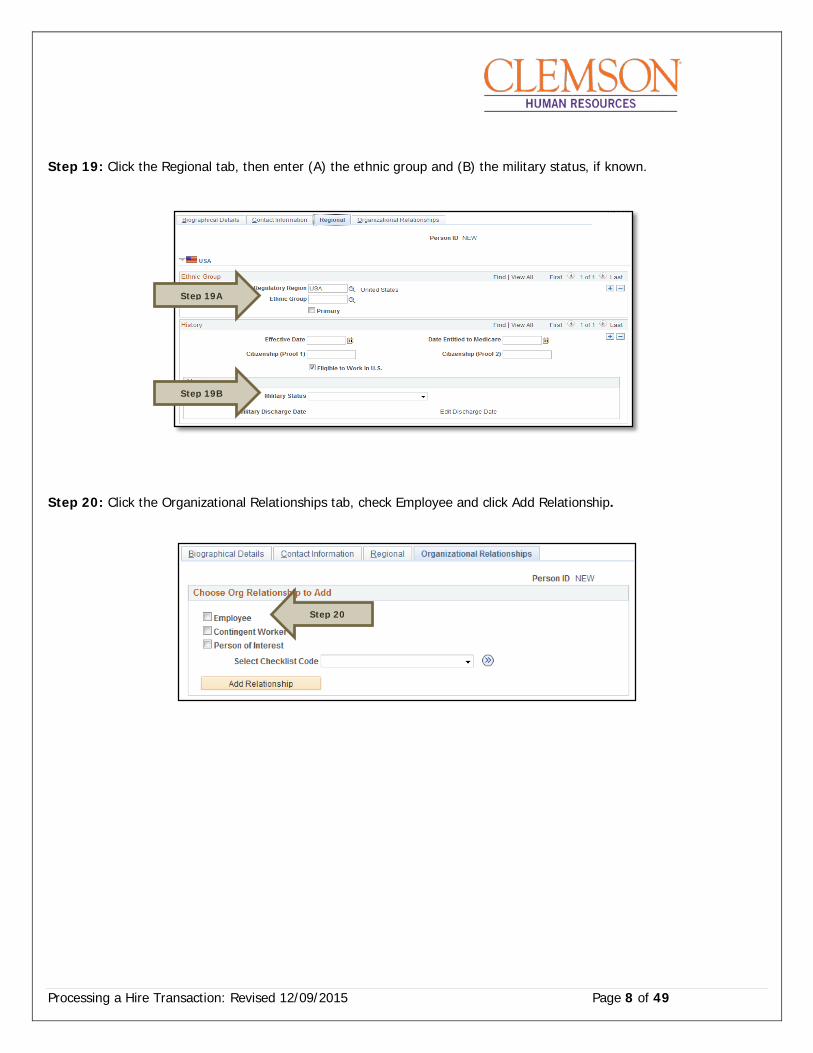
Step 19: Click the Regional tab, then enter (A) the ethnic group and (B) the military status, if known.
Step 20: Click the Organizational Relationships tab, check Employee and click Add Relationship.
Step 20
Step 19A
Step 19B
Processing a Hire Transaction: Revised 12/09/2015 Page 9 of 49
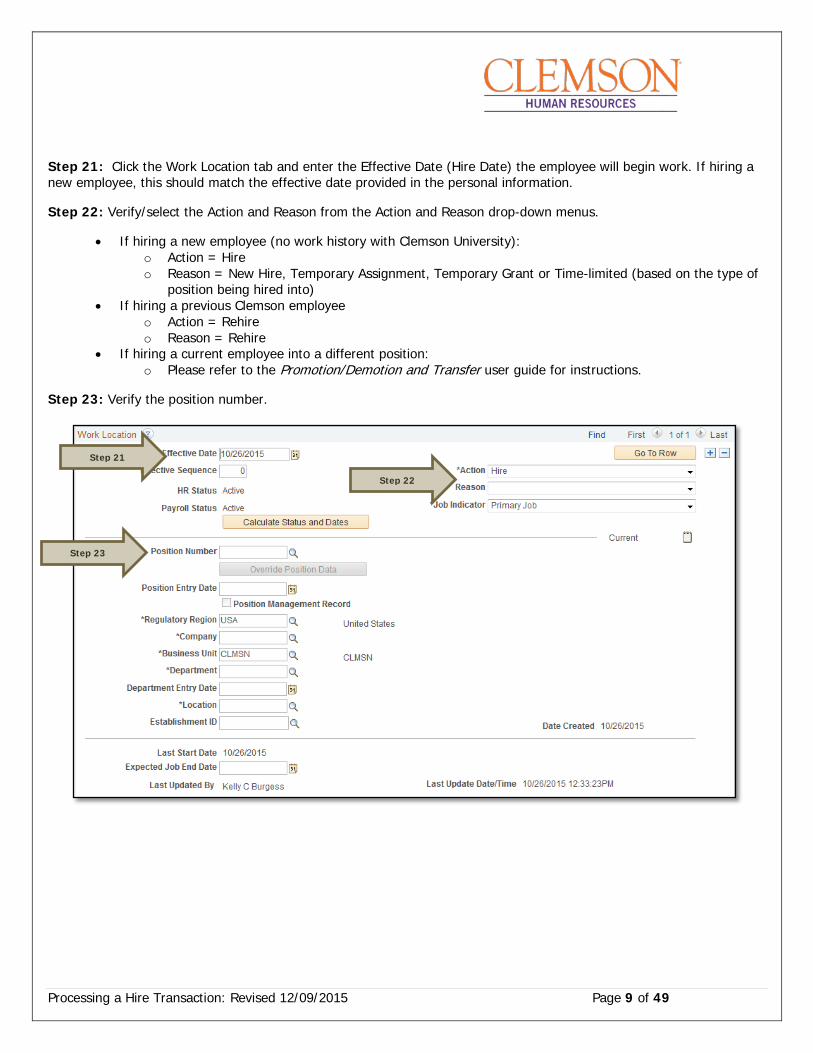
Step 21: Click the Work Location tab and enter the Effective Date (Hire Date) the employee will begin work. If hiring a new employee, this should match the effective date provided in the personal information.
Step 22: Verify/select the Action and Reason from the Action and Reason drop-down menus.
• If hiring a new employee (no work history with Clemson University): o Action = Hire o Reason = New Hire, Temporary Assignment, Temporary Grant or Time-limited (based on the type of
position being hired into) • If hiring a previous Clemson employee
o Action = Rehire o Reason = Rehire
• If hiring a current employee into a different position: o Please refer to the Promotion/Demotion and Transfer user guide for instructions.
Step 23: Verify the position number.
Step 21
Step 22
Step 23
Processing a Hire Transaction: Revised 12/09/2015 Page 10 of 49
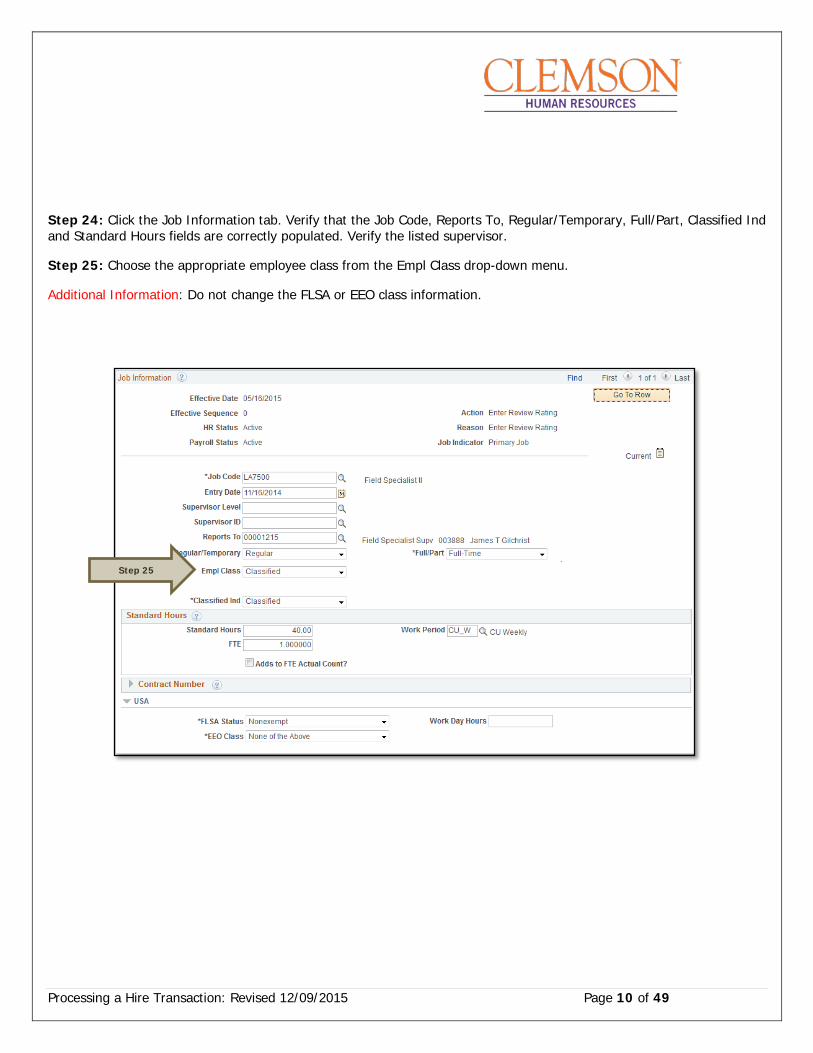
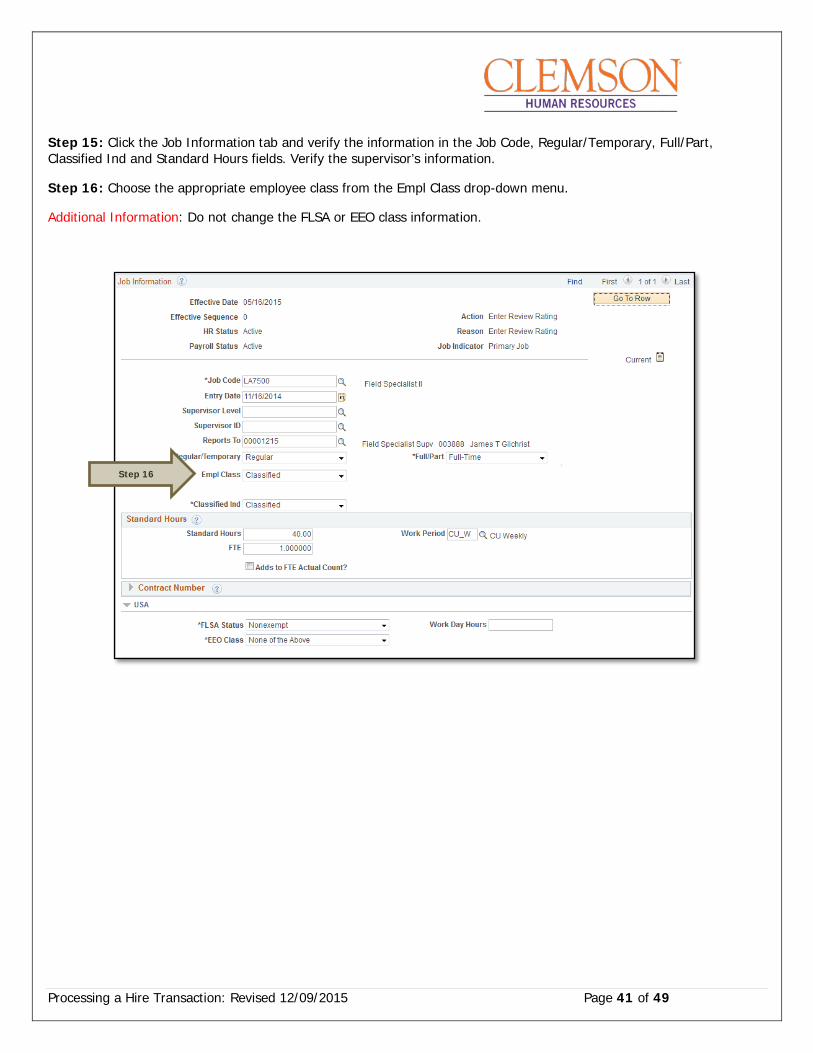
Step 24: Click the Job Information tab. Verify that the Job Code, Reports To, Regular/Temporary, Full/Part, Classified Ind and Standard Hours fields are correctly populated. Verify the listed supervisor.
Step 25: Choose the appropriate employee class from the Empl Class drop-down menu.
Additional Information: Do not change the FLSA or EEO class information.
Step 25
Processing a Hire Transaction: Revised 12/09/2015 Page 11 of 49
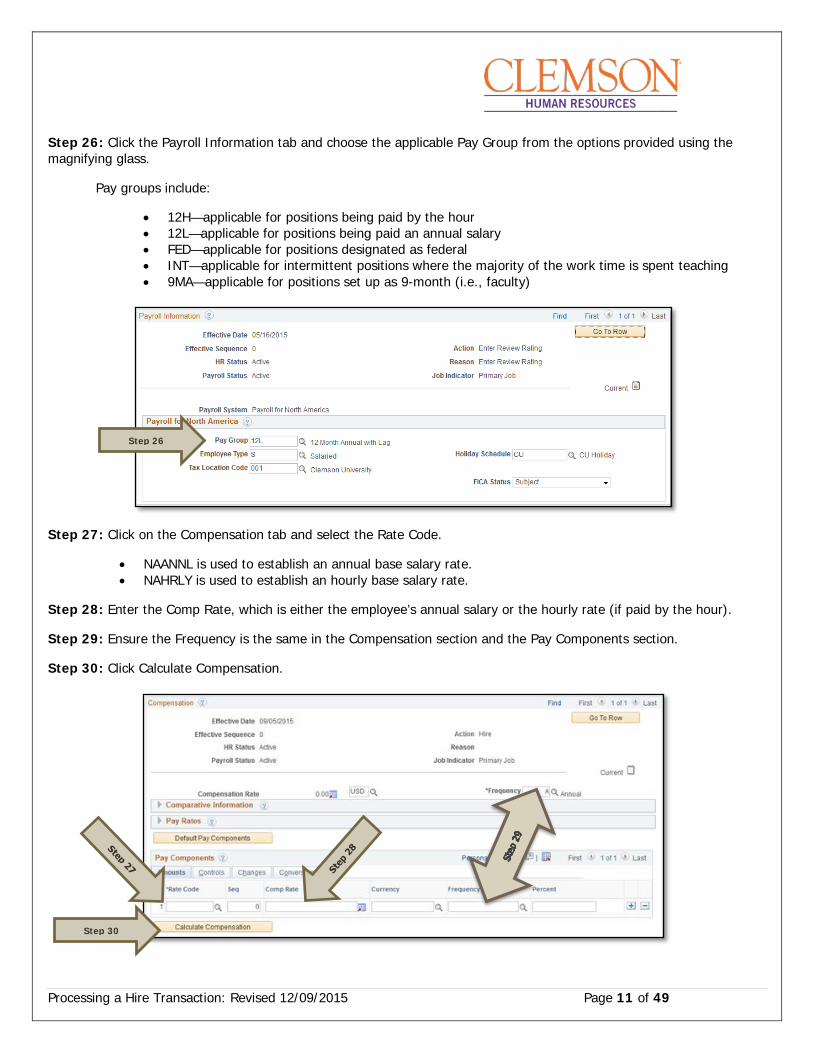
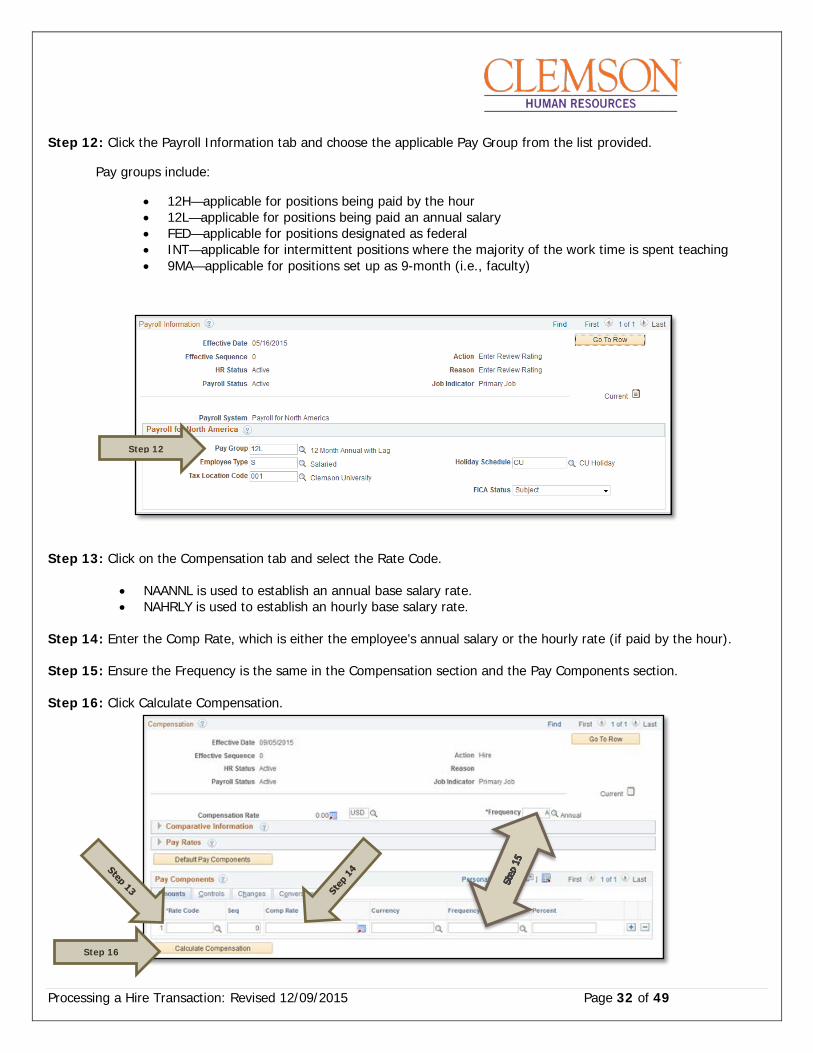
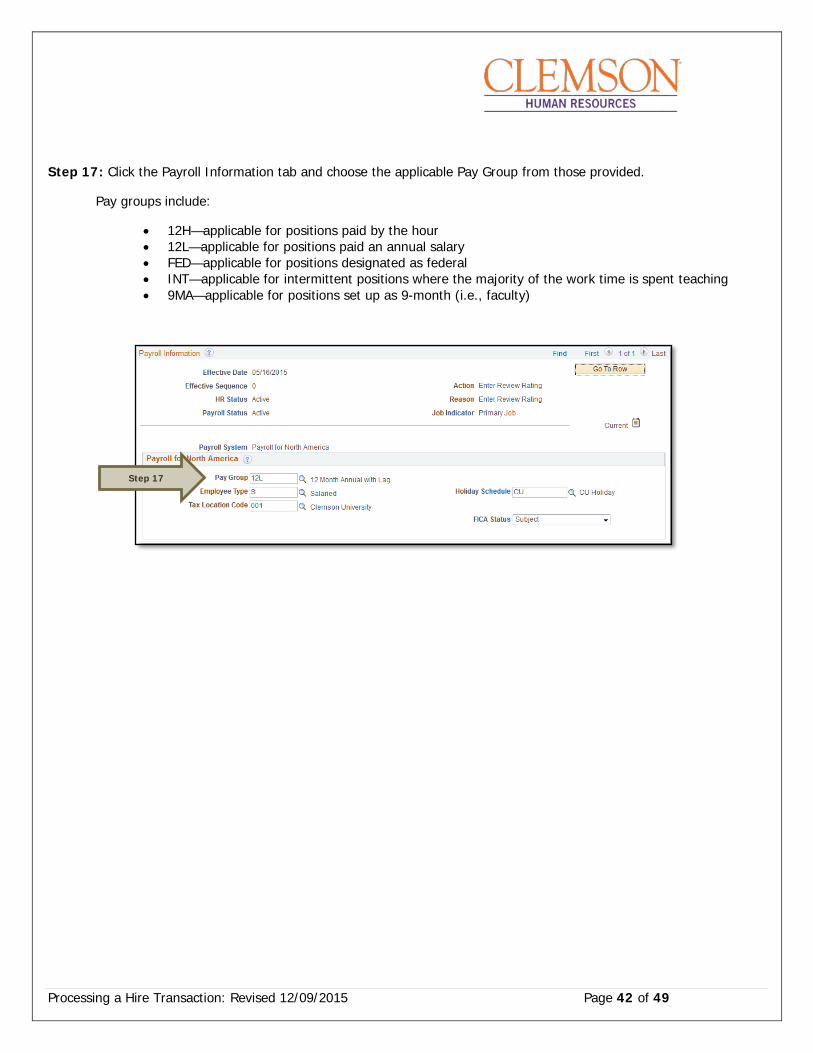
Step 26: Click the Payroll Information tab and choose the applicable Pay Group from the options provided using the magnifying glass.
Pay groups include:
• 12H—applicable for positions being paid by the hour • 12L—applicable for positions being paid an annual salary • FED—applicable for positions designated as federal • INT—applicable for intermittent positions where the majority of the work time is spent teaching • 9MA—applicable for positions set up as 9-month (i.e., faculty)
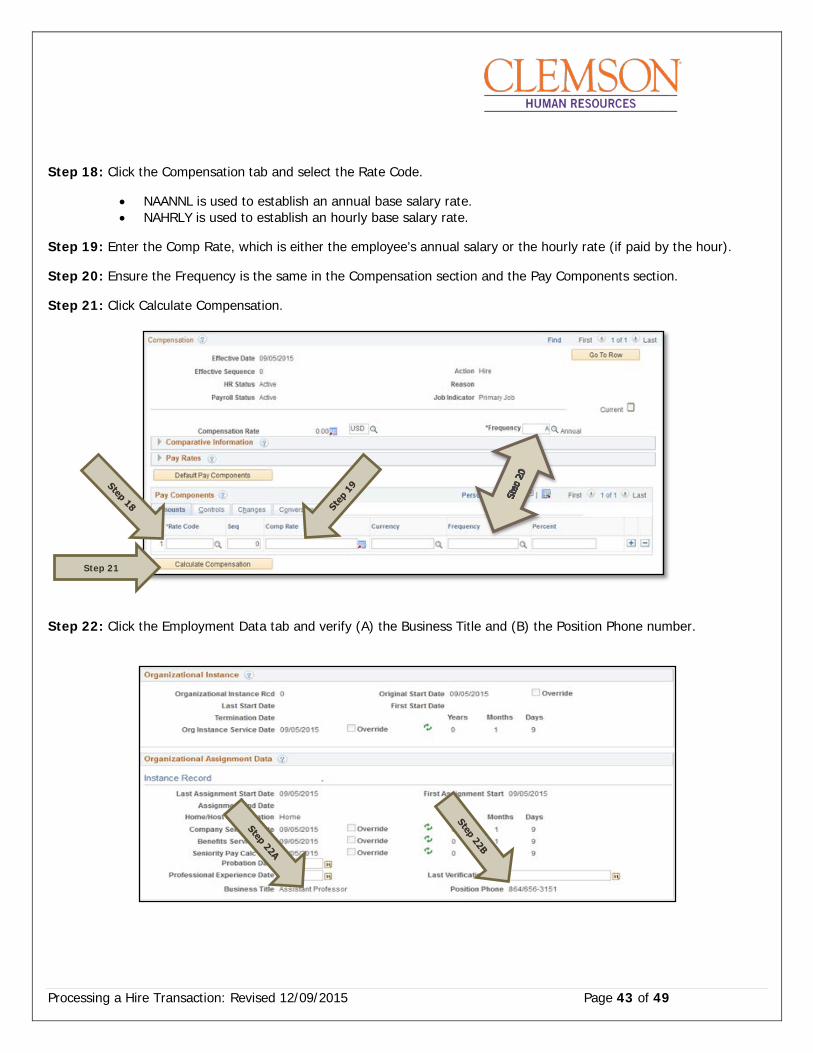
Step 27: Click on the Compensation tab and select the Rate Code.
• NAANNL is used to establish an annual base salary rate. • NAHRLY is used to establish an hourly base salary rate.
Step 28: Enter the Comp Rate, which is either the employee’s annual salary or the hourly rate (if paid by the hour).
Step 29: Ensure the Frequency is the same in the Compensation section and the Pay Components section.
Step 30: Click Calculate Compensation.
Step 26
Step 30
Processing a Hire Transaction: Revised 12/09/2015 Page 12 of 49
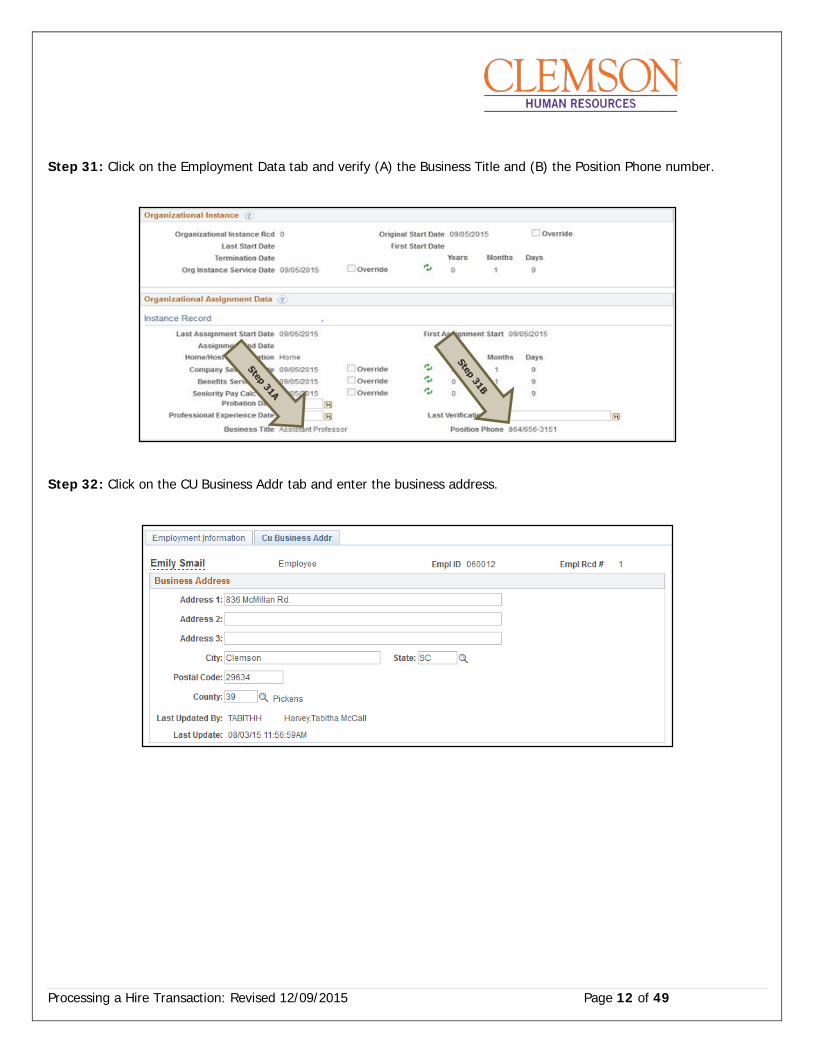
Step 31: Click on the Employment Data tab and verify (A) the Business Title and (B) the Position Phone number.
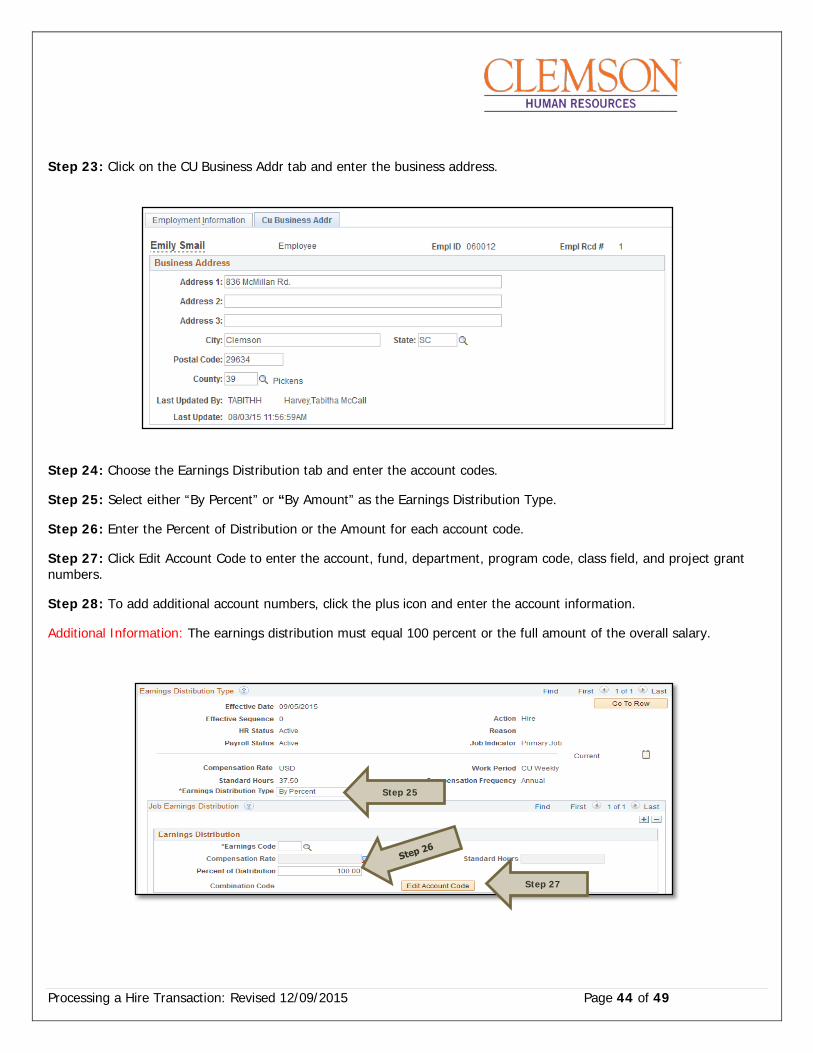
Step 32: Click on the CU Business Addr tab and enter the business address.

Processing a Hire Transaction: Revised 12/09/2015 Page 13 of 49
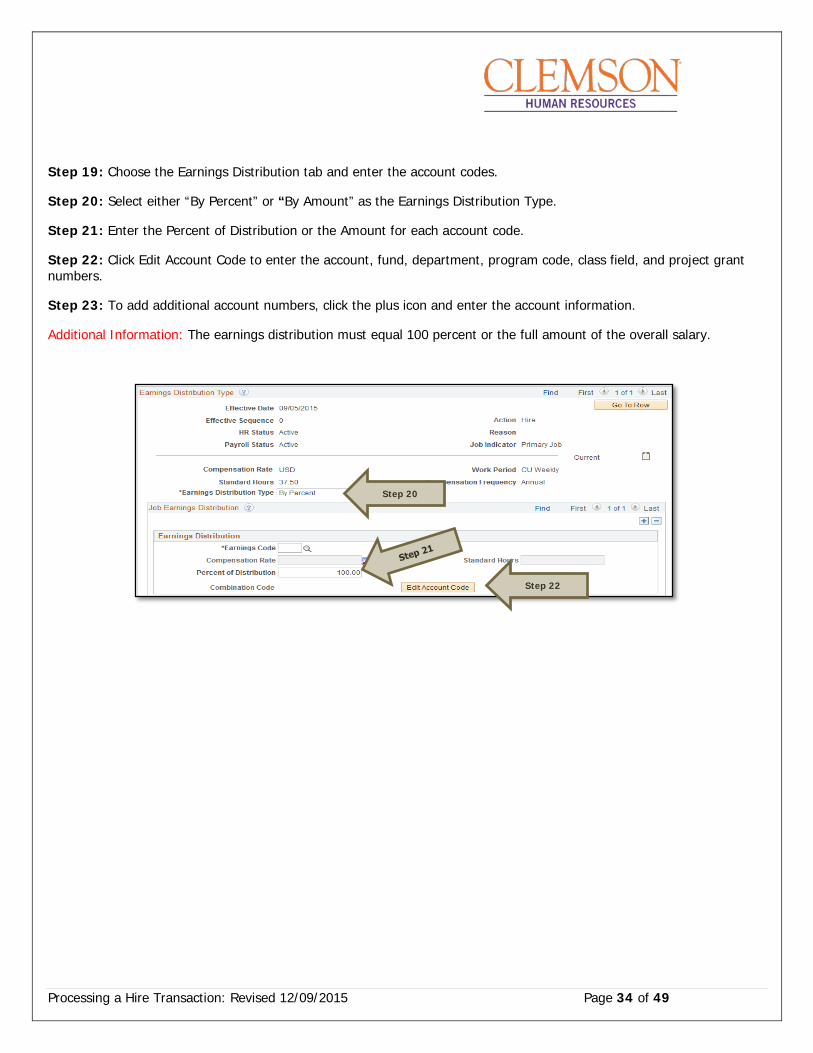
Step 33: Choose the Earnings Distribution tab and enter the account codes. Step 34: Select either “By Percent” or “By Amount” as the Earnings Distribution Type. Step 35: Enter the Percent of Distribution or the Amount for each account code. Step 36: Click Edit Account Code to enter the combination code. Step 37: To add additional account numbers, click the plus icon and enter the account information. Additional Information: The earnings distribution must equal 100 percent or the full amount of the overall salary.
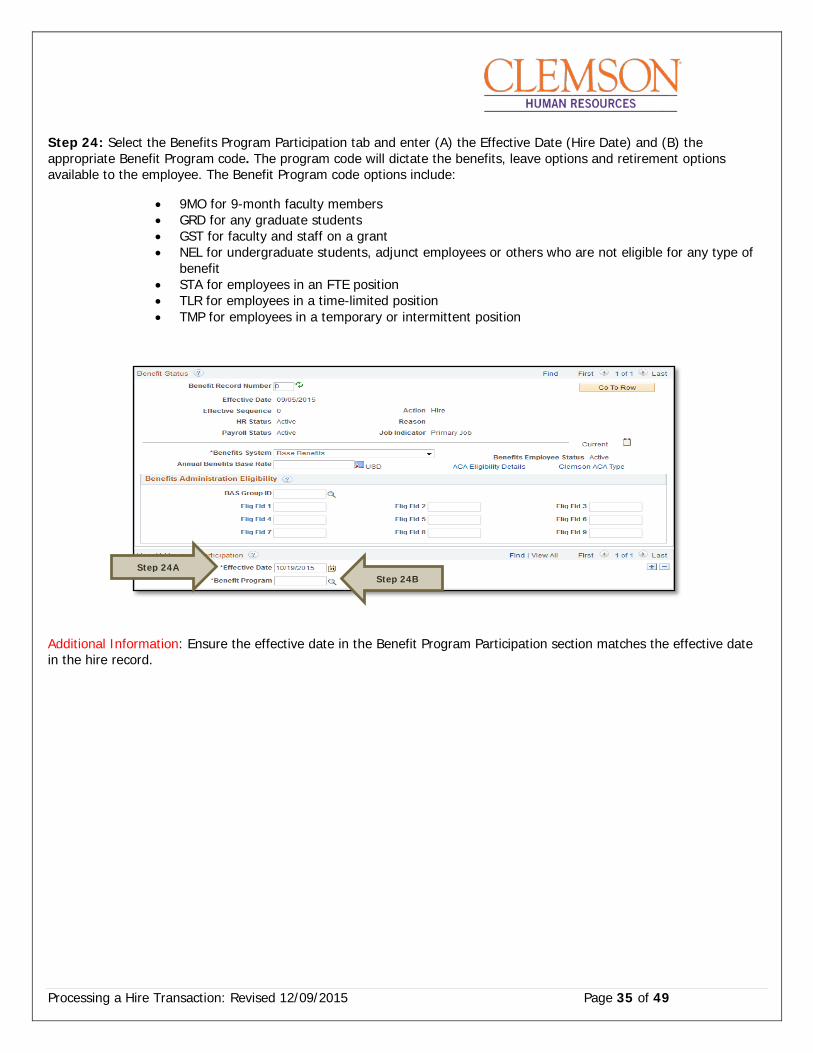
Step 38: Select the Benefits Program Participation tab and enter (A) the Effective Date (Hire Date) and (B) the appropriate Benefit Program Participation code. The program code will dictate the benefits, leave options and retirement options available to the employee. The Benefit Program options include:
• 9MO for 9-Month faculty members • GRD for any graduate students • GST for faculty and staff on a grant • NEL for undergraduate students, adjunct employees or others who are not eligible for any type of
benefit • STA for employees in an FTE position • TLR for employees in a time-limited position • TMP for employees in a temporary or intermittent position
Additional Information: Ensure the effective date in the Benefits Program Participation section matches the effective date in the hire record.
Step 34
Step 36
Step 38B Step 38A
Processing a Hire Transaction: Revised 12/09/2015 Page 14 of 49
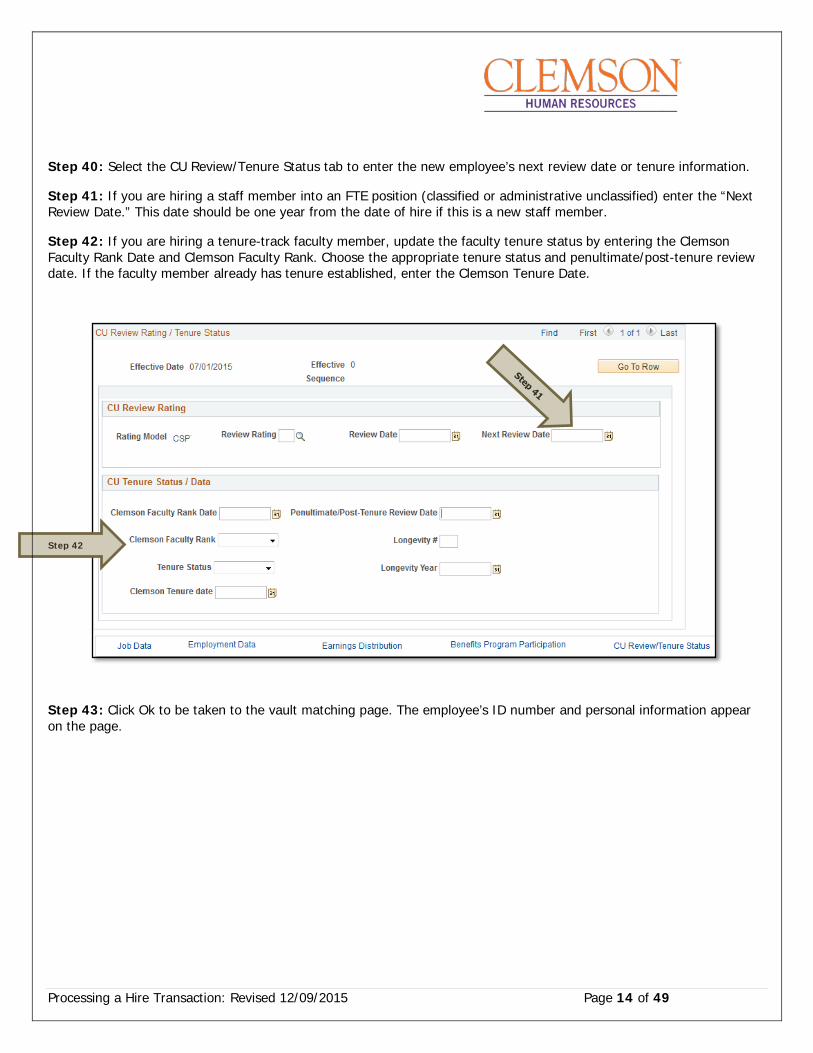
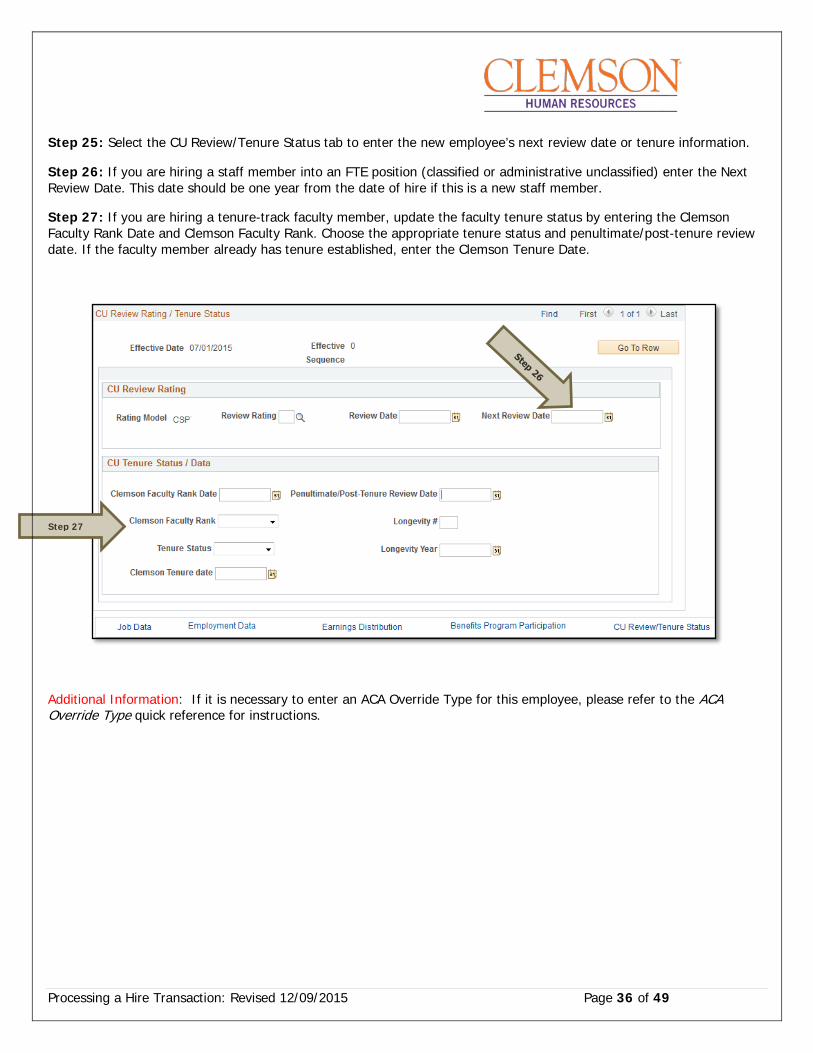
Step 40: Select the CU Review/Tenure Status tab to enter the new employee’s next review date or tenure information.
Step 41: If you are hiring a staff member into an FTE position (classified or administrative unclassified) enter the “Next Review Date.” This date should be one year from the date of hire if this is a new staff member.
Step 42: If you are hiring a tenure-track faculty member, update the faculty tenure status by entering the Clemson Faculty Rank Date and Clemson Faculty Rank. Choose the appropriate tenure status and penultimate/post-tenure review date. If the faculty member already has tenure established, enter the Clemson Tenure Date.
Step 43: Click Ok to be taken to the vault matching page. The employee’s ID number and personal information appear on the page.
Step 42

Processing a Hire Transaction: Revised 12/09/2015 Page 15 of 49
Step 44: Click Find to determine if a CUID already exists for this employee.
Step 45: If a match is found, verify the birthdate and social security number to ensure the found CUID belongs to this individual. If so, click the radio button and click OK to link the employee ID and Clemson ID number.
Step 46: If no matches are found, click Create New Identity in Vault.
Additional Information: If it is necessary to enter an ACA Override Type for this employee, please refer to the ACA Override Type quick reference for instructions.
Step 46
Processing a Hire Transaction: Revised 12/09/2015 Page 16 of 49
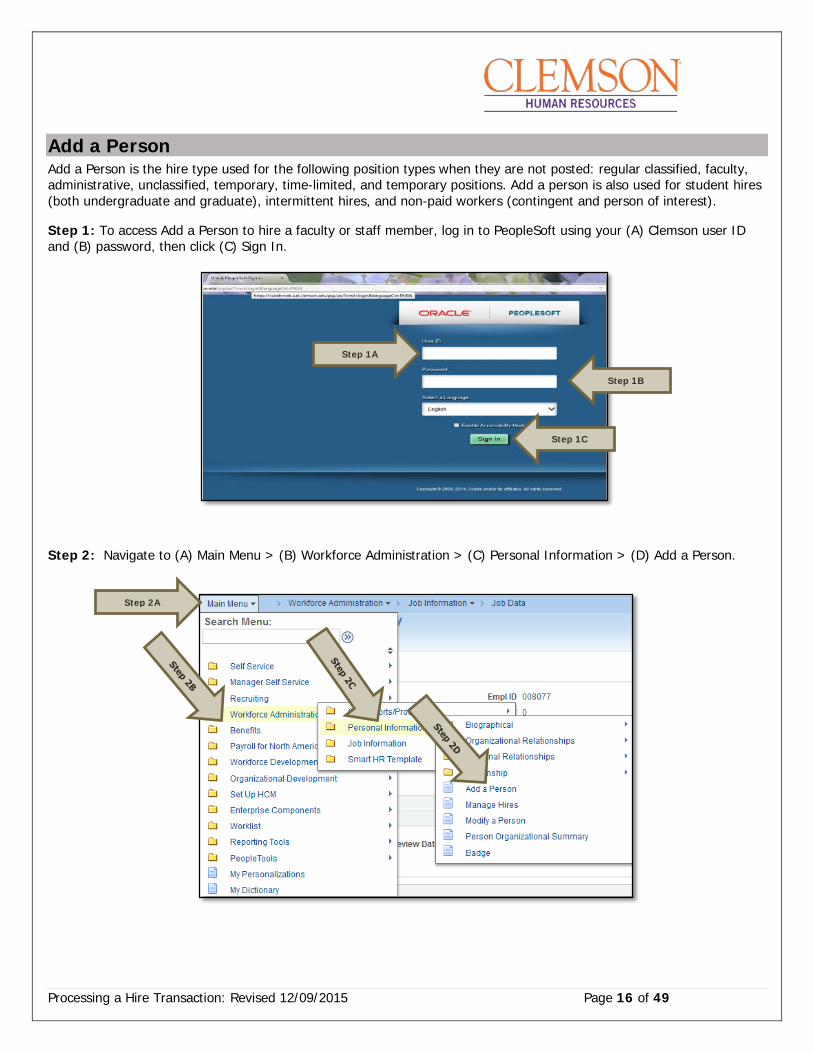
Add a Person Add a Person is the hire type used for the following position types when they are not posted: regular classified, faculty, administrative, unclassified, temporary, time-limited, and temporary positions. Add a person is also used for student hires (both undergraduate and graduate), intermittent hires, and non-paid workers (contingent and person of interest).
Step 1: To access Add a Person to hire a faculty or staff member, log in to PeopleSoft using your (A) Clemson user ID and (B) password, then click (C) Sign In.
Step 2: Navigate to (A) Main Menu > (B) Workforce Administration > (C) Personal Information > (D) Add a Person.
Step 1B
Step 1C
Step 1A
Step 2A

Processing a Hire Transaction: Revised 12/09/2015 Page 17 of 49
Step 3: Click Add Person to enter the employee’s personal information into the PeopleSoft record.
Additional Information: You will be directed to the Biographical Details page.
Step 4: Under Biographic Information, enter all requested information.
Step 5: Under the Biographical History section, select the Gender, Highest Education Level and Marital Status.
Step 6: Under the National ID section, select “Social Security Number” from the National ID Type drop-down and enter the social security number (no dashes) in the National ID field.
Step 4
Step 5
Step 6
Processing a Hire Transaction: Revised 12/09/2015 Page 18 of 49
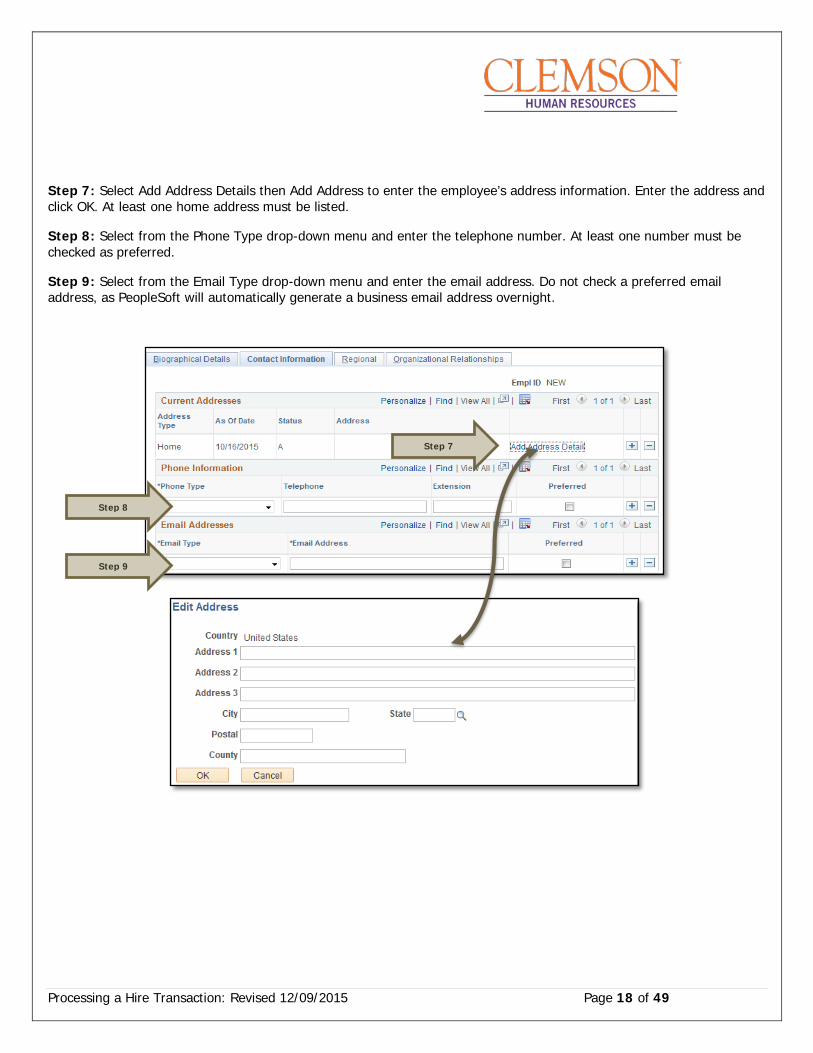
Step 7: Select Add Address Details then Add Address to enter the employee’s address information. Enter the address and click OK. At least one home address must be listed.
Step 8: Select from the Phone Type drop-down menu and enter the telephone number. At least one number must be checked as preferred.
Step 9: Select from the Email Type drop-down menu and enter the email address. Do not check a preferred email address, as PeopleSoft will automatically generate a business email address overnight.
Step 7
Step 8
Step 9
Processing a Hire Transaction: Revised 12/09/2015 Page 19 of 49
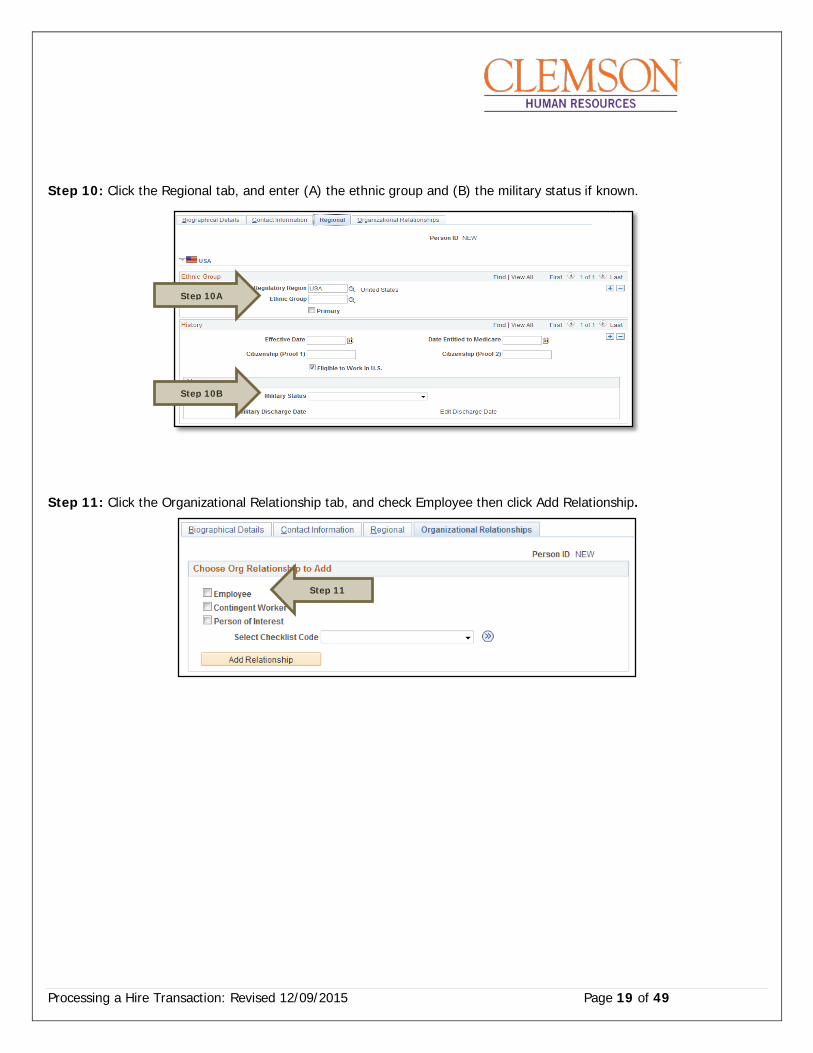
Step 10: Click the Regional tab, and enter (A) the ethnic group and (B) the military status if known.
Step 11: Click the Organizational Relationship tab, and check Employee then click Add Relationship.
Step 11
Step 10A
Step 10B
Processing a Hire Transaction: Revised 12/09/2015 Page 20 of 49
Step 12: Click the Work Location tab and enter the Effective Date (Hire Date) the employee will begin work. If hiring a new employee, this should match the effective date provided in the personal information.
Step 13: Verify/select the Action and Reason from the Action and Reason drop-down menus.
• If hiring a new employee (no work history with Clemson University): o Action = Hire o Reason = New Hire, Temporary Assignment, Temporary Grant or Time-limited (based on the type of
position being hired into) • If hiring a previous Clemson employee
o Action = Rehire o Reason = Rehire
• If hiring a current employee into a different position: o Please refer to the Promotion/Demotion and Transfer user guide for instructions.
Step 14: Verify the position number.
Step 12
Step 13
Step 14
Processing a Hire Transaction: Revised 12/09/2015 Page 21 of 49
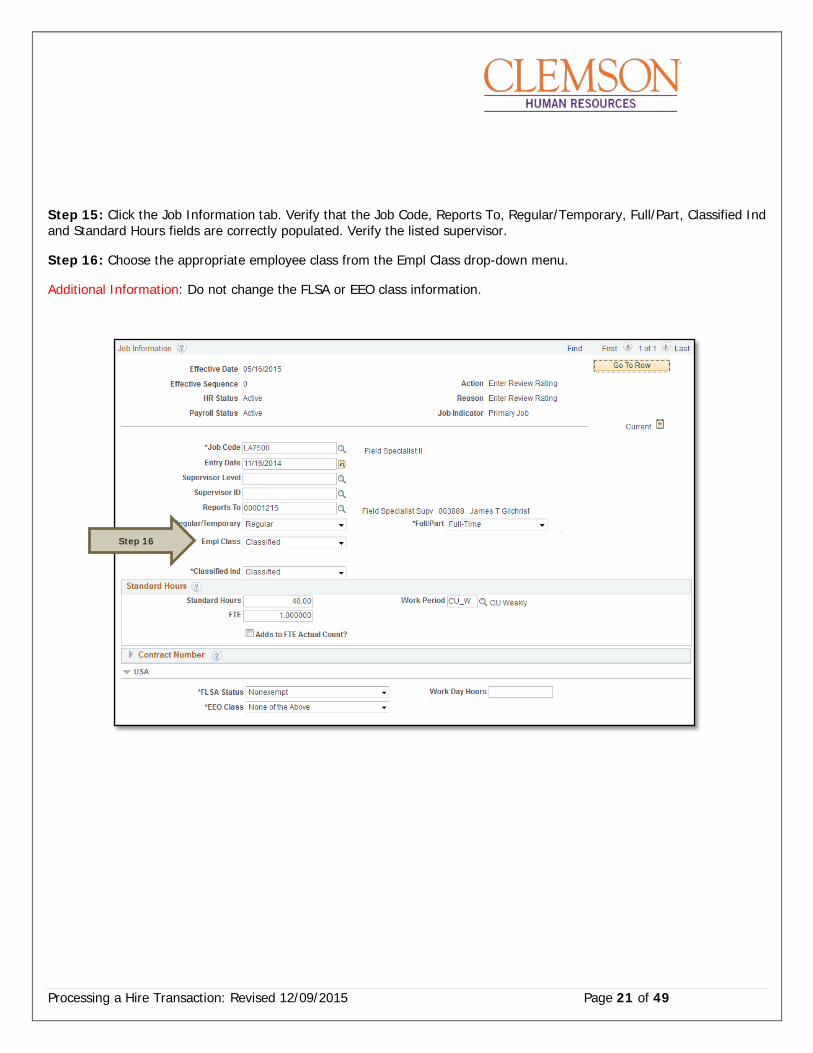
Step 15: Click the Job Information tab. Verify that the Job Code, Reports To, Regular/Temporary, Full/Part, Classified Ind and Standard Hours fields are correctly populated. Verify the listed supervisor.
Step 16: Choose the appropriate employee class from the Empl Class drop-down menu.
Additional Information: Do not change the FLSA or EEO class information.
Step 16
Processing a Hire Transaction: Revised 12/09/2015 Page 22 of 49
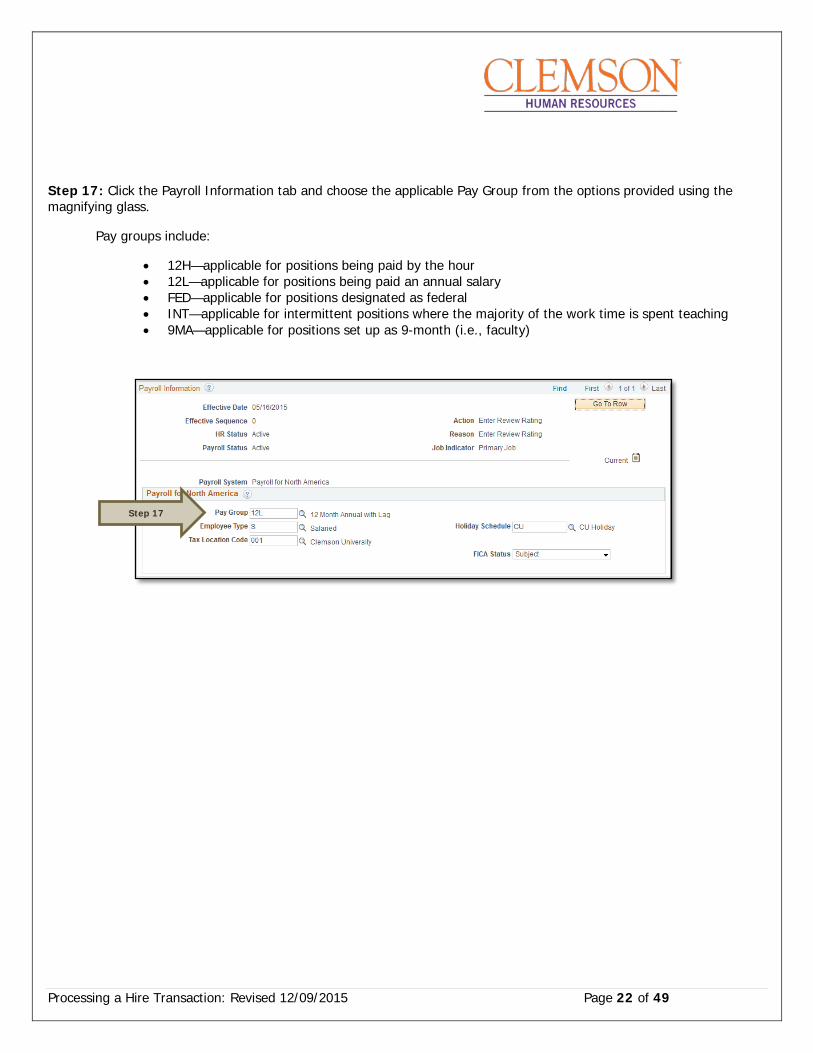
Step 17: Click the Payroll Information tab and choose the applicable Pay Group from the options provided using the magnifying glass.
Pay groups include:
• 12H—applicable for positions being paid by the hour • 12L—applicable for positions being paid an annual salary • FED—applicable for positions designated as federal • INT—applicable for intermittent positions where the majority of the work time is spent teaching • 9MA—applicable for positions set up as 9-month (i.e., faculty)
Step 17
Processing a Hire Transaction: Revised 12/09/2015 Page 23 of 49
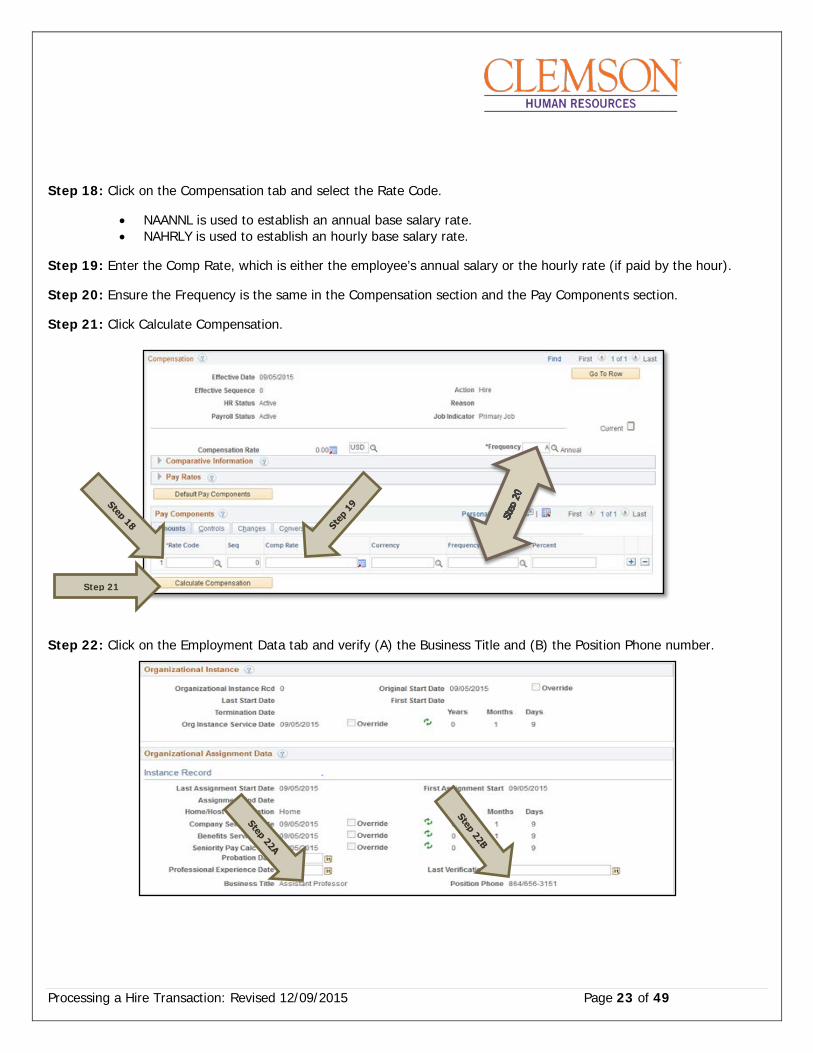
Step 18: Click on the Compensation tab and select the Rate Code.
• NAANNL is used to establish an annual base salary rate. • NAHRLY is used to establish an hourly base salary rate.
Step 19: Enter the Comp Rate, which is either the employee’s annual salary or the hourly rate (if paid by the hour).
Step 20: Ensure the Frequency is the same in the Compensation section and the Pay Components section.
Step 21: Click Calculate Compensation.
Step 22: Click on the Employment Data tab and verify (A) the Business Title and (B) the Position Phone number.
Step 21
Processing a Hire Transaction: Revised 12/09/2015 Page 24 of 49
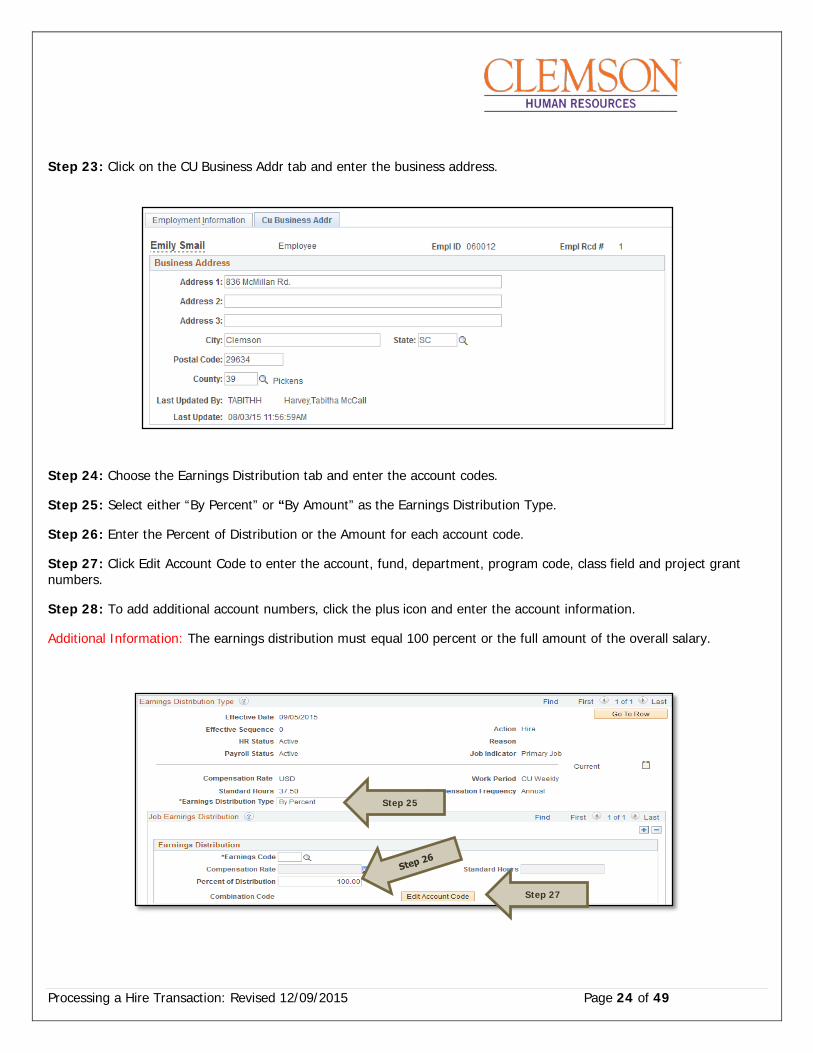
Step 23: Click on the CU Business Addr tab and enter the business address.
Step 24: Choose the Earnings Distribution tab and enter the account codes.
Step 25: Select either “By Percent” or “By Amount” as the Earnings Distribution Type.
Step 26: Enter the Percent of Distribution or the Amount for each account code.
Step 27: Click Edit Account Code to enter the account, fund, department, program code, class field and project grant numbers.
Step 28: To add additional account numbers, click the plus icon and enter the account information.
Additional Information: The earnings distribution must equal 100 percent or the full amount of the overall salary.
Step 25
Step 27
Processing a Hire Transaction: Revised 12/09/2015 Page 25 of 49
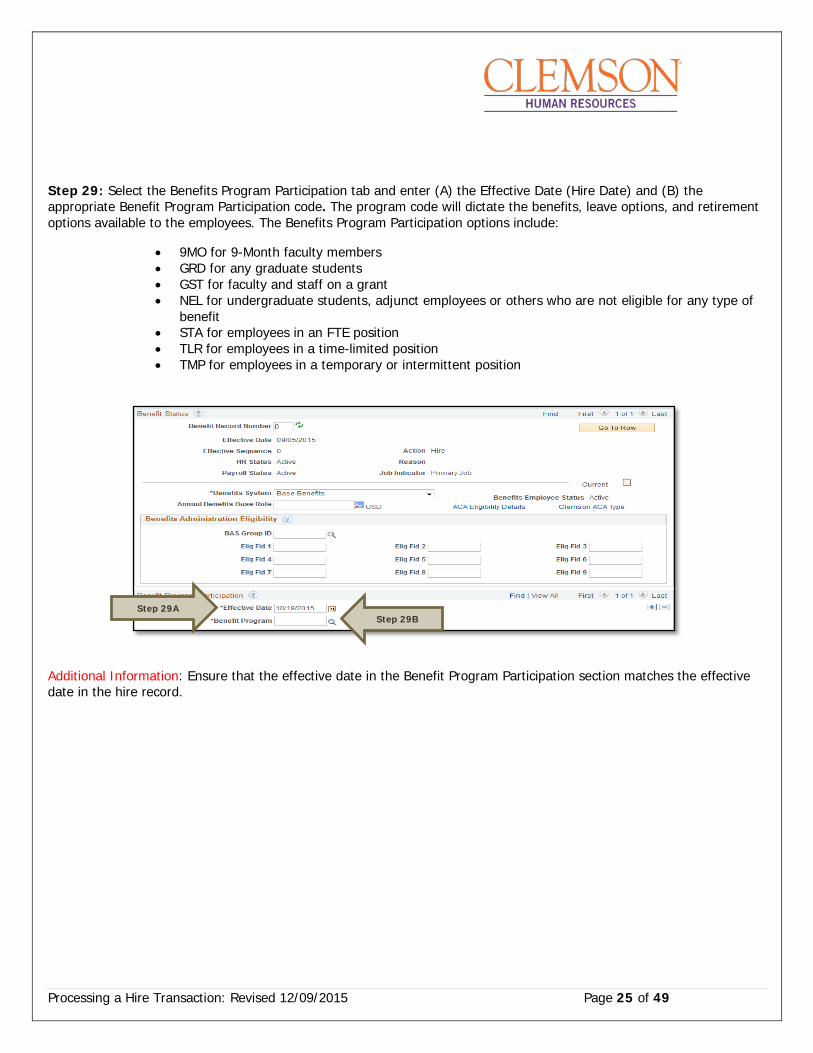
Step 29: Select the Benefits Program Participation tab and enter (A) the Effective Date (Hire Date) and (B) the appropriate Benefit Program Participation code. The program code will dictate the benefits, leave options, and retirement options available to the employees. The Benefits Program Participation options include:
• 9MO for 9-Month faculty members • GRD for any graduate students • GST for faculty and staff on a grant • NEL for undergraduate students, adjunct employees or others who are not eligible for any type of
benefit • STA for employees in an FTE position • TLR for employees in a time-limited position • TMP for employees in a temporary or intermittent position
Additional Information: Ensure that the effective date in the Benefit Program Participation section matches the effective date in the hire record.
Step 29B Step 29A
Processing a Hire Transaction: Revised 12/09/2015 Page 26 of 49
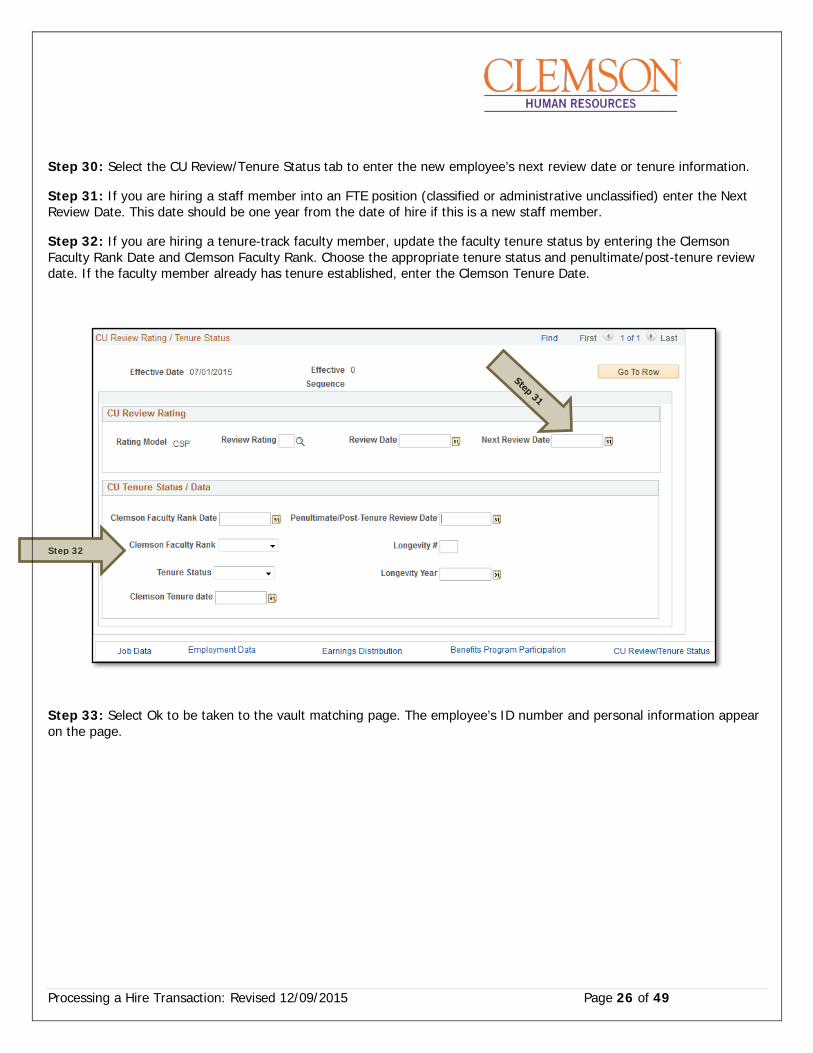
Step 30: Select the CU Review/Tenure Status tab to enter the new employee’s next review date or tenure information.
Step 31: If you are hiring a staff member into an FTE position (classified or administrative unclassified) enter the Next Review Date. This date should be one year from the date of hire if this is a new staff member.
Step 32: If you are hiring a tenure-track faculty member, update the faculty tenure status by entering the Clemson Faculty Rank Date and Clemson Faculty Rank. Choose the appropriate tenure status and penultimate/post-tenure review date. If the faculty member already has tenure established, enter the Clemson Tenure Date.
Step 33: Select Ok to be taken to the vault matching page. The employee’s ID number and personal information appear on the page.
Step 32
Processing a Hire Transaction: Revised 12/09/2015 Page 27 of 49
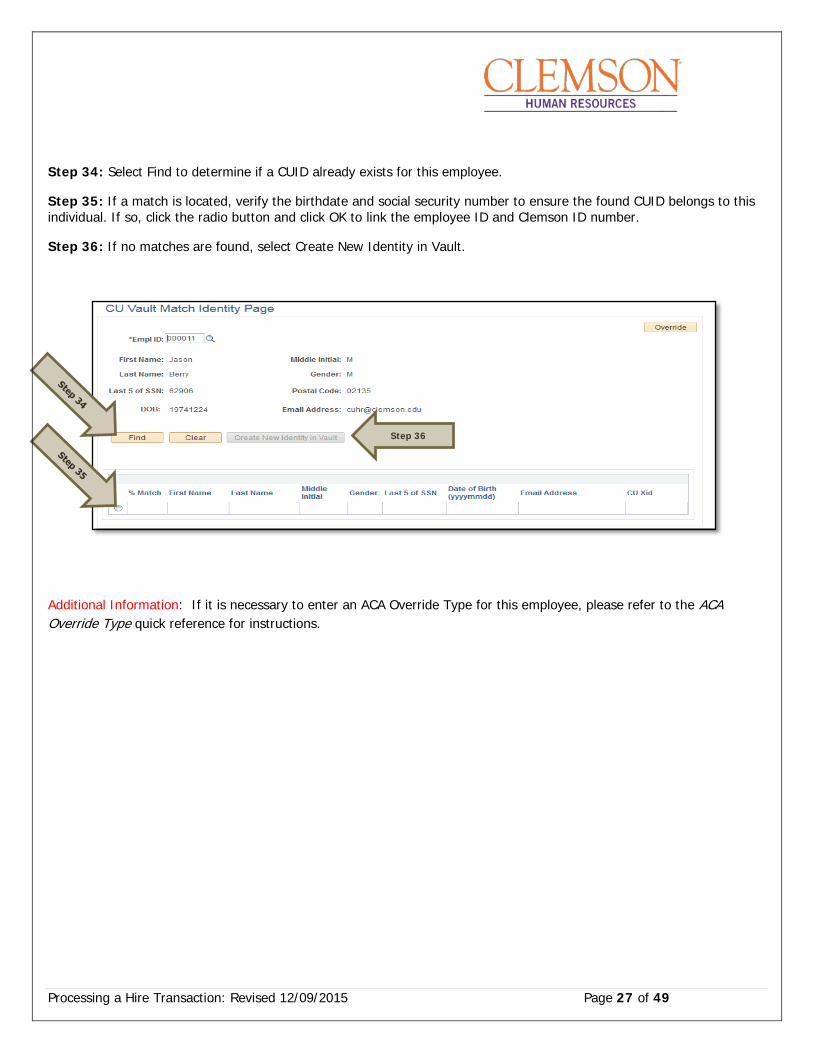
Step 34: Select Find to determine if a CUID already exists for this employee.
Step 35: If a match is located, verify the birthdate and social security number to ensure the found CUID belongs to this individual. If so, click the radio button and click OK to link the employee ID and Clemson ID number.
Step 36: If no matches are found, select Create New Identity in Vault.
Additional Information: If it is necessary to enter an ACA Override Type for this employee, please refer to the ACA Override Type quick reference for instructions.
Step 36
Processing a Hire Transaction: Revised 12/09/2015 Page 28 of 49
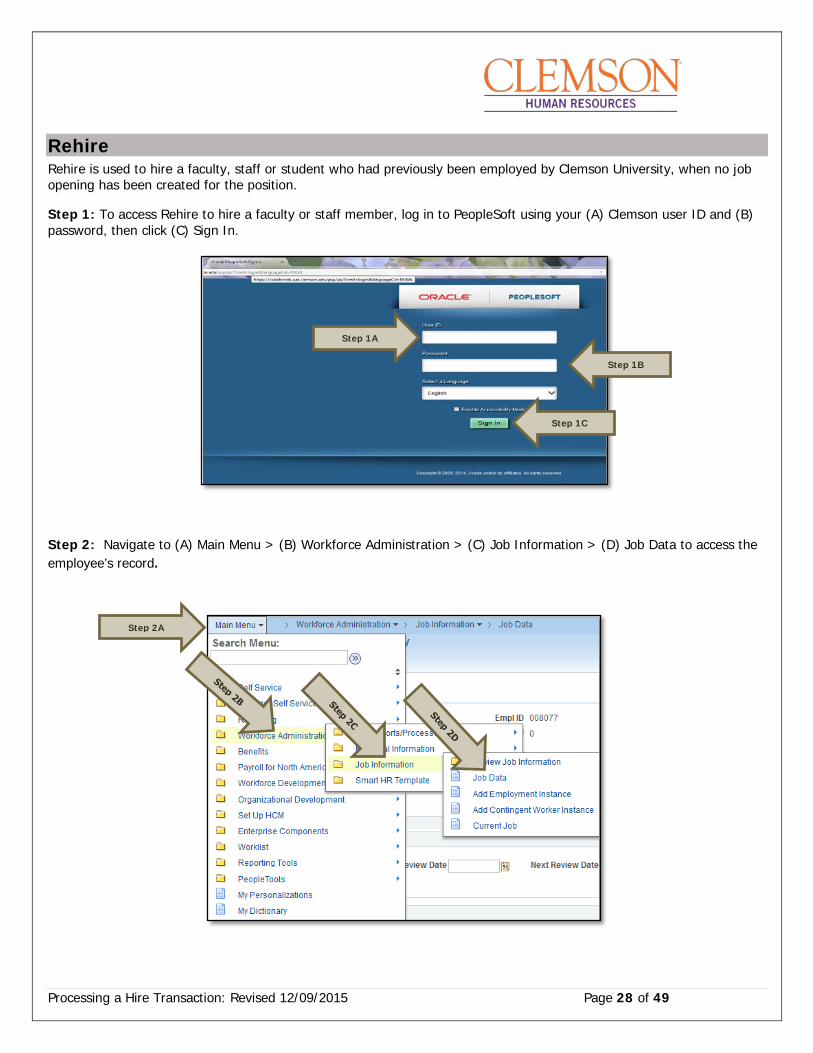
Rehire Rehire is used to hire a faculty, staff or student who had previously been employed by Clemson University, when no job opening has been created for the position.
Step 1: To access Rehire to hire a faculty or staff member, log in to PeopleSoft using your (A) Clemson user ID and (B) password, then click (C) Sign In.
Step 2: Navigate to (A) Main Menu > (B) Workforce Administration > (C) Job Information > (D) Job Data to access the employee’s record.
Step 2A
Step 1B
Step 1C
Step 1A

Processing a Hire Transaction: Revised 12/09/2015 Page 29 of 49
Step 3: In the Search Criteria section, enter the employee’s Empl ID, Name, National ID or Clemson University XID number.
Step 4: Click Search to see the employee’s job record.
Additional Information: If your search results in more than one record, verify the information on the record you select.
Step 4
Processing a Hire Transaction: Revised 12/09/2015 Page 30 of 49
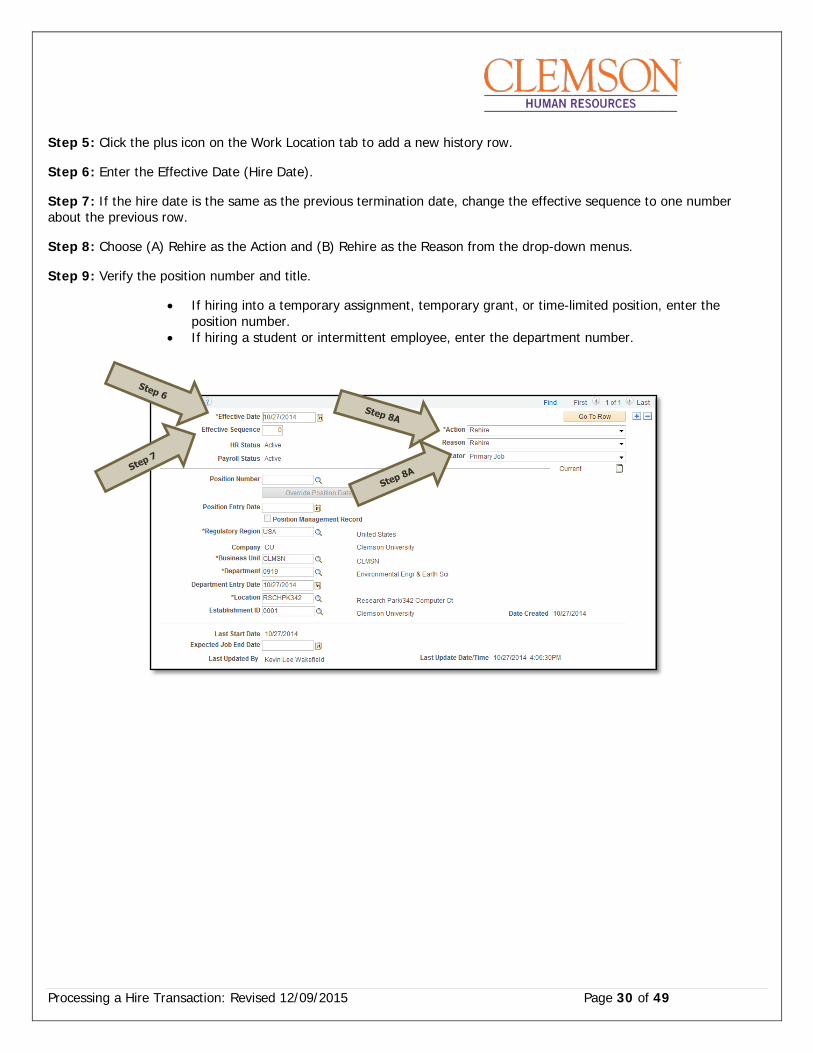
Step 5: Click the plus icon on the Work Location tab to add a new history row.
Step 6: Enter the Effective Date (Hire Date).
Step 7: If the hire date is the same as the previous termination date, change the effective sequence to one number about the previous row.
Step 8: Choose (A) Rehire as the Action and (B) Rehire as the Reason from the drop-down menus.
Step 9: Verify the position number and title.
• If hiring into a temporary assignment, temporary grant, or time-limited position, enter the position number.
• If hiring a student or intermittent employee, enter the department number.
Processing a Hire Transaction: Revised 12/09/2015 Page 31 of 49
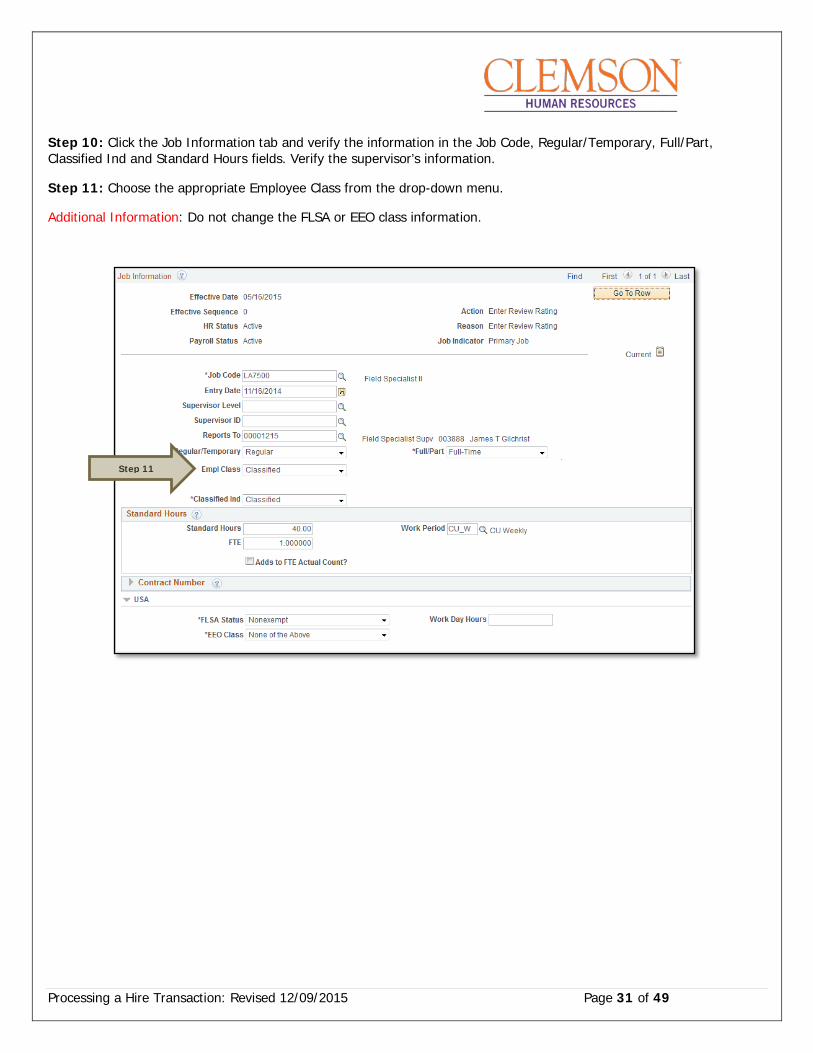
Step 10: Click the Job Information tab and verify the information in the Job Code, Regular/Temporary, Full/Part, Classified Ind and Standard Hours fields. Verify the supervisor’s information.
Step 11: Choose the appropriate Employee Class from the drop-down menu.
Additional Information: Do not change the FLSA or EEO class information.
Step 11
Processing a Hire Transaction: Revised 12/09/2015 Page 32 of 49
Step 12: Click the Payroll Information tab and choose the applicable Pay Group from the list provided.
Pay groups include:
• 12H—applicable for positions being paid by the hour • 12L—applicable for positions being paid an annual salary • FED—applicable for positions designated as federal • INT—applicable for intermittent positions where the majority of the work time is spent teaching • 9MA—applicable for positions set up as 9-month (i.e., faculty)
Step 13: Click on the Compensation tab and select the Rate Code.
• NAANNL is used to establish an annual base salary rate. • NAHRLY is used to establish an hourly base salary rate.
Step 14: Enter the Comp Rate, which is either the employee’s annual salary or the hourly rate (if paid by the hour).
Step 15: Ensure the Frequency is the same in the Compensation section and the Pay Components section.
Step 16: Click Calculate Compensation.
Step 16
Step 12

Processing a Hire Transaction: Revised 12/09/2015 Page 33 of 49
Step 17: Click the Employment Data tab and verify (A) the Business Title and (B) the Position Phone number.
Step 18: Click on the CU Business Addr tab and enter the business address.
Processing a Hire Transaction: Revised 12/09/2015 Page 34 of 49
Step 19: Choose the Earnings Distribution tab and enter the account codes.
Step 20: Select either “By Percent” or “By Amount” as the Earnings Distribution Type.
Step 21: Enter the Percent of Distribution or the Amount for each account code.
Step 22: Click Edit Account Code to enter the account, fund, department, program code, class field, and project grant numbers.
Step 23: To add additional account numbers, click the plus icon and enter the account information.
Additional Information: The earnings distribution must equal 100 percent or the full amount of the overall salary.
Step 20
Step 22
Processing a Hire Transaction: Revised 12/09/2015 Page 35 of 49
Step 24: Select the Benefits Program Participation tab and enter (A) the Effective Date (Hire Date) and (B) the appropriate Benefit Program code. The program code will dictate the benefits, leave options and retirement options available to the employee. The Benefit Program code options include:
• 9MO for 9-month faculty members • GRD for any graduate students • GST for faculty and staff on a grant • NEL for undergraduate students, adjunct employees or others who are not eligible for any type of
benefit • STA for employees in an FTE position • TLR for employees in a time-limited position • TMP for employees in a temporary or intermittent position
Additional Information: Ensure the effective date in the Benefit Program Participation section matches the effective date in the hire record.
Step 24B Step 24A
Processing a Hire Transaction: Revised 12/09/2015 Page 36 of 49
Step 25: Select the CU Review/Tenure Status tab to enter the new employee’s next review date or tenure information.
Step 26: If you are hiring a staff member into an FTE position (classified or administrative unclassified) enter the Next Review Date. This date should be one year from the date of hire if this is a new staff member.
Step 27: If you are hiring a tenure-track faculty member, update the faculty tenure status by entering the Clemson Faculty Rank Date and Clemson Faculty Rank. Choose the appropriate tenure status and penultimate/post-tenure review date. If the faculty member already has tenure established, enter the Clemson Tenure Date.
Additional Information: If it is necessary to enter an ACA Override Type for this employee, please refer to the ACA Override Type quick reference for instructions.
Step 27
Processing a Hire Transaction: Revised 12/09/2015 Page 37 of 49
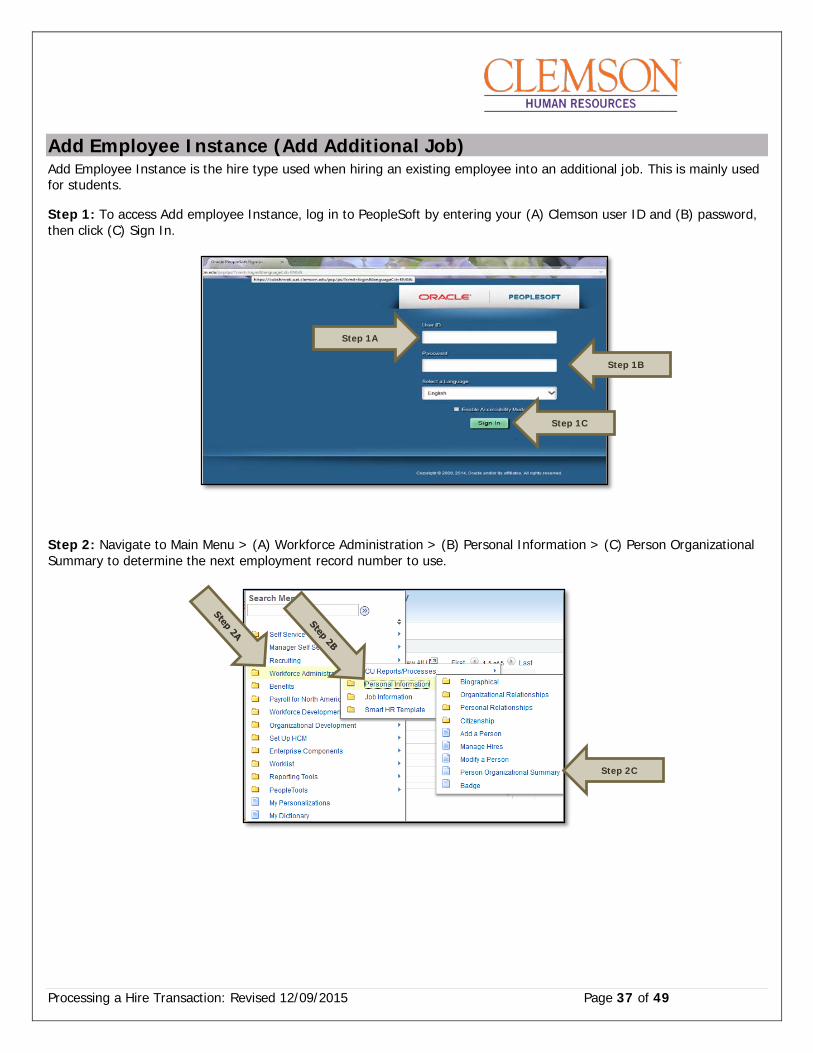
Add Employee Instance (Add Additional Job) Add Employee Instance is the hire type used when hiring an existing employee into an additional job. This is mainly used for students.
Step 1: To access Add employee Instance, log in to PeopleSoft by entering your (A) Clemson user ID and (B) password, then click (C) Sign In.
Step 2: Navigate to Main Menu > (A) Workforce Administration > (B) Personal Information > (C) Person Organizational Summary to determine the next employment record number to use.
Step 1B
Step 1C
Step 1A
Step 2C
Processing a Hire Transaction: Revised 12/09/2015 Page 38 of 49
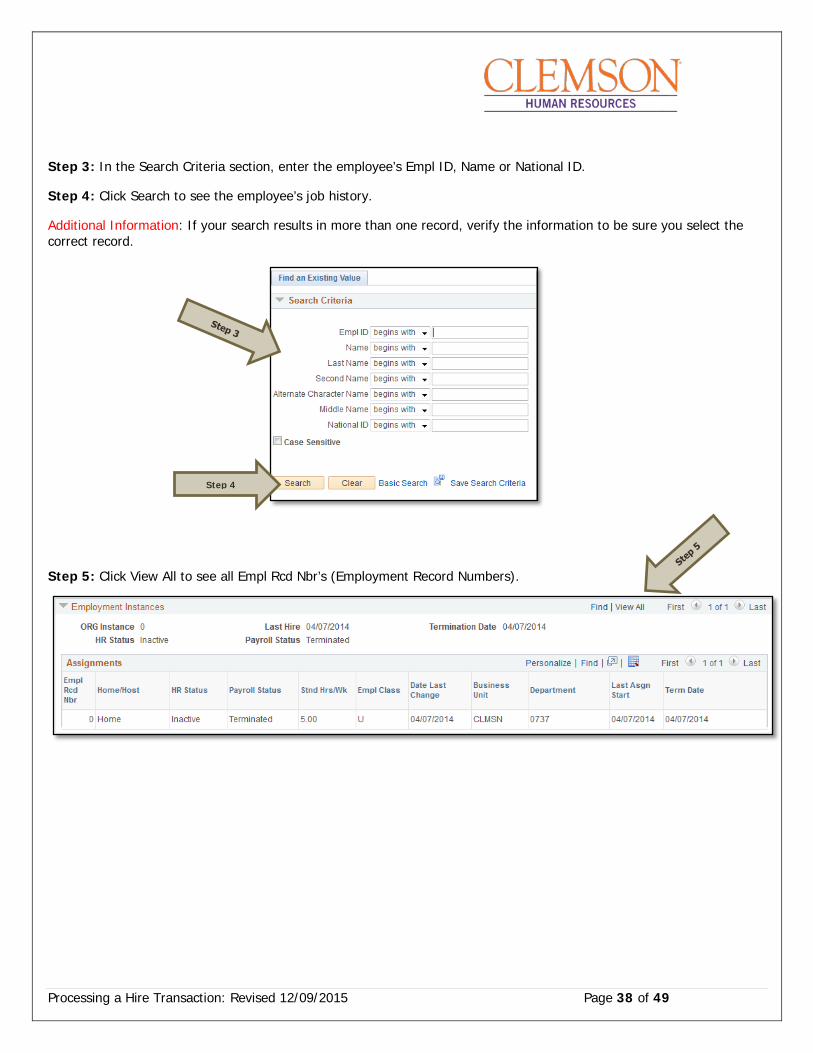
Step 3: In the Search Criteria section, enter the employee’s Empl ID, Name or National ID.
Step 4: Click Search to see the employee’s job history.
Additional Information: If your search results in more than one record, verify the information to be sure you select the correct record.
Step 5: Click View All to see all Empl Rcd Nbr’s (Employment Record Numbers).
Step 4
Processing a Hire Transaction: Revised 12/09/2015 Page 39 of 49
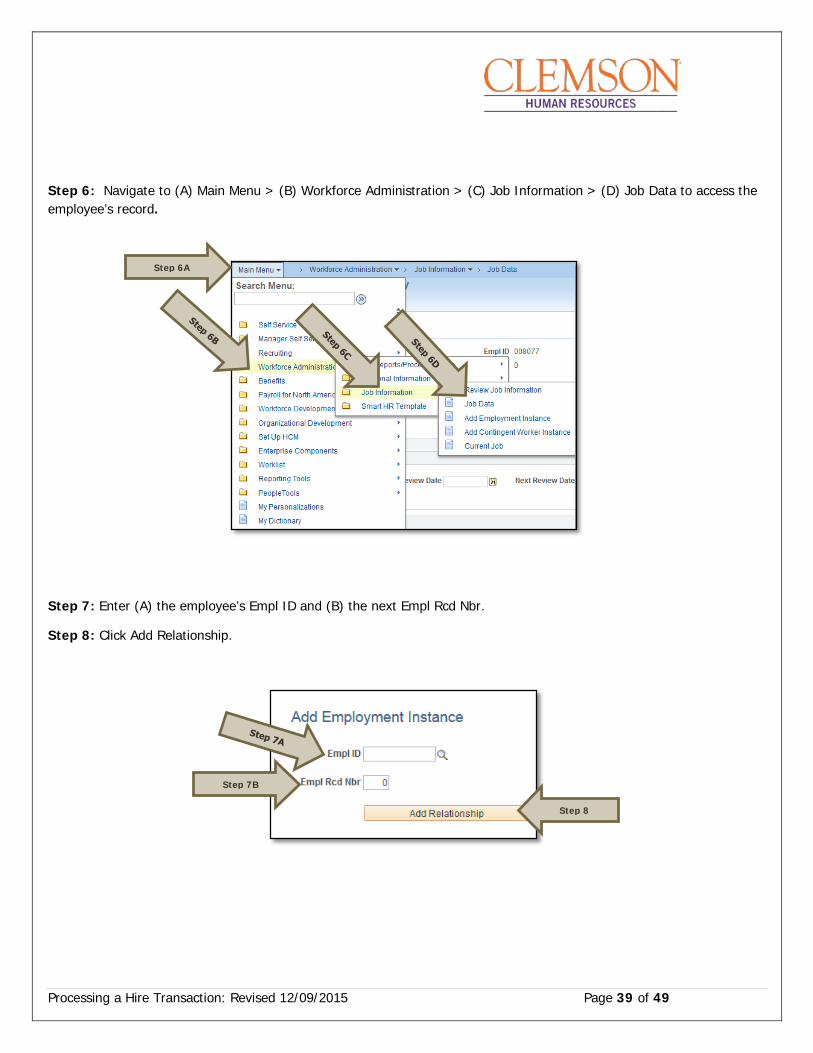
Step 6: Navigate to (A) Main Menu > (B) Workforce Administration > (C) Job Information > (D) Job Data to access the employee’s record.
Step 7: Enter (A) the employee’s Empl ID and (B) the next Empl Rcd Nbr.
Step 8: Click Add Relationship.
Step 6A
Step 8
Step 7B
Processing a Hire Transaction: Revised 12/09/2015 Page 40 of 49
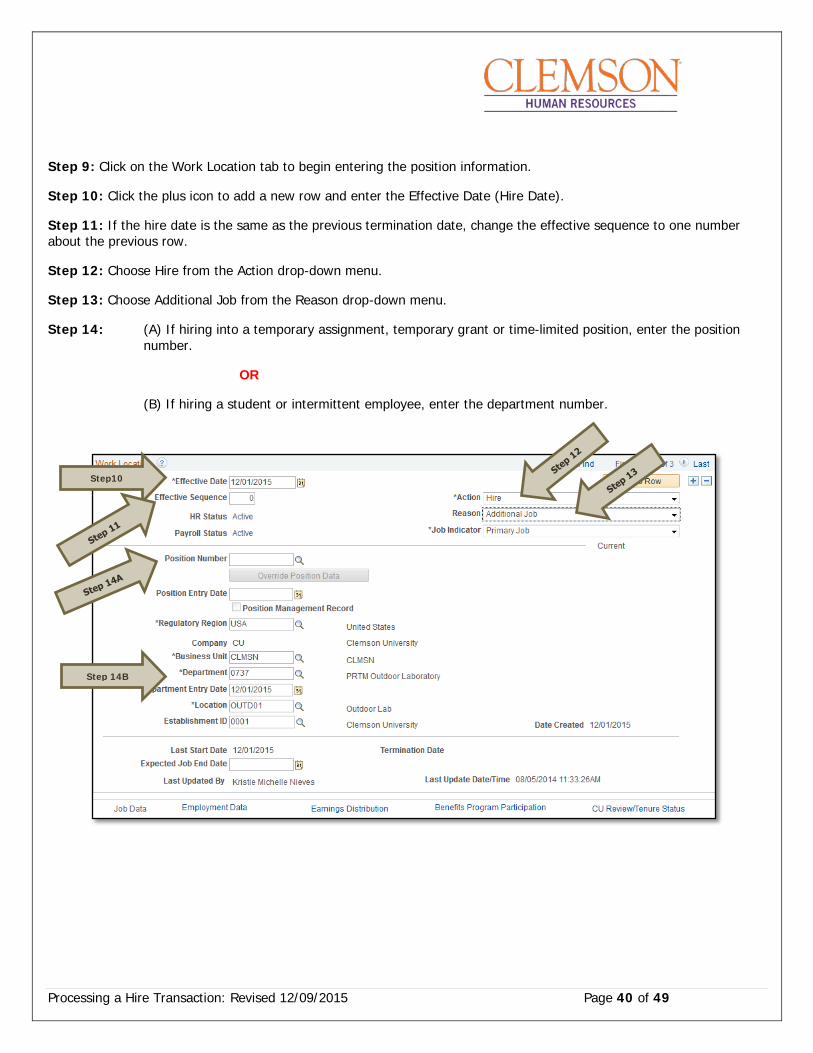
Step 9: Click on the Work Location tab to begin entering the position information.
Step 10: Click the plus icon to add a new row and enter the Effective Date (Hire Date).
Step 11: If the hire date is the same as the previous termination date, change the effective sequence to one number about the previous row.
Step 12: Choose Hire from the Action drop-down menu.
Step 13: Choose Additional Job from the Reason drop-down menu.
Step 14: (A) If hiring into a temporary assignment, temporary grant or time-limited position, enter the position number.
OR
(B) If hiring a student or intermittent employee, enter the department number.
Step 14B
Step10
Processing a Hire Transaction: Revised 12/09/2015 Page 41 of 49
Step 15: Click the Job Information tab and verify the information in the Job Code, Regular/Temporary, Full/Part, Classified Ind and Standard Hours fields. Verify the supervisor’s information.
Step 16: Choose the appropriate employee class from the Empl Class drop-down menu.
Additional Information: Do not change the FLSA or EEO class information.
Step 16
Processing a Hire Transaction: Revised 12/09/2015 Page 42 of 49
Step 17: Click the Payroll Information tab and choose the applicable Pay Group from those provided.
Pay groups include:
• 12H—applicable for positions paid by the hour • 12L—applicable for positions paid an annual salary • FED—applicable for positions designated as federal • INT—applicable for intermittent positions where the majority of the work time is spent teaching • 9MA—applicable for positions set up as 9-month (i.e., faculty)
Step 17
Processing a Hire Transaction: Revised 12/09/2015 Page 43 of 49
Step 18: Click the Compensation tab and select the Rate Code.
• NAANNL is used to establish an annual base salary rate. • NAHRLY is used to establish an hourly base salary rate.
Step 19: Enter the Comp Rate, which is either the employee’s annual salary or the hourly rate (if paid by the hour).
Step 20: Ensure the Frequency is the same in the Compensation section and the Pay Components section.
Step 21: Click Calculate Compensation.
Step 22: Click the Employment Data tab and verify (A) the Business Title and (B) the Position Phone number.
Step 21
Processing a Hire Transaction: Revised 12/09/2015 Page 44 of 49
Step 23: Click on the CU Business Addr tab and enter the business address.
Step 24: Choose the Earnings Distribution tab and enter the account codes.
Step 25: Select either “By Percent” or “By Amount” as the Earnings Distribution Type.
Step 26: Enter the Percent of Distribution or the Amount for each account code.
Step 27: Click Edit Account Code to enter the account, fund, department, program code, class field, and project grant numbers.
Step 28: To add additional account numbers, click the plus icon and enter the account information.
Additional Information: The earnings distribution must equal 100 percent or the full amount of the overall salary.
Step 25
Step 27
Processing a Hire Transaction: Revised 12/09/2015 Page 45 of 49
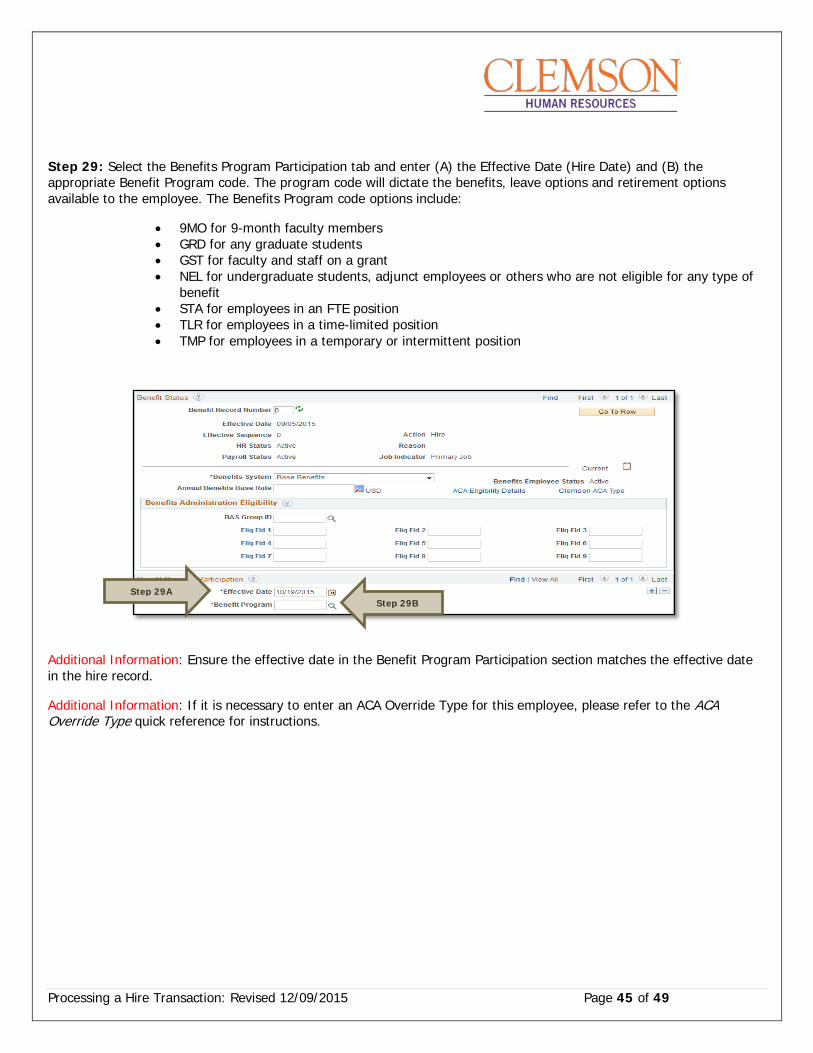
Step 29: Select the Benefits Program Participation tab and enter (A) the Effective Date (Hire Date) and (B) the appropriate Benefit Program code. The program code will dictate the benefits, leave options and retirement options available to the employee. The Benefits Program code options include:
• 9MO for 9-month faculty members • GRD for any graduate students • GST for faculty and staff on a grant • NEL for undergraduate students, adjunct employees or others who are not eligible for any type of
benefit • STA for employees in an FTE position • TLR for employees in a time-limited position • TMP for employees in a temporary or intermittent position
Additional Information: Ensure the effective date in the Benefit Program Participation section matches the effective date in the hire record.
Additional Information: If it is necessary to enter an ACA Override Type for this employee, please refer to the ACA Override Type quick reference for instructions.
Step 29B Step 29A
Processing a Hire Transaction: Revised 12/09/2015 Page 46 of 49
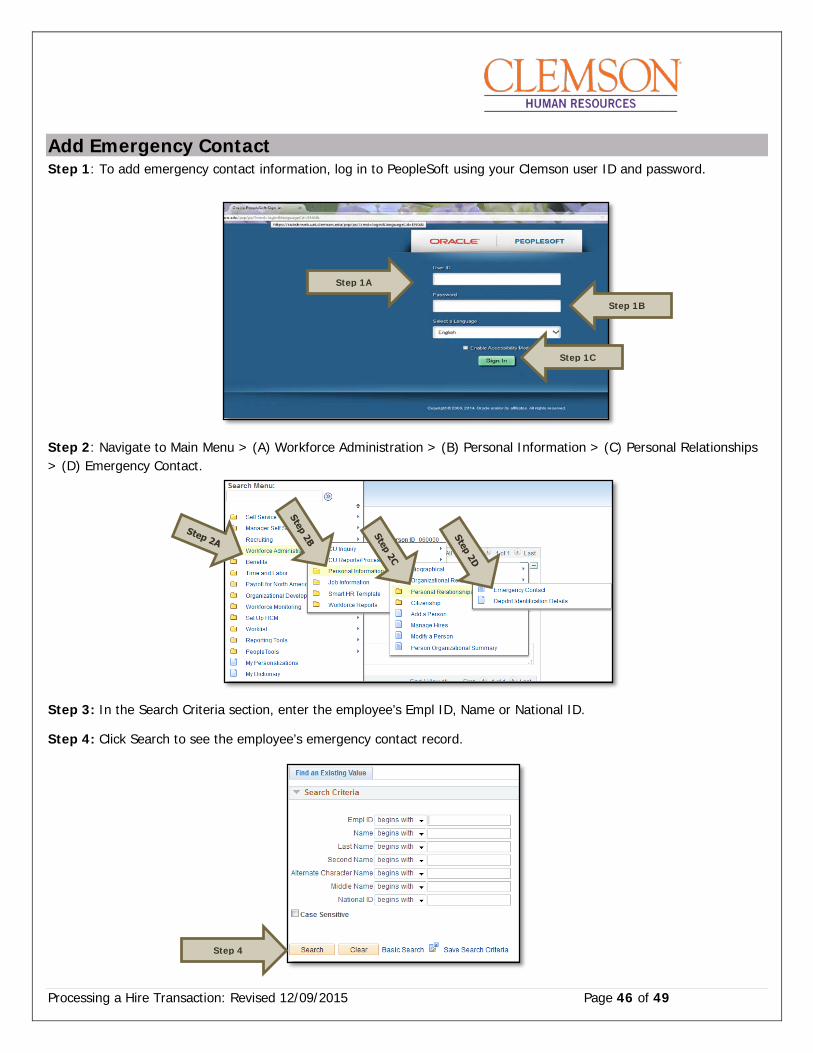
Add Emergency Contact Step 1: To add emergency contact information, log in to PeopleSoft using your Clemson user ID and password.
Step 2: Navigate to Main Menu > (A) Workforce Administration > (B) Personal Information > (C) Personal Relationships > (D) Emergency Contact.
Step 3: In the Search Criteria section, enter the employee’s Empl ID, Name or National ID.
Step 4: Click Search to see the employee’s emergency contact record.
Step 1A
Step 1B
Step 1C
Step 4
Processing a Hire Transaction: Revised 12/09/2015 Page 47 of 49
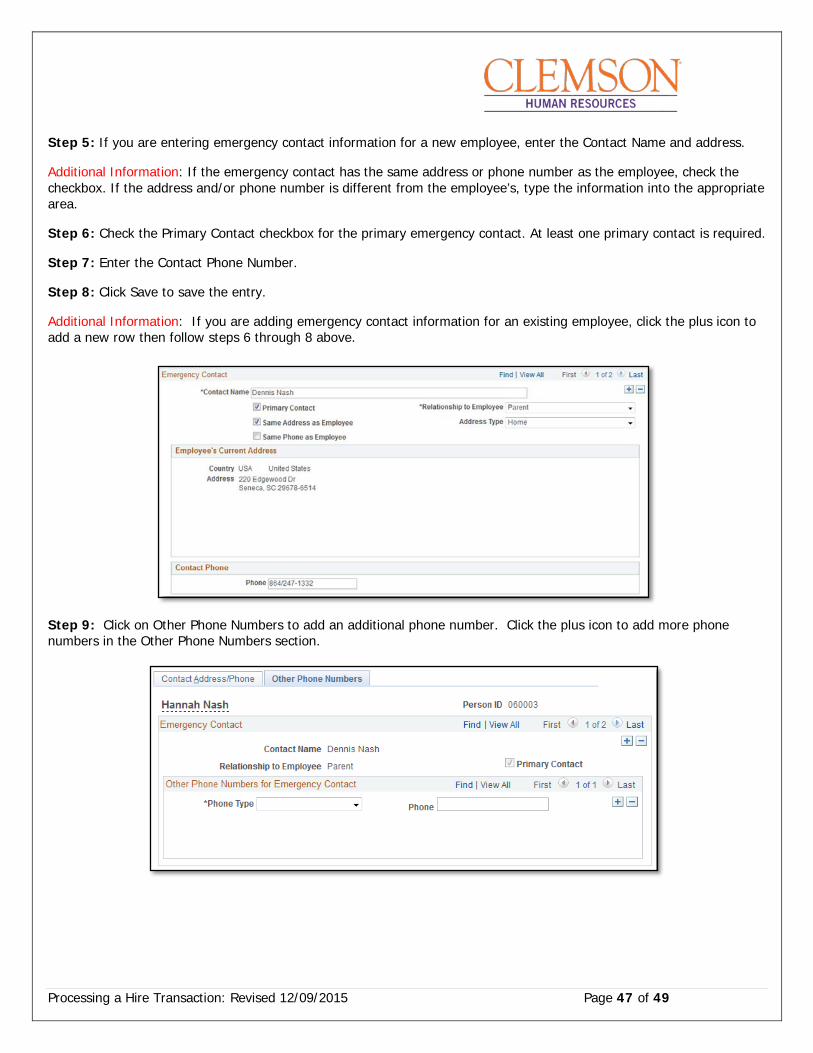
Step 5: If you are entering emergency contact information for a new employee, enter the Contact Name and address.
Additional Information: If the emergency contact has the same address or phone number as the employee, check the checkbox. If the address and/or phone number is different from the employee’s, type the information into the appropriate area.
Step 6: Check the Primary Contact checkbox for the primary emergency contact. At least one primary contact is required.
Step 7: Enter the Contact Phone Number.
Step 8: Click Save to save the entry.
Additional Information: If you are adding emergency contact information for an existing employee, click the plus icon to add a new row then follow steps 6 through 8 above.
Step 9: Click on Other Phone Numbers to add an additional phone number. Click the plus icon to add more phone numbers in the Other Phone Numbers section.

Processing a Hire Transaction: Revised 12/09/2015 Page 48 of 49
Add Driver’s License Step 1: To add driver’s license information, log in to PeopleSoft using your (A) Clemson user ID and (B) password, then click (C) Sign In.
Step 2: Navigate to Main Menu > (A) Personal Information > (B) Biographical > (C) Driver’s License Data.
Step 1A
Step 1B
Step 1C
Processing a Hire Transaction: Revised 12/09/2015 Page 49 of 49
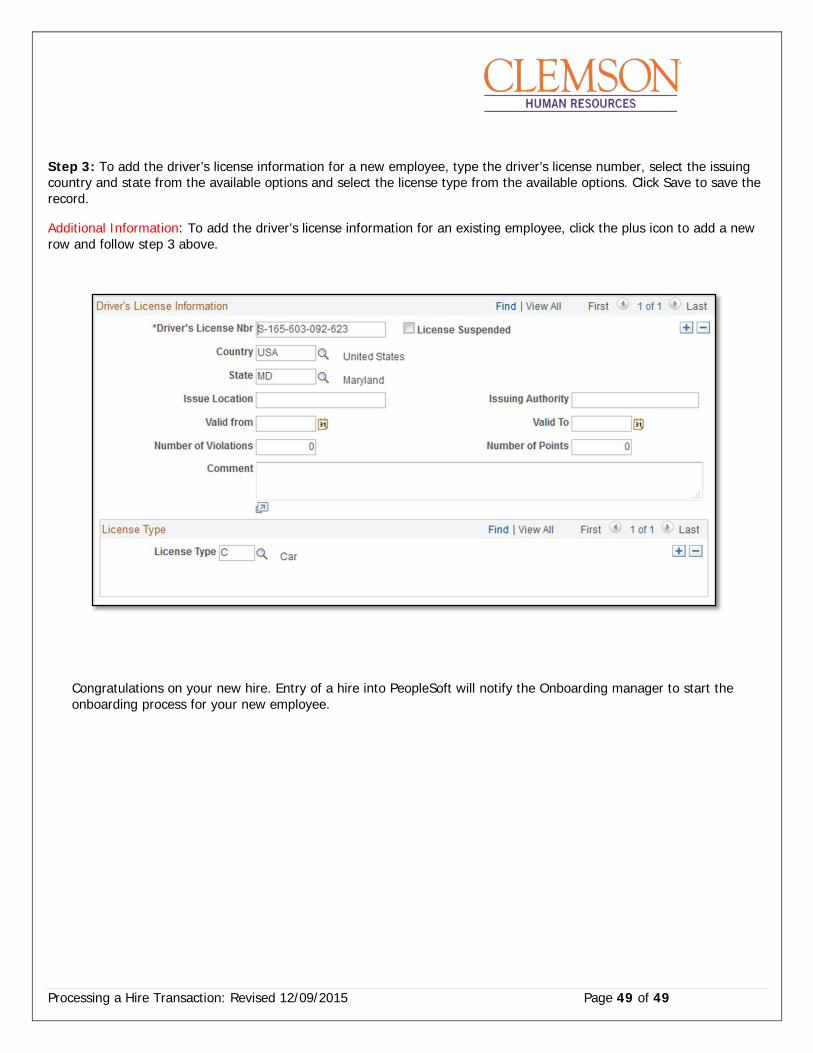
Step 3: To add the driver’s license information for a new employee, type the driver’s license number, select the issuing country and state from the available options and select the license type from the available options. Click Save to save the record.
Additional Information: To add the driver’s license information for an existing employee, click the plus icon to add a new row and follow step 3 above.
Congratulations on your new hire. Entry of a hire into PeopleSoft will notify the Onboarding manager to start the onboarding process for your new employee.