Embed Size (px)
Citation preview

PENTAX VIDEO GI SCOPES
EG-290Kp
OWNER’S MANUAL
EC-380LKp

Intended Use (Gastroscope)These instruments are intended to provide optical visualization of (via a video monitor), and therapeutic access to, the Upper Gastrointestinal Tract.This anatomy includes, but is not restricted to, the organs; tissues; and subsystems: Esophagus, Stomach, Duodenum and Small Bowel.
The instruments are introduced via the mouth when indications consistent with the need for the procedure are observed in adult and pediatric patientpopulations.
Never use the endoscope for any purpose other than that for which it has been designed.
The video endoscopes contained in this manual can only be used with PENTAX video processor, model EPK-1000 and EPK-i.
Intended Use (Colonoscopes)These instruments are intended to provide optical visualization of (via a video monitor), and therapeutic access to, the Lower Gastrointestinal Tract.The This anatomy includes, but is not restricted to, the organs; tissues; and subsystems: Large Bowel to the Cecum.
These instruments are introduced via the rectum when indications consistent with the need for the procedure are observed in adult and pediatric patientpopulations.
Never use these endoscopes for any purpose other than that for which they have been designed.
These video endoscopes contained in this manual can only be used with PENTAX video processors, model EPK-1000 and EPK-i.
NotesRead this manual before operating, and save this book for future reference. Failure to read and thoroughly understand the information presented in thismanual, as well as those developed for ancillary endoscopic equipment and accessories, may result in serious injury including infection by crosscontamination to the patient and/or user. Furthermore, failure to follow the instructions in this manual may result in damage to, and/or malfunction of,the equipment.
This manual describes the recommended procedures for inspecting and preparing the equipment prior to its use and for the reprocessing andmaintenance of the equipment after its use. It does not describe how an actual procedure is to be performed, nor does it attempt to teach the beginnerthe proper technique or any medical aspects regarding the use of the equipment.
It is the responsibility of each medical facility to ensure that only well educated and appropriately trained personnel, who are competent andknowledgeable about the endoscopic equipment, antimicrobial agents/processes and hospital infection control protocol be involved in the use and thereprocessing of these medical devices. Known risks and/or potential injuries associated with flexible endoscopic procedures include, but are not limitedto, the following: perforation, infection, hemorrhage, burns and electric shock.
Current infection control guidelines require that G.I.scopes and other semi-critical medical devices, that normally come into contact with intact mucousmembranes, such as in the gastrointestinal tract, must at least be high-level disinfected before patient use. Only the user can determine if an instrumenthas undergone appropriate infection control procedures prior to each clinical use. It must be recognized that infection control practices involve manycomplex and often controversial issues which are constantly evolving. PENTAX strongly recommends that user remain informed of the latest federaland local regulations, and encourages users to follow infection control guidelines developed by various organizations for health care professionals.
The text contained in this manual is common for various types/models of PENTAX endoscopes and users must carefully follow only those sections andinstructions pertaining to the specific instrument models appearing on the front cover.
If you have any questions regarding any of the information in this manual or concerns pertaining to the safety and/or use of this equipment, pleasecontact your local PENTAX representative.
Sterility StatementThe instruments identified in this instructional booklet are reusable medical devices. Since they are packaged non-sterile, they must be high-leveldisinfected or sterilized BEFORE initial use. Prior to each subsequent procedure, they must be subjected to an appropriate cleaning and either high-level disinfection or sterilization process.
ConventionsThroughout this manual, the following conventions will be used to indicate a potentially hazardous situation which, if not avoided;
: could result in death or serious injury.
: may result in minor or moderate injury or property-damage.
: may result in property-damage. Also, advises owner/operator about important information on the use of this equipment.
Prescription StatementFederal (U.S.A) law restricts this device to sale by or on the order of a physician or other appropriately licensed medical professional.
EC REP
Symbol for “MANUFACTURER”
Symbol for “DATE OF MANUFACTURE”
Symbol for “AUTHORISEDREPRESENTATIVE”

TABLE OF CONTENTS
1. NOMENCLATURE AND FUNCTION. . . . . . . . . . . . . . . . . . . . . . . . . . . . . . . . . . . . . . 1
1-1. VIDEO ENDOSCOPE . . . . . . . . . . . . . . . . . . . . . . . . . . . . . . . . . . . . . . . . . . . . . . . . . . 1
1-2. ACCESSORIES . . . . . . . . . . . . . . . . . . . . . . . . . . . . . . . . . . . . . . . . . . . . . . . . . . . . . . . 3
1-3. VIDEO PROCESSOR. . . . . . . . . . . . . . . . . . . . . . . . . . . . . . . . . . . . . . . . . . . . . . . . . . . 4
2. PREPARATION AND INSPECTION FOR USE. . . . . . . . . . . . . . . . . . . . . . . . . . . . . . 5
2-1. INSPECTION OF THE VIDEO PROCESSOR . . . . . . . . . . . . . . . . . . . . . . . . . . . . . . . 5
2-2. INSPECTION OF ENDOSCOPE. . . . . . . . . . . . . . . . . . . . . . . . . . . . . . . . . . . . . . . . . . 6
2-3. PREPARATION JUST BEFORE INSERTION OF ENDOSCOPE . . . . . . . . . . . . . . . 13
3. DIRECTIONS FOR USE
3-1. PRETREATMENT . . . . . . . . . . . . . . . . . . . . . . . . . . . . . . . . . . . . . . . . . . . . . . . . . . . . . 15
3-2. INSERTION AND WITHDRAWAL . . . . . . . . . . . . . . . . . . . . . . . . . . . . . . . . . . . . . . . 15
3-3. BIOPSY. . . . . . . . . . . . . . . . . . . . . . . . . . . . . . . . . . . . . . . . . . . . . . . . . . . . . . . . . . . . . . 17
3-4. LASER . . . . . . . . . . . . . . . . . . . . . . . . . . . . . . . . . . . . . . . . . . . . . . . . . . . . . . . . . . . . . . 18
3-5. ELECTRO-SURGERY. . . . . . . . . . . . . . . . . . . . . . . . . . . . . . . . . . . . . . . . . . . . . . . . . . 20
4. CARE AFTER USE . . . . . . . . . . . . . . . . . . . . . . . . . . . . . . . . . . . . . . . . . . . . . . . . . . . 21
4-1. ENDSCOPES . . . . . . . . . . . . . . . . . . . . . . . . . . . . . . . . . . . . . . . . . . . . . . . . . . . . . . . . . 234-1-1 INTERNAL CHANNELS . . . . . . . . . . . . . . . . . . . . . . . . . . . . . . . . . . . . . . . . . . . . . 234-1-2 PRE-CLEANING. . . . . . . . . . . . . . . . . . . . . . . . . . . . . . . . . . . . . . . . . . . . . . . . . . . . 264-1-3 CLEANING . . . . . . . . . . . . . . . . . . . . . . . . . . . . . . . . . . . . . . . . . . . . . . . . . . . . . . . . 274-1-4 HIGH-LEVEL DISINFECTION . . . . . . . . . . . . . . . . . . . . . . . . . . . . . . . . . . . . . . . . 324-1-5 STERILIZATION . . . . . . . . . . . . . . . . . . . . . . . . . . . . . . . . . . . . . . . . . . . . . . . . . . . 35
4-2. ENDOSCOPIC ACCESSORY INSTRUMENT (EAIs) AND ENDOSCOPE COMPONENTS . . . . . . . . . . . . . . . . . . . . . . . . . . . . . . . . . . . . . . . . . . . . . . . . . . . . . . . 364-2-1 CLEANING . . . . . . . . . . . . . . . . . . . . . . . . . . . . . . . . . . . . . . . . . . . . . . . . . . . . . . . . 364-2-2 DISINFECTION . . . . . . . . . . . . . . . . . . . . . . . . . . . . . . . . . . . . . . . . . . . . . . . . . . . . 384-2-3 STERILIZATION . . . . . . . . . . . . . . . . . . . . . . . . . . . . . . . . . . . . . . . . . . . . . . . . . . . 38
4-3. WATER BOTTLE ASSEMBLY . . . . . . . . . . . . . . . . . . . . . . . . . . . . . . . . . . . . . . . . . . 40
5. POST REPROCESSING . . . . . . . . . . . . . . . . . . . . . . . . . . . . . . . . . . . . . . . . . . . . . . . 42
5-1. SERVICING . . . . . . . . . . . . . . . . . . . . . . . . . . . . . . . . . . . . . . . . . . . . . . . . . . . . . . . . . . 43
5-2. CARE AND MAINTENANCE TIPS . . . . . . . . . . . . . . . . . . . . . . . . . . . . . . . . . . . . . . . 44

1. NOMENCLATURE AND FUNCTION
1-1. VIDEO ENDOSCOPE
NOTE:To avoid damaging the endoscope, do NOT twist, rotate or bend excessively any of the rubber strain reliefs.
ENHANCE BUTTON
Push to activate the VCR for recording live procedures.
UP/DOWN DEFLECTION LOCKWhen this lever is in the “F” position, turned clockwise, the bending section moves freely. When turned counterclockwise,the bending section becomes progressively more stabilized.
UMBILICAL CABLE
RIGHT/LEFT DEFLECTIONCONTROL KNOB
RIGHT/LEFT DEFLECTION LOCKFunctions similar to Up/Down lock
UP/DOWN DEFLECTION CONTROL KNOB
“F” (FREEZE) BUTTON Push to freeze an image.
“C” (COPY) BUTTON Push to activate the hardcopy system that was selected between “FILE” and “HARD COPY”.
MODEL DESIGNATION
SUCTION CONTROL VALVE (OF-B120)Depress to remove fluids or air throughthe instrument channel.
RUBBER INLET SEAL (OF-B190)Allows passage of accessories whilepreventing escape of fluids and air. INSTRUMENT
CHANNEL INLETFor introduction of biopsy forcepsand other accessoriesCONTROL BODY
AIR/WATER FEEDING VALVE (OF-B121)Covering of hole in the top of the valve deliverspressurized air. Covering of the hole and fullydepressing the valve delivers pressurized water.
U
LR
DFF
BUTTON Freeze
VCR
HardcopyBUTTON
BUTTON
EPK-1000
Freeze
VCR
Hardcopy
EPK-i
* The function can be changed. For more details, refer to the manual supplied with the processor
RUBBER STRAIN RELIEF
- 1 -

WARNING: Note: Immediately after use, the metal light guide prong and the electrical contacts/pins of the endoscope may be HOT. To avoid burns, do not touch these areas immediately after use. For safer handling after a procedure, grasp the PVE connector housing.
Ensure that the soaking cap has been securely attached (by properly rotating it) to prevent the cap from coming off during reprocessing. Failure to securely attach the soaking cap can result in scope damage.
INSERTION TUBE
ELECTRICAL CONTACTS
LIGHT GUIDETransmits light fromlight source to distalend of endoscope.
ETO GAS STERILIZATION VENTING CAP OF-C5Provides venting of endoscope interior to equalize internal and external pressures. This cap must beremoved before immersion.NOTE: See important separate section
regarding the use of this cap!
SUCTION NIPPLEFor attachment toexternal suctionsource
PVE CONNECTORCan be rotated within a 180 range
AIR/WATER PORTTo connect feeding tube from waterbottle assembly.
FEED BACK TERMINALCertain manufacturers’ electrosurgical units, suchas older Olympus models, require the connectionof a scope feedback cord (S-cord) to thisfeedback terminal.
VENTING CONNECTORAccepts “RED” ETO GAS Sterilization Venting cap.Also accepts Leakage Tester.
PVE SOAKING CAP OE-C9
BENDING SECTION
RED
This cap must be securely attached before immersion.
DISTAL END (Refer to the inside rear cover of this manual)
RUBBER STRAIN RELIEF
RUBBER STRAIN RELIEF
- 2 -

1-2. ACCESSORIES
CAUTION:• Because of the effect that accessories used through the instrument channel of the endoscope can
have on the performance of the endoscope itself, it is strongly recommended that PENTAX accesso-ries be used with PENTAX endocopes. If a unique or highly specialized accessory is available from another source, please contact PENTAX to arrange a test of its compatibility before using it through the PENTAX endoscope.
• Maximum outer diameter of an endoscopic accessory instrument must be at least 0.2 mm less than the specified instrument channel diameter in PENTAX endoscopes. Working length of an endoscopic accessory instrument should be approximately 30 cm longer than the endoscope working length.
NOTE:• Depending upon country and/or local PENTAX distributor, each PENTAX endoscopic accessory may
be an optional accessory.• For patient contact endoscopic accessories, follow the specific and detailed instructions on use, care
and maintenance supplied with each product.• To confirm the exact condition of any new accessory device, check the labeling/packaging accompany-
ing the product. Each label/package should clearly identify the contents as either sterile or non-sterile.
HANDLE
(CS6021SN)
FLEXIBLE SHAFTWHITE BRISTLE
1) Cleaning Brush for Instrument Channel
2) Cleaning Brush for A/W Suction Valve Cylinder
( CS-C5S )
3) Biopsy Forceps
ENHANCED FLEXIBLEPORTION
CUPS
FLEXIBLE SHAFTGRIP
HANDLE
Pink handle definesautoclavable forceps.
- 3 -

1-3. VIDEO PROCESSOR
CAUTION:Please refer to the instruction supplied with the processor.
NOTE:Do not use the new PENTAX OS-H4 water bottle cap with the older OS-H2 water container/bottle. Although the cap may appear to fit onto the bottle, air may escape resulting in insufficient pressure and flow of air and water during the endoscopic procedure. Both the PENTAX water bottle cap and bottle (container) are identified by their appropriate model designation. Ensure that an OS-H4 cap is used only with the OS-H4 water container/bottle.Do not overtighten the bottle cap. Overtighting can cause the bottle cap to break.
WARNING: The lifetime of the lamp in EPK-i processor is 500 hours. Prior to use, check the lamp life meter on the rearpanel to ensure the lamp life is less than 500 hours. After 500 hours of use, the image quality willdeteriorate. Excessive use of the lamp beyond 500 hours could break the lamp inside the equipmentresulting in damage to the equipment.
WARNING: The lifetime of the lamp in EPK-i processor is 500 hours. Prior to use, check the lamp life meter on the frontpanel to ensure the lamp life is less than 500 hours. After 500 hours of use, the image quality willdeteriorate. Excessive use of the lamp beyond 500 hours could break the lamp inside the equipmentresulting in damage to the equipment.
NOTE:The lamp life could be affected by frequency of use. In which case, the lamp life might become shorter thanits respective rated hours (EPK-i: 500 hours, EPK-1000 and EPK-100p: 400 hours)
WATER BOTTLE
LAMP SWITCH
AIR PUMP SWITCHLCD
POWER SWITCHINTERFACE SOCKET
EPK-1000
POWER SWITCH I : ON O: OFF
LAMP SWITCH
INTERFACESOCKET
BRIGHTNESSCONTROLS
AIR PUMP SWITCH
WATER BOTTLE
EPK-i
EPK-1000
- 4 -

2. PREPARATION AND INSPECTION FOR USEPrior to use, the endoscope, video processor and endoscopic accessory instruments must be carefully inspected for cleanliness and proper function to determine that they are appropriate for patient use:
2-1. INSPECTION OF THE VIDEO PROCESSOR
Please refer to the Owner’s Manual of the specific model of PENTAX video processor for complete instructions.1) Attach water bottle assembly, 2/3 filled with sterile water to the appropriate location on the left side of the
video processor.
2) Set the drain lever on the water bottle assembly to the upright position labeled A/W (air/water).3) Plug the processor into a properly grounded receptacle with the power switch in the OFF position.
4) Make sure that the PENTAX PVE connector is aligned with the interface socket on the front panel of the proc-essor.
5) Connect the endoscope to the interface socket on the processor as illustrated. Rotate the lever of the inter-face socket clockwise after insertion.
6) Connect the air/water feeding tube from the water bot-tle assembly to the air/water port on the side of the PVE connector.
7) Turn the processor and air pump to the “ON” position and check for proper functioning.8) Press the lamp switch of the processor to ignite the lamp.
NOTE:PENTAX video endoscopes contained in this manual are only compatible with PENTAX video processor, model EPK-1000 and EPK-i.
CAUTION:To avoid discontinuation of endoscopic procedure, have an extra (spare) instrument available as a standby device. Should any unforeseen event or circumstance render the original instrument inoperable and/or unsafe for patient.
WARNING:The addition of defoaming agents to the water supply is NOT recommended. Due to their nature, these silicone based agents cling tenaciously to surfaces. Unless they are rinsed very thoroughly, a “barrier” could be created which could reduce the effectiveness of the disinfection/sterilization process. Addition-ally, repeated use of such defoamers could eventually lead to residual silicone build up resulting in equipment malfunction such as clogged air and/or water channels.
EPK-1000
WATER BOTTLE
air/water feeding tube
CAUTIONFailure to do so may create a “miscommunication” between the scope and processor and may result in the loss of the system’s automatic brightness control and in excessive light emission from the scope. Excessive light intensity can in turn increase the amount of delivered thermal energy causing heating of the scope tip, specifically the illumination (LCB) cover glass and/or objects in contact with the distal cover glass.
- 5 -

9) Prior to each procedure, check the endoscope image quality displayed on the monitor. Confirm that the image quality, color, automatic brightness (iris) functions are acceptable as per the instructions provided with the PENTAX video processor.
2-2. INSPECTION OF ENDOSCOPE
Before proceeding with inspection of individual functions, PENTAX endoscopes should be tested for the integrity of their water-tight design (example: tear in the instrument channel). This test is described in another section of this manual entitled: “Leakage Testing.”
1) Inspection of the Insertion Tubea) Check the entire surface of the insertion tube for abnormal conditions such as dents, crush marks, wrin-
kles, bumps, buckles, excessive bending, protrusions, bite marks, peeling of outer sheath, cuts/holes or other irregularities. Any crush or indentation of the flexible shaft of the endoscopes can cause damage to the internal mechanisms of the endoscopes.
b) Similarly, check the condition of the umbilical cable for outward signs of damage such as buckling, crush marks, etc.
c) Make sure that the entire endoscope is clean and has been subjected to either a high-level disinfection or sterilization process before each patient use.
NOTE:As indicated elsewhere in PENTAX product labeling, endoscopes particularly the quality of the endo-scopic image should be checked prior to patient use.
CAUTION:If the endoscope is intended to be clinically used after testing of individual scope functions (suction, air/water delivery, water jet, etc.) without further reprocessing, the following precaution should be exercised.Use “fresh” distilled or sterile water during individual scope function tests to avoid recontamination of the previously reprocessed instrument by waterborne microorganisms. Tap water, especially that which may be left idle and uncovered for a prolonged period of time, should not be used during any inspection/test-ing of the endoscope.
CAUTION:Various types of endoscope leakage testers exist including manual, electro-mechanical and “automated” versions, some of which are stand alone units and others which may be integrated into Automated Endo-scope Reprocessors (AERs)/Washer-Disinfectors (WDs). It must be recognized that PENTAX does not evaluate non-PENTAX leak tester systems to satisfy their specific products claims, for their effectiveness to accurately detect leaks and/or for their compatibility with PENTAX endoscopes. Insufficient pressures may adversely affect the endoscope, especially if pressurization occurs during automated reprocessing at elevated temperatures. PENTAX accepts no responsibility for use of non-PENTAX leakage testers.Users should check with the leakage tester manufacturer and confirm their specific product claims, including compatibility with PENTAX endoscopes at various temperatures and their ability to detect leaks with/without fluid immersion and with/without flexing of the scope’s distal bending section.
CAUTION:To avoid further damage to the endoscope or the possibility of malfunction during a procedure, do not use an endoscope with any abnormalities or outward signs of damage.
WARNING:All instruments must be reprocessed prior to first time use, after any repairs/service and before every patient use. When utilizing chemo-thermal processes for reprocessing the endoscope, the instrument should be allowed to return to room temperature prior to use and/or further handling.
- 6 -

NOTE:• The distal end of the endoscope as well as the electrical contacts/pins on the PVE connector must be
protected against damage from impact. Never apply excess force such as twisting, or severe bending to the flexible portion of the endoscope.
• During pre-use inspection, ensure that the distal objective lens and the illumination (LCB) cover glass are clean and no residues are present on these distal surfaces. If not, crisp images can NOT be dis-played. Wipe with a gauze or the like moistened with enzymatic detergent solution.
• As indicated elsewhere in PENTAX product labelling, endoscopes particularly the quality of the endo-scopic image should be checked prior to patient use.
• Ideally all patients should be prepped well to maximize visualization of the intended areas of interest. Patient material and sections should be removed from the area of observation to eliminate the potential to blur the endoscopic image and/or obscure the illumination system.
• Prior to a procedure, remove debris or secreta from observation area as much as a possible.• Continuing use of the light guide with sticky debris might cause steam because debris is deprived of
moisture by heat. If steam is found on the light guide during a procedure, stop it immediately and with-draw the scope carefully from a patient.
NOTE:Flexible endoscopes and other sophisticated medical instruments are constructed of special materials,unique parts and intricate components with strict dimensional tolerances. Specialized assembly techniquesand application of specific sealants and/or adhesives are required to ensure the watertight integrity andmaintain the functionality of these devices. It is therefore imperative that endoscopes be routinely checkedto ensure that parts used in their construction are not loose, missing or compromised that could otherwisenegatively affect the functionality of these devices. Compromised or loose components could result in devicefailure, scope damage (via fluid invasion) and/or in incomplete decontamination of used instruments.PENTAX recommends that prior to use endoscopes should be carefully inspected for their integrity andchecked for any “looseness” in the mating or joining of components including the following parts/areas:• the channel inlet assembly (biopsy inlet port) ( ① )• the suction nipple/connector ( ② )• the air/water inlet port ( ③ )• any valve cylinder ( ④ )• basically, any inlet or outlet port associated with an internal channel, an indirect patient contact portion of
the endoscope• rubber strain relief along insertion tube and umbilical cable (rotate clockwise only to tighten)
One method to check for looseness is to lightly gripthe exposed part, and while grasping the componentcarefully attempt to move it in various directions. Useof a lintfree gauze while grasping metal parts isrecommended as a protection for one’s fingers.If any part/component remains loose (afterattempting to tighten) and/or if there is anyindication or suspicion of an abnormality oroutward signs of damage, do NOT use theendoscope. Contact your local PENTAX service facility.
�
�
�
�
- 7 -

2) Inspection of Deflection Controls and Locksa) Slowly manipulate the Up/Down and the Right/Left
control knobs to see that they function smoothly. Be certain that a full and appropriate range of deflec-tion is possible.
b) Engage the deflection locks to be certain that the position of the deflected tip can be stabilized.
CAUTION:To avoid damaging the endoscopes, do NOT twist, rotate or bend excessively any of the rubber strainrelief ( ① , ② ) during inspection, clinical use, reprocessing or any handling activity. Be particularly cautious forthe insertion tube strain relief ( ① ). When wiping the insertion tube and the umbilical cable, use a slow backand forth motion to wipe them along the tube/cable. Never apply excessive force or torque on these strainreliefs or slim tubes/cables. During ANY handling of the instrument avoid excess force, twisting, rotation and/or bending of the actual insertion tubes and umbilical cables to prevent inadvertent damage (crush,compression, deformity, etc.) to these parts as well as to internal components contained within theendoscope.
UL
RD
F
F
UL
RD
F
F
U
LR
DFF
Twisting or Rotating Bending
RIGHT-LEFT
UP-DOWN
NOTE:The deflection locks are of the friction type and the degree of friction is adjustable. The degree of locking friction depends on the rotational position of the lever.
CAUTION:ANY lack of smooth operation of the deflection controls may be an early indication of internal damage to and/or part(s) failure within the endoscope’s angulation system. To avoid the possibility of further endo-scope damage or the potential for malfunction of the angulation system, do NOT use the endoscope if the angulation mechanism does not operate properly.Prior to use ensure that the deflection controls can rotate smoothly, that there is no grinding or excess friction within the angulation system and that the distal bending section bends freely and smoothly. NEVER APPLY EXCESSIVE FORCE TO THE DEFLECTION CONTROLS!When an endoscope exhibits excessive “knob play” or if angulation is lost in any direction, do NOT use the instrument. Excessive “knob play” can be defined as rotating of the angulation control knob(s) in any one direction for more than 30 degrees without any corresponding distal tip deflection. The examples above are indications that service is required to avoid more serious problems with the angulation control system, including angle or pulley cable/wire breakage and/or the possibility of a “frozen” distal bending section.A “frozen” bending section can make instrument extraction from a patient more difficult.
- 8 -

3) Inspection of Air/Water Feedinga) Prior to use, the air/water feeding valve (OF-B121)
should be inspected. Remove the valve from the control body and make sure that the black rubber check-valve (OE-C14) in good condition is prop-erly attached to the bottom of the metal valve stem.
b) If the rubber check-valve is missing or not attached properly, correctly reposition the check-valve by turning it several times on the air/water valve stem. For proper positioning, there should be no clear-ance (gap) between the rubber check valve and the metal air/water valve stem
c) To confirm that the check-valve is attached properly, visually inspect the check-valve and install the air/water valve into the air/water cylinder on the control body. Proceed to test the air delivery function.
d) Connect the scope to the video processor. Turn air pump “ON” to desired pressure setting. Place the scope distal tip into sterile water and confirm that no air bubbles exit the distal air nozzle.
e) To inspect air delivery, cover the hole at the top of the air/water valve and confirm that air flows freely from the air/water nozzle at the scope disital tip.
f) By depressing the air/water feeding valve, the water delivery system is activated. Water should flow in a steady stream from the air/water nozzle at the distal tip of the endoscope. (This may take several sec-onds on the initial attempt.) USE STERILE WATER ONLY.
WARNING:A worn or damaged check-valve should be replaced with a new one which has already been subjected to a high-level disinfection or sterilization procedure (Check valve set, model OE-C15 is optionally avail-able). For repeated use, always ensure that the check-valve has already been reprocessed. A dam-aged, worn or missing check-valve could create continous air flow or excessive air insufflation and result in potential patient injury such as pneumatic perforation. If the check-valve is not attached properly, it could fall off during the endoscopic procedure and result in potential injury to the patient.
CAUTION:If there is any doubt as to the suitability for use of the rubber check-valve, replace with a fully reprocessed one prior to each procedure. A set of 10 pieces of the OE-C14 check-valve are available in a package as model OE-C15.
WARNING:If air bubbles are observed during the test, the rubber check-valve MUST BE REPLACED. Repeat the test procedure with a new check-valve (OE-C14).
OF-B121
OE-C14
Don’t let the skirt fold under
Action
ResultAirFeeding
WaterFeeding–
- 9 -

g) Release the air/water valve to determine if the valve freely returns to its OFF (neutral) position and delivery of water (and air) ceases.
h) If the air/water valve OF-B121 does not function properly, does not move smoothly or feels “sticky”, remove the valve and apply a very small amount of silicone oil lubricant onto all the O-rings. Do NOT use excess oil, avoid “blobs”, large drops and/or squirts of oil directly onto the metal valve stems - instead, simply place a small droplet of oil on one’s sterile gloved forefinger and gently swirl between thumb and forefinger. Next place the valve with
O-ring in-between thumb and finger and gently rotate the valve so that the oil is evenly applied to the outer edges of each rubber O-ring. Make sure the oil is applied to all O-rings and wipe off all excess. Do NOT apply excess oil. Doing so can allow for inadvertent migration of the oil inside channels or other areas not intended to be lubricated.
i) If air and/or water do not flow properly, NEVER attempt to clear the air or water nozzles with a needle or any other sharp object. Instead, the following steps should be followed.
1 Disconnect the endoscope from the video processor.2 Remove the air/water feeding valve.3 Using a cotton tipped applicator and alcohol, clean the valve recess (receptacle) in the control body thor-
oughly to remove any debris. Do NOT attempt to insert the applicator into the small openings within the valve receptacle as the cotton or applicator could become lodged within these openings and cause channel blockage.
4 • Following the section of this manual for cleaning the air and water channel with detergent, flush deter-gent through both the air and water channel. Then flush the air several times to force any residual solution out of the channel.
• Remove the adapters and install the air/water feeding valve. (Alternate) By leaving the air/water valve in the cylinder instead of the adapter, one may direct pressured fluid (or air) independently to either channel to expel debris from and/or more forcefully flush solution into either the air or water channel. This should not be attempted on a completely clogged/blocked air or water channel/nozzle.
5 Test for normal delivery of air and water. It may be necessary to repeat the above procedure if normal air and water delivery is still not available.
OF-B121
O Ring : OF-B143
NOTE:Excessive silicone oil (lubricant) should be avoided to prevent occlusion of the internal air or water chan-nels/nozzles and potential impairment of the normally clear endoscopic image.
NOTE:If blockage of the line is encountered, avoid use of excessive pressure to prevent scope damage.
NOTE:Do NOT apply excessive force in an attempt to unblock a clogged channel as the channel and/or brush could become damaged. Whenever channel damage is suspected, the endoscope should be leak tested.If repeated attempts to flush the air/water system are unsuccessful, do not attempt to use the endoscope on a patient. Contact the PENTAX service department.
NOTE:Prior to clinical use, it is important that the entire air channel system be dry. Failure to thoroughly dry the air system could result in an unclear or blurry image caused by very fine droplets of moisture being swept over and/or onto the objective lens at the distal end of the scope.
- 10 -
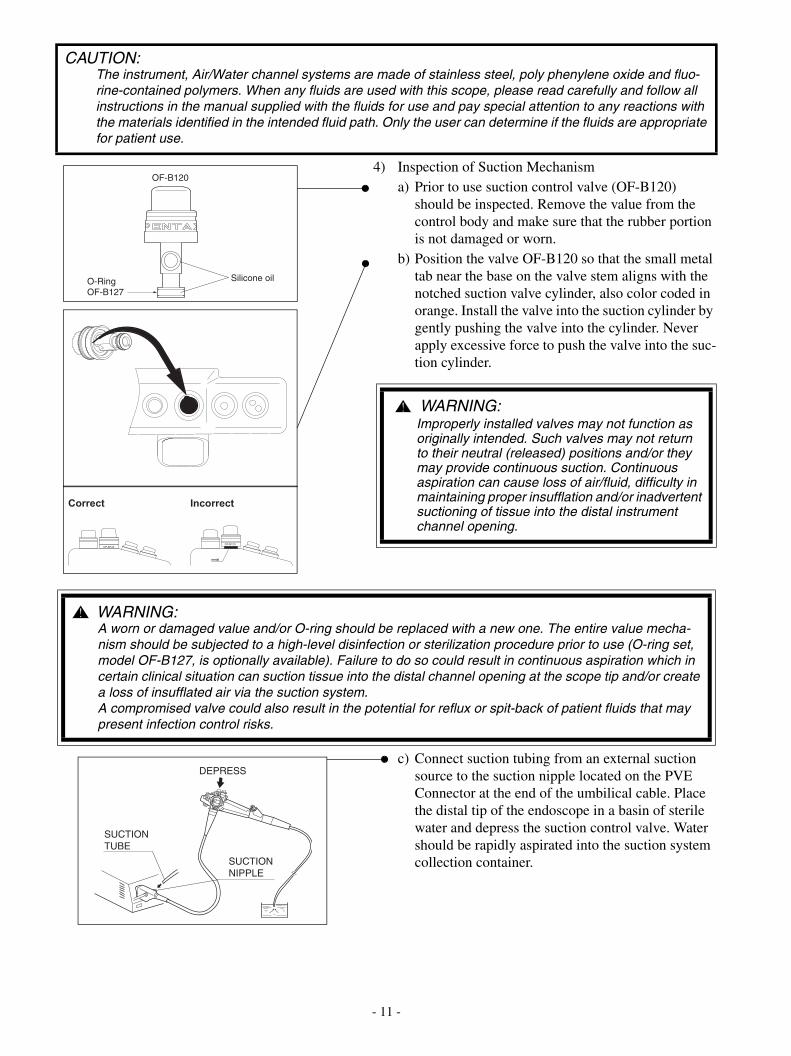
4) Inspection of Suction Mechanisma) Prior to use suction control valve (OF-B120)
should be inspected. Remove the value from the control body and make sure that the rubber portion is not damaged or worn.
b) Position the valve OF-B120 so that the small metal tab near the base on the valve stem aligns with the notched suction valve cylinder, also color coded in orange. Install the valve into the suction cylinder by gently pushing the valve into the cylinder. Never apply excessive force to push the valve into the suc-tion cylinder.
c) Connect suction tubing from an external suction source to the suction nipple located on the PVE Connector at the end of the umbilical cable. Place the distal tip of the endoscope in a basin of sterile water and depress the suction control valve. Water should be rapidly aspirated into the suction system collection container.
CAUTION:The instrument, Air/Water channel systems are made of stainless steel, poly phenylene oxide and fluo-rine-contained polymers. When any fluids are used with this scope, please read carefully and follow all instructions in the manual supplied with the fluids for use and pay special attention to any reactions with the materials identified in the intended fluid path. Only the user can determine if the fluids are appropriate for patient use.
Silicone oilO-RingOF-B127
OF-B120
IncorrectCorrect
metal
OF-B120OF-B120
WARNING:Improperly installed valves may not function as originally intended. Such valves may not return to their neutral (released) positions and/or they may provide continuous suction. Continuous aspiration can cause loss of air/fluid, difficulty in maintaining proper insufflation and/or inadvertent suctioning of tissue into the distal instrument channel opening.
WARNING:A worn or damaged value and/or O-ring should be replaced with a new one. The entire value mecha-nism should be subjected to a high-level disinfection or sterilization procedure prior to use (O-ring set, model OF-B127, is optionally available). Failure to do so could result in continuous aspiration which in certain clinical situation can suction tissue into the distal channel opening at the scope tip and/or create a loss of insufflated air via the suction system. A compromised valve could also result in the potential for reflux or spit-back of patient fluids that may present infection control risks.
SUCTIONTUBE
DEPRESS
SUCTIONNIPPLE
- 11 -

d) Release the suction control valve to determine if the valve freely returns to its OFF position and the aspira-tion of water ceases.
e) If the suction valve does not move smoothly or feels “sticky”, remove the valve from the suction cylinder on the control body of the endoscope. Apply a small amount of silicone oil lubricant, OF-Z11, onto rubber part and rubber the O-ring. Place a small droplet of oil on one’s sterile gloved forefinger and gently swirl between thumb and forefinger. Next place the valve with O-ring in-between thumb and finger and gently rotate the valve so that the oil is evenly applied to the outer edges of the rubber O-ring.Remove/wipe off excess lubricant with a soft gauze. Do not use excessive silicone oil.
5) Inspection of Biopsy Forceps and Instrument Channela) Make sure there are no kinks in the flexible shaft of
the biopsy forceps.b) The jaws of the forceps must be free of any residual
debris. Any debris must be cleaned from the for-ceps before they are used. Use only sterile forceps.
c) The handle mechanism on the forceps should be operated to open and close the jaws. This mecha-nism should operate freely.
d) Close and inspect the jaws of the forceps to make sure the cups are in proper alignment. If the forceps has a spike, the spike must be completely straight and fully within the cups.
e) Any accessory should be slowly inserted through the instrument channel inlet with the endoscope in a straight position. There should be no resistance encountered. If resistance is encountered, do not attempt to introduce the accessory further. The instrument channel may be damaged and the endoscope should not be used. Contact the PENTAX service department.
CAUTION:If the instrument is to be used immediately after the inspection, use only “fresh” distilled or sterile water. To avoid recontamination of a previously reprocessed endoscope, avoid use of idle/uncovered tap water.
NOTE:A rubber inlet seal in good condition must be on the instrument channel inlet to prevent the loss of suction and a risk of cross contamination to the end user due to the potential for reflux (spit-back) of patient flu-ids. Worn seal will result in leakage and should be replaced. To ensure maximum performance of these sealing mechanisms, consider replacing the rubber inlet seal with a new fully reprocessed one for each procedure.
WARNING:The use of any forceps or accessory that shows any sign of damage or difficulty of operation must be avoided. Any malfunction of a forceps or accessory during a patient procedure could result in serious injury to the patient. Also, the use of damaged forceps or accessories may result in serious and costly damage to the endoscope.
WARNING:All patient contact accessories must be thoroughly cleaned and subjected to an appropriate high-level disinfection or sterilization process before being used for the first time and subsequently after each clin-ical use.
CAUTION:The instrument, Air/Water channel systems are made of stainless steel, poly phenylene oxide and fluo-rine-contained polymers. When any fluids are used with this scope, please read carefully and follow all instructions in the manual supplied with the fluids for use and pay special attention to any reactions with the materials identified in the intended fluid path. Only the user can determine if the fluids are appropriate for patient use.
CLOSEOPEN
- 12 -

2-3. PREPARATION JUST BEFORE INSERTION OF ENDOSCOPE
1) If the endoscope has just recently been reprocessed, has been prepared or stored properly and passed all pre-procedure inspections, the instrument should be ready to use. If necessary, the scope’s insertion tube may be wiped down with a gauze dampehed with 70-90% ethyl or isopropyl alcohol.
2) Gently wipe the insertion tube with a gauze moistened with 70-90% ethyl or isopropyl alcohol.3) Gently clean the objective lens with a cotton-tip applicator moistened with 70-90% ethyl or isopropyl alco-
hol. A lens cleaner (anti-fogging agent) may also be applied via gauze or other applicator.4) Check the endoscopic image and confirm that it is of acceptable quality for clinical use. Refer also to the
owner’s manual supplied with the PENTAX video processor for inspection of the image quality.5) (SCOPES TO BE INTRODUCED TRANSORALLY)
Prior to trans-oral insertion of the endoscope, place a bite-block (mouthpiece) into the patient’s mouth to pro-tect the endoscope from damage during the procedure. Failure to do so can result in scratches, tears and/or crushing of the insertion portion of the endoscope.
6) Apply a medical grade water soluble lubricant to the insertion tube. Do not use petroleum based lubricants.
NOTE:Accessories should always be inspected and checked with the particular endoscope prior to each procedure.
WARNING:Do NOT clinically use the endoscope if any irregularity or abnormality is suspected. If there is any doubt as to the suitability of use for any endoscope component, replace it with a new fully reprocessed one. An instrument irregularity may cause scope damage and/or compromise patient or user safety.
WARNING:Every endoscope should be properly disinfected or sterilized before being used for the first time. The endoscope should have been properly cleaned, disinfected or sterilized after any previous use and after being returned for any repairs/service.Refer to the companion manual describing in detail PENTAX reprocessing instructions.
WARNING:Current infection control guidelines require that endoscopes and their patient contact accessories either be sterilized or at the least be subjected to high-level disinfection. Accessories which ENTER STERILE TISSUE or THE VASCULAR SYSTEM must be sterilized before patient use. It is recommended that any accessory intended for use in the biliary tract be subjected to an appropriate sterilization process. Only the user can determine if an instrument has undergone appropriate infection control procedures prior to each clinical use.
NOTE:Contact the manufacturer and follow local regulations regarding safe use, appropriate handling and dis-posal of alcohol products. Material Safety Data Sheets (Health and Safety Data Sheets or similar docu-ments depending upon country) available from the alcohol manufacturer should provide guidance to end users about composition, hazards, chemical and physical properties, first aid, handling and storage, sta-bility, precautions, disposal, etc. associated with alcohol solution.
- 13 -

NOTE:• The objective lens and the light guide must be kept free of the lubricant and excess lens cleaner.• Prior to a procedure, remove debris or secreta from observation area as much as possible.
WARNING:Never drop this equipment or subject it to severe impact as it could compromise the functionality and/or safety of the unit. Should this equipment to be mishandled or dropped, do not use it. Return it to an authorized PENTAX service facility for inspection or repair.
- 14 -

3. DIRECTIONS FOR USE
3-1. PRETREATMENT
1) The patient should be prepared in your normal endoscopy regimen.
3-2. INSERTION AND WITHDRAWAL
1) Slowly insert the scope under direct vision. 2) (SCOPES TO BE INTRODUCED TRANSORALLY)
When the distal end of the scope is passed through the pharynx, the patient should be gently biting down on the bite block to maintain the bite block’s position during the procedure.
3) Adjust the intensity of the video processor to obtain a brightness level suitable for observation.
4) The deflection controls should be used as needed to position the scope. The deflection of the tip should be done under direct vision in a gentle and deliberate manner.
5) Insufflation can be controlled by the combined use of the air valve or CO2 valve to increase the amount of insufflation and the suction control to decrease the level of insufflation. The user may elect to use CO2 deliv-ery in lieu of air delivery by using the CO2 gas adapter (OF-G11) in combination with a special CO2/water valve. (OF-B130)
WARNING:This instrument should only be used by physicians who have thoroughly studied all the characteristics of this instrument and who are familiar with the proper techniques of endoscopy. During the procedure, always wear protective garments such as gloves, gowns, face masks, etc. to minimize the risk of cross contamination.
BITE BLOCK
WARNING:The light emission from the endoscope could cause thermal injury. To minimize the risk, use only the minimum amount of brightness and avoid close stationary viewing and unnecessary prolonged use.
CAUTION:ANY lack of smooth operation of the deflection controls may be an early indication of internal damage to and/or part(s) failure within the endoscope’s angulation system. To avoid the potential for malfunction of the angulation system, do NOT use the endoscope if the angulation mechanism does not operate prop-erly.Ensure that the deflection controls can rotate smoothly, that there is no grinding or excess friction within the angulation system and that the distal bending section bends freely and smoothly.NEVER APPLY EXCESSIVE FORCE TO THE DEFLECTION CONTROLS!If during a procedure angulation is lost in any direction such as when “cables snap” (broken pulley wire, broken angle wire, etc.), do NOT continue to use the instrument and do NOT rotate the deflection con-trols. Should the angulation system fail for any reason, stop the procedure, release the lock lever and carefully withdraw the endoscope under direct visualization.The examples above are indications that service is required to avoid more serious problems with the angulation control system, including the possibility of a “frozen” distal bending section.A “frozen” bending section can make instrument extraction from a patient more difficult.
- 15 -

6) Procedures involving poorly prepped patients should be avoided as excessive patient material can negatively affect certain scope channel functions as well as the ability to maintain a clear endoscopic view.
7) Mucous, fluids and/or other patient material should be aspirated via the instrument/suction channel and suc-tion control valve to improve visualization. Maintain a clear view during aspiration, avoid prolonged suction time and use the minimum level of negative pressure required to perform the clinical procedure.
8) The objective lens may be cleaned during the procedure by alternately using the air/water and suction control valves.
9) Image capture, hard copy documentation, video recording, etc. may be carried out as necessary.10) Before withdrawing the scope, trapped air should be suctioned to reduce patient discomfort.11) When attempting to withdraw the scope, return the deflection locking levers to their free position. Always
withdraw the scope under direct visualization.
NOTE:Be careful not to deliver too much air.
WARNING:It must be recognized that variations in air flow (pressure and volume) for patient insufflation may exist from one manufacturer’s equipment (processor and/or scope type) to another. It is, therefore, important to closely monitor the patient at all times and to aspirate excessive air to prevent overinsufflation and potential pneumatic perforation.
WARNING:Do not apply excessive negative pressures (high suction settings) and/or prolonged contact of the distal instrument channel opening (scope tip) against mucosal surfaces to avoid “suction polyps”, bleeding and/or other trauma to the patient. During aspiration keep as clear as possible an endoscopic view of patient anatomy and maintain some distance from scope tip to tissue to avoid suctioning of mucosa onto/into the distal channel opening.
NOTE:Continuing use of the light guide with sticky debris might cause steam because debris is deprived of moisture by heat. If steam is found on the light guide during a procedure, stop it immediately, and with-draw the scope carefully from a patient.
NOTE:Should debris on the objective lens be difficult to clean, one can temporarily use the HIGH air pressure setting on the processor and simultaneously press the air/water and suction control valves. Return air pressure setting to original selection before proceeding.
UP/DOWN DEFLECTION LOCK
RIGHT/LEFT DEFLECTION LOCK
FREE POSITION(LOCK RELEASED)
FREE POSITION(LOCK RELEASED)
LOCK POSITION
LOCK POSITION
WARNING:If for any reason, the image is lost due to power shortage, lamp or processor failure, etc. the deflection locking levers should be released, the scope tip should be straightened to its neutral position, and the insertion tube should be care-fully and slowly withdrawn from the patient.
- 16 -

3-3. BIOPSY
1) Insert the forceps through the slit in the rubber inlet seal. Be certain to hold the forceps handle in such a way to ensure that the jaws of the forceps are in a fully closed position during insertion.
2) When a portion of the cups of the forceps becomes visible in the viewing field, carefully advance the for-ceps onto the target area.
3) Open the forceps cups and advance the forceps against the target area. Carefully squeeze the forceps handle to close the cups and obtain a specimen within the cups. Always maintain a view of accessory during advance-ment.
4) Withdraw the forceps slowly with the cups closed.
CAUTION:For ALL types of endoscopic accessory instruments, always maintain a view of the accessory during advancement, use and withdrawal of the device.
WARNING:For safety reasons, always insert and advance the accessory in the standard, non-magnified mode. Magnified vision reduces the depth of the viewing field making it difficult to maintain a clear view of the accessory.
5 cm
NOTE:When the cups are first passed through the inlet seal, a temporary resistance will be encountered. Hold the shaft tightly at about 5cm from the cups and push it through.
NOTE:During insertion, if the forceps are found hard to advance further due to resistance, decrease the deflec-tion of the bending section to a level suitable for smooth insertion and insert the forceps again.
CAUTION:Never apply excessive pressure when introducing any accessory since the instrument channel may be damaged. Malfunction of the scope as well as costly repairs may result.
NOTE:Because of the effect accessories used in the instrument channel of the endoscope can have on the per-formance of the endoscope itself, it is strongly recommended that only PENTAX accessories be used with PENTAX endoscopes. If a unique or highly specialized accessory is available from another source, please contact PENTAX to arrange a test of its compatibility before using it through the PENTAX endo-scope.
WARNING:Accessories which ENTER STERILE TISSUE or THE VASCULAR SYSTEM must be sterile. Accessories intended for use in the biliary tract should be sterilized before patient use.
- 17 -

3-4. LASER
Laser equipment should only be used by physicians who have thoroughly studied all the characteristics of the equipment and who are familiar with the proper techniques of endoscopic laser therapy. The user must carefully read and follow all instructions in the operating manual supplied with the Laser equipment. The Laser equipment should be carefully and thoroughly inspected and calibrated. Only the user can determine if the condition of the Laser equipment is suitable.
1) The user has the option of using a non-explosive gas for insufflation. Non-explosive gas from a pressure-regulated and flow-rate controlled source can be con-nected to the provided or optionally available gas adapter, Model OF-G11, as illustrated.
2) The gas adapter, which can be secured to the air/water port on the PVE connector, has a luer receptacle to accept tubing from an external source of non-explosive gas. As long as the air/water feeding tube from a PENTAX water bottle assembly is connected to the gas adapter and the air pump in the video processor is turned OFF, non-explosive gas can be delivered.
3) Flow of gas from the nozzle at the distal end of the scope can be checked by placing the tip of the scope under water and covering the hole on the top of the CO2/water valve. The flow rate of gas should be no greater than the rate of air delivery when the air feeding valve on the control head of the scope is covered.
4) The water delivery system is activated by depressing the CO2/water feeding valve.
WARNING:The PENTAX endoscopes identified in this manual are compatible with Nd:YAG laser (wavelength 1064 nm) and Diode Laser (wavelength 800 nm ~ 1000 nm) only. Do not use these endoscopes with other types of laser such as KTP, He-Cd, or Excimer Laser Systems. It could result serious injury to the patient.
LIGHT GUIDE PLUG
CO2 GASCYLINDER
CO2 GASADAPTER
OF-G11
PROCESSOR
NOTE:Never connect an unregulated source of gas to the PENTAX endoscope.
NOTE:Set the pressure below 49 kPa (0.5 kg/cm2, 7.1 PSI) and the flow rate at about 1 liter/min.
CAUTION:Open the valve of the CO2 gas cylinder only AFTER turning off the pump switch of the processor. Failure to do so will apply excessive pressure to the processor and can cause damage to the air pump.
NOTE:It should be noted that as long as the valve of the CO2 gas cylinder is OPEN and the hole at the top of the A/W feeding valve is NOT covered, CO2 gas will constantly be vented through the A/W valve into the room. To reduce excessive CO2 concentrations, it is, therefore, recommended to close the CO2 gas cylin-der valve, work in a well ventilated room, and use air delivery whenever possible during examinations which are lengthy or in very confined quarters. As an alternative, the optionally available gas/water valve, Model OF-B130, may be used in place of the standards air/water valve. OF-B130 is a closed two-stage valve mechanism. Pressing the first stage delivers CO2 gas and fully depressing the second stage acti-vates water delivery.When using the OF-B130 valve, there will be no venting of CO2 gas into the room.Replace OF-B130 with the air/water valve OF-B121 after using the CO2 gas.
- 18 -

5) The operator and assistant(s) should wear surgical gloves to avoid burns during use of Laser equipment.
6) The laser probe should be introduced through the endoscope in the same manner as described for biopsy for-ceps in section 3-3.
7) The position of the active portion of the laser probe should always be clearly visualized before Laser equip-ment is activated.
8) It should be recognized that a variety of factors can effect the quality of the video endoscope image during laser use. Intensity of the aiming beam, high power setting of the laser, close distance of laser fiber to scope tip, excessive tissue burning, can each adversely influence image quality. To obtain optimum results, it is rec-ommended that the power settings of the aiming beam and laser be adjusted to minimal levels capable of achieving the desired clinical effect.
9) Follow standard hospital protocol regarding safe-use of lasers, including the wearing of safety eyewear.
10) Should the distal tip of the endoscope be moved closer than 20 mm from the irradiated tissue surface, the aim-ing beam may create a “smear” in the image as shown at left. If this smear affect becomes too severe and dis-torts the visual field, the intensity of the aiming light should be decreased.
11) When activating the laser at high power (about 100 W for Yag Laser and 60 W for Diode Laser.) and/or if the endoscope tip comes to within 10 mm of the irradiated tissue, flare may appear at the corners of the image as shown at left.
NOTE:One may choose to leave the OF-G11 adapter attached to the endoscope during conventional air insuf-flation using the standard air/water valve. However, the luer sideport of the OF-G11 must be capped.Similarly, for normal water delivery, the air pump must be turned ON and the plastic luer lock cap must be secured to the OF-G11 adapter.
WARNING:Prior to activation of the laser, make sure that the laser fiber exits the distal channel opening of the endoscope. Failure to do so can result in scope damage and possible ignition/burning of the endoscope.
NOTE:It is normal for the aiming light to appear white in the video scope image.
IRRADIATE AREA
SMEAR
PROBE
PROBE
FLARE
WARNING:Activation of the laser at high power settings may cause patient injury or thermal damage of the endoscopes tip.Avoid use of high power.
- 19 -

3-5. ELECTRO-SURGERY
1) The user has the option of using a non-explosive gas for insufflation. Non-explosive gas from a pressure-regulated and flow-rate controlled source can be con-nected to the provided or optionally available gas adapter, Model OF-G11, as described for Laser in sec-tion 3-4.
2) The electrosurgical accessories should be introduced through the endoscope in the same manner as described for biopsy forceps in section 3-3.
WARNING:Please refer to the operating manual provided with the electrosurgical unit. Electrosurgical systems may be of the floating type (BF type, CF-type) or non-floating (B type). To avoid patient and user burn, use only the floating type ESU (such as ERBOTOM ICC 200) /accessory systems. Do not use the non-float-ing (B type) electrosurgical systems. The electrosurgical generator and any electrosurgical accessory should be carefully and thoroughly inspected. Only the user can determine if the condition of the electro-surgical generator and the electro-surgical accessory are suitable.
LIGHT GUIDE PLUG
CO2 GASCYLINDER
CO2 GASADAPTER
OF-G11
LIGHTSOURCE
WARNING:To avoid patient and user burn, follow the instruction below before electrosurgical energy is delivered.1) Use only the electrosurgical generator with the floating grounding type (BF or CF Type). Do not use
the non-floating (B type) electrosurgical systems.2) Wear rubber gloves and face masks. 3) The position of the target area, the insulated distal portion of the electrosurgical accessory and the
active portion of the electrosurgical accessory, should be visible.4) The active portion of the electrosurgical accessory should not touch the surrounding tissue directly or
via fluids.5) The head of any lesion such as polyp should not touch the surrounding tissue directly or via fluids.6) Physicians and assisting personnel should avoid contact with the patient while high frequency
energy is delivered.7) Electro-surgical energy should be delivered for as short a time period as necessary to accomplish
the desired clinical effect.8) Select a high frequency output power setting suitable for the particular intended procedure in order to
avoid thermal invasion of the tissue or insufficient coagulation resulting in excessive bleeding.9) To avoid the risk of thermal injury, use only insulated accessories.
Never use non-insulated devices while performing endoscopic electrosurgical procedures.
CAUTION:It should be recognized that the use of electro-surgical accessory devices employing high frequency cur-rent may interfere with the normal endoscopic image and this interference is not indicative of a malfunc-tion of the video endoscope system. PENTAX has developed an earth cable, model OL-Z3 intended to reduce potential RF interference and electronic noise that may appear in the endoscope image when using electro-surgical devices. Ensure to always correctly connect cable OL-Z3 between the endoscope and video processor as described in the instructions provided with the OL-Z3
to endoscope
to video processor
- 20 -

4. CARE AFTER USE
IMPORTANT INSTRUCTIONSCleaning-Disinfection-Sterilization: PENTAX EndoscopesTo maintain maximum performance and a long service life of the endoscope, proper care after each proce-dure is extremely important. Immediately after the completion of a procedure, the endoscope and its com-ponents should be thoroughly and carefully cleaned. If the endoscope or its components are left uncleaned for some time after use, dried blood, mucous, contrast material or other patient debris may cause damage to the instrument (component) or may interfere with the ability of the user to properly reprocess the endo-scope or component
NOTE:This manual has been written having regard to ISO 17664 and national guidelines on reprocessing of medicalproducts (e.g. RKI, DGS/DHOS).
NOTE:This owner’s manual contains detailed recommendations on the manual reprocessing of PENTAX endoscopes using PENTAX supplied cleaning/disinfecting adapters. Automated endoscope reproces-sors (AER) may provide a means of reprocessing flexible endoscopes, including PENTAX instruments. Only those Automated Endoscope Reprocessors (AERs) should be used whose manufacturers provide device-specific instructions and have validation data that support each AER claim with respect to PEN-TAX model instruments. AER manufacturers should be consulted for their specific claims including but not necessarily limited toa) the ability of the AER to provide a cleaned and high-level disinfected (or sterilized) endoscope and
scope components (ex. valves),b) the identification of any special feature area (internal channel) or scope component that can not be
reprocessed and therefore requires manual reprocessing,c) the microbial quality of the rinse water,d) the inclusion of an “automated” alcohol rinse cycle.e) the inclusion of a terminal drying cycle that removes the majority of water/fluid within scope channels,f) maintenance procedures for water filter replacement and/or decontamination of the filtration system to
ensure the microbial claim of water, etc.g) compliance with local regulations and/or guidelines
Summary of PENTAX Reprocessing InstructionsPENTAX reprocessing instructions can be broken down into seven basic steps.1) Internal Channels Section 4-1-12) Pre-Cleaning (in the Examination Room) Section 4-1-23) Leakage Testing (in a designated Decontamination Area) Section 4-1-34) Cleaning (in a designated Decontamination Area) Section 4-1-45) High-Level Disinfection or sterilization (in a designated Decontamination Area) Section 4-1-5, 4-1-66) Endoscopic Accessory Instruments (EAIs) and Endoscope Components Section 4-27) Post Reprocessing Section 5
- 21 -

CAUTION:(Automated Reprocessing) Unless the AER/WD has validated channel monitoring capability for device-specific scope model.• prior to “automated reprocessing” check and confirm the patency of any lumens/channels to ensure
that all internal channels are unblocked and/or unclogged• prior to use of any AER/WD confirm the integrity of all channel tubes and recommended channel clean-
ing adapters• once tubing sets are connected to the appropriate channels, check the tubing to confirm that there are
no kinks or crimps that could restrict flow of solution throughout the endoscope• (if the unit allows) during reprocessing check and confirm that reprocessing solutions are exiting
expected channel portsFailure to adhere to the above recommendations could result in inadequate cleaning, disinfection (or sterilization) of and/or improper removal of residues from all instrument channels/surfaces.
- 22 -

4-1. ENDSCOPES
4-1-1 INTERNAL CHANNELS
The following internal schematics have been provided as a service to help users better understand the intricate con-struction of PENTAX endoscopes. Knowledge of the various internal channels and tubes within an instrument and their relation to each other allows one to care for and reprocess the endoscope more easily and with greater confi-dence. Much time and effort has been expended into designing endoscopes and their cleaning/disinfecting components so that reprocessing of the instruments before each patient use can be effectively and efficiently performed by ei-ther manual methods or automated processes.Connectors on all PENTAX cleaning/disinfecting adapters and scope inlet ports incorporate standard size luer-lock and/or luer-slip fittings to easily accommodate reprocessing devices or systems available from other manu-facturers. As can be seen from these internal schematics, the PENTAX cleaning system promotes efficient unidirectional flow of solution beginning from connections at the light guide plug, traveling up tubings in the umbilical cable to the valve cylinders in the control body, passing through the channels in the insertion tube and finally exiting noz-zles or channel openings at the distal tip of the scope.The elimination of multiple branching of channels, combined with a direct and straightforward pathway for solu-tions to travel maximizes flow efficiency and ensures contact of detergent/disinfectant/sterilant with all internally exposed channel surfaces.
WARNING: (in the U.S.A. or other countries adhering to FDA regulations)It is imperative that flexible endoscopes and other semi-critical devices be reprocessed using at least high-level disinfection with a legally marketed sterilant/disinfectant. Only legally marketed endoscope automated reprocessing devices/systems whose device specific claims have been validated by the AER manufacturer and/or anti-microbial agents which have been tested and found to be compatible by Pen-tax should be used with PENTAX products.Generally speaking, “2%” and “3.2%” alkaline glutaraldehyde solutions which have been FDA cleared with High-Level Disinfection and/or Sterilization claims are recommended. It should be noted that the actual percentage of active ingredient (glutaraldehyde) in these solutions, as per their product label, may vary from the generic and traditional terms “2% glutaraldehyde” and/or “3.2% glutaraldehyde”.For specific brands of compatible disinfectants/sterilants, please contact your local PENTAX service facility or sales representative. Please also refer to the inside front cover of this manual regarding infec-tion control.
Items required for reprocessing:
• 10 mL Syringe• 50 mL Syringe• Tray/Reprocessing basin (at least 40 cm by 40 cm/16 in × 16 in)• Soft Sponge• Personal Protective Equipment (PPE) including gloves, face mask, etc.• Soft Sterile Gauze• PVE Soaking Cap OE-C9• Air/Water Channel Cleaning Adapter OF-G17• Rubber Inlet Seal• Cleaning Brush CS6021SN• Cleaning Brush CS-C5S• Air/Water/Instrument Channel Cleaning Adapter OF-B115
• Suction Control Valve OF-B120• Air/Water Feeding Valve OF-B121• Detergent• Disinfectant• Alcohol• Source of compressed/forced air
- 23 -

(1) INTERNAL CHANNEL
The illustration above shows the actual routes taken by air, water, and suction through single biopsy/instrument channel PENTAX videoscopes with forward optics.
EG-290Kp/EC-380Kp
Water Feeding Channel
Air/Water Valve
Channel Inlet
Rubber Inlet Seal
Suction Valve
Suction Tube
Air Feeding Tube
Water Bottle
Water Feeding Tube
Suction Source
Video Processor
Air Feeding Channel
Instrument ChannelAir/Water Nozzle
- 24 -

(2) REPROCESSING SYSTEM
To reprocess a PENTAX single-channel videoscope, first an enzymatic detergent and then a high-level disinfectant or sterilant must be exposed to all internal lumens as well as to all external instrument surfaces and scope components (air/water valve, suction valve, etc.). Exposure times of detergent and disinfectant/sterilant must be strictly adhered to as recommended by each respective manufacuturer.
Please note that all solution entrance ports and flow pathways are illustrated above.
CAUTION:BEFORE IMMERSING:a) The ‘Red’ ETO gas sterilization venting cap must be taken OFF.b) The PVE Soaking cap should be securely ON the electrical contacts.
NOTE:Prior to exposure of all internal channels to an enzymatic detergent and high-level disinfectant (or steri-lant), all brushable channels should be manually cleaned with cleaning brushes.
EG-290Kp/EC-380Kp
Water Feeding Channel
Rubber Inlet Seal
Channel Inlet
A/W Instrument Channel Cleaning Adapter OF-B115
Air/Water ChannelCleaning Adapter OF-G17
PVE Soaking Cap(ATTACH)
ETO Cap(REMOVE)
Air Feeding Tube
Water Feeding Tube
Suction Tube
Suction Nipple
Luer-Slip SyringewithCleaning/DisinfectiingSolution
Luer-Slip SyringewithCleaning/DisinfectiingSolution
Air Feeding Channel
Instrument ChannelAir/Water Nozzle
- 25 -
4-1-2 PRE-CLEANING
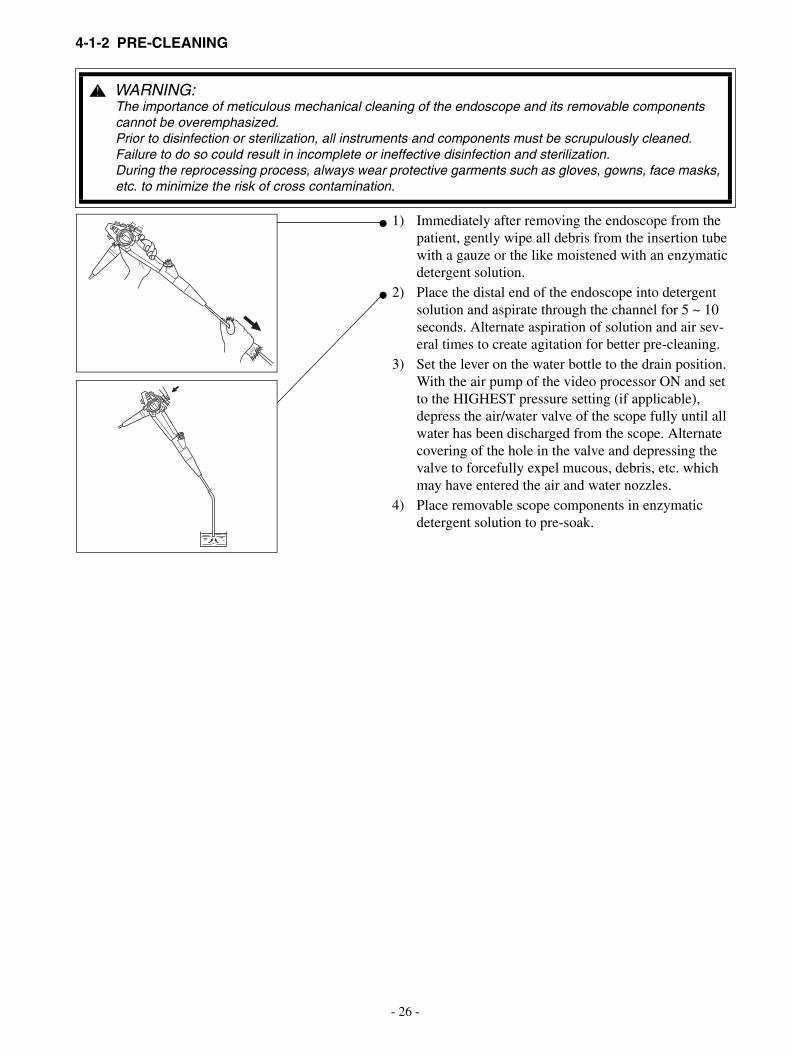
1) Immediately after removing the endoscope from the patient, gently wipe all debris from the insertion tube with a gauze or the like moistened with an enzymatic detergent solution.
2) Place the distal end of the endoscope into detergent solution and aspirate through the channel for 5 ~ 10 seconds. Alternate aspiration of solution and air sev-eral times to create agitation for better pre-cleaning.
3) Set the lever on the water bottle to the drain position. With the air pump of the video processor ON and set to the HIGHEST pressure setting (if applicable), depress the air/water valve of the scope fully until all water has been discharged from the scope. Alternate covering of the hole in the valve and depressing the valve to forcefully expel mucous, debris, etc. which may have entered the air and water nozzles.
4) Place removable scope components in enzymatic detergent solution to pre-soak.
WARNING: The importance of meticulous mechanical cleaning of the endoscope and its removable components cannot be overemphasized.Prior to disinfection or sterilization, all instruments and components must be scrupulously cleaned.Failure to do so could result in incomplete or ineffective disinfection and sterilization.During the reprocessing process, always wear protective garments such as gloves, gowns, face masks, etc. to minimize the risk of cross contamination.
- 26 -

4-1-3 CLEANING
1) Prepare a basin with warm water and a mild enzymatic detergent per detergent manufacturer’s instructions. The solutions must be enzymatic detergents or other cleaning agents specially formulated to clean flexible endoscopes. For specific brands of compatible solutions, please contact your local PENTAX service facility or sales representative.
2) Immerse the endoscope and its components in fresh detergent solution. Then thoroughly (but gently) wash the entire surface of the endoscope and its compo-nents.Make sure that the recessed areas such as the channel openings, valve cylinders, etc are brushed clean using the provided or similarly effective cleaning brushes.
3) Allow all items to soak in an enzymatic solution for a time period recommended by the manufacturer of the enzymatic detergent.
PVESoaking Cap ETO Cap
CAUTION:BEFORE IMMERSING:a) The ‘Red’ ETO gas sterilization venting cap
must be taken OFF.b) The PVE Soaking cap should be securely
ON the electrical contacts.
WARNING: Immediately after use, the metal light guide prong and the electrical contacts/pins of the endoscope may be HOT. To avoid burns, do not touch these areas immediately after use. For safer handling after a pro-cedure, grasp the PVE connector housing.
air/water feeding valve
Suction control valve
⑤ PVE Soaking Cap
Inlet seal
① ②
③
④ ETO cap
① Suction Control Valve OF-B120② Air/Water Feeding Valve OF-B121③ Rubber Inlet Seal OF-B190④ ETO venting cap OF-C5⑤ Soaking cap OE-C9
CAUTION:The use of an enzymatic detergent immediately after each procedure to dissolve and remove organic contaminants and proteinaceous debris is essential to the care and maintenance of the endoscope from the standpoints of infection control and functionality.
NOTE:Detergent refers to an enzymatic detergent or other cleaning solution specifically formulated for use and compatible with flexible endoscopes.
NOTE:• Do not squeeze or severely bend the insertion tube.• Do not use any abrasive materials.• Be careful to avoid damage to the distal lenses.
- 27 -

4) Manual Cleaning of Suction System by Brush
CAUTION:1) It is highly recommended that only PENTAX cleaning brushes specified in our manuals should be used to clean
PENTAX endoscopes. 2) PENTAX cleaning brushes have been specially designed to clean various PENTAX internal channel systems and
valves, ports or cylinders. Validation studies have been performed supporting the use of PENTAX supplied brushes and cleaning adapters for cleaning PENTAX scopes following PENTAX manual reprocessing instruc-tions.
3) Over the years some other manufacturers’ cleaning brushes/devices have been found to damage PENTAX scopes and/or create the need for servicing as some cleaning devices can become lodged (“stuck”) inside various lumens of PENTAX scopes. The likelihood for scope damage or servicing increases if a cleaning device does not have a protective tip (or contains any sharp-edged surface), if its flexible shaft uses a flimsy plastic material that is not firm enough to allow for easy accessory advancement and/or if the proper sequence and/or direction of chan-nel cleaning is not followed as described in PENTAX manuals.
4) The cleaning brushes should be always inserted as described in this manual.5) It is recommended that cleaning brushes should be grasped about 5 cm (2 inches) from any channel ports/open-
ings while advancing/withdrawing a brush. To avoid scope and brush damage, do not use force. 6) To prevent excess friction between brush and channel, do NOT tightly coil the scope while brushing. Keep the
insertion tube and umbilical cable as straight as possible and never attempt to pass the cleaning brush through a fully angulated scope. Failure to follow these instructions could result in scope or brush damage.
7) Cleaning brushes/devices, especially those with metal coiled flexible shafts should NOT be inserted into the distal exit/opening of channels. Doing so can damage the endoscopes.
Fig. Place Brush Entrance Exit Fig.
① Suction Tube CS6021SN Suction Nipple Suction Cylinder 4-a)
② Suction Channel CS6021SN Suction Cylinder — 4-b)
③ Instrument Channel CS6021SN Channel Inlet Distal Tip 4-c)
④ Suction Cylinder CS-C5S Suction Cylinder — 4-d)
⑤ Suction Valve CS-C5S Suction Valve — 4-e)
Suction Nipple
① Suction Tube
② Suction Channel
③ Instrument Channel
Rubber Inlet Seal
⑤ Suction Valve
④ Suction Cylinder
Channel Inlet
- 28 -

A variety of special brushes have been provided to mechan-ically brush clean the entire suction/instrument channels and tubes. Whenever possible, the entire endoscope should be immersed in detergent solution during the remainder of the cleaning procedure.Brush clean the entire instrument/suction channel system:a) Using the cleaning brush provided, insert the brush
into the opening of the suction nipple and gently pass the brush until it appears in the suction control valve receptacle. This will clean the suction tube within the light guide/umbilical cable.Then gently withdraw the brush. Repeat at least 3 times until it is visibly clean.
b) Next, insert the brush into the opening at the bottom of the suction control valve receptacle (cylinder) on the control head and gently advance until resistance is felt. DO NOT USE EXCESS FORCE.Then gently withdraw the brush. Repeat at least 3 times until it is visibly clean.
c) Insert the brush into the instrument channel inlet and gently advance the brush until it exits the distal end of the scope. Clean debris off the brush and then gently withdraw the brush. Repeat several times ensuring that only a clean brush is introduced into the channel each time.
d) Using the large bristle of the specially designed clean-ing brush (CS-C5S), scrub clean the surfaces inside the suction control valve receptacle on the control head. Do not insert the brush excessively.
e) Scrub all internal and external surfaces of the suction valve OF-B120 using the smaller side of the cleaning brush (CS-C5S).
1
23
(CS-C5S)
CS-C5S
OF-B120Depress
Cleaning Brush CS6021SN
NOTE:Be sure to inspect the bottom of the suction control valve receptacle on the control head for any debris.
CAUTION:A worn or damaged valve and/or O-ring should be replaced with a new one. The entire valve mechanism should be subjected to a high-level disinfection or sterilization procedure prior to use (O-ring set, model OF-B127, is optionally available). Failure to do so could result in continuous aspiration which in certain clinical situations can suction tissue into the distal channel opening at the scope tip and/or create a loss of insufflated air via the suction system.A compromised valve could also result in the potential for reflux or spit-back of patient fluids that may present infection control risks.
NOTE:Brushing of all internal channels is not a substitute for exposure to an appropriate cleaning solution. Man-ual cleaning by brush complements and augments the cleaning effectiveness of chemical cleaning (i.e. enzymatic detergent).
- 29 -

5) Chemical Cleaning by Detergent Solution
The rubber A/W Instrument channel cleaning adapter (OF-B115) should be attached to the air/water and suc-tion cylinders. This adapter caps (seals) off the air/wa-ter and suction cylinders to allow unidirectional flow of solution through these delivery/aspiration systems. Please note that the symbols on OF-B115 show a full circle ( ) and circle with notch ( ) which represent the shape of the respective cylinders for proper attach-ment. The notched symbol should align with the suc-tion cylinder and the circle symbol, the air/water cylinder.
a) For Air/Water Cleaning Air/water channel cleaning adapter, model OF-G17, has a standard ANSI luer lock connector to which a syringe or other device should be attached. Connect OF-G17 to the air/water port on the PVE connector/plug. Fresh detergent should be flushed through this connector and will simultaneously flow through both the air and water channels within the scope. Please refer to the internal schematics.
Provided the enzymatic detergent is allowed remain in contact with the internal channel surfaces for the recom-mended exposure time, the enzymatic solution should dissolve and clean any remaining debris within these chan-nels.(Alternate) By leaving the air/water valve in the cylinder instead of the OF-B115 adapter, one may direct pressured fluid (or air) independently to either channel to expel debris from and/or more forcefully flush solution into either the air or water channel. This should not be attempted on a completely clogged/blocked air or water channel/noz-zle.
b) For Biopsy/Suction Cleaning 1 Install a rubber inlet seal to the instrument channel inlet prior to injecting cleaning solution into the
suction system.2 The suction nipple located on the PVE connector has a standard luer slip fitting to which a 50mL
syringe or other device may be attached. Fresh detergent solution should be flushed through the entire instrument/suction channel system.
CAUTION:Current PENTAX manual cleaning instructions have been validated using enzymatic detergent solutions. For non-enzymatic solutions always adhere to the specific manual cleaning instructions developed by the manufacturer of the detergent product. When using a non-enzymatic detergent during automated reprocessing refer to the validated cleaning instructions developed by the manufacturer of the Auto-mated Endoscope Reprocessor (AER) or Washer Disinfector (WD) unit/system.
Channel Adapters/Components to be attached Cleaning solution Rinse water
Air/Water Channel OF-B115OF-G17
50 mL or more 70 mL or more
Biopsy/Suction Channel OF-B115Rubber Inlet Seal
100 mL or more 150 mL or more
OF-B115
NOTE:It is imperative that the OF-B115 channel cleaning adapter be securely attached to their respective valve cylinders. Failure to properly match and secure the cleaning adapter could result in ineffective and incom-plete reprocessing.
OF-B115
Air/Water ChannelCleaning Adapter (OF-G17)
NOTE:If blockage of the line is encountered, avoid use of excessive pressure to prevent scope damage.
- 30 -

As an alternative, solution can be drawn into the instrument channels by attaching tubing from an aspirator to the suction nipple, as long as the aspirator is turned on, detergent solution can be suctioned through the scope.
6) Prior to rinsing, attach the previously removed adapters and components, and purge all internal channels with air (using a syringe) to expel residual detergent solution out from each channel.
7) Using clean water, immerse the entire endoscope as well as all removed components and thoroughly rinse all items.
8) With all cleaning adapters, including irrigation tube, still attached to the endoscope, flush all previously air purged channels with 200 mL clean water. All internal channels must be thoroughly rinsed to remove resid-ual detergent and debris. Then remove the endoscope and its components from the solution.
9) Rinse water remaining within the channels should be purged using air to prevent dilution and/or adulteration of antimicrobial agents to be used in the subsequent disinfection or sterilization process.
10) Gently dry all external surfaces of the endoscope with a soft gauze or the like. Dry the objective lens with a cotton tip applicator. Do not put tension on the insertion tube on the endoscope while drying since the outer cover of the bending section may be excessively stretched.
WARNING: Avoid introduction of air during the flushing process. Confirm that no air bubbles exit from the channel openings at the scope distal tip. The presences of the air bubbles could prevent contact of the deterfent with channel surfaces.
WARNING: The enzymatic detergent solution should remain in contact with ALL internal channels and external scope surfaces for the time period recommended by the manufacturer of the detergent.
WARNING: It is important that ALL internal channels (air, water, instrument, etc.), external scope surtaces and com-ponents be thoroughly rinsed with clean water to remove residual detergent solution.
NOTE:70-90% ethyl or isopropyl alcohol for disinfection followed by compressed air, not greater than 165 kPa (1.69 kg/cm2, 24 PSI), may be used to facilitate drying.
WARNING: Prior to disinfection or sterilization, it is imperative that any solutions previously used in the cleaning process be thoroughly rinsed and dried. Failure to do so, could result in ineffective or incomplete disin-fection and sterilization.
CAUTION:Never subject the endoscope to ultrasonic cleaning methods employing high-frequency ultrasound.
- 31 -

4-1-4 HIGH-LEVEL DISINFECTION
Before any attempt is made to disinfect the endoscope, the complete cleaning procedure described elsewhere in this manual must have been completed. Prior to high-level disinfection, the end user should confirm the minimum effective concentration (MEC) of reused disinfectant as per the manufacturer’s instructions. Before complete im-mersion in any disinfecting solution the endoscope should have been “Leak Tested” as described elsewhere in this manual.
1) The air/water/instrument channel disinfecting adapters consisting of two separate components OF-B115 and OF-G17 should already be installed on the endoscope from the previous cleaning procedure.
a) Model number OF-G17 incorporates a standard ANSI luer lock connector to which a syringe or other device should be attached. Fresh (or reused actively effective) disinfecting solution should be flushed through this connector and will simultaneously flow through both
the air and water channels of the scope. (Refer to the internal schematics)b) After the entire scope is completely immersed, and the air and water channels have been filled with disinfect-
ing solution, Model Number OF-G17 should be removed.c) Adhere to proper exposure times for the disinfectant.d) Confirm that a rubber inlet seal is already attached to each channel inlet during the next step.e) The suction nipple located on the PVE connector incorporates a standard luer slip fitting to which a syringe or
other device can be attached. Fresh (or reused actively effective) disinfecting solution should be flushed through or drawn into the entire suction system.
Channel Adapters/Components to be attached Disinfecting solution Rinse water
Air/Water Channel OF-B115OF-G17
50 mL or more 70 mL or more
Biopsy/Suction Channel OF-B115Rubber Inlet Seal
100 mL or more 150 mL or more
WARNING:It is imperative that flexible endoscopes and other semi-critical devices be reprocessed using at least high-level disinfection with a legally marketed sterilant/disinfectant. Only legally marketed endoscope automated reprocessing devices/systems whose device specific claims have been validated by the AER/WD manufacturer and/or reprocessing agents which have been tested and found to be compatible by PENTAX should be used with PENTAX products.Generally speaking, “2%” and “3.2%” alkaline glutaraldehyde solutions which have been FDA cleared with High-Level Disinfection and/or Sterilization claims are recommended. It should be noted that the actual percentage of active ingredient (glutaraldehyde) in these solutions, as per their product label, may vary from the generic and traditional terms “2% glutaraldehyde” and/or “3.2% glutaraldehyde”. For specific brands of compatible disinfectants/sterilants, please contact your local PENTAX service facility or sales representative. Please also refer to the inside front cover of this manual regarding infec-tion control.
ETO Cap
PVE Soaking Cap
(OF-G17)
(OF-B115)
CAUTION:BEFORE IMMERSING, confirm thata) The ‘Red’ ETO gas sterilization venting cap is
taken OFF.b) The PVE soaking cap is securely ON the elec-
trical contacts.
WARNING:Avoid introduction of air during the flushing process. Confirm that no air bubbles exit from the channel openings at the scope distal tip. The presence of the air bubbles could prevent contact of the disinfect-ant with channel surfaces.
- 32 -

2) As long as the entire instrument is immersed in disin-fecting solution, the cleaning adapters, the syringes used in previous steps and the rubber inlet seal should remain removed while the instrument remains fully under the disinfecting solution. The removal of com-ponent parts and cleaning adapters from the endoscope will eliminate the risk of mated surfaces not being exposed to the liquid chemical germicide.
3) While fully immersed, manipulate valve mechanisms and inject disinfectant via syringe into/through remov-able scope components. This will remove entrapped air bubbles that could inhibit contact of solution with component surfaces and provide for better exposure of surfaces to germicide. Make sure disinfectant is injected into/through the rubber inlet seal. The endoscope’s component parts, including all valves should remain in contact with the disinfecting solution for the time period recommended by the manufacturer of the solution and accepted by the user as appropriate to accomplish the desired clinical effect.
4) After the endoscope and its component parts have been in contact with the disinfecting solution for an appro-priate time, flush all channels with air to purge remaining disinfectant, then remove the scope and its compo-nents from the solution. Thoroughly rinse the entire endoscope and all its components with sterile water.
5) a)A 20 mL syringe filled with sterile water should be attached to adapter OF-G17 to flush disinfecting solu-tion from the air and water channels of the scope. Repeat it four times. Fill a syringe with air and flush through the air and water channels several times to force any residual water out of the tubing and nozzles. Dry thoroughly.
b)With the A/W instrument channel cleaning adapter OF-B115 attached, rinse the entire suction system, in-cluding both instrument channel (s) with sterilie water (200 mL or more). Flush air through the instrument channel(s) several times to remove residual water. Dry thoroughly.
6) Following an alcohol rinse, the following steps may be performed to aid in the drying process. a) Remove the air/water/instrument channel cleaning adapters, OF-B115, air/water/channel adapter OF-G17,
reinstall the previously reprocessed scope components. b) Attach the scope to an external suction source, and aspirate air through the channel of the scope to remove
any residual alcohol and to air dry channel surfaces.
DC
Never remove the soaking cap.
WARNING:It is imperative that ALL internal surfaces of the channels are in contact with the disinfecting solution for the time period recommended by the manufacturer of the solution.
NOTE:Ideally, all final rinses should be made with sterile water or bacteria-free water whose microbial quality has been confirmed via monitoring. After water rinsing, 70-90% ethyl or isopropyl alcohol should be flushed through all channels, followed by compressed air, not greater than 165 kPa (24 PSI) to facilitate drying. Channel cleaning adapters should be used for alcohol flushing/rinsing and forced air drying. The outer surfaces of the endoscopes can be dried by gently wiping with a sterile gauze or lint-free cloth sat-urated with alcohol.Regardless of the liquid chemical germicide (sterilant or high-level disinfectant) and/or the quality of the rinse water used, a dry instrument accomplished by a final alcohol rinse followed by forced air is essential to prevent bacteria colonization and/or infections associated with waterborne microorganisms. Such infections are more likely to occur when wet/contaminated instruments are used on patients whose immune systems are compromised or suppressed or when these devices are used in anatomical areas considered sterile and/or susceptible to these organisms.
- 33 -

c) Remove the soaking cap and attach the scope to the processor with the air pump turned ON to its HIGHEST pressure setting and the drain lever of the water bottle set in the DRAIN position, depress the air/water valve of the scope fully until all alco-hol has been discharged from the scope. Thor-oughly drain all alcohol from the air channel as well by covering the hole in the air/water valve. Repeat until no moisture or alcohol is seen exiting the scope or distal tip. 70-90% ethyl or isopropyl alcohol should be flushed through all channels, followed by com-pressed air, not greater than 165 kPa (1.69 kg/cm2, 24 PSI), to facilitate drying.
7) Gently dry all external surfaces of the endoscope with a soft gauze or the like. Do not put tension on the insertion tube while drying since the outer cover of the bending section may be excessively stretched. Dry the objective lens with a cotton-tip applicator.
A/W
DRAIN
WARNING:If the endoscope is to be stored after reprocessing , detach removable valves, components, etc. All channels should be completely dry before storage.
CAUTION:PENTAX recommended rinsing parameters described in this section on high-level disinfection apply to the use of a 2.4% alkaline Glutaraldehyde solution containing no surfactants.Always check with the manufacturer of the liquid chemical germicide (or AER for “automated reprocess-ing”) to confirm that their specific rinsing instructions are based upon validated test data demonstrating that no harmful levels of residues remain on any device or lumen surfaces that may pose a risk to patient and/or user.
- 34 -

4-1-5 STERILIZATIONBefore any attempt is made to sterilize the endoscope, the complete cleaning procedure as described elsewhere in this manual must have been completed.
A) Ethylene Oxide Gas Sterilization (Recommended)
Ethylene Oxide (ETO) Gas Sterilization can be performed on these endoscopes, provided the following special instructions, which may differ from other endoscopes, are followed to ensure the proper performance of the instru-ment. Adhere to the sterilization manufacturer’s instructions and always use a biological indicator.
1) The endoscope must first have been properly cleaned and thoroughly dried according to the instructions in this manual and each of the component parts such as air/water valve, suction control valve, rubber inlet seal, etc. should be removed.
2) The following parameters for Ethylene Oxide Gas Sterilization are proposed.
3) Following ETO Gas Sterilization, aeration time of 72 hours at room temperature is required.4) Aeration Chamber: To shorten the aeration time to 12 hours, an aeration chamber may be used, provided the
temperature does not exceed 55°C (131°F).
B) Other Methods of SterilizationOther types of sterilization systems/processes are available for the reprocessing of medical devices. However, due to the heat sensitive nature and/or the specific biocompatible materials used in the construction of flexible endoscopes, some of these marketed systems/processes/ solutions could have detrimental effects on flexible endoscopes.To avoid the potential for instrument damage and/or scope failure, confirm the compatibility of such reproc-essing systems/solutions first with the OEM of the reprocessing agent/sterilization process and then confirm with your local PENTAX dealer prior to use with any PENTAX products. Prior to using other methods, con-firm the specific compatibility and sterilization claims of ANY sterilizing methods/processes with the steriliz-er manufacturer and ensure manufacturer that they have performed microbiological validation studies that support their claims of achieving sterilization of device specific flexible endoscopes and scope components.
CAUTION:NEVER place the endoscope in a steam autoclave!! NEVER subject the endoscope to ultrasonic clean-ing methods employing high-frequency ultrasound!! Follow provided ETO gas sterilization Parameters.
a)
b)
CAUTION:Prior to placing these endoscopes in a Gas Sterilizer or Aeration Chamber:a) The ‘Red’ ETO gas sterilization venting cap MUST be “ON” securely.b) The PVE soaking cap should be “OFF” the electrical contacts. This is opposite of the immersion instructions.
WARNING:Failure to thoroughly dry all surface areas could result in incomplete or ineffective sterilization. Moisture could prevent contact of the ETO gas with the actual contaminated surfaces.
Temperature: 55°C(131°F)
Relative Humidity: 50%RH
EO Concentration: 600-650 mg/L
Gas Exposure Time: 5 Hours
Aeration: 12 Hours at 55°C(131°F)
CAUTION:Prior to placing these endoscopes in an aeration chamber the ‘RED’ ETO Gas Sterilization Venting Cap MUST be “ON” securely and the PVE soaking Cap should be “OFF” the electrical contacts.
- 35 -

.
4-2. ENDOSCOPIC ACCESSORY INSTRUMENT (EAIs) AND ENDOSCOPE COMPONENTS
4-2-1 CLEANING
1) Reusable endoscopic accessory instruments (such as biopsy forceps, needle, etc.) and removable scope com-ponents (such as suction valve) should be cleaned immediately after each use since dried blood, mucous, or other debris may cause damage to the instrument and render the mechanism inoperable, or may interfere with the ability of the user to reprocess the device or component.
2) Place the EAIs and/or components in a basin with fresh enzymatic detergent solution for the time period recommended by the manufacturer of the detergent being careful not to tightly coil or kink the flexible shaft.
3) Clean the handle and flexible shaft by gently wiping with a soft gauze or the like. Removable components such as suction valve should be manipulated and detergent injected directly into/onto component surfaces and then brushed clean.
4) Rinse all residual detergent from the EAIs by immersing the entire EAIs under clean water and manipulating the handle mechanism. Similarly rinse component surfaces.
5) Ultrasonic cleaning of forceps and similar accessories is then recommended, provided the manufacturer’s instructions and the parameters below are followed: Heavily soiled and/or difficult-to-manually clean compo-nents such as valve mechanisms, inlet seals, etc. should be ultrasonically cleaned prior to subsequent high-level disinfection or sterilization.
Frequency Range 44 kHz ± 6%Time 5 minutes
DO NOT use caustic or abrasive solutions in the ultrasonic cleaner.
CAUTION:Use appropriate heat process indicators and/or biological monitors as recommended by the manufac-turer of the sterilizer.
WARNING:In addition to efficacy claims always check with the manufacturer of the sterilizer/disinfector to confirm their specific product claims including compatibility and confirm that they have test data supporting their claims and demonstrating that no harmful levels of any residues (active/inert ingredients, their byprod-ucts or derivatives of the processed devices) remain on any instrument or lumened surfaces that may pose a risk to patient and users.
WARNING:Current infection control guidelines require that biopsy forceps and similar endoscopic accessory instru-ments which enter sterile tissue or the vascular system or break the mucosal barrier must be sterilized before each patient use. For patient contact endoscopic accessories, follow the specific and detailed reprocessing instructions supplied with each product.
CAUTION:Not all manufacturers of Automated Endoscope Reprocessors (AERs) and Washer-Disinfectors (WDs) make specific claims nor provide special instructions for reprocessing all of the removable scope components that are integral to the safe and effective operation of flexible endoscopes. Therefore, should the AER/WD manu-facturer’s instructions not specifically address reprocessing of any particular scope component (air/water valve, suction valve, inlet seal, etc.) in the AER/WD, then those components must be reprocessed manually as described in PENTAX instructions/labeling. Prior to use, check with each AER/WD manufacturer as to their specific claims with respect to reprocessing individual endoscope components as well as any endoscopic accessory instrument.
- 36 -

6) After cleaning and thorough rinsing, the endoscopic accessory instruments and components should be gently dried using a soft gauze or the like. Avoid tight coiling or kinking and do NOT put tension on the flexible shaft of the forceps and similar endoscopic accessory instruments.
* The endoscopic accessory instruments and scope components listed above may be subjected to ultrasonic cleaning methods and/or steam sterilization.
CAUTION:NEVER use ultrasonic cleaning methods with high-frequency ultrasound on the endoscope itself.
NOTE:All detergent must be removed from the inner mechanism of the forceps and individual scope components. Detergent that remains after the water evaporates may cause increased friction that may render the mecha-nism inoperable. Residual detergent may also interfere in the subsequent biocidal process.
NOTE:It is imperative that ultrasonic cleaning of the biopsy forceps, other endoscopic accessory instruments and other components be performed PRIOR to steam sterilization. Only those PENTAX accessories identified by their pink colored handle, labeled sa being autoclavable or identified below may be subjected to steam auto-claving.
NOTE:Other PENTAX reusable accessories (channel cleaning adapters, cleaning brushes, bite block, etc.) and scope components (rubber inlet seals, air/water and suction control valves, etc. not specifically identified previously should be cleaned in a similar manner as above. Ultrasonic cleaning methods are recommended for accesso-ries whose entire surfaces are not easily accessible by manual cleaning.Heavily soiled components such as valve mechanisms, inlet seals, etc. should be ultrasonically cleaned prior to subsequent high-level disinfection or sterilization. For these specific items, please refer to their separate operation manuals or instruction sheets.
Accessory Ultrasonic-Cleanable Autoclavable
Suction Control Valve OF-B120
Rubber Inlet Seal
Bite Block OF-Z5
Air/Water/Instrument Channel Cleaning Adapter OF-B115
Air/Water Feeding Valve OF-B121
Check-valve OE-C14
Biopsy Forceps
Air/Water Channel Cleaning Adapter OF-G17
All Cleaning Brushes
Water Bottle OS-H4
- 37 -

4-2-2 HIGH-LEVEL DISINFECTION
Before any attempt is made to disinfect endoscopic accessory instruments and/or scope components such as bite block, air/water and suction control valve, brushes, etc. the complete cleaning procedure as described elsewhere in this manual, must have been completed. Heavily soiled components such as valve mechanisms, inlet seals, etc. should be ultrasonically cleaned prior to subsequent high-level disinfection.1) The entire accessory or component should be immersed in disinfecting solution.2) Accessory and component surfaces should remain in contact with the disinfecting solution for the time period
recommended by the manufacturer of the solution and accepted by the user as appropriate. To ensure better contact, manipulate components such as valves while injecting disinfectant into/onto components surfaces.
3) After the item has been in contact with the disinfecting solution for the appropriate amount of time, remove it from the solution.
4) Rinse all residual disinfecting solution from the accessory/component by immersing it under sterile water.5) After thoroughly rinsing, the items should be gently dried using a soft gauze or the like. Compressed air may
also be used to facilitate drying.
WARNING:Current infection control guidelines require that biopsy forceps and similar endoscopic accessory instru-ments (EAIs) which enter sterile tissue or the vascular system or break the mucosal barrier must be ster-ilized before each patient use. It is recommended that any endoscopic accessory instruments intended for use in the biliary tract be subjected to an appropriate sterilization process. For patient contact endo-scopic accessories, follow the specific and detailed reprocessing instructions supplied with each prod-uct.
NOTE:Ideally, all final rinses should be made with sterile water or bacteria-free water whose microbial quality has been confirmed via monitoring. After water rinsing, 70-90% ethyl or isopropyl alcohol should be flushed through lumens of the endoscopic instruments as well as any removable scope components including valve mechanisms, followed by compressed air, not greater than 165 kPa (24 PSI) to facilitate drying. External instrument and component surfaces can be dried by gently wiping with a sterile gauze or lint-free cloth saturated with alcohol.Regardless of the quality of the rinse water used, a dry instrument accomplished by a final alcohol rinse followed by forced air is essential to prevent bacteria colonization and/or infections associated with waterborne microorganisms. Such infections are more likely to occur when wet/contaminated instru-ments are used on patients whose immune systems are compromised or suppressed or when these devices are used in anatomical areas considered sterile and/or susceptible to these organisms.
WARNING:The addition of defoaming agents to the water supply and/or automated reprocessing system is NOT recommended. Due to their nature, these silicone based agents cling tenaciously to surfaces. Unless they are rinsed very thoroughly, a “barrier” could be created which could reduce the effectiveness of the disinfection/sterilization process. Additionally, repeated use of such defoamers could eventually lead to residual silicone build up resulting in equipment malfunction such as clogged air and water channels. Similarly, silicone residues can deposit a “film” onto the distal objective lens causing “blurry” endo-scopic images.
- 38 -

4-2-3 STERILIZATION
Before any attempt is made to sterilize the accessories and/or individual scope components, the complete cleaning procedure as described elsewhere in this manual must have been completed. Heavily soiled components such as valve mechanisms, inlet seals, etc. should be ultrasonically cleaned prior to subsequent sterilization.
• Steam Sterilization (Autoclaving) Recommended
1) Prior to steam sterilization, all autoclavable endoscopic accessary instruments and endoscopic components previously identified should be thoroughly cleaned using manual and ultrasonic cleaning methods as described elsewhere in this manual.
2) Autoclaving can then be performed under the following conditions:
• ETO GAS sterilization1) ETO Gas Sterilization can be performed on these accessories and/or components, provided they have first
been properly cleaned and thoroughly dried.2) Following ETO GAS Sterilization, aeration is required.
WARNING:Current infection control guidelines require that biopsy forceps and similar accessories which enter ster-ile tissue or vascular system or break the mucosal barrier must be sterilized before each patient use.It is recommended that any endoscopic accessary instruments intended for use in the biliary tract be subjected to an appropriate sterilization process. For patient contact endoscopic accessories, follow the specific and detailed reprocessing instructions supplied with each product.
CAUTION:Use only the type of packaging material and package configuration as recommended by the manufac-turer of the sterilizer. Use appropriate heat process indicators and/or biological monitors as recom-mended by the manufacturer of the sterilizer.
NOTE:The following sterilization parameters are only valid with sterilization equipment that is properly main-tained and calibrated.
NOTE:The PENTAX accessories and scope components listed on page 28 may be subjected to Steam Auto-claving:
CAUTION:Never place the endoscope in a steam autoclave nor subject it to high-frequency ultrasonic cleaning methods!
NOTE:For ethylene oxide sterilization of PENTAX accessories and endoscope components, follow the same ETO parameters as for PENTAX endoscopes.
Sterilizer Type: Prevacuum
Temperature: 132 ~ 135 °C (270 ~ 275 °F)
Time: 5 minutes
- 39 -

4-3. WATER BOTTLE ASSEMBLY
Each water bottle assembly should be cleaned and sterilized at least on a daily basis or more frequently depending upon the patient and/or type of endoscopic procedure. As with all endoscopic accessories, prior to sterilization, water bottle assemblies must be scrupulously cleaned. Failure to do so could result in incomplete or ineffective sterilization.
I. Cleaning of Water Bottle
1) After use, the entire bottle assembly (water container, cap and tubing) should be washed with clean running water and a dampened gauze or scrub brush.
2) Ultrasonic cleaning of the entire water bottle assembly is then recommended to access difficult to reach areas, provided the operating frequency is 44 kHz ± 6% for a period of at least 5 minutes.
3) After washing with a cleaning solution, all surfaces of the water bottle assembly should be thoroughly rinsed with clean water and dried. Gauze or cloth can be used to wipe dry most surfaces. Compressed air and 70-90% ethyl or isopropyl alcohol should be used to facilitate drying of hard to reach areas.
II. Sterilization of Water Bottle Before any attempt is made to sterilize the water bottle assembly, the complete cleaning procedure described above must have been completed. Failure to scrupulously clean the water bottle prior to the sterilizing process, could result in incomplete or ineffective sterilization.
WARNING:The addition of defoaming agents to the water supply is NOT recommended. Due to their nature, these silicone based agents cling tenaciously to surfaces. Unless they are rinsed very thoroughly, a “barrier” could be created which could reduce the effectiveness of the disinfection/sterilization process. Addition-ally, repeated use of such defoamers could eventually lead to residual silicone build up resulting in equipment malfunction such as clogged air and/or water channels.
NOTE:Take care in handling the water bottle. DO NOT carry the bottle by the A/W Connector or the hose. When the bottle cap has been removed from the bottle, be careful in handling the water feeding stem.
Reprocessing At-A-GlanceAutoclave
Manual Pre-Cleaning
Ultrasonic Cleaning
Rinse and Dry
Steam Sterilize
Cooling
CAUTION:To avoid disconnection and/or bursting of the internal tubing, always set the lever to the Air/Water posi-tion (upright) and use less than 165 KPa (24 psi) air pressure during forcep air drying.
CAUTION:Use only the type of packaging material and package configuration as recommended by the manufac-turer of the sterilizer. Use appropriate heat process indicators and/or biological monitors as recom-mended by the manufacturer of the sterilizer.
NOTE:The following sterilization parameters are only valid with sterilization equipment that is properly main-tained and calibrated.
- 40 -

Steam Sterilization (Autoclaving)PENTAX water bottle assemblies, Model OS-H4 have been designed to withstand high-pressure steam steri-lization procedures providing the following parameters are adhered to:
During steam sterilization, ensure that the cap and tubing section have been removed from the water bottle container.Make sure that the drain lever on the water bottle cap has been set on the A/W position (upright).
Sterilizer Type : Prevacuum Temperature : 132 ~ 135°C (270 ~ 275°F) Time : 5 - 18 minutes
- 41 -

5. POST REPROCESSING1) Following reprocessing, the endoscope may either be reused or placed in storage.
2) Prior to reuse, ensure that instrument has been properly inspected and fully prepared for the next clinical pro-cedure.
3) Prior to storage, ensure that all internal channels, scope components, instrument surfaces and accessories are thoroughly dry.
4) A cotton tipped applicator moistened with 70-90% ethyl or isopropyl alcohol for disinfection may be used to carefully remove any films or residues left upon the lens surfaces, such as the distal objective lens.
5) The endoscope should be hung in a clean, dry, well-ventilated storage cabinet at room temperature. The insertion tube and light guide cable should be hung and kept as straight as possible during storage.
CAUTION:When utilizing chemo-thermal processes for reprocessing PENTAX endoscopes, the instruments should be allowed to return to room temperature prior to use and/or further handling.
CAUTION:• Make sure that all removable components such as the air/water valve, suction valve, rubber inlet
seal(s), and rubber distal tip are detached from the scope. This will allow for better air circulation throughout the internal channels to ensure thorough drying.
• Never store the endoscope, its components and accessories in the carrying case, as this type of dark, humid and unventilated environment is conducive to bacteria colonization, which increases the risk of cross contamination. These cases are intended for transportation of the instrument, not storage.
• Never store the endoscope in areas of high humidity, high temperatures or in direct exposure to sunlight or X-rays.
• Avoid storage of the scope in cabinets, which have any sharp edges, exposed nails/screws, etc. Contact with sharp objects can puncture, scratch or otherwise damage the endoscope.
- 42 -

5-1. SERVICING
Prior to returning any instrument for repair to PENTAX, the instrument should first undergo appropriate reproc-essing/decontamination procedures for the purpose of infection control. Check with your local PENTAX service facility for more details.1) All instruments requiring repair should be shipped in the original carrying case with appropriate packing
along with comments describing the instrument damage and complaint.2) A repair purchase order number, contact name and phone number of the individual responsible for authoriz-
ing repairs, as well as shipping address should be included.3) The “Red” ETO gas sterilization venting cap should be attached to the instrument if it will be shipped by air
freight.4) Any accessories and/or scope component potentially related to the scope damage or complaint should also be
returned with the endoscope.5) Soaking caps should also be returned with the scope to check/confirm the integrity of their watertight seal.6) After servicing, all endoscopes must be reprocessed prior to patient use.
7) For disposal of instruments, follow local or country regulations.
WARNING:Your local PENTAX distributor can provide a list of “compatible” reprocessing agents with PENTAX endoscopes based upon material compatibility and functionality studies performed by PENTAX, Japan. These tests of course apply only to genuine PENTAX parts, components and materials including propri-etary adhesives, sealants, lubricants, etc. specifically selected for use in PENTAX endoscopes to satisfy their original design criteria. PENTAX manual reprocessing instructions supplied with each product have been validated for PENTAX endoscopes utilizing exclusive PENTAX parts/materials and assembled based upon proprietary PENTAX manufacturing technologies and/or servicing techniques.
It must be recognized that PENTAX does not evaluate non-PENTAX parts, components, materials and/or servicing methods and therefore questions regarding material compatibility and/or functionality of PENTAX instruments built with these unauthorized, untested and unapproved items, materials, repair/assembly methods must be referred to the third party service organization and/or device remanufac-turer. It is unknown to PENTAX if serviced or remanufactured instruments (performed by unauthorized PENTAX entities) which still bear a Pentax label are within Pentax device specifications and/or if unau-thorized activities have significantly changed the instrument’s performance, intended use, safety and/or effectiveness.
These companies should confirm the ability for these serviced/remanufactured devices to be reproc-essed safely and effectively with reprocessing agents/systems recognized as compatible by PENTAX for standard PENTAX products. These third party companies and/or remanufacturers should be con-sulted to confirm if they have performed reprocessing validation studies on instrument models which they have serviced (or remanufactured) that support the cleaning, high-level disinfection and/or steriliza-tion of these endoscopes via the normal scope OEM reprocessing recommendations, standard AER device-specific instructions and/or their own unique reprocessing recommendations.
Ultimately, owners of these medical devices are responsible for selecting an appropriate service facility or vendor whose activities render an instrument to the same expectations and quality of a finished device supplied by the scope OEM.
- 43 -

5-2. CARE AND MAINTENANCE TIPS
Flexible endoscopes have been an invaluable tool in the medical community’s armamentarium to successfully di-agnose and treat a wide variety of illnesses in patients for several decades. Perhaps due to their longevity and pro-gressive design changes over the years which have simplified their use, flexible endoscopes have been somewhat taken for granted and have erroneously not been considered highly technological medical devices.
In fact, current generation flexible endoscopes although easier to clinically use, are much more sophisticated than ever. Special reprocessing instructions must be followed to ensure the instruments are patient ready and patient safe. Special care and handling must be exercised and practiced to prevent instrument malfunction and prolong the reliability of the endoscope.
The burden of responsibility to ensure safe and reliably functioning instruments is left in the hands of the health-care professionals who actually care for and reprocess flexible endoscopes.
Naturally, equipment manufacturers share in this responsibility and tremendous efforts have been made in design-ing instruments which could be reprocessed and maintained as easy as possible. However, due to the nature of their use and application, flexible endoscopes must be subjected to special cleaning procedures, followed by a dis-infection or sterilization process after each and every patient use.
To highlight and simplify, what may appear to some as being complicated maintenance and reprocessing instruc-tions, PENTAX strongly recommends the users review the following suggestions and advice on the care and main-tenance of your PENTAX flexible endoscopes.
These tips, particularly those involving scope reprocessing should not be construed as “shortcuts” and are not in-tended as substitute directions for complete instructions found elsewhere in the owner’s manual.
** When utilizing chemo-thermal processes for reprocessing PENTAX endoscopes, the instruments should be allowed to return to room temperature prior to use and/or further handling.
** Make sure that the air/water/instrument channel cleaning adapter is securely attached to the top of the air/water and suction valve cylinders.
** Avoid soaking of the endoscope with accessories (forceps, injection or aspiration needles, etc.) or any sharp edged objects which could inadvertently scratch or cut the distal bending section sheath. (Subsequent flexing back and forth of the rubber sheath could eventually stretch the scratched rubber until a pinhole and leak de-velops.)
** Exposure to a compatible enzymatic detergent is essential to thorough cleaning of all surfaces of the endo-scope. Rinsing and drying after cleaning is imperative to prevent dilution and/or adulteration of the disinfect-ant/sterilant.
** Do not reuse disposable endoscope accessory instruments (EAIs) or scope component intended for single pa-tient or one time use.
** Do not expose the endoscope or endoscope accessory instruments (EAIs) or scope component to harsh chem-ical solutions. Strictly adhere to exposure times recommended by the manufacturers of compatible solutions.
** Not all manufacturers of automated endoscope reprocessors (AERs) make specific claims nor provide special instructions for reprocessing all of the removable scope components that are integral to the safe and effective operation of flexible endoscopes. Therefore, should the AER manufacturer’s instructions not specifcally ad-dress reprocessing of any particular scope component (air/water valve, suction valve, inlet seal, etc.) in the AER, then those components must be reprocessed manually as descrived in PENTAX instructions/labeling. Prior to use, check with each AER manufacturer as to their specific claims with respect to reprocessing indi-vidual endoscope components.
- 44 -

** Avoid contact of any flexible portion of the endoscope with any sharp edge objects (bed frames, table top cor-ners, sink drains, accessories hanging in storage cabinets, etc.) at any time during the handling, reprocessing or storage of the endoscope.
** Avoid stretching of the bending section rubber sheath at the distal portion of the scope. During mechanical cleaning with a dampened gauze, do not use excessive force. A gentle back and forth wiping motion should be sufficient to remove gross debris. Subsequent soaking in an enzymatic detergent will clean the remainder of debris.
** Disinfectants and sterilants are toxic substances by nature. All residual solution must be thoroughly rinsed and dried prior to each patient use.
** The key to preventing clogged air water channels/nozzles is to immediately flush the channels with either air pressure or fluid/detergent right after removal from the patient. This should be followed by brushing of each accessible channel and then soaking with an enzymatic detergent.
** Avoid attempting to remove or unscrew scope components which should not be removed. Parts such as the distal portion of the light guide plug, any inlet ports and any rubber strain reliefs on either the insertion tube or umbilical cable are essential to the watertight integrity of the instrument. Removal or loosening of these components and subsequent immersion could lead to fluid invasion into the endoscope and/or compromise effective reprocessing.
** Check for any sharp edges on all surfaces of an automated cleaning/reprocessing unit which may come in con-tact with an endoscope. Some units may have sharp edged wire mesh filters and baskets or inlet/outlet ports which could damage your scope.
** Do NOT overtighten the cap to the water bottle assembly. The metal pipe at the top of the PENTAX water bottle assembly functions as an inlet port for air from the light source. This inlet pipe should not be used as a leverage tool to tighten the cap to the water container. Overtightening could cause the plastic cap to crack.
** Do NOT introduce air bubbles into the scope’s internal channels during flushing of cleaning and/or disinfect-ing/sterilizing solutions as these bubbles could interfere in the effectiveness of the disinfection/sterilization process.
** Do not store the endoscope, its components or accessories in the carrying case as this type of dark, humid and unventilated environment is conducive to bacteria colonization which increases the risk of cross-contamina-tion.
** Prior to each use, check the condition of all endoscope accessary instruments.Do NOT use any accessories with kinked or bent flexible shafts.Do NOT use forceps with misaligned cups and/or bent needles/spikes.Do NOT use aspiration or injection needles which are not retractable or whose sharp tips can not be protected.Do NOT use cleaning brushes without smooth or rounded distal tips.Do NOT use instruments with exceptionally long rigid sections or whose outer diameter restricts pasage through the instrument channel/channel inlet.Use of any of the above accessories could result in channel damage and costly repairs.
** Verification of the effective level of glutaraldehyde (via test strips or similar methods) is recommended to en-sure potency of glutaraldehyde to achieve high-level disinfection and/or sterilization.
WARNING:Instrument repairs should only be performed by an authorized PENTAX service facility. PENTAX assumes no liability for any patient/user injury, instrument damage or malfunctions, or REPROCESS-ING FAILURE due to repairs made by unauthorized personnel.
WARNING:NEVER drop this equipment or subject it to severe impact as it could compromise the functionality and/or safety of the unit. Should this equipment be mishandled or dropped, do not use it. Return it to an authorized PENTAX service facility for inspenction or repair.
- 45 -

SPECIFICATIONS
*There is no guarantee that instruments selected solely using this minimum instrument channel width will be com-patible in combination.
NOTE: Specifications are subject to change without prior notice and without any obligation on the part of the man-ufacturer.
DISTAL END
EG-290Kp EC-380LKp
Direction of View Forward
Field of View 140°
Depth of Field 5 ~ 100 mm 3 ~ 100 mm
Tip Deflection Up - Down
Right - Left
210° - 120°
120° - 120°
180° - 180°
160° - 160°
Rigid Distal Diameter ø 9.8 mm ø 13.4 mm
Distal End Width ø 9.8 mm ø 13 mm
Maximum Insertion Portion Width ø 11.35 mm ø 14.65 mm
Insertion Tube Width ø 9.8 mm ø 13.2 mm
* Minimum Instrument Channel Width ø 2.8 mm ø 3.8 mm
Insertion Portion Working Length 1,050 mm 1,700 mm
Total Length 1,373 mm 2,023 mm
Operation
environment
Ambient temperature 10 ~ 40°C
Relative humidity 30 ~ 85%
Air pressure 700 ~ 1060 hPa
Storage
environment
Ambient temperature -20 ~ 60°C
Relative humidity 0 ~ 85%
Air pressure 700 ~ 1060 hPa
Degree of protection against electric shock BF type
EG-290Kp EC-380LKp
LIGHT GUIDE
OBJECTIVE LENS
LIGHT GUIDE
INSTRUMENT CHANNEL
AIR/WATERNOZZLE
OBJECTIVE LENS
LIGHT GUIDE
LIGHT GUIDE
INSTRUMENT CHANNEL
AIR/WATERNOZZLE
- 46 -

MEMO
- 47 -

MEMO
- 48 -

NOTICE
These instruments are used with Class B Medical Equipment (specified EN55011) and are intended for hospital or health care districts.
Together, these endoscopes and the compatible processor comply with EN 60601-1-2 (2002) for EU, IEC 60601-1-2 (2001) for other countries.
When used in clinical or residential areas near radio and TV receiver units, these instruments may be subjected to radio interference.
To avoid and resolve adverse electromagnetic effects, do NOT operate these instruments near the RF energy equipment
HOYA Corporation2-7-5 Naka-Ochiai, Shinjuku-ku, Tokyo 161-8525 Japan
HOYA Corporation PENTAX Life Care Tokyo Office3-16-3 Higashi-Ikebukuro, Toshima-ku, Tokyo 170-0013 JapanTel: 03-5953-2592Fax: 03-5953-2595
PENTAX Medical Company A Division of PENTAX of America, inc.102 Chestnut Ridge Road Montvale, New Jersey 07645-1856Tel: 201-571-2300 Toll Free: (800) 431-5880Fax: 201-391-4189
PENTAX Canada Inc.1770 Argentia Road Mississauga, Ontario L5N 3S7Tel: 905-286-5585Fax: 905-286-5571
Specifications are subject to change without notice and without
any obligation on the part of the manufacturer.
Our representative in your area:
2009. 11. 6217001 Z789 R05 printed in JAPAN
88123