Embed Size (px)
Citation preview

PENT "
OPERATING MANUAT
www.orphancameras.com
Welcome to the world of Pentax MediumFormat Photography. The 67's picture formatgives an image area four t imes larger than thatof the 35mm SLR camera, assuring thephotogra pher of f inegrained, su perior q ual i tyimage definit ion on enlargements.
, , ,Careful reading of this operating manual will , ',help you take advantages of al l the photo- r
graphic capacit ies this equipment has to offer.Please be on the look out for the speciald i rect ions wi th a" . " mark in the coloredcolumn.
The names of the camera's working parts arel isted in the nomenclature section inside thefront and back f laps. Please keep the f lapsunfolded for quick reference while you readth is manual .
Effit
ii)iiiE!ii
i ; r i ; ; i ; ; , . - ; ,L r ,6S
www.orphancameras.com
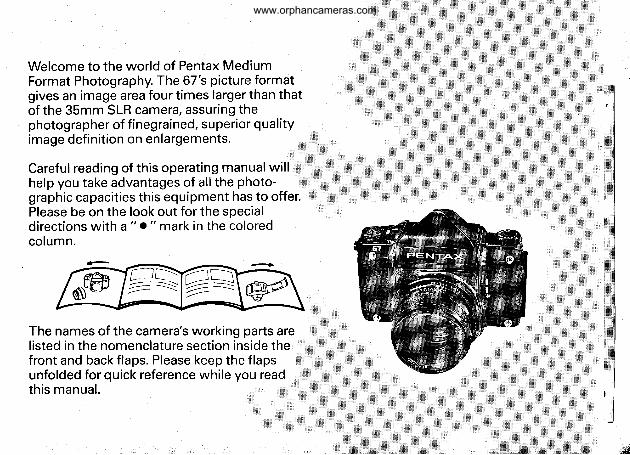
Shut te r bu t ton
Shut te r lock lever
Exposure counter d ia l
Exposure counter
Exposure counter cont ro l d ia l
Safety device re lease but ton
Mi r ro r lock uP lever
Depth of f ie ld Preview lever
D is tance sca le
F i l t e r a l i g n m e n t i n
Lens (op t ion
Pentapr ism (op t ion)
Shut te r speed index /Bat te ry check lamp
HE
$
Shu t t e r d i a l
Lock p in
F lash t e rm ina l s
Accessory a l ignment p in
St rap lug
Lens re lease lever
Mi r ro r
Lens a l i gnmen t i ndex
M o u n t
Apertu re sca le
Aper tu re r ing
Focus ing r i ng
www.orphancameras.com
Notes to Users
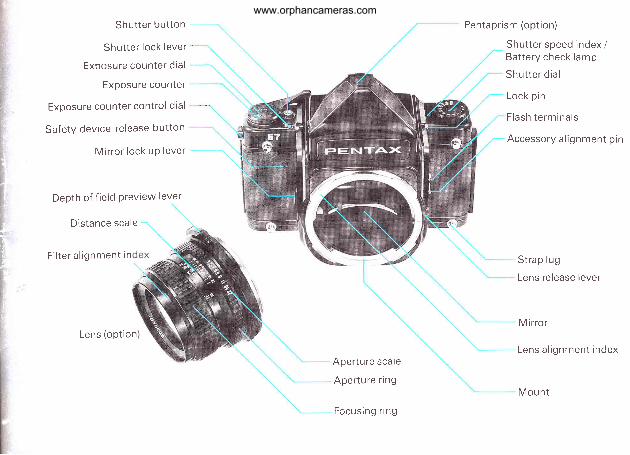
Commercial ly avai lable lenses and accessoriesproduced by other manufacturers are notmade to our precise specif icat ions and there-fore, may cause difficulties with - or actualdamage to - your Pentax camera. We do notassume any responsibi l i ty or l iabi l i ty fordif f icult ies result ing from the use of lenses andaccessories made by other manufacturers withPentax cameras and photographic products.
Photographs and/or i l lustrat ions of theproducts in this operating manual may dif fer
' from the actual product in i ts detai ls.
riigMxr*,xl,...',rj$;.]tr
www.orphancameras.com
TABIEOFEONT"Effif
Nomenclature . . . . . . . . . . . . . . .F1aps \PREPARATIONS Ni.PUCNNONSAttaching shoulder s t rap. . . . . : . . . . . . . . . . . . . . . . . . . . . . . . . . . . . . . . .2Insert ing battery.. . . . . . . . . . . . .3 - 5I nterchangea ble f i ndersMount ing 1ens. . . . . . . . . . . . . . . . . .8 - IShut ter re lease wi thout f i lm . . . . . . . . . . . . . . . . . . . . . .10 - 1 1LOADING FILMSett ing f i lm type (12012201 .. . . . . . .13 - 14Loading f i lm . . . . . . . . . . . . . . . . .15 - 19Unloading f i lmBASIC OPERATIONShutter dial/button... . . . . . . . . . . . . . . . . . . .22 -23
Setting apertureHold ing camera . . . . . . . . . . . . . . . . . . .25Diopter adjustment and focusing. . . . . . . . . . . . .26 - 27Exposure . . . . . . . . . . . . . . . . . . . . . . . . . . . . . . .28
B(Bulb) and Time photography. . . . . . . . . . . . . . . . . . . . . . . . . .30
Mirror-lock-up leverFf ash photography. . . . . . . . . . . . . . . . . . . . . .32- 33Depth of f ield . . . . . .34Inf rared index. . . . . . . . . . . . . . . . . . : . . . . . . . . . . . . . . . . . . . . .35ACCESSORTES ... . . . . . . .36 - 41
OPERATIONAL PRECAUTIONS ... . .42MATNTENANCE . . . . . . . . . . . . . . . .43TROU BLE.SHOOTING ... . . . . .INTERCHANGEABLE LENSES ... . . . . . . . . . . . 46- 47WARRANTY POLTCY ... . . . . . . . . . . . . .48 - 49SPECIFICATIONS ... . . . . . . . . . . .S1
.-dsiihiatsls{.^ .. **!Sr*-. ....-. ll$+r.-, "
$rct$e"*",'-slt!ffi'
www.orphancameras.com
PREPARATION
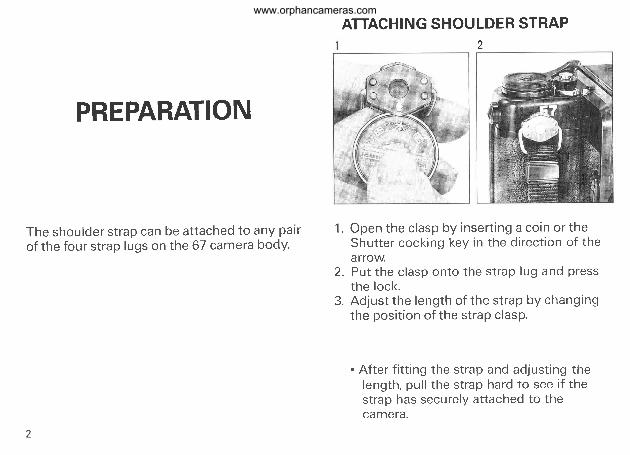
The shoulder s t rap can be at tached toof the four s t rap lugs on th e 67 camera
any pa l rbody.
ATTACH I NG SHOU LDER STRAP2
1. Open the c lasp by inser t ing a co in o r theShut ter cocking key in the d i rect ion of thea rrow.
2. Put the c lasp onto the st rap lug and pressthe lock.
3. Adjust the length of the st rap by changingthe posi t ion of the st rap c lasp.
. After f i t t ing the strap and adjust ing thelength, pul l the strap hard to see i f thestrap has securely attached to theca mera.
www.orphancameras.com
INSERTING BATTERY
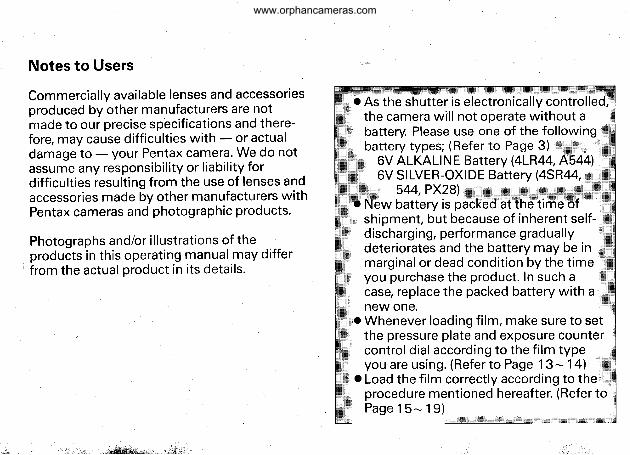
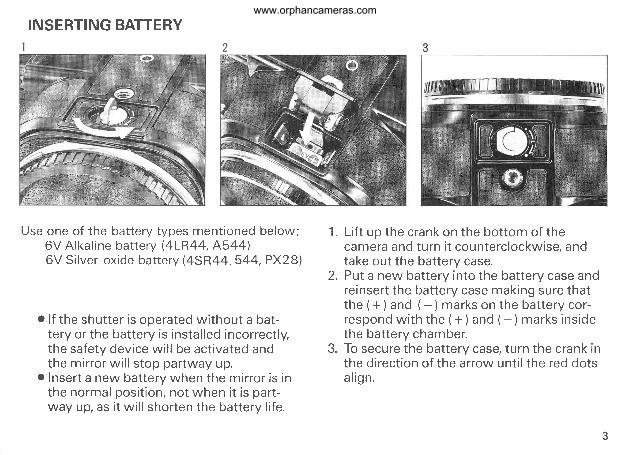
Use one of the bat tery types ment ioned below;6V Alkal ine battery (4LR44, A54416V Si lver-ox ide bat tery (4SR44,544, PX28)
o l f the shut ter is operated wi thout a bat-tery or the battery is instal led incorrect ly,the safety device wi l l be act ivated andthe mir ror wi l l s top par tway up.
o Inser t a new bat tery when the mir ror is inthe normal posi t ion, not when i t is par t -way up, as i t wi l l shor ten the bat tery l i fe .
1 . L i f t up the c rank on the bo t tom o f thecam era and turn i t counterc lockwise, andtake out the battery case.
2. Put a new bat tery in to the bat tery case andreinser t the bat tery case making sure thatthe ( + ) and ( - ) marks on the bat tery cor-respond w i th t he (+ ) and ( - ) marks i ns idethe bat tery chamber.
3. To secure the battery case, turn the crank inthe d i rect ion of the arrow unt i l the red dotsa l i g n .
www.orphancameras.com
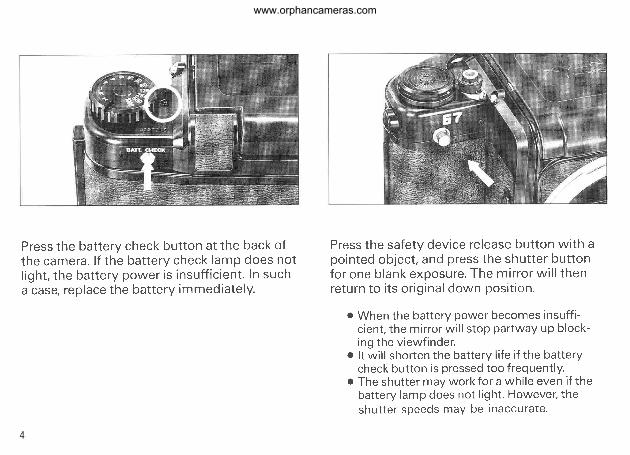
Press the bat tery check but ton at the back ofthe camera. l f the bat tery check lamp does notl igh t , the ba t te ry power i s insu f f i c ien t . In sucha case, replace the bat tery immediate ly .
Press the safety device re lease but ton wi th apo in ted ob jec t , and press the shut te r bu t ton
fo r one b lank exposu re . The m i r ro r w i l l t henre turn to i t s o r ig ina l down pos l t lon .
o When the bat tery power becomes insuf f i -c ient , the mirror wi l l s top partway up b lock-ing the v iewf inder.
r l t wi l l shorten the bat tery l i fe i f the bat terycheck but ton is pressed too f requent ly .
r The shut ter may work for a whi le even i f thebat tery lamp does not l ight . Howevet the
shut ter speeds may be inaccurate.
www.orphancameras.com
PRECAUTIONS ON BATTERY
o Use the Alkaline battery (4LR44, A544) orthe Silver-Oxide battery (4SR44, 544, PX28lal igning the polari t ies correctly.
o Always keep batteries out of the reach ofch i ldren.
o The misuse of batteries may cause hazardssuch as leakage, over heating, explosions,etc.
o To prevent explosion:never try to break a part,never recharge the battery,never throw into fire,never expose to excessive heat.
o The Alkal ine battery should last about 6months, while the Si lver-Oxide batteryabout one year with average use at normaltemperature. Howevel when the TTL pen-taprism is used, the battery wil l last less as i talso activates the TTL meter.
o At temperature below 0oC (32"F), batteryperformance may temporari ly decrease. Oneway to avoid this is to use the 67 remotebattery cord (optional) for keeping thebattery warm under your clothing.
o Keep a spare battery on hand for con-venience when shooting outdoors ortravel ing.
o Make sure to remove the battery when thecamera is not in use for an extended periodof time, as the battery may deteriorate andcause damage to the contact points.
www.orphancameras.com
INTERCHANGEABLE FI N DERS
@ @o o
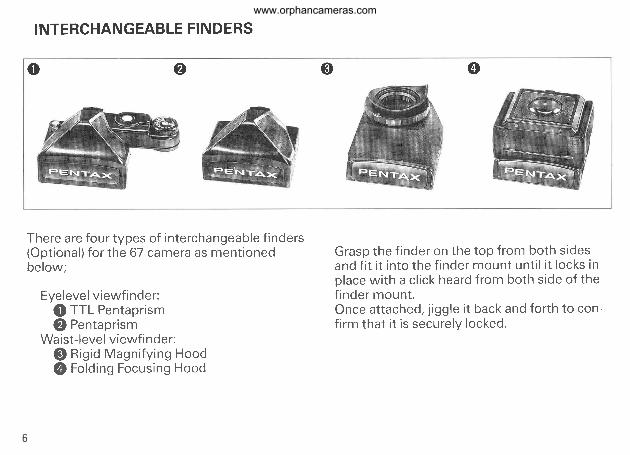
There are four types of interchangeable f inders(Optional) for the 67 camera as mentioned Grasp the finder on the top from both sidesbelow; and f i t i t into the f inder mount unt i l i t locks in
place with a click heard from both side of theEyelevelviewfinder: f inder mount.
O TTL Pentaprism Once attached, jiggle it back and forth to con-(O Pentaprism firm that it is securely locked.
Waist-level viewf inder:@ Rigid Magnify ing Hood@ Folding Focusing Hood
www.orphancameras.com
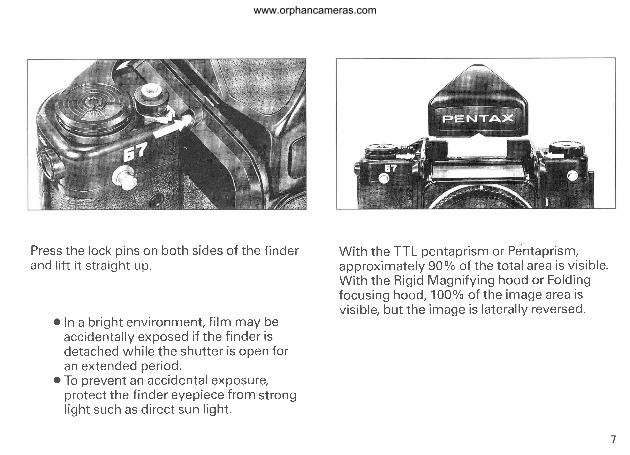
Press the lock p ins on both s ides of the f indei 'a nd l i f t i t stra ig ht u p.
o In a b r igh t env i ronment , f i lm may beaccidenta l ly exposed i f the f inder isdetached whi le the shut ter is open foran extended per iod.
o To prevent an accidental exposure,protect the f inder eyepiece from strongl igh t such as d i rec t sun l igh t .
Wi th the TTL pentapr ism or Pentapr ism,approximately 90 o/o of the tota l area is v is ib le.Wi th the R ig id Magn i fy ing hood or Fo ld ingfocusing hood, 100 o/o of the image area isv is ib le, but the image is la tera l ly reversed.
www.orphancameras.com
MOUNTING LENS
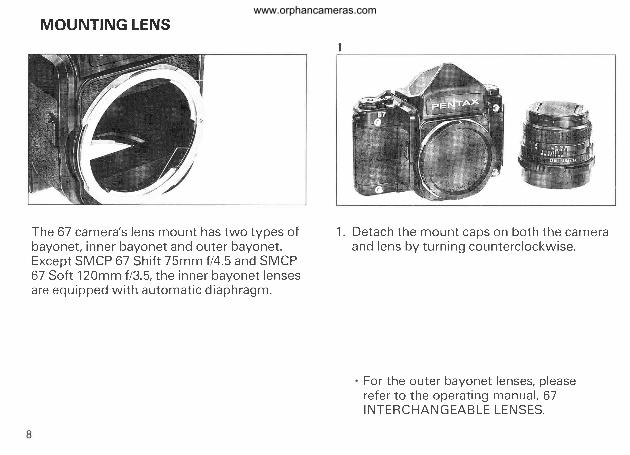
The 67 camera's lens mount has two types ofbayonet , inner bayonet and outer bayonet .Except SMCP 67 Sh i f t 75m m f 14 .5 and SMCP67 Sof t 120mm f /3.5, the inner bayonet lensesare equ ipped w i th au tomat ic d iaphragm.
1 . Detach the mount caps on bo th the cameraand lens by tu rn ing counterc lockwise .
For the outer bayonet lenses, pleaserefer to the operat ing manual , 67I NTE R C HAN G EAB LE LE N SES.
I
www.orphancameras.com
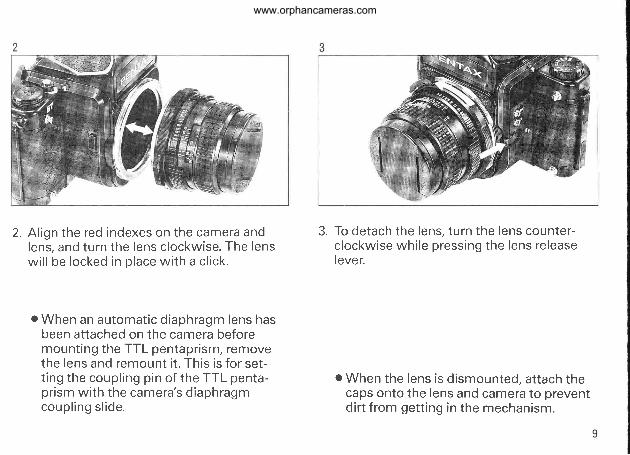
2. A l ign the red indexes on the camera andlens , and tu rn the lens c lockwise . The lenswi l l be locked in p lace w i th a c l i ck .
o When an au tomat ic d iaphragm lens hasbeen attached on the camera beforemount ing the TTL pentapr ism, removethe lens and remount i t . This is for set-t ing the coup l ing p in o f the TTL penta-pr ism wi th the camera 's d iaphragmcoup l i ng s l i de .
3. To detach the lens, turn the lens counter-c lockwise whi le pressing the lens re leaselever.
o When the lens is d ismounted, at tach thecaps onto the lens and camera to preventd i r t f rom get t ing in the mechanism.
www.orphancameras.com
SHUTTER RELEASE WITHOUT FILM
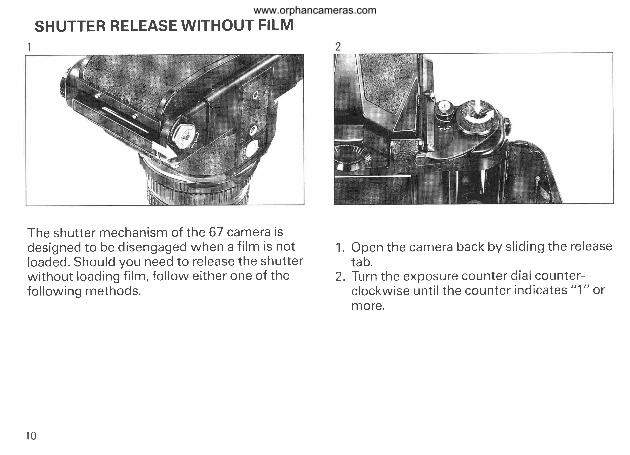
The shut te r mechan ism o f the 67 camera isdes igned to be d isengaged when a f i lm is no tloaded. Shou ld you need to re lease the shut te rw i thout load ing f i lm, fo l low e i ther one o f thefo l low ing methods .
Open the camera back by s l id ing the re leaseta b.Turn the exposure counter d ia l counter-c lockwise un t i l the counter ind ica tes "1" o rmore.
1 .
2 .
10
www.orphancameras.com
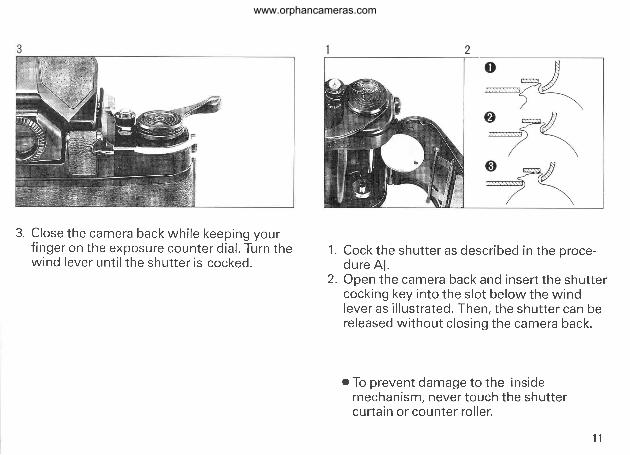
3. C lose the camera back wh i le keep ing yourf inger on the exposure counter d ia l . Turn thewind lever un t i l the shut te r i s cocked.
1. Cock the shut ter as descr ibed in the proce-dure A l .
2 . Open the camera back and inser t the shut te rcocking key in to the s lot below the windlever as i l lust rated. Then, the shut ter can bereleased wi thout c los ing the camera back.
o To prevent damage to the insidemechanism, never touch the shut tercur ta in or counter ro l ler .
il
www.orphancameras.com

LOADING FILM(Please go through "BASIC OPERATION" be-fore actually loading a f i lm.)
12
www.orphancameras.com
SETTING FILM TYPE
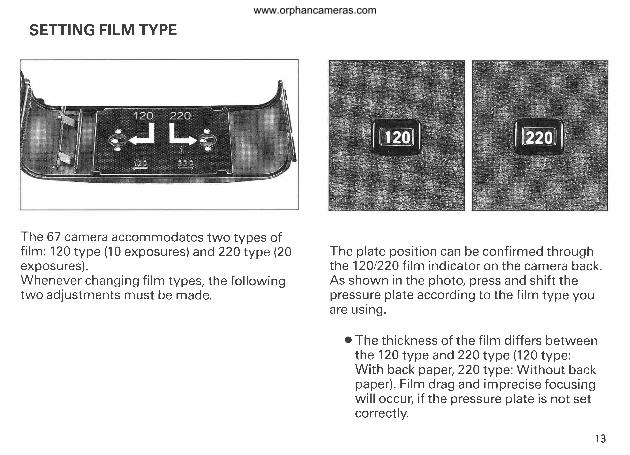
The 67 camera accommodates two types off i lm:120 type (10 exposures) and 220 type (20exposu res).Whenever changing f i lm types, the fo l lowingtwo adjustments must be made.
The plate posi t ion can be conf i rmed throughthe 1201220 f i lm indicator on the camera back.As shown in the photo, press and shi f t thepressure p late according to the f i lm type youare usrng .
o The th ickness of the f i lm d i f fers betweenthe 120 type and 220 type (120 type:With back paper, 220 type: Without backpaper) . F i lm drag and imprecise focusingwi l l occur , i f the pressure p late is not setcorrectly.
1 3
www.orphancameras.com
120 type 22O type
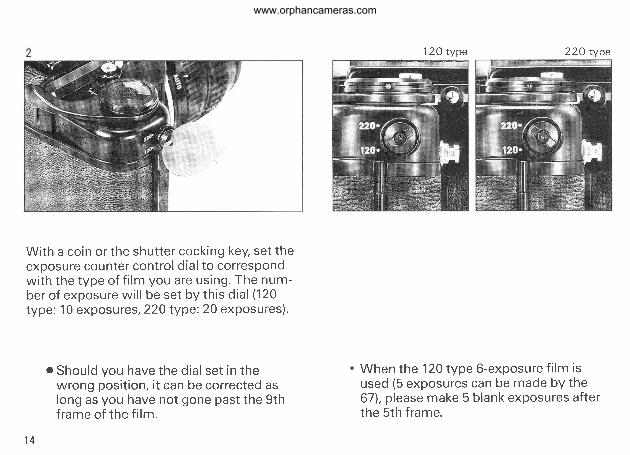
With a coin or the shut ter cocking key, set theexposure counter contro l d ia l to correspondwi th the type o f f i lm you are us ing . The num-ber of exposure wi l l be set by th is d ia l (120type: 10 exposures, 220 type: 20 exposures) .
o Shou ld you have the d ia l se t in thewrong posit ion, i t can be corrected aslong as you have not gone past the gth
f rame o f the f i lm.
When th e 120 type G-exposure f i lm isused (5 exposures can be made by the67), p lease make 5 b lank exposures af terthe sth f rame.
1 4
www.orphancameras.com
LOADING FILM (Avoid direct sunlight when loading or unloading film.)
2
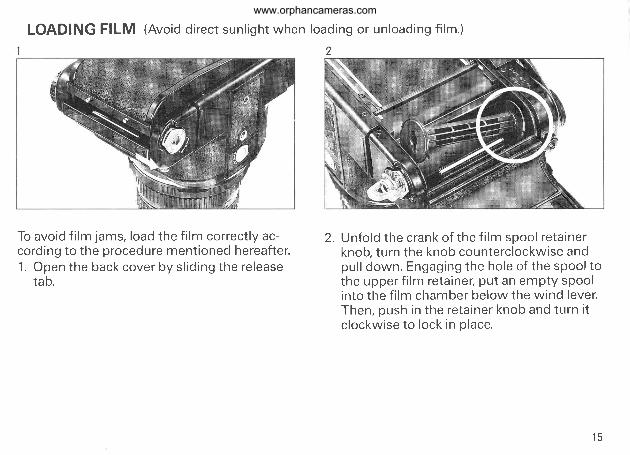
To avoid f i lm jams, load the f i lm correct ly ac-cord ing to the procedure ment ioned hereaf ter .1 . Open the back cover by s l id ing the re lease
ta b.
2 . Unfo ld the c rank o f the f i lm spoo l re ta inerknob, turn the knob counterc lockwise andpu l l down. Engag ing the ho le o f the spoo l tothe upper f i lm re ta iner , pu t an empty spoo lin to the f i lm chamber be low the w ind lever .Then, push in the re ta iner knob and tu rn i tc lockwise to lock in p lace.
t 5
www.orphancameras.com
3
Tape
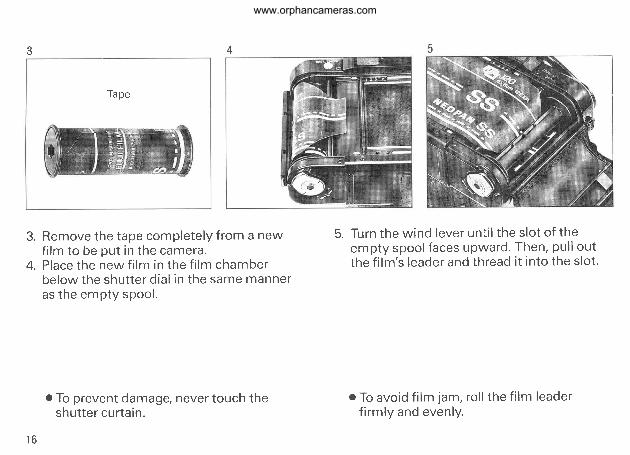
3. Remove the tape complete ly f rom a newf i lm to be pu t in the camera .
4 . P lace the new f i lm in the f i lm chamberbe low the shut te r d ia l in the same manneras the empty spoo l .
o To prevent damage, never touch theshut ter cur ta in.
5. Turn the wind lever unt i l the s lot of theempty spool faces upward. Then, pul l outthe f i lm 's leader and th read i t in to the s lo t .
o To avoid f i lm jam, ro l l the f i lm leaderf i rmly and evenly.
r6
www.orphancameras.com

6. Turn the w ind lever un t i l the spoo l has madeone revo lu t ion , wh i le p ress ing the f i lm lead-er as shown in the photo.
o Never tu rn the spoo l in the oppos i ted i rec t ion . l t may damage the w indmechan ism.
7. Make sure the leader is evenly ro l led ontothe spool . l f not , repeat the procedure 5 and6 unt i l the f i lm leader is set correct ly .
Spoo l
S lo t
H o l e
1 7
www.orphancameras.com
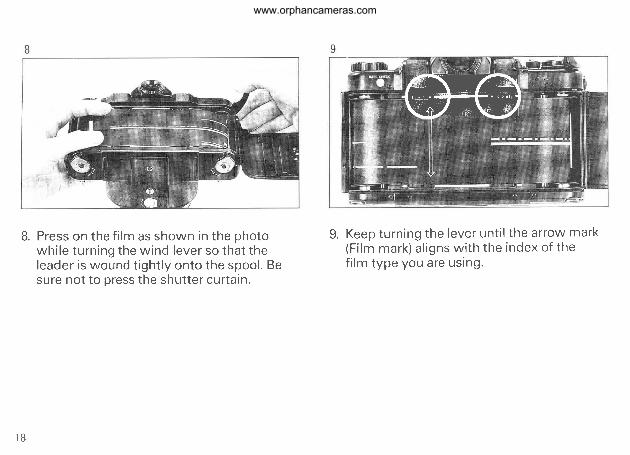
8. Press on the f i lm as shown in the photowhi le tu rn ing the w ind lever so tha t theleader i s wound t igh t ly on to the spoo l . Besure not to press the shut ter cur ta in.
9 . Keep tu rn ing the lever un t i l the ar row mark(F i lm mark) a l igns w i th the index o f thef i lm type you are us ing .
1 8
www.orphancameras.com
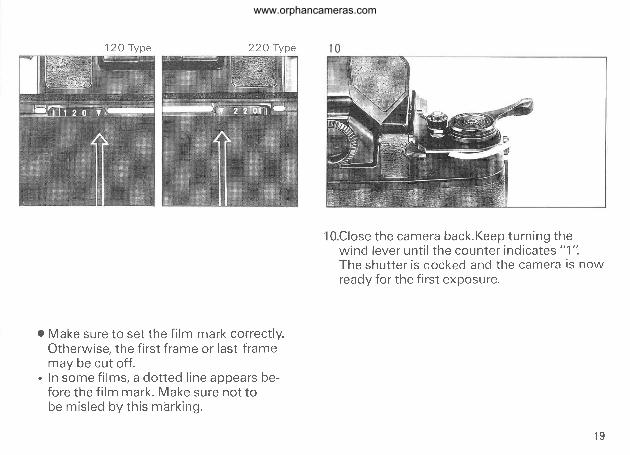
1 20 Type 22O Type
1O.Close the camera back .Keep tu rn ing thewind lever un t i l the counter ind ica tes "1" .The shut te r i s cocked and the camera is nowready for the f i rst exposure.
o Make sure to set the f i lm mark correct ly .Otherwise, the f i rs t f rame or last f ramemay be cut off .
. In some f i l f f is , a dot ted l ine appears be-fore the f i lm mark. Make sure not tobe m is led by t h i s mark ing .
r 9
www.orphancameras.com
UNLOADING FILM
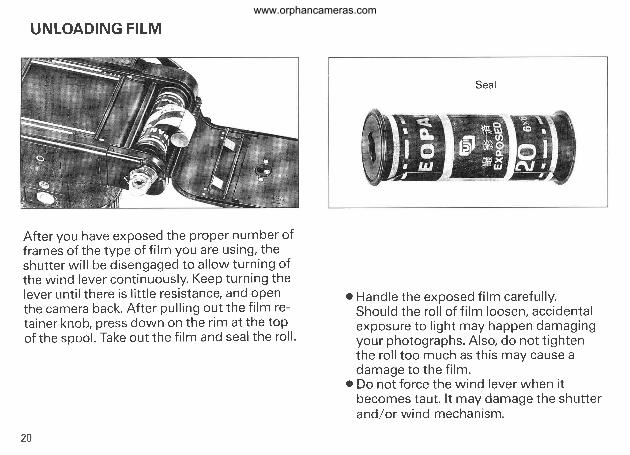
After you have exposed the proper number off rames of the type of f i lm you are us ing, theshut te r w i l l be d isengaged to a l low tu rn ing o fthe wind lever cont inuously. Keep turn ing thelever unt i l there is l i t t le res is tance, and openthe camera back. Af ter pul l ing out the f i lm re-ta iner knob, press down on the r im at the topof the spool . Take out the f i lm and seal the ro l l .
Seal
o Handle the exposed f i lm carefu l ly .Should the ro l l o f f i lm loosen, acc identa lexposure to l igh t may happen damagingyour photographs. Also, do not t ightenthe ro l l too much as th is may cause adamage to the f i lm.
o Do not force the wind lever when i tbecomes taut . l t may damage the shut terand/or wind mechantsm.
20
www.orphancameras.com

RASIC OPERATION
21
www.orphancameras.com
SHUTTER DIAL/BUTTON
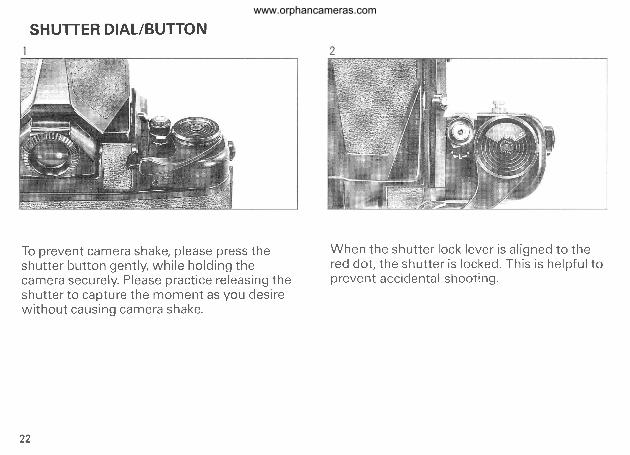
To prevent camera shake, p lease press theshut te r bu t ton gent ly , wh i le ho ld ing thecamera securely . Please pract ice re leasing theshut ter to capture the moment as you desi rewi thout caus ing camera shake.
When the shut te r lock lever i s a l igned to thered do t , the shut te r i s locked. Th is i s he lp fu l toprevent acc identa l shoot ing.
22
www.orphancameras.com
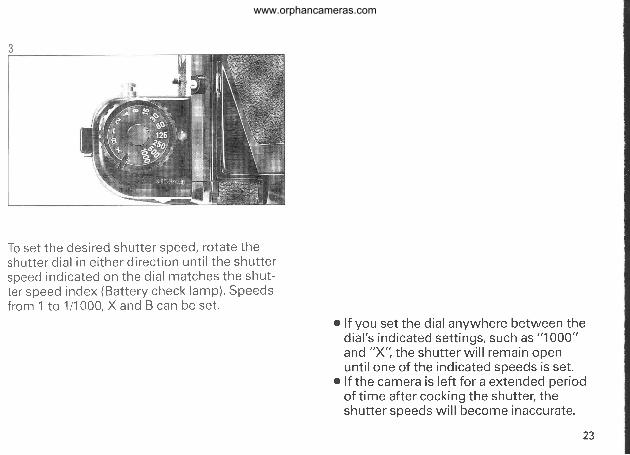
To set the desi red shut ter speed, rotate theshut te r d ia l in e i ther d i rec t ion un t i l the shut te rspeed ind ica ted on the d ia l matches the shut -te r speed index (Bat te ry check lamp) . Speedsfrom 1 to 111CI00, X and B can be set.
o l f you set the dial anywhere between thed ia l ' s ind ica ted se t t ings , such as "1000"and "X", the shut ter wi l l remain openunt i l one of the indicated speeds is set .
o l f the camera is left for a extended periodof t ime af ter cocking the shut ter ; theshut ter speeds wi l l become inaccurate.
23
www.orphancameras.com

SETTING THE APERTURE
F-N umberThe aperture can be set by rotat ing the aper-tu re r ing un t i l the des i red F-number i s a l ignedwi th the index Ol .An in te rmed ia te F-numbercan be se t as we l l . The va lues o f F-number andin te rmed ia te F-number a re bas ica l l y asfo l lows;2, 2.8, 4, 5.6, g, 11 , 16, 22, 32, 452.4, 3.4, 4.8, 6.7, 9.5, 13.5, 19, 26, 3g
Almost a l l the SMC PENTAX/TAKUMAR 67lenses w i th inner bayonet a re equ ipped w i ththe au tomat ic d iaphragm. The d iaphragmstays fu l l y open un t i l the moment the shut te ris re leased.
o For lens detai ls, please refer to theoperat ing manual , 67 INTER-CHANGEABLE LENSES.
24
www.orphancameras.com