Embed Size (px)
Citation preview
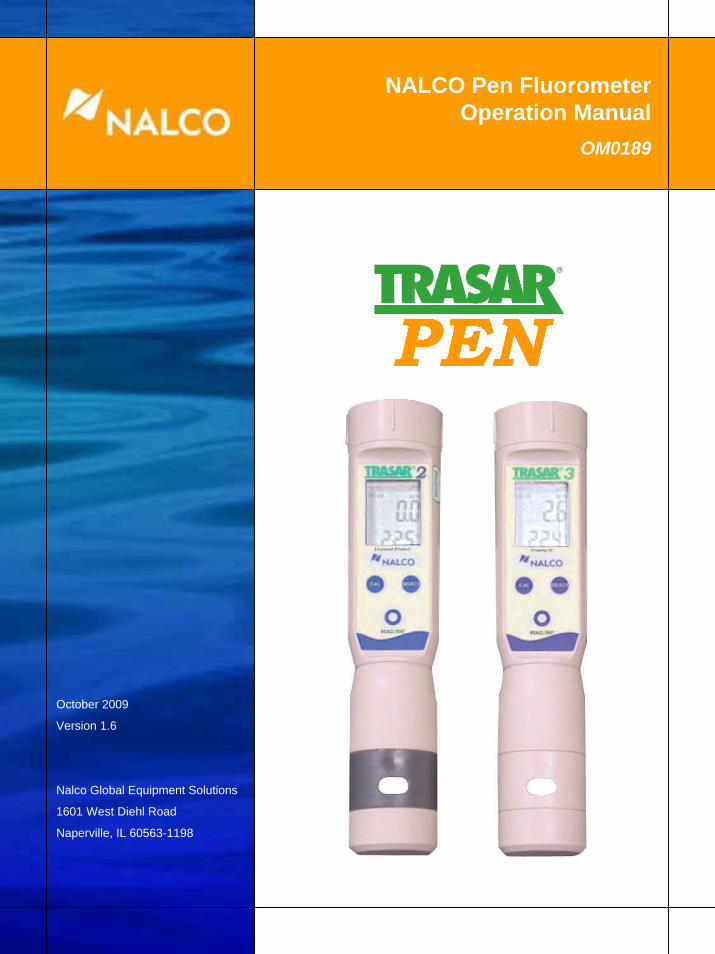
NALCO Pen FluorometerOperation Manual
OM0189
October 2009
Version 1.6
Nalco Global Equipment Solutions
1601 West Diehl Road
Naperville, IL 60563-1198
TRASAR Pen Fluorometer Operation Manual OM0189__________________________________________________________________________
Nalco Global Equipment Solutions 3
Table of Contents Section I: TRASAR License ............................................................................................................. 5
Section 2: Product Description ......................................................................................................... 6 2.1 Description of Unit .................................................................................................................. 6
2.1.1 Overview of Fluorometer Tip .................................................................................... 6 2.2 Unit Overview ...................................................................................................................... 6
2.2.1 READ/ENTER KEY ............................................................................................... 6 2.2.2 CAL KEY ............................................................................................................... 6 2.2.3 SELECT KEY ........................................................................................................ 7
2.3 Display Overview ................................................................................................................ 8
Section 3: Assembly and Installation ................................................................................................ 9 3.1 Changing Batteries .............................................................................................................. 9
Section 4: Measurement Mode ........................................................................................................ 10 4.1 Making a Measurement ..................................................................................................... 10
Section 5: Two-Point Calibration Mode ........................................................................................... 11 5.1 Performing a Calibration .................................................................................................... 11
Section 6: Setup Mode ..................................................................................................................... 12 6.1 Entering or Changing PF and TRA .................................................................................... 12
Section 7: Reactivation (Password) ................................................................................................. 13 7.1 Overview ........................................................................................................................... 13 7.2 Notification ........................................................................................................................ 13 7.3 Obtaining a Password ....................................................................................................... 13 7.4 Obtaining a Serial Number and a Reactivation Number .................................................... 13 7.5 Entering a Password ......................................................................................................... 13
Section 8: Diagnostics and Troubleshooting ................................................................................... 15 8.1 Self-Diagnostic Messages ................................................................................................. 15
Section 9: Technical Specifications ................................................................................................. 16 9.1 Measurement .................................................................................................................... 16 9.2 Mechanical Specifications ................................................................................................. 16 9.3 Power Supply .................................................................................................................... 16 9.4 Display .............................................................................................................................. 16 9.5 Electromagnetic Compliance (EMC) Specifications .......................................................... 16 9.6 Environmental Conditions ................................................................................................. 16
Section 10: Range and Default Setting of Parameters ...................................................................... 17 10.1 Default Value of Parameter ............................................................................................... 17 10.1.1 Product Factor and TRA Value ........................................................................... 17 10.2 Range of Parameters ........................................................................................................ 17 10.2.1 Product Factor and TRA Value ........................................................................... 17
Section 11: Accessories ..................................................................................................................... 18 11.1 Replacement Unit .............................................................................................................. 18 11.2 Assembly Accessories ...................................................................................................... 18
Section 12: General Information ........................................................................................................ 19 12.1 Packaging/Scope of Delivery ............................................................................................ 19 12.2 Return of Goods ................................................................................................................ 19 12.3 Maintenance and Cleaning ................................................................................................ 19 12.4 Warranty ............................................................................................................................ 19 12.5 Responsibility for Safe Delivery ......................................................................................... 20
TRASAR Pen Fluorometer Operation Manual OM0189__________________________________________________________________________
Nalco Global Equipment Solutions 5
Section 1: TRASAR® License Nalco has one or more patents and related know-how, which pertain to either TRASAR or 3D TRASAR method of use or practice of technology (“Tracer Technology”). Buyer’s purchase of equipment, software and chemicals from Nalco conveys to Buyer a non-assignable and non-transferable express license to practice Tracer Technology that correlates with equipment, software and chemicals that Buyer chooses to purchase for its water treatment facilities needs for the practice of Tracer Technology; and all or some of the royalty for such license is included in the payments made by Buyer for certain equipment, chemicals and software it has agreed to purchase from Nalco. Nalco, however, does not prohibit Buyer from using purchased equipment and software for non-proprietary technologies. Nalco grants no other rights expressly, by implication, or by estoppel, or under any other patent rights owned or licensable. If Buyer is not willing to accept the limitations of this limited use statement, then Buyer shall promptly advise Nalco of such, and Nalco will accept return of the equipment and software in its original, new condition for a full refund. Nalco will, on request, license to Buyer at its standard royalty rate to practice the Tracer Technology, using constituents purchased from any non-Nalco source whatever. Any warranties or performance guarantees granted by Nalco relating to the Tracer Technology shall be nullified in the event that Buyer purchases chemicals, equipment or software from vendors other than Nalco. Persons wishing a copy of Nalco’s standard license should write to Nalco at the below-mentioned address. Nalco will also sell constituents ex-royalty to Buyer who advises that the constituents are being purchased for a use other than for practicing Tracer Technology.
Nalco Company Attn: Legal Department 1601 W. Diehl Road Naperville, IL 60563
TRASAR Pen Fluorometer Operation Manual OM0189
6 Nalco Global Equipment Solutions
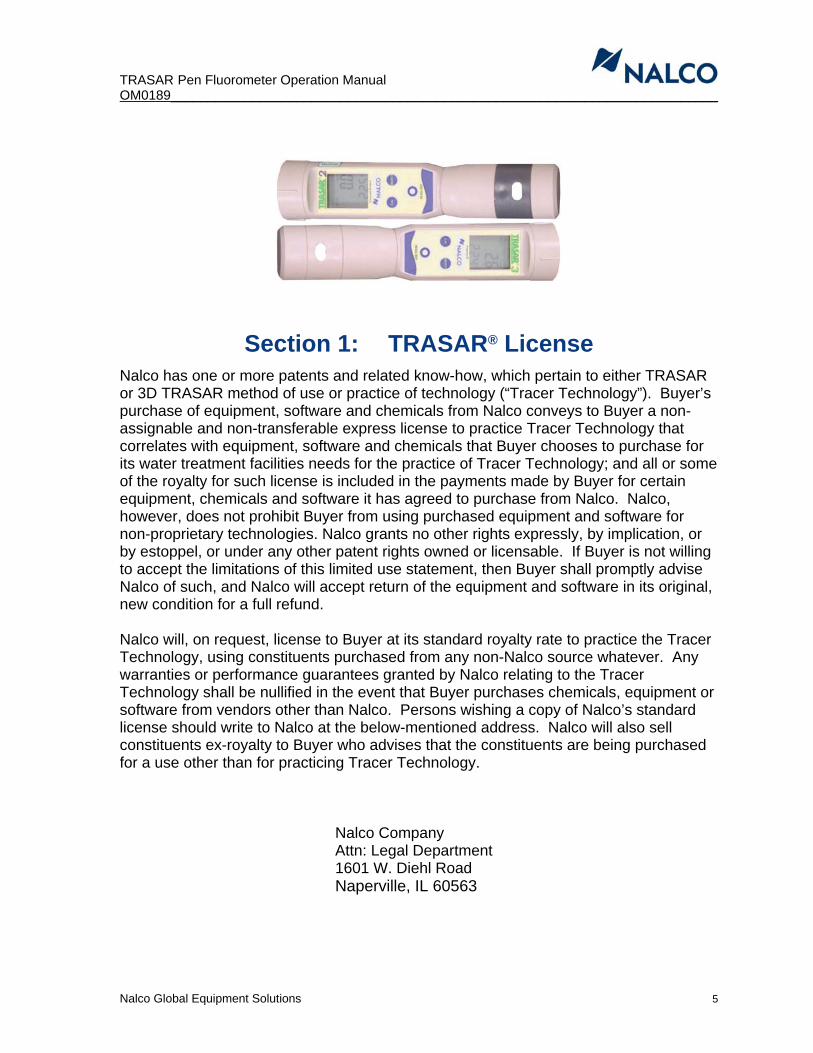
Section 2: Product Description 2.1 Description of Unit The Nalco Pen Fluorometer is an economical, battery-powered, handheld fluorometer for taking TRASAR® measurements on a water sample. It consists of a:
• Waterproof, Molded housing • Three function keys • Customized dual panel LCD display • Permanently installed fluorometer probe tip
Measurements are obtained by immersing the tip in a sample, pressing a key, and reading the result on the display. Two other keys allow for calibration and setting of operational parameters. 2.1.1 Overview of Fluorometer Tip The probe tip is designed for measuring Nalco products containing TRASAR. It contains all the optics and electronics to induce and measure fluorescence. The user cannot replace the fluorometer tip.
The TRASAR 2 Pen can be used to monitor TRASAR 2 products only. The TRASAR 3 Pen can be used to monitor TRASAR 3 products only.
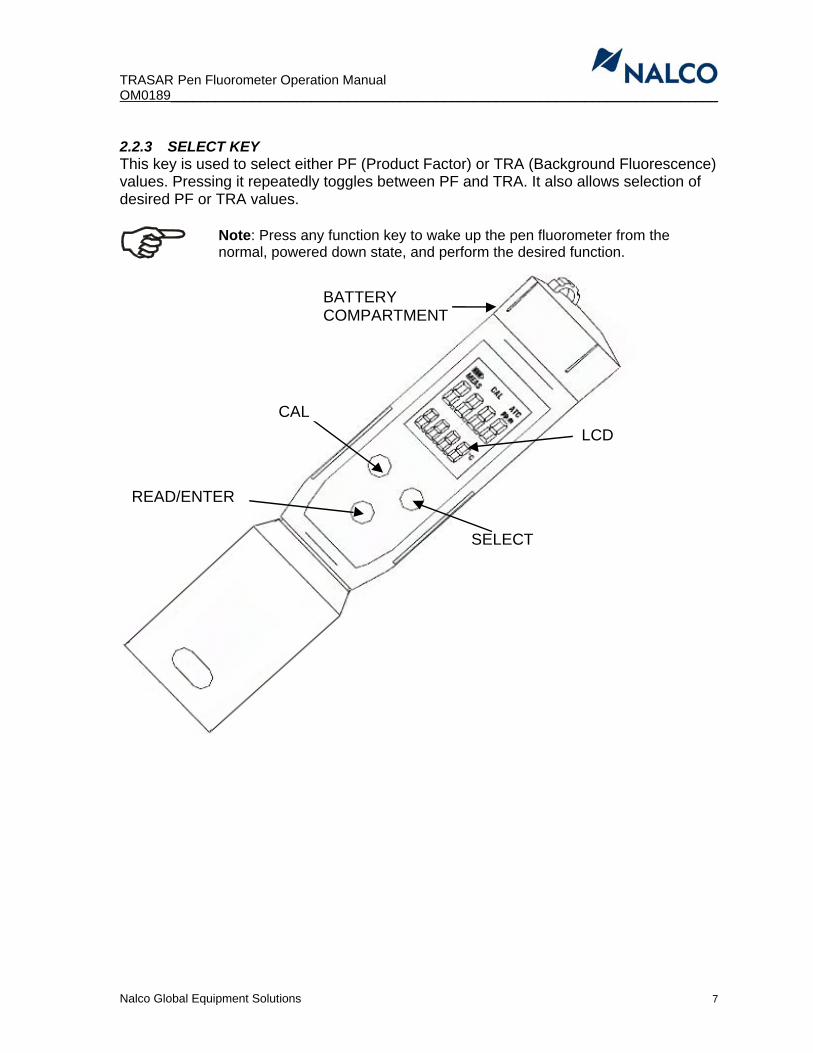
2.2 Unit Overview The front panel consists of a custom LCD display and a 3-button keypad.
• READ/ENTER • CAL • SELECT
2.2.1 READ/ENTER KEY This key has two functions. In measurement or calibration mode, it acts as a ‘READ’ key to measure the product concentration when the instrument tip is immersed into the sample solution. In setup mode, it acts as an ‘ENTER’ key. Here it is used to select the value on the LCD display. 2.2.2 CAL KEY This key is used to enter into the calibration mode from the powered down state. When in calibration mode, the CAL icon will be displayed on the screen.
TRASAR Pen Fluorometer Operation Manual OM0189__________________________________________________________________________
Nalco Global Equipment Solutions 7
2.2.3 SELECT KEY This key is used to select either PF (Product Factor) or TRA (Background Fluorescence) values. Pressing it repeatedly toggles between PF and TRA. It also allows selection of desired PF or TRA values.
READ/ENTERRR
SELECT
CAL LCD
BATTERY COMPARTMENT
Note: Press any function key to wake up the pen fluorometer from the normal, powered down state, and perform the desired function.
TRASAR Pen Fluorometer Operation Manual OM0189
8 Nalco Global Equipment Solutions
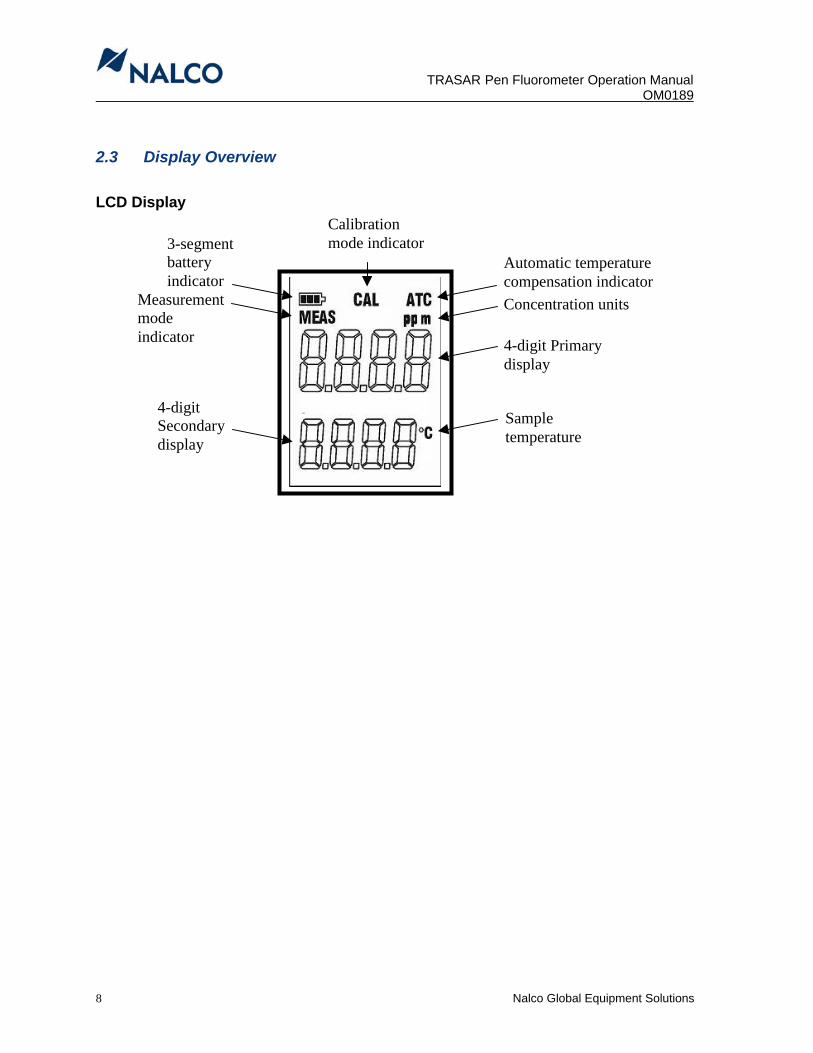
2.3 Display Overview LCD Display
Automatic temperature compensation indicator
4-digit Primary display
3-segment battery indicator
Measurement mode indicator
Concentration units
4-digit Secondary display
Sample temperature
Calibration mode indicator
TRASAR Pen Fluorometer Operation Manual OM0189__________________________________________________________________________
Nalco Global Equipment Solutions 9
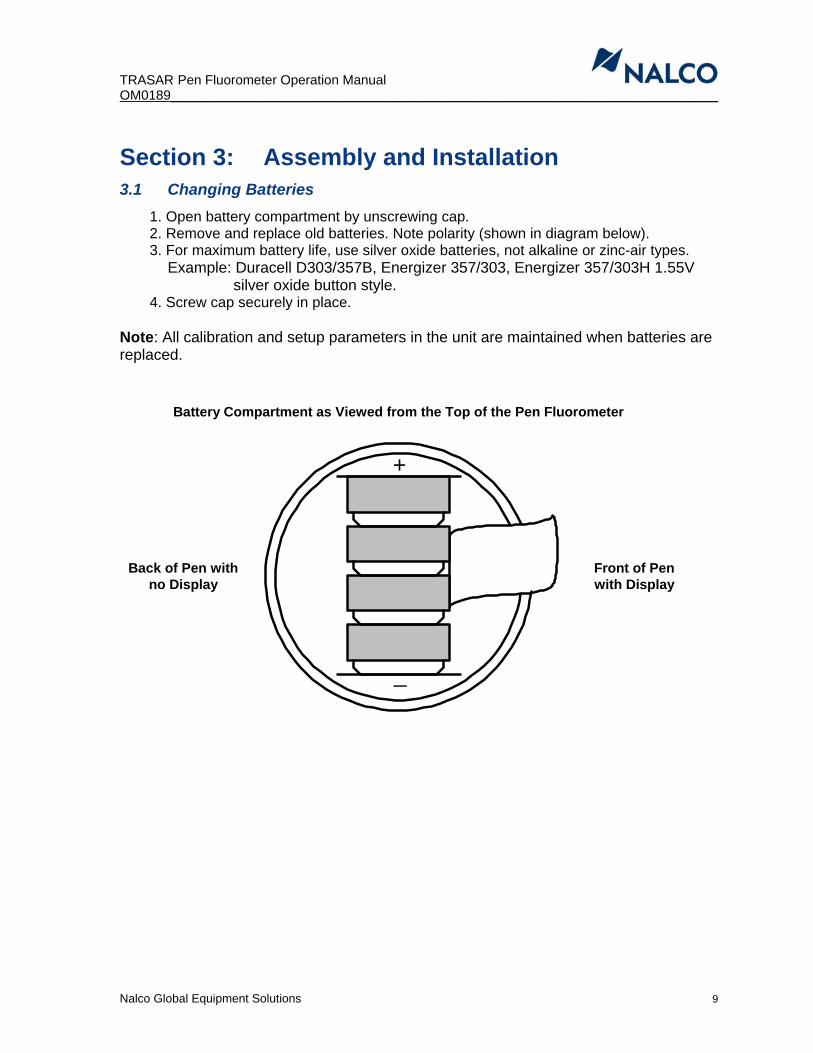
Section 3: Assembly and Installation 3.1 Changing Batteries
1. Open battery compartment by unscrewing cap. 2. Remove and replace old batteries. Note polarity (shown in diagram below). 3. For maximum battery life, use silver oxide batteries, not alkaline or zinc-air types.
Example: Duracell D303/357B, Energizer 357/303, Energizer 357/303H 1.55V silver oxide button style.
4. Screw cap securely in place. Note: All calibration and setup parameters in the unit are maintained when batteries are replaced.
Battery Compartment as Viewed from the Top of the Pen FluorometerBattery Compartment as Viewed from the Top of the Pen Fluorometer
Front of Penwith Display
Front of Penwith DisplayBack of Pen with
no Display
Back of Pen withno Display
+
_

TRASAR Pen Fluorometer Operation Manual OM0189
10 Nalco Global Equipment Solutions
Section 4: Measurement Mode
4.1 Making a Measurement 1. The unit is normally powered down with LCD blank. 2. There are two ways to capture a sample inside the Pen Fluorometer:
Option A. Place enough sample into a beaker or cup so that the sample cell will be completely filled. Dip tip into the sample and make sure the cell contains no air bubbles.
Option B. Insert special plug (500-P1692.88) into the back slot of sample chamber and the pen chamber can then be filled with a sample. This option requires only a few milliliters of sample.
3. Push READ/ENTER button to take a single reading. Display comes on with MEAS icon
and four dashes flashing. ATC is on indicating that the measurement is temperature compensated.
4. A battery measurement is made and the battery icon segments are lit showing the
battery strength. Product level is displayed in the top row. Sample temperature is displayed in the bottom row.
5. The display is held for 30 seconds and the unit has powered down when the display is
blank.
Flash during measurement
Display remains on for 30 seconds
- - - -
Press READ/ENTER
40.1 25.9 °C
ATC ppm MEAS
ATC ppm MEAS
TRASAR Pen Fluorometer Operation Manual OM0189__________________________________________________________________________
Nalco Global Equipment Solutions 11
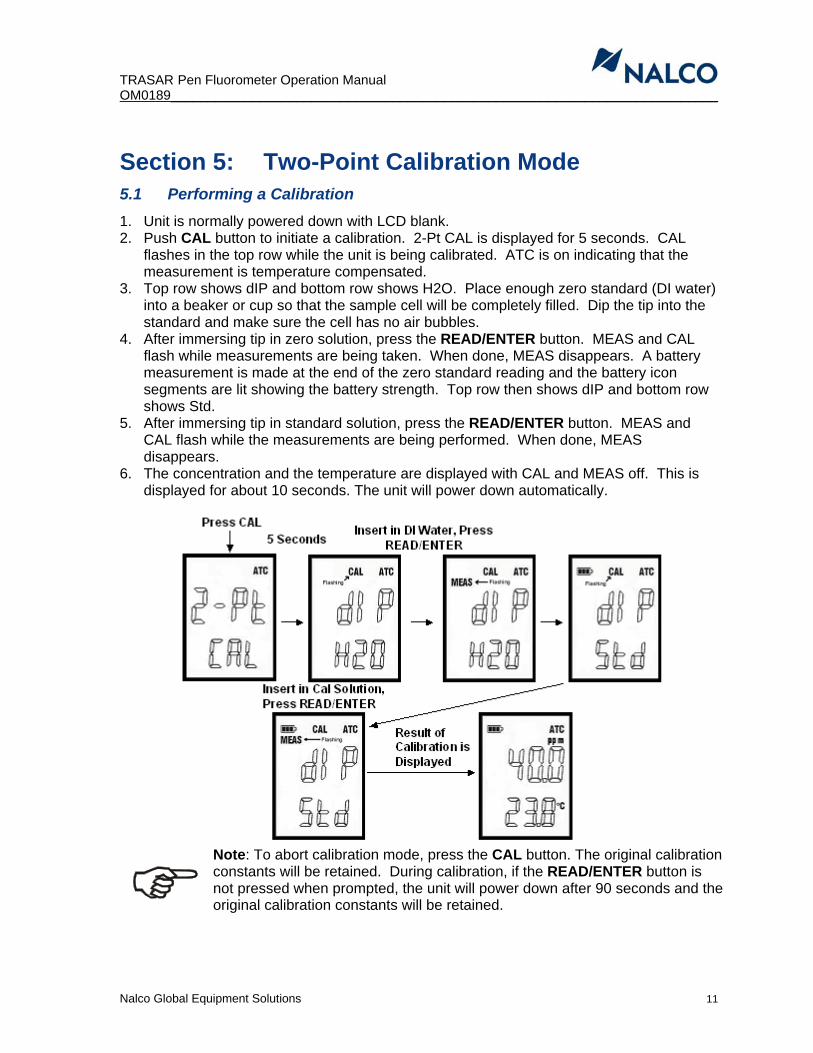
Section 5: Two-Point Calibration Mode 5.1 Performing a Calibration 1. Unit is normally powered down with LCD blank. 2. Push CAL button to initiate a calibration. 2-Pt CAL is displayed for 5 seconds. CAL
flashes in the top row while the unit is being calibrated. ATC is on indicating that the measurement is temperature compensated.
3. Top row shows dIP and bottom row shows H2O. Place enough zero standard (DI water) into a beaker or cup so that the sample cell will be completely filled. Dip the tip into the standard and make sure the cell has no air bubbles.
4. After immersing tip in zero solution, press the READ/ENTER button. MEAS and CAL flash while measurements are being taken. When done, MEAS disappears. A battery measurement is made at the end of the zero standard reading and the battery icon segments are lit showing the battery strength. Top row then shows dIP and bottom row shows Std.
5. After immersing tip in standard solution, press the READ/ENTER button. MEAS and CAL flash while the measurements are being performed. When done, MEAS disappears.
6. The concentration and the temperature are displayed with CAL and MEAS off. This is displayed for about 10 seconds. The unit will power down automatically.
Note: To abort calibration mode, press the CAL button. The original calibration constants will be retained. During calibration, if the READ/ENTER button is not pressed when prompted, the unit will power down after 90 seconds and the original calibration constants will be retained.
TRASAR Pen Fluorometer Operation Manual OM0189
12 Nalco Global Equipment Solutions
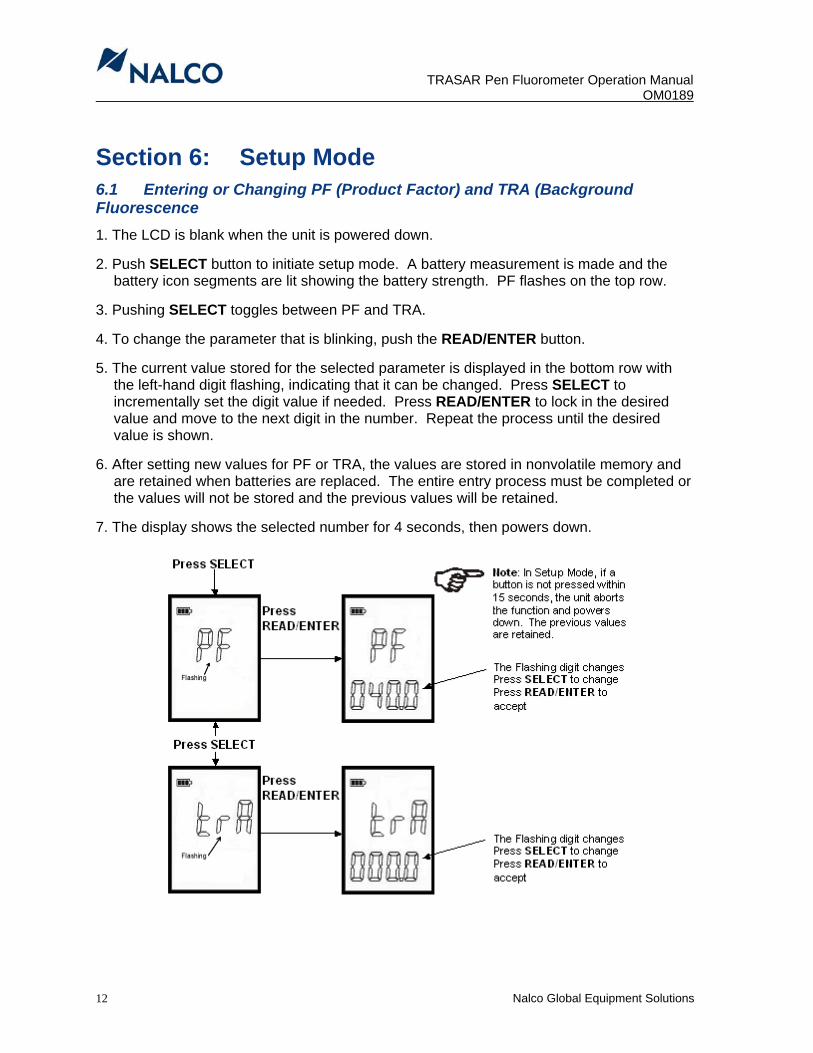
Section 6: Setup Mode 6.1 Entering or Changing PF (Product Factor) and TRA (Background Fluorescence 1. The LCD is blank when the unit is powered down. 2. Push SELECT button to initiate setup mode. A battery measurement is made and the
battery icon segments are lit showing the battery strength. PF flashes on the top row. 3. Pushing SELECT toggles between PF and TRA. 4. To change the parameter that is blinking, push the READ/ENTER button. 5. The current value stored for the selected parameter is displayed in the bottom row with
the left-hand digit flashing, indicating that it can be changed. Press SELECT to incrementally set the digit value if needed. Press READ/ENTER to lock in the desired value and move to the next digit in the number. Repeat the process until the desired value is shown.
6. After setting new values for PF or TRA, the values are stored in nonvolatile memory and
are retained when batteries are replaced. The entire entry process must be completed or the values will not be stored and the previous values will be retained.
7. The display shows the selected number for 4 seconds, then powers down.
TRASAR Pen Fluorometer Operation Manual OM0189__________________________________________________________________________
Nalco Global Equipment Solutions 13
Section 7: Reactivation (Password) 7.1 Overview To prevent competitors from using Nalco equipment — like the new pen fluorometer — to control their programs, a deactivation algorithm has been programmed into the device. The pen will operate normally for eighteen months. At the end of that period, the user will be required to enter a reactivation code, reactivating it for another eighteen months. Reactivation is accomplished by entering a password that is unique to each pen and unique to each renewal period. This password must be obtained from Nalco. The Pen will become inoperable without reactivation.
7.2 Notification The unit initiates a countdown when it is first operated. After seventeen months, when the READ/ENTER key is pressed, the unit will display “30 days” for several seconds prior to taking a measurement. The user then has 30 days to reactivate the unit. The next day, the unit will display “29 days” and so on. If the unit is allowed to count down to 0 days, the unit will be disabled. The unit may be reactivated at any time during the 30-day period or even after the unit has been disabled. To reactivate the unit, call your Nalco Sales Engineer to obtain a reactivation password.
7.3 Obtaining a Password Contact your Nalco Sales Engineer with the following information:
• Serial Number • Reactivation Number
You will be given a 4-digit password that consists of numbers and letters.
7.4 Obtaining a Serial Number and a Reactivation Number Once the unit displays “30 days”, “29 days”, etc, the user will have a 5-second period in which to push the SELECT key. If the SELECT key is not pushed, the unit will begin a measurement. If the SELECT key is pushed, the unit will display the Serial Number for 30 seconds. During this 30-second period, if the SELECT key is pushed, the Reactivation Number will be displayed. The values for the Serial Number and the Reactivation Number should be written down for reference. If the unit becomes deactivated (0 days), pushing the READ/ENTER key will immediately display the Serial Number for 30 seconds. During this 30-second period, if the SELECT key is pushed, the Reactivation Number will be displayed. Once deactivated, no readings will be taken until the unit is reactivated.
7.5 Entering a Password Section 8.4 describes how to obtain the Serial Number and Reactivation Number. Follow those instructions until the unit is displaying the Reactivation Number. The Reactivation Number will be displayed for 30 seconds. During this 30-second interval, if the SELECT key is pressed, the unit will prompt for a password. The upper row of the display will flash “CodE” and remain flashing during password entry. Have your correct password ready (see Section 8.3).
TRASAR Pen Fluorometer Operation Manual OM0189
14 Nalco Global Equipment Solutions
The numbers and letters are entered in much the same way as the product factor is entered. Each 7-segment digit can be changed from 0 to 9 and from a to F (a,b,c,d,E,F). The values can be scrolled in a continuous loop. The left-most digit of the lower row will begin to flash indicating that it may be changed. Press SELECT to incrementally change the digit if needed. Press READ/ENTER to lock in the desired value and move to the next digit in the password. Repeat the process until the desired value is shown. After pressing the READ/ENTER button for the last digit in the password, the unit will check the entered password against the correct calculated password. If the password is correct, the unit will display “Code Pass” and the unit will be reactivated for another 18 months. If the password is incorrect, the unit will display “Code Fail” for 5 seconds and password reentry will be allowed.
TRASAR Pen Fluorometer Operation Manual OM0189__________________________________________________________________________
Nalco Global Equipment Solutions 15
Section 8: Diagnostics and Troubleshooting 8.1 Self-Diagnostic Messages Low battery indicator The Battery indicator will indicate different levels of battery life. Use fresh silver oxide batteries for replacement as specified in Section 3.1.
3 bars – battery is fully charged (100%). 2 bars – battery is at intermediate charge. 1 bar with flashing battery casing – the batteries should be replaced soon.
bAd Batteries require replacement before a reading can be made. bAtt HI Measured fluorescence intensity too high or ppm value > 9999. conc Sample must be diluted or PF must be reduced. too Measured sample temperature exceeds 50°C. Cool sample. hot HI High ambient light – above a threshold during dark measurements. LItE Cover pen tip to exclude ambient light. dEt1 Main detector low – below a threshold during LED on measurements. FAIL Clean cell and retry. If error persists, pen must be replaced. dEt2 Ref detector low – below a threshold during LED on measurements. FAIL Clean cell and retry. If error persists, pen must be replaced. LEd1 LED 1 failure. FAIL Clean cell and retry. If error persists, pen must be replaced. LEd2 LED 2 failure. FAIL Clean cell and retry. If error persists, pen must be replaced. HI Sample too turbid or bubbles in probe tip. Clean cell and remove any turb air bubbles. Dilute sample if very turbid. CAL Calibration error. Make sure correct standards are used in the proper FAIL order. Zero standard first followed by calibration standard. Unit Elapsed time counter has failed. Repeat measurement a few times. FAIL If error persists, pen fluorometer must be replaced.
TRASAR Pen Fluorometer Operation Manual OM0189
16 Nalco Global Equipment Solutions
Section 9: Technical Specifications 9.1 Measurement TRASAR Product Measuring Range 0-9999 ppm Resolution 0.1 ppm product Relative accuracy ±5 % of reading Calibration Two-point calibration – DI Water and
calibration solution Temperature Measurement Range 5.0 to 50.0 °C Resolution 0.1 °C Relative accuracy 0.5 °C after 15 seconds Temperature Compensation Automatic Temperature Compensation (ATC)
9.2 Mechanical Specifications Enclosure Rating Waterproof Dimensions Fluorometer: 18 cm length x 4 cm diameter Boxed: 22cm x 6cm x 5cm Weight Fluorometer: 149 g (5.25 oz) Boxed: 170g
9.3 Power Supply
Power Requirement 4 x 1.55V Silver Oxide battery Battery Life Approximately 1000 Readings
9.4 Display LCD Dual Panel with 4 digits for each Panel.
9.5 Electromagnetic Compliance (EMC) Specifications Emitted Interference EN 61326 Immunity to Interference EN 61326
9.6 Environmental Conditions Ambient Temperature operating range 0 to 40 °C Maximum Relative Humidity 95%, non-condensing Certifications CE, RoHS
TRASAR Pen Fluorometer Operation Manual OM0189__________________________________________________________________________
Nalco Global Equipment Solutions 17
Section 10: Range and Default Setting of Parameters 10.1 Default value of parameters
10.1.1 Product Factor and TRA value TRASAR 3 Defaults PF 40.0 TRA 0.0 TRASAR 2 Defaults PF 100.0 TRA 0.0
10.2 Range of Parameters
10.2.1 Product Factor and TRA value PF 0.0 to 999.0 (Resolution 0.1) TRA 0.0 to 100.0 (Resolution 0.1)
TRASAR Pen Fluorometer Operation Manual OM0189
18 Nalco Global Equipment Solutions
Section 11: Accessories 11.1 Replacement Unit
Product Description Nalco Order Code Nalco TRASAR 3 Pen Fluorometer 060-TSR3PEN.88 Nalco TRASAR 2 Pen Fluorometer 060-TSR2PEN.88
11.2 Assembly Accessories
Product Description Nalco Order Code Silver Oxide Battery Qty 1 (4 Batteries Required) 6017888 Beaker, plastic, 250 ml 500-P0118.88 TRASAR 3 Calibration Solution 460-S0980 TRASAR 2 Calibration Solution 460-S0920 Cleaning Solution – 1:1 HCl 460-S0726 Cleaning Solution – 10% Sulfuric Acid 460-S0800 TRASAR Cleaning Brush - 6mm Flow Cell Brushes (3ea.) 121-F01000.88 TRASAR Pen Special Calibration Plugs 500-P1692.88 Note: Please contact the Nalco Sales Engineer or Global Equipment Solutions Help Desk for pricing information.
Note: Please contact the Nalco Sales Engineer or Global Equipment Solutions Help Desk for pricing information.
TRASAR Pen Fluorometer Operation Manual OM0189__________________________________________________________________________
Nalco Global Equipment Solutions 19
Section 12: General Information 12.1 Packaging / Scope of delivery The instrument is packaged in a plastic box with an instruction manual.
12.2 Return of goods Before returning goods for any reason whatsoever, Customer Service Dept. has to be informed in advance. Items must be carefully packed to prevent damage during shipment. Warning: Shipping damage as a result of inadequate packaging is the user’s/distributor’s responsibility, whoever applicable. Please follow the guidelines below before shipment.
12.3 Maintenance and Cleaning Maintenance The Pen Fluorometer contains no user repairable components. Please contact Nalco if there is any problem with the unit. Cleaning To remove dust, dirt and spots, the external surfaces of the pen fluorometer may be wiped with a damp, lint-free cloth. A mild household cleaner can also be used if necessary.
12.4 Warranty Nalco Global Equipment Solutions warrants its standard equipment and related installation services to the original purchaser to be free of defects in material or workmanship for one year from the date of shipment, unless otherwise specified. Key Features Include:
• Simplified claims processing-warranty assistance is just a toll free call away. Most claims can be handled by making a single phone call
• 12-month coverage of all standard part-numbered Nalco equipment offerings
(excepting consumable items and products with shelf lives of less than 12 months. • 12-month coverage of Nalco equipment installation.
• Repair and on-site warranty assistance now available in selected areas.
TRASAR Pen Fluorometer Operation Manual OM0189
20 Nalco Global Equipment Solutions
Limitations: Warranty does not cover damage caused by misuse, neglect, accident (including a force majeure event), improper installation or improper maintenance or repair. Nalco's liability under this warranty is limited to repair or replacement of defective items, or, refund of or credit for the product price excluding shipping. Nalco DISCLAIMS ALL OTHER WARRANTIES INCLUDING WARRANTIES OF MERCHANTABILITY AND FITNESS FOR A PARTICULAR PURPOSE. In no event shall Nalco be liable for any consequential or indirect damages. Non-Warranty Equipment Returns If you wish to return a standard, part-numbered Nalco Equipment Solutions product for credit or repair, please follow the guidelines below: Credit: Products purchased from Equipment Solutions may be returned for credit within three (3) months of purchase if they have never been placed in service and they are returned in the original packaging complete with all accessories, component with all accessories, component parts, and manuals. Repairs: Products eligible for billable repair include standard items that were purchased within the past five (5) years.
12.5 Responsibility for Safe Delivery
Nalco Company has done everything possible to protect this equipment from damage due to normal transportation hazards. After the product leaves the manufacturing site, the transportation company assumes the responsibility for safe handling and delivery of the equipment. It the crated unit shows evidence of rough handling, you must request that the person making the delivery writes "Received in Damaged Condition" on the delivery receipt. If concealed damage is revealed after the shipment is unpacked, contact that transportation company and request that a "Damaged Goods" report be completed. In either event, the transportation company should be notified immediately of any damage to the shipment to protect your rights or recovery.

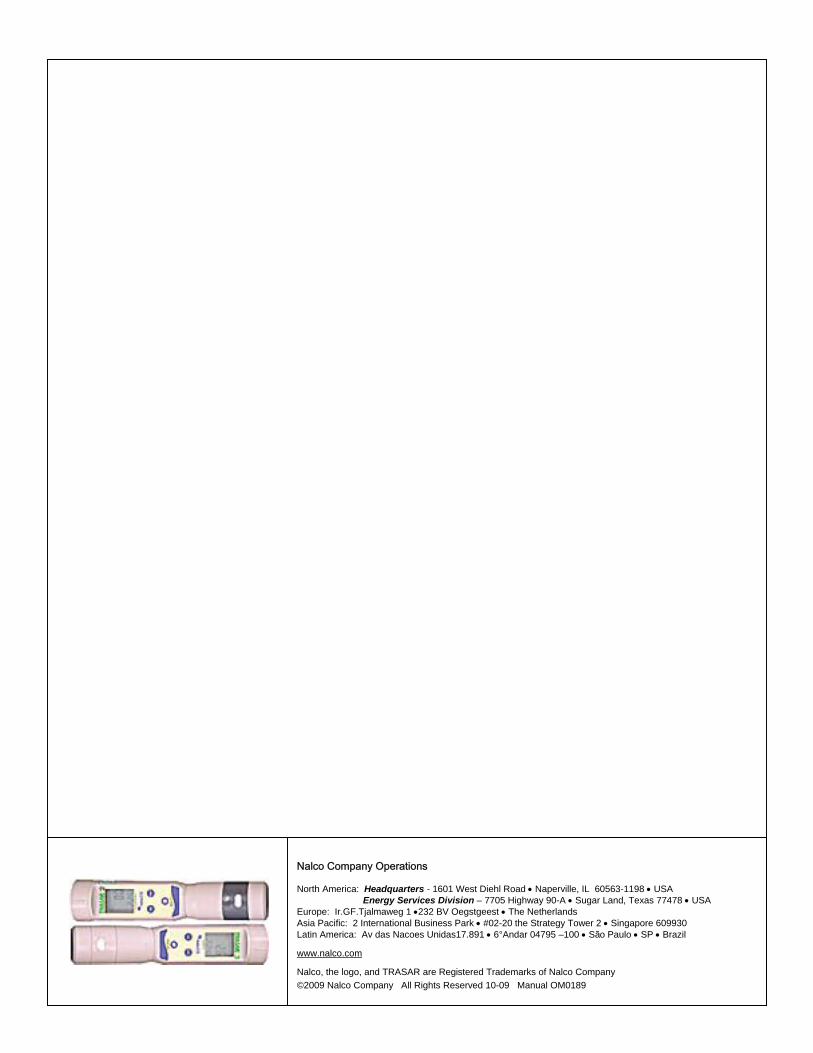
Nalco Company Operations
North America: Headquarters - 1601 West Diehl Road • Naperville, IL 60563-1198 • USA Energy Services Division – 7705 Highway 90-A • Sugar Land, Texas 77478 • USA Europe: Ir.GF.Tjalmaweg 1 •232 BV Oegstgeest • The Netherlands Asia Pacific: 2 International Business Park • #02-20 the Strategy Tower 2 • Singapore 609930 Latin America: Av das Nacoes Unidas17.891 • 6°Andar 04795 –100 • São Paulo • SP • Brazil
www.nalco.com
Nalco, the logo, and TRASAR are Registered Trademarks of Nalco Company ©2009 Nalco Company All Rights Reserved 10-09 Manual OM0189