Embed Size (px)
Citation preview

Updated 1/08/2017 Copyright © 2018 by Pearson Education, Inc. All Rights Reserved.
Pearson | MyLab | IT® for Microsoft Office 2016 Interactive Training Guide

Return to Table of Contents | 2
Return to Table of Contents | 3
TABLE OF CONTENTS MODULE 1: PLAN YOUR PEARSON | MYLAB | IT COURSE ....................................... 7
Why is Planning Important? .............................................................................................. 7
P.I.E Model for Implementation: 10 Steps to Successful Implementation .......................... 7
Pearson | MyLab | IT Planning Toolkit ..................................................................................... 9
Results and Case Studies ............................................................................................................ 9
Understand User Roles and Training Paths ................................................................... 12
Program Administrator / Coordinator ....................................................................................12
Program Designer......................................................................................................................14
Course Instructor .......................................................................................................................15
Section Instructor with Full Instructor Access .......................................................................16
Section Instructor with Section Instructor Access ................................................................17
Explore & Select Activities and Assignments ................................................................ 18
Simulation Activities ..................................................................................................................18
Grader Activities .........................................................................................................................22
Badging with Capstone Grader Activities ...............................................................................24
End of Chapter Activities...........................................................................................................26
Student Resources .....................................................................................................................26
Computer Concepts Material ...................................................................................................27
Book Specific Course Set Up Guides .......................................................................................27
Explore Implementation Models ..................................................................................... 29
Skills / Enabling Focus ...............................................................................................................30
Projects / Outcomes Focus .......................................................................................................30
Mixed Focus: Skills / Enabling & Projects / Outcomes..........................................................30
MODULE 2: IMPLEMENT YOUR PEARSON | MYLAB | IT COURSE PLAN ............... 33 Computer Set Up & Technical Support ........................................................................... 33
System Requirements & Home Computer Set Up ................................................................33
Technical Support ......................................................................................................................33
System Status Site .....................................................................................................................34
Create Pearson | MyLab | IT Courses ............................................................................. 36

Return to Table of Contents | 4
Create Coordinator Courses ....................................................................................................36
Course Group Set Up Options .................................................................................................42
Option 1: Program Admin/Coordinator & Section Instructors (SI Access) ........................43
SI HANDOUT: Section Instructor step-by-step instructions for Option 1 ..........................46
Option 2: Program Admin/Coordinator & Section Instructors (existing Pearson account) ......................................................................................................................................................47
SI HANDOUT: Section Instructor step-by-step instructions for Option 2 ..........................50
Option 3: Program Admin/Coordinator & Section Instructors (full instructor access) ...51
SI HANDOUT: Section Instructor step-by-step instructions for Option 3 ..........................52
Option 4: Program Designer & Section Instructors (full instructor access) ......................53
SI HANDOUT: Section Instructor step-by-step instructions for Option 4 ..........................54
Option 5: Course Instructor .....................................................................................................55
My Courses Page .......................................................................................................................59
Explore and Navigate Your Course ................................................................................. 63
Course Overview ........................................................................................................................63
Pearson | MyLab | IT Course Menu Items ............................................................................66
eText ............................................................................................................................................68
Organize & Add Content to Your Course ........................................................................ 70
Create Course Structure/Folder Organization ......................................................................70
Add Content from the Course Materials Library...................................................................70
Add Content from Other Courses or the Product Shared Library .....................................73
Add/Create Custom Content for Your Course ............................................................... 74
Edit Existing Activities ................................................................................................................74
Upload Outside Content ...........................................................................................................81
Create Custom Simulation and/or Objective-based Activities ............................................81
Create Custom Grader Projects using the Project Creation Tool (PCT) .............................86
Assign Activities & Assignments ..................................................................................... 87
“Show” Content vs. Assign Content .........................................................................................87
Set Scheduling Options .............................................................................................................91
Set Activity Preferences ............................................................................................................93

Return to Table of Contents | 5
Set Up Gradebook to Align with Syllabus....................................................................... 96
Gradebook Overview ................................................................................................................96
Global Grading Preferences .....................................................................................................98
Grade Schemas ....................................................................................................................... 100
Gradebook Customizations & Custom View ....................................................................... 104
MODULE 3: TEACH WITH PEARSON | MYLAB | IT ................................................. 110 Student & Teaching Assistant (TA) Access ................................................................... 110
Student Registration and Enrollment .................................................................................. 110
Temporary Access .................................................................................................................. 111
CHECKLIST: Help Students Have a Successful Experience with Pearson | MyLab | IT 111
Teaching Assistant (TA) Registration and Enrollment ....................................................... 112
TA HANDOUT: Teaching Assistant step-by-step instructions ........................................... 112
Course/Assignment Adjustments ................................................................................. 115
Set Time Zone.......................................................................................................................... 115
Manage Roster ........................................................................................................................ 119
Adjust Due Dates & Scheduling Options ............................................................................. 119
Adjust Activities / Assessments for Special Circumstances .............................................. 122
Use LockDown Browser ......................................................................................................... 122
View & Manage Student Submissions .......................................................................... 124
Simulation Activities Submissions ........................................................................................ 124
Grader Activities Submissions .............................................................................................. 124
Potential Integrity Violations ................................................................................................. 125
Manage Student Submissions .............................................................................................. 127
Manage Student Results ................................................................................................ 128
Use Gradebook Filters ........................................................................................................... 129
Edit Student Scores ................................................................................................................ 130
Export Grades ......................................................................................................................... 131
Intervention & Teaching Strategies .............................................................................. 132
Student Intervention Strategies ........................................................................................... 132
Lecture Planning ..................................................................................................................... 134

Return to Table of Contents | 6
Motivation Techniques .......................................................................................................... 135
MODULE 4: EVALUATE SUCCESS & PREP FOR NEXT TERM ................................... 140 Analyze Student Results................................................................................................. 140
Reports Overview ................................................................................................................... 140
Use Reports to Measure Student Performance ................................................................. 140
Use Reports to Measure Program Success ......................................................................... 142
Plan & Prepare for Next Term ....................................................................................... 144
Use Reports for Planning Course Adjustments for Next Term ........................................ 144
Create Coordinator Course for Next Term ......................................................................... 146
MODULE 5: OTHER RESOURCES .............................................................................. 149
***ICON LEGEND***
HOW TO VIDEO
BEST PRACTICES
NOTE
HELP DOCUMENTATION
CASE STUDY
IMPORTANT
HANDOUT

Return to Table of Contents | 7
MODULE 1: PLAN YOUR PEARSON | MYLAB | IT COURSE Why is Planning Important?
For more than 15 years, we’ve been collecting data and evidence around teaching strategies and learning experiences from our customers. After reviewing the observations and reports from the most successful implementations, we have identified three common attributes: administrators and professors who achieve success know where they stand relative to course goals, they have established clear goals from the very beginning, and they design their implementations to reach them. We’ve also found that successful implementations include three key sections: plan, implement, and evaluate.
But how do you plan? How do you implement correctly? And what do you evaluate? These 10 steps can help you plan a successful online learning implementation.
P.I.E Model for Implementation: 10 Steps to Successful Implementation
Phase I: Plan seeks to identify your desired outcomes and goals, identify and select the assets and features within MyLab to integrate into the course, and define how you plan to measure and evaluate the success of the implementation. Essentially, in addition to goal setting, this phase will encourage you to plan for the Implement and Evaluate phases you will execute as next steps.
Phase II: Implement is where your plan takes shape. You learn about the implementation resources available and how you can utilize them in order to effectively integrate the product into the course. In this phase, you consider how you might customize the product features to create assignments and configure the gradebook to align with your desired outcomes and goals. You also customize resources to help students get started successfully in the digital product (or Pearson | MyLab | IT).
Phase III: Evaluate is where you measure impact and success of your implementation. This phase is intended to be completed throughout and at the end of the course. You analyze student performance to predict future success, interpret the student performance data to determine if intervention strategies are needed to increase success, and devise strategies to address any performance issues. Depending on what the data tells you during the term, you may decide to revise the course including the product setup and configuration. This phase also includes analyzing the end-of-term course and learner data to correlate results with learner outcomes and course goals and help you plan for your next course.

Return to Table of Contents | 8

Return to Table of Contents | 9
Pearson | MyLab | IT Planning Toolkit
The best implementations occur when a clearly defined set of goals are met with the right training materials and resources. Whether you’re brand new to Pearson | MyLab | IT or a seasoned user, using the Planning Toolkit will help you make more-informed decisions about course design, assets and functionality, and how you measure success. Before you begin to build your course(s) in Pearson | MyLab | IT, use the Pearson | MyLab | IT Planning Toolkit to help you plan how you will implement Pearson | MyLab | IT in your course. It provides charts, worksheets, and checklists to facilitate and support the Plan phase--the first phase of the implementation process: Plan, Implement, and Evaluate.
By working through the toolkit, you will create a well-designed plan that will provide the framework and shape your implementation strategy and how you measure the impact of Pearson | MyLab | IT on course outcomes, goals, and student achievement.
After examining the most successful Pearson | MyLab | IT implementations, one thing is consistent: those schools that achieve success know precisely where they stand, they establish clear goals at the onset and then specifically design their Pearson | MyLab | IT courses to reach them. Investing time to plan now can have great impact.
The Planning Toolkit can be accessed from the Training and Support area on the Pearson | MyLab | IT website (www.Pearson | MyLab | IT.com).
Results and Case Studies
Pearson has over 80,000 users of our digital products every single semester. We have over 500 documented stories of true results, so why not learn from those best practices and implementations?
As noted in the complete My Lab & Mastering: 10 Best Practices publication, simply adding any technology product to your course won’t guarantee instant resolution of your institution’s teaching and learning challenges. However, adoption of the best practices described below in concert with a MyLab implementation has repeatedly shown to yield positive results that both continue through the course sequence and remain sustainable over time. Below is a summary of a complete Pearson publication found here.
The trends we see among instructors and institutions experiencing the best results include:
• Recognize and embrace educational value of technology integration • Require the MyLab for at least 10%-20% of the final course grade • Participate in training and follow recommended best practices

Return to Table of Contents | 10
• Enable active class discussion by assigning pre-lecture homework • Align formative activities (homework and remediation) and summative assessments
(quizzes, writing assignments, and exams) with Learning Outcomes • Use assessments/ data to measure student gains
At Pearson, we are committed to illustrating ways in which our MyLabs are impacting students and instructors. One way we highlight our MyLabs in action is through case studies: documents which contain both qualitative and quantitative information that supports the effectiveness of a MyLab. These Efficacy studies help show the value and benefits of using a learning technology to other instructors, and can benefit you as well, given that more than ever, instructors are being asked to provide data and reports to illustrate the performance of the resources they choose for their students.
If desired, our efficacy team will partner with you to review the case study structure, assess your data and complete the analysis and statistical correlations necessary to create an efficacy report around your implementation and usage of Pearson | MyLab | IT.
If you are not familiar with the case studies that Pearson has published, take a look at our Results Library for Pearson | MyLab | IT. Use the search field to search the site by keywords.
Case Studies
Here are just a few highlights:
Virginia Commonwealth University Read about the implementation and results Instructor Wilma Andrews achieves at VCU using Pearson | MyLab | IT to offer and coordinate seven Information Systems Digital Literacy courses through a fully online, self-paced, pass-fail model generating more than 4,400 credits annually.
Piedmont Technical College Read about the results Instructor Mary Lou Wilson is seeing in her courses at Piedmont Tech implementing Simulation and Grader activities and integrating with the campus LMS, Desire2Learn (Brightspace). North Arkansas College

Return to Table of Contents | 11
Read how Instructor Kim Potts leverages Pearson | MyLab | IT Simulation activities for low-stakes practice and Grader activities for both homework and exams to help students succeed in her courses at North Arkansas College.

Return to Table of Contents | 12
MODULE 1: PLAN YOUR PEARSON | MYLAB | IT COURSE Understand User Roles and Training Paths
We have identified five unique user roles. How you implement Pearson | MyLab | IT will be influenced by the way you will use the program. This tutorial provides personas, questions and descriptions of the five user groups listed below to help you determine which role most closely describes your situation.
• Program Administrator / Coordinator • Program Designer • Course Instructor • Section Instructor with Full Instructor Access • Section Instructor with Section Instructor Access
Program Administrator / Coordinator, Program Designer, & Course Instructor are the main user roles that are responsible for creating and designing Pearson | MyLab | IT Coordinator courses, but depending on your program, Section Instructors with full instructor access might also create courses.
Review the following personas, workflows associated with course creation, and recommended training path for each. More information and instructions for creating courses is available in the Creating Pearson | MyLab | IT Courses Tutorial in Module 2.
Program Administrator / Coordinator
“Professor Black is a Program Administrator / Coordinator for a large IT program. He creates, designs, and manages the Pearson | MyLab | IT Coordinator course and all Pearson | MyLab | IT member sections that Section Instructors (i.e., Graduate/Teaching Assistants and/or Adjunct Instructors) teach. He provides unique Course IDs to each Section Instructor. He needs full access to all Pearson | MyLab | IT sections in order to fully monitor how the course is delivered throughout the term. He directly manages and monitors sections taught by Section Instructors, and can opt to run reports across the sections in the course group.”
If you are a Course Coordinator for your institution or campus and are responsible for creating courses for other instructors, you have a choice between creating a coordinator course with sections and creating a coordinator course with copy settings set to “available to copy”. Program Administrators / Coordinators create a Coordinator course with all sections.

Return to Table of Contents | 13
If this describes your role and you answer yes to at least two of these questions, you should identify with the Program Administrator / Coordinator role:
Are you responsible for creating a Pearson | MyLab | IT courses to be used by other instructors at your institution?
Do you need to manage, monitor and/or run reports on all Pearson | MyLab | IT sections being taught?
Do you want to have more control over what the other instructors can change or do in the courses being taught?
Course Creation Workflows
OR
Training Path
Create or Copy a
Coordinator Course
Build, Design, Customize the
Coordinator Course
Create Sections from
the Coordinator
Course (same account)
Provide Section
Instructors with Unique Course IDs &
Section Instructor
Access Code
Create or Copy a Coordinator
Course
Build, Design, Customize the
Coordinator Course
Set the Coordinator
Course to "Available to
Copy"
Provide Section Instructors with
the Coordinator Course ID to
Copy as a Member Section
Module 1 to plan your Pearson | MyLab | IT
course
Module 2 using
course group set up option
1, 2, or 3
Module 3 IF you are also teaching at least one section of the course
Module 4 to evaluate the success of
the program and plan for
next term

Return to Table of Contents | 14
Program Designer
“Professor White is a Program Designer for a large IT program. She designs a Pearson | MyLab | IT Coordinator course to be copied to provide Section Instructors a standard template that can be modified. She is not enrolled in Section Instructor courses and Section Instructors retain ownership of their own course sections.”
If you are a Course Coordinator for your institution or campus and are responsible for creating courses for other instructors, you have a choice between creating a coordinator course with sections and creating a coordinator course with copy settings set to “available to copy”. Program Designers create a Coordinator course set to “available to copy”.
If this describes your role and you answer yes to at least two of these questions, you should identify with the Program Designer role:
Are you responsible for creating a Pearson | MyLab | IT course template to be used by other instructors at your institution?
Do you need reporting capabilities for all sections in the course group, but wish to allow each section instructor more control over sections?
Do you want to use the fastest and easiest solution to create courses for other instructors?
Course Creation Workflow
Training Path
Create or Copy a Coordinator
Course
Build, Design, Customize the
Coordinator Course
Set the Coordinator
Course to "Available to
Copy"
Provide Section Instructors with
the Coordinator Course ID to
Copy as a New Coordinator
Course
Module 1 to plan your Pearson | MyLab | IT
course
Module 2 using
course group set up option
4
Module 3 IF you are also teaching at least one section of the course
Module 4 to evaluate the success of
the program and plan for
next term

Return to Table of Contents | 15
Course Instructor
“Professor Gray is a Course Instructor. He is the only instructor at his school teaching Computer Applications. There is no IT Department Program Administrator or Program Designer creating or designing courses for instructors. He is responsible for creating and designing the Pearson | MyLab | IT Coordinator course and member sections he is teaching this term.”
Course Instructors create their own course(s) from scratch and are not part of a larger Pearson | MyLab | IT program and course group. You will create your own “Coordinator” course to use as a template from scratch along with the section(s) you will be teaching.
If this describes your role and you answer yes to at least one of these questions, you should identify with the Course Instructor role:
Are you planning to create your own Pearson | MyLab | IT course(s) from scratch? Are you copying a course from another instructor as a Coordinator course in your
own Pearson account?
Your course sections are not required to be part of a course group created and managed by a Course Coordinator.
Course Creation Workflow
Training Path
Create or Copy a Coordinator
Course
Build, Design, Customize the Coordinator
Course
Create Sections from the
Coordinator Course
Module 1 to plan your Pearson | MyLab | IT
course
Module 2 using
course group set up option
5
Module 3 to learn about
teaching with Pearson | MyLab | IT
Module 4 to evaluate the success of
your course(s)
and plan for next term

Return to Table of Contents | 16
Section Instructor with Full Instructor Access
“Professor Brown is a Section Instructor who will teach section course(s) in an IT Program managed by a Program Administrator / Coordinator or Designer. Depending on her Coordinator’s and/or departmental preferences, she may or may not have the freedom to make changes within the section course(s) she is teaching.”
IT courses are often part of a program headed up by a Program Administrator / Coordinator or Program Designer. The set up options for these coordinators working with Section Instructors with full instructor access varies.
If this describes your role and campus set up and you answer yes to at least three of these questions, you should identify with the Section Instructor w/ Full Instructor Access role:
Do you have a Pearson Instructor Account that allows you to create courses? Is someone else responsible for creating your section(s) or designing a starting template? Have you been asked to enroll in the section(s) you will be teaching with a SI access code? Have you been provided a Coordinator course ID and instructed to copy as a member
section course or new Coordinator course?
Course Creation Workflows
OR
OR
Training Path
Program Admin / Coordinator creates your section(s)
You Enroll Using Unique Course IDs & Section Instructor Access
Code
Program Admin / Coordinator creates the Coordinator course
You create a copy using the Coordinator course ID to create a
member section
Program Desinger creates the Coordinator course template
You create a copy using the Coordinator course ID to create a
new Coordinator course
Module 2 using the SI Handout for course group set up
option 2, 3, or 4
Module 3 to learn about teaching with Pearson | MyLab | IT

Return to Table of Contents | 17
Section Instructor with Section Instructor Access
“Professor Green is a Section Instructor who will teach section course(s) in an IT Program managed by a Program Administrator or Coordinator. He will be provided with the Course ID(s) for the sections he is teaching from his Coordinator. Depending on his Coordinator’s and/or departmental preferences, he may or may not have the freedom to make changes within his section course that was provided for him.”
IT courses are often part of a program headed up by a Program Administrator / Coordinator responsible for creating a master template and all of the sections being taught by all instructors.
If this describes your role and campus set up and you answer yes to these questions, you should identify with the Section Instructor w/ Section Instructor Access role:
Is someone else responsible for creating and designing your section(s) of Pearson | MyLab | IT?
Have you been asked to enroll with a Section Instructor access code into the section(s) you will be teaching?
Course Creation Workflow
Training Path
Program Admin / Coordinator creates your section(s)
You Enroll Using Unique Course IDs & Section Instructor Access
Code
Module 2 using the SI Handout for course group set up option 1
Module 3 to learn about teaching with Pearson | MyLab | IT

Return to Table of Contents | 18
MODULE 1: PLAN YOUR PEARSON | MYLAB | IT COURSE Explore & Select Activities and Assignments
Simulation Activities
Pearson | MyLab | IT: Explore the Simulations
Pearson | MyLab | IT's Simulation activities are enabling focused, cloud-based, high-fidelity HTML5 Microsoft Office simulations. They provide realistic skill-based training and assessment, so students can practice Microsoft Office application skills using multiple methods of completion.
Simulation Learning Aids (Training Activities Only)
With Simulation Training activities, students can use Learning Aids as they work through the simulation such as Read, Watch, and Practice for just-in-time remediation of any skill.
Read: Opens the eText to the page the material is covered. This is a great option for students who prefer to read and look up the source material directly related to the task at hand.
Watch: Opens a video scripted directly from the textbook authors that will show students how to progress through the task. These videos include highlighting, close captioning, resizing, and other features to make it easily accessible for students who prefer to learn visually.

Return to Table of Contents | 19
Practice: Opens a guided walk-through of the task in a no-risk environment. When students activate this learning aid, a practice tool opens as a pop-up, assisting them before they try the task on their own. The tool features both auditory and visual ways to engage the student, allowing them to pause and replay different components of the simulation.
Simulation Activity Features (Training and Exam)
The new Pearson | MyLab | IT Virtual Keyboard is available in both training and exam simulations and designed to ensure that every user is able to complete simulation activities. Removing barriers, this keyboard allows for users with non-PC hardware (such as a Mac computer) or students with disabilities to enjoy the same user experience.
Pearson | MyLab | IT’s embedded screen reader offers increased accessibility for students with disabilities. The simulation text and screen reader can also be translated into five languages: Spanish, French, Arabic, Chinese, and Japanese.

Return to Table of Contents | 20
There are multiple features of the accessibility tool bar including:
• Audio Control: This feature will allow the student to pause, rewind, and advance the text on the screen as the user click on different components of the simulation
• Click Navigate: The student can select an icon or a button on the simulation and a voice will announce what the student clicked on
• Speak Selection: Students can highlight the text they wish to be repeated back to them in an auditory format
• Spell Selection: Students can have the audio guide spell out different text on the screen in the simulated environment
• Translation: Students can activate the translation feature, which will change the Microsoft Ribbon, Pearson | MyLab | IT toolbar, and audio to different languages available. New languages are being added periodically, so please check within Pearson | MyLab | IT to discover the latest ones available.
• Adjust Settings: Students can use this portion of the accessibility toolbar to change the voice available (male or female) and adjust the speed at which the computer speaks. The student can also adjust the tracking settings available. The Accessibility Toolbar can also be used with a variety of keyboard shortcuts to further increase access to this great feature.
Pearson | MyLab | IT: Accessibility Toolbar Keyboard Shortcut
Guide

Return to Table of Contents | 21
Simulation Bandwidth Meter gives users a measurement of the strength of their connection in terms of running the simulation upon launch.
Simulation Study Plans The third type of Simulation activity is the Simulation Study Plan. Simulation Study Plans are located in the activities folder and the simulation activity sub-folder. They are assigned in the same manner as other Pearson | MyLab | IT activities. The plan is a multi-part activity and includes three different components:
• Pre-Test • Training (remediation) • Post-Test
Pre-Test and Post-Test mode means the activities will be deployed in assessment mode, which means no save-for-later tasks or learning aids can be used. The Training task will always include the save-for-later feature and the learning aids, if the student wishes to use them.
Simulation Study Plans have been created for Volume 1 “Introductory Level” content using the Pre-Test > Training > Post-Test configuration, and where both the Pre-Test and Training will rely on the “Training 1 Scenario.”
Windows 10 Simulation Activities
In addition to the Simulation activities for Office Applications, Pearson | MyLab | IT also offers topic-based Simulation activities for Windows 10 which can be implemented regardless of the Pearson Series you are using, Skills for Success, GO!, Exploring or Your Office.
The Windows 10 Simulations are available within the Course Materials Library in the Windows 10 Content folder for your textbook. There are three types of Windows 10 Simulation activities:
• Training simulation activity, which includes the Watch and Practice learning aids only • Assessment simulation activity with a different scenario than Training • Simulation Study Plan

Return to Table of Contents | 22
The Windows 10 Simulations cover three topics: Personalizing Windows 10, Using File Explorer and System Management. For more flexibility, ou can either assign the combined activities that cover all three topics, or assign an activity topic by topic.
To learn more about the student experience with Simulation activities, watch the following video:
Pearson | MyLab | IT for Office 2016: How to Complete Simulation Activities (Student)
Grader Activities
Grader activities are outcomes focused and offer you the ability to assign project-based homework/assessment. Students complete Grader projects live in Microsoft Word, Excel, PowerPoint, and Access, mirroring the environment and skills needed for their future jobs. Students submit projects for immediate grading by the Pearson | MyLab | IT grading engine. The grading engine will also capture Potential Integrity Violations at both the content and document level.
There are four steps for students to complete a grader activity: Download Starting Materials Work Assignment on Your Computer Upload Completed Assignment Submit Assignment for Grading
Download File Naming Convention Since students can work on Pearson | MyLab | IT assignments in an open campus lab environment, it's common to find many copies of a project start file in the downloads

Return to Table of Contents | 23
folder of a shared lab computer. False-positive Potential Integrity Violations can occur when students accidentally select the wrong start file from a shared lab computer. Therefore, a change in the naming convention for downloadable grader files was implemented to reduce false-positive Potential Integrity Violations.
When students download the Grader Project Start File, Submitted File, and Live Comments File, Grader will automatically inject the student’s Last Name into the file name. This small change will make it easy for students to identify the correct file to use. However, it will bear no impact on grading. Pearson | MyLab | IT does not rely on the file name as part of the submission grading process, so students can change their project file names with no impact on scoring.
Note: "_Student, _Student" is the placeholder name for an educator working in student view. You will see "_Student" injected into project file names if you download from the student view of your courses. You will not see this if you download the project from
Preview on the educator side.
Grader Reports Grader Project reports offer students just-in-time feedback in an easy- to-read format. Students can download a Live Comments Report for Word, Excel, and PowerPoint or Marked Up Report for Access. These detailed reports allow students to identify what they got correct, and understand why a response was incorrect, so they can fix and learn from their mistakes.

Return to Table of Contents | 24
To learn more about the student experience with Grader activities, watch the following video:
Pearson | MyLab | IT for Office 2016: How to Complete a Grader Activity (Student)
Badging with Capstone Grader Activities
Burning Glass research tells us that Microsoft Excel and Word are the #5 and #6 most requested skills from potential job candidates.

Return to Table of Contents | 25
Your course is a critical and an important part of your students getting a job or making progress in a job that they already have. In addition to helping students master Microsoft Office skills, Pearson | MyLab | IT also promotes critical thinking skills that translate to the workplace.
Pearson | MyLab | IT provides you with the learning tools, grading and reporting to help you teach your students to become proficient in these skills with our book specific Simulation activities and live-in-the-application Grader projects, but how can students showcase and provide employers evidence of these skills?
• Pearson | MyLab | IT Open Badges • MOS or IC3 certification
Pearson | MyLab | IT Open Badges Capstone Grader Projects are available for each of the Microsoft Office applications. When you assign a Capstone Grader Project in your course, you are providing an opportunity for your students to earn a badge that showcases the skills they have mastered. Students earn a badge when they score 90% or above on an assigned Capstone Grader Project.
Badging is web-enabled, verifiable proof of certain Microsoft Office and IC3 skills to get and retain a job. With Pearson | MyLab | IT Open Badging, students can earn a badge and share their achievements with current/future employers via LinkedIn, online portfolios and more. The meta-data contained in each badge also contributes to key word searches employers might conduct when looking for potential candidates with certain skills sets.
When students claim their badge, they also gain access to valuable Labor Market Insights which identifies the number of job openings requiring these skills, top employers, salary ranges, etc. They can also link directly to related job postings and apply for positions immediately!
Pearson | MyLab | IT: How to use Pearson | MyLab | IT Badges
To view details on the skills students have obtained with each badge earned, please visit our Pearson | MyLab | IT badging pages.
MOS or IC3 Certification Is the MOS or IC3 certification exam something you encourage your students to take? What better way to show evidence of skills than to become certified.

Return to Table of Contents | 26
When students earn a badge, by scoring 90% or above on an assigned Capstone Grader Project, they also earn the ability to purchase MOS and IC3 certification vouchers from Certiport at a 30% discount.
In addition to assigning book specific Simulation activities and live-in-the-application Grader projects to help your students prepare for the exam, do not forget about the MOS practice exams in the Shared Library you can also add to your course.
End of Chapter Activities
Within each chapter, there is an “Activities” folder that houses the End of Chapter Activities subfolder. This is the area where you can find objective-based assessments and other end of chapter assessment and project material. Depending on the textbook you are using, here are examples of some of the content you will find:
• End of Chapter Quizzes • Key Terms Quizzes • Prepared Exams (Data Files & Instructions) • MOS Quizzes • Online End of Chapter Projects Instructions
To learn more about the student experience with objective-based activities, such as End of Chapter Quizzes, Key Terms Quizzes, and MOS quizzes, watch the following video:
Pearson | MyLab | IT Student: How to Complete an Objective-Based Assessment
Student Resources
Within each chapter, there is a Student Resources folder. These are often items educators make available to students, but do not require. You can read about using the “show” feature to include these items in your course without assigning them in the “Show” Content vs. Assign Content Tutorial in Module 2.
Depending on the textbook you are using, here are examples of some of the content you will find:
• eText • Data Files • PowerPoint Presentations

Return to Table of Contents | 27
• Audio PowerPoint Presentations • Student Videos
Computer Concepts Material
If you are teaching computer concepts with Pearson | MyLab | IT, help your students practice by assigning activities designed to promote mastery.
Dynamic Study Modules Dynamic Study Modules work by continuously assessing student performance and activity, then using data and analytics to provide personalized content in real-time to reinforce concepts that target each student’s particular strengths and weaknesses. This framework is ideal for helping students learn and master computer concepts.
For students, dynamic study modules, or DSMs, leverage research from the field of cognitive psychology, neurobiology and game to deliver a uniquely effective, learning system. The DSMs continuously assess students’ performance and provide additional practice in the areas where they struggle the most. They can be accessed by a computer, a smart phone or other mobile device.
NEW! The June 2016 release provides enhancements such as the ability to remove questions from modules and the ability for students to "refresh" on a module from the review page.
IT Simulations IT Simulations for computer concepts provide 12 individual scenarios covering a core computer concept. Students apply what they are learning by working through the scenario in an active learning environment and grades feed to the Pearson | MyLab | IT grade book.
Similar to Simulation Training activities for Office applications, Windows® 10 high-fidelity training simulations allow students to explore Windows in a safe, guided environment that provides feedback as well as Watch and Practice Learning Aids to assist them if they need help.
Book Specific Course Set Up Guides
While all Pearson | MyLab | IT courses share the same overall design, structure, and content types, the actual content available varies by textbook. To help inform and guide your course build decisions, we have provided Course Set Up Guides to provide a high-level view of the content you will find in your Pearson | MyLab | IT course (and where its located) as well as a sample learning path.

Return to Table of Contents | 28
Click the links to download a Course Set Up Guide for your book(s):
• Go! Office 2016 • Go! All in One 3e • Exploring Office 2016 • Skills for Success Office 2016 • Your Office: Office 2016 • Technology in Action 14e • Visualizing Technology 6e

Return to Table of Contents | 29
MODULE 1: PLAN YOUR PEARSON | MYLAB | IT COURSE Explore Implementation Models
Now that you know the type of content available in your course, which materials will you assign to help students reach the learning outcomes for your course?
The alignment of our content to learning objectives and professional standards helps students transfer what they learn in the classroom into the workplace, promoting career readiness. Simply put, Pearson | MyLab | IT is designed with the learner in mind, to help learners learn and foster college and career success. To help you determine the best way to design your course, let’s explore how you can leverage Pearson | MyLab | IT’s Simulation and Grader activities to help students succeed.
Authentic learning or learning through practice and assessments that closely align with real world applications is what students experience when using Simulation and Grader activities in Pearson | MyLab | IT. Enabling focused activities assess students in a simulated Office environment; Pearson | MyLab | IT’s realistic Simulation activities assess the student’s ability on individual skills. Outcomes focused activities assess students in the actual Office applications; Pearson | MyLab | IT’s project-based Grader activities assess the student’s ability to complete real-world projects.
How you position these activities in your course depends on the way you want students to practice and prove mastery. This chart represents the different models to implement Simulation and Grader activities by pedagogical focus:

Return to Table of Contents | 30
Skills / Enabling Focus
If you prefer for students to practice and prove mastery on individual skills:
Projects / Outcomes Focus
If you prefer for students to practice and prove mastery in project-based assignments:
Mixed Focus: Skills / Enabling & Projects / Outcomes
Many educators choose to use a combination of Simulation and Grader activities for homework and assessment to provide students with an authentic learning environment where they can practice realistic tasks in a simulated environment that closely mirrors applications they will use in the workplace (Simulations) as well as practice these skills right

Return to Table of Contents | 31
in the live application (Graders). Here are some examples of using these assignments together to help students succeed.
Skills Focus for Homework & Project Focus for Assessment
If you prefer students to practice on individual skills and prove mastery in project-based assignments:

Return to Table of Contents | 32
Project Focus for Homework & Skills Focus for Assessment
If you prefer students to practice in project-based assignments and prove mastery on individual skills:
Case Study: Read how Professor Cliff Niemeier leverages Simulation training activities for lecture/lab time as practice (no scores recorded), but uses Grader Activities for homework and Simulation activities for tests (assessment) grades in
his course at Jefferson Community and Technical College.
Skills Focus & Project Focus for Homework & Assessment If you want students to be exposed to both skills-based and project-based assignments for homework and/or assessment:
Case Studies:
North Arkansas College Read how Instructor Kim Potts leverages Pearson | MyLab | IT Simulation activities for low-stakes practice and Grader activities for both homework and assessment to help students succeed in her courses at North Arkansas College.
MacEwan University Read how Instructor Randy Jenne uses Simulation and Grader activities for homework or practice and the Project Creation Tool (PCT) to build custom Grader projects for assessment.
St. Petersburg College, Seminole Campus Read how Instructor Alan Shapiro uses a combination of Simulation and Grader activities for both homework and assessment in his courses at St. Petersburg College.

Return to Table of Contents | 33
MODULE 2: IMPLEMENT YOUR PEARSON | MYLAB | IT COURSE PLAN
Computer Set Up & Technical Support
System Requirements & Home Computer Set Up
Both students and instructors should view the System Requirements for Pearson | MyLab | IT, as each client computer or workstation running a Pearson | MyLab | IT product must meet a specific set of minimum system requirements.
Troubleshooting FAQs for System Requirements
Although many users will not need to do anything before using Pearson | MyLab | IT, some users might need to manually configure a computer to meet system requirements. Review this Knowledge Base article that walks through the steps to manually get your browser ready to run Pearson | MyLab | IT, including tips for the following questions:
How do I check which browser I am using?
How do I check which software version I am using?
How do I clear cache and cookies on my computer?
How do I enable session cookies in Chrome?
How do I enable Javascript?
How do I add trusted sites?
How do I allow pop-ups?
How do I set screen resolution?
Technical Support
Pearson offers technical support to you and students 24/7. You can connect with Pearson Support for assistance with registration, signing in, browser settings, other system requirements, and general technical issues with your course or account. Bookmark this site for easy and quick reference. There are three ways to contact Pearson Support:
Find Answers 24/7 (Search FAQs) 24/7 Chat 24/7 Phone:
o Educator- 877-694-8522

Return to Table of Contents | 34
o Student- 844-292-7016
The Knowledge Base is a section of our 24/7 Support site that collects the most common questions and answers, and catalogs them in a searchable way. The FAQ listing changes daily depending on the volume of questions coming in at that time. The search field is linked to an extensive knowledge base of questions and answers which is an excellent place to start if you have an “error code” or “error message,” as it will retrieve the reason for the error as well as the steps to resolve the issue. This can save you and/or your students a great deal of time and effort.
Anytime you OR your students reach out to Technical Support via phone or chat, an incident number is generated. This is the “tracking” for the incident reported.
Best Practice: Require students to provide a Pearson Incident Number to you before bringing any technical issue or error directly to you. We are unable to
troubleshoot technical issues without an incident report with all necessary details. You can in turn pass this incident number to your Pearson representative in the event it needs escalated. Students will receive an incident number with any of the above methods to contact our technical support teams.
System Status Site
To review details of any unexpected system outage or downtime, we recommend you bookmark the Pearson System Status site. It provides up-to-date performance information regarding a subset of Pearson Higher Education digital products with the goal of improving the customer experience by providing updates about system disruptions and outages.
You can access the Pearson System Status site 24/7/365, allowing for full transparency of Pearson product status. Please note that this site does not include information about scheduled maintenance downtimes. You may find that information here.
You can review hour-by-hour for the last 24 hours or daily view of the last 35 days with a detailed description of any issues, disruptions, or outages.

Return to Table of Contents | 35
Additionally, you can follow @PearsonSupport on Twitter for Higher Ed product support, useful tips, downtime information, and more.

Return to Table of Contents | 36
MODULE 2: IMPLEMENT YOUR PEARSON | MYLAB | IT COURSE PLAN
Create Pearson | MyLab | IT Courses
The My Courses page is where you create or copy Pearson | MyLab | IT courses. You can also organize your course list and see details about your course from the My Courses page. This tutorial will walk your through creating or copying a Coordinator course, creating course groups, as well as provide a basic overview of the My Courses page.
Create Coordinator Courses
Whether you are a Program Administrator/Coordinator, Program Designer, Course Instructor, or Section Instructor (with full instructor access) responsible for creating your own sections, the first step is to create a coordinator course. There are two ways to create a coordinator course:
• Create a new coordinator course from the catalog • Copy a course (from previous terms or another instructor) as a new coordinator
course
Pearson | MyLab | IT: How to Create a Coordinator Course
Pearson | MyLab | IT: How to Copy a Course from a Previous Term
Pearson | MyLab | IT: How to Copy a Course from Another Instructor
Best Practice: If you are acting as a Program Administrator, you can use a Program Administrator account instead of your personal instructor account to create the course. When creating a Program Administrator account, it is recommended to use the First Name: Admin and Last Name: [your school’s name].
Step-by-Step Instructions to Create a Coordinator Course from the Catalog:
Login to your Pearson MyLab & Mastering account and click the Create/Copy Course tile on your courses page or the Create/Copy Course button in the upper right of your screen.

Return to Table of Contents | 37
Under Choose from catalog, in the search field type Pearson | MyLab | IT and click
the search icon.
NOTE: • Materials are listed in alphabetical order by textbook
title, then by edition. Select Sort by to list materials first by Course Title, Author, Discipline, or Series.
• The number of courses appears at the top of the page. For example: Showing 1-20 of 20. If there are more courses than can be shown on one page, navigate through the page numbers at the bottom of the page.
Locate the materials you are using and click Select Coordinator Material.
NOTE: If you are using both an applications text and a computer concepts text, make sure to select the combined course option (e.g. Exploring Series and Technology in Action).

Return to Table of Contents | 38
Enter the required fields and click Create Course.
You can either Create Another Course or Return to My Courses.
Your Coordinator Course will appear in a grayed out tile on your courses page until course creation is complete. When the course is available for use, you will receive an email, the tile will activate with color, and become clickable.
Optional: If you will allow other instructors to copy your course, select Instructors can copy this course and provide them with your course ID.

Return to Table of Contents | 39
IMPORTANT: Build and customize your Coordinator course BEFORE any sections are created. Although there are some shared content and settings features for
Pearson | MyLab | IT course groups, it is a best practice to complete set up and customizations before member sections are created.
Step-by-Step Instructions to Copy a Course as a New Coordinator Course:
Login to your Pearson MyLab & Mastering account and click the Create/Copy Course tile on your courses page or the Create/Copy Course button in the upper right of your screen.
Best Practice: If you are acting as a Program Administrator, you can use a Program Administrator account instead of your personal instructor account to create the course. When creating a Program Administrator account, it is recommended to use the First Name: Admin and Last Name: [your school’s name].
Under Copy existing course, either: a. Enter a Course ID from another instructor and click the Search icon OR b. Click See My List to choose a course from your list and click Select.

Return to Table of Contents | 40
Choose Course Type: Coordinator Course and enter the required course details and click Create Course.
You can either Create Another Course or Return to My Courses.

Return to Table of Contents | 41
Your Coordinator Course will appear in a grayed out tile on your courses page until course creation is complete. When the course is available for use, you will receive an email, the tile will activate with color, and become clickable.
IMPORTANT: Build and customize your Coordinator course BEFORE any sections are created. Although there are some shared content and settings
features for Pearson | MyLab | IT course groups, it is a best practice to complete set up and customizations before member sections are created.

Return to Table of Contents | 42
Course Group Set Up Options
It is important you build and customize your Coordinator course BEFORE any sections are created. Although there are some shared content and settings features for Pearson | MyLab | IT course groups, it is a best practice to complete set up and customizations before member sections are created.
When your Coordinator course is ready, member sections can be created from it to create a course group. There are several options for course group set up. You will want to identify and follow the instructions for the option that best suits your program. In the Understand User Roles and Training Paths Tutorial in Module 1, we provided information to help you identify the educator roles in your program that will help you determine the best course group set up option.
Review the course group set up option you will pursue in the following sections of this tutorial for member section creation details. Also review and download the corresponding handout with instructions for Section Instructors specific to your chosen set up.
Click here to see this graphic as a larger .pdf file.

Return to Table of Contents | 43
Option 1: Program Admin/Coordinator & Section Instructors (SI Access)
As a Program Administrator / Coordinator, you will create the coordinator course and sections in the same account. Once you have finalized the coordinator course, you will begin creating sections.
NOTE: By creating all of the sections from your account under the coordinator course, you will have full access, reporting capabilities across all sections, and more control
over what the other instructors can change or do in the course. Both you and the sections instructors will have access to the course as an instructor.
3 Steps to Set Up Course Group Option 1
Member sections are created from the Coordinator course in the Program Admin/Coordinator account
Section Instructors are provided with resources to register in sections as Section Instructor through the registration path on the main MyLab & Mastering site
Section Instructors register in the course sections they are teaching
Step-by-Step Instructions to make sections of a course: Pearson | MyLab | IT: How to Create a Section(s) from a Coordinator Course
1. Click the Create/Copy Course tile on your courses page or the Create/Copy Course button in the upper right of your screen.

Return to Table of Contents | 44
2. Under Copy existing course, click See My List.
3. Select the coordinator course you want to create sections from and click Select.
Choose Course Type: Member Section, enter the number of sections needed, then click Update.
NOTE: The coordinator course acts as a template only and CAN NOT be used for student enrollment. If you are teaching any sections, make sure you create sections for yourself as well.
Best Practice: When creating multiple sections from your coordinator course at one time, name the courses with identifiers such as the Section Instructors’ last names.
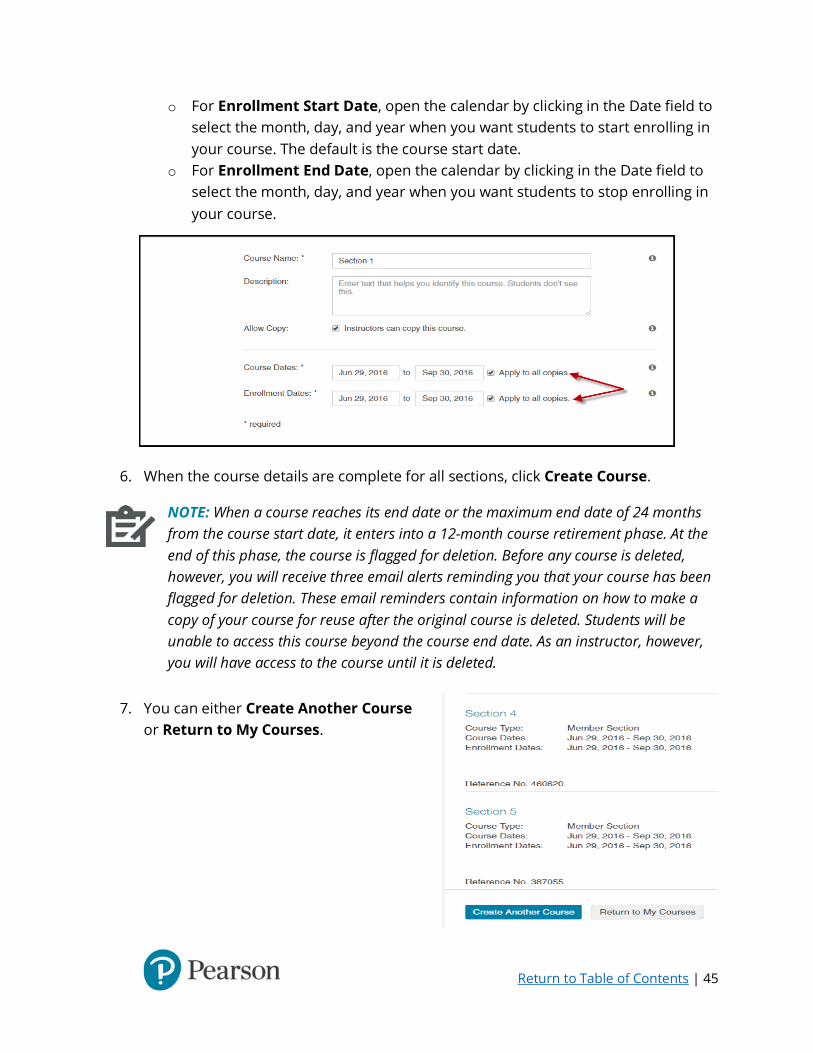
5. Enter the required course details for each section OR use the same Course and Enrollment Dates for all sections by entering the dates in the first section and clicking the checkbox for Apply to all copies.
o For Course Start Date, open the calendar by clicking in the Date field to select the month, day, and year when you plan to begin teaching the course. The course start date can be edited up to 90 days from course creation date.
o For Course End Date, open the calendar by clicking in the Date field to select the month, day, and year when you want to close student access to your course. The end date takes effect early in the morning of the following day. For example, if you select June 1, 2016 as the end date, student access ends early in the morning of June 2, 2016 Eastern Time.
Return to Table of Contents | 45
o For Enrollment Start Date, open the calendar by clicking in the Date field to select the month, day, and year when you want students to start enrolling in your course. The default is the course start date.
o For Enrollment End Date, open the calendar by clicking in the Date field to select the month, day, and year when you want students to stop enrolling in your course.
6. When the course details are complete for all sections, click Create Course.
NOTE: When a course reaches its end date or the maximum end date of 24 months from the course start date, it enters into a 12-month course retirement phase. At the end of this phase, the course is flagged for deletion. Before any course is deleted, however, you will receive three email alerts reminding you that your course has been flagged for deletion. These email reminders contain information on how to make a copy of your course for reuse after the original course is deleted. Students will be unable to access this course beyond the course end date. As an instructor, however, you will have access to the course until it is deleted.
7. You can either Create Another Course or Return to My Courses.

Return to Table of Contents | 46
You will not see your member sections immediately. The coordinator course tile you used to create the member sections will display 0 Active Member Sections until the section course creation is complete, at which time the zero will be replaced with the number of sections you created. However, you can access your member sections at any time by clicking Details on the Coordinator course and then Show Member Sections.
When your member sections are processing, they will appear in a grayed out tile in your Member Sections page until course creation is complete. When the sections are available for use, you will receive an email, the tiles will activate with color, and become clickable.
Review the first part of the following video to see how your Section Instructors will register in assigned member sections.
Pearson | MyLab | IT: Section Instructor Registration/Enrollment Process
SI HANDOUT: Section Instructor step-by-step instructions for Option 1
Section Instructors for this course group option will need to complete the registration for Pearson | MyLab | IT as a Section Instructor for the course(s) they are teaching. Please provide this handout to all Section Instructors for step-by-step instructions, along with a Section Instructor access code and Course ID(s) for the Pearson | MyLab | IT section(s) they are teaching. Contact your Pearson Sales Representative if you need to request Section Instructor access codes for your educators.
HANDOUT: Section Instructor in Course Group Set Up Option 1

Return to Table of Contents | 47
Option 2: Program Admin/Coordinator & Section Instructors (existing Pearson account)
As a Program Administrator / Coordinator, you will create the coordinator course and sections in the same account. Once you have finalized the coordinator course, you will begin creating sections.
NOTE: By creating all of the sections from your account under the coordinator course, you will have full access, reporting capabilities across all sections, and more control
over what the other instructors can change or do in the course. Both you and the sections instructors will have access to the course as an instructor.
3 Steps to Set Up Course Group Option 2
Member sections are created from the Coordinator course in the Program Admin/Coordinator account
Section Instructors are provided with resources to enroll in sections as Section Instructor from their Instructor account
Section Instructors enroll in the course sections they are teaching
Step-by-Step Instructions to make sections of a course: Pearson | MyLab | IT: How to Create a Section(s) from a Coordinator Course
1. Click the Create/Copy Course tile on your courses page or the Create/Copy Course button in the upper right of your screen.

Return to Table of Contents | 48
2. Under Copy existing course, click See My List.
3. Select the coordinator course you want to create sections from and click Select.
Choose Course Type: Member Section, enter the number of sections needed, then click Update.
NOTE: The coordinator course acts as a template only and CAN NOT be used for student enrollment. If you are teaching any sections, make sure you create sections for yourself as well.
Best Practice: When creating multiple sections from your coordinator course at one time, name the courses with identifiers such as the Section Instructors’ last names.
5. Enter the required course details for each section OR use the same Course and Enrollment Dates for all sections by entering the dates in the first section and clicking the checkbox for Apply to all copies.
o For Course Start Date, open the calendar by clicking in the Date field to select the month, day, and year when you plan to begin teaching the course. The course start date can be edited up to 90 days from course creation date.
o For Course End Date, open the calendar by clicking in the Date field to select the month, day, and year when you want to close student access to your course. The end date takes effect early in the morning of the following day. For example, if you select June 1, 2016 as the end date, student access ends early in the morning of June 2, 2016 Eastern Time.

Return to Table of Contents | 49
o For Enrollment Start Date, open the calendar by clicking in the Date field to select the month, day, and year when you want students to start enrolling in your course. The default is the course start date.
o For Enrollment End Date, open the calendar by clicking in the Date field to select the month, day, and year when you want students to stop enrolling in your course.
6. When the course details are complete for all sections, click Create Course.
NOTE: When a course reaches its end date or the maximum end date of 24 months from the course start date, it enters into a 12-month course retirement phase. At the end of this phase, the course is flagged for deletion. Before any course is deleted, however, you will receive three email alerts reminding you that your course has been flagged for deletion. These email reminders contain information on how to make a copy of your course for reuse after the original course is deleted. Students will be unable to access this course beyond the course end date. As an instructor, however, you will have access to the course until it is deleted.
7. You can either Create Another Course or Return to My Courses.

Return to Table of Contents | 50
You will not see your member sections immediately. The coordinator course tile you used to create the member sections will display 0 Active Member Sections until the section course creation is complete, at which time the zero will be replaced with the number of sections you created. However, you can access your member sections at any time by clicking Details on the Coordinator course and then Show Member Sections.
When your member sections are processing, they will appear in a grayed out tile in your Member Sections page until course creation is complete. When the sections are available for use, you will receive an email, the tiles will activate with color, and become clickable.
Review the second part of the following video to see how your Section Instructors will register in assigned member sections.
Pearson | MyLab | IT: Section Instructor Registration/Enrollment Process
SI HANDOUT: Section Instructor step-by-step instructions for Option 2
Section Instructors for this course group option will need to complete the enrollment into Pearson | MyLab | IT as a Section Instructor for the course(s) they are teaching. Please provide this handout to all Section Instructors for step-by-step instructions, along with a Section Instructor access code Course ID(s) for the Pearson | MyLab | IT section(s) they are teaching. Contact your Pearson Sales Representative if you need to request Section Instructor access codes for your educators.
HANDOUT: Section Instructor in Course Group Set Up Option 2

Return to Table of Contents | 51
Option 3: Program Admin/Coordinator & Section Instructors (full instructor access)
As a Program Administrator / Coordinator, you will create a coordinator course set to “available to copy” and will build and customize the coordinator course that Section Instructors will use to create member sections. You will provide your Section Instructors the Coordinator course ID to copy and create member section courses in their own Pearson accounts. Before your Coordinator course can be copied, you will need to take an additional step to make the Coordinator Course available for copy.
NOTE: By having Section Instructors create their own member sections, they will have more control of the course(s), but you will still retain centralized content management
and reporting capabilities across all sections.
3 Steps to Set Up Course Group Option 3
Coordinator Course Template is set as available to copy Section Instructors are provided with resources to create member sections in their
own account from your template Section Instructors complete member course creation
Step-by-Step Instructions to set a course as available to copy:
Click Details on the Coordinator course tile from your courses page.

Return to Table of Contents | 52
Select Edit Course Details.
Select the checkbox for Instructors can copy this course and click Save Changes.
SI HANDOUT: Section Instructor step-by-step instructions for Option 3
Section Instructors for this course group set up option will need to create copies of your Coordinator course as member section courses in their own accounts for the course(s) they are teaching. Please provide this handout to all Section Instructors for step-by-step instructions along with your Pearson | MyLab | IT Coordinator Course ID.
HANDOUT: Section Instructor in Course Group Set Up Option 3

Return to Table of Contents | 53
Option 4: Program Designer & Section Instructors (full instructor access)
As a Program Designer, you will create a coordinator course set to “available to copy” and will build and customize the template course that will be copied by other instructors at your institution. You will provide your Section Instructors the Coordinator course ID to copy as a new Coordinator course to use to create member section courses in their own Pearson accounts. Before your Coordinator course can be copied, you will need to take an additional step to make the Coordinator Course available for copy.
NOTE: By having Section Instructors create a copy of your Coordinator course template as a new Coordinator course, you will not have access to the copied courses or
reporting capabilities across all sections.
3 Steps to Set Up Course Group Option 4
Coordinator Course Template is set as available to copy Section Instructors are provided with resources to create a NEW Coordinator course
and member sections in their own account from your template Section Instructors complete coordinator course and member course creation
Step-by-Step Instructions to set a course as available to copy:
Click Details on the Coordinator course tile from your courses page.

Return to Table of Contents | 54
Select Edit Course Details.
Select the checkbox for Instructors can copy this course and click Save Changes.
SI HANDOUT: Section Instructor step-by-step instructions for Option 4
Section Instructors for this course group set up option will need to create a copy of your Coordinator course as a NEW Coordinator course in their own account, before creating their own member sections for the course(s) they are teaching. Please provide this handout to all Section Instructors for step-by-step instructions along with your Pearson | MyLab | IT Coordinator Course ID.
HANDOUT: Section Instructor in Course Group Set Up Option 4

Return to Table of Contents | 55
Option 5: Course Instructor
As a Course Instructor, you will create a coordinator course and sections for yourself in the same account. Once you have finalized the coordinator course, you will begin creating sections.
1 Step to Set Up Course Group Option 5
Member sections are created from your Coordinator course in your educator account
Step-by-Step Instructions to make sections of a course: Pearson | MyLab | IT: How to Create a Section(s) from a Coordinator Course
1. Click the Create/Copy Course tile in the courses page or the Create/Copy Course button in the upper right of your screen.
2. Under Copy existing course, click See My List.
3. Select the coordinator course you want to create sections from and click Select.

Return to Table of Contents | 56
4. Choose Course Type: Member Section, enter the number of sections needed, then click Update.
5. Enter the required course details for each section OR use the same Course and
Enrollment Dates for all sections by entering the dates in the first section and clicking the checkbox for Apply to all copies.
o For Course Start Date, open the calendar by clicking in the Date field to select the month, day, and year when you plan to begin teaching the course. The course start date can be edited up to 90 days from course creation date.
o For Course End Date, open the calendar by clicking in the Date field to select the month, day, and year when you want to close student access to your course. The end date takes effect early in the morning of the following day. For example, if you select June 1, 2016 as the end date, student access ends early in the morning of June 2, 2016 Eastern Time.
o For Enrollment Start Date, open the calendar by clicking in the Date field to select the month, day, and year when you want students to start enrolling in your course. The default is the course start date.
o For Enrollment End Date, open the calendar by clicking in the Date field to select the month, day, and year when you want students to stop enrolling in your course.

Return to Table of Contents | 57
6. When the course details are complete for all sections, click Create Course.
NOTE: When a course reaches its end date or the maximum end date of 24 months from the course start date, it enters into a 12-month course retirement phase. At the end of this phase, the course is flagged for deletion. Before any course is deleted, however, you will receive three email alerts reminding you that your course has been flagged for deletion. These email reminders contain information on how to make a copy of your course for reuse after the original course is deleted. Students will be unable to access this course beyond the course end date. As an instructor, however, you will have access to the course until it is deleted.
7. You can either Create Another Course or Return to My Courses.
You will not see your member sections immediately. The coordinator course tile you used to create the member sections will display 0 Active Member Sections until the section course creation is complete, at which time the zero will be replaced with the number of sections you created. However, you can access your member sections at any time by clicking Details on the Coordinator course and then Show Member Sections.

Return to Table of Contents | 58
When your member sections are processing, they will appear in a grayed out tile in your Member Sections page until course creation is complete. When the sections are available for use, you will receive an email, the tiles will activate with color, and become clickable.
IMPORTANT: Provide students with the Registration Instructions Handout that is included in the section creation confirmation email or by clicking Details on your
member section course tile from your Coordinator course and clicking Get Registration Instructions. If registration instructions are not available for your course, provide students with the member section Course ID to register.

Return to Table of Contents | 59
My Courses Page
Pearson | MyLab | IT: Best Practices to Manage Your MyCourses List
The My Courses page is where you manage your Pearson MyLab courses.
To open a course, select its name under Active or Inactive.
Active — See active Coordinator courses you are managing and/or member sections you are teaching.
Inactive — Courses that have ended appear here. Courses show for 12 months beyond the end date unless you delete them. Create a copy if you plan to teach again with this content.
Select Announcements to see all unread and read announcements. General announcements from Pearson can be alerts for planned and unplanned system maintenance, or short descriptions of new product or software releases, for example.

Return to Table of Contents | 60
Working with Courses A course tile shows important information about the course, including its course type.
Coordinator courses — Use the Coordinator course to organize your course structure and customize assignments. Then copy it to create member section courses for enrollment. A coordinator course label appears on all coordinator courses.
Each coordinator course shows the number of active member section courses. The count includes your member sections, as well as active member sections made by other instructors (if applicable).
To see all associated member sections you’ve created based on this coordinator course, select Details and then Show Member Sections.
Member section courses — access your member sections at any time by clicking Details on the Coordinator course and then Show Member Sections.
The course ID which you provide to your students to register into your course is in the upper left.
After 1 student enrolls, you can open the roster by selecting the enrolled number (for example, Enrolled: 10). A separate count shows the number of those students enrolled with unpaid temporary access.
A section instructor count links to the section instructor list, where you can see all enrolled section instructors and remove them, if necessary.

Return to Table of Contents | 61
Other Course Products — Some course products, such as the Instructor Resource Center don’t have a course ID. Open these products, just like a course, by selecting the name on the tile. Select Details for more product information, such as the subscription dates.
See More Information about your member sections Select Details to see more course information, such as the course ID, instructors’ names, your role, all course dates, course copy history, and original course materials. The Course Details page also gives you access to key tools for working with your course, such as the roster and student registration instructions.

Return to Table of Contents | 62
indicates a course that is linked (paired) with a learning management system (LMS) course. For more information, see LMS Help.
Alerts help you monitor the status of each of your courses. For example, an alert appears when a course approaches its end date, or if new edition or new version course materials are available. The alert may also recommend actions to take, or offer links to additional options.
Students see similar alerts when a course approaches its end date, or when their temporary access is expiring.
Organize your course list The My Courses page offers you a number of ways to control the appearance of your course list. Switch between a tile or list view, drag and drop courses to rearrange them, and reduce the size of your list by hiding courses without deleting them.
Tile or list views — Courses appear as tiles by default. Select to switch to a list view.
Select to again see courses as tiles.
Search — As you type a keyword in the search box, the list is filtered to show only matching courses. The counts for Main and Secondary change to reflect the number of matches in each category. Clear the search box to again see your full course list and the full course count.
Arrange courses — To change the order of your course list, select a course and drag it to its new location.
You can’t move courses if the list is filtered. Clear the search box to see your full course list and rearrange courses.
Hide and show courses — Prioritize a course by dragging it from the Main category to the Secondary category. Be sure to select the show icon for Secondary before moving courses. Use the hide icon to temporarily hide all courses under a category.
Default ordering of course tiles — The default sorting order for course and product cards is alphabetical order. If you customize ordering, then new cards will appear as the first card in the top row left corner. If the My Courses page is not custom sorted, then new cards will also adjust among other cards to maintain alphabetical order.

Return to Table of Contents | 63
MODULE 2: IMPLEMENT YOUR PEARSON | MYLAB | IT COURSE PLAN
Explore and Navigate Your Course
Course Overview
Manage Your Account Make sure you’re signed in to your
account. Quick sign out to protect your
account. Get assistance if you need it. Use Account to manage your
Pearson profile, update email address, or change password.
Course Menu / Left Navigation The major components of each Pearson | MyLab | IT course are accessed from the Course Menu on the left side of the screen.
When you click an item from the course menu, the menu collapses to show only those specific menu items to reduce scrolling. Clicking Main Menu will return the full course menu.

Return to Table of Contents | 64
Show/hide course menu Close the course menu to optimize your work space. By default, the menu is open on laptops, but closed on smaller devices.
Menu Open Menu Closed
Manage your course Select Manage Course to:
• Edit the course menu • Restore or delete archived items • Choose a color and style theme • Manage the course roster

Return to Table of Contents | 65
• Manage uploaded content files
indicates menu items hidden from students.
Customize your course menu
Pearson | MyLab | IT for Office 2016: How to Modify the Course Menu
Make menu edits on one page.
Enter the order number (#) when adding a new menu item. Rearrange existing items by drag and drop.
-OR- Enter a different order number. Rename, add sub items, archive, or hide items.

Return to Table of Contents | 66
Pearson | MyLab | IT Course Menu Items
Though there are additional course components you can use, the primary course components that you will use often are:
• Getting Started is the first page you encounter when you login to a course. It has several useful components to help your students get started
• Notifications allows students to view instructor comments, view new grades, check on unread discussion and check on their progress
• Assignment Calendar includes all activities in the course and a course calendar allowing you to quickly assign specific due dates
• Course Materials includes all available course materials as students will see them. As the instructor, you can manage what students see
• Communication Tools include email, threaded discussions, document sharing, chat, and class live for synchronous communications
• Grades includes scores for completed student work and reports for analysis of student achievement
Read or watch the videos in the following sections for more information on each component.
Getting Started
Getting Started includes important information for students about getting their computer setup for Pearson | MyLab | IT, a user’s guide, and a place to setup their time zone so they can be sure they turn in all assignments on time (by default all students are set to EST).

Return to Table of Contents | 67
Notifications
Pearson | MyLab | IT: How to Navigate and Customize Notifications
Assignment Calendar Using the Assignment Calendar is the fastest and easiest way to assign items your course by dragging and dropping into the calendar dates.
Pearson | MyLab | IT: How to Assign Content
Course Materials In Course Materials, students and instructors will both see the My Course area. My Course is the central area of Course Materials, where all activities students will complete are accessed. Under Course Materials, notice the menu items hidden from student view: Add From Library, Manage Course Materials, and Additional Instructor Views. In contrast Course Materials is not hidden from students and allows you to see the course materials exactly as students see them.

Return to Table of Contents | 68
In the upper right corner of Course Materials is a small icon that allows you to quickly toggle between instructor view and student view. This toggle icon is also available in other areas of Pearson | MyLab | IT. It is good practice to check the student view whenever you have made changes to your course to make sure that they are showing correctly for students.
Pearson | MyLab | IT: How to Navigate the Course Materials Library
Pearson | MyLab | IT: How to Explore My Course Side
Communication Tools
Pearson | MyLab | IT: How to Use Email Tool
Pearson | MyLab | IT: How to Use the Discussion Tool
Pearson | MyLab | IT: How to Use Chat
Grades Pearson | MyLab | IT: How to Navigate the Gradebook
eText
If you are using an eText, your students will only be able to view the eText if they have purchased the Pearson | MyLab | IT access code with eText.

Return to Table of Contents | 69
Pearson | MyLab | IT: How to Use the eText
Pearson | MyLab | IT: How to Customize the eText

Return to Table of Contents | 70
MODULE 2: IMPLEMENT YOUR PEARSON | MYLAB | IT COURSE PLAN
Organize & Add Content to Your Course
Create Course Structure/Folder Organization
My Course is typically organized by a folder structure. It is recommended that you organize your course materials to match the outline of your course syllabus. For example if your syllabus is organized into weeks or modules, you should name your folders in My Course accordingly (e.g. Week 1, Week 2, etc.).
If you determine that you need to adjust your existing folder structure, you can easily add and/or edit folders.
Pearson | MyLab | IT: Understanding Good Folder Structure
Pearson | MyLab | IT: How to Create a Folder
Pearson | MyLab | IT: How to Edit a Folder or Activity
Best Practice: Create a folder in the Course Materials Library for storage of your custom content, such as your syllabus, handouts, custom assignments, etc. If you
will use a lot of custom materials, create several custom content folders such as: My Handouts, My Discussions, My Assignments, etc.
Add Content from the Course Materials Library
Pearson | MyLab | IT: Understanding the Add from a Library Menu Item
The Course Materials Library contains materials developed specifically for the textbook series that you have chosen for your course. It is organized according to the textbook table of contents. Therefore, the folders in the Course Materials Library will be different depending on the textbook series you are using.

Return to Table of Contents | 71
You will use the Course Materials Library to add activities, assessments, and other materials to your courses. To access the Course Materials Library, click Add From Library from the Course Materials sub menu.
Notice that the Course Materials Library is on the left side of the screen, while My Course is on the right.
Depending on which series of textbooks you are using, you may find additional folders for different types of resources. You can review the specific content available in your course in the Course Set Up Guides located in the Explore and Select Activities and Assignments tutorial in Module 1.
Click the folder next to the type of resources you want to access. Within the folder, you will see a list of items that you can either preview or add to your course. You can add materials to My Course by clicking the check box next to the activity you want to add, and then clicking the Add button located between the Course Materials Library and My Course.
You can add folders or multiple activities and assessments at once by clicking the boxes next to all the items you want to add and then clicking the Add button. Just be careful to add your items to the right folder to reduce the time you spend reorganizing your course later!

Return to Table of Contents | 72
Pearson | MyLab | IT: How to Add a Grader Project
Pearson | MyLab | IT: How to Add a Dropbox
Pearson | MyLab | IT: How to Add Assignments for Multiple Classes

Return to Table of Contents | 73
Add Content from Other Courses or the Product Shared Library
In addition to adding content from the Course Materials Library, you can also change the content source you use to find and add materials to your course. You have the ability to either choose another course from your account or the Product Shared Library.
Share Content Between Courses If you want to add content from another Pearson | MyLab | IT course, you simply need to be enrolled in the course as an instructor so that it appears in your courses list. This is a great feature to share content with other educators in your program or to add content from previously taught courses.
Pearson | MyLab | IT: How to Share Content Between Courses
Copy Content from the Product Shared Library If you want to add materials from a different Pearson textbook series, you will need to access the Product Shared Library. You can copy materials from the Product Shared Library and use them in your course. If you have a specific need that is not met by your course materials, check the Product Shared Library!
Pearson | MyLab | IT: How to Copy Content from the Product Shared Library

Return to Table of Contents | 74
MODULE 2: IMPLEMENT YOUR PEARSON | MYLAB | IT COURSE PLAN
Add/Create Custom Content for Your Course
Edit Existing Activities
You can edit many of the activities in your Pearson | MyLab | IT course to match your course needs.
Edit Simulation Activities
Pearson | MyLab | IT: Editing a Simulation Activity
You may add up to 100 questions or tasks into a Simulation Training or Simulation Assessment activity. These activities may include any combination of Word, Excel, Access, PowerPoint, or objective-based questions.
Note: When editing an assignment to include both simulation and objective-based questions, keep in mind that questions are added to sections based on the question type. Objective-based questions, such as matching and multiple choice, appear in
the Standard Questions section. Simulation questions appear in specific sections based on the application in use, such as Word Questions. You cannot mix question types within the same section of an assignment. To add questions to an existing Simulation activity:
From the Questions tab, click Add Questions & click Select Questions from Bank.

Return to Table of Contents | 75
Locate the questions you want to add: a. To add simulation questions, drill into a chapter folder>Activities>Simulation
Activities b. To add objective-based questions, drill into a chapter folder>Instructor
Resources>Testbank questions Click the check box next to one or more questions and click Add and Close (you can
click Add to continue choosing more questions). When finished making edits, click Save and Return.
Edit Grader Activities There are two types of edits you can make to any Pearson provided Grader activity:
• Edit the instructions, point values or feedback • Edit/Customize the actual project (e.g. adding/removing/or changing a skill)
Both types of edits are completed via the Project Creation Tool (PCT).
Step- by- Step Instructions to edit instructions, point values or feedback:
Pearson | MyLab | IT for Office 2016: Edit grader project instructions, hints, or point values
From Manage Course Materials, click the options dropdown menu next to the desired project and choose Edit.

Return to Table of Contents | 76
From the Questions tab, click Options and choose edit. Click Add Answer and Select Project or Instruction Variation.
Click the 2nd tab, Pearson Project Library and choose to Create a New Variation OR Select an Existing Variation.
Enter a name for the new variation and click Create New.
Click the icon next to any step to edit the instruction’s text, hints, or scores.
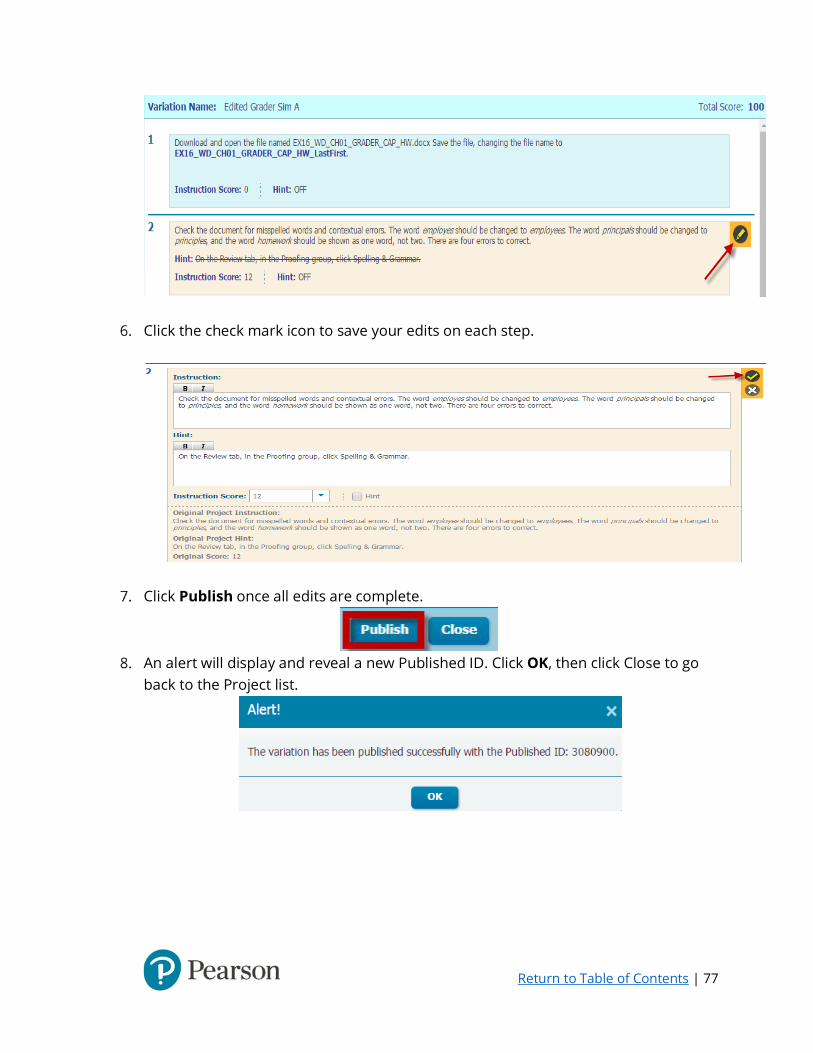
Return to Table of Contents | 77
Click the check mark icon to save your edits on each step.
Click Publish once all edits are complete.
An alert will display and reveal a new Published ID. Click OK, then click Close to go
back to the Project list.

Return to Table of Contents | 78
Hover over the variation you just created and click Select to use this variation in place of the current project.
The Grader ID will update to match the variation selected. Click Save and Close. Click Save and Return to complete the process.
A confirmation message will appear that the activity was updated successfully.
NOTE: If you choose to edit
a Grader Project already using a variation, you will also have the option to edit the existing variation.

Return to Table of Contents | 79
Step- by- Step Instructions to edit/customize the actual project: Pearson | MyLab | IT: How to clone and edit a project in the Project Creation Tool (PCT)
Open the Project Creation Tool from any Instructor menu item under Tools. Click the 2nd tab, the Pearson Project Library. Use the Advanced Search in the top right hand corner.
Hover and select the clone icon.
Enter the information and click Clone Project.

Return to Table of Contents | 80
It automatically opens to allow you to begin editing, but it will also now appear in your My Projects list, the 1st tab in PCT.
Project Sharing / Collaboration Feature You can share a Grader project from your My Projects tab in the Project Creation Tool (PCT) with your colleagues to collaborate on customizing or editing projects or to simply gain feedback from another colleague on your project.
Note: Published and Pearson created grader projects cannot be shared.
Pearson | MyLab | IT: Using Project Sharing in the Project Creation Tool (PCT)

Return to Table of Contents | 81
Upload Outside Content
Pearson | MyLab | IT allows you to upload your course syllabus or other custom materials. You can upload one file at a time or multiple files at once. You can also upload links to materials that are already online elsewhere, or create your own web page in HTML format. Click Add From Library and then Add Course Materials to see a list of the types of materials you can add.
Pearson | MyLab | IT: How to Upload Outside Materials
Create Custom Simulation and/or Objective-based Activities
You can create custom simulation and custom assessments using the Pearson | MyLab | IT testbank or other objective-based questions. If you want students to complete an exam in Pearson | MyLab | IT, you can build and deliver them using testbank questions in Pearson | MyLab | IT.
Just like editing existing activities, you can create custom activities that contain any combination of Word, Excel, Access, PowerPoint, or objective-based questions.
Step-by-Step Instructions:
Create a folder in the Course Materials Library to house your custom assignments.
From within the folder you just created, click Create Materials and choose the type of asset you want to create.
Enter the activity name and click Save and Continue.

Return to Table of Contents | 82
From the Questions tab, click Add Questions and click Select Questions from Bank.
Locate the questions you want to add: a. To add simulation questions, drill into a chapter folder>Activities>Simulation
Activities b. To add objective-based questions, drill into a chapter folder>Instructor
Resources>Testbank questions Click the check box next to questions you want to add and click Add. Continue navigating to other chapters and/or activity types until you have
completed adding all of the questions. Click Add and Close on your last round of additions. When finished creating the custom assignment, click Save and Return.
Add Images to Questions You can add images to questions in 3 easy steps:
Create Folders Add Image Files Create Exam/Questions
Step-by-Step Instructions to add image files to your course:
Create a folder in the Course Materials Library to house your image files (see video).
Best Practice: If you are creating an exam that will contain image files, you can create three folders: one folder to contain the exam, one folder for the individual
questions, and one folder for the images used in the exam. These folders can be nested if necessary (e.g. adding the images and questions folder to the exam folder).

Return to Table of Contents | 83
From within the folder you created for images, click Add Course Materials and then choose Add File.
Click Choose File and locate the image you want to add.
Enter a title for the image and click Add.
Repeat steps 1-4 to add remaining images

Return to Table of Contents | 84
Step-by-step instructions to add images to questions:
From the Questions tab of the assignment you want to add images, locate the question where the first image should be added (if you are creating a custom question, you can add the image while you create the question / if you are editing an existing question, click the options drop down and choose edit)
In the Narrative section with the text for your question, you can use the Insert Media button on the toolbar above the question text to insert an image.
Click the Course Materials Library tab and then click Choose.

Return to Table of Contents | 85
Drill into the folder you created for your images to select the image file you want to add. Click the radio button next to the image and click Add and Close.
5. Click the OK button. This will add the image to the question. Remember to save changes for the question. Repeat for all additional questions that require images.

Return to Table of Contents | 86
Create Custom Grader Projects using the Project Creation Tool (PCT)
Pearson | MyLab | IT: How to Create Your Own Grader Project
Would you like to create and assign live in the application projects from scratch? Maybe it is important to align projects with your course goals and learning outcomes or to tailor projects to MAC user needs. In any case, Pearson | MyLab | IT has you covered with the Project Creation Tool (PCT).
The PCT allows instructors to create Grader Projects from scratch for Word, Excel, and PowerPoint, not just select or deselect tasks from an existing project, but to truly take your own project –and have Pearson | MyLab | IT’s Grader score your students’ submissions! There are four steps to create your own Grader project:
1. Upload the starting and final documents of the project you want to create 2. Add the instructions for the evaluation of the project 3. Map the steps in the instructions to corresponding skills and set scoring criteria 4. Test your project
Projects created using the new Project Creation Tool will be evaluated using the same Pearson | MyLab | IT Grader engine as a project published by Pearson and offer the same submission reports.

Return to Table of Contents | 87
MODULE 2: IMPLEMENT YOUR PEARSON | MYLAB | IT COURSE PLAN
Assign Activities & Assignments
“Show” Content vs. Assign Content
In Pearson | MyLab | IT, every activity that is added to My Course will appear in the Gradebook. However, activities and assessments will not be included in the calculation of a student’s grade unless they are assigned. This allows you to include some activities that are just for practice.
When you first add content to My Course, those items are automatically hidden by default. In order for students to be able to access these items, you will need to take additional action. There are several different ways to make content available to students:
• Make Content Available Without Assigning • Assign Content without a Due Date • Assign Content with a Due Date • Assign Content with an Availability Window
For the activities you want included in student grades, it is very important that you check the student view of Course Materials to be sure they are assigned. If they are not assigned, there are several ways to assign activities. Watch the following video to learn how to assign activities with and without specific due dates to match your course syllabus.
Pearson | MyLab | IT: How to Assign Content
Make Content Available Without Assigning For items in the course you want to simply make available to students, but not assign (in other words recommended, but not required), you can use the “show/hide” feature. If you “show” activities to students, but don’t assign them, students can complete them and see their scores, without including their scores in their grades. This is a good way to set up extra practice on key skills.

Return to Table of Contents | 88
You can show or hide materials to students from Manage Course Materials or the My Course side of the Add From Library menu item. Select items by checking the box before the title of each item you want to show and then click the Show/Hide button at the top right of the list of materials.
Best Practice: Use the Show/Hide feature if you want to permit students to see materials for one week or one module at a time. You can organize your course
materials into folders and hide the subsequent folders until it is time for student access. But if you do this, make sure the materials inside the folders are shown so that when you show the folder, all the materials will be available to students.

Return to Table of Contents | 89
Assign Content without a Due Date You can assign or unassign materials to students from Manage Course Materials or the My Course side of the Add From Library menu item. Select items by checking the box before the title of each item you want to show and then click the Assign/Unassign button at the top right of the list of materials.
Assign Content with a Due Date The easiest way to add a due date to an assignment is via the Instructor Assignment Calendar. This method assigns an activity with open access, so students can access and complete the assignment whenever they want and submit for grading.
From the Instructor Assignment Calendar, navigate to the item you wish to assign. Select and drag/drop the activity to the calendar to the due date.
Best Practice: After assigning activities, check the student view of the Assignment Calendar to make sure all assignments are showing appropriately.
Assign Content with an Availability Window In addition to setting standard due dates, Pearson | MyLab | IT allows you to specify an availability range for when students can access the activity. Assigning with restricted availability is a common setting for higher stakes activities.
When an activity is set with restricted availability, students can see that the assignment is coming up on the calendar, but will be unable to access until the date/time that you have set. The availability range is flexible and can span hours the same day or span multiple days. You also have an option for an ‘end date’ as well to lock down the assignment after a certain date/time so students can no longer open and access.

Return to Table of Contents | 90
Step-by-Step Instructions:
Navigate to the activity or assessment for which you want to set an availability window.
To the right of the activity, click on the down arrow to open the options menu, then choose Set Scheduling Options.
Within the Assign area, click the radio button next to Assigned. Assign the test with a
due date (if desired) this will allow the item to appear on the calendar with an alarm clock icon
Click on Restrict Availability label, select Set Availability date range and enter a start date and end date and time for each.

Return to Table of Contents | 91
Check the following boxes:
o Always show item to student but prevent student from opening before or after the start date above.
o Show availability notification on the calendar (this will place an icon on the calendar to alert the student that the ‘activity is available’ starting on X date. (this is highly recommended if you are allowing a ‘window’ of opportunity to complete the activity over a number of days.)
Click Save
Set Scheduling Options
In addition to setting an availability window for assignments, there are various other scheduling options for each type of assignment. For example, you can make the activity available to only selected students, add location restrictions (e.g. specific computer labs), and add a proctor password.
When you add content to My Course, you will be asked if you want to set scheduling options at that time. Most instructors choose to build the course with the content first and then go back to set the due dates and other scheduling options later. In cases where you are building the Coordinator course to create member sections for Section Instructors to teach, you might choose to have each Section Instructor set the due dates and other scheduling options depending on the department policy.

Return to Table of Contents | 92
Step-by-Step Instructions: To set scheduling options for an individual activity or assessment, follow this process (this same process can be performed from either the Instructor Assignment Calendar, Add From the Library, or Manage Course Material):
Navigate to the activity or assessment for which you want to set scheduling options. You might need to open folders to find the activity.
To the right of the activity, click on the down arrow to open the options menu, then choose Set Scheduling Options.
If you wish to make this item available to only Selected Students, click on the Make Item available to… label. Check Selected Students. Under the Availability column, click the Off button on the individual students to make this content available to those individual students.

Return to Table of Contents | 93
Click on the Advanced Options label. Read through the options available and change the settings as you desire.
When you are finished making changes to the scheduling options, click Save.
If you are teaching more than one section of a course at time, you can set scheduling options for activities for all of your sections at once.
Pearson | MyLab | IT: How to Adjust Scheduling Options Across Multiple Sections
Set Activity Preferences
In addition to setting scheduling options, Pearson | MyLab | IT allows you to set various preferences for activities as well. Customizing your activity preferences allows you to dictate how you want the activity delivered and how students will interact with them. For example, you can specify the number of attempts for an activity, the number of attempts for each question, the amount of time students are permitted in order to complete an activity, add a grace period, enforce a late submission deduction, and more.
NOTE: that the available preferences options vary with the type of activity, but the process is the same.
There are two ways to set preferences in Pearson | MyLab | IT:
• Globally by assignment category • Individually by activity or assessment

Return to Table of Contents | 94
Global Activity Preferences If your course provides consistent preferences for activities in each assignment category, setting the global preferences is the fastest and easiest way to set preferences in your course. If there are some “one-off” exclusions, you can always set individual preferences for those activities at any time to override the global preference settings.
These are the assignment categories available in global activity preferences:
• Grader Project [Assessment] • Grader Project [Homework] • Dropbox [File Upload] • Objective-Based Question Only • Training [Skill-Based] • Exam [Skill-Based]
Pearson | MyLab | IT: How to Set Global Preferences
Help Documentation: Set Activity Preferences
Individual Activity Preferences If you have varying preferences for each activity in any given category, or need to override a global preference setting for an activity, you can set preferences on any individual item as well. The process of setting preferences to an individual activity can be performed from the Instructor Assignment Calendar, Add From the Library, or Manage Course Material areas of your course.
The following videos provide examples of setting individual preferences for a few Pearson | MyLab | IT activity types:
Pearson | MyLab | IT: How to Set Preferences for Simulations
Pearson | MyLab | IT: How to Set Objective Based Preferences
Pearson | MyLab | IT: How to Set Grader Preferences

Return to Table of Contents | 95
Additional Videos for Preferences:
Pearson | MyLab | IT: How to Set a Grace Period for Assignments

Return to Table of Contents | 96
MODULE 2: IMPLEMENT YOUR PEARSON | MYLAB | IT COURSE PLAN
Set Up Gradebook to Align with Syllabus
Gradebook Overview
Pearson | MyLab | IT: How to Navigate the Gradebook
Your Pearson | MyLab | IT gradebook is a powerful tool you can adapt and configure to show you important information for students. In order to get the most out of your gradebook, you need to set up columns and have it automatically calculate your data in a way that is most useful for you to measure the learning outcomes of your students.
You can access the gradebook by clicking Grades from the main menu and then Instructor Gradebook from the submenu.
NOTE: You can toggle to the student grades view at any time by clicking the Grades menu item. If you complete assignments while in Student View, those scores will be
listed in your gradebook under the _Student,_Student entry (not included in reports or class averages)
Most Pearson | MyLab | IT activities and assignments are automatically graded and entered into the gradebook. By default, the Gradebook is organized with the same folder

Return to Table of Contents | 97
structure as My Course. If your My Course is organized with folders, you will need to drill into the folders within the instructor gradebook to reveal those activity columns.
The Grade to Date column is within the gradebook and hidden from students by default. This column provides the total number of points earned vs. the total possible number of points to date (assignments that have been submitted or are past due). By default, it includes an average of all assigned activity types in your course, weighted evenly.
Depending on how you will calculate course grades, this column might not be a true representation of the students’ overall score in the course.
If you choose to use this column, you can adjust the type of calculation (sum or average) and which activity types are used to calculate the Grade to Date score via global grading preferences if desired. To make the column available for student viewing, make sure to change the column options to Show for Student. This will remove the strikethrough the column name indicating it is available in the student view.
If you use a weighted gradebook, whereas each application or activity type counts for a certain percentage of the grade, you will need to create a custom Total column to add weighting to your gradebook to match your syllabus. Custom Total columns are calculated as grades are entered. You can learn more about weighting grades with a total column later in this tutorial in the Gradebook Customizations section.

Return to Table of Contents | 98
Global Grading Preferences
You can access your global preferences by clicking the gear icon in the upper right corner of any instructor page. If the Basic Preference windows appears, close it. Choose Grading in the menu to view all of the global grading preferences.
Raw Scores vs. Percentage Scores There are a lot of options in the global preferences for grading. However, one of the most common preferences manipulated is enabling the use of raw scores vs. percentage scores.
If your course is set up on a points system or you prefer scores to show as a raw score (e.g. 40/50 vs. 80%), enable the setting and choose Use raw score grades for this course.

Return to Table of Contents | 99
Edit Calculation for Grade to Date Gradebook Column By default, it includes an average of all assigned activity types in your course. You can adjust the type of calculation (sum or average) and which activity types are used to calculate the Grade to Date if desired.
Step-by-Step Instructions:
From Preferences, select Grading. Click Edit Calculation Settings.
From the Edit Calculation Settings window, choose Average or Sum and click Select
Activity Types to deselect the activity types you do not want to be included in the Grade to Date column calculation. Then click Save.
Help Documentation: Set Grading Preferences
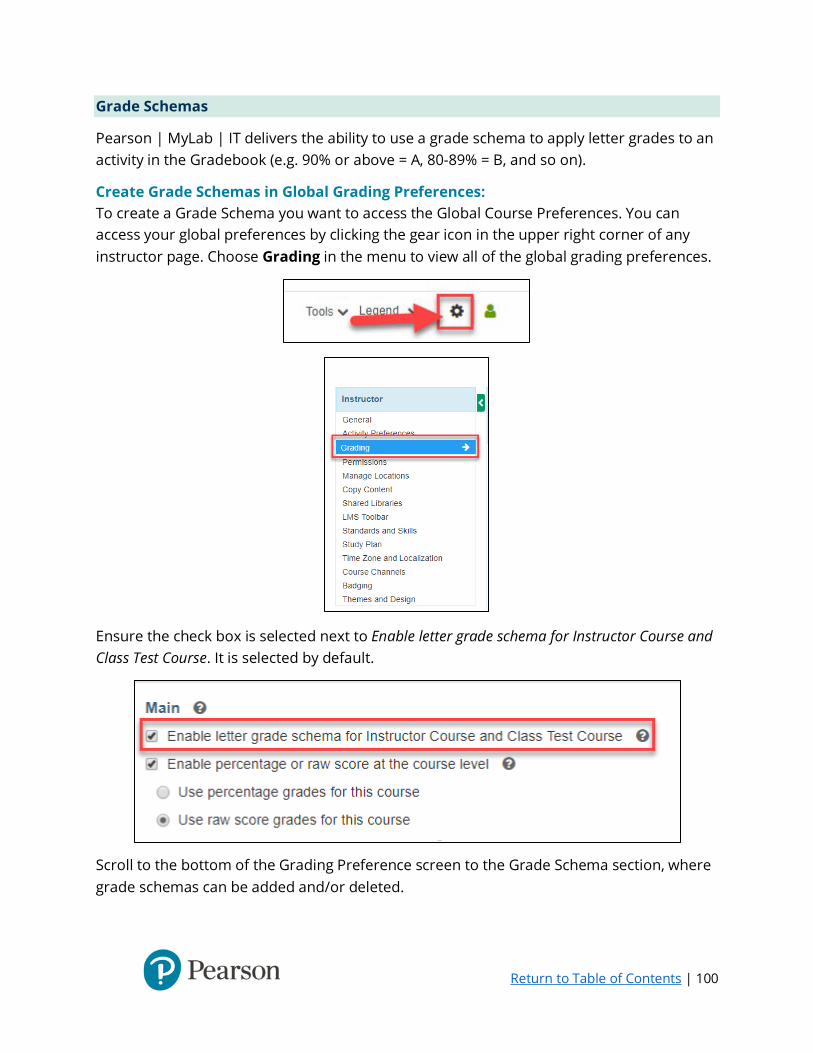
Return to Table of Contents | 100
Grade Schemas
Pearson | MyLab | IT delivers the ability to use a grade schema to apply letter grades to an activity in the Gradebook (e.g. 90% or above = A, 80-89% = B, and so on).
Create Grade Schemas in Global Grading Preferences: To create a Grade Schema you want to access the Global Course Preferences. You can access your global preferences by clicking the gear icon in the upper right corner of any instructor page. Choose Grading in the menu to view all of the global grading preferences.
Ensure the check box is selected next to Enable letter grade schema for Instructor Course and Class Test Course. It is selected by default.
Scroll to the bottom of the Grading Preference screen to the Grade Schema section, where grade schemas can be added and/or deleted.

Return to Table of Contents | 101
Step-by-Step Instructions to Add a New Grade Schema:
Click Add New Schema.
Enter an appropriate schema name and description (optional).

Return to Table of Contents | 102
Enter a Letter Grade in the Grade field, appropriate percentage from/to scores in the (%) Score From/ (%) Score to fields and supplemental notes in the Feedback field.
Click Save and Close once all appropriate information has been entered.
The new grading schema will be displayed in the Grading Schema section.

Return to Table of Contents | 103
Add Grade Schemas to Activities/Gradebook Columns You can apply your custom created grade schemas to both Pearson | MyLab | IT activities and gradebook columns in general.
Step-by-Step Instructions to Add a Grade Schema to an Activity/Gradebook Column:
From the Instructor Gradebook, locate the activity/column you want to apply a grade schema.
Click the drop-down arrow and select Apply Grade Schema.
Click the drop-down menu for the Select Grade Schema option and the available grade schema will be displayed. Select the desired schema.
Click Apply to save the selection.
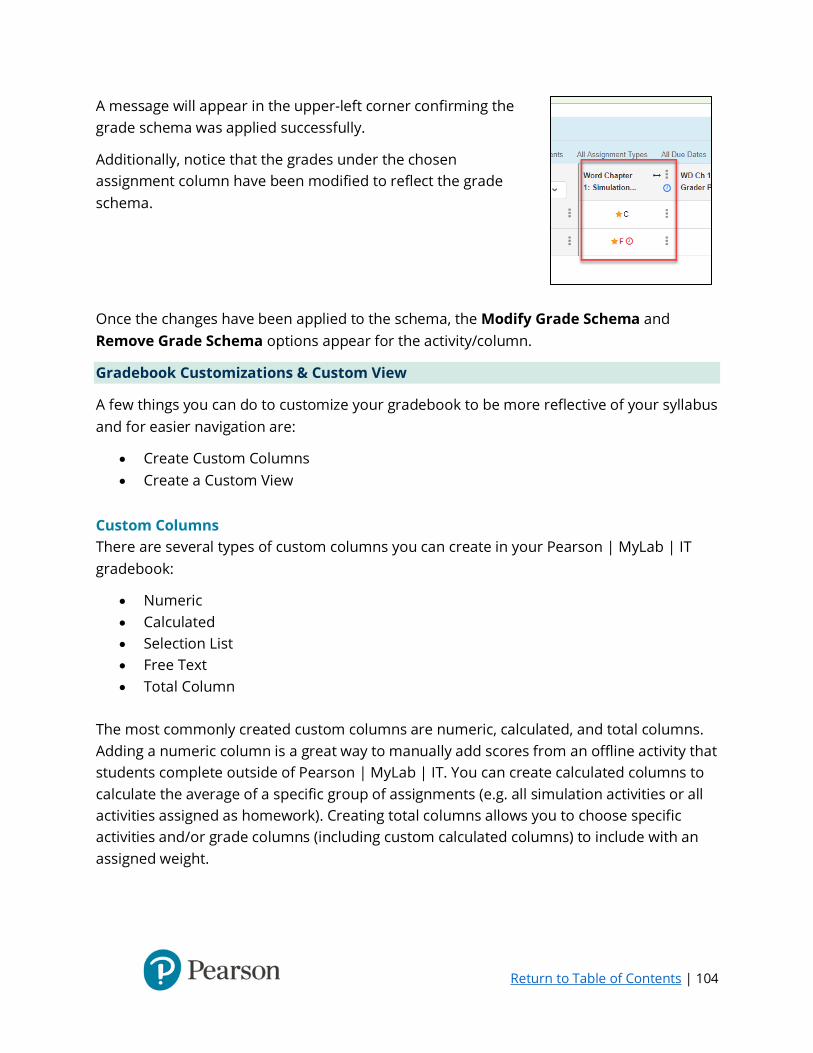
Return to Table of Contents | 104
A message will appear in the upper-left corner confirming the grade schema was applied successfully.
Additionally, notice that the grades under the chosen assignment column have been modified to reflect the grade schema.
Once the changes have been applied to the schema, the Modify Grade Schema and Remove Grade Schema options appear for the activity/column.
Gradebook Customizations & Custom View
A few things you can do to customize your gradebook to be more reflective of your syllabus and for easier navigation are:
• Create Custom Columns • Create a Custom View
Custom Columns There are several types of custom columns you can create in your Pearson | MyLab | IT gradebook:
• Numeric • Calculated • Selection List • Free Text • Total Column
The most commonly created custom columns are numeric, calculated, and total columns. Adding a numeric column is a great way to manually add scores from an offline activity that students complete outside of Pearson | MyLab | IT. You can create calculated columns to calculate the average of a specific group of assignments (e.g. all simulation activities or all activities assigned as homework). Creating total columns allows you to choose specific activities and/or grade columns (including custom calculated columns) to include with an assigned weight.

Return to Table of Contents | 105
To learn more about creating custom calculated columns to include in a custom total column to reflect the weighting in your course, watch the following video:
Pearson | MyLab | IT: How to Weight Gradebook Columns Total Grade
When you create custom calculated columns and total columns, you can choose between two types of cumulative grade columns to appear in your gradebook:
• Grade to Date (only including those assignments that have been submitted or are past due)
• Grade to Total (includes all assignments for the term regardless of due date)

Return to Table of Contents | 106
Step-by-Step Instructions to Add a Calculated Column:
From the Instructor Gradebook, click Create Column and select Calculated. Enter a Column name (e.g. Homework). Select the operation to perform: Sum, Avg, Min, and Max. Specify the Grade Weight (%), up to 100%. Select Drop Lowest Score to exclude the activity with the lowest score from the
calculation. If the student makes another submission and gets a score lower than the current excluded (lowest score), the column updates automatically to drop the latest lowest score and include the previously excluded score.
In Insert after column, enter the number of columns that should appear to the left of your new column.
Select a calculation method: a. Select Use Grade to Date method to compare the total grade achieved by a
student from the beginning of the course to the current date. b. Select Use Grade to Total method to compare the grade a student has
achieved to the total number of possible points that a student could achieve for all assignments, whether completed, unsubmitted, due, or not yet due.
From the list of course materials, select activities to include, and click the Add button. The selected activities appear in the Selected Activities section.
Click Save.

Return to Table of Contents | 107
Step-by-Step Instructions to Add a Total Column:
From the Instructor Gradebook, click Create Column and select Total Column. Enter a Column name (e.g. Course Grade). In Insert after column, enter the number of columns that should appear to the left
of your new column. Select a calculation method:
a. Select Use Grade to Date method to compare the total grade achieved by a student from the beginning of the course to the current date.
b. Select Use Grade to Total method to compare the grade a student has achieved to the total number of possible points that a student could achieve for all assignments, whether completed, unsubmitted, due, or not yet due.
From the listed materials, select the activities or calculated columns you want to include and click the Add button. The selected materials appear in the Selected Columns section.
Assign a weight for each column or activity in the Weight text box. The total weight for the selected columns is added together and displayed in the Total Weight box. The total weight should ideally be 100.
Click Save.

Return to Table of Contents | 108
Custom View
Pearson | MyLab | IT: How to Create Custom View
Create a Custom View of the Gradebook so that you and your students can quickly see scores on important assignments. You will select specific assignments that you want to see in one view. These will appear as columns with the student names down the left side in your custom view. This will allow you to quickly access results without clicking through the folders in the Gradebook which are organized by the same method as the course content in your My Course (e.g. by week, module, textbook chapter, etc.).
Step-by-Step Instructions to add columns to Custom View:
From the Instructor Gradebook, drill into folders to locate the items you want to appear in your Custom View.
Click the Options dropdown next to the activity name in the gradebook, and select Save to Custom View.
A confirmation message will appear in the upper left of your screen confirming the save was successful.
Repeat as needed on ALL items that you want to appear in your Custom View.
Click the Instructor Custom View menu item (located beneath the Instructor Gradebook) at any time to see the activities you have saved.

Return to Table of Contents | 109
Step-by-Step Instructions to remove columns to Custom View:
From the Instructor Custom View, click the Options dropdown next to the activity name in the Custom View, and select Remove from Custom View.
A confirmation message will appear in the upper left of your screen confirming the
removal was successful.
NOTE: Saving items to your Custom View does not remove them from their respective folder in the Instructor Gradebook. All items found in your Custom View will also reside
in the Instructor Gradebook.
Return to Table of Contents | 110
MODULE 3: TEACH WITH PEARSON | MYLAB | IT Student & Teaching Assistant (TA) Access
Both students and instructors will access all MyLab courses through the Pearson MyLab & Mastering website at www.pearsonmylabandmastering.com. This is a single entry for all Pearson MyLab and Mastering products. For example, if your students are using MyMathLab, they will be able to access it along with your Pearson | MyLab | IT course from this single entry point.
Student Registration and Enrollment
This information applies to Pearson | MyLab | IT courses that are not linked to a Learning Management System (LMS). If your students access your course from your school’s LMS, this information will not apply. For registration information for LMS integrated courses, please visit the LMS Integration Services page to choose your LMS and navigate to Training and Support.
For most courses, the course creation confirmation email you receive when you create a member section includes complete Student Registration Instructions (Handout) that you can send to your students. You can also find this handout in the course details for each section. The handout, if available, includes your course’s name and unique course ID.
To enroll in a Pearson | MyLab | IT course, students must have the following: • Student access code, a valid credit card, or a PayPal account. Students get an
access code with a new book purchase or by buying the code separately in a student access kit/card at the campus bookstore. Students can also buy access to a course online with a credit card or PayPal account while they are enrolling. The student access code is non-transferable and can be used only once. If a student is waiting for financial aid, they can access your course without payment. This option grants a student temporary access to your course for 14 days.
• Course ID – This ID, which identifies a specific course section, consists of your last name or part of your school name followed by five digits. You must give your students the course ID before they can enroll.
• Email address – The student’s registration and enrollment confirmation will be sent to this email address. This address is also available to you, the instructor, for course-based communications.
Pearson | MyLab | IT for Office 2016: Student Registration

Return to Table of Contents | 111
Help Documentation: How Students Enroll
Additional Videos to help your students get started:
• Pearson | MyLab | IT Student: Getting Started With Pearson | MyLab | IT
• Pearson | MyLab | IT Student: Course Materials Page Overview & Navigation
• Pearson | MyLab | IT Student: Assignment Calendar Overview
• Pearson | MyLab | IT Student: How to Use eText Student View
• Pearson | MyLab | IT for Office 2016 Student: How to Complete Simulation Activities
• Pearson | MyLab | IT for Office 2016 Student: How To Complete a Grader Activity
• Pearson | MyLab | IT Student: How to Complete an Objective-Based Assessment
• Pearson | MyLab | IT Student: Register Using 14-day Temporary Access
Temporary Access
Students who have not yet received financial aid might need to access your course before
they pay for it. Watch the video below to learn how students can temporarily access courses while waiting for financial aid.
Pearson | MyLab | IT: 14-day Temporary Access for Students
Additional Tips: • If a student creates a duplicate account, you will need to contact Support for grades
from the expired account. Once you have the scores, you can add them manually to the new student account.
• If a student upgrades from a temporary account to a full account, then all of their scores from the temporary account flow through to their full account.
• Students with temporary access can pay anytime to regain full access to the course, even after the enrollment period ends or after temporary access expires.
CHECKLIST: Help Students Have a Successful Experience with Pearson | MyLab | IT
Use this checklist to guide you through best practices to help your students get up and running, motivate students throughout the term, and achieve better results.

Return to Table of Contents | 112
CHECKLIST: Student Success
Teaching Assistant (TA) Registration and Enrollment
You can give Teaching Assistants (TAs) special privileges in your Pearson | MyLab | IT course. There are three steps to setting up a TA in your course:
Your TAs will first need to enroll in your course as a student (you can obtain a student access code from your Pearson sales representative).
Once enrolled, you upgrade the status from student to Teaching Assistant in the Pearson | MyLab | IT roster.
You choose settings to determine the actions they can perform in the course using Permissions (under Preferences).
TA HANDOUT: Teaching Assistant step-by-step instructions
Teaching Assistants will need to enroll as a student for the course(s) they are assigned before you can promote their access to TA through the Pearson | MyLab | IT course roster.
Before your TA begins registration, they will need:
• A complimentary Pearson student access code • Course ID(s) for the section(s) they are assigned as TA
Please provide this handout to all TAs for step-by-step instructions along with a student access code. Contact your Pearson Sales Representative if you need to request access codes for your TAs.
HANDOUT: Teaching Assistant Registration
Promote Teaching Assistants and Set Permissions
Once the TA has registered and enrolled in the course as a student, you need to promote the student to TA status through the Pearson | MyLab | IT roster to give TA privileges.

Return to Table of Contents | 113
Step-by-Step Instructions to promote Teaching Assistant status:
Pearson | MyLab | IT: How to Promote a User to Teaching Assistant
From the left navigation menu of your MyLab course, click Manage Course and then choose Course Roster.
Next to the Teaching Assistant’s name, click Student in the Role column.
Change the role from student to Teaching Assistant in the pop-up window and close the window.
Click Save.

Return to Table of Contents | 114
The TA role in your course has limited privileges by design. You can add additional permissions for your TAs though your course preferences. Step-by-Step Instructions to set permissions for Teaching Assistants:
From your MyLab course, click Course Materials > Manage Course Materials.
Click the Preferences icon toward the top of the window.
Click Permissions and click the appropriate check boxes to give TAs additional privileges. Click Save Preferences.

Return to Table of Contents | 115
MODULE 3: TEACH WITH PEARSON | MYLAB | IT Course/Assignment Adjustments
Set Time Zone
Background Information
Time Zone management with Pearson | MyLab |IT is very important to make sure your students have the correct times when assignments are due. Pearson | MyLab |IT is defaulted for Eastern US Time for both students and faculty. This means if you live a different time zone it is vital to set up the correct time zone for your region.
There are two tasks and decisions that need to make sure your students have the correct time based on your time zone. Both of these tasks need to be completed only once and should be done within your coordinator course before you copy out the member sections.
In order to make sure that the time assignments are due reflects the correct the time zone, it is important that you do not set up the due dates and times for your individual assignments until you have completed the follow:
1. Set the Time Zone for your own Account
2. Set the Time Zone for the Course Preference
Back to the Table of Contents
Note – If you already assigned your content with due dates and times, please read the FAQ: How do I fix the course times to reflect the correct time zone?
Note – If you teach within the Eastern Time US Zone, there is nothing you need to do because Pearson | MyLab |IT time is set to Eastern Time US by default for both students and faculty.

Return to Table of Contents | 116
Tasks for Setting up the Proper Time Zone
There are two tasks that need to be completed in order for your course to have the time zone for your region set up correctly. It is also important to answer the questions for each task.
Task 1 – Setting the Time Zone for your Account
The first step in the time zone process is to set up the correct time zone for your own account. Once you have set up the time zone for your own account, you will not have to do this task again. The time zone for your own account will be correct once you copy your courses for the next term.
Please make sure to answer the following the question before choosing the correct task below:
Does your course have a menu item called Instructor Getting Started in your course?
If you answer Yes, please go to I already have the Instructor Getting Started item
If you answer No, please go to I do not have the Instructor Getting Started item.
I already have the Instructor Getting Started item
Within the Instructor Getting Started menu item, you will set up the time zone for your own account.
Pease review the tutorials below:
Step-by-Step Tutorial: Set up the Time Zone for your Account – Instructor Getting Started Present
Video Tutorial: Set up the Time Zone for your Account – Instructor Getting Started Present

Return to Table of Contents | 117
I do not have the Instructor Getting Started item
There is a two-step process to set up your time zone for your account if you do not have the Instructor Getting Started menu item. The first step is to create a menu item and the second is to set up your time zone for your account.
Pease review the tutorials below:
Step-by-Step Tutorial: Set up the Time Zone for your Account – Instructor Getting Started Not Present
Video Tutorial: Set up the Time Zone for your Account – Instructor Getting Started Not Present
Task 2 – Set the Time Zone for the Course Preferences
The second step in the time zone process is to make sure to set the correct time zone for your course. Once you have set up the time zone for your course, you will not have to do this task again. When you copy your course for next term where you have set up this preference, it will copy to sections.
In order to set up your course preference correctly, you need to ask yourself:
1. Am I teaching a course where all my students taking the course are in the same time zone as You? (This means you are most likely teaching a face-to-face or blended course)
2. Am I teaching a course where my students may be taking the course from outside the time zone that I am teaching. (This means you are most likely teaching an online course)
Am I teaching a course where all my students taking the course are in the same time zone as you? (This means you are most likely teaching a face-to-face or blended course)
Please review the tutorials below:
Step-by-Step Tutorial: Setting the Course Preferences for Time Zones – Students taking Course in the Same Time Zone as You
Video Tutorial: Setting the Course Preferences for Time Zones – Students taking Course in the Same Time Zone as You

Return to Table of Contents | 118
Am I teaching a course where my students may be taking the course from outside the time zone that I am teaching. (This means you are most likely teaching an online course)
Please review the tutorials below:
Step-by-Step Tutorial: Setting the Course Preferences for Time Zones – Students taking Course in different Time Zones
Video Tutorial: Setting the Course Preferences for Time Zones – Students taking Course in different Time Zones
FAQs
How do I fix the course times to reflect the correct time zone if I already scheduled my assignments?
If you have already scheduled all your assignments in your course without setting up the time zone for your own account or modified the course preferences, the times on the assignment that students will see may wrong. To fix this issue complete the following tasks:
1. Set the Time Zone for your own account 2. Set up the Time Zone for the Course Preferences – If you teach multiple
sections, you will need to set up the course preferences for each individual member section.
3. Update the times for all assignments within the course
Where is the best place to set up my own time zone and the course preferences?
It is a best practice to set these up within a coordinator course before you copy out your member sections. Remember that setting your own time zone has to be done only once and it is linked to your account not an individual course. The member sections when copied will have course preference set up correctly because you completed this task within the coordinator course.
After I have set my own time and set up the course preferences, do I have to complete these tasks every term.
In terms of setting up your own time zone, this task has to be done once and you never have to worry about changing your time zone because it is linked to your account. If the course preferences are set up within your coordinator course and you copy your member sections from it, the course preferences will copy to all member sections.

Return to Table of Contents | 119
Should my students set up the time zone for their own account?
By default, the student’s time zone is Eastern Time US. A best practice to encourage your students to change the time zone for their own account. Please send your students the link below for them to view the tutorial about how to set their own time zone:
https://youtu.be/nU1Ysg3Yhmk
Manage Roster
The Course Roster allows to see which students are enrolled in your course, deny access to students that have dropped the course, and promote students to a Teaching Assistant role.
You can access your course from the Manage Course menu item from within your course, or by clicking Details on the course tile on your account courses page.
Pearson | MyLab | IT: How to Manage the Course Roster
Adjust Due Dates & Scheduling Options
In addition to setting standard due dates, Pearson | MyLab | IT allows you to set various scheduling options for each type of assignment. For example, you can specify an availability range for when students can access the activity, make the activity available to only selected students, add location restrictions (i.e. specific computer labs), and add a proctor password. The course(s) you have been assigned to teach might already have set scheduling options.
Make sure to review the scheduling options of your course content to ensure they are in line with how you plan to teach your course. If you need to change or update scheduling options, use the following instructions.
Step-by-Step Instructions: To set scheduling options for an individual activity or assessment, follow this process (this same process can be performed from either the Instructor Assignment Calendar, Add From the Library, or Manage Course Material):
Navigate to the activity or assessment for which you want to set scheduling options. You might need to open folders to find the activity.

Return to Table of Contents | 120
To the right of the activity, click the down arrow to open the options menu, then choose Set Scheduling Options.

Return to Table of Contents | 121
Read through the options available and change the settings as you desire. Click Advanced Options for more scheduling options.
When you are finished making changes to the scheduling options, click Save.
If you are teaching more than one section of a course at time, you can set scheduling options for activities for all of your sections at once.
Pearson | MyLab | IT: How to Adjust Scheduling Options Across Multiple Sections

Return to Table of Contents | 122
Adjust Activities / Assessments for Special Circumstances
It may be necessary to extend a due date or give an extended amount of time for a particular student or group of students. You can easily set personalized scheduling options for assignments without affecting other students in the course.
Pearson | MyLab | IT: Personalized Scheduling -Adjust Time Based Assignment
Pearson | MyLab | IT: Personalized Scheduling -Extend Due Dates for
Assignments
Use LockDown Browser
The Browser Lock feature in simulation activity preferences enables you to create a high-stakes testing environment for students completing simulation activities. LockDown Browser prevents students from navigating away from the browser during the assessment by pressing Alt+Tab and viewing other browser windows or applications. If you secure your Pearson | MyLab | IT simulation activities with LockDown Browser, students cannot launch the activity without installing the Lockdown Browser plugin. When students attempt to open the activity, Pearson | MyLab | IT will detect if they already have the appropriate software to launch the simulation, if not, they will be prompted to download the software. Students can also download the application directly from the Browser Lock section of the Pearson | MyLab | IT website.

Return to Table of Contents | 123
Step-by-Step Instructions:
To add the LockDown Browser to a Simulation activity: From the Add from Library OR Course Manage Course Materials view, click the
options drop down menu from the desired activity and choose Edit. Click the Preferences tab Click checkbox for Enable LockDown Browser and Save.
Return to Table of Contents | 124
MODULE 3: TEACH WITH PEARSON | MYLAB | IT View & Manage Student Submissions
Simulation Activities Submissions
In addition to viewing student scores, you can view student submissions directly from the Gradebook. Submissions for different types of activities and assessments provide different types of performance data.
For example, simulation submissions provide information about the various methods that are appropriate to accomplish each task. They also record each specific action students take in completing a task. Next to each action students take, there is a notation in parentheses that indicates whether the action was correct or incorrect for accomplishing the task.
When selecting to View All Submissions, you can expand all submissions for all students with one click, eliminating the need to expand each student individually.
Pearson | MyLab | IT: How to View Student Submissions
Grader Activities Submissions
Pearson | MyLab | IT provides sophisticated reports when students complete grader projects. These reports go far beyond a simple score to allow you and your students to see exactly where they made mistakes.
Note: You can choose to hide Grader Reports from students if desired during set up. If you choose to hide reports, all reports will be hidden.
Pearson | MyLab | IT for Office 2016: How to View a Grader Submission
Note: The Grader solution files are located in within each chapter folder under Instructor Resources > Grader Project Files.

Return to Table of Contents | 125
Potential Integrity Violations
To detect students who are trying to pass off another student’s file as their own or copy and paste another student’s work, Pearson | MyLab | IT will flag potential Integrity Violations for you.
Pearson | MyLab | IT Grader works by breaking down the XML behind a document and inserting security tags into the code. When a completed document is uploaded, those tags, which include the ID# of the user who completed the project, are compared with ID# of the user logged into the system. This comparison is done on TWO levels: a) DOCUMENT-LEVEL, for the student who "borrowed" a whole document; and b) CONTENT-LEVEL, for the student who "borrowed' content by copying and pasting material into his/her own start document.
Pearson | MyLab | IT: How to View Integrity Violations Pearson | MyLab | IT: Integrity Violation Report
A Potential Integrity Violation icon will be added next to student grades in the Instructor Gradebook so you can see these at a glance without having to click View All Submissions.
Note: Students will see that they have been flagged for a potential integrity violation when they view their submissions report IF you click “notify student” on the individual
Violation detail or have the course set to automatically notify students of integrity violations by default. Only the submitting student is notified, not the student with files shared/borrowed.
Integrity Violation FAQs: Q: A Student Submission is flagged with an Integrity Violation, but the detail does not contain a name or ID number. Why?
A: It is likely the offending student is not part of your institution. To obtain the student information, please contact Pearson Technical Support to request the information behind the offending violation.
Q: A Student Submission is flagged with an Integrity Violation, but the detail shows the same student name as the violator. Why?
A: It is likely the student for a second attempt downloaded the files again and started over rather than correcting and uploading the original file from the previous attempt OR the student used a project that they submitted in a previous course using the Legacy version of Pearson | MyLab | IT.
Q: A Student Submission is flagged with an Integrity Violation, but the detail doesn’t provide any information at all. Why?
A: It is likely the student did not save the starting files to their computer or flash drive before starting the project OR the student used a project that was submitted

Return to Table of Contents | 126
by another student in a previous course using the Legacy version of Pearson | MyLab | IT. In the latter case, the system will not be able to identify the other student, but does detect a potential issue.
Use Integrity Violation Report to prevent plagiarism in your course You can use Pearson | MyLab | IT reports to show students that their work is monitored and they must submit their original work. NOTE – This report can only be run within the Coordinator Course. Admin Tools/Reporting Tools>Integrity Violation Report>Integrity Violation Step-by-Step Instructions:
Click Admin Tools and choose Reporting Tools.
In the Integrity Violation Report section choose Integrity Violation. Click Select Options and choose the sections to include in the report. Once all
sections have been added, click Add and Close. Click Run Report.

Return to Table of Contents | 127
**Example Report**
Manage Student Submissions
As the instructor, you will view and manage all student submissions from the Instructor Gradebook. Pearson | MyLab | IT allows you to view student submissions and edit scores for activities. When you edit scores, it is a good idea to add a note to let students know why their scores were edited. You can also set a grace period for assignments or accept late submissions from students.
Watch the videos below to learn how to manage student submissions.
Pearson | MyLab | IT: How to Delete a Submission Pearson | MyLab | IT: How to Accept a Late Submission

Return to Table of Contents | 128
MODULE 3: TEACH WITH PEARSON | MYLAB | IT Manage Student Results
FAQs: Frequently Asked Gradebook Questions
How is the course content in my gradebook organized? Your gradebook structure mirrors the folder structure used in My Course. So it is likely you will have to drill into folders to locate the grade columns for activities. The custom view is a great way to add columns into one view to avoid drilling into multiple folders to find specific activities.
How do my students’ names appear in my Pearson | MyLab | IT gradebook? You do not enter any student names in your gradebook. The student’s name will automatically appear when the student uses your Course ID to enroll in your course.
Who is _Student,_Student that appears in my gradebook? _Student,_Student is not an actual student in your course. This entry displays scores for any activity you, as the instructor, complete in the student view of the course. These scores are not calculated in any class averages or reports.
How quickly are my student’s scores recorded in the gradebook? As soon as your students complete an activity, the grade is immediately recorded in the gradebook and viewable by you and the student.
Best Practice: Remember that students often need more feedback than just numerical scores. As you teach Pearson | MyLab | IT courses, think about ways that you can provide students with qualitative feedback and encouragement.

Return to Table of Contents | 129
Use Gradebook Filters
When viewing student submissions in the Gradebook, you might want to look only at completed items, assigned items, or at all submissions for a specific type of assignment.
To do this quickly, you can use the Gradebook filters.
Step-by-Step Instructions:
From the Instructor Gradebook, click View Filters to expand the filters options.
To view only Assigned Items, Completed Items, or Assigned AND Completed items, expand Assignment Status and choose the appropriate filter from the drop down menu.

Return to Table of Contents | 130
To view only a specific type of assignment (e.g. Grader Projects [Homework]), click the drop down box next to Filter by Assignment Types and select the type of assignments you want to view.
Edit Student Scores
You can edit student scores via the Instructor Gradebook.
Step-by-Step Instructions:
Click Grades and choose Instructor Gradebook. Navigate the assignment and locate the grade
that needs adjusted. Click the options drop down and choose Edit
Grade. Enter the new grade value and add comments if desired. Click Save.
Best Practice: If you make changes in the Instructor Gradebook, check the Grades area to make sure that your changes are appearing correctly for students.

Return to Table of Contents | 131
Export Grades
You can export grades from Pearson | MyLab | IT in several different formats, including: • CSV file • Tab delineated file • PDF file • Blackboard-MyLab/Mastering • Canvas • Desire2Learn • Moodle
Pearson | MyLab | IT: How to Export Grades from your Pearson | MyLab | IT Gradebook
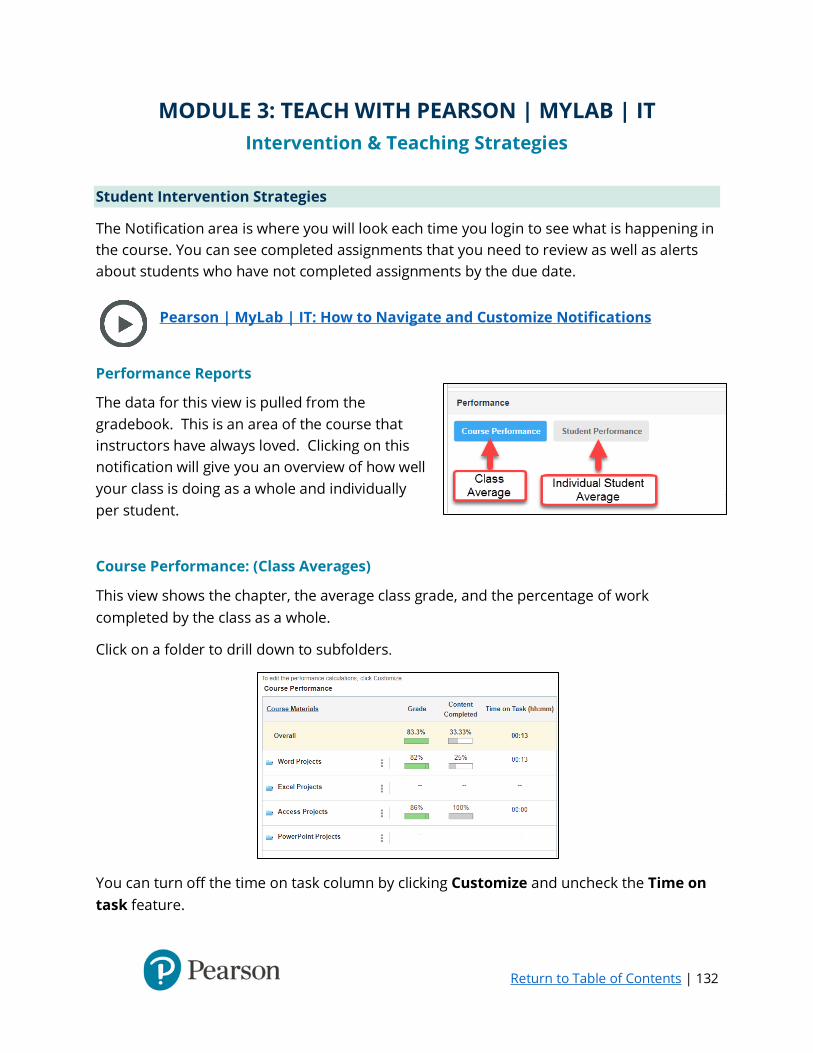
Return to Table of Contents | 132
MODULE 3: TEACH WITH PEARSON | MYLAB | IT Intervention & Teaching Strategies
Student Intervention Strategies
The Notification area is where you will look each time you login to see what is happening in the course. You can see completed assignments that you need to review as well as alerts about students who have not completed assignments by the due date.
Pearson | MyLab | IT: How to Navigate and Customize Notifications
Performance Reports
The data for this view is pulled from the gradebook. This is an area of the course that instructors have always loved. Clicking on this notification will give you an overview of how well your class is doing as a whole and individually per student.
Course Performance: (Class Averages)
This view shows the chapter, the average class grade, and the percentage of work completed by the class as a whole.
Click on a folder to drill down to subfolders.
You can turn off the time on task column by clicking Customize and uncheck the Time on task feature.

Return to Table of Contents | 133
If you want know what is being calculated, click What’s being calculated? under the Customize button on the taskbar.
Note: The performance view is updated every 2 hours. A notification of the last update time is listed under What’s being calculated?
Student Performance The data for this view is pulled from the gradebook. Clicking on this notification will give you an overview of how well an individual student is doing on assigned activities. You can get an overview of how the student is doing overall (all assigned chapters) and also drill down and get individual student grades on specific chapter averages and activities.
To view an individual student’s performance at the course level, click Performance: Student. Click on a folder to drill down to subfolders to see individual grades for each student on activities.
You can turn off the time on task column by clicking Customize and uncheck the Time on task feature.
Note: The performance view is updated every 2 hours. A notification of the last update time is listed under What’s being calculated?

Return to Table of Contents | 134
Lecture Planning
Plan More Effectively by Analyzing Student Performance and Assignments. Here are some examples that you can use to prepare and plan lectures in current term and course set up for concurrent terms:
Planning for lecture when assignments are due BEFORE class
Identify areas or specific questions/exercises that students struggled and allocate additional class time covering problem areas.
Admin Tools/Reporting Tools>Activity Reports>Training Frequency Analysis
Step-by-Step Instructions:
Click Admin Tools and choose Reporting Tools. In the Frequency Analysis Reports section choose Training Frequency Analysis.
Choose Select Sections, find the sections to include in the report and click Add and
Close when complete. Choose Select Trainings from the drop down menu and select the assigned
trainings. Click Add when complete. Click Run Report after all information is selected.

Return to Table of Contents | 135
**Example Report**
Motivation Techniques
Motivate your students with compelling statistics from previous courses by combining and formatting data from Usage Reports. You can create a compelling story to share with students based on actual course data to motivate and show the value of the technology and gain buy in. Here are some examples that you can use at the beginning of the term:
• Motivate students to enroll early and spend time in the class • Motivate students to complete capstone Grader projects • Motivate students to focus in the training and chapter assessments to improve
Capstone Grader Project grade
Motivate students to enroll early and spend time in the class
If available, provide students with real data from the previous term students that enroll early and spend time in class and the correlation to total course scores.
Admin Tools/Reporting Tools>Usage Reports>Student Enrollment
Step-by-Step Instructions:
Click Admin Tools and choose Reporting Tools.

Return to Table of Contents | 136
In the Usage Reports section choose Student Enrollment.
In Select Sections add the Course ID for each section you want information for. Click Student Options to select the students for the report. You may select specific
students or the entire class. In the Date Options area you can specify a date range for your report. The Paging
Options area allows you to change how many results are on a page. The default is 50 results per page.
Click Run Report. Download the report and open in Excel
**Example Report**

Return to Table of Contents | 137
Motivate students to complete capstone Grader projects Show how being successful at the capstone Grader projects correlates to the final grade for the class.
Admin Tools/Reporting Tools>Activity Reports>Activity Results (Multiple Students and Activities)
Step-by-Step Instructions:
Click Admin Tools and choose Reporting Tools. In the Activity Reports section choose Activity Results (Multiple Students and
Activities).
Specify the report options in the Options for Activity Results (Multiple students and
activities) dialog box. Click Select Options and choose the sections. Once all sections have been selected,
click Save and Close. Click Activity Options and select capstone Grader projects, click Save once the
activities are selected. Click Student Options to select the students for the report. You may select specific
students or the entire class. In the Date Options area you can specify a date range for your report. The Paging
Options area allows you to change how many results are on a page. The default is 50 results per page.
Click Run Report. Download the report and open in Excel. Import Final Grade for each student.

Return to Table of Contents | 138
**Example Report**
Motivate students to focus in the training and chapter assessments to improve Capstone Grader Project grade
Provide students a graph containing real data from results from previous semesters depicting grades in the training and chapter assessments and the correlation to the Capstone Grade Project score. Note: you will need to run one report and organize the data in Excel for this comparison.
Admin Tools/Reporting Tools>Activity Reports>Activity Results (Multiple Students and Activities)
Compare grades in the training and chapter assessment activities with grade on capstone activity
Step-by-Step Instructions:
Click Admin Tools and choose Reporting Tools. In the Activity Reports section choose Activity Results (Multiple Students and
Activities).

Return to Table of Contents | 139
Specify the report options in the Options for Activity Results (Multiple students and activities) dialog box.
Click Select Options and choose the sections. Once all sections have been selected, click Save and Close.
Click Activity Options and select training and assessment activities along with the capstone project to compare, click Save once the activities are selected.
Click Student Options to select the students for the report. You may select specific students or the entire class.
In the Date Options area you can specify a date range for your report. The Paging Options area allows you to change how many results are on a page. The default is 50 results per page.
Click Run Report.
Download the report and open in Excel. Organize the training and chapter assessments with each student in Excel. Once the grades are organized you can produce a graph.
Example graph:

Return to Table of Contents | 140
MODULE 4: EVALUATE SUCCESS & PREP FOR NEXT TERM Analyze Student Results
Reports Overview
Pearson | MyLab | IT offers a lot of reporting features and provides course and student data at your fingertips. There are many reports available to create in your Pearson | MyLab | IT course that can be useful throughout the term. Click here to learn more about the available reports.
Pearson | MyLab | IT: How to Create and Run a Report
Understanding the different reports and being able to create them is important, but what can you do with your MyLab data? Some best practices for reporting include:
• Measure Student Success • Plan (Lectures in Current Term and Course Set Up for Concurrent Terms) • Motivate Students at the Term Start with Statistics from Previous Courses • Motivate Students at Midterm with Current Course Data • Collect Support for Accreditation or Performance Reviews (Tenure/Annual/etc.)
Use Reports to Measure Student Performance
Are your students spending enough time and effort on homework assignments?
Admin Tools/Reporting Tools>Activity Reports>Activity Results (Multiple Students and Activities)
Compare Time in the training activity with grade on assessment activity Step-by-Step Instructions:
Click Admin Tools and choose Reporting Tools. In the Activity Reports section choose Activity Results (Multiple Students and
Activities).

Return to Table of Contents | 141
Specify the report options in the Options for Activity Results (Multiple students and activities) dialog box.
First select the sections to include in the report. Click Select Options and choose the sections. Once all sections have been selected, click Save and Close.
Click Activity Options and select a training and assessment activity to compare, click Save once the activities are selected.
Click Student Options to select the students for the report. You may select specific students or the entire class.
In the Date Options area you can specify a date range for your report. The Paging Options area allows you to change how many results are on a page. The default is 50 results per page.
Click Run Report. Download the report and open in Excel. Move the student data from one activity
next to the other activity and compare the results.
**Example Report (with student indicators removed)**

Return to Table of Contents | 142
Tips for Analysis: Filter overall scores from high to low to see if the higher scoring students show a trend of spending more time in homework assignments than students with lower overall scores or if higher scoring students show a trend of scoring higher in homework assignments as well.
Additional Food for Thought: If the results are not what you expect, you might consider changing your approach for assigned homework for next term. Review this case study from Georgia Perimeter College where the educator allows students to reattempt homework assignments until achieving 100% and found that students scoring 100% on homework had test scores that are 12–14 points higher and final exam scores that are 17–18 points higher than students who achieve less than 100 percent on their homework.
Use Reports to Measure Program Success
You can identify trends in student success by faculty and delivery method using the Course Section Usage report. This report produces a snapshot of student activity in several sections. Here are some examples of what you can do with this information:
• Compare student activity by selecting different delivery methods (traditional, online, or hybrid)
• Identify weaknesses and see if modification to the class is required • Compare instructors to identify anomalies between faculty members and reach out
to faculty with low student activity to offer advice and assistance to increase student engagement
Note: You may need to run two reports for this comparison or one report and sort the data in Excel.
Admin Tools/Reporting Tools>Usage Reports>Course Section Usage Step-by-Step Instructions:
Click Admin Tools and choose Reporting Tools. In the Usage Reports section choose Course Section Usage.

Return to Table of Contents | 143
Specify the report options in the Options for Course Section Usage dialog box. Click Select Options and choose the sections. Once all sections have been selected,
click Add and Close. In the Date Options area you can specify a date range for your report. The Paging
Options area allows you to change how many results are on a page. The default is 50 results per page.
Click Run Report.
**Example Report**

Return to Table of Contents | 144
MODULE 4: EVALUATE SUCCESS & PREP FOR NEXT TERM Plan & Prepare for Next Term
Use Reports for Planning Course Adjustments for Next Term
When you start planning your course and assignment adjustments for next term, one best practice is to identify assignments or specific problems/exercises that are not consistent with other assignments in your course in terms of score median and make adjustments for the next term course(s). Download the Customer Efficacy Report and use functions in Excel to identify areas where adjustments are needed.
Admin Tools/Reporting Tools>Usage Reports>Customer Efficacy Report Step-by-Step Instructions:
Click Admin Tools and choose Reporting Tools. In the Usage Reports section choose Customer Efficacy Report.
In Select Sections add the Course ID for each section you want information for. Click Download Report to access grades for assignments and students.

Return to Table of Contents | 145
Use Excel functions like Average to identify weak assignments.
**Example Report**
For assignments identified inconsistent with other assignments, drill into question details to identify trouble areas needing adjustment for next term. Admin Tools/Reporting Tools>Activity Reports>Exam Frequency Analysis Step-by-Step Instructions:
Click Admin Tools and choose Reporting Tools. In the Frequency Analysis Reports section choose Exam Frequency Analysis.
Choose Select Sections, find the sections to include in the report and click Add and
Close when complete. Choose Select Exams from the drop down menu and select the assigned exams.
Click Add when complete. Click Run Report after all information is selected.

Return to Table of Contents | 146
**Example Report**
Create Coordinator Course for Next Term
From term to term, you will likely want to use a fresh copy of a coordinator course to create new sections being taught. This will help keep your account organized and easier to navigate. You can either create a new Coordinator course from the catalog or copy an existing course. Whether you make a copy of a course section or the actual coordinator course, a new coordinator course will be generated. Regardless of which option you choose, you will also need to create all new sections from the new coordinator course when your template is ready to be copied.
Best Practice: We recommend creating a NEW coordinator course from the catalog each term to ensure you have the most current and accurate content,
features, and functionality. You can use Content Sharing to recreate your existing course in the new shell to avoid rebuilding the course each term.
Step-by-Step Instructions to Copy a Course as a New Coordinator Course:
Pearson | MyLab | IT: How to Copy a Course from a Previous Term

Return to Table of Contents | 147
Login to your Pearson MyLab & Mastering account and click the Create/Copy Course tile on your courses page or the Create/Copy Course button in the upper right of your screen.
Under Copy existing course, click See My List to choose a course from your list and click Select.
Choose Course Type: Coordinator Course and enter the required course details and click Create Course.
You can either Create Another Course or Return to My Courses.

Return to Table of Contents | 148
Your new Coordinator Course will appear in a grayed out tile on your courses page until course creation is complete. When the course is available for use, you will receive an email, the tile will activate with color, and become clickable.
IMPORTANT: Build and customize your Coordinator course BEFORE any sections are created. Although there are some shared content and settings
features for Pearson | MyLab | IT course groups, it is a best practice to complete set up and customizations before member sections are created.

Return to Table of Contents | 149
MODULE 5: OTHER RESOURCES
This module provides you access to other resources to help you use Pearson | MyLab | IT for the highest student success.
• Pearson | MyLab | IT Best Practices:
This document shows you some of the best practices when using Pearson | MyLab | IT. It includes video tutorials to some of the best practices
• 10 Features or Settings You May Not Know in MyITLab:
There are number of features or settings within MyITLab that can help you manage your course in a more efficient manner. Some of the features or settings can also help your students be more successful using your MyITLab course. The list below will provide you a brief background on this setting and provide links to a step-by-step tutorials and video tutorials.
• Showcase Courses:
There are five different implementation models for MyITLab. Each model is based on the instructors’ or colleges’ objectives for the course and the type of assessments that fit those objectives. Please review the Explore Implementation Models document to learn more. Each showcase course are not pre-built ones. They provide a starting point to build out the rest of your course with best practices in mind. Below are the course IDs for each type of implementation for the Go! and Exploring Series. Please use the Course IDs to copy the courses to your own account.
Go! Series:
Go! Showcase Course: Graders for HW and Sims for Assessment - shapiro09383 Go! Showcase Course: Sims/Graders HW or Grader/Sims Assessment - shapiro44982 Go! Showcase Course: Sims for HW and Graders for Assessment - shapiro46864 Go! Showcase Course: Simulations Only for HW and Assessment - shapiro01515 Go! Showcase Course: Using Grader Projects Only - shapiro12235
Exploring Series:
Exploring Showcase Course: Both Sims/Graders: HW /Assessment - shapiro24925 Exploring Showcase Course: Graders for HW and Sims for Assessment - shapiro29682 Exploring Showcase Course: Sims for HW and Graders for Assessment - shapiro97804 Exploring Showcase Course: Simulations Only for HW and Assessment - shapiro82959 Exploring Showcase Course: Using Grader Projects Only - shapiro67698