Embed Size (px)
Citation preview
Copyright © 2009 NEXCOM International Co., Ltd. All Rights Reserved. 1 PDS Presentation Designer Quick Installation Guide Ver 2.00
PDS Presentation Designer Quick Installation Guide
IntroductIon
Overview
PDS Presentation Designer is a handy tool that gives you the freedom and flexibility to design your presentation with a wide variety of media and messages. You can add, modify, and control different types of rich media, from simple text messages to dynamic animations, pictures, video files, or flash movies. Content is then combined into a presentation and then played on your PDS Media Player.
Objective and Scope
The main focus of this document is to introduce PDS Presentation Designer installation procedures. From these guidelines you will learn how to create signage presentations using PDS Designer. However, this document does not go into precise details relating to the functionality of the PDS Designer; for this information users should refer to the user manual.
InstallatIon
System Requirement
You can install PDS Presentation Designer software on any PC. The system requirements for installing PDS Presentation Designer are as following:
1. Hardware Requirements
CPU: Pentium• ® Processor 1 GHz or higher
RAM: 512MB minimum, 1GB or more recommended•Graphic system: 16-bit color video graphics array (VGA) recommended•Hard disk space: 15MB. Note: storage space for video files varies depending on •the number, lengths, and type of videos.
NIC: A single Fast Ethernet or GigE card•
2. Software Requirements
Windows XP SP3•Windows 7 X86•WMP 11•Adobe Flash Player 11•
Installation Procedure
1. Insert the PDS Presentation Designer disc into an optical drive.
2. In the root directory of the disc, double-click PowerDigisDesign Setup.exe
3. Click Install to install the component.

Copyright © 2009 NEXCOM International Co., Ltd. All Rights Reserved. 2 PDS Presentation Designer Quick Installation Guide Ver 2.00
PDS Presentation Designer Quick Installation Guide
4. Click Next to begin installation.
5. Read the License Agreement then click Yes.
6. Click Next to install to the destination folder or click Browse to select another folder.
Copyright © 2009 NEXCOM International Co., Ltd. All Rights Reserved. 3 PDS Presentation Designer Quick Installation Guide Ver 2.00
PDS Presentation Designer Quick Installation Guide
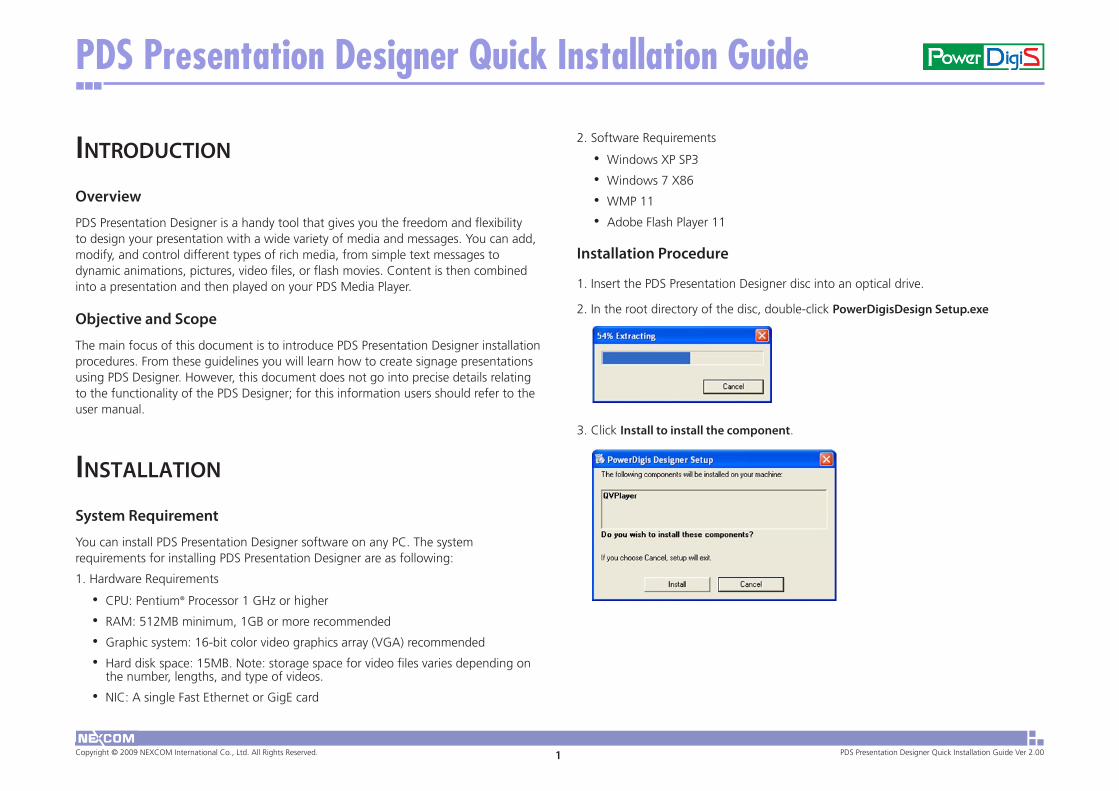
7. Select a language then click Next.
8. The PowerDigiS Presentation Designer is currently being installed.
9. Click Finish.
10. In the welcome dialog box, click Next.
11. Click Install to begin installation.

Copyright © 2009 NEXCOM International Co., Ltd. All Rights Reserved. 4 PDS Presentation Designer Quick Installation Guide Ver 2.00
PDS Presentation Designer Quick Installation Guide
12. The installation of PDS Designer starts
13. Enter the license key which you can find from CD sticker
14. In the Designer Language dialog box, you can select the preferred language for
the PowerDigiS Presentation Designer program. Click the drop-down menu, select the language, and then click OK.
15. The language has been successfully selected and will take effect after restarting the system. Click OK.
16. The installation program is now checking if your system already has the MSXML package installed.
Copyright © 2009 NEXCOM International Co., Ltd. All Rights Reserved. 5 PDS Presentation Designer Quick Installation Guide Ver 2.00
PDS Presentation Designer Quick Installation Guide
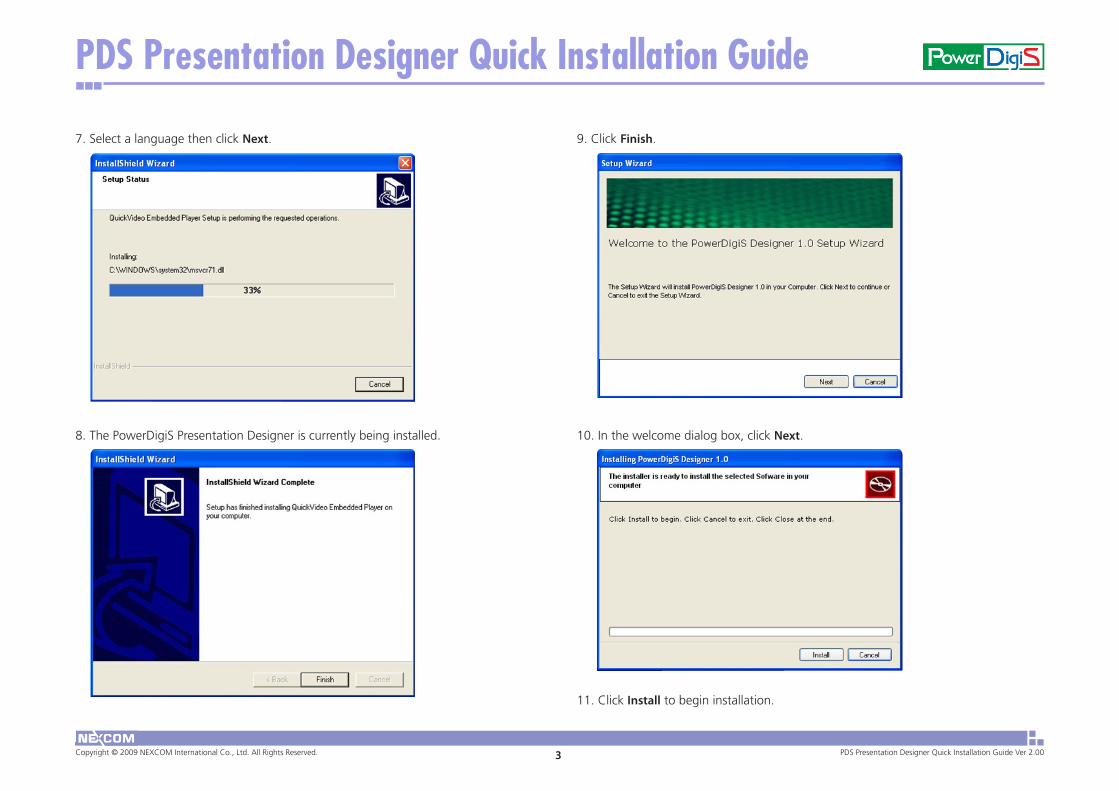
17. If your computer already has the MSXML package installed, you would see a mes-sage like the diagram below. Please chick OK to continue.
18. Then click Finish to proceed.
19 You must restart your system to complete the installation. Click Yes to restart the system.
20. If you choose to restart your computer later, click Close to exit the installer program.
Copyright © 2009 NEXCOM International Co., Ltd. All Rights Reserved. 6 PDS Presentation Designer Quick Installation Guide Ver 2.00
PDS Presentation Designer Quick Installation Guide
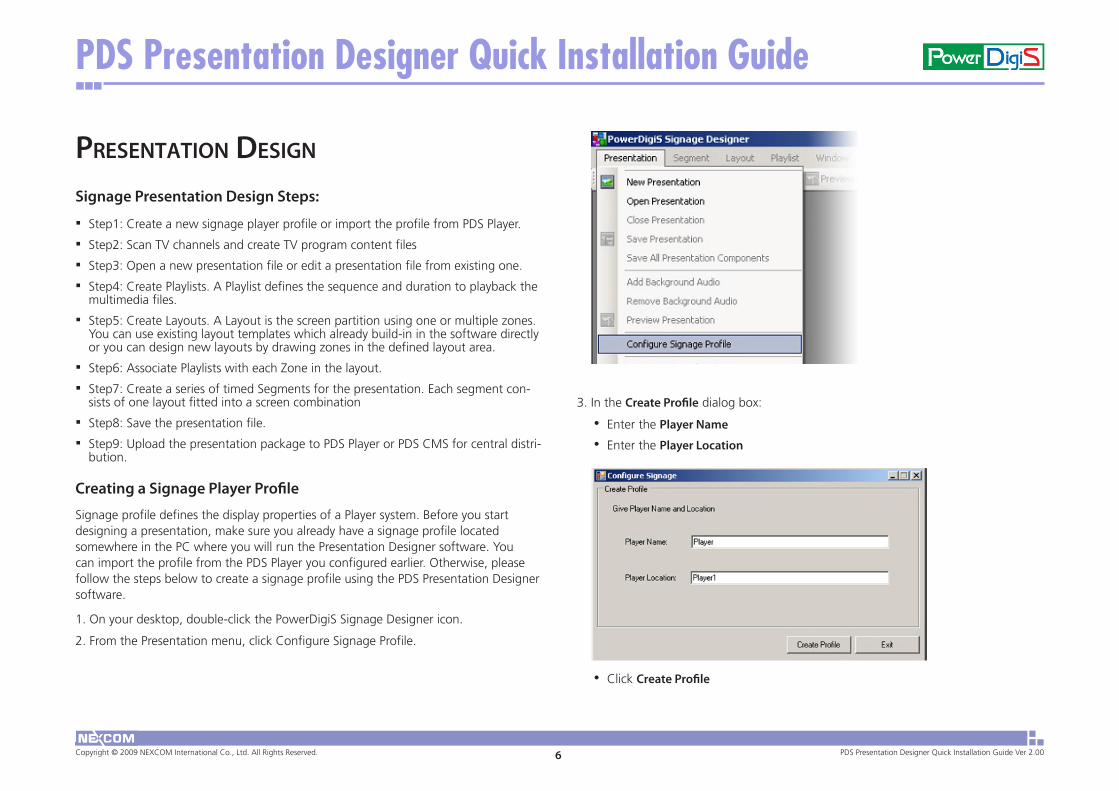
3. In the Create Profile dialog box:
Enter the • Player Name
Enter the • Player Location
Click • Create Profile
PresentatIon desIgn
Signage Presentation Design Steps:
Step1: Create a new signage player profile or import the profile from PDS Player. ▪Step2: Scan TV channels and create TV program content files ▪Step3: Open a new presentation file or edit a presentation file from existing one. ▪Step4: Create Playlists. A Playlist defines the sequence and duration to playback the ▪multimedia files.
Step5: Create Layouts. A Layout is the screen partition using one or multiple zones. ▪You can use existing layout templates which already build-in in the software directly or you can design new layouts by drawing zones in the defined layout area.
Step6: Associate Playlists with each Zone in the layout. ▪Step7: Create a series of timed Segments for the presentation. Each segment con- ▪sists of one layout fitted into a screen combination
Step8: Save the presentation file. ▪Step9: Upload the presentation package to PDS Player or PDS CMS for central distri- ▪bution.
Creating a Signage Player Profile
Signage profile defines the display properties of a Player system. Before you start designing a presentation, make sure you already have a signage profile located somewhere in the PC where you will run the Presentation Designer software. You can import the profile from the PDS Player you configured earlier. Otherwise, please follow the steps below to create a signage profile using the PDS Presentation Designer software.
1. On your desktop, double-click the PowerDigiS Signage Designer icon.
2. From the Presentation menu, click Configure Signage Profile.

Copyright © 2009 NEXCOM International Co., Ltd. All Rights Reserved. 7 PDS Presentation Designer Quick Installation Guide Ver 2.00
PDS Presentation Designer Quick Installation Guide
4. In the Confi gure Monitors dialog box:
Select the number of monitors in the • Number of Monitors field
Select the layout of the monitors.•Click • Next.
5. In the Monitor Display Mode dialog box
Select the monitor’s resolution in the • Resolution field.
Select the preferred display orientation in the • Orientation field.
You can also manually enter a resolution. Click • Give Resolution Manually thenenter the resolution.
Click • Next.
6. In the Create Signage Profi le dialog box:
Name the signage profile in the Profile Name field.•Click • Browse to select the location where you want to save the signage profile.
Click • Save Profi le.
7. The dialog box below shows the location of the newly created signage profile. Click OK.
Copyright © 2009 NEXCOM International Co., Ltd. All Rights Reserved. 8 PDS Presentation Designer Quick Installation Guide Ver 2.00
PDS Presentation Designer Quick Installation Guide
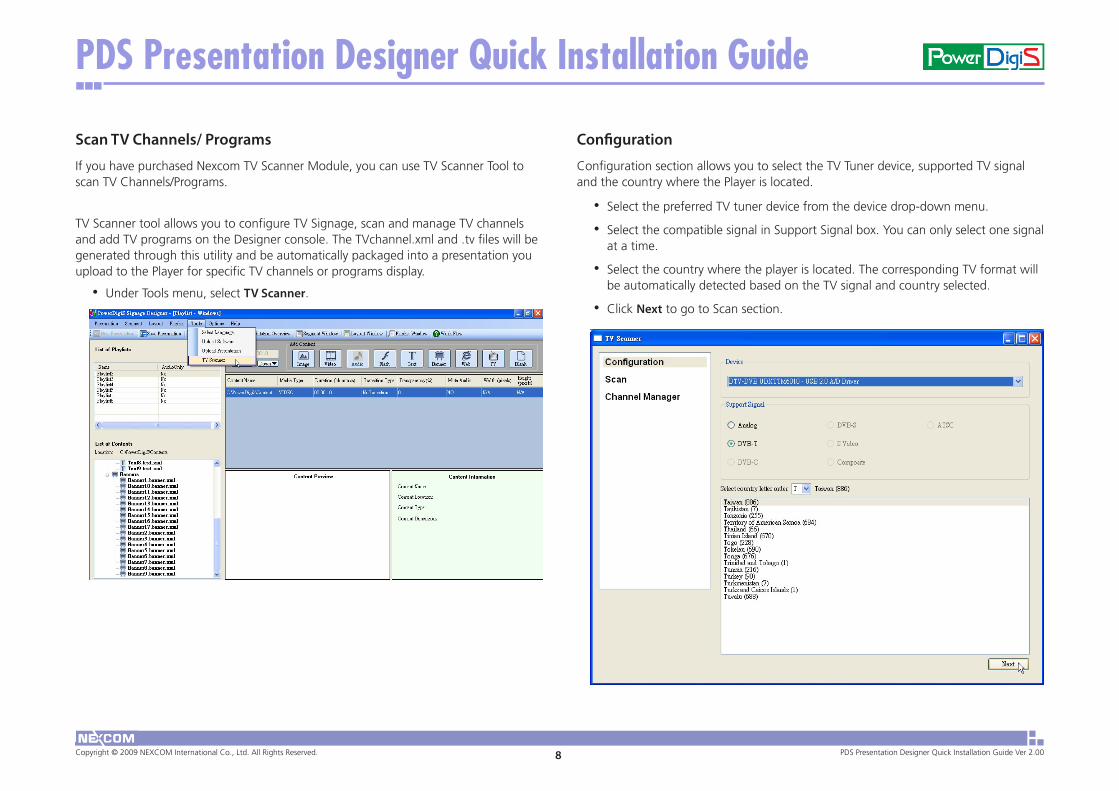
Scan TV Channels/ Programs
If you have purchased Nexcom TV Scanner Module, you can use TV Scanner Tool to scan TV Channels/Programs.
TV Scanner tool allows you to configure TV Signage, scan and manage TV channels and add TV programs on the Designer console. The TVchannel.xml and .tv files will be generated through this utility and be automatically packaged into a presentation you upload to the Player for specific TV channels or programs display.
Under Tools menu, select • TV Scanner.
Configuration
Configuration section allows you to select the TV Tuner device, supported TV signal and the country where the Player is located.
Select the preferred TV tuner device from the device drop-down menu.•Select the compatible signal in Support Signal box. You can only select one signal •at a time.
Select the country where the player is located. The corresponding TV format will •be automatically detected based on the TV signal and country selected.
Click • Next to go to Scan section.
Copyright © 2009 NEXCOM International Co., Ltd. All Rights Reserved. 9 PDS Presentation Designer Quick Installation Guide Ver 2.00
PDS Presentation Designer Quick Installation Guide
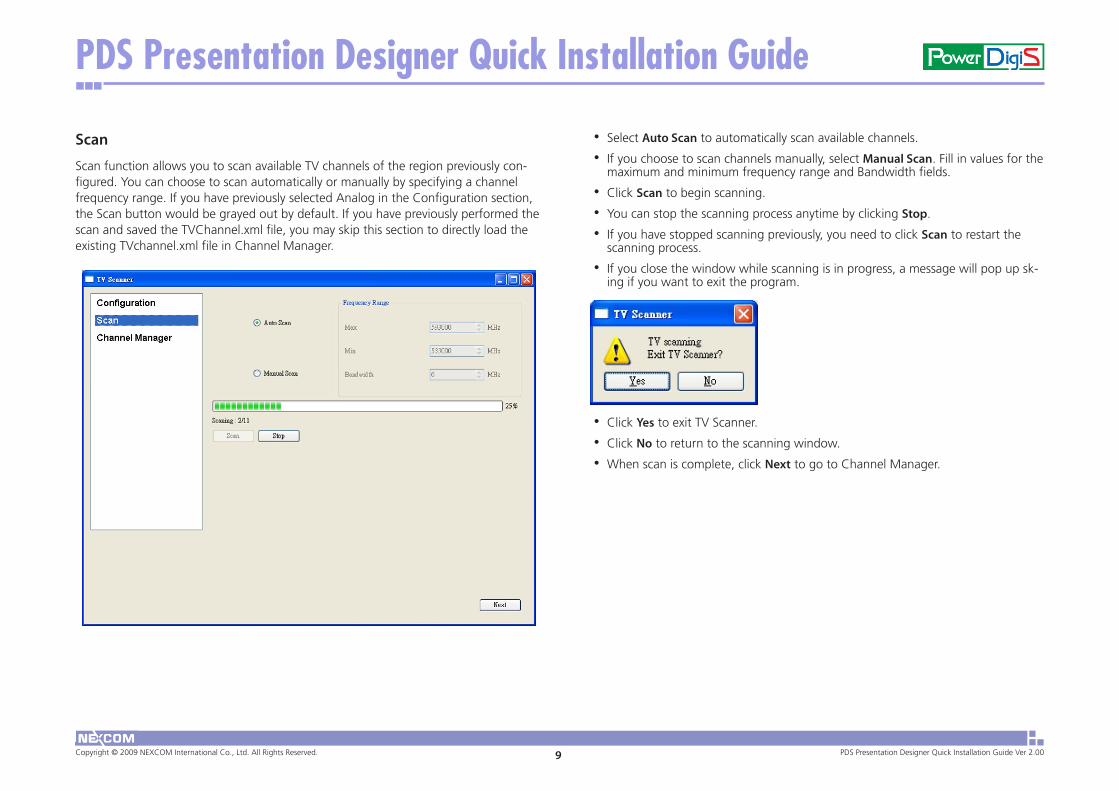
Scan
Scan function allows you to scan available TV channels of the region previously con-figured. You can choose to scan automatically or manually by specifying a channel frequency range. If you have previously selected Analog in the Configuration section, the Scan button would be grayed out by default. If you have previously performed the scan and saved the TVChannel.xml file, you may skip this section to directly load the existing TVchannel.xml file in Channel Manager.
Select • Auto Scan to automatically scan available channels.
If you choose to scan channels manually, select • Manual Scan. Fill in values for the maximum and minimum frequency range and Bandwidth fields.
Click • Scan to begin scanning.
You can stop the scanning process anytime by clicking • Stop.
If you have stopped scanning previously, you need to click • Scan to restart the scanning process.
If you close the window while scanning is in progress, a message will pop up sk-•ing if you want to exit the program.
Click • Yes to exit TV Scanner.
Click • No to return to the scanning window.
When scan is complete, click • Next to go to Channel Manager.
Copyright © 2009 NEXCOM International Co., Ltd. All Rights Reserved. 10 PDS Presentation Designer Quick Installation Guide Ver 2.00
PDS Presentation Designer Quick Installation Guide
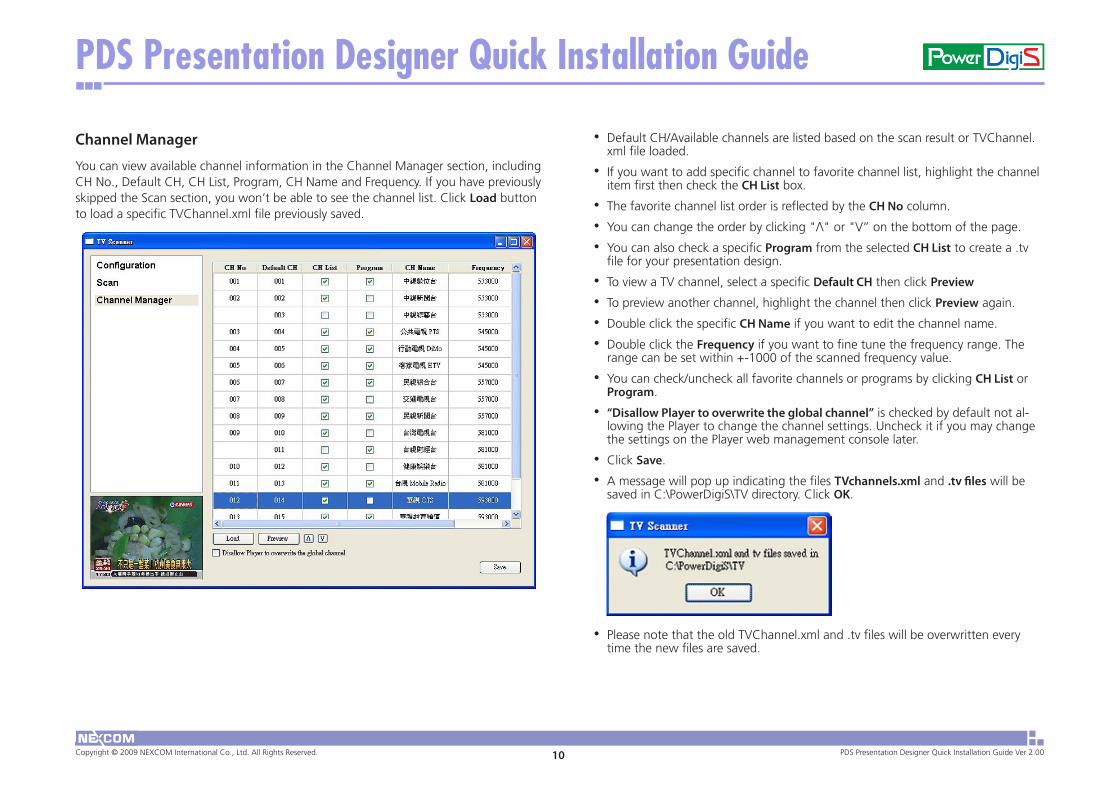
Channel Manager
You can view available channel information in the Channel Manager section, including CH No., Default CH, CH List, Program, CH Name and Frequency. If you have previously skipped the Scan section, you won’t be able to see the channel list. Click Load button to load a specific TVChannel.xml file previously saved.
Default CH/Available channels are listed based on the scan result or TVChannel.•xml file loaded.
If you want to add specific channel to favorite channel list, highlight the channel •item first then check the CH List box.
The favorite channel list order is reflected by the • CH No column.
You can change the order by clicking "/\" or "\/” on the bottom of the page. •You can also check a specific • Program from the selected CH List to create a .tv file for your presentation design.
To view a TV channel, select a specific • Default CH then click Preview
To preview another channel, highlight the channel then click • Preview again.
Double click the specific • CH Name if you want to edit the channel name.
Double click the • Frequency if you want to fine tune the frequency range. The range can be set within +-1000 of the scanned frequency value.
You can check/uncheck all favorite channels or programs by clicking • CH List or Program.
“Disallow Player to overwrite the global channel”• is checked by default not al-lowing the Player to change the channel settings. Uncheck it if you may change the settings on the Player web management console later.
Click • Save.
A message will pop up indicating the files • TVchannels.xml and .tv files will be saved in C:\PowerDigiS\TV directory. Click OK.
Please note that the old TVChannel.xml and .tv files will be overwritten every •time the new files are saved.
Copyright © 2009 NEXCOM International Co., Ltd. All Rights Reserved. 11 PDS Presentation Designer Quick Installation Guide Ver 2.00
PDS Presentation Designer Quick Installation Guide
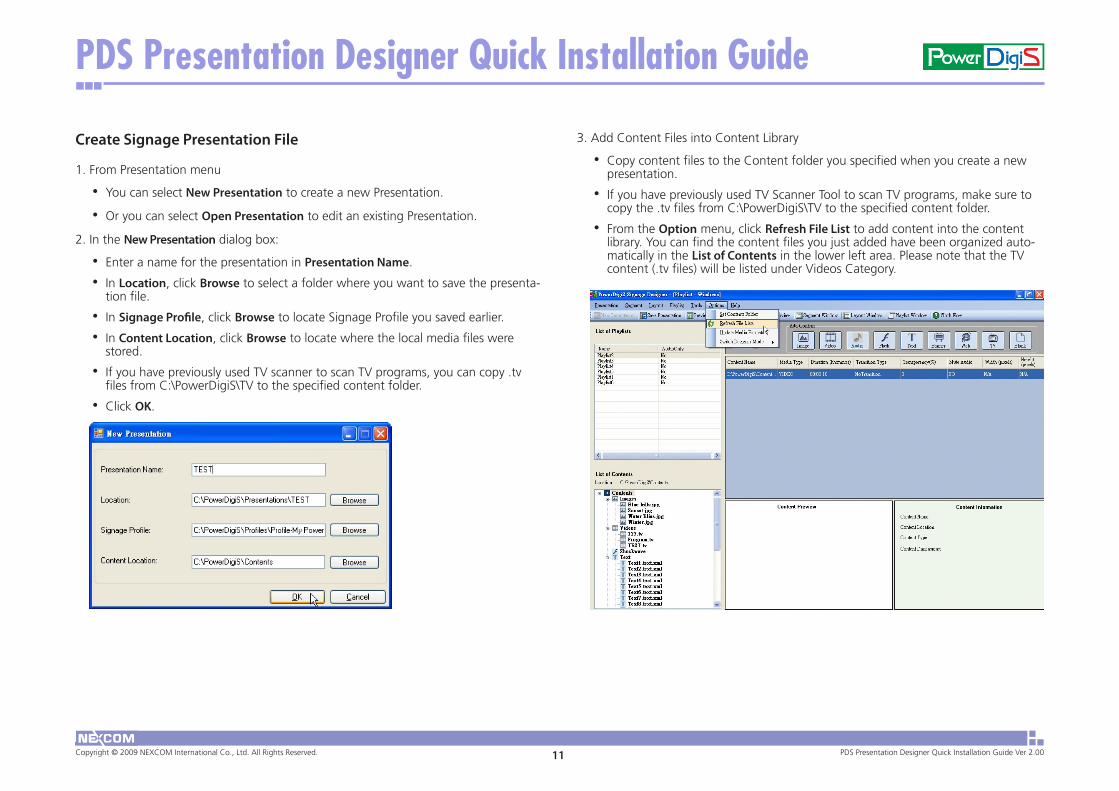
3. Add Content Files into Content Library
Copy content files to the Content folder you specified when you create a new •presentation.
If you have previously used TV Scanner Tool to scan TV programs, make sure to •copy the .tv files from C:\PowerDigiS\TV to the specified content folder.
From the • Option menu, click Refresh File List to add content into the content library. You can find the content files you just added have been organized auto-matically in the List of Contents in the lower left area. Please note that the TV content (.tv files) will be listed under Videos Category.
Create Signage Presentation File
1. From Presentation menu
You can select • New Presentation to create a new Presentation.
Or you can select • Open Presentation to edit an existing Presentation.
2. In the New Presentation dialog box:
Enter a name for the presentation in • Presentation Name.
In • Location, click Browse to select a folder where you want to save the presenta-tion file.
In • Signage Profile, click Browse to locate Signage Profile you saved earlier.
In • Content Location, click Browse to locate where the local media files were stored.
If you have previously used TV scanner to scan TV programs, you can copy .tv •files from C:\PowerDigiS\TV to the specified content folder.
Click • OK.
Copyright © 2009 NEXCOM International Co., Ltd. All Rights Reserved. 12 PDS Presentation Designer Quick Installation Guide Ver 2.00
PDS Presentation Designer Quick Installation Guide
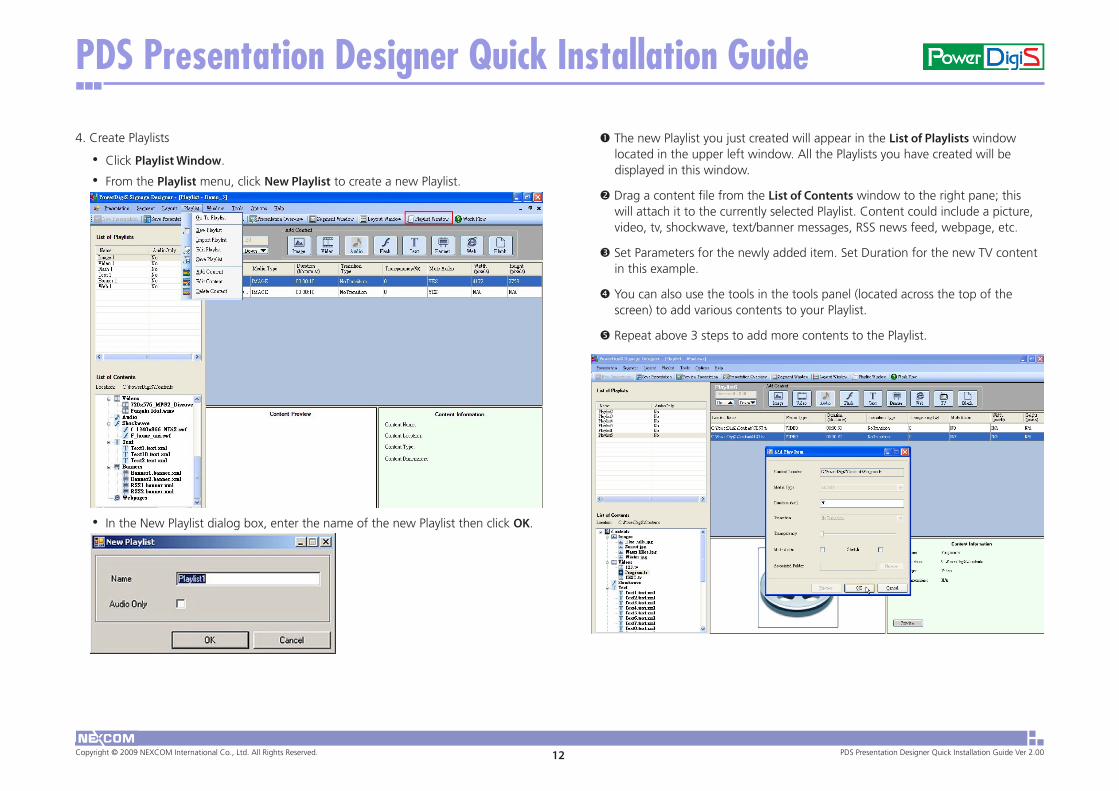
4. Create Playlists
Click • Playlist Window.
From the • Playlist menu, click New Playlist to create a new Playlist.
In the New Playlist dialog box, enter the name of the new Playlist then click • OK.
The new Playlist you just created will appear in the List of Playlists window located in the upper left window. All the Playlists you have created will be displayed in this window.
Drag a content file from the List of Contents window to the right pane; this will attach it to the currently selected Playlist. Content could include a picture, video, tv, shockwave, text/banner messages, RSS news feed, webpage, etc.
Set Parameters for the newly added item. Set Duration for the new TV content in this example.
You can also use the tools in the tools panel (located across the top of the screen) to add various contents to your Playlist.
Repeat above 3 steps to add more contents to the Playlist.
Copyright © 2009 NEXCOM International Co., Ltd. All Rights Reserved. 13 PDS Presentation Designer Quick Installation Guide Ver 2.00
PDS Presentation Designer Quick Installation Guide
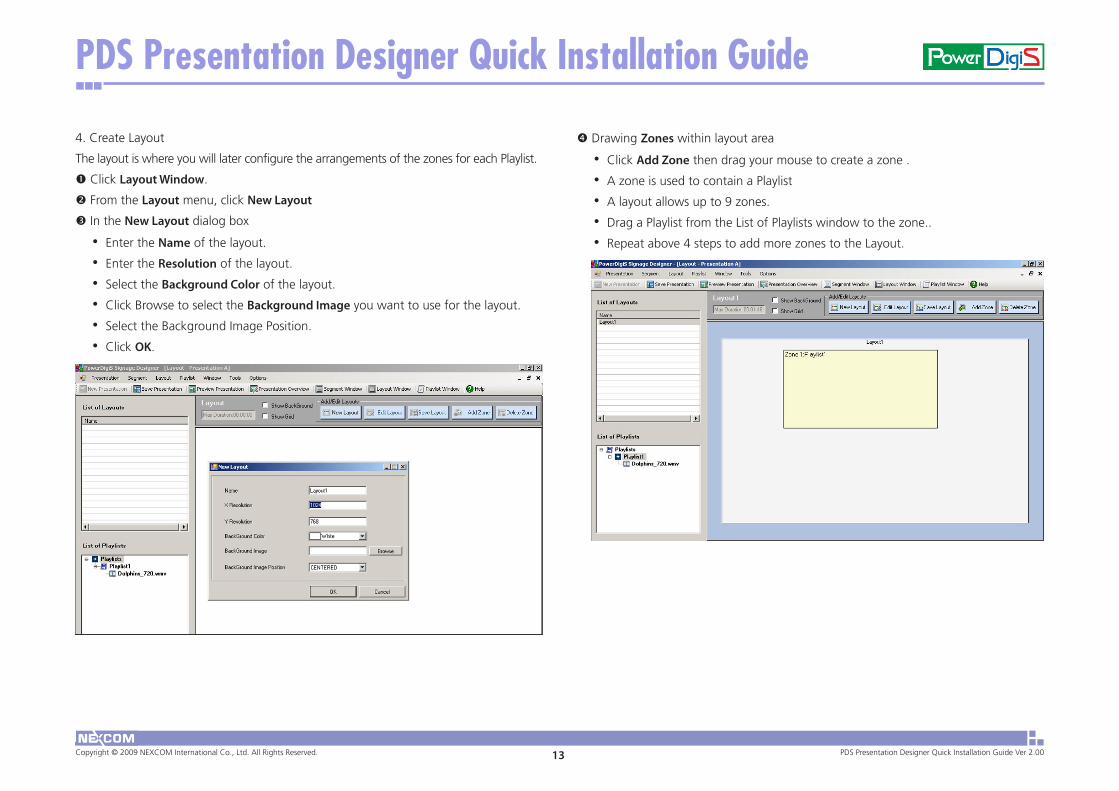
4. Create Layout
The layout is where you will later configure the arrangements of the zones for each Playlist.
Click Layout Window.
From the Layout menu, click New Layout
In the New Layout dialog box
Enter the • Name of the layout.
Enter the • Resolution of the layout.
Select the • Background Color of the layout.
Click Browse to select the • Background Image you want to use for the layout.
Select the Background Image Position.•Click • OK.
Drawing Zones within layout area
Click • Add Zone then drag your mouse to create a zone .
A zone is used to contain a Playlist •A layout allows up to 9 zones.•Drag a Playlist from the List of Playlists window to the zone..•Repeat above 4 steps to add more zones to the Layout.•
Copyright © 2009 NEXCOM International Co., Ltd. All Rights Reserved. 14 PDS Presentation Designer Quick Installation Guide Ver 2.00
PDS Presentation Designer Quick Installation Guide
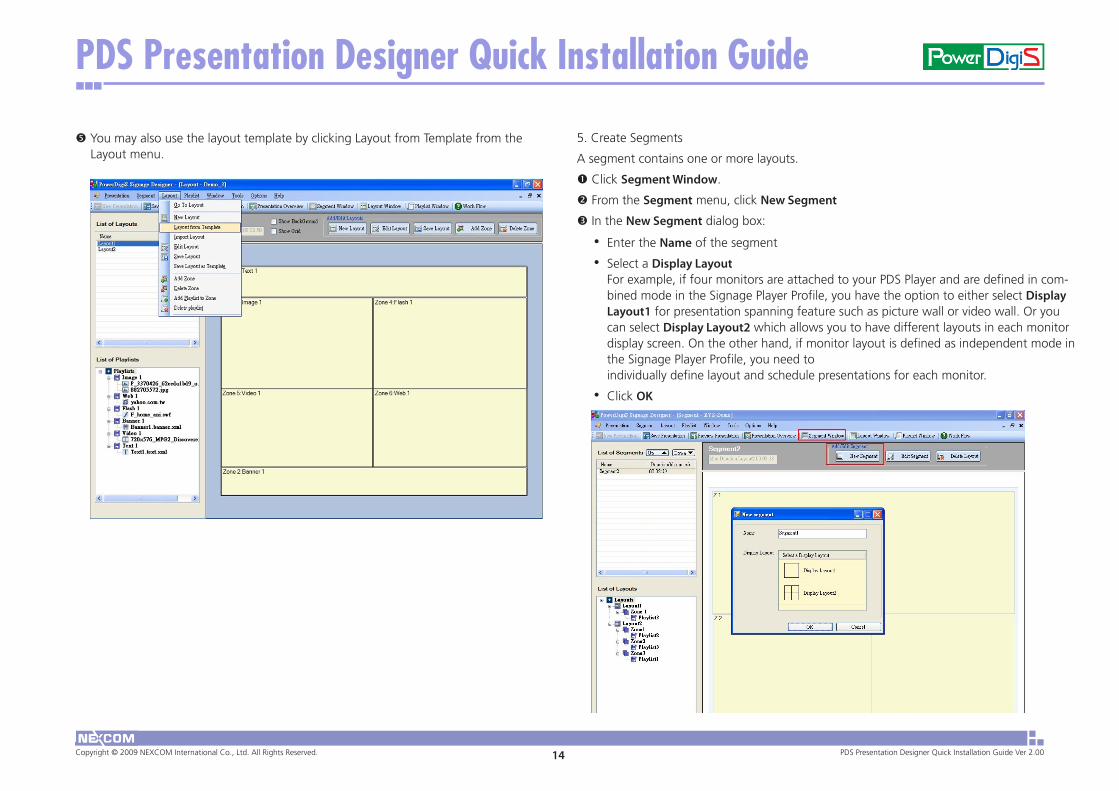
You may also use the layout template by clicking Layout from Template from the Layout menu.
5. Create Segments
A segment contains one or more layouts.
Click Segment Window.
From the Segment menu, click New Segment
In the New Segment dialog box:
Enter the • Name of the segment
Select a • Display Layout For example, if four monitors are attached to your PDS Player and are defined in com-bined mode in the Signage Player Profile, you have the option to either select Display Layout1 for presentation spanning feature such as picture wall or video wall. Or you can select Display Layout2 which allows you to have different layouts in each monitor display screen. On the other hand, if monitor layout is defined as independent mode in the Signage Player Profile, you need to individually define layout and schedule presentations for each monitor.
Click • OK
Copyright © 2009 NEXCOM International Co., Ltd. All Rights Reserved. 15 PDS Presentation Designer Quick Installation Guide Ver 2.00
PDS Presentation Designer Quick Installation Guide
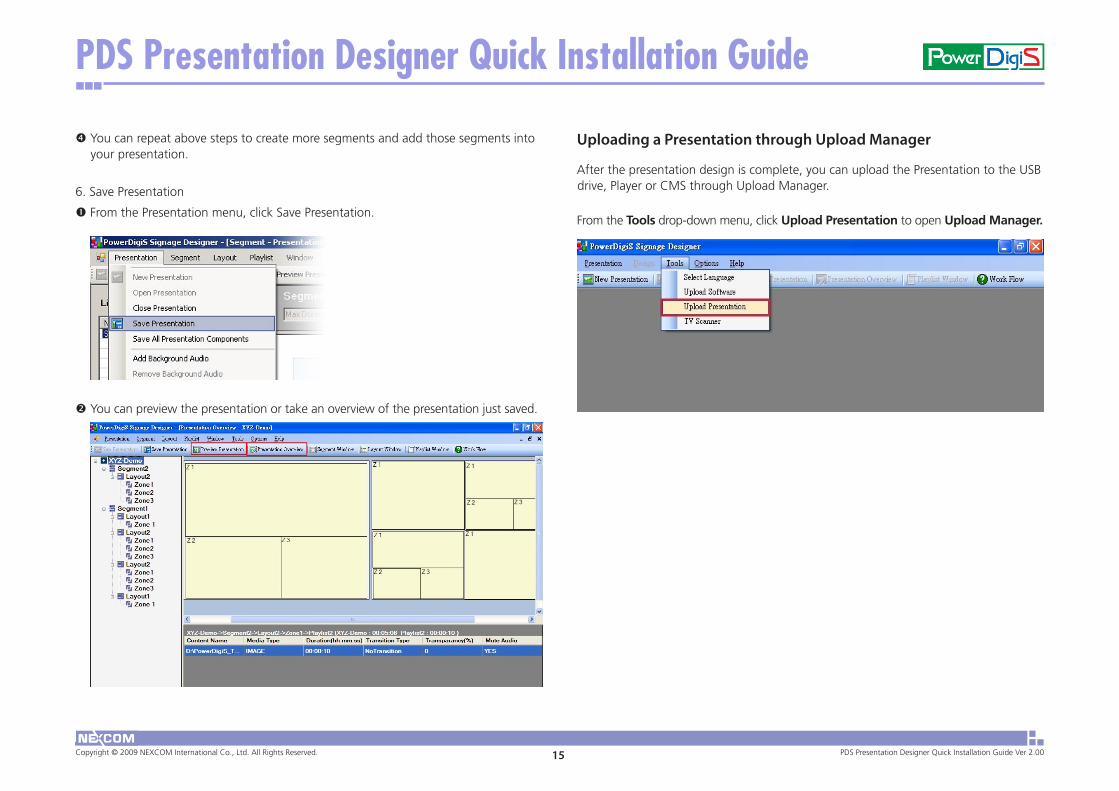
Uploading a Presentation through Upload Manager
After the presentation design is complete, you can upload the Presentation to the USB drive, Player or CMS through Upload Manager.
From the Tools drop-down menu, click Upload Presentation to open Upload Manager.
You can repeat above steps to create more segments and add those segments into your presentation.
6. Save Presentation
From the Presentation menu, click Save Presentation.
You can preview the presentation or take an overview of the presentation just saved.

Copyright © 2009 NEXCOM International Co., Ltd. All Rights Reserved. 16 PDS Presentation Designer Quick Installation Guide Ver 2.00
PDS Presentation Designer Quick Installation Guide
Uploading a Presentation to a USB drive •- Select USB.
- Click Browse to select the presentation file you want to upload to the USB drive.
- The Size and the Mode of the presentation file will appear on the screen.
Click Save.
- Specify the USB drive location then click OK.

Copyright © 2009 NEXCOM International Co., Ltd. All Rights Reserved. 17 PDS Presentation Designer Quick Installation Guide Ver 2.00
PDS Presentation Designer Quick Installation Guide
- You can view which is file is being copied and upload progress on the screen.
- A window will pop up informing you the presentation has been saved successfully.
Uploading a Presentation to the Player •- Select Player. - Click Browse to select the presentation file you want to upload to the Player.
- The Size and the Mode of the presentation file will appear on the screen.
- Enter the Player IP address then click Connect.
Please note that the presentation file mode must be the same with the Player mode.
Copyright © 2009 NEXCOM International Co., Ltd. All Rights Reserved. 18 PDS Presentation Designer Quick Installation Guide Ver 2.00
PDS Presentation Designer Quick Installation Guide
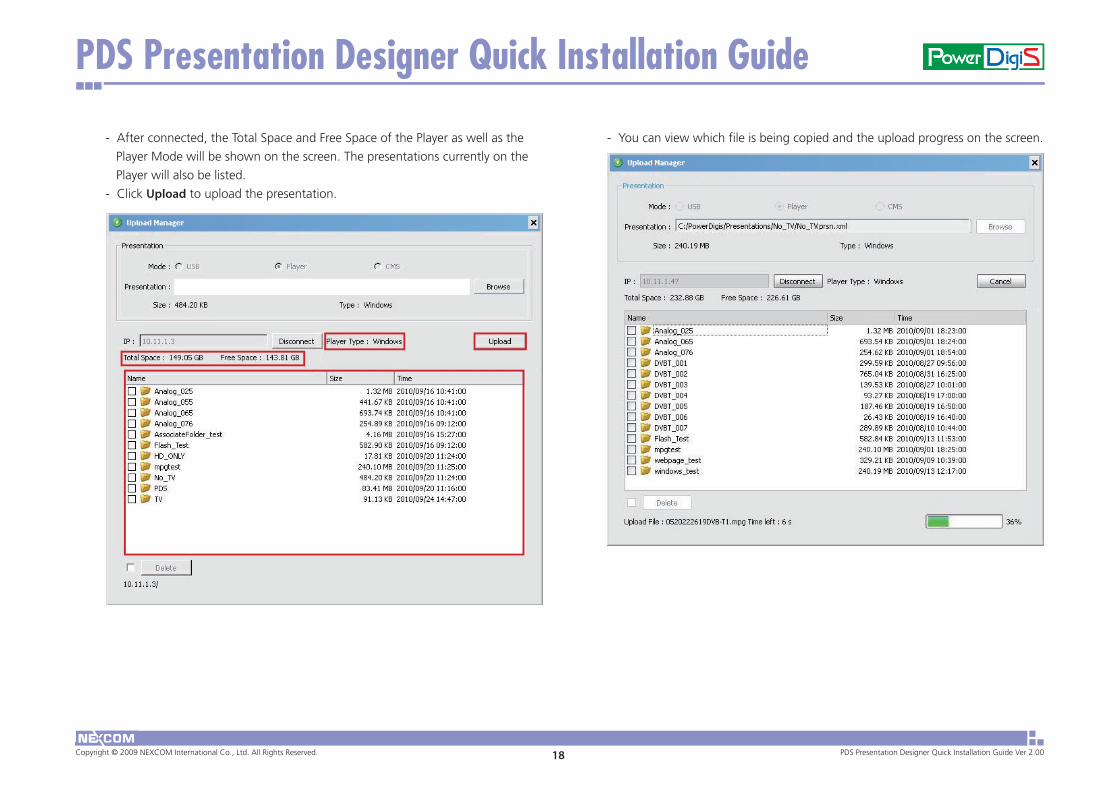
- After connected, the Total Space and Free Space of the Player as well as the
Player Mode will be shown on the screen. The presentations currently on the
Player will also be listed.
- Click Upload to upload the presentation.
- You can view which file is being copied and the upload progress on the screen.
Copyright © 2009 NEXCOM International Co., Ltd. All Rights Reserved. 19 PDS Presentation Designer Quick Installation Guide Ver 2.00
PDS Presentation Designer Quick Installation Guide
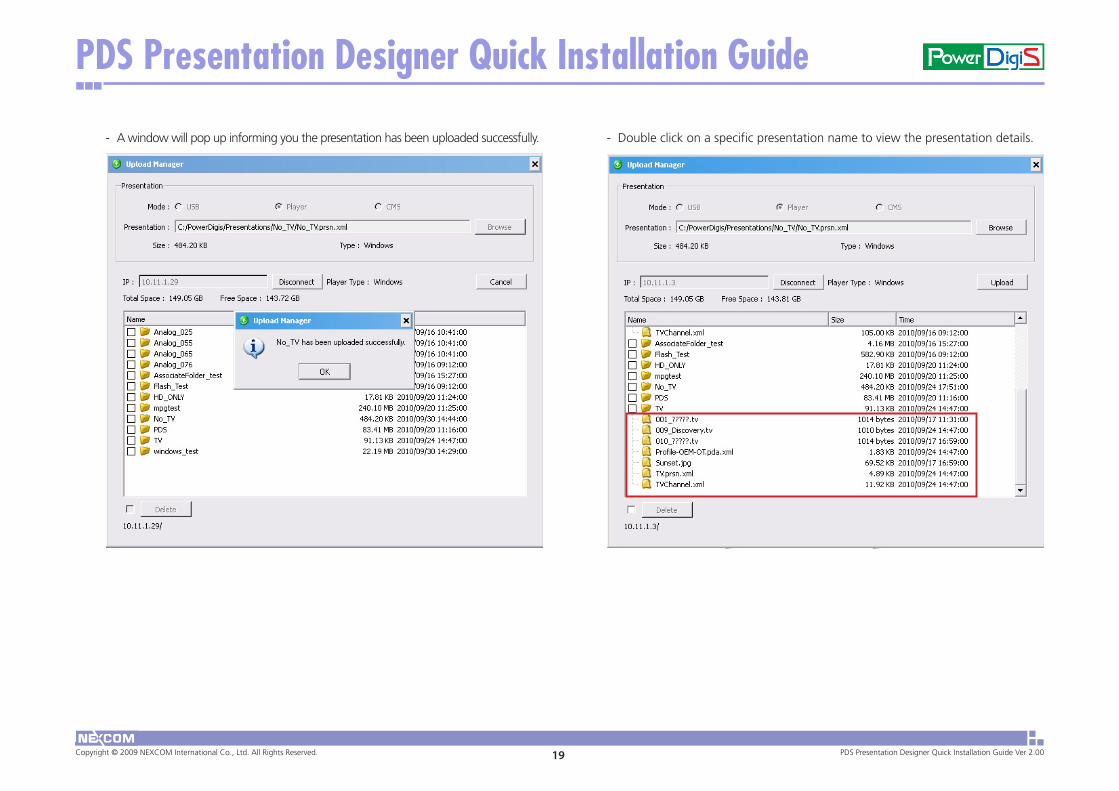
- A window will pop up informing you the presentation has been uploaded successfully. - Double click on a specific presentation name to view the presentation details.
Copyright © 2009 NEXCOM International Co., Ltd. All Rights Reserved. 20 PDS Presentation Designer Quick Installation Guide Ver 2.00
PDS Presentation Designer Quick Installation Guide
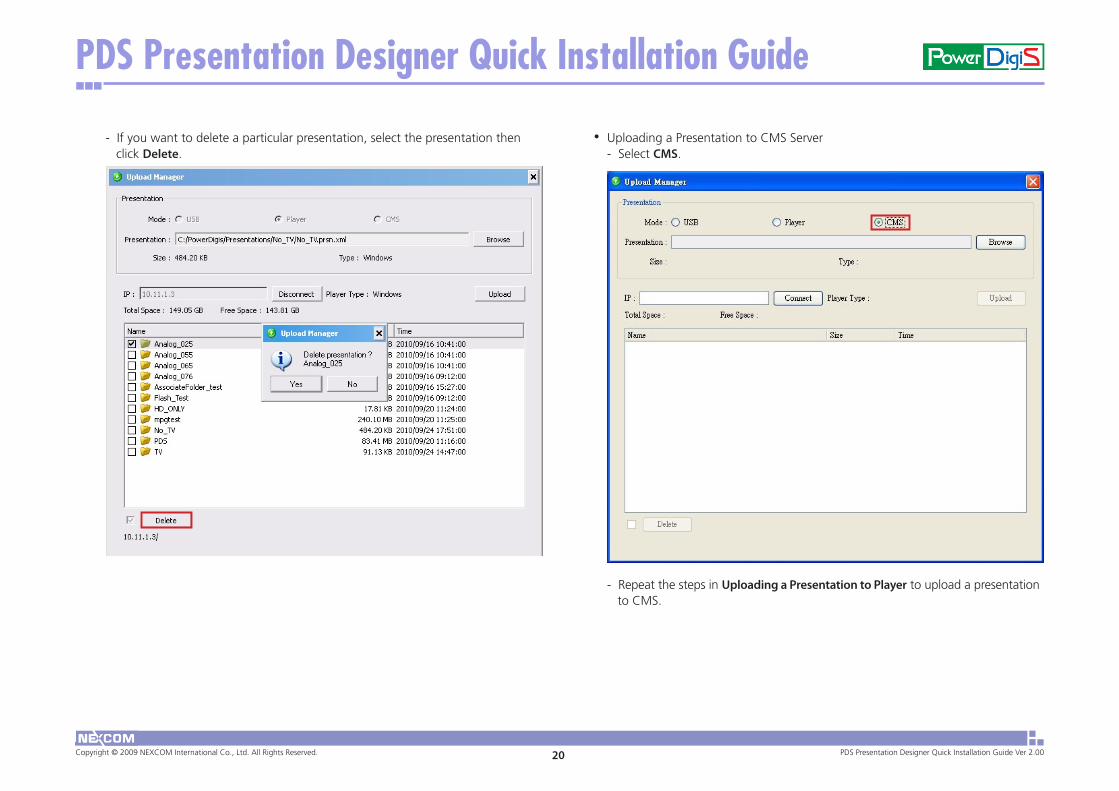
- If you want to delete a particular presentation, select the presentation then click Delete.
Uploading a Presentation to CMS Server •- Select CMS.
- Repeat the steps in Uploading a Presentation to Player to upload a presentation to CMS.