Embed Size (px)
Citation preview

Using Defraggler to Optimize Your Windows System
Ronald Ross
Today we will have a look at an interesting alternative to the Windows hard disk
defragment utility. That alternative is Piriform’s Defraggler, which provides a number of
useful features not present in the Windows utility. As with many free software packages,
there are also professional versions which you have to pay for, and which pays the bills
so that we can enjoy a free version. You can download Defraggler at:
http://www.piriform.com/defraggler
We will have a brief look at the install process, and then move on to highlight some of
the useful features that Defraggler offers. After downloading the binary, go ahead and
run the install. We are going to run this on Windows XP, but Defraggler is fully
supported on Windows 7, and other modern versions of Windows. Below we see one of
the install pop-ups, with important installation options to be subsequently explained.

The selections we have made below involve both personal taste as well substantive
feature configuration. To start with, we have unchecked Add Desktop Shortcut. Here
personal taste dictates that the desktop not be cluttered with pointless shortcut icons. The
Add Start Menu Shortcuts is important because this is where I would rather find an
application when launching it; also a matter of taste. Others may have different
preferences.
The next choice, Add Defraggler menus to Windows Explorer, is more substantive. This
will allow us to run Defraggler directly from Windows Explorer. We will be able to
defragment individual folders and even files in this way. This feature is something that is
not present in the Windows defragmentation utility. Having this level of granularity can
be quite useful when you just want to target the analysis and/or defragmentation of a
specific folder, for instance.
On the other hand, I’m not ready to fully replace the Windows Disk Defragmenter. If
you are ready, by all means check the box. Lastly, I’m not interested in being pestered
with update notices, so I uncheck that box. If I want the latest version, I’ll go and look
for it myself, again a matter of taste.

After going through the remaining setup screens (not shown), you will eventually need to
reboot. Do so, now or later. Next we will have a look at how to invoke and use
Defraggler.

After the Defraggler install has completed, we first look at its capabilities by bringing up
Windows Explorer. We right-click on a folder, and we see that now Defraggler is one of
the options. In our example below, we select the analyze option – Check Fragmentation.
We can see the results in the next screenshot.

We see the result of the analysis in the pop-up below. Both the number of fragmented
files, and the number of fragments are displayed. In the next screenshot, (after closing
the current pop-up) we will run Defraggler to defragment the same folder.

Here we again select the same folder, but this time we specify Defragment, instead of
simply analyzing how fragmented the files are contained in that folder. The next
screenshot shows the result.

Here we see that defragmentation of the Downloads folder has been completed. In the
next screenshot, we launch the Defraggler application directly, and begin to have a look
at how to use it.
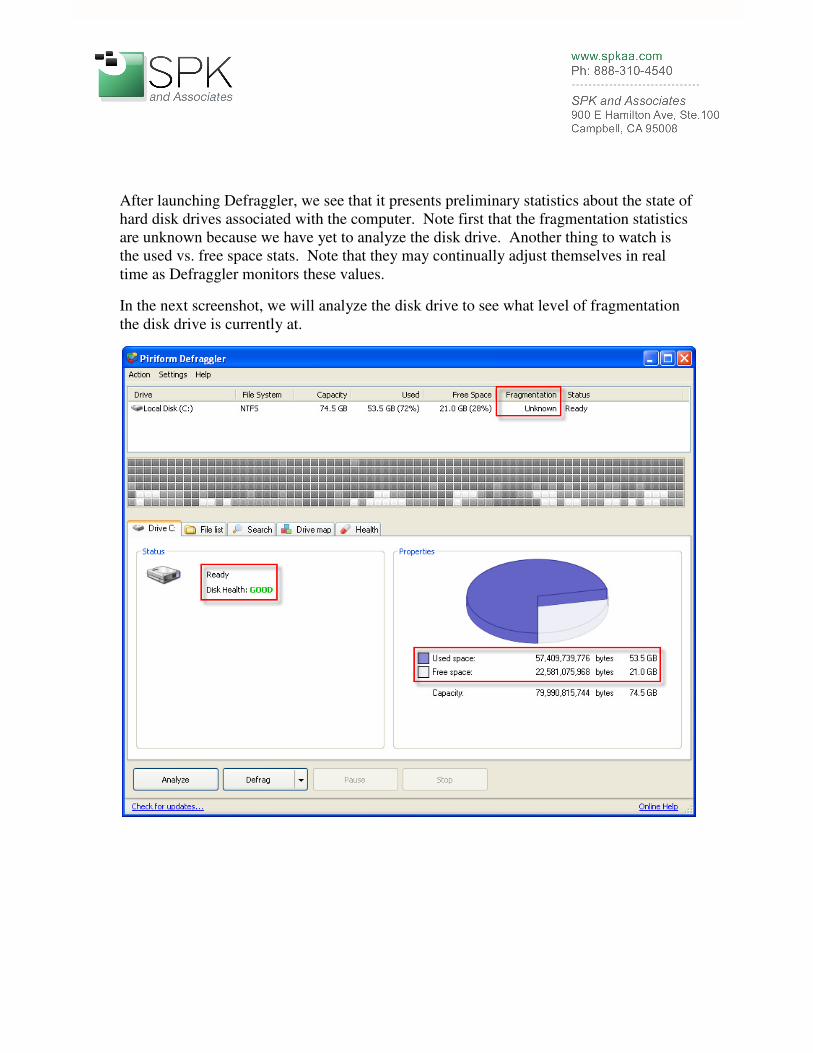
After launching Defraggler, we see that it presents preliminary statistics about the state of
hard disk drives associated with the computer. Note first that the fragmentation statistics
are unknown because we have yet to analyze the disk drive. Another thing to watch is
the used vs. free space stats. Note that they may continually adjust themselves in real
time as Defraggler monitors these values.
In the next screenshot, we will analyze the disk drive to see what level of fragmentation
the disk drive is currently at.

To begin the defragmentation process, we pull down the Action menu, and select
Analyze Drive. The next screenshot displays the analysis in process.

Defraggler analyzes the disk drive, and presents the results in the next screenshot.

The results are in. We see that there are 3,575 fragmented files, with 56,418 total
fragments. The broader statistic for drive fragmentation is 12%, not too bad, but
something that can be improved. So let’s see how much we can improve the statistics
that we have been presented with. The next screenshot depicts launching the
defragmentation process.

Here we launch the full defragmentation process for the disk drive. Note that if there are
files in the Recycle Bin, there will be a query to ask if they should be deleted before
defragmentation begins. The next screenshot shows defragmentation in process.

The defragmentation process is shown here as underway. Note the differences between
the number of fragmented files and also the total file fragments in the highlighted
sections below. The subsequent screenshot on the next page shows the end result of the
defragmentation.

Here the defragmentation has been completed. We can note that the 3,574 fragmented
files have been reduced to 10. Also, 56,415 total fragments is now 211, which is a very
large improvement. Also, we started with a disk drive that was 12% fragmented, and
now we are down to 4%.
Defraggler is a useful supplement (or even replacement) to the Windows Defragment
utility. As we have seen, it is capable of much finer granularity than Windows
Defragment. Another feature, which we did not explore, is Defraggler’s ability to
consolidate all the free space on a drive into a single unit. Download Defraggler, try it
out, and explore some of the additional options. You may find it a very useful tool!