Embed Size (px)
Citation preview
Perceptive Accounts Payable Invoice eForm Advanced Design and Setup Guide Version: 12.5.x Written by: Product Knowledge, R&D Date: August 2016

© 2014-2015 Lexmark International Technology, S.A. All rights reserved.
Lexmark is a trademark of Lexmark International Technology, S.A., or its subsidiaries, registered in the U.S. and/or other countries. All other trademarks are the property of their respective owners. No part of this publication may be reproduced, stored, or transmitted in any form without the prior written permission of Lexmark.
Perceptive Accounts Payable Invoice eForm Advanced Design and Setup Guide
3
Table of Contents How to configure Accounts Payable (AP) Invoice eForm ....................................................................... 7
Prerequisites .............................................................................................................................................. 7
Steps to configure AP Invoice eForm ........................................................................................................ 7 AP Invoice processing compatibility matrix ............................................................................................... 7
Configure a workflow for AP Invoice eForm ............................................................................................ 8
Example: A configured AP workflow process ............................................................................................ 8
Create or configure a workflow process for AP ......................................................................................... 9
Configure routing rules .............................................................................................................................. 9 Create Invoice Entry Validation routing rules ........................................................................................ 9 Create a GL Coding Validation routing rule ......................................................................................... 12
Add the eForm and iScripts to queues .................................................................................................... 13 Configure validation within the eForm ................................................................................................... 14
Enable validation for specific roles and queues ...................................................................................... 14
Configure the duplicate invoice check ..................................................................................................... 14 Duplicate invoice check ....................................................................................................................... 15
Advanced duplicate invoice check ....................................................................................................... 15
Configure header-level and line-level required fields .............................................................................. 16
Configure GL code validation .................................................................................................................. 17 Configure the GL Codes source values ............................................................................................... 17
Configure the GL User and GL Code virtual tables with constraints ................................................... 18 Enable the GL code validation ............................................................................................................. 19
Configure GL account validation ............................................................................................................. 19
Configure the Invoice Total field validation .............................................................................................. 20 Configure amount validation and distribution in PO invoices .............................................................. 20
Configure Invoice Total validation in non-PO invoices or credit memos ............................................. 22
PO/invoice currency validation ................................................................................................................ 23 VAT validation ......................................................................................................................................... 24
Intelligent Capture Connector value-mapping validation ......................................................................... 24 Lookup validation ................................................................................................................................. 24
Date mask ............................................................................................................................................ 24
PO line items ........................................................................................................................................ 25 Replace vendor number....................................................................................................................... 25
Location code ....................................................................................................................................... 25
Perceptive Accounts Payable Invoice eForm Advanced Design and Setup Guide
4
Configure separator for multiple PO .................................................................................................... 25
Configure caching ..................................................................................................................................... 26
Configure temporary XML storage location ........................................................................................... 26
Change the temporary XML storage location .......................................................................................... 26 Configure value added tax within the eForm ......................................................................................... 27
Create and enable the VAT codes .......................................................................................................... 27 Create and update the virtual tables .................................................................................................... 27
Enable the columns ............................................................................................................................. 27
Enable VAT at the line level ................................................................................................................. 27
Enable the VAT amount summary .......................................................................................................... 28
Enable VAT amount validation ................................................................................................................ 28 Update the Currency virtual table ........................................................................................................ 28
Enable the columns ............................................................................................................................. 29
Enable VAT summation and validation ................................................................................................ 29
Configure server-side VAT validation .................................................................................................. 29
Associate the vendor VAT registration numbers ..................................................................................... 30 Verify or create the VAT Registration Number (VAT ID) Vendor and Vendor virtual tables ............... 30
Enable the Vendor VAT ID field ........................................................................................................... 30
Associate the sold-to VAT Registration Numbers ................................................................................... 30 Verify or create the VAT Registration Number (VAT ID) Business Unit and Vendor virtual tables ..... 30
Enable VAT at the header level ........................................................................................................... 31
Enable the VAT Compliance check box .................................................................................................. 31 Enable the Automatic Tax Calculation check box ................................................................................. 31
Associate AP Invoice eForm with virtual tables or other data sources .............................................. 32
Configure AP_Config.xml file to connect with virtual tables .................................................................... 32
Configure AP_Config.xml file to connect with ERP applications ............................................................. 32 Configure AP_Config.xml file to connect with custom connector ............................................................ 32
Configure AP_Config.xml file to connect with demo connector .............................................................. 32 Configure real-time posting in SAP ........................................................................................................ 33
Configure real-time lookups from SAP ................................................................................................... 34
Configure eForm for data massaging to SAP ........................................................................................ 35
Customize document key mapping in Perceptive Content ...................................................................... 35 Configure goods receipts within the eForm for SAP ............................................................................ 36
Create and enable the goods receipt document ..................................................................................... 36 Update the virtual table ........................................................................................................................ 36
Perceptive Accounts Payable Invoice eForm Advanced Design and Setup Guide
5
Update AP_VirtualTable_Updater.xml ................................................................................................. 36
Configure AP_Skin.xml ........................................................................................................................ 36
Configure GL distribution on PO invoices ............................................................................................. 37
Configure GL distribution of additional costs not associated with header amount.................................. 37 Configure add on cost (AOC) on PO invoices ....................................................................................... 38
Create and enable the AOC codes ......................................................................................................... 38 Create the AOC virtual tables .............................................................................................................. 38
Update AP_VirtualTable_Updater.xml ................................................................................................. 39
Enable GL distribution with AOC codes in AP_Skin.xml ..................................................................... 39
Enable multi-line GL distribution exports for Lawson .............................................................................. 40 Enable PO GL distributions in AP_Config.xml ..................................................................................... 40
Configure the miscellaneous line export in AP_Export.xml ................................................................. 40
Display or hide Purchase Order Lines in Invoice Details section ....................................................... 41
Additional fields in Purchase Order Lines ............................................................................................... 41 Configure AP Invoice eForm for a global environment ........................................................................ 41
Configure language, date, and currency settings .................................................................................... 41
Custom configuration ............................................................................................................................... 43
Supported languages, countries and currencies ..................................................................................... 44
Additional supported currencies .............................................................................................................. 45
Configuration considerations ................................................................................................................... 45 Windows regional settings ................................................................................................................... 45 Keyboard configuration ........................................................................................................................ 45
Language Bar ...................................................................................................................................... 45
Appendix A: Add a custom currency example ...................................................................................... 47
Appendix B: User interface labels, tooltips, and messages ................................................................. 48
User interface labels ................................................................................................................................ 48 Tooltips .................................................................................................................................................... 60
Error and confirmation messages ........................................................................................................... 60 Appendix C: Document types and custom properties .......................................................................... 64
Invoice ..................................................................................................................................................... 64
Credit Memo ............................................................................................................................................ 65 Appendix D: AP Invoice eForm file directories ...................................................................................... 66
\inserver\etc\ap ........................................................................................................................................ 66
\inserver\temp\ap ..................................................................................................................................... 66
\inserver\script ......................................................................................................................................... 67

Perceptive Accounts Payable Invoice eForm Advanced Design and Setup Guide
6
\inserver\form\[build folder] ...................................................................................................................... 69
\inserver\form\data_definition .................................................................................................................. 70
\inserver\log ............................................................................................................................................. 70 Appendix E: Custom logic ....................................................................................................................... 71
Global variables ....................................................................................................................................... 71
Custom functions ..................................................................................................................................... 72
Add custom business logic to the form .................................................................................................... 72
JavaScript event handlers ....................................................................................................................... 72
Call a server-side iScript .......................................................................................................................... 73 Enhance the validation iScript ................................................................................................................. 74
Enhance the export iScript ...................................................................................................................... 75 Field level sample ................................................................................................................................ 75
Global level sample .............................................................................................................................. 75
Appendix F: Reserved characters in XML and forms ........................................................................... 76
Appendix G: ERP specific values associated with financial terms ..................................................... 77 Index ........................................................................................................................................................... 78

Perceptive Accounts Payable Invoice eForm Advanced Design and Setup Guide
7
How to configure Accounts Payable (AP) Invoice eForm The process of installing and configuring Accounts Payable (AP) Invoice eForm consists of three main steps. This guide reviews the final configuration process.
Prerequisites Before you configure the AP Invoice eForm, ensure that you have completed the following procedures.
1. Installed AP Invoice eForm on Perceptive Content Server
2. Imported the data required for processing invoices from your enterprise resource planning (ERP) application, such as Lawson
3. Created virtual tables with imported data
Steps to configure AP Invoice eForm Complete the AP Invoice eForm preparation by configuring the solution with the specific features that your back office requires. This guide covers the steps you need to complete the following configuration tasks.
• Configure a workflow
• Configure validation within the eForm
• Configure value added tax within the eForm
• Configure goods receipts within the eForm for SAP
• Configure add on cost (AOC) within the eForm
• Configure AP Invoice eForm for a global environment
For information on custom scripting with the eForm, which is an optional setup process, refer to Appendix E: Custom logic.
AP Invoice processing compatibility matrix The following table maps the compatible versions of Perceptive Content (ImageNow) Server and Perceptive Accounts Payable (AP) Invoice eForm.
To determine compatibility with versions of AP Invoice eForm prior to 10.0.0.28, contact your Perceptive Software representative.
Perceptive Content (ImageNow) Server
Perceptive AP Invoice eForm
6.5.1.149 to 6.6.x 10.0.0.28 to 12.5.x *
6.7.x 10.1.0.307 to 12.5.x
6.8.x 10.4.0.234 to 12.5.x
7.x.x 12.1.0.169 to 12.5.x
Note Perceptive AP Invoice eForm 12.5.x, when used with Perceptive Connector for SAP Financials, is compatible with ImageNow 6.7.x or higher.
Perceptive Accounts Payable Invoice eForm Advanced Design and Setup Guide
8
Configure a workflow for AP Invoice eForm To configure a new or existing workflow with AP Invoice eForm, complete the following tasks.
• Create or configure a workflow process for AP
• Configure routing rules
• Add the eForm and iScripts to queues
While this section provides detailed configuration steps, the workflow process, queues, and routing rules are primarily an example. You may tailor the workflow and its components to meet your back office requirements. For more information on completing other workflow tasks, such as designating workflow queue leads or drawing containers, refer to the Perceptive Content Workflow Designer Help available at www.perceptivesoftware.com, in the Customer Portal.
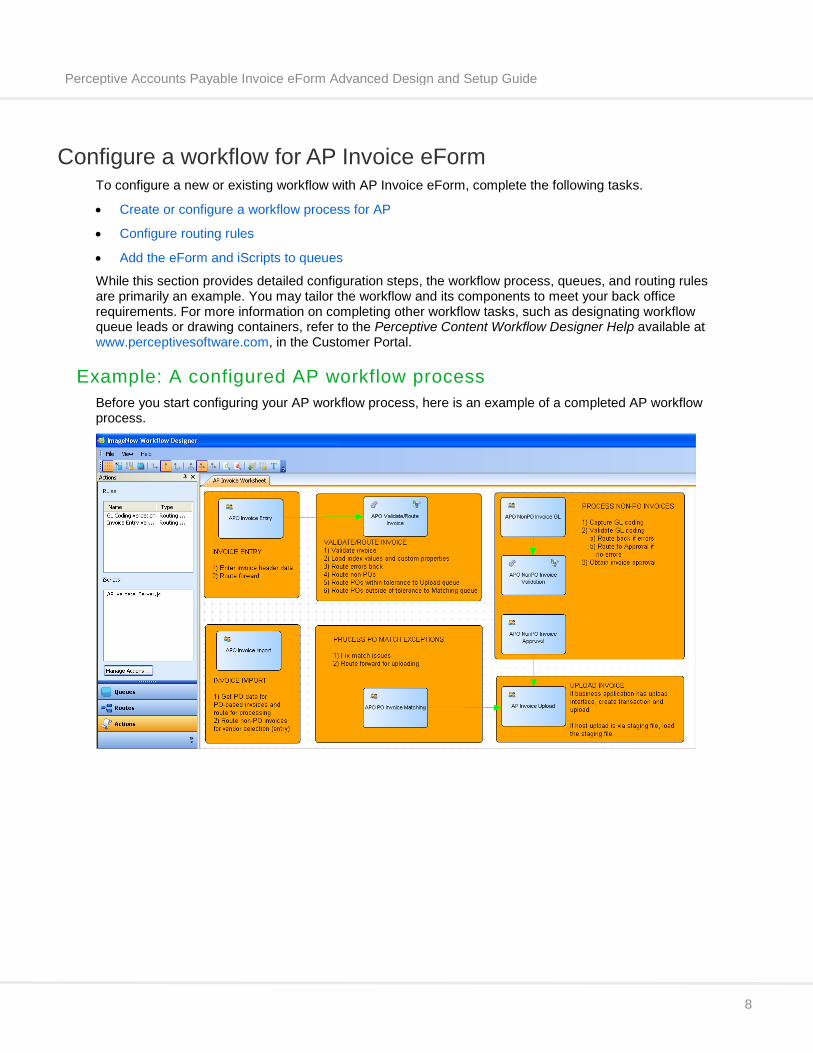
Example: A configured AP workflow process Before you start configuring your AP workflow process, here is an example of a completed AP workflow process.
Perceptive Accounts Payable Invoice eForm Advanced Design and Setup Guide
9
Create or configure a workflow process for AP You can use any names for the queues in this workflow process. The names we provide here for examples correspond to the default mappings in AP_Skin.xml. If you use alternate naming, update the <roles> element in the AP_Skin.xml file with those queue names.
1. Create the following work queues in your process:
• APO Invoice Entry
• APO NonPO Invoice GL
• APO PO Invoice Matching
• APO Invoice Upload
• APO Error
• APO NonPO Invoice Approval
2. Create the following system queues in your process:
• APO Validate/Route Invoice
• APO NonPO Invoice Validation
Configure routing rules You must configure routing rules to use with the form in your workflow process. The AP Invoice eForm installer created the custom properties used in routing rule setup.
The procedures in this section are not exhaustive and do not outline every method you can use to set up the routing rules specific to your particular AP Invoice Form implementation.
Create Invoice Entry Validation routing rules To create Invoice Entry Validation routing rules in your invoice workflow process, complete the following steps.
1. From the Workflow Designer task pane, click Actions.
2. In the task pane, click Manage Actions.
3. In the Action Settings dialog box, on the Rules tab, click New.
4. In the Rules Editor dialog box, complete the following substeps.
1. In the Rule name box, type Invoice Validation.
2. In the Rule type list, click Routing rule.
3. Complete the following procedures, detailed in the following sections.
• Create a rule to route back for header error conditions
• Create a routing rule for non-PO invoices
• Create a routing rule for PO-based invoices within tolerance
• Create a routing rule for PO-based invoices outside of tolerance

Perceptive Accounts Payable Invoice eForm Advanced Design and Setup Guide
10
Create a rule to route back for header error conditions In the event of an error header message, you can route documents back to the APO Invoice Entry queue. For more information on validation and some possible error messages, refer to Configure validation within the eForm. Complete the following steps.
1. In the Rules Editor dialog box, under Statements, click New.
2. In the Statement Editor dialog box, complete the following substeps:
1. In the Statement name box, type Error Condition – Route Back.
2. Under Conditions, click the Add icon.
3. In the Add Condition dialog box, complete the following substeps:
1. In the Constraint by list, select Custom property.
2. In the Type list, select Normal.
3. In the Field list, select AP Header Valid.
4. In the Operator list, select starts with.
5. In the Value box, type ERR.
6. Click OK to close the Add Condition dialog box.
4. Under Actions, click Add and select Route to.
5. In the Queues dialog box, complete the following substeps:
1. In the Business Process list, select your workflow process.
2. Under Available queues, select APO Invoice Entry or the name of the queue in your process where invoice header data is entered and then click Add.
3. Click OK until you return to the Statement Editor dialog box.
Create a routing rule for non-PO invoices To route non-PO invoices to a specific queue, such as the APO Non-PO Invoice GL queue, create a routing rule. Complete the following steps.
Note This statement is necessary only if you are processing both PO-based and non-PO invoices with the form.
1. In the Rules Editor dialog box, under Statements, click New.
2. In the Statement Editor dialog box, complete the following substeps:
1. In the Statement name box, type Non-PO Invoice.
2. Under Conditions, click the Add icon.
3. In the Add Condition dialog box, complete the following substeps:
1. In the Constraint by list, select Document key.
2. In the Type list, select Normal.
3. In the Field list, select Field5 or the field in your indexing structure where the PO number is stored.
4. In the Operator list, select is equal to.
Perceptive Accounts Payable Invoice eForm Advanced Design and Setup Guide
11
5. In the Value box, select Default.
6. Click OK to close the Add Condition dialog box.
4. Under Actions, click Add and select Route to.
5. In the Queues dialog box, complete the following substeps:
1. In the Business Process list, select your workflow process.
2. Under Available queues, select APO Non-PO Invoice GL or the name of the queue in your process where general ledger (GL) coding is entered, and then click Add.
3. Click OK until you return to the Statement Editor dialog box.
Create a routing rule for PO-based invoices within tolerance To route PO-based invoices within tolerance to a specific queue, such as the APO Invoice Upload queue, complete the following steps.
1. In the Rules Editor dialog box, under Statements, click New.
2. In the Statement Editor dialog box, complete the following substeps:
1. In the Statement name box, type PO-Based Invoice – Within Tolerance.
2. Under Conditions, click the Add icon.
3. In the Add Condition dialog box, complete the following substeps:
1. In the Constraint by list, select custom property.
2. In the Type list, select Normal.
3. In the Field list, select PO Variance Factor.
4. In the Operator list, select is equal to.
5. In the Value box, type 0.
6. Click OK to close the Add Condition dialog box.
4. Under Actions, click Add and select Route to.
5. In the Queues dialog box, complete the following substeps:
1. In the Business Process list, select your workflow process.
2. Under Available queues, select APO Invoice Upload or the name of the queue in your process for invoice upload and then click Add.
3. Click OK until you return to the Statement Editor dialog box.

Perceptive Accounts Payable Invoice eForm Advanced Design and Setup Guide
12
Create a routing rule for PO-based invoices outside of tolerance To route PO-based invoices outside of tolerance to a specific queue, such as the APO PO Invoice Matching queue, complete the following steps.
Note This statement is necessary only if you are processing PO invoices with the form.
1. In the Rules Editor dialog box, under Statements, click New.
2. In the Statement Editor dialog box, complete the following substeps:
1. In the Statement name box, type PO-Based Invoice – Outside of Tolerance.
2. Under Conditions, click the Add icon.
3. In the Add Condition dialog box, complete the following substeps:
1. In the Constraint by list, select custom property.
2. In the Type list, select Normal.
3. In the Field list, select PO Variance Factor.
4. In the Operator list, select is not equal to.
5. In the Value box, type 0.
6. Click OK.
4. Under Actions, click Add and select Route to.
5. In the Queues dialog box, complete the following actions:
1. In the Business Process list, select your workflow process.
2. Under Available queues, select APO PO Invoice Matching or the name of the queue in your process for PO invoice matching and then click Add.
3. Click OK until you return to the Workflow Designer task pane.
Create a GL Coding Validation routing rule Complete the following actions to create a GL Coding Validation routing rule.
1. From the Workflow Designer task pane, click Actions.
2. In the task pane, click Manage Actions.
3. In the Action Settings dialog box, on the Rules tab, click New.
4. In the Rules Editor dialog box, complete the following substeps:
1. In the Rules name box, type Invoice Validation.
2. In the Rule type list, select Routing rule.
3. Under Statements, complete the following substeps to include a statement for Check for Errors in GL Coding:
1. Click New.
2. In the Statement Editor dialog box, complete the following substeps:
1. In the Statement name box, type Check for Errors in GL Coding.
2. Under Conditions, click the Add icon.
Perceptive Accounts Payable Invoice eForm Advanced Design and Setup Guide
13
3. In the Add Condition dialog box, complete the following substeps:
1. In the Constraint by list, select Custom property.
2. In the Type list, select Normal.
3. In the Field list, select AP Detail Valid.
4. In the Operator list, select starts with.
5. In the Value box, type ERR.
6. Click OK to close the Add Condition dialog box.
4. Under Actions, click Add and select Route to.
5. In the Queues dialog box, complete the following substeps:
1. In the Business Process list, select your workflow process.
2. Under Available queues, select APO NonPO Invoice GL or the name of the queue in your process where GL coding is entered and then click Add.
3. Click OK until you return to the Workflow Designer task pane.
Add the eForm and iScripts to queues After you add the server validation script and create the routing rules used in the eForm workflow process, you must modify the properties of the workflow queues and add the eForm to user work queues.
Assign the AP invoice form to the following queues:
• APO Invoice Entry
• APO NonPO Invoice GL
• APO NonPO Invoice Approval
• APO PO Invoice Matching
Apply the AP_Validate_Server.js script as an inbound action to the following queues:
• APO Validate/Route Invoice
• APO NonPO Invoice Validation
• APO Invoice Upload
Apply Invoice Entry Validation routing rule as a within queue action to the following queues:
• APO Validate/Route Invoice
• GL Coding Validation

Perceptive Accounts Payable Invoice eForm Advanced Design and Setup Guide
14
Configure validation within the eForm AP Invoice eForm includes both client-side and server-side methods of data validation.
Client-side validation allows your users to verify their data in the eForm user interface instantly. The user also receives feedback as he or she types values into fields, or upon clicking the “Validate” button on the form. The user interface error messages and field-flagging enables users to correct errors or omissions before saving or routing the eForm.
Server-side validation completes eForm verification with the AP_Validate_Server.js script, when run as a queue action. This validation process processes all AP Invoice eForm documents that pass through the queue, regardless of whether a user views or modifies document in the user interface. The validation script creates error codes, which you can use when creating routing rules.
To configure validation, review and complete the following tasks, as necessary.
Enable validation for specific roles and queues
Client-side validation for specific roles Client-side validation takes place within queues attributed to a role, such as Invoice Entry. The first step towards allowing any validation to occur in the user interface is to enable the role or roles. Complete the following steps.
1. Navigate to [drive:]\inserver\etc\ap and open AP_Skin.xml with a text editor.
2. Locate the <roles> node.
3. For any queue that requires header-level, client-side validation, in the corresponding <role> element, set the header attribute to enabled. To run detail-level validation, enable the corresponding detail attribute. In this example, to enable client-side validation in a queue called APO Invoice Entry, you enable the Invoice Entry role. <role name="Invoice Entry" header="enabled" detail="enabled"> <queue invoicetype="nonpo" changetabs="true">APO Invoice Entry</queue> </role>
Server-side validation for specific queues Server-side validation occurs within a queue that includes the AP_Validate_Server.js script as an action.
Configure the duplicate invoice check The duplicate invoice check validates a new invoice against other invoices in Perceptive Content to determine if it is a duplicate.
Client action: The eForm checks for duplicate invoices after the user provides values for the fields used to determine the uniqueness of an invoice. For example, the eForm could search for duplicate invoices using the values of the Invoice Number and Vendor ID fields. It provides the error message “A duplicate invoice exists in the system. To resolve the conflict, review the current invoice and make any necessary changes.”
Perceptive Accounts Payable Invoice eForm Advanced Design and Setup Guide
15
There are two forms of duplicate invoice check available.
• The original duplicate invoice check method validates the Invoice Number and Vendor Number values against all other invoices in the system.
• The advanced duplicate invoice check method allows you to specify an Perceptive Content view, the specific eForm fields to examine, the number of values that indicate a duplicate invoice, and a tolerance level for those values.
If you enable both forms of duplicate invoice check, AP Invoice eForm defaults to the original validation method.
Duplicate invoice check To configure the original duplicate invoice check validation, complete the following steps.
1. Navigate to [drive:]\inserver\etc\ap and open AP_Config.xml with a text editor.
2. In the <dupcheck> and <dupcheck_vsl> elements, set the enabled attribute to true.
3. The default fields for the Invoice Number and Vendor ID fields are tab (field2) and f3 (field3). To specify alternate locations for these values in your specific eForm solution, choose from the following values.
• [folder]or[field1]
• [tab]or[field2]
• [f3]or[field3]
• [f4]or[field4]
• [f5]or[field5]
• [doctype]
• [drawer]
• {any custom property}
For example, {Invoice Number}
Advanced duplicate invoice check To configure the advanced duplicate invoice check validation, complete the following steps.
1. Navigate to [drive:]\inserver\etc\ap and open AP_Config.xml with a text editor.
2. In the <dupcheck> set the enabled attribute to true.
3. In the <statement> element, complete the following substeps.
• To enable the advanced duplicate invoice check, set enabled attribute to true.
• To specify a custom view to match against literals, set the view attribute to the name of the view. The default view is All Documents.
• To set the number of values that must match to indicate a duplicate invoice, set the match attribute with an integer. The default is 2.
Perceptive Accounts Payable Invoice eForm Advanced Design and Setup Guide
16
4. Between the <statement> element tags, specify which fields you want AP Invoice eForm to check. Specify a number greater than or equal to the number of values you specified within the element, and use the | delimiter. Use any of the following fields:
• AddlAmt<1 to 8>
• CompanyNumHdr
• FreightAmount
• Hdr<1 to 8>
• InvoiceDate
• InvoiceNumber
• InvoiceReferenceNumber
• LocationCode
• MiscCharge
• PONumber
• TaxAmount
• TotalAmount
• VendorID
5. Optional. To specify a tolerance level with an amount or percent, complete one of the following steps.
• To set a tolerance amount, following the eForm field name, add # and an integer representing the variance amount. For example, to specify a Total Amount field variance of 3 currency units, such as $3.00, type TotalAmount # 3. In this instance, if all other conditions applied, a Total Amount value of $9.50 would match a Total Amount value of $12.00, and the eForm would indicate a duplicate invoice. You may specify a tolerance amount with decimals, such as .01 for one US cent.
• To set a variance percent for matching an eForm field, include % and an integer representing the variance percent. For example, to specify a variance percent of 10%, type TotalAmount % 10.
Example: The default settings create a duplicate invoice check that examines the VendorID, Invoice Number, and Total Amount fields in the All Documents view. The Total Amount field includes a range of +/- 5. If the user enters matching values in two or more fields, the invoice check indicates a duplicate. <statement view="All Documents" match="2" enabled="true">VendorID | InvoiceNumber | TotalAmount # 5 </statement>
Configure header-level and line-level required fields Required-field validation verifies that every field you mark as required contains a value.
Client action: The eForm flags any blank, required fields with a red box or red highlighting, and provides the error message “Required fields are missing.”
Server action: The validation script sends the error key ERR_REQUIRED_FIELDS to the AP Header Valid or AP Detail Valid custom property.
Complete the following client-side and server-side configuration tasks.
Client-side validation Complete the following steps.
1. In AP_Skin.xml, locate the <fields> node.
2. For the first field you want to set as required, locate the corresponding <header>, <poline>, or <glline> element. For example, the element for the Business Unit field is: <header label="lblBusinessUnit" field="cboBusinessUnit">
Perceptive Accounts Payable Invoice eForm Advanced Design and Setup Guide
17
3. Set the required and visible attributes to "true", and set the disabled attribute to "false".
4. To set additional fields as required, repeat the previous steps.
Server-side validation Complete the following steps.
1. In AP_Validate_Server.xml, in the <required_fields> element, set the enabled attribute to "true".
2. To enable the PO, non-PO, or credit memo header fields, set the corresponding enabled attribute to "true". For example, <pohdr enabled="true">.
3. To require a header-level field, such as CompanyNumHdr, in the <worksheet> element, set the enabled attribute to "true".
4. To enable the PO or GL detail fields, set the corresponding enabled attribute to "true". For example, <podetail enabled="true">.
5. To require a PO or GL line-level field, under the <podetail> or <gldetail> node, in the corresponding <worksheet> element, set the enabled attribute to "true". For example, <worksheet enabled="true" field="ItemNumber">.
Configure GL code validation In AP Invoice eForm, the GL code fields appear under the GL DISTRIBUTIONS section. Example GL codes include Account, Sub Account, Unit, and Cost Center. In AP_Skin.xml, you can configure which of these GL codes to display and how the field displays in the user interface. You can also configure two types of validation.
With GL code validation, the eForm can check user-provided values in GL code fields against available, corresponding values in the GL Codes virtual table. In the client, the eForm can also verify the authorization of the user entering values on a field-by-field basis. You can enable these validation methods together or separately.
Client action: The eForm flags any fields with an invalid or restricted value with a red box or red highlighting. It displays the error message “GL codes are invalid.”
Server action: The validation script sends the error key ERR_GL_CODES_INVALID to the AP Detail Valid custom property.
To enable GL code validation, review and complete the following tasks, as needed.
• Configure the GL Codes source values
• (Optional) Configure the GL User and GL Code virtual tables with constraints
• Enable the GL code validation
Configure the GL Codes source values To validate the values of GL codes in the eForm, you must configure the GL Codes virtual table with source numbers. For virtual table information, refer to the Perceptive AP Invoice eForm Connector Configuration Guide. We recommend keeping this guide open or available, as this section heavily references the example virtual tables.
In AP_Skin.xml, each <glline> element represents a GL Code field, and includes a source attribute. This attribute links to the GLNumber column of the GL Code virtual table, indicating which GL Codes are valid
Perceptive Accounts Payable Invoice eForm Advanced Design and Setup Guide
18
for the field. To enable validation of each GL code you use in AP Invoice eForm, complete the following steps.
• In your GL Code virtual table, verify or configure source numbers in the GLNumber column for each row.
• For client-side validation: in AP_Skin.xml, for each GL code your eForm uses, in the <glline> element, specify the source attribute with a source number.
• For server-side validation: in AP_Validate_Server.xml, under <glcode_validation>, for each GL code, specify the source attribute with the same source number.
For example: In the Perceptive AP Invoice eForm Connector Configuration Guide, in the “GL Code” example table, in the GLNumber column, note that the source number 1 corresponds to the GLCode column values of 100 and 200. In this instance, if you set the source attribute for lblGL1 to 1, then the eForm validates that the user types either 100 or 200 into the first GL Code in the eForm, such as Account.
AP_Skin.xml <glline label="lblGL1" showdesc="true" searchable="true" freeform="false" source="1" line="1" typeaheadchars="2" visible="true" disabled="false" required="true" width="50px" captionkey="LBL_GLLINE_GL1" descriptionkey="LBL_GLLINE_GL1_DESC"/>
AP_Validate_Server.xml <worksheet enabled="false" field="GL1" source="1"></worksheet>
Configure the GL User and GL Code virtual tables with constraints Optional. To validate the authorization of a user to provide a specific value in a GL Code, you must configure the GL User and GL Code virtual tables with constraints. This validation occurs only in the client, and does not have a server-side counterpart. Complete the following steps.
1. In your GL User virtual table, create a row for every AP Invoice eForm user. Provide the username in the UserName column.
2. Specify a pair of constraints for each user, for example Department_01 and KCMO.
Note Valid constraints include strings or numbers.
3. In your GL Code virtual table, to configure which users can access each GL code value, specify the constraint columns for each row.
Note To allow all users to access a GL code, use the constraint ALL for both columns.
For example, referring to the Constraint columns in the GL Code and GL User, note that user JDOE could use the values 1101 and 1102, while user JJONES could use the value 1103. Each code has a different source, which indicates that users JDOE and JJONES would use the values in different GL Code fields, such as Account vs. Unit.
Perceptive Accounts Payable Invoice eForm Advanced Design and Setup Guide
19
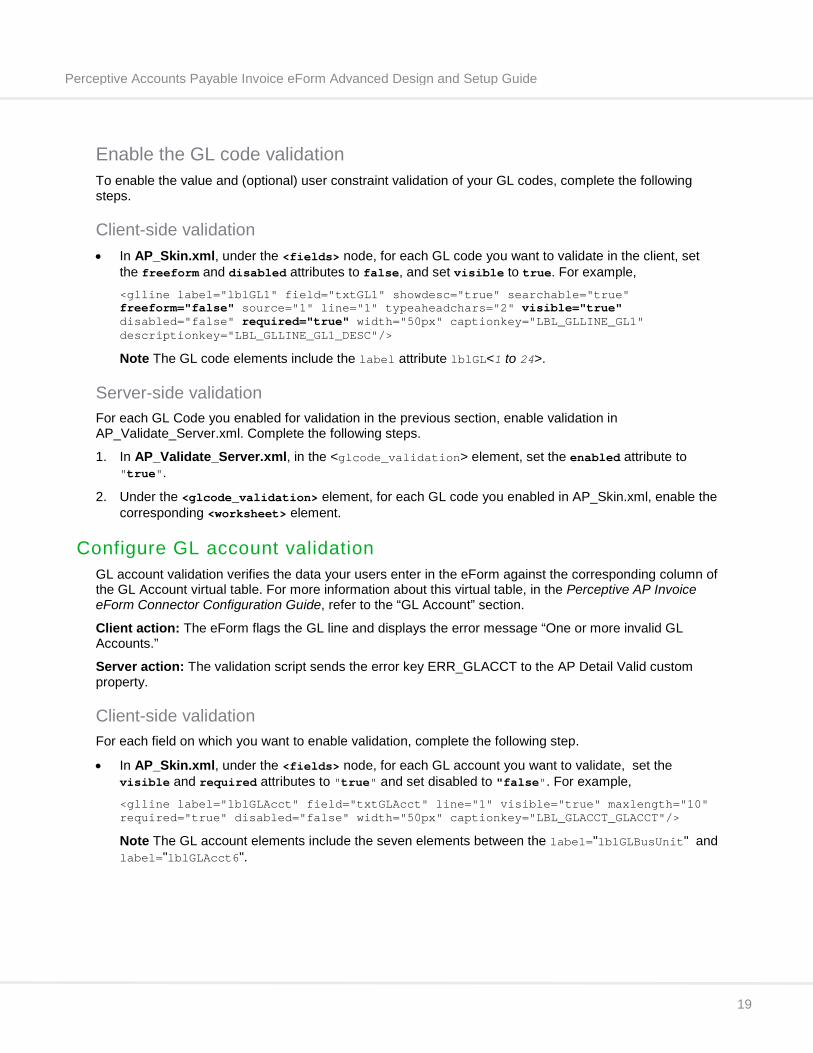
Enable the GL code validation To enable the value and (optional) user constraint validation of your GL codes, complete the following steps.
Client-side validation • In AP_Skin.xml, under the <fields> node, for each GL code you want to validate in the client, set
the freeform and disabled attributes to false, and set visible to true. For example, <glline label="lblGL1" field="txtGL1" showdesc="true" searchable="true" freeform="false" source="1" line="1" typeaheadchars="2" visible="true" disabled="false" required="true" width="50px" captionkey="LBL_GLLINE_GL1" descriptionkey="LBL_GLLINE_GL1_DESC"/>
Note The GL code elements include the label attribute lblGL<1 to 24>.
Server-side validation For each GL Code you enabled for validation in the previous section, enable validation in AP_Validate_Server.xml. Complete the following steps.
1. In AP_Validate_Server.xml, in the <glcode_validation> element, set the enabled attribute to "true".
2. Under the <glcode_validation> element, for each GL code you enabled in AP_Skin.xml, enable the corresponding <worksheet> element.
Configure GL account validation GL account validation verifies the data your users enter in the eForm against the corresponding column of the GL Account virtual table. For more information about this virtual table, in the Perceptive AP Invoice eForm Connector Configuration Guide, refer to the “GL Account” section.
Client action: The eForm flags the GL line and displays the error message “One or more invalid GL Accounts.”
Server action: The validation script sends the error key ERR_GLACCT to the AP Detail Valid custom property.
Client-side validation For each field on which you want to enable validation, complete the following step.
• In AP_Skin.xml, under the <fields> node, for each GL account you want to validate, set the visible and required attributes to "true" and set disabled to "false". For example, <glline label="lblGLAcct" field="txtGLAcct" line="1" visible="true" maxlength="10" required="true" disabled="false" width="50px" captionkey="LBL_GLACCT_GLACCT"/>
Note The GL account elements include the seven elements between the label="lblGLBusUnit" and label="lblGLAcct6".
Perceptive Accounts Payable Invoice eForm Advanced Design and Setup Guide
20
Server-side validation 1. In AP_Validate_Server.xml, enable the <glaccount_validation> element.
2. Under the <glaccount_validation> node, for each GL account you want to validate, enable the corresponding <worksheet> element. For example, <worksheet enabled="true" field="GLAcct"></worksheet>
Configure the Invoice Total field validation AP Invoice eForm allows you to validate the Invoice Total field in PO, non-PO, and credit memo invoices.
PO invoice validation compares the header-level Invoice Total against the line-level Invoice Lines amount total.
Non-PO and credit memo validation methods compare the header-level Invoice Total with the GL Distributions amount total.
Configure amount validation and distribution in PO invoices For PO invoices, AP Invoice eForm validates the header-level Invoice Total amount against the line-level Invoice Lines amount total. To configure this validation, you can choose whether to include Sales Tax, Freight, Misc, and eight other available “additional charges” in the Invoices Lines amount total.
In other words, if you include additional amounts, the eForm verifies:
(Invoice Total) = (Invoice Lines) + (included additional charges)
You can also allow users to distribute additional amounts from the header-level fields into general ledger-level fields, under GL DISTRIBUTIONS.
If using the Perceptive Intelligent Capture Connector and the “run_ic_mapping” element is enabled, then additional functionality is available. For each header-level field, such as include_tax, if enabled and distributed are both set to “true,” the eForm automatically creates a new GL DISTRIBUTIONS section with a single GL line. For more information about validation with Intelligent Capture Connector, refer to Intelligent Capture Connector value-mapping validation below.
Client action: The eForm flags the To Be Distributed amounts with red boxes. It displays the error message “Invoice Amount not fully distributed.”
Server action: The validation script sends the error key ERR_DISTR to the AP Detail Valid custom property.
To include or distribute additional charge fields, complete the following steps, as needed.
Perceptive Accounts Payable Invoice eForm Advanced Design and Setup Guide
21
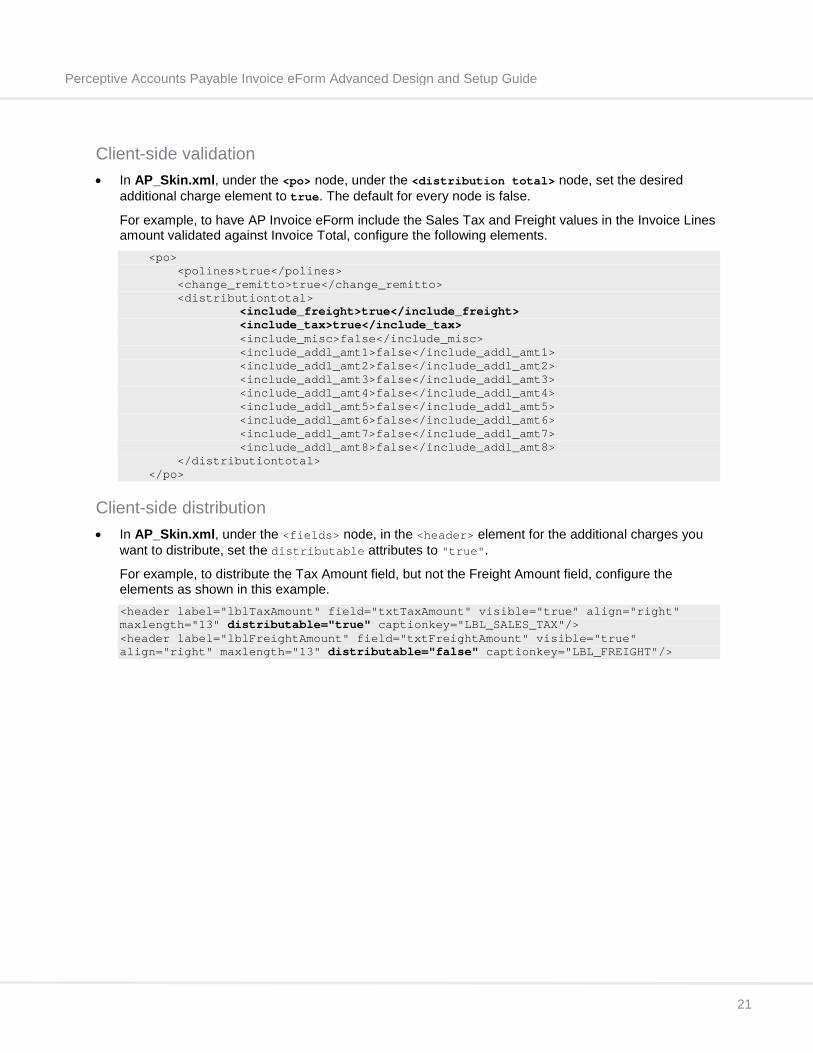
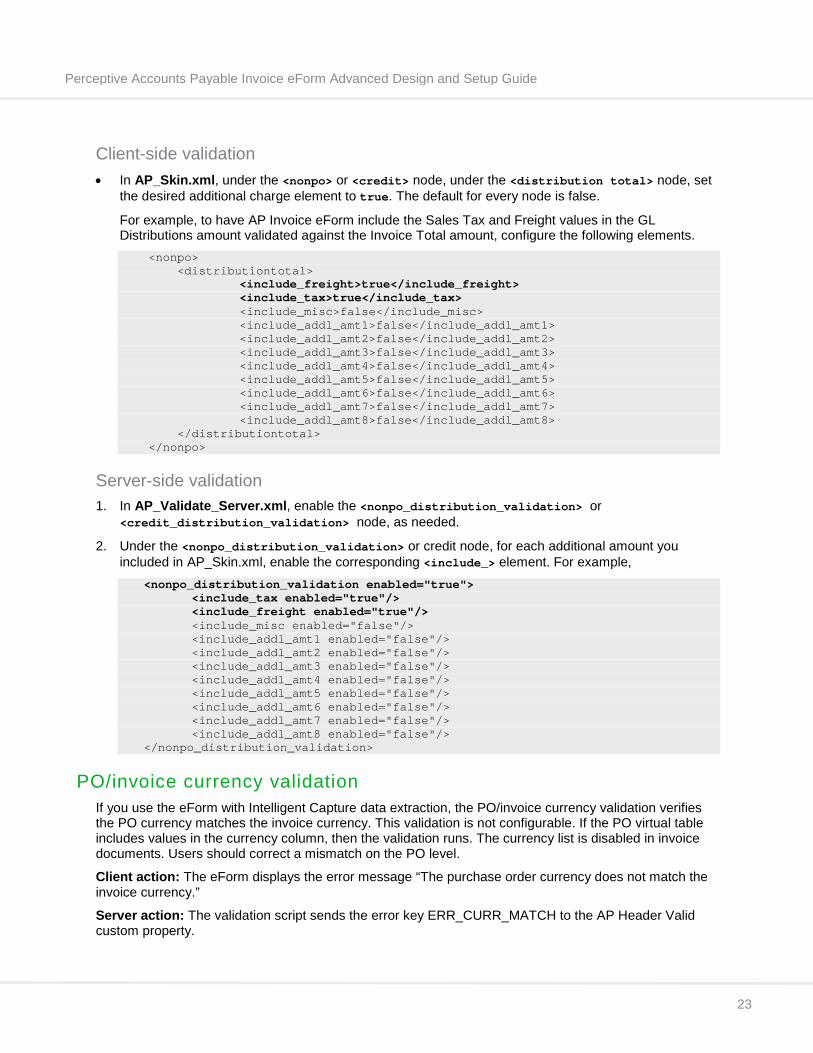
Client-side validation • In AP_Skin.xml, under the <po> node, under the <distribution total> node, set the desired
additional charge element to true. The default for every node is false.
For example, to have AP Invoice eForm include the Sales Tax and Freight values in the Invoice Lines amount validated against Invoice Total, configure the following elements. <po> <polines>true</polines> <change_remitto>true</change_remitto> <distributiontotal> <include_freight>true</include_freight> <include_tax>true</include_tax> <include_misc>false</include_misc> <include_addl_amt1>false</include_addl_amt1> <include_addl_amt2>false</include_addl_amt2> <include_addl_amt3>false</include_addl_amt3> <include_addl_amt4>false</include_addl_amt4> <include_addl_amt5>false</include_addl_amt5> <include_addl_amt6>false</include_addl_amt6> <include_addl_amt7>false</include_addl_amt7> <include_addl_amt8>false</include_addl_amt8> </distributiontotal> </po>
Client-side distribution • In AP_Skin.xml, under the <fields> node, in the <header> element for the additional charges you
want to distribute, set the distributable attributes to "true".
For example, to distribute the Tax Amount field, but not the Freight Amount field, configure the elements as shown in this example. <header label="lblTaxAmount" field="txtTaxAmount" visible="true" align="right" maxlength="13" distributable="true" captionkey="LBL_SALES_TAX"/> <header label="lblFreightAmount" field="txtFreightAmount" visible="true" align="right" maxlength="13" distributable="false" captionkey="LBL_FREIGHT"/>
Perceptive Accounts Payable Invoice eForm Advanced Design and Setup Guide
22
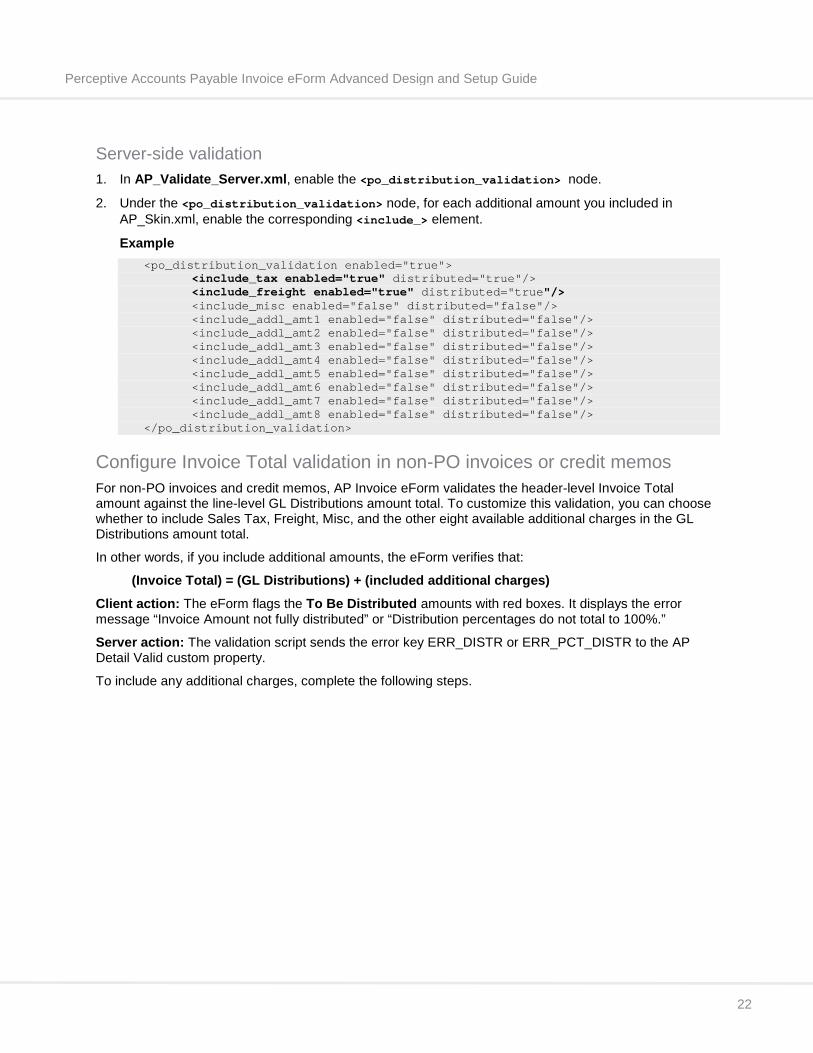
Server-side validation 1. In AP_Validate_Server.xml, enable the <po_distribution_validation> node.
2. Under the <po_distribution_validation> node, for each additional amount you included in AP_Skin.xml, enable the corresponding <include_> element.
Example <po_distribution_validation enabled="true"> <include_tax enabled="true" distributed="true"/> <include_freight enabled="true" distributed="true"/> <include_misc enabled="false" distributed="false"/> <include_addl_amt1 enabled="false" distributed="false"/> <include_addl_amt2 enabled="false" distributed="false"/> <include_addl_amt3 enabled="false" distributed="false"/> <include_addl_amt4 enabled="false" distributed="false"/> <include_addl_amt5 enabled="false" distributed="false"/> <include_addl_amt6 enabled="false" distributed="false"/> <include_addl_amt7 enabled="false" distributed="false"/> <include_addl_amt8 enabled="false" distributed="false"/> </po_distribution_validation>
Configure Invoice Total validation in non-PO invoices or credit memos For non-PO invoices and credit memos, AP Invoice eForm validates the header-level Invoice Total amount against the line-level GL Distributions amount total. To customize this validation, you can choose whether to include Sales Tax, Freight, Misc, and the other eight available additional charges in the GL Distributions amount total.
In other words, if you include additional amounts, the eForm verifies that:
(Invoice Total) = (GL Distributions) + (included additional charges)
Client action: The eForm flags the To Be Distributed amounts with red boxes. It displays the error message “Invoice Amount not fully distributed” or “Distribution percentages do not total to 100%.”
Server action: The validation script sends the error key ERR_DISTR or ERR_PCT_DISTR to the AP Detail Valid custom property.
To include any additional charges, complete the following steps.
Perceptive Accounts Payable Invoice eForm Advanced Design and Setup Guide
23
Client-side validation • In AP_Skin.xml, under the <nonpo> or <credit> node, under the <distribution total> node, set
the desired additional charge element to true. The default for every node is false.
For example, to have AP Invoice eForm include the Sales Tax and Freight values in the GL Distributions amount validated against the Invoice Total amount, configure the following elements. <nonpo> <distributiontotal> <include_freight>true</include_freight> <include_tax>true</include_tax> <include_misc>false</include_misc> <include_addl_amt1>false</include_addl_amt1> <include_addl_amt2>false</include_addl_amt2> <include_addl_amt3>false</include_addl_amt3> <include_addl_amt4>false</include_addl_amt4> <include_addl_amt5>false</include_addl_amt5> <include_addl_amt6>false</include_addl_amt6> <include_addl_amt7>false</include_addl_amt7> <include_addl_amt8>false</include_addl_amt8> </distributiontotal> </nonpo>
Server-side validation 1. In AP_Validate_Server.xml, enable the <nonpo_distribution_validation> or
<credit_distribution_validation> node, as needed.
2. Under the <nonpo_distribution_validation> or credit node, for each additional amount you included in AP_Skin.xml, enable the corresponding <include_> element. For example, <nonpo_distribution_validation enabled="true"> <include_tax enabled="true"/> <include_freight enabled="true"/> <include_misc enabled="false"/> <include_addl_amt1 enabled="false"/> <include_addl_amt2 enabled="false"/> <include_addl_amt3 enabled="false"/> <include_addl_amt4 enabled="false"/> <include_addl_amt5 enabled="false"/> <include_addl_amt6 enabled="false"/> <include_addl_amt7 enabled="false"/> <include_addl_amt8 enabled="false"/> </nonpo_distribution_validation>
PO/invoice currency validation If you use the eForm with Intelligent Capture data extraction, the PO/invoice currency validation verifies the PO currency matches the invoice currency. This validation is not configurable. If the PO virtual table includes values in the currency column, then the validation runs. The currency list is disabled in invoice documents. Users should correct a mismatch on the PO level.
Client action: The eForm displays the error message “The purchase order currency does not match the invoice currency.”
Server action: The validation script sends the error key ERR_CURR_MATCH to the AP Header Valid custom property.
Perceptive Accounts Payable Invoice eForm Advanced Design and Setup Guide
24
VAT validation For more information on enabling VAT validation, refer to the Enable VAT amount validation section.
Intelligent Capture Connector value-mapping validation
Server-side validation You can configure AP_Validate_Server.xml to validate values mapped with the Intelligent Capture Connector. For more information on the connector, refer to the Perceptive Intelligent Capture Connector Installation Guide, available in the Customer Portal.
To enable validation for values from the Intelligent Capture Connector, complete the following steps.
1. In AP_Validate_Server.xml, enable <run_ic_maping>.
2. Refer to the following sections and enable or configure validation settings as needed.
Lookup validation If you enable lookups, AP_Validate_Server.xml compares the data captured from the invoice with the data extracted using lookup from the configured data source for AP Invoice eForm.
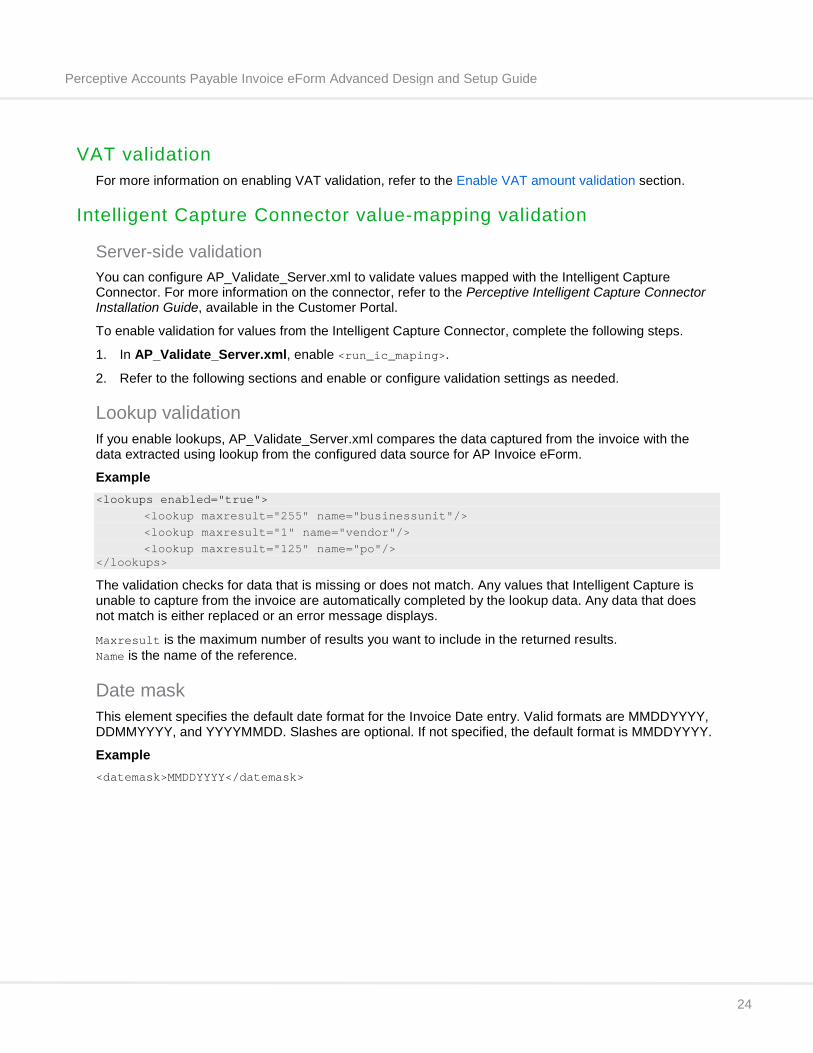
Example <lookups enabled="true">
<lookup maxresult="255" name="businessunit"/> <lookup maxresult="1" name="vendor"/> <lookup maxresult="125" name="po"/>
</lookups>
The validation checks for data that is missing or does not match. Any values that Intelligent Capture is unable to capture from the invoice are automatically completed by the lookup data. Any data that does not match is either replaced or an error message displays.
Maxresult is the maximum number of results you want to include in the returned results. Name is the name of the reference.
Date mask This element specifies the default date format for the Invoice Date entry. Valid formats are MMDDYYYY, DDMMYYYY, and YYYYMMDD. Slashes are optional. If not specified, the default format is MMDDYYYY.
Example <datemask>MMDDYYYY</datemask>
Perceptive Accounts Payable Invoice eForm Advanced Design and Setup Guide
25
PO line items This element allows you to enable and disable Intelligent Capture PO line item processing. If set to FALSE, the data source provides the data to populate the AP Invoice eForm line item section. If set to TRUE, Intelligent Capture provides the data.
The default is FALSE.
Example <polineitemprocessing>false</polineitemprocessing>
For more information about virtual tables, refer to the Perceptive AP Invoice eForm Connector Configuration Guide.
Replace vendor number If a mismatch in vendor numbers is found during validation, you can configure AP_Validate_Server.xml to replace the vendor number captured from the invoice with the vendor number extracted using lookup. To enable vendor number replacement, set <forcevendormatch> to true.
Example <forcevendormatch>true</forcevendormatch>
If set to false, the vendor number captured from the invoice is not replaced.
Location code Use this setting to define the source of the Location code, which is provided at scan time. Intelligent Capture does not provide location code. If using a location code, this value must pass to the Intelligent Capture Connector using an index value that the capture profile sets at scan time. By default, Intelligent Capture uses the Perceptive Content document key F4 (field4). ImageNow 6.6.x and higher to enable the use of a custom property at capture time. The connector references this value to set the related AP Invoice eForm XML data.
Example <locationcode sourcetype="index" sourcename="f4"/>
Valid values for sourcetype are index or customproperty.
Configure separator for multiple PO The Intelligent Capture Connector supports extraction of multiple PO numbers and displays them as a concatenated list with a delimiter. Specify the delimiter under the <poseparator> tag.
Example <poseparator>^</poseparator>
A ; (semi-colon) is the default delimiter.
Perceptive Accounts Payable Invoice eForm Advanced Design and Setup Guide
26
Configure caching Caching enables quick retrieval of previously searched data in AP Invoice eForm. You can schedule caching by running the AP_Maintenance.js file at regular intervals using the Windows Scheduler or by configuring caching in the AP_Config.xml file. If you choose to cache data by running the scheduler, you should either disable caching in the AP_Config.xml file or provide a cache refresh period longer than the period specified in the Windows Scheduler.
The AP_GetCompanies.js script gathers caching data from the virtual tables or the associated ERP application. For additional information on the caching functionality, refer to the AP_GetCompanies.js description in the table under \inserver\script.
To configure caching, complete the following steps.
1. Navigate to [Drive:]\inserver\etc\ap and open AP_Config.xml file.
2. Under the <Scripts> tag, in <AP_GetCompanies>, provide a value to the CacheDuration parameter to configure the cache refresh duration. You can provide any of the following values.
• Type 0 if you want the cache to refresh continuously.
• Type a positive value to specify the duration in minutes after which you want the cache to refresh.
• Type a negative value or special character if you do not want to refresh the cache.
Configure temporary XML storage location The AP_Config.xml file allows you to specify whether you prefer to store the temporary XML storage location on a shared drive or in the local drive. By default, this location is set to shared drive.
Note This enhancement is relevant for Active-Active server environment.
Change the temporary XML storage location To change the temporary XML storage location to your local drive, complete the following steps.
1. Navigate to the [drive:]/inserver/etc/ap directory.
2. Open the AP_Config.xml file.
3. Locate the <tempxmlstorage> element.
Note If the <tempxmlstorage> element is not available, manually add the element in the following syntax. <tempxmlstorage type='shared'></tempxmlstorage>
4. Change the value of the type attribute to ‘local’.
5. For the change to take effect, enter the following command to run the AP_Maintenance.js script. intool --cmd run-iscript --file AP_Maintenance.js
Important If your network connectivity is slow, changing the temporary XML storage location to “local” can help to improve performance.
Perceptive Accounts Payable Invoice eForm Advanced Design and Setup Guide
27
Configure value added tax within the eForm Incorporating value added tax (VAT) into your AP Invoice eForm solution allows your users to process and validate invoices and credit memos that include VAT amounts, codes and jurisdictions. You can enable VAT amounts to calculate automatically, per item at the line level, based on the VAT jurisdiction and VAT code combination.
To use VAT with AP Invoice eForm, review and complete the following procedures.
Create and enable the VAT codes For both purchase order and non-purchase order invoices, AP Invoice eForm provides fields for assigning VAT codes for each line item. The VAT code consists of two components: the jurisdiction and the VAT rate code. To configure AP Invoice eForm to accept line-level VAT code assignment, complete the following steps.
Create and update the virtual tables To create VAT-specific tables and update your existing virtual tables to include the basic VAT-specific columns, complete the following steps. These steps refer to virtual tables, which we detail in the Perceptive AP Invoice eForm Connector Configuration Guide.
1. Verify or create the VAT Code virtual table with Jurisdiction, VATCode and VATRate columns.
2. Verify or update the Business Unit virtual table with a Jurisdiction column.
3. Optional. Verify or update the Purchase Order Lines virtual table with Jurisdiction and VATCode columns.
Enable the columns To enable the VAT-specific columns you created in the previous section, complete the following step.
• In AP_VirtualTable_Updater.xml, for each <recordstructure> and <column> element your solution requires, set the enabled attribute to "true". The following example illustrates enabling the VAT Code table and its columns. <recordstructure recordtype="VAT_CODE" table="Z_APW_APVAT_Code" enabled="true"> <column customprop="Z_APW Active" enabled="true"/> <column customprop="Z_APW VAT Jurisdiction" enabled="true"/> <column customprop="Z_APW VAT Code" enabled="true"/> <column customprop="Z_APW VAT Rate" enabled="true"/> <column customprop="Z_APW VAT Description" enabled="true"/> </recordstructure>
Enable VAT at the line level To enable the global use of VAT in the eForm, at the line level, configure AP_Skin.xml. Complete the following steps.
1. Navigate to [drive:]\inserver\etc\ap and open AP_Skin.xml with a text editor.
2. To display the VAT code at the line level, for each of the following elements, set the visible attribute to "true".
• <poline label="lblPOLVATCode" field="cboPOLVATCode"/> • <glline label="lblGLVATCode" field="cboGLVATCode"/>
Perceptive Accounts Payable Invoice eForm Advanced Design and Setup Guide
28
3. Optional. To allow users to view the Jurisdiction code at the line level, in the following elements, set the visible attribute to “true”.
• <poline label="lblPOLVATJurisdiction" field="txtPOLVATJurisdiction"/>
• <glline label="lblGLVATJurisdiction" field="txtGLVATJurisdiction"/>
4. Optional. To allow users to view the VAT amount at the line level, in the following elements, set the visible attribute to “true”.
• <poline label="lblPOLVATAmount" field="txtPOLVATAmount"/>
• <glline label="lblGLVATAmount" field="txtGLVATAmount"/>
5. Save and close AP_Skin.xml.
Enable the VAT amount summary For each distinct VAT code referenced on an invoice, AP Invoice eForm can summarize the total VAT amounts. In the eForm user interface, the VAT Summary section provides a simple, compiled total of the VAT Base and VAT Amount for each VAT Code.
To enable the VAT amount summary logic, and optionally display the VAT Summary section in the eForm, complete the following steps.
Note To enable VAT sum validation, with or without displaying the VAT amount summary in the eForm, refer to the following Enable VAT amount validation section.
1. Navigate to [drive:]\inserver\etc\ap and open AP_Skin.xml with a text editor.
2. To enable VAT summation logic in the eForm, under <vatsummary>, set <enable> to true.
3. Optional. To display the VAT Summary section in AP Invoice eForm, set <showsection> to true.
4. Save and close AP_Skin.xml.
Enable VAT amount validation To enable validation of the line-level VAT Amount sums against the header-level VAT Total amount, complete the following procedures.
Update the Currency virtual table Due to rounding rate percentages, the sum total of the line-level VAT Amounts and the header-level VAT Total often contain a degree of variation. To specify an acceptable level of variation for your solution, update the Currency Codes virtual table. For more information, in the Perceptive AP Invoice eForm Connector Configuration Guide, refer to the “Currency” section.
Complete the following step.
• Update the Currency virtual table with VATVarianceAmount or VATVariancePercent columns.
Note If neither column exists, AP Invoice eForm validation expects an exact match between the line-level VAT Amounts and the header-level VAT Total. If you configure both columns, AP Invoice eForm uses the VATVariancePercent column.
Perceptive Accounts Payable Invoice eForm Advanced Design and Setup Guide
29
Enable the columns To enable the VATVarianceAmount and VATVariancePercent columns in the Currency Codes table, configure AP_VirtualTable_Updater.xml. Complete the following step.
• In AP_VirtualTable_Updater.xml, in the <recordstructure recordtype="Z_APW_APCurrency"> element, set the enabled attribute to “true” for the following columns. <column customprop="Z_APW VAT Variance Amount" enabled="true"/>
<column customprop="Z_APW VAT Variance Percent" enabled="true"/>
Enable VAT summation and validation To enable VAT summation and validation in the eForm user interface, configure AP_Skin.xml. Complete the following steps.
1. Navigate to [drive:]\inserver\etc\ap and open AP_Skin.xml with a text editor.
2. To convert the Tax Amount label to a VAT Total label in the eForm header, in the <header label="lblTaxAmount"> element, set the captionkey attribute to LBL_VAT_TOTAL.
3. To enable VAT summation in the eForm, under <vatsummary>, set <enable> to true.
4. To enable VAT validation in the eForm, under <vatsummary>, set <validatesummary> to true.
5. Save and close AP_Skin.xml.
Configure server-side VAT validation With server-side VAT validation, you can compare the header-level VAT Total field against the line-level VAT Amount fields in a workflow validation queue. Complete the following steps.
Note Server-side validation allows you to validate VAT amounts for each document processed, without requiring the user to complete the validation step in the eForm user interface.
1. Navigate to [drive:]\inserver\etc\ap and open AP_Validate_Server.xml with a text editor.
2. In the <vatsummary_validation> element, set the enabled attribute to “true”.
3. Save and close AP_Validate_Server.xml.
4. Optional. In Workflow Designer, create a routing rule to route back for VAT validation-specific errors, using the error code ERR_VAT_TOTAL_MATCH for the Value. For more information on routing rules, refer to the Create a rule to route back for header error conditions section.
Perceptive Accounts Payable Invoice eForm Advanced Design and Setup Guide
30
Associate the vendor VAT registration numbers To associate vendor VAT registration numbers (VAT IDs) with vendors and enable the Vendor VAT ID field, complete the following procedures.
Verify or create the VAT Registration Number (VAT ID) Vendor and Vendor virtual tables To create VAT-specific tables and update your existing virtual tables to include VAT-required columns, refer to the Perceptive AP Invoice eForm Connector Configuration Guide and complete the following steps.
1. Create the VAT_ID_VENDOR virtual table and all required columns. Refer to the “VAT Registration Number (VAT ID) Vendor” section.
2. Optional. To create a default VAT ID for each vendor, update the VENDOR virtual table with a VAT ID column. Refer to the “Vendor” section.
Note The user can modify the default value in the eForm by manually keying a new value, or by selecting a value from the VAT Registration Number virtual table using the search feature.
Enable the Vendor VAT ID field To enable the Vendor VAT ID header-level field, configure AP_Skin.xml. Complete the following steps.
1. Navigate to [drive:]\inserver\etc\ap and open AP_Skin.xml with a text editor.
2. For the following element, set the visible attribute to true. <header label="lblVendorVATID" field="txtVendorVATID"/>
3. Save and close AP_Skin.xml.
Associate the sold-to VAT Registration Numbers To associate sold-to VAT registration numbers (VAT IDs) with business units and enable the Sold To VAT ID field, complete the following procedures.
Verify or create the VAT Registration Number (VAT ID) Business Unit and Vendor virtual tables To create VAT-specific tables and update your existing virtual tables to include VAT-required columns, refer to the Perceptive AP Invoice eForm Connector Configuration Guide and complete the following steps.
1. Create the VAT_ID_BUS_UNIT virtual table with the required BusUnit and VAT ID columns. Refer to the “VAT Registration Number (VAT ID) Business Unit” section.
2. Optional. To create a default VAT ID value for each business unit, update the BUS_UNIT virtual table with a VAT ID column. Refer to the “Business Unit” section.
Note The user can modify the default value in the eForm by manually keying a new value, or by selecting a value from the VAT Registration Number virtual table using the search feature.
Perceptive Accounts Payable Invoice eForm Advanced Design and Setup Guide
31
Enable VAT at the header level In the AP_Skin.xml file, you can enable the global use of VAT in your eForm, at the header level.
1. Navigate to [drive:]\inserver\etc\ap and open AP_Skin.xml with a text editor.
2. For the following element, set the visible attribute to true.
• <header label="lblSoldToVATID" field="txtSoldToVATID"/>
3. Save and close AP_Skin.xml.
Enable the VAT Compliance check box You can customize the AP Invoice eForm to include a check box that signifies that the invoice follows all rules and regulations around the handling of invoices with VAT. To enable this feature, complete the following steps.
1. Navigate to [drive:]\inserver\etc\ap and open AP_Skin.xml with a text editor.
2. For the following element, set the visible attribute to ”true”.
• <header label="lblVATCompliant" field="chkVATCompliant"/>
Note You can set the required attribute to true, however the user must still select the check box in the eForm.
3. Save and close AP_Skin.xml.
Enable the Automatic Tax Calculation check box With SAP integrations, the Automatic Tax Calculation check box allows SAP to calculate an invoice tax amount rather than using any value provided in the eForm. When selected, SAP calculates the invoice tax separately with its own internal tables of external tax engine.
If you enable the check box in AP Invoice eForm, the eForm selects the check box by default.
Complete the following steps.
1. Navigate to [drive:]\inserver\etc\ap and open AP_Skin.xml with a text editor.
2. For the following element, set the visible attribute to “true”.
• <header label="lblAutomaticTaxCalc" field="chkAutomaticTaxCalc"/>
3. Save and close AP_Skin.xml.
4. Start INTool by accessing a command prompt and changing directories to \inserver\bin or
\inserver\bin64.
5. To commit the changes, enter the following command to run the AP_Maintenance.js script. intool --cmd run-iscript --file AP_Maintenance.js
Perceptive Accounts Payable Invoice eForm Advanced Design and Setup Guide
32
Associate AP Invoice eForm with virtual tables or other data sources You can configure AP Invoice eForm to connect with virtual tables or with ERP applications, for example SAP. To enable this you must update the configuration in the AP_Config.xml file. By default, the demo connector is configured with the eForm.
Configure AP_Config.xml file to connect with virtual tables To configure AP_Config.xml to associate AP Invoice eForm with virtual tables, complete the following steps.
1. In the AP_Config.xml file, under <configurations>, locate the <connector> tag.
2. Within the <connector> tag, replace DemoConnector or any other existing value with APEF_VirtualTableConnector.
Configure AP_Config.xml file to connect with ERP applications To configure AP_Config.xml to associate AP Invoice eForm with ERP applications, complete the following steps.
1. In the AP_Config.xml file, under <configurations>, locate the <connector> tag.
2. Within the <connector> tag, remove DemoConnector or any other existing value.
3. Type the value associated with the ERP that is included in the [Drive:]\inserver\script\apef\connectors folder. For example, to connect AP Invoice eForm to SAP, type SAPConnector within the <connector> tag, as the SAPConnector.js file is available in this folder.
Configure AP_Config.xml file to connect with custom connector To configure AP_Config.xml to associate AP Invoice eForm with ERP applications, complete the following steps.
1. In the AP_Config.xml file, under <configurations>, locate the <connector> tag.
2. Within the <connector> tag, replace DemoConnector or any other existing value with CustomConnector.
Configure AP_Config.xml file to connect with demo connector To configure AP_Config.xml to associate AP Invoice eForm with the demo connector, complete the following steps.
1. In the AP_Config.xml file, under <configurations>, locate the <connector> tag.
2. Within the <connector> tag , replace the existing value with DemoConnector.
Perceptive Accounts Payable Invoice eForm Advanced Design and Setup Guide
33
Configure real-time posting in SAP If your solution uses Perceptive Connect Runtime or Perceptive Connect with Perceptive Connector for SAP Financial Accounting, you can configure AP Invoice eForm to create, park, post, and cancel invoices and Credit Memos directly in SAP.
The SAP connector allows you to make data channels directly between the eForm and SAP.
To begin, create Integration automated system queues (ASQs) in your eForm workflow and then configure channels with the connector. To configure real-time posting in SAP, complete the following steps.
1. In the AP Invoice eForm workflow, create the following Integration ASQ to create, park, post, and cancel invoices in SAP. For additional information on how to create an Integration ASQ, refer to the Perceptive Connector for SAP Financials Installation and Setup Guide.
• To create invoices, create three Integration ASQs, one for each of the following segments.
• Integration ASQ for PO. To accommodate PO-related invoices to be created in SAP and route them to designated queues
• Integration ASQ for non-PO. To accommodate non-PO-related invoices to be created in SAP and route them to designated queues
• Integration ASQ for Credit Memo. To accommodate Credit Memos to be created in SAP and route them to designated queues
• To park invoices, create three Integration ASQs, one for each of the following segments.
• Integration ASQ for PO. To accommodate PO-related invoices to be parked in SAP and route them to designated queues
• Integration ASQ for non-PO. To accommodate non-PO-related invoices to be parked in SAP and route them to designated queues
• Integration ASQ for Credit Memo. To accommodate Credit Memos to be parked in SAP and route them to designated queues
• To post previously parked invoices in SAP for PO, non-PO, and Credit Memo, create one Integration ASQ.
• To cancel invoices in SAP for PO, non-PO, and Credit Memo, create one Integration ASQ.
2. Open Perceptive Connect Runtime Web Console, create a channel for each Integration ASQ, and specify a name for the channel. For example, to configure a channel to create PO invoices, name the channel as APEF_CreateInvoice_PO. For additional information on how to create a channel, refer to the Perceptive Connector for SAP Financials Installation and Setup Guide.
Note The steps to create a channel are based on Perceptive Connect Runtime version 1.0.
3. In Perceptive Connect Runtime Web Console, to configure a channel, complete the following steps to map the parameters to each Integration ASQ, as required.
1. Navigate to the [drive]\{path}\Perceptive AP Invoice eForm 12.<x>.<x> for SAP\SAPMappingfiles directory.
Note In the directory path mentioned above, replace x with the current version number. For example, if the current version is 12.4.0, the directory path is [drive]\{path}\Perceptive AP Invoice eForm 12.4.0 for SAP\SAPMappingfiles.
Perceptive Accounts Payable Invoice eForm Advanced Design and Setup Guide
34
2. Open APEF_CreateInvoice_PO.xml and copy the contents to the wizard box in the Configure the channel page.
3. Click Save.
Note The XML map associates the invoice number and fiscal year with Field1 and Field2, respectively, by default. To associate them to a different field or custom property, in the respective XML configuration, change the value of the <in:key> element appropriately under <outputs> tag.
For additional information on how to create Integration ASQ and map the Integration ASQ using Perceptive Connect Runtime Web Console, refer to the Create an Integration ASQ and Create and configure a channel sections of the Perceptive Connector for SAP Financials Installation and Setup Guide.
Configure real-time lookups from SAP You can configure the AP Invoice eForm to perform live lookups from SAP. This requires back-end integration of AP Invoice eForm with SAP Financials connector using ImageNow Envoy service. After the configuration is complete, SAP Financials connector receives the eForm data and returns the lookup result. To configure the AP Invoice eForm, complete the following steps.
1. In Perceptive Content Management Console, in the left pane, click Envoy Services and then click New.
2. In the Envoy Services dialog box, in the Definition page, set the following attributes.
1. In the Name box, type ErpCommonOperationsService to identify the remote service.
2. Optional. In the Description box, type a description.
3. In the URI box, type the URI for your connector server in the format http://<Perceptive Connect Runtime server>:<port>/ws/ErpSyncOperations?wsdl.
4. In the Authentication list, select None.
5. Optional. If you want to enable interceptor logging for the remote service, select the Enable interceptor logging check box.
3. Click Next.
4. In the Operations page, in the ErpCommonOperationsService operation, select all the check boxes.
5. Click Finish.
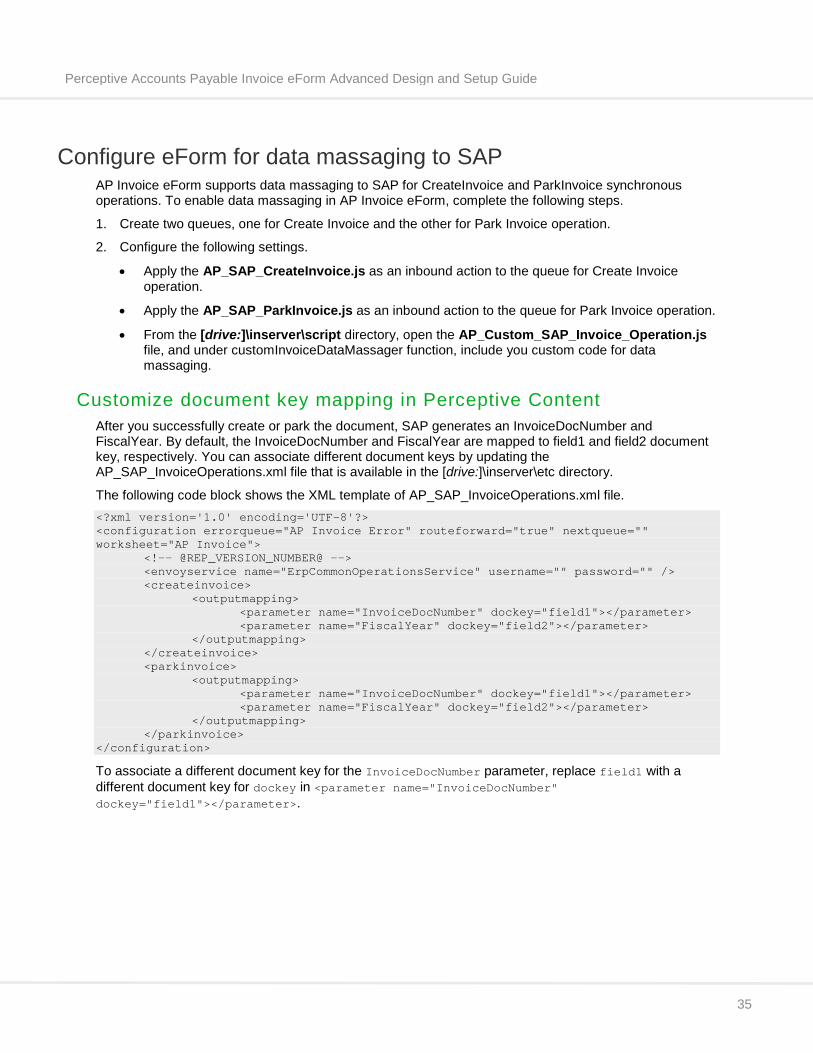
Perceptive Accounts Payable Invoice eForm Advanced Design and Setup Guide
35
Configure eForm for data massaging to SAP AP Invoice eForm supports data massaging to SAP for CreateInvoice and ParkInvoice synchronous operations. To enable data massaging in AP Invoice eForm, complete the following steps.
1. Create two queues, one for Create Invoice and the other for Park Invoice operation.
2. Configure the following settings.
• Apply the AP_SAP_CreateInvoice.js as an inbound action to the queue for Create Invoice operation.
• Apply the AP_SAP_ParkInvoice.js as an inbound action to the queue for Park Invoice operation.
• From the [drive:]\inserver\script directory, open the AP_Custom_SAP_Invoice_Operation.js file, and under customInvoiceDataMassager function, include you custom code for data massaging.
Customize document key mapping in Perceptive Content After you successfully create or park the document, SAP generates an InvoiceDocNumber and FiscalYear. By default, the InvoiceDocNumber and FiscalYear are mapped to field1 and field2 document key, respectively. You can associate different document keys by updating the AP_SAP_InvoiceOperations.xml file that is available in the [drive:]\inserver\etc directory.
The following code block shows the XML template of AP_SAP_InvoiceOperations.xml file. <?xml version='1.0' encoding='UTF-8'?> <configuration errorqueue="AP Invoice Error" routeforward="true" nextqueue="" worksheet="AP Invoice"> <!-- @REP_VERSION_NUMBER@ --> <envoyservice name="ErpCommonOperationsService" username="" password="" /> <createinvoice> <outputmapping> <parameter name="InvoiceDocNumber" dockey="field1"></parameter> <parameter name="FiscalYear" dockey="field2"></parameter> </outputmapping> </createinvoice> <parkinvoice> <outputmapping> <parameter name="InvoiceDocNumber" dockey="field1"></parameter> <parameter name="FiscalYear" dockey="field2"></parameter> </outputmapping> </parkinvoice> </configuration>
To associate a different document key for the InvoiceDocNumber parameter, replace field1 with a different document key for dockey in <parameter name="InvoiceDocNumber" dockey="field1"></parameter>.
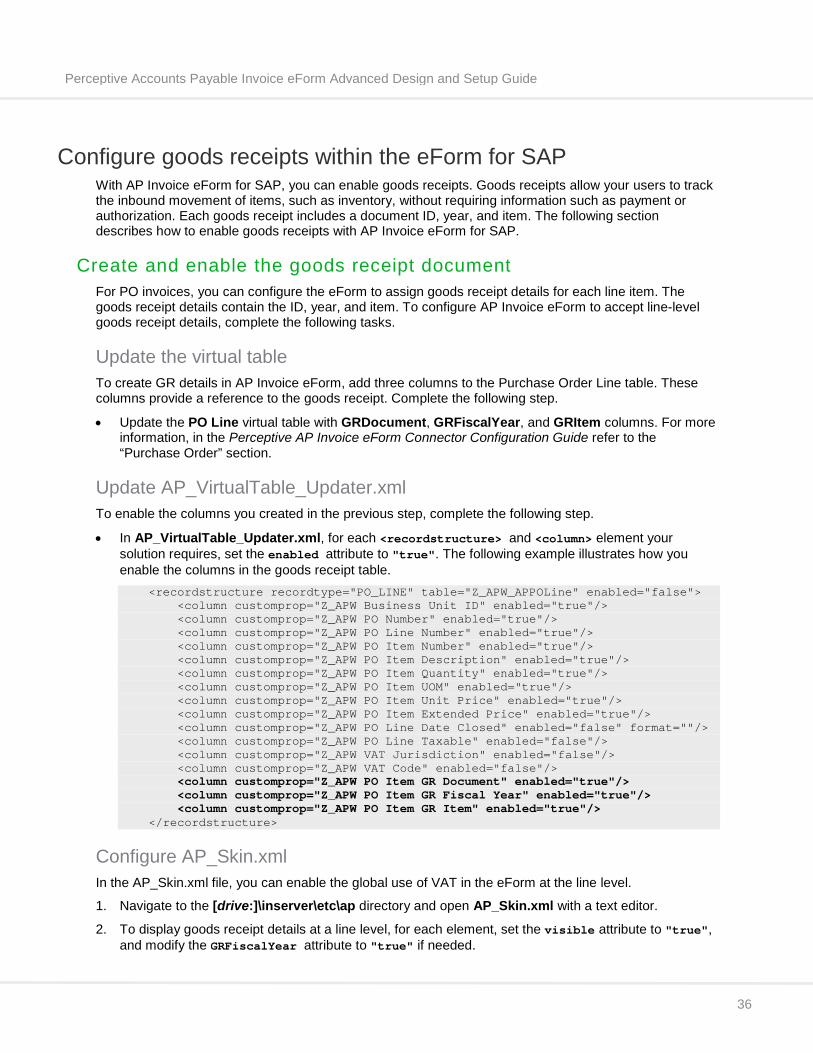
Perceptive Accounts Payable Invoice eForm Advanced Design and Setup Guide
36
Configure goods receipts within the eForm for SAP With AP Invoice eForm for SAP, you can enable goods receipts. Goods receipts allow your users to track the inbound movement of items, such as inventory, without requiring information such as payment or authorization. Each goods receipt includes a document ID, year, and item. The following section describes how to enable goods receipts with AP Invoice eForm for SAP.
Create and enable the goods receipt document For PO invoices, you can configure the eForm to assign goods receipt details for each line item. The goods receipt details contain the ID, year, and item. To configure AP Invoice eForm to accept line-level goods receipt details, complete the following tasks.
Update the virtual table To create GR details in AP Invoice eForm, add three columns to the Purchase Order Line table. These columns provide a reference to the goods receipt. Complete the following step.
• Update the PO Line virtual table with GRDocument, GRFiscalYear, and GRItem columns. For more information, in the Perceptive AP Invoice eForm Connector Configuration Guide refer to the “Purchase Order” section.
Update AP_VirtualTable_Updater.xml To enable the columns you created in the previous step, complete the following step.
• In AP_VirtualTable_Updater.xml, for each <recordstructure> and <column> element your solution requires, set the enabled attribute to "true". The following example illustrates how you enable the columns in the goods receipt table. <recordstructure recordtype="PO_LINE" table="Z_APW_APPOLine" enabled="false"> <column customprop="Z_APW Business Unit ID" enabled="true"/> <column customprop="Z_APW PO Number" enabled="true"/> <column customprop="Z_APW PO Line Number" enabled="true"/> <column customprop="Z_APW PO Item Number" enabled="true"/> <column customprop="Z_APW PO Item Description" enabled="true"/> <column customprop="Z_APW PO Item Quantity" enabled="true"/> <column customprop="Z_APW PO Item UOM" enabled="true"/> <column customprop="Z_APW PO Item Unit Price" enabled="true"/> <column customprop="Z_APW PO Item Extended Price" enabled="true"/> <column customprop="Z_APW PO Line Date Closed" enabled="false" format=""/> <column customprop="Z_APW PO Line Taxable" enabled="false"/> <column customprop="Z_APW VAT Jurisdiction" enabled="false"/> <column customprop="Z_APW VAT Code" enabled="false"/> <column customprop="Z_APW PO Item GR Document" enabled="true"/> <column customprop="Z_APW PO Item GR Fiscal Year" enabled="true"/> <column customprop="Z_APW PO Item GR Item" enabled="true"/> </recordstructure>
Configure AP_Skin.xml In the AP_Skin.xml file, you can enable the global use of VAT in the eForm at the line level.
1. Navigate to the [drive:]\inserver\etc\ap directory and open AP_Skin.xml with a text editor.
2. To display goods receipt details at a line level, for each element, set the visible attribute to "true", and modify the GRFiscalYear attribute to "true" if needed.
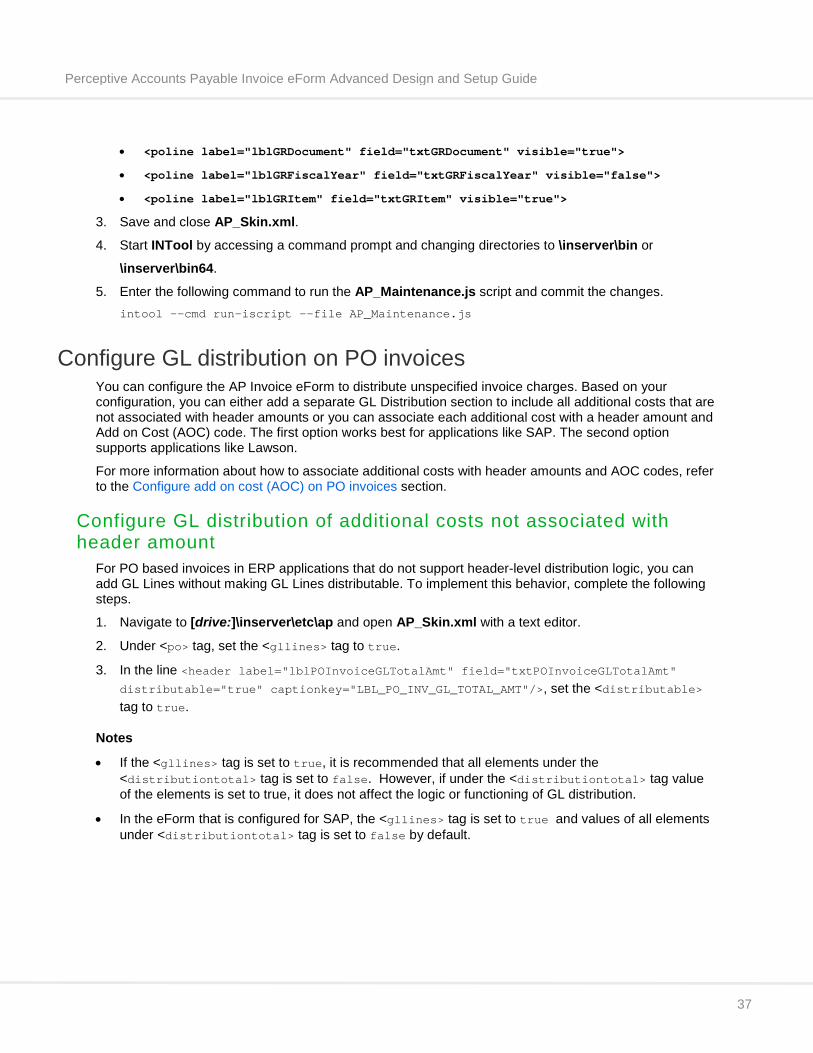
Perceptive Accounts Payable Invoice eForm Advanced Design and Setup Guide
37
• <poline label="lblGRDocument" field="txtGRDocument" visible="true">
• <poline label="lblGRFiscalYear" field="txtGRFiscalYear" visible="false">
• <poline label="lblGRItem" field="txtGRItem" visible="true">
3. Save and close AP_Skin.xml.
4. Start INTool by accessing a command prompt and changing directories to \inserver\bin or
\inserver\bin64.
5. Enter the following command to run the AP_Maintenance.js script and commit the changes. intool --cmd run-iscript --file AP_Maintenance.js
Configure GL distribution on PO invoices You can configure the AP Invoice eForm to distribute unspecified invoice charges. Based on your configuration, you can either add a separate GL Distribution section to include all additional costs that are not associated with header amounts or you can associate each additional cost with a header amount and Add on Cost (AOC) code. The first option works best for applications like SAP. The second option supports applications like Lawson.
For more information about how to associate additional costs with header amounts and AOC codes, refer to the Configure add on cost (AOC) on PO invoices section.
Configure GL distribution of additional costs not associated with header amount
For PO based invoices in ERP applications that do not support header-level distribution logic, you can add GL Lines without making GL Lines distributable. To implement this behavior, complete the following steps.
1. Navigate to [drive:]\inserver\etc\ap and open AP_Skin.xml with a text editor.
2. Under <po> tag, set the <gllines> tag to true.
3. In the line <header label="lblPOInvoiceGLTotalAmt" field="txtPOInvoiceGLTotalAmt" distributable="true" captionkey="LBL_PO_INV_GL_TOTAL_AMT"/>, set the <distributable> tag to true.
Notes
• If the <gllines> tag is set to true, it is recommended that all elements under the <distributiontotal> tag is set to false. However, if under the <distributiontotal> tag value of the elements is set to true, it does not affect the logic or functioning of GL distribution.
• In the eForm that is configured for SAP, the <gllines> tag is set to true and values of all elements under <distributiontotal> tag is set to false by default.
Perceptive Accounts Payable Invoice eForm Advanced Design and Setup Guide
38
Configure add on cost (AOC) on PO invoices The add on cost (AOC) feature allows you to configure the way you categorize and distribute Sales Tax, Freight, Misc. Charge, and other additional amount charges. These charges appear on PO invoices, but are not included in the purchase order. For Lawson users, this configuration also allows you to export AOC codes with distributed amounts, including GL Code or GL Account information, to the MA540 file.
For example, you could assign a default AOC code and accompanying description to your header-level “Misc. Charge” field, such as “HA – Handling.” During PO invoice processing, your user keys an amount into the “Misc. Charge” field. The GL Distributions section automatically populates the default AOC code, description, distribution amount, and any other default GL information you prefer, such as Account number.
At that point, your user could retain the default AOC code for the Misc. Charge value, or select an alternate code from the AOC list. The user can insert and modify additional distribution lines under the AOC code. For example, the user could split a handling charge across multiple departments, cost centers, or accounting units. The AOC feature supports the ability to incorporate both GL Code and GL Account fields in your GL Distributions section.
To configure AOC codes and PO GL distributed-line exports for Lawson, refer to the following sections.
Create and enable the AOC codes AP Invoice eForm provides the ability to assign an AOC code for each PO GL header-level field amount. In the eForm, the AOC list populates a concatenated AOC code and optional description. The list can import these values from the AOC GL Code table, the AOC GL Account table, or both.
To configure AP Invoice eForm with AOC functionality, complete the following tasks.
Create the AOC virtual tables To use AOC, create an AOC GL Code table, an AOC GL Account table, or both, depending on your current usage of the GL Code and GL Account virtual tables. If you use both AOC tables, the AOC list under GL Distributions contains each unique AOC Code and its description. If you use both GL Code and GL Account fields, use matching sets of AOC codes and optional descriptions.
The eForm completes field-level validation with the GL Code and GL Account tables. To pass validation, every code or account field used in the AOC tables must also exist in the corresponding GL Code or GL Account table.
Complete the following steps, as necessary for your solution.
• Create the AOC GL Account virtual table with Table Name, Active, AOC Code, and any optional columns. For more information, in the Perceptive AP Invoice eForm Connector Configuration Guide, refer to the “AOC GL Account” section.
• Create the AOC GL Code virtual table with Table Name, Active, and AOC Code, and any optional columns. For more information, in the Perceptive AP Invoice eForm Connector Configuration Guide, refer to the “AOC GL Code” section.
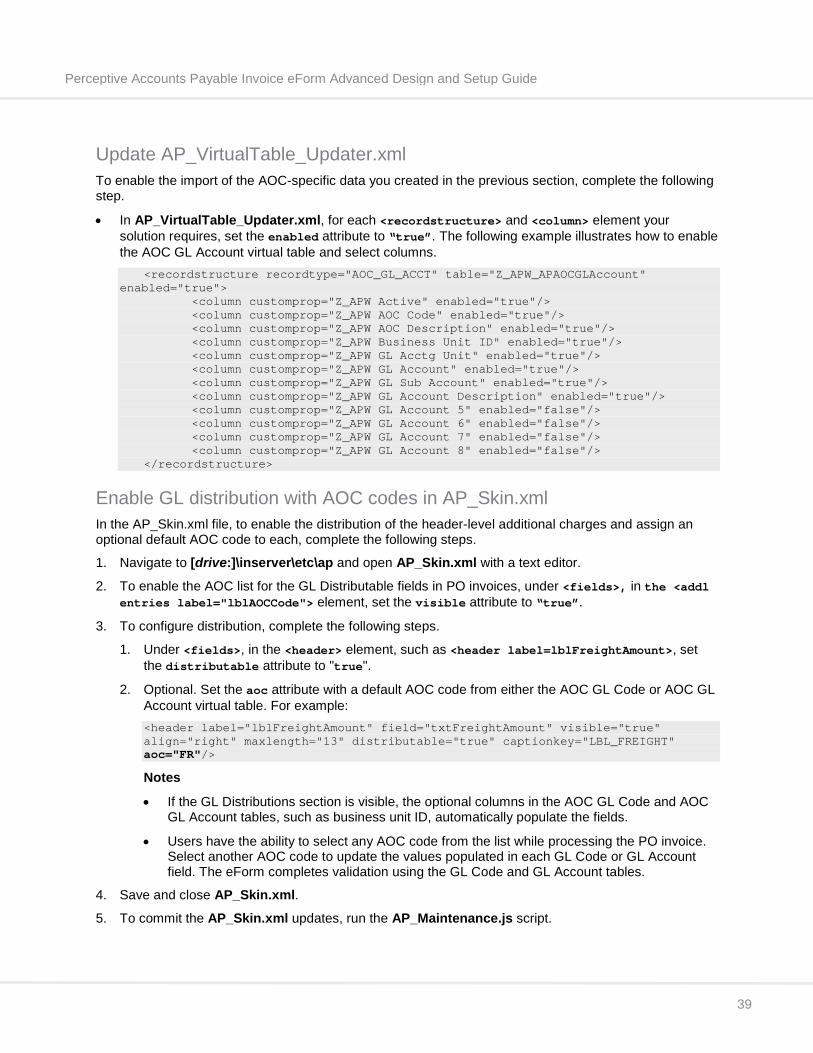
Perceptive Accounts Payable Invoice eForm Advanced Design and Setup Guide
39
Update AP_VirtualTable_Updater.xml To enable the import of the AOC-specific data you created in the previous section, complete the following step.
• In AP_VirtualTable_Updater.xml, for each <recordstructure> and <column> element your solution requires, set the enabled attribute to “true”. The following example illustrates how to enable the AOC GL Account virtual table and select columns. <recordstructure recordtype="AOC_GL_ACCT" table="Z_APW_APAOCGLAccount" enabled="true"> <column customprop="Z_APW Active" enabled="true"/> <column customprop="Z_APW AOC Code" enabled="true"/> <column customprop="Z_APW AOC Description" enabled="true"/> <column customprop="Z_APW Business Unit ID" enabled="true"/> <column customprop="Z_APW GL Acctg Unit" enabled="true"/> <column customprop="Z_APW GL Account" enabled="true"/> <column customprop="Z_APW GL Sub Account" enabled="true"/> <column customprop="Z_APW GL Account Description" enabled="true"/> <column customprop="Z_APW GL Account 5" enabled="false"/> <column customprop="Z_APW GL Account 6" enabled="false"/> <column customprop="Z_APW GL Account 7" enabled="false"/> <column customprop="Z_APW GL Account 8" enabled="false"/> </recordstructure>
Enable GL distribution with AOC codes in AP_Skin.xml In the AP_Skin.xml file, to enable the distribution of the header-level additional charges and assign an optional default AOC code to each, complete the following steps.
1. Navigate to [drive:]\inserver\etc\ap and open AP_Skin.xml with a text editor.
2. To enable the AOC list for the GL Distributable fields in PO invoices, under <fields>, in the <addl entries label="lblAOCCode"> element, set the visible attribute to “true”.
3. To configure distribution, complete the following steps.
1. Under <fields>, in the <header> element, such as <header label=lblFreightAmount>, set the distributable attribute to "true".
2. Optional. Set the aoc attribute with a default AOC code from either the AOC GL Code or AOC GL Account virtual table. For example: <header label="lblFreightAmount" field="txtFreightAmount" visible="true" align="right" maxlength="13" distributable="true" captionkey="LBL_FREIGHT" aoc="FR"/>
Notes
• If the GL Distributions section is visible, the optional columns in the AOC GL Code and AOC GL Account tables, such as business unit ID, automatically populate the fields.
• Users have the ability to select any AOC code from the list while processing the PO invoice. Select another AOC code to update the values populated in each GL Code or GL Account field. The eForm completes validation using the GL Code and GL Account tables.
4. Save and close AP_Skin.xml.
5. To commit the AP_Skin.xml updates, run the AP_Maintenance.js script.
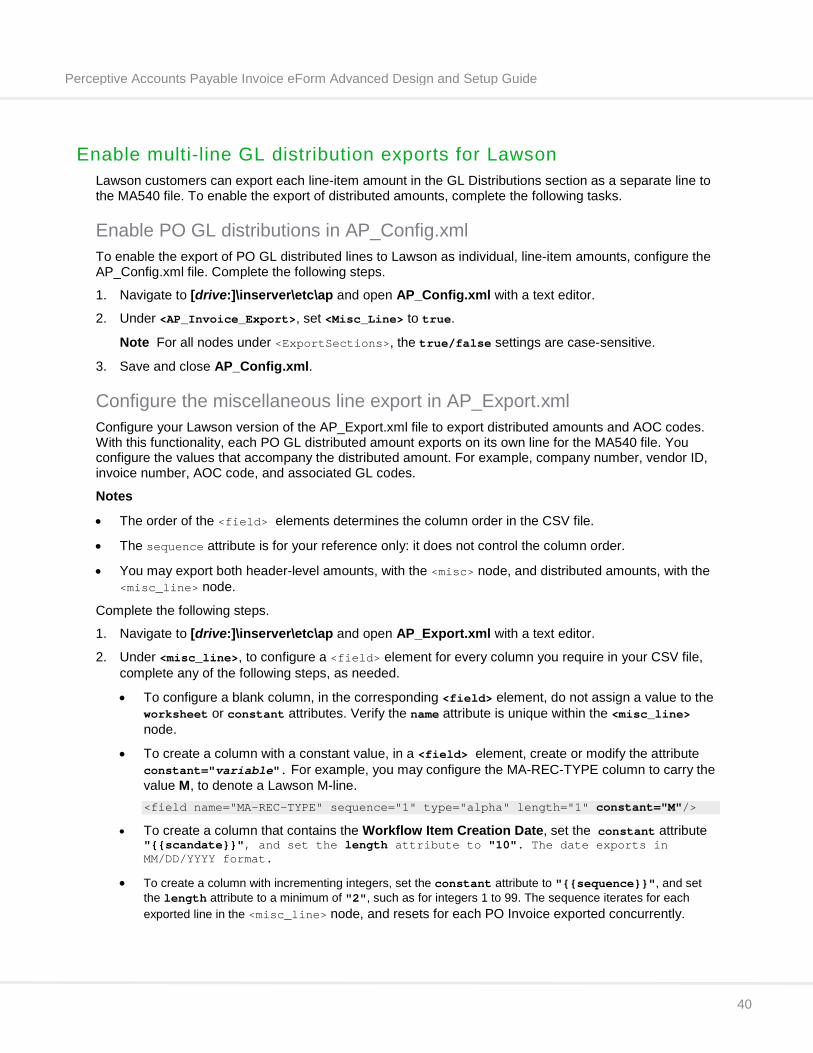
Perceptive Accounts Payable Invoice eForm Advanced Design and Setup Guide
40
Enable multi-line GL distribution exports for Lawson Lawson customers can export each line-item amount in the GL Distributions section as a separate line to the MA540 file. To enable the export of distributed amounts, complete the following tasks.
Enable PO GL distributions in AP_Config.xml To enable the export of PO GL distributed lines to Lawson as individual, line-item amounts, configure the AP_Config.xml file. Complete the following steps.
1. Navigate to [drive:]\inserver\etc\ap and open AP_Config.xml with a text editor.
2. Under <AP_Invoice_Export>, set <Misc_Line> to true.
Note For all nodes under <ExportSections>, the true/false settings are case-sensitive.
3. Save and close AP_Config.xml.
Configure the miscellaneous line export in AP_Export.xml Configure your Lawson version of the AP_Export.xml file to export distributed amounts and AOC codes. With this functionality, each PO GL distributed amount exports on its own line for the MA540 file. You configure the values that accompany the distributed amount. For example, company number, vendor ID, invoice number, AOC code, and associated GL codes.
Notes
• The order of the <field> elements determines the column order in the CSV file.
• The sequence attribute is for your reference only: it does not control the column order.
• You may export both header-level amounts, with the <misc> node, and distributed amounts, with the <misc_line> node.
Complete the following steps.
1. Navigate to [drive:]\inserver\etc\ap and open AP_Export.xml with a text editor.
2. Under <misc_line>, to configure a <field> element for every column you require in your CSV file, complete any of the following steps, as needed.
• To configure a blank column, in the corresponding <field> element, do not assign a value to the worksheet or constant attributes. Verify the name attribute is unique within the <misc_line> node.
• To create a column with a constant value, in a <field> element, create or modify the attribute constant="variable". For example, you may configure the MA-REC-TYPE column to carry the value M, to denote a Lawson M-line. <field name="MA-REC-TYPE" sequence="1" type="alpha" length="1" constant="M"/>
• To create a column that contains the Workflow Item Creation Date, set the constant attribute "{{scandate}}", and set the length attribute to "10". The date exports in MM/DD/YYYY format.
• To create a column with incrementing integers, set the constant attribute to "{{sequence}}", and set the length attribute to a minimum of "2", such as for integers 1 to 99. The sequence iterates for each exported line in the <misc_line> node, and resets for each PO Invoice exported concurrently.
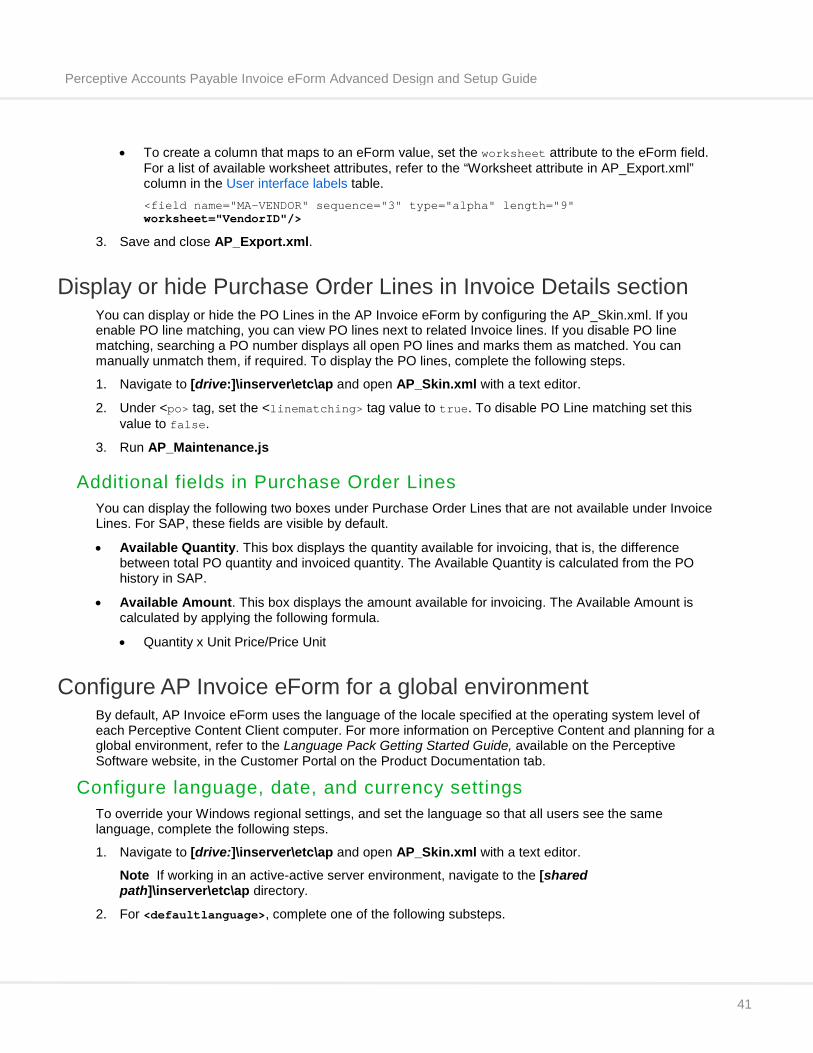
Perceptive Accounts Payable Invoice eForm Advanced Design and Setup Guide
41
• To create a column that maps to an eForm value, set the worksheet attribute to the eForm field. For a list of available worksheet attributes, refer to the “Worksheet attribute in AP_Export.xml” column in the User interface labels table. <field name="MA-VENDOR" sequence="3" type="alpha" length="9" worksheet="VendorID"/>
3. Save and close AP_Export.xml.
Display or hide Purchase Order Lines in Invoice Details section You can display or hide the PO Lines in the AP Invoice eForm by configuring the AP_Skin.xml. If you enable PO line matching, you can view PO lines next to related Invoice lines. If you disable PO line matching, searching a PO number displays all open PO lines and marks them as matched. You can manually unmatch them, if required. To display the PO lines, complete the following steps.
1. Navigate to [drive:]\inserver\etc\ap and open AP_Skin.xml with a text editor.
2. Under <po> tag, set the <linematching> tag value to true. To disable PO Line matching set this value to false.
3. Run AP_Maintenance.js
Additional fields in Purchase Order Lines You can display the following two boxes under Purchase Order Lines that are not available under Invoice Lines. For SAP, these fields are visible by default.
• Available Quantity. This box displays the quantity available for invoicing, that is, the difference between total PO quantity and invoiced quantity. The Available Quantity is calculated from the PO history in SAP.
• Available Amount. This box displays the amount available for invoicing. The Available Amount is calculated by applying the following formula.
• Quantity x Unit Price/Price Unit
Configure AP Invoice eForm for a global environment By default, AP Invoice eForm uses the language of the locale specified at the operating system level of each Perceptive Content Client computer. For more information on Perceptive Content and planning for a global environment, refer to the Language Pack Getting Started Guide, available on the Perceptive Software website, in the Customer Portal on the Product Documentation tab.
Configure language, date, and currency settings To override your Windows regional settings, and set the language so that all users see the same language, complete the following steps.
1. Navigate to [drive:]\inserver\etc\ap and open AP_Skin.xml with a text editor.
Note If working in an active-active server environment, navigate to the [shared path]\inserver\etc\ap directory.
2. For <defaultlanguage>, complete one of the following substeps.
Perceptive Accounts Payable Invoice eForm Advanced Design and Setup Guide
42
• To set a generic default language in AP Invoice eForm, use one of these two-character language codes. • For Dutch, type nl. • For English, type en. • For French, type fr. • For German, type de. • For Portuguese, type pt. • For Spanish, type es.
The following example sets the language to English. <defaultlanguage>en</defaultlanguage>
• To set a default language based on a specific country, and to display the date, number, percentage and currency format according to that locale, use one of these four-character language codes.
• Dutch
• For Belgium, type nl-BE.
• For Netherlands, type nl-NL.
• English
• For Australia, type en-AU.
• For Canada, type en-CA.
• For Great Britain, type en-GB.
• For India, type en-IN.
• For the United States, type en-US.
• French
• For Belgium, type fr-BE.
• For France, type fr-FR.
• For Switzerland, type fr-CH.
• German
• For Germany, type de-DE.
• For Switzerland, type de-CH.
• Portuguese
• For Brazil, type pt-BR.
• Spanish
• For Argentina, type es-AR.
• For Mexico, type es-MX.
• For Spain, type es-ES.
Perceptive Accounts Payable Invoice eForm Advanced Design and Setup Guide
43
• For Spanish-Argentina, type es-AR, for Spanish-Mexico, type es-MX or for Spanish-Spain, type es-ES.
In the example below, the language is set to French, and the country is set to Belgium. <defaultlanguage>fr-BE</defaultlanguage>
Note For more information on supported languages, with the associated language and country codes, refer to Supported languages, countries and currencies.
3. Save and close AP_Skin.xml.
Custom configuration To make a culture-specific customization to your AP Invoice eForm, complete the following steps.
1. Navigate to [drive:]\inserver\etc\ap and open AP_Custom_Cultures.xml with a text editor.
Note If working in an active-active server environment, navigate to the [shared path]\inserver\etc\ap directory.
2. For the <culture> element, configure the following attributes.
• For the name attribute, type a unique name to identify the specific language and country for which you are customizing the form.
• For the base attribute, type the language code or the language code and country code pair from which culture inherits the properties. For example, en or en-US.
Note For more information on language and country codes, refer to Supported languages, countries and currencies.
• For the language attribute, type the language code, such as en.
3. For the <numberFormat> element, configure the following attributes.
• For groupseparator, type the character you want to use to separate number groupings, such as comma (,), period (.), space (ns), or apostrophe (‘).
• For decimalseparator, type the character you want to use to separate the integer part of a number and the decimal part, such as comma (,) or period (.).
• For groupsizes, type a value for the number grouping size, such as 3,2 grouping.
4. For the <calendar> element, configure the following attributes.
• For separator, type the character you want to use to separate the day, month, and year values of the date string, such as forward slash (/), hyphen (-), or period(.).
5. For the <patterns> element, configure the following attributes.
• For shortinput, type the short date format, without separators, that you want to use to format your dates, such as MMddyy.
• For longinput, type the long date format, without separators, that you want to use to format your dates, such as MMddyyyy.
• For display, type the short date format, with separators, that you want to use to display your dates, such as MM/dd/yyyy.
6. For the <messages> element, configure the following attributes.
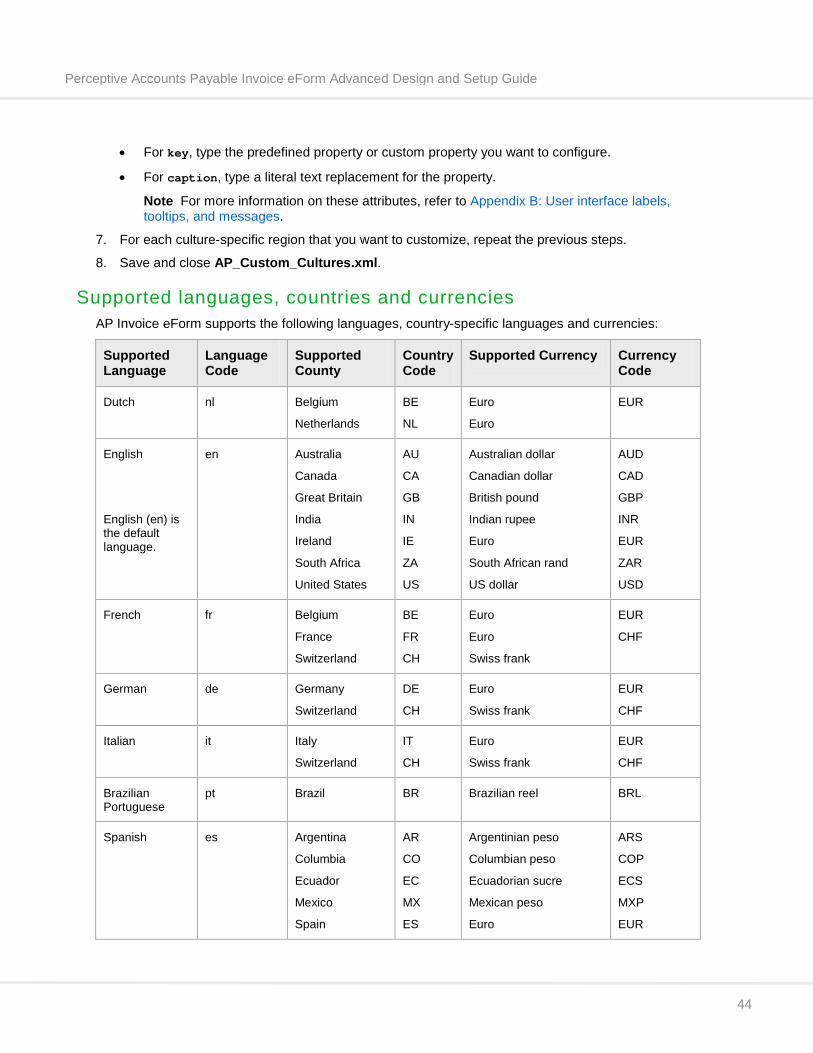
Perceptive Accounts Payable Invoice eForm Advanced Design and Setup Guide
44
• For key, type the predefined property or custom property you want to configure.
• For caption, type a literal text replacement for the property.
Note For more information on these attributes, refer to Appendix B: User interface labels, tooltips, and messages.
7. For each culture-specific region that you want to customize, repeat the previous steps.
8. Save and close AP_Custom_Cultures.xml.
Supported languages, countries and currencies AP Invoice eForm supports the following languages, country-specific languages and currencies:
Supported Language
Language Code
Supported County
Country Code
Supported Currency Currency Code
Dutch nl Belgium
Netherlands
BE
NL
Euro
Euro
EUR
English
English (en) is the default language.
en Australia
Canada
Great Britain
India
Ireland
South Africa
United States
AU
CA
GB
IN
IE
ZA
US
Australian dollar
Canadian dollar
British pound
Indian rupee
Euro
South African rand
US dollar
AUD
CAD
GBP
INR
EUR
ZAR
USD
French fr Belgium
France
Switzerland
BE
FR
CH
Euro
Euro
Swiss frank
EUR
CHF
German de Germany
Switzerland
DE
CH
Euro
Swiss frank
EUR
CHF
Italian it Italy
Switzerland
IT
CH
Euro
Swiss frank
EUR
CHF
Brazilian Portuguese
pt Brazil BR Brazilian reel BRL
Spanish es Argentina
Columbia
Ecuador
Mexico
Spain
AR
CO
EC
MX
ES
Argentinian peso
Columbian peso
Ecuadorian sucre
Mexican peso
Euro
ARS
COP
ECS
MXP
EUR
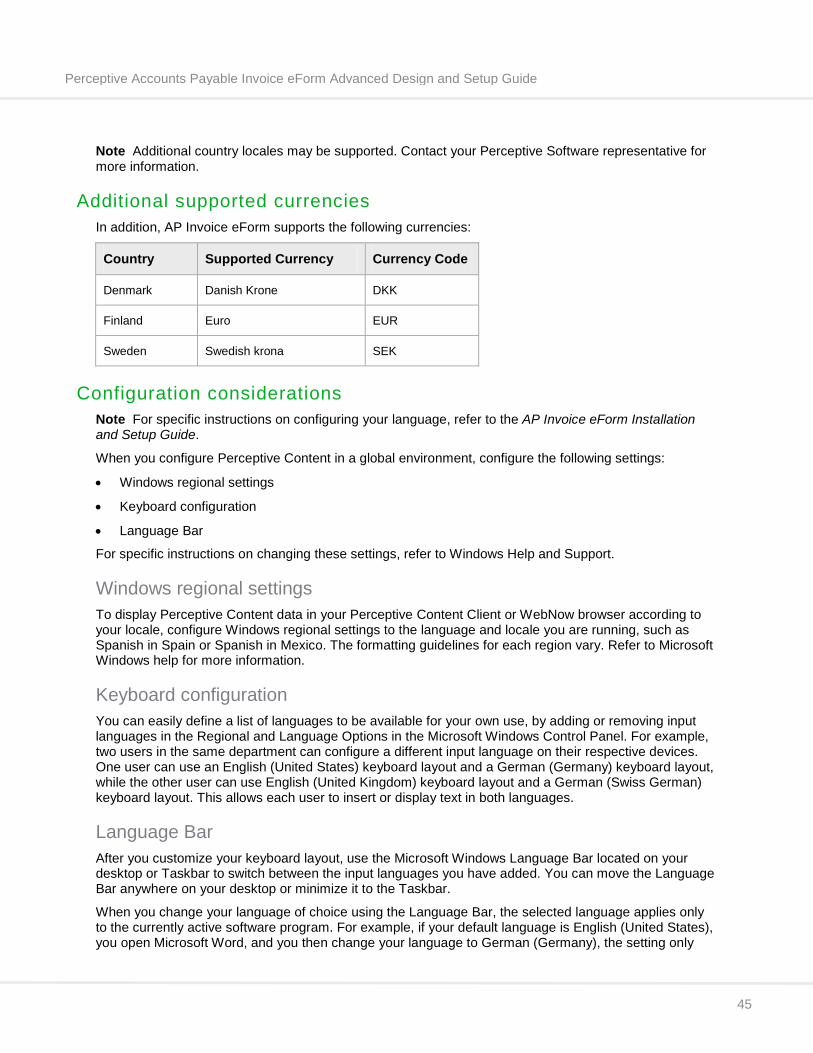
Perceptive Accounts Payable Invoice eForm Advanced Design and Setup Guide
45
Note Additional country locales may be supported. Contact your Perceptive Software representative for more information.
Additional supported currencies In addition, AP Invoice eForm supports the following currencies:
Country Supported Currency Currency Code
Denmark Danish Krone DKK
Finland Euro EUR
Sweden Swedish krona SEK
Configuration considerations Note For specific instructions on configuring your language, refer to the AP Invoice eForm Installation and Setup Guide.
When you configure Perceptive Content in a global environment, configure the following settings:
• Windows regional settings
• Keyboard configuration
• Language Bar
For specific instructions on changing these settings, refer to Windows Help and Support.
Windows regional settings To display Perceptive Content data in your Perceptive Content Client or WebNow browser according to your locale, configure Windows regional settings to the language and locale you are running, such as Spanish in Spain or Spanish in Mexico. The formatting guidelines for each region vary. Refer to Microsoft Windows help for more information.
Keyboard configuration You can easily define a list of languages to be available for your own use, by adding or removing input languages in the Regional and Language Options in the Microsoft Windows Control Panel. For example, two users in the same department can configure a different input language on their respective devices. One user can use an English (United States) keyboard layout and a German (Germany) keyboard layout, while the other user can use English (United Kingdom) keyboard layout and a German (Swiss German) keyboard layout. This allows each user to insert or display text in both languages.
Language Bar After you customize your keyboard layout, use the Microsoft Windows Language Bar located on your desktop or Taskbar to switch between the input languages you have added. You can move the Language Bar anywhere on your desktop or minimize it to the Taskbar.
When you change your language of choice using the Language Bar, the selected language applies only to the currently active software program. For example, if your default language is English (United States), you open Microsoft Word, and you then change your language to German (Germany), the setting only

Perceptive Accounts Payable Invoice eForm Advanced Design and Setup Guide
46
applies to Microsoft Word. All other programs you subsequently open use English (United States). Always verify that you are using the correct keyboard layout and language of choice when switching between programs.
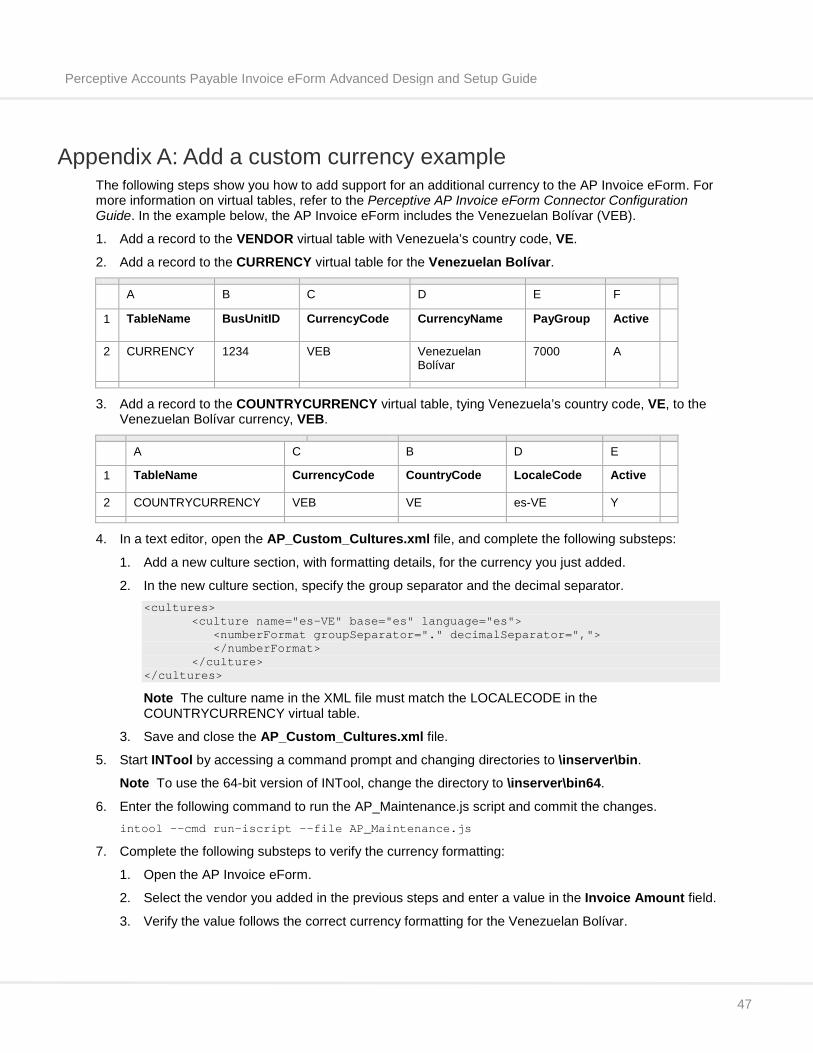
Perceptive Accounts Payable Invoice eForm Advanced Design and Setup Guide
47
Appendix A: Add a custom currency example The following steps show you how to add support for an additional currency to the AP Invoice eForm. For more information on virtual tables, refer to the Perceptive AP Invoice eForm Connector Configuration Guide. In the example below, the AP Invoice eForm includes the Venezuelan Bolívar (VEB).
1. Add a record to the VENDOR virtual table with Venezuela’s country code, VE.
2. Add a record to the CURRENCY virtual table for the Venezuelan Bolívar.
A B C D E F
1 TableName BusUnitID CurrencyCode CurrencyName PayGroup Active
2 CURRENCY 1234 VEB Venezuelan Bolívar
7000 A
3. Add a record to the COUNTRYCURRENCY virtual table, tying Venezuela’s country code, VE, to the
Venezuelan Bolívar currency, VEB.
A C B D E 1 TableName CurrencyCode CountryCode LocaleCode Active 2 COUNTRYCURRENCY VEB VE es-VE Y
4. In a text editor, open the AP_Custom_Cultures.xml file, and complete the following substeps:
1. Add a new culture section, with formatting details, for the currency you just added.
2. In the new culture section, specify the group separator and the decimal separator. <cultures> <culture name="es-VE" base="es" language="es"> <numberFormat groupSeparator="." decimalSeparator=","> </numberFormat> </culture> </cultures>
Note The culture name in the XML file must match the LOCALECODE in the COUNTRYCURRENCY virtual table.
3. Save and close the AP_Custom_Cultures.xml file.
5. Start INTool by accessing a command prompt and changing directories to \inserver\bin.
Note To use the 64-bit version of INTool, change the directory to \inserver\bin64.
6. Enter the following command to run the AP_Maintenance.js script and commit the changes. intool --cmd run-iscript --file AP_Maintenance.js
7. Complete the following substeps to verify the currency formatting:
1. Open the AP Invoice eForm.
2. Select the vendor you added in the previous steps and enter a value in the Invoice Amount field.
3. Verify the value follows the correct currency formatting for the Venezuelan Bolívar.
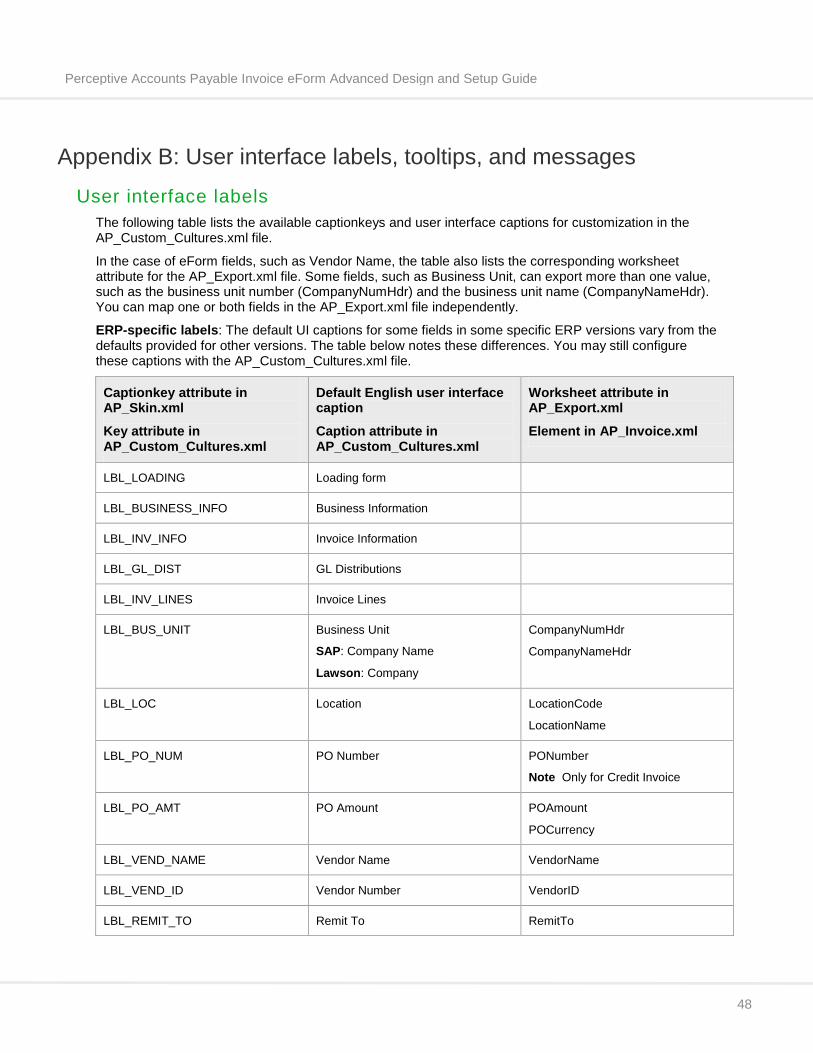
Perceptive Accounts Payable Invoice eForm Advanced Design and Setup Guide
48
Appendix B: User interface labels, tooltips, and messages
User interface labels The following table lists the available captionkeys and user interface captions for customization in the AP_Custom_Cultures.xml file.
In the case of eForm fields, such as Vendor Name, the table also lists the corresponding worksheet attribute for the AP_Export.xml file. Some fields, such as Business Unit, can export more than one value, such as the business unit number (CompanyNumHdr) and the business unit name (CompanyNameHdr). You can map one or both fields in the AP_Export.xml file independently.
ERP-specific labels: The default UI captions for some fields in some specific ERP versions vary from the defaults provided for other versions. The table below notes these differences. You may still configure these captions with the AP_Custom_Cultures.xml file.
Captionkey attribute in AP_Skin.xml
Key attribute in AP_Custom_Cultures.xml
Default English user interface caption
Caption attribute in AP_Custom_Cultures.xml
Worksheet attribute in AP_Export.xml
Element in AP_Invoice.xml
LBL_LOADING Loading form
LBL_BUSINESS_INFO Business Information
LBL_INV_INFO Invoice Information
LBL_GL_DIST GL Distributions
LBL_INV_LINES Invoice Lines
LBL_BUS_UNIT Business Unit
SAP: Company Name
Lawson: Company
CompanyNumHdr
CompanyNameHdr
LBL_LOC Location LocationCode
LocationName
LBL_PO_NUM PO Number PONumber
Note Only for Credit Invoice
LBL_PO_AMT PO Amount POAmount
POCurrency
LBL_VEND_NAME Vendor Name VendorName
LBL_VEND_ID Vendor Number VendorID
LBL_REMIT_TO Remit To RemitTo
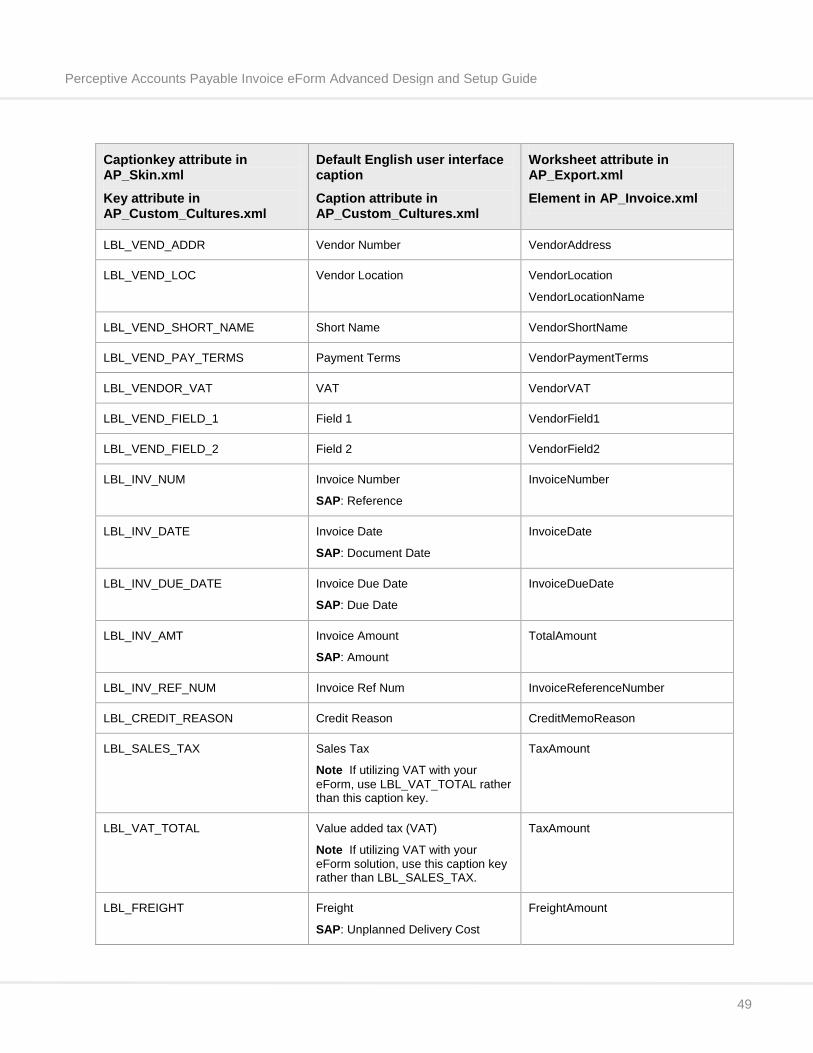
Perceptive Accounts Payable Invoice eForm Advanced Design and Setup Guide
49
Captionkey attribute in AP_Skin.xml
Key attribute in AP_Custom_Cultures.xml
Default English user interface caption
Caption attribute in AP_Custom_Cultures.xml
Worksheet attribute in AP_Export.xml
Element in AP_Invoice.xml
LBL_VEND_ADDR Vendor Number VendorAddress
LBL_VEND_LOC Vendor Location VendorLocation
VendorLocationName
LBL_VEND_SHORT_NAME Short Name VendorShortName
LBL_VEND_PAY_TERMS Payment Terms VendorPaymentTerms
LBL_VENDOR_VAT VAT VendorVAT
LBL_VEND_FIELD_1 Field 1 VendorField1
LBL_VEND_FIELD_2 Field 2 VendorField2
LBL_INV_NUM Invoice Number
SAP: Reference
InvoiceNumber
LBL_INV_DATE Invoice Date
SAP: Document Date
InvoiceDate
LBL_INV_DUE_DATE Invoice Due Date
SAP: Due Date
InvoiceDueDate
LBL_INV_AMT Invoice Amount
SAP: Amount
TotalAmount
LBL_INV_REF_NUM Invoice Ref Num InvoiceReferenceNumber
LBL_CREDIT_REASON Credit Reason CreditMemoReason
LBL_SALES_TAX Sales Tax
Note If utilizing VAT with your eForm, use LBL_VAT_TOTAL rather than this caption key.
TaxAmount
LBL_VAT_TOTAL Value added tax (VAT)
Note If utilizing VAT with your eForm solution, use this caption key rather than LBL_SALES_TAX.
TaxAmount
LBL_FREIGHT Freight
SAP: Unplanned Delivery Cost
FreightAmount
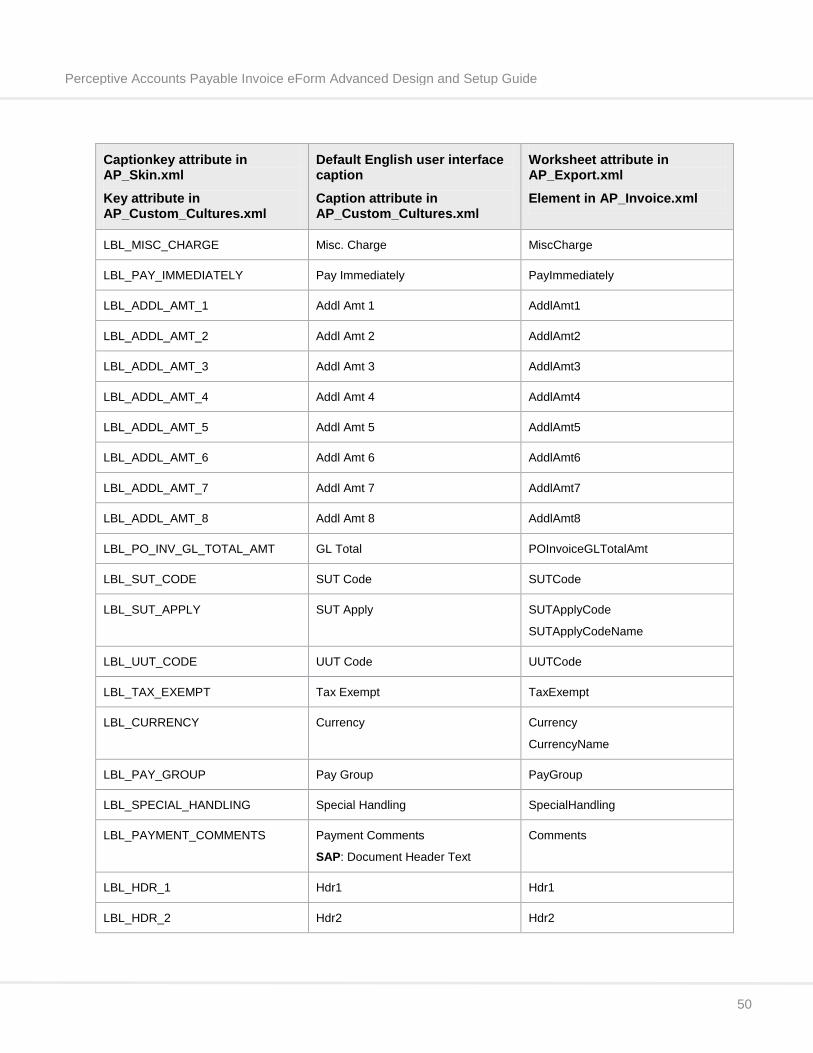
Perceptive Accounts Payable Invoice eForm Advanced Design and Setup Guide
50
Captionkey attribute in AP_Skin.xml
Key attribute in AP_Custom_Cultures.xml
Default English user interface caption
Caption attribute in AP_Custom_Cultures.xml
Worksheet attribute in AP_Export.xml
Element in AP_Invoice.xml
LBL_MISC_CHARGE Misc. Charge MiscCharge
LBL_PAY_IMMEDIATELY Pay Immediately PayImmediately
LBL_ADDL_AMT_1 Addl Amt 1 AddlAmt1
LBL_ADDL_AMT_2 Addl Amt 2 AddlAmt2
LBL_ADDL_AMT_3 Addl Amt 3 AddlAmt3
LBL_ADDL_AMT_4 Addl Amt 4 AddlAmt4
LBL_ADDL_AMT_5 Addl Amt 5 AddlAmt5
LBL_ADDL_AMT_6 Addl Amt 6 AddlAmt6
LBL_ADDL_AMT_7 Addl Amt 7 AddlAmt7
LBL_ADDL_AMT_8 Addl Amt 8 AddlAmt8
LBL_PO_INV_GL_TOTAL_AMT GL Total POInvoiceGLTotalAmt
LBL_SUT_CODE SUT Code SUTCode
LBL_SUT_APPLY SUT Apply SUTApplyCode
SUTApplyCodeName
LBL_UUT_CODE UUT Code UUTCode
LBL_TAX_EXEMPT Tax Exempt TaxExempt
LBL_CURRENCY Currency Currency
CurrencyName
LBL_PAY_GROUP Pay Group PayGroup
LBL_SPECIAL_HANDLING Special Handling SpecialHandling
LBL_PAYMENT_COMMENTS Payment Comments
SAP: Document Header Text
Comments
LBL_HDR_1 Hdr1 Hdr1
LBL_HDR_2 Hdr2 Hdr2
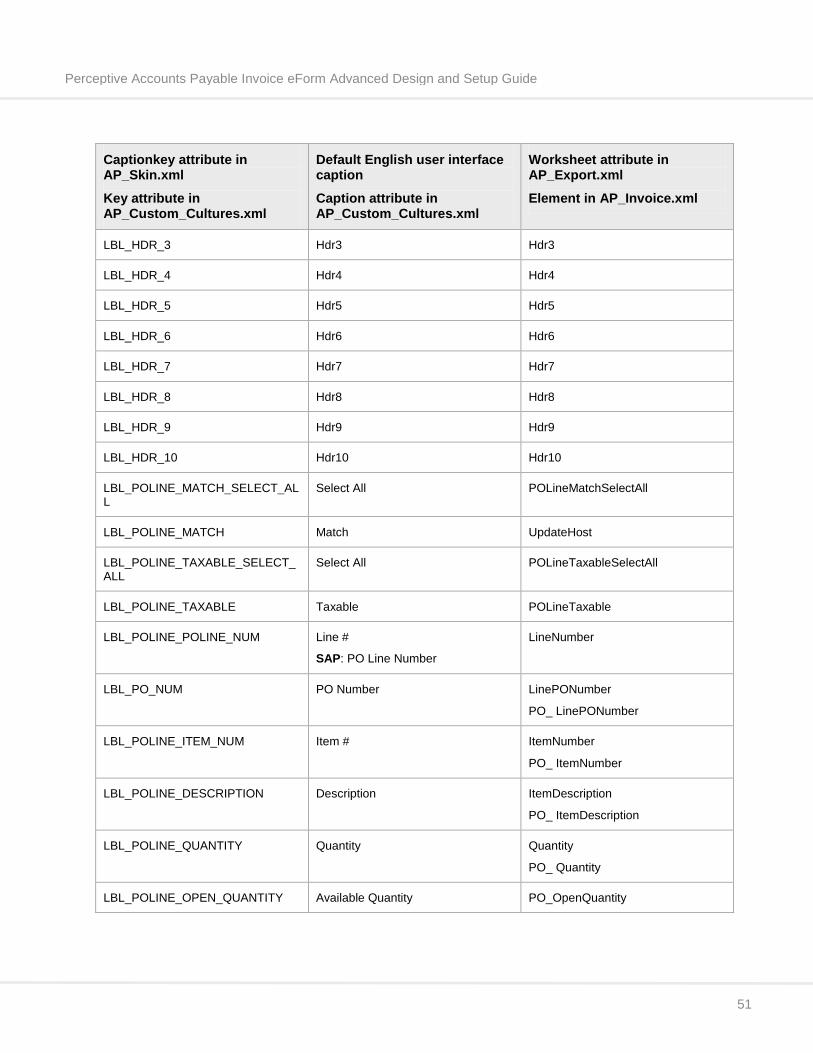
Perceptive Accounts Payable Invoice eForm Advanced Design and Setup Guide
51
Captionkey attribute in AP_Skin.xml
Key attribute in AP_Custom_Cultures.xml
Default English user interface caption
Caption attribute in AP_Custom_Cultures.xml
Worksheet attribute in AP_Export.xml
Element in AP_Invoice.xml
LBL_HDR_3 Hdr3 Hdr3
LBL_HDR_4 Hdr4 Hdr4
LBL_HDR_5 Hdr5 Hdr5
LBL_HDR_6 Hdr6 Hdr6
LBL_HDR_7 Hdr7 Hdr7
LBL_HDR_8 Hdr8 Hdr8
LBL_HDR_9 Hdr9 Hdr9
LBL_HDR_10 Hdr10 Hdr10
LBL_POLINE_MATCH_SELECT_ALL
Select All POLineMatchSelectAll
LBL_POLINE_MATCH Match UpdateHost
LBL_POLINE_TAXABLE_SELECT_ ALL
Select All POLineTaxableSelectAll
LBL_POLINE_TAXABLE Taxable POLineTaxable
LBL_POLINE_POLINE_NUM Line #
SAP: PO Line Number
LineNumber
LBL_PO_NUM PO Number LinePONumber
PO_ LinePONumber
LBL_POLINE_ITEM_NUM Item # ItemNumber
PO_ ItemNumber
LBL_POLINE_DESCRIPTION Description ItemDescription
PO_ ItemDescription
LBL_POLINE_QUANTITY Quantity Quantity
PO_ Quantity
LBL_POLINE_OPEN_QUANTITY Available Quantity PO_OpenQuantity
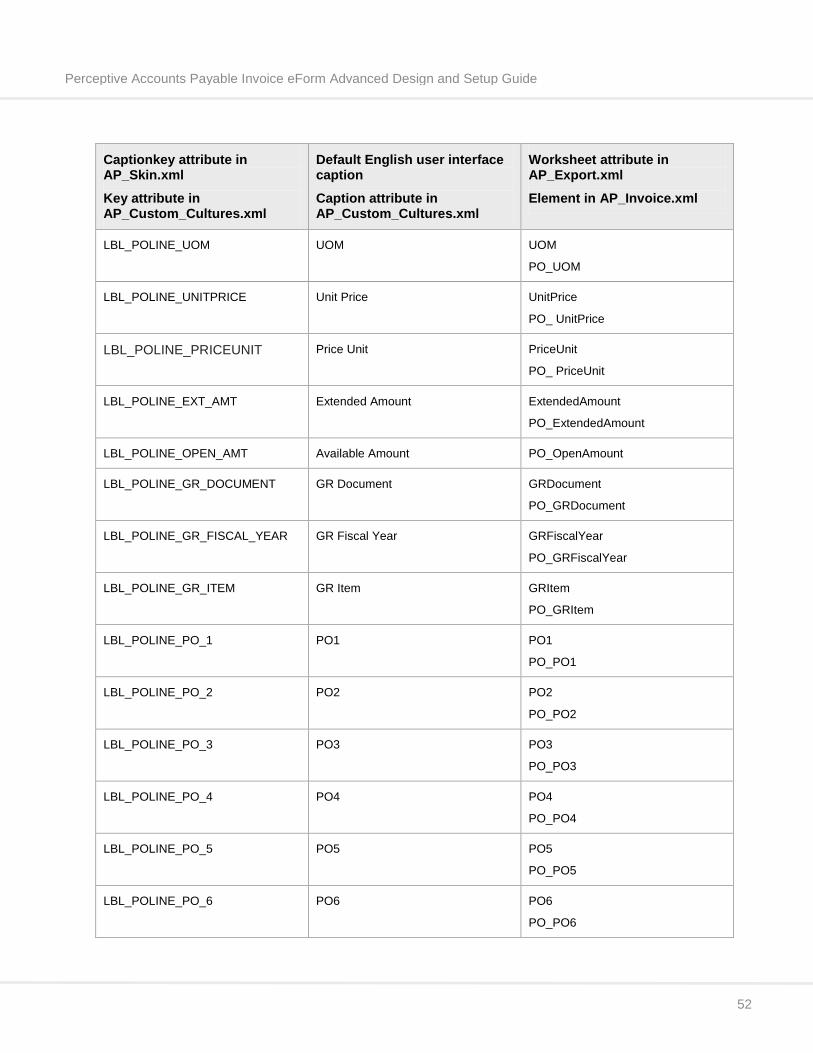
Perceptive Accounts Payable Invoice eForm Advanced Design and Setup Guide
52
Captionkey attribute in AP_Skin.xml
Key attribute in AP_Custom_Cultures.xml
Default English user interface caption
Caption attribute in AP_Custom_Cultures.xml
Worksheet attribute in AP_Export.xml
Element in AP_Invoice.xml
LBL_POLINE_UOM UOM UOM
PO_UOM
LBL_POLINE_UNITPRICE Unit Price UnitPrice
PO_ UnitPrice
LBL_POLINE_PRICEUNIT Price Unit PriceUnit
PO_ PriceUnit
LBL_POLINE_EXT_AMT Extended Amount
ExtendedAmount
PO_ExtendedAmount
LBL_POLINE_OPEN_AMT Available Amount PO_OpenAmount
LBL_POLINE_GR_DOCUMENT GR Document GRDocument
PO_GRDocument
LBL_POLINE_GR_FISCAL_YEAR GR Fiscal Year GRFiscalYear
PO_GRFiscalYear
LBL_POLINE_GR_ITEM GR Item GRItem
PO_GRItem
LBL_POLINE_PO_1 PO1 PO1
PO_PO1
LBL_POLINE_PO_2 PO2 PO2
PO_PO2
LBL_POLINE_PO_3 PO3 PO3
PO_PO3
LBL_POLINE_PO_4 PO4 PO4
PO_PO4
LBL_POLINE_PO_5 PO5 PO5
PO_PO5
LBL_POLINE_PO_6 PO6 PO6
PO_PO6
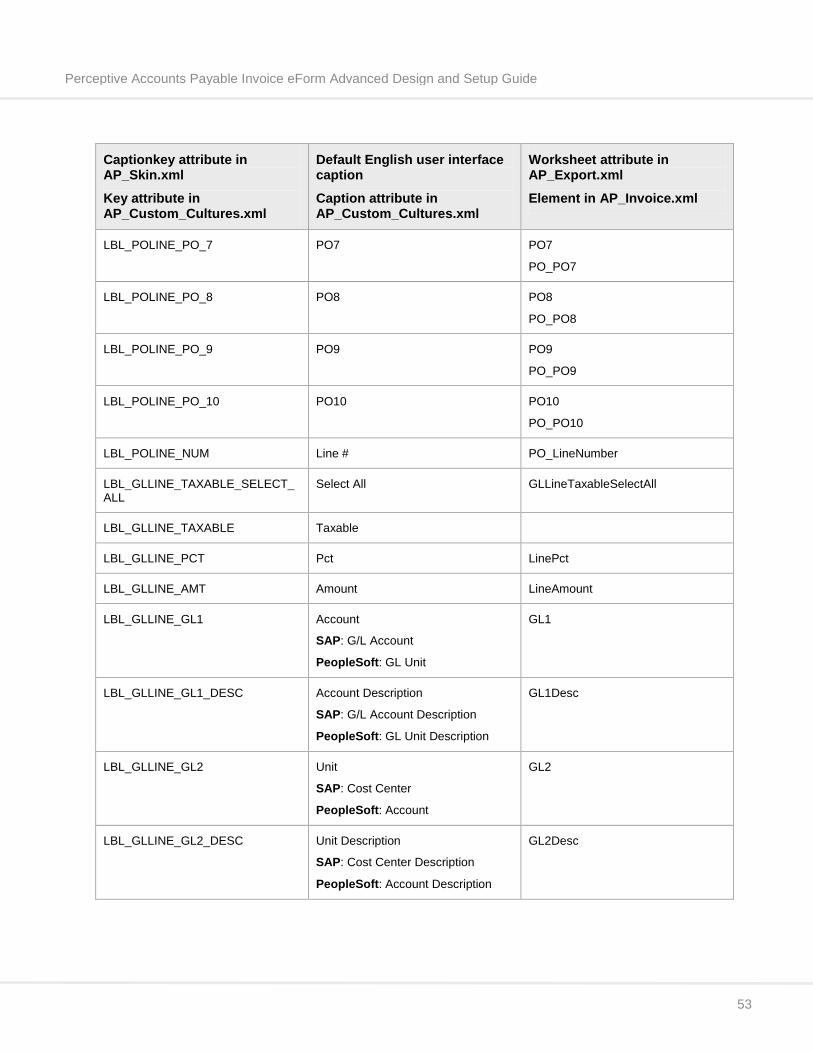
Perceptive Accounts Payable Invoice eForm Advanced Design and Setup Guide
53
Captionkey attribute in AP_Skin.xml
Key attribute in AP_Custom_Cultures.xml
Default English user interface caption
Caption attribute in AP_Custom_Cultures.xml
Worksheet attribute in AP_Export.xml
Element in AP_Invoice.xml
LBL_POLINE_PO_7 PO7 PO7
PO_PO7
LBL_POLINE_PO_8 PO8 PO8
PO_PO8
LBL_POLINE_PO_9 PO9 PO9
PO_PO9
LBL_POLINE_PO_10 PO10 PO10
PO_PO10
LBL_POLINE_NUM Line # PO_LineNumber
LBL_GLLINE_TAXABLE_SELECT_ALL
Select All GLLineTaxableSelectAll
LBL_GLLINE_TAXABLE Taxable
LBL_GLLINE_PCT Pct LinePct
LBL_GLLINE_AMT Amount LineAmount
LBL_GLLINE_GL1 Account
SAP: G/L Account
PeopleSoft: GL Unit
GL1
LBL_GLLINE_GL1_DESC Account Description
SAP: G/L Account Description
PeopleSoft: GL Unit Description
GL1Desc
LBL_GLLINE_GL2 Unit
SAP: Cost Center
PeopleSoft: Account
GL2
LBL_GLLINE_GL2_DESC Unit Description
SAP: Cost Center Description
PeopleSoft: Account Description
GL2Desc
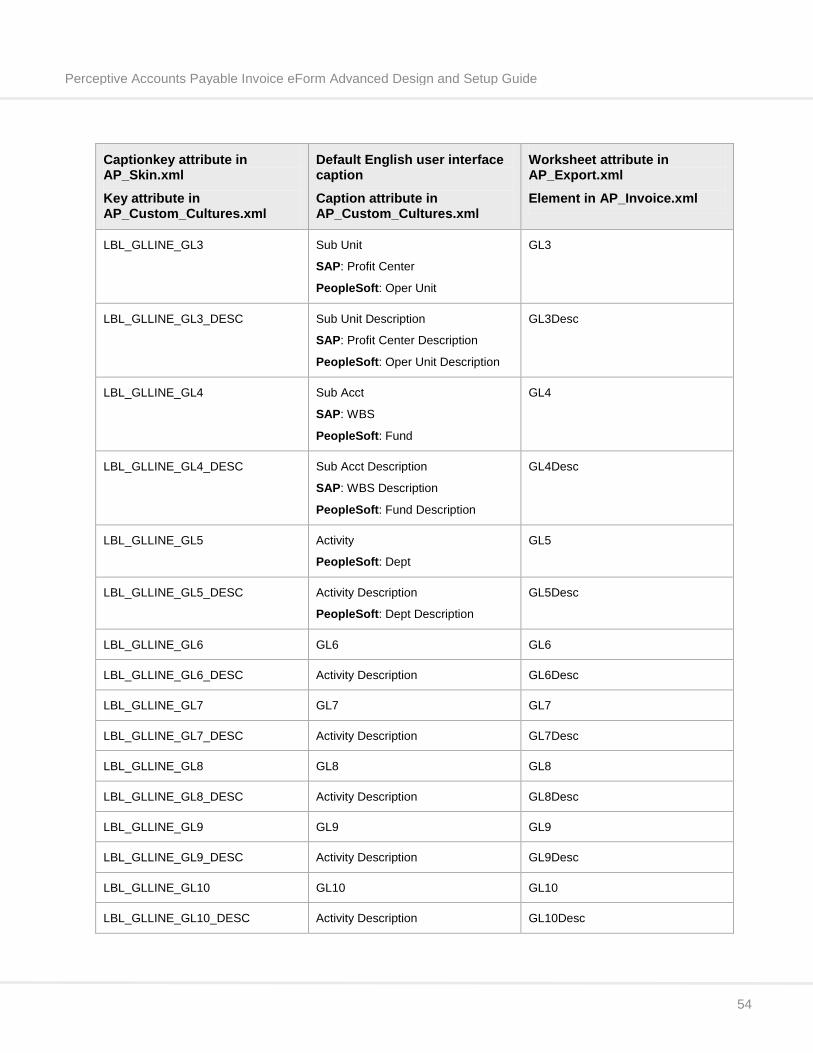
Perceptive Accounts Payable Invoice eForm Advanced Design and Setup Guide
54
Captionkey attribute in AP_Skin.xml
Key attribute in AP_Custom_Cultures.xml
Default English user interface caption
Caption attribute in AP_Custom_Cultures.xml
Worksheet attribute in AP_Export.xml
Element in AP_Invoice.xml
LBL_GLLINE_GL3 Sub Unit
SAP: Profit Center
PeopleSoft: Oper Unit
GL3
LBL_GLLINE_GL3_DESC Sub Unit Description
SAP: Profit Center Description
PeopleSoft: Oper Unit Description
GL3Desc
LBL_GLLINE_GL4 Sub Acct
SAP: WBS
PeopleSoft: Fund
GL4
LBL_GLLINE_GL4_DESC Sub Acct Description
SAP: WBS Description
PeopleSoft: Fund Description
GL4Desc
LBL_GLLINE_GL5 Activity
PeopleSoft: Dept
GL5
LBL_GLLINE_GL5_DESC Activity Description
PeopleSoft: Dept Description
GL5Desc
LBL_GLLINE_GL6 GL6 GL6
LBL_GLLINE_GL6_DESC Activity Description GL6Desc
LBL_GLLINE_GL7 GL7 GL7
LBL_GLLINE_GL7_DESC Activity Description GL7Desc
LBL_GLLINE_GL8 GL8 GL8
LBL_GLLINE_GL8_DESC Activity Description GL8Desc
LBL_GLLINE_GL9 GL9 GL9
LBL_GLLINE_GL9_DESC Activity Description GL9Desc
LBL_GLLINE_GL10 GL10 GL10
LBL_GLLINE_GL10_DESC Activity Description GL10Desc
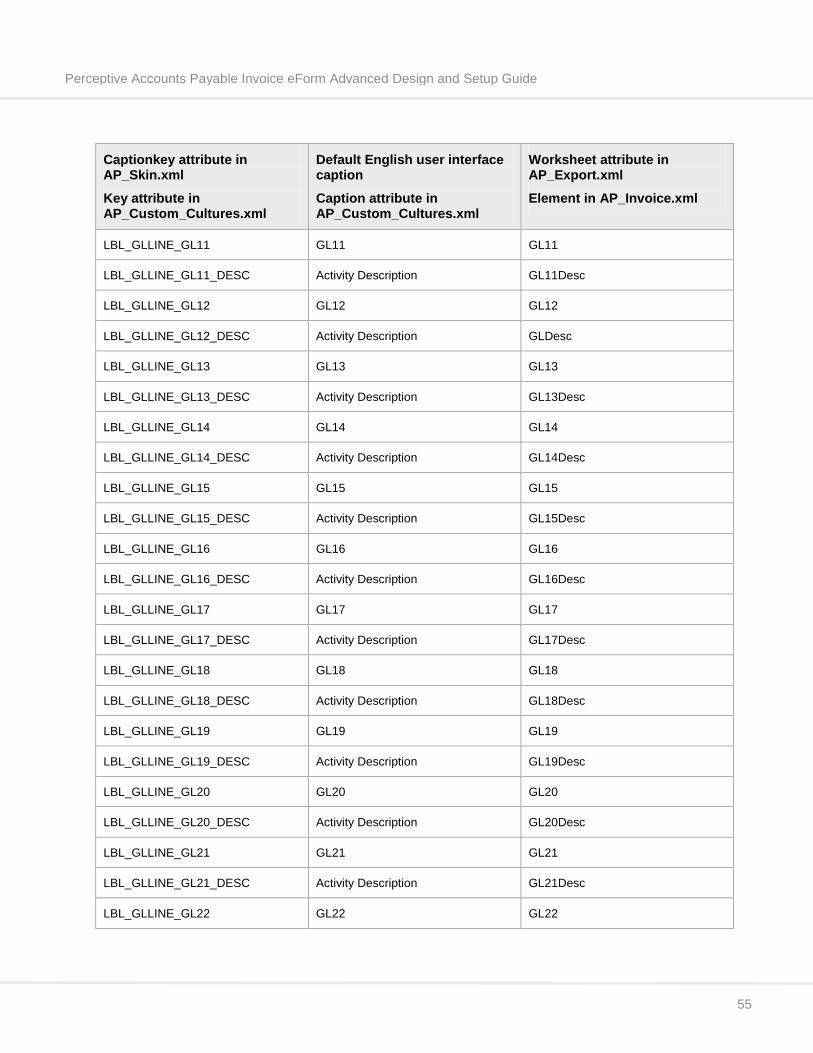
Perceptive Accounts Payable Invoice eForm Advanced Design and Setup Guide
55
Captionkey attribute in AP_Skin.xml
Key attribute in AP_Custom_Cultures.xml
Default English user interface caption
Caption attribute in AP_Custom_Cultures.xml
Worksheet attribute in AP_Export.xml
Element in AP_Invoice.xml
LBL_GLLINE_GL11 GL11 GL11
LBL_GLLINE_GL11_DESC Activity Description GL11Desc
LBL_GLLINE_GL12 GL12 GL12
LBL_GLLINE_GL12_DESC Activity Description GLDesc
LBL_GLLINE_GL13 GL13 GL13
LBL_GLLINE_GL13_DESC Activity Description GL13Desc
LBL_GLLINE_GL14 GL14 GL14
LBL_GLLINE_GL14_DESC Activity Description GL14Desc
LBL_GLLINE_GL15 GL15 GL15
LBL_GLLINE_GL15_DESC Activity Description GL15Desc
LBL_GLLINE_GL16 GL16 GL16
LBL_GLLINE_GL16_DESC Activity Description GL16Desc
LBL_GLLINE_GL17 GL17 GL17
LBL_GLLINE_GL17_DESC Activity Description GL17Desc
LBL_GLLINE_GL18 GL18 GL18
LBL_GLLINE_GL18_DESC Activity Description GL18Desc
LBL_GLLINE_GL19 GL19 GL19
LBL_GLLINE_GL19_DESC Activity Description GL19Desc
LBL_GLLINE_GL20 GL20 GL20
LBL_GLLINE_GL20_DESC Activity Description GL20Desc
LBL_GLLINE_GL21 GL21 GL21
LBL_GLLINE_GL21_DESC Activity Description GL21Desc
LBL_GLLINE_GL22 GL22 GL22
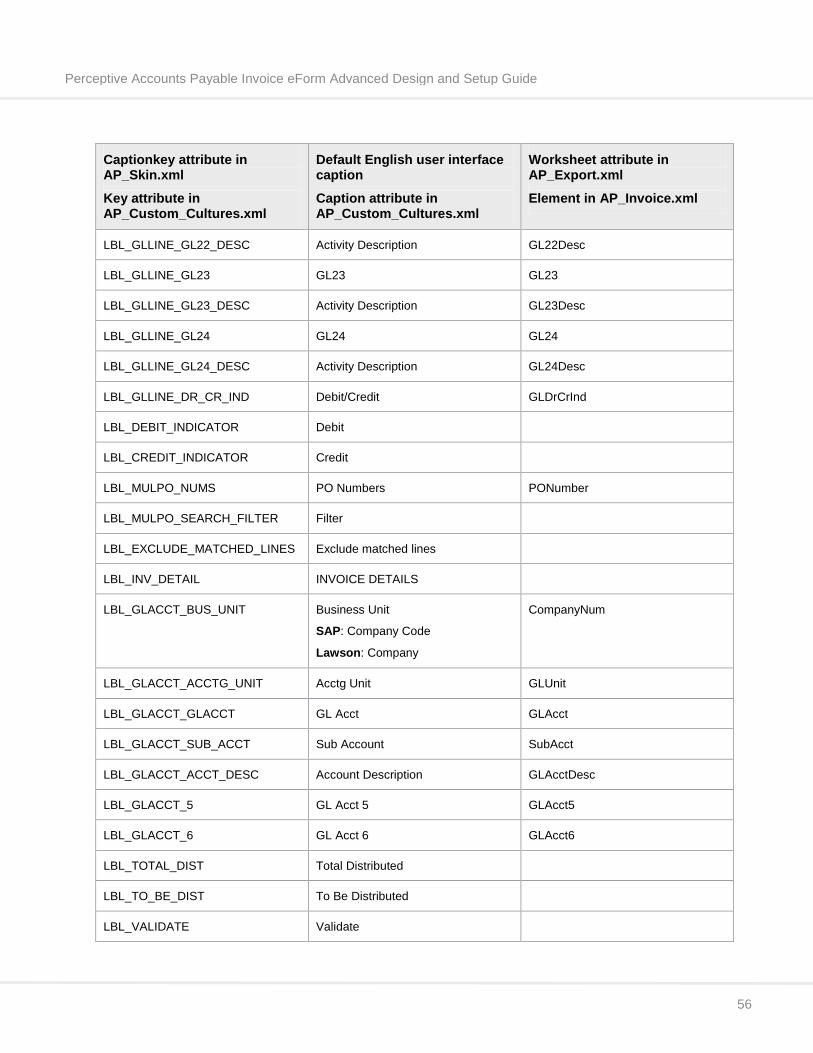
Perceptive Accounts Payable Invoice eForm Advanced Design and Setup Guide
56
Captionkey attribute in AP_Skin.xml
Key attribute in AP_Custom_Cultures.xml
Default English user interface caption
Caption attribute in AP_Custom_Cultures.xml
Worksheet attribute in AP_Export.xml
Element in AP_Invoice.xml
LBL_GLLINE_GL22_DESC Activity Description GL22Desc
LBL_GLLINE_GL23 GL23 GL23
LBL_GLLINE_GL23_DESC Activity Description GL23Desc
LBL_GLLINE_GL24 GL24 GL24
LBL_GLLINE_GL24_DESC Activity Description GL24Desc
LBL_GLLINE_DR_CR_IND Debit/Credit GLDrCrInd
LBL_DEBIT_INDICATOR Debit
LBL_CREDIT_INDICATOR Credit
LBL_MULPO_NUMS PO Numbers PONumber
LBL_MULPO_SEARCH_FILTER Filter
LBL_EXCLUDE_MATCHED_LINES Exclude matched lines
LBL_INV_DETAIL INVOICE DETAILS
LBL_GLACCT_BUS_UNIT Business Unit
SAP: Company Code
Lawson: Company
CompanyNum
LBL_GLACCT_ACCTG_UNIT Acctg Unit GLUnit
LBL_GLACCT_GLACCT GL Acct GLAcct
LBL_GLACCT_SUB_ACCT Sub Account SubAcct
LBL_GLACCT_ACCT_DESC Account Description GLAcctDesc
LBL_GLACCT_5 GL Acct 5 GLAcct5
LBL_GLACCT_6 GL Acct 6 GLAcct6
LBL_TOTAL_DIST Total Distributed
LBL_TO_BE_DIST To Be Distributed
LBL_VALIDATE Validate
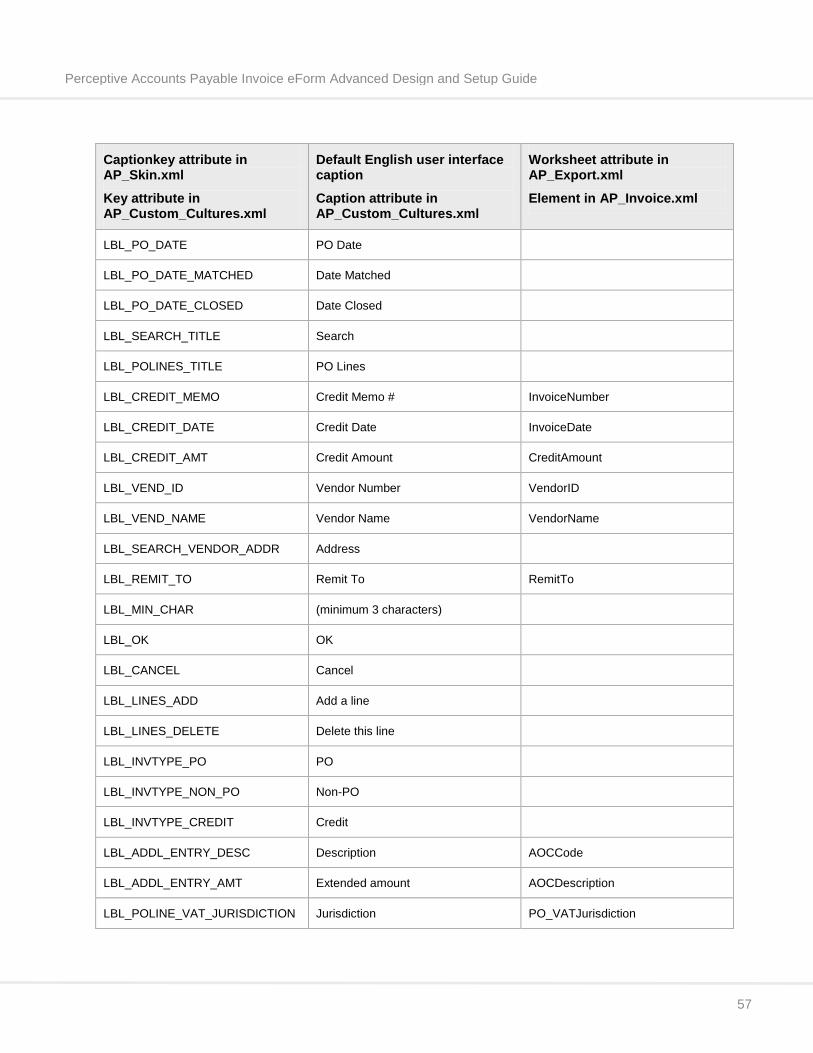
Perceptive Accounts Payable Invoice eForm Advanced Design and Setup Guide
57
Captionkey attribute in AP_Skin.xml
Key attribute in AP_Custom_Cultures.xml
Default English user interface caption
Caption attribute in AP_Custom_Cultures.xml
Worksheet attribute in AP_Export.xml
Element in AP_Invoice.xml
LBL_PO_DATE PO Date
LBL_PO_DATE_MATCHED Date Matched
LBL_PO_DATE_CLOSED Date Closed
LBL_SEARCH_TITLE Search
LBL_POLINES_TITLE PO Lines
LBL_CREDIT_MEMO Credit Memo # InvoiceNumber
LBL_CREDIT_DATE Credit Date InvoiceDate
LBL_CREDIT_AMT Credit Amount CreditAmount
LBL_VEND_ID Vendor Number VendorID
LBL_VEND_NAME Vendor Name VendorName
LBL_SEARCH_VENDOR_ADDR Address
LBL_REMIT_TO Remit To RemitTo
LBL_MIN_CHAR (minimum 3 characters)
LBL_OK OK
LBL_CANCEL Cancel
LBL_LINES_ADD Add a line
LBL_LINES_DELETE Delete this line
LBL_INVTYPE_PO PO
LBL_INVTYPE_NON_PO Non-PO
LBL_INVTYPE_CREDIT Credit
LBL_ADDL_ENTRY_DESC Description AOCCode
LBL_ADDL_ENTRY_AMT Extended amount AOCDescription
LBL_POLINE_VAT_JURISDICTION Jurisdiction PO_VATJurisdiction
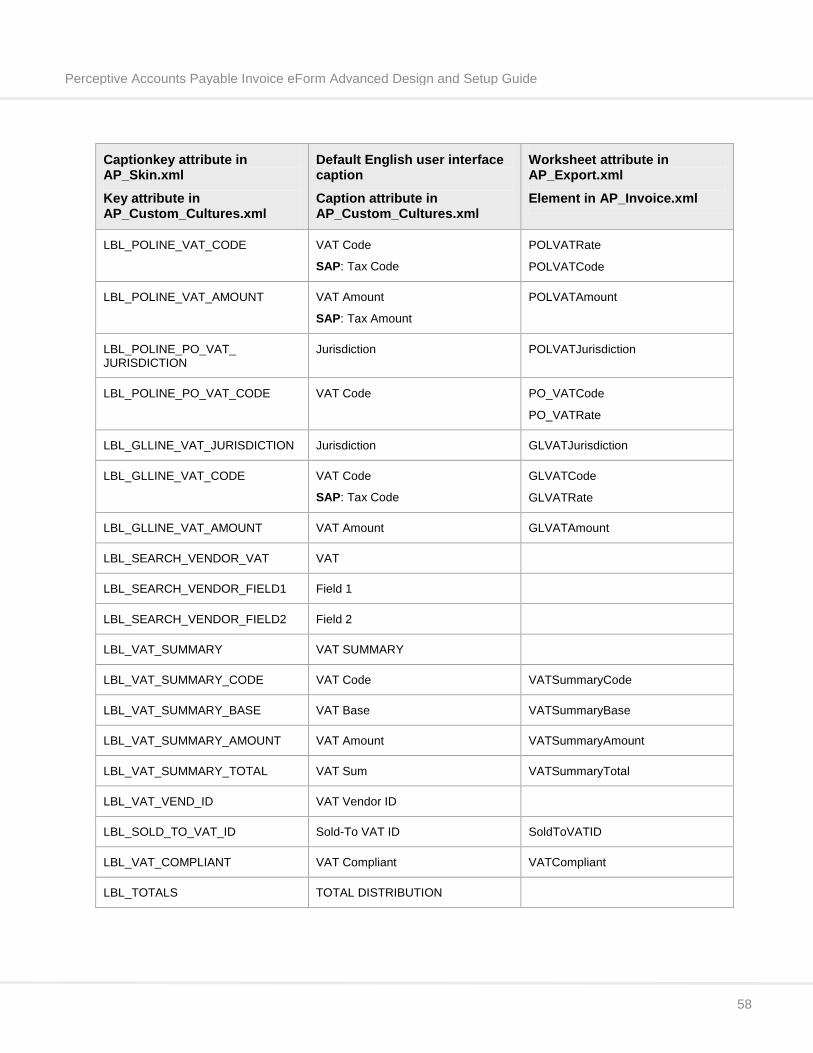
Perceptive Accounts Payable Invoice eForm Advanced Design and Setup Guide
58
Captionkey attribute in AP_Skin.xml
Key attribute in AP_Custom_Cultures.xml
Default English user interface caption
Caption attribute in AP_Custom_Cultures.xml
Worksheet attribute in AP_Export.xml
Element in AP_Invoice.xml
LBL_POLINE_VAT_CODE VAT Code
SAP: Tax Code
POLVATRate
POLVATCode
LBL_POLINE_VAT_AMOUNT VAT Amount
SAP: Tax Amount
POLVATAmount
LBL_POLINE_PO_VAT_ JURISDICTION
Jurisdiction POLVATJurisdiction
LBL_POLINE_PO_VAT_CODE VAT Code PO_VATCode
PO_VATRate
LBL_GLLINE_VAT_JURISDICTION Jurisdiction GLVATJurisdiction
LBL_GLLINE_VAT_CODE VAT Code
SAP: Tax Code
GLVATCode
GLVATRate
LBL_GLLINE_VAT_AMOUNT VAT Amount GLVATAmount
LBL_SEARCH_VENDOR_VAT VAT
LBL_SEARCH_VENDOR_FIELD1 Field 1
LBL_SEARCH_VENDOR_FIELD2 Field 2
LBL_VAT_SUMMARY VAT SUMMARY
LBL_VAT_SUMMARY_CODE VAT Code VATSummaryCode
LBL_VAT_SUMMARY_BASE VAT Base VATSummaryBase
LBL_VAT_SUMMARY_AMOUNT VAT Amount VATSummaryAmount
LBL_VAT_SUMMARY_TOTAL VAT Sum VATSummaryTotal
LBL_VAT_VEND_ID VAT Vendor ID
LBL_SOLD_TO_VAT_ID Sold-To VAT ID SoldToVATID
LBL_VAT_COMPLIANT VAT Compliant VATCompliant
LBL_TOTALS TOTAL DISTRIBUTION
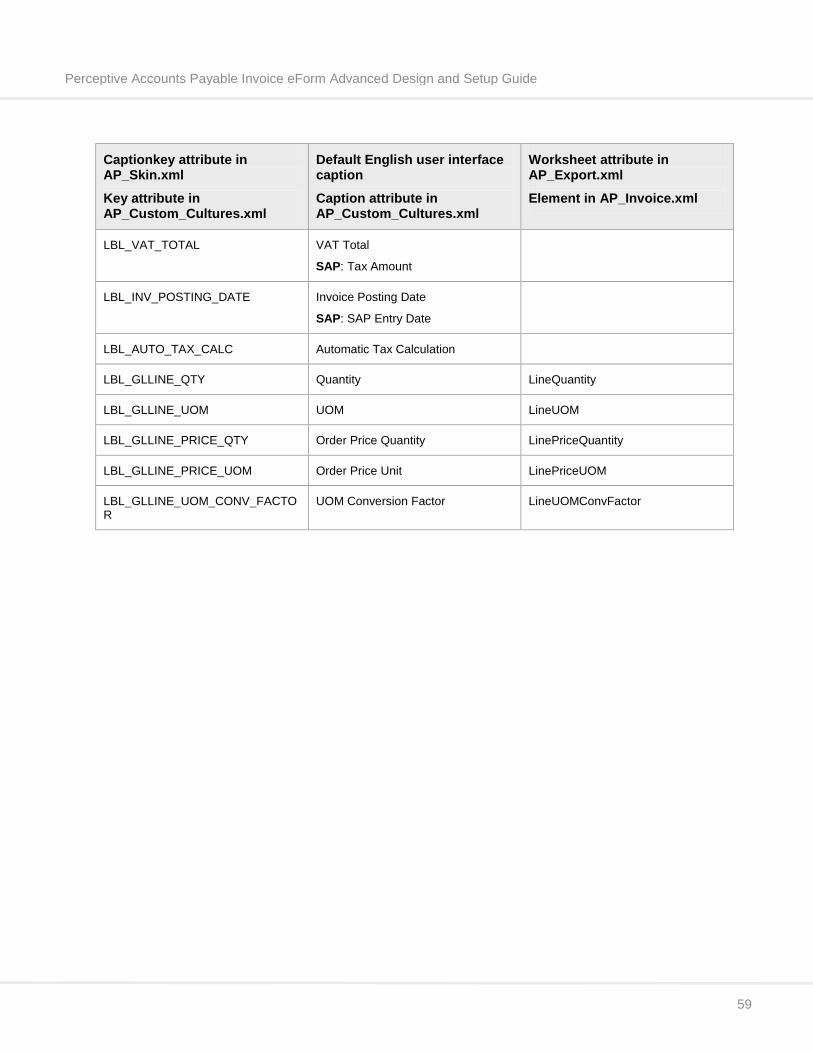
Perceptive Accounts Payable Invoice eForm Advanced Design and Setup Guide
59
Captionkey attribute in AP_Skin.xml
Key attribute in AP_Custom_Cultures.xml
Default English user interface caption
Caption attribute in AP_Custom_Cultures.xml
Worksheet attribute in AP_Export.xml
Element in AP_Invoice.xml
LBL_VAT_TOTAL VAT Total
SAP: Tax Amount
LBL_INV_POSTING_DATE Invoice Posting Date
SAP: SAP Entry Date
LBL_AUTO_TAX_CALC Automatic Tax Calculation
LBL_GLLINE_QTY Quantity LineQuantity
LBL_GLLINE_UOM UOM LineUOM
LBL_GLLINE_PRICE_QTY Order Price Quantity LinePriceQuantity
LBL_GLLINE_PRICE_UOM Order Price Unit LinePriceUOM
LBL_GLLINE_UOM_CONV_FACTOR
UOM Conversion Factor LineUOMConvFactor
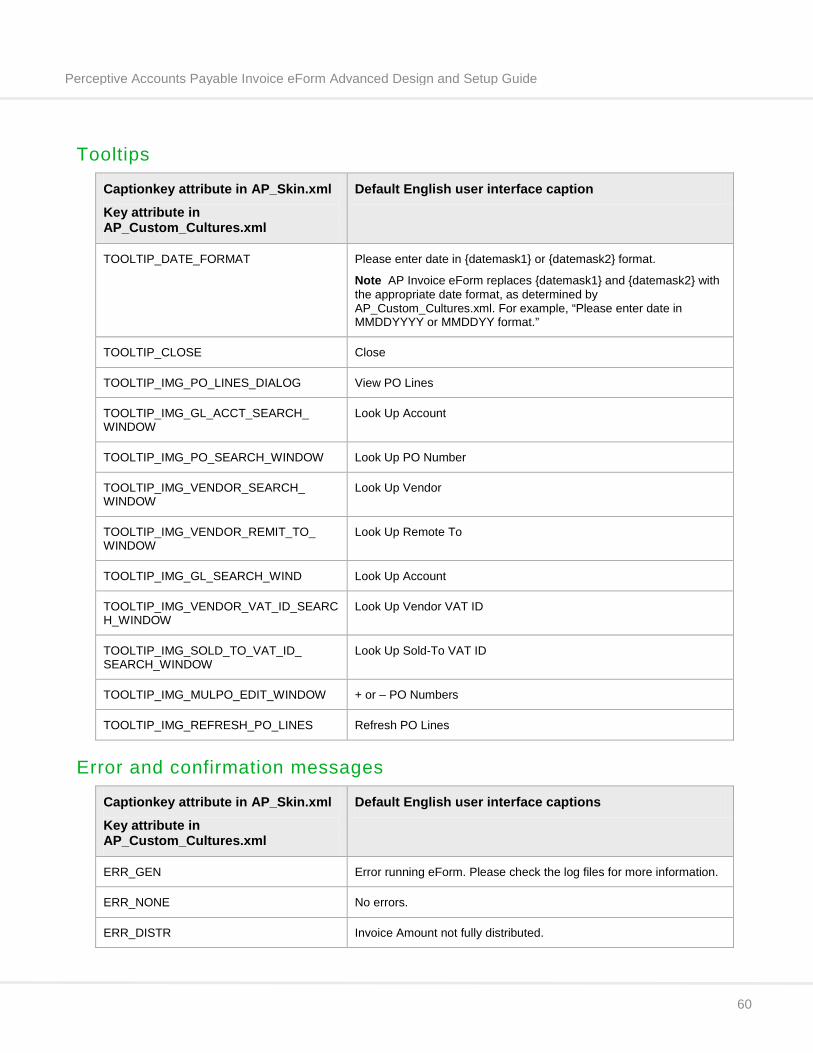
Perceptive Accounts Payable Invoice eForm Advanced Design and Setup Guide
60
Tooltips
Captionkey attribute in AP_Skin.xml
Key attribute in AP_Custom_Cultures.xml
Default English user interface caption
TOOLTIP_DATE_FORMAT Please enter date in {datemask1} or {datemask2} format.
Note AP Invoice eForm replaces {datemask1} and {datemask2} with the appropriate date format, as determined by AP_Custom_Cultures.xml. For example, “Please enter date in MMDDYYYY or MMDDYY format.”
TOOLTIP_CLOSE Close
TOOLTIP_IMG_PO_LINES_DIALOG View PO Lines
TOOLTIP_IMG_GL_ACCT_SEARCH_ WINDOW
Look Up Account
TOOLTIP_IMG_PO_SEARCH_WINDOW Look Up PO Number
TOOLTIP_IMG_VENDOR_SEARCH_ WINDOW
Look Up Vendor
TOOLTIP_IMG_VENDOR_REMIT_TO_ WINDOW
Look Up Remote To
TOOLTIP_IMG_GL_SEARCH_WIND Look Up Account
TOOLTIP_IMG_VENDOR_VAT_ID_SEARCH_WINDOW
Look Up Vendor VAT ID
TOOLTIP_IMG_SOLD_TO_VAT_ID_ SEARCH_WINDOW
Look Up Sold-To VAT ID
TOOLTIP_IMG_MULPO_EDIT_WINDOW + or – PO Numbers
TOOLTIP_IMG_REFRESH_PO_LINES Refresh PO Lines
Error and confirmation messages
Captionkey attribute in AP_Skin.xml
Key attribute in AP_Custom_Cultures.xml
Default English user interface captions
ERR_GEN Error running eForm. Please check the log files for more information.
ERR_NONE No errors.
ERR_DISTR Invoice Amount not fully distributed.
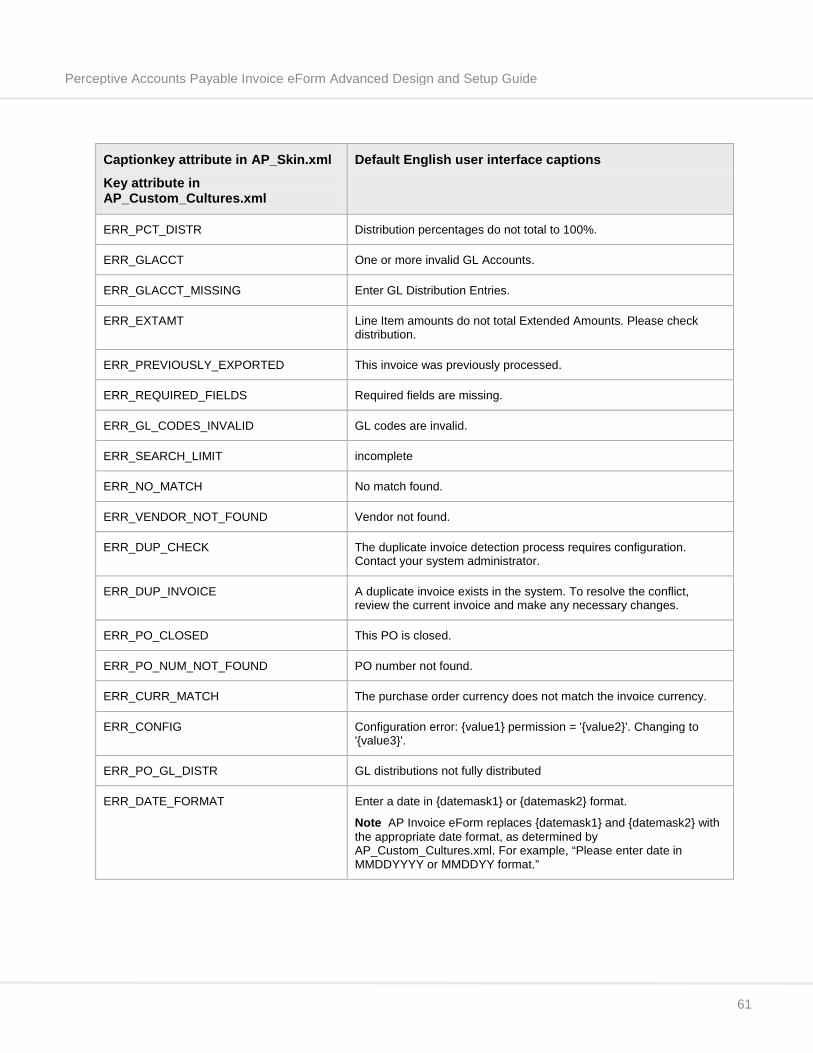
Perceptive Accounts Payable Invoice eForm Advanced Design and Setup Guide
61
Captionkey attribute in AP_Skin.xml
Key attribute in AP_Custom_Cultures.xml
Default English user interface captions
ERR_PCT_DISTR Distribution percentages do not total to 100%.
ERR_GLACCT One or more invalid GL Accounts.
ERR_GLACCT_MISSING Enter GL Distribution Entries.
ERR_EXTAMT Line Item amounts do not total Extended Amounts. Please check distribution.
ERR_PREVIOUSLY_EXPORTED This invoice was previously processed.
ERR_REQUIRED_FIELDS Required fields are missing.
ERR_GL_CODES_INVALID GL codes are invalid.
ERR_SEARCH_LIMIT incomplete
ERR_NO_MATCH No match found.
ERR_VENDOR_NOT_FOUND Vendor not found.
ERR_DUP_CHECK The duplicate invoice detection process requires configuration. Contact your system administrator.
ERR_DUP_INVOICE A duplicate invoice exists in the system. To resolve the conflict, review the current invoice and make any necessary changes.
ERR_PO_CLOSED This PO is closed.
ERR_PO_NUM_NOT_FOUND PO number not found.
ERR_CURR_MATCH The purchase order currency does not match the invoice currency.
ERR_CONFIG Configuration error: {value1} permission = '{value2}'. Changing to '{value3}'.
ERR_PO_GL_DISTR GL distributions not fully distributed
ERR_DATE_FORMAT Enter a date in {datemask1} or {datemask2} format.
Note AP Invoice eForm replaces {datemask1} and {datemask2} with the appropriate date format, as determined by AP_Custom_Cultures.xml. For example, “Please enter date in MMDDYYYY or MMDDYY format.”
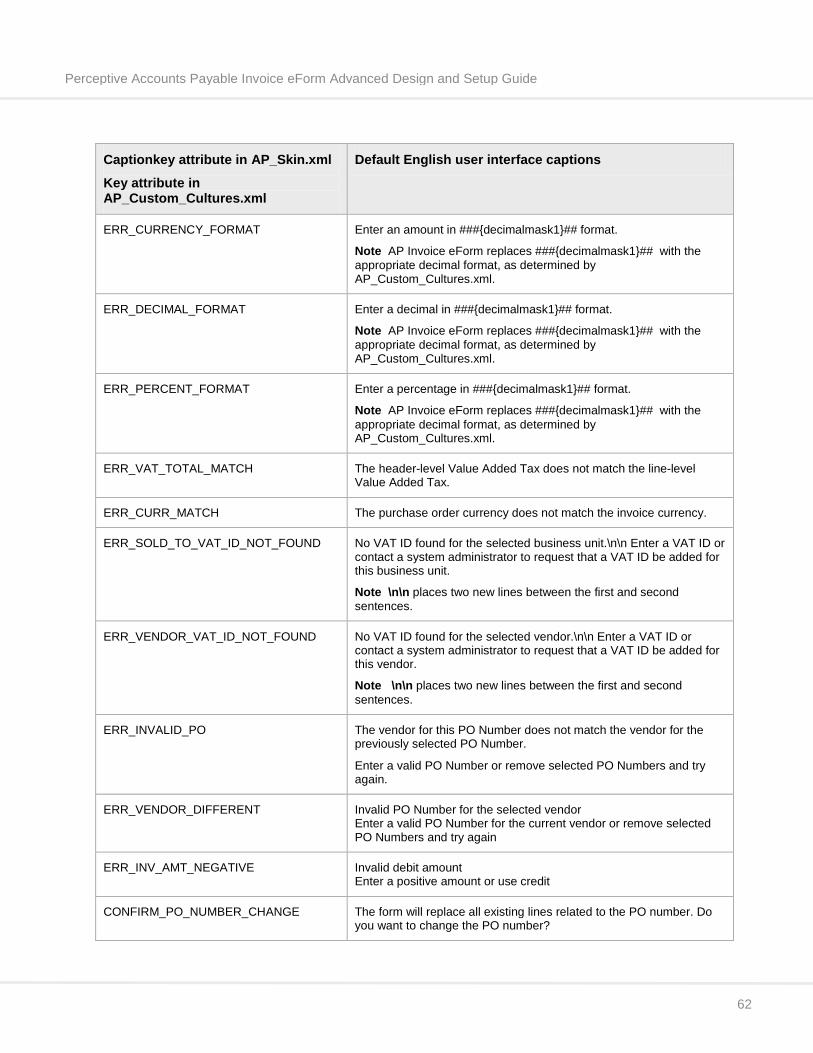
Perceptive Accounts Payable Invoice eForm Advanced Design and Setup Guide
62
Captionkey attribute in AP_Skin.xml
Key attribute in AP_Custom_Cultures.xml
Default English user interface captions
ERR_CURRENCY_FORMAT Enter an amount in ###{decimalmask1}## format.
Note AP Invoice eForm replaces ###{decimalmask1}## with the appropriate decimal format, as determined by AP_Custom_Cultures.xml.
ERR_DECIMAL_FORMAT Enter a decimal in ###{decimalmask1}## format.
Note AP Invoice eForm replaces ###{decimalmask1}## with the appropriate decimal format, as determined by AP_Custom_Cultures.xml.
ERR_PERCENT_FORMAT Enter a percentage in ###{decimalmask1}## format.
Note AP Invoice eForm replaces ###{decimalmask1}## with the appropriate decimal format, as determined by AP_Custom_Cultures.xml.
ERR_VAT_TOTAL_MATCH The header-level Value Added Tax does not match the line-level Value Added Tax.
ERR_CURR_MATCH The purchase order currency does not match the invoice currency.
ERR_SOLD_TO_VAT_ID_NOT_FOUND No VAT ID found for the selected business unit.\n\n Enter a VAT ID or contact a system administrator to request that a VAT ID be added for this business unit.
Note \n\n places two new lines between the first and second sentences.
ERR_VENDOR_VAT_ID_NOT_FOUND No VAT ID found for the selected vendor.\n\n Enter a VAT ID or contact a system administrator to request that a VAT ID be added for this vendor.
Note \n\n places two new lines between the first and second sentences.
ERR_INVALID_PO The vendor for this PO Number does not match the vendor for the previously selected PO Number.
Enter a valid PO Number or remove selected PO Numbers and try again.
ERR_VENDOR_DIFFERENT Invalid PO Number for the selected vendor Enter a valid PO Number for the current vendor or remove selected PO Numbers and try again
ERR_INV_AMT_NEGATIVE Invalid debit amount Enter a positive amount or use credit
CONFIRM_PO_NUMBER_CHANGE The form will replace all existing lines related to the PO number. Do you want to change the PO number?
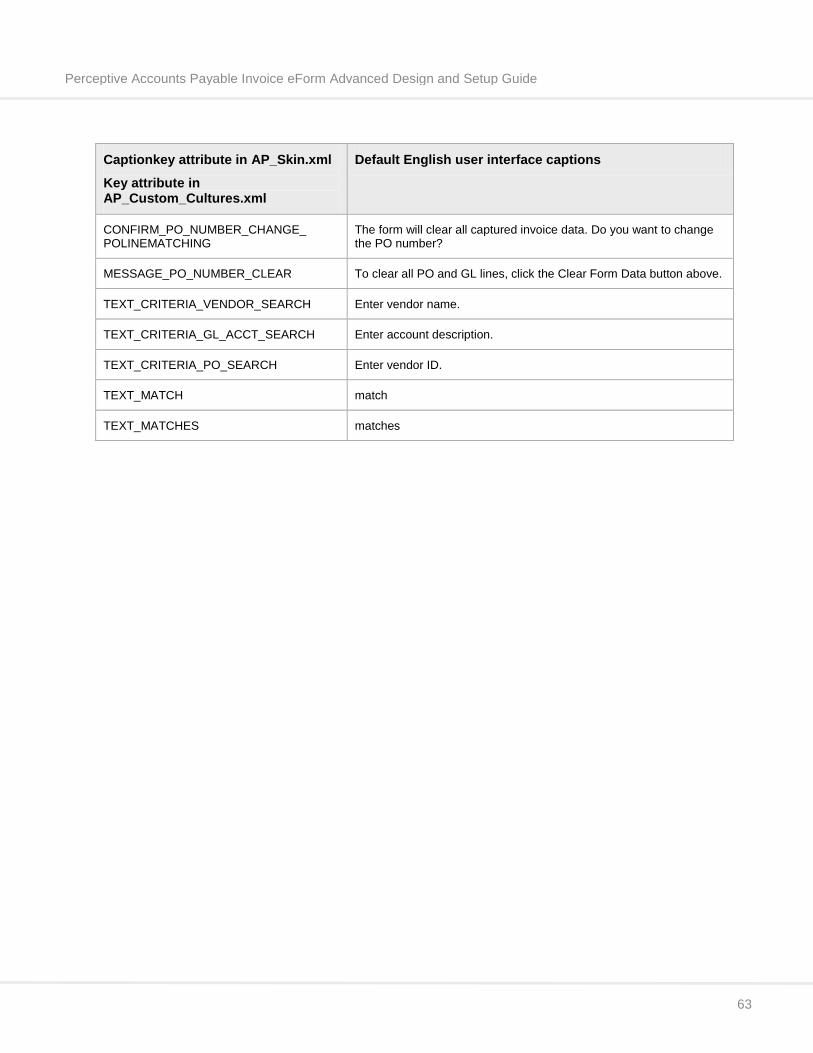
Perceptive Accounts Payable Invoice eForm Advanced Design and Setup Guide
63
Captionkey attribute in AP_Skin.xml
Key attribute in AP_Custom_Cultures.xml
Default English user interface captions
CONFIRM_PO_NUMBER_CHANGE_ POLINEMATCHING
The form will clear all captured invoice data. Do you want to change the PO number?
MESSAGE_PO_NUMBER_CLEAR To clear all PO and GL lines, click the Clear Form Data button above.
TEXT_CRITERIA_VENDOR_SEARCH Enter vendor name.
TEXT_CRITERIA_GL_ACCT_SEARCH Enter account description.
TEXT_CRITERIA_PO_SEARCH Enter vendor ID.
TEXT_MATCH match
TEXT_MATCHES matches
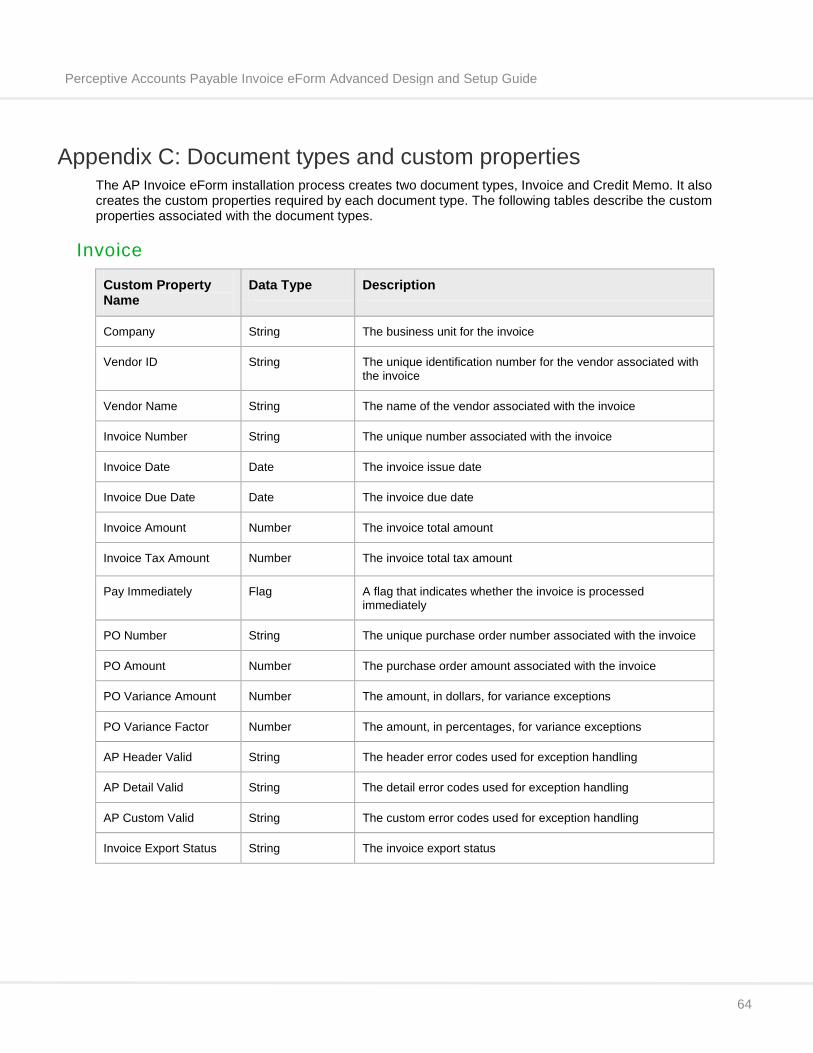
Perceptive Accounts Payable Invoice eForm Advanced Design and Setup Guide
64
Appendix C: Document types and custom properties The AP Invoice eForm installation process creates two document types, Invoice and Credit Memo. It also creates the custom properties required by each document type. The following tables describe the custom properties associated with the document types.
Invoice
Custom Property Name
Data Type Description
Company String The business unit for the invoice
Vendor ID String The unique identification number for the vendor associated with the invoice
Vendor Name String The name of the vendor associated with the invoice
Invoice Number String The unique number associated with the invoice
Invoice Date Date The invoice issue date
Invoice Due Date Date The invoice due date
Invoice Amount Number The invoice total amount
Invoice Tax Amount Number The invoice total tax amount
Pay Immediately Flag A flag that indicates whether the invoice is processed immediately
PO Number String The unique purchase order number associated with the invoice
PO Amount Number The purchase order amount associated with the invoice
PO Variance Amount Number The amount, in dollars, for variance exceptions
PO Variance Factor Number The amount, in percentages, for variance exceptions
AP Header Valid String The header error codes used for exception handling
AP Detail Valid String The detail error codes used for exception handling
AP Custom Valid String The custom error codes used for exception handling
Invoice Export Status String The invoice export status
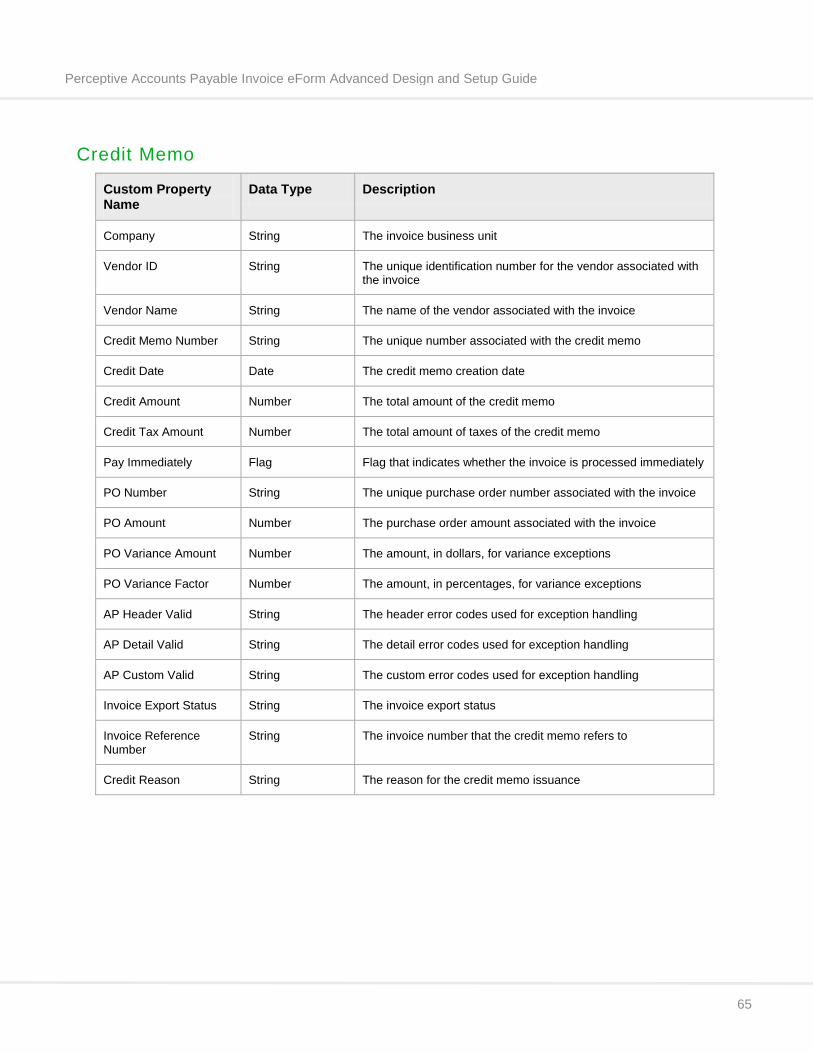
Perceptive Accounts Payable Invoice eForm Advanced Design and Setup Guide
65
Credit Memo
Custom Property Name
Data Type Description
Company String The invoice business unit
Vendor ID String The unique identification number for the vendor associated with the invoice
Vendor Name String The name of the vendor associated with the invoice
Credit Memo Number String The unique number associated with the credit memo
Credit Date Date The credit memo creation date
Credit Amount Number The total amount of the credit memo
Credit Tax Amount Number The total amount of taxes of the credit memo
Pay Immediately Flag Flag that indicates whether the invoice is processed immediately
PO Number String The unique purchase order number associated with the invoice
PO Amount Number The purchase order amount associated with the invoice
PO Variance Amount Number The amount, in dollars, for variance exceptions
PO Variance Factor Number The amount, in percentages, for variance exceptions
AP Header Valid String The header error codes used for exception handling
AP Detail Valid String The detail error codes used for exception handling
AP Custom Valid String The custom error codes used for exception handling
Invoice Export Status String The invoice export status
Invoice Reference Number
String The invoice number that the credit memo refers to
Credit Reason String The reason for the credit memo issuance
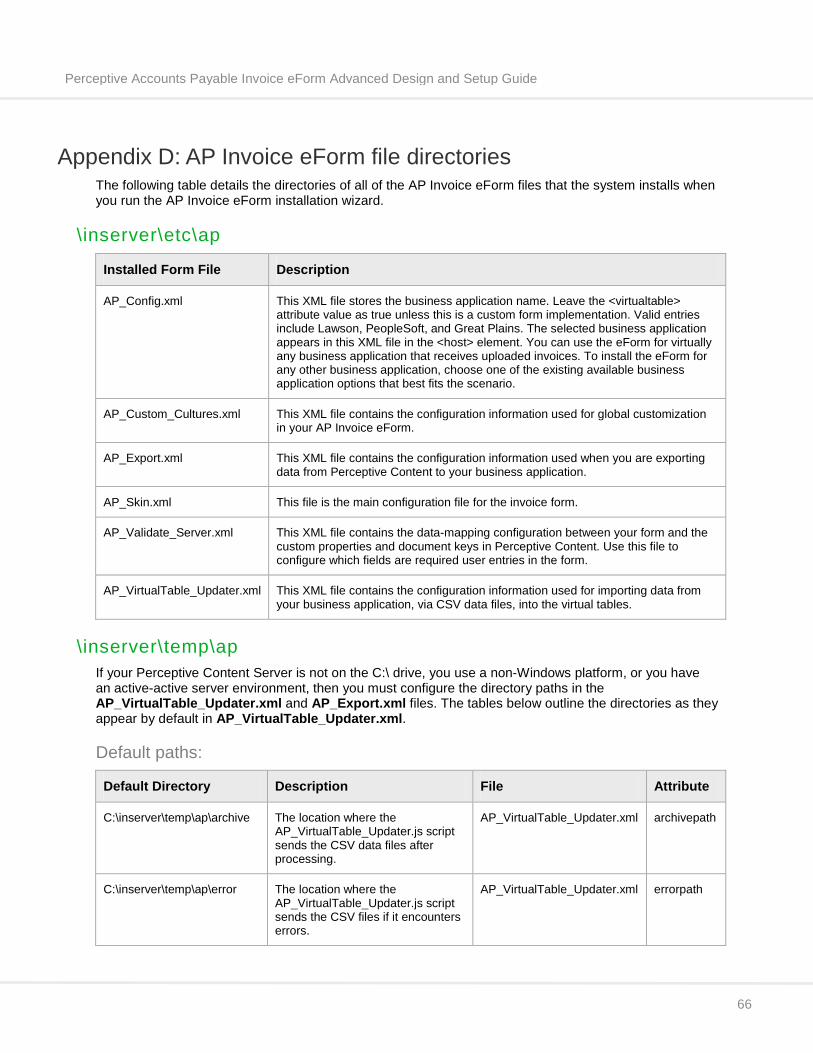
Perceptive Accounts Payable Invoice eForm Advanced Design and Setup Guide
66
Appendix D: AP Invoice eForm file directories The following table details the directories of all of the AP Invoice eForm files that the system installs when you run the AP Invoice eForm installation wizard.
\inserver\etc\ap
Installed Form File Description
AP_Config.xml This XML file stores the business application name. Leave the <virtualtable> attribute value as true unless this is a custom form implementation. Valid entries include Lawson, PeopleSoft, and Great Plains. The selected business application appears in this XML file in the <host> element. You can use the eForm for virtually any business application that receives uploaded invoices. To install the eForm for any other business application, choose one of the existing available business application options that best fits the scenario.
AP_Custom_Cultures.xml This XML file contains the configuration information used for global customization in your AP Invoice eForm.
AP_Export.xml This XML file contains the configuration information used when you are exporting data from Perceptive Content to your business application.
AP_Skin.xml This file is the main configuration file for the invoice form.
AP_Validate_Server.xml This XML file contains the data-mapping configuration between your form and the custom properties and document keys in Perceptive Content. Use this file to configure which fields are required user entries in the form.
AP_VirtualTable_Updater.xml This XML file contains the configuration information used for importing data from your business application, via CSV data files, into the virtual tables.
\inserver\temp\ap If your Perceptive Content Server is not on the C:\ drive, you use a non-Windows platform, or you have an active-active server environment, then you must configure the directory paths in the AP_VirtualTable_Updater.xml and AP_Export.xml files. The tables below outline the directories as they appear by default in AP_VirtualTable_Updater.xml.
Default paths:
Default Directory Description File Attribute
C:\inserver\temp\ap\archive The location where the AP_VirtualTable_Updater.js script sends the CSV data files after processing.
AP_VirtualTable_Updater.xml archivepath
C:\inserver\temp\ap\error The location where the AP_VirtualTable_Updater.js script sends the CSV files if it encounters errors.
AP_VirtualTable_Updater.xml errorpath
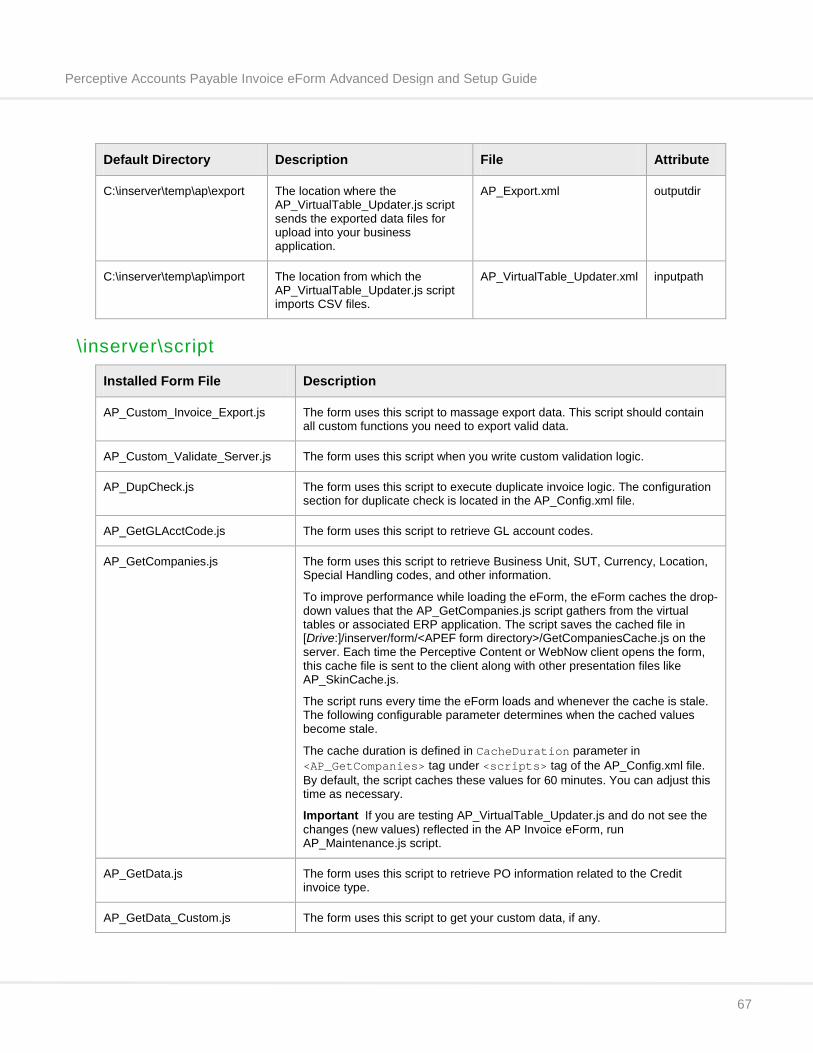
Perceptive Accounts Payable Invoice eForm Advanced Design and Setup Guide
67
Default Directory Description File Attribute
C:\inserver\temp\ap\export The location where the AP_VirtualTable_Updater.js script sends the exported data files for upload into your business application.
AP_Export.xml outputdir
C:\inserver\temp\ap\import The location from which the AP_VirtualTable_Updater.js script imports CSV files.
AP_VirtualTable_Updater.xml inputpath
\inserver\script
Installed Form File Description
AP_Custom_Invoice_Export.js The form uses this script to massage export data. This script should contain all custom functions you need to export valid data.
AP_Custom_Validate_Server.js The form uses this script when you write custom validation logic.
AP_DupCheck.js The form uses this script to execute duplicate invoice logic. The configuration section for duplicate check is located in the AP_Config.xml file.
AP_GetGLAcctCode.js The form uses this script to retrieve GL account codes.
AP_GetCompanies.js The form uses this script to retrieve Business Unit, SUT, Currency, Location, Special Handling codes, and other information.
To improve performance while loading the eForm, the eForm caches the drop-down values that the AP_GetCompanies.js script gathers from the virtual tables or associated ERP application. The script saves the cached file in [Drive:]/inserver/form/<APEF form directory>/GetCompaniesCache.js on the server. Each time the Perceptive Content or WebNow client opens the form, this cache file is sent to the client along with other presentation files like AP_SkinCache.js.
The script runs every time the eForm loads and whenever the cache is stale. The following configurable parameter determines when the cached values become stale.
The cache duration is defined in CacheDuration parameter in <AP_GetCompanies> tag under <scripts> tag of the AP_Config.xml file. By default, the script caches these values for 60 minutes. You can adjust this time as necessary.
Important If you are testing AP_VirtualTable_Updater.js and do not see the changes (new values) reflected in the AP Invoice eForm, run AP_Maintenance.js script.
AP_GetData.js The form uses this script to retrieve PO information related to the Credit invoice type.
AP_GetData_Custom.js The form uses this script to get your custom data, if any.
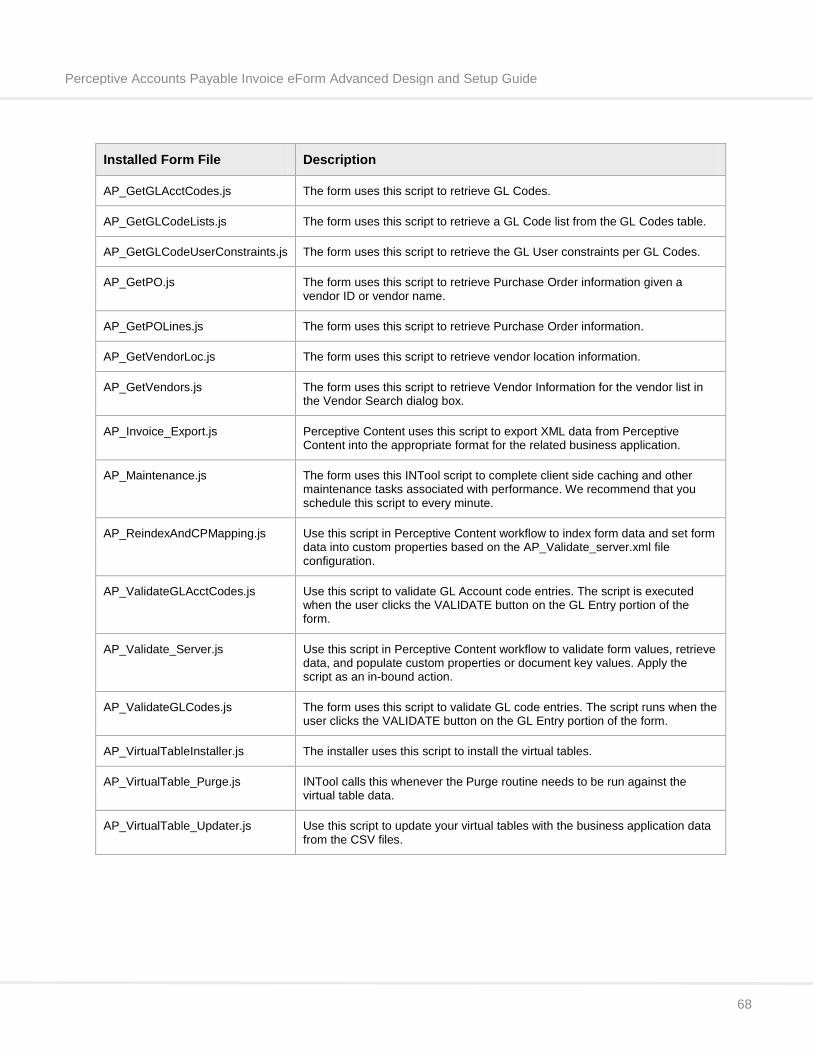
Perceptive Accounts Payable Invoice eForm Advanced Design and Setup Guide
68
Installed Form File Description
AP_GetGLAcctCodes.js The form uses this script to retrieve GL Codes.
AP_GetGLCodeLists.js The form uses this script to retrieve a GL Code list from the GL Codes table.
AP_GetGLCodeUserConstraints.js The form uses this script to retrieve the GL User constraints per GL Codes.
AP_GetPO.js The form uses this script to retrieve Purchase Order information given a vendor ID or vendor name.
AP_GetPOLines.js The form uses this script to retrieve Purchase Order information.
AP_GetVendorLoc.js The form uses this script to retrieve vendor location information.
AP_GetVendors.js The form uses this script to retrieve Vendor Information for the vendor list in the Vendor Search dialog box.
AP_Invoice_Export.js Perceptive Content uses this script to export XML data from Perceptive Content into the appropriate format for the related business application.
AP_Maintenance.js The form uses this INTool script to complete client side caching and other maintenance tasks associated with performance. We recommend that you schedule this script to every minute.
AP_ReindexAndCPMapping.js Use this script in Perceptive Content workflow to index form data and set form data into custom properties based on the AP_Validate_server.xml file configuration.
AP_ValidateGLAcctCodes.js Use this script to validate GL Account code entries. The script is executed when the user clicks the VALIDATE button on the GL Entry portion of the form.
AP_Validate_Server.js Use this script in Perceptive Content workflow to validate form values, retrieve data, and populate custom properties or document key values. Apply the script as an in-bound action.
AP_ValidateGLCodes.js The form uses this script to validate GL code entries. The script runs when the user clicks the VALIDATE button on the GL Entry portion of the form.
AP_VirtualTableInstaller.js The installer uses this script to install the virtual tables.
AP_VirtualTable_Purge.js INTool calls this whenever the Purge routine needs to be run against the virtual table data.
AP_VirtualTable_Updater.js Use this script to update your virtual tables with the business application data from the CSV files.
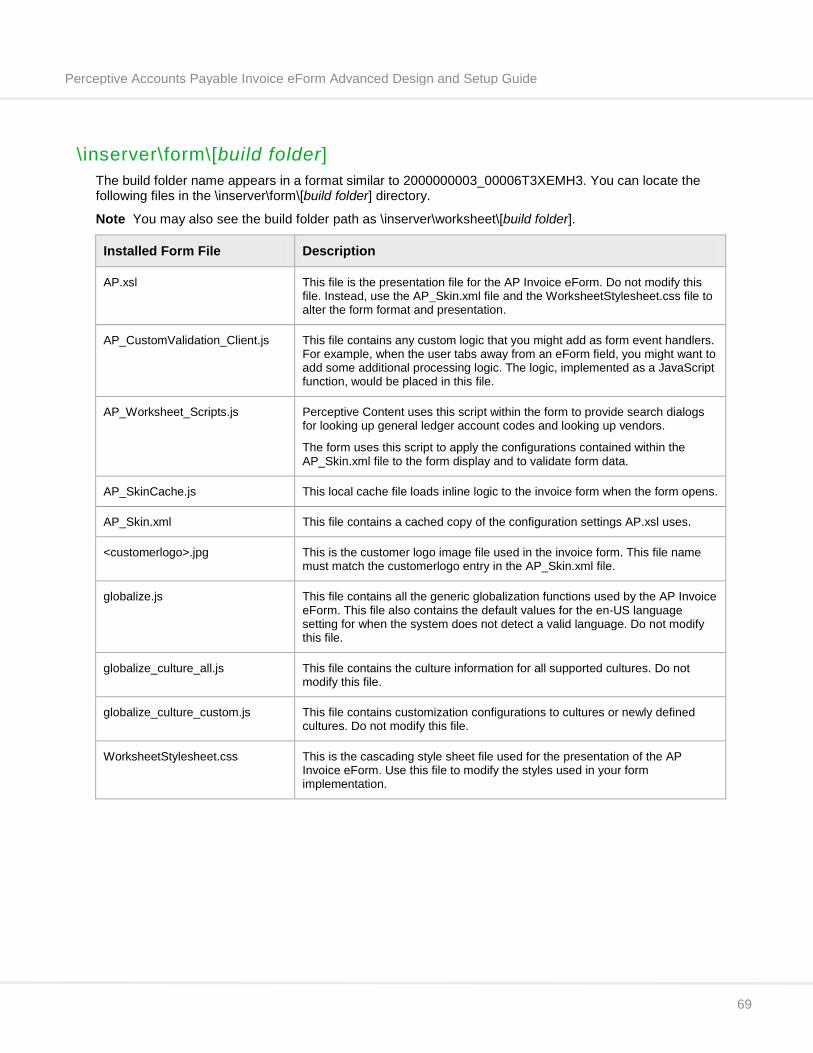
Perceptive Accounts Payable Invoice eForm Advanced Design and Setup Guide
69
\inserver\form\[build folder] The build folder name appears in a format similar to 2000000003_00006T3XEMH3. You can locate the following files in the \inserver\form\[build folder] directory.
Note You may also see the build folder path as \inserver\worksheet\[build folder].
Installed Form File Description
AP.xsl This file is the presentation file for the AP Invoice eForm. Do not modify this file. Instead, use the AP_Skin.xml file and the WorksheetStylesheet.css file to alter the form format and presentation.
AP_CustomValidation_Client.js This file contains any custom logic that you might add as form event handlers. For example, when the user tabs away from an eForm field, you might want to add some additional processing logic. The logic, implemented as a JavaScript function, would be placed in this file.
AP_Worksheet_Scripts.js Perceptive Content uses this script within the form to provide search dialogs for looking up general ledger account codes and looking up vendors.
The form uses this script to apply the configurations contained within the AP_Skin.xml file to the form display and to validate form data.
AP_SkinCache.js This local cache file loads inline logic to the invoice form when the form opens.
AP_Skin.xml This file contains a cached copy of the configuration settings AP.xsl uses.
<customerlogo>.jpg This is the customer logo image file used in the invoice form. This file name must match the customerlogo entry in the AP_Skin.xml file.
globalize.js This file contains all the generic globalization functions used by the AP Invoice eForm. This file also contains the default values for the en-US language setting for when the system does not detect a valid language. Do not modify this file.
globalize_culture_all.js This file contains the culture information for all supported cultures. Do not modify this file.
globalize_culture_custom.js This file contains customization configurations to cultures or newly defined cultures. Do not modify this file.
WorksheetStylesheet.css This is the cascading style sheet file used for the presentation of the AP Invoice eForm. Use this file to modify the styles used in your form implementation.
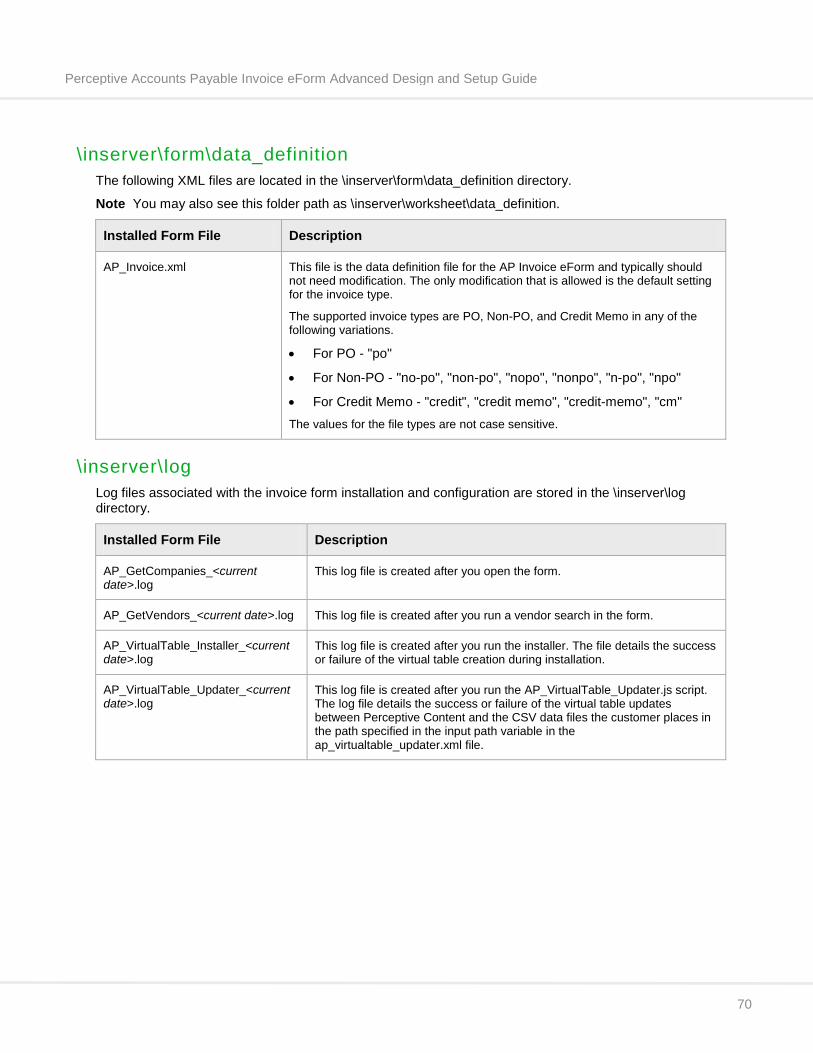
Perceptive Accounts Payable Invoice eForm Advanced Design and Setup Guide
70
\inserver\form\data_definition The following XML files are located in the \inserver\form\data_definition directory.
Note You may also see this folder path as \inserver\worksheet\data_definition.
Installed Form File Description
AP_Invoice.xml This file is the data definition file for the AP Invoice eForm and typically should not need modification. The only modification that is allowed is the default setting for the invoice type.
The supported invoice types are PO, Non-PO, and Credit Memo in any of the following variations.
• For PO - "po"
• For Non-PO - "no-po", "non-po", "nopo", "nonpo", "n-po", "npo"
• For Credit Memo - "credit", "credit memo", "credit-memo", "cm" The values for the file types are not case sensitive.
\inserver\log Log files associated with the invoice form installation and configuration are stored in the \inserver\log directory.
Installed Form File Description
AP_GetCompanies_<current date>.log
This log file is created after you open the form.
AP_GetVendors_<current date>.log This log file is created after you run a vendor search in the form.
AP_VirtualTable_Installer_<current date>.log
This log file is created after you run the installer. The file details the success or failure of the virtual table creation during installation.
AP_VirtualTable_Updater_<current date>.log
This log file is created after you run the AP_VirtualTable_Updater.js script. The log file details the success or failure of the virtual table updates between Perceptive Content and the CSV data files the customer places in the path specified in the input path variable in the ap_virtualtable_updater.xml file.
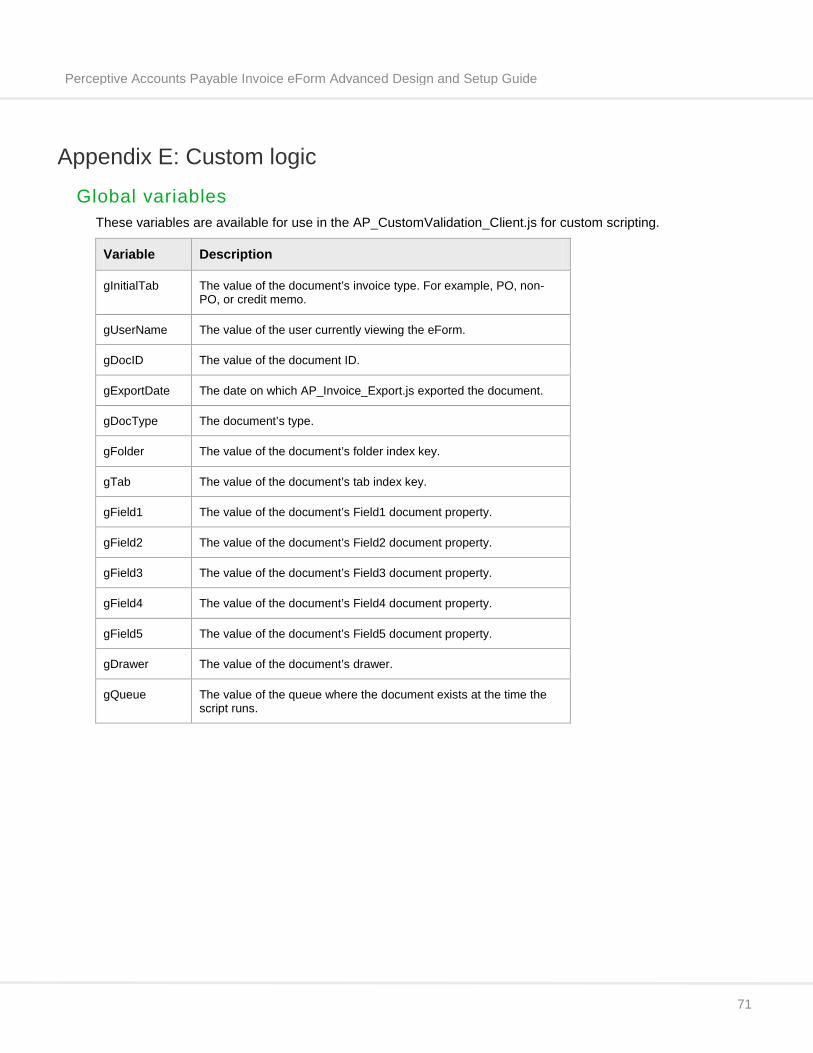
Perceptive Accounts Payable Invoice eForm Advanced Design and Setup Guide
71
Appendix E: Custom logic
Global variables These variables are available for use in the AP_CustomValidation_Client.js for custom scripting.
Variable Description
gInitialTab The value of the document’s invoice type. For example, PO, non-PO, or credit memo.
gUserName The value of the user currently viewing the eForm.
gDocID The value of the document ID.
gExportDate The date on which AP_Invoice_Export.js exported the document.
gDocType The document’s type.
gFolder The value of the document’s folder index key.
gTab The value of the document’s tab index key.
gField1 The value of the document’s Field1 document property.
gField2 The value of the document’s Field2 document property.
gField3 The value of the document’s Field3 document property.
gField4 The value of the document’s Field4 document property.
gField5 The value of the document’s Field5 document property.
gDrawer The value of the document’s drawer.
gQueue The value of the queue where the document exists at the time the script runs.
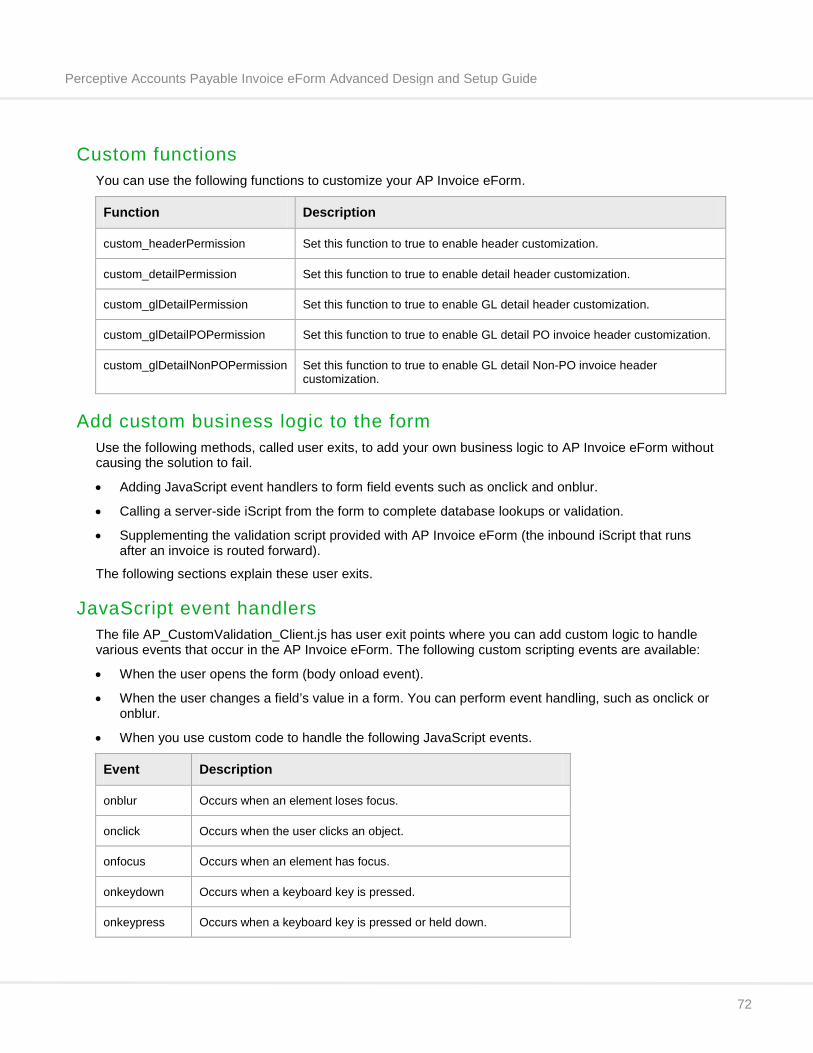
Perceptive Accounts Payable Invoice eForm Advanced Design and Setup Guide
72
Custom functions You can use the following functions to customize your AP Invoice eForm.
Function Description
custom_headerPermission Set this function to true to enable header customization.
custom_detailPermission Set this function to true to enable detail header customization.
custom_glDetailPermission Set this function to true to enable GL detail header customization.
custom_glDetailPOPermission Set this function to true to enable GL detail PO invoice header customization.
custom_glDetailNonPOPermission Set this function to true to enable GL detail Non-PO invoice header customization.
Add custom business logic to the form Use the following methods, called user exits, to add your own business logic to AP Invoice eForm without causing the solution to fail.
• Adding JavaScript event handlers to form field events such as onclick and onblur.
• Calling a server-side iScript from the form to complete database lookups or validation.
• Supplementing the validation script provided with AP Invoice eForm (the inbound iScript that runs after an invoice is routed forward).
The following sections explain these user exits.
JavaScript event handlers The file AP_CustomValidation_Client.js has user exit points where you can add custom logic to handle various events that occur in the AP Invoice eForm. The following custom scripting events are available:
• When the user opens the form (body onload event).
• When the user changes a field’s value in a form. You can perform event handling, such as onclick or onblur.
• When you use custom code to handle the following JavaScript events.
Event Description
onblur Occurs when an element loses focus.
onclick Occurs when the user clicks an object.
onfocus Occurs when an element has focus.
onkeydown Occurs when a keyboard key is pressed.
onkeypress Occurs when a keyboard key is pressed or held down.
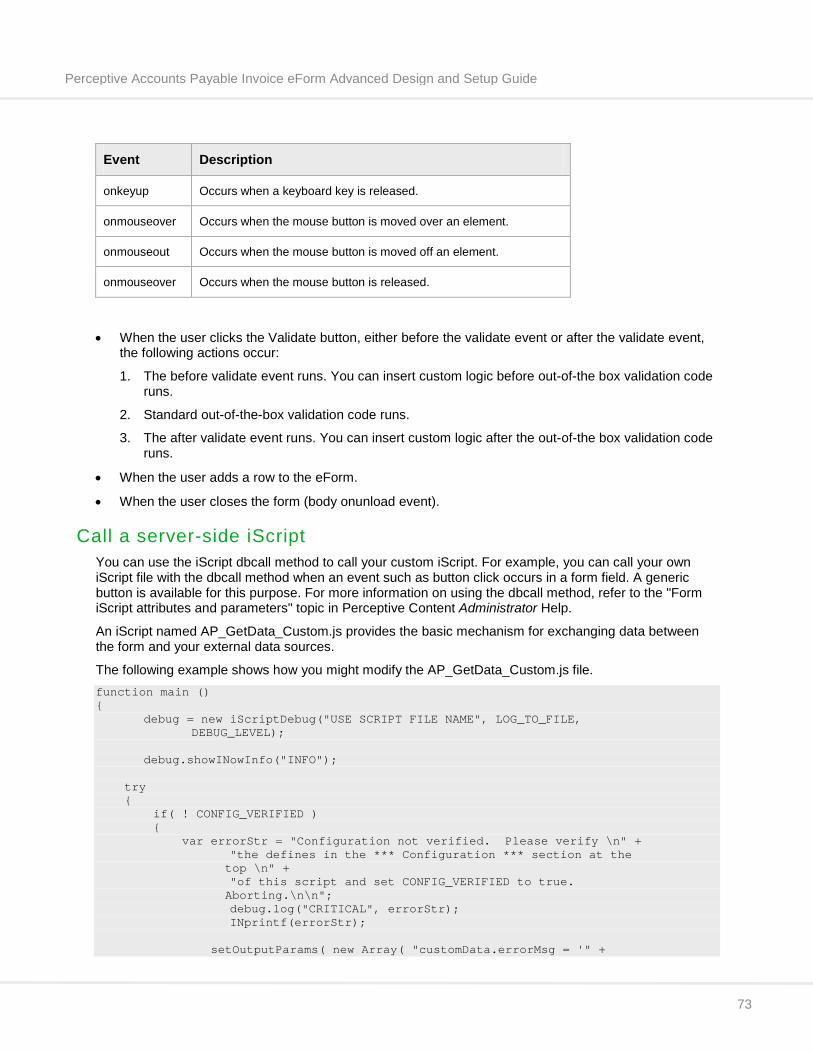
Perceptive Accounts Payable Invoice eForm Advanced Design and Setup Guide
73
Event Description
onkeyup Occurs when a keyboard key is released.
onmouseover Occurs when the mouse button is moved over an element.
onmouseout Occurs when the mouse button is moved off an element.
onmouseover Occurs when the mouse button is released.
• When the user clicks the Validate button, either before the validate event or after the validate event, the following actions occur:
1. The before validate event runs. You can insert custom logic before out-of-the box validation code runs.
2. Standard out-of-the-box validation code runs.
3. The after validate event runs. You can insert custom logic after the out-of-the box validation code runs.
• When the user adds a row to the eForm.
• When the user closes the form (body onunload event).
Call a server-side iScript You can use the iScript dbcall method to call your custom iScript. For example, you can call your own iScript file with the dbcall method when an event such as button click occurs in a form field. A generic button is available for this purpose. For more information on using the dbcall method, refer to the "Form iScript attributes and parameters" topic in Perceptive Content Administrator Help.
An iScript named AP_GetData_Custom.js provides the basic mechanism for exchanging data between the form and your external data sources.
The following example shows how you might modify the AP_GetData_Custom.js file. function main () { debug = new iScriptDebug("USE SCRIPT FILE NAME", LOG_TO_FILE, DEBUG_LEVEL); debug.showINowInfo("INFO"); try { if( ! CONFIG_VERIFIED ) { var errorStr = "Configuration not verified. Please verify \n" + "the defines in the *** Configuration *** section at the top \n" + "of this script and set CONFIG_VERIFIED to true. Aborting.\n\n"; debug.log("CRITICAL", errorStr); INprintf(errorStr); setOutputParams( new Array( "customData.errorMsg = '" +
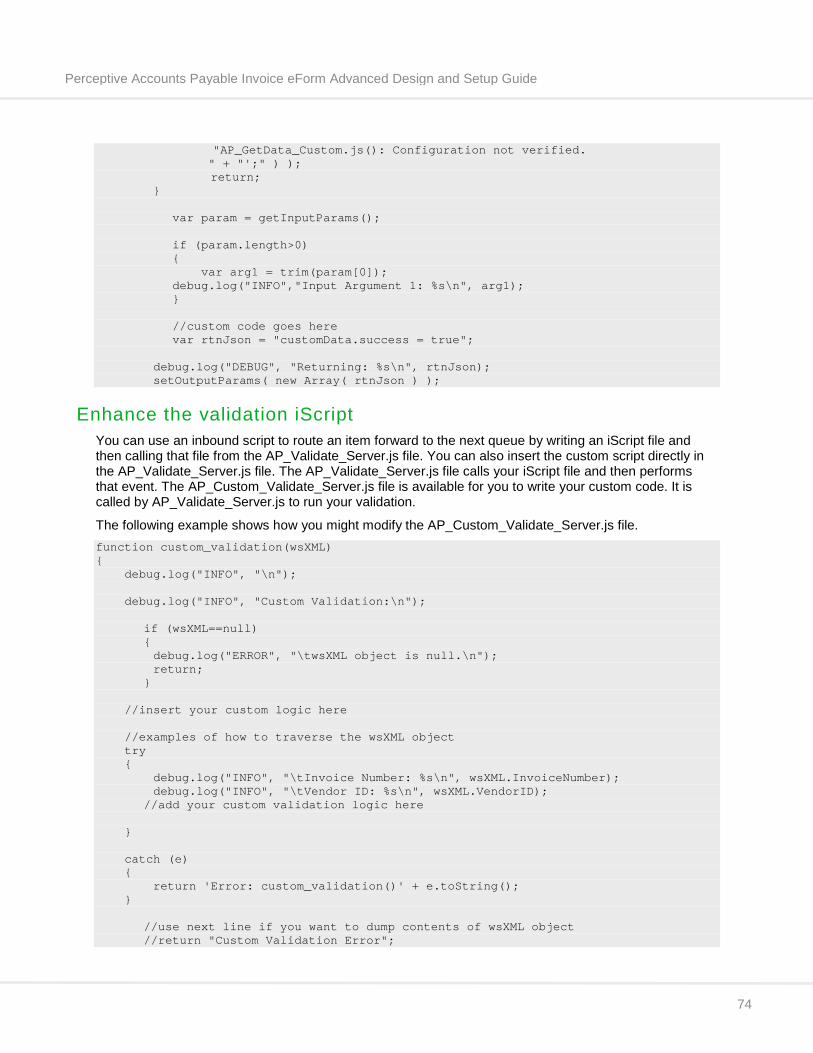
Perceptive Accounts Payable Invoice eForm Advanced Design and Setup Guide
74
"AP_GetData_Custom.js(): Configuration not verified. " + "';" ) );
return; } var param = getInputParams(); if (param.length>0) { var arg1 = trim(param[0]); debug.log("INFO","Input Argument 1: %s\n", arg1); } //custom code goes here var rtnJson = "customData.success = true"; debug.log("DEBUG", "Returning: %s\n", rtnJson); setOutputParams( new Array( rtnJson ) );
Enhance the validation iScript You can use an inbound script to route an item forward to the next queue by writing an iScript file and then calling that file from the AP_Validate_Server.js file. You can also insert the custom script directly in the AP_Validate_Server.js file. The AP_Validate_Server.js file calls your iScript file and then performs that event. The AP_Custom_Validate_Server.js file is available for you to write your custom code. It is called by AP_Validate_Server.js to run your validation.
The following example shows how you might modify the AP_Custom_Validate_Server.js file. function custom_validation(wsXML) { debug.log("INFO", "\n"); debug.log("INFO", "Custom Validation:\n"); if (wsXML==null) { debug.log("ERROR", "\twsXML object is null.\n"); return; } //insert your custom logic here //examples of how to traverse the wsXML object try { debug.log("INFO", "\tInvoice Number: %s\n", wsXML.InvoiceNumber); debug.log("INFO", "\tVendor ID: %s\n", wsXML.VendorID); //add your custom validation logic here } catch (e) { return 'Error: custom_validation()' + e.toString(); }
//use next line if you want to dump contents of wsXML object //return "Custom Validation Error";
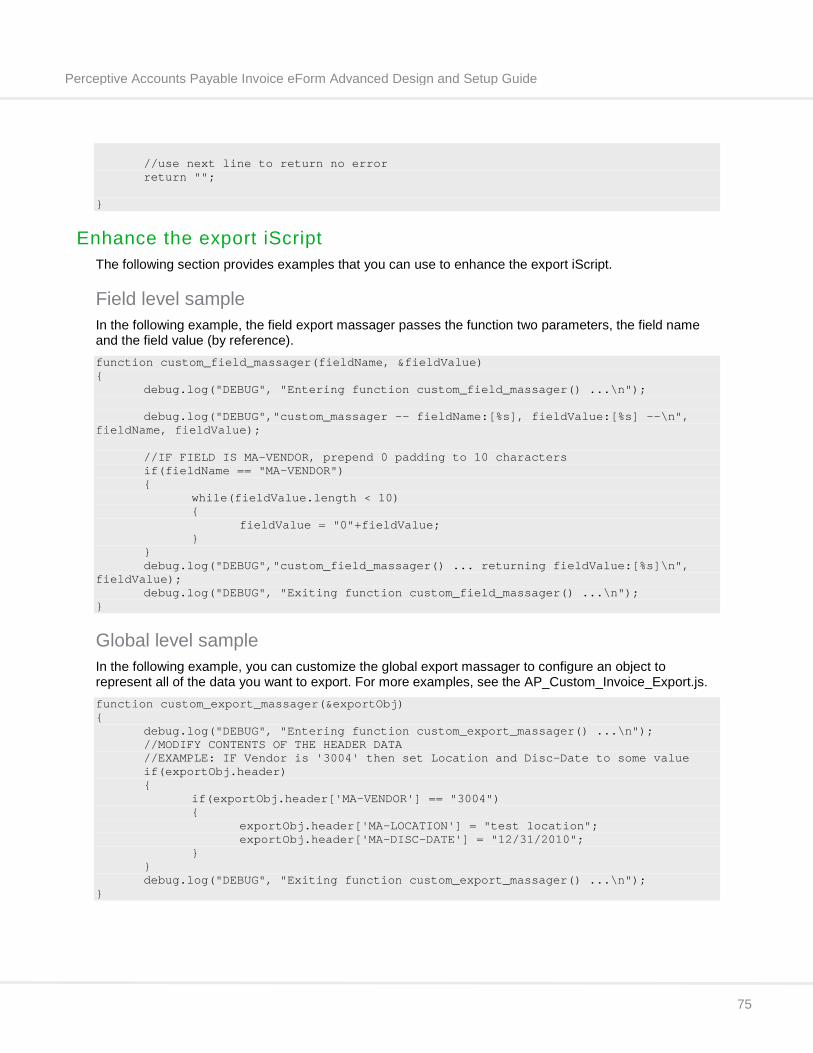
Perceptive Accounts Payable Invoice eForm Advanced Design and Setup Guide
75
//use next line to return no error return "";
}
Enhance the export iScript The following section provides examples that you can use to enhance the export iScript.
Field level sample In the following example, the field export massager passes the function two parameters, the field name and the field value (by reference). function custom_field_massager(fieldName, &fieldValue) { debug.log("DEBUG", "Entering function custom_field_massager() ...\n"); debug.log("DEBUG","custom_massager -- fieldName:[%s], fieldValue:[%s] --\n", fieldName, fieldValue); //IF FIELD IS MA-VENDOR, prepend 0 padding to 10 characters if(fieldName == "MA-VENDOR") { while(fieldValue.length < 10) { fieldValue = "0"+fieldValue; } } debug.log("DEBUG","custom_field_massager() ... returning fieldValue:[%s]\n", fieldValue); debug.log("DEBUG", "Exiting function custom_field_massager() ...\n"); }
Global level sample In the following example, you can customize the global export massager to configure an object to represent all of the data you want to export. For more examples, see the AP_Custom_Invoice_Export.js. function custom_export_massager(&exportObj) { debug.log("DEBUG", "Entering function custom_export_massager() ...\n"); //MODIFY CONTENTS OF THE HEADER DATA //EXAMPLE: IF Vendor is '3004' then set Location and Disc-Date to some value if(exportObj.header) { if(exportObj.header['MA-VENDOR'] == "3004") { exportObj.header['MA-LOCATION'] = "test location"; exportObj.header['MA-DISC-DATE'] = "12/31/2010"; } } debug.log("DEBUG", "Exiting function custom_export_massager() ...\n"); }
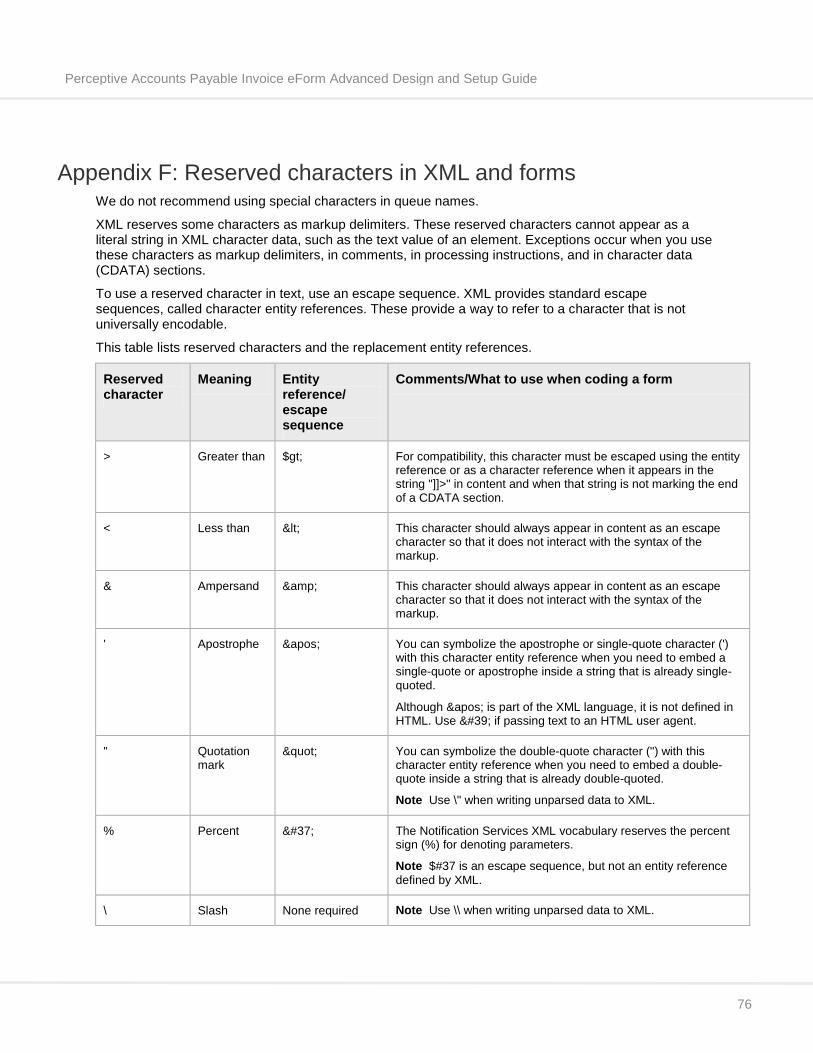
Perceptive Accounts Payable Invoice eForm Advanced Design and Setup Guide
76
Appendix F: Reserved characters in XML and forms We do not recommend using special characters in queue names.
XML reserves some characters as markup delimiters. These reserved characters cannot appear as a literal string in XML character data, such as the text value of an element. Exceptions occur when you use these characters as markup delimiters, in comments, in processing instructions, and in character data (CDATA) sections.
To use a reserved character in text, use an escape sequence. XML provides standard escape sequences, called character entity references. These provide a way to refer to a character that is not universally encodable.
This table lists reserved characters and the replacement entity references.
Reserved character
Meaning Entity reference/ escape sequence
Comments/What to use when coding a form
> Greater than $gt; For compatibility, this character must be escaped using the entity reference or as a character reference when it appears in the string "]]>" in content and when that string is not marking the end of a CDATA section.
< Less than < This character should always appear in content as an escape character so that it does not interact with the syntax of the markup.
& Ampersand & This character should always appear in content as an escape character so that it does not interact with the syntax of the markup.
' Apostrophe ' You can symbolize the apostrophe or single-quote character (') with this character entity reference when you need to embed a single-quote or apostrophe inside a string that is already single-quoted.
Although ' is part of the XML language, it is not defined in HTML. Use ' if passing text to an HTML user agent.
" Quotation mark
" You can symbolize the double-quote character (") with this character entity reference when you need to embed a double-quote inside a string that is already double-quoted.
Note Use \" when writing unparsed data to XML.
% Percent % The Notification Services XML vocabulary reserves the percent sign (%) for denoting parameters.
Note $#37 is an escape sequence, but not an entity reference defined by XML.
\ Slash None required Note Use \\ when writing unparsed data to XML.
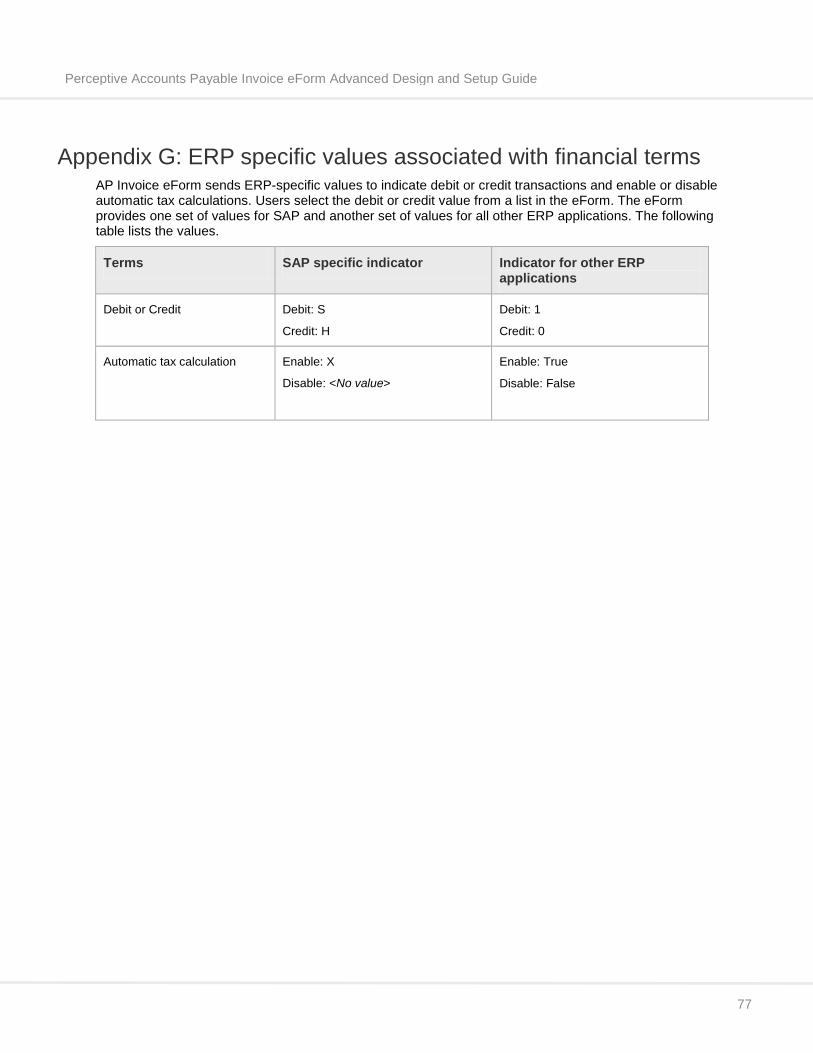
Perceptive Accounts Payable Invoice eForm Advanced Design and Setup Guide
77
Appendix G: ERP specific values associated with financial terms AP Invoice eForm sends ERP-specific values to indicate debit or credit transactions and enable or disable automatic tax calculations. Users select the debit or credit value from a list in the eForm. The eForm provides one set of values for SAP and another set of values for all other ERP applications. The following table lists the values.
Terms SAP specific indicator Indicator for other ERP applications
Debit or Credit Debit: S
Credit: H
Debit: 1
Credit: 0
Automatic tax calculation Enable: X
Disable: <No value>
Enable: True
Disable: False
Perceptive Accounts Payable Invoice eForm Advanced Design and Setup Guide
78
Index add on cost
AOC GL Account table ................................. 38 AOC GL Code table ...................................... 38 codes ............................................................ 38 overview.............................................. 7, 37, 38
AP workflow process .......................................... 9
AP_CustomValidation_Client.js ....................... 72
AP_GetData_Custom.js ................................... 73
attribute
captionkey..................................................... 48 key ................................................................ 48 worksheet ..................................................... 48
body onload event ............................................ 72
body onunload event ........................................ 73
custom logic ..................................................... 69
custom properties ............................................. 64
database lookups ............................................. 72
date format ....................................................... 24
datemask .................................................... 60, 61
dbcall ................................................................ 73
dbcall method ................................................... 73
inputpath variable............................................. 70
INTool .................................................. 31, 37, 47
JavaScript ........................................................ 72
JavaScript Event Handlers .............................. 72
Lawson
MA540 file .................................................... 40
multi-line GL distribution .................................. 40
Purge routine ................................................... 68
user exits .......................................................... 72
validation .................................................... 68, 72
value added tax ...................................... 7, 37, 38
amount summary.......................................... 28 amount validation ......................................... 28 codes ............................................................ 27 Compliance check box ................................. 31 ID .................................................................. 30 registration numbers, sold-to ........................ 30 registration numbers, vendor ....................... 30
WorksheetStylesheet.css ................................ 69
XML reserved characters ................................. 76


![[Webinar] Invoice Processing in Accounts Payable: Start the Year Strong](https://img.pdfslide.us/doc/110x75/55d520aabb61eb94578b474d/webinar-invoice-processing-in-accounts-payable-start-the-year-strong.jpg)
