Embed Size (px)
Citation preview
1
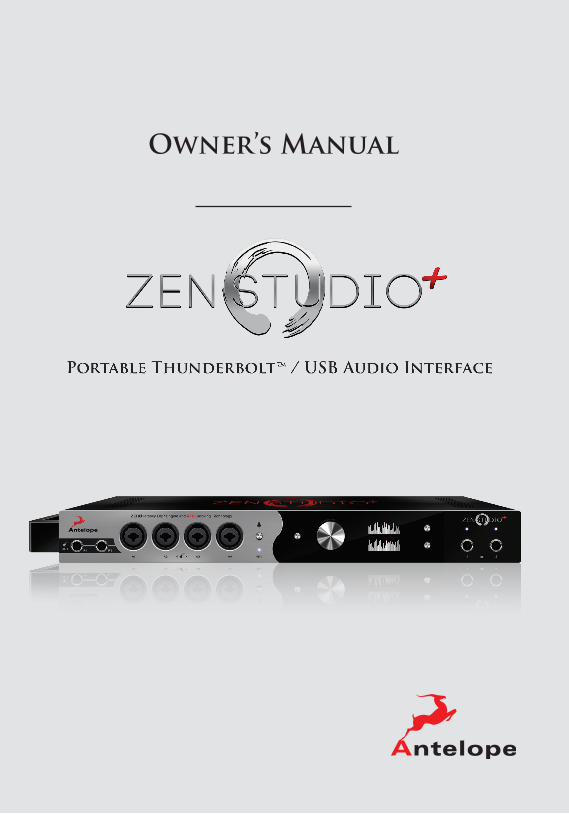
Portable Thunderbolt™ / USB Audio Interface
Owner’s Manual


Contents
1. Safety Notes 5 2. Introduction 63. Features 74. Quick Start 85. Installation Guide 96. Front, Rear and Side Panels Explained
6.1. Front Panel Explained 10 6.2. Rear Panel Explained 12 6.3. Side Panel Explained 13
7. Software Control Panel 148. Advanced User Tips 239. In the box 2310. Troubleshooting 2411. Technical Specifications 2612. Antelope Audio Support Resources 27


5
1. Safety Notes
• To reduce the risk of electrical shocks, fire, and relatedhazards:
• Do not remove screws, cover, or cabinet. There are no userserviceable parts inside. Refer servicing to qualified servicepersonnel.
• Do not expose this device to rain, moisture or spillover of liquidof any kind.
• Should any form of liquid or a foreign object enter the device,do not use it. Switch off the device and then unplug it fromthe power source. Do not operate the device again until theforeign object is removed or the liquid has completely driedand its residues fully cleaned up. If in doubt, please consultthe manufacturer.
• Do not handle the power cables with wet hands!
• Make sure the device is switched off when plugging/unplugging it to/from the power source.
• Avoid placing things on the cabinet or using the device ina narrow and poorly ventilated place which could affectits operation or the operation of other closely locatedcomponents.
• If anything goes wrong, turn off the device first and thenunplug the power. Do not attempt to repair the device yourself:consult authorized service personnel or your dealer.
• Do not install near any heat sources such as radiators, stoves,or other apparatus (including amplifiers) that produce heat.
• Do not use harsh chemicals to clean your Unit. Clean only withspecialized cleaners for electronics equipment.
• Connect all your devices before powering your Unit.
• Your unit should always be un-racked when traveling or in aflight case.
6
2. Introduction
Thank you for purchasing the Zen Studio+ from Antelope Audio.
Zen Studio+ is the successor to Antelope’s world-renowned professional portable interface Zen Studio. Its extended analog and digital connectivity, 12 world-class mic pres and Antelope’s signature clocking are now accompanied by an evolving library of hardware-based vintage effects. With both Thunderbolt™ and USB connectivity, Zen Studio+ is a the ultimate and most versatile mobile recording system.
Zen Studio+ comes with a growing arsenal of vintage FPGA-based effects, among which EQs, compressors, guitar amps and cabinets. The key to the Zen Studio+ modeling power is its custom FPGA chip. This proprietary technology makes the interface times more powerful than similar devices. You can not only create and maintain multiple mixes, but also reach the sound of legendary studios and hardware classics while exclusively working in-the-box.
The interface features an integrated Talkback function, allowing easy and fast communication between recordings artists, the engineer and the producer. Zen Studio+ offers dedicated Reamp outs, making it a preferred choice not only for mobile recordists and traveling artists, but for pro guitarists as well. This portable interface is also equipped with a 10MHz Atomic Clock Input for the most stable type of clocking – all in the name of reaching the perfect sound.
Zen Studio+ is fully controllable via an intuitive desktop application for PC and Mac, offering flexible signal routing and customizable presets. Users can create up to four independent, zero-latency mixes, which are assignable to any output, including the two independent headphone outputs and the monitor outputs.
For further information visit: www.antelopeaudio.com
Enjoy working with Zen Studio+!
All the best, The Antelope Team

7
3. Features
• Hardware-based vintage effects: EQs, compressors, guitar amps & cabinets• Proprietary FPGA with massive modeling capabilities• Thunderbolt™• Custom USB 2.0 Type-B Connector• 12 Class A mic preamps, with individual phantom power• 2 Reamp outputs• 4 Hi-Z instrument inputs• 8 Channels I/O on DB-25• 2 Monitor channels on TRS• 2 Individually assignable stereo headphone outputs• 32 Channels at 192kHz I/O via Thunderbolt™• 24 Channels at 192kHz I/O via proprietary USB• 16 Channels I/O via ADAT• 2 Channels I/O via S/PDIF• Talkback microphone• Flexible routing and multiple zero-latency mixing• Antelope’s renowned 64-bit Acoustically Focused Clocking• Oven Controlled Oscillator for supreme clocking stability• Word Clock I/O for sync with other devices• Five presets for fast and easy recall of setups• User friendly Windows and OS X compatible desktop app

8
4. Quick Start
Connect the DC power source on the rear panel.
Windows 1. Connect the USB cable to the USB port on your computer.2. Download the Zen Studio+ launcher from
http://en.antelopeaudio.com/products/zen-studio-plus/.3. Start the application, the launcher will automatically download the Software Control Panel.4. Open your Control Panel by double clicking and follow the device activation procedure.5. Connect your inputs and outputs of choice to Zen Studio+.6. Open your preferred DAW and ensure the device is selected as an input and output.
Note: Make sure your Zen Studio+ has the most recent firmware installed. Check this by selecting the Info panel and clicking on the Firmware Update button.
Mac OS 1. Connect the Thunderbolt™ (TB) or the USB cable to the TB or USB port on your computer.2. Download the Zen Studio+ launcher from
http://en.antelopeaudio.com/products/zen-studio-plus/.3. Start the application, the launcher will automatically download the Software Control Panel.4. Open your Control Panel by double clicking and follow the device activation procedure.5. Connect your inputs and outputs of choice to Zen Studio+.6. Open your preferred DAW and ensure the device is selected as an input and output.
Note: Make sure your Zen Studio+ has the most recent firmware installed. Check this by selecting the Options panel and clicking on the Firmware Update button.
Zen Studio+ System Requirements
Computer: Thunderbolt™ equipped Mac or USB 2.0 equipped PCProcessor: Core 2 Duo minimum, Core i3/i5/i7/E5 recommendedMemory: 4 GB RAM minimum, 8 GB RAM recommendedOS X: 10.9.3 or greater

9
5. Activation Guide
It is essential to activate Zen Studio+ before using it. Once the DC power source is plugged and the device is connected to your computer via USB or Thunderbolt™ follow the steps below:
1. Navigate to www.antelopeaudio.com/products/zen-tour/.2. Download the Zen Studio+ Launcher.3. Start the application (If you are on a PC install the launcher). The launcher will automatically
download the Software Control Panel.4. You will be greeted by an Activation Screen. If you already have an Antelope Audio account
click on “Use existing Antelope ID”. Enter your information and click Continue.If you don’t have an Antelope Audio account please enter a user ID, e-mail and password,then click Done.Check your email for the activation link mail and click on it. If the email does not appear inyour Inbox, please check your Spam folder.
5. Go back to the launcher and enter the required information. Click Done.6. You’re good to go!

10
6. Front, Rear and Side Panels Explained
6.1. Front Panel Explained
1. 2 Reamp outs
These outputs are direct outputs that should be used with guitar amplifiers for reamping.
2. 4 Instrument/ Mic Preamp/ Line Inputs
4 Class A mic preamps, with phantom power over Combo input with switchable line/ Hi-Z input.
3. Talkback Button
Press the talkback button to activate the talkback microphone. This can be distributed to theselected headphones and/or monitors using the software control panel or the touchscreen.
4. Power button
Toggles standby/operation state. Clicking and holding for two seconds allows you to enter sub-menu of the device.
• Mic Gain Control (rotary controls adjusts Mic Gain Clock Source)• Sample Rate• Volume Knob Control (allows you to select between three different monitoring outputs)• Screensaver Time (allows you to change the time at which the screensaver becomes active)• Device Info• Factory Reset
5. Rotary control
Large stepped attenuator for headphone volume and main out volume. Clicking-in the largevolume control allows you to scroll between three different monitoring options: rear monitoroutput; headphone output 1 and headphone output 2.
1 2 3 4 5
10 9
6 7 8

11
6. Display
Multi-function display that can scroll (using the 2 option buttons (6) to the right) through fivedifferent option screens:
• Peak Meter displaying up to 32 channels at a time that are adjustable from the softwarecontrol panel.
• Preferences screen, including:• Sync – indicates current clock source• SR – indicates current sample rate• DAC Vol – displays current volume of the DAC• HP1 Vol – displays current volume of the Headphone 1 output• HP2 Vol – displays current volume of the Headphone 2 output
• Three subsequent screens display the current input trim state of each of the 12preamplifiers. Note: Be aware that there might be a protective film over the display, whichdims the illumination – feel free to remove it.
7. Option buttons
Two option buttons allow you to scroll up and down between five different option screens.
8. Headphone indicator lights
These lights are illuminated to indicate which headphone outputs are active. Note: When bothlights are off, rear monitor output is selected.
9. Headphone outputs
Two independently assignable headphone outputs, selectable and controllable via the mainvolume control knob
10. 48V Indicator light
Displays when phantom power is enabled at any of the inputs.
12
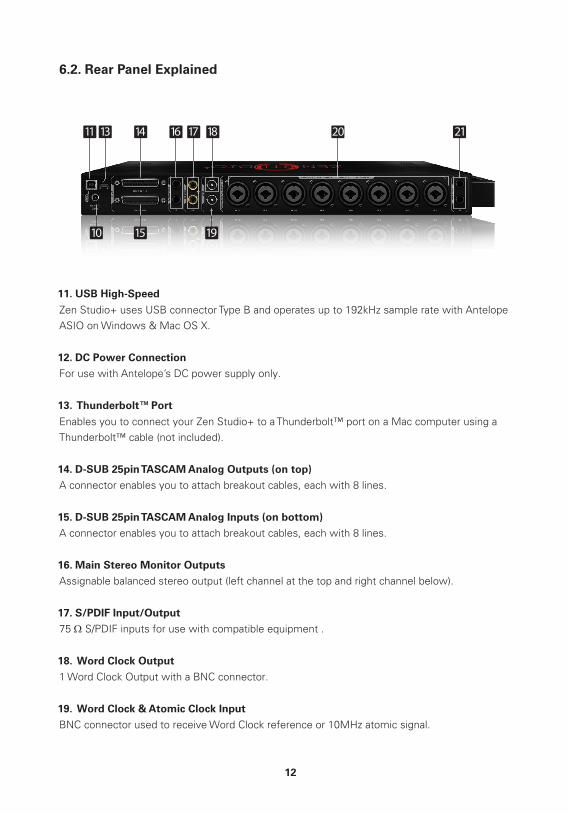
6.2. Rear Panel Explained
11. USB High-Speed
Zen Studio+ uses USB connector Type B and operates up to 192kHz sample rate with Antelope ASIO on Windows & Mac OS X.
12. DC Power Connection
For use with Antelope’s DC power supply only.
13. Thunderbolt™ Port
Enables you to connect your Zen Studio+ to a Thunderbolt™ port on a Mac computer using a Thunderbolt™ cable (not included).
14. D-SUB 25pin TASCAM Analog Outputs (on top)
A connector enables you to attach breakout cables, each with 8 lines.
15. D-SUB 25pin TASCAM Analog Inputs (on bottom)
A connector enables you to attach breakout cables, each with 8 lines.
16. Main Stereo Monitor Outputs
Assignable balanced stereo output (left channel at the top and right channel below).
17. S/PDIF Input/Output
75 Ω S/PDIF inputs for use with compatible equipment .
18. Word Clock Output
1 Word Clock Output with a BNC connector.
19. Word Clock & Atomic Clock Input
BNC connector used to receive Word Clock reference or 10MHz atomic signal.
20
10 15 19
11 13 14 16 17 18 21
13
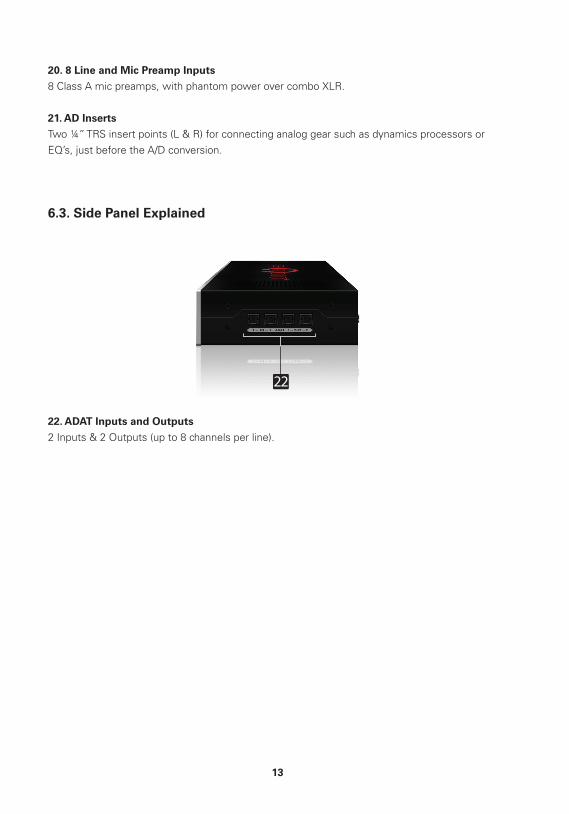
20. 8 Line and Mic Preamp Inputs
8 Class A mic preamps, with phantom power over combo XLR.
21. AD Inserts
Two ¼” TRS insert points (L & R) for connecting analog gear such as dynamics processors orEQ’s, just before the A/D conversion.
6.3. Side Panel Explained
22. ADAT Inputs and Outputs
2 Inputs & 2 Outputs (up to 8 channels per line).
22
14
7. Software Control Panel
7.1. Routing Tab and Main View
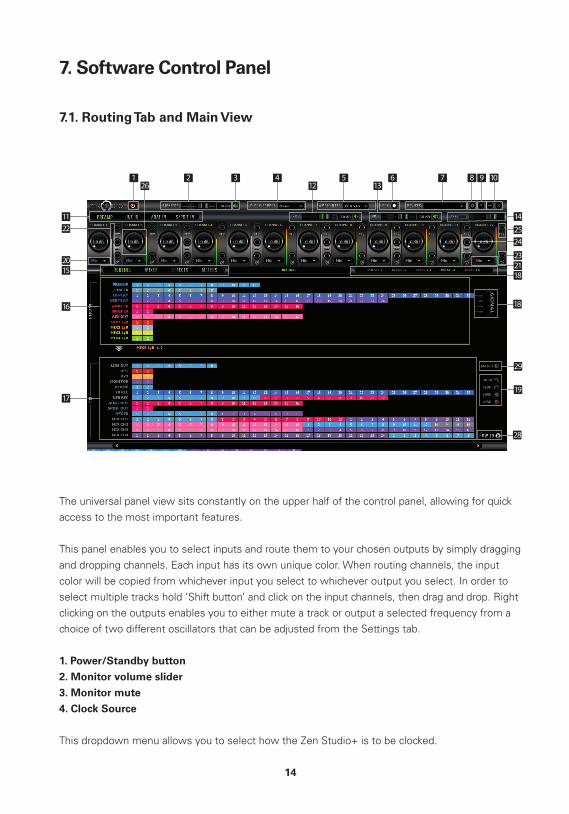
The universal panel view sits constantly on the upper half of the control panel, allowing for quick access to the most important features.
This panel enables you to select inputs and route them to your chosen outputs by simply dragging and dropping channels. Each input has its own unique color. When routing channels, the input color will be copied from whichever input you select to whichever output you select. In order to select multiple tracks hold ‘Shift button’ and click on the input channels, then drag and drop. Right clicking on the outputs enables you to either mute a track or output a selected frequency from a choice of two different oscillators that can be adjusted from the Settings tab.
1. Power/Standby button
2. Monitor volume slider
3. Monitor mute
4. Clock Source
This dropdown menu allows you to select how the Zen Studio+ is to be clocked.
11
2126
3 412 13
14
2524
18
18
2123
19
28
5 6 7 8 9 10
15
16
17
20
22
29

15
5. Sample Rate select
Once you select the Clock Source and Sample Rate, this will automatically determine the number of channels available to you in the Inputs & Outputs Router.
6. Lock light
When your Zen Studio+ is slaved to another clock source i.e. Thudnerbolt/USB, the panel will lock, displaying a “Pad Lock” symbol to the clock source and you also won’t be able to change the presets. Presets do not store clock source info or sample rate. This allows you to adjust presets while the device is receiving clock lock.
7. Devices
This dropdown menu allows you to switch between Antelope Audio devices connected to your computer or on the same network.
8. Settings
9. Info
10. Minimize & Close
11. PREAMP / ADAT IN / S/PDIF IN Section
12. Headphone (HP 1) volume slider & ‘Mute’ button
13. Headphone (HP 2) volume slider & ‘Mute’ button
14. Talkback button / indicator light & Talkback volume fader
15. ROUTING / MIXER / EFFECTS / METERS Section
16. ‘From’ Section (from Routing tab)
17. ‘To’ Section (from Routing tab)
18. Presets Section
Five different presets are available to save your favorite setups for easy access. To save a new preset:• Hold down Ctrl (PC) or Command (MAC) & mouse-click on the preset button (in the software
control panel) or; • Press Ctrl (PC) or Command (MAC) & press the according number on your keyboard. You can reset the presets to the factory setting or check device info:
19. Undo/Redo Routing; Save/Load (from Routing tab)20. Hi-Z, Mic and Line (on first four preamps) modes selectable via dropdown menu (please ensure your selection from the dropdown menu matches the type of signal being inputted)

16
21. Mic and Line (inputs on TRS / XLR combo) modes selectable via dropdown menu (please ensure your selection from the dropdown menu matches the type of signal being inputted)
22. Peak Meter
23. Phase Inverse button
24. Stereo Link
25. 48V Phantom Power
26. Gain
27. Signal Indicator
28. “How To...” Video Tutorials
29. Alternative Routing Matrix View

17
7.2. Mixer Tab
Zen Studio+ offers four software low latency mixers which provide zero latency mixing and monitoring that can be distributed to any output from the control panel. The low latency mixers provide all basic functions of a real mixer such as: Solo, Mute, Pan, Stereo Link, Volume Level fader control and a Master Fader, so you can easily make a stereo mix plus an Auxiliary send in order to use AuraVerb.
1. Fader (double-click to reset to zero)
2. Fader Level indication
3. Solo
4. Mute
5. Stereo Link
6. Pan (double-click to reset to zero)
7. Send (double-click to reset to zero)
8. Master Mix Fader (double-click to reset to zero)
9. Master Mix Level indication
10. Master Mix Mute
11. Mixer 1–4 Show/Hide
1
8
10
9
9
345
2
6
7

18
AuraVerb is a powerful and flexible algorithmic reverb effect powered by the Zen Studio+ Custom FPGA-based DSP. It provides near zero-latency effect monitoring without taxing your CPU. AuraVerb can also be used as a hardware effect from your DAW. That way you can take advantage of its rich and unique sound while mixing or mastering.
By default the effect is switched off.
Quick Start
AuraVerb appears as a pre-fader send effect on the Zen Studio+’s Mixer 1. To send a signal to the reverb, turn up the send control on a mixer channel and use the reverb output level to adjust the return to the mixer’s master channel. To hear the reverb, route the mixer output to your monitors by clicking and dragging MIX 1 [1] [2] to MONITOR [1] [2] on the routing matrix. Fine tune the reverb mix by balancing between the dry signal on the mixer channel’s fader and the reverb Output Level knob.
AuraVerb Parameters
• Color
AuraVerb’s Color control allows you to adjust the overall tone of the reverb. On “0” the space created is darker, like a lushly carpeted area. On “100” the reverb sounds the brightest, which can add some sizzle to a lead vocal, for example.
• PreDelay
PreDelay is a common function on most reverb effects and allows you to create a bit of space between the source and the onset of reverb by controlling the amount of delay time that precedes the initial reverberated sound. This parameter is used to place the reverberated signal
19
later in time with respect to the unprocessed signal. Natural settings for this are based on the size of the environment and range from 0 to 32 milliseconds. Fine adjustment of this parameter with respect to the tempo of the song or dramatic timing of the piece can help set the feel of the reverb within the mix.
• Early Reflection Gain
This is the linear gain value for all early reflections. These reflections are perceptually grouped with the direct sound when set at lower levels and can nicely thicken a track when increased.
• Late Reflection Delay
Among other things, AuraVerb calculates reflected energy from the side walls and ceiling of the virtual space. Late Reflection Delay controls the delay of these these late bursts of reflections, either to create dedicated echoes or to support the spatial impression of the simulated acoustic space.
AuraVerb allows you to fine tune several other parameters for even deeper control of the acoustic environment you are designing.
• Richness• Reverb Time• Room Size• Reverb Level
AuraVerb offers 24 presets suitable for a variety of genres and instruments.
The S & L icons stand for saving and loading your own AuraVerb presets.

20
7.3. Effects Tab
Click on the Effects Tab to reveal the 16 AFX Channel strips. Zen Studio+ Effects tab allows you to stack up to 8 effects (viewable in pairs) on each channel strip. You can choose between EQs, Compressors, Vintage Guitar Amps and Cabinets. ZenStudio+ comes with the growing Antelope Audio library of hardware-based vintage FX modeling legendary studio gear.

21
7.4. Meter Tab
Clicking the Meter Tab reveals the 32 Channel Metering tab. It visualizes sources using peak meters. Precise 32-track peak meters, with a dropdown menu from which you can select the source that you wish to be represented on the displays.
1. Meter Source
Dropdown tab allows you to select:
2. Clip Light
Indicates when you are overloading the input of the channels.
Preamp Mix 2 L/R Thunderbolt™ Rec
Line in Mix 3 L/R ADAT Out
USB Play Mix 4 L/R S/PDIF Out
Thunderbolt™ Play Line Out AFX In
ADAT in HP1 Mix 1 Ch
S/PDIF In HP2 Mix 2 Ch
AFX out Monitor Mix 3 Ch
Mix 1 L/R USB rec Mix 4 Ch
1 2

22
7.5 Settings Tab
Clicking the Settings Tab reveals the Settings panel.
1. Monitor Out Trim
2. Line Out Trim
3. ADC Trim
4. SPDIF SRC
5. Talkback Headphones Out 1 Indicator Light
6. Talkback Headphones Out 2 Indicator Light
7. Talkback Monitor Outs
8. Oscillator 1 & Mute
9. Oscillator Level
10. Oscillator 2 & Mute
11. Volume Knob Mode
12. Reamp Volume
13. Line Out Volume
14. Windows only: ASIO Control – Buffer Size & USB Streaming Mode
15. Thunderbolt™ Latency Mode
16. Display Brightness
1
8 10
13
15
16
9
2 3 4 5 6 7
11
14
12

23
With the Zen Studio+ in operating mode, press and hold the standby button to bring up Device INFO and Factory Reset options in the front panel display. You can scroll between these, using the Settings buttons. To initiate either of these desired options, press and hold the bottom options button.
Clock Source ADAT options: (Note that there is no S-Mux check-box for ADAT as it automatically enabled when you select ADAT 2X or ADAT 4X):
Sample Rate Thunderbolt™ USB ADAT S/PDIF
32 kHz 32 ch 24 ch 16 ch total / 8 ch per line 2 ch
44.1 kHz 32 ch 24 ch 16 ch total / 8 ch per line 2 ch
48 kHz 32 ch 24 ch 16 ch total / 8 ch per line 2 ch
88.2 kHz 32 ch 24 ch 8 ch total / 4 ch per line 2 ch
96 kHz 32 ch 24 ch 8 ch total / 4 ch per line 2 ch
176.4 kHz 32 ch 24 ch 4 ch total / 2 ch per line 2 ch
192 kHz 32 ch 24 ch 4 ch total / 2 ch per line 2 ch
8. Advanced User Tips
Ground Loop Hum and Noise
The design of Zen Studio+ minimizes the possibility of ground loop hum and noise. However, we recommend the use of shorter, shielded cables and balanced connections for all the audio signals of your system. All power cables of the system should be connected to a dedicated outlet box or power conditioner unit to avoid ground current noise affecting the audio signal path. It is also advisable to keep the layout of your signal and power cables separate.
9. In the box
• Zen Studio+ Portable Audio interface • Quick Start Guide • Warranty Card • 1 USB Cable• 1 DC Power Adapter
24
10. Troubleshooting
Start up and Sound
• Are you running the latest control panel and firmware?
If not, please update your control panel and firmware.
• Are you correctly routing the audio signal via the routing panel?
For USB/Thunderbolt™ playback, route the USB/Thunderbolt™ play channels to the DAC channel by dragging and dropping from the top section to the bottom. For more info on routing see the “Orion32 – Routing with ease” video from the Antelope Audio You Tube page.
• Have you set the correct sample rates matching your DAW with your computer’s sound
and the Zen Studio+?
On Mac, first check that the sample rate is correct in the audio midi set up, then proceed to check in the DAW before finally checking the Zen Studio+ sample rate.
For Windows, first check in playback devices, right click on the Zen Studio+ then click properties before then moving to the advanced tab. Then repeat the above by checking the DAW’s sample as well as the Zen Studio+.
Connectivity
• If you believe there is no sound being received to an input or delivered from an output:
• Check your source. Is there a signal being transmitted form the source?
• Is your source in the correct sample rate for the Zen Studio+ to receive?
• Check what clocking mode you are in. Are you receiving the clock signal from the source?
• Check that the relevant lock light on the control panel of the Zen Studio+ is lit up.
• Try a different cable and another source if available.
• Check the routing on the control panel. Have you routed the signal path correctly?
• If you have routed signals to the routing mixer, check their corresponding fader is up.
• Check the relevant peak meters of the control panel by selecting them in the drop down menu to see if the relevant signal is being received or is being outputted.

25
DAW
• What buffer size is your DAW set to?
If it is significantly low i.e. lower than 128 samples in your buffer size, try increasing it. Try increasing the buffer size from the Zen Studio+ control panel (Windows Only)
• Have you checked the input and output routing is correct in your DAW?
Is the Zen Studio+ device selected in the relevant sound card section of the DAW’s preferences?
• If the Zen Studio+ doesn’t show up in you DAW, first try unplugging and plugging back
the USB/Thunderbolt™ cable, then restarting your Computer and finally re-install the
firmware, drivers and control panel for the Zen Studio+.
26
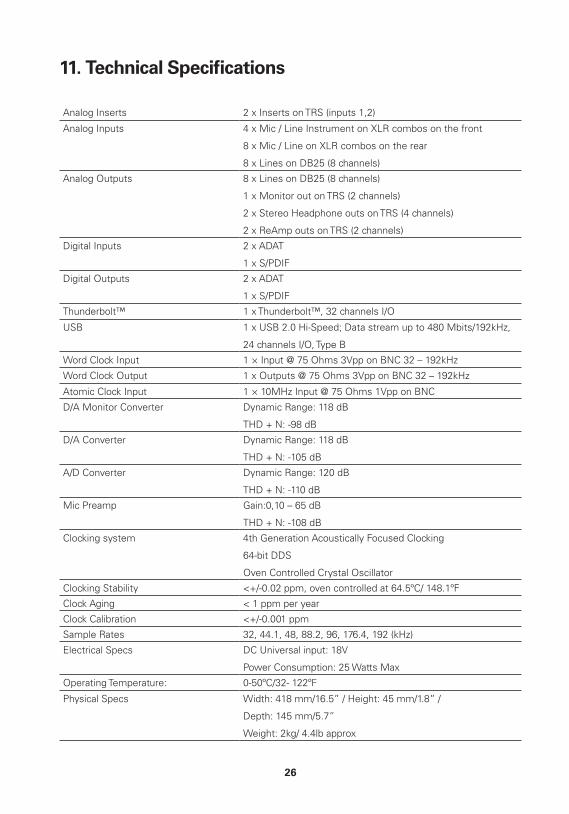
Analog Inserts 2 x Inserts on TRS (inputs 1,2)
Analog Inputs 4 x Mic / Line Instrument on XLR combos on the front
8 x Mic / Line on XLR combos on the rear
8 x Lines on DB25 (8 channels)
Analog Outputs 8 x Lines on DB25 (8 channels)
1 x Monitor out on TRS (2 channels)
2 x Stereo Headphone outs on TRS (4 channels)
2 x ReAmp outs on TRS (2 channels)
Digital Inputs 2 x ADAT
1 x S/PDIF
Digital Outputs 2 x ADAT
1 x S/PDIF
Thunderbolt™ 1 x Thunderbolt™, 32 channels I/O
USB 1 x USB 2.0 Hi-Speed; Data stream up to 480 Mbits/192kHz,
24 channels I/O, Type B
Word Clock Input 1 × Input @ 75 Ohms 3Vpp on BNC 32 – 192kHz
Word Clock Output 1 x Outputs @ 75 Ohms 3Vpp on BNC 32 – 192kHz
Atomic Clock Input 1 × 10MHz Input @ 75 Ohms 1Vpp on BNC
D/A Monitor Converter Dynamic Range: 118 dB
THD + N: -98 dB
D/A Converter Dynamic Range: 118 dB
THD + N: -105 dB
A/D Converter Dynamic Range: 120 dB
THD + N: -110 dB
Mic Preamp Gain:0,10 – 65 dB
THD + N: -108 dB
Clocking system 4th Generation Acoustically Focused Clocking
64-bit DDS
Oven Controlled Crystal Oscillator
Clocking Stability <+/-0.02 ppm, oven controlled at 64.5ºC/ 148.1ºF
Clock Aging < 1 ppm per year
Clock Calibration <+/-0.001 ppm
Sample Rates 32, 44.1, 48, 88.2, 96, 176.4, 192 (kHz)
Electrical Specs DC Universal input: 18V
Power Consumption: 25 Watts Max
Operating Temperature: 0-50ºC/32- 122ºF
Physical Specs Width: 418 mm/16.5” / Height: 45 mm/1.8” /
Depth: 145 mm/5.7”
Weight: 2kg/ 4.4lb approx
11. Technical Specifications

27
12. Antelope Audio Support Resources
Antelope Audio offers a range of services and support resources for your Antelope hardware, firmware and software control panels.
FAQ Several categories of frequently asked questions are available on the website: http://www.antelopeaudio.com/en/support
Telephone Support Phone line is for general inquiries and technical support: +1 734 418 8661 Hours of Operation: 7:00 a.m. – 3:00 p.m. (EST)
Help Desk A ticketing system ensures a 24-hour response time: www.antelopeaudio.com/en/support/help-desk
Live Chat Connect with a customer support agent directly via the website: http://www.antelopeaudio.com/en/support Click on Antelope Tab on the right-hand side of the webpage Hours of Operation: 7:00 a.m. – 3:00 p.m. (EST)
Control Panel Newsfeed The software control panel for Zen Studio+ incorporates a newsfeed at the bottom, which displaysall new updates and relevant information:
Facebook Page Get social with Antelope Audio and never miss an update: https://facebook.com/AntelopeAudio/
YouTube Page Tutorial videos, interviews, user cases and promos for forthcoming products: http://goo.gl/yfOmZf
Web Blog Regular blog posts will update you on the latest user cases with the Zen Studio+: http://en.antelopeaudio.com/products/zen-studio-plus/

28
Notes

29
Notes


32
Portable Thunderbolt™ / USB Audio Interface
Owner’s Manual
www.AntelopeAudio.com