Embed Size (px)
Citation preview

Vidya Pratishthan’s
College Of Engineering, Baramati
Laboratory Manual
Database Management System Laboratory
Third Year - Information Technology (2012)
Examination Scheme Practical: 50 marks Oral: 50 Marks
Teaching Scheme
Practical: 04 Hrs/Week/Batch
Prepared By
Prof. Patil Pradeep M. Prof. Shah Sahil K.
Department of Information Technology Vidya Pratishthan's College of Engineering
Baramati - 413133 Dist- Pune (M.S.)
INDIA
JUNE 2015

Vidya Pratishthan’s College of Engineering, Baramati
Department of Information Technology Engineering
Approval Sheet
Laboratory Manual
Database Management System Laboratory
Third Year - Information Technology (2012)
Prof. Patil P.M. Prof. Shah Sahil K Prof.S.A.Takale Subject Incharge Head IT Dept
Dr. S.B.Deosarkar
Principal

List of Assignments
Sr. No
Title
Part – I: Database Programming Languages – SQL, PL/SQL, NoSQL
1 Study of Open source Database MySQL
2 Design and Development of SQL/NoSQL DDL statements to
demonstrate the use of SQL object as Table , View, index and
sequence
3 Study of SQL queries
4 Study of SQL Join types
5 Write a PL/SQL code block to calculate the grade of minimum
10 students
6 Write a PL/SQL block to implement all types of cursor
7 Write a PL/SQL stored procedure and function
8 Write a Database trigger (Row level and Statement trigger)
Part – II: Large Scale Databases
1 Implement aggregation and indexing with suitable example
using MongoDB.
2 Implement Map reduces operation with suitable example using
MongoDB.
3 Design and Implement any 5 query using MongoDB
4 Implement any one Concurrency Control Protocol using
MongoDB and .net/Java
5 Create simple objects and array objects using JSON
6 Encode and Decode JSON Objects using
Java/Perl/PHP/Python/Ruby
7 Implement any machine learning algorithm for BIG data
Part – III : Mini Project : Database Project Life Cycle
1 Design and Implement any Database Application using PHP/ python/Java and MogoDB as a back end. Implement Database navigation operations (add, delete, edit etc. ) using ODBC/JDBC.
2 Write a program in PHP/ python/Java/.net to access stored procedure and functions using ODBC/JDBC

Syllabus:
314447 : DATABASE MANAGEMENT SYSTEMS LABORATORY
Teaching Scheme:
Practical: 4 Hours/Week
Examination Scheme:
Practical : 50 Marks Oral : 50 Marks
Prerequisites :Discrete Structure
Course Objectives :
1. To learn and understand Database Programming Paradigms
2. To learn and understand SQL, PL/SQL ,NoSQL
3. To learn Relational Database (Open source) such as MongoDB/ Oracle/MySQL/SQL
Server
4. To learn and understand Database Project Life Cycle.
Course Outcomes :
1. Understanding of Database Programming Languages
2. Master the basics of database languages and construct queries using SQL, PLSQL, NoSQL
3. Master the basic concepts of Database Project Life Cycle and appreciate the applications of
database systems
4. Understand how analytics and big data affect various functions now and in the future
5. Appreciate the impact of analytics and big data on the information industry and the
external
ecosystem for analytical and data services
Part – I: Database Programming Languages – SQL, PL/SQL, NoSQL
1. Study of Open Source Databases : MySQL/ MongoDB/CouchDB etc
2. Design and Develop SQL/NoSQL DDL statements which demonstrate the use of SQL
objects such as Table, View, Index, Sequence, Synonym.
3. Design at least 10 SQL/NoSQL queries for suitable database application using
SQL/NoSQL DML statements: Insert, Select, Update, Delete with operators, functions, and
set operator.
4. Design at least 10 SQL/NoSQL queries for suitable database application using SQL DML
statements: all types of Join, Sub-Query and View.
5. Write a PL/SQL block to calculate the grade of minimum 10 students.
6. Write a PL/SQL block to implement all types of cursors.
7. Write a PL/SQL stored procedure and function.
8. Write a database Trigger (Row level and Statement level).
Part – II: Large Scale Databases
1. Implement aggregation and indexing with suitable example using MongoDB.
2. Implement Map reduces operation with suitable example using MongoDB.
3. Design and Implement any 5 query using MongoDB

4. Implement any one Concurrency Control Protocol using MongoDB and .net/Java
5. Create simple objects and array objects using JSON
6. Encode and Decode JSON Objects using Java/Perl/PHP/Python/Ruby
7. Implement any machine learning algorithm for BIG data
Part – III : Mini Project : Database Project Life Cycle
1. Design and Implement any Database Application using PHP/ python/Java and MogoDB as
a
back end. Implement Database navigation operations (add, delete, edit etc. ) using
ODBC/JDBC.
2. Write a program in PHP/ python/Java/.net to access stored procedure and functions using
ODBC/JDBC
Group of students should submit the Project Report which will be consist of Title of the
Project, Abstract, Introduction, scope, Requirements, Data Modeling features, Data
Dictionary, Relational Database Design, Database Normalization, Graphical User Interface,
Source Code, Testing document, Conclusion.
Instructor should maintain progress report of mini project throughout the semester from
project group and assign marks as a part of the term work
Instructions:
1. Instructor should frame minimum six Practical Assignments on Part I
2. Instructor should frame minimum seven Practical Assignments on Part II
3. Instructor should frame minimum two Practical Assignments and Develop mini project on
Part III
1. Submission of each Practical Assignment should be in the form of handwritten write-ups/
printout of source code and output
2. Instructor should assign a mini project to a group of 3 - 4 students based Part III
3. Practical Examination will be based on the all topics covered from Part I, Part II &
Part III and questions will be asked to judge understanding of practical performed at
the time of practical examination
All the assignments should be conducted on Latest version of Open Source Operating
Systems, tools and Multi-core CPU supporting Virtualization and Multi-Threading.
Reference Books
1. “SQL and PL/SQL for Oracle 10g Black Book”, Dr. P. S. Deshpande, DreamTech
2. “SQL, PL/SQL: The Programming Language of Oracle”, Ivan Bayross, BPB Publication
3. “Oracle 9i/10g The Complete Reference”, Kevin Loney, George Koch, Tata McGraw Hill
4. “Managing and Using MySQL”, Reese G., Yarger R., King T., Williums H, 2nd Edition,
Shroff Publishers and Distributors Pvt. Ltd., ISBN 81 - 7366 - 465 – X
5. “ SQL Server – Black Book”, Dalton Patrik, DreamTech Press
6. MongoDB ,O’Reilly Publications
7. Hadoop, O’Reilly Publications
8. Data Mining: Concepts and Techniques by Jiawei Han, Micheline Kamber, Jian Pei,
Elsevier
9. http://www.tutorialspoint.com/json/

Assignment No: Basic 1&2
Aim: Study of Open Source Databases: MySQL
Theory:
MySQL is the most popular Open Source Relational SQL database management system.
MySQL is a fast, easy-to-use RDBMS being used for many small and big businesses.
MySQL is popular because:
1) It is released under open source
2) It handles a large subset of the functionality of the most expensive and powerful database
packages, it uses standard form of the well-known SQL data language,
3) works on many operating systems and with many languages including PHP, PERL, C,
C++, JAVA, etc.
4) MySQL works very quickly and works well even with large data sets and with PHP.
MySQL supports large databases, up to 50 million rows or more in a table.
5) The default file size limit for a table is 4GB, but we can increase this (if your operating
system can handle it) to a theoretical limit of 8 million terabytes (TB).
Starting MySQL :
To start MySQL obtain a user ID and a password created by your database administrator in
order to log on to the MySQL .
To start MySQL you would:
1. Select the Start button
2. Select All Programs and then MySQL
3. Select MySQL Server 5.0
4. Click on the MySQL Command line client
The MySQL command line client window will be displayed
5. Enter your password to log on to MySQL

MySQL has its own client interface, allowing you to move data around and change database
configuration. Note that you should use a password to log in. The default username is root if
you’ve installed MySQL on your own computer. Each MySQL server can host many
databases. A web application may use its own proprietary database or a standard database
like MySQL.
Once you log in the following command line interface is displayed:
To exit the MySQL Shell, just type QUIT or EXIT:
mysql> QUIT
mysql> exit
Basic Queries : Once logged in, you can try some simple queries. For example:

mysql> SELECT VERSION();
Note that :
1. Most MySQL commands end with a semicolon (;)
2. MySQL returns the total number of rows found, and the total time to execute the query.
3. Keywords may be entered in any letter case i.e uppercase or lowercase. The following
commands are equivalent.
mysql>select current_date();
mysql>select CURRENT_DATE();

4. use mysql as a simple calculator as:

5. You can also enter multiple statements on a single line. Just end each one with a
semicolon:
6. Multi-Line Commands :
mysql determines where your statement ends by looking for the terminating
semicolon, not by looking for the end of the input line.
Here's a simple multiple-line statement:
6. Canceling a Command : If you decide you don't want to execute
a command that you are in the process of entering, cancel it by typing \c
. ( Notice the prompt. It switches back to mysql> after you type \c, providing
feedback to indicate that mysql is ready for a new command.
)

Prompts: At the MySQL prompt, you can enter database commands followed by Enter. There
is also a set of commands that MySQL itself interprets. For a list of these commands,
type help or \h at the mysql> prompt. Following Table shows some of the prompts
you will see.
Prompt Meaning
mysql> Waiting for a command i.e ready for new command
-> Waiting for the next line of a multiple-line command
'> Waiting for the next line , waiting for completion of a string that
begins with a single quote( “ ‘ “ )
"> Waiting for the next line of a string that starts with a double quote
MySQL client commands:
Command Parameter Meaning
Quit Exit the command-line utility
Use Database name Use a specific database
Show tables or databases Show lists such as tables or
databases available
Describe Table name Describe a table’s columns
Status Display database version and
status
Source Filename Execute commands from a
file as a script
These commands allow you to perform tasks such as executing SQL commands that are
stored in a script file using the source.

Using a Database : To get started on your own database, first check which databases currently exist.
Use the SHOW statement to find out which databases currently exist on the server:
mysql> SHOW DATABASES;
To create a new database, issue the “create database” command:
((replacing myldatabseXYZ with your username)
To the select a database, issue the “ use” command:
Mysql> select mydatabaseXYZ;

Creating a Table : Once you have selected a database, you can view all database tables:
(An empty set indicates that I have not created any tables yet )

MySQL data types:
MySQL uses many different data types broken into three categories:
1) numeric,
2) date and time, and
3) string types.
Numeric data types :
1) INT - A normal-sized integer that can be signed or unsigned. If signed, the allowable
range is from -2147483648 to 2147483647. If unsigned, the allowable range is
from 0 to 4294967295. You can specify a width of up to 11 digits.
2) TINYINT - A very small integer that can be signed or unsigned. If signed, the allowable
range is from -128 to 127. If unsigned, the allowable range is from 0 to 255. You can
specify a width of up to 4 digits.
3) SMALLINT - A small integer that can be signed or unsigned. If signed, the allowable
range is from -32768 to 32767. If unsigned, the allowable range is from 0 to
65535. You can specify a width of up to 5 digits.
4) MEDIUMINT - A medium-sized integer that can be signed or unsigned. If signed, the
allowable range is from - 8388608 to 8388607. If unsigned, the allowable range is
from 0 to 16777215. You can specify a width of up to 9 digits.
5) BIGINT - A large integer that can be signed or unsigned. If signed, the allowable range is
from - 9223372036854775808 to 9223372036854775807. If unsigned, the allowable
range is from 0 to 18446744073709551615. You can specify a width of up to 20
digits.
6) FLOAT(M,D) - A floating-point number that cannot be unsigned. You can define the
display length (M) and the number of decimals (D). This is not required and will
default to 10,2, where 2 is the number of decimals and 10 is the total number of
digits (including decimals). Decimal precision can go to 24 places for a FLOAT.
7) DOUBLE(M,D) - A double precision floating-point number that cannot be unsigned. You
can define the display length (M) and the number of decimals (D). This is not required
and will default to 16,4, where 4 is the number of decimals. Decimal precision
can go to 53 places for a DOUBLE. REAL is a synonym for 8) DOUBLE.
8) DECIMAL(M,D) - An unpacked floating-point number that cannot be unsigned. In
unpacked decimals, each decimal corresponds to one byte. Defining the display
length (M) and the number of decimals (D) is required. NUMERIC is a
synonym for DECIMAL.
Date and Time Types:
The MySQL date and time datatypes are:
1) DATE - A date in YYYY-MM-DD format, between 1000-01-01 and 9999-12-31. For
example, December 30th, 1973 would be stored as 1973-12-30.
2) DATETIME - A date and time combination in YYYY-MM-DD HH:MM:SS format,
between 1000-01-01 00:00:00 and 9999-12-31 23:59:59. For example, 3:30 in the
afternoon on December 30th, 1973 would be stored as 1973- 12-30 15:30:00.

3) TIMESTAMP - A timestamp between midnight, January 1, 1970 and sometime in 2037.
This looks like the previous DATETIME format, only without the hyphens
between numbers; 3:30 in the afternoon on December 30th, 1973 would be stored as
19731230153000 ( YYYYMMDDHHMMSS ).
4) TIME - Stores the time in HH:MM:SS format.
5) YEAR(M) - Stores a year in 2-digit or 4-digit format. If the length is specified as 2 (for
example YEAR(2)), YEAR can be 1970 to 2069 (70 to 69). If the length is specified
as 4, YEAR can be 1901 to 2155. The default length is 4.
String Types:
Most data you'll store will be in string format. This list describes the common string
datatypes in MySQL.
1) CHAR(M) - A fixed-length string between 1 and 255 characters in length (for example
CHAR(5)), right-padded with spaces to the specified length when stored.
Defining a length is not required, but the default is 1.
2) VARCHAR(M) - A variable-length string between 1 and 255 characters in length; for
example VARCHAR(25). You must define a length when creating a
VARCHAR field.
3) LOB or TEXT - A field with a maximum length of 65535 characters. BLOBs are "Binary
Large Objects" and are used to store large amounts of binary data, such
as images or other types of files. Fields defined as TEXT also hold large amounts of
data; the difference between the two is that sorts and comparisons on stored
data are case sensitive on BLOBs and are not case sensitive in TEXT fields. You do
not specify a length with BLOB or TEXT.
5) TINYBLOB or TINYTEXT - A BLOB or TEXT column with a maximum length of 255
characters. You do not specify a length with TINYBLOB or TINYTEXT.
6) MEDIUMBLOB or MEDIUMTEXT - A BLOB or TEXT column with a maximum
length of 16777215 characters. You do not specify a length with MEDIUMBLOB or
MEDIUMTEXT.
7) LONGBLOB or LONGTEXT - A BLOB or TEXT column with a maximum length of
4294967295 characters. You do not specify a length with LONGBLOB or
LONGTEXT.
8) ENUM - An enumeration, which is a fancy term for list. When defining an ENUM, you
are creating a list of items from which the value must be selected (or it can be
NULL). For example, if you wanted your field to contain "A" or "B" or "C", you
would define your ENUM as ENUM ('A', 'B', 'C') and only those values (or NULL)
could ever populate that field.
Conclusion: Write what you have understood about databases and MySQL.

Exercise 1:
1. Which command is used for clearing the screen in MySQL?
2. What is difference between Oracle and MySQL?
3. Which are the major categories of SQL commands? Enlist the same with suitable
commands from each category.
4. Define DBMS. Which are the major vendors of DBMS in today’s generation?
5. Explain the various steps used to launch MySQL prompt both in Windows OS and Linux
OS.

Assignment No: 1
Aim: To Study SQL DDL, DML and DCL statements.
Title: Design and develop DB using various SQL objects like Tables, Views, Index on
sample DB.
Theory:
Introduction to SQL:
The Structured Query Language (SQL) comprises one of the fundamental building blocks of
modern database architecture. SQL defines the methods used to create and manipulate
relational databases on all major platforms.
SQL comes in many flavors. Oracle databases utilize their proprietary PL/SQL. Microsoft
SQL Server makes use of Transact-SQL. However, all of these variations are based upon the
industry standard ANSI SQL.
SQL commands can be divided into three main types.
1. Data Definition Language (DDL)
2. Data Manipulation Language (DML)
3. Data Control Language (DCL)
1. DATA DEFINITION LANGUAGE (DDL)
It contains the commands used to create and destroy databases and database objects. These
commands will primarily be used by database administrators during the setup and removal
phases of a database project.
DDL Commands:
a) Create table command:
Syntax
CREATE TABLE table_name
(
column_name1 data_type(size),
column_name2 data_type(size),
.......
)
Example:
This example demonstrates how one can create a table named “Person", with four columns.
The column names will be “LastName", “FirstName", “Address", and “Age".
CREATE TABLE Person
( LastName varchar(10),
FirstName varchar(10),
Address varchar(20),
Age int );

Creating table from another table (existing table):
Syntax:
CREATE TABLE tablename
[(columnname,columnaname)]]
AS SELECT columnname,columnaname
FROM tablename;
b) Alter table command:
Once table is created within a database, one may wish to modify the definition of that table.
The ALTER command allows making changes to the structure of a table without deleting and
recreating it.
ALTER TABLE table_name
ADD (newcolumn_name1 data_type(size),
newcolumn_name2 data_type(size), .......);
Example:
ALTER TABLE personal_info
ADD salary int;
This example adds a new attribute “salary” to the personal_info table i.e. an employee's
salary.
Alter table command can be used to add a new column, drop or modify an existing column.
c) Drop table command:
DROP command allows us to remove entire database objects from our DBMS. For example,
if we want to permanently remove the personal_info table that we created, one'd use the
following command:
Syntax:
DROP TABLE/VIEW/INDEX table_name/view_name/index_name;
Example:
DROP TABLE personal_info;
d) SELECT Command
The SELECT command is the most commonly used command in SQL. It allows database
users to retrieve the specific information they desire from an operational database.
Syntax:
SELECT A1,A2,….An

FROM tablename WHERE predicate
A1, A2 is the list of attributes and predicate is the condition which must be satisfied by the
resulting rows.
Example:
Following command displays list of all last names in personal_info table:
SELECT last_name
FROM personal_info
The command shown below retrieves all of the information contained within the personal
info table.
The asterisk is used as a wildcard in SQL. This means "Select everything(all records) from
the personal info table."
SELECT * FROM personal_info;
Finally, the WHERE clause can be used to limit the records that are retrieved to those that
meet specified criteria. If someone is interested in reviewing the personnel records of all
highly paid employees, the following command retrieves all of the data contained within
personal info for records that have a salary value greater than 50,000:
SELECT * FROM account
WHERE balance > 50000
2. DATA MANIPULATION LANGUAGE (DML):
After the database structure is defined with DDL, database administrators and users can
utilize the Data Manipulation Language to insert, retrieve and modify the data contained
within it.
a. INSERT COMMAND:
The INSERT command in SQL is used to add records to an existing table.
Format 1:-Inserting a single row of data into a table
Syntax:
INSERT INTO table_name[(columnname,columnname)] VALUES (expression,expression);
Example:
INSERT INTO customer values('xeta','lincon', calcuuta)
Format 2: Inserting data into a table from another table
Syntax:
INSERT INTO tablename SELECT columnname,columnname

FROM tablename;
b) UPDATE COMMAND
The UPDATE command can be used to modify information contained within a table.
Syntax:
UPDATE tablename SET columnname=expression,columnname=expression,..
WHERE columnname=expression;
Each year, company gives all employees a 3 % cost-of-living increase in their salary.
The following SQL command could be used to quickly apply this to all of the employees
stored in the database.
UPDATE account
SET balance=balance*1.03
c) DELETE COMMAND:
The DELETE command can be used to delete information contained within a table.
Syntax:
DELETE FROM tablename
WHERE search condition
The DELETE command with a WHERE clause can be used to remove particular record from
the account table.
Example:
DELETE FROM account
WHERE account-number=12345;
The following command deletes all the rows from the table account:
DELETE FROM account;
3. Data Control Language
These contain commands COMMIT and ROLLBACK.
COMMIT is used to permanently store all the modifications done to database objects. By
default, AUTO COMMIT feature is ON in most of the DBMS.
ROLLBACK is used in similar terms of undo. It undo’s all the changes made to a database
object before last COMMIT.
Conclusion: Write your concluding points by analyzing various commands and their
purpose.
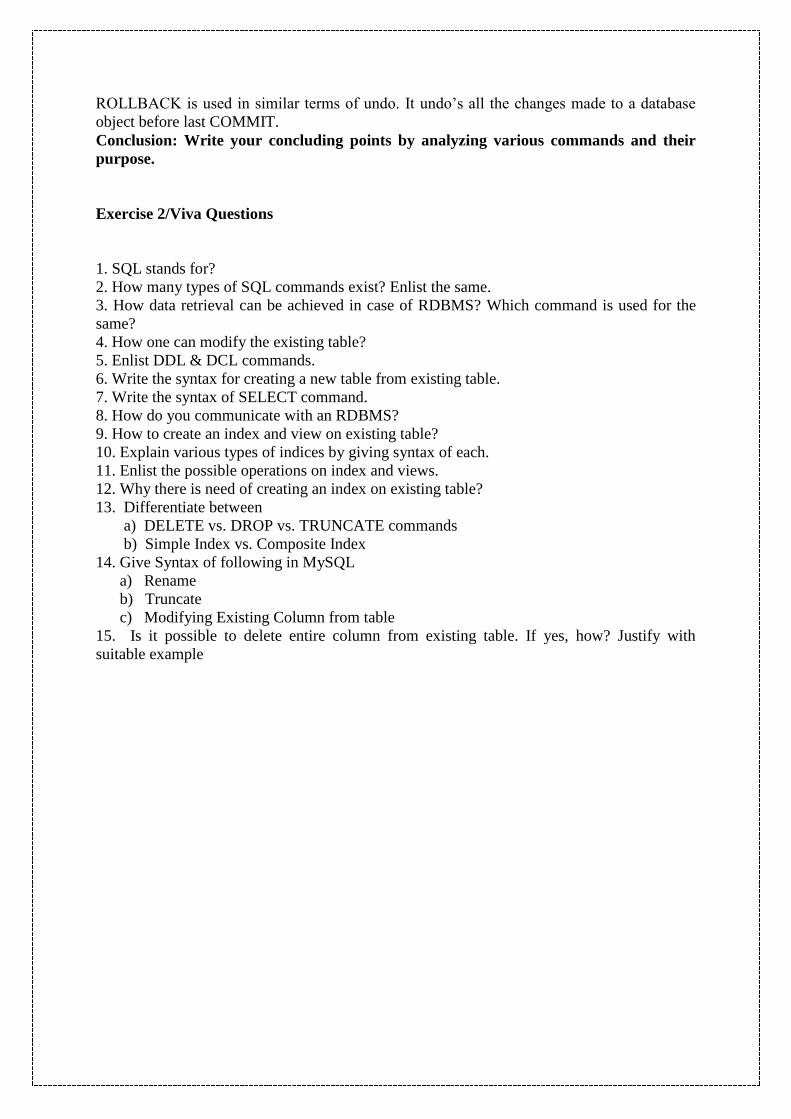
Exercise 2/Viva Questions
1. SQL stands for?
2. How many types of SQL commands exist? Enlist the same.
3. How data retrieval can be achieved in case of RDBMS? Which command is used for the
same?
4. How one can modify the existing table?
5. Enlist DDL & DCL commands.
6. Write the syntax for creating a new table from existing table.
7. Write the syntax of SELECT command.
8. How do you communicate with an RDBMS?
9. How to create an index and view on existing table?
10. Explain various types of indices by giving syntax of each.
11. Enlist the possible operations on index and views.
12. Why there is need of creating an index on existing table?
13. Differentiate between
a) DELETE vs. DROP vs. TRUNCATE commands
b) Simple Index vs. Composite Index
14. Give Syntax of following in MySQL
a) Rename
b) Truncate
c) Modifying Existing Column from table
15. Is it possible to delete entire column from existing table. If yes, how? Justify with
suitable example

Assignment No: 3
Aim: To study the various SQL constraints on database objects and their purpose.
Title: Design and develop DB for Managing customer orders with all constraints using
tables like Client_Master, Product_Master, Salsman_Master etc.
Theory:
DATA INTEGRITY
Enforcing data integrity ensures the quality of the data in the database. For example, if an
employee is entered with an employee id value of “123", the database should not allow
another employee to have an ID with the same value.
Two important steps in planning tables are to identify valid values for a column and to decide
how to enforce the integrity of the data in the column.
Data integrity falls into four categories:
Entity integrity
Domain integrity
Referential integrity
User-defined integrity
There are several ways of enforcing each type of integrity as shown in figure:
Figure 3.1 Integrity Constraints Enforcement
ENTITY INTEGRITY
Entity integrity defines a row as a unique entity for a particular table. Entity integrity enforces
the integrity of the identifier column(s) or the primary key of a table (through indexes,
UNIQUE constraints, PRIMARY KEY constraints, or IDENTITY properties).
DOMAIN INTEGRITY
Domain integrity is the validity of entries for a given column. One can enforce domain
integrity by restricting the type (through data types), the format (through CHECK constraints
and rules), or the range of possible values (through FOREIGN KEY constraints, CHECK
constraints, DEFAULT definitions, NOT NULL definitions, and rules).

REFERENTIAL INTEGRITY
Referential integrity preserves the defined relationships between tables when records are
entered or deleted. In Microsoft SQL Server, referential integrity is based on relationships
between foreign keys and primary keys or between foreign keys and unique keys.
Referential integrity ensures that key values are consistent across tables. Such consistency
requires that there need not be any references to nonexistent values and that if a key value
changes, all references to it change consistently throughout the database.
1. PRIMARY KEY CONSTRAINT
Definition: The primary key of a relational table uniquely identifies each record in the table.
A primary key constraint ensures no duplicate values are entered in particular columns and
that NULL values are not entered in those columns.
2. NOT NULL CONSTRAINT
This constraint ensures that NULL values are not entered in those columns with NOT NULL
constraint.
3. UNIQUE CONSTRAINT
This constraint ensures that no duplicate values are entered in those columns.
4. CHECK CONSTRAINT
The CHECK constraint enforces column value restrictions. Such constraints can restrict a
column, for example, to a set of values, only positive numbers, or reasonable dates.
5. FOREIGN KEY CONSTRAINT
Foreign keys constrain data based on columns in other tables. They are called foreign keys
because the constraints are foreign that is, outside the table.
For example,
Suppose a table contains customer addresses, and part of each address is a United States two-
character state code. If a table held all valid state codes, a foreign key constraint could be
created to prevent a user from entering invalid state codes.
To create a table with different types of constraints:
SYNTAX:
CREATE TABLE table_name
(
column_name1 data_type [constraint],
column_name2 data_type [constraint],
.......
)

Example:
create table customer
( customer-name char(20) not null,
customer-street char(30),
customer-city char(30),
primary key ( customer-name));
create table branch
( branch-name char(15) not null,
branch-city char(30),
assets number,
primary key ( branch-name));
create table account
( branch-name char(15),
account-number char(10) not null,
balance number,
primary key ( account-number),
foreign key ( branch-name) references branch,
check (balance>500));
Conclusion:
Write your concluding points which include comparison of various constraints and their
purpose.
Exercise/Viva Questions:
1. What are primary keys and foreign keys?
2. What is the difference between primary key and unique key?
3. Which are the different ways to apply a constraint to database tables?
4. Whether Foreign Key constraint allows a column to have NULL values?
5. Can we apply check constraint using MySQL on database table? If yes, how?
6. How to add a new constraint or remove an existing constraint from database tables?
7. Can we apply constraints on views? Explain with example.
8. How to create synonyms? Give the syntax for the same.

Assignment No: 4
Aim: To Study and implement the SQL queries on sample tables using all versions of
joins and aggregate functions and set operations.
Title: Write and execute SQL queries using aggregate functions, set operations and
joins on DB schema like University Schema, Employee schema etc.
Theory:
Aggregate Functions
Aggregate functions are functions that take a collection (a set or multiset) of values as input
and return a single value. SQL offers five built-in aggregate functions:
• Average: avg
• Minimum: min
• Maximum: max
• Total: sum
• Count: count
The input to sum and avg must be a collection of numbers, but the other operators can operate
on collections of nonnumeric data types, such as strings, as well.
Basic Aggregation
Consider the query “Find the average salary of employees in the Computer Science
department.”
We write this query as follows:
select avg (salary)
from employee where dept name= ’Comp. Sci.’;
The result of this query is a relation with a single attribute, containing a single tuple with a
numerical value corresponding to the average salary of employees in the Computer Science
department.
We use the aggregate function count frequently to count the number of tuples in a relation.
The notation for this function in SQL is count (*). Thus, to find the number of tuples in the
employee relation, we write
select count (*)
from employee;
There are circumstances where we would like to apply the aggregate function not only to a
single set of tuples, but also to a group of sets of tuples; we specify this wish in SQL using
the group by clause. The attribute or attributes given in the group by clause are used to form

groups. Tuples with the same value on all attributes in the group by clause are placed in one
group.
As an illustration, consider the query “Find the average salary in each department.”
We write this query as follows:
select dept name, avg (salary) as avg salary
from employee
group by dept name;
Set Operations
The SQL operations union, intersect, and except operate on relations and correspond to the
mathematical set-theory operations ∪, ∩, and −.
The Union Operation
To find the set of all employees who belong to either ‘IT’ dept. or ‘Comp’ dept, or both,
(select *
from employee
where dept_name=’IT’)
union
(select *
from employee
where dept_name = ’Comp’);
The union operation automatically eliminates duplicates, unlike the select clause.
On the similar concepts, intersect and minus/except operations works by retaining their
individual properties.
Introduction to Database Joins
Sometimes we have to select data from two or more tables to make our result complete. We
have to perform a join. Tables in a database can be related to each other with common
keys/attributes.
In the “Employees" table shown below, the “Employee_ID" column is the primary key,
meaning that no two rows can have the same Employee_ID. The Employee_ID distinguishes
two persons even if they have the same name.
The “Employee ID" column is the primary key of the “Employees" table
The “Prod ID" column is the primary key of the “Orders" table
The “Employee ID" column in the “Orders" table is used to refer to the persons in the
“Employees" table without using their names

Fig. 4.1 Employee Table
Fig. 4.2 Orders Table
Referring to Two Tables, We can select data from two tables by referring to two tables, like
this:
Example:
Who has ordered a product, and what did they order?
SELECT Employees.Name, Orders.Product
FROM Employees, Orders
WHERE Employees.Employee_ID=Orders.Employee_ID;
Result:
Fig.4.3 Result of Join Operation

Types of Joins
a) INNER JOIN:
The INNER JOIN returns all rows from both tables where there is a match. If there are rows
in Employees that do not have matches in Orders, those rows will not be listed.
Syntax:
SELECT field1, field2, field3
FROM first_table
INNER JOIN second_table
ON first_table.keyfield = second_table.foreign_keyfield;
Example:
Who has ordered a product, and what did they order?
SELECT Employees.Name, Orders.Product
FROM Employees
INNER JOIN Orders
ON Employees.Employee_ID=Orders.Employee_ID;
b) LEFT OUTER JOIN:
The LEFT JOIN returns all the rows from the first table (Employees), even if there are no
matches in the second table (Orders). If there are rows in Employees that do not have
matches in Orders, those rows also will be listed.
Syntax:
SELECT field1, field2, field3
FROM first_table
LEFT JOIN second_table
ON first_table.keyfield = second_table.foreign_keyfield;
Example:
List all employees, and their orders(if any).
SELECT Employees.Name, Orders.Product
FROM Employees
LEFT JOIN Orders
ON Employees.Employee_ID=Orders.Employee_ID;
c) RIGHT OUTER JOIN:
The RIGHT JOIN returns all the rows from the second table (Orders),even if there are no
matches in the first table (Employees). If there had been any rows in Orders that did not have
matches in Employees, those rows also would have been listed.
Syntax:
SELECT field1, field2, field3
FROM first_table
RIGHT JOIN second_table

ON first_table.keyfield = second_table.foreign_keyfield;
Example:
List all orders, and who has ordered(if any).
SELECT Employees.Name, Orders.Product
FROM Employees
RIGHT JOIN Orders
ON Employees.Employee_ID=Orders.Employee_ID;
SELF JOIN
Joining a table to itself is achieved by Self Join. It is used very rarely and in most of the cases
when results are not possible using normal joins.
As this type of join uses same table twice, it makes use of aliases for referring to a single
table twice.
Example:
Following query retrieves all employees who are residing in same city using self-join.
SELECT DISTINCT E1.ENAME, E1.CITY FROM EMPLOYEE E1, EMPLOYEE E2
WHERE E1.ENAME < > E2.ENAME AND E1.CITY=E2.CITY
Conclusion:
In conclusion, analysis of various aggregate functions and joins is expected.
Exercise 04/ Viva Questions
1. What is a “join"?
2. Which are the different types of joins?
3. What is the difference between “inner" and “outer" joins?
4. Out of JOIN and SUB-QUERY, which one is more efficient?
5. What is outer join? Explain with examples.
6. Give the syntax for:
a) Intersect
b) Minus
with suitable example of each.

Assignment No: 5
Aim: To Study and implement the SQL queries on sample tables using various logical
operators, set operations and clauses.
Title: Write and execute SQL queries using logical operators, set operations on DB
schema like University Schema, Employee schema etc.
Theory:
LIKE CONDITION:
The LIKE condition allows to use wildcards in the where clause of an SQL statement. This
allows performing pattern matching. The LIKE condition can be used in any valid SQL
statement - select, insert, update, or delete.
The patterns that can be chosen are:
“% “ allows matching any string of any length (including zero length)
“_” allows to match on a single character
Example 1:
To find all of the clients whose city begins with ‘M’
SELECT *FROM client where name like ‘M%’
Example 2:
To find suppliers whose name does not start with 'M'.
SELECT *FROM client
WHERE name not like 'M%';
Example 3:
To find all suppliers whose name is 6 characters long, where the first two characters is
'Mu' and the last 3 characters is 'bai'.
SELECT *FROM client
WHERE name like ‘Mu_bai’;
IN CONDITION:
The IN function helps to reduce the need to use multiple OR conditions.
SYNTAX:
SELECT columns
FROM tables
WHERE column1 in (value1, value2 ... value_n);

This SQL statement will return the records where column1 is value1, value2..., or value_n.
The IN function can be used in any valid SQL statement - select, insert, update or delete.
Example 1
SELECT *
FROM client
WHERE name in ( 'Mumbai' , 'Delhi', );
This would return all rows where the client city is either Mumbai or Delhi.
Example 2
SELECT *
FROM client
WHERE name not in ( 'Mumbai');
This would return all rows where the client city is not Mumbai.
BETWEEN CONDITION:
The BETWEEN condition allows to retrieve values within a range.
Syntax:
SELECT columns
FROM tables
WHERE column1 between value1 and value2;
This SQL statement will return the records where column1 is within the range of value1 and
value2 (inclusive).
Example 1
SELECT *
FROM salesman
WHERE salary between 2500 AND 5000;
This would return all rows where the salesmen salary is between 2500 and 5000, inclusive.
Example 2
SELECT *
FROM salesman
WHERE salary not between 2500 and 5000;
EXISTS CONDITION:
The EXISTS condition is considered "to be met" if the sub query returns at least one row.

SYNTAX:
SELECT columns
FROM tables
WHERE EXISTS ( sub query );
Example
SELECT *
FROM client
WHERE EXISTS
(select *
from sales
where sales.client_id = client.client_id);
This select statement will return all records from the client table where there is at least one
record in the sales table with the same client_id.
Example
SELECT *
FROM client
WHERE NOT EXISTS
(select *
from sales
where sales.client_id = client.client_id);
This select statement will return all records from the client table where there are
no records in the sales table with the same client_id.
GROUP BY CLAUSE:
The GROUP BY clause can be used in a SELECT statement to collect data across multiple
records and group the results by one or more columns.
SELECT column1, column2, ... column_n, aggregate_function
(expression)
FROM tables
WHERE predicates
GROUP BY column1, column2, ... column_n;
Where,aggregate_function can be a function such as sum,count,min,max.
Example
To return city wise data of clients, following query can be used:
SELECT client_id, name, SUM (salary) as "Total salary"
FROM client
GROUP BY city;

HAVING CLAUSE:
The HAVING clause is used in combination with the GROUP BY clause. It can be used in a
SELECT statement to filter the records that a GROUP BY returns.
Syntax:
SELECT column1, column2, ... column_n,
aggregate_function (expression)
FROM tables
WHERE predicates
GROUP BY column1, column2, ... column_n
HAVING condition1 ... condition_n;
Example
To return the name of the department and the total sales (in the associated department)
,following query can be used.
The HAVING clause will filter the results so that only departments with sales greater than
1000 will be returned.
SELECT department, SUM (sales) as "Total sales"
FROM order_details
GROUP BY department
HAVING SUM (sales) > 1000;
ORDER BY CLAUSE:
The ORDER BY clause allows you to sort the records in your result set. The ORDER BY
clause can only be used in SELECT statements. The ORDER BY clause sorts the result set
based on the columns specified. If the ASC or DESC value is omitted, the system assumed
ascending order.
Syntax:
SELECT columns
FROM tables
WHERE predicates
ORDER BY column ASC/DESC;
Where, ASC indicates ascending order. (default)
DESC indicates descending order.
Example:
SELECT sales_id, client_id, to_char(sales_date,DD/MM/YY)
FROM sales
ORDER BY to_char(sales_date,DD/MM/YY);
This would return all records sorted by the date field from sales table.

Conclusion: Write your concluding points according to the analysis of various operators and their
usage/purpose.
Exercise 05/ Viva Questions:
1. What is the difference between GROUP BY and ORDER BY clauses?
2. What is the difference between a \where" clause and a \having" clause?
3. When using a count (distinct) is it better to use a self-join or temp table to find redundant
data, and provide an example?
4. How to find out the 10th highest salary in SQL query?
5. What is the use of DESC in SQL?
6. Which operator performs pattern matching?
7. What are the wildcards used for pattern matching?
8. How to select last N records from a Table?
9. Identify error in following SQL:
SELECT EMPNO, SUM(SAL) FROM EMP
GROUP BY EMPNO
HAVING ENAME= "KENT";
a) Syntax Error
b) SUM() is not an aggregate function
c) HAVING cannot be used with GROUP BY
d) The Having condition has to be based on some column that appears in the select list.
10. Explain the ORDER BY clause with proper syntax.
Assignment No: 6
Aim: To Study and implement PL/SQL programming along with Procedures and
Functions.
Title: Write and execute simple PL/SQL programs and apply this knowledge to execute
PL/SQL procedures and functions.
Theory:
PL/SQL (Procedural Language/Structured Query Language)
It is Oracle Corporation's proprietary procedural extension to the SQL database language,
used in the Oracle database. Some other SQL database management systems offer similar
extensions to the SQL language. PL/SQL's syntax strongly resembles that of Ada, and just
like some Ada compilers of the 1980s, the PL/SQL runtime system uses Diana as
intermediate representation. The key strength of PL/SQL is its tight integration with the
Oracle database.
Basic code structure in PL/SQL
DECLARE
TYPE / item / FUNCTION / PROCEDURE declarations
BEGIN
Statements
EXCEPTION
EXCEPTION handlers
END;
The DECLARE and EXCEPTION sections are optional.
Simple Example:
DECLARE
number1 int;
number2 int:= 17; -- value default
text1 VARCHAR(12) := 'Hello world';
BEGIN
SELECT street_number
INTO number1
FROM address
WHERE name = 'Sahil';
END;
FUNCTIONS
Functions in PL/SQL are a collection of SQL and PL/SQL statements that perform a task and
should return a value to the calling environment.

SYNTAX:
CREATE FUNCTION <function_name> [(input/output variable declarations)] RETURN
return_type
<IS|AS>
BEGIN
[declaration block]
<PL/SQL block WITH RETURN statement>
[EXCEPTION
EXCEPTION block]
END;
Example:
CREATE FUNCTION add(a in int,b out int,c in out int) return int IS
BEGIN
SELECT CONCAT ('a = ', a , ' b = ', b , ' c = ' , c);
SELECT CONCAT ('Addition Result = ');
return (a+b+c);
END;
PROCEDURES
Procedures are the same as Functions, in that they are also used to perform some task with the
difference being that procedures cannot be used in a SQL statement and although they can
have multiple out parameters they do not return a value.
SYNTAX:
CREATE PROCEDURE <procedure_name> [(input/output variable declarations)]
BEGIN
[declaration block]
<PL/SQL block statements>
[EXCEPTION
EXCEPTION block]
END;
Example:
Create Procedure to check stock of items whose quantity is less than particular number and
display result in temporary table 'stockcheck' and drop temp table after display.
CREATE PROCEDURE check_stock()
BEGIN
DECLARE SNO INT;
DECLARE ITEM CHAR(30);
DECLARE PRICE INT;
DECLARE TR INT;

DECLARE QA INT;
DECLARE C1 INT;
Declare C2 INT;
DECLARE CS cursor for select * from stock;
DECLARE CONTINUE HANDLER FOR NOT FOUND SET C1=1;
set C2=22;
create table stockcheck(stock_no int, item char(30), quantity_available int);
OPEN CS;
lable1: loop
FETCH CS INTO SNO,ITEM,PRICE,TR,QA;
if C1=1 then
leave lable1;
end if;
if QA <10 then
set C2=11;
insert into stockcheck values(SNO,ITEM,QA);
end if;
end loop;
if C2=22 then
Select "Enough stock for all items";
ELSE
select * from stockcheck;
drop table stcokcheck;
end if;
close CS;
END;//
Conclusion:
After completing this assignment, solve following sample examples by trying each
possibility. Write your analysis as concluding points.
Exercise 6
1. Write a PL/SQL code block that will accept an account number from the user. check if the
users balance is less than the minimum balance, only then deduct Rs. 100/- from the balance.
The process is fired on the Acc Master table.(Use conditional control- If-Else If-Else-End If).
2. Write a PL/SQL code block to calculate the area of a circle for a value of radius varying
from 3 to 7, consisting of two columns Radius & Area.(Use Iterative control- the While
loop).
3. Write a PL/SQL block of code for inverting a number 5639 to 9365.(Use Iterative Control
loop).
4. Write a PL/SQL block of code to achieve the following: if there are no transactions taken
place in the last 365 days then mark the account status as inactive, and then record the
account number, the opening date & the type of account in the Inactive Acct_Master table.

Viva Questions
1. What is difference between SQL and PL/SQL?
2. What is PL/SQL Block?
3. What is difference between procedures and functions?
4. What are the different iterative controls in PL/SQL?
5. Give the structure of PL/SQL block.

Assignment No: 7
Aim: To study PL/SQL programming using cursors and to apply the same in procedure.
Title: Write a PL/SQL block to calculate the grade of minimum 10 students. Write function
for the same using cursors
Theory:
Create a table student
CREATE TABLE student
( stud_id INT UNSIGNED PRIMARY KEY AUTO_INCREMENT , m1 int ,m2 int , m3 int);
Insert minimum ten records in the table as shown in sample
insert into student(m1,m2,m3) values (40,40,40),(50,50,50),(60,60,60);
Change delimiter before writing procedure
DELIMITER $$
Create a procedure in MySQL
CREATE PROCEDURE stud()
BEGIN
DECLARE pid, pm1, pm2, pm3, pm INT;
/* Declare a local variable for a subsequent handler. */
DECLARE fetched INT DEFAULT 0;
DECLARE CONTINUE HANDLER FOR NOT FOUND SET fetched=1;
DECLARE student_cursor CURSOR FOR
SELECT * FROM student;
/* Start transaction context. */
START TRANSACTION;
/* Set savepoint. */
SAVEPOINT all_or_none;
/* Open a student cursor. */
OPEN student_cursor;
Lable1: LOOP
/* Fetch a row at a time. */
FETCH student_cursor
INTO pid , pm1, pm2, pm3;
/* Place the catch handler for no more rows found immediately after the fetch operation.

*/
IF fetched = 1 THEN LEAVE Lable1; END IF;
set pm = (pm1+pm2+pm3)/3;
if pm>=70 then
select concat ('Distinction' ,pm) as "rows";
end if;
if pm>=60 and pm<70 then
select concat ('First' ,pm) as "rows";
end if;33
if pm>=50 and pm<60 then
select concat ('second' ,pm) as "rows";
end if;
if pm<50 then
select concat ('Fail' ,pm) as "rows";
end if;
END LOOP;
CLOSE student_cursor;
END;
$$
Reset the delimiter back to a semicolon to work again. DELIMITER ; Call the procedure. CALL stud();
Conclusion:
After completing this assignment, solve sample examples by using cursors and procedures.
Write your analysis as concluding points.
Exercise 07:
1. Modify the created procedure inorder to classify various students according to obtained
grades. Create new tables viz. Distinction, First Class and so on.
2. Create a new procedure that displays first ‘n’ toppers from student table.
3. Create a procedure to display number, square of a number and its cube in reverse order
from 01 to 20.

Assignment No: 8
Aim: To Study and implement PL/SQL Triggers and Cursors.
Title: Write and execute simple PL/SQL programs that demonstrate the use of all types
of triggers and cursors.
Theory:
PL/SQL Cursors Types:
1. Implicit Cursors:
Implicit cursors are automatically created and used by RDBMS every time you issue a select
statement in PL/SQL. If you use an Implicit cursors, underlying RDBMS will perform the
open, fetches, and close for you automatically. Implicit cursors are used in statements that
return only one row.
If the SQL statement returns more than one row, an error will occur.
In the following PL/SQL code block, the select statement makes use of an implicit cursor:
Example:
Begin
Update emp Set empno=empno Where 1=2;
SELECT CONCAT(sql%rowcount ‘ ' rows are affected by the update statement');
End;
Mostly these type of cursors work fine in Oracle but not compatible with MySQL.
2. Explicit Cursors
Explicit cursors are created by the programmer, and with these you can do operations on a set
of rows, which can be processed one by one. You use explicit cursors when you are sure that
the SQL statement will return more than one row. You have to declare an explicit cursors in
the declare section at the beginning of the PL/SQL block.
Once you declare your cursor, the explicit cursors will go through these steps:
1. Declare: This clause initializes the cursor into memory.
2. Open: the previously declared cursor is now open and memory is allotted.
3. Fetch: The previously declared and opened cursor can now access data;
4. Close: The previously declared, opened, and fetched cursor is closed, which also releases
memory allocation.
Examples of this type of cursor have already been covered in last assignment.

Triggers
Triggers are simply stored procedures that are ran automatically by the database whenever
some event (usually a table update) happens. If you know how to write stored procedures,
you already know how to write triggers.
PL/SQL Triggers
Triggers are basically PL/SQL procedures that are associated with tables, and are called
whenever a certain modification (event) occurs. The modification statements may include
INSERT, UPDATE, and DELETE.
SYNTAX:
CREATE
TRIGGER trigger_name
BEFORE (or AFTER)
INSERT OR UPDATE [OF COLUMNS] OR DELETE
ON tablename
[FOR EACH ROW [WHEN (condition)]]
BEGIN
...
END;
Example:
CREATE TRIGGER PERSON_DELETE_AFTER
AFTER
DELETE ON PERSON
FOR EACH ROW
BEGIN
INSERT INTO PERSON_BACKUP VALUES (OLD.ID,OLD.NAME,OLD.SALARY);
END;
Conclusion:
After completing this assignment, solve sample examples by using cursors and triggers. Write
your analysis as concluding points.
Exercise 08/Viva Questions:
1. What is trigger and cursor in PL/SQL?
2. What are the types of trigger and cursor?
3. How to delete a trigger?
4. Why we write a cerate or replace in PL/SQL Block?
5. What is row level and statement level trigger?

Assignment No: 9
Aim: To Design and Implement any 5 queries using MongoDB.
Title: Write and execute simple queries that demonstrate usage of MongoDB database.
Theory:
MongoDB is an open-source, cross-platform, document oriented database that
provides, high performance, high availability, and easy scalability. MongoDB works on
concept of collection and document.
Database in MongoDB
Database is a physical container for collections. Each database gets its own set of files on the
file system.
A single MongoDB server typically has multiple databases.
Collection
Collection is a group of MongoDB documents. It is the equivalent of an RDBMS table. A
collection exists within a single database. Collections do not enforce a schema. Documents
within a collection can have different fields. Typically, all documents in a collection are of
similar or related purpose.
Document
A document is a set of key-value pairs. Documents have dynamic schema. Dynamic schema
means that documents in the same collection do not need to have the same set of fields or
structure, and common fields in a collection's documents may hold different types of data.
Following table shows the relationship of traditional RDBMS and MongoDB.
Table 9.1: RDBMS and MongoDB relationship

Advantages of MongoDB over RDBMS
Schema less: MongoDB is document database in which one collection holds different
documents. Number of fields, content and size of the document can be differ from one
document to another.
Structure of a single object is clear.
No complex joins
Deep query-ability: MongoDB supports dynamic queries on documents using a
document-based query language that's nearly as powerful as SQL Tuning
Ease of scale-out: MongoDB is easy to scale
Conversion / mapping of application objects to database objects not needed
Uses internal memory for storing the (windowed) working set, enabling faster access
of data
Installation Steps for MongoDB on Windows OS
At Server side:
1. Extract Zip File of MongoDB Setup for Windows OS.
2. Open command prompt. Set the path to bin directory of MongoDB.
C:\Users\admin>cd E:\mongodb-win32-x86_64-2008plus-2.6.2\mongodb-win32-
x86_64-2008plus-2.6.2\bin
Ex: E:\Teacher (this is the folder which contains information related to Teacher.
Here we are creating Teacher Database which contains the information of
Teacher_id, name of a teacher, department of a teacher, salary and status of a
teacher. Here status is whether teacher is approved by the university or not. Our
main idea is to implement all the DDL & DML queries on the Teacher Database.
3. One can create a working DB directory using following
E:\mongodb-win32-x86_64-2008plus-2.6.2\mongodb-win32-x86_64-2008plus-
2.6.2\bin>mongod.exe --dbpath E:\Teacher
Note: keep the server in running state.
At Client Side:
• Open Another command prompt
• Go to bin folder of Mongodb and execute following commands
1. E:\mongodb-win32-x86_64-2008plus-2.6.2\mongodb-win32-x86_64-2008plus-
2.6.2\bin>mongo.exe Teacher
2. MongoDB shell version: 2.6.2
connecting to: Teacher
Now Teacher database is ready. One can perform all the related operations on the
teacher database.

At server side:
One can find the following:
2014-06-20T17:44:09.233+0530 [initandlisten] connection accepted from 127.0.0.1:
49360 #1 (1 connection now open)
Now it indicates both server and client are ready.
The use Command
MongoDB use DATABASE_NAME is used to create database. The command will create a
new database, if it doesn't exist otherwise it will return the existing database.
Syntax:
Basic syntax of use DATABASE statement is as follows:
use DATABASE_NAME
Example:
If you want to create a database with name <mydb>, then use DATABASE statement would
be as follows:
>use mydb
switched to db mydb
To check your currently selected database use the command db
>db mydb
If you want to check your databases list, then use the command show dbs.
>show dbs
local 0.78125GB
test 0.23012GB
Your created database (mydb) is not present in list. To display database you need to insert at
least one document into it.
>db.student.insert({"name":"sachin"})
>show dbs
local 0.78125GB
mydb 0.23012GB
test 0.23012GB
In MongoDB default database is test. If you didn't create any database then collections will
be stored in test database.

The dropDatabase() Method
MongoDB db.dropDatabase() command is used to drop a existing database.
Syntax:
Basic syntax of dropDatabase() command is as follows:
db.dropDatabase()
This will delete the selected database. If you have not selected any database, then it will
delete default 'test' database
Collections in MongoDB
The createCollection() Method
MongoDB db.createCollection(name, options) is used to create collection.
Syntax:
Basic syntax of createCollection() command is as follows
db.createCollection(name, options)
In the command, name is name of collection to be created. Option is a document and used to
specify configuration of collection(memory size etc. optional part).
Examples:
Basic syntax of createCollection() method without options is as follows
>use test
switched to db test
>db.createCollection("mycollection")
{ "ok" : 1 }
You can check the created collection by using the command show collections
>show collections
mycollection
system.indexes
In MongoDB you don't need to create collection. MongoDB creates collection automatically,
when you insert some document.
>db.student.insert({"name" : "sagar"})
Above command creates collection student automatically.
Multiple records in student collection can be inserted using following command:

>db.student.insert(
[
{
rno:101512 ,
name: “James”,
city: “Pune”
},
{
rno:101513,
name: “Anderson”,
city: “London”
}
] )
Above command inserts two records in student collection. Here rno, name and city are treated
as columns (known as key in MongoDB) and 101512, James and Pune are the actual values.
The drop() Method
MongoDB's db.collection.drop() is used to drop a collection from the database.
Syntax:
Basic syntax of drop() command is as follows
db.COLLECTION_NAME.drop()
Example:
db.student.drop ()
This command will drop collection student.
Retrieving Data in MongoDB
find() method is used to retrieve records in a collection.
Syntax:
db.COLLECTION_NAME.find()
Example:
db.student.find()
Above command will display all records (key-value pairs) present in collection “student”.
Its working is similar as that of select * from student command in SQL.

SQL and MongoDB commands to retrieve specific records:
SQL Statements MongoDB Statements
SELECT * FROM Teacher_info; db.Teacher_info.find()
SELECT * FROM Teacher_info
WHERE sal = 25000;
db.Teacher_info.find({sal: 25000})
SELECT Teacher_id FROM
Teacher_info WHERE Teacher_id = 1;
db.Teacher_info.find( {Teacher_id: "1"})
SELECT * FROM Teacher_info
WHERE status != "A“;
db.Teacher_info.find({status:{$ne:"A"}})
SELECT * FROM Teacher_info
WHERE status = "A" AND sal = 20000;
db.Teacher_info.find({status:"A",
sal:20000})
SELECT * FROM Teacher_info
WHERE status = "A" OR sal = 50000;
> db.Teacher_info.find( { $or: [ { status:
"A" } , { sal:50000 } ] } )
SELECT * FROM Teacher_info
WHERE sal > 40000
db. Teacher_info.find( { sal: { $gt: 40000
} } )
SELECT * FROM Teacher_info
WHERE status = "A" ORDER BY SAL
ASC
db. Teacher_info.find( { status: "A" }
).sort( { sal: 1 } )
SELECT * FROM users WHERE status
= "A" ORDER BY SAL DESC
db. Teacher_info.find( { status: "A" }
).sort( {sal: -1 } )
SELECT COUNT(*) FROM
Teacher_info;
db. Teacher_info.count()
or
db. Teacher_info.find().count()

SELECT DISTINCT(Dept_name)
FROM Teacher_info;
db. Teacher_info.distinct( “Dept_name"
)
UPDATE Teacher_info SET Dept_name
= “ETC" WHERE sal > 250000
db. Teacher_info.update( { sal: { $gt:
25000 } }, { $set: { Dept_name: “ETC" }
}, { multi: true } )
UPDATE Teacher_info SET sal = sal +
10000 WHERE status = "A"
db. Teacher_info.update( { status: "A" }
, { $inc: { sal: 10000 } }, { multi: true } )
DELETE FROM Teacher_info WHERE
Teacher_id = “pic001"
db.Teacher_info.remove({Teacher_id:
"pic001"});
DELETE FROM Teacher_info; db. Teacher_info.remove({})
ALTER TABLE Teacher_info ADD
join_date DATE
db.Teacher_info.update( { }, { $set: {
join_date: new Date() } }, { multi: true} )
Conclusion:
After completing this assignment, solve sample queries using MongoDB. Write your analysis
as concluding points.
Exercise 09/Viva Questions:
1. Compare RDBMS vs. MongoDB
2. How to update a collection in MongoDB?
3. List all possible special notations used in MongoDB while finding specific records based
on conditions.
4. Execute all queries solved earlier on MySQL using MongoDB.
5. Can we specify Data Types in MongoDB for columns?

Assignment No: 10
Aim: To study and implement indexing and aggregation in MongoDB.
Title: Write and execute simple queries to perform indexing and aggregation.
Theory:
Indexing:
Indexes support the efficient resolution of queries. Without indexes, MongoDB must scan
every document of a collection to select those documents that match the query statement.
This scan is highly inefficient and requires the mongod to process a large volume of data.
Indexes are special data structures, which store a small portion of the data set in an
easy to traverse form. The index stores the value of a specific field or set of fields, ordered by
the value of the field as specified in index.
Indexing can be achieved on any field in a document using ensureIndex () method.
ensureIndex () Syntax:
>db.COLLECTION_NAME.ensureIndex ({KEY: 1})
Here key is the name of filed on which you want to create index and 1 is for ascending order.
To create index in descending order one need to use -1.
Example:
>db.ensureIndex({eid:1})
This is simple/unique index.
We can define index on multiple fields as well resulting into composite index.
>db.ensureIndex({eid:1,ename:-1})
Sole purpose of indexing lies in faster retrieval of data by organizing data in organized
format.

Aggregation:
Aggregation operations process data records and return computed results.
Aggregation operations group values from multiple documents together, and can perform a
variety of operations on the grouped data to return a single result.
In sql count(*) and with group by is an equivalent of MongoDB aggregation.
The aggregate () Method
For the aggregation in MongoDB one should use aggregate() method.
Syntax:
>db.COLLECTION_NAME.aggregate(AGGREGATE_OPERATION)
Aggregate operation could be finding sum on particular field/key or taking an average or
finding maximum or minimum values associated with particular field from various
documents in a single collection.
Example:
Assume a sample collection with sample documents inserted as below:
> db.emp1.insert(
.. [{eid:101,ename:"sachin",dept:"IT",sal:40000},
.. {eid:110,ename:"pranav",dept:"IT",sal:60000},
.. {eid:105,ename:"manoj",dept:"COMP",sal:45000},
.. {eid:102,ename:"yogesh",dept:"FE",sal:20000}])
If we want to display all employees based on their departments along with average
salary of particular department we can write following query:
> db.emp1.aggregate([{$group:{_id:"$dept","avg sal":{$avg:"$sal"}}}])
The above query computes average salary per department.
Following query displays number of employees associated along with particular department.
db.emp1.aggregate([{$group:{_id:"$dept","number of emp":{$sum:1}}}])
In the above example we have grouped documents by field dept and on each occurance of
dept previous value of sum is incremented.
The various available aggregation expressions are listed below:

Expression Description
$sum Sums up the defined value from all
documents in the collection.
$avg It computes average of defined value from all
documents in the collection.
$max It displays maximum of defined value from
all documents in the collection.
$min It displays minimum of defined value from
all documents in the collection.
Conclusion: Compare and contrast SQL and MongoDB Aggregate functions and write your
concluding points accordingly.
Exercise 10/Viva Questions:
1. Compare SQL vs. MongoDB indexing.
2. What changes you observe after performing Indexing?
3. How to remove specific document from MongoDB collection?
4. Execute all queries solved earlier on MySQL using MongoDB.
5. Can we specify more than one aggregate function simultaneously in MongoDB?

Assignment No: 11
Aim: To study and implement MapReduce operation in MongoDB.
Title: Write and execute simple queries to demonstrate MapReduce operation.
Theory:
MapReduce is a generic multi-phase data aggregation modality for processing
quantities of data. MongoDB provides map-reduce with the MapReduce database command.
The map function is a JavaScript function that associates or “maps” a value with a key
and emits the key and value pair during a map-reduce operation.
In general, map-reduce operations have two phases: a map stage that processes each
document and emits one or more objects for each input document, and reduce phase that
combines the output of the map operation. Optionally, map-reduce can have a finalize stage
to make final modifications to the result. Like other aggregation operations, map-reduce can
specify a query condition to select the input documents as well as sort and limit the results.
Map-reduce uses custom JavaScript functions to perform the map and reduce
operations, as well as the optional finalize operation. While the custom JavaScript provides
great flexibility compared to the aggregation pipeline, in general, MapReduce is less efficient
and more complex than the aggregation pipeline.
Additionally, map-reduce operations can have output sets that exceed the 16
megabyte output limitation of the aggregation pipeline.
Example:
Problem: A king wants to count the total population in his country.
Solution 1: He can send one person to count the population. The assigned person will visit
every city serially and return with the total population in the country.
Solution 2: King sends one person to each city. They will count the population in each city
and after returning to kingdom the total count will reduce to single count (By adding
population of each city). Here all persons are counting the population in every city.
First solution is serial and second is parallel solution.
Assuming there are 10 cities in the kingdom, if it takes one day to count the population in
each city then counting the total population takes 10 days in solution 1 and only one day in
solution 2.
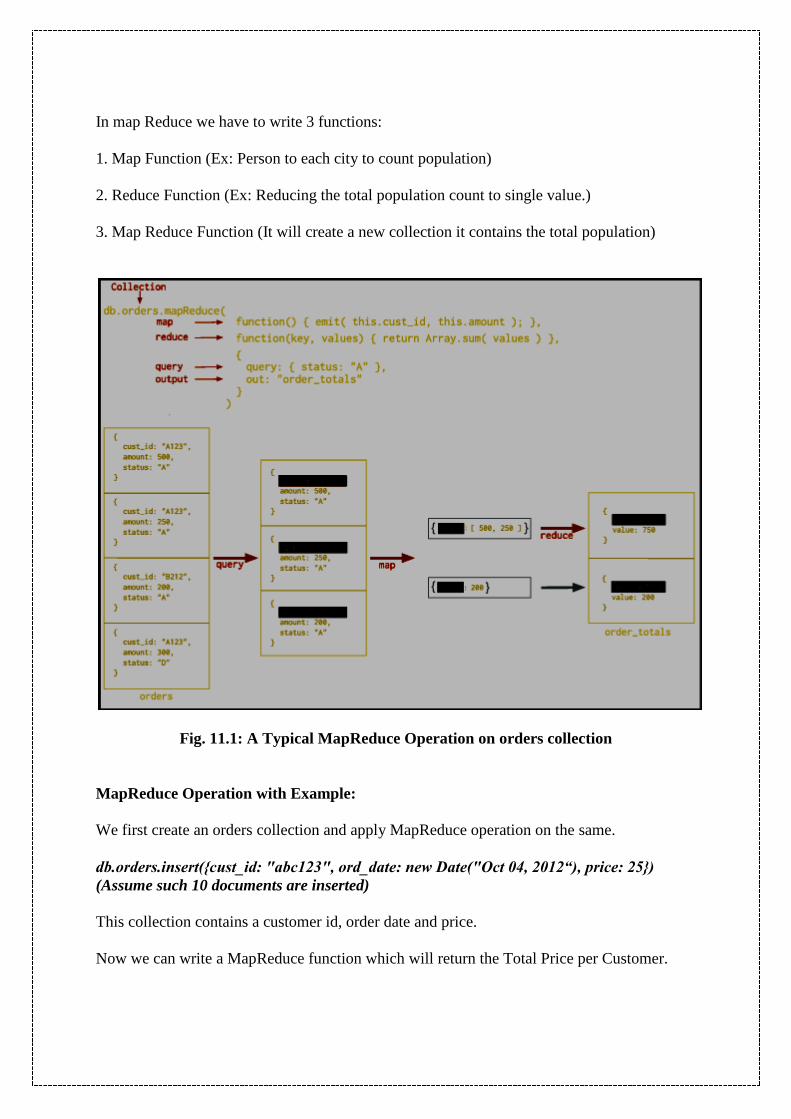
In map Reduce we have to write 3 functions:
1. Map Function (Ex: Person to each city to count population)
2. Reduce Function (Ex: Reducing the total population count to single value.)
3. Map Reduce Function (It will create a new collection it contains the total population)
Fig. 11.1: A Typical MapReduce Operation on orders collection
MapReduce Operation with Example:
We first create an orders collection and apply MapReduce operation on the same.
db.orders.insert({cust_id: "abc123", ord_date: new Date("Oct 04, 2012“), price: 25})
(Assume such 10 documents are inserted)
This collection contains a customer id, order date and price.
Now we can write a MapReduce function which will return the Total Price per Customer.

Step 1: Map
Map function to process each input document:
var mapFunction1 = function() {
emit(this.cust_id, this.price);
};
Above function maps the price to the cust_id for each document and emits the cust_id and
price pair.
Step 2: Reduce
var reduceFunction1 = function(keyCustId, valuesPrices) { return
Array.sum(valuesPrices);
};
Above function defines the corresponding reduce function with two arguments keyCustId and
valuesPrices.
The valuesPrices is an array whose elements are the price values emitted by the map
function and grouped by keyCustId. The function reduces the valuesPrice array to the sum of
its elements.
Step 3: MapReduce
This function performs the map-reduce on all documents in the orders collection using the
mapFunction1 map function and the reduceFunction1 reduce function.
db.orders.mapReduce(
mapFunction1,
reduceFunction1,
{ out: "map_example" }
)
This operation outputs the results to a collection named map_example.
If the map_example collection already exists, the operation will replace the contents with the
results of this map-reduce operation.

One can see the result of this MapReduce operation using
db.map_example.find()
Conclusion: Analyze the use of MapReduce operation and write your concluding points
accordingly.
Exercise 11/Viva Questions:
1. Explain the use of MapReduce Operation.
2. Apply the MapReduce operation to find the total salary of each department assuming
employee collection already exists.
3. Can we apply MapReduce operation in relational databases? Justify your answer with
suitable example.

Assignment No: 12
Aim: To create simple objects and array objects using JSON.
Title: Create various objects using JSON and implement the same to create array
objects.
Theory:
JSON (Java Script Object Notation)
JSON stands for JavaScript Object Notation. This format was specified by Douglas
Crockford. This was designed for human-readable data interchange. JSON has been extended
from the JavaScript scripting language.
Uses of JSON
1. JSON is used when writing JavaScript based application which includes browser
extension and websites.
2. JSON format is used for serializing & transmitting structured data over network
connection.
3. JSON is primarily used to transmit data between server and web application.
4. Web Services and API.s use JSON format to provide public data.
5. JSON can be used with modern programming languages.
Characteristics of JSON
• It is easy to read and write JSON.
• JSON is lightweight text based interchange format
• JSON is language independent.
Data Types Supported by JSON
The various data types supported by JSON are shown in following table:

Table 12.1 Data Types supported by JSON
Creation of Simple Objects using JSON
JSON objects can be created with Java Script.
To create an empty object:
var JSONObj = {};
To create a new object:
var JSONObj = new Object();
Object
It is an unordered set of name/value pairs. Object are enclosed in curly braces that is it
starts with '{' and ends with '}'. Each name is followed by ':'(colon) and the name/value pairs
are separated by , (comma).
The keys must be strings and should be different from each other. Objects should be used
when the key names are arbitrary strings.

Syntax:
{key: value, .......}
Example showing Object:
{“id": "011A", "language": "JAVA", "price": 500, }
Example:
<html>
<head>
<title>Welcome to VPCOE TO LEARN JSON </title>
<script language="javascript" >
var JSONObj = { "name" : "www.vpcoe.org", "academic_year": 2014 };
document.write("<h1>JSON with JavaScript example</h1>");
document.write("<br>");
document.write("<h3>Website Name="+JSONObj.name+"</h3>");
document.write("<h3>Academic Year="+JSONObj.year+"</h3>");
</script>
</head>
<body>
</body>
</html>
Write the above code in any editor and save with extension .html. Output can be viewed
through any web browser by opening this html file in web browser.
Creation of an Array Object in JSON
Array objects are the objects containing multiple objects in sequential fashion which are
separated by comma (,). We can maintain various objects inside a single array object,
Syntax
{key:[{value1},{value2},…..]}
Example showing an Array Object:
{ "books": [ { "language":"Java" , "edition":"second" },
{ "language":"C++" , "lastName":"fifth" },
{ "language":"C" , "lastName":"third" } ] }

Sample Example:
<html>
<head>
<title>Creation of array object in javascript using JSON</title>
<script language="javascript" >
document.writeln("<h1>Example of JSON Array object</h1>");
var book = { "DBMS" : [
{ "Name" : "DBMS System", "Price" : 250 },
{ "Name" : "No SQL ", "price" : 400 }
],
"Mongo" : [
{ "Name" : "Mongo DB", "price" : 200 },
{ "Name" : "Mongo DB and Java", "price" : 300 }
]
}
var i = 0
document.writeln("<table border='4'><tr>");
for(i=0;i<book.DBMS.length;i++)
{
document.writeln("<td>");
document.writeln("<table border='2' width=100 >");
document.writeln("<tr><td><b>Name</b></td><td width=50>"
+ book.DBMS[i].Name+"</td></tr>");
document.writeln("<tr><td><b>Price</b></td><td width=50>"
+ book.DBMS[i].price +"</td></tr>");
document.writeln("</table>");
document.writeln("</td>");
}
for(i=0;i<book.Mongo.length;i++)
{
document.writeln("<td>");
document.writeln("<table border='2' width=100 >");
document.writeln("<tr><td><b>Name</b></td><td width=50>"
+ book.Mongo[i].Name+"</td></tr>");
document.writeln("<tr><td><b>Price</b></td><td width=50>"
+ book.Mongo[i].price+"</td></tr>");
document.writeln("</table>");
document.writeln("</td>");
}
document.writeln("</tr></table>");
</script>
</head>
<body>
</body>
</html>

Conclusion:
Create simple JSON objects and write the concluding remarks specifying the use of JSON.
Exercise 12/Viva Questions:
1. Explain the use of JSON.
2. Explain encoding and decoding functions in JSON.
3. How to encode/decode JSON objects using PHP? Explain with suitable example?
4. How to encode/decode JSON objects using JAVA? Explain with suitable example?

Assignment No: 13
Aim: To encode and decode JSON objects using PHP/JAVA.
Title: Study and demonstrate the use of encoding and decoding JSON objects using
PHP/JAVA.
Theory:
JSON extension is bundled with PHP by default from version 5.2.0 so there is no need of any
special environment.
JSON Functions:
1. json_encode: It returns the JSON representation of a value.
2. json_decode: It decodes a JSON string.
3. json_last_error: It returns the last error occurred.
Encoding:
json_encode () function is used for encoding which returns JSON representation of a value.
Syntax:
string json_encode ( $value [, $options = 0 ] )
The value parameter specifies value being specified. It works only with UTF-8 encoded data.
The options parameter specifies the a bitmask consisting of
JSON_HEX_QUOT,JSON_HEX_TAG,JSON_HEX_AMP,JSON_HEX_APOS,JSON_NUM
ERIC_CHECK,JSON_PRETTY_PRINT,JSON_UNESCAPED_SLASHES,
JSON_FORCE_OBJECT.
Example:
The following PHP code
<?php
class Emp {
public $name = "";
public $hobbies = "";
public $birthdate = "";
}
$e = new Emp();
$e->name = "sachin";
$e->hobbies = "sports";
$e->birthdate = date('m/d/Y h:i:s a', strtotime("8/5/1974
11:20:03"));

echo json_encode($e);?>
can be encoded to JSON object
{"name":"sachin","hobbies":"sports","birthdate":"08/05/1974
11:20:03 pm"}
Decoding:
json_decode () function is used for decoding JSON object in to PHP.
Syntax:
json_decode ($json [,$assoc = false [, $depth = 511 [, $options = 0 ]]])
Parameters:
json_string : It is encoded string which must be UTF-8 encoded data.
assoc : It is a boolean type parameter, when set to TRUE, returned objects
will be converted into associative arrays.
depth: It is an integer type parameter which specifies recursion depth
options: It is an integer type bitmask of JSON decode. It supports
JSON_BIGINT_AS_STRING
Example:
The following JSON object
<?php
$json = '{"a":1,"b":2,"c":3,"d":4,"e":5}';
var_dump(json_decode($json));
var_dump(json_decode($json, true));
?>
can be decoded into
object(stdClass)#1 (5) {
["a"] => int(1)
["b"] => int(2)
["c"] => int(3)
["d"] => int(4)
["e"] => int(5)
}
array(5) {
["a"] => int(1)
["b"] => int(2)
["c"] => int(3)
["d"] => int(4)
["e"] => int(5)
}

Conclusion: Write your analysis (whatever you have learned) for this assignment as
concluding points.
Exercise 13:
1. Implement encoding/decoding of JSON objects using JAVA.
2. Define encoding and decoding of objects in general.
3. Whether encoding/decoding supports simple JSON objects or JSON Array objects or both.
Explain with suitable example.

Assignment No: 14
Aim: To implement CRUD operations using MongoDB and JAVA/PHP.
Title: Study and implement simple insert, update, delete and search operations using
JAVA/PHP at Front end and MongoDB at backend.
Theory:
In most of the web applications/commercial applications 2 tier/3 tier architectures are used. In
such applications users can interact with underlying database using front end languages like
JAVA/PHP/Python etc.
A simple user friendly GUI will be provided by such front end tools so that user will remain
completely unaware about underlying actual database operations.
Steps to connect PHP program with MongoDB
To use MongoDB with PHP we need to use MongoDB PHP driver. Make sure to download
latest release of it. Now unzip the archive and put php_mongo.dll in your PHP
extension directory ("ext" by default) and add the following line to your php.ini file:
extension=php_mongo.dll
Make a connection and Select a database
To make a connection, you need to specify database name, if database doesn't exist then
MongoDB creates it automatically.
<?php
// connect to mongodb
$m = new MongoClient();
echo "Connection to database successfully";
// select a database
$db = $m->mydb;
echo "Database mydb selected";
?>
Creation of a collection <?php
// connect to mongodb
$m = new MongoClient();
echo "Connection to database successfully";
// select a database
$db = $m->mydb;
echo "Database mydb selected";
$collection = $db->createCollection("mycol");
echo "Collection created succsessfully";
?>
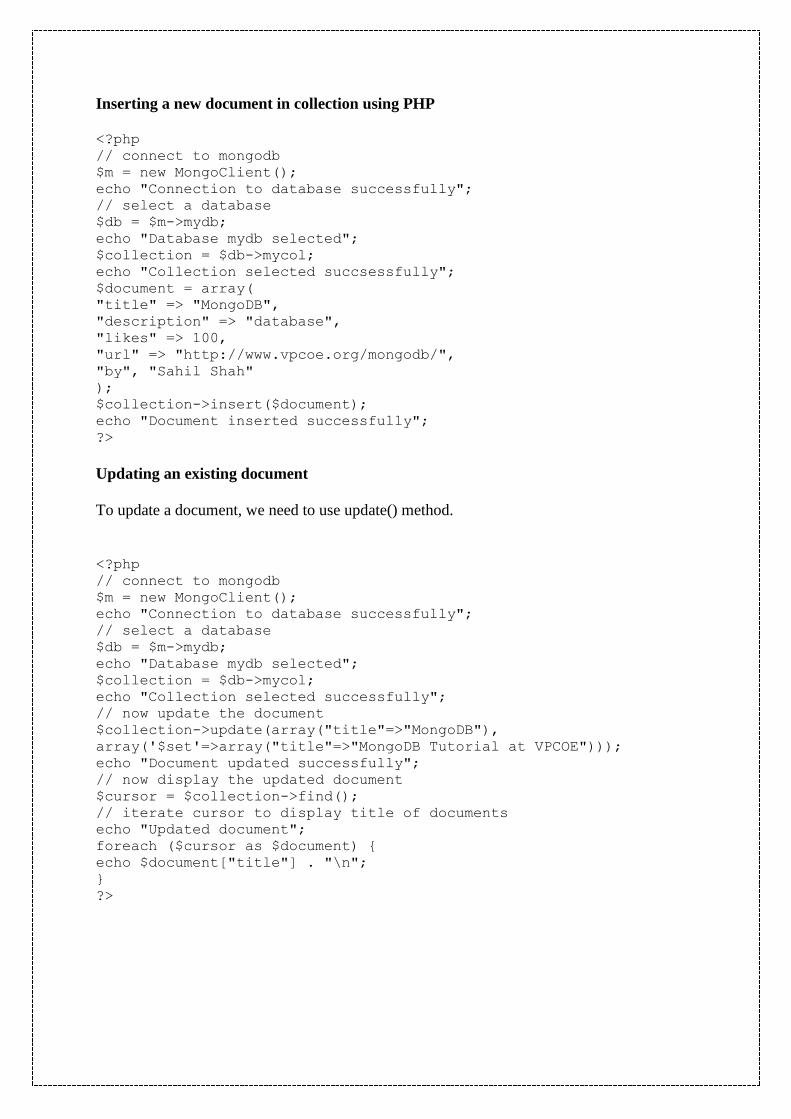
Inserting a new document in collection using PHP
<?php
// connect to mongodb
$m = new MongoClient();
echo "Connection to database successfully";
// select a database
$db = $m->mydb;
echo "Database mydb selected";
$collection = $db->mycol;
echo "Collection selected succsessfully";
$document = array(
"title" => "MongoDB",
"description" => "database",
"likes" => 100,
"url" => "http://www.vpcoe.org/mongodb/",
"by", "Sahil Shah"
);
$collection->insert($document);
echo "Document inserted successfully";
?>
Updating an existing document
To update a document, we need to use update() method.
<?php
// connect to mongodb
$m = new MongoClient();
echo "Connection to database successfully";
// select a database
$db = $m->mydb;
echo "Database mydb selected";
$collection = $db->mycol;
echo "Collection selected successfully";
// now update the document
$collection->update(array("title"=>"MongoDB"),
array('$set'=>array("title"=>"MongoDB Tutorial at VPCOE")));
echo "Document updated successfully";
// now display the updated document
$cursor = $collection->find();
// iterate cursor to display title of documents
echo "Updated document";
foreach ($cursor as $document) {
echo $document["title"] . "\n";
}
?>

Deleting an existing document
To delete a document, we need to use remove () method.
<?php
// connect to mongodb
$m = new MongoClient();
echo "Connection to database successfully";
// select a database
$db = $m->mydb;
echo "Database mydb selected";
$collection = $db->mycol;
echo "Collection selected successfully";
// now remove the document
$collection->remove(array("title"=>"MongoDB Tutorial at
VPCOE"),false);
echo "Documents deleted successfully";
// now display the available documents
$cursor = $collection->find();
// iterate cursor to display title of documents
echo "Updated document";
foreach ($cursor as $document) {
echo $document["title"] . "\n";
}
?>
Conclusion: Write the short analysis of connectivity with MongoDB as concluding points.
Exercise 14:
Implement CRUD application using JAVA as a front end and MongoDB as back end.

Assignment No: 15
Aim: To implement a mini project/sample application.
Title: Study and implement simple commercial application using PHP as Front End and
MongoDB as Back End.
Theory:
Prepare a detailed report of your mini project covering following details:
1. Title of the Project.
2. Abstract
3. Introduction
4. Scope
5. Software/Hardware Requirements Specification
6. Entity Relationship Diagram with EER features
7. Data Dictionary
8. Relational Database Design
9. Database Normalization
10. Graphical User Interface(Screenshots)
11. Source Code: (should be in CD)
12. Data Reports
13. Testing document
14. Future Enhancement
15. Conclusion
16. References/Bibliography
Student groups may choose any topics (not limited to following) for your mini project:
Performance appraisal system
Employee Information System
Human Resource monitoring system
Administrations and Management of Policies for insurance agent.
Hotel Occupancy monitoring
Hospital staff database
Payroll system in the college
Passengers Database for airline industry
Aviation Industry Information System
Customers Feedback monitoring.
Patients History database
Sales Force Automation
Marketing Info Systems
Inventory Control Systems
Online investment Management
Cash Management System
References
[1] “JAVA Programming, Black Book DreamTeach Press. [12]
[2] Dr. P.S.Deshpande, “SQL and PL/SQL for Oracle 10g Black Book", DreamTech Press
[05]
[3] Urman S., Hardman R., McLAUGHLIN M., “PL/SQL Programming: Develop Database
Driven PL/SQL Applications", Tata McGraw-Hill Edition, 2004,ISBN 0 -07 - 059779 - 0
[4] Rosenzweig B., Silvestrova E., “Oracle PL/SQL by Example", 3rd Edition,Pearson
Education ISBN 81-297-0503-6.[10]
[5] Ivan Bayross,"SQL PL/SQL:The Programming Language of Oracle” [17]
[6] Kristina Chodorow, Michael Dirolf, “MongoDB: The Definitive Guide” ,O’Reilly
Pubications [01]
[7] Joel Murach, “Murach’s MySQL” [01]
[8] Murach’s PHP & MySQL
Web Resources
[1] http://www.tutorialspoint.com [Useful for PHP, MongoDB and MySQL]
[2] http://www.w3schools.com [Useful for PHP basics]
[3] Dr. Janakiraman (IIT-Madras) [Video lecture series is available on
http://www.youtube.com/nptel ]