Embed Size (px)
Citation preview

Operating Manual
vPad-EQM™
Equipment Management App for vPad Safety Analyzers

vPad-EQM™
Equipment Management Appfor vPad Safety Analyzers
Operating Manual
© 2013-2017 Datrend Systems Inc.130-4020 Viking Way
Richmond, BC • CANADA • V6V 2L4Tel: 800.667.6557 (North America Only) or
604.291.7747 • Fax 604.294.2355e-mail: [email protected]

Page i
To order this manual, use Part Number 6100-047 Revision
Revision HistoryDescription Date
A Initial release 2013-Dec-12
B Update to V1.10.4 2017-Mar-14
CopyrightDatrend Systems Inc. (“DSI”) agrees to a limited copyright release that allows you to reproduce manuals and otherprinted materials for use in service training programs and other technical publications. If you would like otherreproductions or distributions, submit a written request to Datrend Systems Inc.
Unpacking and InspectionFollow standard receiving practices upon receipt of goods. Check the shipping carton for damage. If damage isfound, stop unpacking. Notify the freight carrier and ask for an agent to be present while the goods are unpacked.There are no special unpacking instructions, but be careful not to damage the goods when unpacking. Inspect thegoods for physical damage such as bent or broken parts, dents, or scratches.
ClaimsOur routine method of shipment is via common carrier. Upon delivery, if physical damage is found, retain all packingmaterials in their original condition and contact the carrier immediately to file a claim.If the goods are delivered in good physical condition but does not operate within specifications, or if there are anyother problems not caused by shipping damage, please contact your local sales representative or DSI immediately.
Standard Terms and Conditions
Refunds & CreditsPlease note only serialized products (products labelled with a distinct serial number) and accessories are eligible forpartial refund and/or credit. Non-serialized parts and accessory items (cables, carrying cases, auxiliary modules,etc.) are not eligible for return or refund. In order to receive a partial refund/credit, the product must not have beendamaged, and must be returned complete (meaning all manuals, cables, accessories, etc.) within 90 days of originalpurchase and in “as new” and resalable condition. The Return Procedure must be followed.
Software which has been activated may not be returned for credit. Us it in Demo mode where possible to ensuresuitability for purpose.
Return ProcedureEvery product returned for refund/credit must be accompanied by a Return Material Authorization (RMA) number,obtained from Datrend Customer Service. All items being returned must be sent prepaid (freight, duty, brokerage,and taxes ) to our factory location.
Restocking ChargesProduct returned within 30 days of original purchase are subject to a minimum restocking fee of 15%. Productreturned in excess of 30 days after purchase, but prior to 90 days, are subject to a minimum restocking fee of 20%.Additional charges for damage and/or missing parts and accessories will be applied to all returns. Product which isnot in “as new” and resalable condition, are not eligible for credit return and will be returned to the customer at theirexpense.
CertificationThis instrument was thoroughly tested and inspected and found to meet DSI’s specifications when it was shippedfrom the factory.
Where applicable, calibration measurements are traceable to the National Research Council of Canada (NRC)and/or the National Institute of Standards and Technology (NIST). Devices for which there are no NRC/NISTcalibration standards are measured against in-house performance standards using accepted test procedures.
Page ii
Warranty
Warranty and Product Support
Software Applications (Apps) for use in conjunction with ES601 and vPad Safety Analyzers and other DatrendProducts are supplied subject to the Terms and Conditions agreed to by the act of Activating the App. In the eventno Activation is required, the Terms and Conditions published on the Datrend Systems Inc. (DSI) website shallprevail. By using the App, you agree to these terms and Conditions. IN NO EVENT SHALL DATREND SYSTEMSINC. BE LIABLE FOR CONSEQUENTIAL DAMAGES.
DSI DISCLAIMS ALL OTHER WARRANTIES, EXPRESSED OR IMPLIED, INCLUDING ANY WARRANTY OFMERCHANTABILITY OR FITNESS FOR A PARTICULAR PURPOSE OR APPLICATION.
vPad™, vPad-A1™, vPad-ES™, vPad-353™, vPad-RF™, vPad-AS™, vPad-A3™,vPad-NFPA™, vPad-RM™, vPadRecord Manager™, vPad-AIMS™, vPad-EQM™, vPad-Check™, vPad-Cal™, vPad-STM™, vPad-XPORT™, DatrendDocs™ and CMX™ are trademarks of Datrend Systems Inc.
Android™ is trademark of Google Inc.
vPad-EQM OPERATORS MANUAL
Table of Contents # Page iii
Table of Contents
1 SPECIFICATIONS . . . . . . . . . . . . . . . . . . . . . . . . . . . . . . . . . . . . . . . . . . . . . . . . 1
2 OVERVIEW . . . . . . . . . . . . . . . . . . . . . . . . . . . . . . . . . . . . . . . . . . . . . . . . . . . . 32.1 Features . . . . . . . . . . . . . . . . . . . . . . . . . . . . . . . . . . . . . . . . . . . . . . . . . . . . . . . 3
2.1.1 Equipment Database . . . . . . . . . . . . . . . . . . . . . . . . . . . . . . . . . . . . . . . . . 32.1.2 Work Order Database . . . . . . . . . . . . . . . . . . . . . . . . . . . . . . . . . . . . . . . . 32.1.3 Test Automation . . . . . . . . . . . . . . . . . . . . . . . . . . . . . . . . . . . . . . . . . . . . . 42.1.4 Equipment/Work Order List Import/Export . . . . . . . . . . . . . . . . . . . . . . . . . 4
3 INSTALLATION . . . . . . . . . . . . . . . . . . . . . . . . . . . . . . . . . . . . . . . . . . . . . . . . . . 5
4 OPERATION . . . . . . . . . . . . . . . . . . . . . . . . . . . . . . . . . . . . . . . . . . . . . . . . . . . 74.1 Startup Screen . . . . . . . . . . . . . . . . . . . . . . . . . . . . . . . . . . . . . . . . . . . . . . . . . . 74.2 Equipment Manager . . . . . . . . . . . . . . . . . . . . . . . . . . . . . . . . . . . . . . . . . . . . . . 7
4.2.1 Equipment List . . . . . . . . . . . . . . . . . . . . . . . . . . . . . . . . . . . . . . . . . . . . . . 84.2.1.1 Scrolling . . . . . . . . . . . . . . . . . . . . . . . . . . . . . . . . . . . . . . . . . . . . . . . 94.2.1.2 Settings . . . . . . . . . . . . . . . . . . . . . . . . . . . . . . . . . . . . . . . . . . . . . . . 94.2.1.3 Action Edit/Create Details . . . . . . . . . . . . . . . . . . . . . . . . . . . . . . . . 134.2.1.4 Action: Run . . . . . . . . . . . . . . . . . . . . . . . . . . . . . . . . . . . . . . . . . . . . 194.2.1.5 Search . . . . . . . . . . . . . . . . . . . . . . . . . . . . . . . . . . . . . . . . . . . . . . . 214.2.1.6 Filter . . . . . . . . . . . . . . . . . . . . . . . . . . . . . . . . . . . . . . . . . . . . . . . 224.2.1.7 File I/O . . . . . . . . . . . . . . . . . . . . . . . . . . . . . . . . . . . . . . . . . . . . . . . 23
4.2.2 Work Order List . . . . . . . . . . . . . . . . . . . . . . . . . . . . . . . . . . . . . . . . . . . . 264.2.3 Exit vPad-EQM . . . . . . . . . . . . . . . . . . . . . . . . . . . . . . . . . . . . . . . . . . . . . 26
4.3 Work Order Manager . . . . . . . . . . . . . . . . . . . . . . . . . . . . . . . . . . . . . . . . . . . . 274.3.1 Work Order List . . . . . . . . . . . . . . . . . . . . . . . . . . . . . . . . . . . . . . . . . . . . 27
4.3.1.1 Scrolling . . . . . . . . . . . . . . . . . . . . . . . . . . . . . . . . . . . . . . . . . . . . . 284.3.1.2 Settings . . . . . . . . . . . . . . . . . . . . . . . . . . . . . . . . . . . . . . . . . . . . . 284.3.1.3 Action: Edit/Create Details . . . . . . . . . . . . . . . . . . . . . . . . . . . . . . . 294.3.1.4 Action: Run . . . . . . . . . . . . . . . . . . . . . . . . . . . . . . . . . . . . . . . . . . . 324.3.1.5 Search . . . . . . . . . . . . . . . . . . . . . . . . . . . . . . . . . . . . . . . . . . . . . . . 334.3.1.6 Filter . . . . . . . . . . . . . . . . . . . . . . . . . . . . . . . . . . . . . . . . . . . . . . . 354.3.1.7 File I/O . . . . . . . . . . . . . . . . . . . . . . . . . . . . . . . . . . . . . . . . . . . . . . 36
4.3.2 Equipment List . . . . . . . . . . . . . . . . . . . . . . . . . . . . . . . . . . . . . . . . . . . . . 374.3.3 Exit vPad-EQM . . . . . . . . . . . . . . . . . . . . . . . . . . . . . . . . . . . . . . . . . . . . . 37
5 UPGRADES AND MAINTENANCE . . . . . . . . . . . . . . . . . . . . . . . . . . . . . . . . . . . . 38

vPad-EQM OPERATORS MANUAL
Table of Contents # Page iv
vPad-EQM OPERATORS MANUAL
Specifications/Chapter 1 # Page 1
1 SpecificationsvPad-EQM™ is a software application (App) which provides a basic equipment database managementsystem with the additional capability to track work orders assigned to specific equipment items.
The equipment database contains the following fields:
ControlNumberDescriptionSerialNumberManufacturerModelLocationFacilityChecklistTechCodeScheduleLastDateNextDateStatusRiskManagementAEMAddress1Address2Address3SoftwareVersionDepartmentRoomEditedActiveState
Note, to be compatible with the nomenclature for fields in other systems, it is possible to map the ‘native’field names to an alternate set of names.
The work order database contains the following fields:
"WorkOrder" This is a unique entry, identifying the work or job"ControlNumber" This is the unique ID of the device to be tested"Description" The description of the problem to be corrected"Open_Date" The date the WO was opened"Closed_Date" The date the WO was closed"Report_Filename" The filename of the test report
vPad-EQM OPERATORS MANUAL
Specifications/Chapter 1 # Page 2
"Status" Typically PASS or FAIL"TechCode" As in the Equipment list above"WOType" User defined in a text file list WorkType.txt, in Datrend\Database folder"ReportedDate" Normally the same as Open_Date"ReportedBy" Person reporting the problem"ContactInfo" How/where to contact the person above"Checklist" The name of the Checklist to follow"PassDateReported" A flag indicating that the ReportedDate data should be included in the test
report"PassProblemBy" A flag indicating that the ReportedBy data should be included in the test
report"PassContactInfo" A flag indicating that the ContactInfo data should be included in the test
report"PassProblemDesc" A flag indicating that the (Problem)Description should be included in the test
report"Exported" A flag indicating that the Work Order has been exported to an external
device
vPad-EQM works in conjunction with vPad-Check™ to automate testing by allowing activation of thespecified equipment Checklist via the equipment or the work order database.
vPad-EQM OPERATORS MANUAL
Overview/Chapter 2 # Page 3
2 OverviewNot everyone has or needs a comprehensive CMMS system to organize and track information on theirmedical device inventory, and the associated service and preventive maintenance it receives. Somemay have an equipment asset system that deals with the financial aspects of equipment management,but does not deal with service or preventive maintenance. Others may have a home-grown systemwhich does not have the ability to create and perform specific ‘automated’ procedures as part of ascheduled preventive maintenance program. vPad-EQM is designed to help fill this gap and enable abasic level of test automation in the absence of these major systems.
2.1 Features
2.1.1 Equipment Database
vPad-EQM contains the basic, essential equipment information required to organize and manage yourequipment inventory. It is not intended to replace an existing CMMS or Asset management program,but to supplement their use if they do not have test automation or on-line work order capabilities. Incases where a user does not have one of these major systems, vPad-EQM provides an economicalalternative until a more comprehensive system is justified.
The Equipment Manager database can be populated by importing data from another source, or can becreated on-line, as new pieces of equipment are encountered.
Part of the equipment database is a link to the appropriate automation Checklist for each device. Working in conjunction with the vPad-Check App (pre-requisite), a Checklist can be RUN directly byselecting a specific device. Vpad-Check comes with a good cross-section of example Checklists. These Checklists are not warranted to follow any particular manufacturer’s recommended practice, andare provided for guidance purposes only. These Checklists may be modified to suit the user’spurposes using a text editor or the vPad-IDE program. Consult the vPad-Check Operator’s Manualfor a full description on the use of the vPad Programming Language (VPL) capabilities andfunctionality.
2.1.2 Work Order Database
To keep track of work to be done, and work completed, vPad-EQM’s Work Order database providesthe ability to open work orders linked to a specific device. A work order can also be RUN once a pieceof equipment has been linked to it. When a work order is completed, it will be closed in the Work
vPad-EQM OPERATORS MANUAL
Overview/Chapter 2 # Page 4
Order database, and the test report file name is stored in the record. The Last PM Date and the NextPM Due date will be updated in the Equipment Manager.
The Equipment Manager and Work Order databases work in tandem to provide a complete history ofdevice service and preventive maintenance.
2.1.3 Test Automation
vPad-EQM completes the test automation loop by allowing the inclusion of device specific Checklistsin the Equipment Manager database, and the ability to RUN these Checklists directly through vPad-Check. Test automation Checklists can easily be developed or modified to suit generic equipmentgroups and/or specific device models. Checklists can include direct interaction with other test devices(e.g. Defibrillator testers) for the full automation experience and to maximize the time savings that testautomation has to offer.
2.1.4 Equipment/Work Order List Import/Export
In many cases, a user will have been using some type of asset management system, or possibly a home-grown maintenance management program. These programs typically do not have a test automationcomponent. They generally are, however, capable of outputting an Excel spreadsheet containing (mostof) the basic equipment information vPad-EQM needs. They may also be able to export/import workorder information to some degree. vPad-EQM can import and export both the Equipment Managerand Work Order databases using the Excel spreadsheet/CSV format. This allows information oncentral based PC systems to be kept in-sync with the vPad-EQM databases.
vPad-EQM OPERATORS MANUAL
Installation/Chapter 3 # Page 5
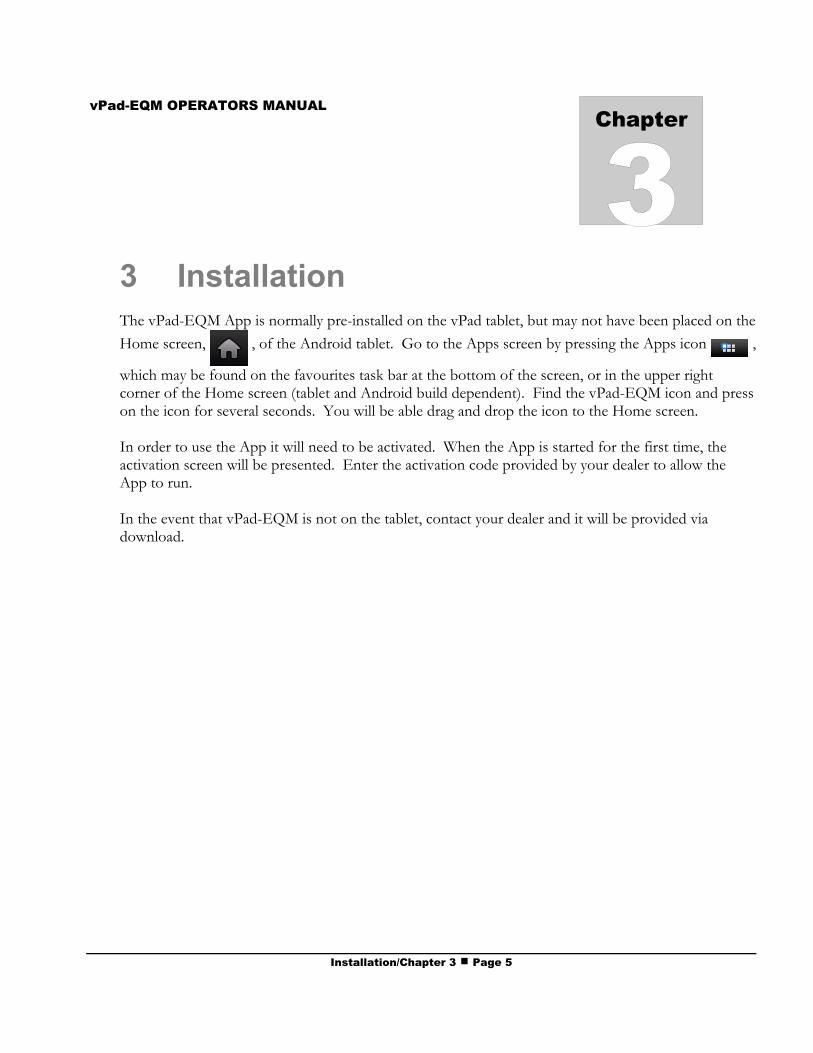
3 InstallationThe vPad-EQM App is normally pre-installed on the vPad tablet, but may not have been placed on the
Home screen, , of the Android tablet. Go to the Apps screen by pressing the Apps icon ,
which may be found on the favourites task bar at the bottom of the screen, or in the upper rightcorner of the Home screen (tablet and Android build dependent). Find the vPad-EQM icon and presson the icon for several seconds. You will be able drag and drop the icon to the Home screen.
In order to use the App it will need to be activated. When the App is started for the first time, theactivation screen will be presented. Enter the activation code provided by your dealer to allow theApp to run.
In the event that vPad-EQM is not on the tablet, contact your dealer and it will be provided viadownload.

vPad-EQM OPERATORS MANUAL
Installation/Chapter 3 # Page 6
vPad-EQM OPERATORS MANUAL
Operation/Chapter 4 # Page 7
4 Operation
4.1 Startup Screen
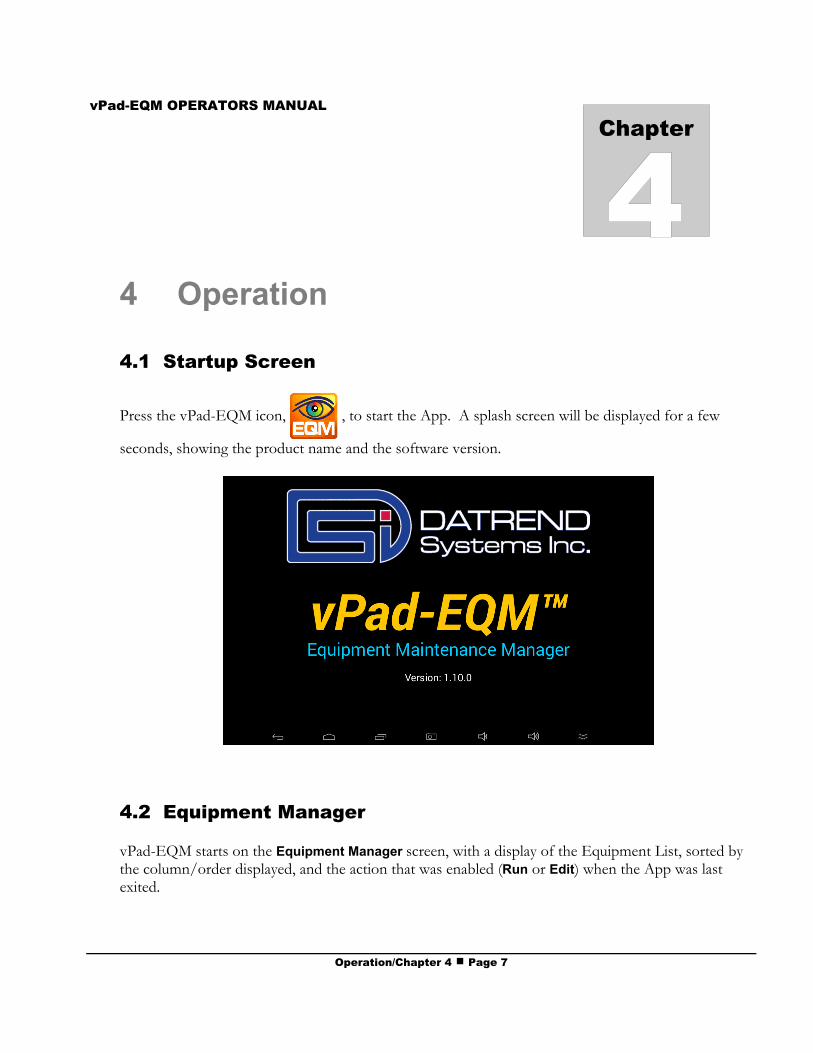
Press the vPad-EQM icon, , to start the App. A splash screen will be displayed for a few
seconds, showing the product name and the software version.
4.2 Equipment Manager
vPad-EQM starts on the Equipment Manager screen, with a display of the Equipment List, sorted bythe column/order displayed, and the action that was enabled (Run or Edit) when the App was lastexited.
vPad-EQM OPERATORS MANUAL
Operation/Chapter 4 # Page 8
4.2.1 Equipment List
The equipment database or Equipment List contains 23 parameters, 21 of which are displayed on thescreen in a vertical/horizontal list box, with the other 2* as non-visible flags. Theparameters/database fields are:
"ControlNumber" a unique identifier for the device, assigned by the owner. Alsoknown as device_ID, asset#, tag#, etc.
"Description" a textual description of what the device is or does"SerialNumber" a unique identifier for the device, assigned by the manufacturer"Manufacturer" the name of the company that manufactured the device"Model" a designator for the device, used to distinguish this device from
other similar devices from the same manufacturer"Location" a physical position within the facility that the device is normally
found (eg. EMERG, ICU, RM 103, WARD4, etc.)"Facility" the name of the building, complex where the device normally found
(eg. Essex General Hospital, Mercy Hospital Pheonix, etc.)"Checklist" the name of a list of actions to be followed when performing a
routine inspection of a device. The actions are also commonlyknown as tasks or items. The Checklist may also be known as aProcedure, Check Procedure, PM Procedure, etc.
"TechCode" an abbreviated version of a technicians name. Can be formed fromthe initials or assigned by the facilities administration (eg. anemployee number)
"Schedule" the planned number of months between inspections based on theChecklist
"LastDate" the last date that the device was inspected according to theSchedule
"NextDate" the date that the device is due for an inspection according to theSchedule
"Status" this is the Status of the last inspection performed since the data onthe tablet was last updated. This field would typically contain aPASS or a FAIL designation based on the result of the lastinspection performed, and would be blank when the data is updatedfrom the PC
"RiskManagement" data related to risk management of the device, could be adescription, a code
"AEM" data related to the ‘alternate equipment maintenance’ status of thedevice
"Address1" address of the facility"Address2" address of the facility"Address3" address of the facility"SoftwareVersion" software version(s) in the device"Department" department in the facility where the device is located, or to which
the device belongs"Room" room number in the facility where the device is located"Edited" * a flag indicating if the equipment record data has been changed
since the last update. This field would be blank when data is sent tothe tablet, but may contain data indicating the data has been editedon the tablet when the data is sent back to the PC.
vPad-EQM OPERATORS MANUAL
Operation/Chapter 4 # Page 9
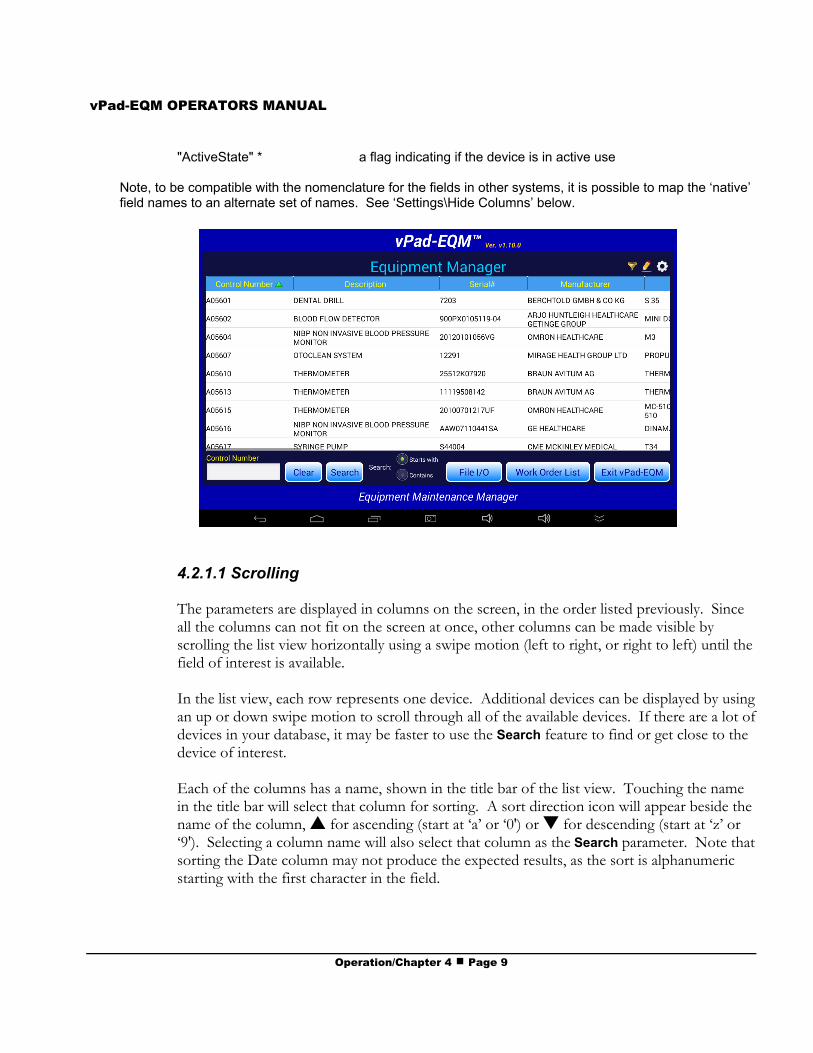
"ActiveState" * a flag indicating if the device is in active use
Note, to be compatible with the nomenclature for the fields in other systems, it is possible to map the ‘native’field names to an alternate set of names. See ‘Settings\Hide Columns’ below.
4.2.1.1 Scrolling
The parameters are displayed in columns on the screen, in the order listed previously. Sinceall the columns can not fit on the screen at once, other columns can be made visible byscrolling the list view horizontally using a swipe motion (left to right, or right to left) until thefield of interest is available.
In the list view, each row represents one device. Additional devices can be displayed by usingan up or down swipe motion to scroll through all of the available devices. If there are a lot ofdevices in your database, it may be faster to use the Search feature to find or get close to thedevice of interest.
Each of the columns has a name, shown in the title bar of the list view. Touching the namein the title bar will select that column for sorting. A sort direction icon will appear beside thename of the column, • for ascending (start at ‘a’ or ‘0') or – for descending (start at ‘z’ or‘9'). Selecting a column name will also select that column as the Search parameter. Note thatsorting the Date column may not produce the expected results, as the sort is alphanumericstarting with the first character in the field.
vPad-EQM OPERATORS MANUAL
Operation/Chapter 4 # Page 10
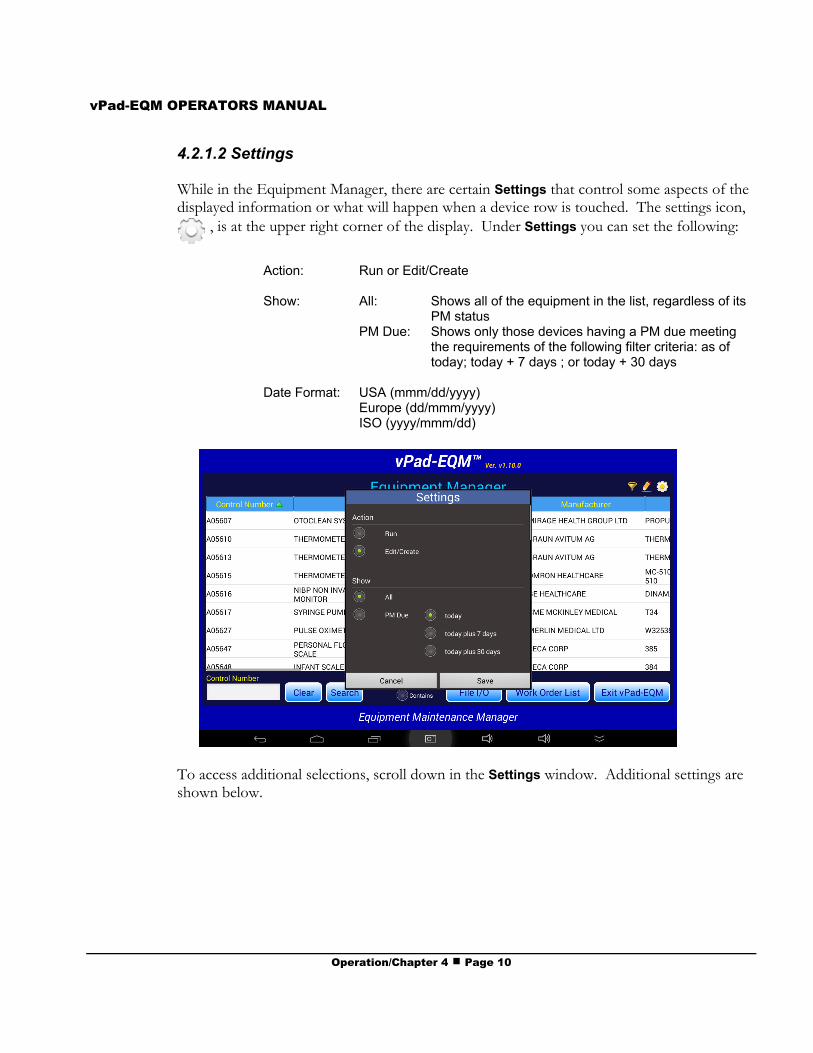
4.2.1.2 Settings
While in the Equipment Manager, there are certain Settings that control some aspects of thedisplayed information or what will happen when a device row is touched. The settings icon,
, is at the upper right corner of the display. Under Settings you can set the following:
Action: Run or Edit/Create
Show: All: Shows all of the equipment in the list, regardless of itsPM status
PM Due: Shows only those devices having a PM due meetingthe requirements of the following filter criteria: as oftoday; today + 7 days ; or today + 30 days
Date Format: USA (mmm/dd/yyyy)Europe (dd/mmm/yyyy)ISO (yyyy/mmm/dd)
To access additional selections, scroll down in the Settings window. Additional settings areshown below.
vPad-EQM OPERATORS MANUAL
Operation/Chapter 4 # Page 11
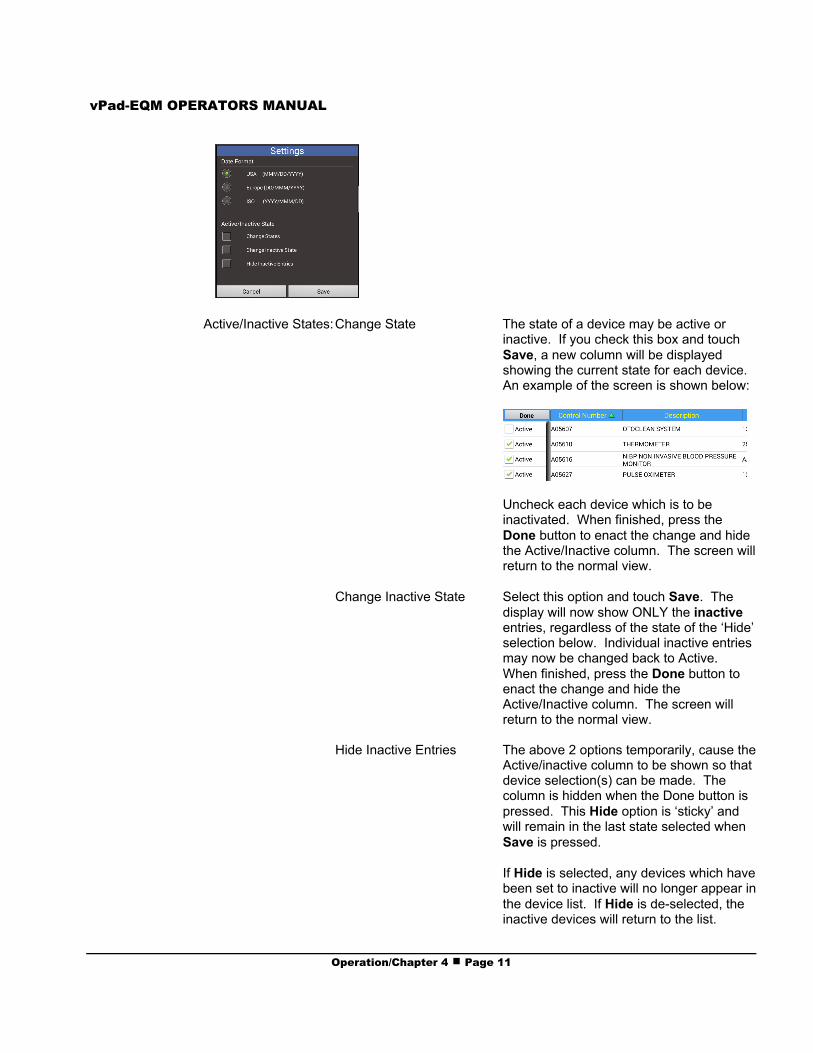
Active/Inactive States:Change State The state of a device may be active orinactive. If you check this box and touchSave, a new column will be displayedshowing the current state for each device. An example of the screen is shown below:
Uncheck each device which is to beinactivated. When finished, press theDone button to enact the change and hidethe Active/Inactive column. The screen willreturn to the normal view.
Change Inactive State Select this option and touch Save. Thedisplay will now show ONLY the inactiveentries, regardless of the state of the ‘Hide’selection below. Individual inactive entriesmay now be changed back to Active. When finished, press the Done button toenact the change and hide theActive/Inactive column. The screen willreturn to the normal view.
Hide Inactive Entries The above 2 options temporarily, cause theActive/inactive column to be shown so thatdevice selection(s) can be made. Thecolumn is hidden when the Done button ispressed. This Hide option is ‘sticky’ andwill remain in the last state selected whenSave is pressed.
If Hide is selected, any devices which havebeen set to inactive will no longer appear inthe device list. If Hide is de-selected, theinactive devices will return to the list.
vPad-EQM OPERATORS MANUAL
Operation/Chapter 4 # Page 12
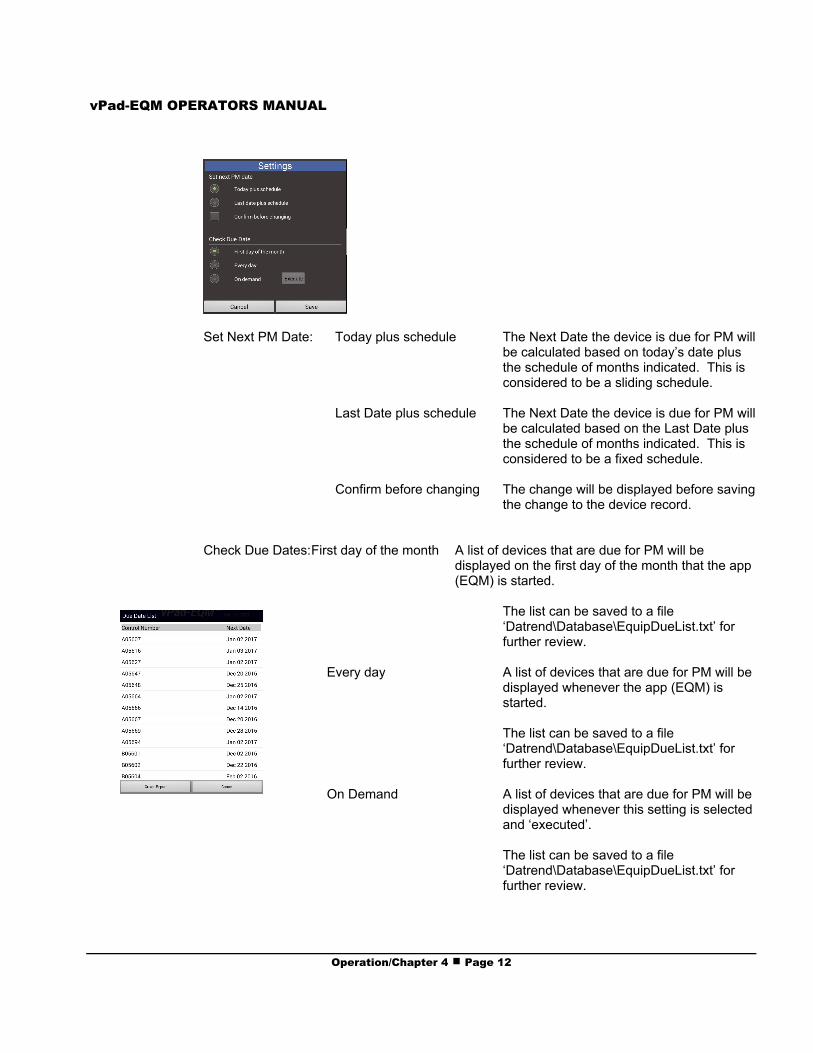
Set Next PM Date: Today plus schedule The Next Date the device is due for PM willbe calculated based on today’s date plusthe schedule of months indicated. This isconsidered to be a sliding schedule.
Last Date plus schedule The Next Date the device is due for PM willbe calculated based on the Last Date plusthe schedule of months indicated. This isconsidered to be a fixed schedule.
Confirm before changing The change will be displayed before savingthe change to the device record.
Check Due Dates:First day of the month A list of devices that are due for PM will bedisplayed on the first day of the month that the app(EQM) is started.
The list can be saved to a file‘Datrend\Database\EquipDueList.txt’ forfurther review.
Every day A list of devices that are due for PM will bedisplayed whenever the app (EQM) isstarted.
The list can be saved to a file‘Datrend\Database\EquipDueList.txt’ forfurther review.
On Demand A list of devices that are due for PM will bedisplayed whenever this setting is selectedand ‘executed’.
The list can be saved to a file‘Datrend\Database\EquipDueList.txt’ forfurther review.
vPad-EQM OPERATORS MANUAL
Operation/Chapter 4 # Page 13
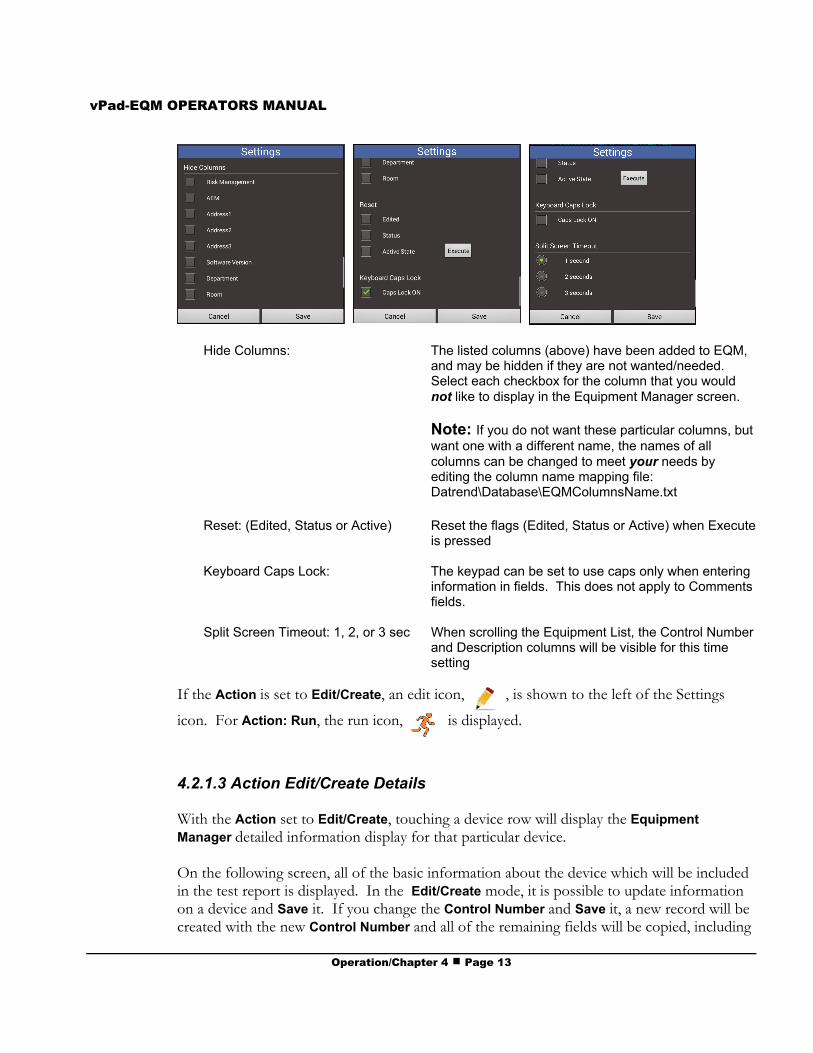
Hide Columns: The listed columns (above) have been added to EQM,and may be hidden if they are not wanted/needed.Select each checkbox for the column that you wouldnot like to display in the Equipment Manager screen.
Note: If you do not want these particular columns, butwant one with a different name, the names of allcolumns can be changed to meet your needs byediting the column name mapping file:Datrend\Database\EQMColumnsName.txt
Reset: (Edited, Status or Active) Reset the flags (Edited, Status or Active) when Executeis pressed
Keyboard Caps Lock: The keypad can be set to use caps only when enteringinformation in fields. This does not apply to Commentsfields.
Split Screen Timeout: 1, 2, or 3 sec When scrolling the Equipment List, the Control Numberand Description columns will be visible for this timesetting
If the Action is set to Edit/Create, an edit icon, , is shown to the left of the Settings
icon. For Action: Run, the run icon, is displayed.
4.2.1.3 Action Edit/Create Details
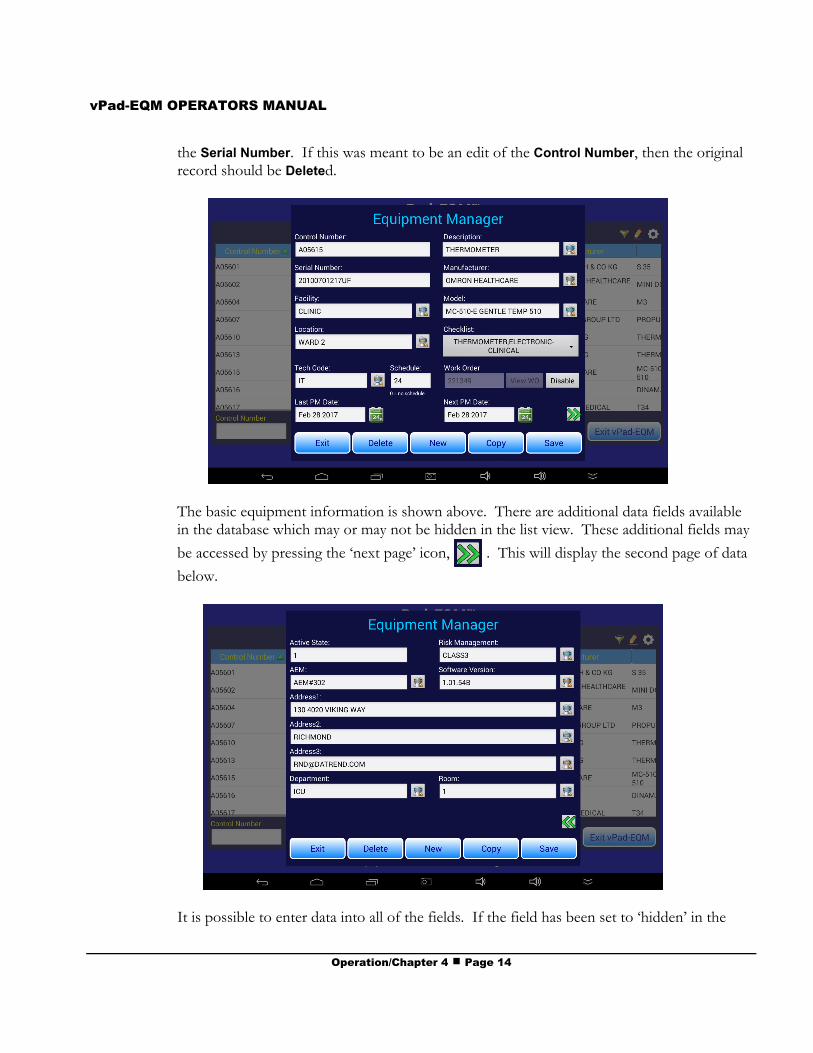
With the Action set to Edit/Create, touching a device row will display the EquipmentManager detailed information display for that particular device.
On the following screen, all of the basic information about the device which will be includedin the test report is displayed. In the Edit/Create mode, it is possible to update informationon a device and Save it. If you change the Control Number and Save it, a new record will becreated with the new Control Number and all of the remaining fields will be copied, including
vPad-EQM OPERATORS MANUAL
Operation/Chapter 4 # Page 14
the Serial Number. If this was meant to be an edit of the Control Number, then the originalrecord should be Deleted.
The basic equipment information is shown above. There are additional data fields availablein the database which may or may not be hidden in the list view. These additional fields may
be accessed by pressing the ‘next page’ icon, . This will display the second page of data
below.
It is possible to enter data into all of the fields. If the field has been set to ‘hidden’ in the
vPad-EQM OPERATORS MANUAL
Operation/Chapter 4 # Page 15
Settings, the indication (hidden) will appear after the field name. To return to the first page of
data, press the ‘last page’ icon, .
While on this screen you can also create a New record, Copy an existing record, or Delete therecord on the screen.
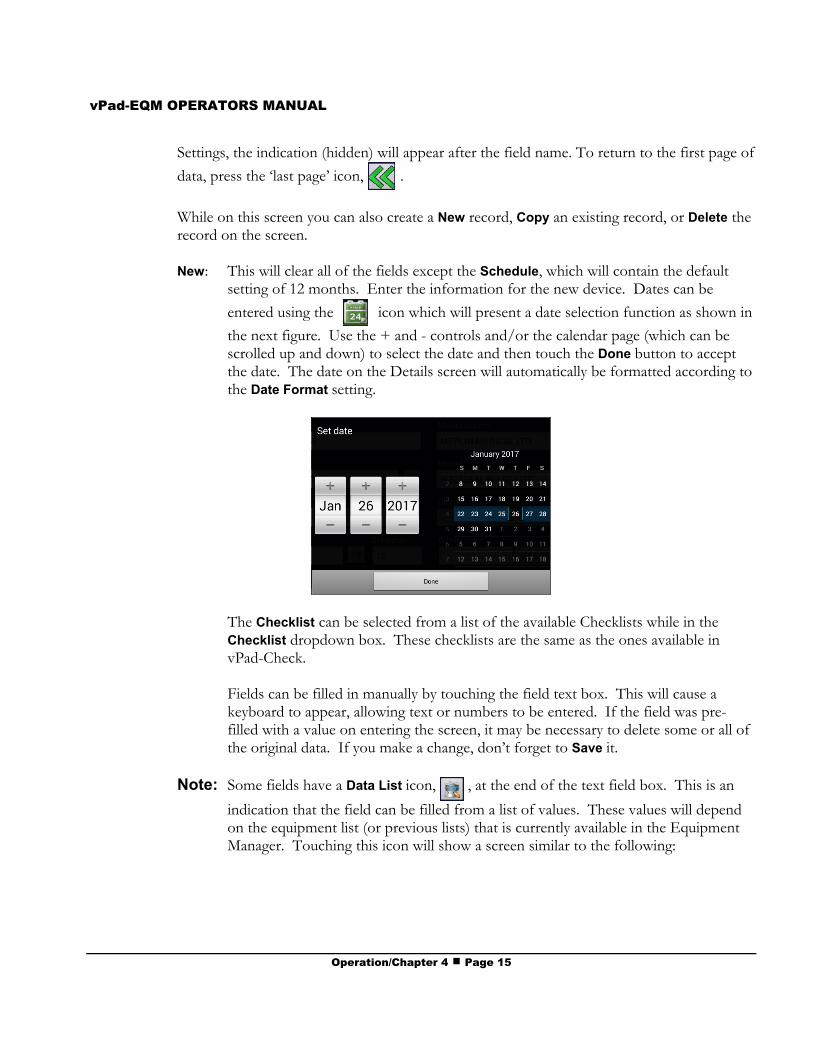
New: This will clear all of the fields except the Schedule, which will contain the defaultsetting of 12 months. Enter the information for the new device. Dates can be
entered using the icon which will present a date selection function as shown in
the next figure. Use the + and - controls and/or the calendar page (which can bescrolled up and down) to select the date and then touch the Done button to acceptthe date. The date on the Details screen will automatically be formatted according tothe Date Format setting.
The Checklist can be selected from a list of the available Checklists while in theChecklist dropdown box. These checklists are the same as the ones available invPad-Check.
Fields can be filled in manually by touching the field text box. This will cause akeyboard to appear, allowing text or numbers to be entered. If the field was pre-filled with a value on entering the screen, it may be necessary to delete some or all ofthe original data. If you make a change, don’t forget to Save it.
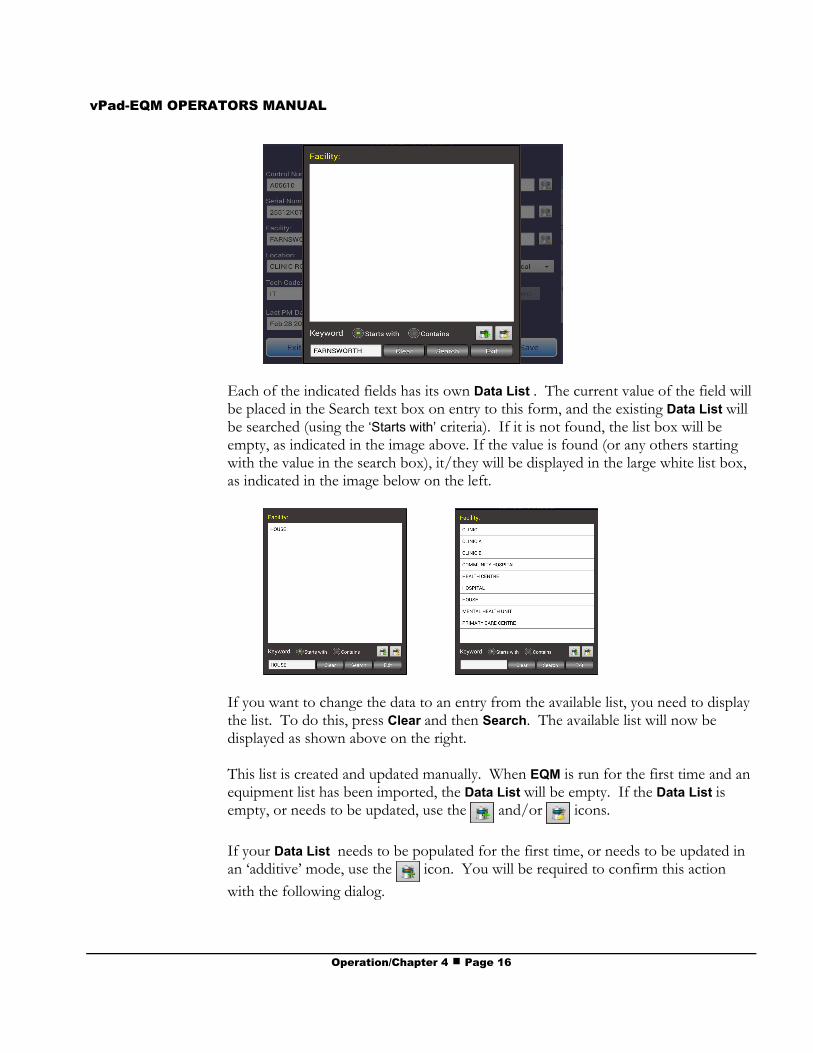
Note: Some fields have a Data List icon, , at the end of the text field box. This is an
indication that the field can be filled from a list of values. These values will dependon the equipment list (or previous lists) that is currently available in the EquipmentManager. Touching this icon will show a screen similar to the following:
vPad-EQM OPERATORS MANUAL
Operation/Chapter 4 # Page 16
Each of the indicated fields has its own Data List . The current value of the field willbe placed in the Search text box on entry to this form, and the existing Data List willbe searched (using the ‘Starts with’ criteria). If it is not found, the list box will beempty, as indicated in the image above. If the value is found (or any others startingwith the value in the search box), it/they will be displayed in the large white list box,as indicated in the image below on the left.
If you want to change the data to an entry from the available list, you need to displaythe list. To do this, press Clear and then Search. The available list will now bedisplayed as shown above on the right.
This list is created and updated manually. When EQM is run for the first time and anequipment list has been imported, the Data List will be empty. If the Data List isempty, or needs to be updated, use the and/or icons.
If your Data List needs to be populated for the first time, or needs to be updated inan ‘additive’ mode, use the icon. You will be required to confirm this actionwith the following dialog.
vPad-EQM OPERATORS MANUAL
Operation/Chapter 4 # Page 17
If you want to remove all existing entries and then populate the list use first and
then . You will be required to confirm clearing the database with the followingdialog.
All of the entries in the equipment list, for the field of interest, will be scanned and atable of unique entries will be stored. This list will represent the ‘standardized’ list ofselections for the particular field you are currently in. If the table of entries does notrepresent the current equipment list, the table can be added to by pressing the icon. This will add any new entries from the current equipment list. If there areentries in the table that are no longer of interest, the table can first be cleared andthen updated.
Schedule
The Schedule is the number of months between scheduled PM Inspections, andaccepts any value equal to or greater than 0. The value 0 is a special case, indicatingthat the device has no schedule, and therefore there will be no Next PM Date.
Next PM Date
The Next PM Date is calculated automatically by adding the scheduled number ofmonths to either the Last PM Date or today’s date, depending on the Setting.
Work Order
If a Work Order exists for this Control Number, the Work Order number will appearhere. If there is more than one work order, the first one will be shown. If no workorder is available for this device, this field will be blank. In Edit mode, a work ordernumber may be visible, but other Work Order controls are disabled.
When editing the information is completed, press the Save button and the Newrecord will be inserted into the database. There will an Android ‘toast’ messagewhich will appear at the bottom of the screen, which should read “The record has been
successfully created”, or an alternate message if there was a problem.
vPad-EQM OPERATORS MANUAL
Operation/Chapter 4 # Page 18
When the record has been added, the vPad display will remain the same, allowingother actions to be performed with the information on the screen. When finishedwith all desired actions, press the Exit button to return to the equipment listingscreen.
Copy: Pressing the Copy button will copy all of the fields, except Control Number, SerialNumber and Work Order, to a ‘new’ device entry. This is particularly useful if you arecreating multiple new entries for more than one similar/’identical’ devices (eg. ashipment of 20 pulse oximeters). Enter the information for one device and thencopy the core details using this Copy function. Be sure to Save the information aftereach device entry is completed.
This can also be helpful if you are creating a ‘new’ device entry which is virtualidentical to another , existing device. For instance a new pulse oximeter: find asimilar pulse oximeter using the Search feature, open an identical model and Copythe data. Make small changes, as necessary, then Save and Exit.
New: Pressing the New button will blank the data in all the fields. Enter new data for adevice and press Save.
Delete: Pressing the Delete button will remove the displayed record from the equipmentlisting database. The information will remain on the screen in case it might be usefulfor a New or Copy function, or even to recover from an accidental deletion. WhenExit is pressed, the deleted record will no longer appear in the equipment listing.
Save: Save will process each of the transactions (New, Copy, Delete, Save) that areperformed. If Save is not pressed, the transaction will not be completed. Forinstance, if Copy is pressed and data is entered, then New is pressed; the Copytransaction will not be Saved. Save must be pressed after the Copy data is entered.
Exit: When Exit is pressed the user is returned to the equipment listing, which will reflectall of the changes made and Saved.
It is possible to have a Next PM Date which is in the past. This may be as the result ofincorrect data entry or a data import from another source. When you complete a PM WorkOrder, this date will be corrected according to the Schedule. At the same time, the Last PMDate will be changed to reflect the date the Work Order was closed.
Whenever a device is created or edited, an internal "Edited" field is set to 1. This is used as aflag to indicate that this device record should be included in an Equipment List Export.
vPad-EQM OPERATORS MANUAL
Operation/Chapter 4 # Page 19
4.2.1.4 Action: Run
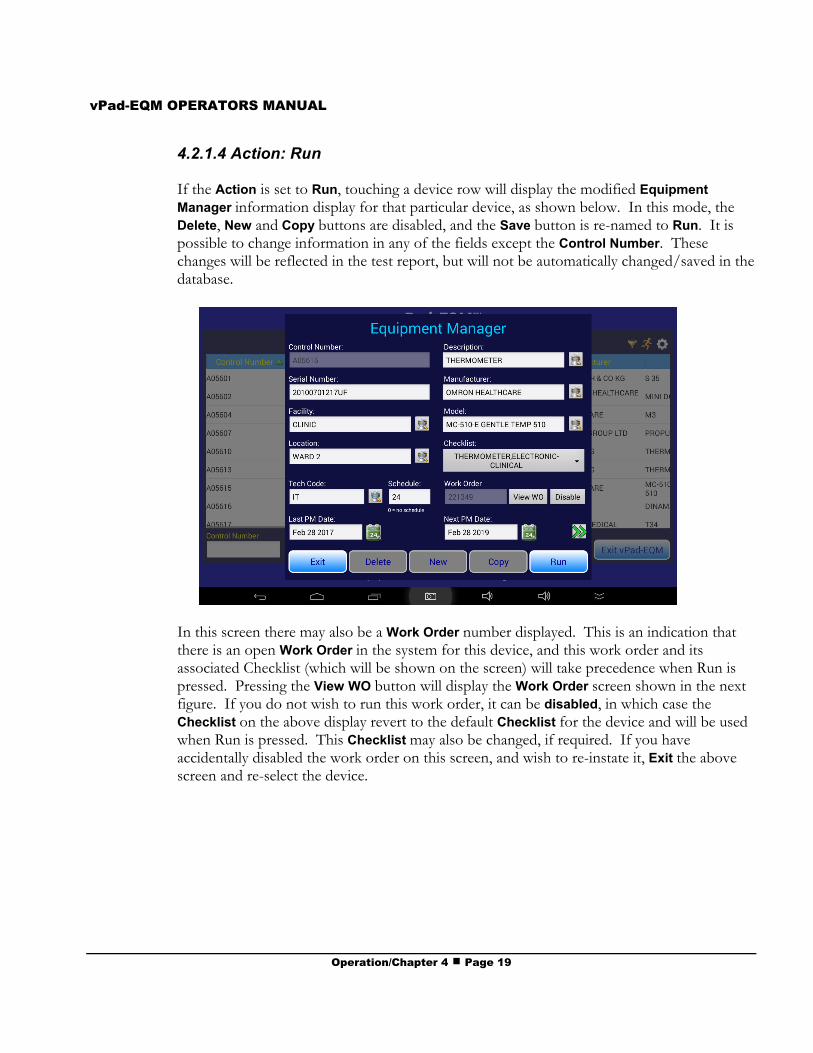
If the Action is set to Run, touching a device row will display the modified EquipmentManager information display for that particular device, as shown below. In this mode, theDelete, New and Copy buttons are disabled, and the Save button is re-named to Run. It ispossible to change information in any of the fields except the Control Number. Thesechanges will be reflected in the test report, but will not be automatically changed/saved in thedatabase.
In this screen there may also be a Work Order number displayed. This is an indication thatthere is an open Work Order in the system for this device, and this work order and itsassociated Checklist (which will be shown on the screen) will take precedence when Run ispressed. Pressing the View WO button will display the Work Order screen shown in the nextfigure. If you do not wish to run this work order, it can be disabled, in which case theChecklist on the above display revert to the default Checklist for the device and will be usedwhen Run is pressed. This Checklist may also be changed, if required. If you haveaccidentally disabled the work order on this screen, and wish to re-instate it, Exit the abovescreen and re-select the device.
vPad-EQM OPERATORS MANUAL
Operation/Chapter 4 # Page 20
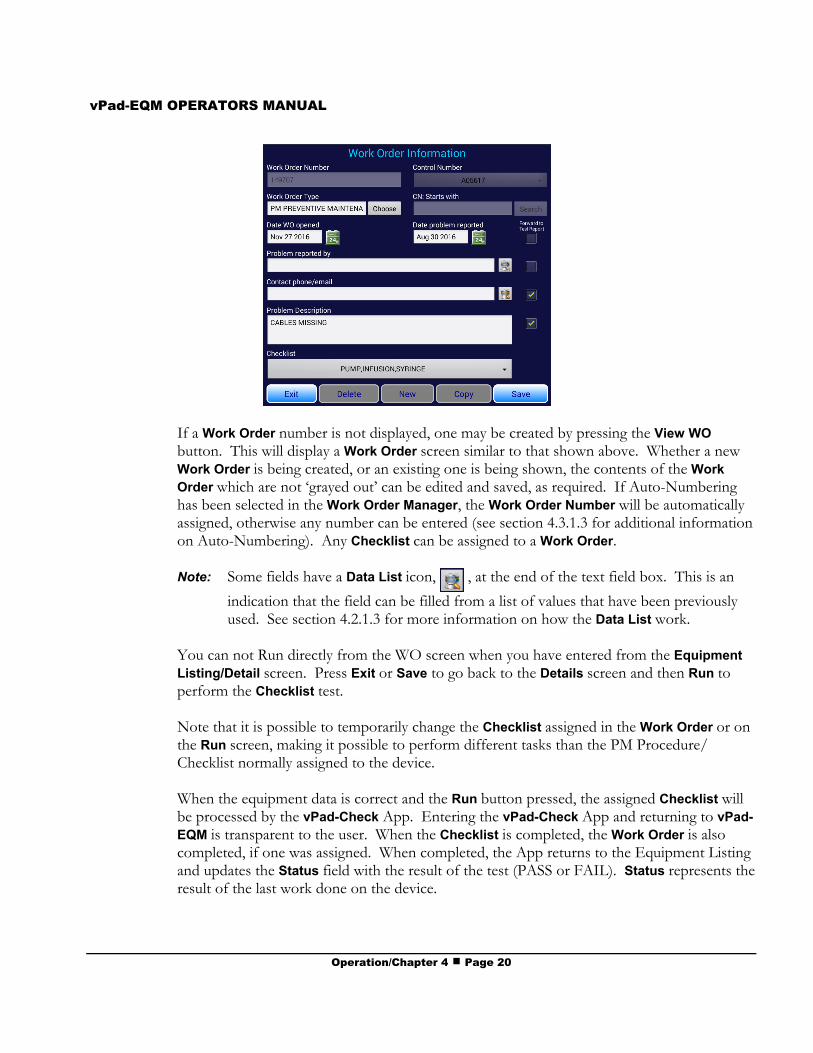
If a Work Order number is not displayed, one may be created by pressing the View WObutton. This will display a Work Order screen similar to that shown above. Whether a newWork Order is being created, or an existing one is being shown, the contents of the WorkOrder which are not ‘grayed out’ can be edited and saved, as required. If Auto-Numberinghas been selected in the Work Order Manager, the Work Order Number will be automaticallyassigned, otherwise any number can be entered (see section 4.3.1.3 for additional informationon Auto-Numbering). Any Checklist can be assigned to a Work Order.
Note: Some fields have a Data List icon, , at the end of the text field box. This is an
indication that the field can be filled from a list of values that have been previouslyused. See section 4.2.1.3 for more information on how the Data List work.
You can not Run directly from the WO screen when you have entered from the EquipmentListing/Detail screen. Press Exit or Save to go back to the Details screen and then Run toperform the Checklist test.
Note that it is possible to temporarily change the Checklist assigned in the Work Order or onthe Run screen, making it possible to perform different tasks than the PM Procedure/Checklist normally assigned to the device.
When the equipment data is correct and the Run button pressed, the assigned Checklist willbe processed by the vPad-Check App. Entering the vPad-Check App and returning to vPad-EQM is transparent to the user. When the Checklist is completed, the Work Order is alsocompleted, if one was assigned. When completed, the App returns to the Equipment Listingand updates the Status field with the result of the test (PASS or FAIL). Status represents theresult of the last work done on the device.

vPad-EQM OPERATORS MANUAL
Operation/Chapter 4 # Page 21
4.2.1.5 Search
As previously mentioned under Section 4.2.1.1, it is possible to Search the equipmentdatabase by any of the parameters displayed on the screen. The currently selected column(parameter) is automatically selected as the Search parameter. To change the search context,select the column of interest.
While on the main Equipment Manager screen, touch in the Search text box. The column tobe searched is indicated above the text box, and will change as different columns are selected. Once the text box is touched, a keyboard will appear to allow entry of the value for which tosearch. Before starting Search, select the search method: 1) Starts with; or, 2) Contains. Enter the search value and touch the Search button. In the ‘Starts with’ mode, theEquipment Manager will show the closest (or exact) match in the list. This search is casesensitive.
In ‘Contains’ mode, the Equipment Manager list will be filtered to contain only those deviceswhich have the search value anywhere in the parameter of interest. This search is not casesensitive.
The last Search value will remain in the text box until changed by the keyboard or the Clearbutton is pressed. To return to the view of the complete equipment list, press Clear and thenSearch.
vPad-EQM OPERATORS MANUAL
Operation/Chapter 4 # Page 22
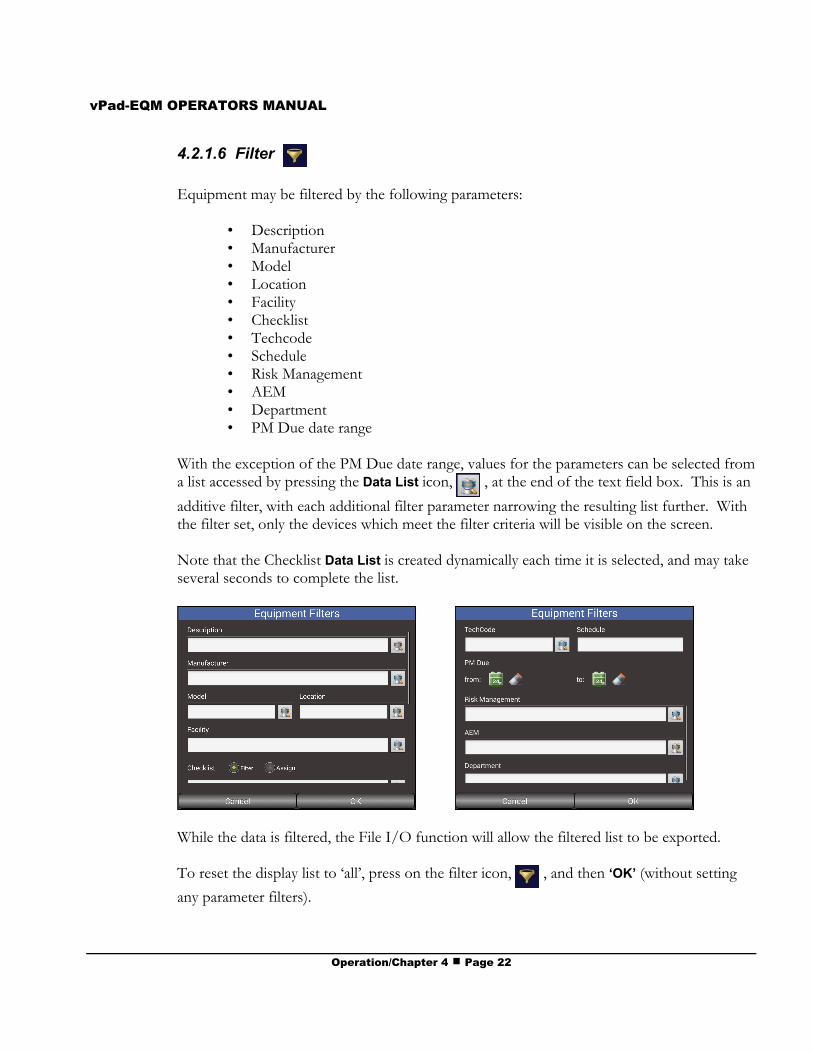
4.2.1.6 Filter
Equipment may be filtered by the following parameters:
• Description• Manufacturer• Model• Location• Facility• Checklist• Techcode• Schedule• Risk Management• AEM• Department• PM Due date range
With the exception of the PM Due date range, values for the parameters can be selected froma list accessed by pressing the Data List icon, , at the end of the text field box. This is an
additive filter, with each additional filter parameter narrowing the resulting list further. Withthe filter set, only the devices which meet the filter criteria will be visible on the screen.
Note that the Checklist Data List is created dynamically each time it is selected, and may takeseveral seconds to complete the list.
While the data is filtered, the File I/O function will allow the filtered list to be exported.
To reset the display list to ‘all’, press on the filter icon, , and then ‘OK’ (without setting
any parameter filters).
vPad-EQM OPERATORS MANUAL
Operation/Chapter 4 # Page 23
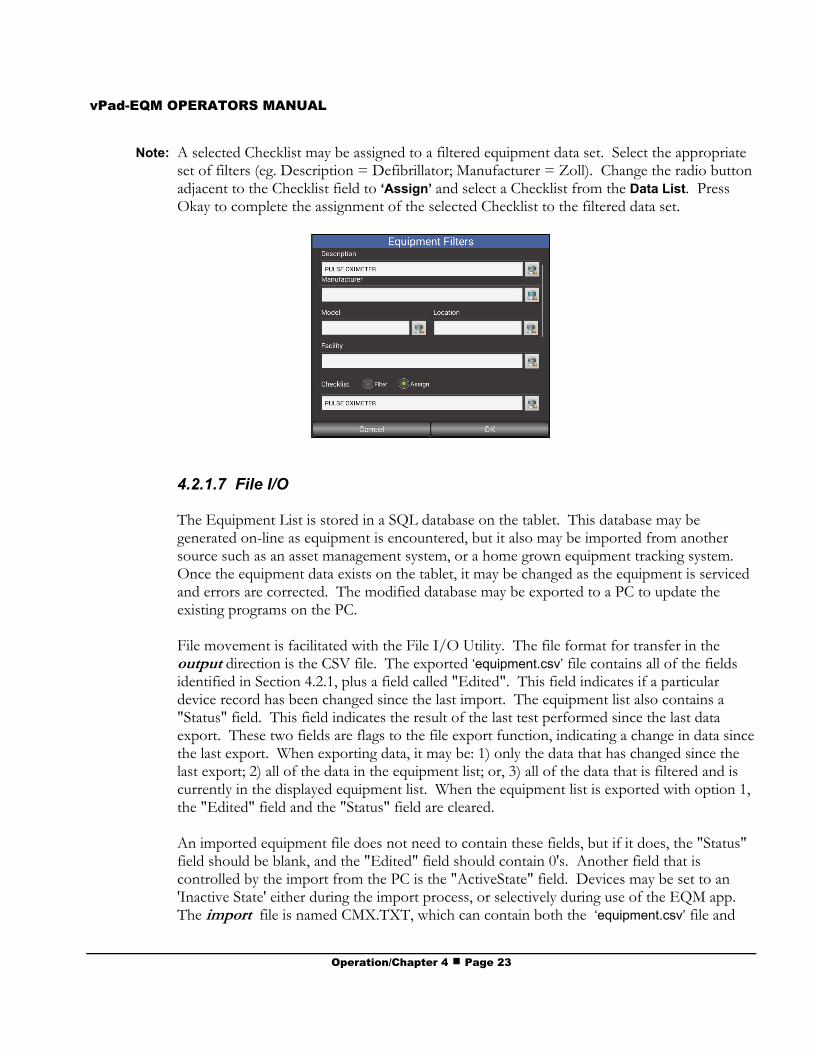
Note: A selected Checklist may be assigned to a filtered equipment data set. Select the appropriateset of filters (eg. Description = Defibrillator; Manufacturer = Zoll). Change the radio buttonadjacent to the Checklist field to ‘Assign’ and select a Checklist from the Data List. PressOkay to complete the assignment of the selected Checklist to the filtered data set.
4.2.1.7 File I/O
The Equipment List is stored in a SQL database on the tablet. This database may begenerated on-line as equipment is encountered, but it also may be imported from anothersource such as an asset management system, or a home grown equipment tracking system. Once the equipment data exists on the tablet, it may be changed as the equipment is servicedand errors are corrected. The modified database may be exported to a PC to update theexisting programs on the PC.
File movement is facilitated with the File I/O Utility. The file format for transfer in theoutput direction is the CSV file. The exported ‘equipment.csv’ file contains all of the fieldsidentified in Section 4.2.1, plus a field called "Edited". This field indicates if a particulardevice record has been changed since the last import. The equipment list also contains a"Status" field. This field indicates the result of the last test performed since the last dataexport. These two fields are flags to the file export function, indicating a change in data sincethe last export. When exporting data, it may be: 1) only the data that has changed since thelast export; 2) all of the data in the equipment list; or, 3) all of the data that is filtered and iscurrently in the displayed equipment list. When the equipment list is exported with option 1,the "Edited" field and the "Status" field are cleared.
An imported equipment file does not need to contain these fields, but if it does, the "Status"field should be blank, and the "Edited" field should contain 0's. Another field that iscontrolled by the import from the PC is the "ActiveState" field. Devices may be set to an'Inactive State' either during the import process, or selectively during use of the EQM app. The import file is named CMX.TXT, which can contain both the ‘equipment.csv’ file and
vPad-EQM OPERATORS MANUAL
Operation/Chapter 4 # Page 24
the ‘workorderinfo.csv’ file. This CMX.TXT file is created by the CMX program on the PC.
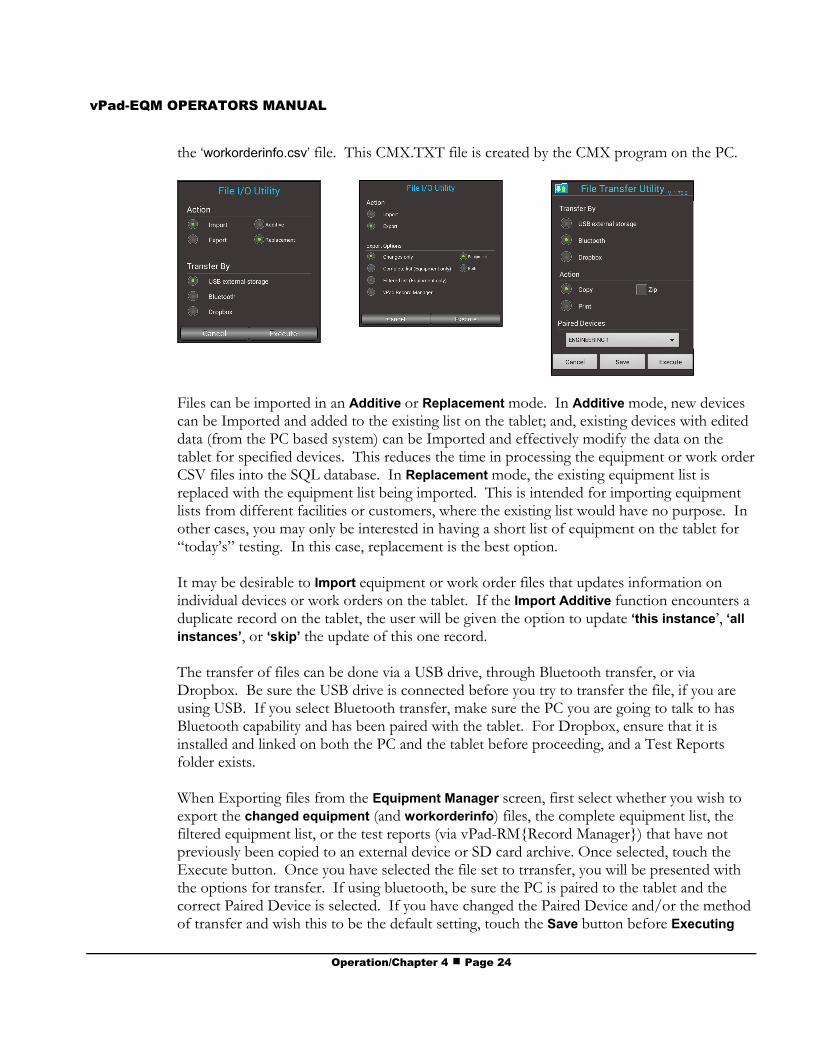
Files can be imported in an Additive or Replacement mode. In Additive mode, new devicescan be Imported and added to the existing list on the tablet; and, existing devices with editeddata (from the PC based system) can be Imported and effectively modify the data on thetablet for specified devices. This reduces the time in processing the equipment or work orderCSV files into the SQL database. In Replacement mode, the existing equipment list isreplaced with the equipment list being imported. This is intended for importing equipmentlists from different facilities or customers, where the existing list would have no purpose. Inother cases, you may only be interested in having a short list of equipment on the tablet for“today’s” testing. In this case, replacement is the best option.
It may be desirable to Import equipment or work order files that updates information onindividual devices or work orders on the tablet. If the Import Additive function encounters aduplicate record on the tablet, the user will be given the option to update ‘this instance’, ‘allinstances’, or ‘skip’ the update of this one record.
The transfer of files can be done via a USB drive, through Bluetooth transfer, or viaDropbox. Be sure the USB drive is connected before you try to transfer the file, if you areusing USB. If you select Bluetooth transfer, make sure the PC you are going to talk to hasBluetooth capability and has been paired with the tablet. For Dropbox, ensure that it isinstalled and linked on both the PC and the tablet before proceeding, and a Test Reportsfolder exists.
When Exporting files from the Equipment Manager screen, first select whether you wish toexport the changed equipment (and workorderinfo) files, the complete equipment list, thefiltered equipment list, or the test reports (via vPad-RM{Record Manager}) that have notpreviously been copied to an external device or SD card archive. Once selected, touch theExecute button. Once you have selected the file set to trransfer, you will be presented withthe options for transfer. If using bluetooth, be sure the PC is paired to the tablet and thecorrect Paired Device is selected. If you have changed the Paired Device and/or the methodof transfer and wish this to be the default setting, touch the Save button before Executing
vPad-EQM OPERATORS MANUAL
Operation/Chapter 4 # Page 25
the transfer.
When using bluetooth, the file will be transferred to the PC and stored in a default file folder,normally in:
C:\Documents and Settings\<your name>\My Documents\Bluetooth Exchange Folder
The name of the Bluetooth folder is OS version dependant. Check your PC Bluetoothsetting to confirm the location.
When importing a file into EQM, the CMX.TXT file must exist in the tablet’s bluetoothfolder, in the root of the USB drive, or in the Dropbox\Datrend Imports folder. If you areusing CMX to send the CMX.TXT file to the Bluetooth or Dropbox folder, be sure to deleteany existing CMX.TXT files in the folder, otherwise the ‘new’ file may automatically berenamed CMX-1.TXT, and the import function will use the wrong (old) file. Forinformation on the CMX program for the PC, please refer to the manual: MN-083 6100-048CMX Operators Manual.
Note: The Edited, Status and ActiveState fields are not modified during the Export process.
The format of the CMX file is important in order to correctly import into EQM. The basicformat is as follows:
}WORKORDERINFO.CSV{"WorkOrder","ControlNumber","Description","Open_Date","Closed_Date","Report_Filename","Status","TechCode","WOType","ReportedDate","ReportedBy","ContactInfo","Checklist","PassDateReported","PassProblemBy","PassContactInfo","PassProblemDesc""151814","A05688","BROKEN!","2016-08-30","2016-08-30","","","JR","PM","2016-08-30","UNKNOWN","","PULSE OXIMETER","1","0","0","1""151889","A05691","PM REQUIRED","2016-08-30","2016-08-30","","","JR","PM","2016-08-30","MARY RN","X567","PULSE OXIMETER","1","1","1","1"}EQUIPMENT.CSV{ControlNumber","Description","SerialNumber","Manufacturer","Model","Location","Facility","Checklist","TechCode","Schedule","LastDate","NextDate","Status","RiskManagement","AEM","Address1","Address2","Address3","SoftwareVersion","Department","Room","Edited","ActiveState"A05607","OTOCLEAN SYSTEM","12291","MIRAGE HEALTH GROUP LTD","PROPULSE II","WARD 1","HOSPITAL","Monitor,NIBP (fulltest)","95223","6","10/28/16","12/02/17","FAIL","Class1","No","130 4020 Viking Way","Richmond","[email protected]","1.01.54b","ICU","3","0","1"A05626","NIBP NON INVASIVE BLOOD PRESSURE MONITOR","20131000194VG","OMRON HEALTHCARE","M6","CONSULTING ROOM 9","HEALTH CENTRE","DemoChecklist","147594","10","11/28/16","12/02/17","","Class4","AEM#623","130 4020 Viking Way","Richmond","[email protected]","1.01.54b","ICU","3","0","1
Key points are that the equipment information is preceded by the header “}EQUIPMENT.CSV{“,followed by the column names row, then the actual data. Similarly, the work order information is preceded by the header “}WORKORDERINFO.CSV{“, followed by the column names row, thenthe actual data. The work order information may be second or first in the CMX file. In theexample shown above, the column names row and some of the data rows take up 2 lines due totheir length.
Clearing or modifying these fields on the tablet database is done during the Import process.These fields are intended as flags to a PC based program. If a file is Imported as a replacementfor the existing file, the previous contents of these fields on the tablet is not relevant. However,during an Additive Import, only new or revised device/work order records are imported.
The intent is that the user will used the data exported from vPad-EQM to update/revise recordson the PC based CMMS system. The CMMS system would, in returning data to vPad-EQM,
vPad-EQM OPERATORS MANUAL
Operation/Chapter 4 # Page 26
clear the Status field, and reset the Edited field to ‘0'. In addition, any devices that have been setto Inactive would have their data record sent. The CMMS system is responsible to send back anyrevisions it has made to data it has received from the tablet, in order to sync the tablet data withthe CMMS.
Note: Caution should be exercised when Importing an Equipment.CSV file from a PC whereExcel was used to create the file. Specifically, serial numbers which are all long and numeric maybe changed by Excel to an exponential format automatically, and may not be converted to a CSVformat correctly (ie. 1234567891234 may become 1.2E+12). Correct data transfer may beachieved by formatting the serial number column to ‘number, decimal places=0' before creatingthe CSV file format. Failure to do this may result in serial numbers being saved as the wrong textdata (ie. 1.2E+12), which may be non-recoverable.
4.2.2 Work Order List
The Work Order List can be accessed by touching the Work Order List button. The capabilities of theWork Order List are discussed in Section 4.3.1 following.
4.2.3 Exit vPad-EQM
The Exit vPad-EQM button returns to the Home screen of the Android tablet.
vPad-EQM OPERATORS MANUAL
Operation/Chapter 4 # Page 27
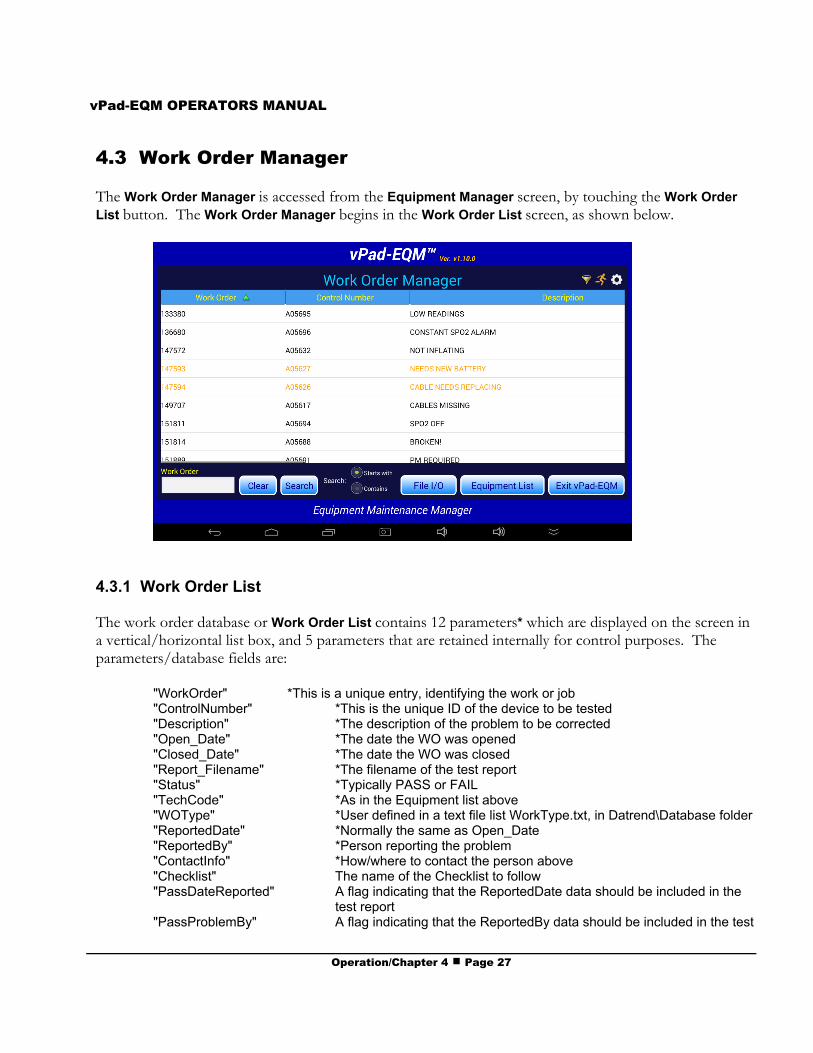
4.3 Work Order Manager
The Work Order Manager is accessed from the Equipment Manager screen, by touching the Work OrderList button. The Work Order Manager begins in the Work Order List screen, as shown below.
4.3.1 Work Order List
The work order database or Work Order List contains 12 parameters* which are displayed on the screen ina vertical/horizontal list box, and 5 parameters that are retained internally for control purposes. Theparameters/database fields are:
"WorkOrder" *This is a unique entry, identifying the work or job"ControlNumber" *This is the unique ID of the device to be tested"Description" *The description of the problem to be corrected"Open_Date" *The date the WO was opened"Closed_Date" *The date the WO was closed"Report_Filename" *The filename of the test report"Status" *Typically PASS or FAIL"TechCode" *As in the Equipment list above"WOType" *User defined in a text file list WorkType.txt, in Datrend\Database folder"ReportedDate" *Normally the same as Open_Date"ReportedBy" *Person reporting the problem"ContactInfo" *How/where to contact the person above"Checklist" The name of the Checklist to follow"PassDateReported" A flag indicating that the ReportedDate data should be included in the
test report"PassProblemBy" A flag indicating that the ReportedBy data should be included in the test
vPad-EQM OPERATORS MANUAL
Operation/Chapter 4 # Page 28
report"PassContactInfo" A flag indicating that the ContactInfo data should be included in the test
report"PassProblemDesc" A flag indicating that the (Problem)Description should be included in the
test report"Exported" A flag indicating that the Work Order has been exported to an external
device
4.3.1.1 Scrolling
The parameters are displayed in columns on the screen, in the order listed previously. Since allthe columns can not fit on the screen at once, other columns can be made visible by scrolling thelist view horizontally using a swipe motion (left to right, or right to left) until the parameter ofinterest is available.
In the list view, each row represents one work order. Additional work orders can be displayed byusing an up or down swipe motion to scroll through all of the available work orders. If there area lot of work orders in your database, it may be faster to use the Search feature to find or getclose to the work order of interest.
Each of the columns has a name, shown in the title bar of the list view. Touching the name inthe title bar will select that column for sorting. A sort direction icon will appear beside the nameof the column, • for ascending (start at ‘a’ or ‘0') or – for descending (start at ‘z’ or ‘9'). Selecting a column name will also select that column as the Search parameter.
Columns in the Work Order Manager can not be re-named.
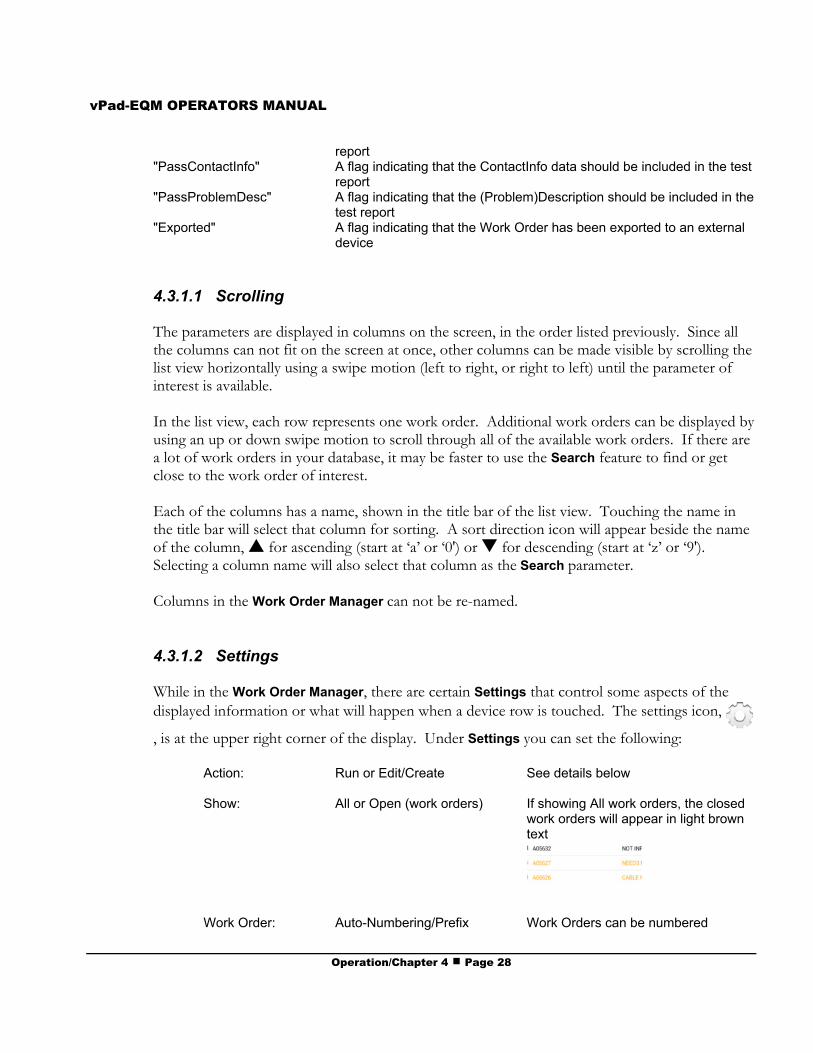
4.3.1.2 Settings
While in the Work Order Manager, there are certain Settings that control some aspects of thedisplayed information or what will happen when a device row is touched. The settings icon,
, is at the upper right corner of the display. Under Settings you can set the following:
Action: Run or Edit/Create See details below
Show: All or Open (work orders) If showing All work orders, the closedwork orders will appear in light browntext
Work Order: Auto-Numbering/Prefix Work Orders can be numbered
vPad-EQM OPERATORS MANUAL
Operation/Chapter 4 # Page 29
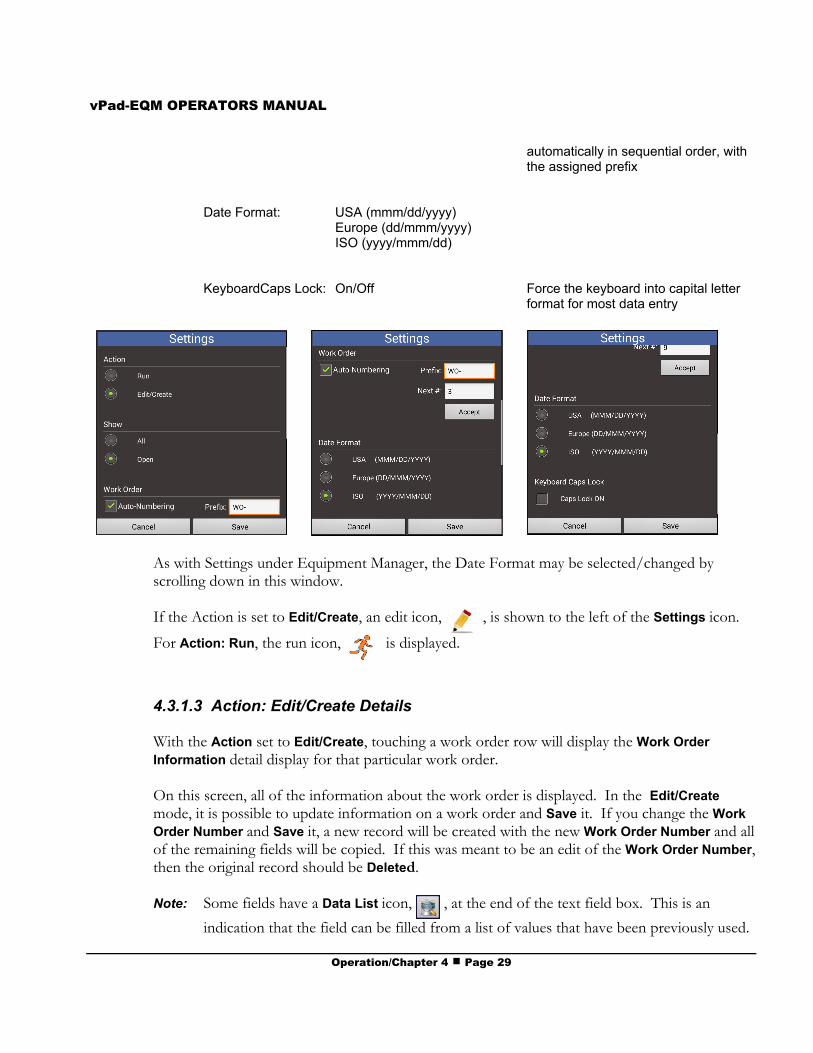
automatically in sequential order, withthe assigned prefix
Date Format: USA (mmm/dd/yyyy)Europe (dd/mmm/yyyy)ISO (yyyy/mmm/dd)
KeyboardCaps Lock: On/Off Force the keyboard into capital letterformat for most data entry
As with Settings under Equipment Manager, the Date Format may be selected/changed byscrolling down in this window.
If the Action is set to Edit/Create, an edit icon, , is shown to the left of the Settings icon.
For Action: Run, the run icon, is displayed.
4.3.1.3 Action: Edit/Create Details
With the Action set to Edit/Create, touching a work order row will display the Work OrderInformation detail display for that particular work order.
On this screen, all of the information about the work order is displayed. In the Edit/Createmode, it is possible to update information on a work order and Save it. If you change the WorkOrder Number and Save it, a new record will be created with the new Work Order Number and allof the remaining fields will be copied. If this was meant to be an edit of the Work Order Number,then the original record should be Deleted.
Note: Some fields have a Data List icon, , at the end of the text field box. This is an
indication that the field can be filled from a list of values that have been previously used.

vPad-EQM OPERATORS MANUAL
Operation/Chapter 4 # Page 30
If data is typed into this field it will be saved to the data list automatically.m See section4.2.1.3 for more information on how the Data List work.
Note: Some fields have a checkbox on the right side of the screen. To include this field in thetest report check the box.
Note: A different Checklist may be selected on a work order, allowing for specialty services tobe performed. These specialty services must have a Checklist created and installed on thetablet in advance. An example of this might be a O2 Monitor Battery Replacement , or,Cable Replacement, or Telemetry Adjustment.
While on this screen you can also create a New record, Copy an existing record, or Delete therecord on the screen.
New: This will clear all of the fields except the Date, which defaults to today’s date. Enter the
information for the work order. Dates can be entered using the icon which will
present a date selection function as described previously. Use the + and - controls toselect the date and then touch the Done button to accept the date.
The Work Order Number can be generated automatically or entered manually, dependingon the Settings. If it is generated automatically, it will number sequentially using the WOPrefix and the Next # as indicated in the Settings.
vPad-EQM OPERATORS MANUAL
Operation/Chapter 4 # Page 31
Note: When using the Auto-Numbering system, you can reset the counter to a number lowerthan what you currently have as the ‘next number’. In this case, any work ordersgenerated by the Auto-Numbering system which are greater than the new number will bedeleted (a cautionary prompt will be displayed first). Any work order numbers generatedmanually which are in the same format as the Auto-Numbered format will not berecognized, and therefore will not be deleted.
The Control Number may not be known at the time the Work Order is created. The WorkOrder may be created as the result of a message or phone call from an individual thatdoes not know the Control Number. If the Control Number is not known, use the default‘Unknown Control Number’ entry. If the Control Number is known, the drop down listwill allow selection of the correct number. To get closer to the number in the list, usethe Search feature ‘CN: Starts with’. Enter the first few numbers/characters of theControl Number and touch Search. The drop down list will begin at this value.
When completed, press the Save button and the New record will be inserted into thedatabase. There will an Android ‘toast’ message which will appear at the bottom of thescreen, which should read “The record has been successfully created”, or an alternate message ifthere was a problem. When the record has been added, the vPad display will remain thesame, allowing other actions to be performed with the information on the screen. Whenfinished with all desired actions, press the Exit button to return to the work order listingscreen.
Copy: Pressing the Copy button will copy all of the fields, except Work Order Number, to a‘new’ work order entry. This is particularly useful if you are creating multiple new entriesfor more than one similar/’identical’ devices (eg. a shipment of 20 pulse oximeters). Enter the information for one device and then copy the core details using this Copyfunction, then update the Control Number and Serial Number. Be sure to Save theinformation after each device entry is completed.
This can also be helpful if you are creating a ‘new’ work order entry which is virtualidentical to another , existing work order. For instance a new pulse oximeter: find asimilar pulse oximeter using the Search feature, open an identical device’s work orderand Copy the data. Make any small changes, as necessary, then Save and Exit.
Delete: Pressing the Delete button will remove the displayed work order from the work orderlisting database. The information will remain on the screen in case it might be useful fora New or Copy function, or even to recover from an accidental deletion. When Exit ispressed, the deleted record will no longer appear in the work order listing.
Save: Save will process each of the transactions (New, Copy, Delete, Save) that are performed.If Save is not pressed, the transaction will not be completed. For instance, if Copy ispressed and data is entered, then New is pressed; the Copy transaction will not be Saved. Save must be pressed after the Copy data is entered.
vPad-EQM OPERATORS MANUAL
Operation/Chapter 4 # Page 32
Exit: When Exit is pressed the user is returned to the work order listing, which will reflect allof the changes made.
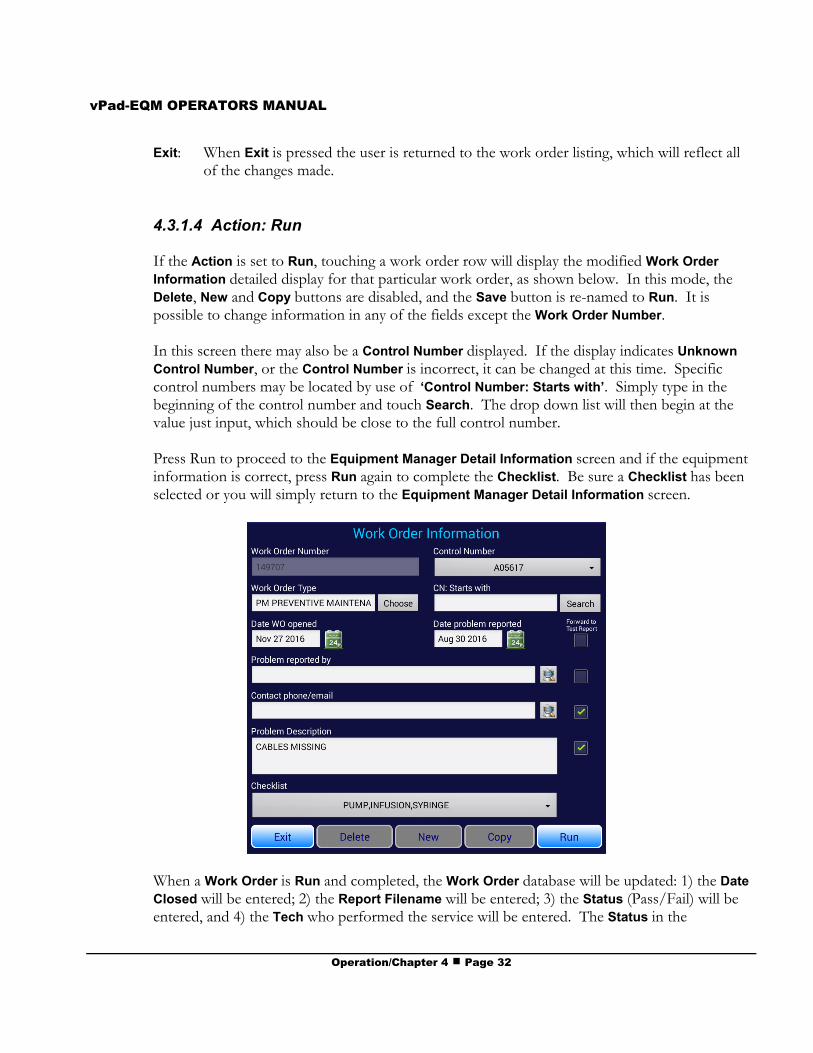
4.3.1.4 Action: Run
If the Action is set to Run, touching a work order row will display the modified Work OrderInformation detailed display for that particular work order, as shown below. In this mode, theDelete, New and Copy buttons are disabled, and the Save button is re-named to Run. It ispossible to change information in any of the fields except the Work Order Number.
In this screen there may also be a Control Number displayed. If the display indicates UnknownControl Number, or the Control Number is incorrect, it can be changed at this time. Specificcontrol numbers may be located by use of ‘Control Number: Starts with’. Simply type in thebeginning of the control number and touch Search. The drop down list will then begin at thevalue just input, which should be close to the full control number.
Press Run to proceed to the Equipment Manager Detail Information screen and if the equipmentinformation is correct, press Run again to complete the Checklist. Be sure a Checklist has beenselected or you will simply return to the Equipment Manager Detail Information screen.
When a Work Order is Run and completed, the Work Order database will be updated: 1) the DateClosed will be entered; 2) the Report Filename will be entered; 3) the Status (Pass/Fail) will beentered, and 4) the Tech who performed the service will be entered. The Status in the
vPad-EQM OPERATORS MANUAL
Operation/Chapter 4 # Page 33
Equipment database will also be updated.
4.3.1.5 Search
As previously mentioned under Section 4.3.1.1, it is possible to Search the Work Order databaseby any of the parameters displayed on the screen. The currently selected column (parameter) isautomatically selected as the Search parameter. To change the search context, select the columnof interest.
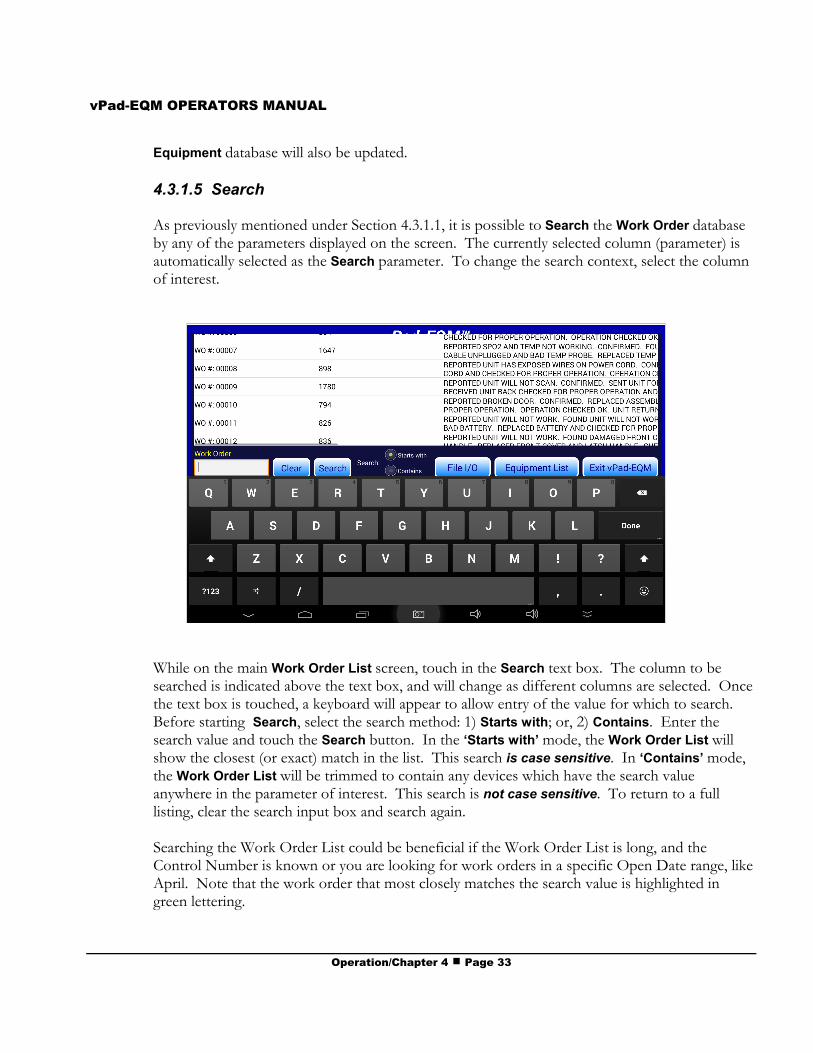
While on the main Work Order List screen, touch in the Search text box. The column to besearched is indicated above the text box, and will change as different columns are selected. Oncethe text box is touched, a keyboard will appear to allow entry of the value for which to search. Before starting Search, select the search method: 1) Starts with; or, 2) Contains. Enter thesearch value and touch the Search button. In the ‘Starts with’ mode, the Work Order List willshow the closest (or exact) match in the list. This search is case sensitive. In ‘Contains’ mode,the Work Order List will be trimmed to contain any devices which have the search valueanywhere in the parameter of interest. This search is not case sensitive. To return to a fulllisting, clear the search input box and search again.
Searching the Work Order List could be beneficial if the Work Order List is long, and theControl Number is known or you are looking for work orders in a specific Open Date range, likeApril. Note that the work order that most closely matches the search value is highlighted ingreen lettering.
vPad-EQM OPERATORS MANUAL
Operation/Chapter 4 # Page 34
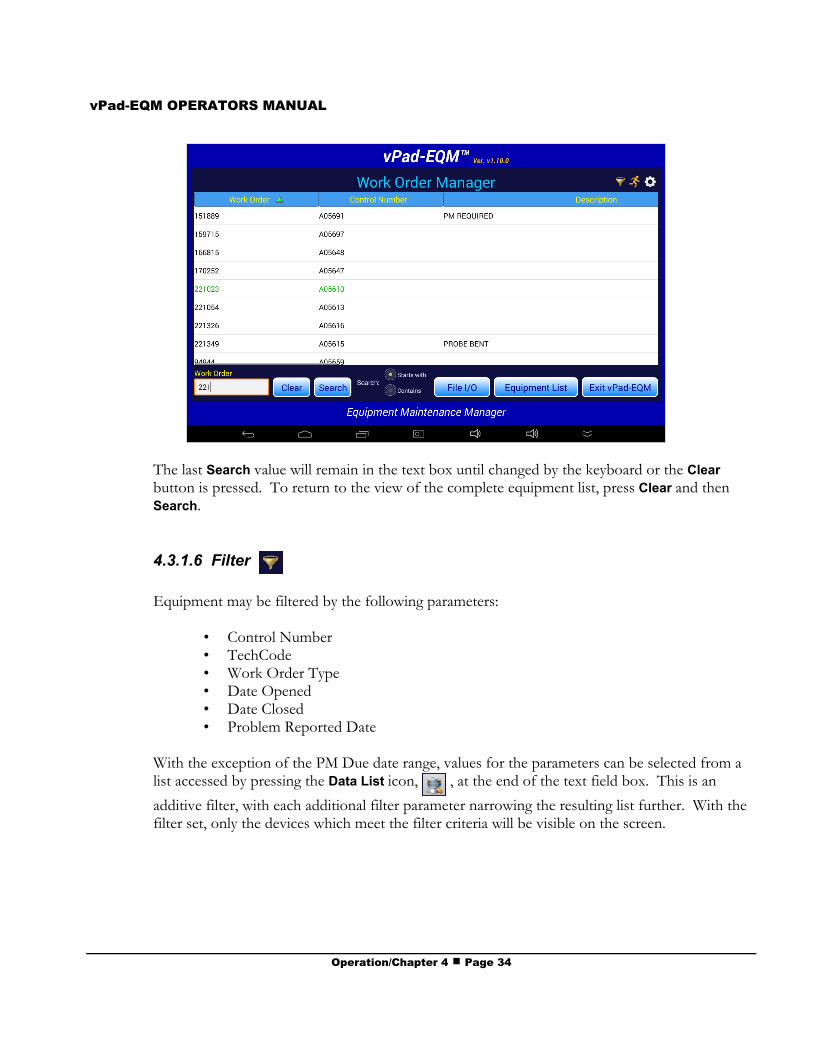
The last Search value will remain in the text box until changed by the keyboard or the Clearbutton is pressed. To return to the view of the complete equipment list, press Clear and thenSearch.
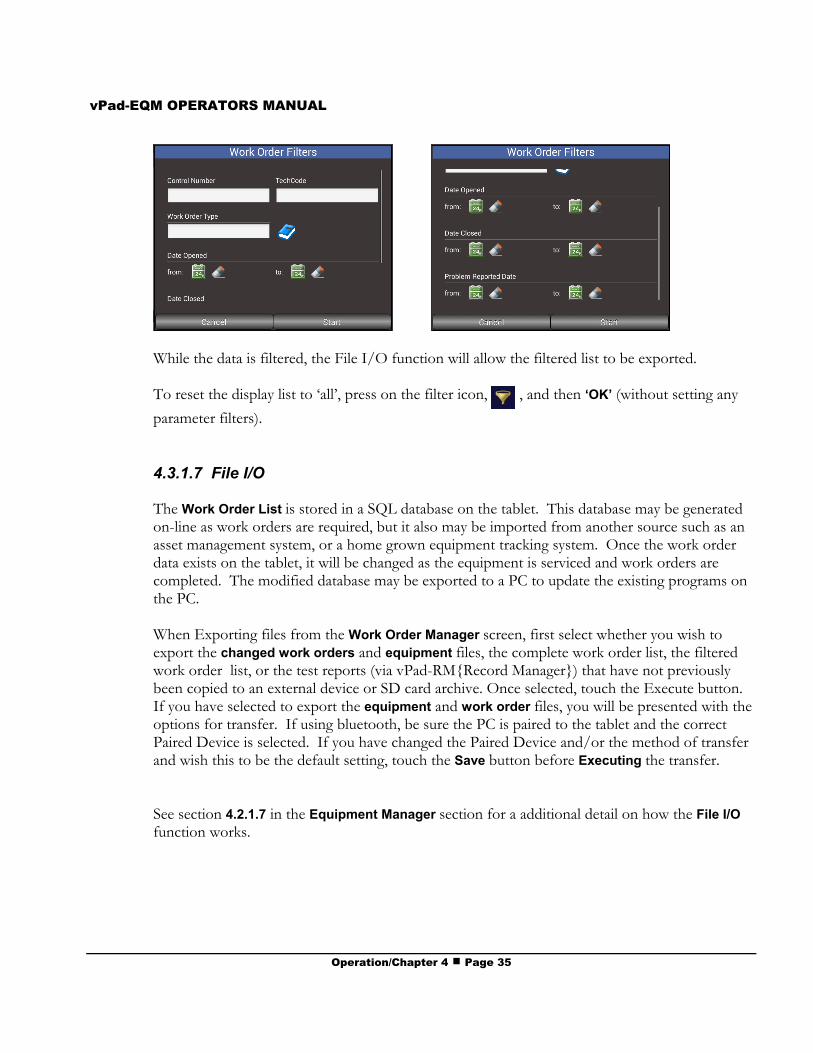
4.3.1.6 Filter
Equipment may be filtered by the following parameters:
• Control Number• TechCode• Work Order Type• Date Opened• Date Closed• Problem Reported Date
With the exception of the PM Due date range, values for the parameters can be selected from alist accessed by pressing the Data List icon, , at the end of the text field box. This is an
additive filter, with each additional filter parameter narrowing the resulting list further. With thefilter set, only the devices which meet the filter criteria will be visible on the screen.
vPad-EQM OPERATORS MANUAL
Operation/Chapter 4 # Page 35
While the data is filtered, the File I/O function will allow the filtered list to be exported.
To reset the display list to ‘all’, press on the filter icon, , and then ‘OK’ (without setting any
parameter filters).
4.3.1.7 File I/O
The Work Order List is stored in a SQL database on the tablet. This database may be generatedon-line as work orders are required, but it also may be imported from another source such as anasset management system, or a home grown equipment tracking system. Once the work orderdata exists on the tablet, it will be changed as the equipment is serviced and work orders arecompleted. The modified database may be exported to a PC to update the existing programs onthe PC.
When Exporting files from the Work Order Manager screen, first select whether you wish toexport the changed work orders and equipment files, the complete work order list, the filteredwork order list, or the test reports (via vPad-RM{Record Manager}) that have not previouslybeen copied to an external device or SD card archive. Once selected, touch the Execute button. If you have selected to export the equipment and work order files, you will be presented with theoptions for transfer. If using bluetooth, be sure the PC is paired to the tablet and the correctPaired Device is selected. If you have changed the Paired Device and/or the method of transferand wish this to be the default setting, touch the Save button before Executing the transfer.
See section 4.2.1.7 in the Equipment Manager section for a additional detail on how the File I/Ofunction works.
vPad-EQM OPERATORS MANUAL
Operation/Chapter 4 # Page 36
4.3.2 Equipment List
The Equipment List can be accessed by touching the Equipment List button. The capabilities of theEquipment List are discussed in Section 4.2.1.
4.3.3 Exit vPad-EQM
The Exit vPad-EQM button returns to the Home screen of the Android tablet.
5 Upgrades and Maintenance
Software Applications (Apps) may from time-to-time be upgraded to provide enhanced features orimprovements. Contact Datrend or your local dealer for information on these upgrades.
In some cases, the changes made to an App may be to correct operational issues that have come to theattention of DSI. These shall generally be referred to as maintenance upgrades. In other cases, thechanges may be to improve performance or add features which would enhance the overall functionality ofthe App. The decision to apply a charge to any upgrade shall be solely at the discretion of DSI.
Datrend Systems Inc.130 - 4020 Viking Way
Richmond, BC • CANADA • V6V 2L4Tel 604.291.7747 or 800.667.6557 • Fax 604.294.2355
e-mail [email protected]