Embed Size (px)
DESCRIPTION
mainframe
Citation preview

Installation Guide Release 7.7
CA PDSMAN® PDS Library Management
Second Edition

This documentation, which includes embedded help systems and electronically distributed materials, (hereinafter referred to as the “Documentation”) is for your informational purposes only and is subject to change or withdrawal by CA at any time.
This Documentation may not be copied, transferred, reproduced, disclosed, modified or duplicated, in whole or in part, without the prior written consent of CA. This Documentation is confidential and proprietary information of CA and may not be disclosed by you or used for any purpose other than as may be permitted in (i) a separate agreement between you and CA governing your use of the CA software to which the Documentation relates; or (ii) a separate confidentiality agreement between you and CA.
Notwithstanding the foregoing, if you are a licensed user of the software product(s) addressed in the Documentation, you may print or otherwise make available a reasonable number of copies of the Documentation for internal use by you and your employees in connection with that software, provided that all CA copyright notices and legends are affixed to each reproduced copy.
The right to print or otherwise make available copies of the Documentation is limited to the period during which the applicable license for such software remains in full force and effect. Should the license terminate for any reason, it is your responsibility to certify in writing to CA that all copies and partial copies of the Documentation have been returned to CA or destroyed.
TO THE EXTENT PERMITTED BY APPLICABLE LAW, CA PROVIDES THIS DOCUMENTATION “AS IS” WITHOUT WARRANTY OF ANY KIND, INCLUDING WITHOUT LIMITATION, ANY IMPLIED WARRANTIES OF MERCHANTABILITY, FITNESS FOR A PARTICULAR PURPOSE, OR NONINFRINGEMENT. IN NO EVENT WILL CA BE LIABLE TO YOU OR ANY THIRD PARTY FOR ANY LOSS OR DAMAGE, DIRECT OR INDIRECT, FROM THE USE OF THIS DOCUMENTATION, INCLUDING WITHOUT LIMITATION, LOST PROFITS, LOST INVESTMENT, BUSINESS INTERRUPTION, GOODWILL, OR LOST DATA, EVEN IF CA IS EXPRESSLY ADVISED IN ADVANCE OF THE POSSIBILITY OF SUCH LOSS OR DAMAGE.
The use of any software product referenced in the Documentation is governed by the applicable license agreement and such license agreement is not modified in any way by the terms of this notice.
The manufacturer of this Documentation is CA.
Provided with “Restricted Rights.” Use, duplication or disclosure by the United States Government is subject to the restrictions set forth in FAR Sections 12.212, 52.227-14, and 52.227-19(c)(1) - (2) and DFARS Section 252.227-7014(b)(3), as applicable, or their successors.
Copyright © 2011 CA. All rights reserved. All trademarks, trade names, service marks, and logos referenced herein belong to their respective companies.

CA Technologies Product References
This document references the following CA Technologies products:
■ PDSMAN® PDS Library Management (PDSMAN)
■ CA Panvalet® (CA Panvalet)
■ CA Panexec® (CA Panexec)
■ CA PMO® Runtime Performance Optimizer (CA PMO)
■ CA OPS/MVS® Event Management and Automation (CA OPS/MVS Event Management and Automation)
■ CA Vantage™ Graphical Management Interface ( CA Vantage GMI)
Contact CA Technologies
Contact CA Support
For your convenience, CA Technologies provides one site where you can access the information you need for your Home Office, Small Business, and Enterprise CA Technologies products. At http://ca.com/support, you can access the following:
■ Online and telephone contact information for technical assistance and customer services
■ Information about user communities and forums
■ Product and documentation downloads
■ CA Support policies and guidelines
■ Other helpful resources appropriate for your product
Providing Feedback About Product Documentation
If you have comments or questions about CA Technologies product documentation, you can send a message to [email protected].
If you would like to provide feedback about CA Technologies product documentation, complete our short customer survey, which is available on the CA Support website at http://ca.com/docs.

Contents 5
Contents
Chapter 1: Overview 11
Audience .................................................................................................................................................................... 11
How the Installation Process Works........................................................................................................................... 12
Chapter 2: Preparing for Installation 15
Software Requirements ............................................................................................................................................. 15
CA Common Services Requirements .......................................................................................................................... 15
LMP Key Requirements .............................................................................................................................................. 16
Security Requirements ............................................................................................................................................... 16
Storage Requirements ................................................................................................................................................ 17
Concurrent Releases .................................................................................................................................................. 17
Chapter 3: Installing Your Product Using CA MSM 19
How to Use CA MSM: Scenarios ................................................................................................................................. 19
How to Acquire a Product ................................................................................................................................... 19
How to Install a Product ...................................................................................................................................... 20
How to Maintain Existing Products ..................................................................................................................... 21
How to Deploy a Product .................................................................................................................................... 22
How to Configure a Product ................................................................................................................................ 22
Chapter 4: Installing Your Product from Pax-Enhanced ESD 25
How to Install a Product Using Pax-Enhanced ESD .................................................................................................... 25
How the Pax-Enhanced ESD Download Works ................................................................................................... 27
ESD Product Download Window ......................................................................................................................... 27
USS Environment Setup ...................................................................................................................................... 30
Allocate and Mount a File System .............................................................................................................................. 31
Copy the Product Pax Files into Your USS Directory .................................................................................................. 34
Download Using Batch JCL .................................................................................................................................. 35
Download Files to Mainframe through a PC ....................................................................................................... 38
Create a Product Directory from the Pax File ............................................................................................................ 39
Sample Job to Execute the Pax Command (Unpackage.txt) ............................................................................... 40
Copy Installation Files to z/OS Data Sets .................................................................................................................... 40
Receiving the SMP/E Package .................................................................................................................................... 41
How to Install Products Using Native SMP/E JCL ................................................................................................ 42
Prepare the SMP/E Environment for Pax Installation ......................................................................................... 42

6 Installation Guide
Run the Installation Jobs for a Pax Installation ................................................................................................... 44
Clean Up the USS Directory ........................................................................................................................................ 45
Apply Maintenance .................................................................................................................................................... 46
HOLDDATA .......................................................................................................................................................... 47
Chapter 5: Installing Your Product from Tape 49
Unload the Sample JCL from Tape ............................................................................................................................. 49
How to Install Products Using Native SMP/E JCL ....................................................................................................... 50
Prepare the SMP/E Environment for Tape Installation ....................................................................................... 51
Run the Installation Jobs for a Tape Installation ................................................................................................. 53
Apply Maintenance .................................................................................................................................................... 54
HOLDDATA .......................................................................................................................................................... 55
Chapter 6: Starting Your Product 57
Introduction ............................................................................................................................................................... 58
Understand PDSMAN Configurations ......................................................................................................................... 58
How to Choose a Configuration Method ................................................................................................................... 59
How to Deploy With CA MSM .................................................................................................................................... 59
Tasks If Configuring With CA MSM ............................................................................................................................. 60
Configuration Options Using MSM ..................................................................................................................... 60
Understand Target Settings ................................................................................................................................ 62
Other Resources Created by CA MSM Configuration ......................................................................................... 64
Configure Using CA MSM ........................................................................................................................................... 64
How to Complete Configuration With CA MSM ......................................................................................................... 65
Update LMP Licensing Keys ................................................................................................................................. 65
APF-Authorize the PDSMAN System Linklist Library ........................................................................................... 65
Add the PDSMAN System Linklist Library to the System Linklist ........................................................................ 65
Copy JCL Procedures to PROCLIB ........................................................................................................................ 66
Copy TSO/ISPF CLISTs to SYSPROC ...................................................................................................................... 66
Prepare to Start PDSMAN .......................................................................................................................................... 67
Start PDSMAN ............................................................................................................................................................ 67
Verify PDSMAN Operation ......................................................................................................................................... 68
Post-Installation Considerations ................................................................................................................................ 68
Automatically Start PDSMAN .............................................................................................................................. 68
Database Administration .................................................................................................................................... 68
Review Your ISPF Environment ........................................................................................................................... 68
Enable User Exits (Optional) ................................................................................................................................ 69
Activate PDSMAN Facilities ................................................................................................................................. 69

Contents 7
Chapter 7: Manually Configuring Your Product 71
Introduction ............................................................................................................................................................... 72
Understand PDSMAN Configurations ......................................................................................................................... 73
How to Deploy PDSMAN ............................................................................................................................................ 73
How to Deploy With CA MSM ............................................................................................................................. 73
Prepare to Configure a PDSMAN Runtime Environment ........................................................................................... 74
Member Locations .............................................................................................................................................. 74
Configuration Input Libraries .............................................................................................................................. 74
Allocate the PDSMAN Shared Data Sets..................................................................................................................... 74
Allocate the Cross-System Communications Data Set ........................................................................................ 75
Allocate the PDSMAN Database .......................................................................................................................... 76
Allocate the PDSMAN Runtime Libraries ................................................................................................................... 76
Allocate the PDSMAN System Linklist Library ..................................................................................................... 77
Allocate the Other PDSMAN Runtime Libraries .................................................................................................. 78
Complete the PDSMAN Runtime Environment .......................................................................................................... 78
Copy the Initialization Control Statements ......................................................................................................... 79
Install the Address Space JCL Procedure ............................................................................................................. 79
Copy the Database Server Address Space JCL Procedure ................................................................................... 80
Establish the PDSMAN Database Environment ................................................................................................... 80
Copy TSO/ISPF CLIST to SYSPROC ........................................................................................................................ 81
Prepare to Update an Existing Set of Runtime Libraries ............................................................................................ 81
Back Up the Runtime Libraries ............................................................................................................................ 81
Stop PDSMAN Images ......................................................................................................................................... 82
Verify Library Space............................................................................................................................................. 82
Empty the Runtime Libraries............................................................................................................................... 83
Update the PDSMAN Runtime Libraries ..................................................................................................................... 83
Copy the Updated Software ................................................................................................................................ 83
Refresh Library Look-Aside ................................................................................................................................. 84
How to Complete Configuration ................................................................................................................................ 84
Update LMP Licensing Keys ................................................................................................................................. 84
APF-Authorize the PDSMAN System Linklist Library ........................................................................................... 84
Add the PDSMAN System Linklist Library to the System Linklist ........................................................................ 85
Prepare to Start PDSMAN .......................................................................................................................................... 85
Start PDSMAN ............................................................................................................................................................ 86
Verify PDSMAN Operation ......................................................................................................................................... 86
Post-Installation Considerations ................................................................................................................................ 86
Automatically Start PDSMAN .............................................................................................................................. 86
Database Administration .................................................................................................................................... 87
Review Your ISPF Environment ........................................................................................................................... 87
Enable User Exits (Optional) ................................................................................................................................ 87
Activate PDSMAN Facilities ................................................................................................................................. 87

8 Installation Guide
Appendix A: PDSMAN Configurations 89
Introduction ............................................................................................................................................................... 89
PDSMAN Configuration .............................................................................................................................................. 90
PDSMAN Shared Data Sets ......................................................................................................................................... 91
Cross-System Communications Data Set ............................................................................................................ 92
PDSMAN Database .............................................................................................................................................. 92
Independent Environment Example ................................................................................................................... 93
Typical Shared Environment Example ................................................................................................................. 94
Mixed Shared Environment Example .................................................................................................................. 95
PDSMAN System Linklist Library ................................................................................................................................ 96
PDSMAN System Linklist Library Naming Considerations ................................................................................... 96
PDSMAN System Linklist Library Space Allocation Considerations ..................................................................... 96
PDSMAN System Linklist Library APF-Authorization ........................................................................................... 97
PDSMAN System Linklist Library LNKLST Definition ............................................................................................ 98
PDSMAN Runtime Libraries ........................................................................................................................................ 99
Members Tailored by Configuration ........................................................................................................................ 100
PDSMINIT Rule Member ................................................................................................................................... 100
PDSMAN JCL Procedure .................................................................................................................................... 101
PDSMDB JCL Procedure ..................................................................................................................................... 101
PDSMISPF CLIST ................................................................................................................................................. 102
$DEMO Job Stream ........................................................................................................................................... 102
PDSMAN ISPF Environment ...................................................................................................................................... 103
ISPF LIBDEF Service Method.............................................................................................................................. 104
TSO Logon Procedure Method (Optional) ......................................................................................................... 105
Adding ISPF Menu Options ............................................................................................................................... 106
Invoking PDSMAN ISPF Facilities ....................................................................................................................... 106
Before You Start PDSMAN ........................................................................................................................................ 107
Review Enqueue Conversion Settings ............................................................................................................... 108
Review Compatibility Information .................................................................................................................... 108
Appendix B: CA LMP Licensing Keys 109
PDSMAN Licensing Keys ........................................................................................................................................... 109
CA LMP Key Certificate ...................................................................................................................................... 110
How CA LMP Statements Are Coded ................................................................................................................. 111
KEYS Member—Add Execution Key .................................................................................................................. 112
Appendix C: Verify Your PDSMAN Installation 115
Locate the Demonstration Job Stream JCL ............................................................................................................... 115
Verify Available DASD Space .................................................................................................................................... 115
Verify the Active PDSMAN Environment .................................................................................................................. 116

Contents 9
Tailor the $DEMO Demonstration Job Stream ......................................................................................................... 117
Execute the $DEMO Demonstration Job Stream ..................................................................................................... 117
Appendix D: User Exit Facilities 119
PDSMAN User Exits .................................................................................................................................................. 119
BLDL Interface Exit—PDSM018U.............................................................................................................................. 120
Activating and Reloading the BLDL Interface Exit ............................................................................................. 120
STOW Interface Exit—PDSM021U............................................................................................................................ 122
Activating and Reloading the STOW Interface Exit ........................................................................................... 122
Member Version Exit—PDSMUSR2 .......................................................................................................................... 124
PDSMUSR2 Invoked from PDSM15 ................................................................................................................... 124
PDSMUSR2 Invoked from PDSM28 ................................................................................................................... 124
Activating the Member Version Exit ................................................................................................................. 125
Member Control Information Interface Exit—PDSM12EX ....................................................................................... 126
Activating the Member Control Information Interface Exit .............................................................................. 126
Distributed Sample Exits .......................................................................................................................................... 127
Appendix E: Directory Entry User Data Format Descriptions 129
ISPF Directory Entry Format ..................................................................................................................................... 129
CA SCM for Mainframe Directory Entry Format ....................................................................................................... 131
PDSMAN Load Module Directory Entry Format ....................................................................................................... 132
Appendix F: Using a PDSMAN Test Environment 133
How You Establish the Test Environment ................................................................................................................ 133
Install the Test Initialization Control Statements .............................................................................................. 134
Authorize the STEPLIB Library ........................................................................................................................... 134
Establish Production and Test Image Communication...................................................................................... 134
Install the Address Space JCL Procedure ........................................................................................................... 135
Install the Database Server Address Space JCL Procedure ............................................................................... 135
Make Your ISPF Environment Libraries Available ............................................................................................. 135
Activate and Access the Test Environment .............................................................................................................. 136
Start the Test Environment ............................................................................................................................... 137
Access the Test Environment ............................................................................................................................ 137
Disable the Test Environment ........................................................................................................................... 137
How You Execute the Demonstration Job Stream in the Test Environment ............................................................ 138
Activate the Demonstration Job Stream Initialization Control Statements ...................................................... 138
Execute the $DEMO Demonstration Job Stream .............................................................................................. 139

10 Installation Guide
Index 141

Chapter 1: Overview 11
Chapter 1: Overview
This guide describes how to install and implement PDSMAN.
This section contains the following topics:
Audience (see page 11) How the Installation Process Works (see page 12)
Audience
Readers of this book should have knowledge in the following areas:
■ JCL
■ TSO/ISPF
■ z/OS environment and installing software in this environment
■ VSAM file allocation
■ Your organization's IT environment, enterprise structure, and region structure
You may need to work with the following personnel:
■ Systems programmer for z/OS definitions and system link list library considerations
■ Storage administrator, for DASD allocations
How the Installation Process Works
12 Installation Guide
How the Installation Process Works
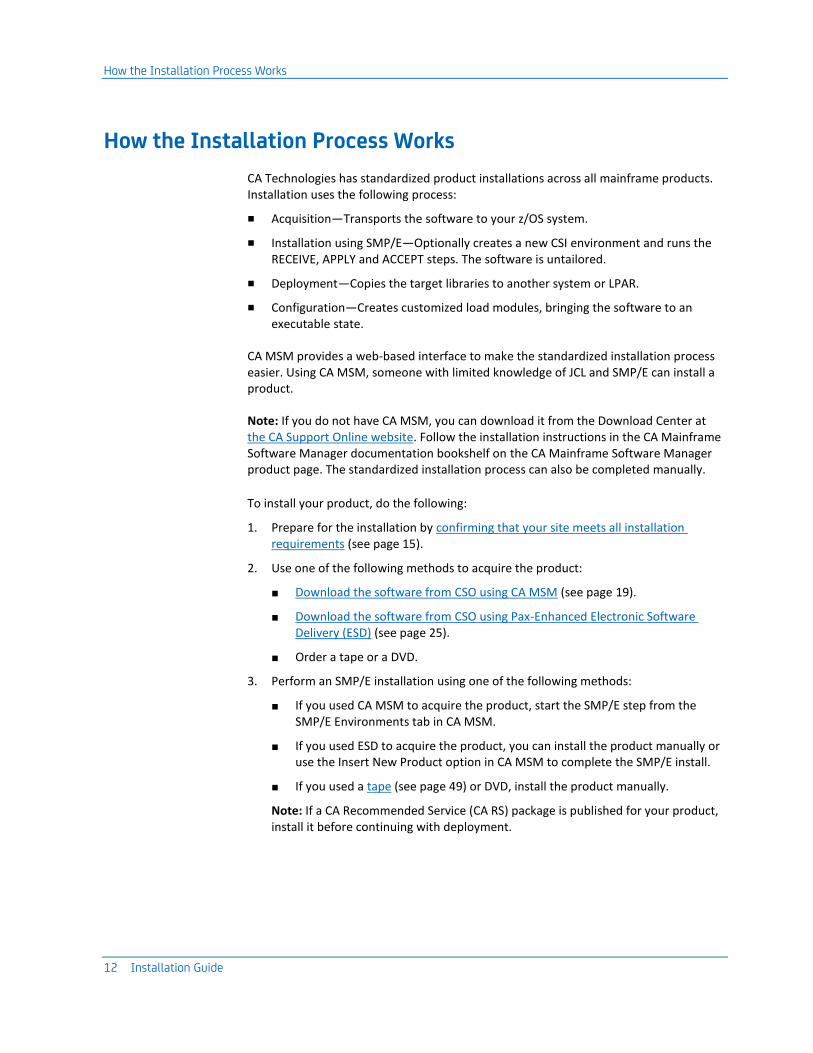
CA Technologies has standardized product installations across all mainframe products. Installation uses the following process:
■ Acquisition—Transports the software to your z/OS system.
■ Installation using SMP/E—Optionally creates a new CSI environment and runs the RECEIVE, APPLY and ACCEPT steps. The software is untailored.
■ Deployment—Copies the target libraries to another system or LPAR.
■ Configuration—Creates customized load modules, bringing the software to an executable state.
CA MSM provides a web-based interface to make the standardized installation process easier. Using CA MSM, someone with limited knowledge of JCL and SMP/E can install a product.
Note: If you do not have CA MSM, you can download it from the Download Center at the CA Support Online website. Follow the installation instructions in the CA Mainframe Software Manager documentation bookshelf on the CA Mainframe Software Manager product page. The standardized installation process can also be completed manually.
To install your product, do the following:
1. Prepare for the installation by confirming that your site meets all installation requirements (see page 15).
2. Use one of the following methods to acquire the product:
■ Download the software from CSO using CA MSM (see page 19).
■ Download the software from CSO using Pax-Enhanced Electronic Software Delivery (ESD) (see page 25).
■ Order a tape or a DVD.
3. Perform an SMP/E installation using one of the following methods:
■ If you used CA MSM to acquire the product, start the SMP/E step from the SMP/E Environments tab in CA MSM.
■ If you used ESD to acquire the product, you can install the product manually or use the Insert New Product option in CA MSM to complete the SMP/E install.
■ If you used a tape (see page 49) or DVD, install the product manually.
Note: If a CA Recommended Service (CA RS) package is published for your product, install it before continuing with deployment.

How the Installation Process Works
Chapter 1: Overview 13
4. Deploy the target libraries using one of the following methods:
■ If you are using CA MSM, deployment is required; it is a prerequisite for configuration.
■ If you are using a manual process, deployment is an optional step.
Note: Deployment is considered part of starting your product.
5. Configure your product using CA MSM or manually.
Note: Configuration is considered part of starting your product.


Chapter 2: Preparing for Installation 15
Chapter 2: Preparing for Installation
This section describes what you need to know and do before you install the product.
This section contains the following topics:
Software Requirements (see page 15) CA Common Services Requirements (see page 15) LMP Key Requirements (see page 16) Security Requirements (see page 16) Storage Requirements (see page 17) Concurrent Releases (see page 17)
Software Requirements
The following software is required for PDSMAN:
■ IBM supported releases of z/OS
■ SMP/E
CA Common Services Requirements
The following CA Common Services are used with PDSMAN:
■ CAIRIM
■ CA LMP
■ CA Health Checker Common Service
Note: If other CA products are installed at your site, some of these services may already be installed.

LMP Key Requirements
16 Installation Guide
LMP Key Requirements
The CA License Management Program (CA LMP) tracks licensed software in a standardized and automated way. It uses common real-time enforcement software to validate the user's configuration. CA LMP reports on activities related to the license, usage, and financials of CA Technologies products.
CA LMP features include the following:
■ Common Key Data Set can be shared among many CPUs.
■ Check digits are used to detect errors in transcribing key information.
■ Execution keys can be entered without affecting any CA Technologies software product already running.
■ No special maintenance is required.
PDSMAN is licensed with an LMP key. You acquire the LMP key with one of the following methods:
■ From your product media
■ With ESD
■ From CA Support
Security Requirements
To complete the tasks in this guide, you need the following security privileges:
■ Read authority for the installation data sets, SMP/E libraries, and PDSMAN runtime environment libraries.
■ Update authority for the SMP/E libraries and PDSMAN runtime environment libraries, including the PDSMAN system link list library.
■ Create authority for all associated data sets as well as the PDSMAN database VSAM KSDS.

Storage Requirements
Chapter 2: Preparing for Installation 17
Storage Requirements
Ensure that you have the following storage available:
If installing with ESD, 7 cylinders for the downloaded files.
For installation and setup:
■ SMP/E Installation = 50 cylinders
■ SMP/E temporary libraries = 25 cylinders
■ Runtime libraries = 50 cylinders
■ Global shared data sets = 55 cylinders
Concurrent Releases
You can install this release of PDSMAN and continue to use an older release for your production environment. If you plan to continue to run a previous release, consider the following points:
■ When installing into an existing SMP/E environment, this installation deletes previous releases.
■ If you acquired your product from tape or with Pax-Enhanced ESD, select different target and distribution zones for your new release from where your current release is installed. The new zones use different libraries than your current release.
Note: CA MSM installs into a new CSI by default.
■ Define DDDEF entries in your new zones to point SMP/E to the proper libraries for installation. Ensure that they point to the new release libraries.
You may also execute more than one release or level of PDSMAN on a given operating system image. This allows you to test a new product release or maintenance even if you do not have access to a separate test system. To execute concurrent releases of the product, see the appendix Using a PDSMAN Test Environment (see page 133).


Chapter 3: Installing Your Product Using CA MSM 19
Chapter 3: Installing Your Product Using CA MSM
How to Use CA MSM: Scenarios
Imagine that your organization has started using CA MSM to simplify the installation of CA Technologies products and unify their management. You have also licensed a new CA Technologies product. In addition, you have a number of existing CSIs from previously installed CA Technologies products.
You can use the following scenarios to guide you through the process:
1. Acquire the new product (see page 19).
2. Install the new product (see page 20).
3. Maintain products already installed in your environment (see page 21).
4. Deploy the product to your target systems (see page 22).
5. Configure the deployed product to your target systems (see page 22).
How to Acquire a Product
The Product Acquisition Service (PAS) facilitates the acquisition of mainframe products and the service for those products, such as program temporary fixes (PTFs). The PAS retrieves information about products to which your site is entitled and records these entitlements in a software inventory maintained on your driving system.
You can use the PAS component of CA MSM to acquire a CA Technologies product.
Follow these steps:
1. Set up a CA Support Online account.
To use CA MSM to acquire or download a product, you must have a CA Support Online account. If you do not have an account, you can create one on the CA Support Online website.
2. Determine the CA MSM URL for your site.
To access CA MSM, you require its URL. You can get the URL from your site's CA MSM administrator and log in using your z/OS credentials. When you log in for the first time, you are prompted to create a CA MSM account with your credentials for the CA Support Online website. This account enables you to download product packages.

How to Use CA MSM: Scenarios
20 Installation Guide
3. Log in to CA MSM and go to the Software Catalog page to locate the product that you want to manage.
After you log in to CA MSM, you can see the products to which your organization is entitled on the Software Catalog tab.
If you cannot find the product you want to acquire, update the catalog. CA MSM refreshes the catalog through the CA Support Online website using the site IDs associated with your credentials for the CA Support Online website.
4. Download the product installation packages.
After you find your product in the catalog, you can download the product installation packages.
CA MSM downloads (acquires) the packages (including any maintenance packages) from the CA FTP site.
After the acquisition process completes, the product is ready for you to install or maintain.
How to Install a Product
The Software Installation Service (SIS) facilitates the installation and maintenance of mainframe products in the software inventory of the driving system. This facilitation includes browsing downloaded software packages, managing SMP/E consolidated software inventories (CSIs) on the driving system, and automating installation tasks.
You can use the SIS component of CA MSM to install a CA Technologies product.
Follow these steps:
1. Initiate product installation and review product information.
2. Select an installation type.
3. Review installation prerequisites if any are presented.
4. Do one of the following to select a CSI:
■ Create a CSI:
a. Set up the global zone.
b. Create a target zone.
c. Create a distribution zone.

How to Use CA MSM: Scenarios
Chapter 3: Installing Your Product Using CA MSM 21
■ Use an existing CSI from your working set:
a. Update the global zone.
b. Set up the target zone: Either create a target zone or use an existing target zone.
c. Set up the distribution zone: Either create a distribution zone or use an existing distribution zone.
Note: If you install a product or its components into an existing target or distribution zone, older versions are deleted from the zone and associated data sets. We recommend that you use new target and distribution zones for this installation so that you can apply maintenance to your current release, if necessary.
5. Review the installation summary and start the installation.
After the installation process completes, the product is ready for you to deploy. You may have to perform other steps manually outside of CA MSM before beginning the deployment process.
How to Maintain Existing Products
If you have existing CSIs, you can bring those CSIs into CA MSM so that you can maintain all your installed products in a unified way from a single web-based interface.
You can use the PAS and SIS to maintain a CA Technologies product.
Follow these steps:
1. Migrate the CSI to CA MSM to maintain an existing CSI in CA MSM.
During the migration, CA MSM stores information about the CSI in the database.
2. Download the latest maintenance for the installed product releases from the Software Catalog tab.
If you cannot find a release (for example, because the release is old), you can add the release to the catalog manually and then update the release to download the maintenance.
3. Apply the maintenance.
Note: You can also install maintenance to a particular CSI from the SMP/E Environments tab.
After the maintenance process completes, the product is ready for you to deploy. You may have to perform other steps manually outside of CA MSM before beginning the deployment process.

How to Use CA MSM: Scenarios
22 Installation Guide
How to Deploy a Product
The Software Deployment Service (SDS) facilitates the deployment of mainframe products from the software inventory of the driving system to the target system. This facilitation includes deploying installed products that are policy driven with a set of appropriate transport mechanisms across a known topology.
You can use the SDS component of CA MSM to deploy a CA Technologies product that you have already acquired and installed.
Follow these steps:
1. Set up the system registry:
a. Determine the systems you have at your enterprise.
b. Set up remote credentials for those systems.
c. Set up the target systems (Non-Sysplex, Sysplex or Monoplex, Shared DASD Cluster, and Staging), and validate them.
d. Add network information, including data destination information, to each system registry entry.
2. Set up methodologies.
3. Create the deployment, which includes completing each step in the New Deployment wizard.
After creating the deployment, you can save it and change it later by adding and editing systems, products, custom data sets, and methodologies, or you can deploy directly from the wizard.
Note: If you must deploy other products to the previously defined systems using the same methodologies, you must create a separate deployment.
4. Deploy the product, which includes taking a snapshot, transmitting to target, and deploying (unpacking) to your mainframe environment.
After the deployment process completes, the product is ready for you to configure. You may have to perform other steps manually outside of CA MSM before beginning the configuration process.
How to Configure a Product
The Software Configuration Service (SCS) facilitates the configuration of your mainframe products from the software inventory of the driving system to targeted z/OS operating systems.
You can use the SCS component of CA MSM to configure a CA Technologies product that you have already acquired, installed, and deployed.

How to Use CA MSM: Scenarios
Chapter 3: Installing Your Product Using CA MSM 23
Follow these steps:
1. Select a deployed product to configure from the Deployments tab to open the Create Configuration wizard.
2. Create the configuration, which includes completing each step in the Create Configuration wizard, including the following:
a. Define a configuration name and select a target system.
b. Select configuration functions and options.
c. Define system preferences.
d. Create target settings.
e. Select and edit resources.
3. Build the configuration. The last step of the Create Configuration wizard lets you build the configuration.
4. Implement the configuration. The implementation process in CA MSM is a step-by-step process that carefully guides you and provides detailed instructions to start, stop, and manage the steps of the implementation process.
After the configuration process completes, the product is ready for you to use. You may have to perform other steps manually outside of CA MSM.
Note: You cannot use CA MSM to configure a product to a Staging System.


Chapter 4: Installing Your Product from Pax-Enhanced ESD 25
Chapter 4: Installing Your Product from Pax-Enhanced ESD
This section contains the following topics:
How to Install a Product Using Pax-Enhanced ESD (see page 25) Allocate and Mount a File System (see page 31) Copy the Product Pax Files into Your USS Directory (see page 34) Create a Product Directory from the Pax File (see page 39) Copy Installation Files to z/OS Data Sets (see page 40) Receiving the SMP/E Package (see page 41) Clean Up the USS Directory (see page 45) Apply Maintenance (see page 46)
How to Install a Product Using Pax-Enhanced ESD
This section describes the Pax-Enhanced ESD process. We recommend that you read this overview and follow the entire procedure the first time you complete a Pax-Enhanced ESD installation. For experienced UNIX users, the Pax-Enhanced ESD Quick Reference Guide has sufficient information for subsequent installations.
Important! Downloading pax files for the SMP/E installation as part of the Pax-Enhanced ESD process requires write authority to the UNIX System Services (USS) directories used for the ESD process.
If you prefer not to involve all CA Technologies product installers with z/OS UNIX System Services, assign a group familiar with USS to perform Steps 1 through 4 and provide the list of the unpacked MVS data sets to the product installer. USS is not required for the actual SMP/E RECEIVE of the product or for any of the remaining installation steps.
To install files using Pax-Enhanced ESD, use the following process:
1. Allocate and mount the file system. This process requires a USS directory to receive the pax file and to perform the unpack steps. We recommend that you allocate and mount a file system dedicated to Pax-Enhanced ESD and create the directory in this file system. Ensure that all users who will be working with pax files have write authority to the directory.

How to Install a Product Using Pax-Enhanced ESD
26 Installation Guide
2. Copy the product pax files into your USS directory. To download files, choose one of the following options:
■ Download a zip file from CA Support Online to your PC, unzip the file, and then upload the product pax files to your USS file system.
■ FTP the pax files from CA Support Online directly to your USS directory.
Note: Perform Steps 3 through 6 for each pax file that you upload to your USS directory.
3. Create a product directory from the pax file. Set the current working directory to the directory containing the pax file, and create a new directory in your USS directory by entering the following command:
pax -rvf pax-filename
4. Use the SMP/E GIMUNZIP utility to create z/OS installation data sets. The file UNZIPJCL in the directory created by the pax command in Step 3 contains a sample job to GIMUNZIP the installation package. Edit and submit the UNZIPJCL job.
5. Receive the SMP/E package. For this step, use the data sets created by GIMUNZIP in Step 4. Perform a standard SMP/E RECEIVE using the SMPPTFIN and SMPHOLD (if applicable) DASD data sets. Also, specify the high-level qualifier for the RELFILEs on the RFPREFIX parameter of the RECEIVE command.
6. Proceed with product installation. Consult product-specific documentation, including AREADME files and installation notes to complete the product installation.
7. (Optional) Clean up the USS directory. Delete the pax file, the directory created by the pax command, all of the files in it, and the SMP/E RELFILEs, SMPMCS, and HOLDDATA data sets.
More Information:
USS Environment Setup (see page 30) Allocate and Mount a File System (see page 31) Copy the Product Pax Files into Your USS Directory (see page 34) Create a Product Directory from the Pax File (see page 39) Copy Installation Files to z/OS Data Sets (see page 40)

How to Install a Product Using Pax-Enhanced ESD
Chapter 4: Installing Your Product from Pax-Enhanced ESD 27
How the Pax-Enhanced ESD Download Works
Important! To download pax files for the SMP/E installation as part of the Pax-Enhanced ESD process, you must have write authority to the UNIX System Services (USS) directories used for the ESD process and available USS file space before you start the procedures in this guide.
Use the following process to download files using Pax-Enhanced ESD:
1. Log in to https://support.ca.com/, and click Download Center.
The CA Support Online web page appears.
2. Under Download Center, select Products from the first drop-down list, and specify the product, release, and genlevel (if applicable), and click Go.
The CA Product Download window appears.
3. Download an entire CA Technologies product software package or individual pax files to your PC or mainframe. If you download a zip file, you must unzip it before continuing.
For both options, The ESD Product Download Window (see page 27) topic explains how the download interface works.
Note: For traditional installation downloads, see the Traditional ESD User Guide. Go to https://support.ca.com/, log in, and click Download Center. A link to the guide appears under the Download Help heading.
4. Perform the steps to install the product based on the product-specific steps.
The product is installed on the mainframe.
ESD Product Download Window
CA Technologies product ESD packages can be downloaded multiple ways. Your choices depend on the size of the individual files and the number of files you want to download. You can download the complete product with all components or you can select individual pax and documentation files for your product or component.

How to Install a Product Using Pax-Enhanced ESD
28 Installation Guide
The following illustration shows sample product files. It lists all components of the product. You can use the Download Cart by checking one or more components that you need or check the box for Add All to cart. If you prefer to immediately download a component, click the Download link.
Clicking the link for an individual component takes you to the Download Method page.
How to Install a Product Using Pax-Enhanced ESD
Chapter 4: Installing Your Product from Pax-Enhanced ESD 29
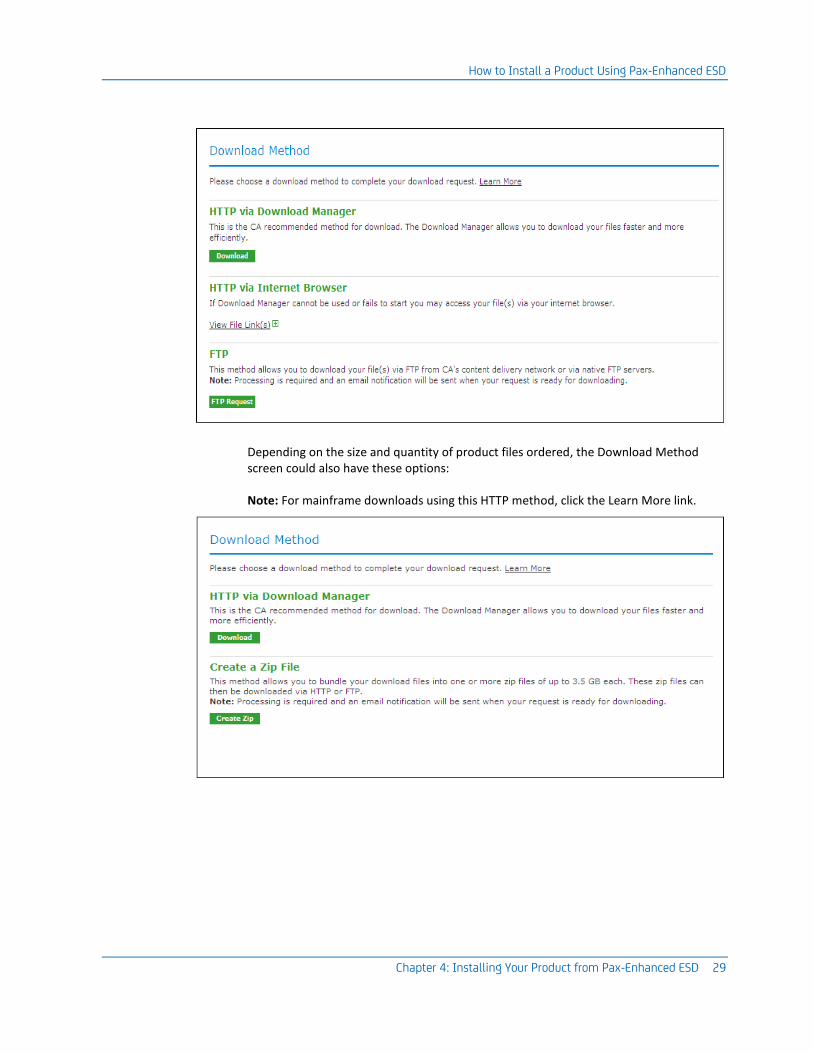
Depending on the size and quantity of product files ordered, the Download Method screen could also have these options:
Note: For mainframe downloads using this HTTP method, click the Learn More link.

How to Install a Product Using Pax-Enhanced ESD
30 Installation Guide
The HTTP method lets you start downloading immediately. The FTP method takes you to the Review Orders page that displays your order, first in a Pending status changing to Ready when your order has been processed.
Preferred FTP uses the new content delivery network (CDN). Alternate FTP uses the CA Technologies New York-based FTP servers.
The Create a Zip File option first creates the zip, and when ready, offers the options shown by the Zip Download Request examples in the next screen.
USS Environment Setup
You need a UNIX System Services (USS) directory and a file system with adequate space to perform the following tasks:
■ Receive product pax files from CA Support Online.
■ Perform utility functions to unpack the pax file into MVS data sets that you can use to complete the product installation.

Allocate and Mount a File System
Chapter 4: Installing Your Product from Pax-Enhanced ESD 31
We recommend that you allocate and mount a file system dedicated to Pax-Enhanced ESD. The amount of space that you need for the file system depends on the following variables:
■ The size of the pax files that you intend to download.
■ Whether you plan to keep the pax files after unpacking them. We do not recommend this practice.
We recommend that you use one directory for downloading and unpacking pax files. Reusing the same directory minimizes USS setup. You need to complete the USS setup only one time. You reuse the same directory for subsequent downloads. Alternatively, you can create a new directory for each pax download.
Important! Downloading pax files for the SMP/E installation as part of the Pax-Enhanced ESD process requires write authority to the UNIX System Services (USS) directories used for the ESD process. In the file system that contains the ESD directories, you also need free space approximately 3.5 times the pax file size to download the pax file and unpack its contents. For example, to download and unpack a 14 MB pax file, you need approximately 49 MB of free space in the file system hosting your ESD directory.
Allocate and Mount a File System
You can use the zSeries File System (zFS) or hierarchical file system (HFS) for ESD downloads.
This procedure describes how to perform the following tasks:
■ Allocate a zFS or an HFS.
■ Create a mount point in an existing maintenance USS directory of your choice.
■ Mount the file system on the newly created mount point.
Note: You must have SUPERUSER authority to do this.
■ Optionally, permit write access to anyone in the same group as the person who created the directory.
Important! USS commands are case-sensitive.

Allocate and Mount a File System
32 Installation Guide
Follow these steps:
1. Allocate the file system by customizing one of the following samples to your site's requirements:
■ On a zFS, use the following sample:
//DEFINE EXEC PGM=IDCAMS
//SYSPRINT DD SYSOUT=*
//SYSUDUMP DD SYSOUT=*
//AMSDUMP DD SYSOUT=*
//SYSIN DD *
DEFINE CLUSTER ( +
NAME(your_zFS_dataset_name) +
STORAGECLASS(class) +
LINEAR +
CYL(primary secondary) +
SHAREOPTIONS(3,3) +
)
/*
//FORMAT EXEC PGM=IOEAGFMT,REGION=0M,
// PARM=('-aggregate your_zFS_dataset_name -compat')
//SYSPRINT DD SYSOUT=*
//SYSUDUMP DD SYSOUT=*
//STDOUT DD SYSOUT=*
//STDERR DD SYSOUT=*
//CEEDUMP DD SYSOUT=*
//*
■ On an HFS, use the following sample:
//ALCHFS EXEC PGM=IEFBR14
//CAESD DD DSN=yourHFS_dataset_name,
// DISP=(NEW,CATLG,DELETE),UNIT=3390,
// DSNTYPE=HFS,SPACE=(CYL,(primary,secondary,1))
The file system is allocated.
Note: Ensure that the zFS or HFS data set name that you use conforms to your data set naming conventions for USS file systems. If the allocation of the file system data set fails, it is because of environmental settings not allowing for the allocation. On an HFS, try using the ISPF 3.2 Data Set Utility to allocate your HFS data set.

Allocate and Mount a File System
Chapter 4: Installing Your Product from Pax-Enhanced ESD 33
2. Create a mount point for the file system. This example shows how to create a /CA/CAESD directory in an existing directory, /u/maint. From the TSO OMVS shell, enter the following commands:
cd /u/maint/
mkdir CA
cd CA
mkdir CAESD
Note: This document refers to this structure as yourUSSESDdirectory.
The mount point is created.
3. Mount the file system by customizing one of the following samples to your site's requirements:
■ On a zFS, use the following sample:
MOUNT FILESYSTEM('your_zFS_dataset_name')
MOUNTPOINT('yourUSSESDdirectory')
TYPE(ZFS) MODE(RDWR)
PARM(AGGRGROW)
■ On an HFS, use the following sample:
MOUNT FILESYSTEM('your_HFS_dataset_name')
MOUNTPOINT('yourUSSESDdirectory')
TYPE(HFS) MODE(RDWR)
The file system is mounted.
4. (Optional) Set security permissions for the directory. You can use the chmod command to let other users access the ESD directory and its files. For example, to allow write access to the ESD directory for other users in your USS group, from the TSO OMVS shell, enter the following command:
chmod -R 775 /yourUSSESDdirectory/
Write access is granted.
Note: For more information about the chmod command, see the IBM z/OS UNIX System Services User Guide (SA22-7802).

Copy the Product Pax Files into Your USS Directory
34 Installation Guide
Copy the Product Pax Files into Your USS Directory
To begin the CA Technologies product installation procedure, copy the product's pax file into the USS directory you set up. Use one of the following methods:
■ Download the product pax files directly from the CA Support Online FTP server to your z/OS system.
■ Download the product pax file from the CA Support Online FTP server to your PC, and upload it to your z/OS system.
■ Download the product file from CA Support Online to your PC. If your download included a zip file, unzip the file, and upload the unzipped pax files to your z/OS system.
This section includes a sample batch job to download a product pax file from the CA Support Online FTP server directly to a USS directory on your z/OS system and sample commands to upload a pax file from your PC to a USS directory on your z/OS system.
Important! The FTP procedures vary due to local firewall and other security settings. Consult your local network administrators to determine the appropriate FTP procedure to use at your site.
Ensure that sufficient free space is available in the USS file system you are using for Pax-Enhanced ESD to hold the product pax file. If you do not have sufficient free space, error messages similar to the following appear:
EZA1490I Error writing to data set
EZA2606W File I/O error 133
When the download finishes, the pax file size in your USS directory matches the value in the Size column for the corresponding pax file on the CA Technologies Products Download window.
More Information:
How the Pax-Enhanced ESD Download Works (see page 27) ESD Product Download Window (see page 27)
Copy the Product Pax Files into Your USS Directory
Chapter 4: Installing Your Product from Pax-Enhanced ESD 35
Download Using Batch JCL
Use this process to download a pax file from the CA Support Product Downloads window by running batch JCL on the mainframe. Use the sample JCL attached to the PDF file as CAtoMainframe.txt to perform the download.
Important! To simplify the Pax-Enhanced ESD process, the PDF version of this guide includes a sample JCL job that you can copy directly to the mainframe. To access this job, click the paper clip icon at the left of the PDF reader. A window displaying attachments opens. Double-click the file to view the sample JCL.
Note: We recommend that you follow the preferred method as described on CA Support Online. This procedure is our preferred download method; however, we do include the procedure to download to the mainframe through a PC in the next section.
Follow these steps:
1. Supply a valid JOB statement.
2. Replace yourTCPIP.PROFILE.dataset with the name of the TCP/IP profile data set for your system. Consult your local network administrators, if necessary.
The job points to your profile.
3. Replace YourEmailAddress with your email address.
The job points to your email address.
4. Replace yourUSSESDdirectory with the name of the USS directory that you use for ESD downloads.
The job points to your USS directory.
5. Locate the product component to download on the CA Support Product Download window.
You have identified the product component to download.
6. Click Download for the applicable file.
Note: For multiple downloads, add files to a cart.
The Download Method window opens.
7. Click FTP Request.
The Review Download Requests window displays any files that you have requested to download.
Note: We send you an email when the file is ready to download or a link appears in this window when the file is available.

Copy the Product Pax Files into Your USS Directory
36 Installation Guide
8. Select one of the following methods:
Preferred FTP
Uses CA Technologies worldwide content delivery network (CDN). If you cannot download using this method, review the security restrictions for servers that company employees can download from that are outside your corporate network.
Host Name: ftp://ftpdownloads.ca.com
Alternate FTP
Uses the original download servers that are based on Long Island, New York.
Host Name: ftp://scftpd.ca.com for product files and download cart files and ftp://ftp.ca.com for individual solution files.
Both methods display the host, user name, password, and FTP location, which you then can copy into the sample JCL.
Note: The following links provide details regarding FTP: the FTP Help document link in the Review Download Requests window and the Learn More link available in the Download Methods window.
9. Submit the job.
Important! If your FTP commands are incorrect, it is possible for this job to fail and still return a zero condition code. Read the messages in the job DDNAME SYSPRINT to verify the FTP succeeded.
After you run the JCL job, the pax file resides in the mainframe USS directory that you supplied.

Copy the Product Pax Files into Your USS Directory
Chapter 4: Installing Your Product from Pax-Enhanced ESD 37
Example: CAtoMainframe.txt, JCL
The following text appears in the attached CAtoMainframe.txt JCL file:
//GETPAX JOB (ACCOUNTNO),'FTP GET ESD PACKAGE',
// MSGCLASS=X,CLASS=A,NOTIFY=&SYSUID
//*********************************************************************
//* This sample job can be used to download a pax file directly from *
//* CA Support Online to a USS directory on your z/OS system. *
//* *
//* When editing the JCL ensure that you do not have sequence numbers *
//* turned on. *
//* *
//* This job must be customized as follows: *
//* 1. Supply a valid JOB statement. *
//* 2. The SYSTCPD and SYSFTPD JCL DD’s statements in this JCL maybe *
//* optional at your site. Remove the statements that are not *
//* required. For the required statements, update the data set *
//* names with the correct site specific data set names. *
//* 3. Replace "Host" based on the type of download method. *
//* 4. Replace "YourEmailAddress" with your email address. *
//* 5. Replace "yourUSSESDdirectory" with the name of the USS *
//* directory used on your system for ESD downloads. *
//* 6. Replace "FTP Location" with the complete path *
//* and name of the pax file obtained from the FTP location *
//* of the product download page. *
//*********************************************************************
//GETPAX EXEC PGM=FTP,PARM='(EXIT',REGION=0M
//SYSTCPD DD DSN=yourTCPIP.PROFILE.dataset,DISP=SHR
//SYSFTPD DD DSN=yourFTP.DATA.dataset,DISP=SHR
//SYSPRINT DD SYSOUT=*
//OUTPUT DD SYSOUT=*
//INPUT DD *
Host
anonymous YourEmailAddress
lcd yourUSSESDdirectory
binary
get FTP location
quit

Copy the Product Pax Files into Your USS Directory
38 Installation Guide
Download Files to Mainframe through a PC
If you download pax or zip files from CA Support Online to your PC, use this procedure to upload the pax file from your PC to your z/OS USS directory.
Follow these steps:
1. Follow the procedures in How the Pax-Enhanced ESD Download Works to download the product pax or zip file to your PC. If you download a zip file, first unzip the file to use the product pax files.
The pax or zip file resides on your PC.
2. Open a Windows command prompt.
The command prompt appears.
3. Customize and enter the FTP commands with the following changes:
a. Replace mainframe with the z/OS system's IP address or DNS name.
b. Replace userid with your z/OS user ID.
c. Replace password with your z/OS password.
d. Replace C:\PC\folder\for\thePAXfile with the location of the pax file on your PC.
e. Replace yourUSSESDdirectory with the name of the USS directory that you use for ESD downloads.
f. Replace paxfile.pax.Z with the name of the pax file to upload.
The pax file is transferred to the mainframe.
Example: FTP Commands
This list is a sample of FTP commands to upload the pax file from your PC to your USS Pax-Enhanced ESD directory:
ftp mainframe
userid
password
bin
lcd C:\PC\folder\for\thePAXfile
cd /yourUSSESDdirectory/
put paxfile.pax.Z
quit
exit

Create a Product Directory from the Pax File
Chapter 4: Installing Your Product from Pax-Enhanced ESD 39
Create a Product Directory from the Pax File
Use the sample job attached to the PDF file as Unpackage.txt to extract the product pax file into a product installation directory.
Important! To simplify the Pax-Enhanced ESD process, the PDF version of this guide includes a sample JCL job that you can copy directly to the mainframe. To access this job, click the paper clip icon at the left of the PDF reader. A window displaying attachments opens. Double-click the file to view the sample JCL.
Follow these steps:
1. Supply a valid JOB statement.
2. Replace yourUSSESDdirectory with the name of the USS directory that you use for ESD downloads.
The job points to your specific directory.
3. Replace paxfile.pax.Z with the name of the pax file.
The job points to your specific pax file.
4. Submit the job.
The job runs and creates the product directory.
Note: If the PARM= statement exceeds 71 characters, uncomment and use the second form of UNPAXDIR instead. This sample job uses an X in column 72 to continue the PARM= parameters to a second line.

Copy Installation Files to z/OS Data Sets
40 Installation Guide
Sample Job to Execute the Pax Command (Unpackage.txt)
The following text appears in the attached Unpackage.txt JCL file:
//ESDUNPAX JOB (ACCOUNTNO),'UNPAX ESD PACKAGE ',
// MSGCLASS=X,CLASS=A,NOTIFY=&SYSUID
//*********************************************************************
//* This sample job can be used to invoke the pax command to create *
//* the product-specific installation directory. *
//* *
//* This job must be customized as follows: *
//* 1. Supply a valid JOB statement. *
//* 2. Replace "yourUSSESDdirectory" with the name of the USS *
//* directory used on your system for ESD downloads. *
//* 3. Replace "paxfile.pax.Z" with the name of the pax file. *
//* NOTE: If you continue the PARM= statement on a second line, make *
//* sure the 'X' continuation character is in column 72. *
//*********************************************************************
//UNPAXDIR EXEC PGM=BPXBATCH,
// PARM='sh cd /yourUSSESDdirectory/; pax -rvf paxfile.pax.Z'
//*UNPAXDIR EXEC PGM=BPXBATCH,
//* PARM='sh cd /yourUSSESDdirectory/; pax X
//* -rvf paxfile.pax.Z'
//STDOUT DD SYSOUT=*
//STDERR DD SYSOUT=*
Copy Installation Files to z/OS Data Sets
Use this procedure to invoke the SMP/E GIMUNZIP utility to create MVS data sets from the files in the product-specific directory.
Follow these steps:
1. Locate and read the product readme file or installation notes, if applicable, which resides in the product-specific directory that the pax command created. This file contains the product-specific details you require to complete the installation procedure.
You have identified the product-specific installation details.
2. Use ISPF EDIT or TSO ISHELL to edit the UNZIPJCL sample job. You can perform this step in one of the following ways:
■ Use ISPF EDIT. Specify the full path name of the UNZIPJCL file.
■ Use TSO ISHELL. Navigate to the UNZIPJCL file and use the E line command to edit the file.
The job is edited.

Receiving the SMP/E Package
Chapter 4: Installing Your Product from Pax-Enhanced ESD 41
3. Change the SMPDIR DD PATH to the product-specific directory created by the pax command.
Your view is of the product-specific directory.
4. If ICSF is not active, perform the following steps:
a. Change the SMPJHOME DD PATH to your Java runtime directory. This directory varies from system to system.
b. Perform one of the following steps:
■ Change the SMPCPATH DD PATH to your SMP/E Java application classes directory, typically /usr/lpp/smp/classes/.
■ Change HASH=YES to HASH=NO on the GIMUNZIP parameter.
One of the following occurs: ICSF is active or you are using Java.
5. Change all occurrences of YourHLQ to the high-level qualifier (HLQ) for z/OS data sets used by the installation process. We suggest that you use a unique HLQ for each expanded pax file to identify uniquely the package. Do not use the same value for YourHLQ as you use for the SMP/E RELFILEs.
All occurrences of YourHLQ are set to your high-level qualifier for z/OS data sets.
6. Submit the UNZIPJCL job.
The UNZIPJCL job completes with a zero return code. Messages GIM69158I and GIM48101I in the output and IKJ56228I in the JES log are acceptable.
GIMUNZIP creates z/OS data sets with the high-level qualifier you specified in the UNZIPJCL job. You use these data sets to perform the product installation. The pax file and product-specific directory are no longer needed.
Note: For more information, see the IBM reference guide, SMP/E for z/OS Reference (SA22-7772).
Receiving the SMP/E Package
If you are installing the package into a new SMP/E environment, use the sample jobs included with the product to set up an SMP/E environment before proceeding.
At this point, complete the SMP/E RECEIVE using files on DASD that the UNZIPJCL job created. Consult the product sample JCL library that contains a sample job customized to receive the product from DASD. Specifically, you must specify the following values:
■ DASD data set names for SMPPTFIN and SMPHOLD (if applicable)
■ The HLQ that you used in the UNZIPJCL job on the RFPREFIX parameter on the RECEIVE command

Receiving the SMP/E Package
42 Installation Guide
How to Install Products Using Native SMP/E JCL
The following steps describe the process to install products using native SMP/E JCL:
1. Allocate product data sets and SMP/E data sets.
2. Create SMP/E CSI.
3. Receive base functions.
4. Apply base functions.
5. Accept base functions.
6. Configure the product according to your site requirements.
Prepare the SMP/E Environment for Pax Installation
The members used in this procedure prepare the data sets, initialize the zones, and create the DDDEFs for PDSMAN.
Prior to beginning this procedure, confirm whether your product uses UNIX System Services (USS). If it does, establishing a hierarchical file system (HFS) may be required as part of the product installation or required as a feature of the product.
For information about the members, see the comments in the JCL.
Follow these steps:
1. Customize the macro PDSSEDIT with your site-specific information and then copy the macro to your SYSPROC location. Replace the rightmost parameters for each ISREDIT CHANGE command. Each time you edit an installation member, type PDSSEDIT on the command line, and press Enter to replace the defaults with your specifications.
The macro is ready to customize the yourHLQ.SAMPJCL members.
Note: Set the DASD HLQ to the same value specified for yourHLQ for the unzip to DASD ESD JCL.
Note: The following steps include instructions to execute the PDSSEDIT macro each time you open a new SAMPJCL member. To edit all SAMPJCL members simultaneously, read and follow the instructions in the PDSEDALL member.
2. Open the SAMPJCL member PDS1ALL in an edit session and execute the PDSSEDIT macro from the command line.
PDS1ALL is customized.
Receiving the SMP/E Package
Chapter 4: Installing Your Product from Pax-Enhanced ESD 43
3. Submit PDS1ALL.
This job produces the following results:
■ The target and distribution data sets for PDSMAN are created.
■ Unique SMPLTS, SMPMTS, SMPSCDS, and SMPSTS data sets for this target zone are created.
4. If your product requires HFS or if you want to install a feature of the product that requires HFS, complete the following substeps:
a. Open the SAMPJCL member ccc1ALLU in an edit session and execute the PDSSEDIT macro from the command line.
Note: All instances of ccc in this section indicate a three-character component code based on the FMID.
ccc1ALLU is customized.
b. Submit ccc1ALLU.
This job allocates your HFS data sets.
c. Open the SAMPJCL member ccc2MKD in an edit session and execute the PDSSEDIT macro from the command line.
ccc2MKD is customized.
d. Submit ccc2MKD.
This job creates all directories and mounts the file system.
5. Open the SAMPJCL member PDS2CSI in an edit session and execute the PDSSEDIT macro from the command line.
PDS2CSI is customized.
6. Submit PDS2CSI.
This job produces the following results:
■ The CSI data set is defined.
■ The SMPPTS and SMPLOG data sets are allocated.
■ The global, target, and distribution zones are initialized.
■ The DDDEF entries for your product are created.
■ The DDDEFs for the required SMP/E data sets are created.

Receiving the SMP/E Package
44 Installation Guide
7. If your product requires HFS or if you want to install a feature of the product that requires HFS, complete the following substeps:
a. Open the SAMPJCL member ccc3CSIU in an edit session and execute the PDSSEDIT macro from the command line.
ccc3CSIU is customized.
b. Submit ccc3CSIU.
This job customizes the CSI by adding the DDDEFs associated with the directory.
Run the Installation Jobs for a Pax Installation
Submit and run these yourhlq.SAMPJCL members in sequence. Do not proceed with any job until the previous job has completed successfully.
Follow these steps:
1. Open the SAMPJCL member PDS3RECD in an edit session and execute the PDSSEDIT macro from the command line.
PDS3RECD is customized.
2. Submit the yourhlq.SAMPJCL member PDS3RECD to receive SMP/E base functions.
PDSMAN is received and now resides in the global zone.
3. Open the SAMPJCL member PDS4APP in an edit session and execute the PDSSEDIT macro from the command line.
PDS4APP is customized.
4. Submit the yourhlq.SAMPJCL member PDS4APP to apply SMP/E base functions.
Your product is applied and now resides in the target libraries.
5. Open the SAMPJCL member PDS5ACC in an edit session and execute the PDSSEDIT macro from the command line.
PDS5ACC is customized.
6. Submit the yourhlq.SAMPJCL member PDS5ACC to accept SMP/E base functions.
Your product is accepted and now resides in the distribution libraries.

Clean Up the USS Directory
Chapter 4: Installing Your Product from Pax-Enhanced ESD 45
Clean Up the USS Directory
Important! This procedure is optional. Do not use this procedure until you complete the entire installation process.
To free file system disk space for subsequent downloads after downloading and processing the pax files for your CA Technologies product, we recommend removing the files from your USS directory and deleting unnecessary MVS data sets. You can delete the following items:
■ Pax file
■ Product-specific directory created by the pax command and all of the files in it
■ SMP/E RELFILEs, SMPMCS, and HOLDDATA MVS data sets
These data sets have the HLQ that you assigned in the UNZIPJCL job.
Note: Retain non-SMP/E installation data sets such as yourhlq.INSTALL.NOTES for future reference.
Follow these steps:
1. Navigate to your Pax-Enhanced ESD USS directory.
Your view is of the applicable USS directory.
2. Delete the pax file by entering the following command:
rm paxfile
paxfile
Specifies the name of the CA Technologies pax file that you downloaded.
The pax file is deleted.
3. Delete the product-specific directory by entering the following command:
rm -r product-specific-directory
product-specific-directory
Specifies the product-specific directory created by the pax command.
The product-specific directory is deleted.
Note: You can also use TSO ISHELL to navigate to the pax file and product-specific directory, and delete them using the D line command.

Apply Maintenance
46 Installation Guide
Apply Maintenance
CA Support Online has maintenance and HOLDDATA published since the installation data was created. After the maintenance process completes, the product is ready to deploy.
Follow these steps:
1. Check CA Support Online and download any PTFs and HOLDDATA published since this release was created. If the base release was created recently, no PTFs or HOLDATA will have been published yet.
2. Transfer the downloaded files to two separate FB 80 sequential data sets. Use one data set to contain the PTFs and the other to contain the HOLDDATA.
The PTFs and HOLDDATA become accessible to the yourhlq.SAMPJCL maintenance members.
3. The PDSSEDIT macro was customized in the installation steps. Verify that you still have the values from the base install.
4. Open the SAMPJCL member PDS6RECP in an edit session and execute the PDSSEDIT macro from the command line.
PDS6RECP is customized with your JOB statement, CSI location, and zone names.
5. Customize the PDS6RECP SMPPTFIN and SMPHOLD DD statements to reference the FB 80 data sets for the PTFs and HOLDDATA.
6. Submit PDS6RECP.
The PTFs and HOLDDATA are received.
7. Open the SAMPJCL member PDS7APYP in an edit session and execute the PDSSEDIT macro from the command line.
PDS7APYP is customized.
8. Submit PDS7APYP.
The PTFs are applied.
9. (Optional) Open the SAMPJCL member PDS8ACCP in an edit session and execute the PDSSEDIT macro from the command line.
PDS8ACCP is customized.
10. (Optional) Submit yourhlq.SAMPJCL member PDS8ACCP.
The PTFs are accepted.
Note: You do not have to submit the job at this time. You can accept the PTFs according to your site policy.
Note: We recommend that you check for available maintenance; however, you may find that none is available.

Apply Maintenance
Chapter 4: Installing Your Product from Pax-Enhanced ESD 47
HOLDDATA
When you apply maintenance, you typically encounter SMP/E HOLDDATA. We use HOLDDATA to notify your SMP/E system of SYSMODs that have errors or special conditions. We support system and external HOLDDATA.
Note: When you have completed the procedures in this section, go to Configuring Your Product.


Chapter 5: Installing Your Product from Tape 49
Chapter 5: Installing Your Product from Tape
This section contains the following topics:
Unload the Sample JCL from Tape (see page 49) How to Install Products Using Native SMP/E JCL (see page 50) Apply Maintenance (see page 54)
Unload the Sample JCL from Tape
The sample JCL to install the product is provided in the CAI.SAMPJCL library on the distribution tape.
Follow these steps:
1. Run the following sample JCL:
//COPY EXEC PGM=IEBCOPY,REGION=4096K
//SYSPRINT DD SYSOUT=*
//SYSUT1 DD DSN=CAI.SAMPJCL,DISP=OLD,UNIT=unitname,VOL=SER=nnnnnn,
// LABEL=(1,SL)
//SYSUT2 DD DSN=yourhlq.SAMPJCL,
// DISP=(,CATLG,DELETE),
// UNIT=sysda,SPACE=(TRK,(15,3,6),RLSE)
//SYSUT3 DD UNIT=sysda,SPACE=(CYL,1)
//SYSIN DD DUMMY
unitname
Specifies the tape unit to mount the tape.
nnnnnnn
Specifies the tape volume serial number.
yourhlq
Specifies the data set prefix for the installation.
sysda
Specifies the DASD where you want to place the installation software.
The SAMPJCL data set is created and its contents are downloaded from the tape.

How to Install Products Using Native SMP/E JCL
50 Installation Guide
2. Continue with one of the following options:
■ If you already have the SMP/E environment set up, go to Run the Installation Jobs for a Tape Installation.
■ If you do not have the SMP/E environment set up, go to Prepare the SMP/E Environment for Tape Installation.
How to Install Products Using Native SMP/E JCL
The following steps describe the process to install products using native SMP/E JCL:
1. Allocate product data sets and SMP/E data sets.
2. Create SMP/E CSI.
3. Receive base functions.
4. Apply base functions.
5. Accept base functions.
6. Configure the product according to your site requirements.

How to Install Products Using Native SMP/E JCL
Chapter 5: Installing Your Product from Tape 51
Prepare the SMP/E Environment for Tape Installation
The members in this procedure prepare the data sets, initialize the zones, and create the DDDEFs for PDSMAN. External DDDEF data sets are required. The default is NULLFILE.
Prior to beginning this procedure, confirm whether your product uses UNIX System Services (USS). If it does, establishing a hierarchical file system (HFS) may be required as part of the product installation or required as a feature of the product.
For information about the members, see the comments in the JCL.
To prepare the SMP/E environment for your product
1. Customize the macro PDSSEDIT with your site-specific information and then copy the macro to your syslib location. Replace the rightmost parameters for each ISREDIT CHANGE macro command. Each time you edit an installation member, type SEDIT on the TSO command line, and press Enter to replace the defaults with your specifications.
The macro is ready to customize your yourhlq.SAMPJCL members.
Note: The following steps include instructions to execute the PDSSEDIT macro each time you open a new SAMPJCL member. To edit all SAMPJCL members simultaneously, read and follow the instructions in the PDSEDALL member.
2. Open the SAMPJCL member PDS1ALL in an edit session and execute the PDSSEDIT macro from the command line.
PDS1ALL is customized.
3. Submit PDS1ALL.
This job produces the following results:
■ The target and distribution data sets for PDSMAN are created.
■ Unique SMPLTS, SMPMTS, SMPSCDS, and SMPSTS data sets for this target zone are created.

How to Install Products Using Native SMP/E JCL
52 Installation Guide
4. If your product requires HFS or if you want to install a feature of the product that requires HFS, complete the following substeps:
a. Open the SAMPJCL member ccc1ALLU in an edit session and execute the PDSSEDIT macro from the command line.
Note: All instances of ccc in this section indicate a three-character component code based on the FMID.
ccc1ALLU is customized.
b. Submit ccc1ALLU.
This job allocates your HFS data sets.
c. Open the SAMPJCL member ccc2MKD in an edit session and execute the PDSSEDIT macro from the command line.
ccc2MKD is customized.
d. Submit ccc2MKD.
This job creates all directories and mounts the file system.
5. Open the SAMPJCL member PDS2CSI in an edit session and execute the PDSSEDIT macro from the command line.
PDS2CSI is customized.
6. Submit PDS2CSI.
This job produces the following results:
■ The CSI data set is defined.
■ The SMPPTS and SMPLOG data sets are allocated.
■ The global, target, and distribution zones are initialized.
■ The DDDEF entries for your product are created.
■ The DDDEFs for the required SMP/E data sets are created.
7. If your product requires HFS or if you want to install a feature of the product that requires HFS, complete the following substeps:
a. Open the SAMPJCL member ccc3CSIU in an edit session and execute the PDSSEDIT macro from the command line.
ccc3CSIU is customized.
b. Submit ccc3CSIU.
This job customizes the CSI by adding the DDDEFs associated with the directory.

How to Install Products Using Native SMP/E JCL
Chapter 5: Installing Your Product from Tape 53
Run the Installation Jobs for a Tape Installation
Submit and run these SAMPJCL members in sequence. Do not proceed with any job until the previous job has completed successfully.
Follow these steps:
1. Open the SAMPJCL member PDS3RECT in an edit session and execute the PDSSEDIT macro from the command line.
Note: Comment out any unwanted FMIDs.
PDS3RECT is customized.
2. Submit the yourhlq.SAMPJCL member PDS3RECT to receive SMP/E base functions.
PDSMAN is received and now resides in the global zone.
3. Open the SAMPJCL member PDS4APP in an edit session and execute the PDSSEDIT macro from the command line.
Note: Comment out any unwanted FMIDs.
PDS4APP is customized.
4. Submit the yourhlq.SAMPJCL member PDS4APP to apply SMP/E base functions.
Your product is applied and now resides in the target libraries.
5. Open the SAMPJCL member PDS5ACC in an edit session and execute the PDSSEDIT macro from the command line.
Note: Comment out any unwanted FMIDs.
PDS5ACC is customized.
6. Submit the yourhlq.SAMPJCL member PDS5ACC to accept SMP/E base functions.
Your product is accepted and now resides in the distribution libraries.

Apply Maintenance
54 Installation Guide
Apply Maintenance
CA Support Online has maintenance and HOLDDATA published since the installation data was created. After the maintenance process completes, the product is ready to deploy.
Follow these steps:
1. Check CA Support Online and download any PTFs and HOLDDATA published since this release was created. If the base release was created recently, no PTFs or HOLDATA will have been published yet.
2. Transfer the downloaded files to two separate FB 80 sequential data sets. Use one data set to contain the PTFs and the other to contain the HOLDDATA.
The PTFs and HOLDDATA become accessible to the yourhlq.SAMPJCL maintenance members.
3. The PDSSEDIT macro was customized in the installation steps. Verify that you still have the values from the base install.
4. Open the SAMPJCL member PDS6RECP in an edit session and execute the PDSSEDIT macro from the command line.
PDS6RECP is customized with your JOB statement, CSI location, and zone names.
5. Customize the PDS6RECP SMPPTFIN and SMPHOLD DD statements to reference the FB 80 data sets for the PTFs and HOLDDATA.
6. Submit PDS6RECP.
The PTFs and HOLDDATA are received.
7. Open the SAMPJCL member PDS7APYP in an edit session and execute the PDSSEDIT macro from the command line.
PDS7APYP is customized.
8. Submit PDS7APYP.
The PTFs are applied.
9. (Optional) Open the SAMPJCL member PDS8ACCP in an edit session and execute the PDSSEDIT macro from the command line.
PDS8ACCP is customized.
10. (Optional) Submit yourhlq.SAMPJCL member PDS8ACCP.
The PTFs are accepted.
Note: You do not have to submit the job at this time. You can accept the PTFs according to your site policy.
Note: We recommend that you check for available maintenance; however, you may find that none is available.

Apply Maintenance
Chapter 5: Installing Your Product from Tape 55
HOLDDATA
When you apply maintenance, you typically encounter SMP/E HOLDDATA. We use HOLDDATA to notify your SMP/E system of SYSMODs that have errors or special conditions. We support system and external HOLDDATA.
Note: When you have completed the procedures in this section, go to Configuring Your Product.


Chapter 6: Starting Your Product 57
Chapter 6: Starting Your Product
This section describes how you deploy and configure PDSMAN using CA MSM. It also describes how to start a PDSMAN image and verify that the product is operating properly.
This section contains the following topics:
Introduction (see page 58) Understand PDSMAN Configurations (see page 58) How to Choose a Configuration Method (see page 59) How to Deploy With CA MSM (see page 59) Tasks If Configuring With CA MSM (see page 60) Configure Using CA MSM (see page 64) How to Complete Configuration With CA MSM (see page 65) Prepare to Start PDSMAN (see page 67) Start PDSMAN (see page 67) Verify PDSMAN Operation (see page 68) Post-Installation Considerations (see page 68)

Introduction
58 Installation Guide
Introduction
You completed the first two steps in the PDSMAN installation process when you acquired the product and performed SMP/E RECEIVE, APPLY and ACCEPT functions to install it in an SMP/E environment.
This section describes the remaining steps to complete the installation process and activate PDSMAN on your system:
■ Deploy the software.
■ Configure the software.
■ Prepare to start the product.
■ Start PDSMAN.
■ Verify the product is operating properly.
Deployment copies the SMP/E target libraries to one or more systems or LPARs to create sets of deployment libraries. These deployment libraries are subsequently used as input to the software configuration process.
Configuration takes the untailored software in the deployment libraries and configures it based on settings you provide. The process creates one or more PDSMAN runtime environments, also called configurations, specific to the target systems.
To prepare to start the product, you tailor the configured runtime environment, review information about compatibility with other products and learn how to enable optional PDSMAN user exits.
Starting PDSMAN activates an instance of the product called a PDSMAN image. PDSMAN executes within the runtime environment you created during configuration; only one production PDSMAN image can be active at a time on any given system.
After starting PDSMAN, you verify that the product is operating properly by executing the Demonstration Job Stream. This batch job stream also provides examples of the many facilities offered by PDSMAN.
Understand PDSMAN Configurations
It is important for you to understand the concepts, architecture and components of a PDSMAN configuration before you deploy and configure the software. This understanding will be valuable when you choose a configuration method and install and manage more complex PDSMAN environments.
For a detailed description of PDSMAN configurations, see PDSMAN Configurations (see page 89).

How to Choose a Configuration Method
Chapter 6: Starting Your Product 59
How to Choose a Configuration Method
Choosing a configuration method determines the procedure you will use to deploy, configure and activate PDSMAN on your system. You can configure the product:
■ Using the manual configuration method.
■ Using the CA MSM Software Configuration Service (SCS).
Manual configuration is most familiar to current PDSMAN users. When you use this method, you perform a series of manual steps to build the PDSMAN runtime environment.
The CA MSM Software Configuration Service (SCS) allows you to specify options, product variable settings and other information used to build a PDSMAN configuration. When the configuration is implemented, CA MSM automates many of the steps you would have performed with the manual method.
Important! You can use CA MSM to build new PDSMAN configurations on target systems that did not contain an existing PDSMAN runtime environment. If PDSMAN is present on the target system it must be completely removed before implementing a configuration built by CA MSM.
Note: Configurations built with CA MSM Release 4.1 and earlier may need to be updated or discarded as new capabilities are added to CA MSM or as changes are made to the PDSMAN configuration process.
To use CA MSM SCS you must have CA MSM Release 4.0 or later and a minimum PDSMAN level of r7.7 with PTF RO36050 applied to the SMP/E target libraries.
Your next step depends on the configuration method you choose:
■ To use the manual configuration method, see Manually Configuring Your Product (see page 71).
■ To use CA MSM, continue with the instructions in this chapter.
How to Deploy With CA MSM
Use CA MSM to deploy a copy of all PDSMAN SMP/E target libraries to any systems defined in the CA MSM system registry. The deployed libraries are used as input to the manual configuration process.
For specific deployment instructions, see How to Deploy a Product.
After deploying the product you are ready to prepare to configure PDSMAN.

Tasks If Configuring With CA MSM
60 Installation Guide
Tasks If Configuring With CA MSM
The topics in this section provide information about building and implementing a PDSMAN configuration using CA MSM.
Configuration Options Using MSM
CA MSM provides options for your PDSMAN configuration.
Base Configuration Option
This option configures PDSMAN; it is required and cannot be deselected.

Tasks If Configuring With CA MSM
Chapter 6: Starting Your Product 61
Create MCPU Data Set Option
This option is used to manage the Cross-System Communications data set. Select this option, or allow the selection to default, to allocate the Cross-System Communications data set and define it to this configuration. You will be asked to provide a name for the data set during the configuration process.
Deselect this option if you plan to use a Cross-System Communications data set you created as part of a previous configuration. You will be asked to provide the name of this existing data set during the configuration process.
Important! If the data set you specify does not exist, the CA MSM configuration will build and implement successfully but the PDSMAN address space will fail with a JCL error when you attempt to start the product.
For more information on this data set, see Cross-System Communications Data Set (see page 92).
Create PDSMAN Database Option
This option is used to manage the PDSMAN Database. Select this option, or allow the selection to default, to allocate the VSAM KSDS used for the database file and define it to this configuration. You will be asked to provide a name for the VSAM KSDS during the configuration process.
Deselect this option if you plan to use a database you created as part of a previous configuration. You will be asked to provide name of the existing VSAM KSDS during the configuration process.
Important! If the VSAM KSDS you specify does not exist, the configuration will build and implement successfully but the PDSMAN address space will fail with an initialization error when you attempt to start the product.
For more information on the database, see PDSMAN Database (see page 92).
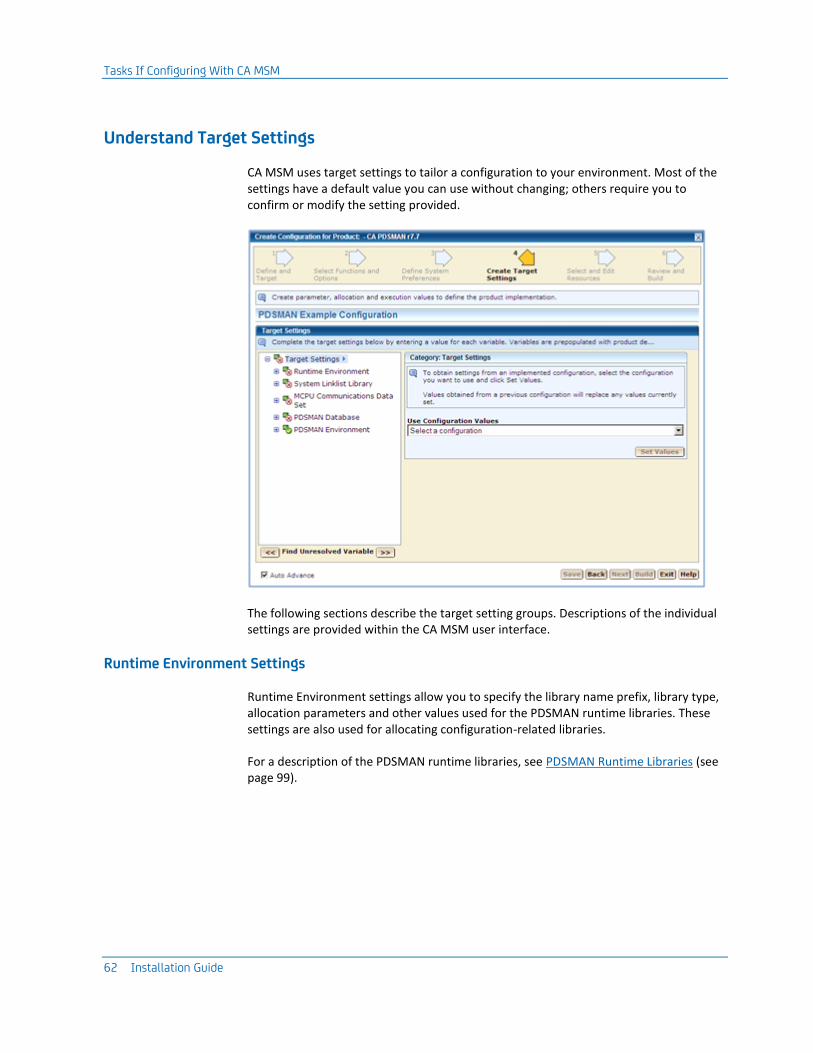
Tasks If Configuring With CA MSM
62 Installation Guide
Understand Target Settings
CA MSM uses target settings to tailor a configuration to your environment. Most of the settings have a default value you can use without changing; others require you to confirm or modify the setting provided.
The following sections describe the target setting groups. Descriptions of the individual settings are provided within the CA MSM user interface.
Runtime Environment Settings
Runtime Environment settings allow you to specify the library name prefix, library type, allocation parameters and other values used for the PDSMAN runtime libraries. These settings are also used for allocating configuration-related libraries.
For a description of the PDSMAN runtime libraries, see PDSMAN Runtime Libraries (see page 99).

Tasks If Configuring With CA MSM
Chapter 6: Starting Your Product 63
System Linklist Library Settings
System Linklist Library settings allow you to specify the name and allocation parameters for the special runtime library that contains the PDSMAN executable programs.
This library is defined separately from the other runtime libraries because it has additional requirements such as APF-authorization and definition in the system linklist concatenation.
For more information on naming and allocating the PDSMAN System Linklist Library, see PDSMAN System Linklist Library (see page 96).
MCPU Communications Data Set Settings
MCPU Communications Data Set settings allow you to specify the name of the PDSMAN Cross-System Communications data set and the allocation parameters and other values used when it is created. This data set is intended to be shared by multiple PDSMAN configurations.
For more information on Cross-System Communications data set considerations, see Cross-System Communications Data Set (see page 92) and Create MCPU Data Set Option (see page 61).
PDSMAN Database Settings
PDSMAN Database settings allow you to specify the cluster name of the VSAM KSDS that PDSMAN uses as a database. You can also provide allocation parameters and other settings used when the data set is created.
The PDSMAN database is usually shared by multiple configurations, although you may also choose to define a separate database for each PDSMAN configuration.
For more information on PDSMAN Database considerations, see PDSMAN Database (see page 92) and Create PDSMAN Database Option (see page 61).

Configure Using CA MSM
64 Installation Guide
PDSMAN Environment Settings
PDSMAN Environment settings provide specific configuration information such as the names of JCL procedures used for started tasks, the ISPF environment CLIST and the member containing the PDSMAN Initialization Control Statements.
The default names provided are used to configure an isolated PDSMAN runtime environment. You can change the member names so they are more easily identified with a particular system or configuration. For example, for a system named SYS4 you may choose a name such as PDSMSYS4 for the PDSMAN started task JCL procedure. Doing so reduces the chance of a naming conflict when the members are copied to common system locations such as a PROCLIB or SYSPROC library.
For information on the members tailored by the configuration procedure, see Members Tailored by Configuration (see page 100).
Other Resources Created by CA MSM Configuration
CA MSM creates a number of resources specifically related to the configuration procedure.
Output Listing Libraries
The SYSPRINT report output from system utilities such as IEBCOPY, IEBGENER and IDCAMS is written to output listing libraries. These libraries are named using the Runtime Prefix target setting followed by the low-level qualifiers LIST121 and LIST125.
The report output may be useful in diagnosing issues that occur during the implementation of a configuration.
CONINFO Member
Information about the configured environment is written to the CONINFO member in the Configuration Control library.
Configure Using CA MSM
Use CA MSM to configure a PDSMAN runtime environment using the deployment libraries, the target environment options and settings you provide. For specific configuration instructions, see How to Configure a Product (see page 22).

How to Complete Configuration With CA MSM
Chapter 6: Starting Your Product 65
How to Complete Configuration With CA MSM
The topics in this section describe the manual tasks you perform to complete the configuration using CA MSM.
These tasks appear as external operations when you implement a configuration. After completing each of the tasks, confirm the external operation by clicking the Confirm button on the CA MSM implementation dialog.
Update LMP Licensing Keys
When PDSMAN starts, license validation is performed by calling the CA LMP service of the CAIRIM component of CCS. For information about installing CAIRIM, activating CA LMP and coding CA LMP keys, see the CA Common Services for z/OS documentation.
Place CA LMP keys for PDSMAN in the KEYS member of the PPOPTION data set, found in the CAS9 JCL procedure. For information about using CA LMP keys for PDSMAN see CA LMP Licensing Keys (see page 109).
When you have completed this task, confirm the external operation by clicking the Confirm button on the CA MSM implementation dialog.
APF-Authorize the PDSMAN System Linklist Library
Ensure that the PDSMAN System Linklist Library is APF-authorized. For instructions for authorizing the library, see PDSMAN System Linklist Library APF-Authorization (see page 97).
For more information on PDSMAN System Linklist Library considerations, see PDSMAN System Linklist Library (see page 96).
When you have completed this task, confirm the external operation by clicking the Confirm button on the CA MSM implementation dialog.
Add the PDSMAN System Linklist Library to the System Linklist
The PDSMAN System Linklist library must be present in the active system linklist for PDSMAN to operate properly. For instructions for defining the library to the linklist, see PDSMAN System Linklist Library LNKLST Definition (see page 98).
For more information on PDSMAN System Linklist Library considerations, see PDSMAN System Linklist Library (see page 96).

How to Complete Configuration With CA MSM
66 Installation Guide
Copy JCL Procedures to PROCLIB
The JCL procedures used to start PDSMAN address spaces must reside in a library, such as SYS1.PROCLIB, that is part of your system PROCLIB concatenation. The CA MSM configuration process tailors two JCL procedures and writes them to the PDSMAN Configuration Control Library.
Copy the JCL for the PDSMAN address space (member PDSMAN) and the PDSMAN Database Server address space (member PDSMDB) from the Configuration Control Library to a system PROCLIB library. The member names may be different than these defaults if you specified alternate names when you built the configuration.
When you copy the members, make sure that you do not replace an existing member with the same name created by another configuration.
For more information about these JCL procedure members see PDSMAN JCL Procedure (see page 101) and PDSMDB JCL Procedure (see page 101).
When you have completed this task, confirm the external operation by clicking the Confirm button on the CA MSM implementation dialog.
Copy TSO/ISPF CLISTs to SYSPROC
The TSO CLIST used to establish the PDSMAN ISPF environment must reside in a library included in the SYSPROC concatenation of the logon procedures used by your TSO users. The CA MSM configuration process tailors this CLIST and writes it to member PDSMISPF in the PDSMAN Configuration Control Library.
Copy the CLIST PDSMISPF to a SYSPROC library. The member name may be different than the default if you specified an alternate name when you built the configuration.
When you copy the member, make sure that you do not replace an existing member with the same name created by another configuration.
For more information about this PDSMAN CLIST see PDSMISPF CLIST (see page 102).
When you have completed this task, confirm the external operation by clicking the Confirm button on the CA MSM implementation dialog.
Prepare to Start PDSMAN
Chapter 6: Starting Your Product 67
Prepare to Start PDSMAN
This section describes the manual tasks you perform before starting PDSMAN for the first time.
To prepare to start PDSMAN, do the following:
1. Review enqueue conversion settings for your resource serialization software, see Review Enqueue Conversion Settings (see page 108).
2. Review information about compatibility issues between PDSMAN and other products, see Review Compatibility Information (see page 108).
3. Grant the PDSMAN address space read access authority to all LLA-Managed libraries. The address space LLA Monitoring subtask requires this authority to read directory information from LLA-Managed libraries in order to determine if the LLA directory is in synchronization with the directory on DASD. For more information, see Monitoring the LLA Address Space in the LLA Extensions and Performance Facilities User Guide.
Start PDSMAN
Start the PDSMAN address space by issuing the following operator command:
S PDSMAN
PDSMAN is the name of the PDSMAN address space JCL procedure. The procedure name may be different if you specified an alternate name when you built the configuration.
Starting the PDSMAN address space:
■ Loads and validates the PDSMAN Initialization Control Statements.
■ Attaches subtasks that execute within the main address space.
■ Starts the PDSMDB address space used for PDSMAN database processing.
■ Establishes operating system hooks and service functions.
■ Performs other processing necessary to activate the product.
Startup has completed when a PDSMOPR-02 message is issued indicating that the address space is accepting commands.
For information on other commands that can be issued to the address space, including commands for stopping and reinitializing PDSMAN, see the Administrator Guide.

Verify PDSMAN Operation
68 Installation Guide
Verify PDSMAN Operation
PDSMAN provides a demonstration job stream you use to verify that the major facilities of the product are operating correctly and to demonstrate many of the capabilities PDSMAN provides.
For more information on how to execute the demonstration job stream see Verify Your PDSMAN Installation (see page 115).
Post-Installation Considerations
This section describes topics for consideration after you have installed and activated PDSMAN.
Automatically Start PDSMAN
The PDSMAN address space must be active for the product to operate properly. You should establish operational procedures to start PDSMAN after each IPL.
Database Administration
If you have not already done so, you should establish procedures to back up the PDSMAN Database on a regular basis. For information on PDSMAN Database administration and usage notes, see the chapter Database Considerations in the Administrator Guide.
Review Your ISPF Environment
In addition to using the PDSMISPF CLIST, you can make the PDSMAN ISPF Master Menu and the EZYEDIT platform available as options on your local ISPF menus. For a description of the necessary ISPF menu updates, see Adding ISPF Menu Options (see page 106).
For a complete description of your PDSMAN ISPF environment see PDSMAN ISPF Environment (see page 103).

Post-Installation Considerations
Chapter 6: Starting Your Product 69
Enable User Exits (Optional)
Install optional user exits using the PDSMUSR2, PDSM12EX, PDSM018U and PDSM021U user exit points.
Important! Most customers do not need to install or enable the user exit routines.
For more information about PDSMAN user exits and how they are installed see PDSMAN User Exits (see page 119).
Activate PDSMAN Facilities
Most PDSMAN facilities are disabled by default. After installing and configuring the product, review the output of the Demonstration Job Stream as well as the chapter What is PDSMAN? in the Administrator Guide to identify facilities that can help you better manage your partitioned library environment.
Activate the PDSMAN facilities by following the implementation instructions provided with each facility.


Chapter 7: Manually Configuring Your Product 71
Chapter 7: Manually Configuring Your Product
This section describes how you deploy and configure PDSMAN using the manual method. It also describes how to start a PDSMAN image and verify that the product is operating properly.
This section contains the following topics:
Introduction (see page 72) Understand PDSMAN Configurations (see page 73) How to Deploy PDSMAN (see page 73) Prepare to Configure a PDSMAN Runtime Environment (see page 74) Allocate the PDSMAN Shared Data Sets (see page 74) Allocate the PDSMAN Runtime Libraries (see page 76) Complete the PDSMAN Runtime Environment (see page 78) Prepare to Update an Existing Set of Runtime Libraries (see page 81) Update the PDSMAN Runtime Libraries (see page 83) How to Complete Configuration (see page 84) Prepare to Start PDSMAN (see page 85) Start PDSMAN (see page 86) Verify PDSMAN Operation (see page 86) Post-Installation Considerations (see page 86)

Introduction
72 Installation Guide
Introduction
You completed the first two steps in the PDSMAN installation process when you acquired the product and performed SMP/E RECEIVE, APPLY and ACCEPT functions to install it in an SMP/E environment.
This section describes the remaining steps to complete the installation process using the manual method and activate PDSMAN on your system:
■ Deploy the software (optional).
■ Configure the software to create a PDSMAN runtime environment.
■ Prepare to start the product.
■ Start PDSMAN.
■ Verify the product is operating properly.
Deployment copies the SMP/E target libraries to one or more systems or LPARs to create sets of deployment libraries. These deployment libraries are subsequently used as input to the software configuration process.
Note: Deploying the software with CA MSM is optional when using the manual PDSMAN configuration method.
Configuration takes the untailored software in the deployment libraries and configures it based on settings you provide. The process creates a PDSMAN runtime environment specific to the target system.
Note: A PDSMAN runtime environment is functionally equivalent to a PDSMAN configuration and the terms are used interchangeably.
To prepare to start the product, you tailor the configured runtime environment, review information about compatibility with other products and learn how to enable optional PDSMAN user exits.
Starting PDSMAN activates an instance of the product called a PDSMAN image. PDSMAN executes within the runtime environment you created during configuration; only one production PDSMAN image can be active at a time on any given system.
After starting PDSMAN, you verify that the product is operating properly by executing the Demonstration Job Stream. This batch job stream also provides examples of the many facilities offered by PDSMAN.

Understand PDSMAN Configurations
Chapter 7: Manually Configuring Your Product 73
Understand PDSMAN Configurations
It is important for you to understand the concepts, architecture and components of a PDSMAN configuration before you deploy and configure the software. This understanding will be valuable as you install and manage more complex PDSMAN environments.
For a detailed description of PDSMAN configurations see PDSMAN Configurations (see page 89).
How to Deploy PDSMAN
Deployment moves the software from the SMP/E installation environment to one or more target systems by copying the SMP/E target libraries to a set of corresponding deployment libraries.
Deploying PDSMAN is optional when using the manual configuration method. You can deploy the product using the CA MSM Software Deployment Service (SDS) or you can skip deployment and use your installed SMP/E target libraries as deployment libraries.
Your deployment choice depends on your system environment. A complex environment with many LPARs or systems may need additional management capabilities provided by CA MSM SDS. Simpler environments with a limited number of systems are best suited for direct use of the SMP/E target libraries.
To deploy using CA MSM see the next topic.
To skip deployment and use your SMP/E target libraries directly, see Prepare to Configure a PDSMAN Runtime Environment (see page 74).
How to Deploy With CA MSM
Use CA MSM to deploy a copy of all PDSMAN SMP/E target libraries to any systems defined in the CA MSM system registry. The deployed libraries are used as input to the manual configuration process.
For specific deployment instructions, see How to Deploy a Product.
After deploying the product you are ready to prepare to configure PDSMAN.

Prepare to Configure a PDSMAN Runtime Environment
74 Installation Guide
Prepare to Configure a PDSMAN Runtime Environment
The following section describes topics for consideration as you prepare to configure a PDSMAN runtime environment.
Member Locations
The instructions for manual configuration refer to members in the PDSMAN Sample Materials Library and the User Information Library. Sample Materials Library members are found in the CPDSSAMP SMP/E installation or CA MSM deployment library. Members in the User Information Library are found in the CPDSTXT SMP/E installation or CA MSM deployment library.
Configuration Input Libraries
Configuration takes the untailored software in the deployment libraries and configures it based on settings you provide.
If you deployed PDSMAN using CA MSM, the names of the deployment libraries are available from the reports produced during the deployment.
If you skipped deployment, use your SMP/E target libraries as input to the configuration process instead. You can determine the names of these libraries from your SMP/E DDDEFs.
In either case, the low level qualifiers of your input libraries identify the contents of the libraries.
Make note of the data set name prefix used for your deployment or SMP/E target libraries, as applicable. You will use the prefix when you tailor the configuration JCL and other members.
Allocate the PDSMAN Shared Data Sets
Two PDSMAN data sets are usually shared by all of the PDSMAN images running on your system, including those in different PDSMAN runtime environments. These global data sets are the Cross-System Communications data set (PDSMMCPU) and the PDSMAN Database, a VSAM KSDS.
The topics in this section describe how to allocate the PDSMAN shared data sets if they have not already been allocated as part of another PDSMAN runtime environment.
For more information on Shared Data Sets, see PDSMAN Shared Data Sets (see page 91).

Allocate the PDSMAN Shared Data Sets
Chapter 7: Manually Configuring Your Product 75
Allocate the Cross-System Communications Data Set
PDSMAN communicates with other PDSMAN images using the Cross-System Communications data set. This data set must reside on a DASD volume that is shared by all of the communicating systems. For more information on Cross-System Communications data set considerations, see Cross-System Communications Data Set (see page 92).
Important! Only one Cross-System Communications data set is required for each group of communicating PDSMAN images.
Note: You may skip this allocation if you have an existing Cross-Systems Communications data set you want to reuse with the new runtime environment..
You will need to know the name of the existing data set when you Install the Address Space JCL Procedure (see page 79). You can determine the data set name by examining the PDSMMCPU DD statement in the JCL procedure for an executing PDSMAN address space.
A sample job stream to allocate the Cross-System Communications data set is provided in member ALOCMCPU of the Sample Materials library.
Copy the sample JCL to another library where you can modify it, then follow the tailoring instructions provided in the JCL comments before submitting the job stream.
Note: A zero return code is expected for this job stream.

Allocate the PDSMAN Runtime Libraries
76 Installation Guide
Allocate the PDSMAN Database
PDSMAN uses a VSAM key-sequenced data set (KSDS) database to record information collected about your partitioned library environment. For more information on PDSMAN Database considerations, see PDSMAN Database (see page 92).
Important! Earlier releases of PDSMAN required the database only if you were using a PDSMAN facility that used it to store collected information. Beginning with PDSMAN r7.7, creating the database and establishing a database environment are best practices that are no longer optional.
The PDSMAN Database is usually shared by all PDSMAN images; however you may define a combination of shared and independent databases if such a combination better meets your operational or environmental requirements.
Skip this allocation if you have an existing database KSDS data set you want to reuse with the new runtime environment. You will need to know the name of this data set when you Establish the PDSMAN Database Environment (see page 80). You can determine the name of an existing database from the $DATABASE Initialization Control Statement in the rules for executing a PDSMAN image.
A sample job stream to allocate the PDSMAN Database VSAM KSDS is provided in member ALOCDB of the Sample Materials library.
Copy the sample JCL to another library where you can modify it, then follow the tailoring instructions provided in the JCL comments before submitting the job stream.
Note: A zero return code is expected for this job stream.
You complete the steps for establishing a PDSMAN database environment later in the configuration process.
Allocate the PDSMAN Runtime Libraries
A PDSMAN image executes from a set of runtime libraries that contain ISPF-related members, sample materials and other information. PDSMAN does not execute directly from the SMP/E target libraries created during installation or from the libraries created by the CA MSM Software Deployment Services.
Runtime libraries are associated with a specific PDSMAN runtime environment. They can be used to execute a single PDSMAN image or shared by multiple copies of PDSMAN on more than one operating system image. All of the PDSMAN images running from a given set of runtime libraries execute at the same maintenance level.
The topics in this section describe how to allocate the PDSMAN runtime libraries if they have not already been allocated as part of an existing PDSMAN environment.

Allocate the PDSMAN Runtime Libraries
Chapter 7: Manually Configuring Your Product 77
Allocate the PDSMAN System Linklist Library
PDSMAN executable program modules must be installed in a library defined in the system linklist concatenation. This PDSMAN System Linklist Library must be APF- authorized and should contain only PDSMAN members.
For information on the PDSMAN System Linklist Library, including naming and space allocation considerations, see PDSMAN System Linklist Library (see page 96).
Note: You may skip this task if a suitable system linklist library was allocated.
A sample job stream that allocates the PDSMAN System Linklist library is provided. The JCL for this step is in member ALOCLINK of the Sample Materials library. Specific DASD space allocation information is provided in the sample JCL.
Important! Define the PDSMAN system linklist library without an allocation for secondary extents.
Copy the sample JCL to another library where you can modify it. Change the job card and other job related JCL as required for your environment. Then follow the tailoring instructions provided in the JCL comments before submitting the job stream.
Note: A zero return code is expected for this job stream.
Make note of the full name of the PDSMAN System Linklist Library. You will use this name when you tailor the configuration JCL.
You complete the steps to APF-authorize the library and define it to the system linklist, if necessary, later in the configuration process.

Complete the PDSMAN Runtime Environment
78 Installation Guide
Allocate the Other PDSMAN Runtime Libraries
PDSMAN provides panels, CLISTs, and other members that are required to make the product operate in an ISPF environment. A set of PDSMAN runtime libraries must be allocated to hold these ISPF-related members as well as members containing sample materials and other information.
For a description of the PDSMAN runtime libraries, see PDSMAN Runtime Libraries (see page 99).
Note: Skip this task if you have previously allocated PDSMAN runtime libraries and intend to reuse them for this configuration.
Important! The low-level qualifiers used for the runtime libraries have changed in PDSMAN r7.7. If you are upgrading from an earlier release of PDSMAN, create a new set of runtime libraries.
PDSMAN members must be installed in dedicated libraries; do not mix them with members related to ISPF or other products.
A sample job stream is provided to allocate the PDSMAN runtime libraries. The JCL for this step is in member ALOCISPF of the Sample Materials library.
Copy the sample JCL to another library where you can modify it. Change the job card and other job related JCL as required for your environment. Then follow the tailoring instructions provided in the JCL comments before submitting the job stream.
Note: A zero return code is expected for all steps in this job stream.
Make note of the data set name prefix used for your runtime libraries. The prefix is the data set name without the low-level qualifier and without a trailing period. You will use the prefix when your tailor the configuration JCL and other members.
Complete the PDSMAN Runtime Environment
Members such as PDSMAN Initialization Control Statements, JCL procedures and CLISTs are also part of the runtime environment. You initially tailor these members when you configure the runtime environment.
The following sections describe how to complete the PDSMAN runtime environment by tailoring these members.

Complete the PDSMAN Runtime Environment
Chapter 7: Manually Configuring Your Product 79
Copy the Initialization Control Statements
PDSMAN uses Initialization Control Statements, also known as PDSMAN rules, to enable product functionality and control various aspects of PDSMAN processing. The PDSMAN address space reads the initialization control statements through DD name PDSMINIT when the product is started or reinitialized.
A default set of rules is used for initially starting the product and executing the PDSMAN Demonstration Job Stream. For more information about the PDSMAN rules, see PDSMINIT Rule Member (see page 100).
Copy the default Initialization Control Statement member to a parameter library where you can modify it. The default statements are provided in member PDSMINIT of your Sample Materials library. You will need to know the name of the parameter library when you install the address space JCL in the following procedure.
The default name for this member, PDSMINIT, can be changed to avoid naming conflicts with other sets or PDSMAN rules or to provide flexibility in managing the rules in more complicated PDSMAN environments. It is also possible to share this member between multiple PDSMAN images executing on different systems.
If you are upgrading from a previous release of PDSMAN you will already have a set of Initialization Control Statements you have customized for your environment. These existing rules are migrated into your new PDSMAN environment as part of post-installation processing.
Install the Address Space JCL Procedure
PDSMAN executes in a dedicated address space that is started using a supplied JCL procedure. This JCL must reside in a library that is part of your system PROCLIB concatenation. For more information about this procedure, see PDSMAN JCL Procedure (see page 101).
A sample JCL procedure is provided in member PDSMAN of your Sample Materials library.
Copy the sample procedure to a system procedure library where you can modify it. If you have an existing PDSMAN procedure, you should be careful not to regress any modifications you made previously.
You can rename the PDSMAN JCL procedure if you are defining separate address space JCL procedures for different PDSMAN images in a shared runtime environment.
Follow the tailoring instructions in the sample JCL comments.

Complete the PDSMAN Runtime Environment
80 Installation Guide
Copy the Database Server Address Space JCL Procedure
The PDSMAN Database Server task executes in a dedicated address space. This address space is automatically started using the supplied JCL procedure. This JCL procedure must reside in a library that is part of your system PROCLIB concatenation.
For more information about this JCL procedure, see PDSMDB JCL Procedure (see page 101).
A sample JCL procedure is provided in member PDSMDB of your Sample Materials library.
Copy the sample procedure to a system procedure library. If you have an existing PDSMDB procedure, be careful not to regress modifications you made previously. You will need to know the name of the Database Server Address Space JCL procedure when you establish the PDSMAN database environment in the following procedure.
Note: You do not need to tailor the PDSMAN Database Server JCL procedure.
Establish the PDSMAN Database Environment
All PDSMAN images sharing a database must know the name of the VSAM database and have proper update authority to the database.
Edit the PDSMAN Initialization Control Statements in member PDSMINIT that you copied to your modifiable parameter library. Ensure that a $DATABASE control statement exists and that the value specified for the DSN parameter matches the name of the allocated database.
For more information about the $DATABASE control statement, see the Initialization Control Statements in the Administrator Guide.
Ensure that the main PDSMAN address space and the PDSMAN Database Server address space have update authority to the VSAM database. The name of the server address space is defined by the $DATABASE PROC= parameter.
Note: It is only necessary for the address spaces, not individual users, to have update authority.

Prepare to Update an Existing Set of Runtime Libraries
Chapter 7: Manually Configuring Your Product 81
Copy TSO/ISPF CLIST to SYSPROC
PDSMAN distributes panels, CLISTs, and other members required to make the product operate in an online, ISPF environment. For more information about the PDSMAN ISPF environment, see PDSMAN ISPF Environment (see page 103).
A TSO CLIST is used to establish the PDSMAN ISPF environment, a sample of which is provided in member PDSMISPF of your Sample Materials library.
Copy the sample TSO CLIST to a library in the SYSPROC concatenation of the logon procedures used by your TSO users. If you have an existing member by this name, be careful not to regress modifications you made previously. For more information about this CLIST, see PDSMISPF CLIST (see page 102).
Follow the tailoring instructions in the sample CLIST.
Prepare to Update an Existing Set of Runtime Libraries
The PDSMAN runtime libraries are updated by copying the software from the corresponding SMP/E target or CA MSM deployment libraries.
The topics in this section describe tasks you perform only if you are copying the software into existing runtime libraries.
If you have allocated new runtime libraries, including a new PDSMAN System Linklist Library, see PDSMAN System Linklist Library (see page 96).
Back Up the Runtime Libraries
We suggest you make a backup copy of your runtime libraries before they are updated. You can create the backup using your data set management facility, the PDSMAN FastCopy facility, IEBCOPY, or other equivalent utility. Define the backup data sets with the same DCB attributes as the originals.

Prepare to Update an Existing Set of Runtime Libraries
82 Installation Guide
Stop PDSMAN Images
Before executing the JCL to copy the libraries, you must stop PDSMAN on all system images that use the runtime libraries being updated.
Important! Failure to stop all active PDSMAN images using the runtime libraries will result in system abends or other unpredictable results due to the execution of mixed releases of the product modules.
Be aware that TSO users working within the PDSMAN EZYEDIT ISPF Productivity Platform may experience abends or other unexpected results until PDSMAN is restarted.
To stop a PDSMAN image, issue the following commands from the operator console:
F PDSMAN,STOP
PDSMAN is the name of the PDSMAN address space executing on that system. Remember to stop all PDSMAN images that share the runtime libraries.
For more information about this command, see the Administrator Guide. A PDSM00-16 message is issued to indicate that the removal is complete.
Important! Do not cancel the PDSMAN address space to stop the product.
Verify Library Space
You must ensure that sufficient space exists in the runtime libraries to hold elements added or replaced during the update.
Important! The PDSMAN System Linklist Library must not allocate additional extents as a result of the update as this could lead to S106 abends. Confirm that the library was allocated without a secondary extent allocation before performing the update operation.
Update the PDSMAN Runtime Libraries
Chapter 7: Manually Configuring Your Product 83
Empty the Runtime Libraries
The update process uses the PDSM10 utility to empty the runtime libraries before the software is copied. This helps to avoid library space issues during the copy operation.
Important! The PDSMAN runtime libraries must contain only PDSMAN elements. Do not empty the libraries if they are being shared with ISPF or other products.
A sample job stream to empty the runtime libraries is provided in member RUNEMPTY of the Sample Materials library.
Copy the sample JCL to another library where you can modify it, then follow the tailoring instructions provided in the JCL comments before submitting the job stream.
PDSMAN does not need to be active to empty the libraries using this utility, however PDSMCM5-5 messages may be issued when executing the job stream; these messages can be ignored.
Note: A zero return code is expected for all steps in this job stream.
Update the PDSMAN Runtime Libraries
The topics in this section describe tasks you perform when you are copying the software into new or existing runtime libraries.
Copy the Updated Software
You can now copy the updated software to the PDSMAN runtime libraries.
A sample job stream to copy all of the elements to the runtime libraries is provided in member RUNCOPYF of the Sample Materials library.
Copy the sample JCL to another library where you can modify it. Change the job card and other job related JCL as required for your environment. Then follow the tailoring instructions provided in the JCL comments before submitting the job stream.
ISPF users must exit and re-enter ISPF to make the copied members active.
Note: A zero return code is expected for this job stream.

How to Complete Configuration
84 Installation Guide
Refresh Library Look-Aside
The system Library Look-Aside (LLA) facility is frequently used to cache directory entry information for system linklist libraries. If your runtime PDSMAN System Linklist Library is already in the active system linklist, you must refresh the LLA cache information to make the newly copied members available.
Issue the operator console command:
F LLA,REFRESH
The command can be used to refresh the entire LLA cache. Other options are also available. Refer to your own operational procedures for instructions on updating the LLA cache.
How to Complete Configuration
The topics in this section describe the manual tasks you perform to complete the configuration using the manual method.
Update LMP Licensing Keys
When PDSMAN is started, license validation is performed by calling the CA LMP service of the CAIRIM component of CCS. For information about installing CAIRIM, activating CA LMP, and coding CA LMP keys, see the CA Common Services for z/OS documentation.
Place CA LMP keys for PDSMAN in the KEYS member of the PPOPTION data set, found in the CAS9 JCL procedure. For information about using CA LMP keys for PDSMAN, see PDSMAN Licensing Keys (see page 109).
APF-Authorize the PDSMAN System Linklist Library
Ensure that the PDSMAN System Linklist Library is APF-authorized. For instructions for authorizing the library, see PDSMAN System Linklist Library APF-Authorization (see page 97).
For more information on PDSMAN System Linklist Library considerations, see PDSMAN System Linklist Library (see page 96).
Prepare to Start PDSMAN
Chapter 7: Manually Configuring Your Product 85
Add the PDSMAN System Linklist Library to the System Linklist
The PDSMAN System Linklist library must be present in the active system linklist for PDSMAN to operate properly. For instructions for defining the library to the linklist, see PDSMAN System Linklist Library LNKLST Definition (see page 98).
For more information on PDSMAN System Linklist Library considerations, see PDSMAN System Linklist Library (see page 96).
Prepare to Start PDSMAN
This section describes the manual tasks you perform before starting a new release of PDSMAN for the first time.
To prepare to start PDSMAN, do the following:
1. Review enqueue conversion settings for your resource serialization software, see Review Enqueue Conversion Settings (see page 108).
2. Review information about compatibility issues between PDSMAN and other products, see Review Compatibility Information (see page 108).
3. Grant the PDSMAN address space read access authority to all LLA-Managed libraries. The address space LLA Monitoring subtask requires this authority to read directory information from LLA-Managed libraries in order to determine if the LLA directory is in synchronization with the directory on DASD. For more information, see Monitoring the LLA Address Space in the LLA Extensions and Performance Facilities User Guide.

Start PDSMAN
86 Installation Guide
Start PDSMAN
Start the PDSMAN address space by issuing the following operator command:
S PDSMAN
PDSMAN is the name of the PDSMAN address space JCL procedure. The procedure name may be different if you specified an alternate name when you built the configuration.
Starting the PDSMAN address space:
■ Loads and validates the PDSMAN Initialization Control Statements.
■ Attaches subtasks that execute within the main address space.
■ Starts the PDSMDB address space used for PDSMAN database processing.
■ Establishes operating system hooks and service functions.
■ Performs other processing necessary to activate the product.
Startup has completed when a PDSMOPR-02 message is issued indicating that the address space is accepting commands.
For information on other commands that can be issued to the address space, including commands for stopping and reinitializing PDSMAN, see the Administrator Guide.
Verify PDSMAN Operation
PDSMAN provides a demonstration job stream you use to verify that the major facilities of the product are operating correctly and to demonstrate many of the capabilities PDSMAN provides.
For more information on how to execute the demonstration job stream see Verify Your PDSMAN Installation (see page 115).
Post-Installation Considerations
This section describes topics for consideration after you have installed and activated PDSMAN.
Automatically Start PDSMAN
The PDSMAN address space must be active for the product to operate properly. You should establish operational procedures to start PDSMAN after each IPL.

Post-Installation Considerations
Chapter 7: Manually Configuring Your Product 87
Database Administration
If you have not already done so, you should establish procedures to back up the PDSMAN Database on a regular basis. For information on PDSMAN Database administration and usage notes, see the chapter Database Considerations in the Administrator Guide.
Review Your ISPF Environment
In addition to using the PDSMISPF CLIST, you can make the PDSMAN ISPF Master Menu and the EZYEDIT platform available as options on your local ISPF menus. For a description of the necessary ISPF menu updates, see Adding ISPF Menu Options (see page 106).
For a complete description of your PDSMAN ISPF environment see PDSMAN ISPF Environment (see page 103).
Enable User Exits (Optional)
Install optional user exits using the PDSMUSR2, PDSM12EX, PDSM018U and PDSM021U user exit points.
Important! Most customers do not need to install or enable the user exit routines.
For more information about PDSMAN user exits and how they are installed see PDSMAN User Exits (see page 119).
Activate PDSMAN Facilities
Most PDSMAN facilities are disabled by default. After installing and configuring the product, review the output of the Demonstration Job Stream as well as the chapter What is PDSMAN? in the Administrator Guide to identify facilities that can help you better manage your partitioned library environment.
Activate the PDSMAN facilities by following the implementation instructions provided with each facility.


Appendix A: PDSMAN Configurations 89
Appendix A: PDSMAN Configurations
This section provides valuable information for understanding PDSMAN configurations and runtime environments.
This section contains the following topics:
Introduction (see page 89) PDSMAN Configuration (see page 90) PDSMAN Shared Data Sets (see page 91) PDSMAN System Linklist Library (see page 96) PDSMAN Runtime Libraries (see page 99) Members Tailored by Configuration (see page 100) PDSMAN ISPF Environment (see page 103) Before You Start PDSMAN (see page 107)
Introduction
Regardless of the configuration method you choose, it is important you understand the concepts, architecture and components of a PDSMAN configuration before you deploy and configure the software. This understanding will be valuable as you install and manage more complex PDSMAN environments.
Note: A PDSMAN runtime environment is functionally equivalent to a PDSMAN configuration and the terms are used interchangeably.

PDSMAN Configuration
90 Installation Guide
PDSMAN Configuration
A PDSMAN configuration is a set of runtime libraries, tailored members and other resources that are necessary for establishing the runtime environment in which the product executes.
Only one production PDSMAN image can be active on each individual system or LPAR at one time. However, more than one image, executing on different LPARs, can share the same PDSMAN configuration. You can also define multiple PDSMAN configurations within your system environment.

PDSMAN Shared Data Sets
Appendix A: PDSMAN Configurations 91
A PDSMAN configuration is made up of the following:
■ The PDSMAN System Linklist Library, an APF-authorized runtime library containing executable programs and defined in the system linklist concatenation.
■ Runtime libraries containing ISPF-related members, sample materials and other data required to use the product.
■ The PDSMAN Cross-System Communications data set (MCPU), a shared sequential file used to communicate between multiple PDSMAN images executing on different systems.
■ The PDSMAN Database, a shared VSAM KSDS used to record information about your partitioned libraries, your environment and about PDSMAN itself.
■ A library member, PDSMINIT, that contains the PDSMAN Initialization Control Statements, also called PDSMAN rules, used to control and administer many of the product facilities.
■ Two JCL procedures, PDSMAN and PDSMDB, used to start the PDSMAN main and database server address spaces, respectively. The procedures are tailored and copied to a system procedure library or PROCLIB, during configuration.
■ A TSO CLIST, PDSMISPF, executed to establish an ISPF environment for online PDSMAN facilities. During configuration the CLIST is tailored and copied to a library in the SYSPROC concatenation of your TSO logon procedures.
■ The Demonstration Job Stream, $DEMO, containing batch JCL used to verify successful installation and activation of the product and for demonstrating many of the facilities provided by PDSMAN.
PDSMAN Shared Data Sets
Many customers have PDSMAN images executing on multiple systems. The PDSMAN images may be running within the same or different PDSMAN runtime environments.
Two data sets are usually shared globally by all of the running PDSMAN images:
■ The Cross-System Communications data set (PDSMMCPU).
■ The PDSMAN Database (a VSAM KSDS).

PDSMAN Shared Data Sets
92 Installation Guide
Cross-System Communications Data Set
PDSMAN communicates with other PDSMAN images using the Cross-System Communications data set, which must reside on a DASD volume shared by all of the communicating systems.
Important! Only one Cross-System Communications data set is needed for each group of communicating PDSMAN images.
You may have an existing Cross-Systems Communications data set you want to reuse with a new configuration or PDSMAN image. You can determine the name of the existing data set from the PDSMMCPU DD statement in the JCL procedure for an executing PDSMAN address space.
PDSMAN Database
PDSMAN uses a VSAM key-sequenced data set (KSDS) database to record information collected about your partitioned library environment.
The PDSMAN Database is usually shared by all PDSMAN images; however you may define a combination of shared and independent databases if such a combination better meets your operational or environmental requirements.
Important! Earlier releases of PDSMAN required the database only if you were using a PDSMAN facility that used it to store collected information. Beginning with PDSMAN r7.7, creating the database and establishing a database environment are best practices that are no longer optional.
You may have an existing database you want to reuse with a new configuration or PDSMAN image. You can determine the name of an existing database from the $DATABASE Initialization Control Statement in the rules for an executing PDSMAN image.
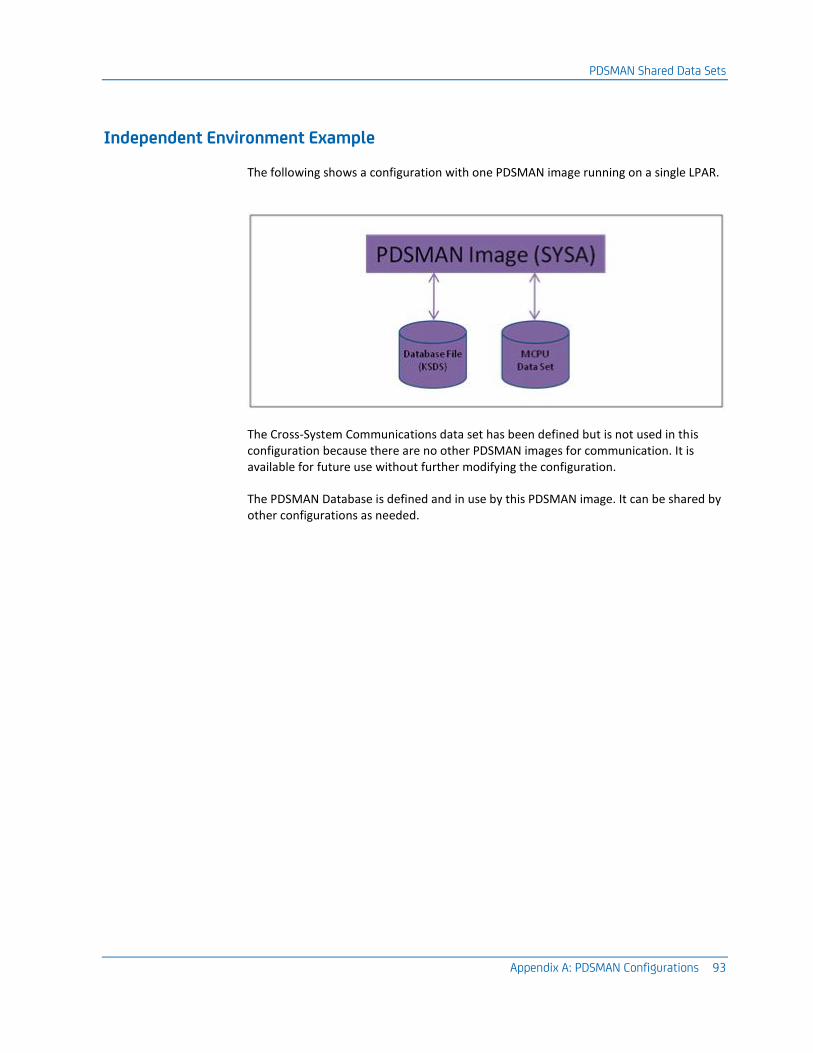
PDSMAN Shared Data Sets
Appendix A: PDSMAN Configurations 93
Independent Environment Example
The following shows a configuration with one PDSMAN image running on a single LPAR.
The Cross-System Communications data set has been defined but is not used in this configuration because there are no other PDSMAN images for communication. It is available for future use without further modifying the configuration.
The PDSMAN Database is defined and in use by this PDSMAN image. It can be shared by other configurations as needed.

PDSMAN Shared Data Sets
94 Installation Guide
Typical Shared Environment Example
The following shows a configuration with two PDSMAN images executing on different LPARs that are sharing DASD. This is a typical configuration when running multiple PDSMAN images.
Both the Cross-System Communications data set and the PDSMAN Database were created when the first configuration was implemented. They have been defined to the second configuration and are being used to share data between the PDSMAN images.

PDSMAN Shared Data Sets
Appendix A: PDSMAN Configurations 95
Mixed Shared Environment Example
The following shows a configuration with two PDSMAN images running on different LPARs that are sharing DASD. The Cross-System Communications data set is shared but each PDSMAN image is using an independent PDSMAN Database.
The Cross-System Communications data set was created when the first configuration was implemented; it has been defined to the second configuration and is being used to share data between the PDSMAN images.
The PDSMAN Databases are independent and are being used by a specific PDSMAN image. The information recorded in the database is not shared.

PDSMAN System Linklist Library
96 Installation Guide
PDSMAN System Linklist Library
Some product facilities require PDSMAN to dynamically front-end other programs when they are executed. For this reason, the PDSMAN executable modules must be placed in the system linklist where they are always available to other tasks running on the system.
The PDSMAN System Linklist Library must be APF-authorized and part of your active system linklist set for PDSMAN to operate properly. You perform manual steps to grant APF-authorization and add the library to the linklist when you configure the product.
If you are upgrading or reinstalling PDSMAN you may already have a library that meets these requirements. You can reuse this library, but only if you are configuring using the manual method.
If you do not have an existing PDSMAN System Linklist Library, or if you are using CA MSM for configuration, a library will be allocated during the configuration process.
PDSMAN System Linklist Library Naming Considerations
We suggest you choose a name for the PDSMAN System Linklist Library that causes it to be cataloged in the master catalog instead of a user catalog. This makes it available to the system when the initial, or IPL, system linklist set is built. The location where a library is cataloged is based on the high-level qualifier of the library name.
If you prefer to use the same runtime library prefix and therefore the same high-level qualifier you used for your other runtime libraries, you will need to specify the volume serial of the PDSMAN System Linklist Library when you define it to the system linklist.
PDSMAN System Linklist Library Space Allocation Considerations
The PDSMAN System Linklist Library is allocated without secondary space extents. This prevents system errors that can occur when a library in the system linklist concatenation stores data in a secondary extent that is not recognized by the system.
This space allocation must be considered when copying product maintenance or a new release of PDSMAN into an existing linklist library. To avoid out-of-space errors, verify that enough space exists in the library before performing the copy operation.
Important! Do not change the allocation to specify secondary space extents.

PDSMAN System Linklist Library
Appendix A: PDSMAN Configurations 97
PDSMAN System Linklist Library APF-Authorization
The PDSMAN System Linklist Library must be APF-authorized.
Note: Because it is defined in the system linklist, the library is already APF-authorized if LNKAUTH=LNKLST is specified, or allowed to default, in the appropriate IEASYSxx member of your logical PARMLIB concatenation.
To authorize the library on a permanent basis, add the following to an appropriate PROGxx member in SYS1.PARMLIB:
APF ADD DSNAME(pdsman_library_name) VOLUME(volume)
where pdsman_library_name specifies the name of the library and volume specifies the DASD volume serial on which it resides.
If the library is SMS managed, instead specify:
APF ADD DSNAME(pdsman_library_name) SMS
To set the APF-authorization immediately, issue the operator command:
SET PROG=xx
where xx is the suffix for the PROGxx member you updated.
You can temporarily APF-authorize the library by issuing the following operator commands:
For non-SMS allocation:
SETPROG APF,ADD,DSN=pdsman_library_name,VOLUME=volume
Or, if the library is allocated on an SMS managed volume:
SETPROG APF,ADD,DSN=pdsman_library_name,SMS

PDSMAN System Linklist Library
98 Installation Guide
PDSMAN System Linklist Library LNKLST Definition
The PDSMAN System Linklist library must be present in the active system linklist for PDSMAN to operate properly.
You can add the library dynamically by creating and activating a new LNKLST set. For example, a new LNKLST set called LNKLST01 can be created by copying the existing LNKLST00 set and adding the PDSMAN System Linklist Library at the bottom of a new concatenation being created.
The following shows example operator commands:
SETPROG LNKLST,DEFINE,NAME=LNKLST01,COPYFROM=LNKLST00
SETPROG LNKLST,ADD,NAME=LNKLST01,DSNAME=library_name,ATBOTTOM
SETPROG LNKLST,ACTIVATE,NAME=LNKLST01
Important! You should permanently add the PDSMAN System Linklist Library to the IPL LNKLST set by updating the PROGxx or LNKLSTxx member of SYS1.PARMLIB.
If the high-level qualifier chosen for the library did not cause it to be cataloged in the master catalog, you must also specify the volume serial on which the library is allocated in the PROGxx or LNKLSTxx entry.
Other options for adding the library to the system linklist are available; consult your IBM documentation.

PDSMAN Runtime Libraries
Appendix A: PDSMAN Configurations 99
PDSMAN Runtime Libraries
A PDSMAN image executes from a set of runtime libraries that contain ISPF-related members, sample materials and other information. These libraries are created as part of the runtime environment when you configure the product. The following describes the PDSMAN runtime libraries.
Note: The CPDSCNTL, CPDSSAMP, CPDSDATA, CPDSTXT and CPDSXML runtime libraries are not allocated when using the manual configuration method.
CPDSSAMP
Contains sample materials and other information helpful for using PDSMAN. It also contains skeletons for members that are tailored during the configuration process. This library is referred to as the Sample Materials Library.
CPDSPNL0
Contains ISPF panels used by the PDSMAN ISPF interface, the EZYEDIT ISPF Productivity Platform, the Partitioned Resource Monitoring View (PRM-View) component and other product facilities.
CPDSCLS0
Contains CLISTs and REXX EXECs used primarily by the PDSMAN ISPF interface and EZYEDIT ISPF Productivity Platform.
CPDSMSG0
Contains ISPF message members used by the PDSMAN ISPF interface and EZYEDIT ISPF Productivity Platform.
CPDSSKL0
Contains ISPF JCL skeletons used by the PDSMAN ISPF interface and Partitioned Resource Monitoring View (PRM-View) component.
CPDSTBL0
Contains ISPF table members used by the PDSMAN EZYEDIT ISPF Productivity Platform.
CPDSHELP
Contains help information used by the PDSMAN TSO commands and the CA Vantage GMI interface.
CPDSDATA
Contains data members used by the PDSMAN Demonstration Job Stream ($DEMO).
CPDSTXT
Contains members that provide additional technical information about PDSMAN installation, configuration and operation. This library is referred to as the User Information Library.
CPDSXML

Members Tailored by Configuration
100 Installation Guide
Contains XML used for installing, deploying and configuring PDSMAN using CA MSM.
CPDSCNTL
Contains members tailored or used by the CA MSM configuration process. This library is referred to as the Configuration Control Library.
Members Tailored by Configuration
The CA MSM configuration method tailors template members from the PDSMAN Sample Materials Library, using target settings you provide when you build the configuration. The tailored members are written to the Configuration Control Library, one of the runtime libraries created when a CA MSM configuration is implemented. The name of this library has a low-level qualifier of CPDSCNTL.
If you use the manual configuration method, you manually tailor sample members from the PDSMAN Sample Materials Library using the instructions provided.
The following sections describe the tailored members that are part of the PDSMAN runtime environment.
PDSMINIT Rule Member
This member contains a set of default PDSMAN Initialization Control Statements also known as PDSMAN rules. These rules are used to enable product functionality and control various aspects of PDSMAN processing.
The default rules are used for initially starting the product and executing the PDSMAN Demonstration Job Stream.
The default name for this member, PDSMINIT, can be changed to make managing the rules easier in complicated PDSMAN environments. When configuring with CA MSM, change the name using the PDSMAN Environment target settings. The new name is used as needed throughout the configuration.
To change the name of this member during manual configuration, do the following:
1. Use a new member name when you copy it to the common parameter library.
2. Update the MEM parameter value in the PDSMAN JCL Procedure to reflect the new member name.

Members Tailored by Configuration
Appendix A: PDSMAN Configurations 101
PDSMAN JCL Procedure
This member contains the PDSMAN address space JCL procedure. It is used to execute the started task to which you issue operator console commands to start, stop and administer the product.
You manually copy this JCL procedure to a system procedure library or PROCLIB, when implementing the configuration.
The default name for this member, PDSMAN, can be changed to avoid naming conflicts with other PDSMAN started tasks. When configuring with CA MSM, change the name using the PDSMAN Environment target settings.
To change the name of this member during manual configuration, use a new member name when you copy it to the system procedure library.
PDSMDB JCL Procedure
This member contains the PDSMAN Database Server address space JCL procedure. It is used to execute the started task that is used to manage the PDSMAN database.
You manually copy this JCL procedure to a system procedure library or PROCLIB, when implementing the configuration.
The default name for this member, PDSMDB, can be changed to avoid naming conflicts with other PDSMAN Database Server started tasks. When configuring with CA MSM, change the name using the PDSMAN Environment target settings.
To change the name of this member during manual configuration, do the following:
1. Use a new member name when you copy it to the system procedure library.
2. Update the $DATABASE PROC= parameter in the appropriate PDSMAN Initialization Control Statement member, usually PDSMINIT, to specify the new member name.

Members Tailored by Configuration
102 Installation Guide
PDSMISPF CLIST
This member contains the TSO CLIST used for establishing a PDSMAN ISPF environment.
You manually copy this TSO CLIST into a library included in the SYSPROC concatenation of the logon procedures used by your TSO users when implementing the configuration.
The default name for this member, PDSMISPF, can be changed to avoid naming conflicts with other CLISTs. When configuring with CA MSM, change the name using the PDSMAN Environment target settings.
To change the name of this member during manual configuration, use a new member name when you copy it to the SYSPROC library.
$DEMO Job Stream
This member contains the Demonstration Job Stream used for verifying successful installation and activation of PDSMAN and for demonstrating many of the facilities provided by the product.
You can execute the demonstration after starting PDSMAN. The rules in the default Initialization Control Statement, PDSMINIT, member are specifically configured for use by this demonstration. Some additional tailoring, such as the specification of a valid job card and accounting information, is required before executing the job.

PDSMAN ISPF Environment
Appendix A: PDSMAN Configurations 103
PDSMAN ISPF Environment
Some PDSMAN facilities are designed for use in an ISPF environment. These facilities include:
■ The PDSMAN ISPF Master Menu.
■ The EZYEDIT ISPF Productivity Platform.
■ The PRM-View component of the Partitioned Resource Monitoring facility.
These facilities require access to ISPF-related members that are included with PDSMAN and copied to your runtime libraries when you configure the product:
■ TSO CLISTs and REXX EXECs copied to the CPDSCLS0 library.
■ ISPF panels copied to the CPDSPNL0 library.
■ ISPF message members copied to the CPDSMSG0 library.
■ ISPF table members copied to the CPDSTBL0 library.
■ ISPF JCL skeleton members copied to the CPDSSKL0 library.
To use the facilities, your users must have an ISPF environment suitable for PDSMAN. You establish this environment by allocating the necessary PDSMAN runtime libraries to the TSO session in which the ISPF user is running. Allocation can be performed by:
■ Using the ISPF LIBDEF service to allocate the libraries dynamically.
■ Modifying your TSO logon procedures to allocate the libraries in the JCL.
The ISPF LIBDEF service is the preferred method for most users. It provides access to the major PDSMAN ISPF facilities and is implemented by default as part of the configuration process.
Some PDSMAN online functions require you take the additional step to allocate the libraries in your TSO logon procedures. These functions include:
■ The EZYEDIT Command Shell.
■ Dynamic update of the system ISPF Command Table.
■ HELP information for PDSMAN TSO command processors.
Many PDSMAN clients use EZYEDIT and the PDSMAN ISPF Master Menu, while fewer take advantage of the Command Shell, ISPF Command Table update, or TSO command processors. If you plan to use these functions, see the instructions for modifying TSO logon procedures in TSO Logon Procedure Method (see page 105).

PDSMAN ISPF Environment
104 Installation Guide
ISPF LIBDEF Service Method
This method is implemented by default when you configure the product. It uses a TSO CLIST to dynamically allocate the necessary PDSMAN runtime libraries using the ISPF LIBDEF service. The libraries remain allocated until the user exits the PDSMAN application that was invoked, EZYEDIT or the PDSMAN ISPF Master Menu.
The PDSMISPF CLIST is tailored with the PDSMAN runtime library names during configuration. You make it available to your ISPF users by placing it in a library that is part of the SYSPROC concatenation for each user TSO Logon Procedure. If possible, choose a common SYSPROC library shared by your users and logon procedures.
Depending on your environment, the CLIST may need to be placed in more than one library for it to be available to all of your ISPF users. The member name may be different than PDSMISPF if you specified an alternate name when you built the configuration.
Note: Only the PDSMISPF CLIST needs to reside in the shared library; do not copy all of the PDSMAN CLISTs.
When you copy the member, make sure you do not inadvertently replace an existing member with the same name created by another configuration. If a naming conflict occurs, do not change the name of a member that was tailored as part of a CA MSM configuration. You may change the name of a PDSMISPF CLIST you configured using the manual method

PDSMAN ISPF Environment
Appendix A: PDSMAN Configurations 105
TSO Logon Procedure Method (Optional)
The PDSMAN runtime libraries can be allocated when a user logs on to TSO by defining them in your TSO logon procedures. The libraries remain allocated until the user logs out of the TSO session.
This method requires you modify the logon procedures used by each of your TSO users. Depending on your TSO environment, this may require you change a large number of individual logon procedures.
Modify each procedure to include the appropriate PDSMAN runtime library in the concatenations for the following DD statements:
SYSPROC
TSO CLISTs and REXX EXECs in the CPDSCLS0 runtime library.
ISPPLIB
ISPF panels in the CPDSPNL0 runtime library.
ISPMLIB
ISPF message members in the CPDSMSG0 runtime library.
ISPTLIB
ISPF table members in the CPDSTBL0 runtime library.
ISPSLIB
ISPF JCL skeleton members in the CPDSSKL0 runtime library.
SYSHELP
TSO help members and CA Vantage GMI help information in the CPDSHELP runtime library.
Note: Place the library being added before any other libraries in the concatenation that contain PDSMAN members.
Users must log off and then back on to TSO to make this change effective.

PDSMAN ISPF Environment
106 Installation Guide
Adding ISPF Menu Options
You may choose to make the PDSMAN ISPF Master Menu and the EZYEDIT platform available as options on a local ISPF menus by doing the following:
Determine the ISPF menu panel to be updated. The panel you choose varies by installation, but often is one you have previously customized for other CA Technologies or non-IBM products.
Update the panel to add entries for options E for the EZYEDIT ISPF Productivity Platform and P for the PDSMAN ISPF Master Menu. For example:
E,'CMD(PDSMISPF APPL(E))'
P,'CMD(PDSMISPF APPL(P))’
These entries use the PDSMISPF CLIST to invoke the required facility. Adjust the entries accordingly if you have renamed the CLIST.
If you have modified your TSO Logon Procedures, you can specify entries that invoke the applications directly. For example:
E,'PGM(PDSEASY) NEWAPPL(PDSM) NOCHECK SCRNAME(EZYEDIT)'
P,'PANEL(PDSMP00) NEWAPPL(PDSM) SCRNAME(PDSMAN)'
These alternative entries bypass the allocations performed by the PDSMISPF CLIST.
Invoking PDSMAN ISPF Facilities
Using the PDSMISPF CLIST
With the PDSMISPF CLIST properly tailored and installed, enter the following in the COMMAND ==> field on any ISPF panel to invoke the PDSMAN ISPF Master Menu:
TSO PDSMISPF
You invoke the PDSMAN EZYEDIT ISPF Productivity Platform by entering:
TSO PDSMISPF APPL(E)
To invoke the Partitioned Resource Monitoring View (PRM-View) component, choose option P on the PDSMAN ISPF Master Menu.
Using ISPF Menu Options
Select option E for EZYEDIT or P for the PDSMAN ISPF Master Menu from the local ISPF menu you modified previously. To invoke the PRM-View component of the Partitioned Resource Monitoring facility, choose option P on the PDSMAN ISPF Master Menu.

Before You Start PDSMAN
Appendix A: PDSMAN Configurations 107
Using ISPF Commands
If you have modified your TSO logon procedures to establish your PDSMAN ISPF environment and if you allow PDSMAN to dynamically update your ISPF command tables, you can enter the following commands on any ISPF panel to access the PDSMAN ISPF-based facilities:
PDSM
Invoke the PDSMAN ISPF Master Menu.
EZY
Invoke the EZYEDIT ISPF Productivity Platform.
PMON
Invoke the Partitioned Resource Monitoring View (PRM-View) component.
By default, PDSMAN dynamically adds these entries by updating your system ISPF command table when a user enters ISPF. For more information, see the description of the $EZYCMD control statement in appendix A of the Administrator Guide.
Before You Start PDSMAN
The topics in this section describe tasks you perform before starting PDSMAN for the first time.

Before You Start PDSMAN
108 Installation Guide
Review Enqueue Conversion Settings
PDSMAN uses enqueues and reserves to protect resources in a shared DASD environment. The setting SCOPE=SYSTEMS is used when the enqueue or reserve needs to be communicated to other systems.
Resource serialization software products convert reserves to global enqueues and communicate those enqueues to other systems that share the resources. This improves performance by reducing the number of reserves.
Important! If you use a GRS exit such as ISGNQXIT or ISGNQXITFAST to change enqueue resource names you should review the description of the $MISC ENQRCHG parameter in the Administrator Guide.
The following table shows the PDSMAN enqueues and reserves that specify SCOPE=SYSTEMS and can be converted to global enqueues by your resource serialization software.
QNAME RNAME Scope Type
PDSMENQ (all RNAMEs) SYSTEMS RESERVE
SPFEDIT (all RNAMEs) SYSTEMS ENQUEUE and RESERVE
SYSIEWLP (all RNAMEs) SYSTEMS ENQUEUE and RESERVE
PDSMTITL (all RNAMEs) SYSTEMS ENQUEUE
EDIDSN (all RNAMEs) SYSTEMS ENQUEUE
PDSMAN PDSMMCPU (only) SYSTEMS ENQUEUE
Review Compatibility Information
Occasionally, there are compatibility issues between PDSMAN and the products of other software vendors, or even with other CA products. The $COMPAT member of the PDSMAN User Information library (CPDSTXT) provides additional information on compatibility with other software products. Review the information and take any steps required to ensure the proper operation of the products involved.

Appendix B: CA LMP Licensing Keys 109
Appendix B: CA LMP Licensing Keys
This section describes how to specify PDSMAN licensing keys to the CA License Management Program (CA LMP).
This section contains the following topics:
PDSMAN Licensing Keys (see page 109)
PDSMAN Licensing Keys
During startup, PDSMAN license validation is performed by calling the CA LMP service of the CAIRIM component of CCS. For information about installing CAIRIM, activating CA LMP and coding CA LMP keys, see the CA Common Services for z/OS documentation.
Place CA LMP keys for PDSMAN in the KEYS member of the PPOPTION data set, found in the CAS9 JCL procedure.
PDSMAN Licensing Keys
110 Installation Guide
CA LMP Key Certificate
Examine the CA License Management Program (CA LMP) key certificate you received for PDSMAN. Your certificate contains the following information:
Product Name
Defines the trademarked or registered name of your product as licensed for the designated site and CPUs.
Product Code
Defines a two-character code that corresponds to the product.
Supplement
Defines the reference number of your license for a particular facility and has the following format:
nnnnnn-nnn
This format differs slightly inside and outside North America and, in some cases, the reference number may not be provided at all.
CPU ID
Defines the code that identifies the specific CPU for which installation of this product is valid.
Execution Key
Defines an encrypted code required by CA LMP for installing your product. During installation, it is referred to as the LMP code.
Expiration Date
Defines the date your license expires and has the following format:
ddmmmyy
Example: 21Mar12
Technical Contact
Defines the name of the designated technical contact at your site who is responsible for the installation and maintenance of your product. CA addresses all CA LMP correspondence to this person.
MIS Director
Defines the name of the Director of MIS or the person who performs such a function at your site. If the title but not the name of the individual is indicated on the certificate, supply the actual name when correcting and verifying the certificate.
CPU Location
Defines the address of the building in which the CPU is installed.

PDSMAN Licensing Keys
Appendix B: CA LMP Licensing Keys 111
How CA LMP Statements Are Coded
Before starting this product, you must code CA LMP statements for product license authorization.
To code CA LMP statements, do the following:
1. Install CAIRIM.
2. Activate LMP.
3. Add your product license codes to the LMP statements.
4. Place the LMP statements in the KEYS member of the PPOPTION data set.
Note: The KEYS member of the PPOPTION data set is specified in the CAS9 JCL procedure. For more information, see the CA Common Services Administration Guide.

PDSMAN Licensing Keys
112 Installation Guide
KEYS Member—Add Execution Key
You must add the CA LMP execution key, provided on your product key certificate, to the CAIRIM parameters to ensure proper initialization.
To define a CA LMP execution key to the CAIRIM parameters, modify the KEYS member.
This sample parameter structure for KEYS member has the following format:
PROD(pp) DATE(ddmmmyy) CPU(tttt-mmmm/sssss)
LMPCODE(kkkkkkkkkkkkkkkk)
Parameter definitions are as follows:
PROD(pp)
Specifies the two-character product code. This code agrees with the product code already in use by the CAIRIM initialization parameters for any earlier releases (if applicable).
For PDSMAN, valid values for pp are as follows:
GC – All PDSMAN features
FY – PDSMAN LLA/Extensions and Performance Options (Feature A)
FZ – PDSMAN Auditing and Comparison Facilities (Feature B)
F2 – PDSMAN FastCopy and Library Space Reuse (Feature C)
F3 – PDSMAN Member Archiving and Recovery (Feature D)
F6 – PDSMAN EZYEDIT and Productivity Tool Facilities (Feature E)
DATE(ddmmmyy)
Specifies the CA LMP licensing agreement expiration date, for example, 13MAR12.
CPU(tttt-mmmm/ssssss)
tttt
Specifies the CPU type on which CA LMP is to run, for example, 3090.
-mmmm
Specifies the CPU model on which CA LMP is to run, for example, 600.
Note: If the CPU type and or model require fewer than four characters, blank spaces are inserted for the unused characters.
/ssssss
Specifies the serial number of the CPU on which CA LMP is to run.
LMPCODE(kkkkkkkkkkkkkkkk)

PDSMAN Licensing Keys
Appendix B: CA LMP Licensing Keys 113
Specifies the execution key (kkkkkkkkkkkkkkkk) needed to run CA LMP. The key certificate shipped with each CA LMP software solution provides this CA LMP execution key.
Example: Add CA LMP Execution Key
The following example shows a control statement for the CA LMP execution software parameter:
PROD(GC) DATE(27JUN12) CPU(2096-E26 /370623)
LMPCODE(52H2K06130Z7RZD6)
In this example, with your product running on the specified CPU, the CA LMP licensing agreement will expire on June 27, 2012. The product code and execution key values are different when you install your product at your site.
Note: For a full description of the procedure for defining the CA LMP execution key to the CAIRIM parameters and further details about the features and associated utilities of CAIRIM, see the CA Common Services for z/OS Administration Guide.


Appendix C: Verify Your PDSMAN Installation 115
Appendix C: Verify Your PDSMAN Installation
PDSMAN provides a demonstration job stream you use to verify that major facilities of the product are operating correctly and to demonstrate many of the capabilities PDSMAN provides. This appendix describes the steps you take to execute the PDSMAN Demonstration Job Stream.
This section contains the following topics:
Locate the Demonstration Job Stream JCL (see page 115) Verify Available DASD Space (see page 115) Verify the Active PDSMAN Environment (see page 116) Tailor the $DEMO Demonstration Job Stream (see page 117) Execute the $DEMO Demonstration Job Stream (see page 117)
Locate the Demonstration Job Stream JCL
The Demonstration Job Stream JCL resides in member $DEMO. The library in which this member is located depends on the method used to configure the runtime environment:
■ If you used CA MSM SCS, the member is located in the Configuration Control Library (CPDSCNTL) that was created when you implemented the configuration.
■ If you used the manual configuration method, the member is located in your Sample Materials Library (CPDSSAMP), one of the SMP/E installation or MSM deployment libraries created earlier in the installation process.
Verify Available DASD Space
The Demonstration Job Stream requires the equivalent of approximately 180 cylinders of 3390 DASD space while it is executing. This space is used for temporary data sets that are deleted when the job completes.
The data sets are allocated using the temporary space unit name you specified during configuration.
Verify the Active PDSMAN Environment
116 Installation Guide
Verify the Active PDSMAN Environment
To execute the Demonstration Job Stream, PDSMAN must be activated with Initialization Control Statements that enable specific PDSMAN facilities for the demonstration libraries.
If you configured using CA MSM, the PDSMINIT member containing the PDSMAN rules is already tailored with the necessary control statements. All that remains is to start PDSMAN using these rules, if it is not already active.
If you configured using the manual method, you must make additional updates to the Initialization Control Statements and then reinitialize PDSMAN to make them active.
To update and activate the Initialization Control Statements:
1. Edit the PDSMINIT member containing the default rules and change all occurrences of the following strings:
#demosrclibrary
The name of the PDSMAN demonstration source library
#demolnklibrary
The name of the PDSMAN demonstration link library
Specify the name of the demonstration source and link libraries using the same prefix as you used for your SMP/E target libraries or MSM deployment libraries. This is also the prefix you used for the inputhlq string in the RUNCOPYF job stream.
For example, if you installed PDSMAN into SMP/E target libraries that begin with the prefix CAI.PDSMTGT, your demonstration source and link library names will be CAI.PDSMTGT.DEMOSRC and CAI.PDSMTGT.DEMOLNK, respectively.
2. Save the changed member.
3. Activate PDSMAN using modified rules. If PDSMAN is already active and was initialized using the member you have just tailored, you only need to reinitialize the product to make your changes active.
To activate the new rules, issue the following command from the operator console:
F PDSMAN,NEWRULES
Note: It is not necessary to completely stop and restart the product to make the rule changes active.

Tailor the $DEMO Demonstration Job Stream
Appendix C: Verify Your PDSMAN Installation 117
Tailor the $DEMO Demonstration Job Stream
Some additional tailoring is required before executing the Demonstration Job Stream:
To complete tailoring, edit the $DEMO member and do the following:
1. Update the JOB card with a job name and accounting information suitable for your environment.
2. If your installation SORT program is not in the system linklist, add an appropriate STEPLIB statement to steps PTSP22 and COMP37.
3. Save the updated member.
Execute the $DEMO Demonstration Job Stream
The Demonstration Job Stream is ready to be executed.
Some job steps end with a condition code greater than zero. The job output provides information on the expected return codes.


Appendix D: User Exit Facilities 119
Appendix D: User Exit Facilities
This section contains the following topics:
PDSMAN User Exits (see page 119) BLDL Interface Exit—PDSM018U (see page 120) STOW Interface Exit—PDSM021U (see page 122) Member Version Exit—PDSMUSR2 (see page 124) Member Control Information Interface Exit—PDSM12EX (see page 126) Distributed Sample Exits (see page 127)
PDSMAN User Exits
In some instances, you may want to alter the way PDSMAN normally processes by writing and using your own exit routines. PDSMAN supports user-written exits in the following areas:
■ The BLDL Interface routine, PDSM018.
■ The STOW Interface routine, PDSM021.
■ The Compiler Interface routine, PDSM15.
■ The Source/Executable Cross-Reference utility, PDSM28.
■ The Member Control Information utility, PDSM12.

BLDL Interface Exit—PDSM018U
120 Installation Guide
BLDL Interface Exit—PDSM018U
The BLDL Interface user exit routine, PDSM018U, can be used to modify $ACCESS rule parameters and alter the directory entry returned to the BLDL caller, thereby permitting the implementation of installation specific member access security. PDSM018U also allows data set level security systems, such as RACF and ACF2, to be augmented by the member level security provided by PDSMAN.
The exit routine is invoked during BLDL and DESERV exit post-processing when a $ACCESS rule matching the current access environment is found. If no $ACCESS rule matches the current environment, the exit routine is not invoked. To invoke PDSM018U for all library access operations, specify the following Initialization Control Statement after all other $ACCESS control statements:
$ACCESS LIB=-
For more information about the $ACCESS control statement, see the appendix Initialization Control Statements in the Administrator Guide.
Parameters are passed to the user exit routine using register 1. For more information about the parameter control block and other information about this user exit, see members SECX$DOC and PDSM018U in the PDSMAN Sample Materials library.
Activating and Reloading the BLDL Interface Exit
The PDSM018U exit is called within critical system services, such as BLDL and the DESERV exit, where stability and performance are of great importance. It is invoked in supervisor state from potentially any address space in the system. As such, the module must be loaded from an APF authorized library and linked as reentrant.
To use the PDSM018U exit routine, you must define the exit point using the system dynamic exit services, provided by the CSVDYNEX macro. PDSMAN detects the status of the exit, active or inactive, when the product is initialized or reinitialized.
The system dynamic exit service is described in the z/OS MVS Programming Authorized Assembler Service Guide and the z/OS MVS Programming Authorized Services Reference Volume 1.

BLDL Interface Exit—PDSM018U
Appendix D: User Exit Facilities 121
Activating a PDSM018U Exit
To activate a PDSM018U exit routine, do the following:
1. Add the following to a SYS1.PARMLIB member with a name in the format PROGxx, where xx is any valid unique value and modname is the name of your PDSM018U user exit module:
EXIT ADD
EXITNAME(PDSMAN.PDSM018U) MODNAME(modname)
2. Place your exit module in an APF-authorized LINKLIST library. Alternatively, you can specify the name of the library in which the exit resides on the EXIT ADD statement using the DSNAME(library.name) parameter.
3. Issue the system command SET PROG=xx to add the exit definitions to the dynamic exit service.
4. Activate the calls to the dynamic exit by starting the PDSMAN address space or reinitializing PDSMAN using the command:
F PDSMAN,NEWRULES
PDSMAN issues a PDSM00-55 message to report the status of the exit.
Reloading a PDSM018U Exit
To reload an updated copy of a PDSM018U exit routine, do the following:
1. Add the following to a SYS1.PARMLIB member with a name in the format PROGxx, where xx is any valid unique value and modname is the name of your PDSM018U user exit module:
EXIT DELETE EXITNAME(PDSMAN.PDSM018U)
MODNAME(modname) FORCE=YES
2. Issue the system command SET PROG=xx to delete the exit module. Subsequent calls to the exit will receive CSVDYNEX RC=4 with error reason=0406. PDSMAN detects this condition, marks the exit inactive and stops making further calls.
3. Update the module containing the user exit code as needed.
4. Add the module back to the dynamic exit service using the instructions provided in the previous procedure, Activating a PDSM018U Exit.
STOW Interface Exit—PDSM021U
122 Installation Guide
STOW Interface Exit—PDSM021U
The STOW Interface user exit routine, PDSM021U, can be used to modify $UPDATE rule parameters and alter the directory entry being stowed, thereby permitting the implementation of installation specific member update security requirements. PDSM021U also allows data set level security systems, such as RACF and ACF2, to be augmented by the member level security provided by PDSMAN.
The exit routine is invoked during STOW and DESERV exit pre-processing when a $UPDATE rule matching the current update environment is found. If no $UPDATE rule matches the current environment, the exit routine is not invoked. To invoke PDSM021U for all library update operations, specify the following Initialization Control Statement after all other $UPDATE control statements:
$UPDATE LIB=-
For more information about the $UPDATE control statement, see the appendix Initialization Control Statements in the Administrator Guide.
Parameters are passed to the user exit routine using register 1. For more information about the parameter control block and other information about this user exit, see members SECX$DOC and PDSM021U in the PDSMAN Sample Materials library.
Activating and Reloading the STOW Interface Exit
The PDSM021U exit is called within critical system services, such as STOW and the DESERV exit, where stability and performance are of great importance. It is invoked in supervisor state from potentially any address space in the system. As such, the module must be loaded from an APF authorized library and linked as reentrant.
To use the PDSM021U exit routine, you must define the exit point using the system dynamic exit services, provided by the CSVDYNEX macro. PDSMAN detects the status of the exit, active or inactive, when the product is initialized or reinitialized.
The system dynamic exit service is described in the z/OS MVS Programming Authorized Assembler Service Guide and the z/OS MVS Programming Authorized Services Reference Volume 1.

STOW Interface Exit—PDSM021U
Appendix D: User Exit Facilities 123
Activating a PDSM021U Exit
To activate a PDSM021U exit routine, do the following:
1. Add the following to a SYS1.PARMLIB member with a name in the format PROGxx, where xx is any valid unique value and modname is the name of your PDSM021U user exit module:
EXIT ADD
EXITNAME(PDSMAN.PDSM021U) MODNAME(modname)
2. Place your exit module in an APF-authorized LINKLIST library. Alternatively, you can specify the name of the library in which the exit resides on the EXIT ADD statement using the DSNAME(library.name) parameter.
3. Issue the system command SET PROG=xx to add the exit definitions to the dynamic exit service.
4. Activate the calls to the dynamic exit by starting the PDSMAN address space or reinitializing PDSMAN using the command:
F PDSMAN,NEWRULES
PDSMAN issues a PDSM00-55 message to report the status of the exit.
Reloading a PDSM021U Exit
To reload an updated copy of a PDSM021U exit routine, do the following:
1. Add the following to a SYS1.PARMLIB member with a name in the format PROGxx, where xx is any valid unique value and modname is the name of your PDSM021U user exit module:
EXIT DELETE EXITNAME(PDSMAN.PDSM021U)
MODNAME(modname) FORCE=YES
2. Issue the system command SET PROG=xx to delete the exit module. Subsequent calls to the exit will receive CSVDYNEX RC=4 with error reason=0406. PDSMAN detects this condition, marks the exit inactive and stops making further calls.
3. Update the module containing the user exit code as needed.
4. Add the module back to the dynamic exit service using the instructions provided in the previous procedure, Activating a PDSM021U Exit.

Member Version Exit—PDSMUSR2
124 Installation Guide
Member Version Exit—PDSMUSR2
The Member Version user exit routine, PDSMUSR2, is invoked by the Compiler Interface (PDSM15) to provide or modify source member version information, or change Compiler Interface processing options. PDSMUSR2 is also invoked from the Source/Executable Cross-Reference utility, PDSM28, to select or format load module IDR records. For more information about the Source/Executable Cross-Reference utility, see the Auditing and Comparison Facilities User Guide.
The source code for a full-function PDSMUSR2 sample is supplied in the PDSMAN Sample Materials library. This sample exit contains helpful comments on the function and installation of the user exit and also documents the control block that is passed to the user exit in machine-readable form. This exit is also distributed in object form and installed in the linklist as part of the normal installation process.
For more information about the parameters passed to the PDSMUSR2 exit routine, see the distributed PDSMUSR2 sample exit in the PDSMAN Sample Materials library.
PDSMUSR2 Invoked from PDSM15
The PDSMUSR2 exit is invoked from the Compiler Interface, PDSM15, and is passed the processing options that have been specified on the $COMPILER control statement. PDSMUSR2 is also passed version information if a source member is being compiled and has member control information or ISPF statistics recorded. Any of this information can be altered by the exit routine. Code supplied in the distributed exit routine can also supply version information for members being compiled from CA Panvalet for z/OS or CA Librarian libraries.
PDSMUSR2 Invoked from PDSM28
The PDSMUSR2 exit is also invoked from the Source/Executable Cross-Reference utility, PDSM28. The exit can reformat output print or header lines and select or exclude records from the report.
Member Version Exit—PDSMUSR2
Appendix D: User Exit Facilities 125
Activating the Member Version Exit
The PDSMUSR2 exit is called from two separate points: by the Compiler Interface, PDSM15, and by the PDSM28 Source/Executable Version Reporting utility. The exit is invoked in problem state, from potentially any address space in the system, when a program named on a $COMPILER rule is executed.
By default, the PDSMUSR2 exit module distributed by PDSMAN is called for this exit processing. To change the name of the PDSMUSR2 exit module, specify the name of your exit module using the $MISC USR2NAME= parameter.
Note: When executing PDSM28, the user exit module name setting can be overridden using the UEXIT execution parameter.
For more information about the $MISC control statement, see the appendix Initialization Control Statements in the Administrator Guide.
To activate a user-tailored exit or module name for the PDSMUSR2 exit:
1. Place the PDSMUSR2 exit module in a library that is available to all jobs that execute programs defined on a $COMPILER rule; usually the module is placed in a system linklist library.
2. Add or update the PDSMAN $MISC Initialization Control Statement with the USR2NAME parameter as follows:
$MISC USR2NAME=modname
where modname is the name of your PDSMUSR2 exit module. If this parameter is not specified, the module named PDSMUSR2 is called.
3. Activate the calls to the exit by starting the PDSMAN address space or reinitializing PDSMAN using the command:
F PDSMAN,NEWRULES

Member Control Information Interface Exit—PDSM12EX
126 Installation Guide
Member Control Information Interface Exit—PDSM12EX
The Member Control Information Interface exit routine, PDSM12EX, allows you to add, delete or change member control information on a member-by-member basis. This provides a way to migrate an existing library management facility such as CA Panvalet or CA Librarian to standard PDS format while maintaining the member control information from the library management system.
PDSM12EX is invoked from the PDSM12 utility. The exit is only invoked if PDSM12EX is found in the JOBLIB/STEPLIB concatenation or in the system linklist. PDSM12EX is invoked for library members or aliases matching the PDSM12 selection criteria. The exit receives control in 31-bit mode.
If PDSM12 is performing a REMOVE operation any changes to member control information made by the user exit are ignored. For more information about the PDSM12 utility, see the Member Archiving and Recovery Facilities User Guide.
For more information about the parameters passed to the PDSM12EX exit routine, see the distributed PDSM12EX sample exit in the PDSMAN Sample Materials library.
For information about the layouts of the user data area for load module and non-load module member directory entries, see the Directory Entry User Data Format Descriptions (see page 129). You must ensure that any changed fields are consistent with the PDSMAN member control information formats.
Activating the Member Control Information Interface Exit
The primary purpose of the PDSM12EX exit is to assist in conversions by allowing the installation to provide member control information. As such, this exit is intended to be used only when its specialized processing is required by specific jobs.
To change the name of the called exit, you must specify the UEXIT= parameter when executing PDSM12. If not specified, the PDSM12EX exit will be called if it is present.
For example, to activate a user-tailored PDSM12EX module for a specific execution of PDSM12, add the ',UEXIT=modname' parameter to the PDSM12 EXEC PARM statement:
//PDSM12 EXEC PGM=PDSM12,PARM='/ADDREUSE,UEXIT=EXIT12'
//PDSMPDS DD DSN=sample.dataset,DISP=SHR
In the above example, all members of the PDSMPDS data set are processed using the ADDREUSE function and the module named EXIT12 is invoked as the PDSM12EX user exit.

Distributed Sample Exits
Appendix D: User Exit Facilities 127
Distributed Sample Exits
Samples of the user exits are distributed in the PDSMAN Sample Materials library. The following table describes the samples available:
User Exit Member Description
PDSMUSR2 PDSMUSR2 Full function exit with CA Librarian and CA Panvalet support.
PDSM018U PDSM018U Skeleton exit containing BLDL parameter definitions.
PDSM018U SECX$DOC Documentation for a member level access security implementation using RACROUTE.
PDSM021U PDSM021U Skeleton exit containing STOW parameter definitions.
PDSM021U SECX$DOC Documentation for a member level update security implementation using RACROUTE.
PDSM12EX PDSM12XL Tool for migration of CA Librarian statistics to a PDS.
PDSM12EX PDSM12LD Skeleton exit to record control information in load module directory entries.


Appendix E: Directory Entry User Data Format Descriptions 129
Appendix E: Directory Entry User Data Format Descriptions
This appendix describes the format of the user data fields maintained by PDSMAN in both non-load and load module directory entries.
This section contains the following topics:
ISPF Directory Entry Format (see page 129) CA SCM for Mainframe Directory Entry Format (see page 131) PDSMAN Load Module Directory Entry Format (see page 132)
ISPF Directory Entry Format
For members of non-load libraries, PDSMAN records member control information using the ISPF directory statistics format, amended as shown in the following table. PDSMAN makes use of fields not used by ISPF and reuses two fields to record more meaningful information.
This information is placed at the beginning of the directory user data area.
Offset Length Description Value/ Format
0 1 Version Level. 1 - 99
1 1 Modification Level. 1 - 99
2 2 SCLM flags and the second’s portion of the ISPF time last modified.
(Note 2)
2 Bit 0 Production Status Indicator. (Note 3)
2 Bits 1-15 Last Reference Date. (Note 1)
4 4 ISPF Creation Date. 0CYYDDDF
8 4 Date Last Modified. 00YYDDDF
12 2 ISPF Time Last Modified. HHMM
14 2 ISPF Current number of lines.
14 Bit 0 Production Status Indicator. (Note 3)
14 Bits 1-15 Last Reference Date (Note 1)
16 2 ISPF initial number of lines.

ISPF Directory Entry Format
130 Installation Guide
16 Bit 0 Expiration Base Date Indicator.
16 Bits 1-15 Expiration Base Date. (Note 1)
18 2 ISPF Number of lines modified.
20 7 Updating TSO User ID or first 7 characters of security ID.
For more information, see the $BSI USER= parameter in the Appendix Initialization Control Statements in the Administrator Guide.
27 3 When ISPF Extended Statistics are not present, this is a reserved field set to blanks when member is updated using ISPF.
(Note 2)
27 1 When ISPF Extended Statistics are present, a single blank.
(Note 2)
28 3 When ISPF Extended Statistics are present, the current number of lines.
(Note 2)
32 3 When ISPF Extended Statistics are present, the initial number of lines.
(Note 2)
36 4 When ISPF Extended Statistics are present, the number of modified lines.
(Note 2)
Notes:
1. PDSMAN Last Reference and Expiration Base dates are recorded as 15 bit binary values. The binary format of the value varies depending on the date being recorded. These values are intended primarily for PDSMAN internal use. For a detailed description of these values contact Technical Support or logon to CA Support Online and reference PDSMAN problem record number 93.
2. ISPF Extended Statistics, which were introduced with z/OS 1.11, are present if both of the following conditions are true:
■ The length of the directory user data is X’14’ halfwords instead of the normal length for ISPF statistics of X’0F’ halfwords.
■ Bit three of byte two in the directory entry is on.
3. When ISPF Extended Statistics are present, PDSMAN records the Production Status Indicator and Last Reference Date at offset 14 instead of offset 2.
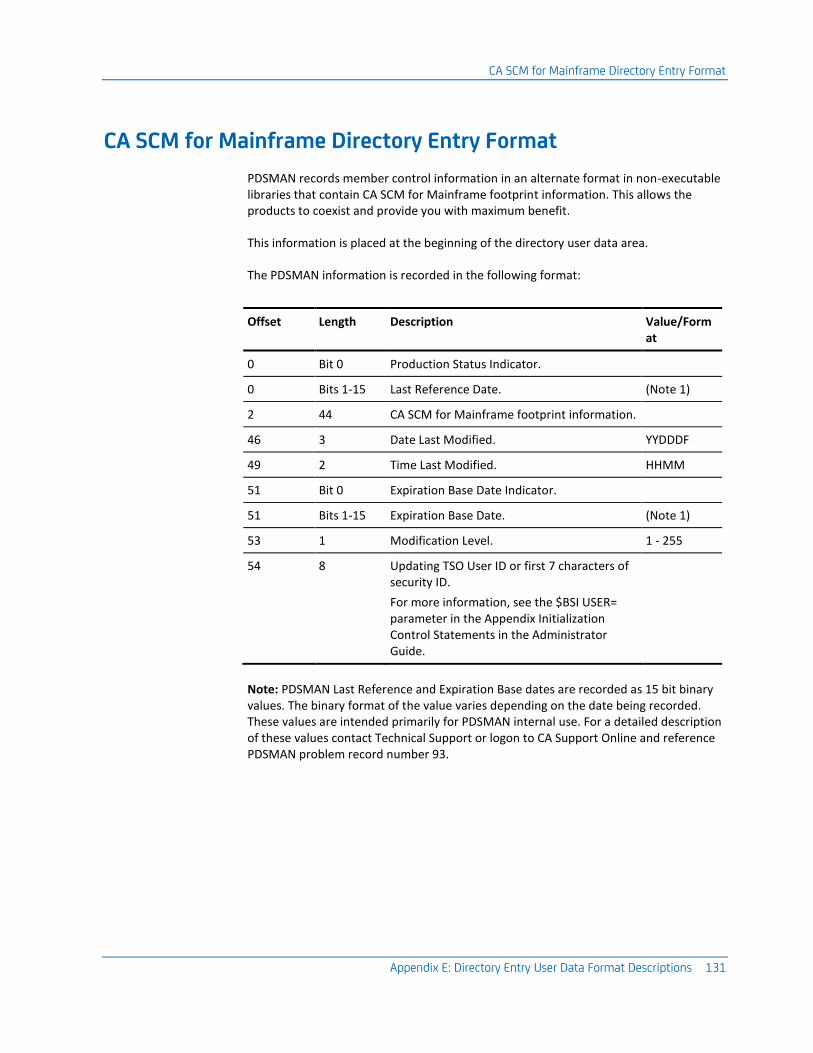
CA SCM for Mainframe Directory Entry Format
Appendix E: Directory Entry User Data Format Descriptions 131
CA SCM for Mainframe Directory Entry Format
PDSMAN records member control information in an alternate format in non-executable libraries that contain CA SCM for Mainframe footprint information. This allows the products to coexist and provide you with maximum benefit.
This information is placed at the beginning of the directory user data area.
The PDSMAN information is recorded in the following format:
Offset Length Description Value/Format
0 Bit 0 Production Status Indicator.
0 Bits 1-15 Last Reference Date. (Note 1)
2 44 CA SCM for Mainframe footprint information.
46 3 Date Last Modified. YYDDDF
49 2 Time Last Modified. HHMM
51 Bit 0 Expiration Base Date Indicator.
51 Bits 1-15 Expiration Base Date. (Note 1)
53 1 Modification Level. 1 - 255
54 8 Updating TSO User ID or first 7 characters of security ID.
For more information, see the $BSI USER= parameter in the Appendix Initialization Control Statements in the Administrator Guide.
Note: PDSMAN Last Reference and Expiration Base dates are recorded as 15 bit binary values. The binary format of the value varies depending on the date being recorded. These values are intended primarily for PDSMAN internal use. For a detailed description of these values contact Technical Support or logon to CA Support Online and reference PDSMAN problem record number 93.

PDSMAN Load Module Directory Entry Format
132 Installation Guide
PDSMAN Load Module Directory Entry Format
The PDSMAN member control information in a load module directory entry has the following format:
Offset Length Description Value/Format
0 1 Reserved.
1 3 Date Last Modified. YYDDDF
4 2 Time Last Modified. HHMM
6 3 Expiration Base Date. YYDDDF
9 1 Modification Level. 1 - 255
10 8 Updating TSO User ID or first 7 characters of security ID.
For more information, see the $BSI USER= parameter in the Appendix Initialization Control Statements in the Administrator Guide.
18 Bit 0 Production Status Indicator.
18 Bits 1-15 Reserved.
19 3 Last Reference Date. YYDDDF
This information is placed at the end of the user data area, following any linkage editor data, in each directory entry.

Appendix F: Using a PDSMAN Test Environment 133
Appendix F: Using a PDSMAN Test Environment
This section describes the steps that are required to establish, activate, and access a PDSMAN Test Environment.
PDSMAN allows you to execute both a production and a test image of the product on the same operating system image. This can be useful when installing a new product release, testing product maintenance, or diagnosing a problem. The test image runs in the PDSMAN Test Environment, which you access using a STEPLIB that points to a library containing the test modules.
Note: You can execute the PDSMAN Test Environment with or without an active production PDSMAN environment.
This section contains the following topics:
How You Establish the Test Environment (see page 133) Activate and Access the Test Environment (see page 136) How You Execute the Demonstration Job Stream in the Test Environment (see page 138)
How You Establish the Test Environment
To establish the PDSMAN Test Environment:
1. Install the test PDSMAN Initialization Control Statements in a parameter library.
2. Ensure the STEPLIB library containing the test modules is APF authorized.
3. Establish communication between the test and production images.
4. Install the PDSMAN Test Environment Address Space JCL procedure in a system JCL procedure library.
5. Install the PDSMAN Test Environment Database Server Address Space JCL procedure in a system JCL procedure library.
6. Make the test versions of the PDSMAN ISPF Environment Libraries available to your online users.

How You Establish the Test Environment
134 Installation Guide
Install the Test Initialization Control Statements
PDSMAN uses Initialization Control Statements, also known as rules, to control its processing. These Initialization Control Statements specify which PDSMAN facilities are enabled and the libraries on which the facilities will operate. The Initialization Control Statements are read by the address space, through DD name PDSMINIT, when the test environment is started or reinitialized.
If you are upgrading from a previous release of PDSMAN, testing product maintenance, or diagnosing a problem, you will already have a customized set of Initialization Control Statements. You can use these same rules to initialize your test environment.
If you plan to execute the PDSMAN Demonstration Job Stream, you should use the sample control statements provided in member PDSMINIT of the Sample Materials library. This set of rules has been specifically written for the demonstration. Copy the sample member to another library before making any changes. Do not update the SMP/E target or MSM deployment library copy of the member.
Record the location of the Initialization Control Statements you plan to use. You need this information when tailoring the PDSMANT address space JCL procedure.
Authorize the STEPLIB Library
The PDSMAN Test Environment executes program modules from a STEPLIB library that must be APF authorized. Frequently, the CPDSLINK SMP/E target or MSM deployment library is used as the STEPLIB library.
You must specify the name of the STEPLIB library in the PDSMANT address space JCL procedure and you must also specify the STEPLIB name in the PDSMDBT database server address space JCL procedure.
At this time, ensure that the library being used as the STEPLIB is APF authorized.
Establish Production and Test Image Communication
PDSMAN uses the Cross-System Communication facility (PDSMMCPU) to communicate information between the production and test images. The address space JCL procedures for both environments (PDSMAN and PDSMANT) should include a PDSMMCPU DD statement pointing to the same communication data set.
If you are executing a production image of PDSMAN, review your production procedure and record the name of the communications data set, adding a PDSMMCPU DD statement if it does not already exist. You must know the name of the communications data set when tailoring the PDSMANT address space JCL procedure.

How You Establish the Test Environment
Appendix F: Using a PDSMAN Test Environment 135
Install the Address Space JCL Procedure
The PDSMAN Test Environment executes in a dedicated address space that is started using a supplied JCL procedure. This JCL procedure must reside in a library that is part of your system PROCLIB concatenation. A sample JCL procedure is provided in member PDSMANT of your Sample Materials library.
Copy the sample procedure to a system procedure library where you can modify it. If you have an existing PDSMANT procedure, you should be careful not to regress any modifications you made previously.
Follow the tailoring instructions in the sample JCL comments.
Install the Database Server Address Space JCL Procedure
The test environment PDSMAN Database Server task also executes in a dedicated address space. This address space is automatically started by PDSMAN using a supplied JCL procedure. This JCL procedure must reside in a library that is part of your system PROCLIB concatenation. A sample JCL procedure is provided in member PDSMDBT of your Sample Materials library.
Copy the sample procedure to a system procedure library. If you have an existing PDSMDBT procedure, you should be careful not to regress any modifications you made previously.
Follow the tailoring instructions in the sample JCL comments.
Make Your ISPF Environment Libraries Available
You can access test versions of the panels, CLISTs and other members required to make the product operate in an online, ISPF environment. Frequently, the corresponding SMP/E target or MSM deployment libraries are used for this purpose.
You must make these libraries available to the TSO and ISPF users who are using the test environment. You can do this by modifying your TSO logon procedures or by using a combination of ISPF LIBDEFs and TSO CLISTs or REXX EXECs.
Note: Regardless of the method you choose for making the ISPF environment libraries available, you must add an appropriate STEPLIB statement to the TSO logon procedure to access the PDSMAN Test Environment executable modules.

Activate and Access the Test Environment
136 Installation Guide
TSO Logon Procedure Method
You can define the libraries containing the test members in a test TSO logon procedure. The following table lists the PDSMAN library identifier and the corresponding TSO logon procedure DD statement:
Identifier TSO Logon Procedure DDName
CPDSCLS0 SYSPROC
CPDSHELP SYSHELP
CPDSMSG0 ISPMLIB
CPDSPNL0 ISPPLIB
CPDSSKL0 ISPSLIB
CPDSTBL0 ISPTLIB
We suggest that you include the PDSMAN libraries directly in the appropriate ddname concatenation. You must place the library containing the test version members before any other libraries containing PDSMAN members.
LIBDEF Method
You can use a combination of ISPF LIBDEFs and TSO CLISTs or REXX EXECs to establish the necessary ISPF environment for using the test PDSMAN image. This allows for a more flexible implementation than does not modify your logon procedures. Using this method, a TSO CLIST or REXX EXEC calls the ISPF LIBDEF service to perform the allocations for the required ISPF libraries.
Note: This method requires you to be familiar with ISPF and the LIBDEF service.
A sample TSO CLIST is provided in member PDSMTEST of your Sample Materials library.
Copy the sample TSO CLIST to a library where it is available to all of your TSO/ISPF users. If you have an existing member by this name, you should be careful not to regress any modifications you made previously.
Follow the tailoring instructions in the sample CLIST.
Note: By default, commands added to the ISPF command table by PDSMAN do not invoke this CLIST to establish the ISPF environment.
Activate and Access the Test Environment
The following sections describe how you can activate and access the test environment.

Activate and Access the Test Environment
Appendix F: Using a PDSMAN Test Environment 137
Start the Test Environment
Initialize the PDSMAN Test Environment by executing the PDSMANT procedure you previously copied to your system procedure library. This procedure starts the PDSMANT address space, initializes the test image of the product, and waits to service operator modify commands.
Start PDSMANT by issuing the following command from the operator console:
S PDSMANT
Access the Test Environment
PDSMAN facilities and programs, and any user or system programs, can access the PDSMAN Test Environment by including a STEPLIB DD statement that specifies the name of the test library named in the PDSMANT procedure.
Other libraries can be concatenated with this library as needed. Any program, procedure, or logon procedure that specifies the test library as a STEPLIB will have its processing directed to the test image.
In an online environment, the way you access the required ISPF panel, message, and other libraries depends on whether you have previously added them to your test logon procedure or if they are to be accessed using the PDSMTEST CLIST.
Disable the Test Environment
To disable a test PDSMAN image, issue one of the following commands from the operator console:
F PDSMANT,STOP
P PDSMANT
For more information about these commands, see the Administrator Guide.
A PDSM00-16 message is issued to indicate that the removal is complete.
Important! Do not cancel the PDSMANT address space to disable the product.

How You Execute the Demonstration Job Stream in the Test Environment
138 Installation Guide
How You Execute the Demonstration Job Stream in the Test Environment
PDSMAN provides a demonstration job stream you can use to verify that the major facilities of the product are operating correctly and to demonstrate a number of the capabilities PDSMAN provides. You can execute the Demonstration Job Stream in a PDSMAN Test Environment or using your production PDSMAN environment.
The Demonstration Job Stream requires the equivalent of approximately 180 cylinders of 3390 DASD space while it is executing. This space is used for temporary data sets that are deleted when the job successfully completes.
The PDSMAN Demonstration Job Stream is in member $DEMO of your Sample Materials library.
To execute the Demonstration Job Stream:
1. Initialize the test PDSMAN image using the appropriate Initialization Control Statements.
2. Tailor and submit the $DEMO JCL member.
Activate the Demonstration Job Stream Initialization Control Statements
The Demonstration Job Stream requires PDSMAN be initialized with a certain set of Initialization Control Statements that specify the PDSMAN facilities to be enabled for the demonstration libraries.
The easiest way to activate these rules is to initialize the test PDSMAN image using the Initialization Control Statements found in member PDSMINIT of your Sample Materials library. Copy this member to another library and make any necessary changes to the copied version. Do not modify the member in the SMP/E target or MSM deployment libraries. For more information about initializing the product with these rules, see the section Install the Test Initialization Control Statements.
In either case, you must tailor the rules located in PDSMINIT and then reinitialize the test PDSMAN image to make them active.
You must tailor the following strings in the control statements:
String Description
#demosrclibrary The name of the PDSMAN demonstration source library
#demolnklibrary The name of the PDSMAN demonstration link library

How You Execute the Demonstration Job Stream in the Test Environment
Appendix F: Using a PDSMAN Test Environment 139
Specify the name of the demonstration source and link libraries using the same prefix as you used for your SMP/E target libraries or MSM deployment libraries. This is also the prefix you used for the inputhlq string in the RUNCOPYF and RUNCOPYS maintenance job streams.
For example, if you installed PDSMAN into SMP/E target zone libraries that begin with the prefix CAI.PDSMTGT, your demonstration source and link library names will be CAI.PDSMTGT.DEMOSRC and CAI.PDSMTGT.DEMOLNK, respectively.
Activate PDSMAN using these tailored rules. If PDSMAN is already active and was initialized using the member you have just tailored, you only need to reinitialize the product to make your changes active.
To activate the new rules, issue the following commands from the operator console:
F PDSMANT,NEWRULES
Note: It is not necessary to completely stop and restart the product to make the rule changes active.
Execute the $DEMO Demonstration Job Stream
The PDSMAN Demonstration Job Stream is used to verify that the major facilities of the product are operating correctly and to demonstrate a number of the capabilities PDSMAN provides.
A sample demonstration job stream is provided in member $DEMO of your Sample Materials library.
Copy the sample JCL to another library where you can modify it. Change the job card and other job related JCL as required for your environment. Then follow the tailoring instructions provided in the JCL comments before submitting the job stream.
Note: If the SORT program your installation uses is not in the system linklist, add an appropriate STEPLIB statement to steps PTSP22 and COMP37 of the Demonstration Job Stream.
Some job steps end with a condition code greater than zero. The job output provides information on the expected return codes.


Index 141
Index
A
access requirements • 25, 30 allocate and mount • 31
C
CA MSM usage scenarios • 19 CAI.SAMPJCL
library • 49 sample jobs • 49
CAtoMainframe.txt • 35 contacting technical support • 3 copy files to USS directory • 34, 35, 38 copy product files • 34 create product directory • 39 create product-specific directory • 40 customer support, contacting • 3
D
directory cleanup • 45 directory structure • 30 download files • 27
E
external HOLDDATA • 47
F
files using ESD • 27 free space • 30
G
GIMUNZIP utility • 40
H
hash setting • 40 high-level qualifier • 40 HOLDDATA • 47
external • 47 internal • 47
I
IEBCOPY • 49 installing
from Pax-Enhanced ESD • 25
from tape • 49 Integrated Cryptographic Services Facility (ICSF) • 40 internal HOLDDATA • 47
J
Java version support • 40
M
maintenance • 46
O
options • 34 overview • 25
P
process overview • 25 product directory cleanup • 45 product download window • 27 product-level directory • 39
R
read me • 25, 40
S
sample JCL • 49 sample jobs • 35, 39 set up USS directory • 30 support, contacting • 3
T
tape, installing from • 49 technical support, contacting • 3 to mainframe through a PC • 38
U
Unpackage.txt • 39 UNZIPJCL • 40 using batch JCL • 35