Embed Size (px)
Citation preview

Applications & Tools
Answers for industry.
Deckblatt
PCS 7 in Practice - Smart Alarm Hiding
SIMATIC PCS 7 V7.0 and higher
Application Example December 2011
2 Smart Alarm Hiding
V 3.1, Entry ID: 55699984
Cop
yrig
ht ©
Sie
men
s A
G 2
011
All
right
s re
serv
ed
Industry Automation and Drive Technologies Service & Support Portal
This article is taken from the Service Portal of Siemens AG, Industry Automation and Drive Technologies. The following link takes you directly to the download page of this document:
http://support.automation.siemens.com/WW/view/en/55699984
If you have any questions about this document, please contact us under the following e-mail address:
For further information on this topic, you may also actively use our Technical Forum in the Service & Support Portal. Add your questions, suggestions and problems and discuss them in our large forum community:
http://www.siemens.com/forum-applications
Smart Alarm Hiding V 3.1, Entry ID: 55699984 3
Cop
yrig
ht ©
Sie
men
s A
G 2
011
All
right
s re
serv
ed
s
SIMATIC PCS 7 Smart Alarm Hiding
Application Example
Task Description and Solution
1
Basic Information 2
Configuration and Settings
3
Summary of Functions 4
Glossary 5
Links & Literature 6
History 7
Warranty and Liability
4 Smart Alarm Hiding
V 3.1, Entry ID: 55699984
Cop
yrig
ht ©
Sie
men
s A
G 2
011
All
right
s re
serv
ed
Warranty and Liability
Note The application examples are not binding and do not claim to be complete with regard to configuration, equipment or any contingencies. The application examples do not represent customer-specific solutions; they are only intended to provide support for typical applications. You are solely responsible for the correct operation of the described products. These application examples do not relieve you of your responsibility to use sound practices in application, installation, operation and maintenance. When using these application examples, you recognize that we will not be liable for any damage/claims beyond the liability clause described. We reserve the right to make changes to these application examples at any time without prior notice. If there are any deviations between the recommendations provided in this application example and other Siemens publications (e.g. catalogs), the contents of the other documents shall have priority.
We do not accept any liability for the information contained in this document.
Any claims against us – based on whatever legal reason – resulting from the use of the examples, information, programs, engineering and performance data etc., described in this Application Example shall be excluded. Such an exclusion shall not apply in the case of mandatory liability, e.g. under the German Product Liability Act (“Produkthaftungsgesetz”), in case of intent, gross negligence, or injury of life, body or health, guarantee for the quality of a product, fraudulent concealment of a deficiency or violation of fundamental contractual obligations. Damages for a breach of a substantial contractual obligation are, however, limited to the foreseeable damage, typical for the type of contract, except in the event of intent or gross negligence or injury to life, body or health. The above provisions do not imply a change in the burden of proof to your detriment.
It is not permissible to transfer or copy these Application Examples or excerpts thereof without express authorization from Siemens Industry Sector.
Table of Contents
Smart Alarm Hiding V 3.1, Entry ID: 55699984 5
Cop
yrig
ht ©
Sie
men
s A
G 2
011
All
right
s re
serv
ed
Table of Contents
Warranty and Liability ................................................................................................. 4
1 Task Description and Solution......................................................................... 6 1.1 Function................................................................................................ 6 1.2 Solution ................................................................................................ 6
2 Basic Information .............................................................................................. 8 2.1 Important alarm displays ...................................................................... 8 2.2 Suppression of alarms........................................................................ 10 2.3 Acknowledgment-triggered reporting (ATR) ...................................... 10 2.4 Filtering of alarms............................................................................... 11 2.5 Evaluation of alarms........................................................................... 11
3 Configuration and Settings ............................................................................ 14 3.1 Manual Alarm Hiding.......................................................................... 14 3.2 Automatic Alarm Hiding...................................................................... 17 3.2.1 Configuration of operating states ....................................................... 18 3.2.2 Configuration of the "StateRep" status block ..................................... 19 3.2.3 Configuration of the block group ........................................................ 22 3.2.4 Configuration of the hiding matrix ...................................................... 25 3.2.5 Compiling the OS ............................................................................... 26 3.2.6 Behavior in OS Runtime..................................................................... 28 3.2.7 The principle of automatic alarm hiding ............................................. 35
4 Summary of Functions.................................................................................... 36
5 Glossary ........................................................................................................... 37
6 Links & Literature ............................................................................................ 37 6.1 Bibliographic references..................................................................... 37 6.2 Internet Links...................................................................................... 37
7 History............................................................................................................... 38
1 Task Description and Solution 1.1 Function
6 Smart Alarm Hiding
V 3.1, Entry ID: 55699984
Cop
yrig
ht ©
Sie
men
s A
G 2
011
All
right
s re
serv
ed
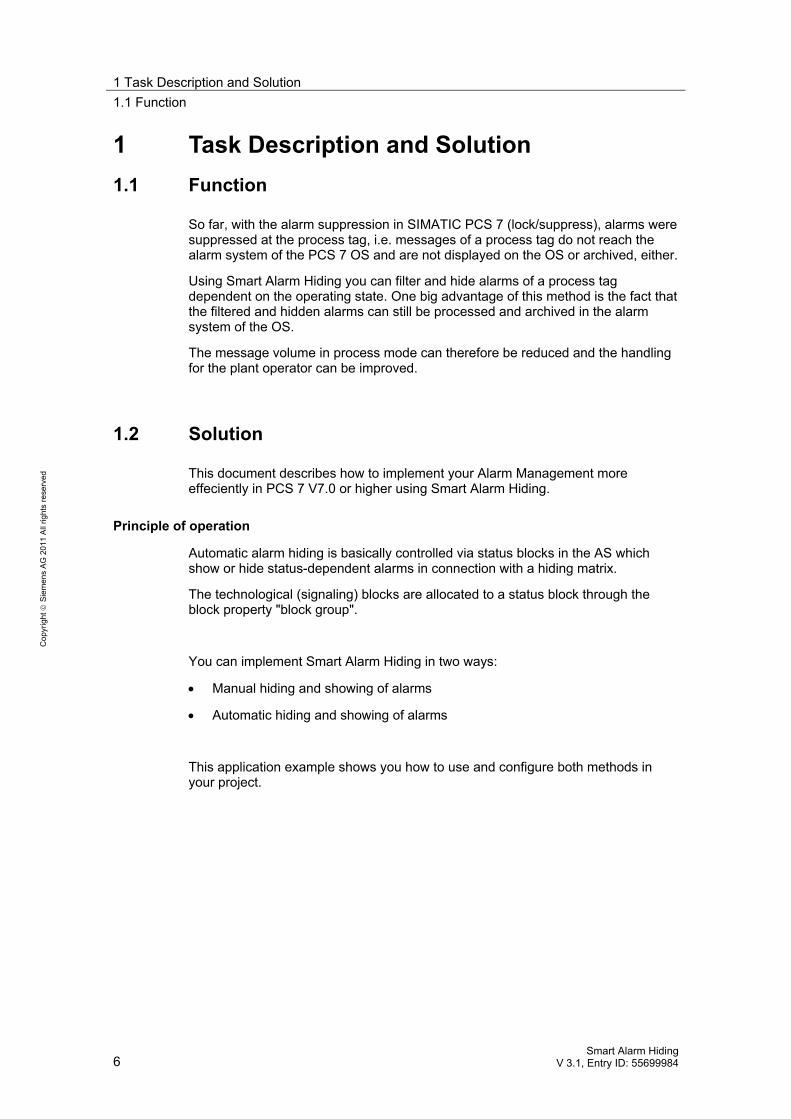
1 Task Description and Solution 1.1 Function
So far, with the alarm suppression in SIMATIC PCS 7 (lock/suppress), alarms were suppressed at the process tag, i.e. messages of a process tag do not reach the alarm system of the PCS 7 OS and are not displayed on the OS or archived, either.
Using Smart Alarm Hiding you can filter and hide alarms of a process tag dependent on the operating state. One big advantage of this method is the fact that the filtered and hidden alarms can still be processed and archived in the alarm system of the OS.
The message volume in process mode can therefore be reduced and the handling for the plant operator can be improved.
1.2 Solution
This document describes how to implement your Alarm Management more effeciently in PCS 7 V7.0 or higher using Smart Alarm Hiding.
Principle of operation
Automatic alarm hiding is basically controlled via status blocks in the AS which show or hide status-dependent alarms in connection with a hiding matrix.
The technological (signaling) blocks are allocated to a status block through the block property "block group".
You can implement Smart Alarm Hiding in two ways:
• Manual hiding and showing of alarms
• Automatic hiding and showing of alarms
This application example shows you how to use and configure both methods in your project.
1 Task Description and Solution1.2 Solution
Smart Alarm Hiding V 3.1, Entry ID: 55699984 7
Cop
yrig
ht ©
Sie
men
s A
G 2
011
All
right
s re
serv
ed
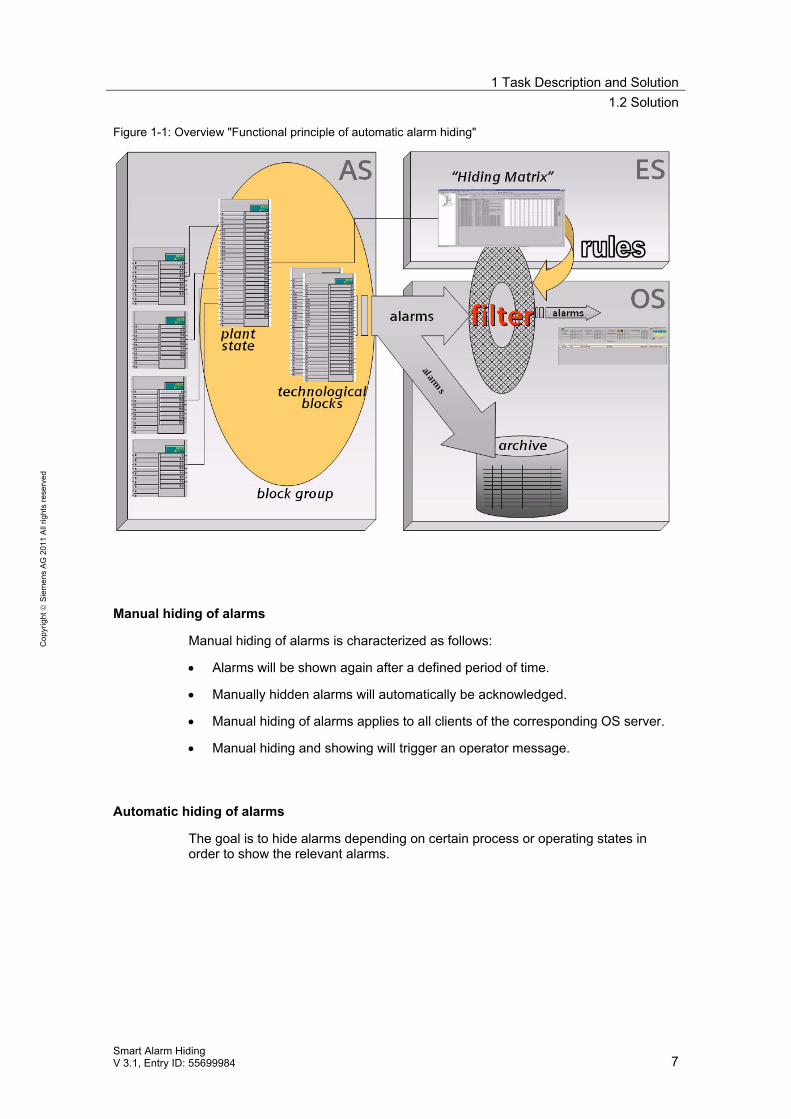
Figure 1-1: Overview "Functional principle of automatic alarm hiding"
Manual hiding of alarms
Manual hiding of alarms is characterized as follows:
• Alarms will be shown again after a defined period of time.
• Manually hidden alarms will automatically be acknowledged.
• Manual hiding of alarms applies to all clients of the corresponding OS server.
• Manual hiding and showing will trigger an operator message.
Automatic hiding of alarms
The goal is to hide alarms depending on certain process or operating states in order to show the relevant alarms.
2 Basic Information 2.1 Important alarm displays
8 Smart Alarm Hiding
V 3.1, Entry ID: 55699984
Cop
yrig
ht ©
Sie
men
s A
G 2
011
All
right
s re
serv
ed
2 Basic Information
The following section gives a short summary of the Alarm Management functions already available in PCS 7 V6.1.
2.1 Important alarm displays
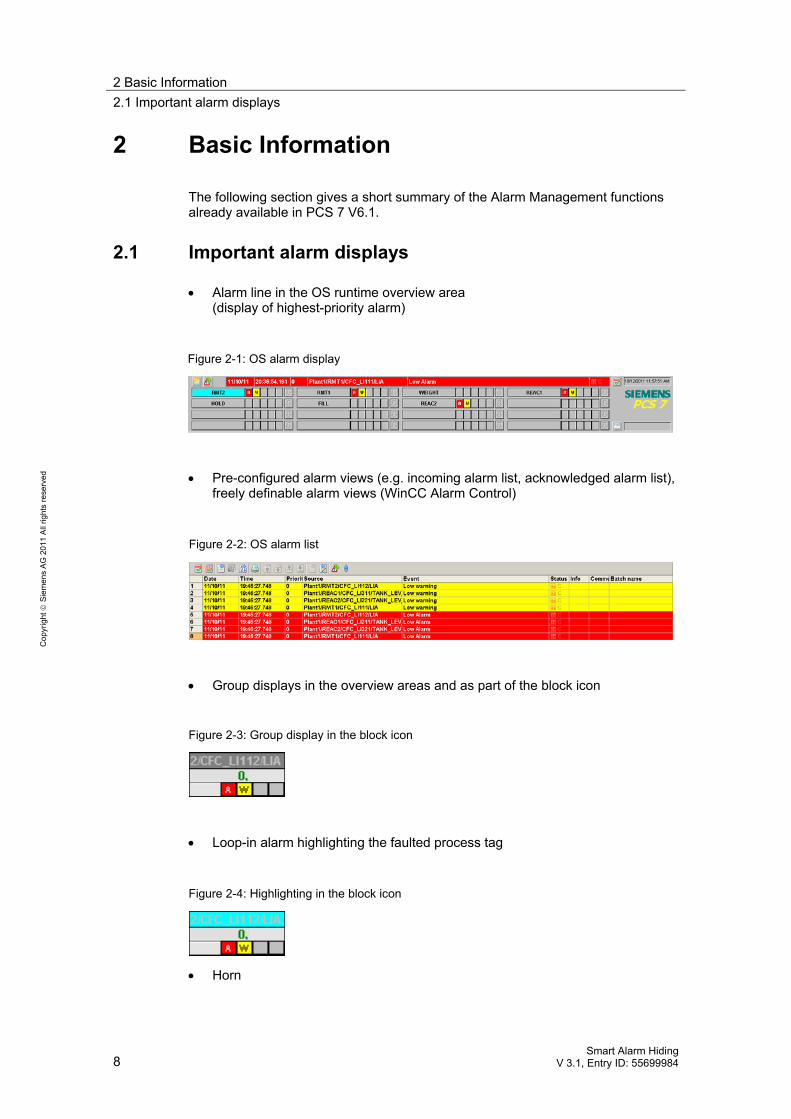
• Alarm line in the OS runtime overview area (display of highest-priority alarm)
Figure 2-1: OS alarm display
• Pre-configured alarm views (e.g. incoming alarm list, acknowledged alarm list), freely definable alarm views (WinCC Alarm Control)
Figure 2-2: OS alarm list
• Group displays in the overview areas and as part of the block icon
Figure 2-3: Group display in the block icon
• Loop-in alarm highlighting the faulted process tag
Figure 2-4: Highlighting in the block icon
• Horn
2 Basic Information2.1 Important alarm displays
Smart Alarm Hiding V 3.1, Entry ID: 55699984 9
Cop
yrig
ht ©
Sie
men
s A
G 2
011
All
right
s re
serv
ed
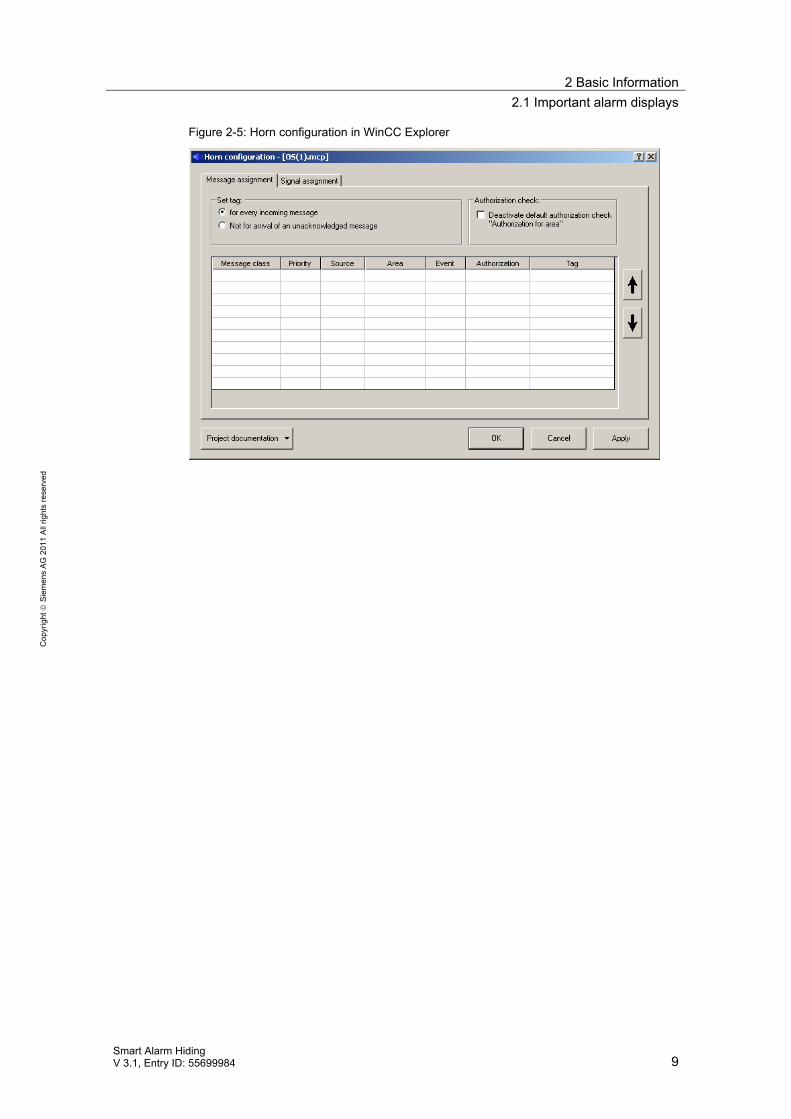
Figure 2-5: Horn configuration in WinCC Explorer
2 Basic Information 2.2 Suppression of alarms
10 Smart Alarm Hiding
V 3.1, Entry ID: 55699984
Cop
yrig
ht ©
Sie
men
s A
G 2
011
All
right
s re
serv
ed
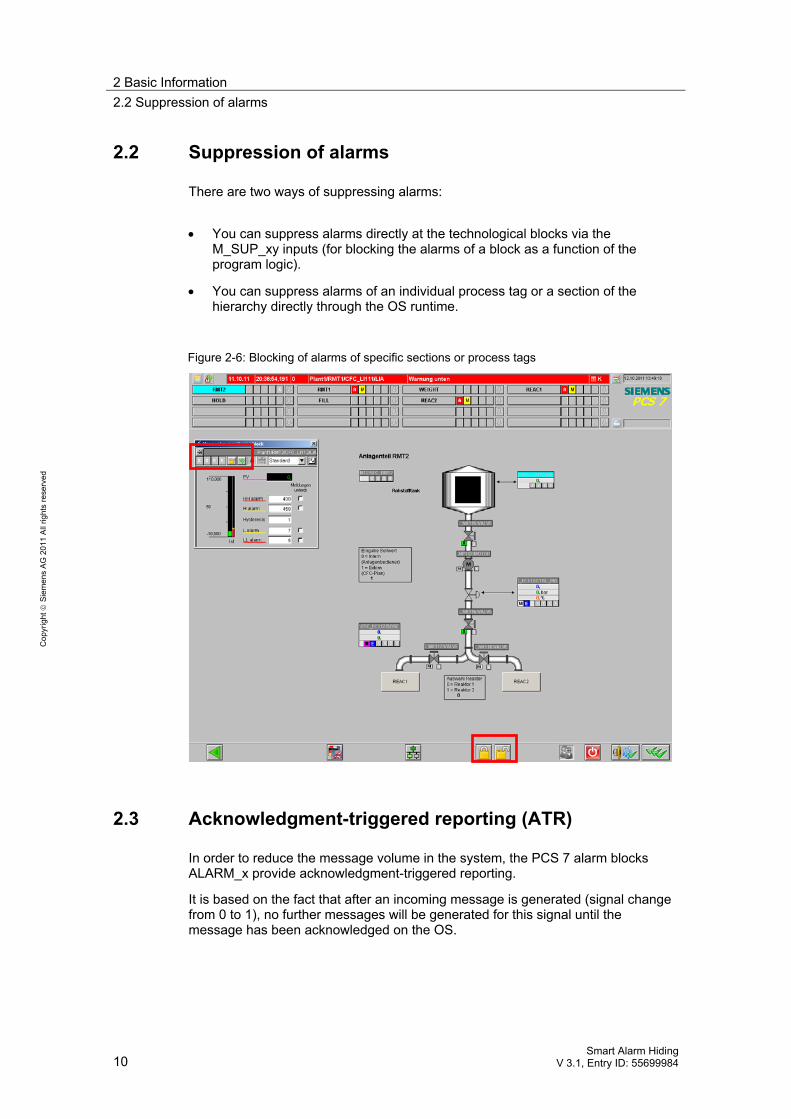
2.2 Suppression of alarms
There are two ways of suppressing alarms:
• You can suppress alarms directly at the technological blocks via the M_SUP_xy inputs (for blocking the alarms of a block as a function of the program logic).
• You can suppress alarms of an individual process tag or a section of the hierarchy directly through the OS runtime.
Figure 2-6: Blocking of alarms of specific sections or process tags
2.3 Acknowledgment-triggered reporting (ATR)
In order to reduce the message volume in the system, the PCS 7 alarm blocks ALARM_x provide acknowledgment-triggered reporting.
It is based on the fact that after an incoming message is generated (signal change from 0 to 1), no further messages will be generated for this signal until the message has been acknowledged on the OS.
2 Basic Information2.4 Filtering of alarms
Smart Alarm Hiding V 3.1, Entry ID: 55699984 11
Cop
yrig
ht ©
Sie
men
s A
G 2
011
All
right
s re
serv
ed
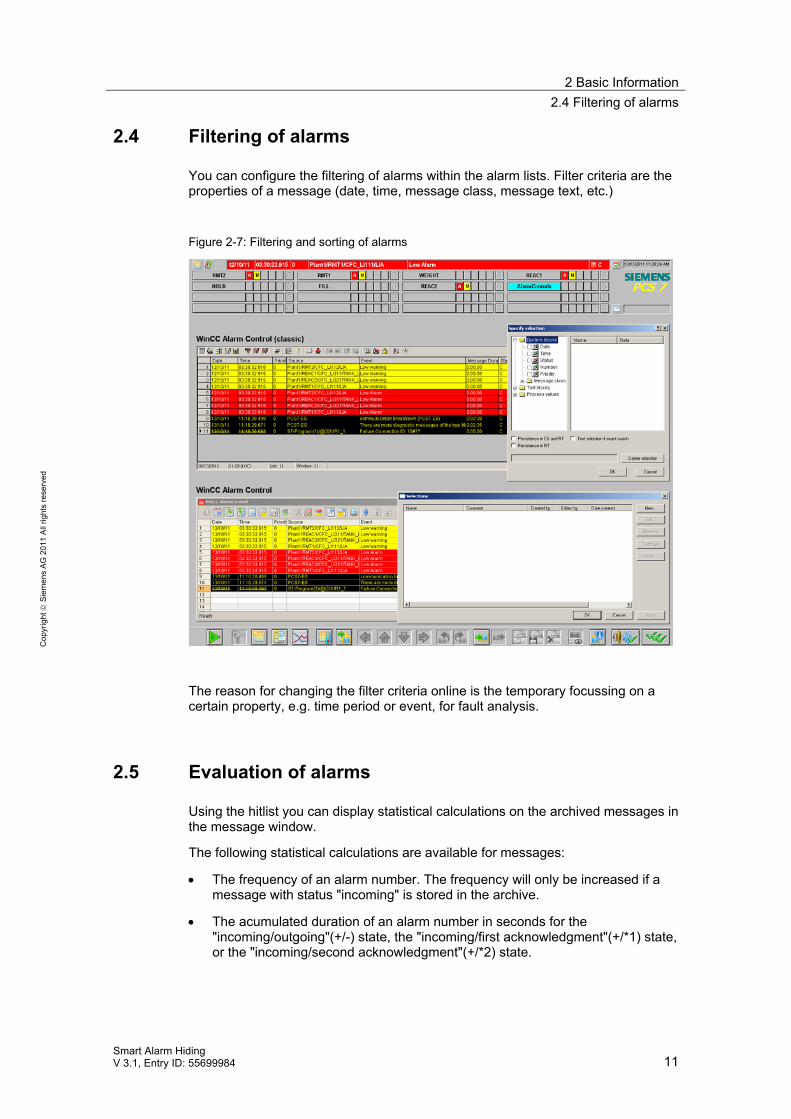
2.4 Filtering of alarms
You can configure the filtering of alarms within the alarm lists. Filter criteria are the properties of a message (date, time, message class, message text, etc.)
Figure 2-7: Filtering and sorting of alarms
The reason for changing the filter criteria online is the temporary focussing on a certain property, e.g. time period or event, for fault analysis.
2.5 Evaluation of alarms
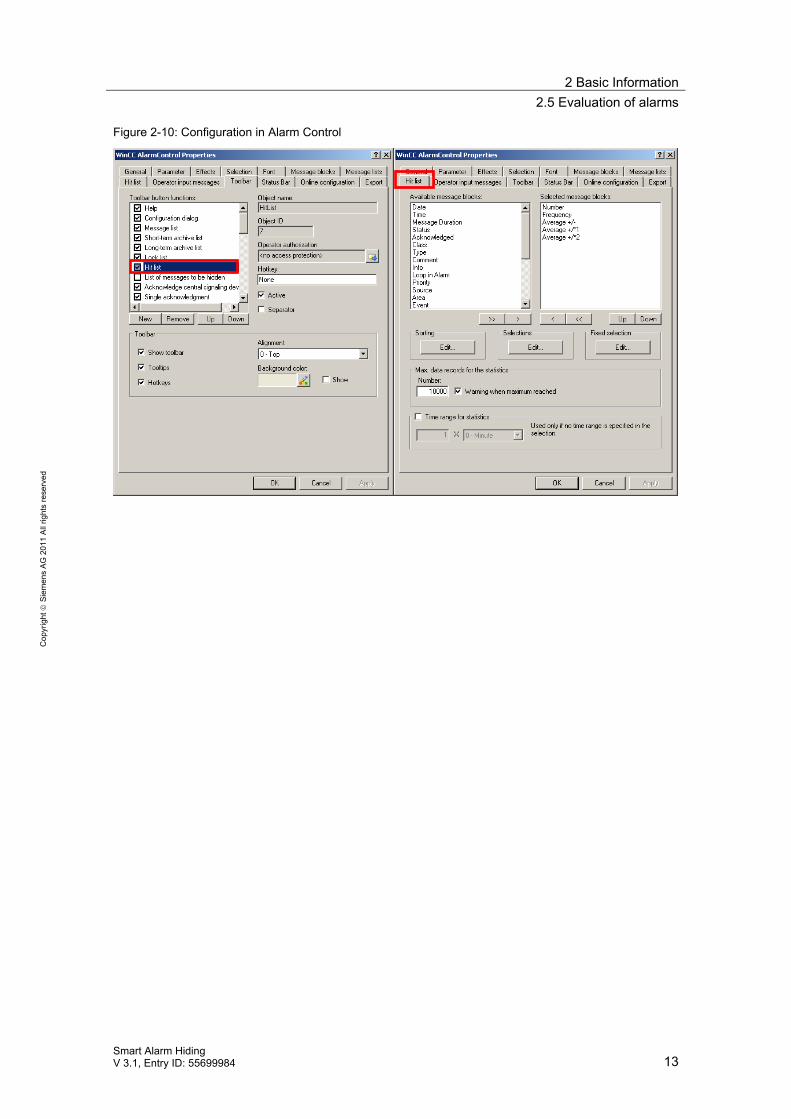
Using the hitlist you can display statistical calculations on the archived messages in the message window.
The following statistical calculations are available for messages:
• The frequency of an alarm number. The frequency will only be increased if a message with status "incoming" is stored in the archive.
• The acumulated duration of an alarm number in seconds for the "incoming/outgoing"(+/-) state, the "incoming/first acknowledgment"(+/*1) state, or the "incoming/second acknowledgment"(+/*2) state.

2 Basic Information 2.5 Evaluation of alarms
12 Smart Alarm Hiding
V 3.1, Entry ID: 55699984
Cop
yrig
ht ©
Sie
men
s A
G 2
011
All
right
s re
serv
ed
• The mean duration of an alarm number in seconds for the "incoming/outgoing"(+/-) state, the "incoming/first acknowledgment"(+/*1) state, or the "incoming/second acknowledgment"(+/*2) state.
Note The acknowledgment states "acknowledgment", "system acknowledgment", and "emergency acknowledgment" only are taken into account for the statistical calculation of the acknowledgment times.
Figure 2-8: Hitlist icon in older WinCC versions
Figure 2-9: Hitlist
2 Basic Information2.5 Evaluation of alarms
Smart Alarm Hiding V 3.1, Entry ID: 55699984 13
Cop
yrig
ht ©
Sie
men
s A
G 2
011
All
right
s re
serv
ed
Figure 2-10: Configuration in Alarm Control
3 Configuration and Settings 3.1 Manual Alarm Hiding
14 Smart Alarm Hiding
V 3.1, Entry ID: 55699984
Cop
yrig
ht ©
Sie
men
s A
G 2
011
All
right
s re
serv
ed
3 Configuration and Settings 3.1 Manual Alarm Hiding
Manual alarm hiding lets you temporarily hide pending alarms that are not relevant for the current operating state.
Note Manual alarm hiding is OS-server-specific.
If an alarm is manually hidden on an OS client, this alarm will not be visible on any client that also accesses the associated server.
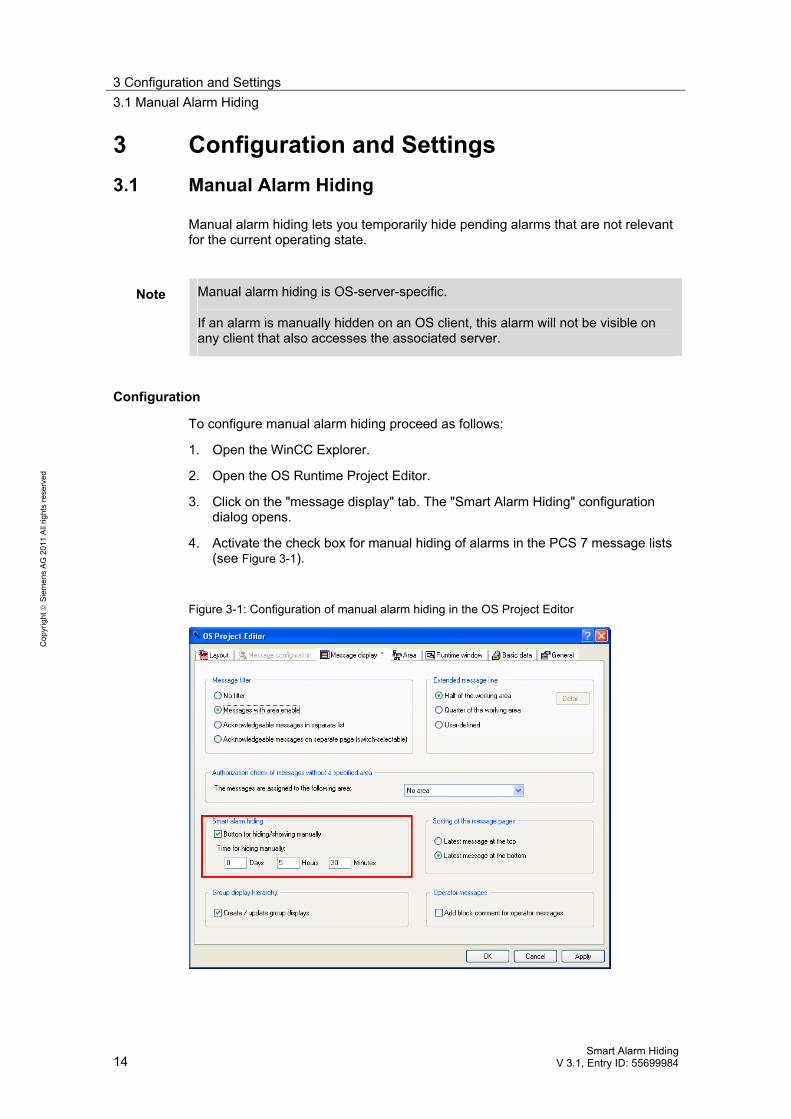
Configuration
To configure manual alarm hiding proceed as follows:
1. Open the WinCC Explorer.
2. Open the OS Runtime Project Editor.
3. Click on the "message display" tab. The "Smart Alarm Hiding" configuration dialog opens.
4. Activate the check box for manual hiding of alarms in the PCS 7 message lists (see Figure 3-1).
Figure 3-1: Configuration of manual alarm hiding in the OS Project Editor
3 Configuration and Settings3.1 Manual Alarm Hiding
Smart Alarm Hiding V 3.1, Entry ID: 55699984 15
Cop
yrig
ht ©
Sie
men
s A
G 2
011
All
right
s re
serv
ed
Note In addition, you can set the time period on the server, after wich a manually hidden alarm will be shown again.
Note Changing the hiding times and displaying the key for manual hiding are delta-loadable.
Configuration in OS Runtime
To perform the configuration in OS Runtime proceed as follows:
1. Activate OS Runtime.
2. In the WinCC Alarm Control views "message list", "short-term archive list", and "long-term archive list" you can manually hide the messages (bulb icon).
Note Manually hidable alarms of the message list are automatically acknowledged when hidden.
After the configured hiding time period the alarms are shown again.
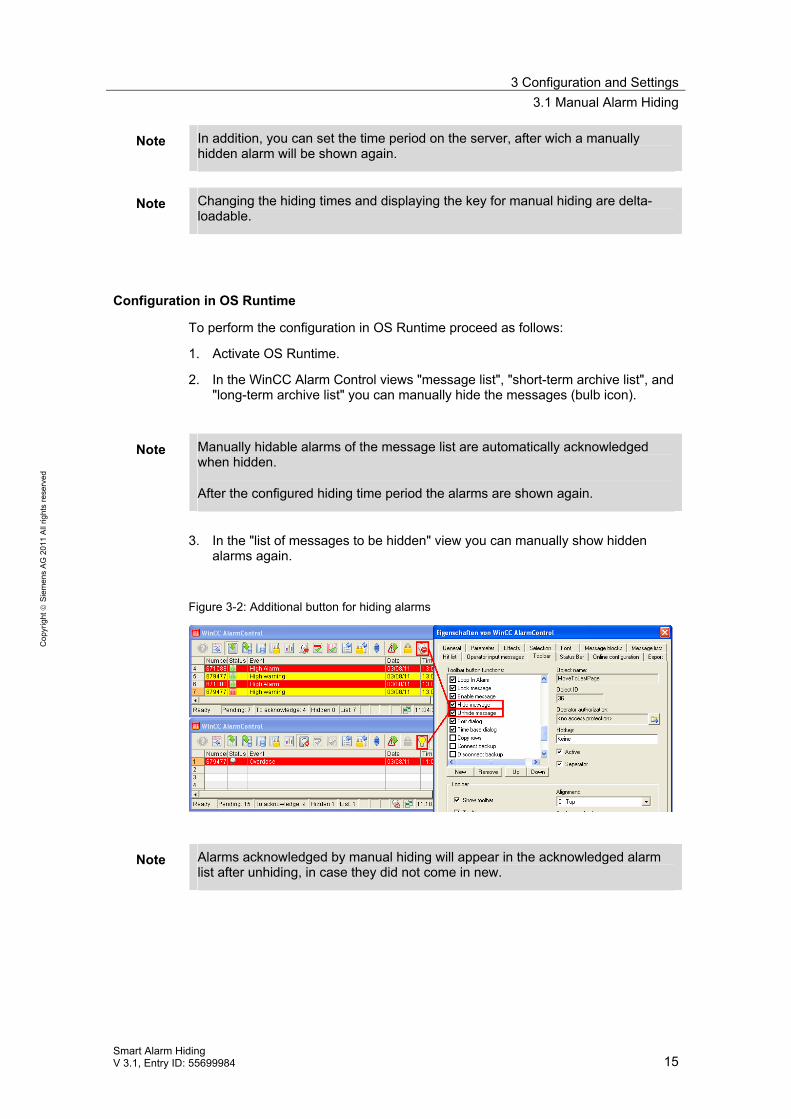
3. In the "list of messages to be hidden" view you can manually show hidden
alarms again.
Figure 3-2: Additional button for hiding alarms
Note Alarms acknowledged by manual hiding will appear in the acknowledged alarm list after unhiding, in case they did not come in new.
3 Configuration and Settings 3.1 Manual Alarm Hiding
16 Smart Alarm Hiding
V 3.1, Entry ID: 55699984
Cop
yrig
ht ©
Sie
men
s A
G 2
011
All
right
s re
serv
ed
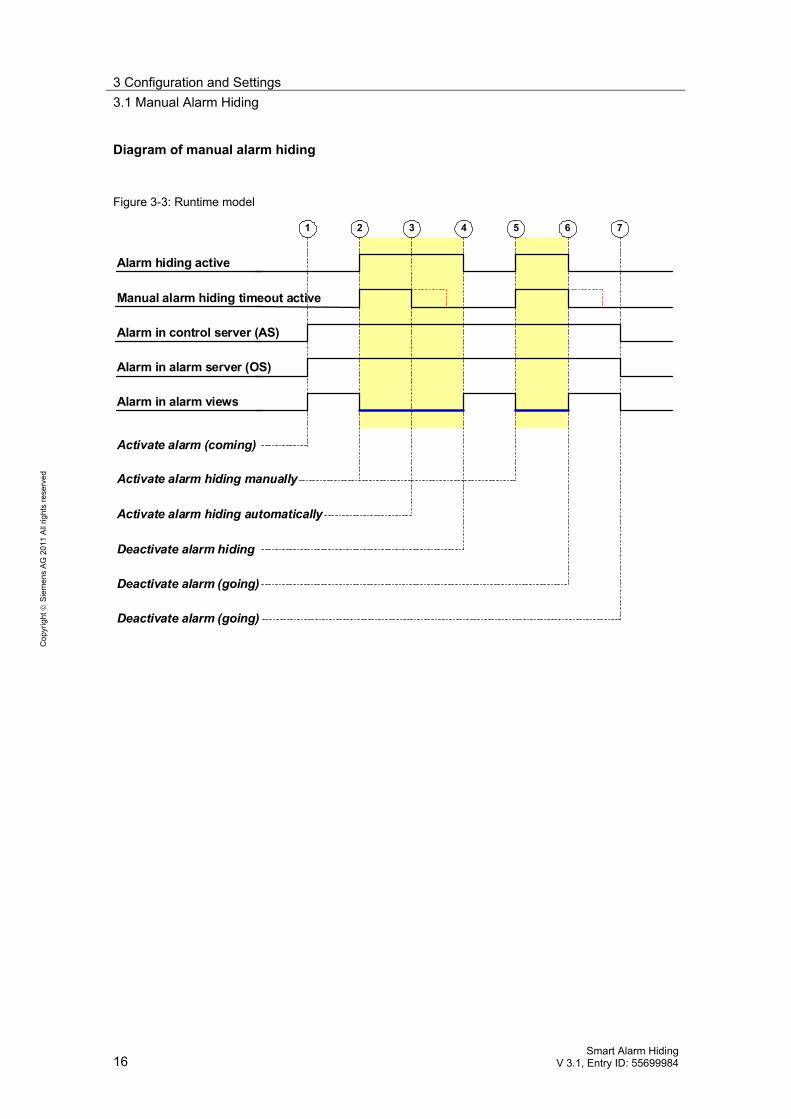
Diagram of manual alarm hiding
Figure 3-3: Runtime model
Manual alarm hiding timeout active
Alarm in alarm server (OS)
Alarm in alarm views
1 2 3 4 6
Activate alarm hiding automatically
Deactivate alarm hiding
Activate alarm (coming)
Alarm hiding active
Deactivate alarm (going)
Alarm in control server (AS)
Activate alarm hiding manually
Deactivate alarm (going)
5 7
3 Configuration and Settings3.2 Automatic Alarm Hiding
Smart Alarm Hiding V 3.1, Entry ID: 55699984 17
Cop
yrig
ht ©
Sie
men
s A
G 2
011
All
right
s re
serv
ed
3.2 Automatic Alarm Hiding
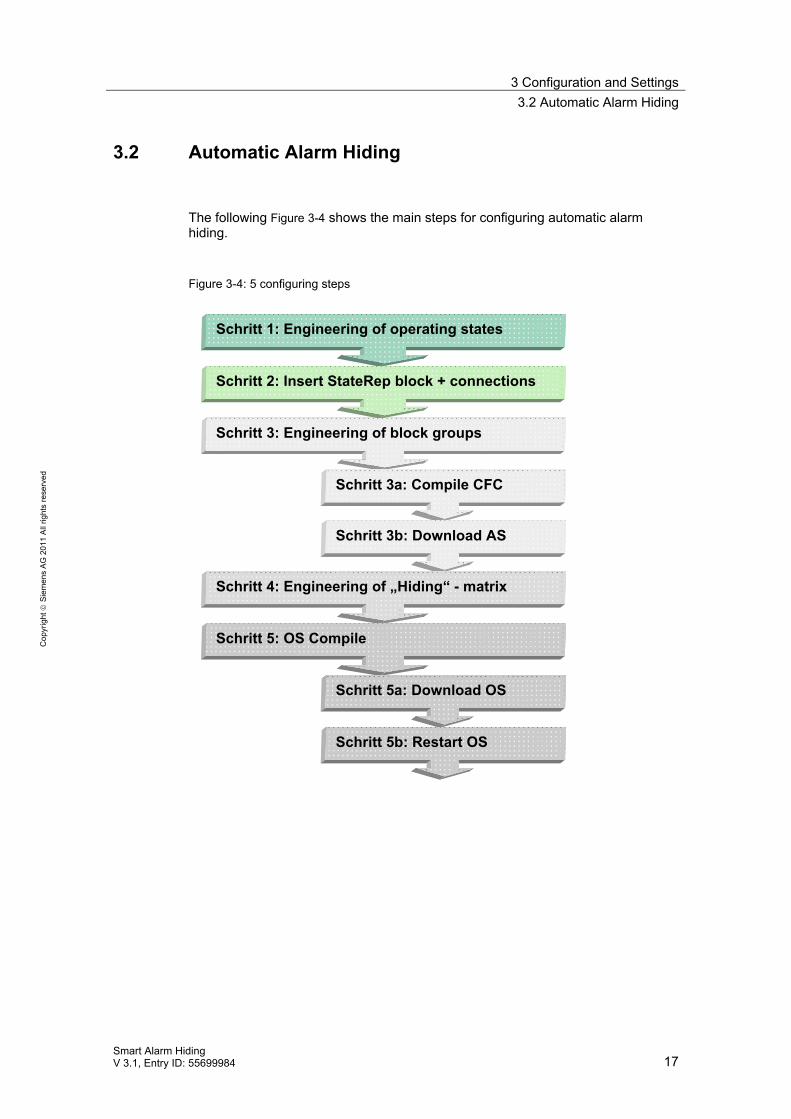
The following Figure 3-4 shows the main steps for configuring automatic alarm hiding.
Figure 3-4: 5 configuring steps
Schritt 1: Engineering of operating states
Schritt 2: Insert StateRep block + connections
Schritt 3: Engineering of block groups
Schritt 3a: Compile CFC
Schritt 3b: Download AS
Schritt 4: Engineering of „Hiding“ - matrix
Schritt 5: OS Compile
Schritt 5a: Download OS
Schritt 5b: Restart OS
3 Configuration and Settings 3.2 Automatic Alarm Hiding
18 Smart Alarm Hiding
V 3.1, Entry ID: 55699984
Cop
yrig
ht ©
Sie
men
s A
G 2
011
All
right
s re
serv
ed
3.2.1 Configuration of operating states
Procedure
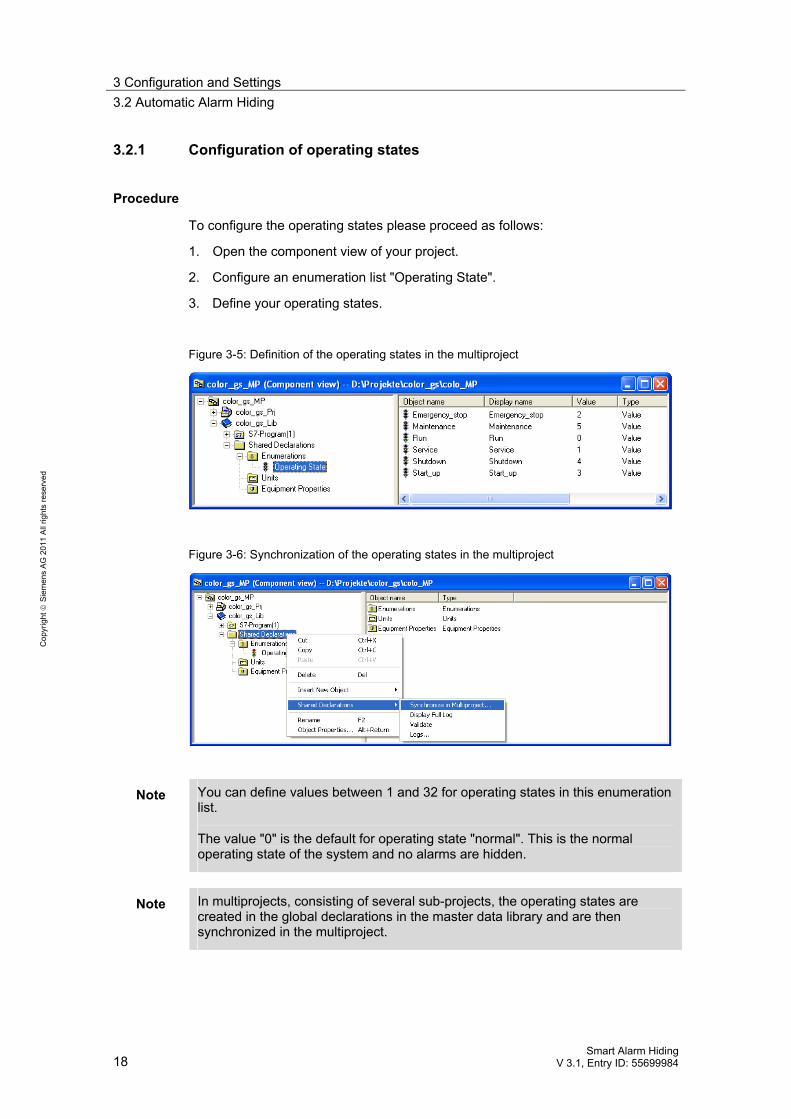
To configure the operating states please proceed as follows:
1. Open the component view of your project.
2. Configure an enumeration list "Operating State".
3. Define your operating states.
Figure 3-5: Definition of the operating states in the multiproject
Figure 3-6: Synchronization of the operating states in the multiproject
Note You can define values between 1 and 32 for operating states in this enumeration list.
The value "0" is the default for operating state "normal". This is the normal operating state of the system and no alarms are hidden.
Note In multiprojects, consisting of several sub-projects, the operating states are created in the global declarations in the master data library and are then synchronized in the multiproject.
3 Configuration and Settings3.2 Automatic Alarm Hiding
Smart Alarm Hiding V 3.1, Entry ID: 55699984 19
Cop
yrig
ht ©
Sie
men
s A
G 2
011
All
right
s re
serv
ed
3.2.2 Configuration of the "StateRep" status block
This technological block serves to convert Boolean input signals into the corresponding operating state.
Procedure
To configure the "StateRep" status please proceed as follows:
1. Open the group "Maint" of the library.
2. Add the technological block "StateRep" to a CFC chart of a corresponding subsystem.
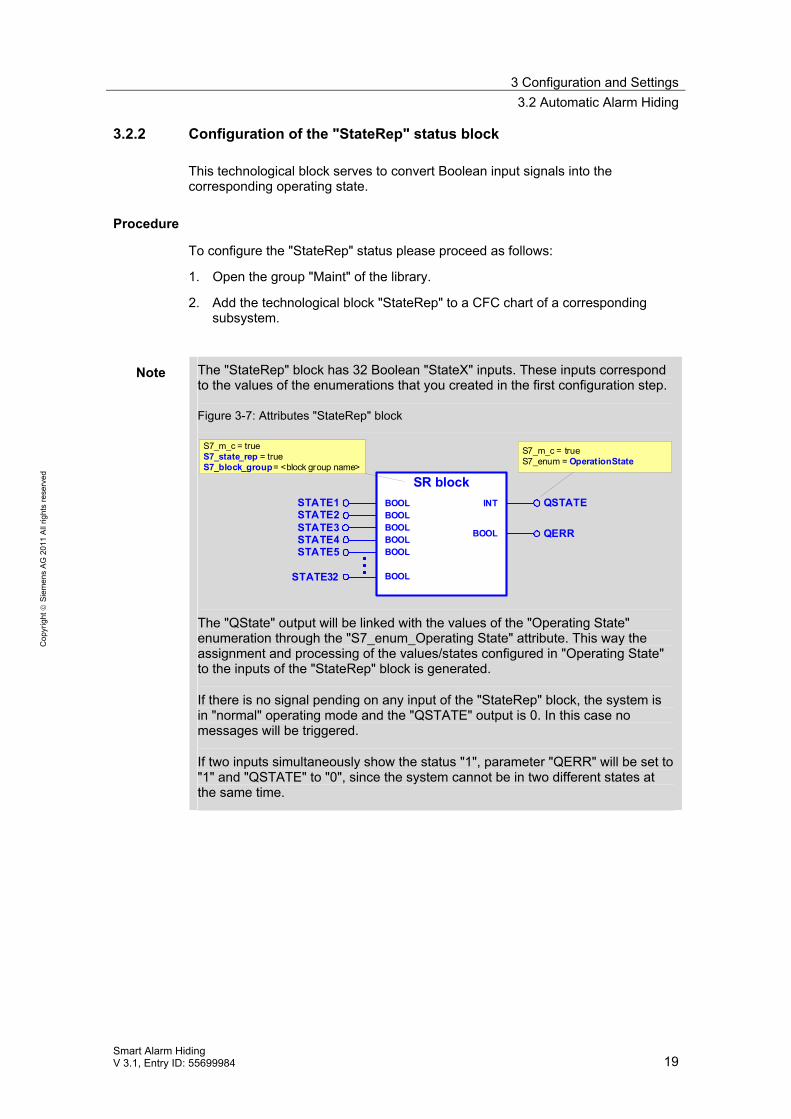
Note The "StateRep" block has 32 Boolean "StateX" inputs. These inputs correspond to the values of the enumerations that you created in the first configuration step.
Figure 3-7: Attributes "StateRep" block
SR blockQSTATEINT
BOOL QERR
STATE1 BOOL
S7_m_c = trueS7_enum = OperationState
S7_m_c = trueS7_state_rep = trueS7_block_group= <block group name>
STATE2 BOOLSTATE3STATE4
STATE32
STATE5
BOOLBOOLBOOL
BOOL
The "QState" output will be linked with the values of the "Operating State" enumeration through the "S7_enum_Operating State" attribute. This way the assignment and processing of the values/states configured in "Operating State" to the inputs of the "StateRep" block is generated.
If there is no signal pending on any input of the "StateRep" block, the system is in "normal" operating mode and the "QSTATE" output is 0. In this case no messages will be triggered.
If two inputs simultaneously show the status "1", parameter "QERR" will be set to "1" and "QSTATE" to "0", since the system cannot be in two different states at the same time.
3 Configuration and Settings 3.2 Automatic Alarm Hiding
20 Smart Alarm Hiding
V 3.1, Entry ID: 55699984
Cop
yrig
ht ©
Sie
men
s A
G 2
011
All
right
s re
serv
ed
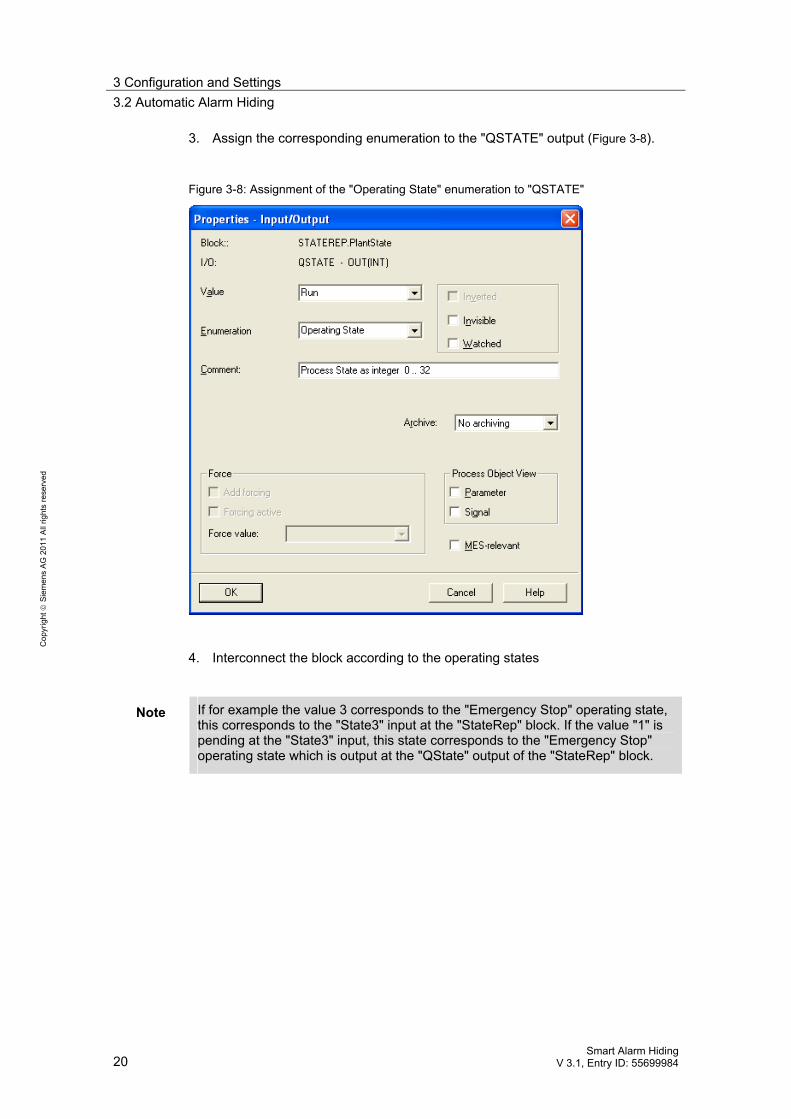
3. Assign the corresponding enumeration to the "QSTATE" output (Figure 3-8).
Figure 3-8: Assignment of the "Operating State" enumeration to "QSTATE"
4. Interconnect the block according to the operating states
Note If for example the value 3 corresponds to the "Emergency Stop" operating state, this corresponds to the "State3" input at the "StateRep" block. If the value "1" is pending at the "State3" input, this state corresponds to the "Emergency Stop" operating state which is output at the "QState" output of the "StateRep" block.
3 Configuration and Settings3.2 Automatic Alarm Hiding
Smart Alarm Hiding V 3.1, Entry ID: 55699984 21
Cop
yrig
ht ©
Sie
men
s A
G 2
011
All
right
s re
serv
ed
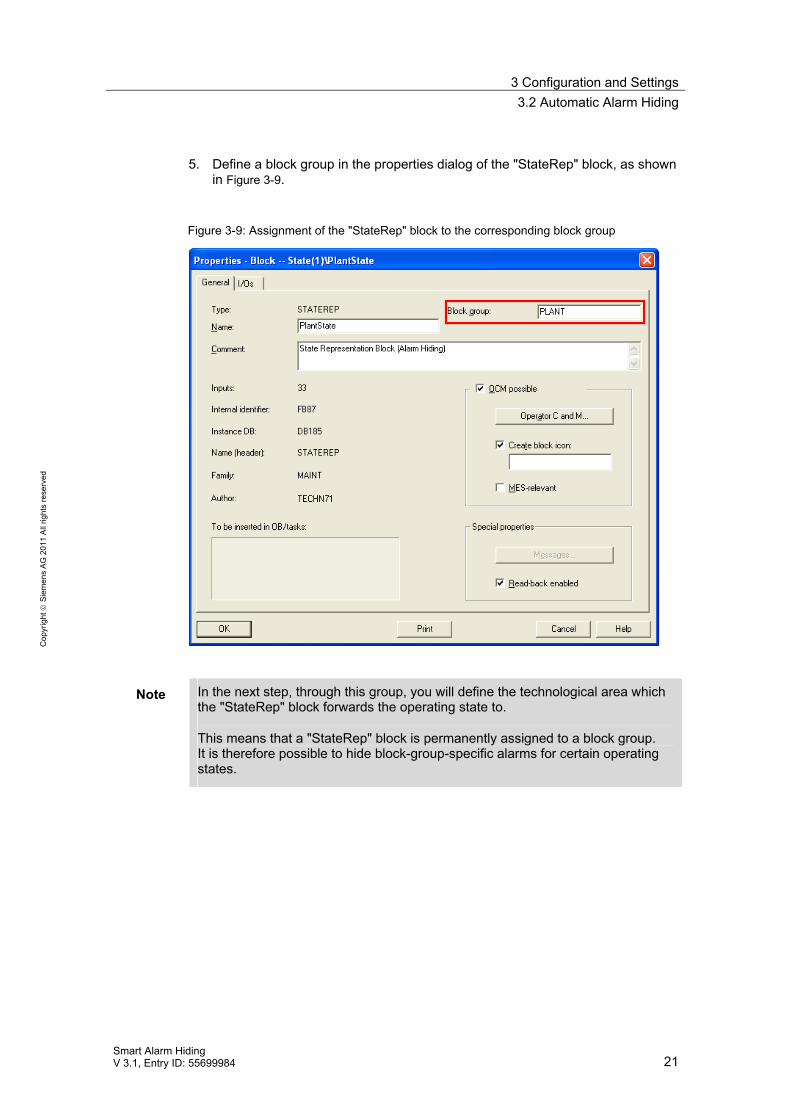
5. Define a block group in the properties dialog of the "StateRep" block, as shown in Figure 3-9.
Figure 3-9: Assignment of the "StateRep" block to the corresponding block group
Note In the next step, through this group, you will define the technological area which the "StateRep" block forwards the operating state to.
This means that a "StateRep" block is permanently assigned to a block group. It is therefore possible to hide block-group-specific alarms for certain operating states.
3 Configuration and Settings 3.2 Automatic Alarm Hiding
22 Smart Alarm Hiding
V 3.1, Entry ID: 55699984
Cop
yrig
ht ©
Sie
men
s A
G 2
011
All
right
s re
serv
ed
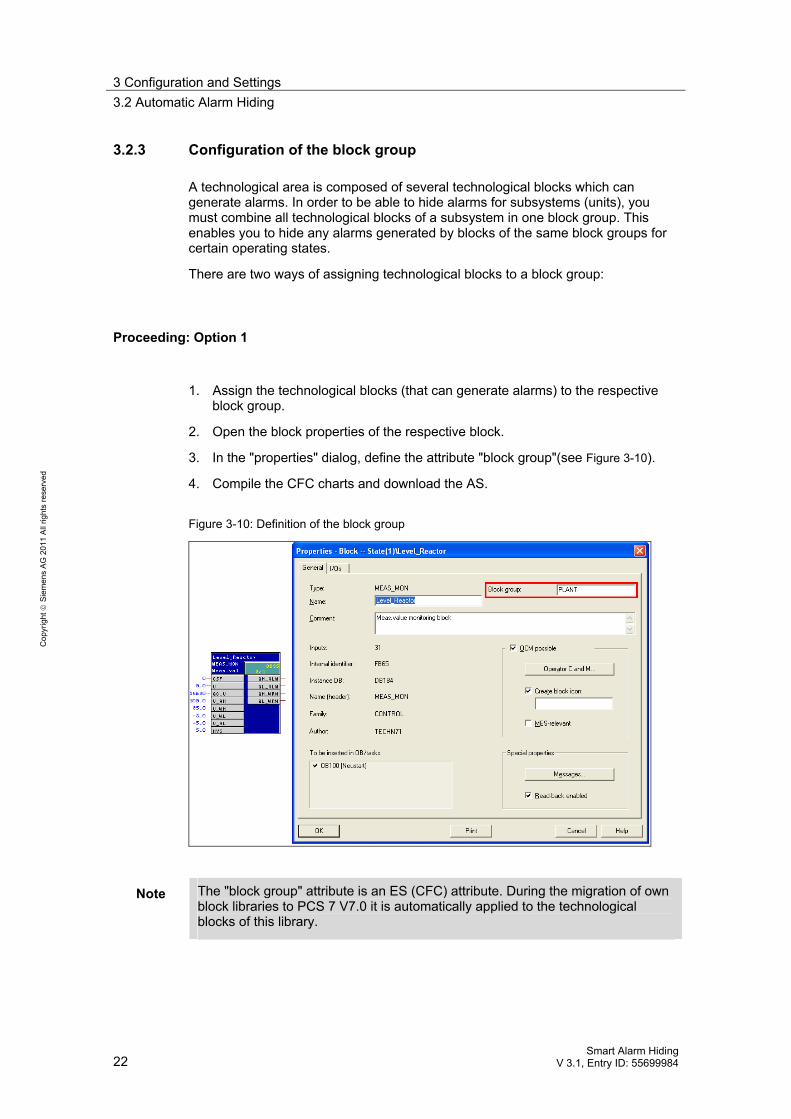
3.2.3 Configuration of the block group
A technological area is composed of several technological blocks which can generate alarms. In order to be able to hide alarms for subsystems (units), you must combine all technological blocks of a subsystem in one block group. This enables you to hide any alarms generated by blocks of the same block groups for certain operating states.
There are two ways of assigning technological blocks to a block group:
Proceeding: Option 1
1. Assign the technological blocks (that can generate alarms) to the respective block group.
2. Open the block properties of the respective block.
3. In the "properties" dialog, define the attribute "block group"(see Figure 3-10).
4. Compile the CFC charts and download the AS.
Figure 3-10: Definition of the block group
Note The "block group" attribute is an ES (CFC) attribute. During the migration of own block libraries to PCS 7 V7.0 it is automatically applied to the technological blocks of this library.
3 Configuration and Settings3.2 Automatic Alarm Hiding
Smart Alarm Hiding V 3.1, Entry ID: 55699984 23
Cop
yrig
ht ©
Sie
men
s A
G 2
011
All
right
s re
serv
ed
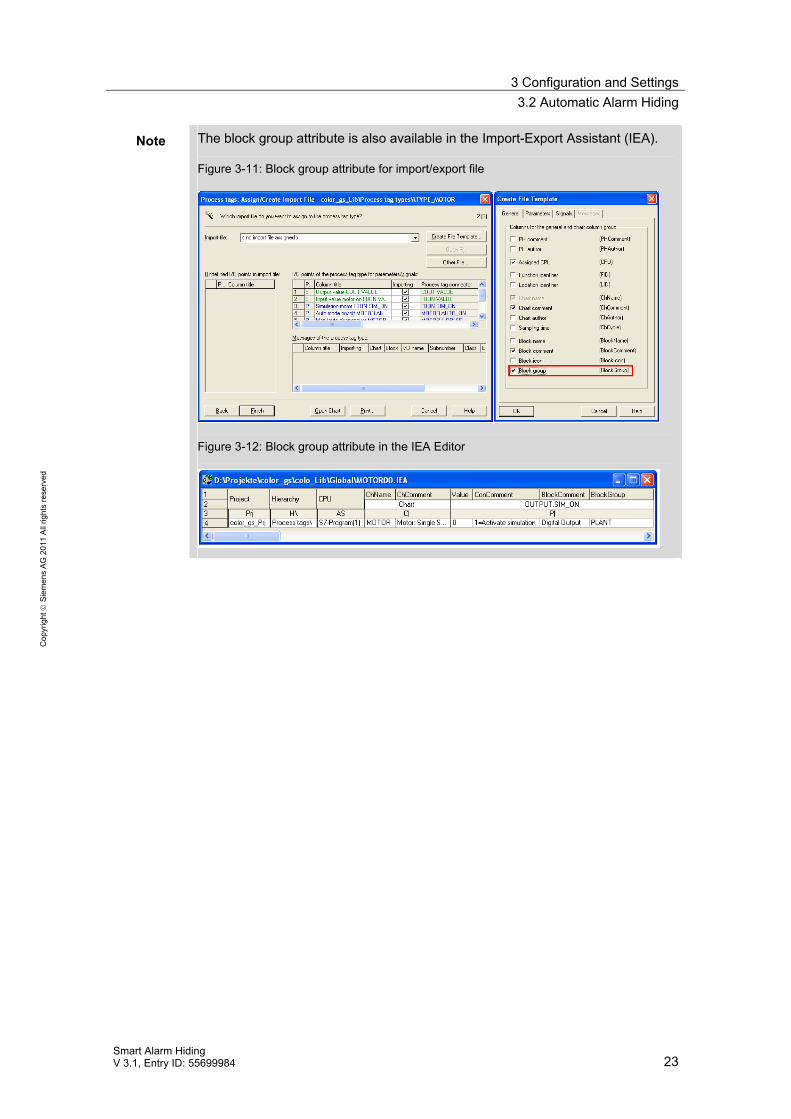
Note The block group attribute is also available in the Import-Export Assistant (IEA).
Figure 3-11: Block group attribute for import/export file
Figure 3-12: Block group attribute in the IEA Editor
3 Configuration and Settings 3.2 Automatic Alarm Hiding
24 Smart Alarm Hiding
V 3.1, Entry ID: 55699984
Cop
yrig
ht ©
Sie
men
s A
G 2
011
All
right
s re
serv
ed
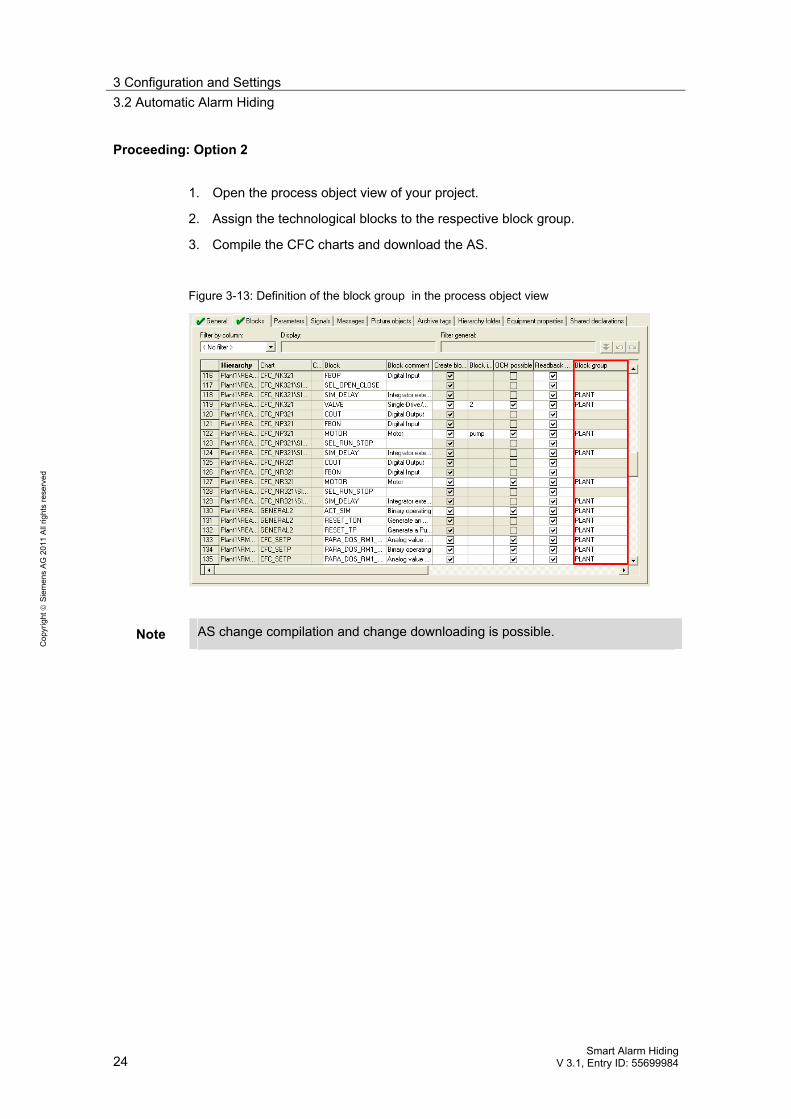
Proceeding: Option 2
1. Open the process object view of your project.
2. Assign the technological blocks to the respective block group.
3. Compile the CFC charts and download the AS.
Figure 3-13: Definition of the block group in the process object view
Note AS change compilation and change downloading is possible.

3 Configuration and Settings3.2 Automatic Alarm Hiding
Smart Alarm Hiding V 3.1, Entry ID: 55699984 25
Cop
yrig
ht ©
Sie
men
s A
G 2
011
All
right
s re
serv
ed
3.2.4 Configuration of the hiding matrix
With the configuration steps of the previous sections 3.2.1, 3.2.2, and 3.2.3 you laid the basis for configuring the alarm hiding matrix in the process object view.
In the process object view you can define which alarms of the alarm-signaling blocks of this groups shall be hidden for certain operating states of the respective block group.
Procedure
To configure the hiding matrix please proceed as follows:
1. Open the process object view of your project.
2. Open the "Messages" tab.
3. Activate the filter "filter by column" and filter according to block group
4. Filter according to block group under "filter by column"
5. Enter the names of the respective block groups under "Display".
6. Configure the hiding matrix for the selected block group (see Figure 3-14).
7. After completing all configuration steps in the ES, compile and download the AS.
8. Compile and download the OS.
Figure 3-14: Message matrix in the process object view

3 Configuration and Settings 3.2 Automatic Alarm Hiding
26 Smart Alarm Hiding
V 3.1, Entry ID: 55699984
Cop
yrig
ht ©
Sie
men
s A
G 2
011
All
right
s re
serv
ed
Note Changing the hiding mask of an available block is delta-loadable. If a new alarm-signaling block with configured hiding mask is added, the alarm hiding functionality will not be active for this block after change-loading of the OS-Server. The OS server must be re-activated to enable this functionality.
If the block group assignment is changed to activate the alarm hiding functionality, the OS server must be re-activated after the change-loading.
3.2.5 Compiling the OS
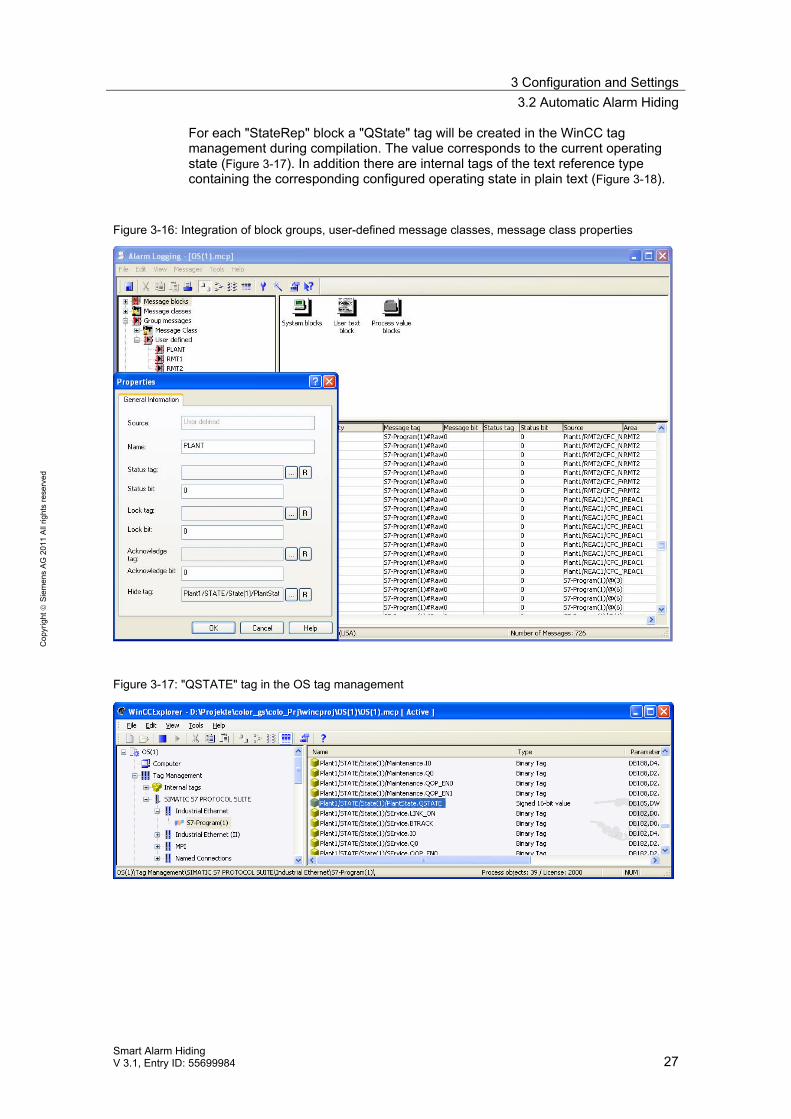
Based on the "message matrix" from the process object view, a hiding matrix is generated automatically during OS compilation in the Alarm Logging as an additional attribute (see Figure 3-15). It can be used for hiding the respective alarms in the alarm lists in OS Runtime later.
Figure 3-15: Hiding matrix OS Alarm Logging
In addition, the corresponding block group is entered as an attribute for each message, and a user-specific alarm group is generated for each block group. It includes all alarms of the blocks in a block group. The status tag of the "StateRep" block is included in the alarm group properties (see Figure 3-16).
3 Configuration and Settings3.2 Automatic Alarm Hiding
Smart Alarm Hiding V 3.1, Entry ID: 55699984 27
Cop
yrig
ht ©
Sie
men
s A
G 2
011
All
right
s re
serv
ed
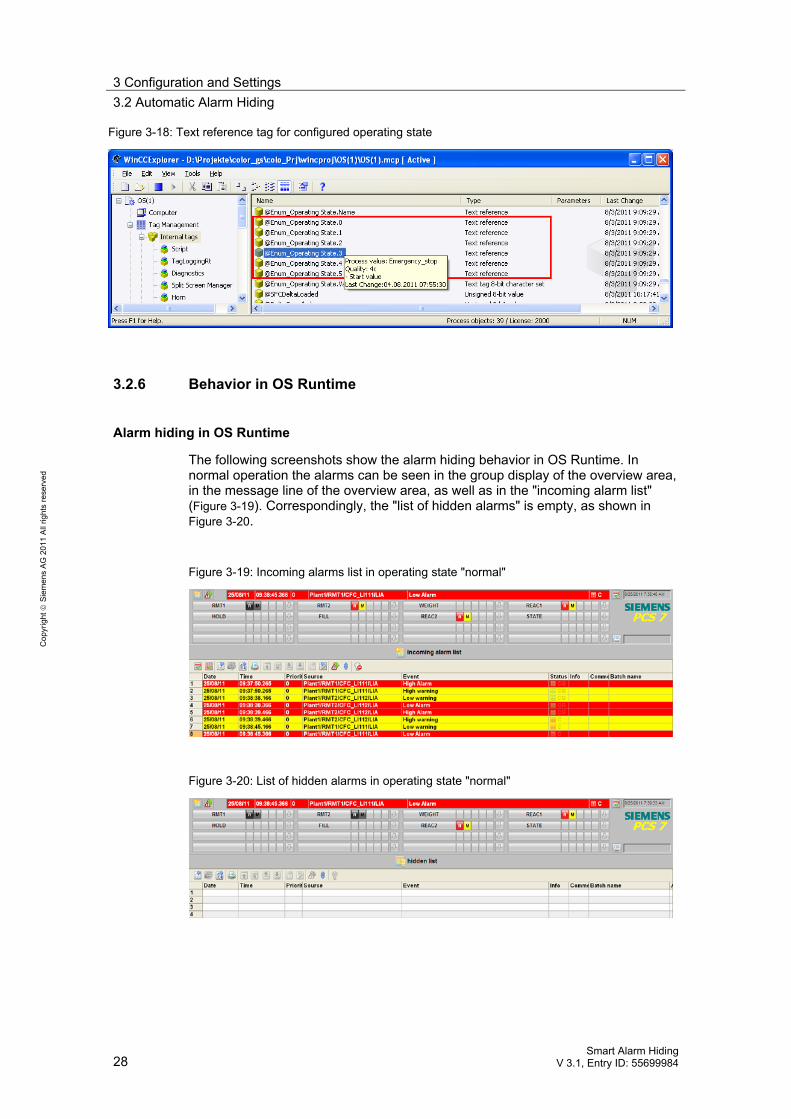
For each "StateRep" block a "QState" tag will be created in the WinCC tag management during compilation. The value corresponds to the current operating state (Figure 3-17). In addition there are internal tags of the text reference type containing the corresponding configured operating state in plain text (Figure 3-18).
Figure 3-16: Integration of block groups, user-defined message classes, message class properties
Figure 3-17: "QSTATE" tag in the OS tag management
3 Configuration and Settings 3.2 Automatic Alarm Hiding
28 Smart Alarm Hiding
V 3.1, Entry ID: 55699984
Cop
yrig
ht ©
Sie
men
s A
G 2
011
All
right
s re
serv
ed
Figure 3-18: Text reference tag for configured operating state
3.2.6 Behavior in OS Runtime
Alarm hiding in OS Runtime
The following screenshots show the alarm hiding behavior in OS Runtime. In normal operation the alarms can be seen in the group display of the overview area, in the message line of the overview area, as well as in the "incoming alarm list" (Figure 3-19). Correspondingly, the "list of hidden alarms" is empty, as shown in Figure 3-20.
Figure 3-19: Incoming alarms list in operating state "normal"
Figure 3-20: List of hidden alarms in operating state "normal"
3 Configuration and Settings3.2 Automatic Alarm Hiding
Smart Alarm Hiding V 3.1, Entry ID: 55699984 29
Cop
yrig
ht ©
Sie
men
s A
G 2
011
All
right
s re
serv
ed
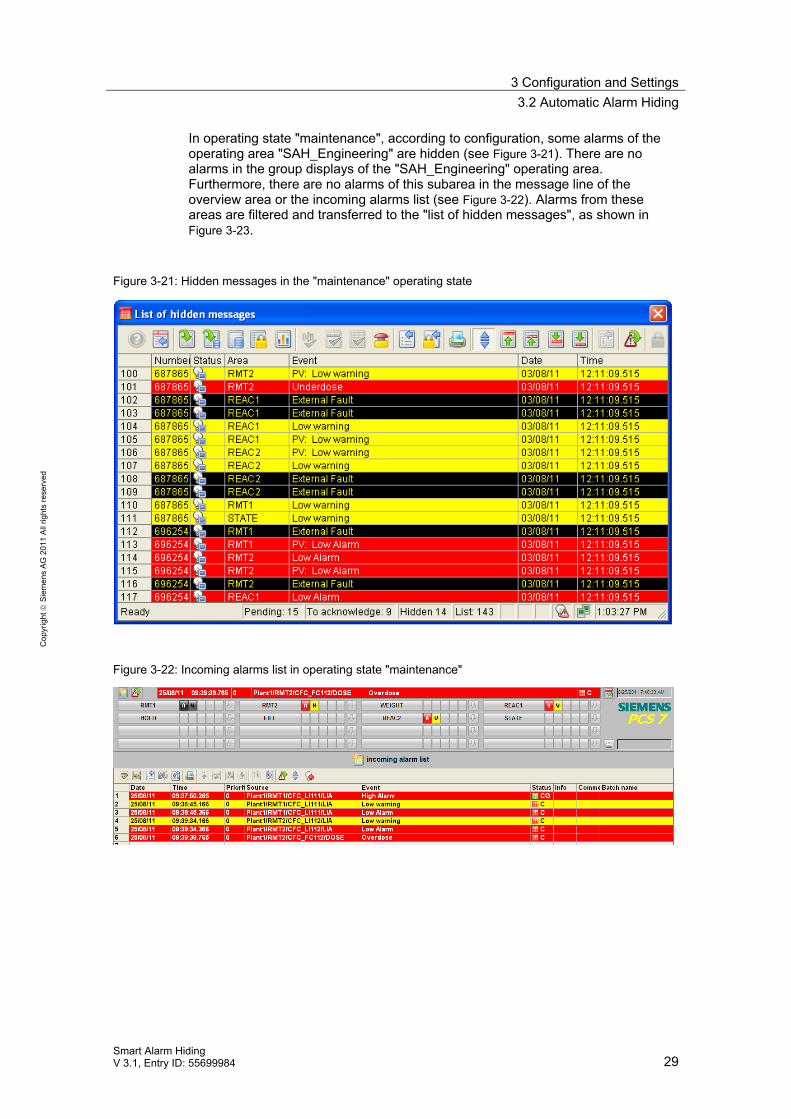
In operating state "maintenance", according to configuration, some alarms of the operating area "SAH_Engineering" are hidden (see Figure 3-21). There are no alarms in the group displays of the "SAH_Engineering" operating area. Furthermore, there are no alarms of this subarea in the message line of the overview area or the incoming alarms list (see Figure 3-22). Alarms from these areas are filtered and transferred to the "list of hidden messages", as shown in Figure 3-23.
Figure 3-21: Hidden messages in the "maintenance" operating state
Figure 3-22: Incoming alarms list in operating state "maintenance"

3 Configuration and Settings 3.2 Automatic Alarm Hiding
30 Smart Alarm Hiding
V 3.1, Entry ID: 55699984
Cop
yrig
ht ©
Sie
men
s A
G 2
011
All
right
s re
serv
ed
Figure 3-23: List of hidden messages in the "maintenance" operating state
Runtime diagram for automatic alarm hiding
The Runtime model shows the alarm behavior and the alarms in process mode with activated and disabled alarm hiding.
Section 1-5 shows that with activated alarm hiding the messages generated in the AS are being processed in the OS alarm server and are thus also archived. However, they will not be displayed in the alarm views and the process diagrams.
An alarm is pending in section 4-6. In point 5 the alarm hiding is disabled and the pending alarm is immediately displayed in the message views and the process diagrams.
In section 5-8 alarm hiding is disabled. Pending alarms are displayed in the alarm views and the process diagrams.
In section 8-12 alarm hiding is re-activated. The alarm pending at point 8 remains pending in the OS alarm server, but is immediately hidden in the alarm views and process diagrams.
Figure 3-24 Runtime model
Alarm hiding active
Alarm in control server (AS)
Alarm in alarm views
1 2 3 4 5 6 7 8 9 10 11 12
Activate alarm hiding
Deactivate alarm hiding
Activate alarm (coming)
Deactivate alarm (going)
Alarm in alarm server (OS)
3 Configuration and Settings3.2 Automatic Alarm Hiding
Smart Alarm Hiding V 3.1, Entry ID: 55699984 31
Cop
yrig
ht ©
Sie
men
s A
G 2
011
All
right
s re
serv
ed
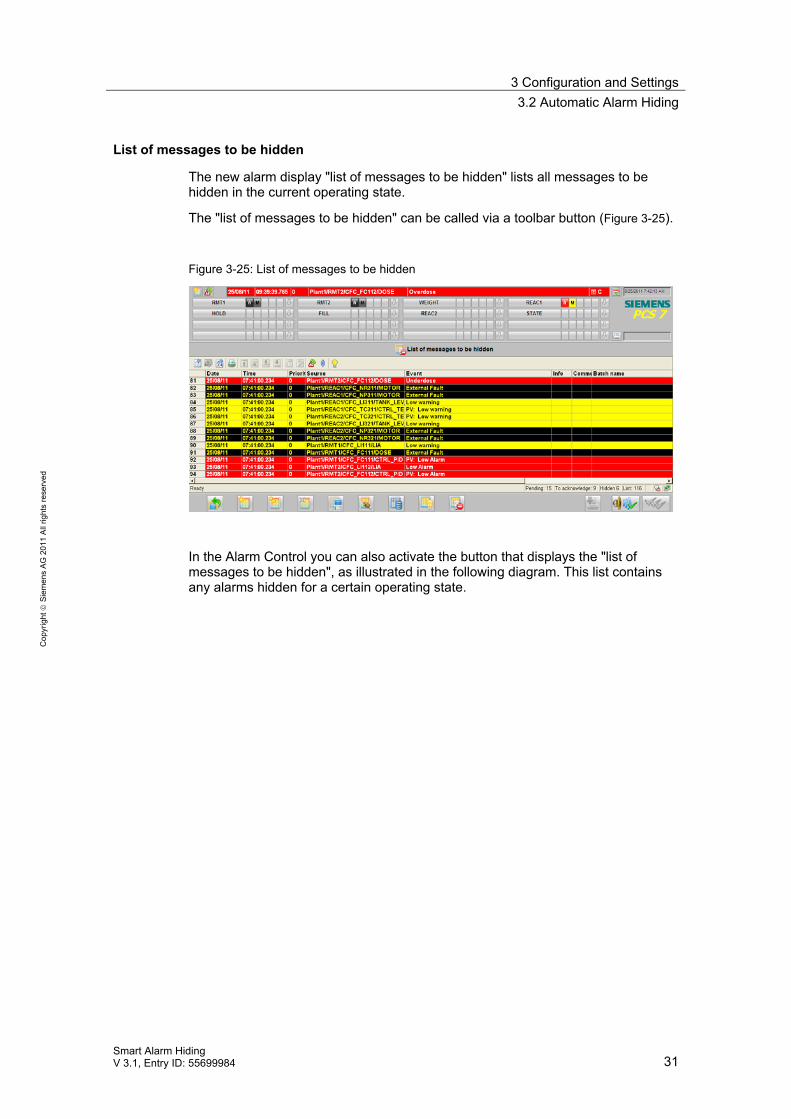
List of messages to be hidden
The new alarm display "list of messages to be hidden" lists all messages to be hidden in the current operating state.
The "list of messages to be hidden" can be called via a toolbar button (Figure 3-25).
Figure 3-25: List of messages to be hidden
In the Alarm Control you can also activate the button that displays the "list of messages to be hidden", as illustrated in the following diagram. This list contains any alarms hidden for a certain operating state.
3 Configuration and Settings 3.2 Automatic Alarm Hiding
32 Smart Alarm Hiding
V 3.1, Entry ID: 55699984
Cop
yrig
ht ©
Sie
men
s A
G 2
011
All
right
s re
serv
ed
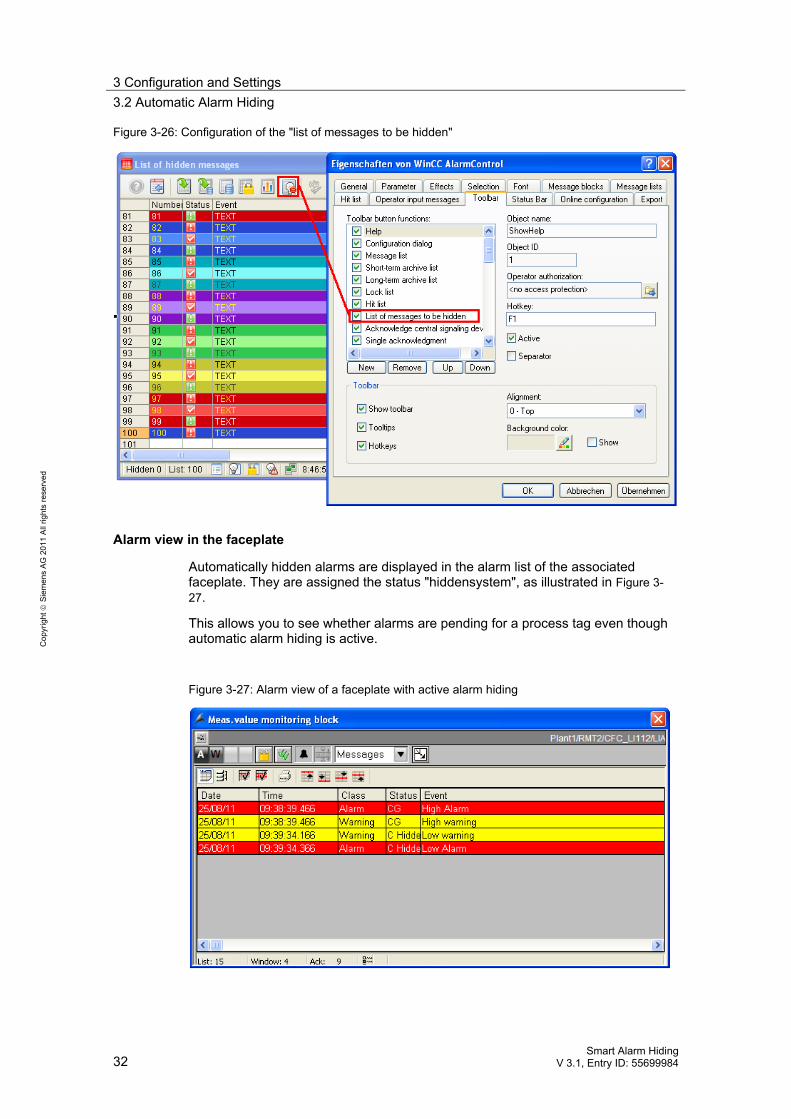
Figure 3-26: Configuration of the "list of messages to be hidden"
Alarm view in the faceplate
Automatically hidden alarms are displayed in the alarm list of the associated faceplate. They are assigned the status "hiddensystem", as illustrated in Figure 3-27.
This allows you to see whether alarms are pending for a process tag even though automatic alarm hiding is active.
Figure 3-27: Alarm view of a faceplate with active alarm hiding
3 Configuration and Settings3.2 Automatic Alarm Hiding
Smart Alarm Hiding V 3.1, Entry ID: 55699984 33
Cop
yrig
ht ©
Sie
men
s A
G 2
011
All
right
s re
serv
ed
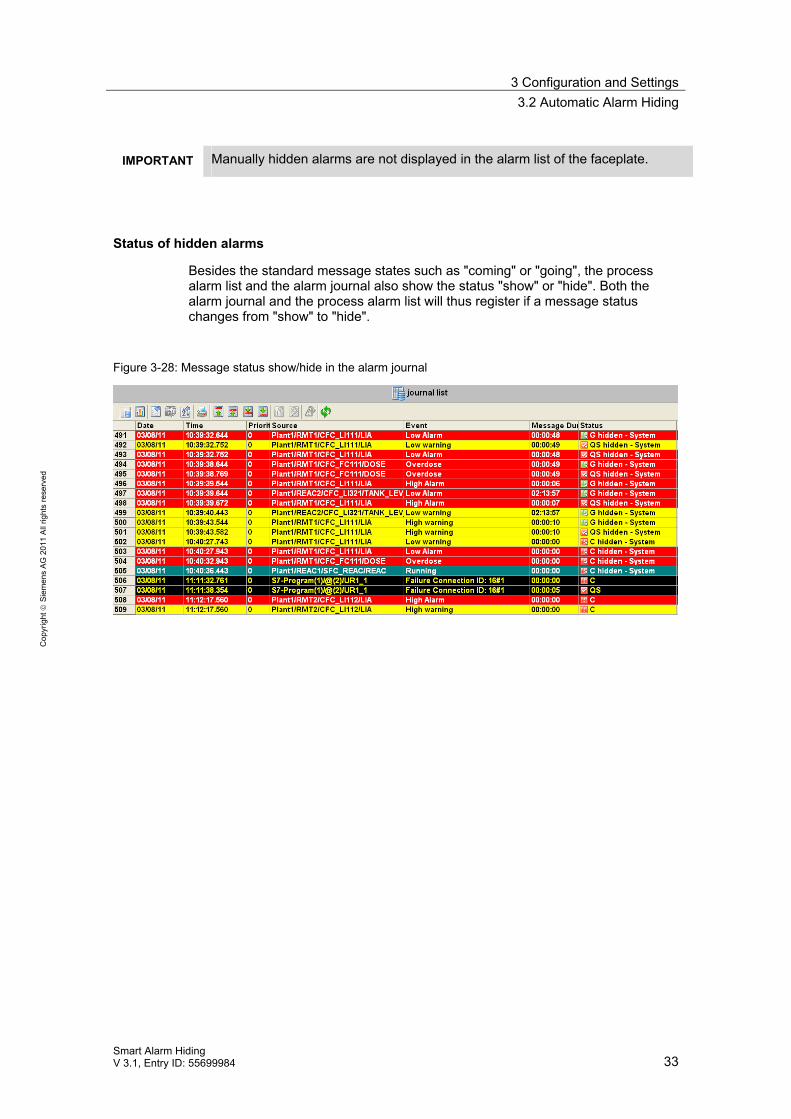
IMPORTANT Manually hidden alarms are not displayed in the alarm list of the faceplate.
Status of hidden alarms
Besides the standard message states such as "coming" or "going", the process alarm list and the alarm journal also show the status "show" or "hide". Both the alarm journal and the process alarm list will thus register if a message status changes from "show" to "hide".
Figure 3-28: Message status show/hide in the alarm journal

3 Configuration and Settings 3.2 Automatic Alarm Hiding
34 Smart Alarm Hiding
V 3.1, Entry ID: 55699984
Cop
yrig
ht ©
Sie
men
s A
G 2
011
All
right
s re
serv
ed
Figure 3-29: Message status show/hide in the process alarm list
3 Configuration and Settings3.2 Automatic Alarm Hiding
Smart Alarm Hiding V 3.1, Entry ID: 55699984 35
Cop
yrig
ht ©
Sie
men
s A
G 2
011
All
right
s re
serv
ed
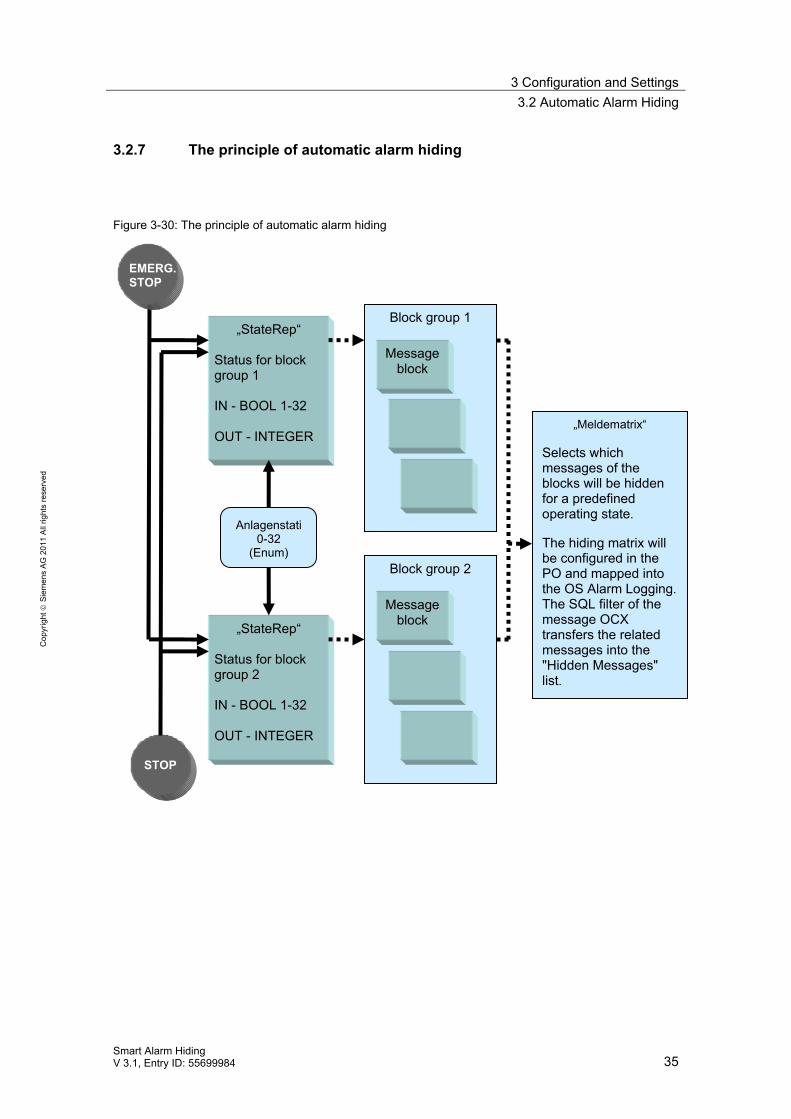
3.2.7 The principle of automatic alarm hiding
Figure 3-30: The principle of automatic alarm hiding
Block group 1
„StateRep“ Status for block group 2 IN - BOOL 1-32 OUT - INTEGER
STOP
EMERG. STOP
„StateRep“ Status for block group 1 IN - BOOL 1-32 OUT - INTEGER
Anlagenstati 0-32
(Enum)
Message block
Block group 2
Message block
„Meldematrix“ Selects which messages of the blocks will be hidden for a predefined operating state. The hiding matrix will be configured in the PO and mapped into the OS Alarm Logging. The SQL filter of the message OCX transfers the related messages into the "Hidden Messages" list.
4 Summary of Functions
36 Smart Alarm Hiding
V 3.1, Entry ID: 55699984
Cop
yrig
ht ©
Sie
men
s A
G 2
011
All
right
s re
serv
ed
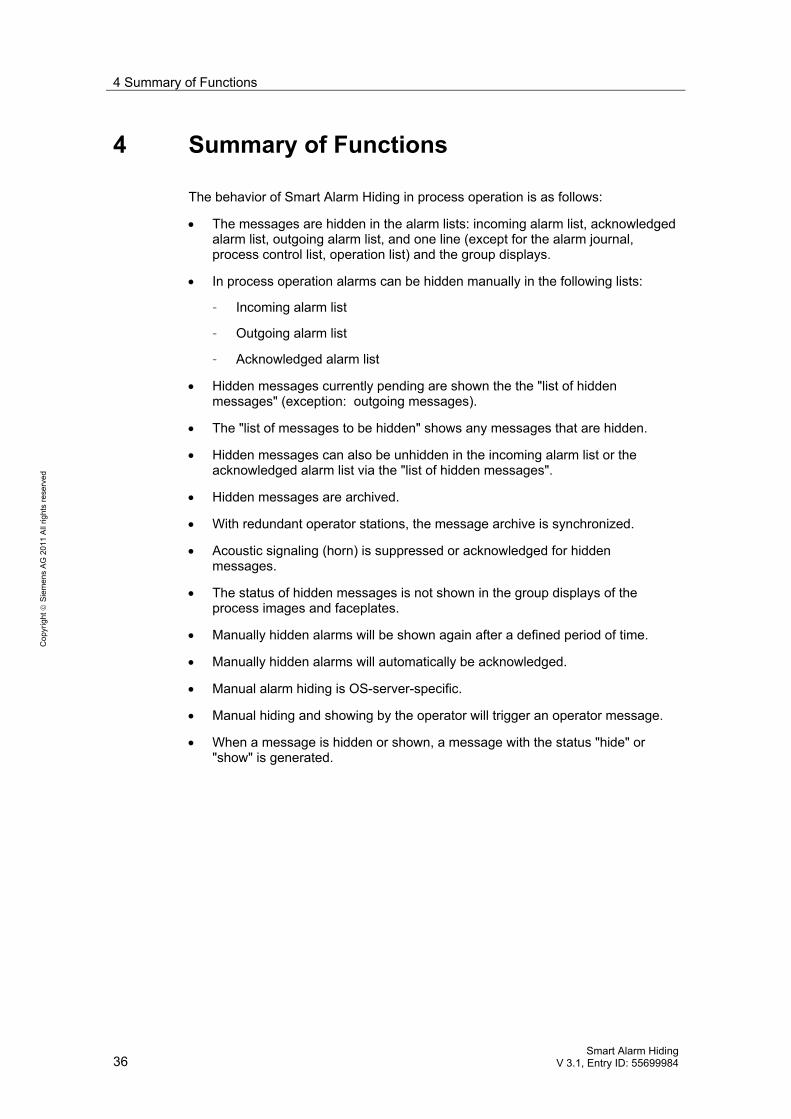
4 Summary of Functions
The behavior of Smart Alarm Hiding in process operation is as follows:
• The messages are hidden in the alarm lists: incoming alarm list, acknowledged alarm list, outgoing alarm list, and one line (except for the alarm journal, process control list, operation list) and the group displays.
• In process operation alarms can be hidden manually in the following lists:
– Incoming alarm list
– Outgoing alarm list
– Acknowledged alarm list
• Hidden messages currently pending are shown the the "list of hidden messages" (exception: outgoing messages).
• The "list of messages to be hidden" shows any messages that are hidden.
• Hidden messages can also be unhidden in the incoming alarm list or the acknowledged alarm list via the "list of hidden messages".
• Hidden messages are archived.
• With redundant operator stations, the message archive is synchronized.
• Acoustic signaling (horn) is suppressed or acknowledged for hidden messages.
• The status of hidden messages is not shown in the group displays of the process images and faceplates.
• Manually hidden alarms will be shown again after a defined period of time.
• Manually hidden alarms will automatically be acknowledged.
• Manual alarm hiding is OS-server-specific.
• Manual hiding and showing by the operator will trigger an operator message.
• When a message is hidden or shown, a message with the status "hide" or "show" is generated.
5 Glossary
Smart Alarm Hiding V 3.1, Entry ID: 55699984 37
Cop
yrig
ht ©
Sie
men
s A
G 2
011
All
right
s re
serv
ed
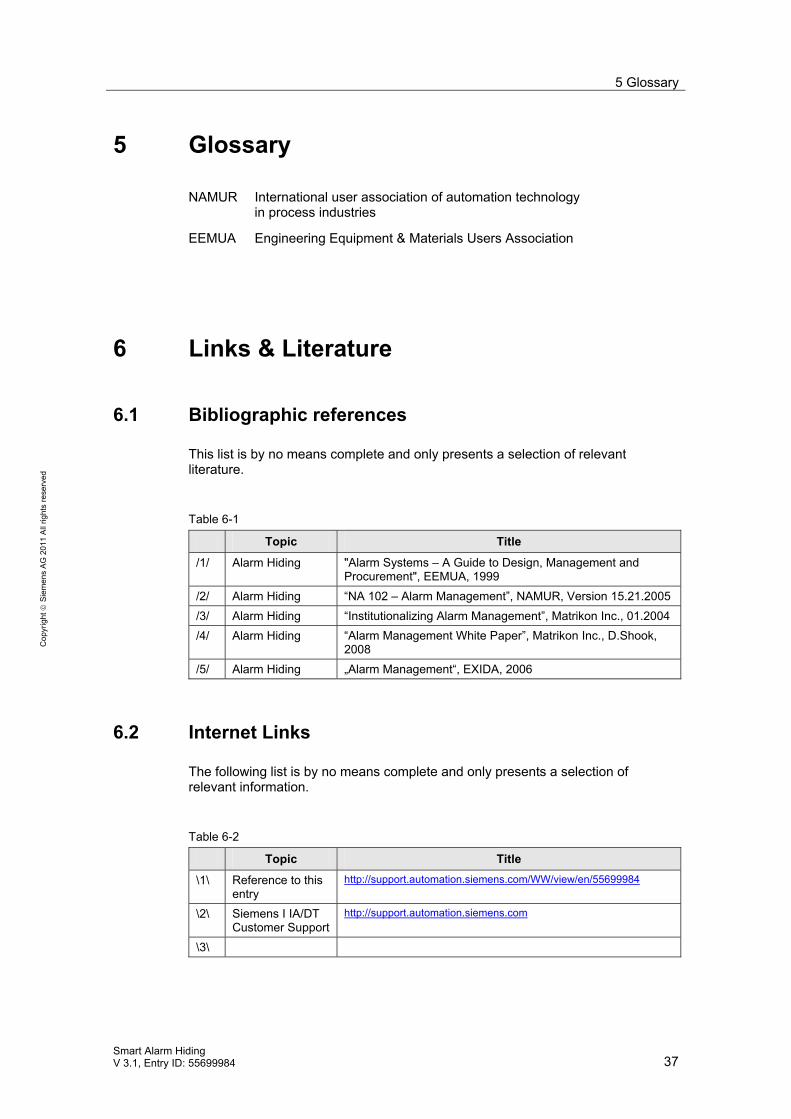
5 Glossary
NAMUR International user association of automation technology in process industries
EEMUA Engineering Equipment & Materials Users Association
6 Links & Literature
6.1 Bibliographic references
This list is by no means complete and only presents a selection of relevant literature.
Table 6-1
Topic Title
/1/ Alarm Hiding "Alarm Systems – A Guide to Design, Management and Procurement", EEMUA, 1999
/2/ Alarm Hiding “NA 102 – Alarm Management”, NAMUR, Version 15.21.2005 /3/ Alarm Hiding “Institutionalizing Alarm Management”, Matrikon Inc., 01.2004 /4/ Alarm Hiding “Alarm Management White Paper”, Matrikon Inc., D.Shook,
2008 /5/ Alarm Hiding „Alarm Management“, EXIDA, 2006
6.2 Internet Links
The following list is by no means complete and only presents a selection of relevant information.
Table 6-2
Topic Title
\1\ Reference to this entry
http://support.automation.siemens.com/WW/view/en/55699984
\2\ Siemens I IA/DT Customer Support
http://support.automation.siemens.com
\3\
7 History
38 Smart Alarm Hiding
V 3.1, Entry ID: 55699984
Cop
yrig
ht ©
Sie
men
s A
G 2
011
All
right
s re
serv
ed
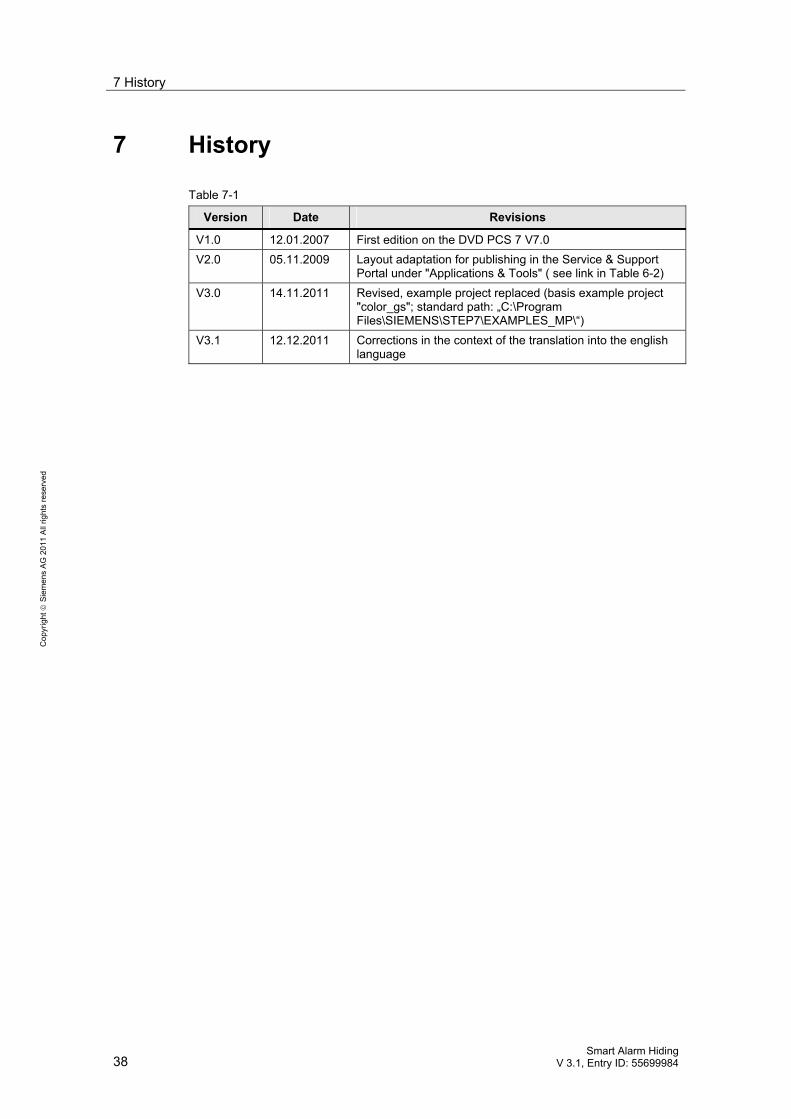
7 History
Table 7-1
Version Date Revisions
V1.0 12.01.2007 First edition on the DVD PCS 7 V7.0 V2.0 05.11.2009 Layout adaptation for publishing in the Service & Support
Portal under "Applications & Tools" ( see link in Table 6-2) V3.0 14.11.2011 Revised, example project replaced (basis example project
"color_gs"; standard path: „C:\Program Files\SIEMENS\STEP7\EXAMPLES_MP\“)
V3.1 12.12.2011 Corrections in the context of the translation into the english language