Embed Size (px)
Citation preview
FRAMEWORK PROGRAMME 7 - PCM USER MANUAL
Owner:
DG RTD
Issue Date:
25/02/2013
Version:
1.13
Framework Programme 7 – PCM User Manual
PCM User Manual
DG Research
Project Officer:
Date:
Signature
PCM:
Project Manager:
Date :
Signature
FRAMEWORK PROGRAMME 7 - PCM USER MANUAL
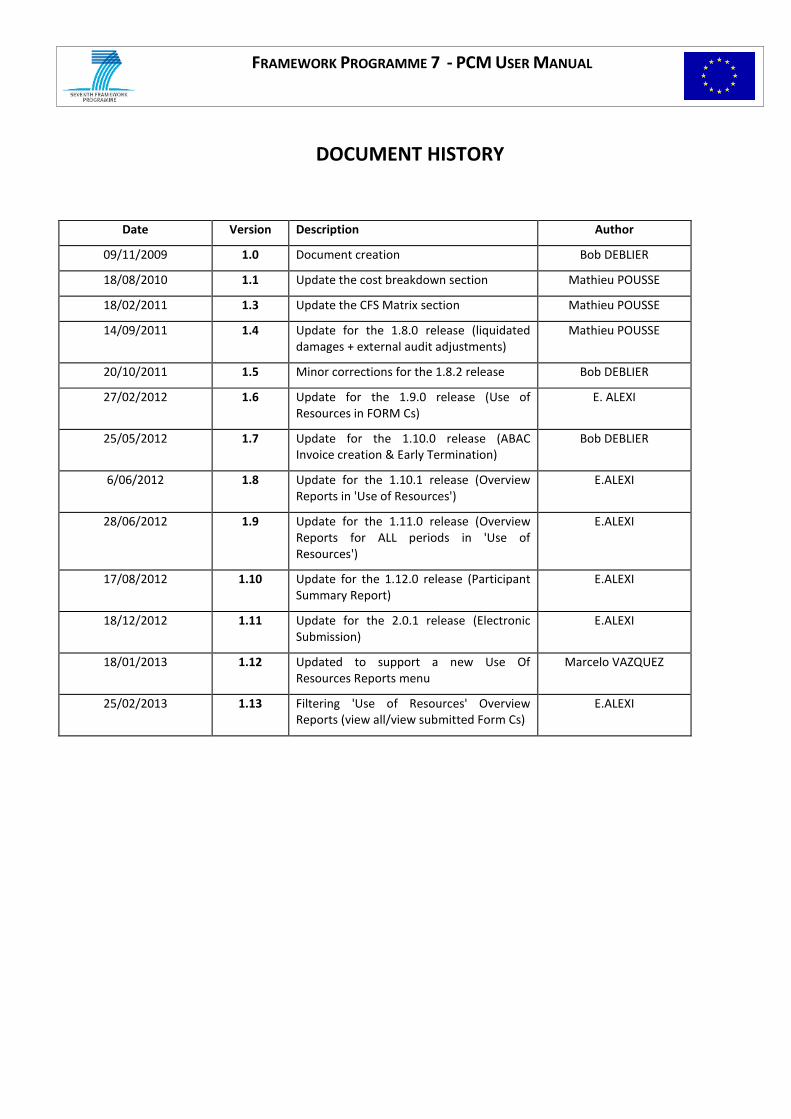
DOCUMENT HISTORY
Date Version Description Author
09/11/2009 1.0 Document creation Bob DEBLIER
18/08/2010 1.1 Update the cost breakdown section Mathieu POUSSE
18/02/2011 1.3 Update the CFS Matrix section Mathieu POUSSE
14/09/2011 1.4 Update for the 1.8.0 release (liquidated damages + external audit adjustments)
Mathieu POUSSE
20/10/2011 1.5 Minor corrections for the 1.8.2 release Bob DEBLIER
27/02/2012 1.6 Update for the 1.9.0 release (Use of Resources in FORM Cs)
E. ALEXI
25/05/2012 1.7 Update for the 1.10.0 release (ABAC Invoice creation & Early Termination)
Bob DEBLIER
6/06/2012 1.8 Update for the 1.10.1 release (Overview Reports in 'Use of Resources')
E.ALEXI
28/06/2012
1.9 Update for the 1.11.0 release (Overview Reports for ALL periods in 'Use of Resources')
E.ALEXI
17/08/2012 1.10 Update for the 1.12.0 release (Participant Summary Report)
E.ALEXI
18/12/2012 1.11 Update for the 2.0.1 release (Electronic Submission)
E.ALEXI
18/01/2013 1.12 Updated to support a new Use Of Resources Reports menu
Marcelo VAZQUEZ
25/02/2013 1.13 Filtering 'Use of Resources' Overview Reports (view all/view submitted Form Cs)
E.ALEXI
FRAMEWORK PROGRAMME 7 - PCM USER MANUAL
Prepared by: E.ALEXI Version: 1.13 Date: 25/02/2013
Reviewed by: Status: Final Reference: FP7_PCM_CEN_UM - 1.13.docx
PCM User Manual FP7_PCM_CEN_UM - 1.13.docx Page 3 of 63 PART I - INTRODUCTION
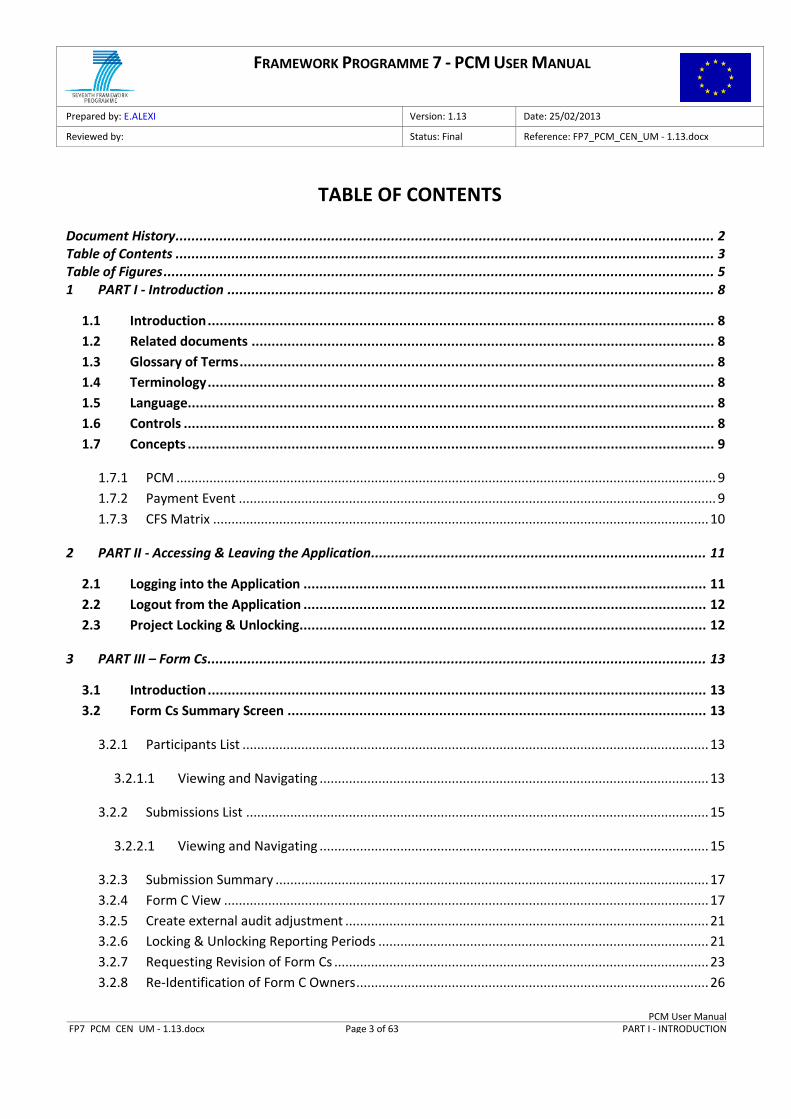
TABLE OF CONTENTS
Document History ....................................................................................................................................... 2 Table of Contents ....................................................................................................................................... 3 Table of Figures .......................................................................................................................................... 5 1 PART I - Introduction .......................................................................................................................... 8
1.1 Introduction ............................................................................................................................... 8
1.2 Related documents .................................................................................................................... 8
1.3 Glossary of Terms ....................................................................................................................... 8
1.4 Terminology ............................................................................................................................... 8
1.5 Language.................................................................................................................................... 8
1.6 Controls ..................................................................................................................................... 8
1.7 Concepts .................................................................................................................................... 9
1.7.1 PCM ................................................................................................................................................... 9
1.7.2 Payment Event .................................................................................................................................. 9
1.7.3 CFS Matrix ....................................................................................................................................... 10
2 PART II - Accessing & Leaving the Application .................................................................................... 11
2.1 Logging into the Application ..................................................................................................... 11
2.2 Logout from the Application ..................................................................................................... 12
2.3 Project Locking & Unlocking...................................................................................................... 12
3 PART III – Form Cs ............................................................................................................................. 13
3.1 Introduction ............................................................................................................................. 13
3.2 Form Cs Summary Screen ......................................................................................................... 13
3.2.1 Participants List ............................................................................................................................... 13
3.2.1.1 Viewing and Navigating .......................................................................................................... 13
3.2.2 Submissions List .............................................................................................................................. 15
3.2.2.1 Viewing and Navigating .......................................................................................................... 15
3.2.3 Submission Summary ...................................................................................................................... 17
3.2.4 Form C View .................................................................................................................................... 17
3.2.5 Create external audit adjustment ................................................................................................... 21
3.2.6 Locking & Unlocking Reporting Periods .......................................................................................... 21
3.2.7 Requesting Revision of Form Cs ...................................................................................................... 23
3.2.8 Re-Identification of Form C Owners ................................................................................................ 26
FRAMEWORK PROGRAMME 7 - PCM USER MANUAL
Prepared by: E.ALEXI Version: 1.13 Date: 25/02/2013
Reviewed by: Status: Final Reference: FP7_PCM_CEN_UM - 1.13.docx
PCM User Manual FP7_PCM_CEN_UM - 1.13.docx Page 4 of 63 PART I - INTRODUCTION
3.2.9 Manage Force Access Rights ........................................................................................................... 27
3.3 Form Cs Submission & Automatic Invoice Creation .................................................................... 29
4 PART IV – Payment Events ................................................................................................................ 31
4.1 Introduction ............................................................................................................................. 31
4.2 Cost Calculation Summary ........................................................................................................ 31
4.3 Creating a New Payment Event ................................................................................................. 32
4.3.1 Step One .......................................................................................................................................... 33
4.3.2 Step Two .......................................................................................................................................... 36
4.3.3 Step Three ....................................................................................................................................... 36
4.3.4 Step Four ......................................................................................................................................... 37
4.3.4.1 Payment Event Detail ............................................................................................................. 37
4.3.4.2 CFS Matrix ............................................................................................................................... 44
4.3.4.3 Cost Breakdown ...................................................................................................................... 48
5 PART V – Reports .............................................................................................................................. 53
5.1 Introduction ............................................................................................................................. 53
5.2 Participant Summary Report ..................................................................................................... 53
5.3 CFS Summary Report ................................................................................................................ 54
6 PART VI – Contract Reference Data ................................................................................................... 56
6.1 Introduction ............................................................................................................................. 56
6.2 Contract Reference Data ........................................................................................................... 56
7 PART VII – Liquidated damages ......................................................................................................... 59
7.1 Introduction ............................................................................................................................. 59
7.2 Liquidated damages summary .................................................................................................. 59
7.3 Liquidated damages form ......................................................................................................... 60
7.3.1 Key data ........................................................................................................................................... 62
7.3.2 Financial data .................................................................................................................................. 62
7.3.3 Calculation of liquidated damages .................................................................................................. 62
7.3.4 Propositin and decision sections ..................................................................................................... 63
FRAMEWORK PROGRAMME 7 - PCM USER MANUAL
Prepared by: E.ALEXI Version: 1.13 Date: 25/02/2013
Reviewed by: Status: Final Reference: FP7_PCM_CEN_UM - 1.13.docx
PCM User Manual FP7_PCM_CEN_UM - 1.13.docx Page 5 of 63 PART I - INTRODUCTION
TABLE OF FIGURES
Figure 1: The PCM Home Page .............................................................................................................................. 11 Figure 2: The General Information section ........................................................................................................... 11 Figure 3: Logout .................................................................................................................................................... 12 Figure 4: Project Locked Warning Message .......................................................................................................... 12 Figure 5: Participants List Screen .......................................................................................................................... 13 Figure 6: Reporting Period Selection .................................................................................................................... 14 Figure 7: Submission List Screen ........................................................................................................................... 15 Figure 8: Reporting Period Selection .................................................................................................................... 16 Figure 9: Expanding a Submission ......................................................................................................................... 16 Figure 10: Viewing a Submission in more detail ................................................................................................... 16 Figure 11: Submission View Screen ...................................................................................................................... 17 Figure 12: Form C View Screen without cost details ............................................................................................ 18 Figure 13: Form C View Screen that contains cost details .................................................................................... 19 Figure 14: Form C View Screen that contains cost details and the e-Receipt document after the electronic
submission .................................................................................................................................................... 20 Figure 15: Selected a Reporting Period to adjust ................................................................................................. 21 Figure 16: Selected a Reporting Period ................................................................................................................. 22 Figure 17: Locking a Reporting Period .................................................................................................................. 22 Figure 18: Confirmation of Reporting Period Locking ........................................................................................... 22 Figure 19: A Locked Reporting Period with Tooltip .............................................................................................. 23 Figure 20: Unlocking a Reporting Period .............................................................................................................. 23 Figure 21: Confirmation of Reporting Period Unlocking ....................................................................................... 23 Figure 22: Selecting several Cost Statements ....................................................................................................... 24 Figure 23: Adding a rejection comment for several Cost Statements .................................................................. 24 Figure 24: Entering a rejection comment for a single Cost Statement ................................................................. 25 Figure 25: Selecting several Cost Statement to reject .......................................................................................... 25 Figure 26: Entering a rejection comment for a set of Cost Statement ................................................................. 25 Figure 27: List of unidentified owners .................................................................................................................. 26 Figure 28: Owner identification popup ................................................................................................................. 27 Figure 29: Unidentify an owner ............................................................................................................................ 27 Figure 30: Managing FORCE access rights ............................................................................................................ 28 Figure 31: List of FORCE access rights for the project........................................................................................... 28 Figure 32: FORCE access rights extra information ................................................................................................ 29 Figure 33: FORCE access rights additional rights information .............................................................................. 29 Figure 34: Form C Invoice key (automatically generated) .................................................................................... 30 Figure 35: Cost Calculation Screen ........................................................................................................................ 31 Figure 36: Cost Calculation Screen ........................................................................................................................ 32 Figure 37: Adding a Payment Event ...................................................................................................................... 32 Figure 38: Payment Event State Diagram ............................................................................................................. 33 Figure 39: Step 1 - Selecting the Reporting Period and Payment Event Type ...................................................... 33 Figure 40: Choosing Amendment / Proposal Version ........................................................................................... 34 Figure 41: Confirm Deletion Popup ...................................................................................................................... 35 Figure 42: Step 2 ................................................................................................................................................... 36
FRAMEWORK PROGRAMME 7 - PCM USER MANUAL
Prepared by: E.ALEXI Version: 1.13 Date: 25/02/2013
Reviewed by: Status: Final Reference: FP7_PCM_CEN_UM - 1.13.docx
PCM User Manual FP7_PCM_CEN_UM - 1.13.docx Page 6 of 63 PART I - INTRODUCTION
Figure 43: Selecting Form Cs ................................................................................................................................. 36 Figure 44: Step 3 ................................................................................................................................................... 37 Figure 45: Step 4 - Navigation Tabs ...................................................................................................................... 37 Figure 46: Payment Calculation Input Parameters ............................................................................................... 38 Figure 47: Expanding the Complete List of Input Parameters .............................................................................. 38 Figure 48: Complete List of Input Parameters ...................................................................................................... 38 Figure 49: CFS Matrix Warning ............................................................................................................................. 39 Figure 50: Payment Details Output Parameters ................................................................................................... 40 Figure 51: Expanding the Complete List of Output Parameters ........................................................................... 40 Figure 52: Freezing a Payment Event .................................................................................................................... 40 Figure 53: Confirmation of Payment Event Freezing ............................................................................................ 41 Figure 54: Unfreezing a Payment Event ................................................................................................................ 41 Figure 55: Payment Details Linked Financial Transactions ................................................................................... 42 Figure 56: Linked Financial Transaction Search Example ..................................................................................... 42 Figure 57: Actual Linked Financial Transaction ..................................................................................................... 42 Figure 58: Contract Reference Data Icon .............................................................................................................. 43 Figure 59: Contract Reference Data used by the Payment Event ......................................................................... 43 Figure 60: The CFS Matrix ..................................................................................................................................... 44 Figure 61: An Expanded CFS Matrix Cell (with adjustment of past payment event) ............................................ 45 Figure 62: An Expanded CFS Matrix Cell (adjusted by future payment event) ..................................................... 46 Figure 63: Expanded Variable Breakdown ............................................................................................................ 47 Figure 64: Creating Certification Cell .................................................................................................................... 47 Figure 65: Certifying Past Costs............................................................................................................................. 48 Figure 66: Cost breakdown screen ........................................................................................................................ 49 Figure 67: Cost breakdown rejection matrix ........................................................................................................ 50 Figure 68: Fully certified amount .......................................................................................................................... 50 Figure 69: Partially certified amount .................................................................................................................... 50 Figure 70: EC Rejection - Certification popup ....................................................................................................... 51 Figure 71: Set the external audit reference .......................................................................................................... 51 Figure 72: Confirmation to reset breakdown ....................................................................................................... 52 Figure 73: Confirmation to reset breakdown ....................................................................................................... 52 Figure 74: Participant Summary Report Screen .................................................................................................... 53 Figure 75: CFS Summary Report Screen ................................................................................................................ 54 Figure 76: Highlighted CFS SummaryCell .............................................................................................................. 54 Figure 77: Expanded CFS Summary Cell ................................................................................................................ 55 Figure 78: CFS Summary Cell Variable Breakdown ............................................................................................... 55 Figure 79: Contract Reference Data Screen .......................................................................................................... 56 Figure 80: Reporting Periods in case of early termination ................................................................................... 57 Figure 81: List of Participants ................................................................................................................................ 57 Figure 82: Selecting the Contract Version............................................................................................................. 58 Figure 83: Liquidated damages summary screen ................................................................................................. 59 Figure 84: Liquidated damages edit screen .......................................................................................................... 61 Figure 85: Key data section ................................................................................................................................... 62 Figure 86: Financial data section........................................................................................................................... 62 Figure 87: Financial data section........................................................................................................................... 63
FRAMEWORK PROGRAMME 7 - PCM USER MANUAL
Prepared by: E.ALEXI Version: 1.13 Date: 25/02/2013
Reviewed by: Status: Final Reference: FP7_PCM_CEN_UM - 1.13.docx
PCM User Manual FP7_PCM_CEN_UM - 1.13.docx Page 7 of 63 PART I - INTRODUCTION
FRAMEWORK PROGRAMME 7 - PCM USER MANUAL
Prepared by: E.ALEXI Version: 1.13 Date: 25/02/2013
Reviewed by: Status: Final Reference: FP7_PCM_CEN_UM - 1.13.docx
PCM User Manual FP7_PCM_CEN_UM - 1.13.docx Page 8 of 63 PART I - INTRODUCTION
1 PART I - Introduction
1.1 Introduction This user manual refers to the Payment Calculation Module used by the financial officer to calculate the
amounts to be reimburse by RTD in the context of FP7 projects.
Various functionalities offered by PCM are presented in detail in the following chapters.
1.2 Related documents Ref. Title Reference Version Date
1.3 Glossary of Terms Acronym Description
CPM Contracts and Project Management system
FORCE Form C Editor
PCM Project Calculation Module
ABAC EC Accounting system
1.4 Terminology Before you start reading this guide, take into consideration the following terminology.
Pointing is moving the mouse to place the mouse pointer over an item.
A Link is a word or sentence (usually underlined and in a different colour) on which you can click with
the mouse and which will lead you to another page when you click on it.
A List Box is a data field where you can select a number of elements from a fixed set of values.
A Combo Box is a data field with a drop-down List Box with alternative values from a fixed set of
values.
1.5 Language The system is available in the English language.
1.6 Controls Buttons allow the user to perform actions. The colour of the button indicates the type of action:
FRAMEWORK PROGRAMME 7 - PCM USER MANUAL
Prepared by: E.ALEXI Version: 1.13 Date: 25/02/2013
Reviewed by: Status: Final Reference: FP7_PCM_CEN_UM - 1.13.docx
PCM User Manual FP7_PCM_CEN_UM - 1.13.docx Page 9 of 63 PART I - INTRODUCTION
Blue buttons represent navigation actions. No data typed in by the user is saved in the database when
pressing a blue button.
Red buttons represent cancel actions (modification, creation...).
Green buttons are used to manipulate / save data.
The action buttons, which are common for different screens, are explained below:
: Back to the previous screen.
: Go to the next page.
: Cancel the action.
: Delete a Payment event
: Save data input field for the current screen.
1.7 Concepts
1.7.1 PCM
PCM builds on the CPM and FORCE applications to allow the financial officer to calculate the amounts of
prefinancing, payments and settled payments that research project participants are entitled to.
It uses the following data as input:
Project information from the CPM application
Contractor information from the CPM application
Form Cs from the Force application
With this data, the application allows the user to create payment events for a given project that represent the
amounts to be paid at the end of each reporting period; finally it allows the user to link each payment event
with corresponding ABAC financial transactions.
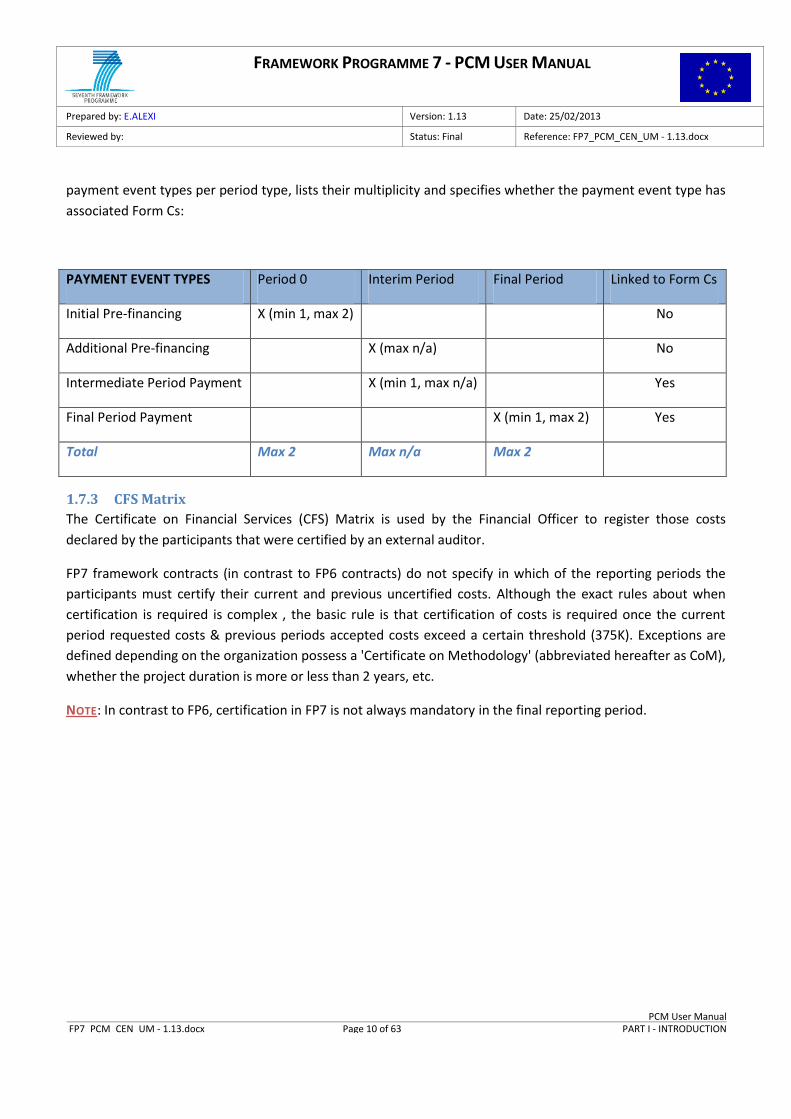
1.7.2 Payment Event
A payment event is a method of calculating the financial contribution that the project’s participants will
receive in a given reporting period. This is achieved through a complex algorithm, via the combination of
historical payment data (previous reporting periods) with the present reporting period cost statements (Form
Cs) and audit certificates.
There are different types of payment events and they can be created at different moments during the lifecycle
of a project, i.e. at the launch of a project (period 0), during an interim period or during a final period. In
addition there can be several payment events linked to one period. The following matrix defines the different
FRAMEWORK PROGRAMME 7 - PCM USER MANUAL
Prepared by: E.ALEXI Version: 1.13 Date: 25/02/2013
Reviewed by: Status: Final Reference: FP7_PCM_CEN_UM - 1.13.docx
PCM User Manual FP7_PCM_CEN_UM - 1.13.docx Page 10 of 63 PART I - INTRODUCTION
payment event types per period type, lists their multiplicity and specifies whether the payment event type has
associated Form Cs:
PAYMENT EVENT TYPES Period 0 Interim Period Final Period Linked to Form Cs
Initial Pre-financing X (min 1, max 2) No
Additional Pre-financing X (max n/a) No
Intermediate Period Payment X (min 1, max n/a) Yes
Final Period Payment X (min 1, max 2) Yes
Total Max 2 Max n/a Max 2
1.7.3 CFS Matrix
The Certificate on Financial Services (CFS) Matrix is used by the Financial Officer to register those costs
declared by the participants that were certified by an external auditor.
FP7 framework contracts (in contrast to FP6 contracts) do not specify in which of the reporting periods the
participants must certify their current and previous uncertified costs. Although the exact rules about when
certification is required is complex , the basic rule is that certification of costs is required once the current
period requested costs & previous periods accepted costs exceed a certain threshold (375K). Exceptions are
defined depending on the organization possess a 'Certificate on Methodology' (abbreviated hereafter as CoM),
whether the project duration is more or less than 2 years, etc.
NOTE: In contrast to FP6, certification in FP7 is not always mandatory in the final reporting period.
FRAMEWORK PROGRAMME 7 - PCM USER MANUAL
Prepared by: E.ALEXI Version: 1.13 Date: 25/02/2013
Reviewed by: Status: Final Reference: FP7_PCM_CEN_UM - 1.13.docx
PCM User Manual FP7_PCM_CEN_UM - 1.13.docx Page 11 of 63 PART II - ACCESSING & LEAVING THE APPLICATION
2 PART II - Accessing & Leaving the Application
2.1 Logging into the Application
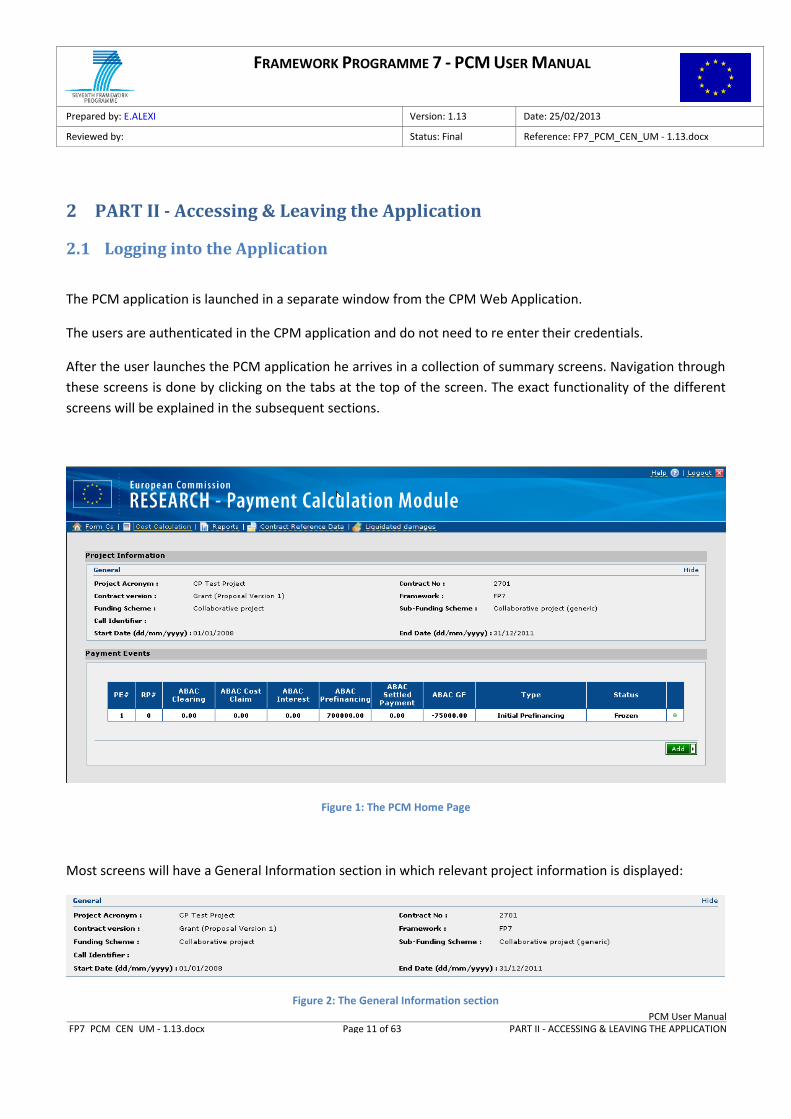
The PCM application is launched in a separate window from the CPM Web Application.
The users are authenticated in the CPM application and do not need to re enter their credentials.
After the user launches the PCM application he arrives in a collection of summary screens. Navigation through
these screens is done by clicking on the tabs at the top of the screen. The exact functionality of the different
screens will be explained in the subsequent sections.
Figure 1: The PCM Home Page
Most screens will have a General Information section in which relevant project information is displayed:
Figure 2: The General Information section
FRAMEWORK PROGRAMME 7 - PCM USER MANUAL
Prepared by: E.ALEXI Version: 1.13 Date: 25/02/2013
Reviewed by: Status: Final Reference: FP7_PCM_CEN_UM - 1.13.docx
PCM User Manual FP7_PCM_CEN_UM - 1.13.docx Page 12 of 63 PART II - ACCESSING & LEAVING THE APPLICATION
The user can hide and show the general information by using the text link at the right-hand side of the section
title.
2.2 Logout from the Application
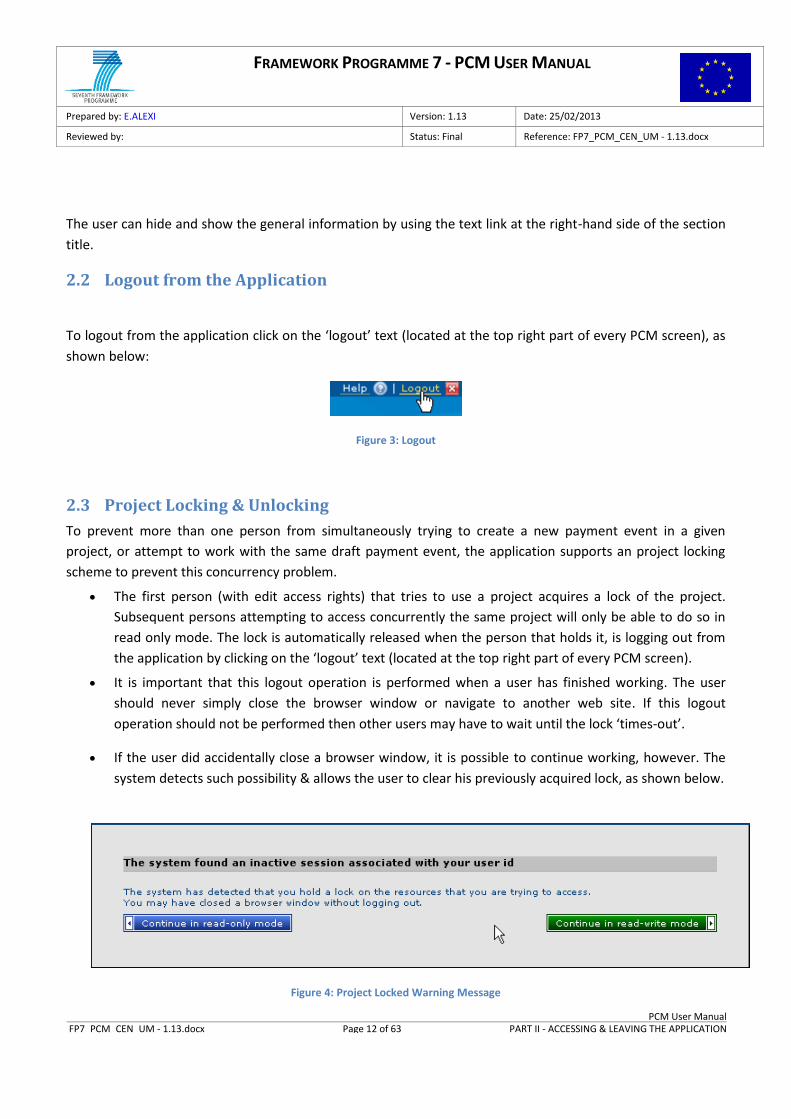
To logout from the application click on the ‘logout’ text (located at the top right part of every PCM screen), as
shown below:
Figure 3: Logout
2.3 Project Locking & Unlocking
To prevent more than one person from simultaneously trying to create a new payment event in a given
project, or attempt to work with the same draft payment event, the application supports an project locking
scheme to prevent this concurrency problem.
The first person (with edit access rights) that tries to use a project acquires a lock of the project.
Subsequent persons attempting to access concurrently the same project will only be able to do so in
read only mode. The lock is automatically released when the person that holds it, is logging out from
the application by clicking on the ‘logout’ text (located at the top right part of every PCM screen).
It is important that this logout operation is performed when a user has finished working. The user
should never simply close the browser window or navigate to another web site. If this logout
operation should not be performed then other users may have to wait until the lock ‘times-out’.
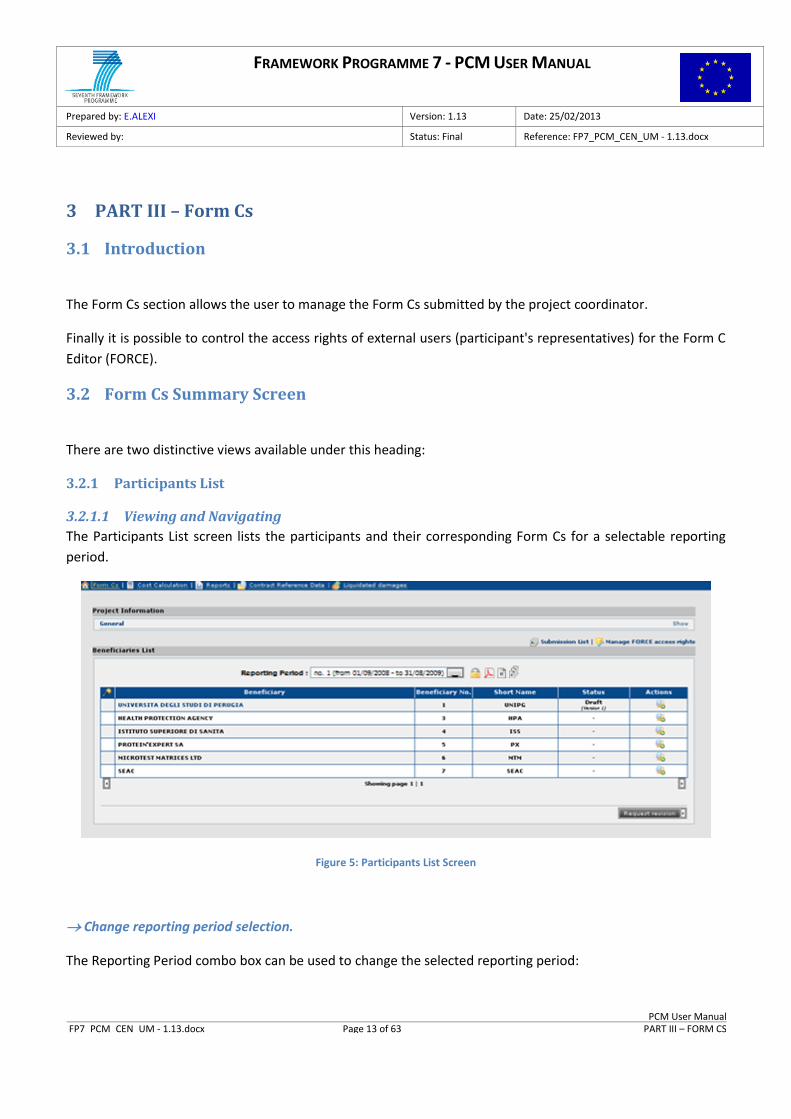
If the user did accidentally close a browser window, it is possible to continue working, however. The
system detects such possibility & allows the user to clear his previously acquired lock, as shown below.
Figure 4: Project Locked Warning Message
FRAMEWORK PROGRAMME 7 - PCM USER MANUAL
Prepared by: E.ALEXI Version: 1.13 Date: 25/02/2013
Reviewed by: Status: Final Reference: FP7_PCM_CEN_UM - 1.13.docx
PCM User Manual FP7_PCM_CEN_UM - 1.13.docx Page 13 of 63 PART III – FORM CS
3 PART III – Form Cs
3.1 Introduction
The Form Cs section allows the user to manage the Form Cs submitted by the project coordinator.
Finally it is possible to control the access rights of external users (participant's representatives) for the Form C
Editor (FORCE).
3.2 Form Cs Summary Screen
There are two distinctive views available under this heading:
3.2.1 Participants List
3.2.1.1 Viewing and Navigating
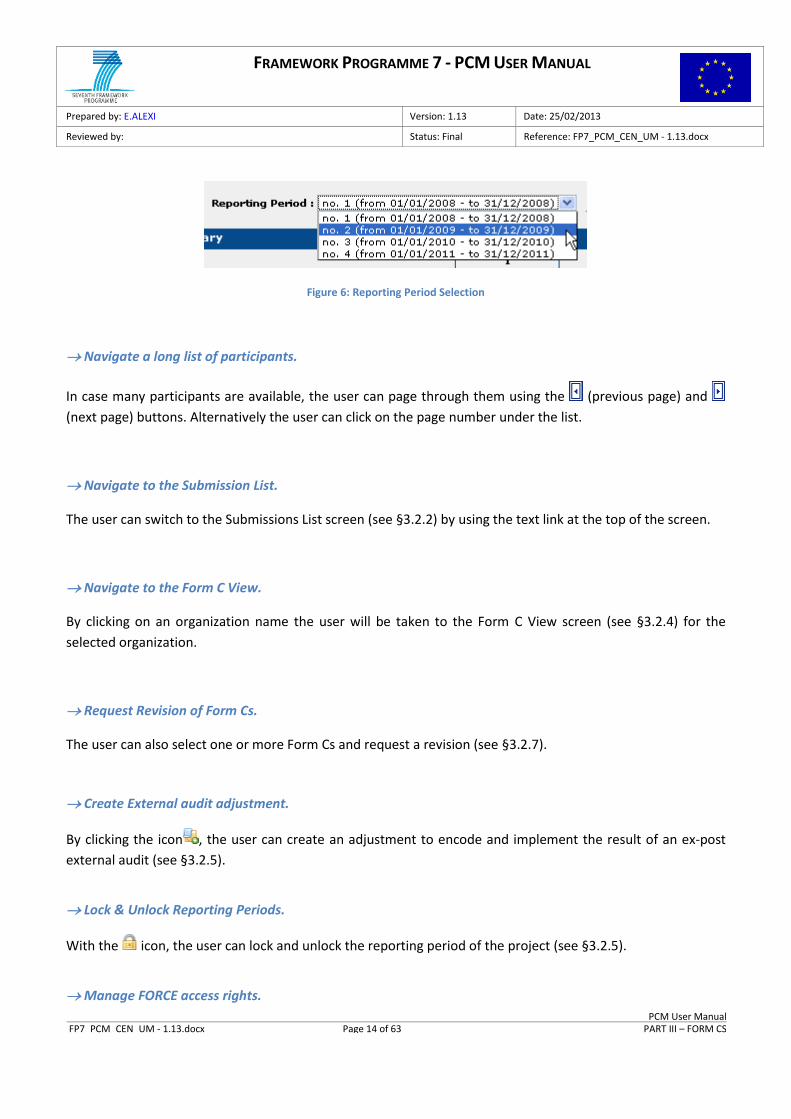
The Participants List screen lists the participants and their corresponding Form Cs for a selectable reporting
period.
Figure 5: Participants List Screen
Change reporting period selection.
The Reporting Period combo box can be used to change the selected reporting period:
FRAMEWORK PROGRAMME 7 - PCM USER MANUAL
Prepared by: E.ALEXI Version: 1.13 Date: 25/02/2013
Reviewed by: Status: Final Reference: FP7_PCM_CEN_UM - 1.13.docx
PCM User Manual FP7_PCM_CEN_UM - 1.13.docx Page 14 of 63 PART III – FORM CS
Figure 6: Reporting Period Selection
Navigate a long list of participants.
In case many participants are available, the user can page through them using the (previous page) and
(next page) buttons. Alternatively the user can click on the page number under the list.
Navigate to the Submission List.
The user can switch to the Submissions List screen (see §3.2.2) by using the text link at the top of the screen.
Navigate to the Form C View.
By clicking on an organization name the user will be taken to the Form C View screen (see §3.2.4) for the
selected organization.
Request Revision of Form Cs.
The user can also select one or more Form Cs and request a revision (see §3.2.7).
Create External audit adjustment.
By clicking the icon , the user can create an adjustment to encode and implement the result of an ex-post
external audit (see §3.2.5).
Lock & Unlock Reporting Periods.
With the icon, the user can lock and unlock the reporting period of the project (see §3.2.5).
Manage FORCE access rights.
FRAMEWORK PROGRAMME 7 - PCM USER MANUAL
Prepared by: E.ALEXI Version: 1.13 Date: 25/02/2013
Reviewed by: Status: Final Reference: FP7_PCM_CEN_UM - 1.13.docx
PCM User Manual FP7_PCM_CEN_UM - 1.13.docx Page 15 of 63 PART III – FORM CS
The icon redirects the user to the Force Access Right management page (see §3.2.9).
Print the Form Cs of the period.
By clicking the icon, the user will generate a PDF containing the Form Cs of the current period.
Print the Overview Report of 'Use of Resources' of the period.
By clicking the icon, the user will generate an overview PDF containing the 'Use of Resources' of all the Form Cs
of the current period. The overview report can be categorized per Activity or per Cost Type and can be filtered
by selecting two different options: a) all Form Cs, b) only the submitted Form Cs.
Print the Overview Report of 'Use of Resources' for all periods.
By clicking the icon the user will generate an overview PDF containing the 'Use of Resources' for all the
periods of the project. This report can be categorized per Activity or per Cost Type and can be filtered by
selecting two different options: a) all Form Cs, b) only the submitted Form Cs.
3.2.2 Submissions List
3.2.2.1 Viewing and Navigating
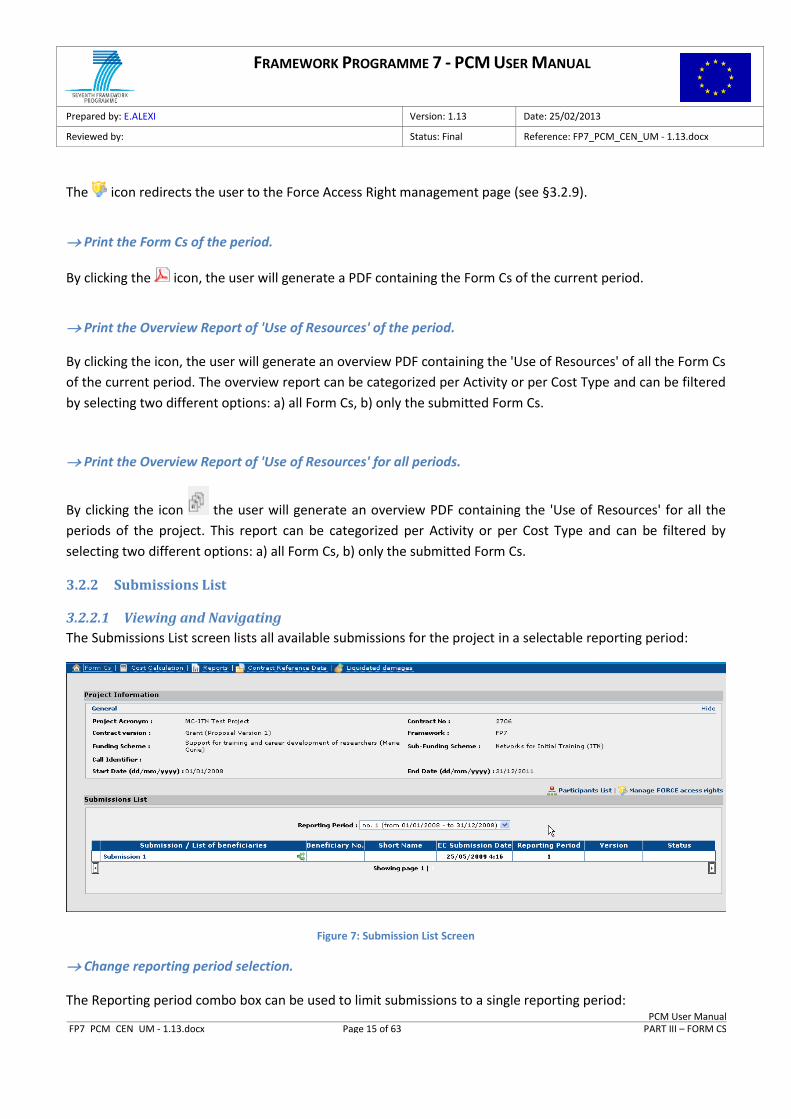
The Submissions List screen lists all available submissions for the project in a selectable reporting period:
Figure 7: Submission List Screen
Change reporting period selection.
The Reporting period combo box can be used to limit submissions to a single reporting period:
FRAMEWORK PROGRAMME 7 - PCM USER MANUAL
Prepared by: E.ALEXI Version: 1.13 Date: 25/02/2013
Reviewed by: Status: Final Reference: FP7_PCM_CEN_UM - 1.13.docx
PCM User Manual FP7_PCM_CEN_UM - 1.13.docx Page 16 of 63 PART III – FORM CS
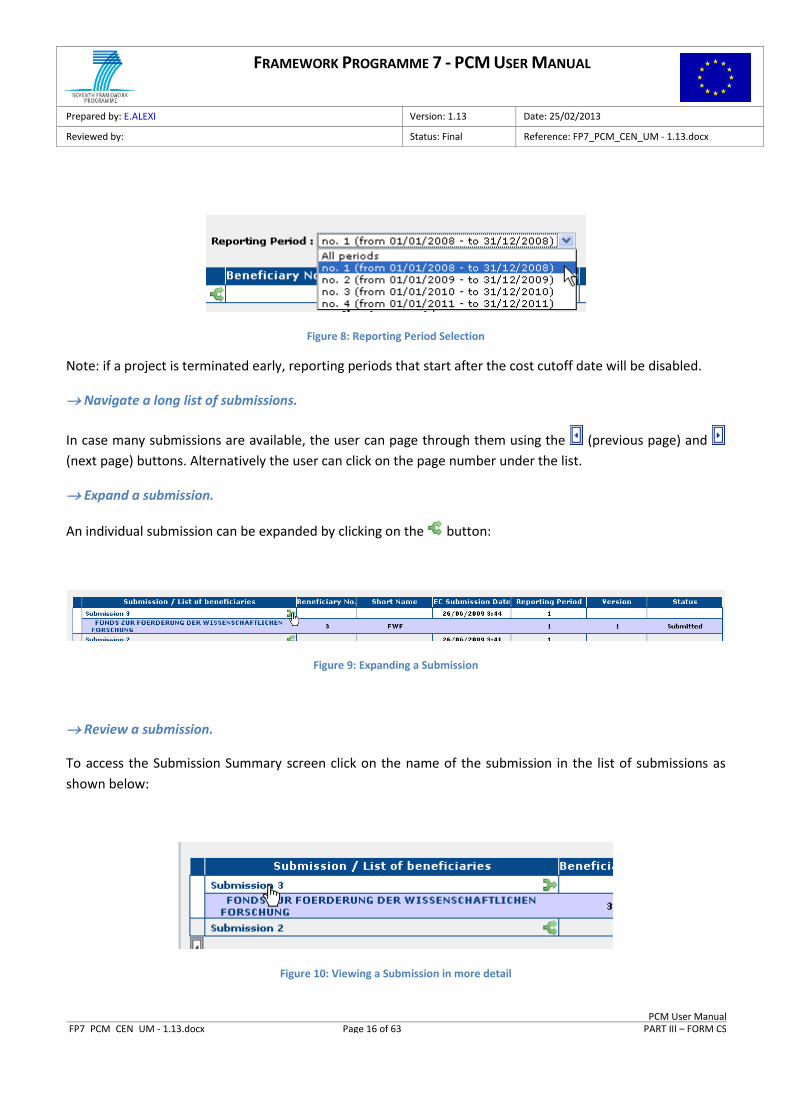
Figure 8: Reporting Period Selection
Note: if a project is terminated early, reporting periods that start after the cost cutoff date will be disabled.
Navigate a long list of submissions.
In case many submissions are available, the user can page through them using the (previous page) and
(next page) buttons. Alternatively the user can click on the page number under the list.
Expand a submission.
An individual submission can be expanded by clicking on the button:
Figure 9: Expanding a Submission
Review a submission.
To access the Submission Summary screen click on the name of the submission in the list of submissions as
shown below:
Figure 10: Viewing a Submission in more detail
FRAMEWORK PROGRAMME 7 - PCM USER MANUAL
Prepared by: E.ALEXI Version: 1.13 Date: 25/02/2013
Reviewed by: Status: Final Reference: FP7_PCM_CEN_UM - 1.13.docx
PCM User Manual FP7_PCM_CEN_UM - 1.13.docx Page 17 of 63 PART III – FORM CS
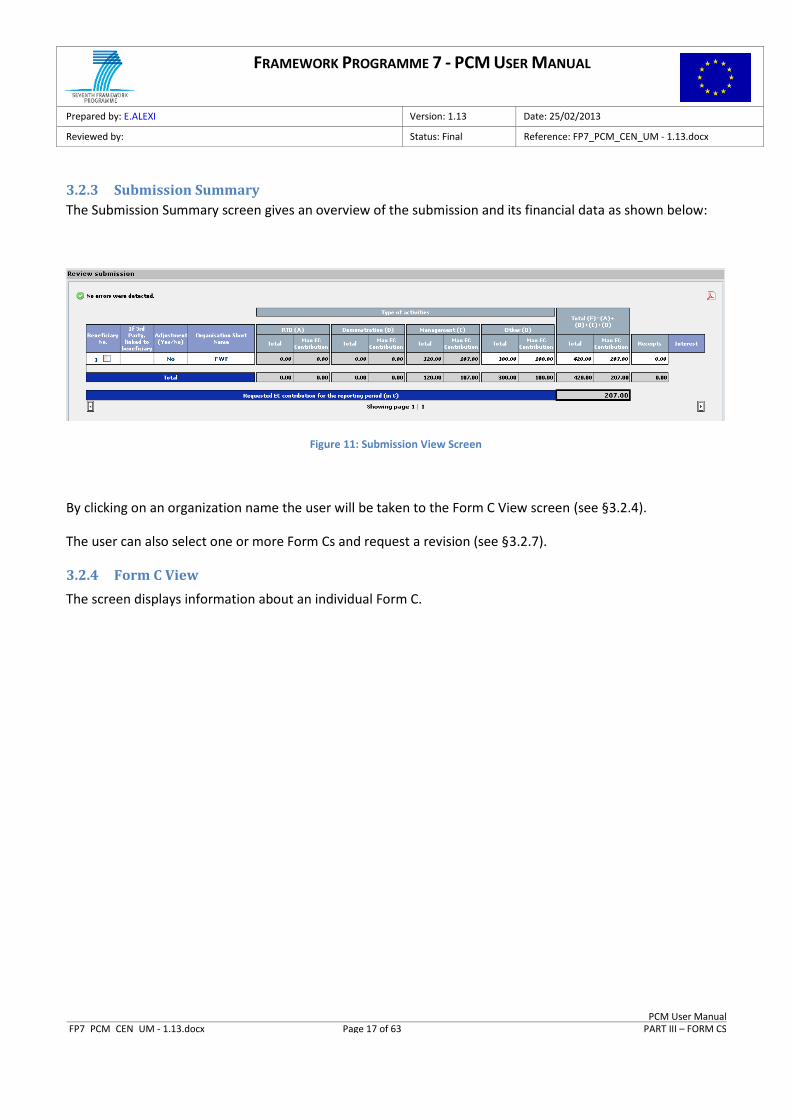
3.2.3 Submission Summary
The Submission Summary screen gives an overview of the submission and its financial data as shown below:
Figure 11: Submission View Screen
By clicking on an organization name the user will be taken to the Form C View screen (see §3.2.4).
The user can also select one or more Form Cs and request a revision (see §3.2.7).
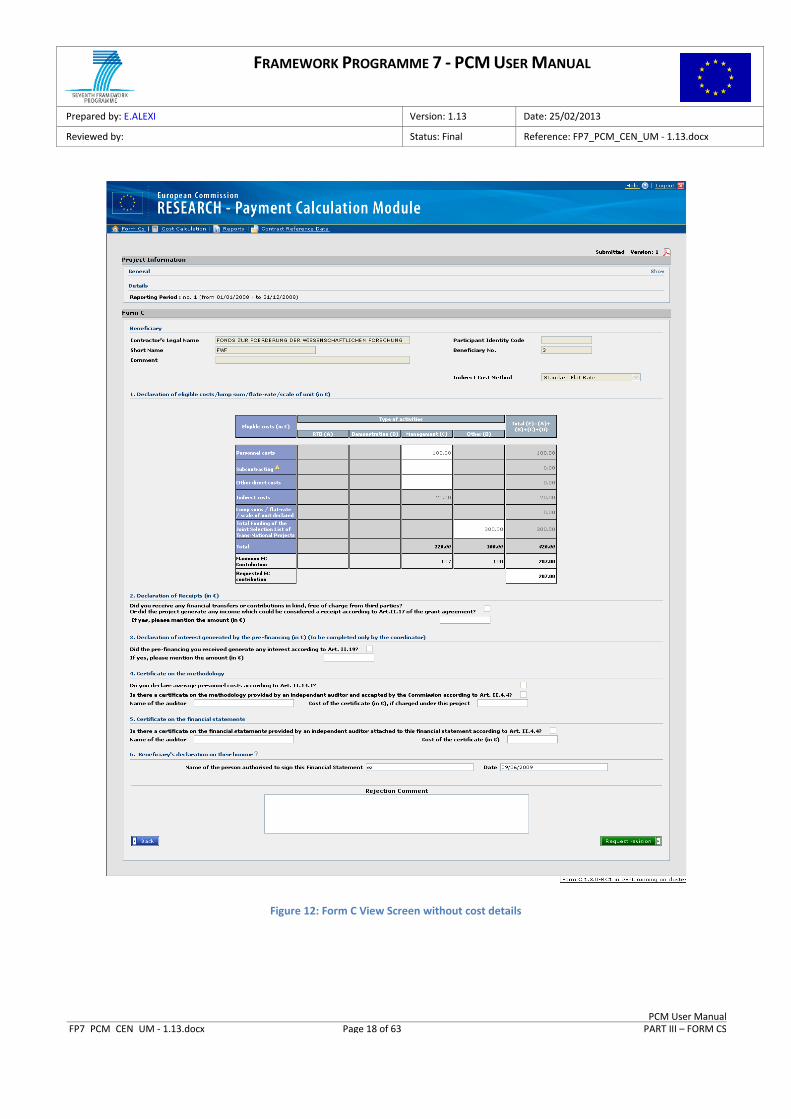
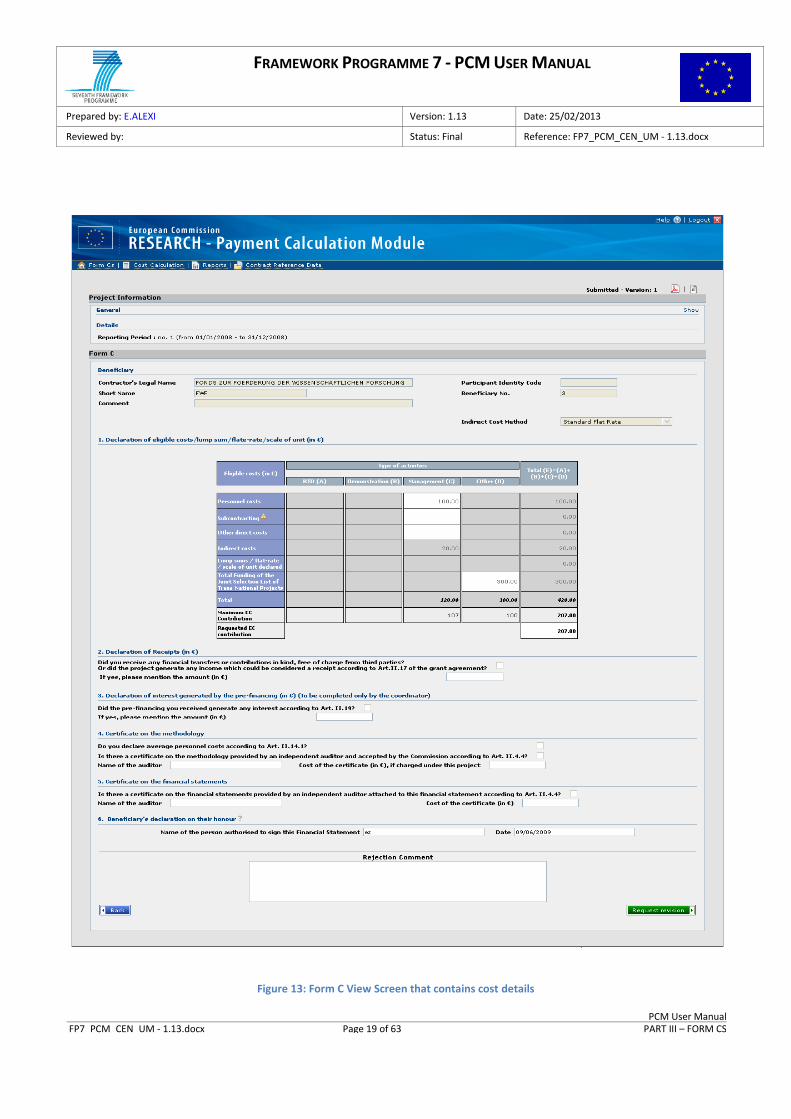
3.2.4 Form C View
The screen displays information about an individual Form C.
FRAMEWORK PROGRAMME 7 - PCM USER MANUAL
Prepared by: E.ALEXI Version: 1.13 Date: 25/02/2013
Reviewed by: Status: Final Reference: FP7_PCM_CEN_UM - 1.13.docx
PCM User Manual FP7_PCM_CEN_UM - 1.13.docx Page 18 of 63 PART III – FORM CS
Figure 12: Form C View Screen without cost details
FRAMEWORK PROGRAMME 7 - PCM USER MANUAL
Prepared by: E.ALEXI Version: 1.13 Date: 25/02/2013
Reviewed by: Status: Final Reference: FP7_PCM_CEN_UM - 1.13.docx
PCM User Manual FP7_PCM_CEN_UM - 1.13.docx Page 19 of 63 PART III – FORM CS
Figure 13: Form C View Screen that contains cost details
FRAMEWORK PROGRAMME 7 - PCM USER MANUAL
Prepared by: E.ALEXI Version: 1.13 Date: 25/02/2013
Reviewed by: Status: Final Reference: FP7_PCM_CEN_UM - 1.13.docx
PCM User Manual FP7_PCM_CEN_UM - 1.13.docx Page 20 of 63 PART III – FORM CS
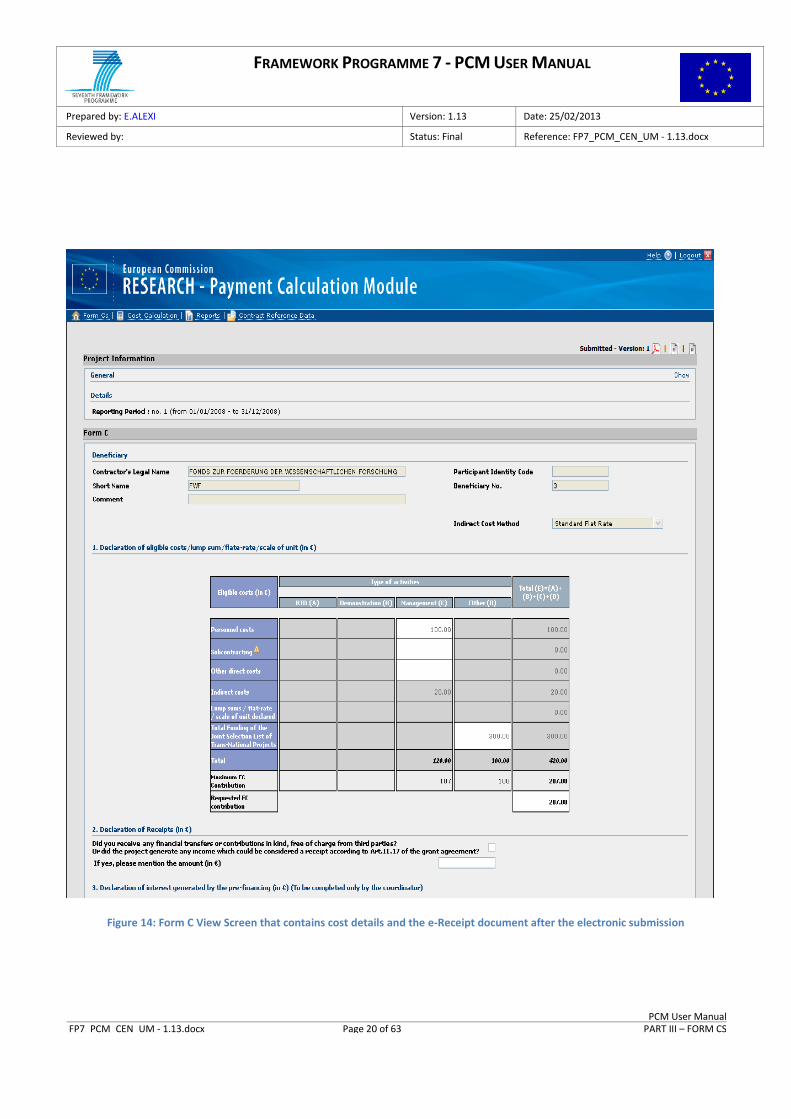
Figure 14: Form C View Screen that contains cost details and the e-Receipt document after the electronic submission
FRAMEWORK PROGRAMME 7 - PCM USER MANUAL
Prepared by: E.ALEXI Version: 1.13 Date: 25/02/2013
Reviewed by: Status: Final Reference: FP7_PCM_CEN_UM - 1.13.docx
PCM User Manual FP7_PCM_CEN_UM - 1.13.docx Page 21 of 63 PART III – FORM CS
As mentioned in the previous sections, there are several ways for the user to arrive in this screen:
via the Participants List view in the Form Cs screen, by clicking on the participant name
via the Submission List view, by clicking on one of the Form C names in the expanded view of a
submission
via the Review Submission screen, by clicking on one of the organization names
The user can request a revision of the Form C (see §3.2.7).
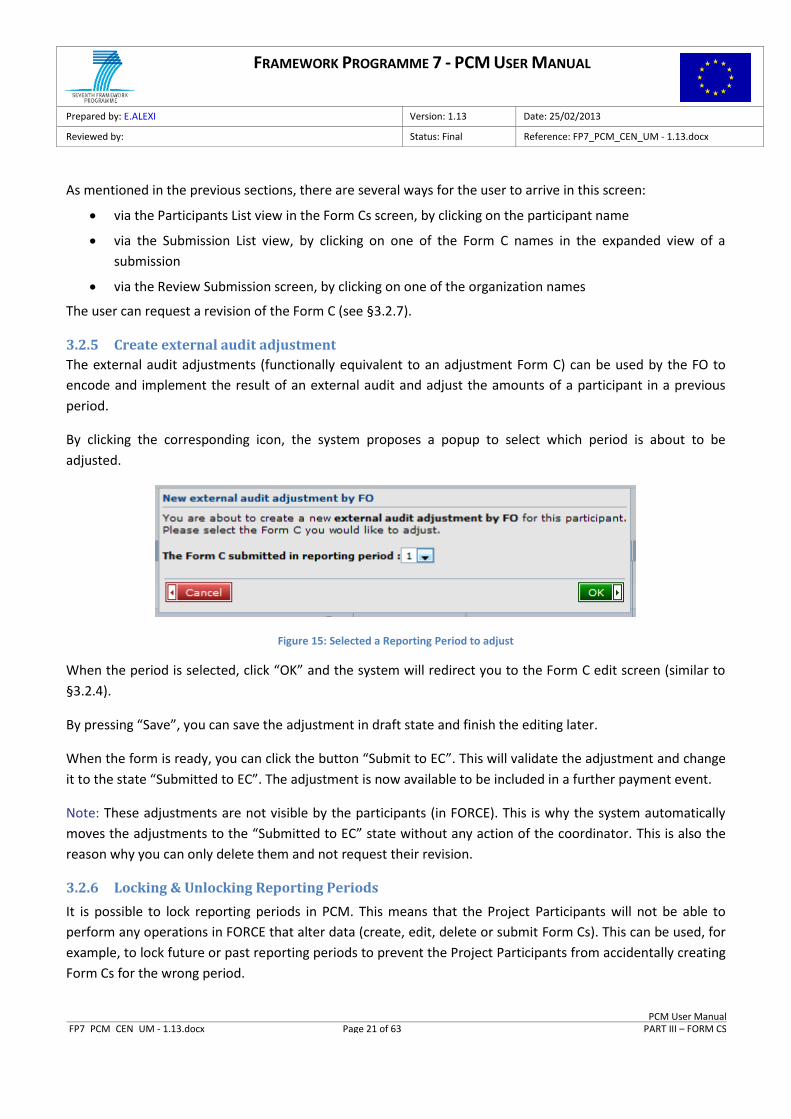
3.2.5 Create external audit adjustment
The external audit adjustments (functionally equivalent to an adjustment Form C) can be used by the FO to
encode and implement the result of an external audit and adjust the amounts of a participant in a previous
period.
By clicking the corresponding icon, the system proposes a popup to select which period is about to be
adjusted.
Figure 15: Selected a Reporting Period to adjust
When the period is selected, click “OK” and the system will redirect you to the Form C edit screen (similar to
§3.2.4).
By pressing “Save”, you can save the adjustment in draft state and finish the editing later.
When the form is ready, you can click the button “Submit to EC”. This will validate the adjustment and change
it to the state “Submitted to EC”. The adjustment is now available to be included in a further payment event.
Note: These adjustments are not visible by the participants (in FORCE). This is why the system automatically
moves the adjustments to the “Submitted to EC” state without any action of the coordinator. This is also the
reason why you can only delete them and not request their revision.
3.2.6 Locking & Unlocking Reporting Periods
It is possible to lock reporting periods in PCM. This means that the Project Participants will not be able to
perform any operations in FORCE that alter data (create, edit, delete or submit Form Cs). This can be used, for
example, to lock future or past reporting periods to prevent the Project Participants from accidentally creating
Form Cs for the wrong period.
FRAMEWORK PROGRAMME 7 - PCM USER MANUAL
Prepared by: E.ALEXI Version: 1.13 Date: 25/02/2013
Reviewed by: Status: Final Reference: FP7_PCM_CEN_UM - 1.13.docx
PCM User Manual FP7_PCM_CEN_UM - 1.13.docx Page 22 of 63 PART III – FORM CS
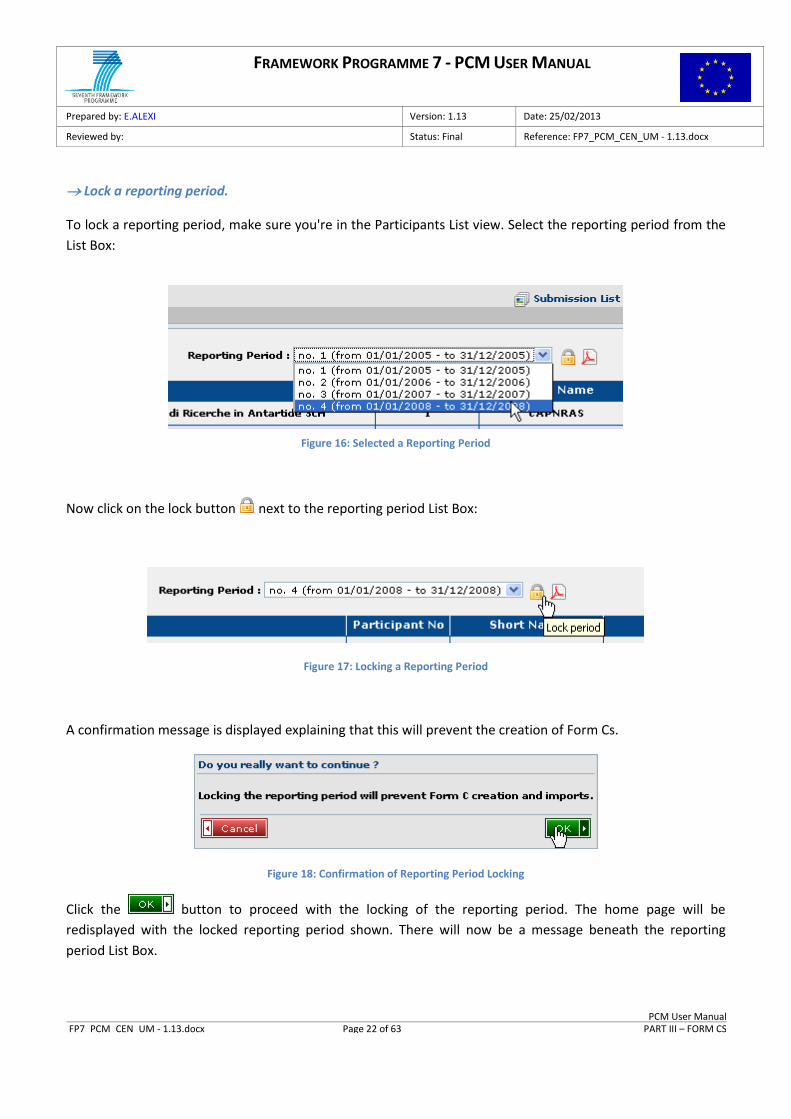
Lock a reporting period.
To lock a reporting period, make sure you're in the Participants List view. Select the reporting period from the
List Box:
Figure 16: Selected a Reporting Period
Now click on the lock button next to the reporting period List Box:
Figure 17: Locking a Reporting Period
A confirmation message is displayed explaining that this will prevent the creation of Form Cs.
Figure 18: Confirmation of Reporting Period Locking
Click the button to proceed with the locking of the reporting period. The home page will be
redisplayed with the locked reporting period shown. There will now be a message beneath the reporting
period List Box.

FRAMEWORK PROGRAMME 7 - PCM USER MANUAL
Prepared by: E.ALEXI Version: 1.13 Date: 25/02/2013
Reviewed by: Status: Final Reference: FP7_PCM_CEN_UM - 1.13.docx
PCM User Manual FP7_PCM_CEN_UM - 1.13.docx Page 23 of 63 PART III – FORM CS
Figure 19: A Locked Reporting Period with Tooltip
Unlock a reporting period.
To unlock a reporting period in order to allow cost statement creation, submission and imports click on the
unlock button to the right of the reporting period List Box:
Figure 20: Unlocking a Reporting Period
A confirmation screen will appear explaining that this will allow Form C creation:
Figure 21: Confirmation of Reporting Period Unlocking
Click the button to proceed with the unlocking of the reporting period. The home page will be
redisplayed with the unlocked reporting period shown.
3.2.7 Requesting Revision of Form Cs
It is possible for the Financial Officer to request a revision (rejection) to one or more Form Cs. Once a Form C
has been rejected, the Participant can revise the Form C and re-submit a new version.
NOTE: only Form Cs with status 'Submitted to EC', that haven't been used in a payment event can be rejected.
Request revision from the Form C Summary page.
To request revision of one or more Form Cs first access the Form Cs summary page (see §0)
FRAMEWORK PROGRAMME 7 - PCM USER MANUAL
Prepared by: E.ALEXI Version: 1.13 Date: 25/02/2013
Reviewed by: Status: Final Reference: FP7_PCM_CEN_UM - 1.13.docx
PCM User Manual FP7_PCM_CEN_UM - 1.13.docx Page 24 of 63 PART III – FORM CS
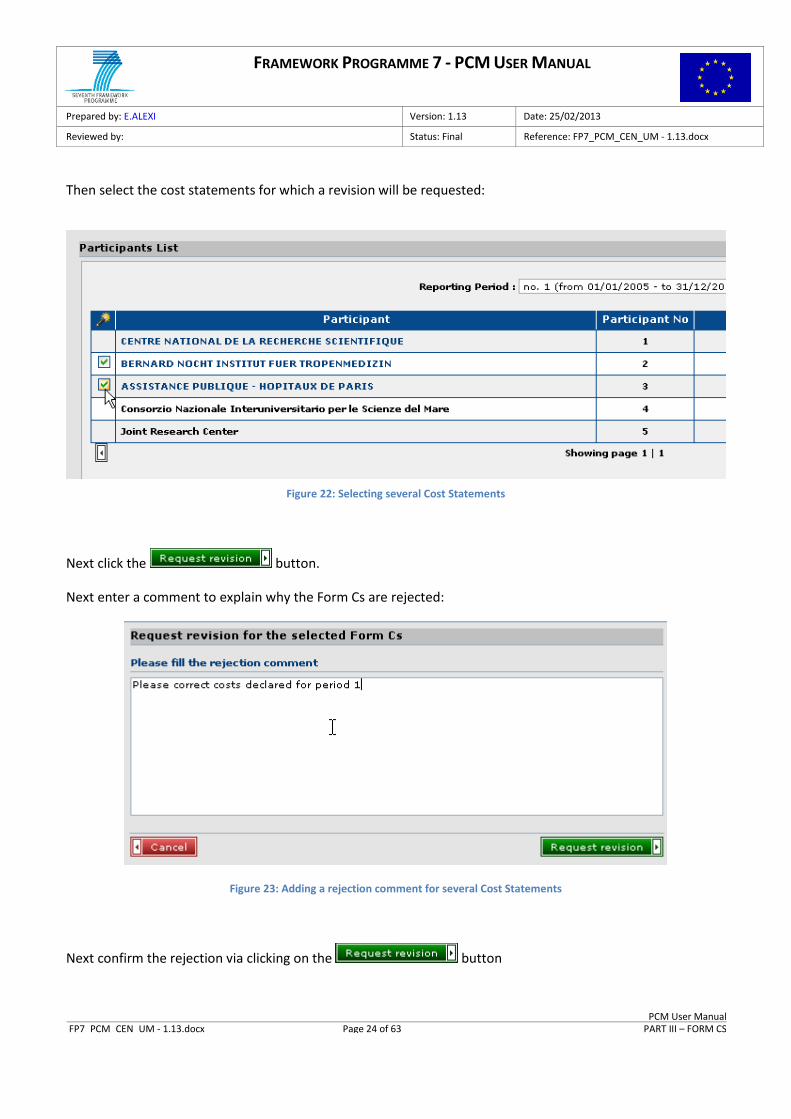
Then select the cost statements for which a revision will be requested:
Figure 22: Selecting several Cost Statements
Next click the button.
Next enter a comment to explain why the Form Cs are rejected:
Figure 23: Adding a rejection comment for several Cost Statements
Next confirm the rejection via clicking on the button
FRAMEWORK PROGRAMME 7 - PCM USER MANUAL
Prepared by: E.ALEXI Version: 1.13 Date: 25/02/2013
Reviewed by: Status: Final Reference: FP7_PCM_CEN_UM - 1.13.docx
PCM User Manual FP7_PCM_CEN_UM - 1.13.docx Page 25 of 63 PART III – FORM CS
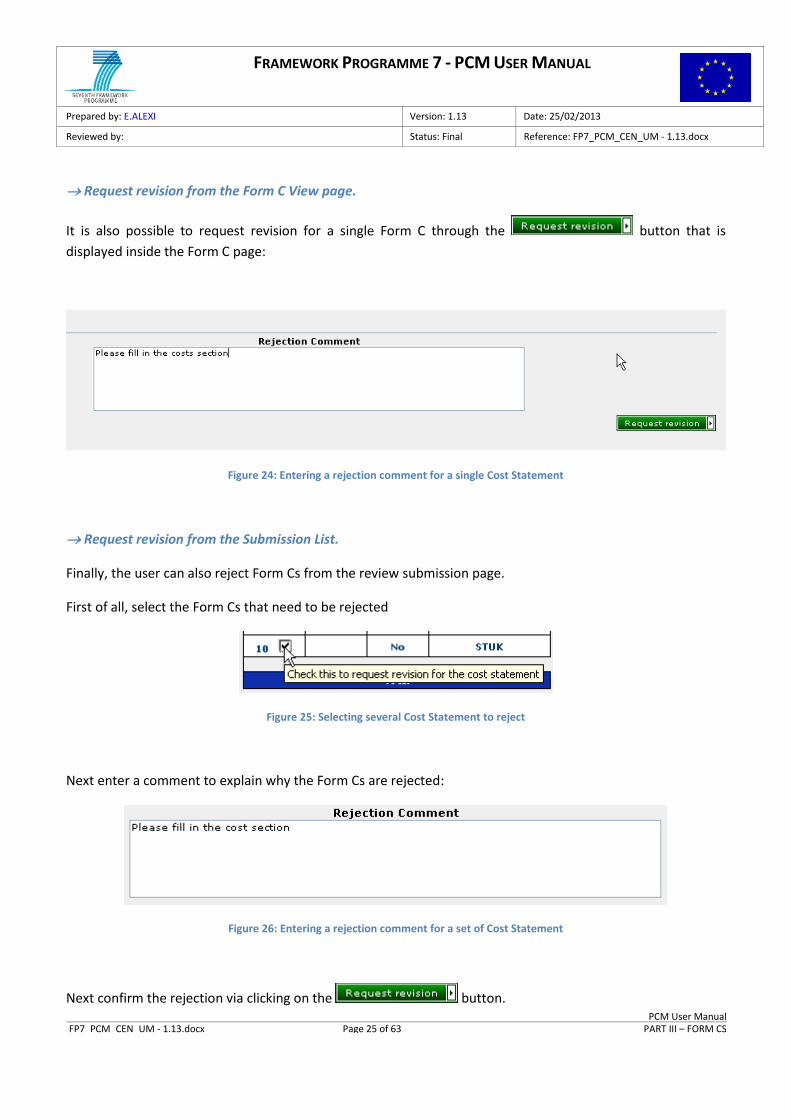
Request revision from the Form C View page.
It is also possible to request revision for a single Form C through the button that is
displayed inside the Form C page:
Figure 24: Entering a rejection comment for a single Cost Statement
Request revision from the Submission List.
Finally, the user can also reject Form Cs from the review submission page.
First of all, select the Form Cs that need to be rejected
Figure 25: Selecting several Cost Statement to reject
Next enter a comment to explain why the Form Cs are rejected:
Figure 26: Entering a rejection comment for a set of Cost Statement
Next confirm the rejection via clicking on the button.
FRAMEWORK PROGRAMME 7 - PCM USER MANUAL
Prepared by: E.ALEXI Version: 1.13 Date: 25/02/2013
Reviewed by: Status: Final Reference: FP7_PCM_CEN_UM - 1.13.docx
PCM User Manual FP7_PCM_CEN_UM - 1.13.docx Page 26 of 63 PART III – FORM CS
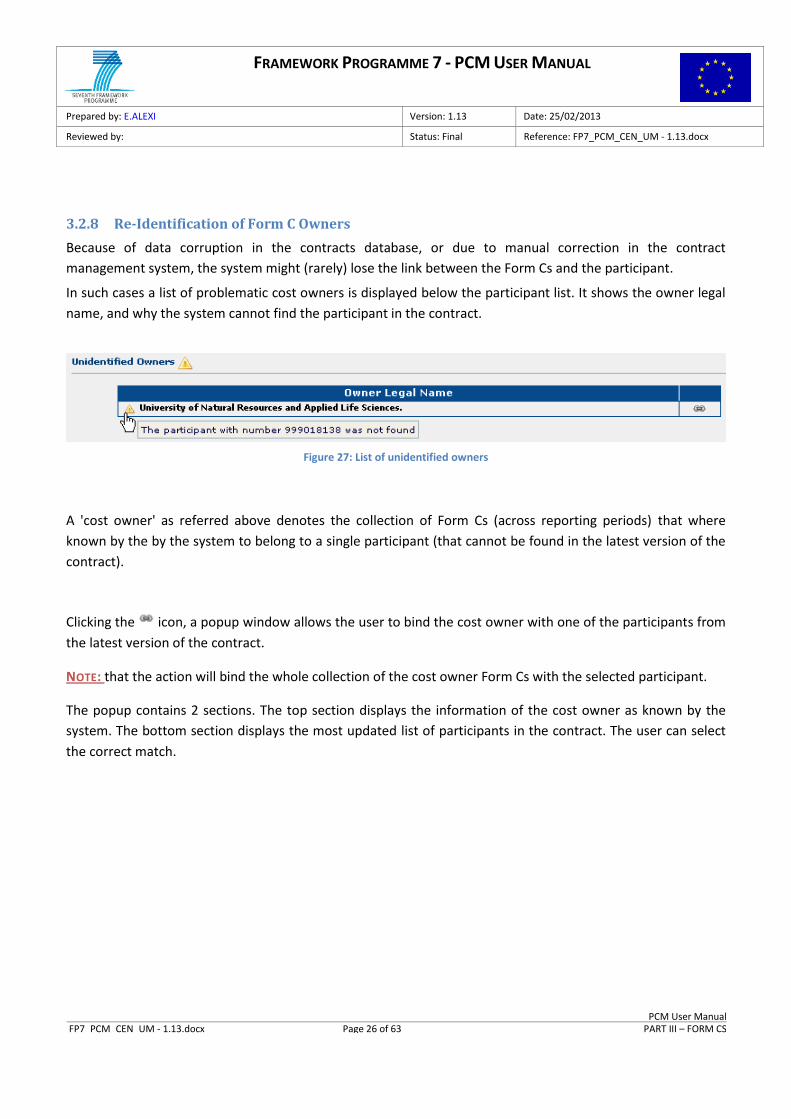
3.2.8 Re-Identification of Form C Owners
Because of data corruption in the contracts database, or due to manual correction in the contract
management system, the system might (rarely) lose the link between the Form Cs and the participant.
In such cases a list of problematic cost owners is displayed below the participant list. It shows the owner legal
name, and why the system cannot find the participant in the contract.
Figure 27: List of unidentified owners
A 'cost owner' as referred above denotes the collection of Form Cs (across reporting periods) that where
known by the by the system to belong to a single participant (that cannot be found in the latest version of the
contract).
Clicking the icon, a popup window allows the user to bind the cost owner with one of the participants from
the latest version of the contract.
NOTE: that the action will bind the whole collection of the cost owner Form Cs with the selected participant.
The popup contains 2 sections. The top section displays the information of the cost owner as known by the
system. The bottom section displays the most updated list of participants in the contract. The user can select
the correct match.

FRAMEWORK PROGRAMME 7 - PCM USER MANUAL
Prepared by: E.ALEXI Version: 1.13 Date: 25/02/2013
Reviewed by: Status: Final Reference: FP7_PCM_CEN_UM - 1.13.docx
PCM User Manual FP7_PCM_CEN_UM - 1.13.docx Page 27 of 63 PART III – FORM CS
Figure 28: Owner identification popup
Next, click the button to commit the identification. The page is reloaded and the Form Cs of the
participant are available in the participant list.
NOTE: if the user accidentally identifies an owner with a wrong participant, it can be "unidentified" by clicking
the icon from the participant list.
Figure 29: Unidentify an owner
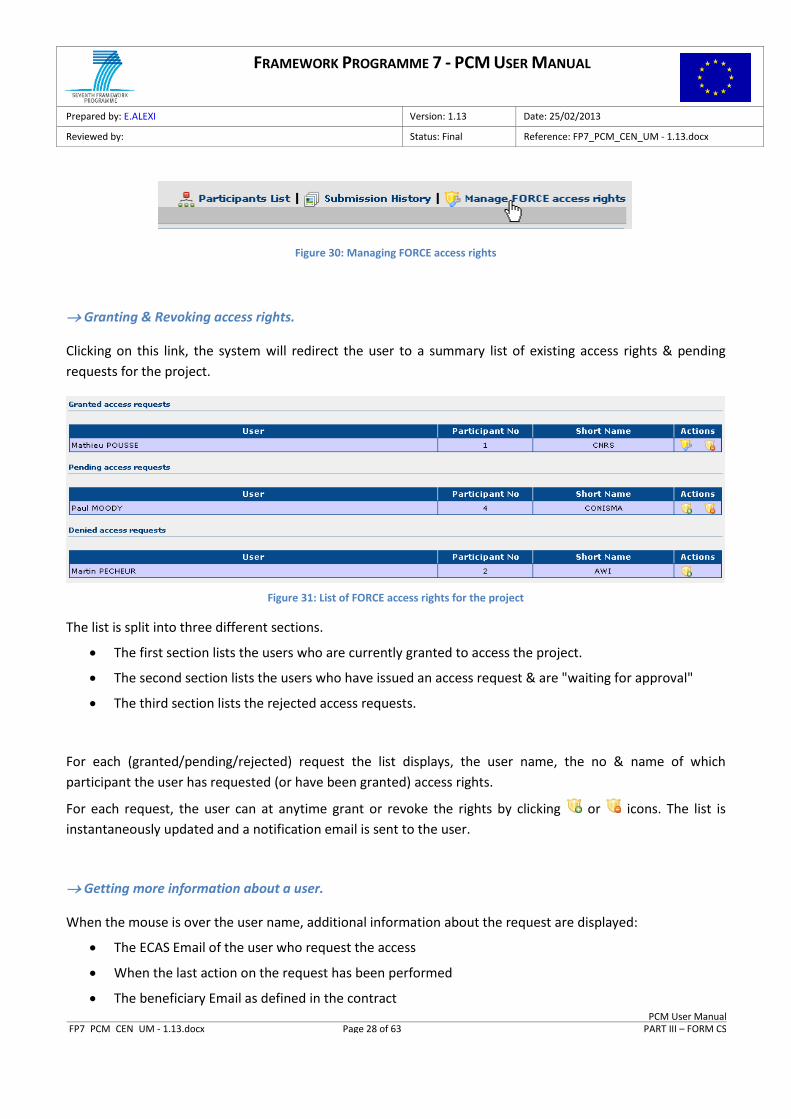
3.2.9 Manage Force Access Rights
In the Form C summary screens it is also possible to manage the Force Access Rights of beneficiaries:
First select the 'Manage FORCE access rights' link as shown below:
FRAMEWORK PROGRAMME 7 - PCM USER MANUAL
Prepared by: E.ALEXI Version: 1.13 Date: 25/02/2013
Reviewed by: Status: Final Reference: FP7_PCM_CEN_UM - 1.13.docx
PCM User Manual FP7_PCM_CEN_UM - 1.13.docx Page 28 of 63 PART III – FORM CS
Figure 30: Managing FORCE access rights
Granting & Revoking access rights.
Clicking on this link, the system will redirect the user to a summary list of existing access rights & pending
requests for the project.
Figure 31: List of FORCE access rights for the project
The list is split into three different sections.
The first section lists the users who are currently granted to access the project.
The second section lists the users who have issued an access request & are "waiting for approval"
The third section lists the rejected access requests.
For each (granted/pending/rejected) request the list displays, the user name, the no & name of which
participant the user has requested (or have been granted) access rights.
For each request, the user can at anytime grant or revoke the rights by clicking or icons. The list is
instantaneously updated and a notification email is sent to the user.
Getting more information about a user.
When the mouse is over the user name, additional information about the request are displayed:
The ECAS Email of the user who request the access
When the last action on the request has been performed
The beneficiary Email as defined in the contract
FRAMEWORK PROGRAMME 7 - PCM USER MANUAL
Prepared by: E.ALEXI Version: 1.13 Date: 25/02/2013
Reviewed by: Status: Final Reference: FP7_PCM_CEN_UM - 1.13.docx
PCM User Manual FP7_PCM_CEN_UM - 1.13.docx Page 29 of 63 PART III – FORM CS
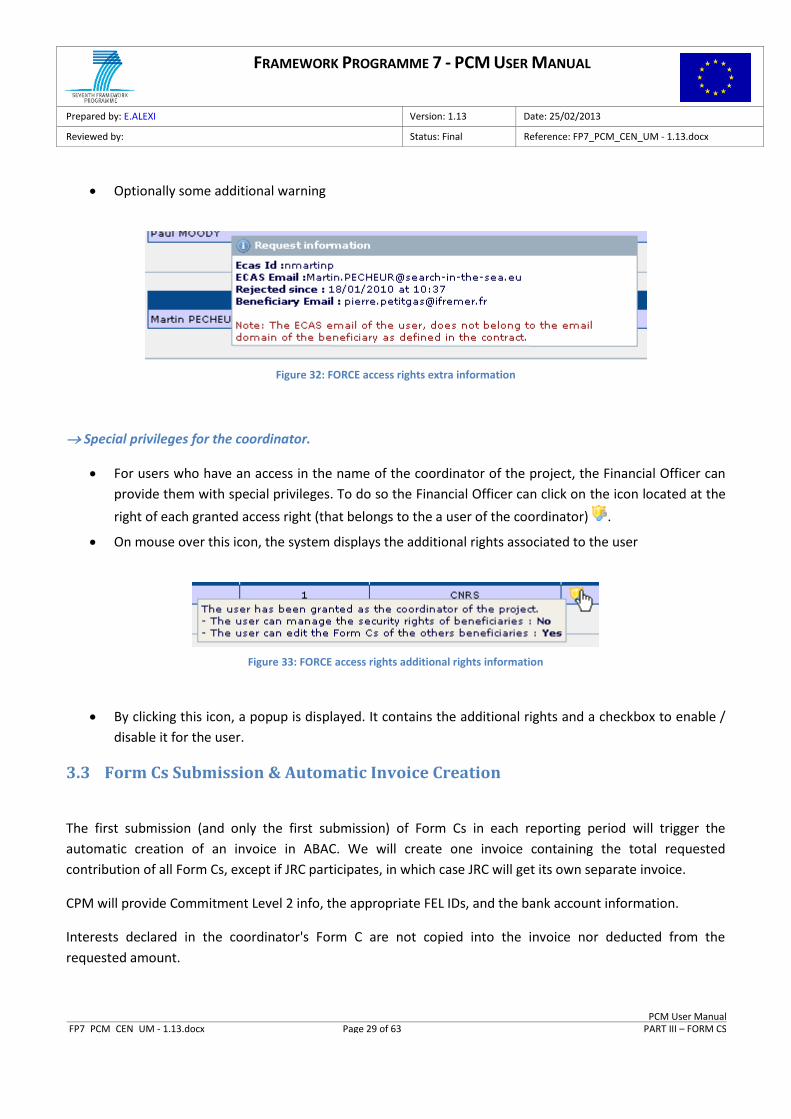
Optionally some additional warning
Figure 32: FORCE access rights extra information
Special privileges for the coordinator.
For users who have an access in the name of the coordinator of the project, the Financial Officer can
provide them with special privileges. To do so the Financial Officer can click on the icon located at the
right of each granted access right (that belongs to the a user of the coordinator) .
On mouse over this icon, the system displays the additional rights associated to the user
Figure 33: FORCE access rights additional rights information
By clicking this icon, a popup is displayed. It contains the additional rights and a checkbox to enable /
disable it for the user.
3.3 Form Cs Submission & Automatic Invoice Creation
The first submission (and only the first submission) of Form Cs in each reporting period will trigger the
automatic creation of an invoice in ABAC. We will create one invoice containing the total requested
contribution of all Form Cs, except if JRC participates, in which case JRC will get its own separate invoice.
CPM will provide Commitment Level 2 info, the appropriate FEL IDs, and the bank account information.
Interests declared in the coordinator's Form C are not copied into the invoice nor deducted from the
requested amount.
FRAMEWORK PROGRAMME 7 - PCM USER MANUAL
Prepared by: E.ALEXI Version: 1.13 Date: 25/02/2013
Reviewed by: Status: Final Reference: FP7_PCM_CEN_UM - 1.13.docx
PCM User Manual FP7_PCM_CEN_UM - 1.13.docx Page 30 of 63 PART III – FORM CS
This invoice is created with workflow status PEND 5, which implies that the clock for the time to pay is not
started.
Once the paper Form Cs are received, the FO should compare them with the electronic version, reject
appropriate costs in PCM, and finally adapt the invoice amount in ABAC before starting the clock on the time
to pay.
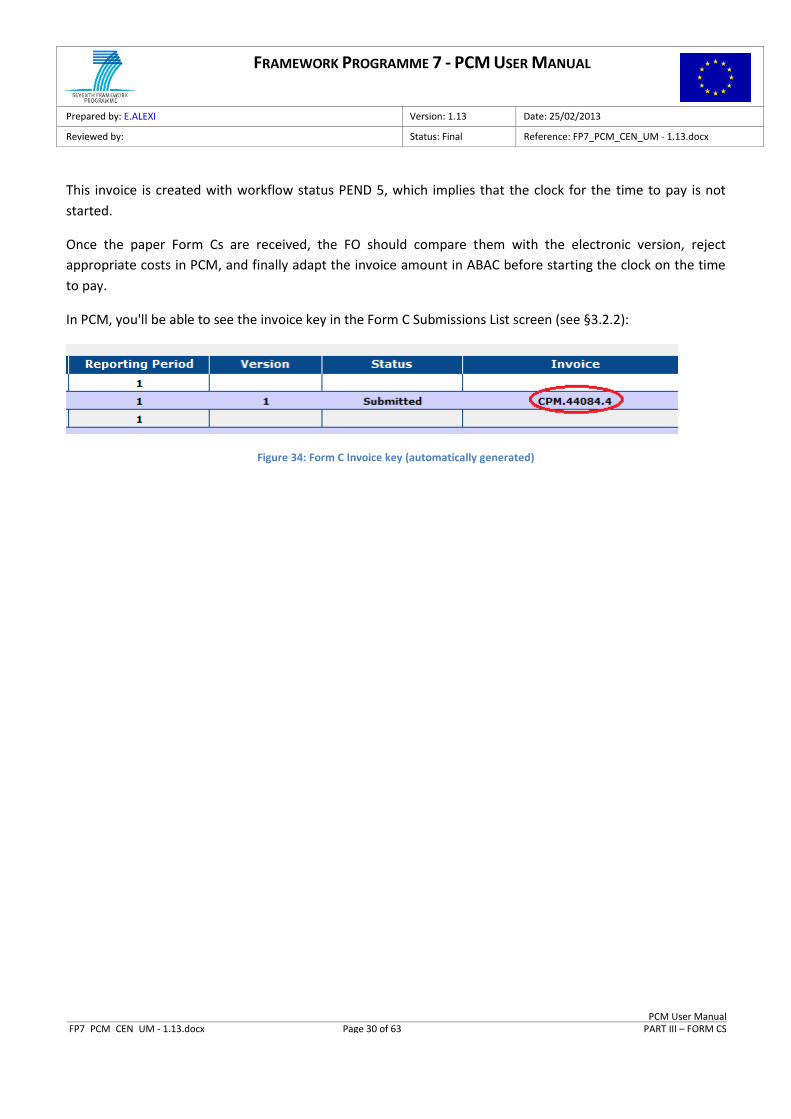
In PCM, you'll be able to see the invoice key in the Form C Submissions List screen (see §3.2.2):
Figure 34: Form C Invoice key (automatically generated)
FRAMEWORK PROGRAMME 7 - PCM USER MANUAL
Prepared by: E.ALEXI Version: 1.13 Date: 25/02/2013
Reviewed by: Status: Final Reference: FP7_PCM_CEN_UM - 1.13.docx
PCM User Manual FP7_PCM_CEN_UM - 1.13.docx Page 31 of 63 PART IV – PAYMENT EVENTS
4 PART IV – Payment Events
4.1 Introduction
The PCM application allows the user to calculate the exact amounts a research project is entitled to for each
reporting period, given the project participants’ cost statements and audit certificates, and given the historical
data from previous calculations. For each reporting period that participants declare costs, the user can create
one normal payment event and one optional supplementary payment event. The latter can be used in case
certain participants did not file their cost statements in time.
NOTE: a supplementary payment event for a reporting period has to be done before the first payment event
for the next reporting period is created.
4.2 Cost Calculation Summary
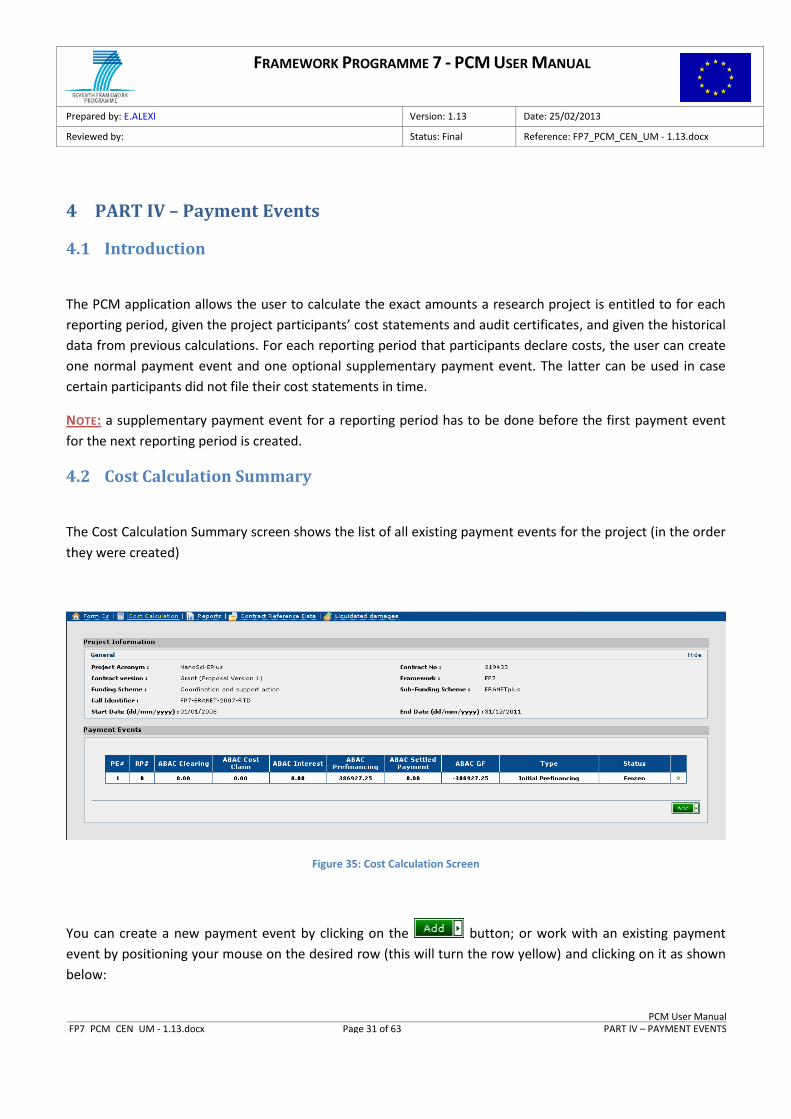
The Cost Calculation Summary screen shows the list of all existing payment events for the project (in the order
they were created)
Figure 35: Cost Calculation Screen
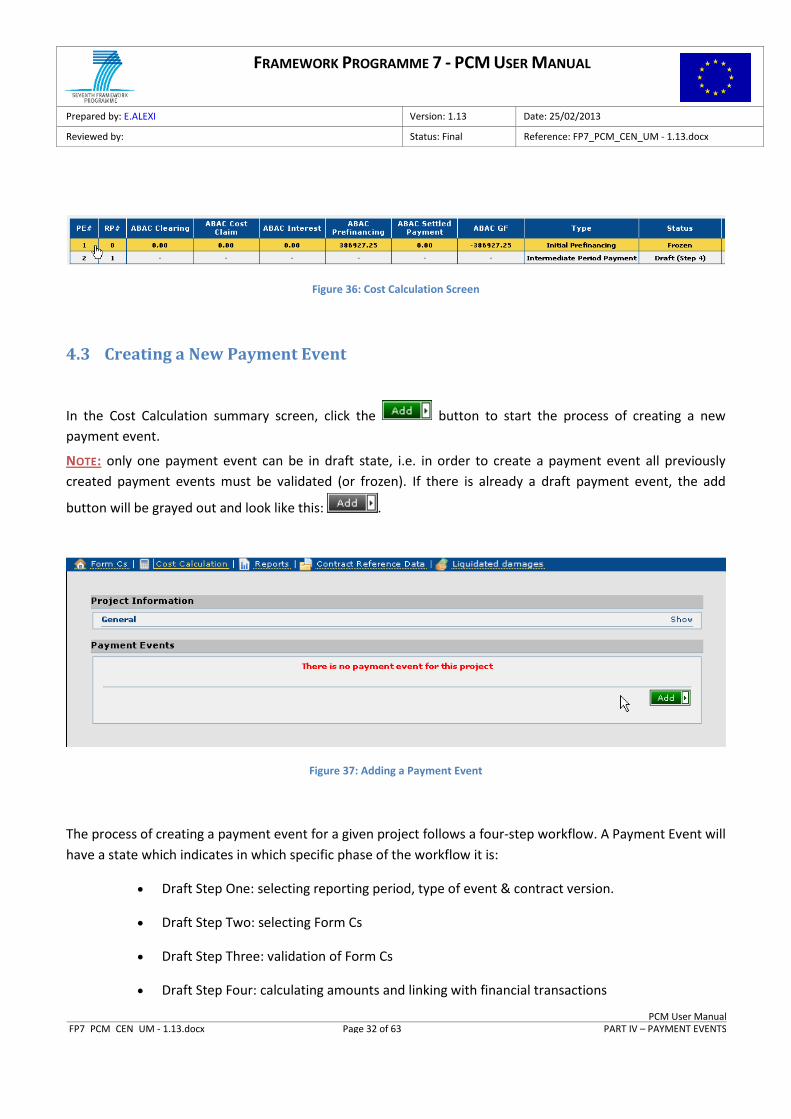
You can create a new payment event by clicking on the button; or work with an existing payment
event by positioning your mouse on the desired row (this will turn the row yellow) and clicking on it as shown
below:
FRAMEWORK PROGRAMME 7 - PCM USER MANUAL
Prepared by: E.ALEXI Version: 1.13 Date: 25/02/2013
Reviewed by: Status: Final Reference: FP7_PCM_CEN_UM - 1.13.docx
PCM User Manual FP7_PCM_CEN_UM - 1.13.docx Page 32 of 63 PART IV – PAYMENT EVENTS
Figure 36: Cost Calculation Screen
4.3 Creating a New Payment Event
In the Cost Calculation summary screen, click the button to start the process of creating a new
payment event.
NOTE: only one payment event can be in draft state, i.e. in order to create a payment event all previously
created payment events must be validated (or frozen). If there is already a draft payment event, the add
button will be grayed out and look like this: .
Figure 37: Adding a Payment Event
The process of creating a payment event for a given project follows a four-step workflow. A Payment Event will
have a state which indicates in which specific phase of the workflow it is:
Draft Step One: selecting reporting period, type of event & contract version.
Draft Step Two: selecting Form Cs
Draft Step Three: validation of Form Cs
Draft Step Four: calculating amounts and linking with financial transactions
FRAMEWORK PROGRAMME 7 - PCM USER MANUAL
Prepared by: E.ALEXI Version: 1.13 Date: 25/02/2013
Reviewed by: Status: Final Reference: FP7_PCM_CEN_UM - 1.13.docx
PCM User Manual FP7_PCM_CEN_UM - 1.13.docx Page 33 of 63 PART IV – PAYMENT EVENTS
Frozen: linking with financial transactions
NOTE: not all states are available for all payment event types.
The following state diagram illustrates the different phases of the Payment Event workflow:
DRAFT_STEP_1 DRAFT_STEP_2choose RP
FROZENDRAFT_STEP_4unfreeze
save
choose Form C
DRAFT_STEP_3next
back
save
next freeze
save
calculate
Figure 38: Payment Event State Diagram
The functionality described in this diagram will be explained in detail in the next sections.
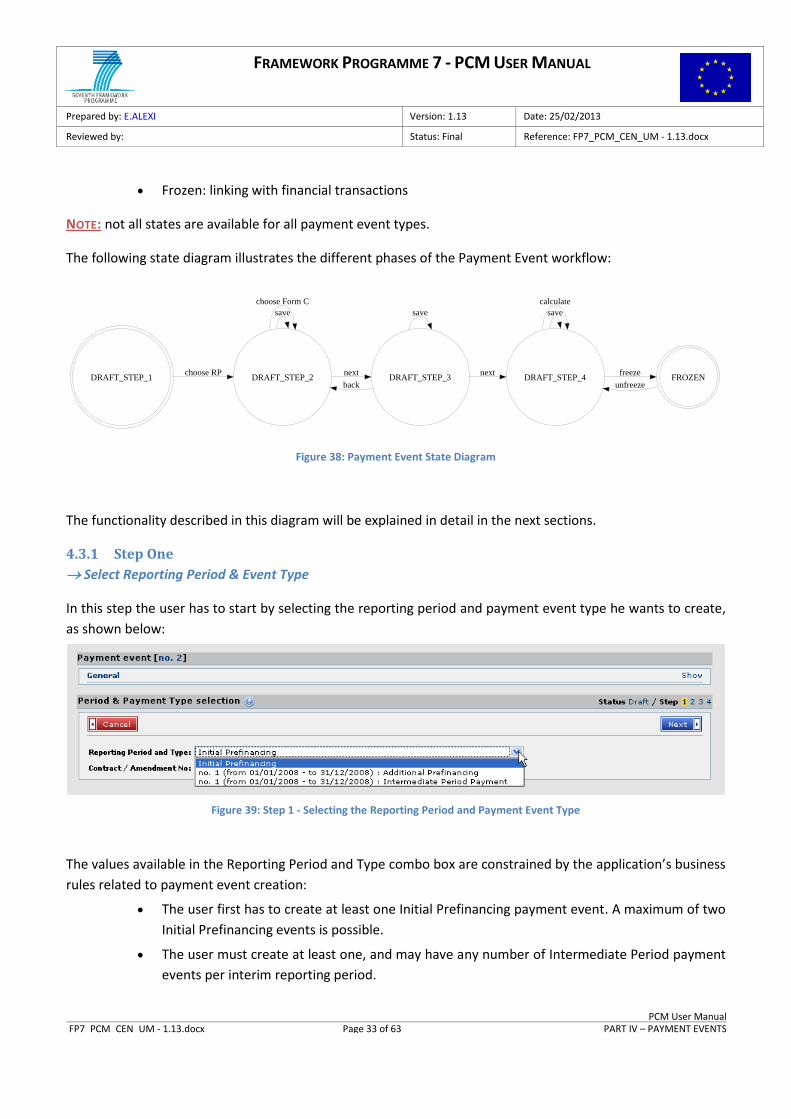
4.3.1 Step One
Select Reporting Period & Event Type
In this step the user has to start by selecting the reporting period and payment event type he wants to create,
as shown below:
Figure 39: Step 1 - Selecting the Reporting Period and Payment Event Type
The values available in the Reporting Period and Type combo box are constrained by the application’s business
rules related to payment event creation:
The user first has to create at least one Initial Prefinancing payment event. A maximum of two
Initial Prefinancing events is possible.
The user must create at least one, and may have any number of Intermediate Period payment
events per interim reporting period.
FRAMEWORK PROGRAMME 7 - PCM USER MANUAL
Prepared by: E.ALEXI Version: 1.13 Date: 25/02/2013
Reviewed by: Status: Final Reference: FP7_PCM_CEN_UM - 1.13.docx
PCM User Manual FP7_PCM_CEN_UM - 1.13.docx Page 34 of 63 PART IV – PAYMENT EVENTS
The user may create any number of Additional Prefinancing payment events per interim
reporting period.
In final periods, the user can create a maximum of two final payment events.
Payment events have to be created in chronological order. (i.e. You can only create a new
payment event in the same reporting period as the previous payment event, or in the
reporting period following that one)
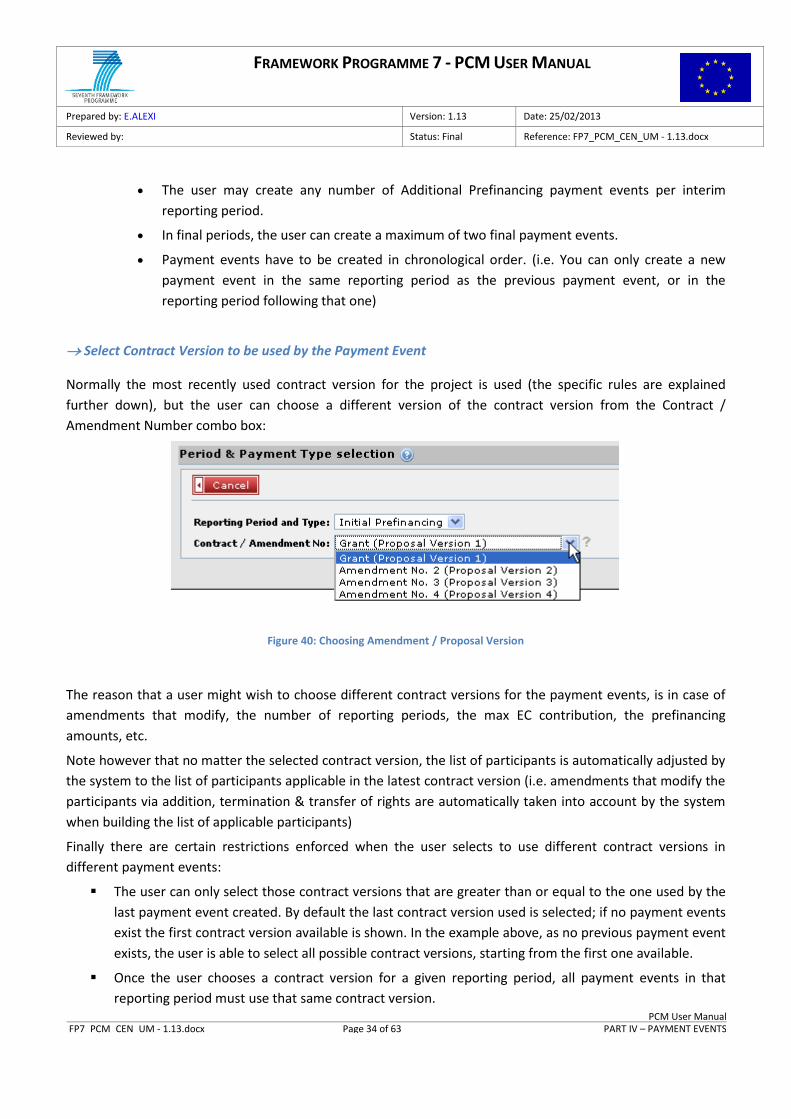
Select Contract Version to be used by the Payment Event
Normally the most recently used contract version for the project is used (the specific rules are explained
further down), but the user can choose a different version of the contract version from the Contract /
Amendment Number combo box:
Figure 40: Choosing Amendment / Proposal Version
The reason that a user might wish to choose different contract versions for the payment events, is in case of
amendments that modify, the number of reporting periods, the max EC contribution, the prefinancing
amounts, etc.
Note however that no matter the selected contract version, the list of participants is automatically adjusted by
the system to the list of participants applicable in the latest contract version (i.e. amendments that modify the
participants via addition, termination & transfer of rights are automatically taken into account by the system
when building the list of applicable participants)
Finally there are certain restrictions enforced when the user selects to use different contract versions in
different payment events:
The user can only select those contract versions that are greater than or equal to the one used by the
last payment event created. By default the last contract version used is selected; if no payment events
exist the first contract version available is shown. In the example above, as no previous payment event
exists, the user is able to select all possible contract versions, starting from the first one available.
Once the user chooses a contract version for a given reporting period, all payment events in that
reporting period must use that same contract version.
FRAMEWORK PROGRAMME 7 - PCM USER MANUAL
Prepared by: E.ALEXI Version: 1.13 Date: 25/02/2013
Reviewed by: Status: Final Reference: FP7_PCM_CEN_UM - 1.13.docx
PCM User Manual FP7_PCM_CEN_UM - 1.13.docx Page 35 of 63 PART IV – PAYMENT EVENTS
Final payment events must always use the most recent signed contract version. If the user didn't use
the most recent contract version, the Reporting Period combo box will not show the option of creating
a final period payment event.
Proceeding to the next step.
Once the user has chosen and pressed the button, the payment event will be created for the
selected reporting periods and contract version.
The application will then proceed, depending on the selected payment event type:
INITIAL PREFINANCING Payment Event.
This type of payment event is used to calculate the initial prefinancing for a project. There are no Form Cs
for this type of Payment Event so the application takes a shortcut straight to Step Four.
ADDITIONAL PREFINANCING Payment Event.
This type of payment event is used to calculate additional prefinancing (outside of the normal
prefinancing) for a project in an interim period. There are no Form Cs for this type of Payment Event so the
application takes a shortcut straight to Step Four.
INTERMEDIATE & FINAL PERIOD Payment Event.
These are types of payment event for which the application follows the normal flow and proceeds with
Step Two.
NOTE: there is an exceptional situation in which a final payment will also take a shortcut to Step Four. This
happens when a project is terminated early with the No Costs option. In this case prefinancing has been paid,
but no cost claims will ever arrive, and hence the prefinancing will have to be recovered.
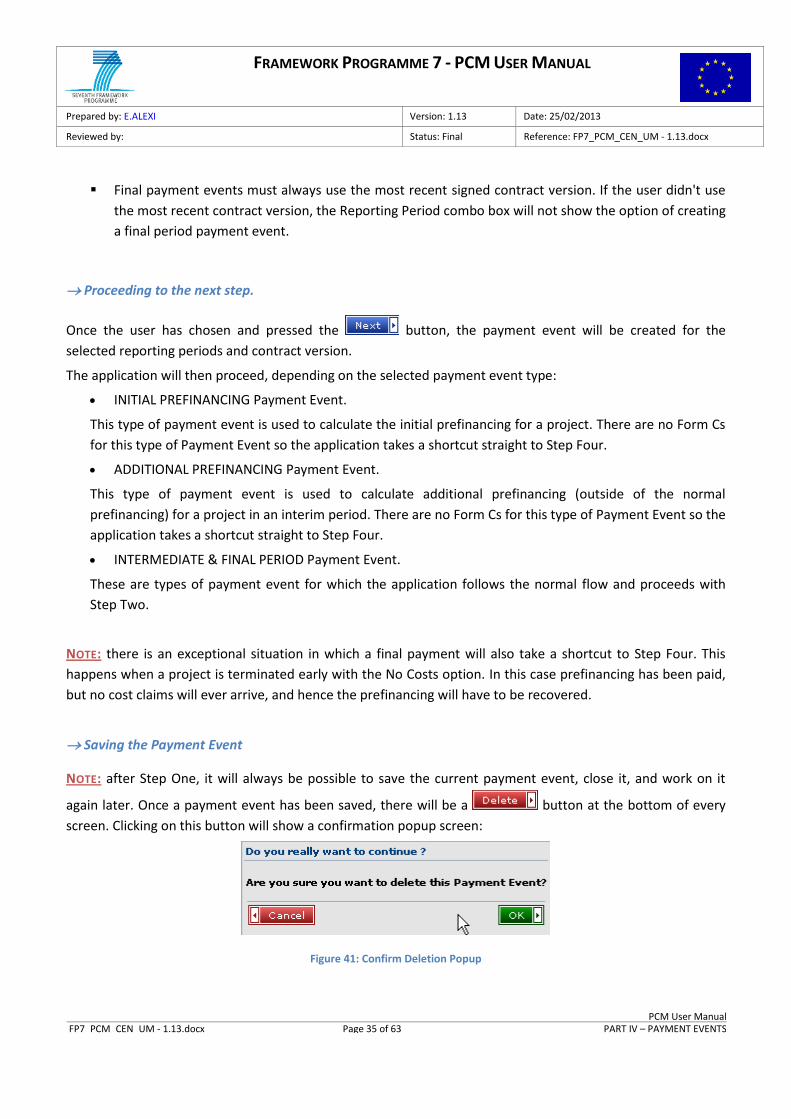
Saving the Payment Event
NOTE: after Step One, it will always be possible to save the current payment event, close it, and work on it
again later. Once a payment event has been saved, there will be a button at the bottom of every
screen. Clicking on this button will show a confirmation popup screen:
Figure 41: Confirm Deletion Popup

FRAMEWORK PROGRAMME 7 - PCM USER MANUAL
Prepared by: E.ALEXI Version: 1.13 Date: 25/02/2013
Reviewed by: Status: Final Reference: FP7_PCM_CEN_UM - 1.13.docx
PCM User Manual FP7_PCM_CEN_UM - 1.13.docx Page 36 of 63 PART IV – PAYMENT EVENTS
Clicking returns you to the screen you were in before. Clicking on will delete the payment
event and return you to the Cost Calculation screen (see § 4.2).
4.3.2 Step Two
Selecting Form Cs
During this step, the user can select the Form Cs to be used in the calculation.
The application will list all available submitted (from the Force application) Form Cs for the chosen period:
Figure 42: Step 2
The user can select one or more Form Cs by clicking the appropriate check boxes:
Figure 43: Selecting Form Cs
Once all the desired Form Cs have been checked, the user uses the button to proceed to Step Three.
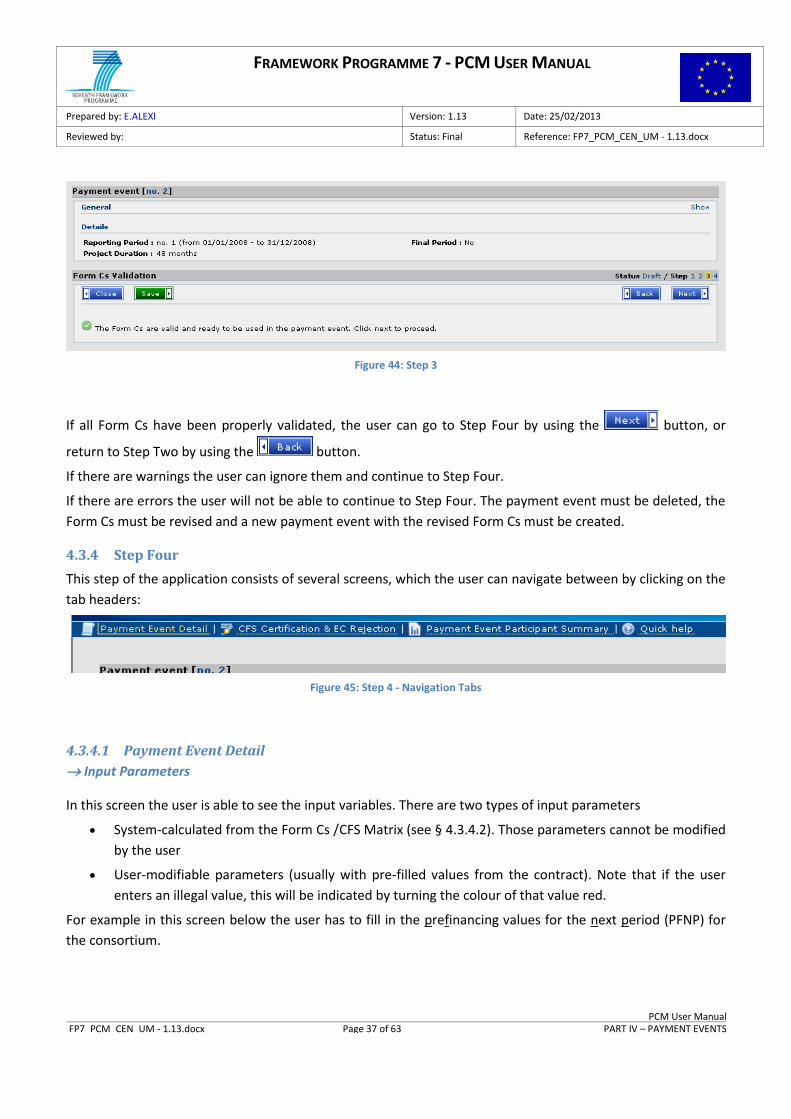
4.3.3 Step Three
During this step the Form Cs are validated, to make sure they can be used in the calculation in step 4.
FRAMEWORK PROGRAMME 7 - PCM USER MANUAL
Prepared by: E.ALEXI Version: 1.13 Date: 25/02/2013
Reviewed by: Status: Final Reference: FP7_PCM_CEN_UM - 1.13.docx
PCM User Manual FP7_PCM_CEN_UM - 1.13.docx Page 37 of 63 PART IV – PAYMENT EVENTS
Figure 44: Step 3
If all Form Cs have been properly validated, the user can go to Step Four by using the button, or
return to Step Two by using the button.
If there are warnings the user can ignore them and continue to Step Four.
If there are errors the user will not be able to continue to Step Four. The payment event must be deleted, the
Form Cs must be revised and a new payment event with the revised Form Cs must be created.
4.3.4 Step Four
This step of the application consists of several screens, which the user can navigate between by clicking on the
tab headers:
Figure 45: Step 4 - Navigation Tabs
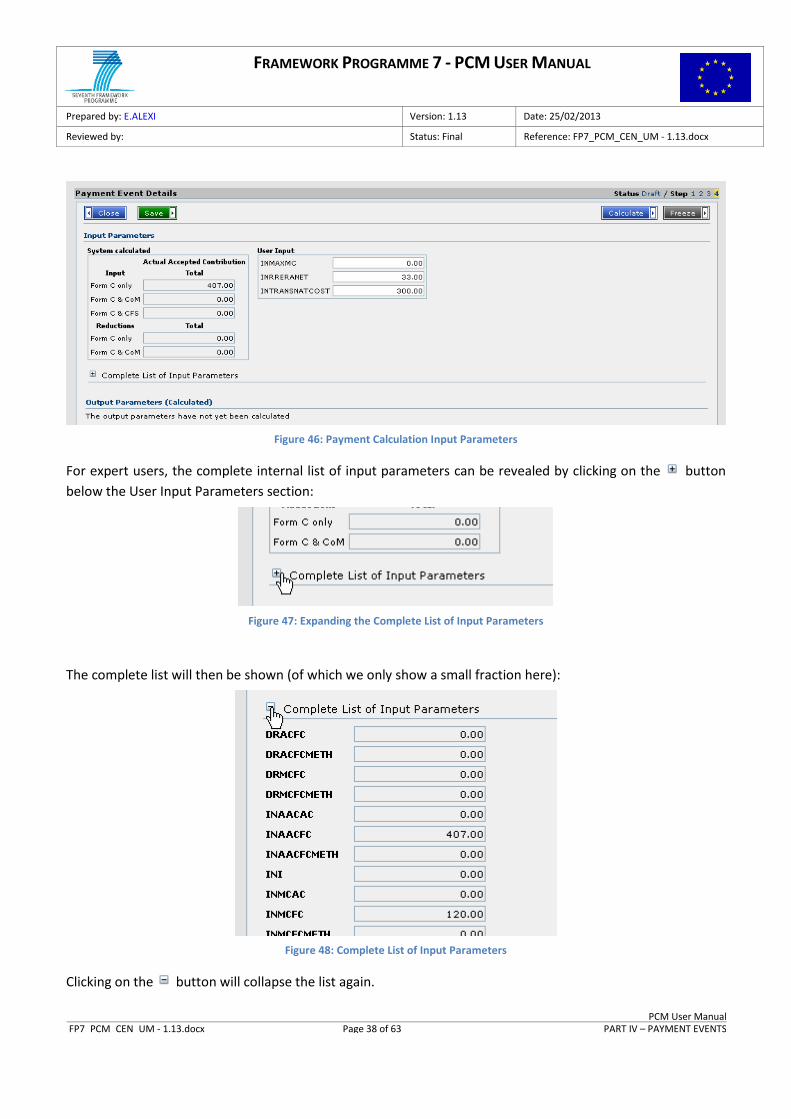
4.3.4.1 Payment Event Detail
Input Parameters
In this screen the user is able to see the input variables. There are two types of input parameters
System-calculated from the Form Cs /CFS Matrix (see § 4.3.4.2). Those parameters cannot be modified
by the user
User-modifiable parameters (usually with pre-filled values from the contract). Note that if the user
enters an illegal value, this will be indicated by turning the colour of that value red.
For example in this screen below the user has to fill in the prefinancing values for the next period (PFNP) for
the consortium.
FRAMEWORK PROGRAMME 7 - PCM USER MANUAL
Prepared by: E.ALEXI Version: 1.13 Date: 25/02/2013
Reviewed by: Status: Final Reference: FP7_PCM_CEN_UM - 1.13.docx
PCM User Manual FP7_PCM_CEN_UM - 1.13.docx Page 38 of 63 PART IV – PAYMENT EVENTS
Figure 46: Payment Calculation Input Parameters
For expert users, the complete internal list of input parameters can be revealed by clicking on the button
below the User Input Parameters section:
Figure 47: Expanding the Complete List of Input Parameters
The complete list will then be shown (of which we only show a small fraction here):
Figure 48: Complete List of Input Parameters
Clicking on the button will collapse the list again.
FRAMEWORK PROGRAMME 7 - PCM USER MANUAL
Prepared by: E.ALEXI Version: 1.13 Date: 25/02/2013
Reviewed by: Status: Final Reference: FP7_PCM_CEN_UM - 1.13.docx
PCM User Manual FP7_PCM_CEN_UM - 1.13.docx Page 39 of 63 PART IV – PAYMENT EVENTS
Executing the calculation
Once all input values are entered and/or modified, the user can calculate the output for the payment event
with the button, but note that the user may first have to certify costs in the CFS Matrix (see §
4.3.4.2) before performing the calculation.
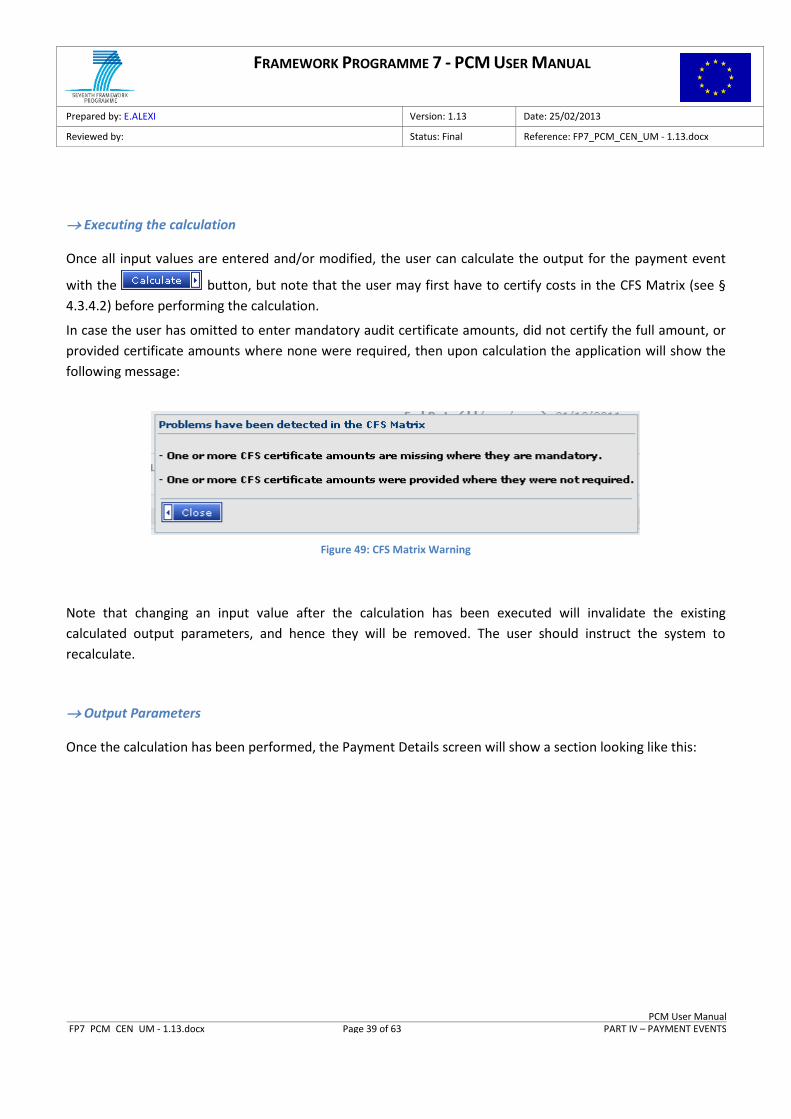
In case the user has omitted to enter mandatory audit certificate amounts, did not certify the full amount, or
provided certificate amounts where none were required, then upon calculation the application will show the
following message:
Figure 49: CFS Matrix Warning
Note that changing an input value after the calculation has been executed will invalidate the existing
calculated output parameters, and hence they will be removed. The user should instruct the system to
recalculate.
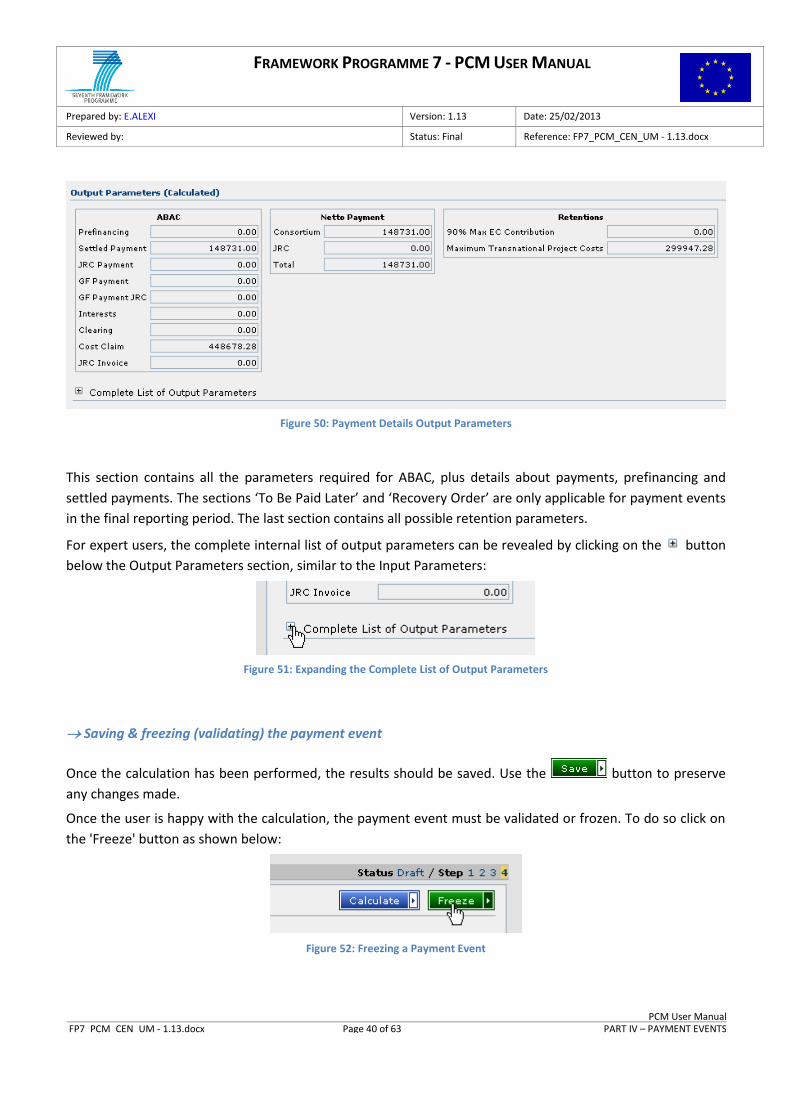
Output Parameters
Once the calculation has been performed, the Payment Details screen will show a section looking like this:
FRAMEWORK PROGRAMME 7 - PCM USER MANUAL
Prepared by: E.ALEXI Version: 1.13 Date: 25/02/2013
Reviewed by: Status: Final Reference: FP7_PCM_CEN_UM - 1.13.docx
PCM User Manual FP7_PCM_CEN_UM - 1.13.docx Page 40 of 63 PART IV – PAYMENT EVENTS
Figure 50: Payment Details Output Parameters
This section contains all the parameters required for ABAC, plus details about payments, prefinancing and
settled payments. The sections ‘To Be Paid Later’ and ‘Recovery Order’ are only applicable for payment events
in the final reporting period. The last section contains all possible retention parameters.
For expert users, the complete internal list of output parameters can be revealed by clicking on the button
below the Output Parameters section, similar to the Input Parameters:
Figure 51: Expanding the Complete List of Output Parameters
Saving & freezing (validating) the payment event
Once the calculation has been performed, the results should be saved. Use the button to preserve
any changes made.
Once the user is happy with the calculation, the payment event must be validated or frozen. To do so click on
the 'Freeze' button as shown below:
Figure 52: Freezing a Payment Event
FRAMEWORK PROGRAMME 7 - PCM USER MANUAL
Prepared by: E.ALEXI Version: 1.13 Date: 25/02/2013
Reviewed by: Status: Final Reference: FP7_PCM_CEN_UM - 1.13.docx
PCM User Manual FP7_PCM_CEN_UM - 1.13.docx Page 41 of 63 PART IV – PAYMENT EVENTS
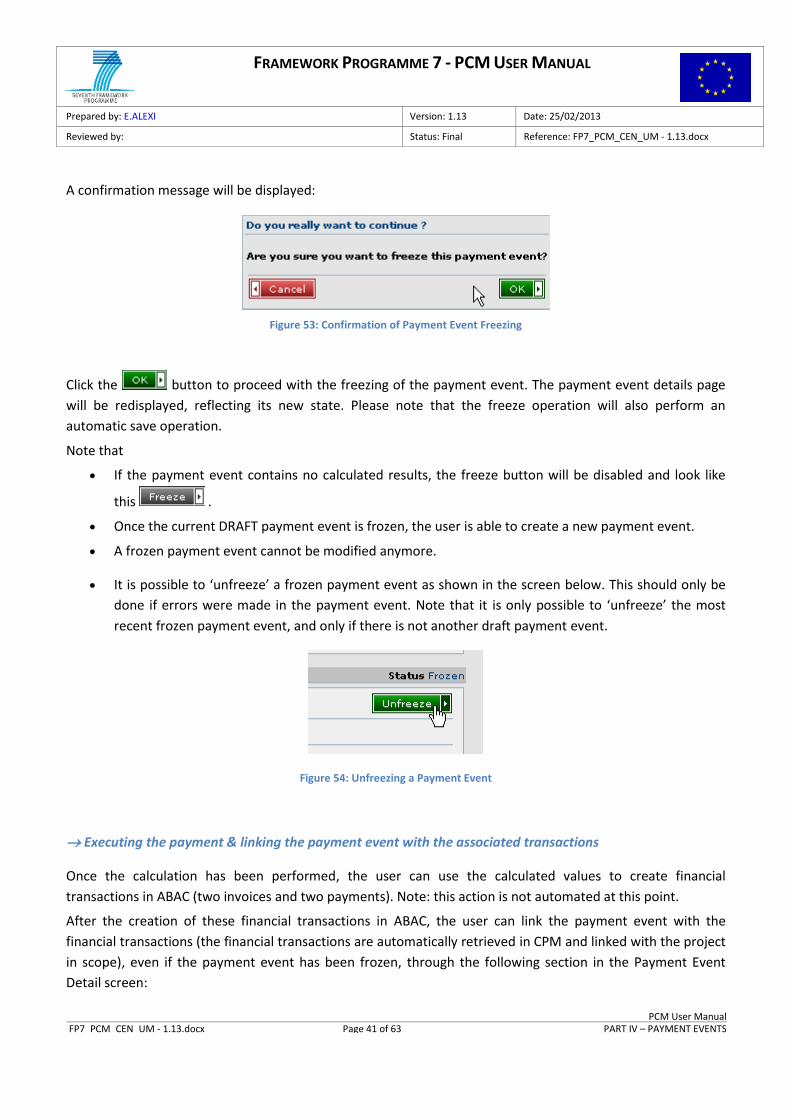
A confirmation message will be displayed:
Figure 53: Confirmation of Payment Event Freezing
Click the button to proceed with the freezing of the payment event. The payment event details page
will be redisplayed, reflecting its new state. Please note that the freeze operation will also perform an
automatic save operation.
Note that
If the payment event contains no calculated results, the freeze button will be disabled and look like
this .
Once the current DRAFT payment event is frozen, the user is able to create a new payment event.
A frozen payment event cannot be modified anymore.
It is possible to ‘unfreeze’ a frozen payment event as shown in the screen below. This should only be
done if errors were made in the payment event. Note that it is only possible to ‘unfreeze’ the most
recent frozen payment event, and only if there is not another draft payment event.
Figure 54: Unfreezing a Payment Event
Executing the payment & linking the payment event with the associated transactions
Once the calculation has been performed, the user can use the calculated values to create financial
transactions in ABAC (two invoices and two payments). Note: this action is not automated at this point.
After the creation of these financial transactions in ABAC, the user can link the payment event with the
financial transactions (the financial transactions are automatically retrieved in CPM and linked with the project
in scope), even if the payment event has been frozen, through the following section in the Payment Event
Detail screen:
FRAMEWORK PROGRAMME 7 - PCM USER MANUAL
Prepared by: E.ALEXI Version: 1.13 Date: 25/02/2013
Reviewed by: Status: Final Reference: FP7_PCM_CEN_UM - 1.13.docx
PCM User Manual FP7_PCM_CEN_UM - 1.13.docx Page 42 of 63 PART IV – PAYMENT EVENTS
Figure 55: Payment Details Linked Financial Transactions
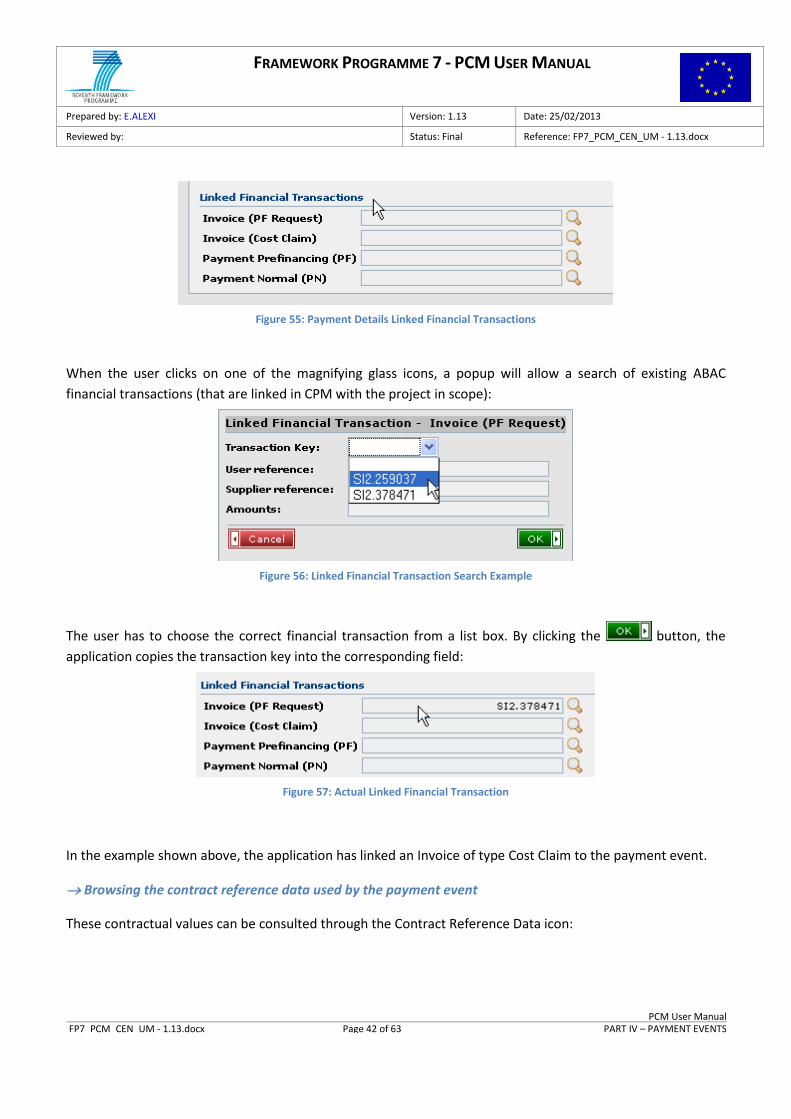
When the user clicks on one of the magnifying glass icons, a popup will allow a search of existing ABAC
financial transactions (that are linked in CPM with the project in scope):
Figure 56: Linked Financial Transaction Search Example
The user has to choose the correct financial transaction from a list box. By clicking the button, the
application copies the transaction key into the corresponding field:
Figure 57: Actual Linked Financial Transaction
In the example shown above, the application has linked an Invoice of type Cost Claim to the payment event.
Browsing the contract reference data used by the payment event
These contractual values can be consulted through the Contract Reference Data icon:
FRAMEWORK PROGRAMME 7 - PCM USER MANUAL
Prepared by: E.ALEXI Version: 1.13 Date: 25/02/2013
Reviewed by: Status: Final Reference: FP7_PCM_CEN_UM - 1.13.docx
PCM User Manual FP7_PCM_CEN_UM - 1.13.docx Page 43 of 63 PART IV – PAYMENT EVENTS
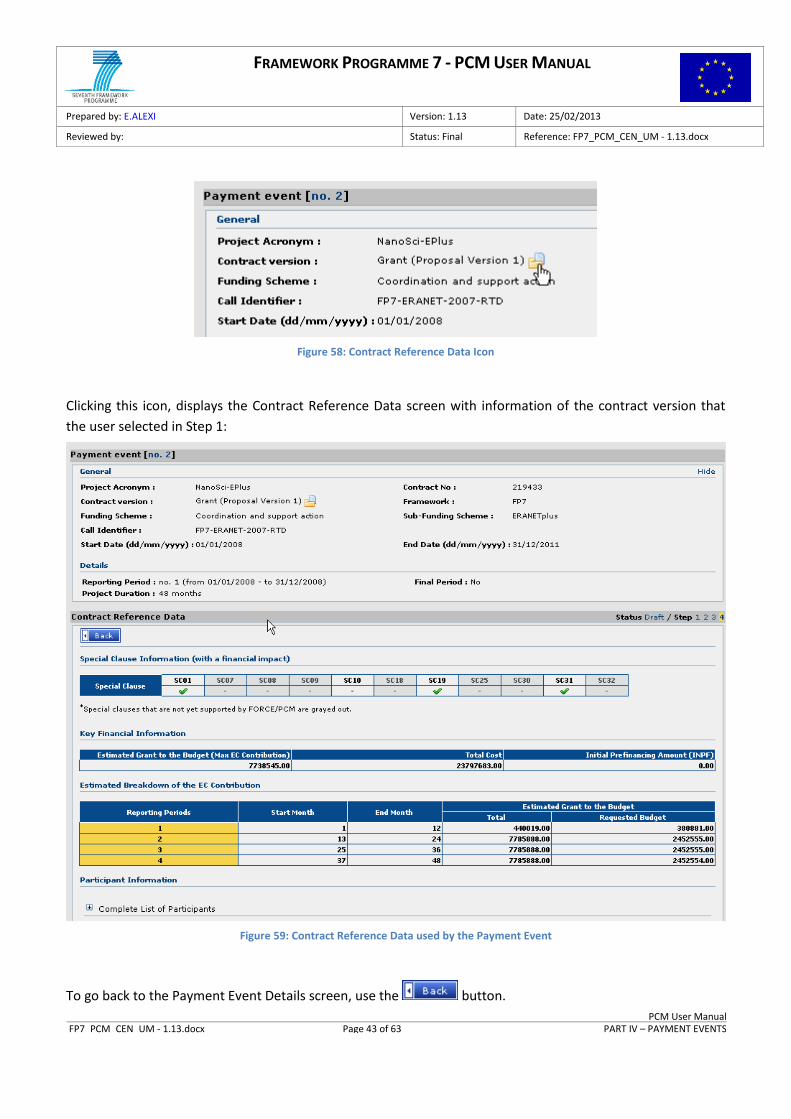
Figure 58: Contract Reference Data Icon
Clicking this icon, displays the Contract Reference Data screen with information of the contract version that
the user selected in Step 1:
Figure 59: Contract Reference Data used by the Payment Event
To go back to the Payment Event Details screen, use the button.
FRAMEWORK PROGRAMME 7 - PCM USER MANUAL
Prepared by: E.ALEXI Version: 1.13 Date: 25/02/2013
Reviewed by: Status: Final Reference: FP7_PCM_CEN_UM - 1.13.docx
PCM User Manual FP7_PCM_CEN_UM - 1.13.docx Page 44 of 63 PART IV – PAYMENT EVENTS
4.3.4.2 CFS Matrix
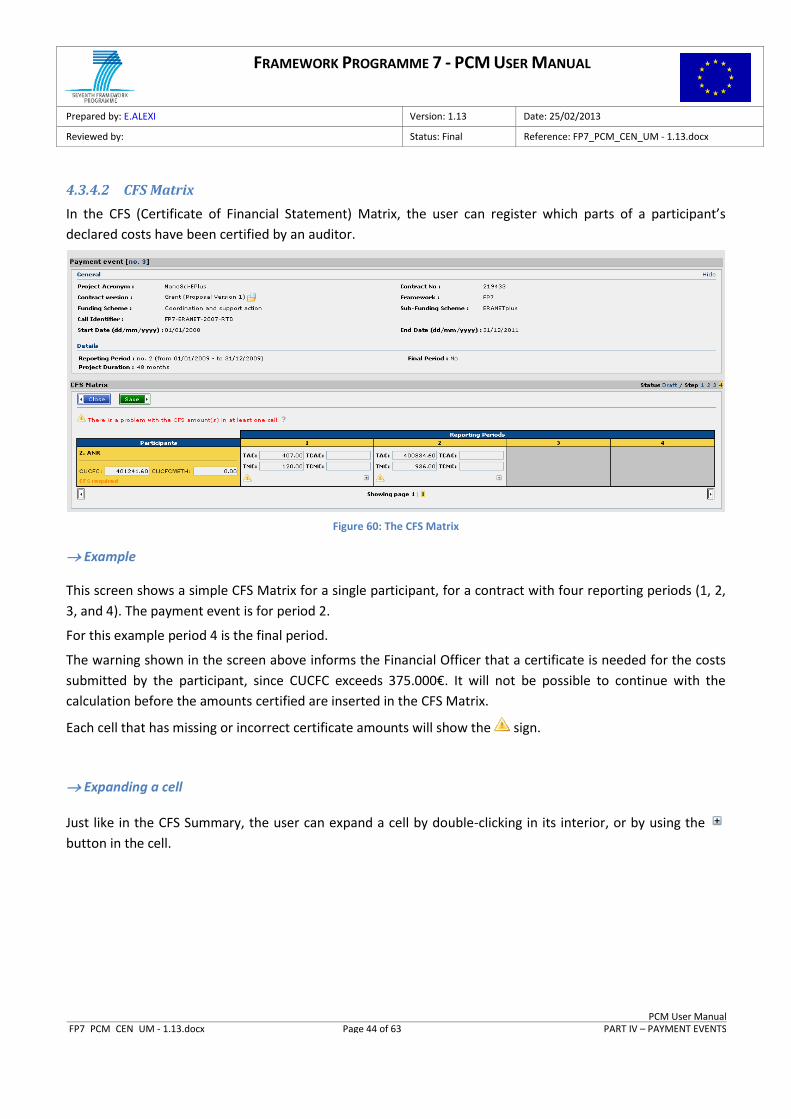
In the CFS (Certificate of Financial Statement) Matrix, the user can register which parts of a participant’s
declared costs have been certified by an auditor.
Figure 60: The CFS Matrix
Example
This screen shows a simple CFS Matrix for a single participant, for a contract with four reporting periods (1, 2,
3, and 4). The payment event is for period 2.
For this example period 4 is the final period.
The warning shown in the screen above informs the Financial Officer that a certificate is needed for the costs
submitted by the participant, since CUCFC exceeds 375.000€. It will not be possible to continue with the
calculation before the amounts certified are inserted in the CFS Matrix.
Each cell that has missing or incorrect certificate amounts will show the sign.
Expanding a cell
Just like in the CFS Summary, the user can expand a cell by double-clicking in its interior, or by using the
button in the cell.
FRAMEWORK PROGRAMME 7 - PCM USER MANUAL
Prepared by: E.ALEXI Version: 1.13 Date: 25/02/2013
Reviewed by: Status: Final Reference: FP7_PCM_CEN_UM - 1.13.docx
PCM User Manual FP7_PCM_CEN_UM - 1.13.docx Page 45 of 63 PART IV – PAYMENT EVENTS
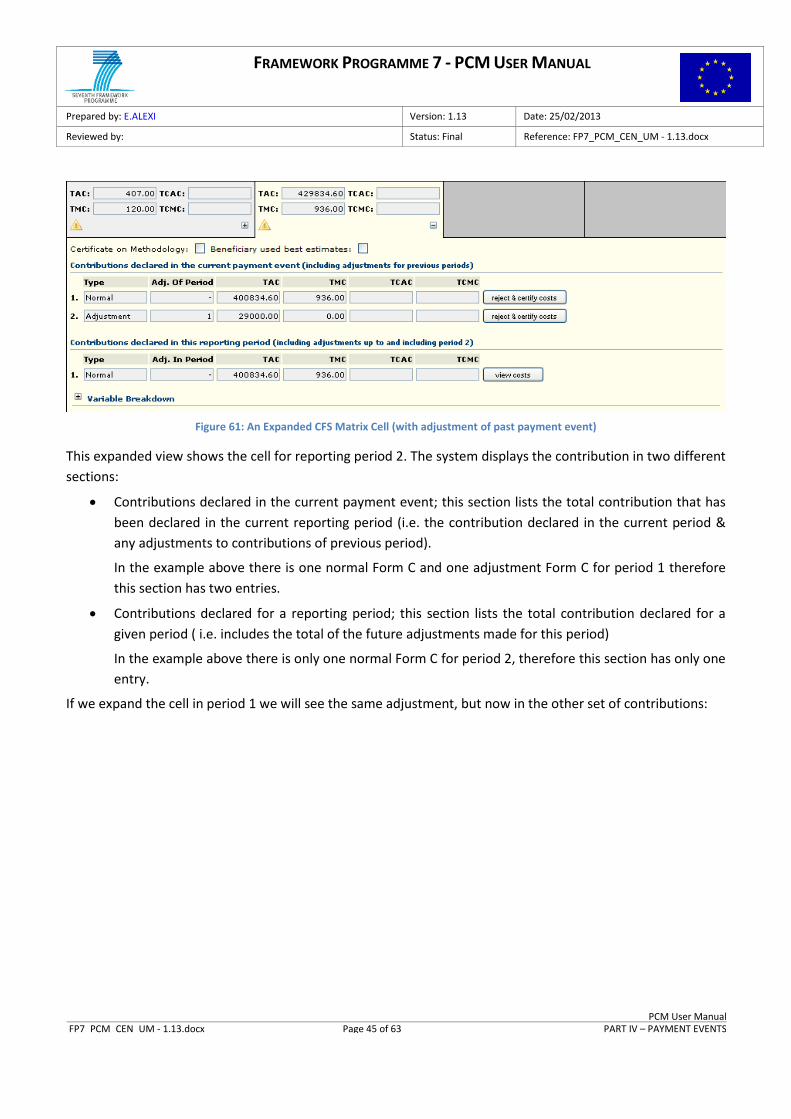
Figure 61: An Expanded CFS Matrix Cell (with adjustment of past payment event)
This expanded view shows the cell for reporting period 2. The system displays the contribution in two different
sections:
Contributions declared in the current payment event; this section lists the total contribution that has
been declared in the current reporting period (i.e. the contribution declared in the current period &
any adjustments to contributions of previous period).
In the example above there is one normal Form C and one adjustment Form C for period 1 therefore
this section has two entries.
Contributions declared for a reporting period; this section lists the total contribution declared for a
given period ( i.e. includes the total of the future adjustments made for this period)
In the example above there is only one normal Form C for period 2, therefore this section has only one
entry.
If we expand the cell in period 1 we will see the same adjustment, but now in the other set of contributions:
FRAMEWORK PROGRAMME 7 - PCM USER MANUAL
Prepared by: E.ALEXI Version: 1.13 Date: 25/02/2013
Reviewed by: Status: Final Reference: FP7_PCM_CEN_UM - 1.13.docx
PCM User Manual FP7_PCM_CEN_UM - 1.13.docx Page 46 of 63 PART IV – PAYMENT EVENTS
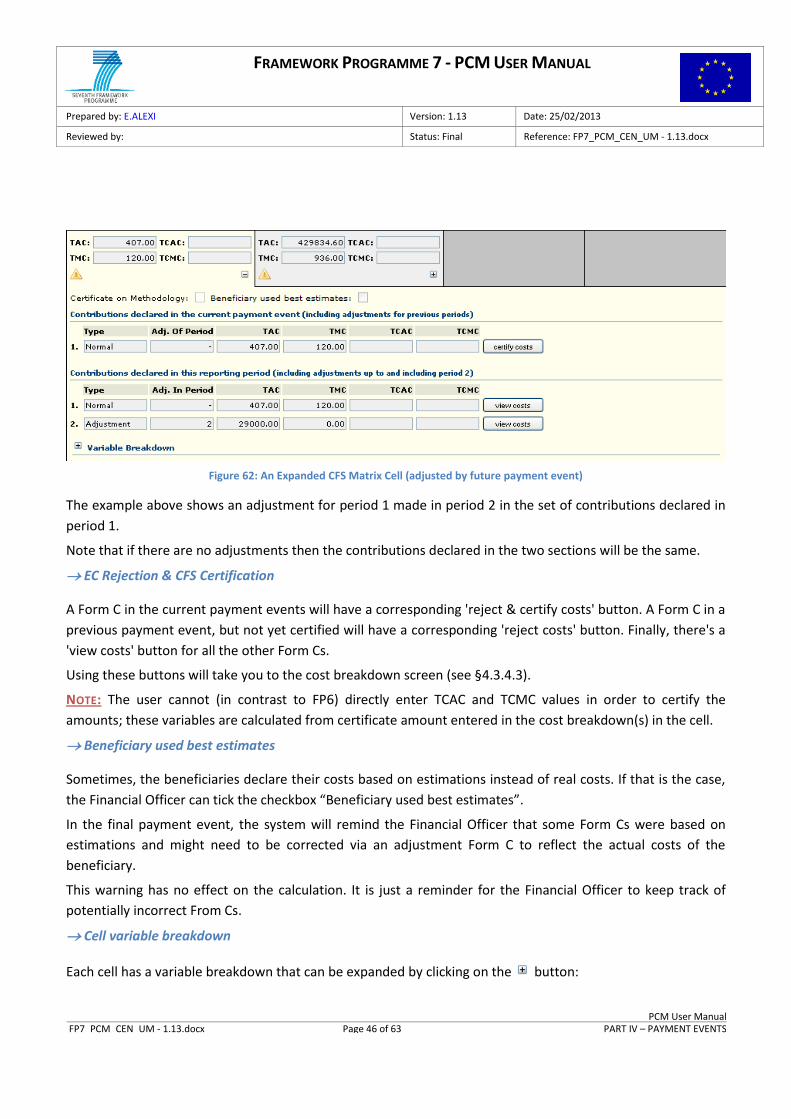
Figure 62: An Expanded CFS Matrix Cell (adjusted by future payment event)
The example above shows an adjustment for period 1 made in period 2 in the set of contributions declared in
period 1.
Note that if there are no adjustments then the contributions declared in the two sections will be the same.
EC Rejection & CFS Certification
A Form C in the current payment events will have a corresponding 'reject & certify costs' button. A Form C in a
previous payment event, but not yet certified will have a corresponding 'reject costs' button. Finally, there's a
'view costs' button for all the other Form Cs.
Using these buttons will take you to the cost breakdown screen (see §4.3.4.3).
NOTE: The user cannot (in contrast to FP6) directly enter TCAC and TCMC values in order to certify the
amounts; these variables are calculated from certificate amount entered in the cost breakdown(s) in the cell.
Beneficiary used best estimates
Sometimes, the beneficiaries declare their costs based on estimations instead of real costs. If that is the case,
the Financial Officer can tick the checkbox “Beneficiary used best estimates”.
In the final payment event, the system will remind the Financial Officer that some Form Cs were based on
estimations and might need to be corrected via an adjustment Form C to reflect the actual costs of the
beneficiary.
This warning has no effect on the calculation. It is just a reminder for the Financial Officer to keep track of
potentially incorrect From Cs.
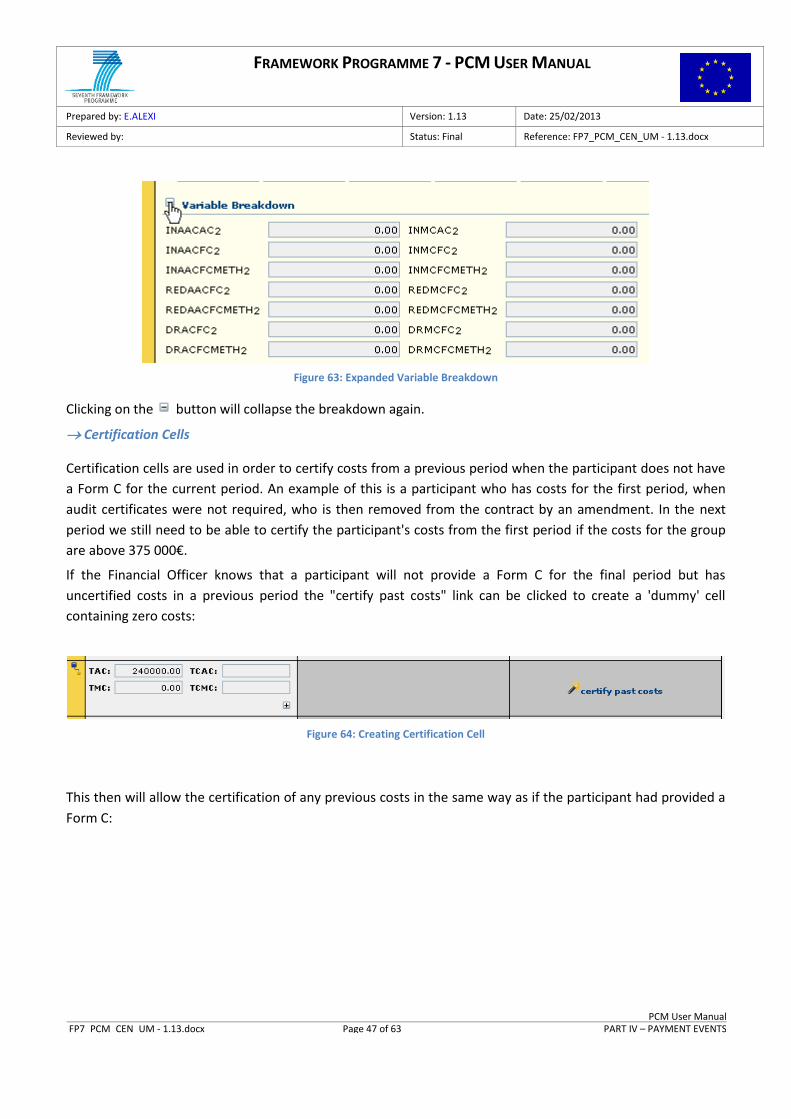
Cell variable breakdown
Each cell has a variable breakdown that can be expanded by clicking on the button:
FRAMEWORK PROGRAMME 7 - PCM USER MANUAL
Prepared by: E.ALEXI Version: 1.13 Date: 25/02/2013
Reviewed by: Status: Final Reference: FP7_PCM_CEN_UM - 1.13.docx
PCM User Manual FP7_PCM_CEN_UM - 1.13.docx Page 47 of 63 PART IV – PAYMENT EVENTS
Figure 63: Expanded Variable Breakdown
Clicking on the button will collapse the breakdown again.
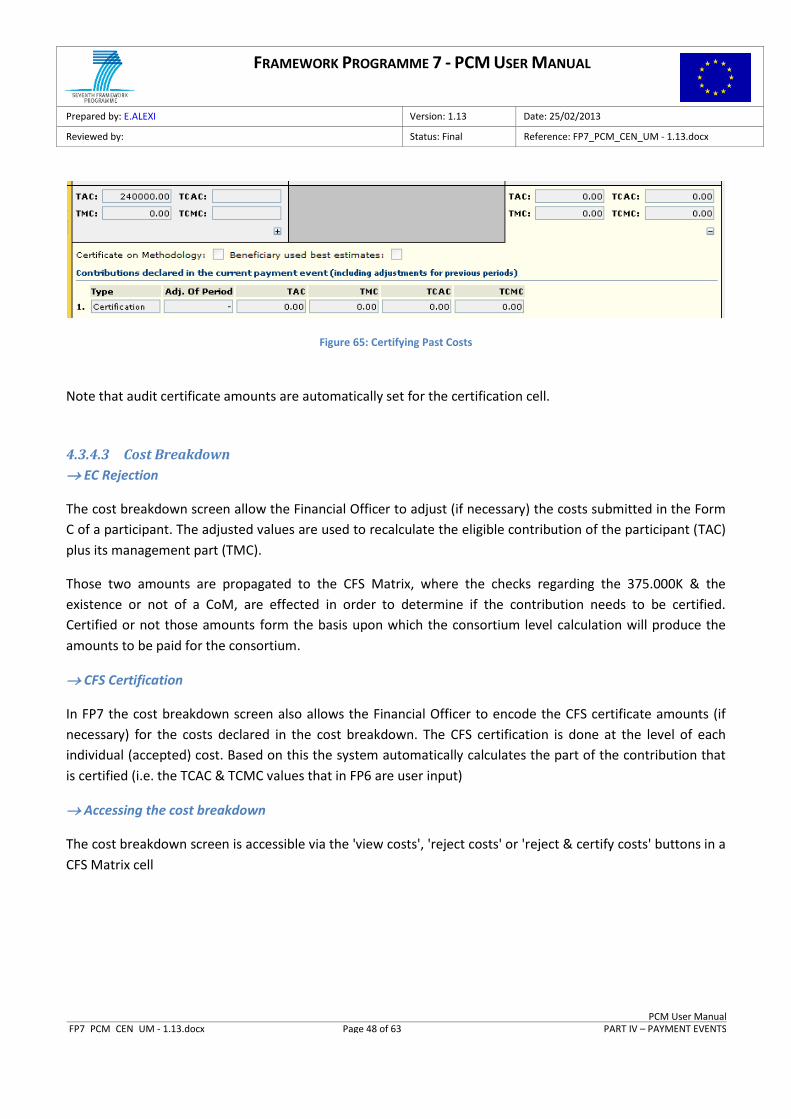
Certification Cells
Certification cells are used in order to certify costs from a previous period when the participant does not have
a Form C for the current period. An example of this is a participant who has costs for the first period, when
audit certificates were not required, who is then removed from the contract by an amendment. In the next
period we still need to be able to certify the participant's costs from the first period if the costs for the group
are above 375 000€.
If the Financial Officer knows that a participant will not provide a Form C for the final period but has
uncertified costs in a previous period the "certify past costs" link can be clicked to create a 'dummy' cell
containing zero costs:
Figure 64: Creating Certification Cell
This then will allow the certification of any previous costs in the same way as if the participant had provided a
Form C:
FRAMEWORK PROGRAMME 7 - PCM USER MANUAL
Prepared by: E.ALEXI Version: 1.13 Date: 25/02/2013
Reviewed by: Status: Final Reference: FP7_PCM_CEN_UM - 1.13.docx
PCM User Manual FP7_PCM_CEN_UM - 1.13.docx Page 48 of 63 PART IV – PAYMENT EVENTS
Figure 65: Certifying Past Costs
Note that audit certificate amounts are automatically set for the certification cell.
4.3.4.3 Cost Breakdown
EC Rejection
The cost breakdown screen allow the Financial Officer to adjust (if necessary) the costs submitted in the Form
C of a participant. The adjusted values are used to recalculate the eligible contribution of the participant (TAC)
plus its management part (TMC).
Those two amounts are propagated to the CFS Matrix, where the checks regarding the 375.000K & the
existence or not of a CoM, are effected in order to determine if the contribution needs to be certified.
Certified or not those amounts form the basis upon which the consortium level calculation will produce the
amounts to be paid for the consortium.
CFS Certification
In FP7 the cost breakdown screen also allows the Financial Officer to encode the CFS certificate amounts (if
necessary) for the costs declared in the cost breakdown. The CFS certification is done at the level of each
individual (accepted) cost. Based on this the system automatically calculates the part of the contribution that
is certified (i.e. the TCAC & TCMC values that in FP6 are user input)
Accessing the cost breakdown
The cost breakdown screen is accessible via the 'view costs', 'reject costs' or 'reject & certify costs' buttons in a
CFS Matrix cell
FRAMEWORK PROGRAMME 7 - PCM USER MANUAL
Prepared by: E.ALEXI Version: 1.13 Date: 25/02/2013
Reviewed by: Status: Final Reference: FP7_PCM_CEN_UM - 1.13.docx
PCM User Manual FP7_PCM_CEN_UM - 1.13.docx Page 49 of 63 PART IV – PAYMENT EVENTS
Figure 66: Cost breakdown screen
The screen displays the original costs encoded in the Form C. Depending on which button was used, certain
sections will be read-only, while others may be editable:
Button \ Section EC Rejection CFS Certification Receipts
view costs read-only read-only read-only
certify costs read-only editable read-only
reject & certify costs editable editable editable
Table 1: Editable Sections in the Cost Breakdown Screen
The screen has four sections.
In the first section it displays the original costs encoded in the Form C. By clicking on the cells, the user
can set the rejected amount
The second section is used for displaying the EC accepted and TAC / TMC variables
The third section is used for setting the CFS certified costs per activity type
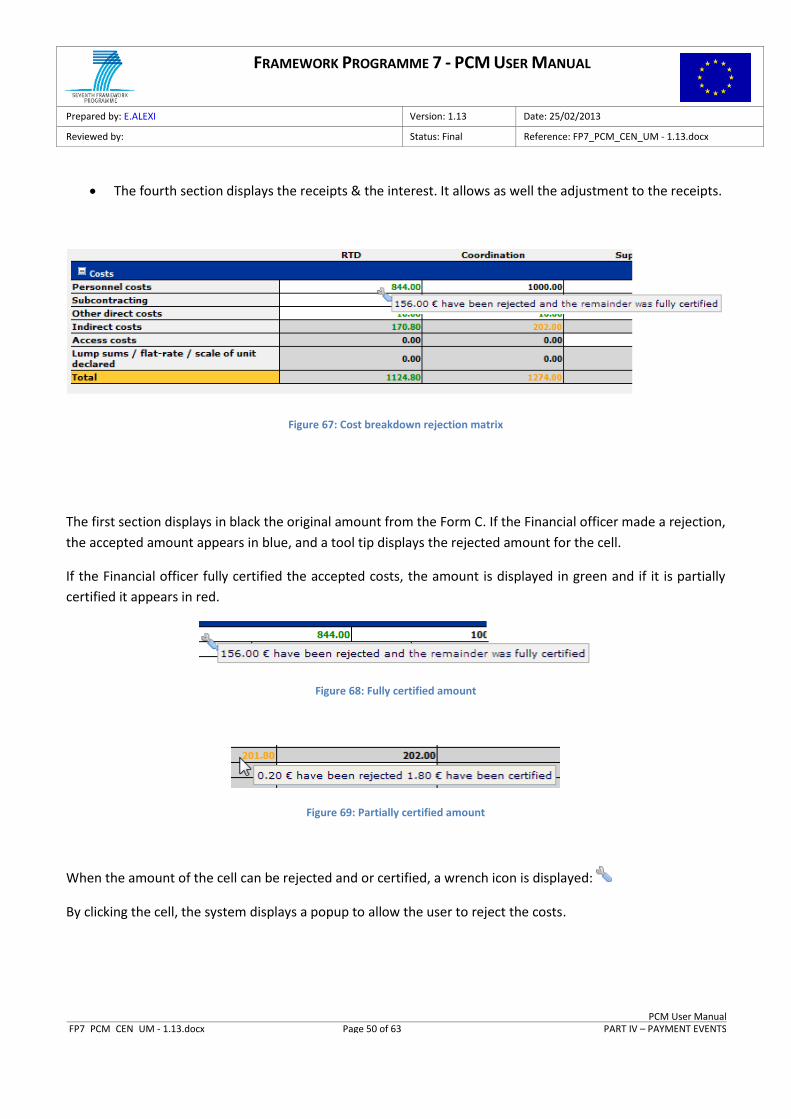
FRAMEWORK PROGRAMME 7 - PCM USER MANUAL
Prepared by: E.ALEXI Version: 1.13 Date: 25/02/2013
Reviewed by: Status: Final Reference: FP7_PCM_CEN_UM - 1.13.docx
PCM User Manual FP7_PCM_CEN_UM - 1.13.docx Page 50 of 63 PART IV – PAYMENT EVENTS
The fourth section displays the receipts & the interest. It allows as well the adjustment to the receipts.
Figure 67: Cost breakdown rejection matrix
The first section displays in black the original amount from the Form C. If the Financial officer made a rejection,
the accepted amount appears in blue, and a tool tip displays the rejected amount for the cell.
If the Financial officer fully certified the accepted costs, the amount is displayed in green and if it is partially
certified it appears in red.
Figure 68: Fully certified amount
Figure 69: Partially certified amount
When the amount of the cell can be rejected and or certified, a wrench icon is displayed:
By clicking the cell, the system displays a popup to allow the user to reject the costs.
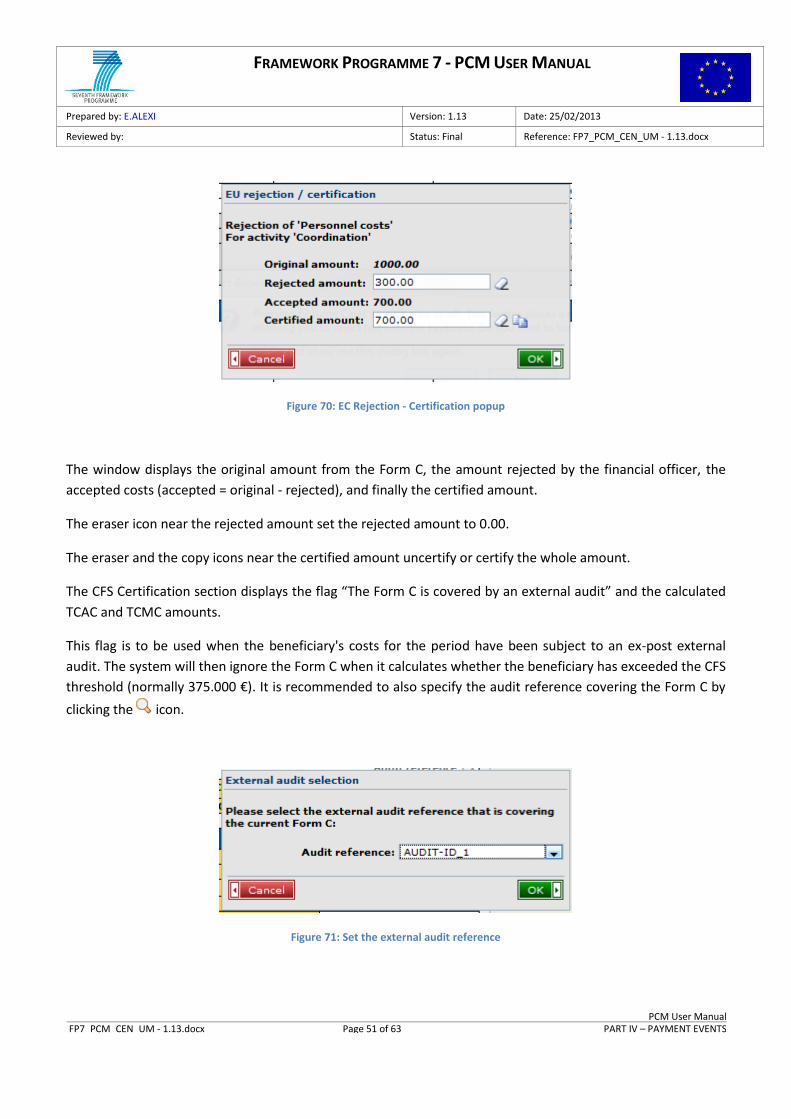
FRAMEWORK PROGRAMME 7 - PCM USER MANUAL
Prepared by: E.ALEXI Version: 1.13 Date: 25/02/2013
Reviewed by: Status: Final Reference: FP7_PCM_CEN_UM - 1.13.docx
PCM User Manual FP7_PCM_CEN_UM - 1.13.docx Page 51 of 63 PART IV – PAYMENT EVENTS
Figure 70: EC Rejection - Certification popup
The window displays the original amount from the Form C, the amount rejected by the financial officer, the
accepted costs (accepted = original - rejected), and finally the certified amount.
The eraser icon near the rejected amount set the rejected amount to 0.00.
The eraser and the copy icons near the certified amount uncertify or certify the whole amount.
The CFS Certification section displays the flag “The Form C is covered by an external audit” and the calculated
TCAC and TCMC amounts.
This flag is to be used when the beneficiary's costs for the period have been subject to an ex-post external
audit. The system will then ignore the Form C when it calculates whether the beneficiary has exceeded the CFS
threshold (normally 375.000 €). It is recommended to also specify the audit reference covering the Form C by
clicking the icon.
Figure 71: Set the external audit reference
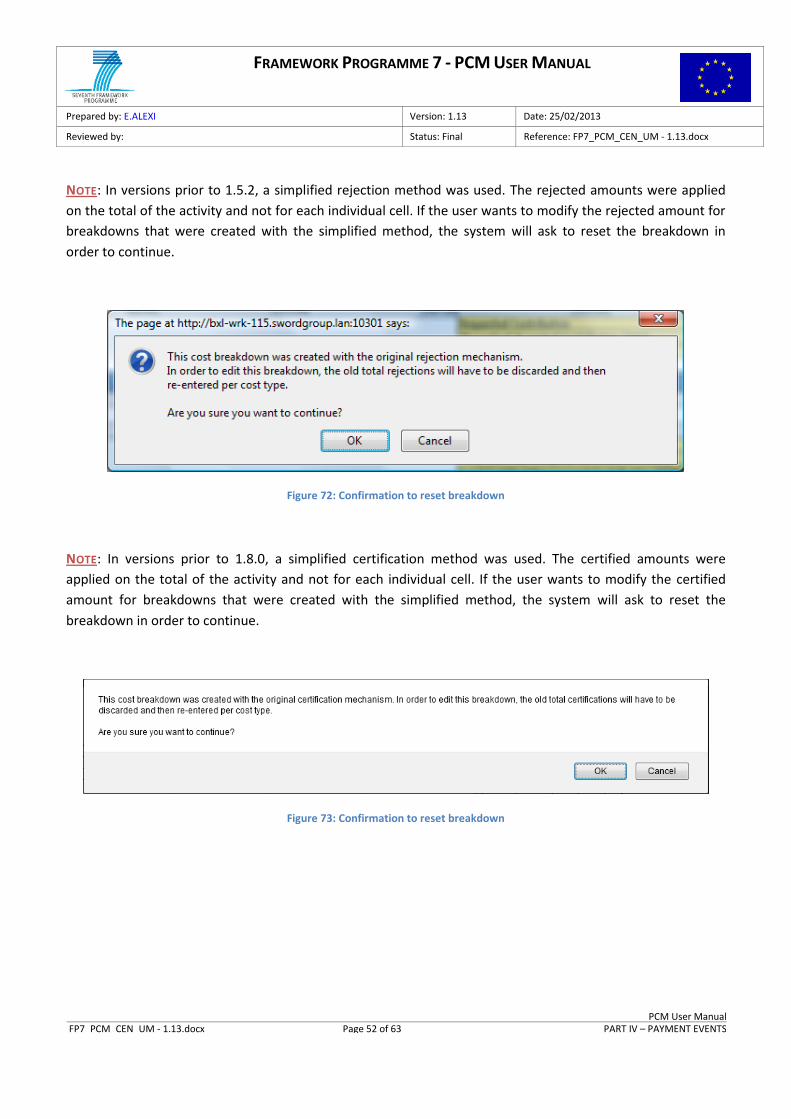
FRAMEWORK PROGRAMME 7 - PCM USER MANUAL
Prepared by: E.ALEXI Version: 1.13 Date: 25/02/2013
Reviewed by: Status: Final Reference: FP7_PCM_CEN_UM - 1.13.docx
PCM User Manual FP7_PCM_CEN_UM - 1.13.docx Page 52 of 63 PART IV – PAYMENT EVENTS
NOTE: In versions prior to 1.5.2, a simplified rejection method was used. The rejected amounts were applied
on the total of the activity and not for each individual cell. If the user wants to modify the rejected amount for
breakdowns that were created with the simplified method, the system will ask to reset the breakdown in
order to continue.
Figure 72: Confirmation to reset breakdown
NOTE: In versions prior to 1.8.0, a simplified certification method was used. The certified amounts were
applied on the total of the activity and not for each individual cell. If the user wants to modify the certified
amount for breakdowns that were created with the simplified method, the system will ask to reset the
breakdown in order to continue.
Figure 73: Confirmation to reset breakdown
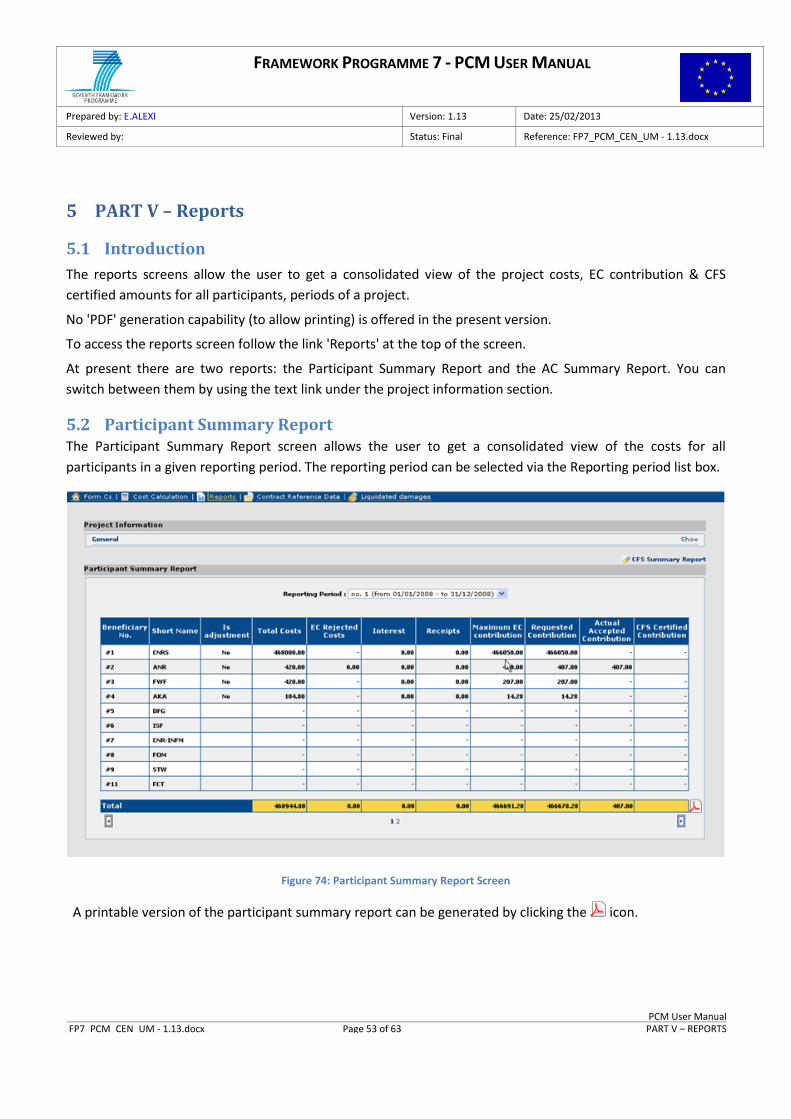
FRAMEWORK PROGRAMME 7 - PCM USER MANUAL
Prepared by: E.ALEXI Version: 1.13 Date: 25/02/2013
Reviewed by: Status: Final Reference: FP7_PCM_CEN_UM - 1.13.docx
PCM User Manual FP7_PCM_CEN_UM - 1.13.docx Page 53 of 63 PART V – REPORTS
5 PART V – Reports
5.1 Introduction
The reports screens allow the user to get a consolidated view of the project costs, EC contribution & CFS
certified amounts for all participants, periods of a project.
No 'PDF' generation capability (to allow printing) is offered in the present version.
To access the reports screen follow the link 'Reports' at the top of the screen.
At present there are two reports: the Participant Summary Report and the AC Summary Report. You can
switch between them by using the text link under the project information section.
5.2 Participant Summary Report The Participant Summary Report screen allows the user to get a consolidated view of the costs for all
participants in a given reporting period. The reporting period can be selected via the Reporting period list box.
Figure 74: Participant Summary Report Screen
A printable version of the participant summary report can be generated by clicking the icon.
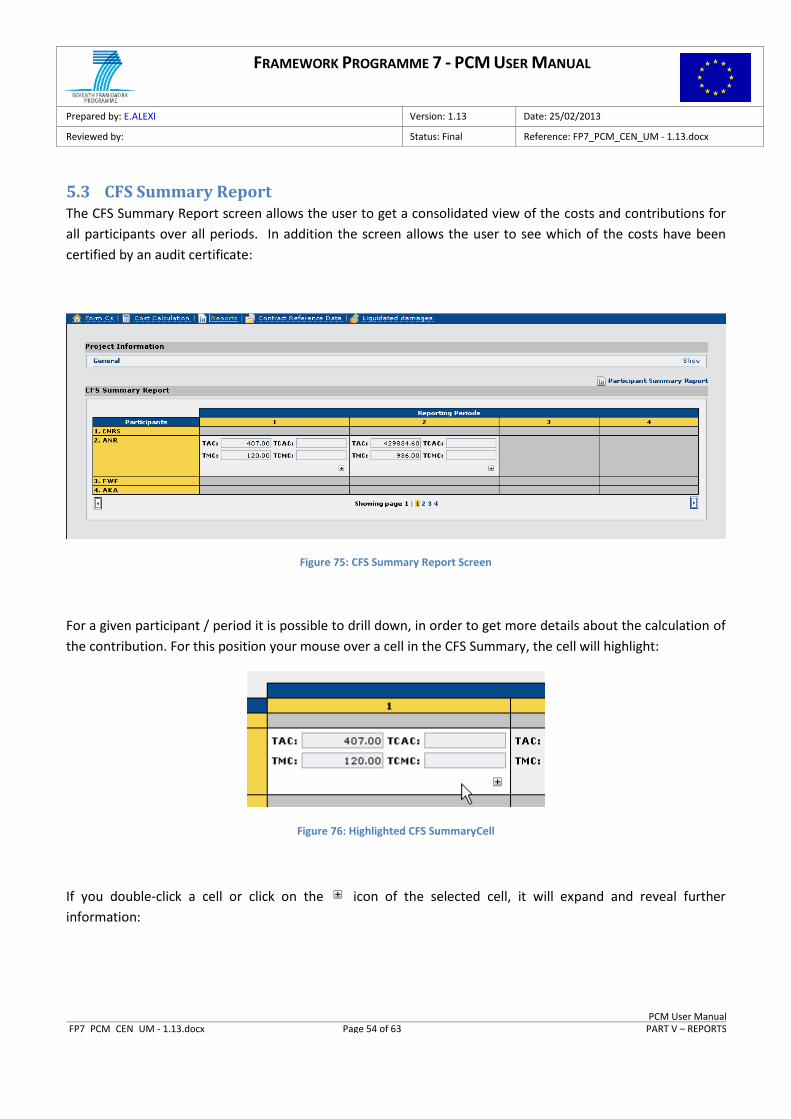
FRAMEWORK PROGRAMME 7 - PCM USER MANUAL
Prepared by: E.ALEXI Version: 1.13 Date: 25/02/2013
Reviewed by: Status: Final Reference: FP7_PCM_CEN_UM - 1.13.docx
PCM User Manual FP7_PCM_CEN_UM - 1.13.docx Page 54 of 63 PART V – REPORTS
5.3 CFS Summary Report The CFS Summary Report screen allows the user to get a consolidated view of the costs and contributions for
all participants over all periods. In addition the screen allows the user to see which of the costs have been
certified by an audit certificate:
Figure 75: CFS Summary Report Screen
For a given participant / period it is possible to drill down, in order to get more details about the calculation of
the contribution. For this position your mouse over a cell in the CFS Summary, the cell will highlight:
Figure 76: Highlighted CFS SummaryCell
If you double-click a cell or click on the icon of the selected cell, it will expand and reveal further
information:
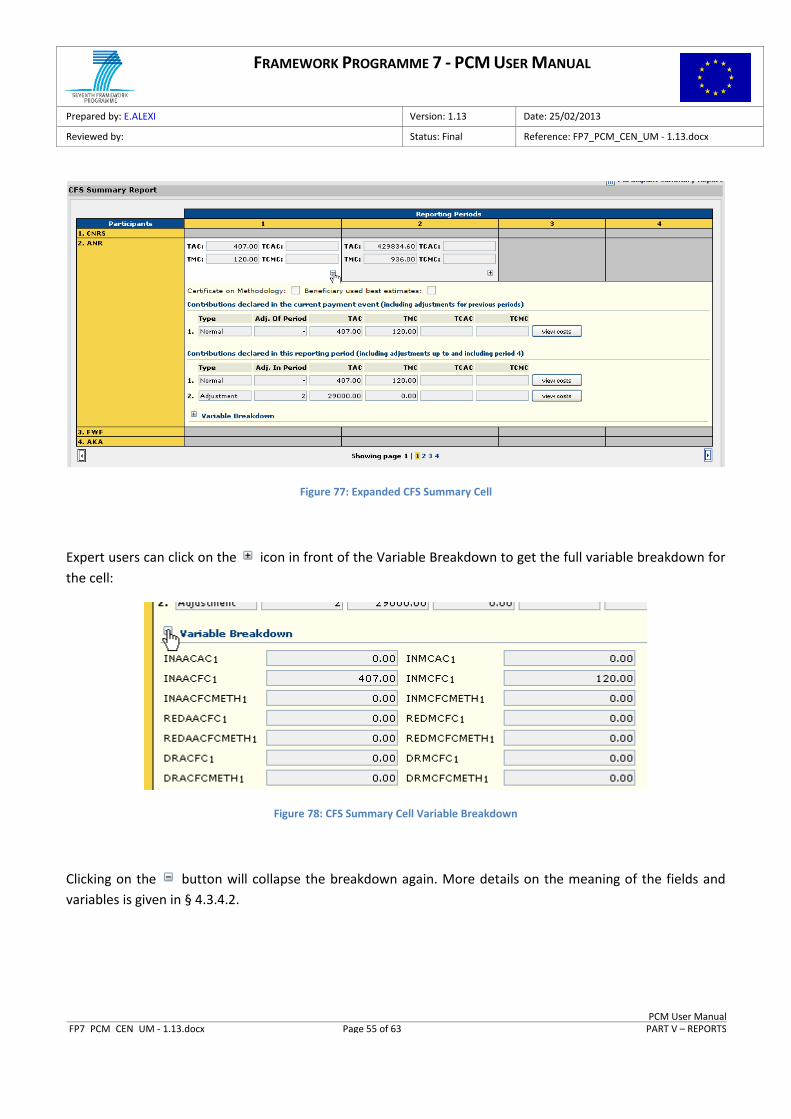
FRAMEWORK PROGRAMME 7 - PCM USER MANUAL
Prepared by: E.ALEXI Version: 1.13 Date: 25/02/2013
Reviewed by: Status: Final Reference: FP7_PCM_CEN_UM - 1.13.docx
PCM User Manual FP7_PCM_CEN_UM - 1.13.docx Page 55 of 63 PART V – REPORTS
Figure 77: Expanded CFS Summary Cell
Expert users can click on the icon in front of the Variable Breakdown to get the full variable breakdown for
the cell:
Figure 78: CFS Summary Cell Variable Breakdown
Clicking on the button will collapse the breakdown again. More details on the meaning of the fields and
variables is given in § 4.3.4.2.
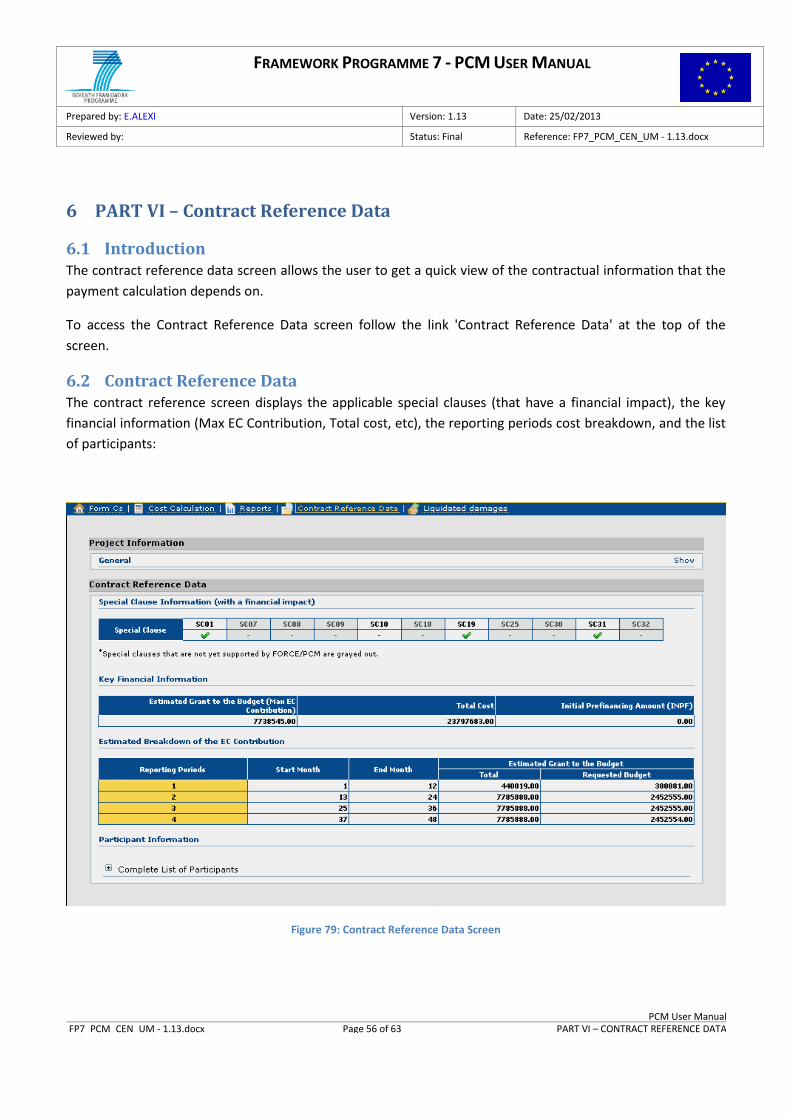
FRAMEWORK PROGRAMME 7 - PCM USER MANUAL
Prepared by: E.ALEXI Version: 1.13 Date: 25/02/2013
Reviewed by: Status: Final Reference: FP7_PCM_CEN_UM - 1.13.docx
PCM User Manual FP7_PCM_CEN_UM - 1.13.docx Page 56 of 63 PART VI – CONTRACT REFERENCE DATA
6 PART VI – Contract Reference Data
6.1 Introduction The contract reference data screen allows the user to get a quick view of the contractual information that the
payment calculation depends on.
To access the Contract Reference Data screen follow the link 'Contract Reference Data' at the top of the
screen.
6.2 Contract Reference Data The contract reference screen displays the applicable special clauses (that have a financial impact), the key
financial information (Max EC Contribution, Total cost, etc), the reporting periods cost breakdown, and the list
of participants:
Figure 79: Contract Reference Data Screen
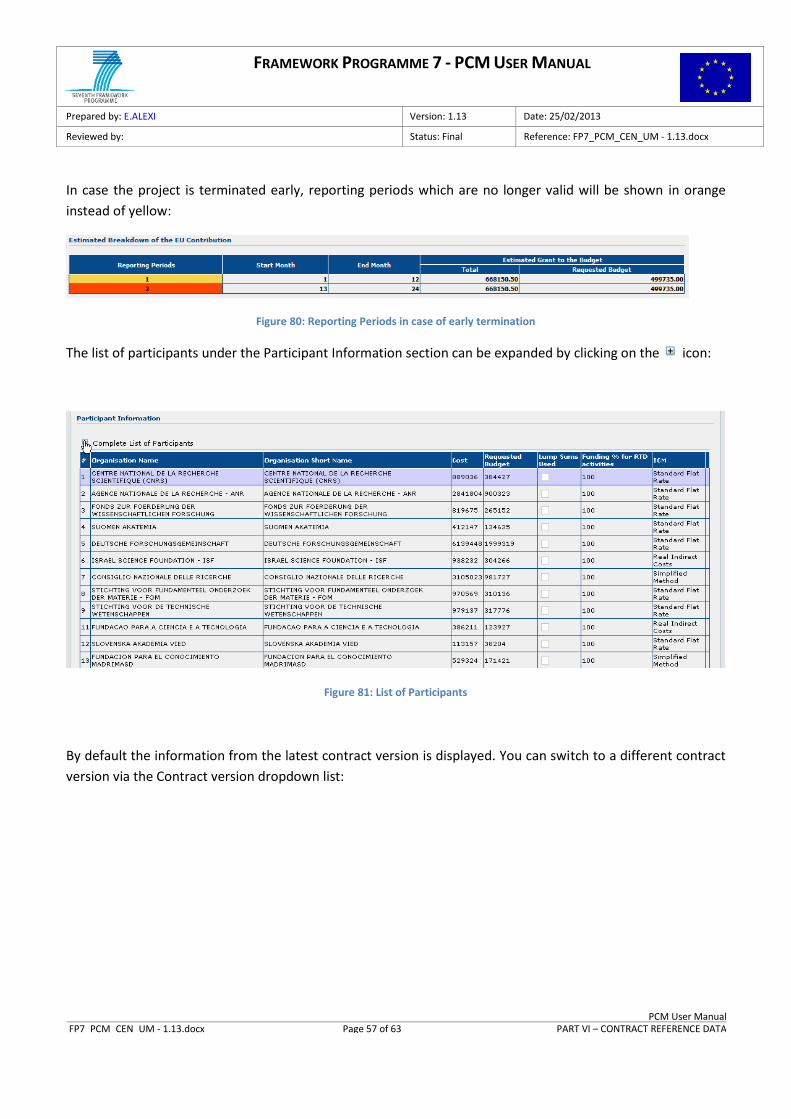
FRAMEWORK PROGRAMME 7 - PCM USER MANUAL
Prepared by: E.ALEXI Version: 1.13 Date: 25/02/2013
Reviewed by: Status: Final Reference: FP7_PCM_CEN_UM - 1.13.docx
PCM User Manual FP7_PCM_CEN_UM - 1.13.docx Page 57 of 63 PART VI – CONTRACT REFERENCE DATA
In case the project is terminated early, reporting periods which are no longer valid will be shown in orange
instead of yellow:
Figure 80: Reporting Periods in case of early termination
The list of participants under the Participant Information section can be expanded by clicking on the icon:
Figure 81: List of Participants
By default the information from the latest contract version is displayed. You can switch to a different contract
version via the Contract version dropdown list:
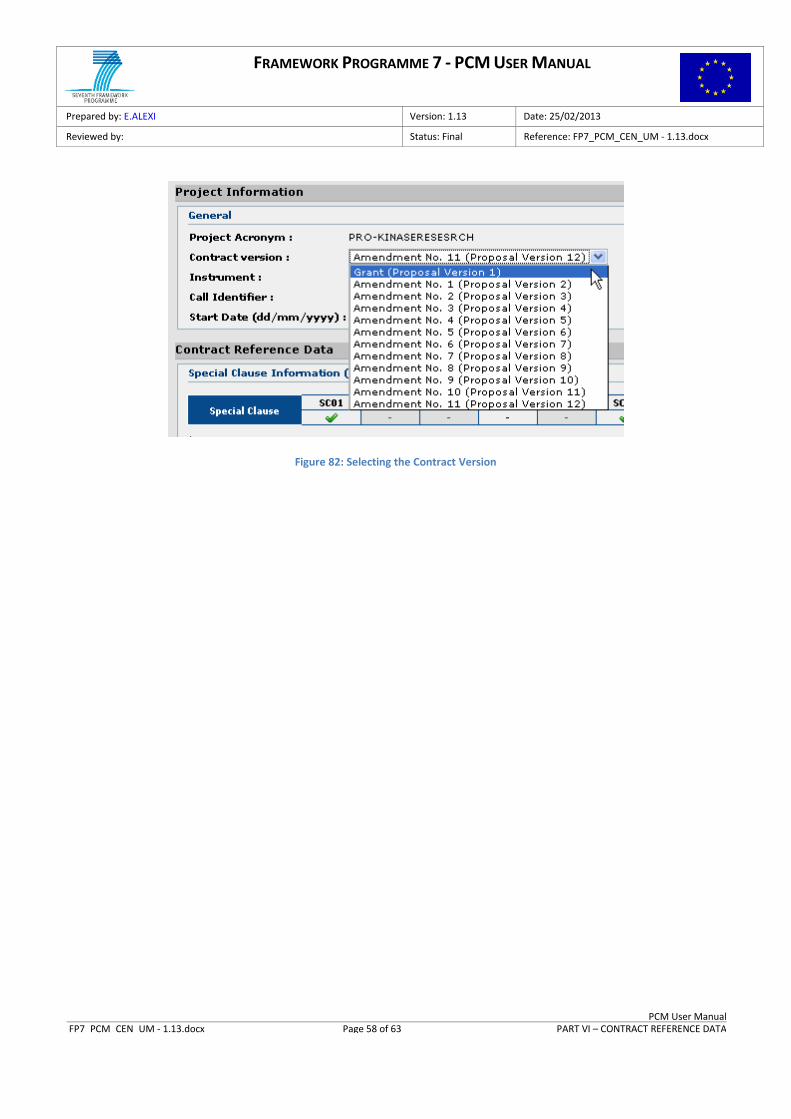
FRAMEWORK PROGRAMME 7 - PCM USER MANUAL
Prepared by: E.ALEXI Version: 1.13 Date: 25/02/2013
Reviewed by: Status: Final Reference: FP7_PCM_CEN_UM - 1.13.docx
PCM User Manual FP7_PCM_CEN_UM - 1.13.docx Page 58 of 63 PART VI – CONTRACT REFERENCE DATA
Figure 82: Selecting the Contract Version
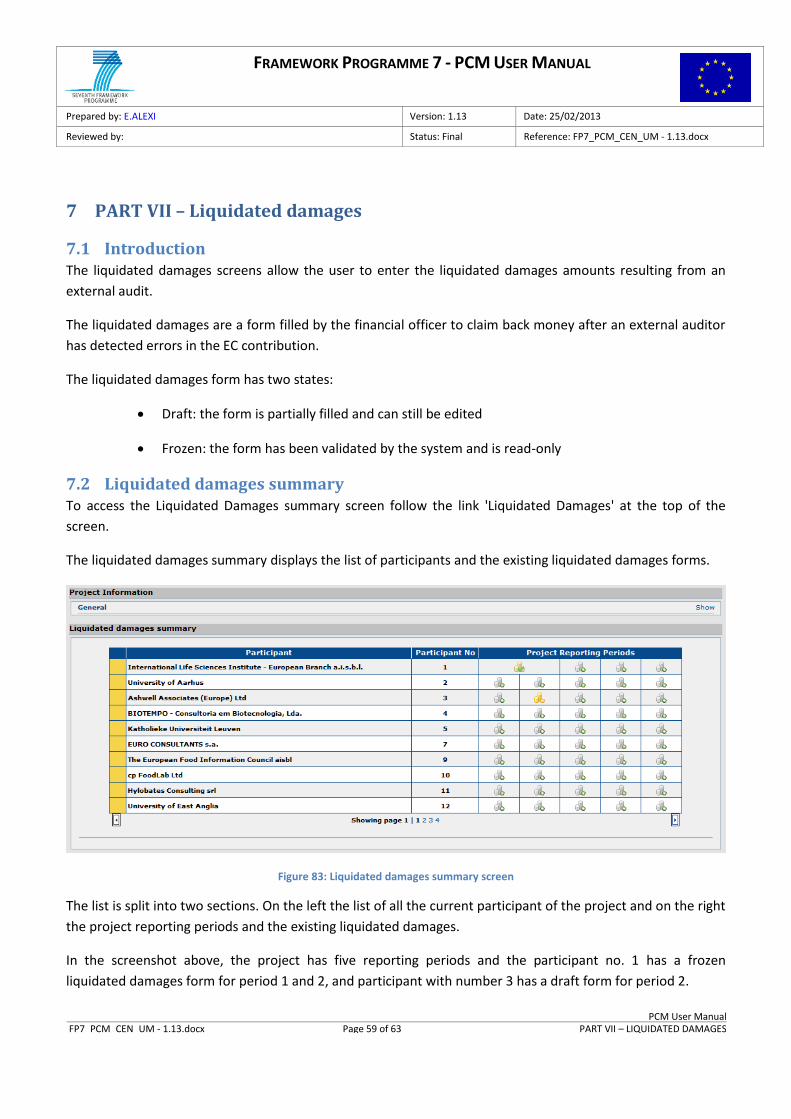
FRAMEWORK PROGRAMME 7 - PCM USER MANUAL
Prepared by: E.ALEXI Version: 1.13 Date: 25/02/2013
Reviewed by: Status: Final Reference: FP7_PCM_CEN_UM - 1.13.docx
PCM User Manual FP7_PCM_CEN_UM - 1.13.docx Page 59 of 63 PART VII – LIQUIDATED DAMAGES
7 PART VII – Liquidated damages
7.1 Introduction The liquidated damages screens allow the user to enter the liquidated damages amounts resulting from an
external audit.
The liquidated damages are a form filled by the financial officer to claim back money after an external auditor
has detected errors in the EC contribution.
The liquidated damages form has two states:
Draft: the form is partially filled and can still be edited
Frozen: the form has been validated by the system and is read-only
7.2 Liquidated damages summary To access the Liquidated Damages summary screen follow the link 'Liquidated Damages' at the top of the
screen.
The liquidated damages summary displays the list of participants and the existing liquidated damages forms.
Figure 83: Liquidated damages summary screen
The list is split into two sections. On the left the list of all the current participant of the project and on the right
the project reporting periods and the existing liquidated damages.
In the screenshot above, the project has five reporting periods and the participant no. 1 has a frozen
liquidated damages form for period 1 and 2, and participant with number 3 has a draft form for period 2.
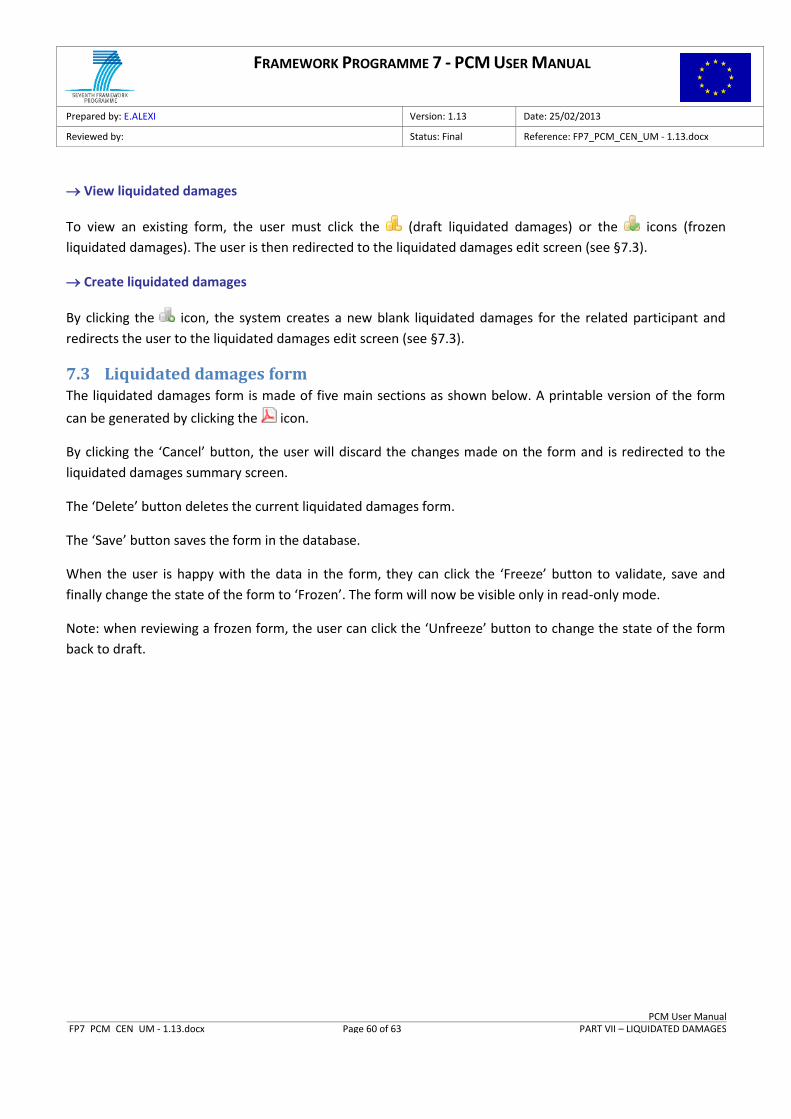
FRAMEWORK PROGRAMME 7 - PCM USER MANUAL
Prepared by: E.ALEXI Version: 1.13 Date: 25/02/2013
Reviewed by: Status: Final Reference: FP7_PCM_CEN_UM - 1.13.docx
PCM User Manual FP7_PCM_CEN_UM - 1.13.docx Page 60 of 63 PART VII – LIQUIDATED DAMAGES
View liquidated damages
To view an existing form, the user must click the (draft liquidated damages) or the icons (frozen
liquidated damages). The user is then redirected to the liquidated damages edit screen (see §7.3).
Create liquidated damages
By clicking the icon, the system creates a new blank liquidated damages for the related participant and
redirects the user to the liquidated damages edit screen (see §7.3).
7.3 Liquidated damages form The liquidated damages form is made of five main sections as shown below. A printable version of the form
can be generated by clicking the icon.
By clicking the ‘Cancel’ button, the user will discard the changes made on the form and is redirected to the
liquidated damages summary screen.
The ‘Delete’ button deletes the current liquidated damages form.
The ‘Save’ button saves the form in the database.
When the user is happy with the data in the form, they can click the ‘Freeze’ button to validate, save and
finally change the state of the form to ‘Frozen’. The form will now be visible only in read-only mode.
Note: when reviewing a frozen form, the user can click the ‘Unfreeze’ button to change the state of the form
back to draft.
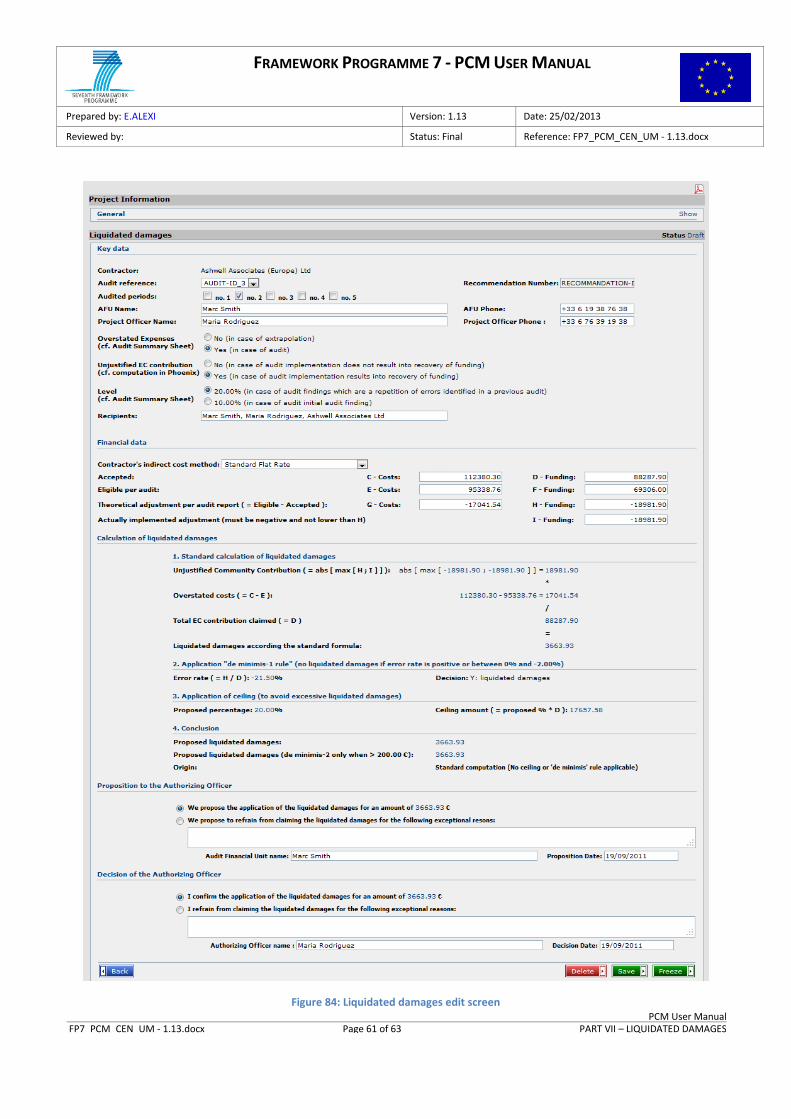
FRAMEWORK PROGRAMME 7 - PCM USER MANUAL
Prepared by: E.ALEXI Version: 1.13 Date: 25/02/2013
Reviewed by: Status: Final Reference: FP7_PCM_CEN_UM - 1.13.docx
PCM User Manual FP7_PCM_CEN_UM - 1.13.docx Page 61 of 63 PART VII – LIQUIDATED DAMAGES
Figure 84: Liquidated damages edit screen
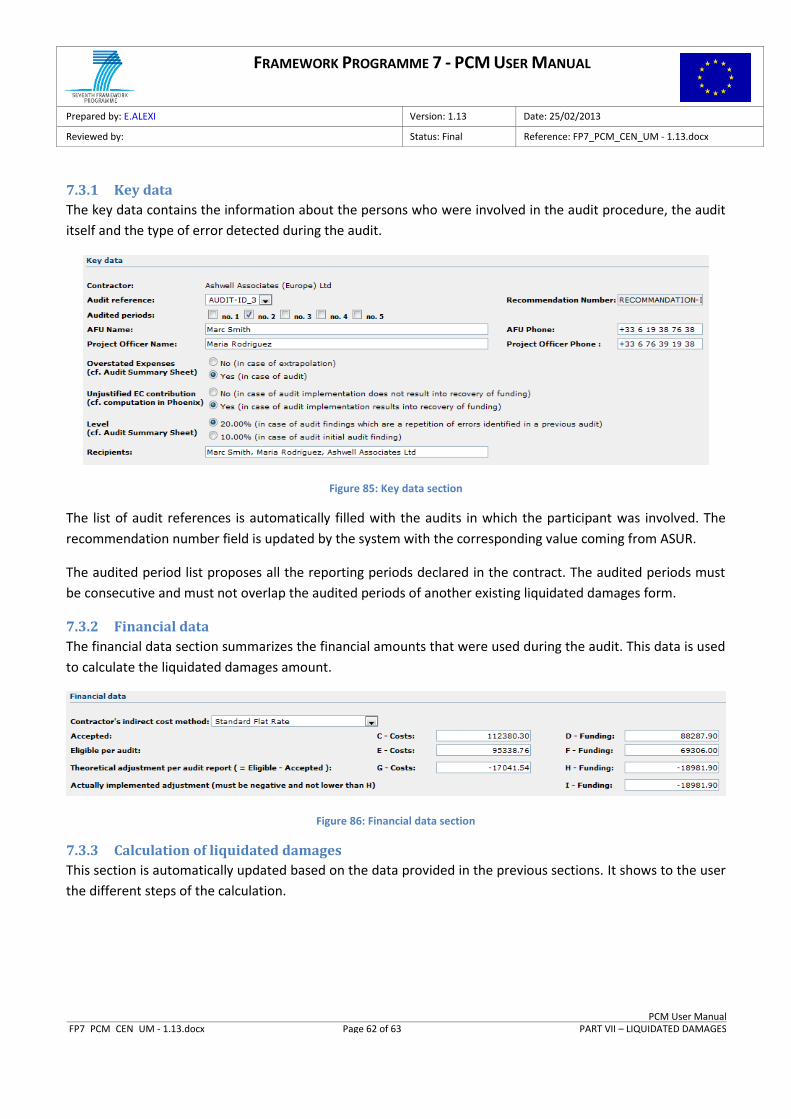
FRAMEWORK PROGRAMME 7 - PCM USER MANUAL
Prepared by: E.ALEXI Version: 1.13 Date: 25/02/2013
Reviewed by: Status: Final Reference: FP7_PCM_CEN_UM - 1.13.docx
PCM User Manual FP7_PCM_CEN_UM - 1.13.docx Page 62 of 63 PART VII – LIQUIDATED DAMAGES
7.3.1 Key data
The key data contains the information about the persons who were involved in the audit procedure, the audit
itself and the type of error detected during the audit.
Figure 85: Key data section
The list of audit references is automatically filled with the audits in which the participant was involved. The
recommendation number field is updated by the system with the corresponding value coming from ASUR.
The audited period list proposes all the reporting periods declared in the contract. The audited periods must
be consecutive and must not overlap the audited periods of another existing liquidated damages form.
7.3.2 Financial data
The financial data section summarizes the financial amounts that were used during the audit. This data is used
to calculate the liquidated damages amount.
Figure 86: Financial data section
7.3.3 Calculation of liquidated damages
This section is automatically updated based on the data provided in the previous sections. It shows to the user
the different steps of the calculation.
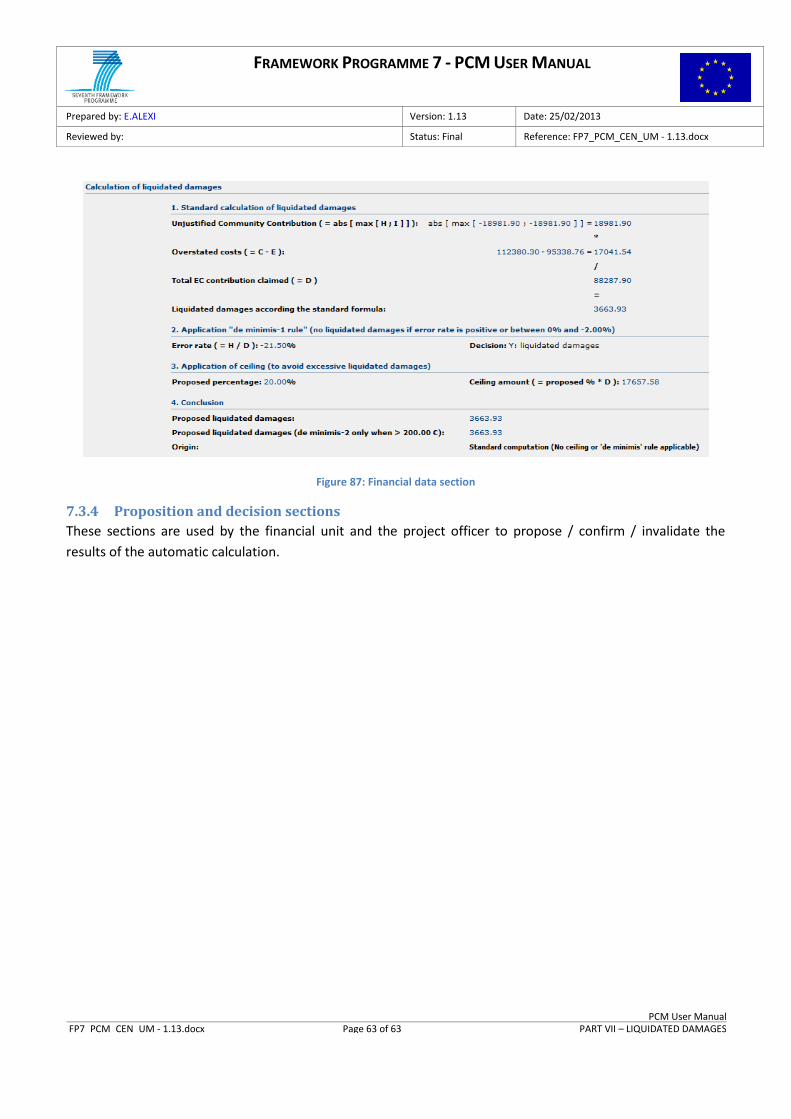
FRAMEWORK PROGRAMME 7 - PCM USER MANUAL
Prepared by: E.ALEXI Version: 1.13 Date: 25/02/2013
Reviewed by: Status: Final Reference: FP7_PCM_CEN_UM - 1.13.docx
PCM User Manual FP7_PCM_CEN_UM - 1.13.docx Page 63 of 63 PART VII – LIQUIDATED DAMAGES
Figure 87: Financial data section
7.3.4 Proposition and decision sections
These sections are used by the financial unit and the project officer to propose / confirm / invalidate the
results of the automatic calculation.


![PCM-9587 User Manual Ed[1].2](https://img.pdfslide.us/doc/110x75/577d35b61a28ab3a6b9133cf/pcm-9587-user-manual-ed12.jpg)