Embed Size (px)
Citation preview
PC sync for WindowsVersion 3.0
User's Guide
E

• MS and Microsoft are registered trademarks of Microsoft Corporation.• Windows and Windows NT are registered trademarks of Microsoft Corporation.• IBM PC/AT is a registered trademark of International Business Machines Corporation.• Other company names and product names are registered trademarks of the respec-
tive companies.• The contents of this document are subject to change without notice.• CASIO COMPUTER CO., LTD. assumes no responsibility for any damage or loss
resulting from the use of this manual.• CASIO COMPUTER CO., LTD. assumes no responsibility for any loss or claims by third
parties which may arise through the use of PC sync for Windows.
Copyright NoticeCopyright © 1997-2000 CASIO COMPUTER CO., LTD. All Rights Reserved.No part of this publication may be reproduced, transmitted, transcribed, stored in aretrieval system, or translated into any human or computer language, in any form or byany means, without the express written permission of CASIO COMPUTER CO., LTD.Copyright © 1997-2000 Yellow Computing Computersysteme GmbH, Germany AllRights Reserved.Please note that the program and this manual are under copyright. No part of thisprogram or manual may be reproduced, changed, translated into other languages orstored in a retrieval system in any form or by any means without prior consent fromYellow Computing.
CD-ROM Precautions• Never try to play the CD-ROM using an audio CD player. Doing so can cause damage to
your hearing or your speakers if the volume setting is too high.• Store the CD-ROM in an area that is not exposed to direct sunlight, or extreme heat or
cold.• Take care that the surface of the CD-ROM is not scratched or soiled by fingerprints,
dust, or dirt.• Never turn off CD-ROM drive power or remove the CD-ROM from the drive while a disc
read operation is in progress.
Important!• Keep this User's Guide in a safe place for future reference.
Note that the term "Digital Diary" or "BN/PV Unit" in this User's Guide is used to indicate theCASIO Digital Diaries of the type "BUSINESS NAVIGATOR" , "Pocket Viewer" and"CASSIOPEIA" . The sections 3.6 and 3.7 of this User's Guide refer to other CASIO DigitalDiaries.
User's Guide
Personal Computer Link
PC sync for Windows
from Version 3.0
Contents
Contents 4
1. General Comments 51.1 Introduction 51.2 Note on the Documentation 61.3 List of Symbols 61.4 Minimum System Requirements 6
2. Connecting a CASIO BN/PV Unit to a PC 7
3. Working with PC sync 133.1 Installing PC sync on Your PC 133.2 First Steps 13
3.2.1 Running the Program 133.2.2 Receiving Data from a CASIO BN/PV Unit 163.2.3 Saving Data 173.2.4 Loading Data 173.2.5 Entering New Records into the Personal Contacts 183.2.6 Entering New Scheduler Items 203.2.7 Finding Records 203.2.8 Deleting Certain Records 213.2.9 Sending Data to a CASIO BN/PV Unit 213.2.10 Using the Password 213.2.11 Data Import and Export 223.2.12 Quitting the Program 23
3.3 Data Synchronization 233.3.1 Synchronization Setup 243.3.2 Synchronize with Casio 25
3.4 Quick Data Copy 263.4.1 Quick Data Copy in the main program 263.4.2 Quick Data Copy as a stand-alone application 283.4.3 Quick Data Copy via a taskbar icon 29
3.5 Complete backup and retrieval of data 303.6 Receiving Data from other CASIO Digital Diaries 303.7 Loading data from CASIO FA-127 or FA-128 31
4. How to Use On-line Help 324.1 The Topic Overview 324.2 How to Find Certain Help Topics 334.3 Printing a Help Topic 334.4 Quitting the Help System 33
Appendix A – Keyboard Assignment 34
Appendix B – The Toolbars 37
Appendix C – Setting-Up the Various Digital Diaries 39
Important Notes 40
Chapter 1 – General Comments
1.1 Introduction
Congratulations on having purchased PC sync for Windows – a powerful program packagethat links your CASIO Digital Diary to a personal computer and opens up a whole world ofopportunities. The PC sync works from Microsoft Windows 95 upwards, making your datamanagement extremely easy. The functions of the CASIO Digital Diaries have been integratedto suit standard Windows conventions, so that it'll take you very little time to get used to theprogram. The simple selection of database areas through index bars, as well as clearlystructured 3D dialogs, toolbars with self-explanatory icons and context-sensitive Help willenable you to feel at home with the program in no time at all.
The synchronization capacity of the new CASIO Digital Diaries opens up completely newopportunities for the recording of data. It is irrelevant on which machine you have enteredyour data, as you now have a perfectly trouble-free option of merging data between aCASIO Digital Diary and a PC any time you like.
The program also gives you extensive editing and processing facilities, so that you caneasily transfer data to and from other Windows applications. The innovative index barallows you to select database areas much faster and more conveniently than with the usualmenus. To increase the clarity of the index bar (area tabs), all Appointment areas have beensummarized in a further index which is only shown when needed.
Here is a simple example of how you can use PC sync in the day-to-day running of youroffice: during the day you may be out collecting information on your CASIO Digital Diary, newcustomers' addresses, for example. Meanwhile your secretary plans your appointments onthe PC. When you get back to the office in the evening, all you need to do is to startsynchronization. All the new addresses from your CASIO Digital Diary are transferred tothe PC and the new appointments are added to the Schedule area in your CASIO DigitalDiary. PC sync is the missing link between a central computer and a CASIO Digital Diary, sothat both systems benefit from an extension of their opportunities.
Your connection kit should contain the following items. Check to make sure that each item ispresent:
• One CD
• One cradle or one cable (for PV-200e)
Note:In this User's Guide the word "cradle" is used both for the "Mini Cradle" of the BN Unitand for the "cradle" of the PV Unit.
General Comments 5
1.2 Note on the Documentation
The documentation comes in two parts - this User's Guide and the on-line help system.The User's Guide gives you all the basics required for working with PC sync. However,your main source of information will be the on-line help system. Any context-orientedquestions that come up while you're working with PC sync can be answered at the pressof a button. You will find a detailed description of the Help System in Chapter 4, "How to UseOn-line Help".
The Digital Diaries have several Appointment areas summarized in the area tab called"Scheduler". Whenever the area is called "Scheduler", it is further subdivided into "To-do","Reminder", "Schedule" and the "Month", "Week" and "Day" view. These sub-areas areaccessible through the vertical area tabs at the right side.
1.3 List of Symbols
Our documentation contains the following symbols:
[ ] Button in PC sync.< > Key or combination of keys on your PC, e.g. <Alt D> <N> means: press <Alt> and
<D> simultaneously, followed by <N>.A key on your CASIO Digital Diary, e.g. "MEMO".
" " A file name on disk (i.e. hard disk or floppy).' ' A selectable menu item on your PC.
1.4 Minimum System Requirements
To run PC sync you will need the following system configuration:
• PC with Pentium 75 or higher CPU for Windows 98, 95 or NT Workstation 4.0, or PC witha 133MHz or higher for Windows 2000 Professional. 16MB of RAM for Windows 98 orWindows 95, 32MB of RAM for Windows NT Workstation 4.0, or 64MB of RAM forWindows 2000 Professional.
• Microsoft Windows 2000 Professional, Windows 98, 95 or Windows NT Workstation4.0 (Service Pack 3 or later).
• CD-ROM drive for software installation.
General Comments 6
Chapter 2 – Connecting a CASIO BN/PV Unit to a PC
To find out how to operate the Pocket Viewer (PV), consult the User's Guide for the PocketViewer.
Important!Be sure to turn off the power of both your BN/PV Unit and computer before connectingthem. Failure to do so can result in damage to the BN/PV Unit, your computer, or thecradle (cable).
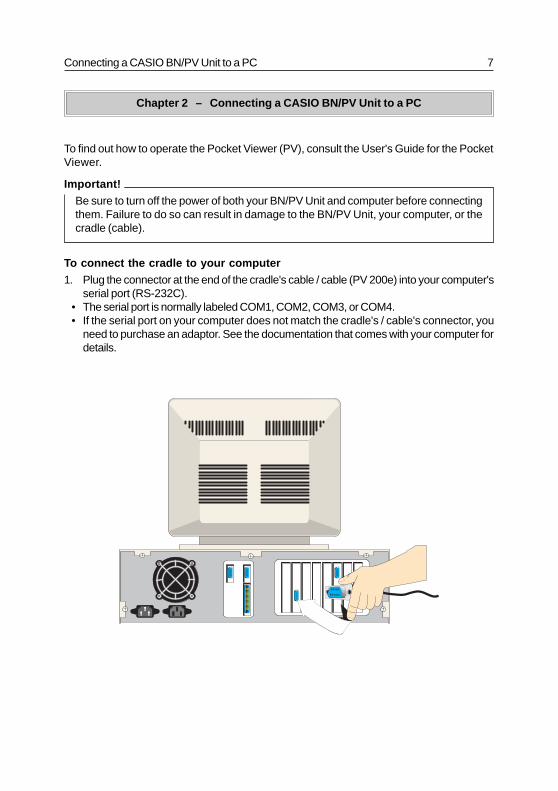
To connect the cradle to your computer1. Plug the connector at the end of the cradle's cable / cable (PV 200e) into your computer's
serial port (RS-232C).• The serial port is normally labeled COM1, COM2, COM3, or COM4.• If the serial port on your computer does not match the cradle's / cable's connector, you
need to purchase an adaptor. See the documentation that comes with your computer fordetails.
Connecting a CASIO BN/PV Unit to a PC 7
Connecting a CASIO BN/PV Unit to a PC 8
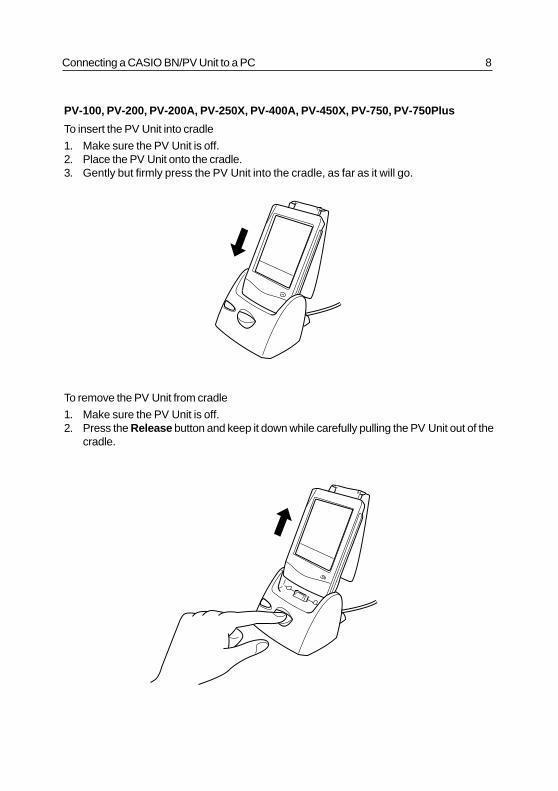
PV-100, PV-200, PV-200A, PV-250X, PV-400A, PV-450X, PV-750, PV-750Plus
To insert the PV Unit into cradle
1. Make sure the PV Unit is off.2. Place the PV Unit onto the cradle.3. Gently but firmly press the PV Unit into the cradle, as far as it will go.
To remove the PV Unit from cradle
1. Make sure the PV Unit is off.2. Press the Release button and keep it down while carefully pulling the PV Unit out of the
cradle.
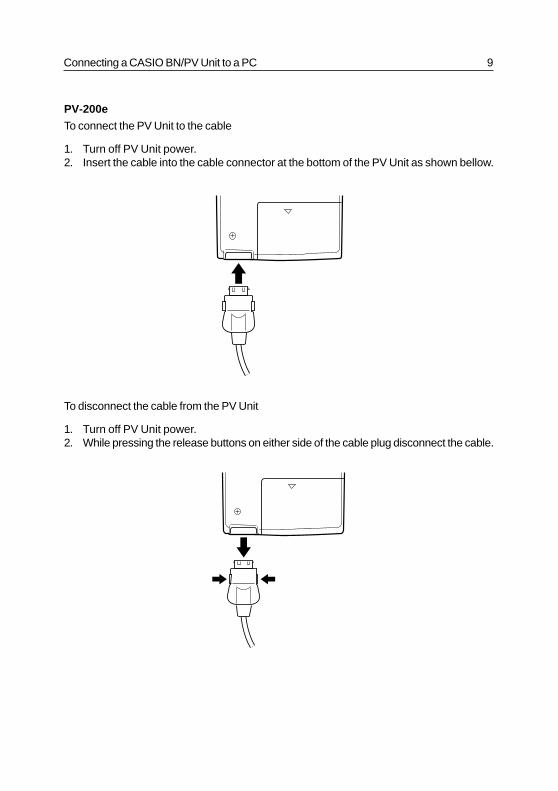
PV-200eTo connect the PV Unit to the cable
1. Turn off PV Unit power.2. Insert the cable into the cable connector at the bottom of the PV Unit as shown bellow.
To disconnect the cable from the PV Unit
1. Turn off PV Unit power.2. While pressing the release buttons on either side of the cable plug disconnect the cable.
Connecting a CASIO BN/PV Unit to a PC 9
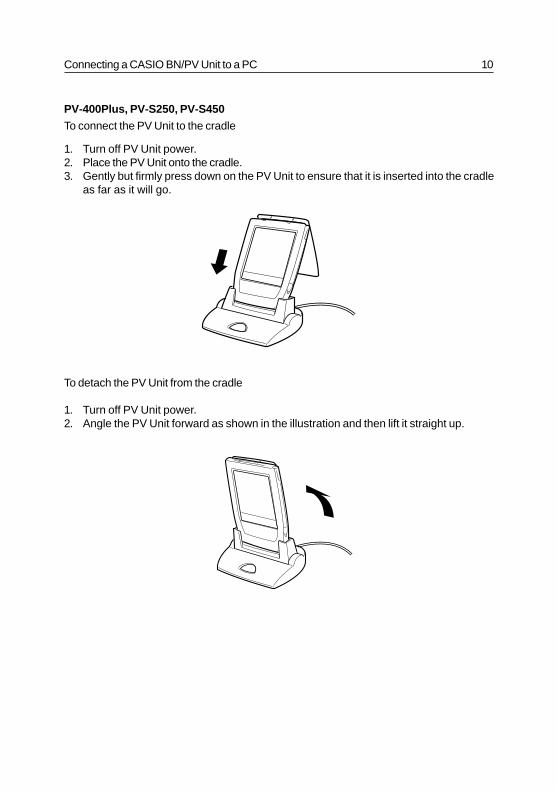
PV-400Plus, PV-S250, PV-S450To connect the PV Unit to the cradle
1. Turn off PV Unit power.2. Place the PV Unit onto the cradle.3. Gently but firmly press down on the PV Unit to ensure that it is inserted into the cradle
as far as it will go.
To detach the PV Unit from the cradle
1. Turn off PV Unit power.2. Angle the PV Unit forward as shown in the illustration and then lift it straight up.
Connecting a CASIO BN/PV Unit to a PC 10
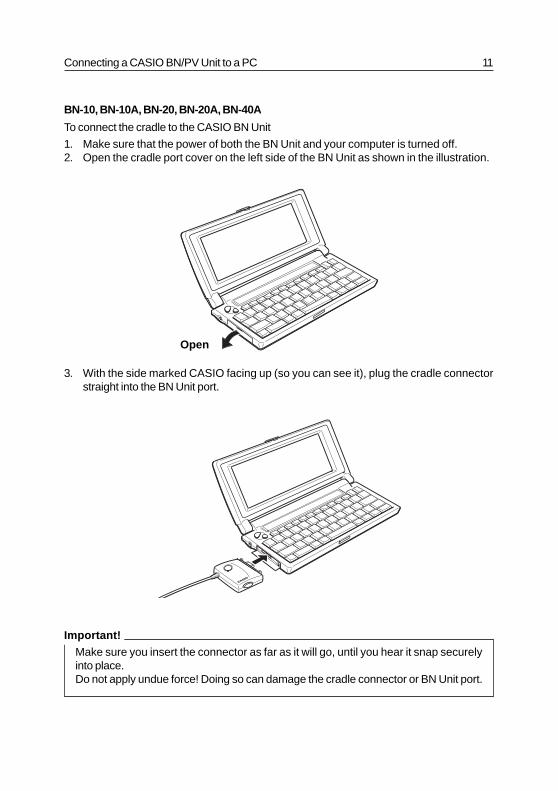
BN-10, BN-10A, BN-20, BN-20A, BN-40A
To connect the cradle to the CASIO BN Unit
1. Make sure that the power of both the BN Unit and your computer is turned off.2. Open the cradle port cover on the left side of the BN Unit as shown in the illustration.
3. With the side marked CASIO facing up (so you can see it), plug the cradle connectorstraight into the BN Unit port.
Important!Make sure you insert the connector as far as it will go, until you hear it snap securelyinto place.Do not apply undue force! Doing so can damage the cradle connector or BN Unit port.
Connecting a CASIO BN/PV Unit to a PC 11
Open
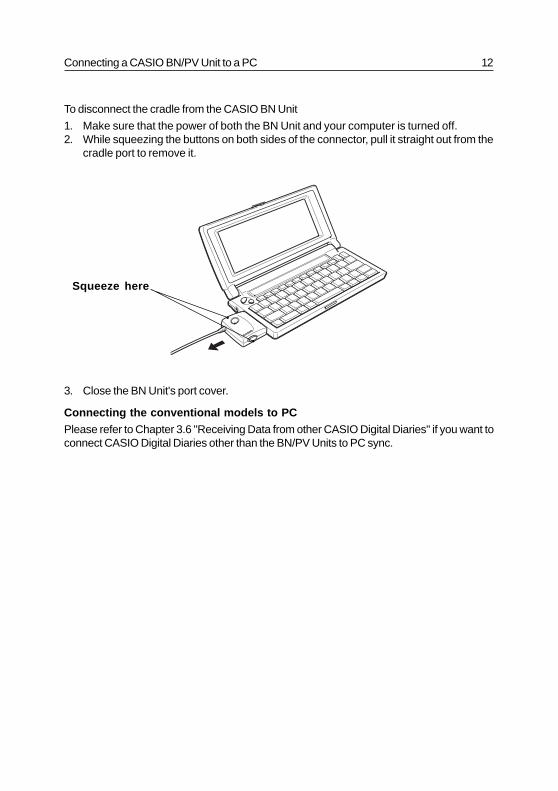
To disconnect the cradle from the CASIO BN Unit
1. Make sure that the power of both the BN Unit and your computer is turned off.2. While squeezing the buttons on both sides of the connector, pull it straight out from the
cradle port to remove it.
3. Close the BN Unit's port cover.
Connecting the conventional models to PCPlease refer to Chapter 3.6 "Receiving Data from other CASIO Digital Diaries" if you want toconnect CASIO Digital Diaries other than the BN/PV Units to PC sync.
Connecting a CASIO BN/PV Unit to a PC 12
Squeeze here
Chapter 3 – Working with PC sync
3.1 Installing PC sync on Your PC
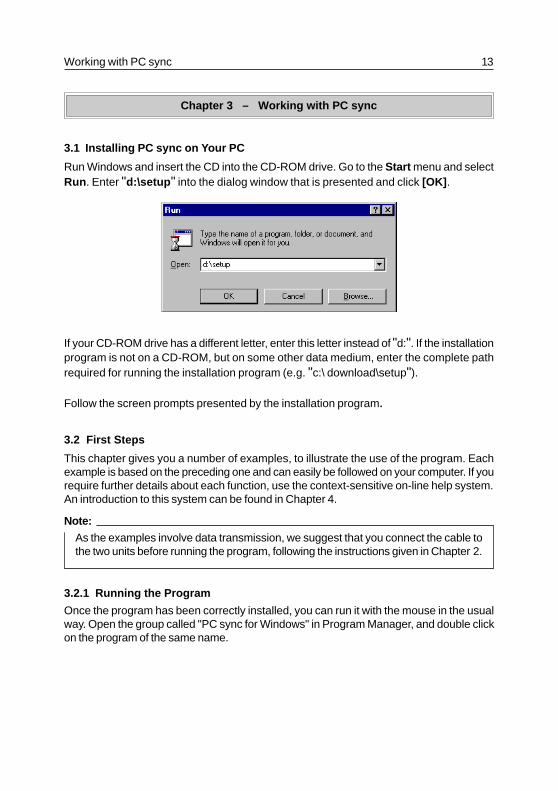
Run Windows and insert the CD into the CD-ROM drive. Go to the Start menu and selectRun . Enter "d:\setup " into the dialog window that is presented and click [OK] .
If your CD-ROM drive has a different letter, enter this letter instead of "d:". If the installationprogram is not on a CD-ROM, but on some other data medium, enter the complete pathrequired for running the installation program (e.g. "c:\ download\setup").
Follow the screen prompts presented by the installation program.
3.2 First Steps
This chapter gives you a number of examples, to illustrate the use of the program. Eachexample is based on the preceding one and can easily be followed on your computer. If yourequire further details about each function, use the context-sensitive on-line help system.An introduction to this system can be found in Chapter 4.
Note:As the examples involve data transmission, we suggest that you connect the cable tothe two units before running the program, following the instructions given in Chapter 2.
3.2.1 Running the Program
Once the program has been correctly installed, you can run it with the mouse in the usualway. Open the group called "PC sync for Windows" in Program Manager, and double clickon the program of the same name.
Working with PC sync 13
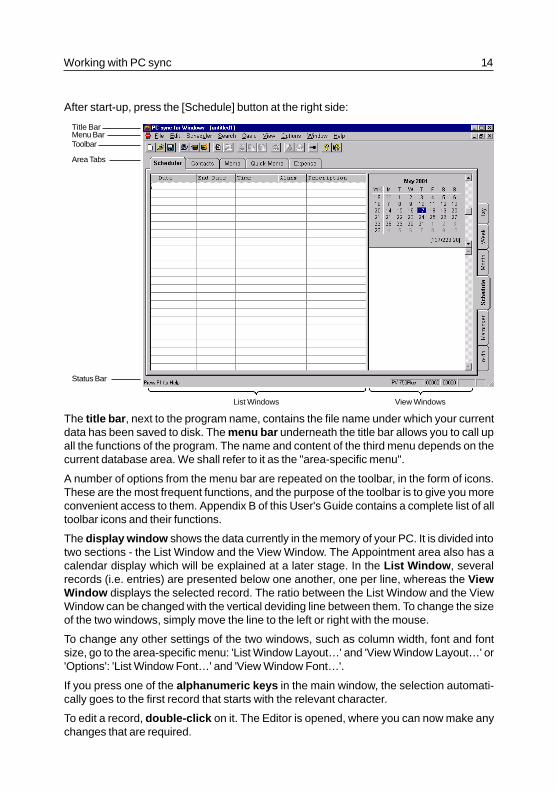
After start-up, press the [Schedule] button at the right side:
List Windows View Windows
The title bar , next to the program name, contains the file name under which your currentdata has been saved to disk. The menu bar underneath the title bar allows you to call upall the functions of the program. The name and content of the third menu depends on thecurrent database area. We shall refer to it as the "area-specific menu".
A number of options from the menu bar are repeated on the toolbar, in the form of icons.These are the most frequent functions, and the purpose of the toolbar is to give you moreconvenient access to them. Appendix B of this User's Guide contains a complete list of alltoolbar icons and their functions.
The display window shows the data currently in the memory of your PC. It is divided intotwo sections - the List Window and the View Window. The Appointment area also has acalendar display which will be explained at a later stage. In the List Window , severalrecords (i.e. entries) are presented below one another, one per line, whereas the ViewWindow displays the selected record. The ratio between the List Window and the ViewWindow can be changed with the vertical deviding line between them. To change the sizeof the two windows, simply move the line to the left or right with the mouse.
To change any other settings of the two windows, such as column width, font and fontsize, go to the area-specific menu: 'List Window Layout…' and 'View Window Layout…' or'Options': 'List Window Font…' and 'View Window Font…'.
If you press one of the alphanumeric keys in the main window, the selection automati-cally goes to the first record that starts with the relevant character.
To edit a record, double-click on it. The Editor is opened, where you can now make anychanges that are required.
Working with PC sync 14
Menu BarToolbar
Area Tabs
Title Bar
Status Bar
The top edge and – under Scheduler – the right-hand edge of the display window containsthe area tabs to determine which database area you are in at the moment. To display adifferent area, simply click on the relevant tab.
If you have large amounts of data, you can scroll up and down in the database area with theslider . Either click on the relevant scroll arrow or place the scroll box in the desired position.
The status bar contains a brief note on the current screen situation as well as two figuresindicating the number of records in the current database area and the number of markedrecords in this area. The status bar also shows information, depending on the selectedCASIO Digital Diary model.
The function bar, area tabs and status bar can be shown or hidden via the 'Options'menu. If, say, you want to display as many records as possible, you may find it useful tohide some of the bars.
The CalendarThe structure of the PC sync Calendar is similar to that of the CASIO Digital Diary. When youchange over to the Scheduler or Schedule area, the Calendar always displays the currentmonth. The current date is framed, the selected date has a coloured background, andmarked dates are shown in bold characters. Calendar markings can be set or deleted forentire months with the two functions 'Mark Days…' / 'Unmark Days…' in the 'Schedule/Scheduler' menu. To mark or unmark a single date, hold down <Shift> and select the relevantdate with the mouse. Alternatively, you can toggle calendar markings with the <Spacebar>.To mark whole lines or columns of the current month, hold down <Shift> and click on therelevant calendar week or weekday.
Dates that have an entry in the Schedule, are marked with a dot in the Calendar. A dot at thetop means an a.m. appointment, and a dot at the bottom a p.m. appointment. To maintainclarity, no markings are given for days with Reminder and To-Do items.
The left margin of the Calendar gives you the calendar week . The three figures at thebottom edge of the Calendar tell you the number of days that have elapsed since thebeginning of the year, the number of days that are still left this year, and the calendar weekof the selected date (with a coloured background).
The Calendar goes from 1 January 1901 to 31 December 2099. The selection marking canbe moved with the arrow keys or set with the mouse. The selection of a month can be setwith the scroll bar on the right edge of the Calendar. To scroll back and forth a month at atime, click on the up/down arrows of the scroll bar. To browse whole years, click betweenthe arrows and the slider. You can also position the slider directly with the mouse.
To access a date through manual entry , select the function 'Scheduler': 'Goto Date…' andenter the date.
A double click on a given date in the Calendar has the effect of creating a new entry forthat date. The Editor is opened, and you can enter your data.
Working with PC sync 15
3.2.2 Receiving Data from a CASIO BN/PV Unit
In this example we want to transmit the entire content of your BN/PV Unit to your PC andthen save it to disk. If you have not done so yet, link up the two units with the cradle, asdescribed in Chapter 2.
Setting the CASIO Digital Diary ModelThis setting tells the program which model you are using, so that it adjusts itself exactly tothe specific qualities of your Digital Diary. The details include, for instance, the names of theavailable database areas, the Editor width, etc.
Call up the function entitled 'Default Digital Diary…' in the 'Options' menu. A dialog box ispresented, prompting you to select the relevant BN/PV Unit. Choose [OK] to confirm yourselection.
The Transmission SetupOnce you have selected the Digital Diary model, you need to specify the relevant transmis-sion setup. Select 'Transmission Setup…' from the 'Casio' menu. A dialog box is presented,prompting you to specify the [Serial Port] to which the cable is connected. Choose [OK]to confirm your settings. You are now ready for transmission.
Saving Your SettingsBoth settings – the Digital Diary model and the transmission setup – usually have to be madeonly once, after installing the program. Later, when you leave the program in the normalway, the values are automatically saved and will be available for all future occasions.
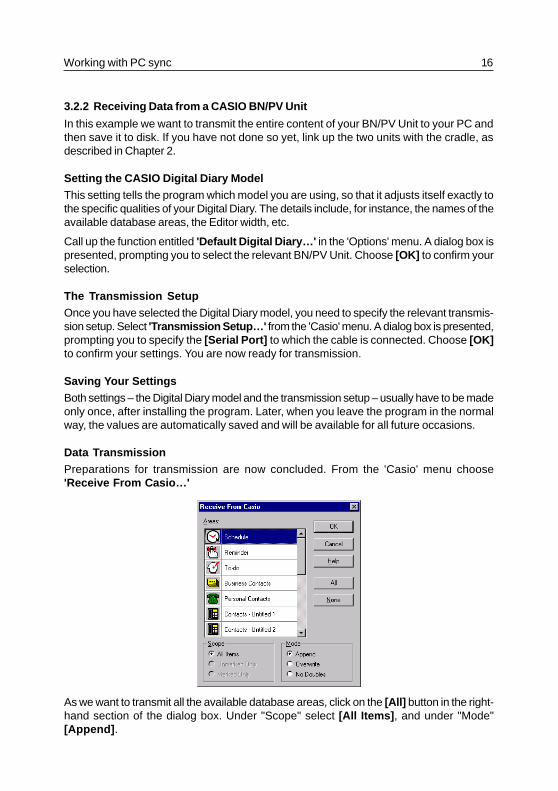
Data TransmissionPreparations for transmission are now concluded. From the 'Casio' menu choose'Receive From Casio…'
As we want to transmit all the available database areas, click on the [All] button in the right-hand section of the dialog box. Under "Scope" select [All Items] , and under "Mode"[Append] .
Working with PC sync 16
To start transmission, select [OK] on your PC, followed by the Start button on the cradle. Ifyou are using a PV-200e unit, tap the PC sync icon in the lower left corner of its screen.During reception a status box is displayed, telling you how far transmission has pro-gressed. To stop transmission on the PC, choose [Abort] .After the BN/PV Unit has succesfully ended transmitting data, the data is displayed inPC sync.
3.2.3 Saving Data
To save data to disk immediately after transmission, without further editing, choose 'File':'Save' . A file selector box is presented, prompting you to enter the desired file name andpath under which you want to save your data to disk (e.g. c:\data\private.twf).
Unless otherwise specified, PC sync automatically adds the extension ".twf". We recom-mend that you do not enter an extension, unless you specifically want to use some otherextension. PC sync will respect your decision, though we do suggest that you only use".twf".
As soon as you have specified a file name and path, choose [OK] to start saving to disk. Ifthe file name already exists, a query is presented, asking you whether you wish to overwritethe existing file.
Note:If the mode you save to a file has more than 16.000 entries, you may not be able to openthe file.
3.2.4 Loading Data
In this section we want to comment briefly on the reading of files that have been saved todisk.
Loading TWF filesTo load a file, choose 'File': 'Open…' . The same file selector box is presented that is alsoused for saving data. It contains a list of all the files with the extension "twf" in the currentdirectory. If you want to display file names with other extensions, specify the relevant maskdirectly under "File name" or select one of the predefined masks via "List files of type".
Next, set the path and name of the desired file and choose [OK] . The relevant file is nowread in and displayed in the display window of the database area that was active when thefile was last saved.
Loading Data from Other Link ProgramsIf you own another link program that does not allow you to load data directly, then thesimplest way of reading its data is to transmit it from the other link program back to theCASIO Digital Diary and then to PC sync.
Working with PC sync 17
3.2.5 Entering New Records into the Personal Contacts
Note:The CASIO PV Units have several contact areas summarized in the area tab called"Contacts". The sub-areas are accessible through the vertical area tabs at the rightside. Mail and SMS (Short Message Service) can only be sent or received. Display,editing and deletion not supported.
In this example we are going to create/edit Personal Contacts data with the Editor. You willalso learn a convenient way of marking, copying and moving data.
To start with, choose 'File': 'New' , and select the proper Digital Diary to open a new filewindow. Next, use the area tabs or choose 'View': 'Personal Contacts' to display thePersonal Contacts. To enter a new record, either choose 'Edit': 'New Item…': 'PersonalContacts' or press <Ins>. The Editor Window is now opened.
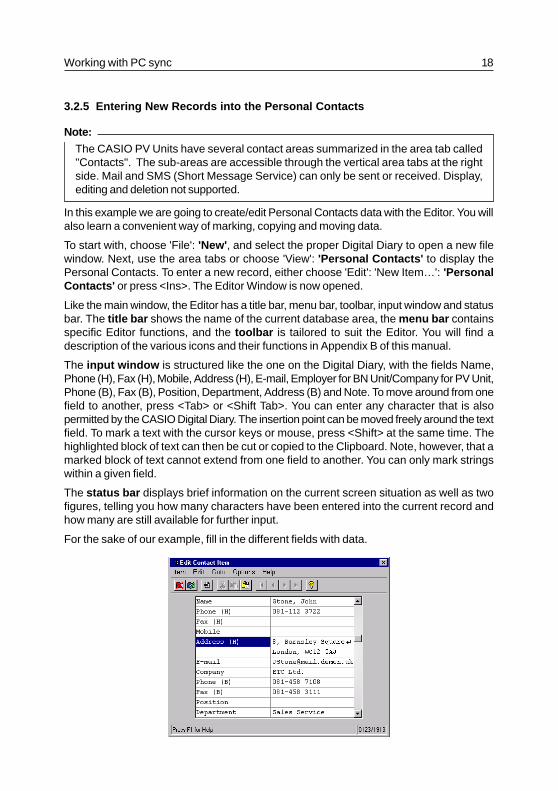
Like the main window, the Editor has a title bar, menu bar, toolbar, input window and statusbar. The title bar shows the name of the current database area, the menu bar containsspecific Editor functions, and the toolbar is tailored to suit the Editor. You will find adescription of the various icons and their functions in Appendix B of this manual.
The input window is structured like the one on the Digital Diary, with the fields Name,Phone (H), Fax (H), Mobile, Address (H), E-mail, Employer for BN Unit/Company for PV Unit,Phone (B), Fax (B), Position, Department, Address (B) and Note. To move around from onefield to another, press <Tab> or <Shift Tab>. You can enter any character that is alsopermitted by the CASIO Digital Diary. The insertion point can be moved freely around the textfield. To mark a text with the cursor keys or mouse, press <Shift> at the same time. Thehighlighted block of text can then be cut or copied to the Clipboard. Note, however, that amarked block of text cannot extend from one field to another. You can only mark stringswithin a given field.
The status bar displays brief information on the current screen situation as well as twofigures, telling you how many characters have been entered into the current record andhow many are still available for further input.
For the sake of our example, fill in the different fields with data.
Working with PC sync 18
Working with PC sync 19
To save the current record and immediately create a new one, select 'Item': 'New' in theEditor. If the Editor menu item entitled 'Options': 'Query Before Saving' is selected (i.e.ticked), you are given a query before the record is saved. Otherwise a new record iscreated without asking for confirmation. Again, fill this record with data. This time, however,conclude with 'Item': 'Exit Editor' . The record is then saved (possibly after a query) and theEditor Window is closed. The two new records are listed underneath one another in the ListWindow.
Note:The menu item 'Exit Editor' has the effect of saving the current record to your computer'smemory, but not to disk. To save your data to disk, choose 'File': 'Save' or 'Save As…'.
Copying Records via the ClipboardIn our example, we are going to duplicate the first record via the Clipboard. This is aconvenient way of saving input time whenever two records are almost identical, e.g. twodifferent contacts at the same company. In the List Window, select the first record by single-clicking on it with the mouse, so that it is displayed in reverse video. Next, choose 'Edit':'Copy' . This has the effect of placing the record onto the Clipboard. Next, choose 'Edit':'Paste' to insert the content of the Clipboard into the Contacts. To edit the copy with theEditor, either select it with the mouse in the List Window and choose 'Edit': 'Edit ContactItem…' or double-click on it with the mouse (i.e. click the left mouse button twice in quicksuccession). When you have edited this record, save it in the usual way via 'Exit Editor' .
Copying and Moving Records with the Mouse (Drag & Drop)Apart from the above Clipboard options, there is also a drag-and-drop function similar to theone in the Windows File Manager. It enables you to pick up marked records in the ListWindow with the mouse and move or copy them to other database areas or even other filewindows. In our example we shall copy two of the previously entered records into theMemo area. To start with, select the two records in the List Window: Hold down either<Shift> or <Control> while at the same time clicking on the relevant records. <Shift> marksall the records between the first record that has been selected and the current one,whereas <Control> marks only the current record in addition to the one selected earlier.When you have made your selection, choose one of the selected records with the mouse,hold down the mouse button and move the mouse to one of the area tabs or to the filewindow into which you want to move/copy the records. For the sake of our example, movethe mouse onto the [Memo] tab.
If you wanted to move the records (so that they are deleted from their previous locations),you would now simply let go of the mouse button. However, as you want to copy them,press <Control> and keep it down until you have released the mouse button. Finally go tothe Memo area via the area tabs or 'View': 'Memo', and you will find copies of the twoPersonal Contact records.
The drag-and-drop function allows you to move/copy the following types of records:
• From one file to another but within the same database area (e.g. from one file windowto another),
• From all database areas into the Memo area,
If the mouse pointer takes this form during a drag-and-drop attempt, then the relevantrecords cannot be pasted to their intended destination.
Drag & Drop with Data Files from the File Manager/ExplorerIn the Windows File Manager or Explorer, select one or more the PC sync files (normally withthe extension ".twf") and drag them onto the PC sync program window or icon. They areautomatically loaded by the program.
3.2.6 Entering New Scheduler Items
Entering records into one of the Scheduler areas entitled Schedule, Reminder or To-do,basically follows the same principles as entering data into the Personal Contacts. The onlydifference is that, next to the text fields, there are also fields which are specially designedfor dates and times.
If you want certain fields (especially Schedule or Reminder) to remain empty, e.g. to distin-guish between monthly and daily Reminder items, deactivate the relevant field. If, say, youdeactivate the month field in the Reminders Editor, then the item will be presented every day.
Furthermore, you can automatically create a new item for the selected day in the currentdatabase area by double-clicking on a certain date. This has the effect of opening theEditor where you can complete your data.
3.2.7 Finding Records
In this section we want to search through the Personal Contacts and find all the Smiths inBirmingham.
Go to the Personal Contacts via the area tabs or 'View': 'Personal Contacts' . Choose'Search': 'Search…' , where a dialog box is presented. Under "Search For" enter "Smith"as a search string. Under "Search Scope" specify: [Search Current Area Only] , as weonly want to search through the Personal Contacts. As we do not want to distinguishcapital and small letters in our search, leave the field [Match Case] deactivated (i.e.unchecked). This means that the program will also find items such as "SMITH", all in capitals.To start searching, choose [OK] . The List Window will now display only records that havethe name "Smith" in them.
Next, we want to narrow down our selection even further by conducting another search,this time for "Birmingham" . Call up the 'Search…' function again and enter "Birmingham".This time, however, make sure you activate [Use Last Search Result] , so that our"Birmingham" search will be limited to the records containing the name "Smith". Again, leavethe field [Match Case] deactivated, so that no distinction is made between capital andsmall letters. Choose [OK] to start the second search. The List Window will now displayonly records that contain both "Smith" and "Birmingham". The found records are now
Working with PC sync 20
available for further processing. They can be selected and then placed into other programsvia the Clipboard, and they can be printed or marked (i.e. via 'Edit': 'Toggle Mark Flag'). Todisplay all the records of the current area again, choose 'Search': 'Discard All SearchResults' .
3.2.8 Deleting Certain Records
In this example we want to eliminate all doubles from the Personal Contacts, i.e. all recordsthat are totally identical. Doubles may arise, for instance, if you have an identical stock ofrecords on your PC and on your Digital Diary and you have added different records on bothunits. When you transmit the Digital Diary data via [Append], you will get doubles.
To delete the superfluous records, choose 'Options': 'Erase Area…' . A dialog box ispresented, prompting you to select the database areas in which you want to weed out thedoubles. For the sake of our example, click on [Personal Contacts] . To erase doublesonly, specify [Doubles] under "Scope". Choose [OK] . The program now erases all recordsthat are totally identical, so that each record is only available once.
3.2.9 Sending Data to a CASIO BN/PV Unit
After editing data in PC sync you now want to send it to your BN/PV Unit. We assume thatthe cradle has been connected to the PC and the BN/PV Unit. If not, link them up as describedin Chapter 2.
To start sending data, call up 'Casio': 'Send To Casio…' . To select all database areas, clickon [All] . Alternatively, you can also select all areas separately, with the mouse. The "Scope"should also be set to [All Items] .
To start transmission, select [OK] on your PC, followed by the Start button on the cradle. Ifyou are using a PV-200e unit, tap the PC sync icon in the lower left corner of its screen.During transmission a status box is displayed, telling you how far the operation has pro-gressed. To stop transmission on the PC, choose [Abort] .
Note that once data has been received by the BN/PV Unit, it is appended to the existingrecords.
3.2.10 Using the Password
Like the BN/PV Units, PC sync also has its own area for secret data. The only differencebetween open and secret data is that the latter requires a password query , which ispresented when you try to access to this area.
Go to 'View': 'Secret Area' . If you are doing this for the first time, then a dialog box ispresented, prompting you to enter the relevant password. The program displays an asteriskfor each character that is entered. As this is your first time in this area, your input isunderstood by the program as the definition of a password. As soon as you choose [OK] ,a further dialog box is therefore opened, asking you to confirm your password. Do makesure that you enter your password without typing errors and that you remember it well.
Once entered, the password is saved permanently when the file itself is saved to disk. Apassword only ever relates to the current file (i.e. the current window). It does not apply
Working with PC sync 21
globally to the entire program. Password input and confirmation are not case-sensitive, i.e.no distinction is made between small and capital letters.
You can change the password for a file via 'File': 'Password' .
As we mentioned above, the only difference between a secret and open area is thepassword query. All other functions are identical. Especially with a view to data transmis-sion, though, it is worth remembering that both the BN/PV Units and PC sync treat secret andopen data of a database area as totally independent and separate from one another. Onboth computers any transmission therefore concerns either secret or open data (but notboth) depending on the currently active area at the time of transmission - unless you haveexplicitly specified that the secret data, for instance, should be appended to the open data.
3.2.11 Data Import and Export
The following section uses data export in dBase-Format to show you how it is possible toexchange data with other programs using the import and export functions. In this examplewe assume that there are already data in the Personal Contacts. Change to the PersonalContacts and select 'Export…' from the 'File' menu. A dialog box appears in which thedesired export format can be defined. For this example select "DBF (xBase standard)" .Confirm your entry with [OK] which brings you to a file selector box in which you shouldenter the name under which the data is to be exported onto disk or hard disk e.g. "tphone.dbf".
After entering the file name a dialog box appears with the available field mappings. A fieldmapping is required as different programs have different structures concerning the formatand number of individual fields within a record. In order to export the PC sync fields to otherprograms in a particular order, you must specify a list of the fields to be exported and notexported. Each list is therefore a field mapping list . To differentiate between the lists, (fieldmapping lists) each one receives a name which is chosen from the dialog box.
As we wish to specify a new field mapping in this example, choose [New…] give the fieldmapping a name (e.g. tphone) and confirm with [OK] . A dialog box divided into two sectionsis now displayed which enables you to allocate the individual fields. The left-hand sideshows a list of all the fields available in the Personal Contacts and the right-hand sideshows a list of all the fields to be exported. You can now customize the right-hand listaccording to your requirements, using the buttons [Add]/[Add All] and [Remove]/[Re-move All] . To create an empty field select <Dummy> .
For our example you should export the fields "Name", "Address (H)", "Dummy" and "Phone (H)"in the given order. To do so, first click on [Name] on the left-hand side and then on [Add]. Afurther dialog box now appears enabling you to enter another name in the field name and todefine the maximum number of characters. To ensure that the fields do not become too widelater on, set the maximum amount of characters to 30 under "Length". The name in the fieldname should remain unchanged. Accept the setting with [OK] and proceed with the addressin the same way. In Dummy you can also choose another name as well as the maximumnumber of characters "Country" for example. Lastly, accept the Phone number field with[OK] and set the length to 20 characters as telephone numbers generally require fewercharacters.
Working with PC sync 22
All four fields have now been transferred to the right-hand side and the newly created fieldmapping can be saved with [OK]. This brings you back to the field mapping menu. If you nowselect the field mapping you have just created, you can start the export process by pressing[OK]. The exported data are now ready to be transferred to other programs.
To now read the data into Microsoft Excel, change to Excel and load the exported data intothe memory with 'Open…' from the 'File' menu. The data format in the file selector box mustbe set to "DBF Files (*.DBF)" . After starting the loading process with [OK] the exporteddata in Excel is ready to be edited further.
Importing data from other programs is carried out in the same way but in the opposite order.Therefore, first of all save the required data in another program in one of the data formats,then choose the data field in PC sync to which the data should be imported and to actuallytransfer the data, select 'Import…' from the 'File' menu.
There is also the option of loading an exported file automatically with a different application.Select an application in the list "Load Result File with Program". This program, which isstarted automatically after the file has been exported, will then read in the exported file. Touse this function, you first need to set up one or more links to applications on your hard disk.Click on [Export Link…] in the Export dialogue, which is then followed by another dialoguebox. Click on [New…]. Under "Application:" enter either the the complete path and file nameof the application you wish to start (e.g. "c:\office\winword.exe") or click on the file selectionoption and browse until you have found the desired file. Under "Name" enter a sufficientlymeaningful name for this application (e.g. "Word 97") and choose [OK] and then [OK] againto confirm. You can now select the newly created link in the list "Load Result File withProgram". If, for instance, you export the Memo area in RTF format and you are going to useWord 97 after specifying a file name, then Word 97 is automatically started on your PC,loading the export file with the Memo area.
Note:For a successful export link, make sure you only specify file formats that can be readby other applications. If you are not sure, consult the user's guide of the other program.
3.2.12 Quitting the Program
To quit the program choose 'File': 'Exit' . PC sync then saves its basic settings, such as thesize and position of the main window, so that these are available again next time you run theprogram. If the program contains unsaved data, a query is presented.
3.3 Data Synchronization
Data Synchronization provides you with the following capabilities. Data synchronizationto update BN/PV Unit file data and PC file data so modifications (edit, delete, create) madein one file are reflected in the other.
Working with PC sync 23
The BN/PV Units can be synchronized with an PC sync file, i.e. the PC file and the BN/PV Unitcan be brought up to an identical data state. New records existing on both units in anidentical state will be filtered automatically, to avoid creating doubles (cf. 3.3.1 'Synchroni-zation Setup').
Therefore a synchronization has big advantages in contrast to the conventional "Send" and"Receive" functions. Please note that you should avoid executing both synchronizationsand transfers (send and receive) for the same data stock. If you send e.g. after asynchronization the same data to the BN/PV Unit, it is possible that doubles will be created!
You start the synchronization process via the 'Synchronize With Casio' command fromthe 'Casio' menu. During the process a status window appears displaying the single stepsof the synchronization. It is also possible to cancel the process.
Note:If you cancel the synchronization, it may be possible that the original state of the datacannot be restored! Therefore you should execute a new synchronization as soon aspossible so that both units will be brought up to an identical data state.
3.3.1 Synchronization Setup
Via this command you can set all the important synchronization settings. In the dialog boxthat appears, click on the [Settings] tab and then select a Conflict Solution Method todeal with the following types of conflict:
• Records have been modified both in the PC sync file and in the BN/PV Unit (1)• Records have been deleted from the PC sync file and modified in the BN/PV Unit (2)• Records have been modified in the PC sync file and deleted from the BN/PV Unit (3)
Add(1) The BN/PV Unit record will be transferred to the PC and added to the current PC sync
file, the PC sync record will be transferred to the BN/PV Unit; i.e. both versions will bekept on both sides.
PC With Priority(1) The records of the BN/PV Unit will be deleted and those of the PC sync file will be
transferred.(2) The corresponding BN/PV Unit records will be deleted.(3) The corresponding PC sync records will be added to the BN/PV Unit.
Digital Diary With Priority(1) The records of the PC sync file will be deleted and those of the BN/PV Unit will be
transferred.(2) The modified BN/PV Unit records will be added to the PC sync file.(3) The corresponding PC sync records will be deleted.Decide also whether duplicate records shall be filtered and whether the file shall besaved after the synchronization .
Working with PC sync 24
The check box titled Detect Automatically Synchronization Start is activated by de-fault. If you have connected the BN/PV Unit to the PC and start the synchronization on theBN/PV Unit by pressing the Start button on the cradle (If you are using a PV-200e unit, tapthe PC sync icon in the lower left corner of its screen) – during PC sync is running (also inthe background) – the synchronization program will start automatically on the PC. If thereare any problems with the serial port, simply press <SHIFT> during the program start – thenthe automatic check of the serial port will not be executed.
Also note that an automatic check may reduce the speed of some other applications runningat the same moment. So if you want to speed up the corresponding application, simplydeactivate the check box.
Via the [File List] tab, all the files used during the previous synchronizations will be listed.Via the [Remove] button, you can remove the marked file from the list.
Note:If you use the automatic detection of synchronization (i.e. if Detect AutomaticallySynchronization Start has been enabled), you can select the [Areas] in thesynchronization setup that are to be synchronized when you press the Start button onthe cradle (or, if you are using a PV-200e unit, tap the PC sync icon in the lower leftcorner of its screen). Whenever you start synchronization from the PC, the areaselection dialogue is presented.
3.3.2 Synchronize with Casio
If you execute the synchronization between the PC sync file and the BN/PV Unit for the firsttime or if you use another file than during the previous synchronization, a dialog boxappears indicating that the BN/PV Unit has not been assigned to a PC sync file. In order toproceed with the synchronization, you can now press one of the following buttons:
[OK]The data will be "reorganized", i.e both the items in the PC sync file and those in the BN/PVUnit will be considered as "new", and the synchronization will then be started. Therefore,this type of synchronization corresponds to a complete send and receive process of all thedata of both units.
[Browse]A dialog box for selecting a file appears. Possibly the file to which the BN/PV Unit has beenassigned will be displayed automatically. If you select another file, the dialog describedabove will appear.
[New File]If you select this button, the data of the BN/PV Unit will be "reorganized", i.e considered as"new". For the PC sync file, the same diary type will be set which has already been used forthe file currently opened. If this is not possible, the Default Digital Diary will be usedautomatically.
Working with PC sync 25
Working with PC sync 26
If a file exists that has already been used during a synchronization with the selected BN/PVUnit, a corresponding dialog box appears. Then you can use this file again or select anotherone via the [Browse] button.
In order to keep always the same data stock on both units, you should always use the samePC sync file for the synchronization with your BN/PV Unit. Of course you can alsosynchronize several BN/PV Units: In this case, use several PC sync files and always thosewhich belong together, so as to avoid that the data will be confused! Otherwise both datastocks have to be "reorganized".
Important:After the synchronization, save the PC sync file via the 'Save' command from the 'File'menu – provided that you have not activated the check box for the automatic saving(via the 'Synchronization Setup' command). Otherwise, before the next synchronization,a dialog box appears for indicating whether the data shall be "reorganized" (seeabove), whether the BN/PV Unit stock shall be deleted and only the PC sync records bekept or whether the PC sync file shall be deleted and the BN/PV Unit records be kept.Mail and SMS can only be sent or received. Synchronization not supported.
3.4 Quick Data Copy
Quick Data Copy is a quick and simple function for moving text to the PV Unit, using Win-dows Clipboard. On the PV Unit you can save the text to one of the five available Memoareas.
Note:Quick Data Copy was developed specially for the new models PV-200A, PV-200e, PV-250X, PV-S250, PV-400A, PV-400Plus, PV-450X, PV-S450, PV-750 and PV-750Plus.
There are three different ways of starting Quick Data Copy:
� Through the menu item 'Casio': 'Quick Data Copy' in the main PC sync program.� As a stand-alone application, "Quick Data Copy", in the program group "PC sync for
Windows"� Through an icon on the taskbar.
Note:During the installation of PC sync you will be asked whether you want to load QuickData Copy automatically whenever you start Windows.
Quick Data Copy is installed as an icon in the taskbar (see option �).
3.4.1 Quick Data Copy in the main program (option �)
Choose the menu item 'Casio': 'Quick Data Copy': 'Send' to send the text straight fromClipboard to the PV.
If the text is longer than 2,048 characters, it is automatically divided up into several memos.PC sync attempts to respect the ends of words, lines and sentences. The title is formedfrom the first ten characters.
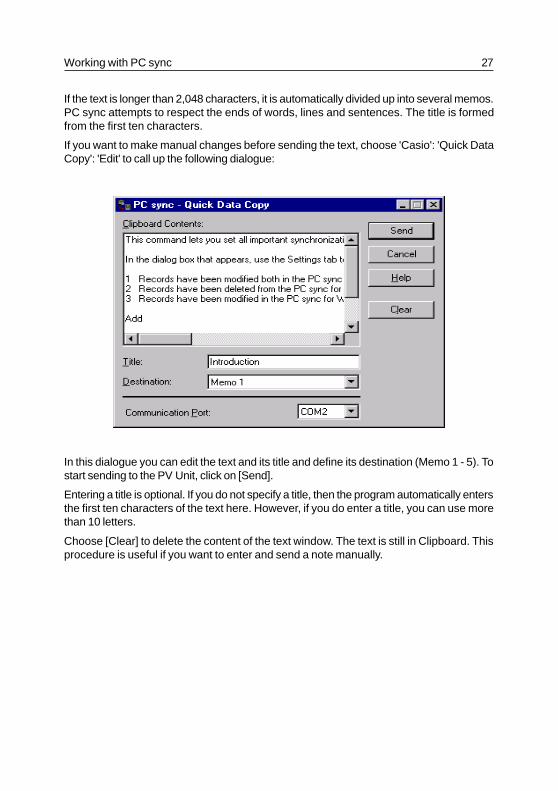
If you want to make manual changes before sending the text, choose 'Casio': 'Quick DataCopy': 'Edit' to call up the following dialogue:
In this dialogue you can edit the text and its title and define its destination (Memo 1 - 5). Tostart sending to the PV Unit, click on [Send].
Entering a title is optional. If you do not specify a title, then the program automatically entersthe first ten characters of the text here. However, if you do enter a title, you can use morethan 10 letters.
Choose [Clear] to delete the content of the text window. The text is still in Clipboard. Thisprocedure is useful if you want to enter and send a note manually.
Working with PC sync 27
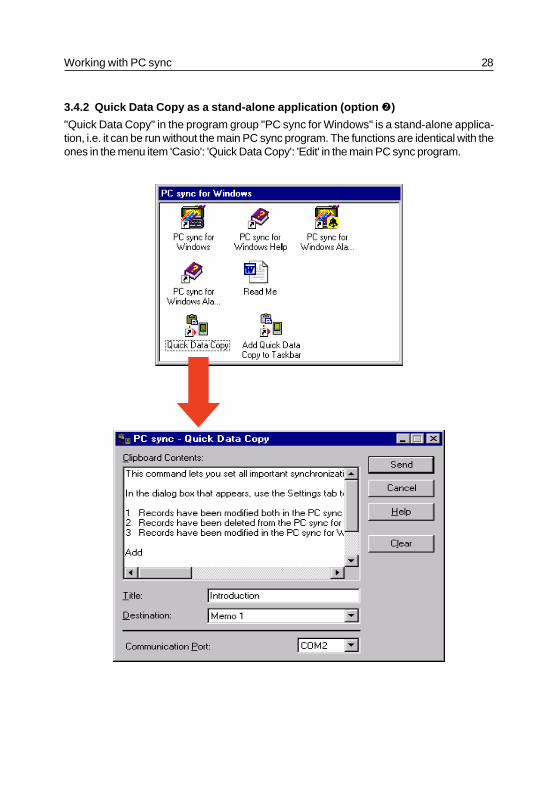
3.4.2 Quick Data Copy as a stand-alone application (option �)
"Quick Data Copy" in the program group "PC sync for Windows" is a stand-alone applica-tion, i.e. it can be run without the main PC sync program. The functions are identical with theones in the menu item 'Casio': 'Quick Data Copy': 'Edit' in the main PC sync program.
Working with PC sync 28
When you run Quick Data Copy for the first time, it automatically takes over your serial portsettings from the main PC sync program. However, you can change the setting any time youlike.
The separate program Quick Data Copy can also be executed while the main PC syncprogram is running.
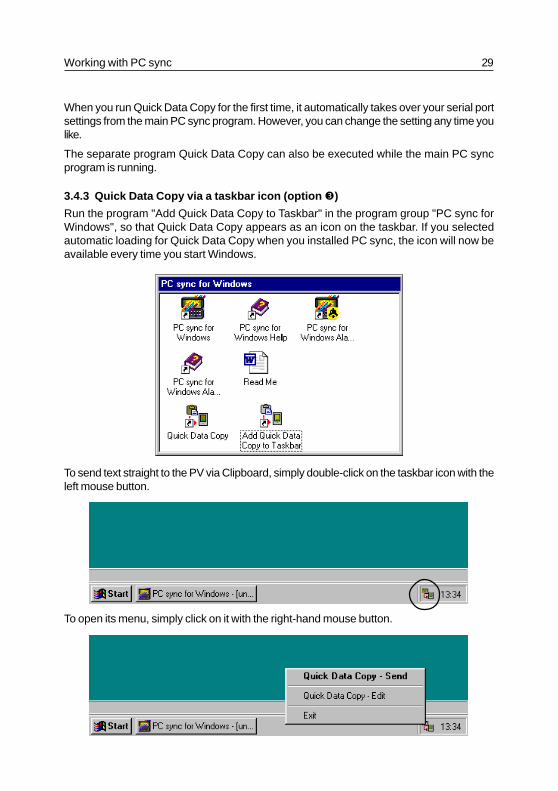
3.4.3 Quick Data Copy via a taskbar icon (option �)
Run the program "Add Quick Data Copy to Taskbar" in the program group "PC sync forWindows", so that Quick Data Copy appears as an icon on the taskbar. If you selectedautomatic loading for Quick Data Copy when you installed PC sync, the icon will now beavailable every time you start Windows.
To send text straight to the PV via Clipboard, simply double-click on the taskbar icon with theleft mouse button.
To open its menu, simply click on it with the right-hand mouse button.
Working with PC sync 29
The menu items have the same functions as in the menu 'Casio': 'Quick Data Copy' in themain PC sync program: 'Send' is for sending Clipboard text without any further queries, and'Edit' opens the dialogue window shown earlier.
Tip:Copy the program 'Add Quick Data Copy to Taskbar' or a shortcut to the 'StartUp' folder,so that the icon will be available every time you start Windows. To find out how this isdone, read the relevant section in your Windows user's manual.
This enables you to run Quick Data Copy with a system icon while the main PC syncprogram is running.
3.5 Complete backup and retrieval of data
The menu items 'Backup': 'Send' and 'Backup': 'Receive' enable you to transfer all the dataof your BN/PV Unit fast and efficiently to your PC, e.g. before changing batteries, and – ifnecessary – back to your BN/PV Unit.
To back up data, choose 'Backup': 'Receive' and press Start on the cradle (If you are usinga PV-200e unit, tap the PC sync icon in the lower left corner of its screen). All data is nowtransferred to your PC. After the transfer give the backup file a file name. To retrieve thedata, choose 'Backup': 'Send', select the relevant back-up file and press Start on the cradle(If you are using a PV-200e unit, tap the PC sync icon in the lower left corner of its screen).
Note:Backup files always have the extension *.bkp and cannot be edited, i.e. you cannotopen them with 'File': 'Open…'.
3.6 Receiving Data from other CASIO Digital Diaries
PC sync can only receive data from other Digital Diaries (Non-BN/PV Units) but not sendback.
Select 'Receive From Other Diary…' from the 'Casio' menu. A dialog box is presented,prompting you to choose the Source and Destination Digital Diary. Select the proper SourceDigital Diary in the left list and click on the [Transmission Setup…] button. A further dialogbox is presented, prompting you to specify the [Serial Port] to which the cable is connected.Next, select the setup for the Baud Rate , Parity and Word Length (i.e. bit length) that arerelevant to your Digital Diary. The default values given here are the ones which the DigitalDiary port would have after a RESET. Normally, you can leave this setup unchanged. Tocompare settings, we recommend that you open the transmission setup display on yourDigital Diary (cf. also Appendix C). Some models have a fixed Baud rate.
Note:It is extremely important that both units should have the same transmission setup.Otherwise, transmission may be faulty.
Working with PC sync 30
Choose [OK] to confirm your settings. Now select the Destination Digital Diary in the right list(this is the BN/PV Unit to which the data will be transferred finally) and click on [OK] . As wewant to transmit all the available database areas, click on the [All] button in the right-handsection of the dialog box. Under "Scope" select [All Items] , and under "Mode" [Append] .Before starting transmission on your PC with [OK], you need to prepare your Digital Diary forthe sending of all data. You can find the relevant key presses in Appendix C. To starttransmission, click on [OK] on your PC, followed by the appropriate on the Digital Diary.
Note:Always start transmission on the unit to which you intend to transmit. This is importantto avoid loss of data.
During reception a status box is displayed, telling you how far transmission has pro-gressed. To stop transmission on the PC, choose [Abort] , and on the Digital Diary either
or . If transmission is aborted on one unit, then the other unit automaticallystops, too. This behaviour may vary from one model to another.
Note:It is neccessary to use an optional interface-cable to connect other CASIO DigitalDiaries. The cradle included in the PC sync package can only be used with BN/PV Units– it will not fit into other CASIO Digital Diaries.
If you want to connect the CASIO Digital Diaries SF-5590SY, SF-5590SYE, SF-5790SY,SF-5790SYE, SF-5990SY, SF-5990SYE, SF-6500SY, SF-6700SY, SF-6900SY, SF-7100SY or SF-7200SY to PC sync, it is necessary to use an optional cable that comeswith CASIO FA-128.
Connection of any other CASIO Digital Diary model requires use of an optional SB-85cable or the cable that comes with the FA-127 package.
3.7 Loading data from CASIO FA-127 or FA-128
You can easily load FA-127 and FA-128 v1.0 files into PC sync. Simply select 'File', 'Open 'and select the relevant "twf" file in the dialog box. Click on [OK] . If the FA-127/128 file ispassword-protected, enter it now. As you load the FA-127/128 file, it is automaticallyconverted to an PC sync file. However, to do so, PC sync needs to know the BN/PV Unit forwhich these data items are intended. A dialog box is presented, prompting you to enter yourBN/PV Unit, whereupon the data is loaded and displayed.
Note, however, that when you save this new file, it will have the format of an PC sync fileand can no longer be read by FA-127/128. To keep your original FA-127/128 file intact,simply give the new file a different name. If you try to open an PC sync file in FA-127 or FA-128, an error message is presented.
Data items from the Business Card area are taken over in Business Contacts in PC sync. Ifareas are not available in PC sync (e.g. Free Files), they cannot be transferred. If at allpossible, you may therefore want to copy such data to a different area while you are still inFA-127.
Working with PC sync 31
Chapter 4 – How to Use On-line Help
The on-line help system will enable you to use the program more efficiently within a veryshort time. After reading this manual you will have learnt the most fundamental basics of theprogram. Stage two will be to extend your knowledge step by step with the on-line helpsystem as your most important source of information.Later, the help system will come in handy as a memory aid and reference tool for the variousprogram functions.
There are three different ways of calling up help:
• 'Help': 'Contents' gives you the Topic Overview. Simply select the required topic.• Press <F1> to obtain context-sensitive help (i.e. help which relates to a specific situa-
tion and your current screen structure). (NB: In the Editor and in the main window <F1>gives you the Topic Overview, unless a dialog box is open).
• If you are in the main window and no dialog box is open, you may wish to use direct helpon certain screen items. Call up 'Help': 'Direct Help' or press<Shift F1>, and the cursor turns into a question mark. Simply click on any screen itemthat requires an explanation.
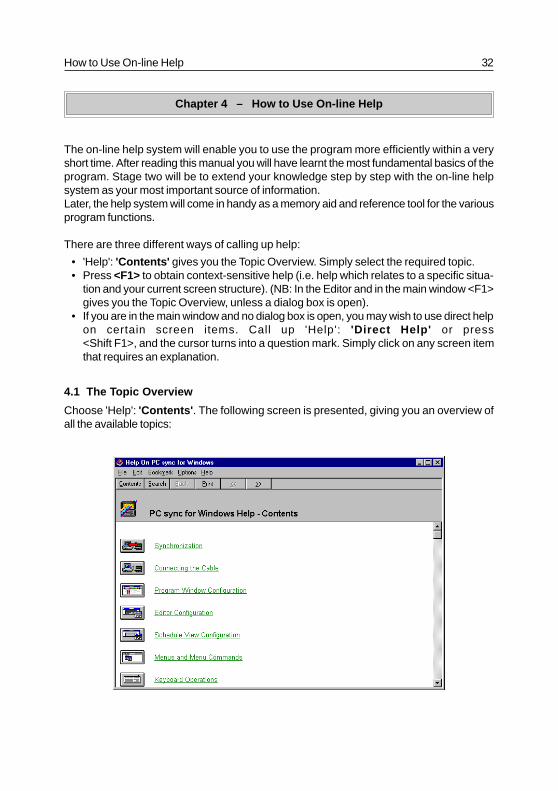
4.1 The Topic Overview
Choose 'Help': 'Contents' . The following screen is presented, giving you an overview ofall the available topics:
How to Use On-line Help 32
How to Use On-line Help 33
This overview is also accessible from the [Contents] button of the toolbar in the Helpwindow.
To choose a topic, click on the relevant picture with the mouse or press <Tab> followed by<Enter>. This opens up a list of subtopics. The text also contains key words with detailedhelp that can be viewed with a mouse click or <Tab> plus <Enter>. The key words areunderlined and in a different colour.
You can obtain a chapter overview on each topic by clicking on the icon to the left of thetitle, at the top. A submenu is presented. To get to any of the topics listed there, simply clickon the relevant item.
4.2 How to Find Certain Help Topics
If you want to find a specific help topic, you needn't go through the entire help system byhand. Simply choose 'Help': 'Contents' and then [Search] on the toolbar in the helpwindow. This calls up a search dialog where you can enter the required key word or selectit from a list.
4.3 Printing a Help Topic
To put the currently selected help topic on paper, simply choose 'File': 'Print Topic…' .
4.4 Quitting the Help System
The help window can be closed any time by choosing 'File': 'Exit' .
Appendix A – Keyboard Assignment
When we wrote the PC sync, we made sure that it conformed as much as possible withexisting Windows applications. Our keyboard assignment therefore follows standard Win-dows conventions. The following list shows all the control keys we have implemented.
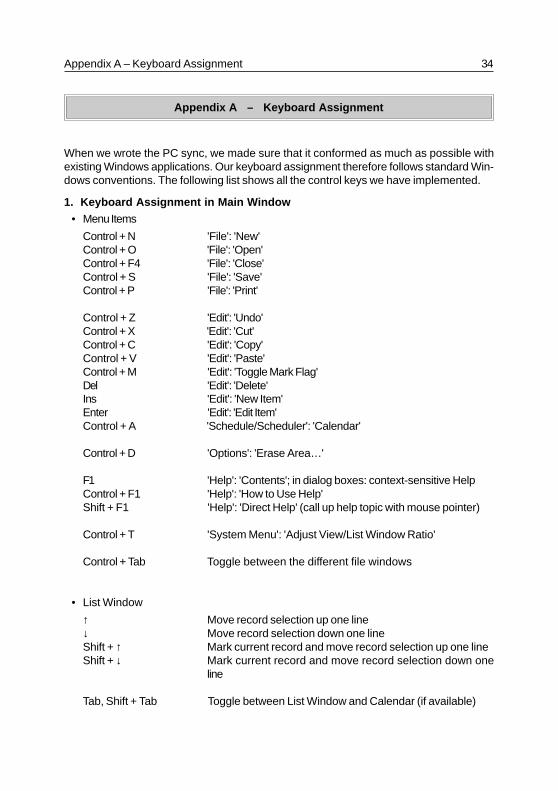
1. Keyboard Assignment in Main Window• Menu Items
Control + N 'File': 'New'Control + O 'File': 'Open'Control + F4 'File': 'Close'Control + S 'File': 'Save'Control + P 'File': 'Print'
Control + Z 'Edit': 'Undo'Control + X 'Edit': 'Cut'Control + C 'Edit': 'Copy'Control + V 'Edit': 'Paste'Control + M 'Edit': 'Toggle Mark Flag'Del 'Edit': 'Delete'Ins 'Edit': 'New Item'Enter 'Edit': 'Edit Item'Control + A 'Schedule/Scheduler': 'Calendar'
Control + D 'Options': 'Erase Area…'
F1 'Help': 'Contents'; in dialog boxes: context-sensitive HelpControl + F1 'Help': 'How to Use Help'Shift + F1 'Help': 'Direct Help' (call up help topic with mouse pointer)
Control + T 'System Menu': 'Adjust View/List Window Ratio'
Control + Tab Toggle between the different file windows
• List Window
↑ Move record selection up one line↓ Move record selection down one lineShift + ↑ Mark current record and move record selection up one lineShift + ↓ Mark current record and move record selection down one
line
Tab, Shift + Tab Toggle between List Window and Calendar (if available)
Appendix A – Keyboard Assignment 34
Appendix A – Keyboard Assignment 35
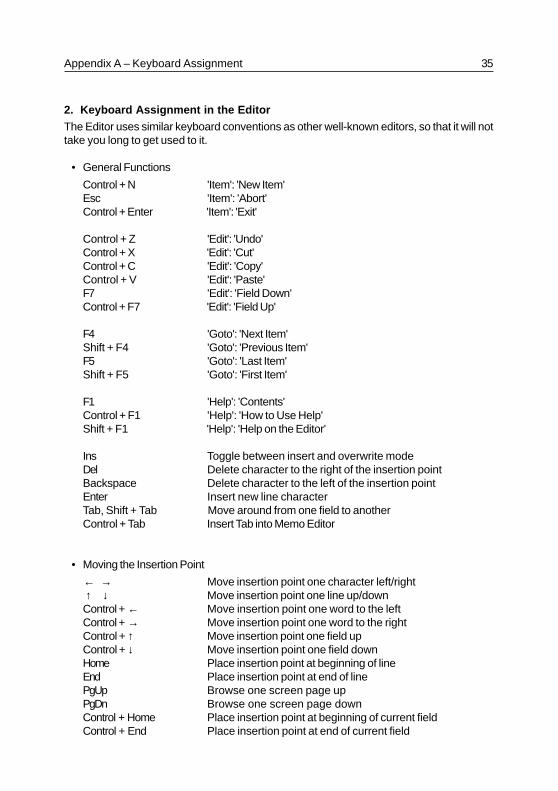
2. Keyboard Assignment in the EditorThe Editor uses similar keyboard conventions as other well-known editors, so that it will nottake you long to get used to it.
• General Functions
Control + N 'Item': 'New Item'Esc 'Item': 'Abort'Control + Enter 'Item': 'Exit'
Control + Z 'Edit': 'Undo'Control + X 'Edit': 'Cut'Control + C 'Edit': 'Copy'Control + V 'Edit': 'Paste'F7 'Edit': 'Field Down'Control + F7 'Edit': 'Field Up'
F4 'Goto': 'Next Item'Shift + F4 'Goto': 'Previous Item'F5 'Goto': 'Last Item'Shift + F5 'Goto': 'First Item'
F1 'Help': 'Contents'Control + F1 'Help': 'How to Use Help'Shift + F1 'Help': 'Help on the Editor'
Ins Toggle between insert and overwrite modeDel Delete character to the right of the insertion pointBackspace Delete character to the left of the insertion pointEnter Insert new line characterTab, Shift + Tab Move around from one field to anotherControl + Tab Insert Tab into Memo Editor
• Moving the Insertion Point
← → Move insertion point one character left/right↑ ↓ Move insertion point one line up/downControl + ← Move insertion point one word to the leftControl + → Move insertion point one word to the rightControl + ↑ Move insertion point one field upControl + ↓ Move insertion point one field downHome Place insertion point at beginning of lineEnd Place insertion point at end of linePgUp Browse one screen page upPgDn Browse one screen page downControl + Home Place insertion point at beginning of current fieldControl + End Place insertion point at end of current field
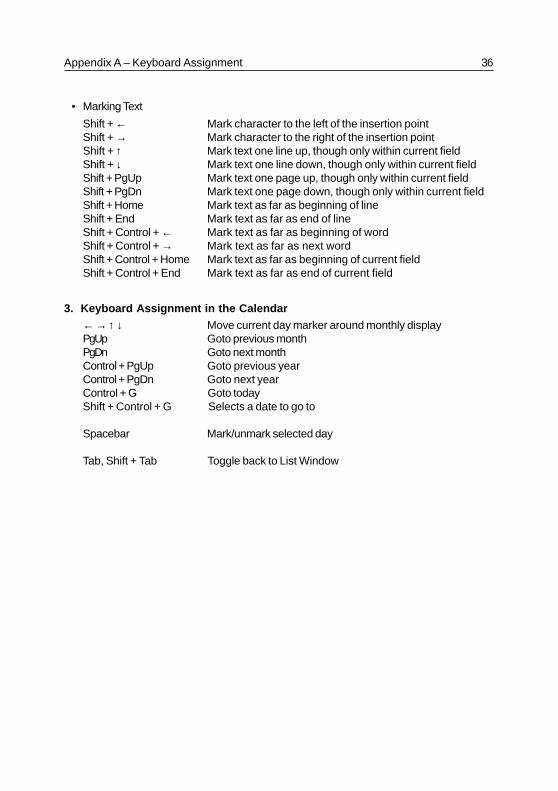
• Marking Text
Shift + ← Mark character to the left of the insertion pointShift + → Mark character to the right of the insertion pointShift + ↑ Mark text one line up, though only within current fieldShift + ↓ Mark text one line down, though only within current fieldShift + PgUp Mark text one page up, though only within current fieldShift + PgDn Mark text one page down, though only within current fieldShift + Home Mark text as far as beginning of lineShift + End Mark text as far as end of lineShift + Control + ← Mark text as far as beginning of wordShift + Control + → Mark text as far as next wordShift + Control + Home Mark text as far as beginning of current fieldShift + Control + End Mark text as far as end of current field
3. Keyboard Assignment in the Calendar← → ↑ ↓ Move current day marker around monthly displayPgUp Goto previous monthPgDn Goto next monthControl + PgUp Goto previous yearControl + PgDn Goto next yearControl + G Goto todayShift + Control + G Selects a date to go to
Spacebar Mark/unmark selected day
Tab, Shift + Tab Toggle back to List Window
Appendix A – Keyboard Assignment 36
Appendix B – The Toolbars
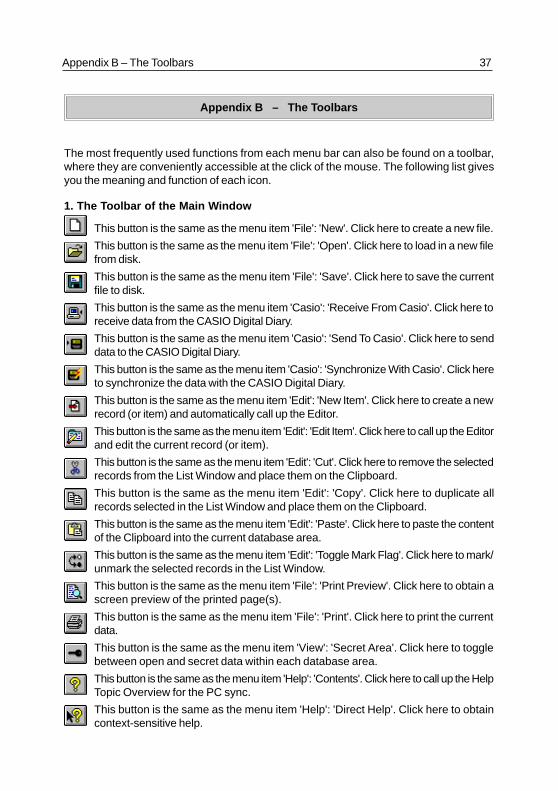
The most frequently used functions from each menu bar can also be found on a toolbar,where they are conveniently accessible at the click of the mouse. The following list givesyou the meaning and function of each icon.
1. The Toolbar of the Main Window
This button is the same as the menu item 'File': 'New'. Click here to create a new file.
This button is the same as the menu item 'File': 'Open'. Click here to load in a new filefrom disk.
This button is the same as the menu item 'File': 'Save'. Click here to save the currentfile to disk.
This button is the same as the menu item 'Casio': 'Receive From Casio'. Click here toreceive data from the CASIO Digital Diary.
This button is the same as the menu item 'Casio': 'Send To Casio'. Click here to senddata to the CASIO Digital Diary.
This button is the same as the menu item 'Casio': 'Synchronize With Casio'. Click hereto synchronize the data with the CASIO Digital Diary.
This button is the same as the menu item 'Edit': 'New Item'. Click here to create a newrecord (or item) and automatically call up the Editor.
This button is the same as the menu item 'Edit': 'Edit Item'. Click here to call up the Editorand edit the current record (or item).
This button is the same as the menu item 'Edit': 'Cut'. Click here to remove the selectedrecords from the List Window and place them on the Clipboard.
This button is the same as the menu item 'Edit': 'Copy'. Click here to duplicate allrecords selected in the List Window and place them on the Clipboard.
This button is the same as the menu item 'Edit': 'Paste'. Click here to paste the contentof the Clipboard into the current database area.
This button is the same as the menu item 'Edit': 'Toggle Mark Flag'. Click here to mark/unmark the selected records in the List Window.
This button is the same as the menu item 'File': 'Print Preview'. Click here to obtain ascreen preview of the printed page(s).
This button is the same as the menu item 'File': 'Print'. Click here to print the currentdata.
This button is the same as the menu item 'View': 'Secret Area'. Click here to togglebetween open and secret data within each database area.
This button is the same as the menu item 'Help': 'Contents'. Click here to call up the HelpTopic Overview for the PC sync.
This button is the same as the menu item 'Help': 'Direct Help'. Click here to obtaincontext-sensitive help.
Appendix B – The Toolbars 37
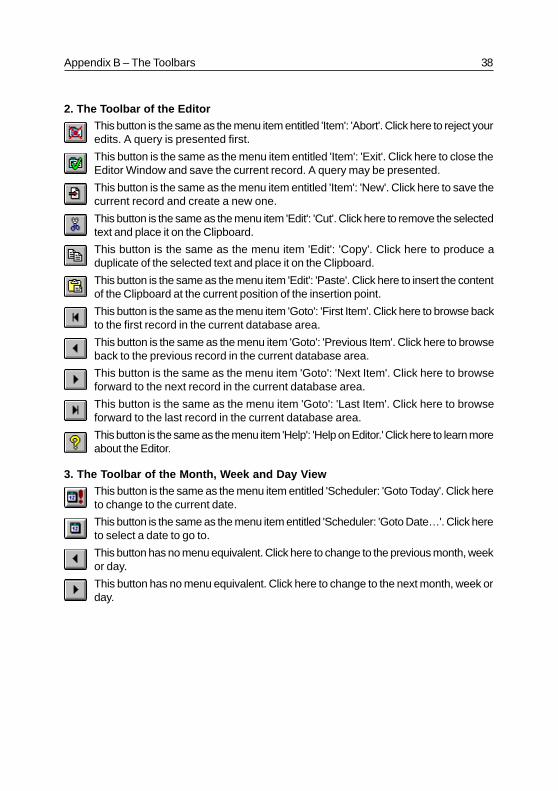
2. The Toolbar of the EditorThis button is the same as the menu item entitled 'Item': 'Abort'. Click here to reject youredits. A query is presented first.
This button is the same as the menu item entitled 'Item': 'Exit'. Click here to close theEditor Window and save the current record. A query may be presented.
This button is the same as the menu item entitled 'Item': 'New'. Click here to save thecurrent record and create a new one.
This button is the same as the menu item 'Edit': 'Cut'. Click here to remove the selectedtext and place it on the Clipboard.
This button is the same as the menu item 'Edit': 'Copy'. Click here to produce aduplicate of the selected text and place it on the Clipboard.
This button is the same as the menu item 'Edit': 'Paste'. Click here to insert the contentof the Clipboard at the current position of the insertion point.
This button is the same as the menu item 'Goto': 'First Item'. Click here to browse backto the first record in the current database area.
This button is the same as the menu item 'Goto': 'Previous Item'. Click here to browseback to the previous record in the current database area.
This button is the same as the menu item 'Goto': 'Next Item'. Click here to browseforward to the next record in the current database area.
This button is the same as the menu item 'Goto': 'Last Item'. Click here to browseforward to the last record in the current database area.
This button is the same as the menu item 'Help': 'Help on Editor.' Click here to learn moreabout the Editor.
3. The Toolbar of the Month, Week and Day ViewThis button is the same as the menu item entitled 'Scheduler: 'Goto Today'. Click hereto change to the current date.
This button is the same as the menu item entitled 'Scheduler: 'Goto Date…'. Click hereto select a date to go to.
This button has no menu equivalent. Click here to change to the previous month, weekor day.
This button has no menu equivalent. Click here to change to the next month, week orday.
Appendix B – The Toolbars 38
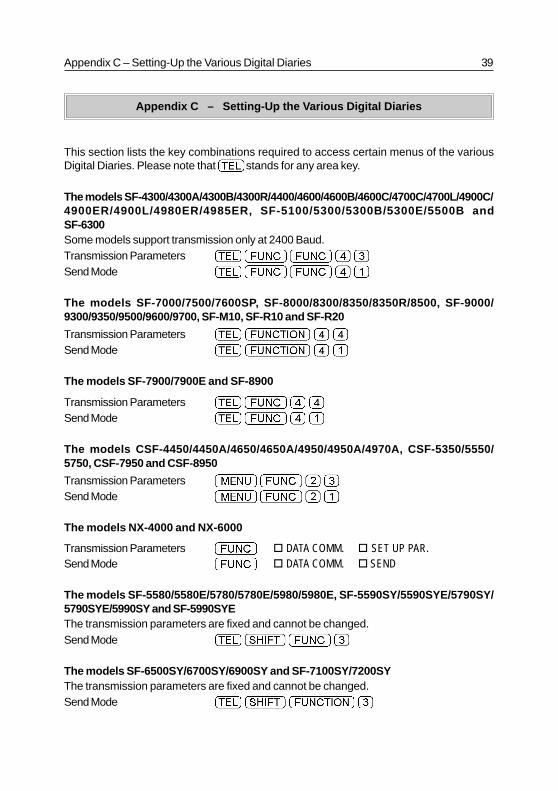
Appendix C – Setting-Up the Various Digital Diaries
This section lists the key combinations required to access certain menus of the variousDigital Diaries. Please note that stands for any area key.
The models SF-4300/4300A/4300B/4300R/4400/4600/4600B/4600C/4700C/4700L/4900C/4900ER/4900L/4980ER/4985ER, SF-5100/5300/5300B/5300E/5500B andSF-6300Some models support transmission only at 2400 Baud.Transmission Parameters Send Mode
The models SF-7000/7500/7600SP, SF-8000/8300/8350/8350R/8500, SF-9000/9300/9350/9500/9600/9700, SF-M10, SF-R10 and SF-R20
Transmission Parameters Send Mode
The models SF-7900/7900E and SF-8900
Transmission Parameters Send Mode
The models CSF-4450/4450A/4650/4650A/4950/4950A/4970A, CSF-5350/5550/5750, CSF-7950 and CSF-8950
Transmission Parameters Send Mode
The models NX-4000 and NX-6000
Transmission Parameters o DATA COMM. o SET UP PAR.Send Mode o DATA COMM. o SEND
The models SF-5580/5580E/5780/5780E/5980/5980E, SF-5590SY/5590SYE/5790SY/5790SYE/5990SY and SF-5990SYEThe transmission parameters are fixed and cannot be changed.Send Mode
The models SF-6500SY/6700SY/6900SY and SF-7100SY/7200SYThe transmission parameters are fixed and cannot be changed.Send Mode
Appendix C – Setting-Up the Various Digital Diaries 39
Important Notes
We strongly recommend making several copies of all important data, preferably also in theform of print-outs, and to store these in different places. Under certain conditions data canbe lost or changed in virtually any transmission cable and on nearly all electronic storagemedia.
CASIO COMPUTER CO., LTD. shall not be held liable for any damage to components, machineryor data due to errors in the User's Guide or in any defects in interface cables or diskssupplied with this product, except to the extend required by warranty laws.
All hardware and software is subject to change without notice.
CASIO COMPUTER CO., LTD. makes no guarantee as to the ability of this product to operateon any particular computer or system configuration, other than those expressly specified.This limitation applies in particular to emulators of all types.
All names and other data used examples are purely fictitious.
Product names mentioned in the User’s Guide and on-line help may be the trademarks oftheir respective owners. Use of any corporate or product name in the User’s Guide or thison-line help should not be regarded as affecting the validity of any trademark or servicemark.
Beware:Opening up or taking apart the cradle immediately voids your warranty and our eligibilityfor future updates. The cradle cannot be purchased separately.
Important Notes 40