Embed Size (px)
Citation preview

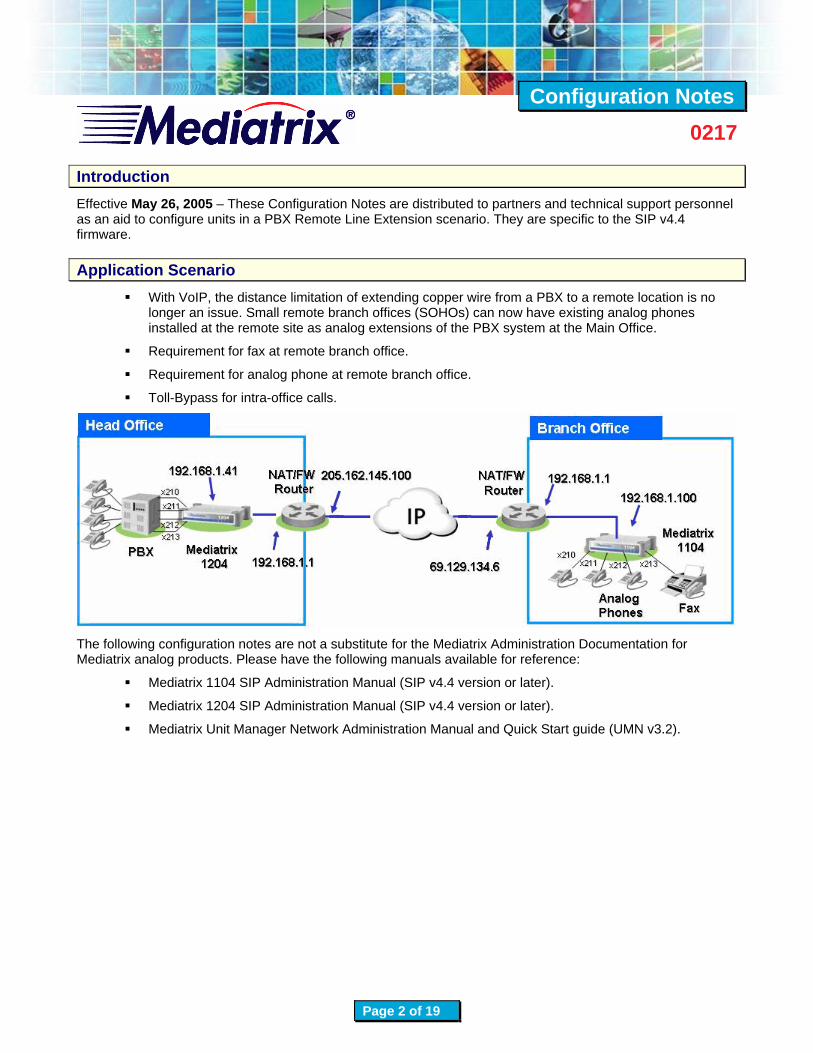
Configuration Notes 0217
Page 1 of 19
PPBBXX RReemmoottee LLiinnee EExxtteennssiioonn uussiinngg MMeeddiiaattrriixx 11110044 aanndd 11220044
Introduction .......................................................................................................................................................... 2 Application Scenario ............................................................................................................................................ 2 Running the Unit Manager Network (UMN) Software ......................................................................................... 3 Configuring the Mediatrix 1104............................................................................................................................ 6 Configuring the Mediatrix 1204.......................................................................................................................... 11 Appendix A – Troubleshooting Tips................................................................................................................... 19
Configuration Notes 0217
Page 2 of 19
Introduction Effective May 26, 2005 – These Configuration Notes are distributed to partners and technical support personnel as an aid to configure units in a PBX Remote Line Extension scenario. They are specific to the SIP v4.4 firmware.
Application Scenario With VoIP, the distance limitation of extending copper wire from a PBX to a remote location is no
longer an issue. Small remote branch offices (SOHOs) can now have existing analog phones installed at the remote site as analog extensions of the PBX system at the Main Office.
Requirement for fax at remote branch office.
Requirement for analog phone at remote branch office.
Toll-Bypass for intra-office calls.
The following configuration notes are not a substitute for the Mediatrix Administration Documentation for Mediatrix analog products. Please have the following manuals available for reference:
Mediatrix 1104 SIP Administration Manual (SIP v4.4 version or later).
Mediatrix 1204 SIP Administration Manual (SIP v4.4 version or later).
Mediatrix Unit Manager Network Administration Manual and Quick Start guide (UMN v3.2).
Configuration Notes 0217
Page 3 of 19
Running the Unit Manager Network (UMN) Software The Unit Manager Network software is a configuration and management tool for Mediatrix devices. The UMN is provided on the CD included with the unit. It has a default 3-units limit upon installation. This will suffice for most configurations.
It is recommended that the administrator uses the UMN to configure the Mediatrix devices. Please refer to the UMN Quick Start guide for the installation of the software. Once the UMN software has been installed on your PC1, proceed with the following steps.
Step 1: Start the UMN Select from the Start Menu > Programs > Unit Manager Network 3.2 > Administrator.
Step 2: Login to the UMN In the Administrator login window (Connect to Unit Manager), the IP address 127.0.0.1 is a
loopback address that refers to the local PC to which the UMN is connecting. A User Name and Password are not required. Click OK to proceed.
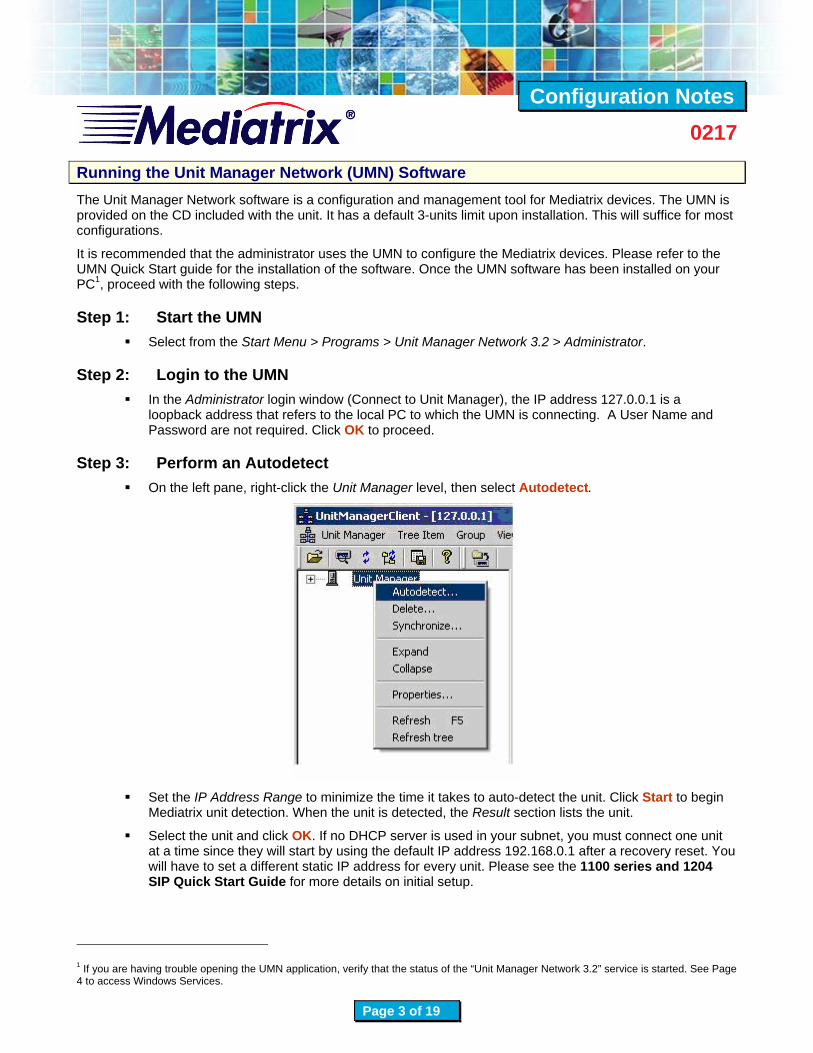
Step 3: Perform an Autodetect On the left pane, right-click the Unit Manager level, then select Autodetect.
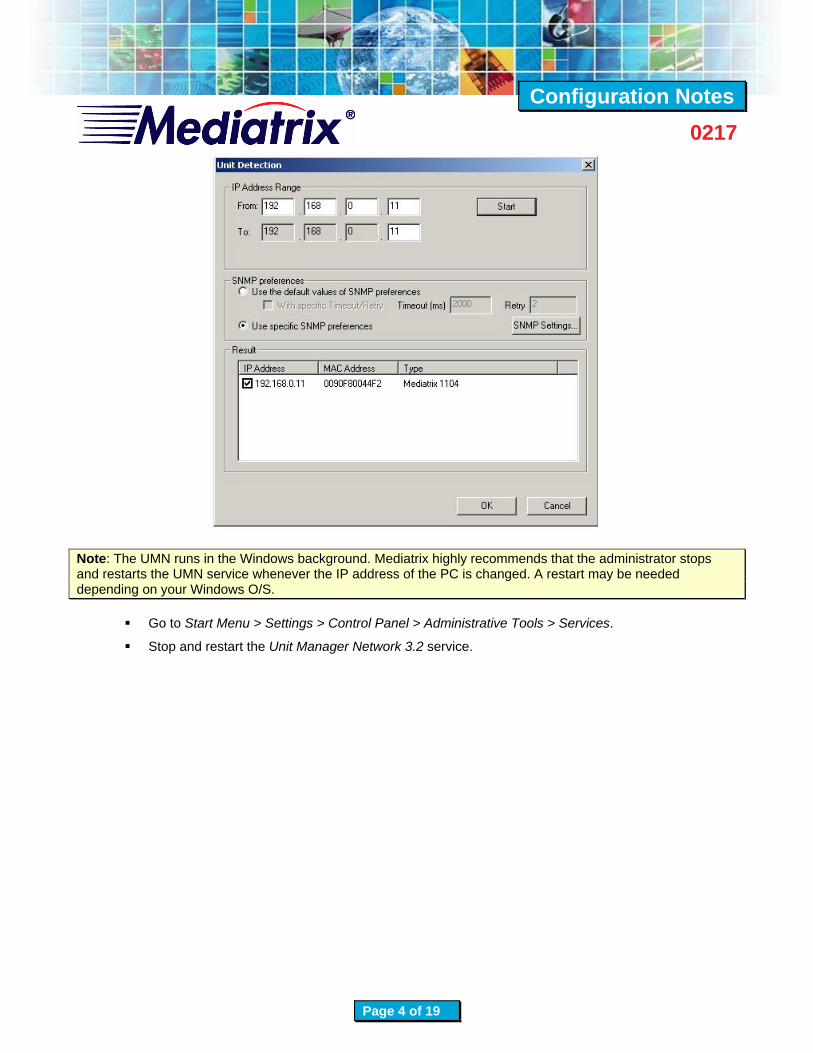
Set the IP Address Range to minimize the time it takes to auto-detect the unit. Click Start to begin
Mediatrix unit detection. When the unit is detected, the Result section lists the unit.
Select the unit and click OK. If no DHCP server is used in your subnet, you must connect one unit at a time since they will start by using the default IP address 192.168.0.1 after a recovery reset. You will have to set a different static IP address for every unit. Please see the 1100 series and 1204 SIP Quick Start Guide for more details on initial setup.
1 If you are having trouble opening the UMN application, verify that the status of the “Unit Manager Network 3.2” service is started. See Page 4 to access Windows Services.
Configuration Notes 0217
Page 4 of 19
Note: The UMN runs in the Windows background. Mediatrix highly recommends that the administrator stops and restarts the UMN service whenever the IP address of the PC is changed. A restart may be needed depending on your Windows O/S.
Go to Start Menu > Settings > Control Panel > Administrative Tools > Services.
Stop and restart the Unit Manager Network 3.2 service.

Configuration Notes 0217
Page 5 of 19
Alternatively, you can configure multiple IP addresses on the same PC network interface card (only in static IP mode – not DHCP) to avoid restarting the computer or stopping and restarting the UMN service whenever you change the IP address and subnet of the Mediatrix unit. This is recommended for advanced IP network users, the current configuration notes do not cover the step by step setting for this alternative.
Configuration Notes 0217
Page 6 of 19
Configuring the Mediatrix 1104
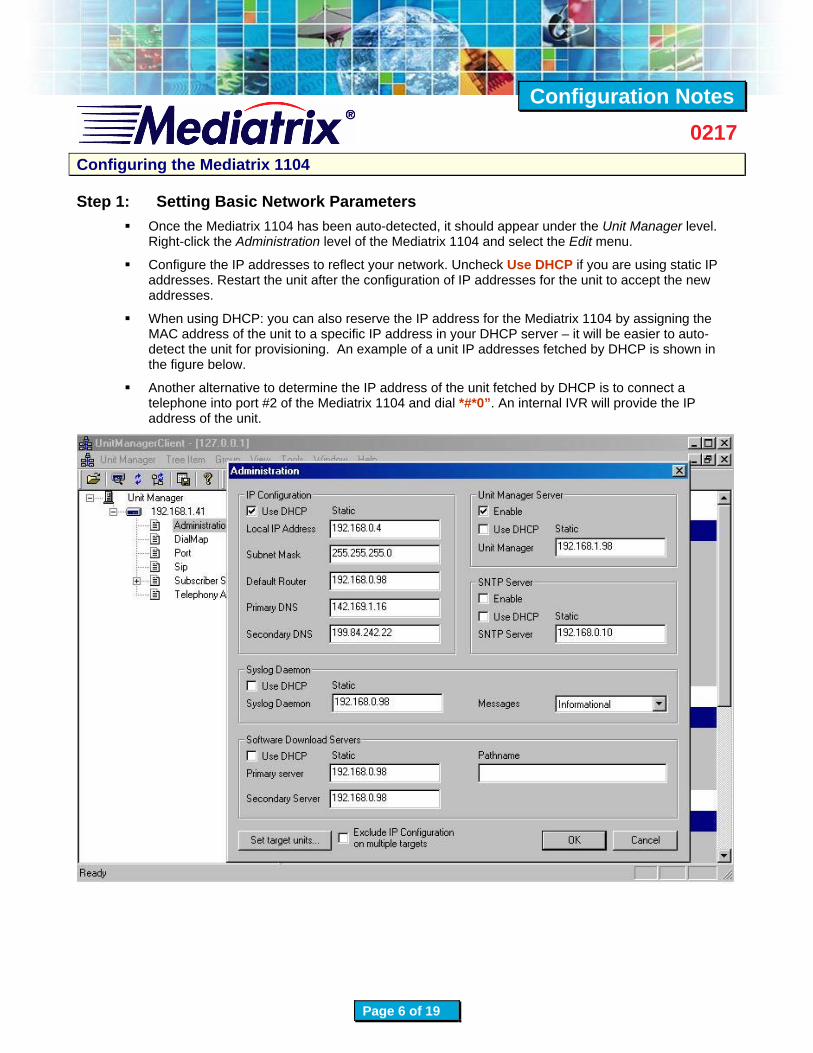
Step 1: Setting Basic Network Parameters Once the Mediatrix 1104 has been auto-detected, it should appear under the Unit Manager level.
Right-click the Administration level of the Mediatrix 1104 and select the Edit menu.
Configure the IP addresses to reflect your network. Uncheck Use DHCP if you are using static IP addresses. Restart the unit after the configuration of IP addresses for the unit to accept the new addresses.
When using DHCP: you can also reserve the IP address for the Mediatrix 1104 by assigning the MAC address of the unit to a specific IP address in your DHCP server – it will be easier to auto-detect the unit for provisioning. An example of a unit IP addresses fetched by DHCP is shown in the figure below.
Another alternative to determine the IP address of the unit fetched by DHCP is to connect a telephone into port #2 of the Mediatrix 1104 and dial *#*0”. An internal IVR will provide the IP address of the unit.
Configuration Notes 0217
Page 7 of 19
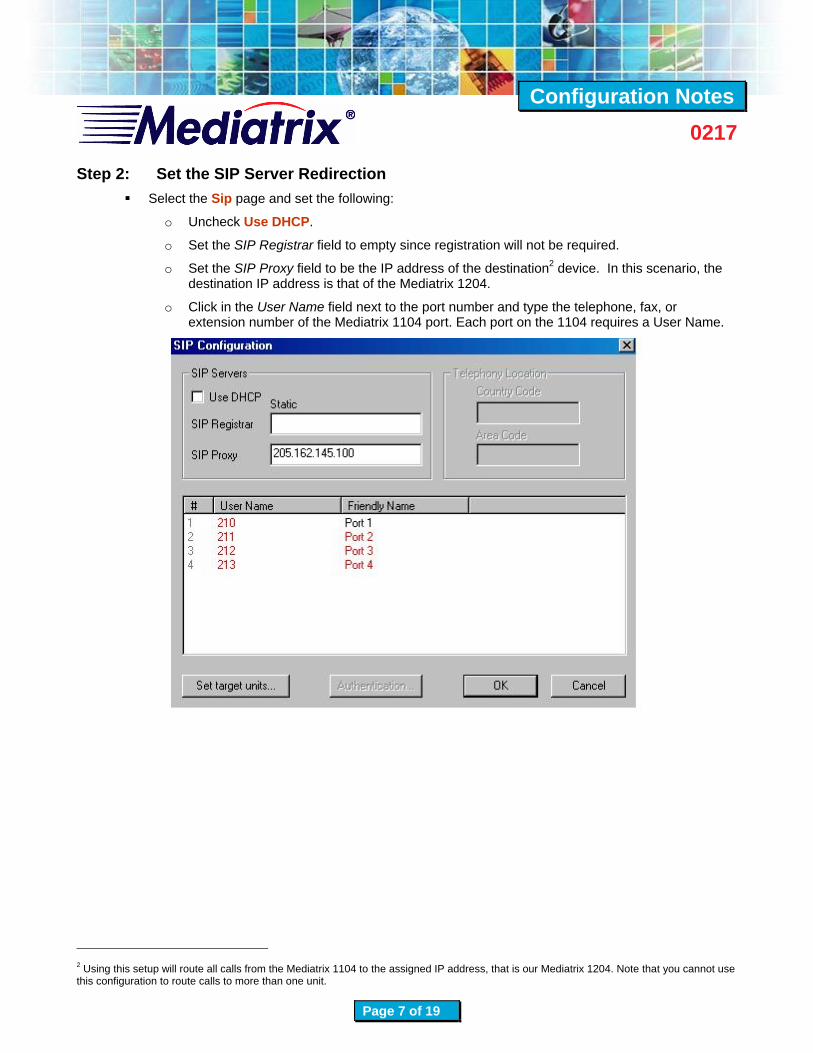
Step 2: Set the SIP Server Redirection Select the Sip page and set the following:
o Uncheck Use DHCP.
o Set the SIP Registrar field to empty since registration will not be required.
o Set the SIP Proxy field to be the IP address of the destination2 device. In this scenario, the destination IP address is that of the Mediatrix 1204.
o Click in the User Name field next to the port number and type the telephone, fax, or extension number of the Mediatrix 1104 port. Each port on the 1104 requires a User Name.
2 Using this setup will route all calls from the Mediatrix 1104 to the assigned IP address, that is our Mediatrix 1204. Note that you cannot use this configuration to route calls to more than one unit.

Configuration Notes 0217
Page 8 of 19
Step 3: Access the Edit SNMP Window Right-click the unit and select Edit SNMP.
Step 4: Set the Port Behaviour On the top menu bar, check the option Automatic GET.
Go to iso>org>dod>internet>private>enterprises>mediatrix > mediatrixExperimental > sipExperimentalMIB > sipExperimentalMIBObjects > sipUnregisteredPortBehavior.
Select the MIB leaf sipUnregisteredPortBehavior. Enable this parameter by selecting enableport from the drop down menu that appears upon double-clicking the value located in the upper-right pane.

Configuration Notes 0217
Page 9 of 19
Step 5: NAT Traversal Configuration In order for the Mediatrix unit to work behind a NAT/Firewall router, the following parameters need
to be configured:
o Go to mediatrix > mediatrixExperimental > sipExperimentalMIB > sipExperimentalMIBObjects > sipNatCustom > sipNatCustomEnable and enable this parameter.
o Go to mediatrix > mediatrixExperimental > sipExperimentalMIB > sipExperimentalMIBObjects > sipNatCustom > sipNatCustomPublicAddress and set the parameter to be the public IP address of the NAT/Firewall router where the Mediatrix 1104 is located. In this scenario, the IP address would be 69.129.134.6 as shown in the following figure.

Configuration Notes 0217
Page 10 of 19
Step 6: Configure Traffic Routing to the Mediatrix Unit To allow traffic from the NAT/Firewall router to be routed to the Mediatrix unit, there are two
alternatives:
o Option1 – Configure the NAT/Firewall router’s DMZ (demilitarized zone) in order to include the Mediatrix unit. Please refer to the documentation provided with your NAT/Firewall router for configuration details.
o Option 2 – Enable the port forwarding on the NAT/Firewall router. The following ports should be forwarded to the IP address of the Mediatrix unit behind the NAT/Firewall:
UDP 5060 for SIP Signaling
UDP 5004 to 5010 for Voice RTP streams
UDP 161 (optional for management of unit via UMN-SNMP)

Configuration Notes 0217
Page 11 of 19
Configuring the Mediatrix 1204
Step 1: Autodetect the Mediatrix 1204 Autodetect the Mediatrix 1204 after a recovery reset (in a recovery reset, the unit restarts with the
address 192.168.0.1) and configure the IP addresses to reflect your network parameters.
Uncheck Use DHCP if you are using static IP addresses. An example is shown in the following figure.
Restart the unit after the configuration of IP addresses for the unit to accept the new addresses.
When using DHCP, you can reserve the IP address for the Mediatrix 1204 by assigning the MAC address of the unit to a specific IP address in your DHCP server – it will be easier to auto-detect the unit for provisioning.

Configuration Notes 0217
Page 12 of 19
Step 2: Configure SIP Parameters Select the Sip page of the 1204 and set the following:
o Uncheck Use DHCP.
o Set the SIP Proxy field to be the IP address of the destination devices, the Mediatrix 1104 IP address in this case.
o Use default values for the other entries.
Configuration Notes 0217
Page 13 of 19
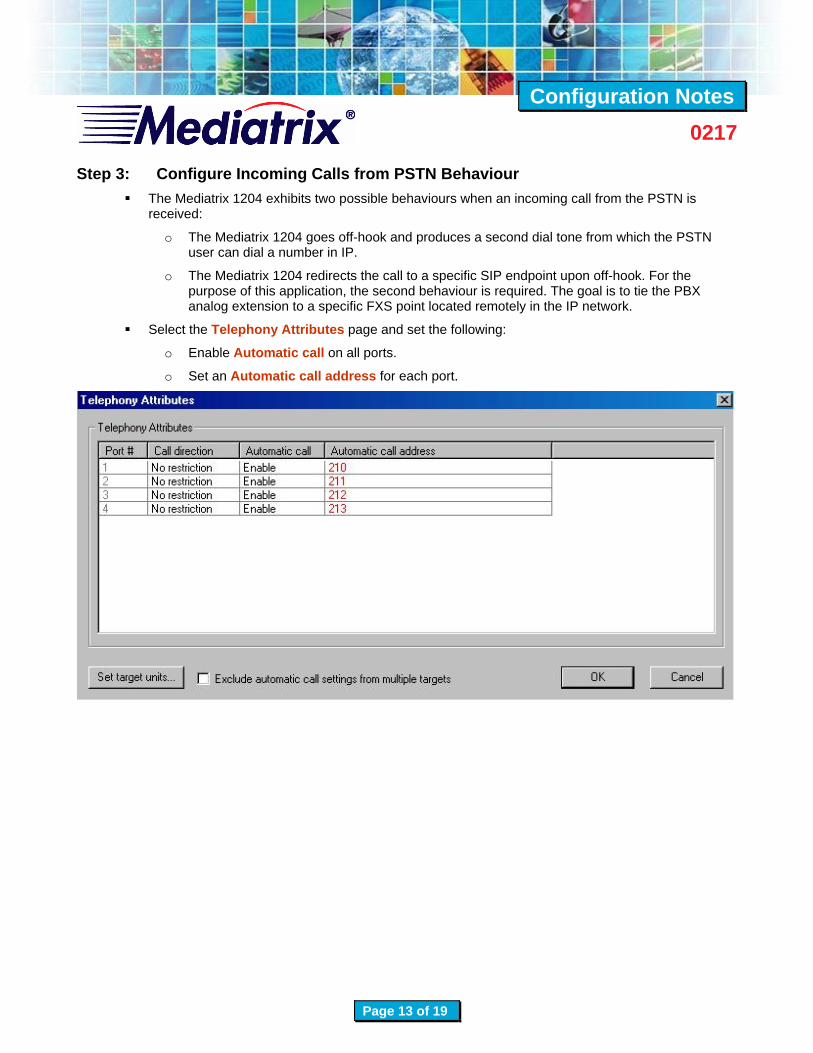
Step 3: Configure Incoming Calls from PSTN Behaviour The Mediatrix 1204 exhibits two possible behaviours when an incoming call from the PSTN is
received:
o The Mediatrix 1204 goes off-hook and produces a second dial tone from which the PSTN user can dial a number in IP.
o The Mediatrix 1204 redirects the call to a specific SIP endpoint upon off-hook. For the purpose of this application, the second behaviour is required. The goal is to tie the PBX analog extension to a specific FXS point located remotely in the IP network.
Select the Telephony Attributes page and set the following:
o Enable Automatic call on all ports.
o Set an Automatic call address for each port.

Configuration Notes 0217
Page 14 of 19
Step 4: NAT Traversal Configuration In order for the Mediatrix unit to work behind a NAT/Firewall router, the following parameters need
to be configured:
o Go to mediatrix > mediatrixExperimental > sipExperimentalMIB > sipExperimentalMIBObjects > sipNatCustom > sipNatCustomEnable and enable this parameter.
o Go to mediatrix > mediatrixExperimental > sipExperimentalMIB > sipExperimentalMIBObjects > sipNatCustom > sipNatCustomPublicAddress and set the parameter to be the public IP address of the NAT/Firewall router where the 1204 is located.
Step 5: Configure Traffic Routing to the Mediatrix Unit To allow traffic from the NAT/Firewall router to be routed to the Mediatrix unit, there are two
alternatives:
o Option1 – Configure the NAT/Firewall router’s DMZ (demilitarized zone) in order to include the Mediatrix unit. Please refer to the documentation provided with your NAT/Firewall router for configuration details.

Configuration Notes 0217
Page 15 of 19
o Option 2 – Enable the port forwarding on the NAT/Firewall router. The following ports should be forwarded to the IP address of the Mediatrix unit behind the NAT/Firewall:
UDP 5060 for SIP Signaling
UDP 5004 to 5010 for Voice RTP streams
UDP 161 (optional for management of unit via UMN-SNMP)
Step 6: Configure Dial Tone Detection The FXO dial tone detection mechanim allows the Mediatrix 1204 to wait for a dial tone on the
PSTN side before initiating the dialing sequence. If no dial tone is detected, the line is considered busy with an incoming PSTN call. This mechanism helps to avoid collisions between incoming and outgoing calls.
Under Edit SNMP, go to mediatrix > mediatrixConfig > fxoMIB > fxoMIBObjects > fxoLinePropertiesCustomization > fxoDialtoneDetectionMode and set this parameter to countryTone.
Note: Certain PBX manufacturers do not produce the country dial tone on the extension line. If this is the case, make sure that the dial tone detection is disabled, otherwise the Mediatrix 1204 will not output dialed digits.

Configuration Notes 0217
Page 16 of 19
Step 7: Configure the Answering Delay Under Edit SNMP, go to mediatrix > mediatrixConfig > fxoMIB > fxoMIBObjects >
fxoIfAnsweringDelayTable.
The parameter fxoAnsweronCallerIdDetection allows the Mediatrix 1204 to go off-hook upon caller
ID detection during the ringing of the PBX extension.
Note: If the PBX does not pass the caller ID to the Mediatrix 1204, you can reduce the <fxoPreAnswerDelay = 1000> to reduce the time before the Mediatrix 1204 goes off-hook upon ring detection.

Configuration Notes 0217
Page 17 of 19
Step 8: Configure the Line Selection Parameters Under Edit SNMP, go to mediatrix > mediatrixConfig > lineSelectionMIB > lineSelectionMIBObjects
> lineSelectionIfCustomizationTable:
o Set the lineSelectionEnable to enable.
o Set the lineSelectionDigitMap to the number corresponding to the Mediatrix 1104 FXS user name.
This feature enables the port-to-port mapping between the Mediatrix 1104 and Mediatrix 1204. Each port of the Mediatrix 1204 corresponds to a specific port of the Mediatrix 1104.
Configuration Notes 0217
Page 18 of 19
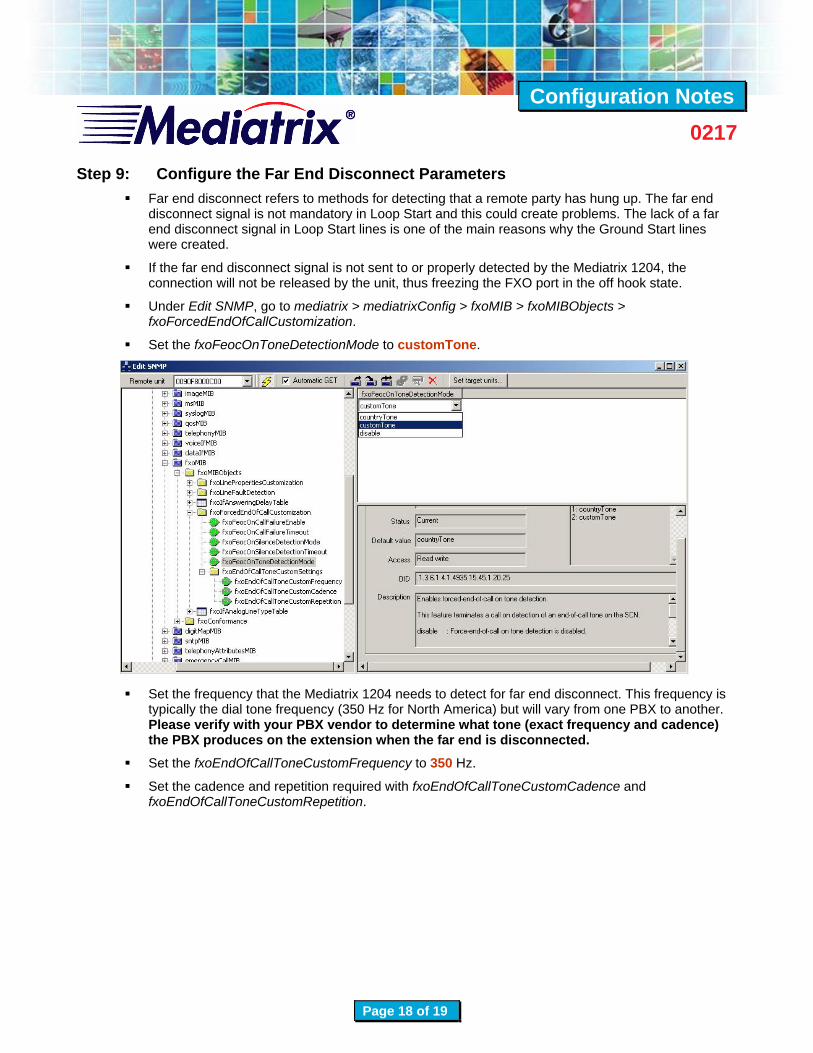
Step 9: Configure the Far End Disconnect Parameters Far end disconnect refers to methods for detecting that a remote party has hung up. The far end
disconnect signal is not mandatory in Loop Start and this could create problems. The lack of a far end disconnect signal in Loop Start lines is one of the main reasons why the Ground Start lines were created.
If the far end disconnect signal is not sent to or properly detected by the Mediatrix 1204, the connection will not be released by the unit, thus freezing the FXO port in the off hook state.
Under Edit SNMP, go to mediatrix > mediatrixConfig > fxoMIB > fxoMIBObjects > fxoForcedEndOfCallCustomization.
Set the fxoFeocOnToneDetectionMode to customTone.
Set the frequency that the Mediatrix 1204 needs to detect for far end disconnect. This frequency is
typically the dial tone frequency (350 Hz for North America) but will vary from one PBX to another. Please verify with your PBX vendor to determine what tone (exact frequency and cadence) the PBX produces on the extension when the far end is disconnected.
Set the fxoEndOfCallToneCustomFrequency to 350 Hz.
Set the cadence and repetition required with fxoEndOfCallToneCustomCadence and fxoEndOfCallToneCustomRepetition.

Configuration Notes 0217
Page 19 of 19
Step 10: Make a Call Connect an analog phone to a port of your Mediatrix 1104 device.
Pick up the phone, you should hear a dial tone.
Dial any valid extension number of your PBX. The dialed extension should ring.
Appendix A – Troubleshooting Tips 1. It is strongly recommended to disable the Call Waiting on the extension connected to the Mediatrix
1204. Call Waiting tone provided by the PBX to the Mediatrix 1204 may trigger the far end disconnect of your Mediatrix 1204 and drop the call.
2. Enabling Current Drop on your PBX extensions connected to the Mediatrix 1204 will improve the release line.
3. No dial tone on the Mediatrix 1104 when picking up the phone. Verify the configuration of your Mediatrix 1104 or your hardware connection on the Mediatrix 1104. The problem would reside on the Mediatrix 1104’s since it provides dial tone to its ports.
4. Cannot establish calls. Can you ping the Mediatrix 1204 from the Mediatrix 1104 and vice-versa?
5. Some ports of the Mediatrix 1204 cannot seize the PBX line.
a. PBX calibration may vary from one port to another.
b. Disable the Stutter dial tone played by the PBX to announce a voicemail message to the port connected on the Mediatrix 1204.