Embed Size (px)
Citation preview

© 2017 Icon Systems Inc.
Payroll Setup Guide

IconCMO Church Softwareby Icon Systems Inc.
All rights reserved. No parts of this work may be reproduced in any form or by any means - graphic, electronic, ormechanical, including photocopying, recording, taping, or information storage and retrieval systems - without thewritten permission of the publisher.
Products that are referred to in this document may be either trademarks and/or registered trademarks of therespective owners. The publisher and the author make no claim to these trademarks.
While every precaution has been taken in the preparation of this document, the publisher and the author assume noresponsibility for errors or omissions, or for damages resulting from the use of information contained in thisdocument or from the use of programs and source code that may accompany it. In no event shall the publisher andthe author be liable for any loss of profit or any other commercial damage caused or alleged to have been causeddirectly or indirectly by this document.
Printed: October 2017
Payroll Setup Guide
© 2017 Icon Systems Inc.
Publisher
Icon Systems, INC.1100 32nd Avenue SouthSuite GMoorhead, MN 56560
Sales:Phone: 1-800-596-4266Email: [email protected]
Support:Phone: 1-218-236-1899Email: [email protected] Site:https://www.iconcmo.com
Payroll Setup Guide4
© 2017 Icon Systems Inc.
Table of Contents
Part I PR Setup > PR Preferences 5
................................................................................................................................... 51 Paid Time Off Adjustments
................................................................................................................................... 62 Employee Status Codes
................................................................................................................................... 73 Payroll Expense Accounts
................................................................................................................................... 84 Payroll Liability Accounts
Part II PR Setup > Employees 10
................................................................................................................................... 101 Employee Information
................................................................................................................................... 112 Maintain Common Accounts and Employee Withholding
................................................................................................................................... 163 Rate Card Maintenance
Index 0
PR Setup > PR Preferences 5
© 2017 Icon Systems Inc.
1 PR Setup > PR Preferences
Note: Section 1 of this manual goes over one screen on the system called PR Preferences foundusing the following menu selection - . The followingsubsections ('Paid Time Off', 'Employee Status Codes', 'Payroll Expense Accounts', & 'PayrollLiability Accounts') are all entered on this one screen.
1.1 Paid Time Off Adjustments
'Paid Time Off Adjustments' Screen Section
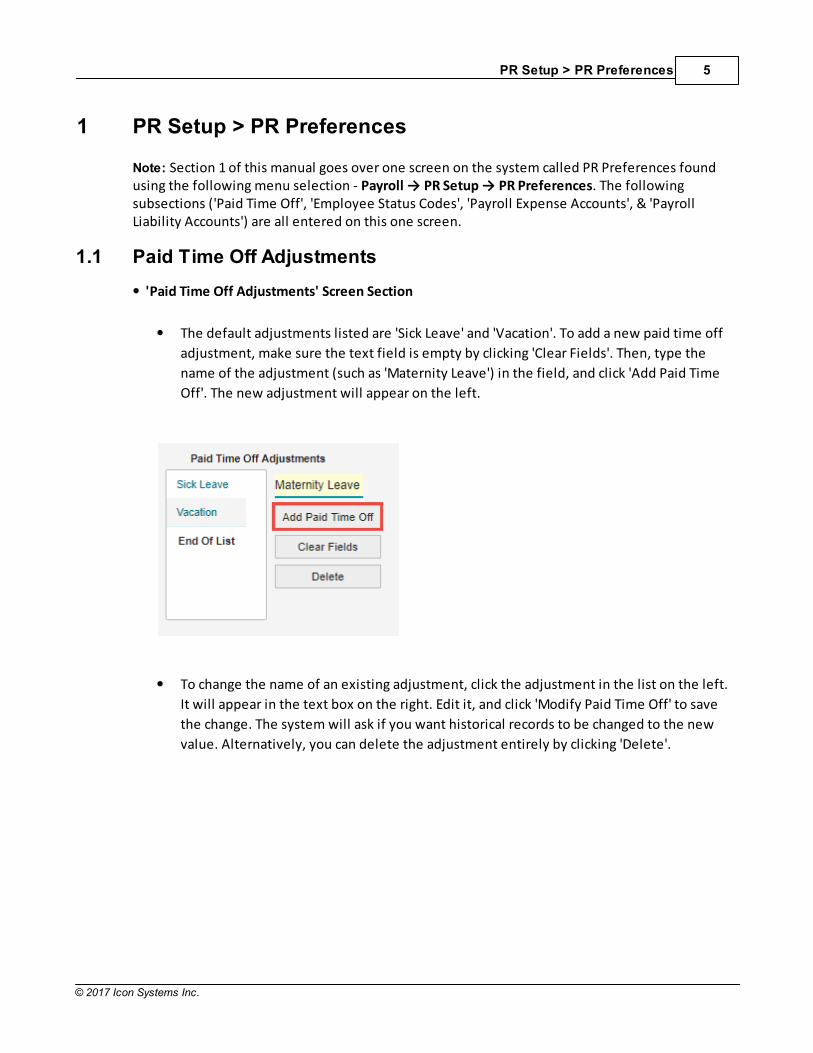
The default adjustments listed are 'Sick Leave' and 'Vacation'. To add a new paid time off
adjustment, make sure the text field is empty by clicking 'Clear Fields'. Then, type the
name of the adjustment (such as 'Maternity Leave') in the field, and click 'Add Paid Time
Off'. The new adjustment will appear on the left.
To change the name of an existing adjustment, click the adjustment in the list on the left.
It will appear in the text box on the right. Edit it, and click 'Modify Paid Time Off' to save
the change. The system will ask if you want historical records to be changed to the new
value. Alternatively, you can delete the adjustment entirely by clicking 'Delete'.
Payroll Setup Guide6
© 2017 Icon Systems Inc.
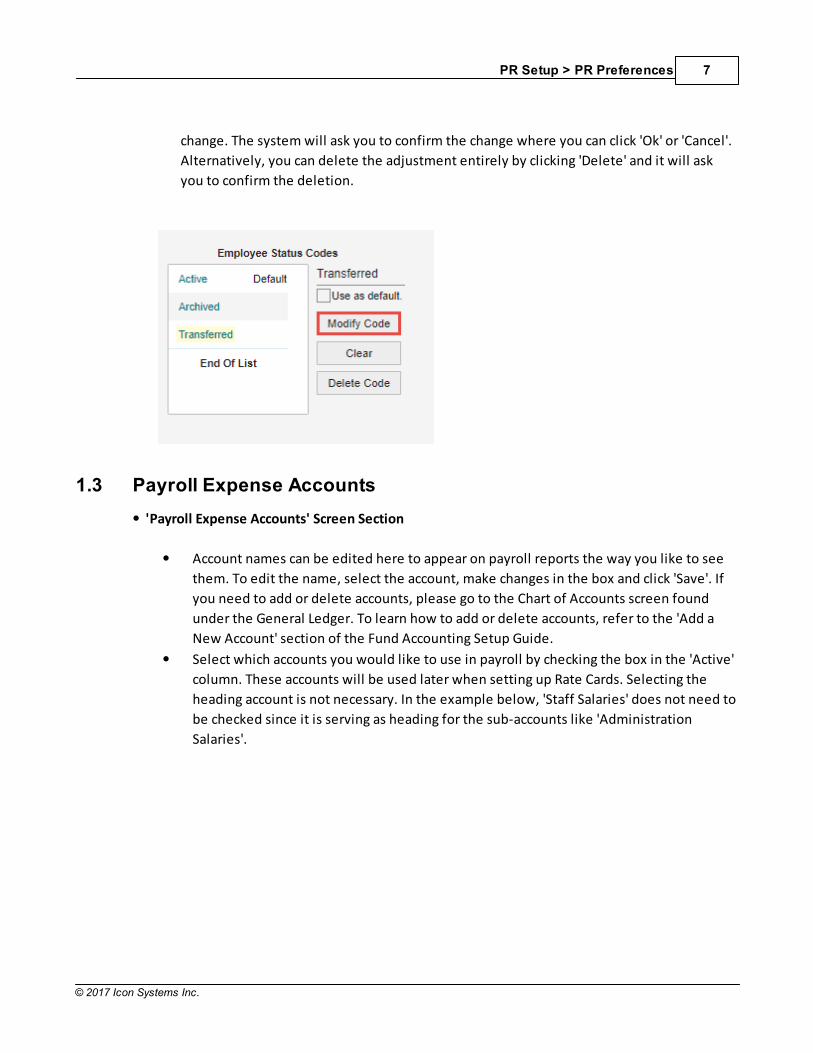
1.2 Employee Status Codes
'Employee Status Codes' Screen Section
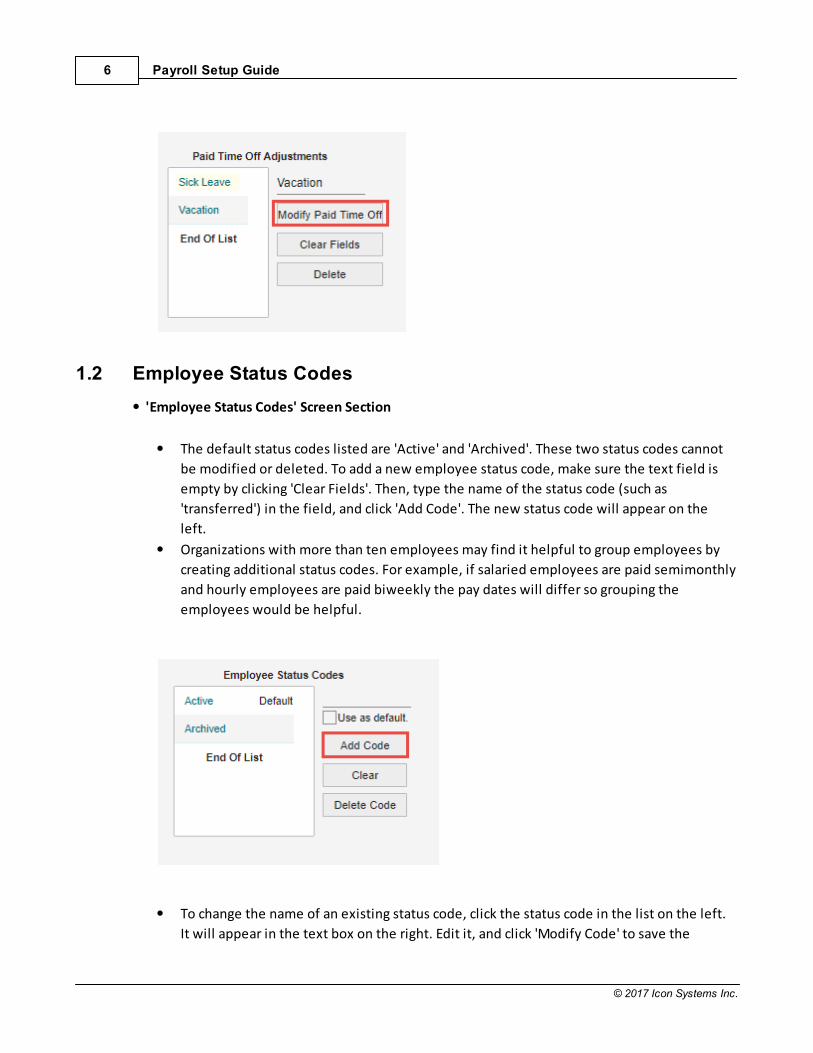
The default status codes listed are 'Active' and 'Archived'. These two status codes cannot
be modified or deleted. To add a new employee status code, make sure the text field is
empty by clicking 'Clear Fields'. Then, type the name of the status code (such as
'transferred') in the field, and click 'Add Code'. The new status code will appear on the
left.
Organizations with more than ten employees may find it helpful to group employees by
creating additional status codes. For example, if salaried employees are paid semimonthly
and hourly employees are paid biweekly the pay dates will differ so grouping the
employees would be helpful.
To change the name of an existing status code, click the status code in the list on the left.
It will appear in the text box on the right. Edit it, and click 'Modify Code' to save the
PR Setup > PR Preferences 7
© 2017 Icon Systems Inc.
change. The system will ask you to confirm the change where you can click 'Ok' or 'Cancel'.
Alternatively, you can delete the adjustment entirely by clicking 'Delete' and it will ask
you to confirm the deletion.
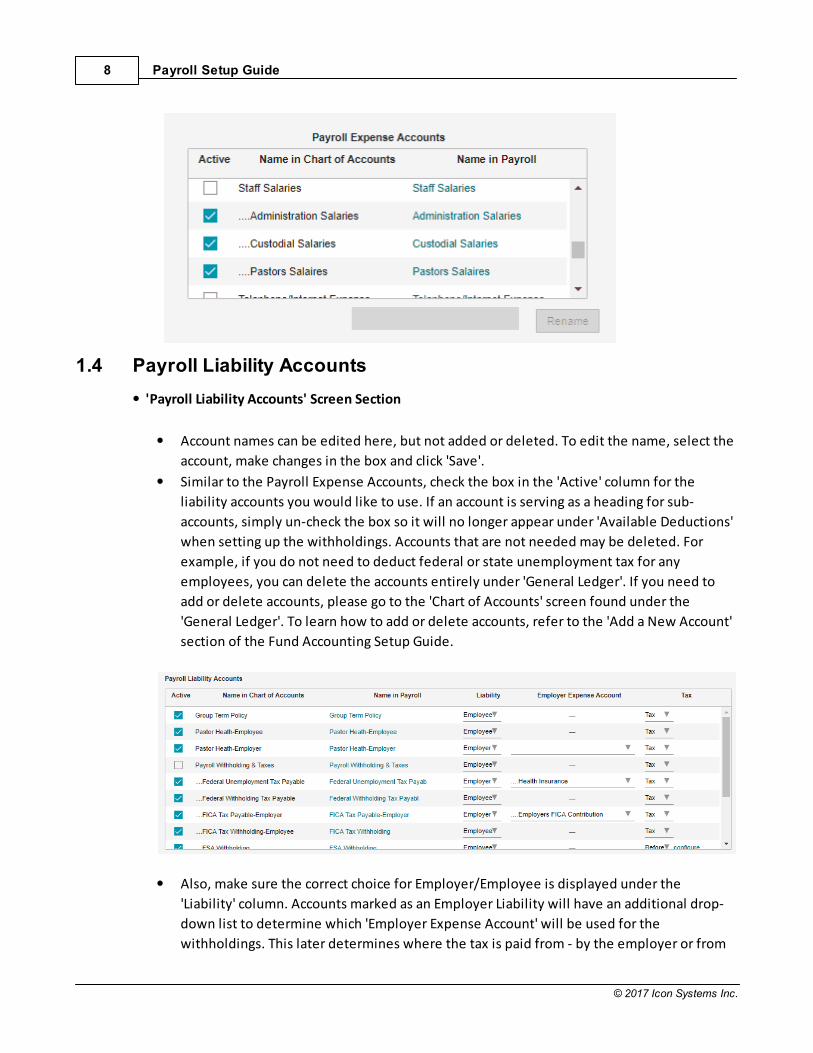
1.3 Payroll Expense Accounts
'Payroll Expense Accounts' Screen Section
Account names can be edited here to appear on payroll reports the way you like to see
them. To edit the name, select the account, make changes in the box and click 'Save'. If
you need to add or delete accounts, please go to the Chart of Accounts screen found
under the General Ledger. To learn how to add or delete accounts, refer to the 'Add a
New Account' section of the Fund Accounting Setup Guide.
Select which accounts you would like to use in payroll by checking the box in the 'Active'
column. These accounts will be used later when setting up Rate Cards. Selecting the
heading account is not necessary. In the example below, 'Staff Salaries' does not need to
be checked since it is serving as heading for the sub-accounts like 'Administration
Salaries'.
Payroll Setup Guide8
© 2017 Icon Systems Inc.
1.4 Payroll Liability Accounts
'Payroll Liability Accounts' Screen Section
Account names can be edited here, but not added or deleted. To edit the name, select the
account, make changes in the box and click 'Save'.
Similar to the Payroll Expense Accounts, check the box in the 'Active' column for the
liability accounts you would like to use. If an account is serving as a heading for sub-
accounts, simply un-check the box so it will no longer appear under 'Available Deductions'
when setting up the withholdings. Accounts that are not needed may be deleted. For
example, if you do not need to deduct federal or state unemployment tax for any
employees, you can delete the accounts entirely under 'General Ledger'. If you need to
add or delete accounts, please go to the 'Chart of Accounts' screen found under the
'General Ledger'. To learn how to add or delete accounts, refer to the 'Add a New Account'
section of the Fund Accounting Setup Guide.
Also, make sure the correct choice for Employer/Employee is displayed under the
'Liability' column. Accounts marked as an Employer Liability will have an additional drop-
down list to determine which 'Employer Expense Account' will be used for the
withholdings. This later determines where the tax is paid from - by the employer or from
PR Setup > PR Preferences 9
© 2017 Icon Systems Inc.
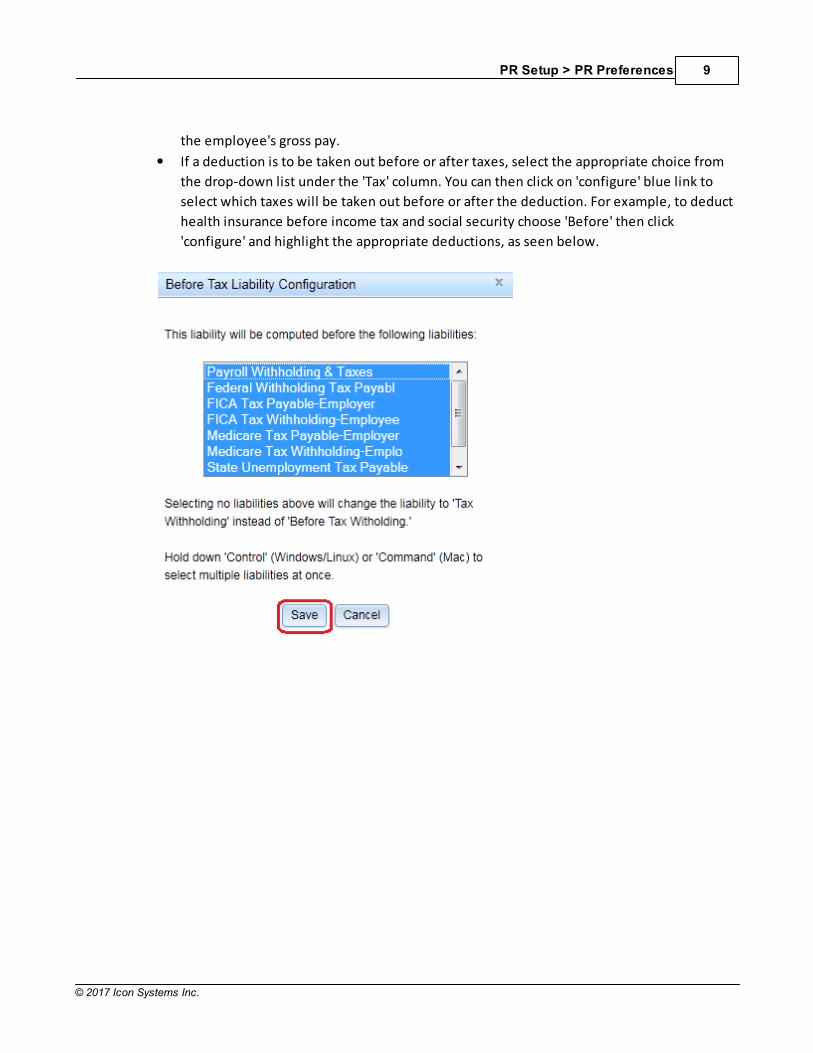
the employee's gross pay.
If a deduction is to be taken out before or after taxes, select the appropriate choice from
the drop-down list under the 'Tax' column. You can then click on 'configure' blue link to
select which taxes will be taken out before or after the deduction. For example, to deduct
health insurance before income tax and social security choose 'Before' then click
'configure' and highlight the appropriate deductions, as seen below.
Payroll Setup Guide10
© 2017 Icon Systems Inc.
2 PR Setup > Employees
Note: Section 2 of this manual goes over one screen on the system called Employees found usingthe following menu selection - . The following subsections('Employee Information', 'Maintain Common Accounts and Employee Withholding', and 'RateCards' ) are all entered on this one screen.
2.1 Employee Information
'Employee ’s List' Screen Section
To add employees, make sure to click 'Clear & Add New' button, then enter the employee
information in the box on the right starting with the last name then first name in the name
field, separated by a comma. Choose which status list is displayed or select ‘Everyone’
under 'Status to View'. If the list is long, you can also search for employees using the 'Find'
box located below the list.
The list on the left populates when employees are added to the system on the right. The
screen allows you to choose the tax filing status of the employee, the Federal exemptions,
direct deposit bank information, what expense and fund to use when paying employees
along with other demographic information.
The screen is where the employer sets up the withholding for each employee (Withholding
View / Setup button) and employee's rate cards (Rate Card Maintenance button).
Additionally, the 'Maintain Common Accounts' button is located at the bottom of the screen
and these accounts should be set up first - refer to Maintain Common Account section.

PR Setup > Employees 11
© 2017 Icon Systems Inc.
2.2 Maintain Common Accounts and Employee Withholding
'Maintain Common Accounts' and 'Employee Withholding' Screen Section
The 'Maintain Common Accounts' and the 'Employee Withholding' Screen are very similar in
the way they function. Both screens will show two methods for calculating taxes - the
'Calculate with Tax Tables' and the 'Formula' method. To save time on setup, we suggest
setting up accounts that are similar in their withholdings across majority of the employees
using the maintain common accounts screen. To further facilitate ease of set up we also
suggest using the 'Calculate with Tax Tables' method. You can access the 'Maintain Common
Accounts' screen by clicking the button on the 'Employee Information' screen named
'Maintain Common Accounts' shown below.

Payroll Setup Guide12
© 2017 Icon Systems Inc.
Fig. 2 below, appears after clicking the 'Maintain Common Accounts' button. This screen
should be used for tax liabilities that are the same across all employees (eg. FICA, SS).
Additionally, the screen has three main components noted by the gray numbers 1), 2), and
3) (circled in red), which we will reference below. Select a deduction from the 'Deduction'
drop-down list in step '1)' shown below. The accounts that appear in the 'Deduction' drop-
down list are the ones checked under 'Payroll Liability Accounts' in 'PR Preferences'. Please
correct any missing deductions in that screen before continuing.
Important - The taxes for both the employer and employee must be completed for each
employee - either in the 'Maintain Common Accounts' screen or the individual employee
'Withholding View / Setup' screen. For example, the employee pays into Medicare 1.45%,
PR Setup > Employees 13
© 2017 Icon Systems Inc.
however the employer also pays into Medicare a matching 1.45%. Both should be listed -
one for the employer and one for the employer, tied to different liability accounts in the
deduction drop down list (step 1). This is illustrated in the above image where there are
two lines with Medicare, noted by 'Medicare Tax Payable-Employer' and 'Medicare Tax
Payable-Employee'.
Let's describe the 'Calculate with Tax Table' method first, then apply these common taxes to
the employees using a mass update button called 'Update All Employees'. The 'Federal
Withholding Tax Payable' is selected for the 'Deduction' drop down list. Next, in step '2)',
choose either the 'Formula' or 'Calculate with tax tables' method. The 'Calculate with Tax
Tables for' is selected by clicking the circle to the left, which we will review first.
'Calculate with Tax Tables' Method -- Select the deduction from the 'Deduction' drop down
list in step '1)' that you want to set up for all employees. Then, select the option in step '2)'
called 'Calculate with Tax Tables'. The drop down list to the right of the 'Calculate with tax
tables' option populates with the suggested taxes towards the top of the drop down list.
Other taxes can be chosen when appropriate by scrolling through the drop down list based
on the taxing jurisdiction. Note: the deduction chosen in step '1)' should correspond to the
tax table chosen in step '2)', which is illustrated by the red arrow. Depending on the
selection made in the drop down list, the system may ask for additional information which
will appear below the drop down list. The Federal Income Tax is asking if you want it to be
set up as a resident or nonresident alien. This method will work for the Federal Income Tax
provided they are all one type of resident, FICA, Medicare, or other taxes that are the same
for all employees. Once you have added the common accounts in, then click on the 'Update
All Employees' button, which applies these taxes to all employees. We will discuss how to
change these, if needed, under each employee or remove it all together using the
'Employee Withholding' screen.
The 'Employee Withholding' screen is best used to set up taxes that are different between
employees, like state income taxes. It is accessed by choosing an employee, then clicking the
'Withholding View / Setup' button. When you open the screen for the employee you should see
the initial taxes that were set up by the 'Maintain Common Accounts' screen, listed in the
bottom window. This screen will have similar look as the 'Maintain Common Accounts' screen,
however the big difference is that you are only working on one employee at a time. The other
difference is there's a button called 'Copy Common Accounts to this Employee', which is used
when you add new employees after the initial set up. Just like the 'Maintain Common Account'
screen, this screen allows you to add specific taxes using either the 'Calculate with Tax Tables'
method or the 'Formula' method. When working with the system we recommend the 'Calculate
with Tax Tables' method where possible. As we just went over the 'Calculate with Tax Tables'
method above, we will move onto the 'Formula' method. If you need help using the 'Calculate
with Tax Tables' method, please review the above paragraph as both screens work the same
way.
Payroll Setup Guide14
© 2017 Icon Systems Inc.
'Formula' Method -- When using the 'Formula' method, enter the information using the
fields ('Fixed Amount', 'Percent', 'Over', 'Annual Maximum', and 'Withholding Allowance')
to create a customized withholding formula. The formula can use one field or any
combination of fields to withhold monies from a paycheck. The formula closely resembles
the 'Percentage Calculation' from the Publication 15 for Federal Income Tax but can also use
the 'Wage Bracket Calculation'; or other state taxing publications. Many taxing publications
include examples to reference if you are unsure how to calculate the withholding.
o To illustrate, let's use the following scenario for a MN resident paying MN state income
taxes -- A person's gross pay is $600.00 weekly ($31,200/annually), and they file as a
married jointly. For illustration purposes, we will break these down into two sub
categories -- the Percentage Calculation and Wage Bracket Calculation using the MN
Income Tax tables.
Percentage Calculation (Simple Formula Method)-- According to the 2014 MN state
website, this person falls into the 5.35% tax bracket. Select the state's deduction from
the 'Deduction' drop down list in step '1)' that you want to set up for this employee.
Then, select the option in step '2)' called 'Formula'. Note: the deduction chosen in step
'1)' should correspond to the formula you are inputting in step '2)'. In the 'Formula' line
you would simply input 5.35 into the percent field and click 'Add to Withholdings'. This
tax is now going to show up for the employee's rate card and be placed in the list at the
bottom of this screen as an available deduction. This works well with hourly employees
as they tend to fluctuate a little more than salary employees.
Wage Bracket Calculation (Simple Formula Method)-- In this method we would use the
fixed amount field instead of the percentage. If you know they are going to make
$31,200 annually and are paid twice a month for 24 pay periods. You can take 31,200 *
.0535 for a total annual tax liability of $1,669.20 which is divided by 24, resulting in a tax
per pay period of $69.55. Input this amount into the fixed amount field and click 'Add to
Withholdings' button. This tax is now going to show up for the employee's rate card.
This works well for salary employees as you know how much they are going to get paid.
o Let's illustrate a more complicated tax scenario using the Federal tax tables instead of MN
state tax tables. Let's use the following scenario -- A person's gross pay is $600.00 weekly,
is single and claiming 2 allowances worth $76.00, each. For illustration purposes we will
break these down into two sub categories just like the last example -- the Percentage
Calculation and Wage Bracket Calculation.
Percentage Calculation (Complicated Tax Scenario)-- According to the example, the
employee is claiming 2 allowances equaling, $152.00. As seen below, the following
should be entered -- the fixed amount is 18.00, 15% for the percent field, 224.00 for the
over field, leave annual maximum field alone, and 152.00 for the withholding
allowance. The formula will calculate it the in the following manner - $600.00 - $152.00
PR Setup > Employees 15
© 2017 Icon Systems Inc.
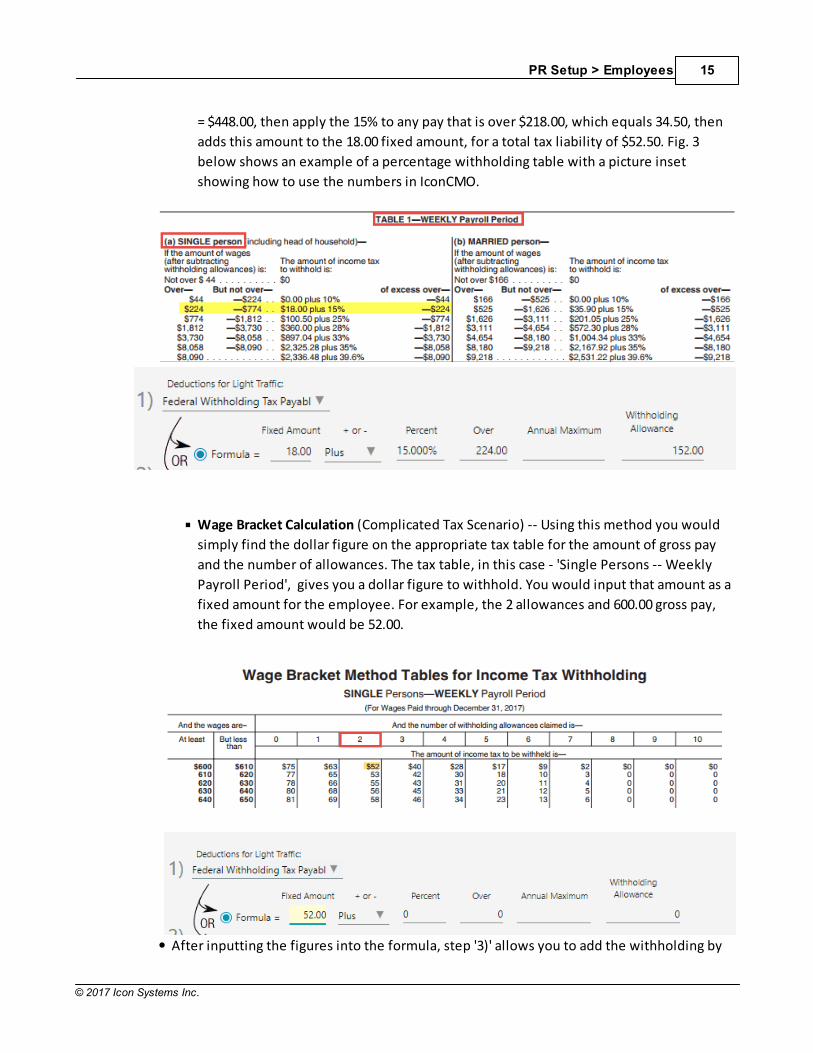
= $448.00, then apply the 15% to any pay that is over $218.00, which equals 34.50, then
adds this amount to the 18.00 fixed amount, for a total tax liability of $52.50. Fig. 3
below shows an example of a percentage withholding table with a picture inset
showing how to use the numbers in IconCMO.
Wage Bracket Calculation (Complicated Tax Scenario) -- Using this method you would
simply find the dollar figure on the appropriate tax table for the amount of gross pay
and the number of allowances. The tax table, in this case - 'Single Persons -- Weekly
Payroll Period', gives you a dollar figure to withhold. You would input that amount as a
fixed amount for the employee. For example, the 2 allowances and 600.00 gross pay,
the fixed amount would be 52.00.
After inputting the figures into the formula, step '3)' allows you to add the withholding by
Payroll Setup Guide16
© 2017 Icon Systems Inc.
clicking the button named 'Add to Withholding', and the deduction shows up in the bottom
of the screen. Once all withholding are entered for the employee and employer in the list,
you can close the screen and continue onto the 'Rate Card Maintenance' screen for this
employee.
Note: Withholdings for non-minister church employees are the same as for-
profit employees. The only difference is that church employees may not need
to pay state and/or federal unemployment tax. Ministers are typically
considered self-employed; please consult your accountant regarding
calculating deductions on minister salaries and housing allowances.
2.3 Rate Card Maintenance
'Rate Card Maintenance'
A rate card defines how much a person makes, the deductions applied to the rate card and
the accounting fund to charge. One employee can have multiple rate cards and various
deductions or none at all - as is the case with pastor's housing most of the time. For
example, an employee might spend half their time working for one department and the
other half working for another. In this case they would have two rate cards. Another
example is when a salaried person is paid twice a month and the deductions are different
between the two pay periods. Select an employee from the employee list, then click the
'Rate Card Maintenance' button.
To create a new rate card, next to 'Rate Card Name' field type the rate card name (For
example, Jimmy Weekly). Choose whether the rate is hourly or salary. If hourly, enter the
regular and overtime rates. Next, select an account from the drop-down list next to 'Salary
Expense' (this list was created by the checked boxes under 'Payroll Expense Accounts' in PR
Preferences.). If you do not see the expense account please go back to PR Preferences and
check mark the missing expense. Select the fund that will pay this rate card and click save.
The rate card will now appear in the 'Available Rate Card' drop down list. If you don't see a
withholding, then please go back to the employees withholding set up found in the
'Employee Information'.
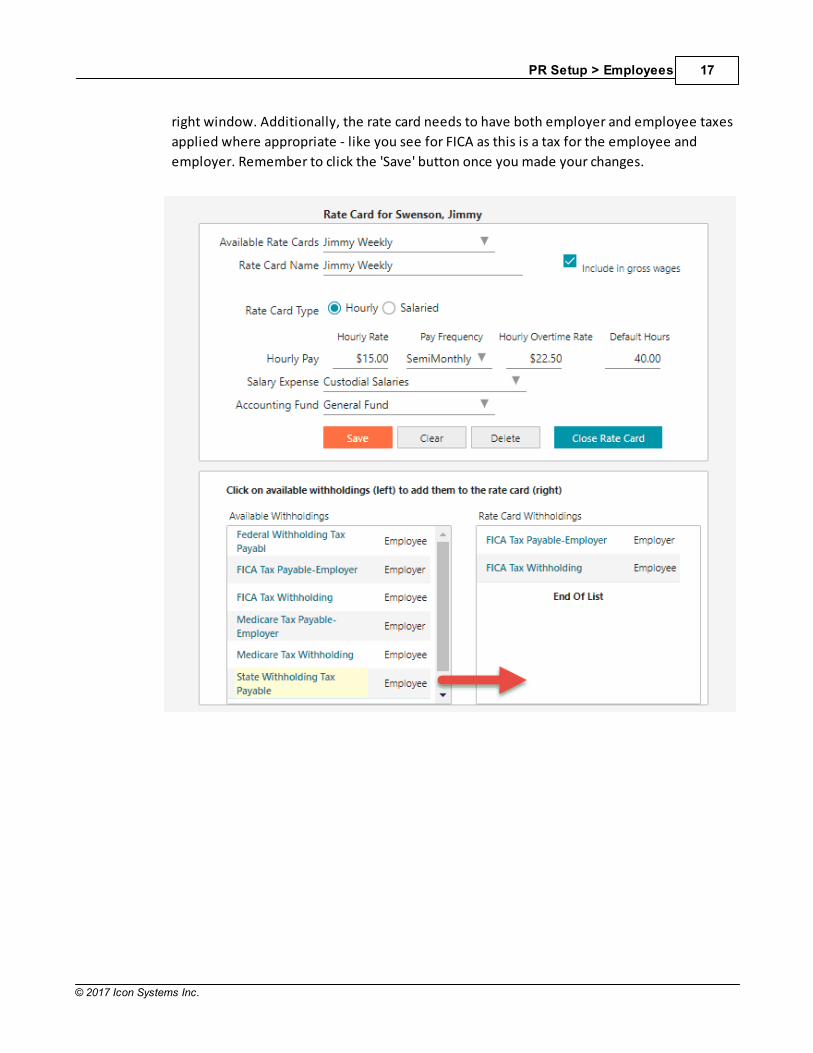
At the bottom of the rate card screen is the available withholdings on the left side and on
the right side are the withholding that are currently applied to the selected rate card. To
apply a withholding click on it on the right side and it moves to the left side of the screen.
The withholding will now be applied to this rate card during batch processing. As an
example below, the rate card called 'Jimmy Weekly' has the FICA (employer and employee)
withholding but not State or Federal withholdings applied yet. You would want to click on
the 'State Withholding Tax Payable' outlined with the arrow which will then move it to the
PR Setup > Employees 17
© 2017 Icon Systems Inc.
right window. Additionally, the rate card needs to have both employer and employee taxes
applied where appropriate - like you see for FICA as this is a tax for the employee and
employer. Remember to click the 'Save' button once you made your changes.