Embed Size (px)
Citation preview
Integration Documentation v2.5.2 Monday, January 24, 2010
Implementing Paymentwall requires 2 steps. Average implementation time is about 1 hour:
1. SETUP: Setting up your applications, defining business rules for individual applications, enabling payment methods, and customizing the user interface for each application.
2. CODE & TEST: Installing the customized Paymentwall iframe/widget into your application, creating a Callback/PingBack script which listens for virtual currency disbursement, and testing the script.
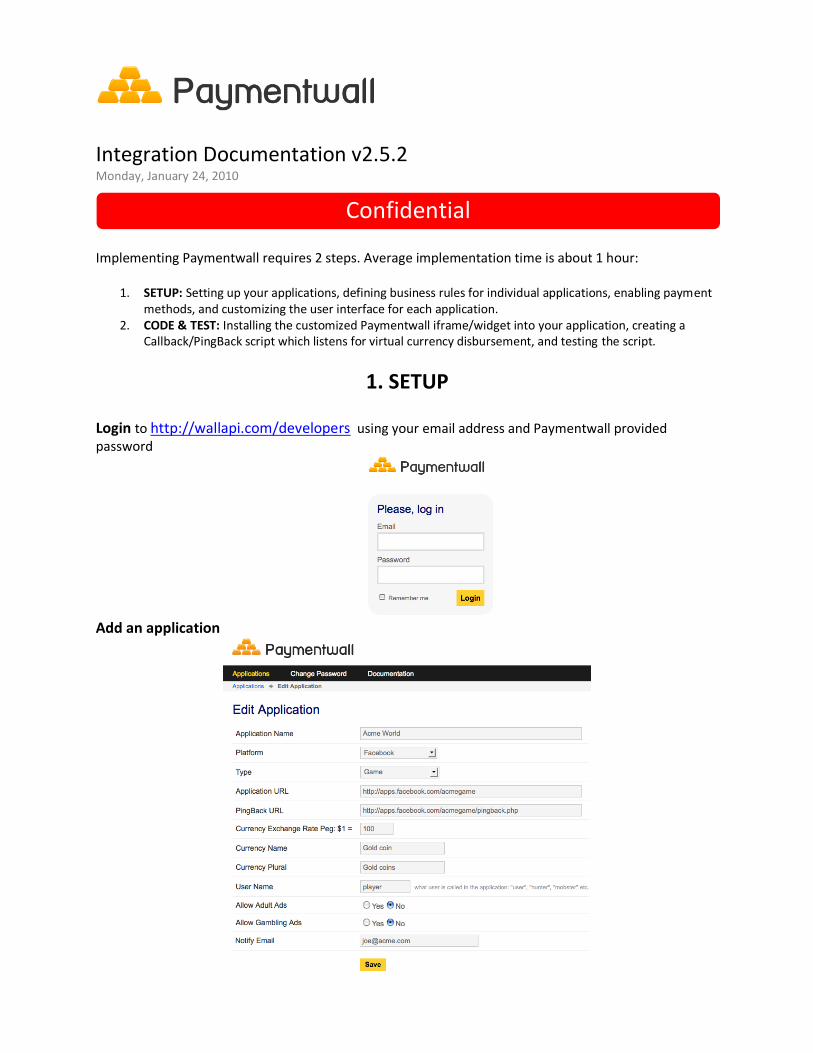
1. SETUP Login to http://wallapi.com/developers using your email address and Paymentwall provided password
Add an application
Confidential
Platform: We support Facebook, MySpace, Bebo, Hi5 as well as standalone websites. Standalone sites typically use proprietary userIDs, Platforms piggyback on existing Platform IDs. Application URL: The URL of your application accessible by the public. PingBack URL: The URL of your script which will listen for virtual currency disbursement. Currency Exchange Rate: Determines how much virtual currency is purchased by 1 USD of sales. Currency Name: What the currency is called within the game Allow Adult/Gambling ads: Developers can specify audience settings for adult and gambling here; further enabling/disabling of ads by category or types is available in next steps. Notify Email: Daily revenue reporting and statistics sent everyday at midnight US CDT (GMT -5).
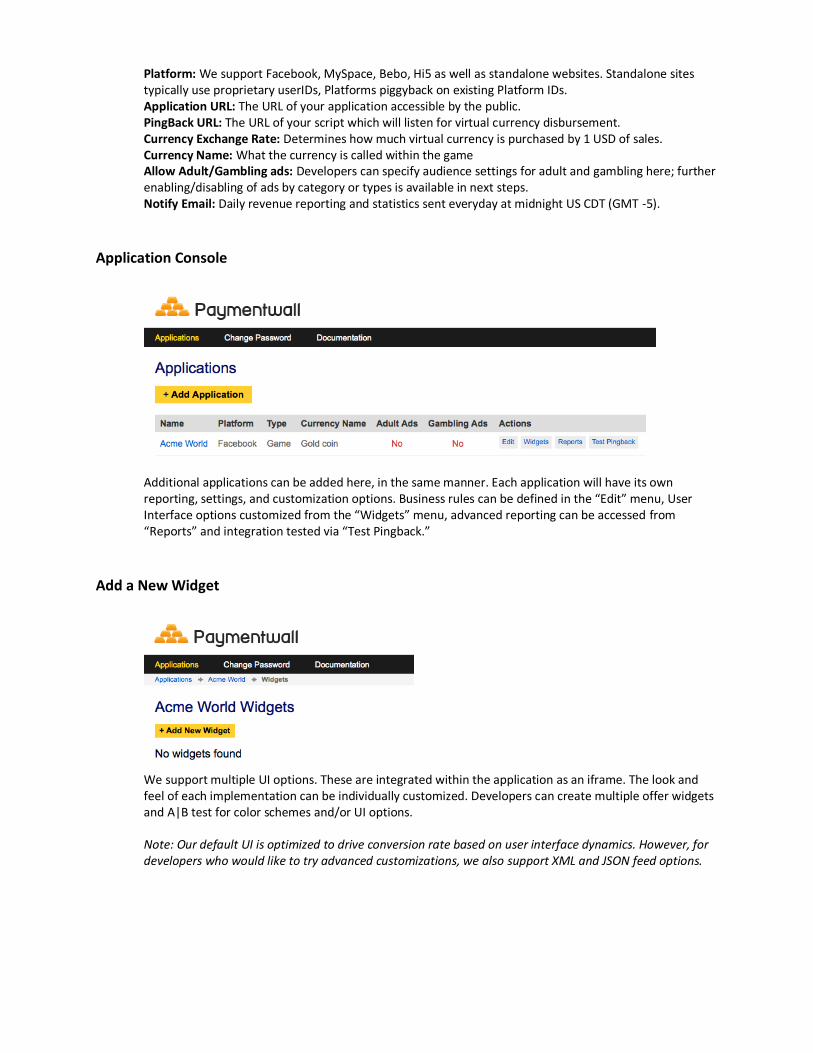
Application Console
Additional applications can be added here, in the same manner. Each application will have its own reporting, settings, and customization options. Business rules can be defined in the “Edit” menu, User Interface options customized from the “Widgets” menu, advanced reporting can be accessed from “Reports” and integration tested via “Test Pingback.”
Add a New Widget
We support multiple UI options. These are integrated within the application as an iframe. The look and feel of each implementation can be individually customized. Developers can create multiple offer widgets and A|B test for color schemes and/or UI options. Note: Our default UI is optimized to drive conversion rate based on user interface dynamics. However, for developers who would like to try advanced customizations, we also support XML and JSON feed options.
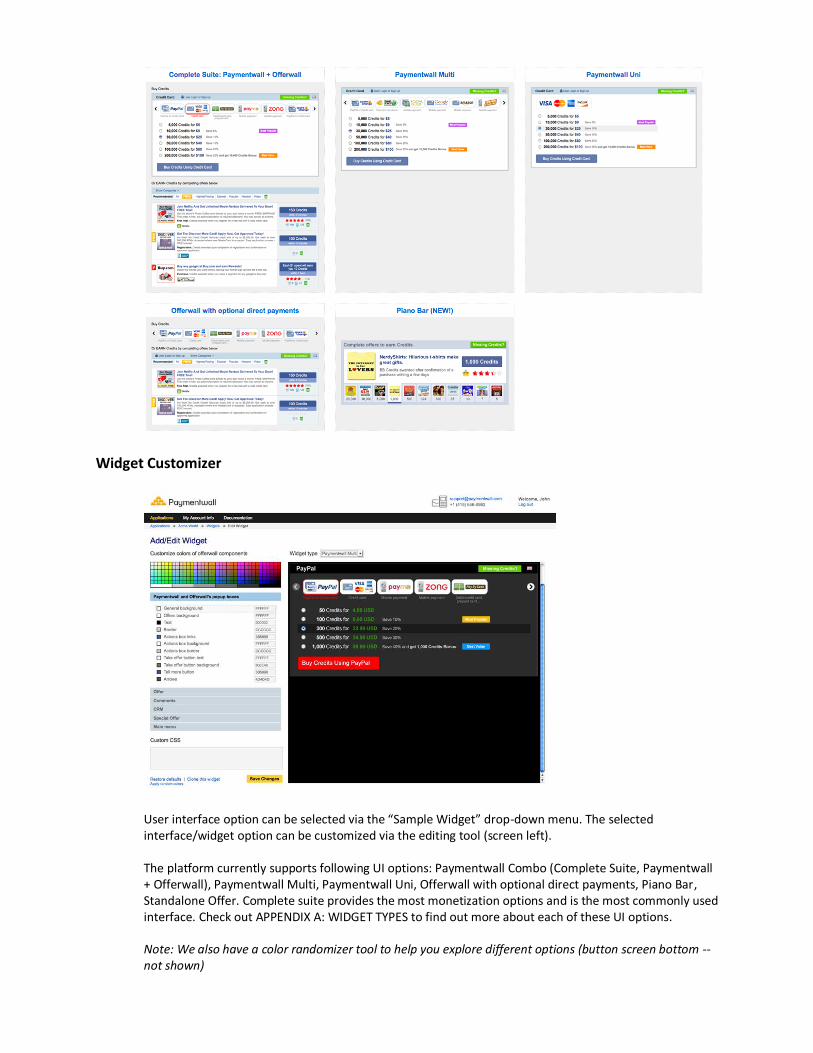
Widget Customizer
User interface option can be selected via the “Sample Widget” drop-down menu. The selected interface/widget option can be customized via the editing tool (screen left). The platform currently supports following UI options: Paymentwall Combo (Complete Suite, Paymentwall + Offerwall), Paymentwall Multi, Paymentwall Uni, Offerwall with optional direct payments, Piano Bar, Standalone Offer. Complete suite provides the most monetization options and is the most commonly used interface. Check out APPENDIX A: WIDGET TYPES to find out more about each of these UI options. Note: We also have a color randomizer tool to help you explore different options (button screen bottom -- not shown)
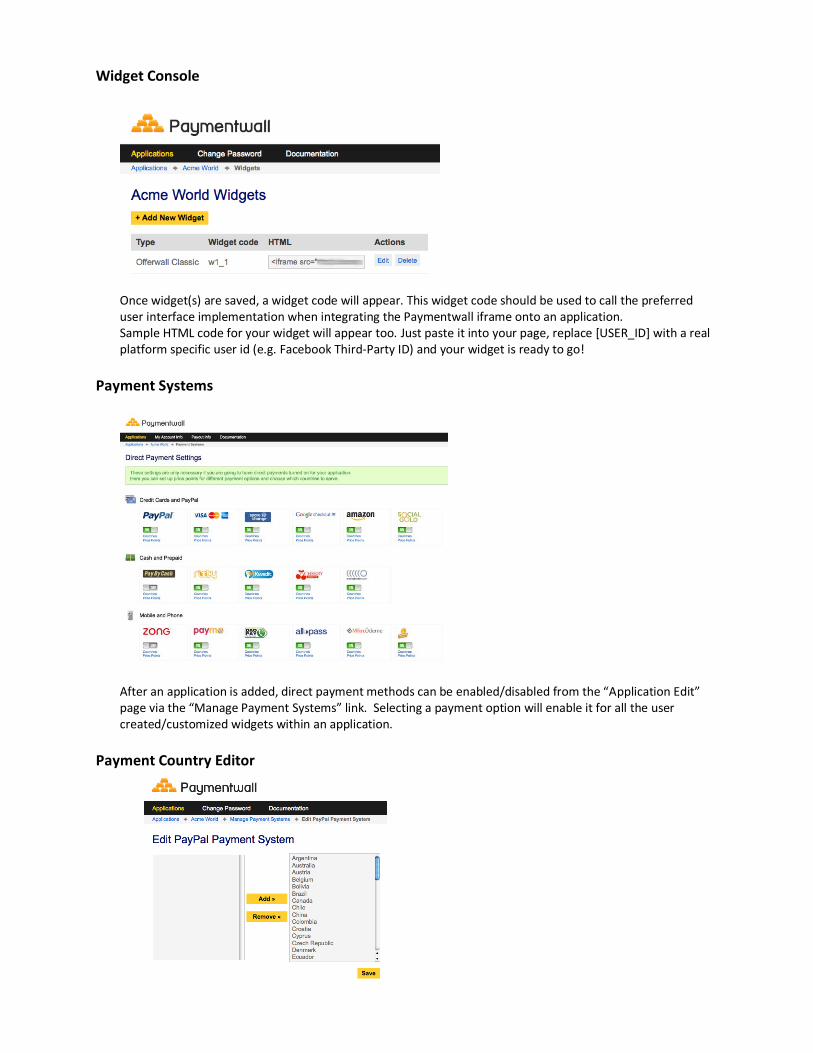
Widget Console
Once widget(s) are saved, a widget code will appear. This widget code should be used to call the preferred user interface implementation when integrating the Paymentwall iframe onto an application. Sample HTML code for your widget will appear too. Just paste it into your page, replace [USER_ID] with a real platform specific user id (e.g. Facebook Third-Party ID) and your widget is ready to go!
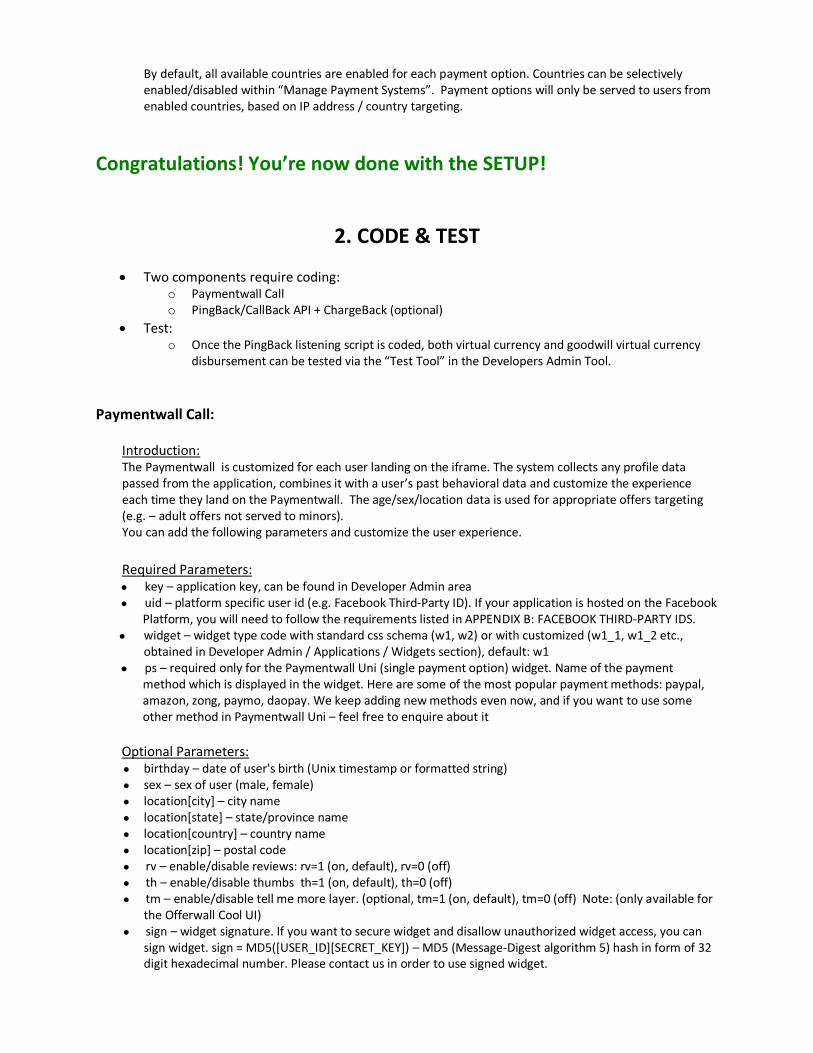
Payment Systems
After an application is added, direct payment methods can be enabled/disabled from the “Application Edit” page via the “Manage Payment Systems” link. Selecting a payment option will enable it for all the user created/customized widgets within an application.
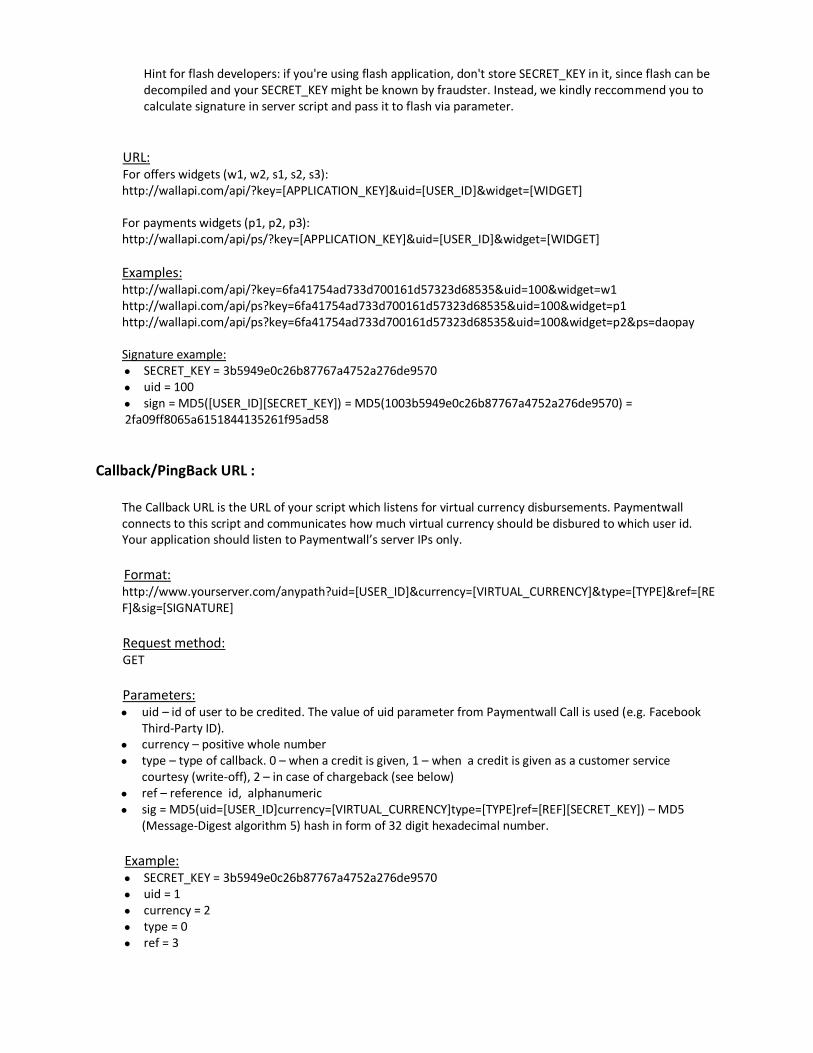
Payment Country Editor
By default, all available countries are enabled for each payment option. Countries can be selectively enabled/disabled within “Manage Payment Systems”. Payment options will only be served to users from enabled countries, based on IP address / country targeting.
Congratulations! You’re now done with the SETUP!
2. CODE & TEST
Two components require coding: o Paymentwall Call o PingBack/CallBack API + ChargeBack (optional)
Test: o Once the PingBack listening script is coded, both virtual currency and goodwill virtual currency
disbursement can be tested via the “Test Tool” in the Developers Admin Tool.
Paymentwall Call:
Introduction: The Paymentwall is customized for each user landing on the iframe. The system collects any profile data passed from the application, combines it with a user’s past behavioral data and customize the experience each time they land on the Paymentwall. The age/sex/location data is used for appropriate offers targeting (e.g. – adult offers not served to minors). You can add the following parameters and customize the user experience.
Required Parameters: key – application key, can be found in Developer Admin area
uid – platform specific user id (e.g. Facebook Third-Party ID). If your application is hosted on the Facebook Platform, you will need to follow the requirements listed in APPENDIX B: FACEBOOK THIRD-PARTY IDS.
widget – widget type code with standard css schema (w1, w2) or with customized (w1_1, w1_2 etc., obtained in Developer Admin / Applications / Widgets section), default: w1
ps – required only for the Paymentwall Uni (single payment option) widget. Name of the payment method which is displayed in the widget. Here are some of the most popular payment methods: paypal, amazon, zong, paymo, daopay. We keep adding new methods even now, and if you want to use some other method in Paymentwall Uni – feel free to enquire about it
Optional Parameters: birthday – date of user's birth (Unix timestamp or formatted string)
sex – sex of user (male, female)
location[city] – city name
location[state] – state/province name
location[country] – country name
location[zip] – postal code
rv – enable/disable reviews: rv=1 (on, default), rv=0 (off)
th – enable/disable thumbs th=1 (on, default), th=0 (off)
tm – enable/disable tell me more layer. (optional, tm=1 (on, default), tm=0 (off) Note: (only available for the Offerwall Cool UI)
sign – widget signature. If you want to secure widget and disallow unauthorized widget access, you can sign widget. sign = MD5([USER_ID][SECRET_KEY]) – MD5 (Message-Digest algorithm 5) hash in form of 32 digit hexadecimal number. Please contact us in order to use signed widget.
Hint for flash developers: if you're using flash application, don't store SECRET_KEY in it, since flash can be decompiled and your SECRET_KEY might be known by fraudster. Instead, we kindly reccommend you to calculate signature in server script and pass it to flash via parameter.
URL: For offers widgets (w1, w2, s1, s2, s3): http://wallapi.com/api/?key=[APPLICATION_KEY]&uid=[USER_ID]&widget=[WIDGET] For payments widgets (p1, p2, p3): http://wallapi.com/api/ps/?key=[APPLICATION_KEY]&uid=[USER_ID]&widget=[WIDGET]
Examples: http://wallapi.com/api/?key=6fa41754ad733d700161d57323d68535&uid=100&widget=w1 http://wallapi.com/api/ps?key=6fa41754ad733d700161d57323d68535&uid=100&widget=p1 http://wallapi.com/api/ps?key=6fa41754ad733d700161d57323d68535&uid=100&widget=p2&ps=daopay Signature example:
SECRET_KEY = 3b5949e0c26b87767a4752a276de9570
uid = 100
sign = MD5([USER_ID][SECRET_KEY]) = MD5(1003b5949e0c26b87767a4752a276de9570) = 2fa09ff8065a6151844135261f95ad58
Callback/PingBack URL :
The Callback URL is the URL of your script which listens for virtual currency disbursements. Paymentwall connects to this script and communicates how much virtual currency should be disbured to which user id. Your application should listen to Paymentwall’s server IPs only.
Format: http://www.yourserver.com/anypath?uid=[USER_ID]¤cy=[VIRTUAL_CURRENCY]&type=[TYPE]&ref=[REF]&sig=[SIGNATURE]
Request method: GET
Parameters: uid – id of user to be credited. The value of uid parameter from Paymentwall Call is used (e.g. Facebook
Third-Party ID). currency – positive whole number
type – type of callback. 0 – when a credit is given, 1 – when a credit is given as a customer service courtesy (write-off), 2 – in case of chargeback (see below)
ref – reference id, alphanumeric
sig = MD5(uid=[USER_ID]currency=[VIRTUAL_CURRENCY]type=[TYPE]ref=[REF][SECRET_KEY]) – MD5 (Message-Digest algorithm 5) hash in form of 32 digit hexadecimal number.
Example: SECRET_KEY = 3b5949e0c26b87767a4752a276de9570
uid = 1
currency = 2
type = 0
ref = 3
sig = MD5(uid=[USER_ID]currency=[VIRTUAL_CURRENCY]type=[TYPE]ref=[REF][SECRET_KEY]) = MD5(uid=1currency=2type=0ref=33b5949e0c26b87767a4752a276de9570) = 813bb3bb5a566fde24f6861c60396727
Callback URL Example: http://www.yourserver.com/anypath?uid=1¤cy=2&type=0&ref=3&sig=813bb3bb5a566fde24f6861c60396727
Return value: If you are able to process the callback requests, please start your response message with 'OK'. If we don't receive a confirmation message, or if the response status code is different from 200, we'll send pingback again within 30 minutes and the subsequent retries will happen at 30 minute increments after that.
Security: Please add the following IP Addresses as authorized IP addresses to access the script:
66.220.10.2
66.220.10.3
174.36.92.186
174.36.96.66
174.36.92.187
174.36.92.192
174.37.14.28
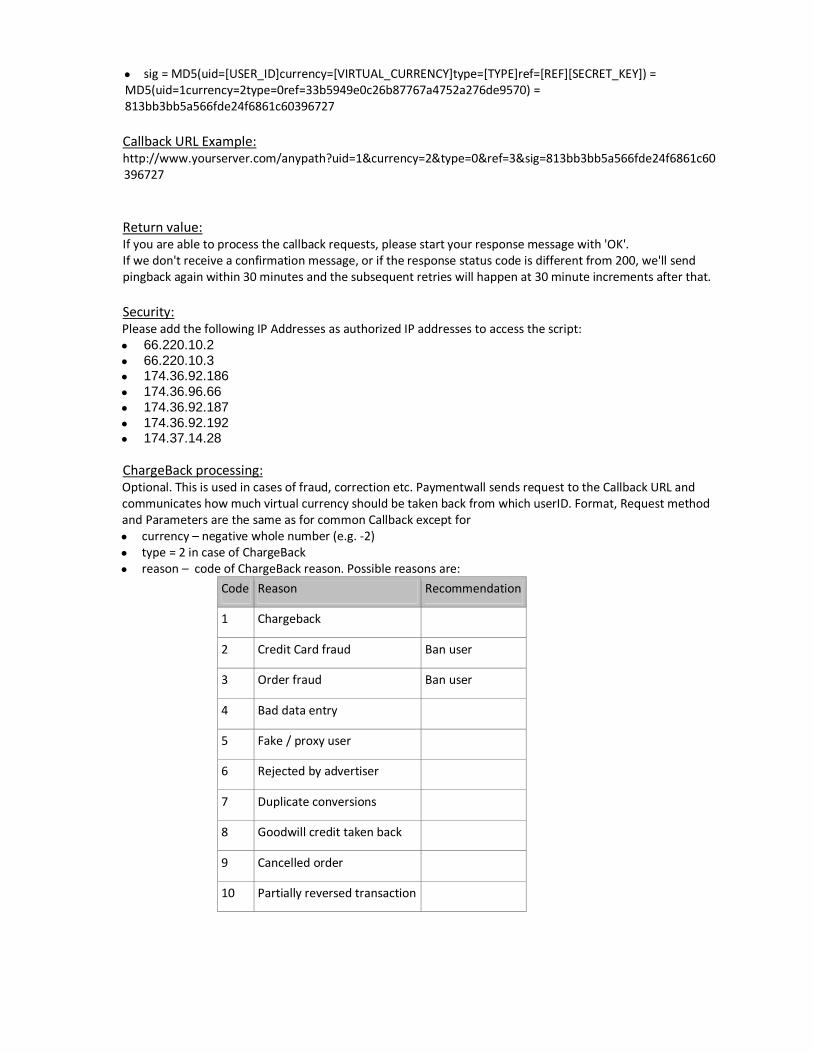
ChargeBack processing: Optional. This is used in cases of fraud, correction etc. Paymentwall sends request to the Callback URL and communicates how much virtual currency should be taken back from which userID. Format, Request method and Parameters are the same as for common Callback except for
currency – negative whole number (e.g. -2)
type = 2 in case of ChargeBack
reason – code of ChargeBack reason. Possible reasons are:
Code Reason Recommendation
1 Chargeback
2 Credit Card fraud Ban user
3 Order fraud Ban user
4 Bad data entry
5 Fake / proxy user
6 Rejected by advertiser
7 Duplicate conversions
8 Goodwill credit taken back
9 Cancelled order
10 Partially reversed transaction
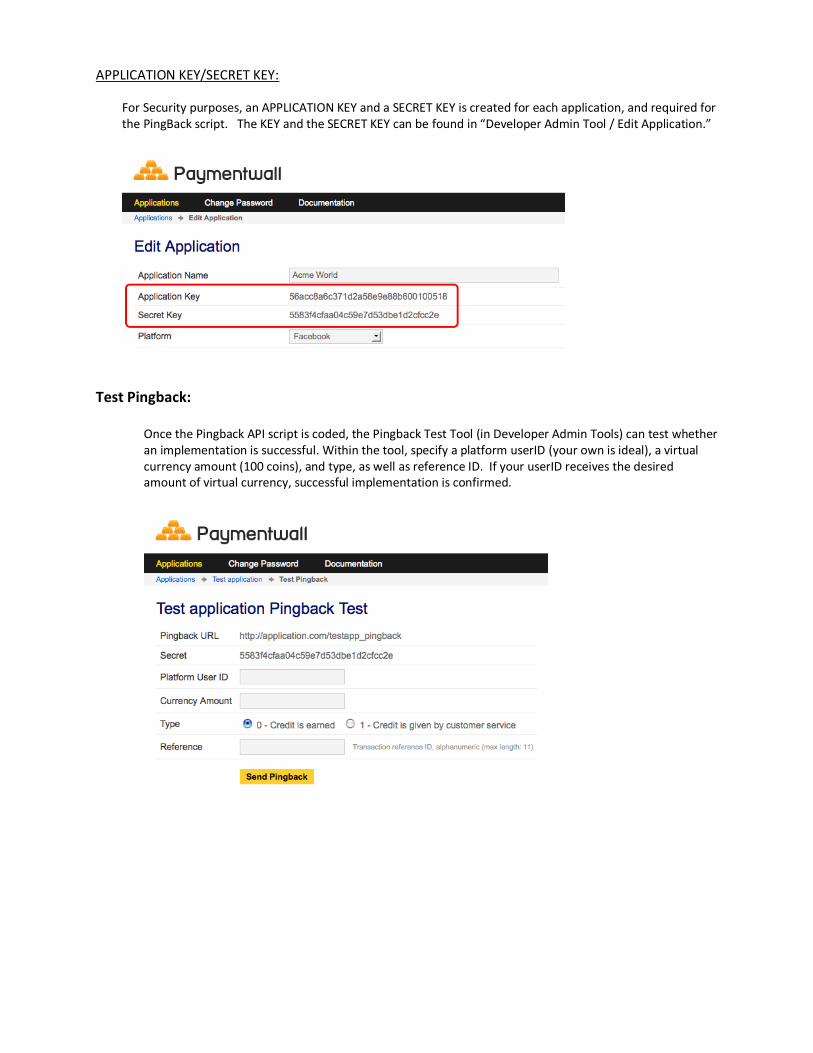
APPLICATION KEY/SECRET KEY:
For Security purposes, an APPLICATION KEY and a SECRET KEY is created for each application, and required for the PingBack script. The KEY and the SECRET KEY can be found in “Developer Admin Tool / Edit Application.”
Test Pingback:
Once the Pingback API script is coded, the Pingback Test Tool (in Developer Admin Tools) can test whether an implementation is successful. Within the tool, specify a platform userID (your own is ideal), a virtual currency amount (100 coins), and type, as well as reference ID. If your userID receives the desired amount of virtual currency, successful implementation is confirmed.
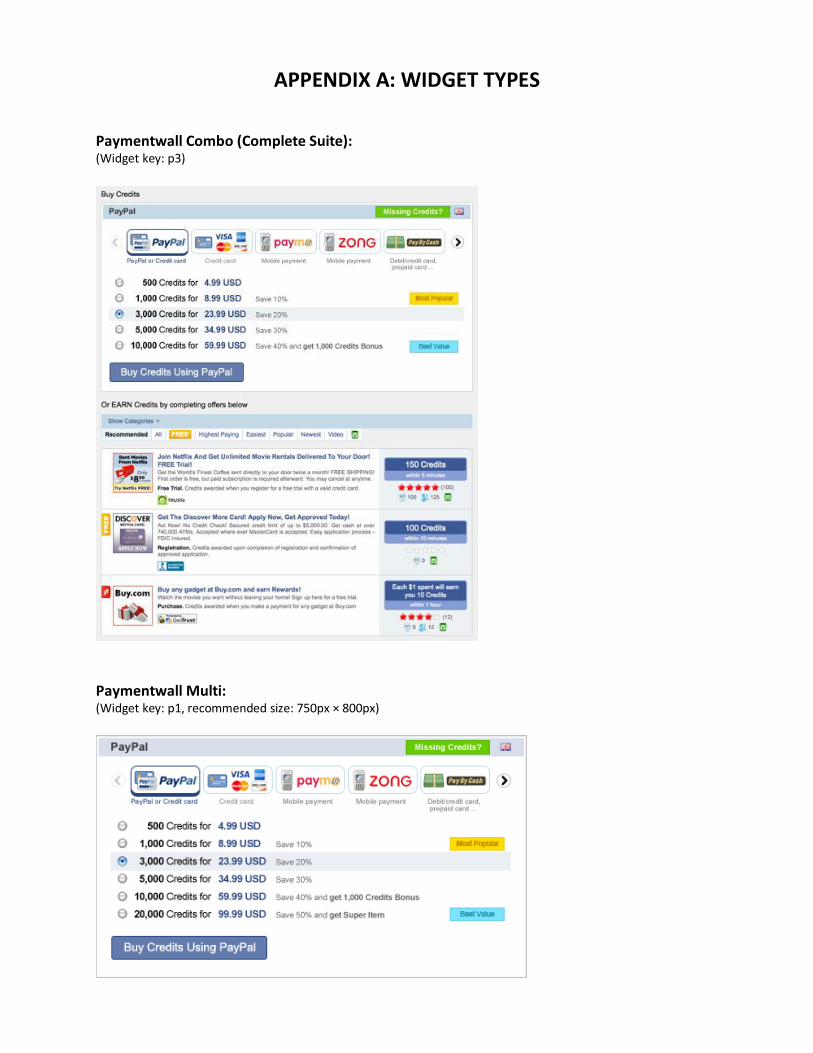
APPENDIX A: WIDGET TYPES
Paymentwall Combo (Complete Suite): (Widget key: p3)
Paymentwall Multi: (Widget key: p1, recommended size: 750px × 800px)
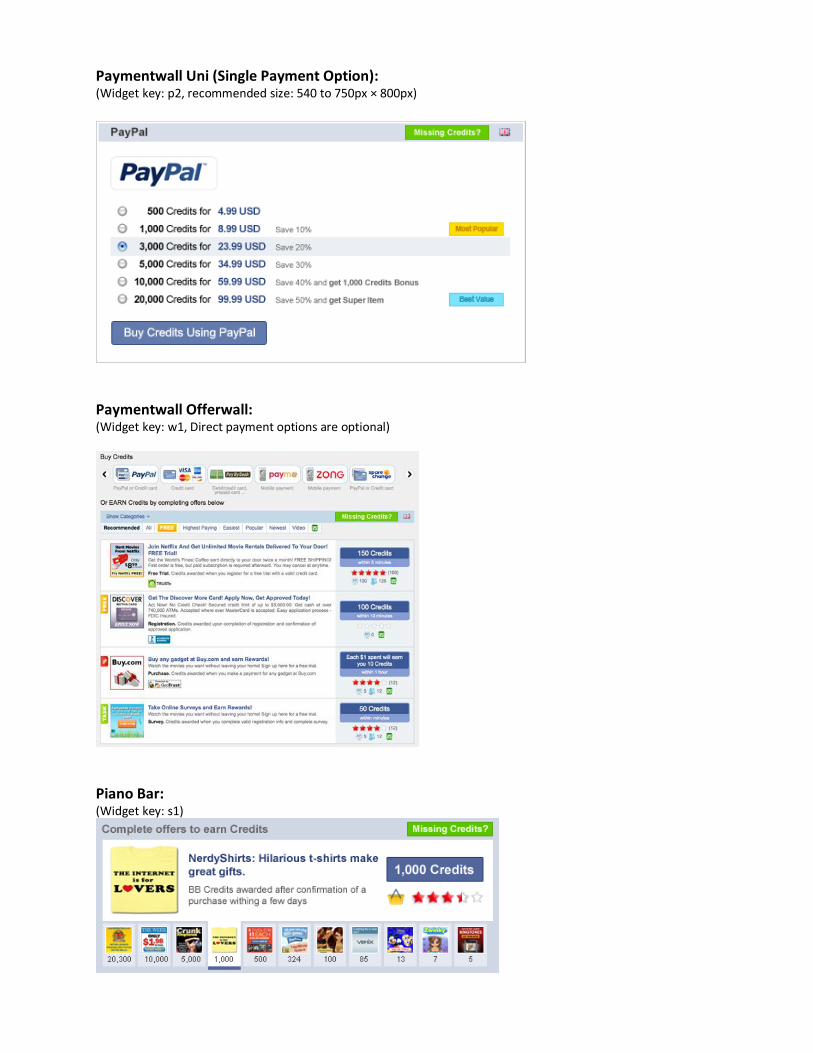
Paymentwall Uni (Single Payment Option): (Widget key: p2, recommended size: 540 to 750px × 800px)
Paymentwall Offerwall: (Widget key: w1, Direct payment options are optional)
Piano Bar: (Widget key: s1)
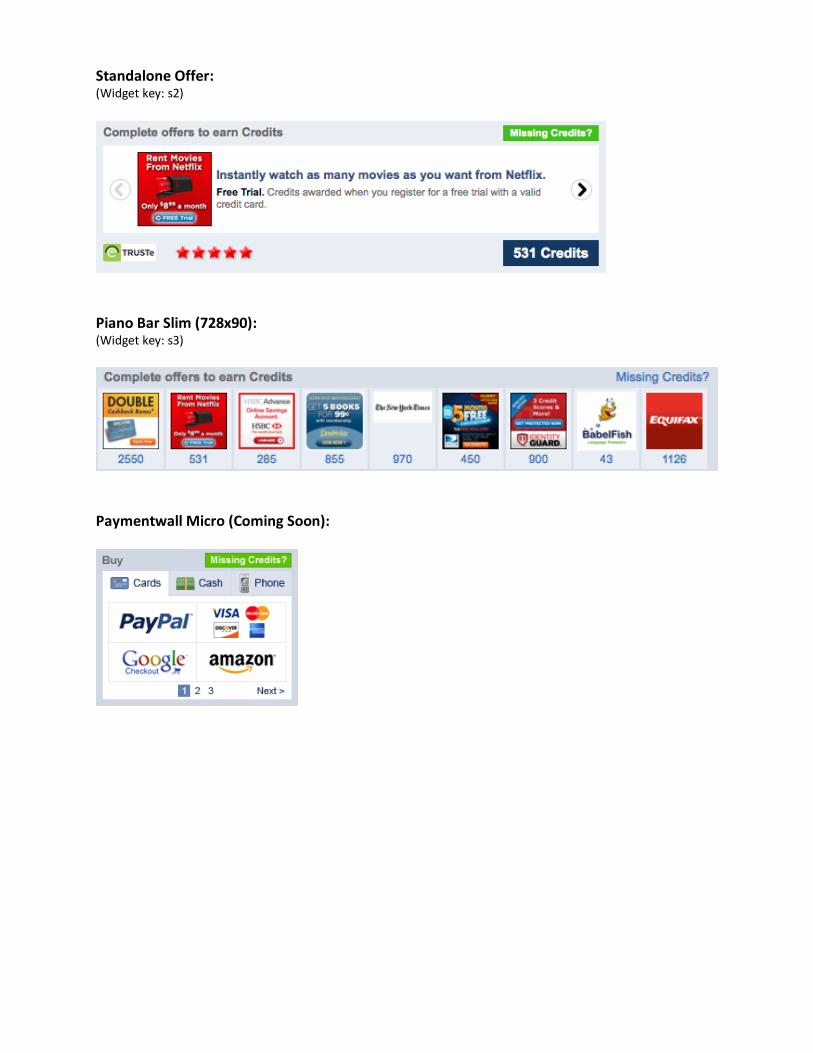
Standalone Offer: (Widget key: s2)
Piano Bar Slim (728x90): (Widget key: s3)
Paymentwall Micro (Coming Soon):
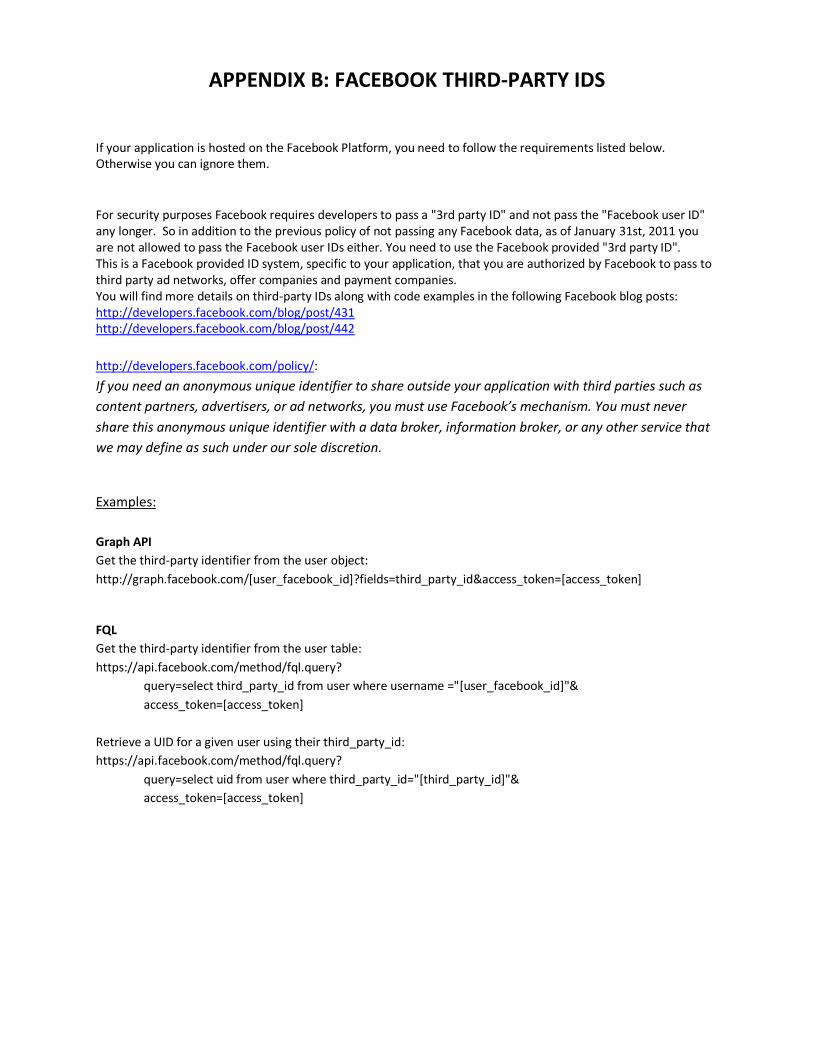
APPENDIX B: FACEBOOK THIRD-PARTY IDS
If your application is hosted on the Facebook Platform, you need to follow the requirements listed below. Otherwise you can ignore them.
For security purposes Facebook requires developers to pass a "3rd party ID" and not pass the "Facebook user ID" any longer. So in addition to the previous policy of not passing any Facebook data, as of January 31st, 2011 you are not allowed to pass the Facebook user IDs either. You need to use the Facebook provided "3rd party ID". This is a Facebook provided ID system, specific to your application, that you are authorized by Facebook to pass to third party ad networks, offer companies and payment companies. You will find more details on third-party IDs along with code examples in the following Facebook blog posts: http://developers.facebook.com/blog/post/431 http://developers.facebook.com/blog/post/442
http://developers.facebook.com/policy/:
If you need an anonymous unique identifier to share outside your application with third parties such as
content partners, advertisers, or ad networks, you must use Facebook’s mechanism. You must never
share this anonymous unique identifier with a data broker, information broker, or any other service that
we may define as such under our sole discretion.
Examples:
Graph API
Get the third-party identifier from the user object:
http://graph.facebook.com/[user_facebook_id]?fields=third_party_id&access_token=[access_token]
FQL
Get the third-party identifier from the user table:
https://api.facebook.com/method/fql.query?
query=select third_party_id from user where username ="[user_facebook_id]"&
access_token=[access_token]
Retrieve a UID for a given user using their third_party_id:
https://api.facebook.com/method/fql.query?
query=select uid from user where third_party_id="[third_party_id]"&
access_token=[access_token]


![O'Pay All-In-One Payment Services API documentV1.1.45 2016/10/05 Remove the parameter [Language] when payment is credit card in “Create Order” API. Remove the description of [UnionPay]](https://img.pdfslide.us/doc/110x75/6148aad22918e2056c22d629/opay-all-in-one-payment-services-api-document-v1145-20161005-remove-the-parameter.jpg)