Embed Size (px)
Citation preview

COLLABORATE 12 Copyright ©2012 Karen Brownfield Page 1
EBS R12 Payables Upgrade: Like for Like and Then Some
Karen Brownfield
Infosemantics, Inc.
Abstract Faced with Extended Support fees and required patches, E-Business Suite 11i users are seeking a quick Release 12
upgrade. Many companies are choosing a “like for like” approach wherein uptake of new functionality is
postponed until after the upgrade. However R12 introduces new functionality for payments, taxes, invoice entry,
and supplier management that must be incorporated. This presentation addresses the required new functionality
with hints on configuration thus meeting the upgrade objectives.
What is “Like for Like” A “Like for Like” upgrade seeks to move from the current release to the most current stable release. For E-Business
Suite, that means either Release 12.1.3 or Release 12.2.3. As the goal is to get to the new release in the shortest
time possible, organizations are saying they just want to keep what they have, but have it on 12.1.3 or 12.2.3. This
means that the upgrade will seek to prevent new customizations, in fact, the goal will be to retire existing
customizations. The upgrade process will still focus on testing all utilized functionality of the current release, but
adding new functionality will be done where either required or whether the addition requires little or no setup and
the new functionality can be absorbed without disrupting current operations or changing current business
processes. Change will be done only when absolutely required by Release 12.
This approach works for the majority of the E-Business Suite modules. However, for Payables, the “absolutely
required” includes
• Suppliers – new form, new tables
• Invoices – modified form, new layer (lines)
• Payments – new module, new form, required use of BI Publisher
• Banks – new forms, ownership transferred to legal entities (as opposed to operating units)
• Subledger Accounting – new layer between Payables and GL, impacts closing
• Taxes – new module (EBTax or Ebiz Tax)
And while multi-org access control isn’t “absolutely” required, it does impact the forms and does require setup and
consideration.
This paper will look at each of the above areas and BRIEFLY discuss the changes and offer suggestions as to how to
adopt the changes in your organization.
Suppliers In 11i, suppliers consisted of two levels, the header and the site. The site belonged to the operating unit and
contained the address and all the site defaults. This meant that if multiple sites shared an address, the address
had to be rekeyed for each site.
Reality is that the address belongs to the supplier. It is not dependant on the operating unit or the defaults
assigned per operating unit. Release 12 recognizes this and moves the address above the operating unit.
Addresses are keyed once. Any address keyed by users of an operating unit is visible to all users (assuming one has
access to view/update suppliers). Companies then decide which operating units need access to an address and
subscribe the Operating units to the address. The result is a site with the same name as the address. Defaults are
then entered for the specific site. The existence of the site is visible only to users authorized to view/transact in
that operating unit.

COLLABORATE 12 Copyright ©2012 Karen Brownfield Page 2
One can even setup multiple sites for the same address within the same operating unit (the additional sites will
have to have a site name that is not the same as the address name). This would be done where you have 2 or more
sets of defaults that you want to apply for the same address. If this is the case, for the site name use the address
name plus some identifier that indicates which defaults are identified.
The following chart shows the differences between the Release 11i model and the Release 12 model.
Unfortunately, the new R12 tables, AP_SUPPLIERS and AP_SUPPLIER_SITES_ALL mask the complexity of this new
model.
Suppliers and addresses also exist in the TCA tables. For those interested in how the AP tables map to the TCA
tables, see the Technical Information section (or the white paper) found in MOS note 1377888.1 “White Paper:
Understanding and Working with Employee Suppliers in R12”.
In 11i, the Enter Supplier form opens up in Entry mode. This can lead to inadvertent entry of bad records or
duplicates. Release 12 opens to a search screen. If you are planning to add a new supplier, use this search screen
to first check whether the supplier already exists. Search by name or Taxpayer ID (US EIN/TIN number) or Tax
Registration Number (Tax ID for non-US countries). Only after this search yields no results should the “Create
Supplier” button be pressed.

COLLABORATE 12 Copyright ©2012 Karen Brownfield Page 3
Above is the screen from 12.1.3, below from 12.2.3. Screens from both releases will be shown where there is a
difference in appearance or functionality.
Of course, if the goal is to change an existing supplier, entering the appropriate information will return that
supplier. If the supplier exists and the query criteria limits the search to a single record, the following screen
appears.
The landing page for a query shows all sites with the key purchasing and payment defaults. The responsibility used
to perform this query had access to multiple operating units. All four sites actually share the same address. This
would be inferred by the 3 sites that share the name “ADVANTAGE FR” but exist in different operating units. That

COLLABORATE 12 Copyright ©2012 Karen Brownfield Page 4
“ADV. FR INTRA” also shares the same address can only be validated by click the Address Book tab and drilling
down to the sites attached to the address.
One advantage to R12, if the initial supplier query returns multiple records, the choices are presented and you
must click the blue box in the Update column to see the above record. This form also supports % as a first
character (most application framework forms do not).
Above is the 12.1.3 screen, below the 12.2.3 screen. The Application Framework technology in 12.2.3 supports
many updates, such as the ability to sort by any column, to resize the columns, to export the results of a table and
to pull the table out as a separate tab. As in 12.1.3, you can also change the column prompts and re-order or add /
remove fields to/from the table. The ability to Personalize the form is required to add/remove sort from the
column, change prompts, reorder the columns and/or add/remove fields to/from the table. Unlike 12.1.3, making
the size of the screen smaller through standard Windows minimization no longer wraps the column headers and
auto-resizes the columns. And you cannot use the new functionality to make a column smaller than the column
header prompt. As the Payables development team did not make allowance for this, the supplier form now
includes a scroll bar under the Service Results in order to see all the columns. As the Update column is the last
column, one must use this scroll bar to select the supplier to update. Until the Payables development team
increases the maximum width of the table, personalizations can be used to re-order the columns so that the
Update button displays without the necessity to use the scroll bar.
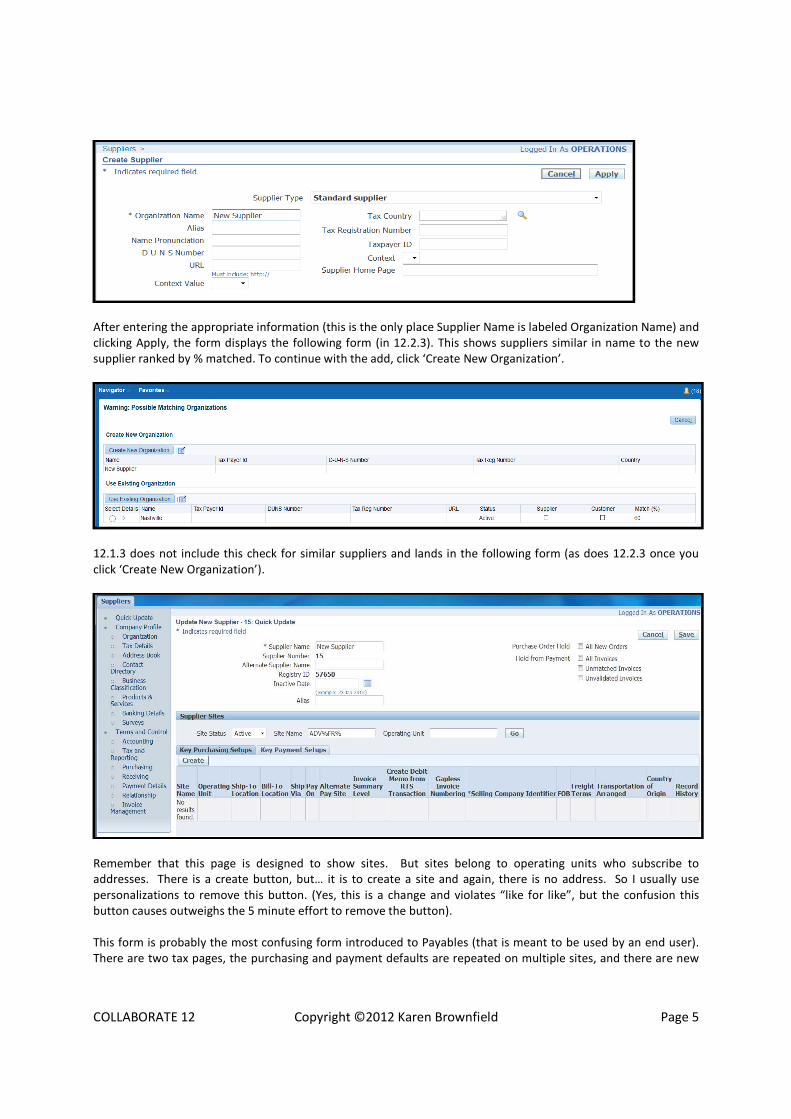
If you click Create Supplier, this is the form you see
COLLABORATE 12 Copyright ©2012 Karen Brownfield Page 5
After entering the appropriate information (this is the only place Supplier Name is labeled Organization Name) and
clicking Apply, the form displays the following form (in 12.2.3). This shows suppliers similar in name to the new
supplier ranked by % matched. To continue with the add, click ‘Create New Organization’.
12.1.3 does not include this check for similar suppliers and lands in the following form (as does 12.2.3 once you
click ‘Create New Organization’).
Remember that this page is designed to show sites. But sites belong to operating units who subscribe to
addresses. There is a create button, but… it is to create a site and again, there is no address. So I usually use
personalizations to remove this button. (Yes, this is a change and violates “like for like”, but the confusion this
button causes outweighs the 5 minute effort to remove the button).
This form is probably the most confusing form introduced to Payables (that is meant to be used by an end user).
There are two tax pages, the purchasing and payment defaults are repeated on multiple sites, and there are new

COLLABORATE 12 Copyright ©2012 Karen Brownfield Page 6
tabs that don’t exist in 11i. Organizations will benefit by documenting the steps needed to setup a supplier for
their organization with the appropriate navigation.
In 12.2.3, when the form opens you might see either of the following:
This is due to the new integration with OBIEE as described in MOS notes 974422.1 – Embedding Analytics in Oracle
E-Business Suite and 1900903.1 – How To Remove Blank Space At Top Of Supplier Form – Rich Container. To
remove the “cannot display the webpage” message, blank out the profile option “FND: Oracle Business Intelligence
Suite EE base URL” or set it to the URL for your OBIEE instance. Setting the URL to null displays the large blank
space, which is removed by using Personalizations to set “Rich Container” to Rendered False. If the Financials
Analytics are installed and the link properly made, this page will display the “Top 20 Suppliers” analytic.
Some Upgrade Considerations:
• 11i Sites upgrade to both addresses and sites
o The Site name becomes the address name
o If multiple sites reference the exact same address, the address name is selected from the site name
that ranks first alphabetically
� Example
• Site Name: PHILADELPHA, OU1-PHILLY
• Resulting Address Name: OU1-PHILLY
o Address will have two sites: PHILADELPHIA, OU1-PHILLY
• There is no “About this record” information
o Oracle currently considers adding this information as an enhancement request
o MOS note 1484326.1 – R12: Unable To View Record History In Supplier HTML Pages explains how to
use Personalizations to show this information
� See the presentation “Ten More Forms and OAF Personalization Examples – Version 3…Updated
for 12.2” by Susan Behn for screenshots showing how to implement this personalization
• http://www.infosemantics.com/presentations/
• There is no seeded Inquiry form
o See MOS notes 473346.1, 559510.1, 1089925.1, and 328525.1 for instructions how to create one
using menu exclusions and personalizations
• To allow update only to Contacts, follow MOS note 466699.1
• By default, Employee Suppliers (Suppliers with Vendor Type = Employee) are not available in the Supplier
screen (they exist in the tables, they are just not viewable)
o Entry is done via HR screens
o Supplier records created when expense report created
o Changes made in HR are synced to the supplier tables via the “Employee Update Program”

COLLABORATE 12 Copyright ©2012 Karen Brownfield Page 7
o Inquiry and/or Update can be restored. See MOS note 1377888.1 “White Paper: Understanding and
Working with Employee Suppliers in R12”
• TINs may not be upgraded for Suppliers with a Corporation Type of Individual, Partnership
o MOS note 1271092.1 “R12: Generic Data Fix (GDF) Patch 10635325 – GDF for Missing Supplier
COLUMNS INDIVIDUAL_1099/TAX_PAYER_ID, JOB_TITLE, SERVICE_TOLERANCE_ID during 11i to R12
Upgrade”
o The script ap_inc_SuppUpg_fields_sel.sql selects Individuals, but not Partnerships. Add
‘PARTNERSHIP’ to the values in the line ‘AND s.organization_type_lookup_code IN’
While “Like for Like” excludes adoption of new functionality, the following functionality has been on the “Top 10”
enhancement list for years and thus bears mentioning.
• 3rd
Party Payments – ability to receive invoice from one supplier and write check to another party such as
a bankruptcy court
o Define the relationship on the Supplier form, Relationship page
o The check will be written to the party specified using the method specified for that new payee
o When invoice is entered, the 3rd
party to be paid is shown on the invoice
o If the original supplier receives a 1099, 3rd
party payments are still reported to that supplier
• AP/AR Netting – 11i provided a report, R12 provides true netting resulting in closing either AP or AR
invoices and creating a new invoice with the resulting balance
• MOAC Access – Supplier Maintenance can be centralized across the entire organization and reporting of
purchases can be reported for the entire organization enabling better information necessary to negotiate
pricing
Invoices At first glance, the invoice form doesn’t look that different: some extra fields, some new buttons, a new tab. But
these “small” changes actually have the most major impact on the testing needed for your upgrade.
The summary page does show more information, including the new functionality for Retainage invoices (requires
purchase of Services Procurement). The new fields in the invoice header support 3rd
party payments (Remit-to
fields), tax applicability (not shown), and the ability to deal with penny rounding errors in tax calculations (tax
control amount).

COLLABORATE 12 Copyright ©2012 Karen Brownfield Page 8
The major impact is the insertion of the new Lines tab. Now an invoice line can be split into multiple distributions
similar to splitting a shipping line in Purchasing. This new tab enables greater functionality in the area of tax and
matching and allocations. However, this new tab introduces new restrictions for updating lines after they have
been validated or accounted.
Note that the R12 screen shots are from a Vision instance where a tax regime was created instead of accepting the
upgraded regime (see section on tax). Therefore tax is calculated even though no Tax Classification Code is
specified. If an upgraded regime was used, a tax classification code would have to be specified as one does in 11i.
New Buttons New Buttons New Buttons
New Fields New Fields New Fields
New Tab

COLLABORATE 12 Copyright ©2012 Karen Brownfield Page 9
Note also the difference in the allocation. In 11i, the allocation results in multiple lines. In R12, the Miscellaneous
line has no distributions. The result of the distribution is in the Distributions tab.
Although there are now two zones, one for the line, one for the distributions, if the line only has a single
distribution, all the applicable information can be entered on the line. This preserves the speed of data entry for
the majority of invoices where there is only the single distribution.
The biggest drawback to the new form is the limitation on making changes. Until the invoice is validated, all
changes are possible. But once the invoice is validated, lines involved in tax, allocations, and/or any type of
matching can only be changed by discarding the line. Discarding a line reverses all distributions and reverses all
matches. If a matched line or line referenced in an allocation has multiple distributions and only one distribution is
wrong, you can’t simply reverse the one distribution. You have to discard the whole line.

COLLABORATE 12 Copyright ©2012 Karen Brownfield Page 10
The same limitation of course extends to lines that are accounted as accounted lines had to be validated before
they could be accounted.
Making changes is also where all the bugs are. You will need to ensure that you have entered every type of
transaction where a line is matched or allocated or tax is applied. They you will need to test changes to each of
these types of lines. You need to test changes before an invoice is validated, changes after a line is validated, and
changes after the line is accounted. You need to test changes to invoices entered after the upgrade and changes to
invoices entered prior to the upgrade. Focus especially on invoices where tax has been applied. Focus again on
invoices matched to POs where the PO specified the tax to be applied.
In order to avoid these bugs, use Patch Wizard to ensure you have applied all the latest recommended patches. As
12.1.3 has been out for several years, Oracle released a rollup of all outstanding patches as of Dec 4, 2013. See
MOS note 1638535.1 “Oracle E-Business Suite Release 12.1.3+ Rcommended Patch Collection 1 (RPC1)” for the
instructions to apply this patch. If upgrading to 12.1.3, make sure to apply all the recommended patches to 12.1
before running any data drivers (12.2.3 has this code embedded in the upgrade scripts). Then if you have issues,
you will at least avoid the cycle of applying patches to get to the latest release and verifying the issue still exists.
For issues with Payables invoices, Oracle now requires that you run a script to detect whether a Generic Data Fix
(GDF) has already been created. See MOS note 1360390.1 “R12: Master GDF Diagnostic to Validate Data Related to
Invoices, Payments, Accounting and Suppliers [VIDEO]”. This note gives instructions for registering this program as
a concurrent program so that it can be run by the Business Analyst supporting Payables.
There are some new features that are quick wins.
• Tax Control Amount – this field in the invoice header forces the tax calculations to match the amount
entered. This will remove penny round-off errors.
• Ability to enter Assets fields while entering the invoice
And then there is the ability to amortize expenses. This feature requires quite a bit of setup in SLA and should not
be considered part of a “like for like” upgrade. However, it should on the list for functionality to be uptaken after
the upgrade is finished. To learn more about this feature, see MOS Note 1315106.1 “R12: Subledger Accounting:
White Paper on Multi Period Accounting”.
Payments The form used to create payment batches in 11i has now been replaced with an entirely new module – Payments.

COLLABORATE 12 Copyright ©2012 Karen Brownfield Page 11
And this new module has entirely new and different forms. Payments | Entry | Payment Batches has become
Payments | Entry | Payments Manager. This opens the following form. The graph can be hidden in 12.2.3
This form shows all batches across your entire organization. You can click on the link for any of the statuses and
see the batches, but you can only drill to the details and transact on the batches for your organization.
Payment Batches are renamed Payment Process Requests or PPRs for short. To start a new PPR, either click the
Submit Single Payment Process Request or click the Payment Process Requests tab and click the Submit New
Request button. The form provides multiple tabs so that you can specify all the parameters necessary to run a
payment batch.

COLLABORATE 12 Copyright ©2012 Karen Brownfield Page 12
The Selection Criteria tab (see screen shot above) specifies:
• Pay From Date – not available in 11i
• Pay Through Date
• Supplier Type – not available in 11i
• Payee – called Supplier in 11i
• Payment Method – can’t be specified in 11i, defaults from Payment Document
• Invoice Batch Name
• Payment Priority High / Low
• Include Only Due
• Include Zero Amount
• Pay Groups (11i only allows one)
• Payment Currencies (11i only allows one)
• Operating Units (11i only allows one)
• Legal Entities (concept not avail in 11i)
The Payment Attributes tab specifies
• Payment Date (you can now backdate checks)
• Disbursement Bank Account
• Payment Document
• Payment Process Profile (new field for R12)
• Payment Exchange Rate Type
• Override Settlement Priority (new field for R12)
• Override Bank Charge Bearer (new field for R12)
• Transfer Priority (new field for R12)
• Starting Voucher Number

COLLABORATE 12 Copyright ©2012 Karen Brownfield Page 13
The User Rates tab (no picture necessary) allows specifying user rates for all the currencies selected on the
Selection Criteria tab.
The Processing tab specifies
• Maximize Credits (new field for R12)
• Stop Process for Review After Schedule Payment Selection (11i equivalent is clicking Select Invoices, Build
Payments, and Print Preliminary Register but not Format Payments)
• Calculate Payment Withholding and Interest During Scheduled Payment Selection (new option for R12)
• Stop Process for Review After Creation of Proposed Payments (11o equivalent to clicking Format
Payments, but not Print Now)
• Create Payment Instructions (11i equivalent to Print Now)
The Validation Failure Results tab specifies (new fields for R12)
• Behavior to follow if there is a failure generating a specific document
• Behavior to follow if there is a failure generating a specific payment
The Additional Information tab allows entry of DFF information. Note that DFFs are always called Additional
Information on the new OAF forms.
Specifying this much information each time is not only time consuming, but it is very prone to error. And most
companies run the same parameters (except date) or groups of parameters each time a batch is created. Oracle
provided the answer for this – templates.
Templates look exactly like the PPR form except instead of specifying the Date, one specifies Days, i.e. how many
days forward or backward do you want a date calculated based on the date the PPR is executed. (To backdate a
check, on the Payment Attributes tab, click Extra Days for Payment Date and enter a negative number. This also
requires “Allow Pre-Date” to be checked on the payment tab of Payables Options). Values in the template can be
overridden when the template is used.
So set up templates for each of your parameter groups. If you use multiple banks, multiple payment types,
multiple currencies, then name your template so that the person selecting the template knows what the
parameters will be. As the description also shows in the LOV, you can use this field to further describe the
template. If you have multiple orgs, the org name should be in the template name as well. Names like VISOPS
BoA-204 Check USD tell one that this is a batch for Vision Operations for USD checks drawn off Bank of American
account ending in 204.
So now instead of specifying all the parameters each time you run a PPR (remember this is the new name for
payment batch), just specify the template and name the batch. Easy.
But before you can specify a template, you must do some setups. The upgrade will populate many of these setups
for you, but the ones mentioned below must be performed as the upgrade cannot make these decisions for you. In
order:

COLLABORATE 12 Copyright ©2012 Karen Brownfield Page 14
From Payment Administrator screen
• Register New XML Publisher Format Templates
• Define New Payment Formats
• Create Payment Process Profiles
• Adjust any other settings in the Payment Administrator page and mark all steps complete
From Bank Accounts screen (see next section for a discussion of these setups)
• Clean up Bank Account Settings, Assign the Formats to the Payment Documents
Any document produced in a PPR whether it’s an electronic file, a check, a positive pay file, or remittance advice
will require a XML or BI Publisher template. Registering these templates loads the template to the database and
specifies the language, country, template type (rtf, eText, xsl, pdf) (and output format (excel, pdf, html, rtf).
Defining the Payment Format links the template with the code used to pull the data from the database and create
an xml file. Note that Funds Capture is used for AR and Funds Disbursement for AP. For example, to register the
template used for the printed check, select ‘Disbursement Payment Instruction’. Make this selection BEFORE
clicking the Create button.
Note that you have very limited choices for the program that extracts the data. You cannot add programs to this
list.
Payment Process Profiles or PPPs specifies “handling of the documents payable, payments, and payment
instructions by including specifications for payment instruction formatting and transmission. When you create a
payment process profile, you must specify whether the profile governs payment processing for printed or
electronic payments. Accordingly, the payment process profile allows you to assign appropriate payment
document printing values or payment system communication configurations. The payment process profile also

COLLABORATE 12 Copyright ©2012 Karen Brownfield Page 15
includes a payment instruction format, which is in turn associated with an XML Publisher template, as well as rules
for grouping documents payable into payments and payments into payment instructions.” (from Oracle® Payments
Implementation Guide, Release 12.1, Part No. E13416-04).
The screen paints differently for Electronic and Printed. However, if when you change the Processing Type to
Printed before entering the Payment Instruction Format, the field disappears from the screen, you have
encountered the bug described in MOS note 1253274.1 “R12 Payment Instruction Format – Attribute
PaymentFormatCode in PaymentProcessProfileAm.PaymentProcessProfilesCreateVO is required”. Note: the
ability to specify bank accounts also disappears. Until you can get the patch applied, enter the Code, Name and
Payment Instruction Format, choose your banks, then change the type to Printed.
Some Security hints: click ‘Automatically Print after Formatting’, ‘Disallow Save/RePrint’ and select your check
printer’ to have checks print to a specific printer and prohibit users from printing to a different printer or using the
reprint to print to a different printer (remember, with BI Publisher, you can now include MICRs and even
signatures, so you don’t want to tempt people to commit fraud).
Another hint: until you go live, select noprint as the printer so that test files are not sent to the printer. You can
change the setting to prove that the print file will generate, but it should be done under very controlled
circumstances where someone can verify the test checks are then voided and/or destroyed.

COLLABORATE 12 Copyright ©2012 Karen Brownfield Page 16
Because the screens show differently in initial entry mode and “Save and Add Details” mode, it is recommended to
fill out the top of the screen, click Save and Add Details before entering data in the other zones.
Usage Rules allow you to specify the currencies, banks, payment methods, and first party organizations (Legal
Entities and/or Orgs). Since you have already assigned a format, the usage rules should match this template, i.e. if
your template includes the MICR, then make sure you restrict the use to the bank to which the MICR belongs or
that you don’t assign a format which produces a negotiable document to the payment method of Wire.
Payment Systems are used more with Funds Capture (AR) and are for electronic payments only and are out of
scope for this paper.
The Payment Creation tab provides fields to segregate how invoices are grouped to be on a single check. It can
also eliminate overflow checks. See MOS note 1178989.1 “How to Prevent Overflow Documents”.
The Payment Instruction tab specifies the sort sequence for the checks, allows grouping of payments into separate
files, and permits limiting the payment batch to a total amount.
The Payment Instruction Format tab provides another spot to specify the Payment Instruction Format if you forget
to specify the format before changing the Processing Type to Printed.
The Reporting tab specifies the formats for the Payment Instruction Register (Final Payment Register for checks),
the Positive Pay file, and the Separate Remittance Advice file. If when running your PPRs, you are missing any of
these reports/files, return to this screen and correct the setups.
For a good white paper that compares 11i and R12, see MOS Note 7333537.1 “R12 Upgrade: Functional upgrade
Impacts Document for Oracle Payments”.
Some Upgrade Considerations
• All Payment Process Requests (PPRs) produce a file, thus everything except recording manaual payments
requires a BI Publisher template
o Multiple templates are allowed, but a custom data extract cannot be selected
• Payment Documents assigned to non-standard (Oracle) formats will be deleted during the upgrade and
must be recreated
o Evergreen is a non-standard format
o Run the Bank Account Listing in 11i just prior to starting the upgrade so there will be a record of
the “Last Used” for each payment document
• See paragraph at end of Banks section for discussion of document numbers for non-check payment types
• Review current payment documents and note how many different formats (now called Payment
Instruction Format) are currently used as each one will require at least one PPP
• Research current payment batch parameters to determine which templates are needed so that the user
can start a payment batch by simply picking a template and typing in the payment batch (now PPR) name
Banks Banks are now owned by the Cash Management module. With that change came new tables and a new entity
ownership module (note that the old tables still exist, however they are empty). Banks and Bank Branches (since
they “belong” to the bank, not your company) were moved above the organization level. Bank accounts belong to
Legal Entities, therefore a bank account could indeed belong to more than one organization. Payment Documents
belong to the organization.
The upgrade will separate out your accounts (Release 12 terminology calls these Internal Banks) from those
belonging to your customers or suppliers. This discussion covers Internal Banks. Customer and Supplier bank
accounts are now stored in different tables and not accessible from the Bank screens.

COLLABORATE 12 Copyright ©2012 Karen Brownfield Page 17
Security is enhanced in R12. First, the upgrade masks the bank account number, i.e. only the last four digits show
in the screens. Even in update mode (shown below), the account is masked. This masking is controlled by the
profile option “CE: Mask Internal Bank Account Numbers”. Choices are “Mask – Last four visible”, “Mask – First
four visible”, and “No Masking”.
Payables Manager comes seeded with menus to access bank accounts, but to get a true picture of the bank
structure; you must access it via Cash Management menus. Navigation path is Setup | Banks | Banks. This lands
on a search screen, but if you click the Overview tab, you will a list of countries and the banks seeded by Oracle for
that country. Oracle will match your bank names to the seeded ones and if the match is exact, will fold your
accounts into the seeded ones. Note that it matches by case so Fleet and FLEET are not the same and FLEET will be
setup as a separate bank.
To see details about a specific account or to update those details, click the button in the details column. Now you
can see the Account Owner and Use, Account Information, Account Controls, Account Access, and Account
Contact. Clicking the Update button allows you to update this information.

COLLABORATE 12 Copyright ©2012 Karen Brownfield Page 18
The Account Owner and Use lists the owner and which application can access the account. Again, the owner will
be a legal entity. The Account Information has the account name and number and is where you inactivate an
account.
Account Controls list the accounting for the account and control information for each application that uses the
account. For Payables, this includes whether the account is pooled, allows multiple currency payments, allows
zero payments, and what the minimum and maximum payment amounts are. This page also contains the controls
for reconciling the bank statements.
Spend time prior to the upgrade cleaning up your accounts. End date old accounts and old payment documents.
Verify the controls are correct. If you don’t allow zero payments, then make the minimum payment .01. If this is
an account used to clear zero payments, make the maximum and minimum .00.
As stated earlier, accounts belong to Legal Entities which may have multiple operating units. The Account Access
Tab controls which operating units within the legal entity has access to the account and for which applications.

COLLABORATE 12 Copyright ©2012 Karen Brownfield Page 19
Click the pencil in the Options column allows you to override the accounting, but not the controls.
Payment Documents are accessed via the Bank Accounts menu regardless of the responsibility you use. Query the
account, click the select button, then click Manage Payment Documents.
Click the Update Pencil to make changes or the Create button to create (or recreate ones lost in the upgrade).
Paper Stock Type is either Blank or Prenumbered. If you choose Blank, you will not be able to restrict it to
Manually issued payments as this choice disappears. Leaving the choice Prenumbered to preserve the ability to
restrict this document to manual payments will not impact the check printing.

COLLABORATE 12 Copyright ©2012 Karen Brownfield Page 20
Select the appropriate format either from the Oracle seeded formats or the formats defined earlier. This is the
document layout.
One other hint that will help with your upgrade. The Manual / Quick Check form as delivered can cause the LOV
for the payment document to duplicate records.
Rearranging the fields (and I hid a few as well) yields

COLLABORATE 12 Copyright ©2012 Karen Brownfield Page 21
If this rearrangement doesn’t eliminate the duplicate LOV issue, then go back to your setups and work on the
format and PPP definitions until the LOV for the Payment Document does not contain duplicate values.
See MOS Note 1403697.1 “LATEST – Payment Documents Setups and Patches” and 1116303.1 “Multiple Payment
Document Entries in the Payment Workbench LOV” .
It should be noted that there are now two numbers that reference payments. One, the Payment Document
number is for non-electronic methods and is the check number. The other, Payment Reference Number, is
assigned to all methods of payments. Many R12 users have found this very confusing and want electronic
payments to also have a “check” or Payment Document number. The functionality can be regained through patch
8971547. See MOS note 467851.1 “Payment Document Number is Not Picked Correctly”. While the cumulative
RPC1 patch does not include patch 8971547, the version of the objects in the RPC1 patch is higher than the
8971547 patch and thus the RPC1 patch does enable this functionality.
Subledger Accounting (SLA) / Closing Subledger Accounting is a new module that provides a single repository for accounted subledger transactions.
Setting up SLA allows one to create rules to determine the JE Header or JE Line descriptions and to “adjust” the
accounting for transactions as they pass through the SLA layer. Definitions are set at module and transaction type
levels.
As the thought of seeing something in GL that looks different from the accounting shown on an invoice horrifies
most organizations, for Payables, the recommendation is to use the seeded definitions. The only changes that
should be considered are changes to the JE descriptions, and even then only if testing reveals issues.
The inquiry screens are different as well. The 11i screen, View Accounting, is replaced by a choice of query by
Journal or by Event Class / Type.

COLLABORATE 12 Copyright ©2012 Karen Brownfield Page 22
The Inquiry by JE supports And / Or logic and allows you to enter additional selection criteria. However, you
cannot query by an entire accounting string. You can only specify segments that are identified by a qualifier, i.e.
balancing, natural account, cost center, management.
The inquiry by Event Class / Type does not allow the degree of detail that the JE inquiry screen does. Even with
Advanced Search there is no ability to restrict the accounting string. In fact, the accounting string is not one of the
returned fields unless you click the View Journal Entries button.

COLLABORATE 12 Copyright ©2012 Karen Brownfield Page 23
The Payables Account Analysis Report (internal name APXAAREP) is replaced by the Account Analysis Report
(internal name XLAAARPT). Like many R12 reports, this one is now a XML Publisher report, which means if you
don’t like the layout, then change the template.

COLLABORATE 12 Copyright ©2012 Karen Brownfield Page 24
The process to create journal entries and transfer them to GL has also changed. The new process, called Create
Accounting, permits running the accounting process in three modes: Draft, Final, and Final Post. Draft allows you
to see the results of the JEs but doesn’t actually create the accounting, thus you can change it. Final creates the
accounting (with the option to transfer to GL as part of the accounting process). Final Post creates the accounting,
transfers the results to GL and posts the JE.
This process initiates a series of programs. Which programs execute depends on the mode.
If you wish to learn more about SLA, see the various papers by Alyssa Johnson in the OAUG Conference paper
database.
By default, the upgrade only converts 6 months worth of data to SLA (or current fiscal year, whichever is greater)
for all the subledgers except Payables. You can choose to bring over more than that, but you must patch 11i before
you start the upgrade and run a concurrent program in 11i. For Payables, all AP events, headers, and lines are
converted, BUT the conversion of XLA_DISTRIBUTION_LINKS follows the choice of data conversion made for the
other subledgers. Any payment or invoice without a XLA_DISTRIBUTION_LINKS record that is cancelled will not
account if the transaction GL date is prior to the upgrade. Thus unless the choice is to convert all data, ensure old
un-paid invoices are either cancelled or paid and un-cleared checks are cleared. See MOS note MOS note 604893.1
“R12.0 and R12.1: FAQ for the SLA Upgrade: SLA Pre-Upgrade, Post-Upgrade, and Hot Patch” for more information.
All Mo
All Modes except Draft
Transfer to GL

COLLABORATE 12 Copyright ©2012 Karen Brownfield Page 25
Oracle modified the upgrade scripts to allow conversion by module instead of month unless you are running
Projects. And the patch to 11i isn’t required either. See MOS note 1376752.1 – SLA: Upgrade Historical Subledger
Transaction Accounting Program (XLAONDEUPG).
Several reports were changed or are new
• Payables Posted Invoices Register
• Payables Posted Payments Register
• Subledger Period Close Exceptions Report
• Unaccounted Transactions Sweep
• Third Party Balances Report
• Accounts Payable Trial Balance
The new Accounts Payable Trial Balance now includes a parameter to list the amount posted to each liability
account that is not from Payables. This option greatly enhances the ability to reconcile the liability accounts.
The Oracle Proactive Support group has put together a set of instructions and documents for the closing process
across all of the modules. These documents are accessed from MOS note 335.1 – Period Close Advisor: E-Business
Suite. The note includes a step-by-step guide, tabs for each module, a spreadsheet and references to white papers
and other notes.
Click the Payables tab, read the Overview, then click each link in the step-by-step guide to get instructions or
further links.
Below is a screenshot of a portion of the spreadsheet.

COLLABORATE 12 Copyright ©2012 Karen Brownfield Page 26
For further information see:
• MOS note 1357449.1 – EBS R12 Period Close Advisor Overview
• MOS note 1553430.1 – E-Business Suite (EBS) – Proactive Video Training Series – Period Close Advisor
• MOS note 437422.1 – R12 Troubleshooting Period Close in Payables
Tax This paper is not meant to be a comprehensive look at the new E-Business Tax or EBiz Tax module. Since the
premise of the paper is “like for like”, the assumption is that you will be using the regime seeded for you by the
upgrade. Note that it is possible to later define your own regime and thus take full advantage of this module’s
functionality.
If your organization is tax exempt and has no tax codes set up, the upgrade will still create an upgraded regime,
but the purpose of this regime is to not apply tax, i.e. maintain the tax exempt status.
Existing tax codes become Tax Classification Codes. The invoice form now asks for the tax code by this new name.
When the tax classification code is entered on the transaction line and either the Calculate Tax button is pressed or
the invoice is validated, the tax rate associated with the tax classification code is applied and tax lines are created.
The upgrade creates a regime for each operating unit defined in 11i. The name of this regime is derived from the 2
digit country code from the operating unit address appended with “-Tax”. Thus in the US you get US-Tax. If you
are running Vertex or Taxware, the regime name is the 2 digit country code appended with “-Sales-Tax-101”.
The tax hierarchy is regime, tax, tax status, tax jurisdictions, rates, rules. Regime is either a country or group of
coutries. Tax is the level under the regime such at state, county, city. Status is a refinement of that like
STANDARD. Jurisdiction is WHICH state, county, city. The Tax Rate is the actual rate to be charged and the
effective dates. Rules govern when the tax is applicable.
Again, for upgraded regimes, you will enter the tax classification code, thus you must know the one to enter. For
regimes created from scratch, the tax engine decides which code to apply based on factors such as ship-to
location, product, your business classification, how the product is to be used, etc.
The upgrade sets “Configuration Owner Tax Options” for each event class (Invoice, Credit Memo, etc). This is set
to STCC or “Standard Tax Classification Code”. STCC uses direct apply rules, thus applicability by the factors just
mentioned isn’t available.
Using a upgraded regime certainly makes the upgrade faster and definitely satisfies the “like for like” project
mandate But there are some restrictions on this upgraded regime. You cannot
• Create new tax rules or modify existing rules (i.e. can’t use the various factors to determine applicability –
you enter the code, Oracle does not pick it for you)
• Modify existing formulas (but you can change rates to match increases/decreases passed by taxing
authorities by applying patch 9723745)

COLLABORATE 12 Copyright ©2012 Karen Brownfield Page 27
• Newly implement partner integrations such as Vertex or Taxware (to do this, just end date the old regime
and create a new one)
• Set up new tax groups (but existing 11i tax groups upgrade and work)
Upgraded regimes work. The functionality is very similar to 11i. Thus there is one less thing to set up, one less
thing to learn, one less thing to train someone on. This is the recommended approach.
However, after the upgrade, you should consider moving to a new regime and utilizing the full functionality. MOS
ID 1062897.1 “Case Study: How to Switch From an Upgraded Tax Regime to a New Tax Regime – Canada HST
example” is an excellent example of how to build a regime. Another MOS note that provides a white paper that
gives a very detailed look at how tax rules work in a new regime and how tax works in an upgraded regime is MOS
ID 464243.1 “E-Business Tax for Oracle Purchasing”.
Some resources for use after the upgrade when you do set up a new regime:
• MOS ID 473066.1 “How to Setup a Rule Using Expert Rule Entry in R12 E-Business Tax”
• MOS ID 1111553.1 “How to Setup Condition Sets and Determining Factor Sets for Tax Rules in R12 E-
Business Tax”
• MOS ID 1108463.1 “How Tax Determining Factors Work in R12 E-Business Tax”
• MOS ID 463001.1 “How to Use EBusiness Tax Seed Data”
• MOS ID 554492.1 “How to Setup Geography Hierarchy and Address Validation in Release 12”
• MOS ID 948414.1 “How to Configure a Tax for Automatic Self-Assessment in R12 E-Business Tax and
Payables”
• MOS ID 735991.1 “How to Use Tax Recovery in Release 12 E-Business Tax”
• MOS ID 948414.1 “How to Setup a Tax Authority”
• MOS ID 602863.1 “How to exempt suppliers from tax”
• MOS ID 549365.1 “How to Leverage Location Based Taxing Method in Purchasing and Payables”
• MOS ID 811272.1 “How to Turn off Tax calculation either selectively or entirely”
• MOS ID 578492.1 “How to Setup Tax Rule for EU
• MOS ID 578544.1 “How to Account for UK VAT Legislation”
• MOS ID 1063534.1 “How To Apply A Tax To Exports in R12 E-Business Tax (EBTax)”
• MOS ID 764297.1 “How to Apply Tax to Freight”
• MOS ID 1063491.1 “How to Compound Taxes”
If you are using Vertex and/or Taxware, some additional resources are:
• MOS ID 1335680.1 “Oracle E-Business Tax Now Validated With Four Tax Partners” – this has a line to a
recorded “Advisor” webcast explaining tax partner integration in Release 12 and has an imbedded
integration document “Oracle E-Business Tax: Vertex Q-Series and Taxware Sales/use Tax System
Implementation Guide”
• MOS ID 465260.1 “What versions of Vertex, ADP/Taxware and Thomson Reuters/Sabrix are certified with
E-Business Tax (EBTax)”
• MOS ID 806565.1 “Using Taxware and Troubleshooting the Integration with R12 eBTax”
• MOS ID 761438.1 “Using Vertex and Troubleshooting the Integration with R12 eBTax”
Multi-org Access Control (MOAC) Multi-org Access Control (MOAC) enables the ability to view and/or enter data across multiple operating units
within the same responsibility. The field “Operating Unit” is now present in almost every form so that
responsibilities that do utilize MOAC can specify the operating unit to which the data belongs.
Implementing MOAC is not required. Oracle will seed the appropriate data to continue to run in a single
org/responsibility mode. However, certain functions, like Supplier Entry, are vastly improved through MOAC.
Setup is easy. Create a security profile containing the operating units you wish to group together. Run the

COLLABORATE 12 Copyright ©2012 Karen Brownfield Page 28
“Security List Maintenance” program. Attach the new security profile to the profile option “MO: Security Profile”
for the responsibility used to access/enter the data.
Regardless of whether you use MOAC or not, one task must be done. There is a new field, MULTI_ORG_CATEGORY
in the table FND_CONCURRENT_PROGRAMS that determines whether a concurrent program can be run across
multiple operating units. Oracle occasionally seeded nulls in this field, which causes issues. And all custom
programs were upgraded with nulls in this field. Programs set to run in Single org mode will look like the following
picture. Note that Operating Unit is not on the parameter screen.
Programs set to run in Muliple mode will look like the following picture. Note that Operating Unit is now one of the
parameters.
One irritation of this new module is that for Single mode programs, if MO: Default Operating Unit has a value, it
will fill into the form and the parameters screen pops open. To select a different operating unit, the parameters
screen must first be closed. To avoid this issue, at the responsibilitiy level set MO: Default Operating Unit to a
value not allowed in the responsibility. The form will now open with a blank field and the parameters screen will
not open until a value is selected.
If you choose to not use MOAC, be aware that the Operating Unit field cannot be removed from the screen using
folders. And it is where the cursor lands in the Invoice Header zone, regardless of where you move the field. Just
change the size of the field using Folders to minimize the real estate taken by this field.
Developers should be aware that the 11i call to initialize the org context, dbms_application_info.set_client_info
(‘&org_id’), is now mo_global.set_policy_context (‘S’,&org_id).
Where to Focus MOAC is optional. The upgrade will create the profiles necessary to run just like 11i. But if you want to test this
new functionality, create a responsibility with just access to enter/update suppliers and a security profile that
allows access across at least two orgs. Set the profile option “MO: Security Profile” to the security profile just
created for the new responsibility and see how MOAC enhances entry of suppliers. Remember to run the “Security
List Maintenance” program after creating the new security profile.
Tax isn’t optional, but creating regimes from scratch is and will add significant time to your upgrade. So use the
upgraded regime. But do remember to file an SR with Oracle to ensure your upgrade scripts contain the latest tax
upgrade scripts. And test, test, test, test, test, especially changes to invoices that were created in 11i.

COLLABORATE 12 Copyright ©2012 Karen Brownfield Page 29
Banks changed both in form and ownership. And it is probable that you will lose some of your payment documents
during the upgrade. So run the Bank Listings in 11i and make sure that you have the last used check number for
each payment document. Clean up the banks in 11i, verify settings for allowing zero payments, etc. Then
update/create the payment documents and you’re done.
For Payables, Subledger Accounting is a matter of accepting the seeded SLAM and then letting Oracle do the work.
Do perform the setups so that if you create Accounting in Final mode that the results are automatically transferred
to GL and posted.
Closing just requires replacing the 11i reports with the R12 reports and adding a few new steps. To ensure all steps
are followed in the correct sequence, create a report set.
Payments will require the most setup. But the time spent on the setup should result in ease of use for the users.
So spend time creating the PPPs and templates. And remember all outputs of the process will be produced using
BI Publisher templates so start early creating and testing the templates.
The new Suppliers page is definitely the most confusing form. But the form works. Develop a procedure for
adding suppliers and create a cheat sheet to show the information stored on each tab for doing inquiry and
updates. Do this prior to the first CRP1 and testing will be much smoother. Additionally use Personalizations to
order the fields on the Payables and Purchasing tabs so that the fields important to your organization are displayed
without scrolling.
The changes to the invoice form do not seem that extreme, but this is the area where the majority of your testing
time should be spent. Create folders to ensure the fields you wish/need to use are accessible without scrolling.
Create multiple folders, one for matching, one for projects, one for neither, etc. With the possible exception of the
Tax Control Amount, postpone adding new features like Expense Amortization until after the upgrade. Focus on
testing every possible invoice type, matching, unmatching, transactions with tax, transaction without tax,
allocations. Test creating invoices. Test changes. Test cancelling – both the entire invoice as well as a single line.
Test these changes prior to validating, after validating, and after accounting. Test them on invoices created before
the upgrade (especially invoices with tax) and on invoices created after the upgrade. Document the process to
make changes. Note the type of change when the status of the invoice to which the change was made. The
process will be different at each stage and for each type of change. Test, test, test, then test again. Try to break it,
because once you are live, the breaks are really painful.
Potential Approach By now everyone is familiar with the standard approach of
• CRP1 – Test Oracle standard functionality
• CRP2 – Add WRICEP / CEMLI, freeze patches and changes
• CRP3/UAT – Test End-to-End
• Train
• Go Live
And despite best intentions, users will want to include new functionality. So create a list, estimate the effort to
setup and test, and prioritize it. If testing goes well and there is extra time in the schedule, work down the list.
With Payables in R12, a few nuances need to be added:
• CRP1
o Core Team must learn New Forms, functionality
o Set up Payments for ease of use, validate it with testing
o Test, Test, Test, Test (it cannot be repeated enough) Invoices
� Especially changes

COLLABORATE 12 Copyright ©2012 Karen Brownfield Page 30
� Especially with tax
• CRP2
o Validate Payment templates
o Validate any bank interfaces
o Work Prioritized Optional Functionality List
Then freeze everything and finish the upgrade.
Consider devoting a full-time resource just to Payables. Test cases will need to be expanded. New test scripts will
be needed. Training must be developed. New setups must be documented and executed. And despite the
maturity of 12.1.3, new problems will inevitably be encountered. It’s truly a full-time job for the life of the
upgrade.
Where to Find More Information Oracle has done an incredible job of providing information about Release 12.1.3 on My Oracle Support. The first
place to start is the Information Centers. These information centers provide lists of references about a particular
topic. For example, the 12.1 Information Center has links to
• Documentation Library
• Release Content Documents (description of differences between Release 12.0 and 12.1)
• Newsletters
• Free Training on specific topics
• Communities
• Upgrade Advisories
Key Information Centers for Release 12 include:
• MOS ID 806593.1 "Oracle E-Business Suite Release 12.1 Information Center"
• MOS ID 401740.1 "Oracle E-Business Suite R12.0 Information Center"
• MOS ID 1117544.1 "E-Business Tax (EBTax) Information Center"
• MOS ID 1336679.2 “Information Center: Use E-Business Tax Release 12 and later”
• MOS ID 1196096.1 "E-Business Suite: Oracle Payables Information Center"
• MOS ID 961285.1 "R12: Period-End Procedures for Oracle Financials E-Business Suite"
• MOS ID 1207527.1 "E-Business Suite: Oracle Financial Control Information Center"
• MOS ID 1319038.1 “R11i/R12 E-Business Suite: Oracle Payables Payments (Funds Disbursement)
Information Center”
• MOS ID 1345061.2 “Information Center: Using Oracle Payments Release 12”
• MOS ID 1383482.2 “R12: Information Center: Troubleshooting Oracle Payments”
• MOS ID 1383396.2 “Information Center: Troubleshooting Oracle Payments Funds Disbursement for
Payables Release 12”
• MOS ID 1390002.2 “Information Center: Using Oracle Payments Funds Disbursement for Payables Release
12”
• MOS ID 1345115.2 “Information Center: Installing and Configuring Oracle Payments 12”
• MOS ID 1330739.1 “Oracle Payables (AP): Create Accounting Information Center
• MOS ID 1363041.2 “Information Center: Overview: Oracle Payables – Suppliers R12 and Higher”
• MOS ID 1383309.2 “Information Center: Oracle EBusiness Tax – Payables Related”
The following notes will help with answering questions and troubleshooting.
• MOS ID 1305001.1 “R12: Master Troubleshooting Guide for Payables (FD) Payment Process Requests
(PPRs) in the Oracle Payments application (IBY)”
• MOS ID 1313324.1 “ Troubleshooting Create Accounting Master Note for Oracle Payables Release 12”
• MOS ID 1311932.1 “R12: Master Note APXIMPT – Payables Open Interface Import – Troubleshooting
• MOS ID 1320497.1 “R12: Master Troubleshooting Guide for the AP Payments Workbench [Video]”

COLLABORATE 12 Copyright ©2012 Karen Brownfield Page 31
• MOS ID 1353280.1 “R12: Master Troubleshooting Guide for Oracle Payables Check Printing issues
• MOS ID 1372288.1 “R12: Master Troubleshooting Guide for the Accounts Payable Trial Balance Report”
• MOS ID 1348102.1 “R12:Master Troubleshooting Guide for Oracle Payables Payment Formats &
associated XML Publisher Templates”
• MOS ID 1373688.1 “R12: Master Troubleshooting Guide for Supplier Sites Open Interface Import Report
(APXSSIMP) [Video]”
• MOS ID 1373699.1 “R12 Master Troubleshooting Guide for Supplier Contacts Open Interface Import
Report (APXSCIMP) [Video]”
• MOS ID 1373689.1 “R12: Master Troubleshooting Guide for Suppliers Open Interface Import Report
(APXSUIMP) [Video]”
• MOS ID 1375017.1 “R12: Master Troubleshooting Guide (MTG) for Accounting in Payables Release 12”
• MOS ID 437422.1 “R12 Troubleshooting Period Close in Payables”
• MOS ID 744185.1 “eBusiness Tax Release 12 Error Messages: Causes and Actions”
Recently released are a series of “Search Helper” notes. This notes are interactive. You click the Topic and then
get a guided list of “In addition the following occurs”. Clicking the second topic creates a list of articles on the
subject. These can be found by using the words “Search Helper” in the Search Knowledge Base window.
• MOS ID 1410773.1 “R12: suppliers Search Helper (Guided Resolution)”
• MOS ID 1345557.1 “R12: Payables Invoices Search Helper (Guided Resolution)”
• MOS ID 1404627.1 “R12: Payables Payments (IBY Funds Disbursements) Search Helper (Guided
Resolution)”
There are many papers on the OAUG web site about the features in R12. Quite a few of them were written by
Alyssa Johnson, who also co-authored the book The Release 12 Primer – Shining a Light on the Release 12 World.
Look for papers that she authored.
Conclusion The extensive changes certainly do not invalidate the “Like for Like” approach. In fact, they are a contributing
factor to make that choice. Organizations can only absorb a certain amount of change occurring at a single time.
Payables in R12 is certainly that change. Do your research, test, test, test, test (and test again), and proceed with
your upgrade.