Embed Size (px)
Citation preview
16 PotteryMaking Illustrated | November/December 2010
tthe necessity of invention
by Annie Chrietzberg
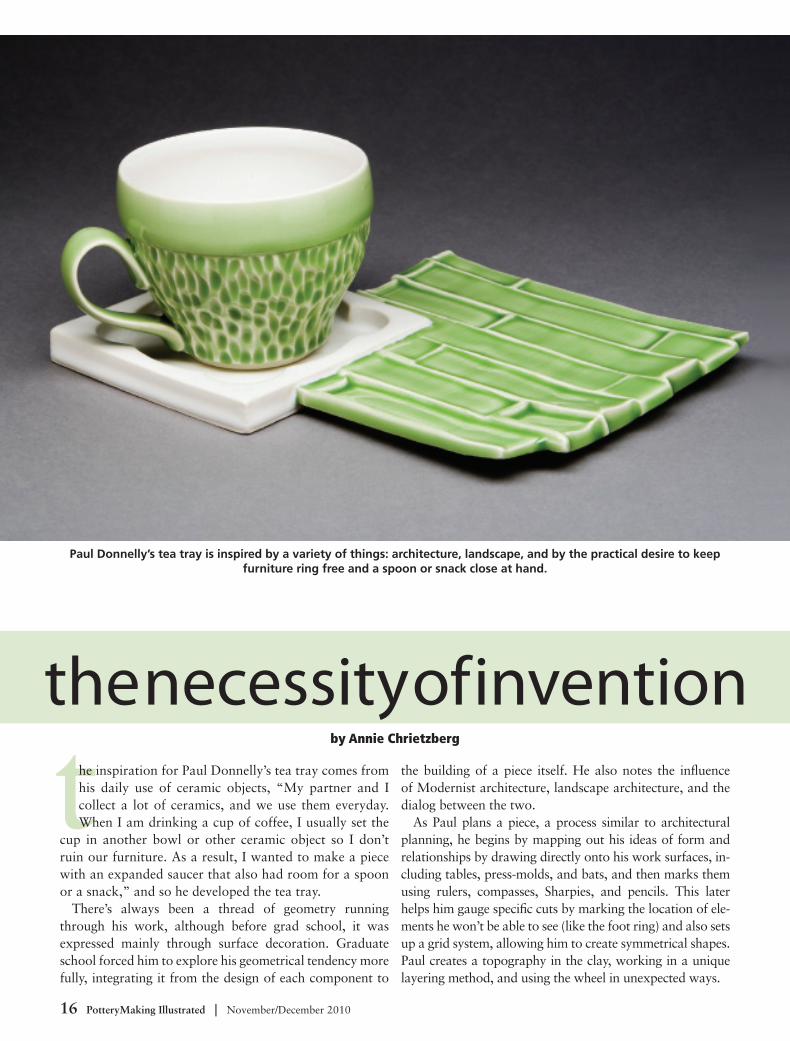
he inspiration for Paul Donnelly’s tea tray comes from his daily use of ceramic objects, “My partner and I collect a lot of ceramics, and we use them everyday. When I am drinking a cup of coffee, I usually set the
cup in another bowl or other ceramic object so I don’t ruin our furniture. As a result, I wanted to make a piece with an expanded saucer that also had room for a spoon or a snack,” and so he developed the tea tray.
There’s always been a thread of geometry running through his work, although before grad school, it was expressed mainly through surface decoration. Graduate school forced him to explore his geometrical tendency more fully, integrating it from the design of each component to
the building of a piece itself. He also notes the influence of Modernist architecture, landscape architecture, and the dialog between the two.
As Paul plans a piece, a process similar to architectural planning, he begins by mapping out his ideas of form and relationships by drawing directly onto his work surfaces, in-cluding tables, press-molds, and bats, and then marks them using rulers, compasses, Sharpies, and pencils. This later helps him gauge specific cuts by marking the location of ele-ments he won’t be able to see (like the foot ring) and also sets up a grid system, allowing him to create symmetrical shapes. Paul creates a topography in the clay, working in a unique layering method, and using the wheel in unexpected ways.
Paul Donnelly’s tea tray is inspired by a variety of things: architecture, landscape, and by the practical desire to keep furniture ring free and a spoon or snack close at hand.

PotteryMaking Illustrated | November/December 2010 17
Creating the Saucer’s FootwellPaul starts by making the cup designed for the tea tray. Referencing the cup’s scale and diameter, he uses calipers to define the size of the saucer’s footwell (the indented area where the cup rests). To create this element, he first throws a thick, solid slab. He uses the wheel because it allows him to add dimension and detail with greater ease and precision. Depending on the design, the slab may be up to an inch or so wider than the cup’s diameter. After throwing, he leaves the slab disc on the wheel or bat to firm up, and then, with the wheel turning, cuts the middle out of it. The size of the circle he starts with is determined by the size of the cup. He then cuts the ring off the wheel or bat with a wire tool and sets it aside until it becomes leather hard. Throwing this piece on a bat, then leaving it on the bat after cutting it off with a wire tool until it is leather hard can help reduce warping.
With a Sharpie and a straight-edge, Paul draws perpen-dicular lines that intersect at 90° angles at the center of his
clean wheel head. He centers the leather-hard ring of clay (1) and uses the lines to cut the outside into a square (2). He cuts additional circles out with a short piece of copper tubing that he has sharpened on one end (3). He now has a square piece with a fancy hole in the middle that will become the footwell for the saucer portion of his tea tray.
Completing the SaucerPaul rolls out a slab then sets the footwell onto it, traces both the inside and outside edges, and makes a key mark on the top of one side of the footwell and to the side of it on the slab. He scores inside the traced outline on the slab and the bottom of the footwell, adds plenty of slip, and presses them together using the key marks for proper orientation. Paul uses ample slip so when the two elements are pressed together, slip squishes out past the edges (4). He lets this slip set up until it is the consis-tency of caulk, then blends it into the seam with a damp,
Cup and Saucer, 8 in. (20 cm) in length, wheel-thrown and handbuilt porce-lain, oxidation fired to cone 6. The footwell design and shape can be altered for variety or to compliment different cup styles.

18 PotteryMaking Illustrated | November/December 2010
Prepare a firm, 1-inch thick slab ring and center it on the wheelhead.
1
Using the guides, make straight cuts from line to line, to create a square.
Use a length of copper tubing, sharpened on one end, to cut circles on the footwell.
Attach the cut form to the slab. Remove excess slip. After the piece sets up, use a Surform to clean it up.
Use a plaster slab with a recessed rectangle to cre-ate the tray. Extend the lines to locate the foot.
Use a mallet to press the clay slab into the recessed foot. Use shims and a cutting wire to trim the slab.
6
2 3
4 5
“… I wanted to make a piece
with an expanded saucer that
also had room for a spoon or
a snack.”
the process

PotteryMaking Illustrated | November/December 2010 19
Cut the edges clean and then texture them with the plaster stamp for consistency.
While the clay is still on the plaster slab, use a piece of textured plaster as a stamp to pattern the piece.
Place 2x2s on the edges of the plaster slab as sup-ports, put a ware board on top, and flip over.
Position the saucer, then cut out a section of the tray to accommodate it.
Score and slip the adjoining edges and attach, pressing from inside the footwell.
Use a piece of foam to support the tray when you flip it over to work on the bottom.
Add soft clay to the seam where the two pieces meet. Let the piece firm up before flipping over.
7 8
9 10
11 12
13
“Paul creates a topography in the
clay, working in a unique layering
method, and using the wheel in
unexpected ways.”

20 PotteryMaking Illustrated | November/December 2010
stiff brush. He sets the saucer portion of the piece aside, under plastic, letting the slip set up and the piece reach an equal moisture consistency throughout. Then he uses a Surform on the outside to remove any inconsistencies from the layering and creates smooth sides.
Forming the TrayPaul uses a large, smooth, plaster slab with a narrow, recessed, rectangular outline cut into its center as a press mold to create a foot on the bottom of the piece. He sets a straight-edge even with the outside lines of the recessed rectangle, and uses a Sharpie to extend the lines to the edge of the press mold so that the location of the foot is visible even when he places a slab on the mold (5).
Paul throws a pug of clay on the tabletop to flatten it slightly, then continues to use his palm to pound it into a slab. He makes this slab about twice as thick as it needs to be, and centers it on the plaster press mold using the marks he made earlier to locate the recessed line. Paul uses a rubber mallet to nudge the clay into the footring, then sets a pair of shims along the sides of the slab (6). With a wire cutter sandwiched firmly between each thumb and a shim, Paul cuts through the thickness of the slab with one decisive gesture. He takes a long rib and smooths and compress-es the freshly cut surface. Working in this way, rather than thinning a slab with a rolling pin, reduces the likeli-hood that the piece will warp as it dries.
Paul grabs a small piece of plaster cut from an old mold, with a subtle stratified texture on it. He uses this tool to impress a ‘landscape’ texture into his piece (7), and then he lets the slab set up for a little bit. He sets a pair of 2×2 boards onto the press mold on either side of the clay slab, places a ware board on top of that, then flips the whole thing over (8). The 2×2s hold the press mold up off of the wareboard, allowing the slab of clay with the foot to drop off of the press mold. He flips his piece over, so that it’s right-side up, and begins to plan the saucer placement.
Paul moves the saucer around, inching it here and there until he finds a nice spot for it visually. He places a fork on the piece beside the saucer, to get an idea of the
interplay between the objects (9). Once satisfied with the location of the saucer, he uses a fettling knife to trace the edges of the saucer onto the tray. After setting the saucer aside, he cuts right through the traced lines, then scores and slips the adjoining areas of the saucer and the tray (10). As before, he uses lots of slip that squishes out when he joins the pieces. He uses a slip trailing bottle to add an additional bead of slip to all of the joined areas, lets it set up to the consistency of caulk, then blends it into the seams with a damp, stiff brush.
Paul positions a square piece of foam onto the tray to equal the height difference between the tray and the sau-cer (11), then flips the whole piece over in order to rein-force the new seams (12). Paul deeply scores the seams and across the abutment where the foot ring meets the side wall of the saucer. He slips the score marks and, with his fingertip, adds a coil of soft clay. These measures rein-
force potentially weak areas that may be likely to crack during the drying and/or the firing.
To finish the piece, Paul cuts into the straight lines of the edge of his pieces with a loop-tool, removing clay in a way that relates to the texture he laid down earlier. This is purely to sat-isfy his own visual desires. He takes his texture tool and uses it to compress and texture these fresh edges, zipping up every last detail of this complex piece (13).
After slowly drying the piece under plastic to even out the moisture between all the parts and to prevent warp-ing as it dries, the tea tray is ready to bisque fire. After the bisque, Paul glazes the pieces so the textures are ac-centuated. The pieces shown here are glazed with a green or blue transparent glaze, then fired to cone 6. n
Paul pairs cups with different surface decoration, from lines to carved textures, with abstracted landscape pat-terns on trays of various dimensions.