Embed Size (px)
Citation preview
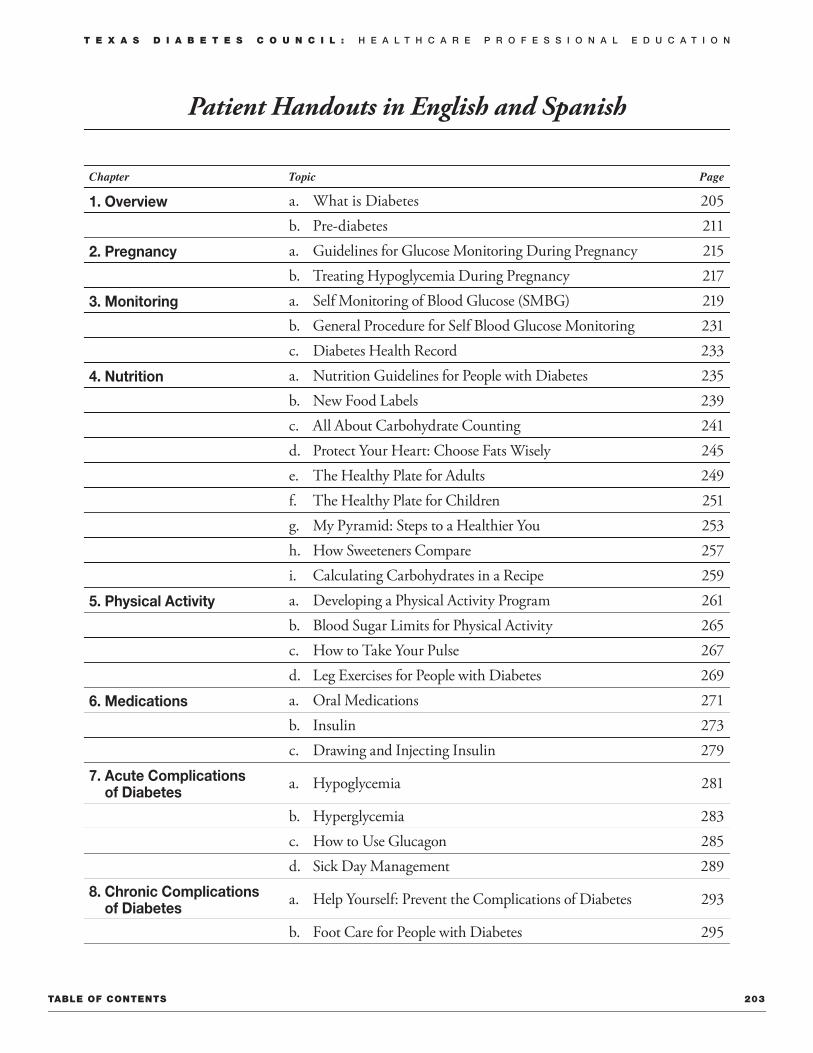
Table of ConTenTs 203
Patient Handouts in English and Spanish
Chapter Topic Page
1. Overview a. What is Diabetes 205b. Pre-diabetes 211
2. Pregnancy a. Guidelines for Glucose Monitoring During Pregnancy 215b. Treating Hypoglycemia During Pregnancy 217
3. Monitoring a. Self Monitoring of Blood Glucose (SMBG) 219b. General Procedure for Self Blood Glucose Monitoring 231c. Diabetes Health Record 233
4. Nutrition a. Nutrition Guidelines for People with Diabetes 235b. New Food Labels 239c. All About Carbohydrate Counting 241d. Protect Your Heart: Choose Fats Wisely 245e. The Healthy Plate for Adults 249f. The Healthy Plate for Children 251g. My Pyramid: Steps to a Healthier You 253h. How Sweeteners Compare 257i. Calculating Carbohydrates in a Recipe 259
5. Physical Activity a. Developing a Physical Activity Program 261b. Blood Sugar Limits for Physical Activity 265c. How to Take Your Pulse 267d. Leg Exercises for People with Diabetes 269
6. Medications a. Oral Medications 271b. Insulin 273c. Drawing and Injecting Insulin 279
7. Acute Complications of Diabetes
a. Hypoglycemia 281
b. Hyperglycemia 283c. How to Use Glucagon 285d. Sick Day Management 289
8. Chronic Complications of Diabetes
a. Help Yourself: Prevent the Complications of Diabetes 293
b. Foot Care for People with Diabetes 295
T e x a s D i a b e T e s C o u n C i l : H e a l t H c a r e P r o f e s s i o n a l e d u c a t i o n

Chapter Topic Page
9. Hygiene a. Skin Care and Diabetes 297b. Foot Care Tips 302c. Diabetes and Gum Disease 306
10. Psychosocial Issues a. Diabetes and Stress Management 308b. Coping with Diabetes 312c. Changing Behavior 314
11. Miscellaneous a. Travel and Diabetes 318b. Diabetes and Disasters: Be Ready to Go! 324c. Diabetes and Tobacco 341d. Texas Quitline Fax Referral Form 342e. Sharps Handling: Disposing of Needles and Lancet
Devices Safely 344
f. Free Diabetes Education Materials 348
Table of ConTenTs 204
T e x a s D i a b e T e s C o u n C i l : H e a l t H c a r e P r o f e s s i o n a l e d u c a t i o n

P a T i e n T H a n D o u T
overview 205
What is Diabetes?
Diabetes is a serious chronic disease. It happens when too much glucose (sugar) stays in the blood stream because there is either no insulin or not enough insulin that can move the sugar into the body’s cells. Most of the food people eat is changed into simpler proteins, fats, or a simple carbohydrate called glucose. Glucose is the form of “sugar” that cells need to make energy. The pancreas, a gland near the stomach, normally makes insulin to move glucose from the blood stream into the cells. In diabetes, the body cannot make or properly use the insulin it has.
Controlling blood sugar helps to prevent the damage to blood vessels and nerves that lead to complications: blindness, amputations, kidney failure, stroke, heart attack, digestive and nerve problems, gum disease, and depression. Good control is achieved by daily attention to nutrition, physical activity, weight control, monitoring blood glucose, and taking medicines as ordered. Regular checkups (including blood tests, dental exams, eye exams, and foot exams) are recommended.
TyPes of DiabeTes
There are 2 major types of diabetes.u Causes the body to produce little or no insulin. The person with type 1
diabetes must replace insulin daily. An auto-immune change damages pancreas beta cells.
u Is usually diagnosed under the age of 20, but can occur at any age.u Does not usually run in families, but there is a higher risk.u Usually occurs in normal-weight individuals.u Accounts for up to 10% of all diagnosed cases of diabetes.u Was called Insulin Dependent Diabetes (IDDM) or Juvenile Onset
until 1997.
T y P e D i a b e T e s 1
u The body may produce normal, high or low amounts of insulin, but the body is unable to use insulin properly.
u Is usually diagnosed in people over 30 years of age, but is being found more frequently in youth who are overweight.
u Tends to run in families; has a strong genetic risk.u Being overweight and inactive raises this risk.u Increases the risk for heart attack and stroke due to high blood pressure
and high cholesterol.u Accounts for most (90%) of all diagnosed cases of diabetes.u Was called Non-insulin Dependent Diabetes (NIDDM) or Adult Onset
until 1997.
T y P e D i a b e T e s2

P a T i e n T H a n D o u T
overview 206
warninG s iGns of DiabeTes
1. Excessive thirst or hunger2. Frequent urination 3. Extreme weakness or fatigue4. Infections, cuts or sores that are slow to heal5. Blurred vision
6. Tingling or numbness of the feet or hands7. Frequent skin, dental (gum), urinary or
yeast infections8. Impotence9. Feeling that you have “no energy”
risK faCTors for TyPe 2 DiabeTes
1. Overweight — greater than or equal to 30 pounds overweight or a body mass index (BMI) greater than or equal to 25 (greater than or equal to 23 if Asian American)
2. Family history of Diabetes Mellitus (DM)3. Hispanic/Latino, African American, American Indian, or Asian American heritage4. Over 30 years of age and overweight or over age 455. Delivered a large baby, 9 pounds or more, or had diabetes during pregnancy (gestational
diabetes)6. Inactive lifestyle (exercise less than 3 times a week)7. High blood pressure (140/90 or higher)8. Abnormal cholesterol (lipid) levels
PrevenTion of TyPe 2 DiabeTes
1. See your healthcare provider to check for diabetes, if you have two or more risk factors (as noted above).
2. Try to be more active.a. Choose activities you enjoy doing, such as walking, dancing, gardening, or bicycling.b. Activity should be done regularly, for at least 30 minutes most days a week.
3. Develop healthy eating habits.a. Reduce fats to no more than 30% of daily calories.b. Cook with nonstick sprays or vegetable oils (canola/olive). Eliminate lard and shortening.c. Use low-fat cooking methods such as broiling, baking, grilling, and steaming.d. Trim fat and skin from meats and poultry.e. Eat smaller portions. Use the Food Guide Pyramid for portion size.f. Choose foods high in fiber, such as fruits, raw vegetables, beans, peas, and whole grains.g. Eat well-balanced meals about the same time each day.
4. Be alert for warning signs. Call your doctor if they occur.
P a T i e n T H a n D o u T
overview 211
Pre-diabetes
According to The American Diabetes Association, before people develop type 2 diabetes, they almost always have “prediabetes.” People with pre-diabetes have higher than normal blood-sugar levels but the levels are not high enough to have a diagnosis of diabetes.
FPG OGTT
There are two different tests your doctor can use to determine whether you have pre-diabetes: the fasting plasma glucose test (FPG) or the oral glucose tolerance test (OGTT). The blood glucose levels measured after these tests determine whether you have a normal metabolism, or whether you have pre-diabetes or diabetes. If your blood glucose level is abnormal following the FPG, you have impaired fasting glucose (IFG); if your blood glucose level is abnormal following the OGTT, you have impaired glucose tolerance (IGT).
Take the Diabetes Risk Test at: http://www.diabetes.org/pre-diabetes/pre-diabetes-symptoms.jsp
Who should be tested for type 2 diabetes?u Anyone age 45 years and older should ask about testing during an office visit. u Anyone who is overweight and 45 years or older should be tested.u Anyone who is overweight and who has other risk factors, even if under age 45 years
(including children age 10 years and up), should ask the health care provider about testing.
Testing according to risks can help diagnose pre-diabetes earlier so you can start action to prevent or delay developing type 2 diabetes. With type 2 diabetes, the pancreas can either no longer make enough insulin that the body can use, or the insulin that is made is not used properly.
< 100mg/dl Z o, ::a i': > r
< 140 mg/di Z ,o ::01
J: r
P a T i e n T H a n D o u T
CHaPTer TiTle 212
What can you do about pre-diabetes?
The good news is that people can lower their risk of developing type 2 diabetes with only a 5-7% weight loss. Being physically active most days and cutting excess calories in meals and snacks usually results in weight loss.
You can request your health care provider check your blood glucose during an office visit.
When should your family talk about pre-diabetes and type 2 diabetes?
As we get older, the chances of developing type 2 diabetes rise. Being overweight is a big risk, and other risk factors increase the chances, too. Some risks include:
1) Having a close relative with type 2 diabetes2) Family background is African American, American Indian, Asian American,
Hispanic/Latino, or Pacific Islander3) History of gestational diabetes (diabetes only during a pregnancy) or had a baby weighing
more than 9 pounds4) High blood pressure (140/90 or higher)5) Cholesterol levels not normal; HDL cholesterol is 40 or lower, or triglycerides level is
150 or higher6) Being fairly inactive, which means exercising fewer than three times a week
What do I do about pre-diabetes?u If you are overweight, start to lose some of the excess weight through daily physical activity
and cutting excess calories (mainly fatty foods). u If you are inactive, start to add some physical activity more days.u If you have high blood pressure or high cholesterol, try to lose excess weight by being
physically active and making smart food choices. Talk to your doctor about cutting down on salt and alcohol. Ask your doctor if you need medicines.

P a T i e n T H a n D o u T
PreGnanCy anD DiabeTes 215
Guidelines for Glucose Monitoring During Pregnancy
Recommendations
1. Check blood sugars at least upon awakening and one hour after meals.2. The doctor may also want you to check 1 or 2 hours after eating
and/or 3:30 a.m. Follow your doctor’s orders. Checking throughout the day will help to make sure that if the blood sugar
level is too high or too low, it can be corrected quickly.
Blood Glucose Goals during Pregnancy:
Fasting: 65-90 mg/dL 1 hr after a meal: less than or equal to 140 mg/dL 2 hrs after a meal: less than or equal to 120 mg/dL
GuiDelines for KeTone TesTinG
Recommendations
1. Test for ketones first thing in the morning (fasting). Call your doctor or health care provider if you have MODERATE TO LARGE KETONES.
If your blood sugar is normal and you have moderate to large ketones, you may need more food or calories before bedtime. Be sure your doctor or health care provider is notified.
2. Test for ketones when your blood sugar is greater than 140 (some doctors prefer greater than 200) or when you are ill. Call your doctor or health care provider if you have MODERATE TO LARGE KETONES.
If your blood sugar is high and you have moderate to large ketones, this may indicate that you need more insulin or may need to be placed on insulin.
3. CALL YOUR DOCTOR
If your results are frequently above your target range or
If blood sugars are always greater than 140 mg/dL and/or
You have moderate to large ketones or
You have signs and symptoms of hypoglycemia more than twice in one week.

P a T i e n T H a n D o u T
PreGnanCy anD DiabeTes 217
Treating Hypoglycemia During Pregnancy
Signs and Symptoms of Hypoglycemia — Low Blood Sugar
Shaky Cold sweat Headache Dizziness Irritability Drowsiness Difficulty talking Blurred vision
If possible, check blood sugar and treat immediately!
If you are feeling really bad and are sweating a lot, you may take your treatment first, and then check your blood sugar.
If you have hypoglycemia (low blood sugar) you must begin treatment immediately.
If your blood sugar is 50-70 mg/dL
1. Drink one 8-oz. glass of low fat milk or chew 2-3 glucose tablets.2. Wait 15 minutes and test blood sugar again.3. If your blood sugar is still less than 70 mg/dL, drink a second glass of milk or chew more
glucose tablets to reach your desired goals. (Note: One glucose tablet will increase your blood sugar by about 20 points.)4. Wait 15 minutes and test blood sugar again.5. If your blood sugar is still less than 70 mg/dL, eat a slice of bread and drink a third glass of
milk, or chew more glucose tablets. (Repeat the treatment.)
If your blood sugar is less than 50 mg/dL
1. Drink 1/2 cup of orange or apple juice or 1/3 cup of grape juice or chew 2-3 glucose tablets.2. Wait 15 minutes and test blood sugar again.3. If blood sugar has not risen by 20 points, repeat the treatment.4. Continue to take a simple glucose, such as juice or glucose tablets, until your blood sugar is
above 70 mg/dL.5. If it is going to be more than 1 hour before your next meal, eat
a. a complex carbohydrate, such as a piece of bread or 6 crackers PLUSb. a protein, such as 2-3 oz. of cheese, sliced ham or chicken, or 2 tbsp. of peanut butter.

P a T i e n T H a n D o u T
MoniTorinG 219
Self Monitoring of Blood Glucose (SMBG)
It is extremely important to monitor your diabetes at home on a daily basis. This involves blood sugar testing and blood/urine ketone testing when sick or if blood sugar levels are high.
Testing your blood sugar can help you control your diabetes. It is important that every person with diabetes have a blood glucose meter and know how to use it.
Knowing when and how often to monitor is very important. Your results will help you and your health care provider decide whether changes need to be made regarding your meal plan, activity, and treatment plan.
When to test:
Listed below are times that you may be asked by your health care provider to monitor your blood sugar:
1. Fasting (first thing in the morning — usually 8 hours without eating/drinking anything but water)
2. Before meals3. 1-2 hours after meals (from first bite)4. At bedtime5. At 3:00 a.m.
How often to test:
Your diabetes health care provider will recommend how often you should test your sugar level. Testing times are based on the kind of medicine you take and on how well your sugar levels are controlled.
Common frequencies are listed below:
Monitor your blood sugar 3-4 times per day
u If you have type 1 diabetes and are taking insulin
u If you have type 2 diabetes and are taking insulin and diabetes pills
Monitor your blood sugar 2-3 times per day
u If you are taking diabetes pills only and have not achieved your target A1c
Ask your health care provider how often you should test
u If you are taking diabetes pills only or you are controlling your diabetes with nutrition and physical activity alone
P a T i e n T H a n D o u T
MoniTorinG 220
You should increase the frequency of testing in the 2-3 weeks prior to your health care professional visit. The more information you provide, the better your health care provider can direct your care and management.
Occasionally, you may need to check more often in order to decide how your medication and treatment plan is working. Your health care provider may ask you to monitor several times throughout the day and possibly at 3:00 a.m.
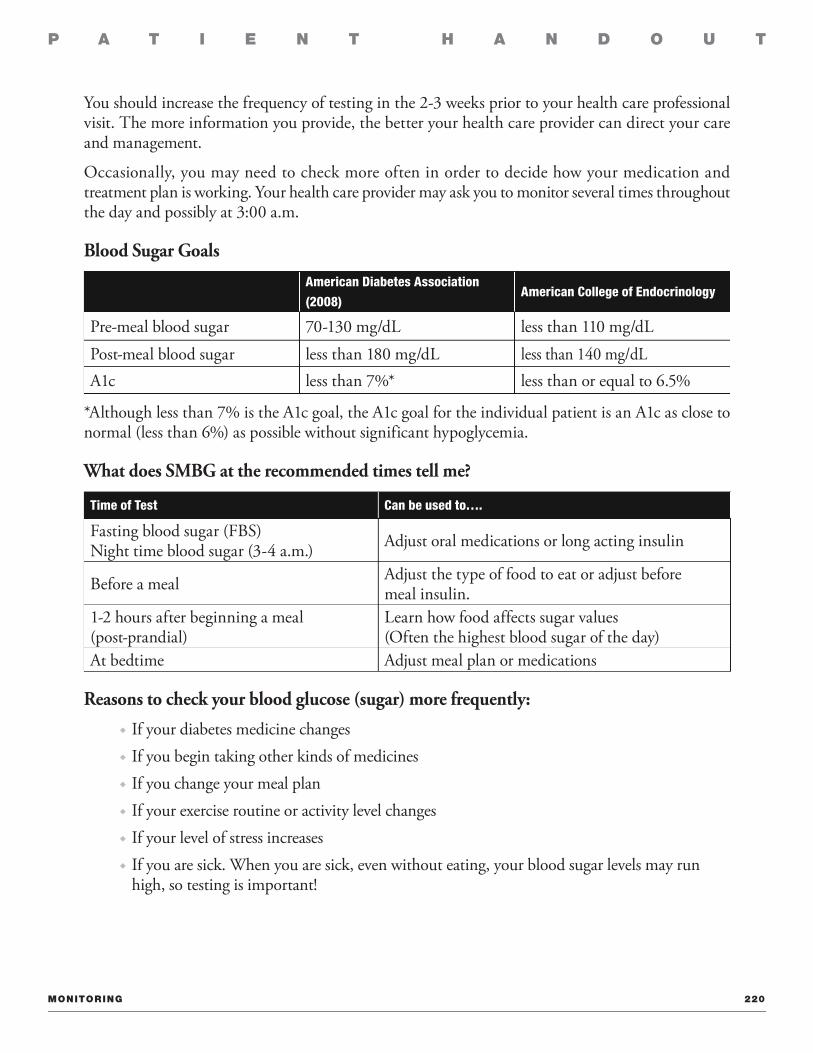
Blood Sugar Goals
American Diabetes Association (2008)
American College of Endocrinology
Pre-meal blood sugar 70-130 mg/dL less than 110 mg/dLPost-meal blood sugar less than 180 mg/dL less than 140 mg/dLA1c less than 7%* less than or equal to 6.5%
*Although less than 7% is the A1c goal, the A1c goal for the individual patient is an A1c as close to normal (less than 6%) as possible without significant hypoglycemia.
What does SMBG at the recommended times tell me?
Time of Test Can be used to….
Fasting blood sugar (FBS) Night time blood sugar (3-4 a.m.) Adjust oral medications or long acting insulin
Before a meal Adjust the type of food to eat or adjust before meal insulin.
1-2 hours after beginning a meal (post-prandial)
Learn how food affects sugar values (Often the highest blood sugar of the day)
At bedtime Adjust meal plan or medications
Reasons to check your blood glucose (sugar) more frequently:u If your diabetes medicine changes u If you begin taking other kinds of medicines u If you change your meal planu If your exercise routine or activity level changes u If your level of stress increases u If you are sick. When you are sick, even without eating, your blood sugar levels may run
high, so testing is important!

P a T i e n T H a n D o u T
MoniTorinG 221
Other reasons to check your blood glucose (sugar):u If you have symptoms of low blood sugar (hypoglycemia), such as dizziness, shaking,
sweating, chills, and confusion u If you have symptoms of high blood sugar (hyperglycemia), which include sleepiness,
blurred vision, frequent urination, and excessive thirst u To see how meals, physical activity, and medicine affect your blood sugar level u To document how well your blood sugar is controlled if you have a job in which poor
control could cause safety problems u To help you decide if it is safe to drive or perform other tasks that require concentration
When you are ill or not feeling well:
You will need to test blood sugar more often and may need to test ketones as well. (See Sick Day Rules.)
1. Test your blood sugar every 2-4 hours (or as medically advised) until stable and you are feeling better.
2. If you have type 1 diabetes:u Test for ketones in your urine when you are ill or not feeling well.u Test for ketones whenever your blood sugar is greater than 240 mg/dL.
3. Rest and get plenty of fluids (water or sugar-free beverages) Be cautious of “sport-ade” types of drinks. Be sure and read the nutrition facts label to properly
evaluate the amount of carbohydrates per serving
Call your health care provider if:
1. Your blood sugar is greater than 240 mg/dL for more than two days.2. Your blood sugar is less than 70 mg/dL more than twice a week.3. If you have moderate to large ketones in your urine (measured with urine ketostix or blood
ketone monitor) for more than 24 hours.
When you call your health care provider, be sure you:
1. Have your log book/blood sugar records handy so you can report the dates, times and values. 2. Report time and amount of medicines you have taken or may have missed. 3. Provide as much information as possible to help your health care provider make well-informed
decisions regarding your diabetes care.
Key points to consider:u Test your blood sugar whenever you do not feel well. Note in the comments section of the log
book any related symptoms, circumstances, or treatments that may have occurred. For example: if you ate a large meal, forgot to take your medicines, had a low blood sugar reaction, etc.
P a T i e n T H a n D o u T

P a T i e n T H a n D o u T
MoniTorinG 222
u Every time you go to see your health care provider, be sure you take your log book, meter and medications. Your healthcare provider will want to review your blood sugar results, check that your meter is working properly, and note your medication doses.
u Studies have shown that writing blood sugar results in a log can improve blood sugar control. This activity can assist you in seeing sugar patterns during certain times of the day. It can also be helpful to see how medications and dietary intake affect blood sugar levels.
u Blood sugar control can also be improved by reviewing sugar values in graphic form. Most meters have memory features that calculate averages and display the blood sugar data by time of day, day of the week, weekends vs. weekdays. Many meters allow users to place markers into the memory to note meals, activity, and medication times. These computer programs are available for health professionals’ use as well as for patients’ use at home.
REMEMBER: The more often you check your blood sugar the more opportunities you will have to change the course of your diabetes.
If your blood sugar values are abnormal, that is a “call to action” to make a change — in your eating plan, physical activity, or medications. If in doubt, contact your health care provider for assistance.
It is important that you provide your health care professional with accurate information.
Listed below are some tips for achieving accurate readings.u Unreliable blood sugar readings may occur if your meter is old, dirty, or has been damaged.u Meters and strips are temperature and humidity sensitive. Follow storage guidelines set by
the manufacturer. Generally meters and strips should be kept between 36 and 90 degrees Fahrenheit. Do not freeze.
u Be sure that your meter is properly coded/calibrated for each new box of strips. A few of the newer meters do not require this step.
u Store your strips in the original container and capped tightly. When you remove a strip from the container, recap tightly right away to prevent the strips from being exposed to humidity and light, which may cause inaccurate readings.
u Destroy test strips if they are past the “use by” date or if you have had them out of their container for a long time.
u Use control solution to test strips each time you open a new container and when there is a question about accuracy.
u Wash your hands prior to testing. Juice or other sticky residues may cause falsely high readings.u If you use alcohol, be sure you allow it to dry before puncturing your finger.u Be sure to use an adequate blood sample size. Inadequate sample size can cause inaccurate
readings. Many meters will note an error in the reading if the sample was not enough. You will need to re-test if this occurs.
u Review your technique with your health care professional at each visit.

P a T i e n T H a n D o u T
MoniTorinG 223
u Several times per year or at each visit, compare your meter results by doing a blood sugar test with your meter and at the same time on the clinic meter.
u If you have anemia, poor circulation, or are on dialysis, talk to your health care professional as your values may be inaccurate..
u For any questions about your meter, call the meter company. All companies have a toll-free number for customer service located on the back of the meter.
Understanding differences in glucose/sugar values:u Virtually, all new meters and test strips are calibrated to give a plasma sugar value.u Values from home glucose (sugar) strips and meters should correspond closely to lab values
taken at the same time (within 15%). u It is not abnormal for repeat results obtained within a few minutes to vary up to 15-20%.
Do not be alarmed if you check your glucose twice in a row and the readings are slightly different (one being 100 mg/dL and another 113 mg/dL).
u If you are not sure how to interpret the readings, check with your health care professional.
A1c and self monitoring of blood glucose/sugar (SMBG):
Another method of monitoring your blood glucose is called a hemoglobin A1c test or simply an A1c test. This test reflects your glucose control over the past 3 months. Testing your A1c level every 3 months is the best way for you and your health care provider to understand how well your glucose levels are controlled overall. Your health care provider will determine your A1c goal, but it is recommended to be less than or equal to 6.5%.
Keep in mind that the A1c will be an AVERAGE of high and low sugar levels for the last 3 months. Your A1c can be “at goal” even if you have wide variations in your sugar levels.
P a T i e n T H a n D o u T
MoniTorinG 224
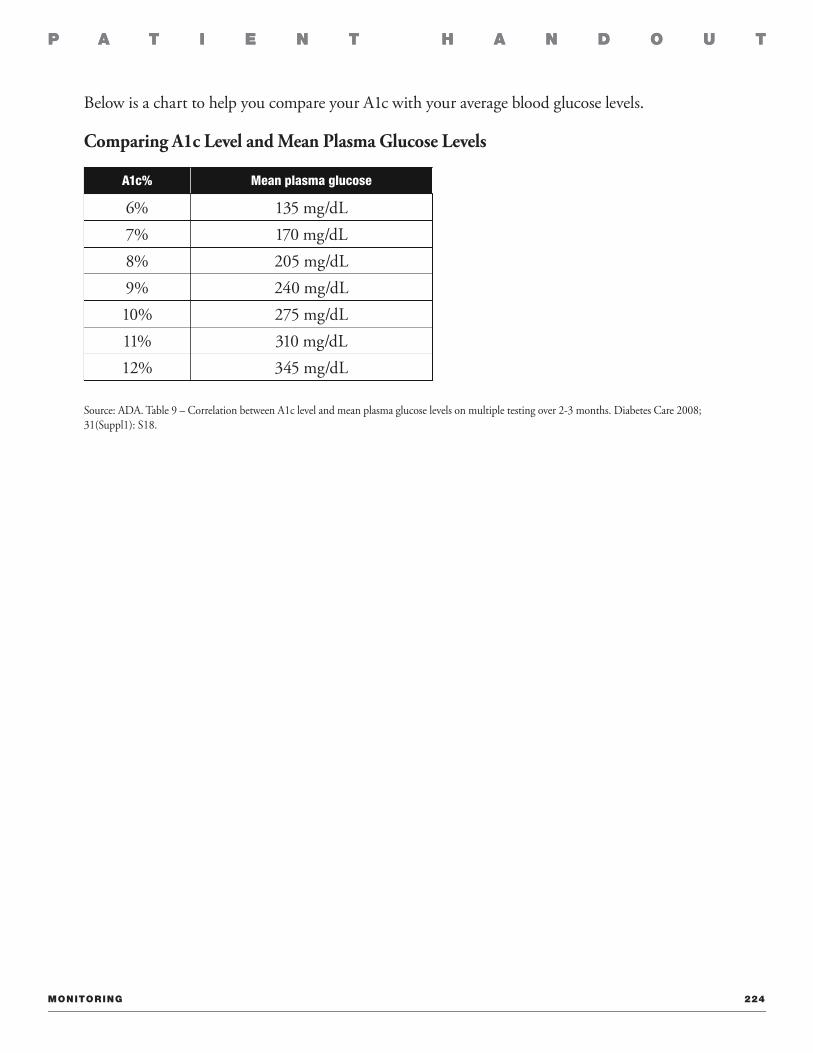
Below is a chart to help you compare your A1c with your average blood glucose levels.
Comparing A1c Level and Mean Plasma Glucose Levels
A1c% Mean plasma glucose
6% 135 mg/dL7% 170 mg/dL8% 205 mg/dL9% 240 mg/dL10% 275 mg/dL11% 310 mg/dL12% 345 mg/dL
Source: ADA. Table 9 – Correlation between A1c level and mean plasma glucose levels on multiple testing over 2-3 months. Diabetes Care 2008; 31(Suppl1): S18.
P a T i e n T H a n D o u T
P a T i e n T H a n D o u T
MoniTorinG 231
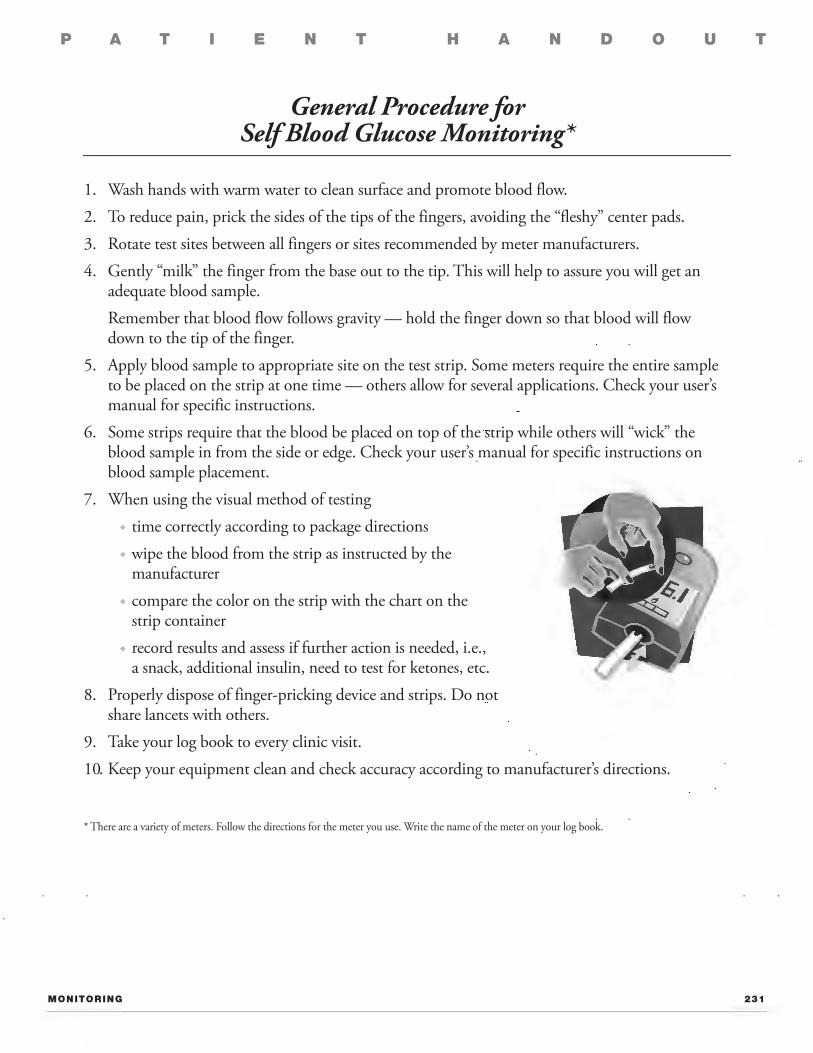
General Procedure for Self Blood Glucose Monitoring*
1. Wash hands with warm water to clean surface and promote blood flow.2. To reduce pain, prick the sides of the tips of the fingers, avoiding the “fleshy” center pads.3. Rotate test sites between all fingers or sites recommended by meter manufacturers.4. Gently “milk” the finger from the base out to the tip. This will help to assure you will get an
adequate blood sample. Remember that blood flow follows gravity — hold the finger down so that blood will flow
down to the tip of the finger.5. Apply blood sample to appropriate site on the test strip. Some meters require the entire sample
to be placed on the strip at one time — others allow for several applications. Check your user’s manual for specific instructions.
6. Some strips require that the blood be placed on top of the strip while others will “wick” the blood sample in from the side or edge. Check your user’s manual for specific instructions on blood sample placement.
7. When using the visual method of testing u time correctly according to package directionsu wipe the blood from the strip as instructed by the
manufactureru compare the color on the strip with the chart on the
strip containeru record results and assess if further action is needed, i.e.,
a snack, additional insulin, need to test for ketones, etc.8. Properly dispose of finger-pricking device and strips. Do not
share lancets with others.9. Take your log book to every clinic visit.10. Keep your equipment clean and check accuracy according to manufacturer’s directions.
* There are a variety of meters. Follow the directions for the meter you use. Write the name of the meter on your log book.

P a T i e n T H a n D o u T
MoniTorinG 233
Diabetes Health Record
Discuss these topics with your diabetes care provider and keep track of your results. Print this page to use for tracking, or contact the Texas Diabetes Council at 1-888-963-7111, ext. 7490, for a wallet-size copy of this Diabetes Health Record.
Dateof Visit
Dateof Visit
Dateof Visit
Dateof Visit
Weight (every visit)Target: BMI less than 25
Wt
BMI
Wt
BMI
Wt
BMI
Wt
BMI
Blood Pressure (every visit)Target: less than 130/80
Check blood sugar records (every visit)Target: Fasting 100 or less2 hours after meal 140 or less
A1c (every 3-6 months) blood testto measure past 3 months blood sugarTarget: 6.0 % or less, if possible
Triglycerides (every year)Target: less than 150
HDL Cholesterol (every year)Target: more than 40
LDL Cholesterol (every year)Target: less than 100 (less than 70 with heart disease)
Urine kidney testsa) Microalbumin Type 2 - every year Type 1 - after 5 years from diagnosis, then every year Target: less than 30b) GFR - ask doctor
Dental Inspection (as needed)
Dental Exam (every 6 months)
Foot Inspection (every visit)
Foot Exam (every year)
Dilated Eye Exam (every year)
Medical Nutrition Therapy (initial & as doctor recommends)
Lifestyle Counseling(physical activity, nutrition,alcohol reduction & tobacco cessation)
Diabetes Education(initial & as doctor recommends)
Adult Immunizations Date
• Flu Shot (every year)
• Tetanus, diphtheria, pertussis (every 10 years)
• Pneumonia vaccine (ages 19-64 1-2 times) (age 65 or older once)
• Zoster (Shingles) vaccine (age 60 or older once)
• Hepatitis vaccine – ask doctor
Childhood Immunizations – ask doctor

P a T i e n T H a n D o u T
nuTriTion 235
Nutrition Guidelines for People with Diabetes
1. Develop a routine. Eat about the same time each day. Space meals no more than 4 1/2 or 5 hours apart when awake. Do not skip meals. If hungry between meals, eat fresh vegetables (like: cucumber, celery, tomatoes, carrots, broccoli or radishes).
2. Eat three (3) balanced meals daily. Control your portion sizes and avoid second helpings. Eat a variety of foods. Limit protein foods to approximately 6 ounces per day. Eat lean meats, fat-free or low-fat cheeses and dairy products.
3. Try to eat fewer calories if you need to lose weight. Your doctor can refer you to a registered dietitian for nutrition counseling. The dietitian can help you with meal plans that are individualized for your needs. Also, ask your doctor if it is safe to be physically active. Being active can help you burn calories and keep you fit.
4. Limit starchy foods to 1-2 servings per meal:
1/2 cup corn
1/2 cup peas
1/2 cup pinto beans
1/3 cup rice
1/2 cup winter squash
1/3 cup pasta
1 slice bread, roll or biscuit
1/2 cup cooked cereal
3/4 cup dry cereal
1 tortilla, corn/flour
6 plain crackers
3 graham cracker squares
1/2 hot dog or hamburger bun
1/4 bagel (4 oz)
1/2 potatoes
5. Limit fruits to 1 serving for lunch and 1 serving for supper. No fruit for breakfast. Avoid fruit juice, except for low blood sugar.
6. Limit milk to 2 cups of skim or fat-free milk per day for adults.
7. Avoid foods high in fat or oil (like: fried foods, bacon, sausage, bologna, mayonnaise, salad dressing and cheeses).
8. Eat more high fiber foods, like beans, whole grains (whole wheat bread, brown rice) fresh fruits and vegetables. Don’t peel your fruit, it has lots of fiber. Eat 14 grams of fiber for every 1,000 calories on your meal plan per day. Example: 21 grams of fiber for 1,500 calories, 28 grams of fiber for 2,000 calories. Fiber works best when you drink plenty of water!
9. Use sugar substitutes like Equal, Splenda, and Sweet'N Low to sweeten your beverages. Drink all beverages sugar-free such as sodas and sports drinks. Try using a sugar substitute when making a dessert.
P a T i e n T H a n D o u T
nuTriTion 236
10. Limit alcoholic drinks. They can interact with your medicine. If you drink alcohol, make sure you have eaten some food. Alcohol lowers your blood sugar. It also has calories that you may not want.
11. Limit desserts to one of the following and count as a starchy food at mealtime.
One slice of plain cake (such as angel food), no icingSix vanilla wafers or 3 gingersnap cookiesOne-half cup sugar-free ice cream or puddingOne slice sugar-free pie (count as 1 fruit and 2 fats)
12. Limit low-calorie foods to 20 calories per meal.
Examples: 1 tablespoon regular catsup, 1 tablespoon low-sugar jam or jelly 12. Use sugar-free, calorie-free items as desired.
Examples are: tea, sugar-free Kool-Aid, diet soda, diet gelatin, sugar-free popsicles, sugar-free syrup, sugar-free jelly, sugar-free gum, etc. Note: Sugar-free candies and cookies have sugar-alcohols that might cause you to get diarrhea. If you eat them, try not to eat too many. They still have calories and fat.
fooDs To liMiT
sugar
syrup
brownies
regular chewing gum
honey jelly/jam
cake with icing
regular (sugared) soft drinks
glazes
ice cream
doughnuts
sweet pickles
sorbet
preserves
pie
breath mints
gelatin
sherbet
pudding
molasses
candy
pan dulce
cobblers
brown sugar
Any meat or vegetable made with a glaze or syrup, and all foods and beverages prepared with regular sugar.

Pa
Ti
en
T
Ha
nD
ou
T
nu
Tr
iTio
n
23
9
New Food Labels Are Here! T he new food label can be found on food packages
in your supennarket. Reading the label tells more about the food and what you are getting. What
you see 011 the food label-the nutrition and ingredient infonnatlon-is requirPd by the government.
This brochure shows what the new label looks like and explains some of its new features.
Nutrition Facts Title The new title "Nutrition Facts" signals the new label.
Serving Size Similar food products now have similar serving sizes. This makes It easier to compare foods. Serving sizes are based on amounts people actually eat.
New Label Information Some label information may be new to you. The new nutrient list covers those most important to your health. You may have seen this Information on some old labels, but It Is now required.
Vitamins and Minerals Only two vitamins, A and C, and two minerals, calcium and Iron, are required on the food label. A food company can voluntarily list other vitamins and minerals in the food.
Label Numbers Numbers on the nutrition label may be rounded for labeling.
Nutrition Facts Se,ving Size 1 cup (228g) Se,vings Per Container 2
Amount Per Serving Calories 90
Calories from Fat 30
% Daily Value• Total Fat 3g 5%
Saturated Fat 0g 0%
Sodium 300mg 13%
Cholesterol 0mg 0%
Total Carbohydrate 13g 4%
Dietary Fiber 3g 12% Sugars 3g
Protein 3g
• [I Vitamin A 80%
Calcium 4% • Iron 4% Vitamin C 60%
* Percent Daily Values are based on a 2,000 calorie diet. Your daily values may be higher or lower depending on your calorie needs:
Calories: 2,000 2,500 Total Fat
Sat Fat Less than Less than
Cholesterol Less than Sodium Less than Total Carbohydrate
Dietary Fiber
Calories per gram:
Fat 9 • Carbohydrate 4
65g 20g 300mg 2.400mg 300g 25g
• Protein 4
80g 25g 300mg 2.400mg 375g 30g
~
Why do some food packages have a short or abbreviated nutrition label? Foods that have only a few of the n11triP11ls n•q11in·d on the standard lahd can use a short label fon11al. What's on the lailPI depends on what's in the food. Small- ancl medi111n-size1l packages with very lillk label space can also use a shoit lalJt•I.
% Daily Value % Daily Value shows how a food fits Into a 2,DDD calorie reference diet.
You can use % Daily Value to compare foods and see how the amount ot a nutrient in a serving of food Ills In a 2,000 calorie reference diet.
Dally Values Footnote Daily Values are the new label reference numbers. These numbers are set by lhe government and are based on current nutrition recommendations.
Some labels list the daily values for a daily diet of 2,000 and 2,500 calories. Your own nutrient needs may be less than or more than the Daily Values on the label.
Calories Per Gram Footnote Some labels tell the approximate number ol calories In a gram ol lat, carbohydrate, and protein.
P a T i e n T H a n D o u T
nuTriTion 241
Howmany servings of carbs are bestforme at eachmeal and snack?The recommended number of servings is based on yourweight, activity level, diabetes medicines, and goals foryour blood glucose levels. Your dietitian or diabeteseducator, can work with you to make a personalizedplan. A general guideline is to have• 3 or 4 servings of carbs at each meal• 1 or 2 servings at each snack
What about other foods such as meats,vegetables, and fats?To have a balanced meal plan, you’ll want to includeprotein foods (such as meat, chicken, and fish),nonstarchy vegetables (such as salad and broccoli), anda moderate amount of healthy fats (such as olive oiland nuts). Talk with your health care team about whatto eat for your meals and snacks.
Why should I pay attention to servingsizes for carbohydrate foods?The amount of carbs you eat can make a big differencein your blood glucose. If you eat more carbs than younormally do at a meal, your blood glucose level islikely to be higher than usual several hours afterward.
AllAbout Carbohydrate Counting
American Diabetes Association 1–800–DIABETES (342–2383) www.diabetes.org ©2009 by the American Diabetes Association, Inc. 11/09
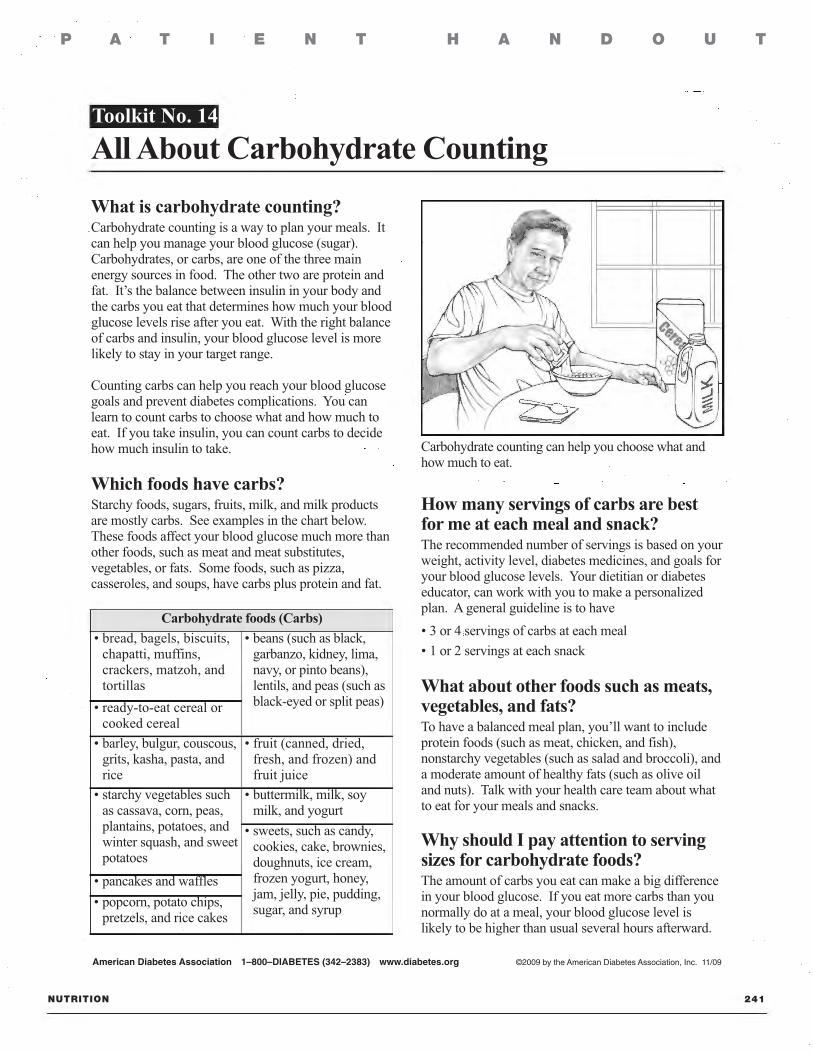
Carbohydrate counting can help you choose what andhowmuch to eat.
Toolkit No. 14
What is carbohydrate counting?Carbohydrate counting is a way to plan your meals. Itcan help you manage your blood glucose (sugar).Carbohydrates, or carbs, are one of the three mainenergy sources in food. The other two are protein andfat. It’s the balance between insulin in your body andthe carbs you eat that determines how much your bloodglucose levels rise after you eat. With the right balanceof carbs and insulin, your blood glucose level is morelikely to stay in your target range.
Counting carbs can help you reach your blood glucosegoals and prevent diabetes complications. You canlearn to count carbs to choose what and how much toeat. If you take insulin, you can count carbs to decidehow much insulin to take.
Which foods have carbs?Starchy foods, sugars, fruits, milk, and milk productsare mostly carbs. See examples in the chart below.These foods affect your blood glucose much more thanother foods, such as meat and meat substitutes,vegetables, or fats. Some foods, such as pizza,casseroles, and soups, have carbs plus protein and fat.
Carbohydrate foods (Carbs)• bread, bagels, biscuits,chapatti, muffins,crackers, matzoh, andtortillas
• beans (such as black,garbanzo, kidney, lima,navy, or pinto beans),lentils, and peas (such asblack-eyed or split peas)• ready-to-eat cereal or
cooked cereal• barley, bulgur, couscous,grits, kasha, pasta, andrice
• fruit (canned, dried,fresh, and frozen) andfruit juice
• starchy vegetables suchas cassava, corn, peas,plantains, potatoes, andwinter squash, and sweetpotatoes
• buttermilk, milk, soymilk, and yogurt• sweets, such as candy,cookies, cake, brownies,doughnuts, ice cream,frozen yogurt, honey,jam, jelly, pie, pudding,sugar, and syrup
• pancakes and waffles• popcorn, potato chips,pretzels, and rice cakes
P a T i e n T H a n D o u T
nuTriTion 242
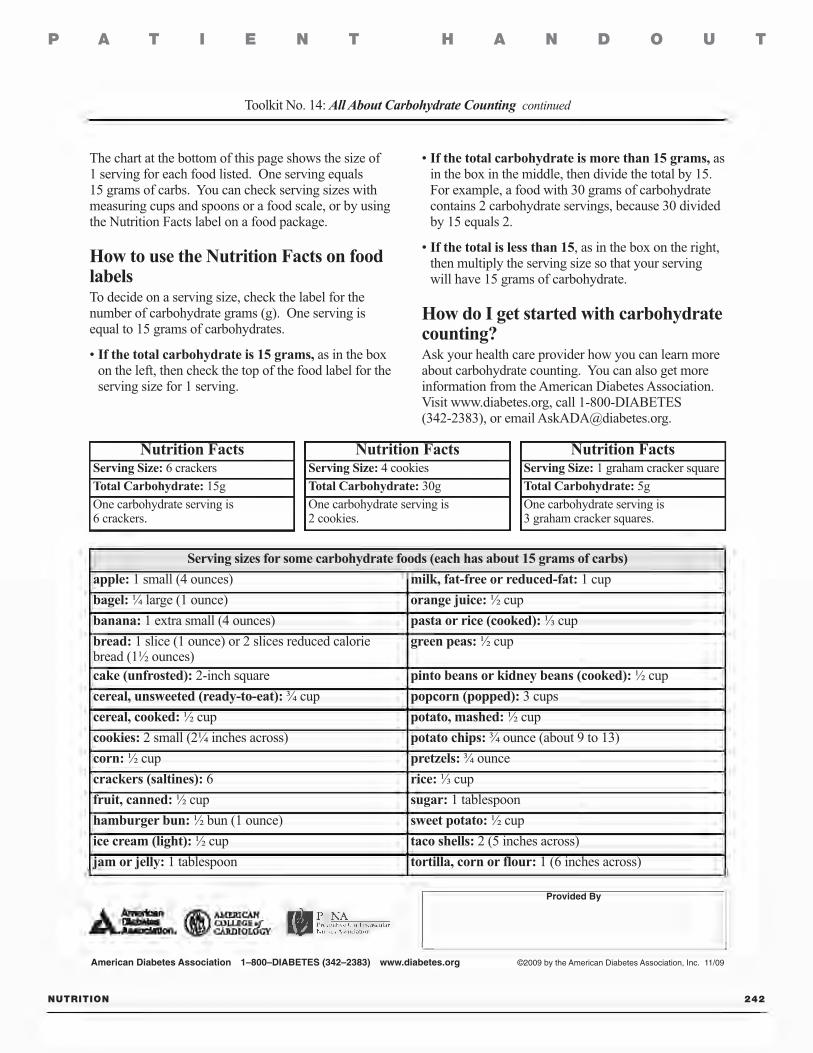
The chart at the bottom of this page shows the size of1 serving for each food listed. One serving equals15 grams of carbs. You can check serving sizes withmeasuring cups and spoons or a food scale, or by usingthe Nutrition Facts label on a food package.
How to use the Nutrition Facts on foodlabelsTo decide on a serving size, check the label for thenumber of carbohydrate grams (g). One serving isequal to 15 grams of carbohydrates.
• If the total carbohydrate is 15 grams, as in the boxon the left, then check the top of the food label for theserving size for 1 serving.
American Diabetes Association 1–800–DIABETES (342–2383) www.diabetes.org ©2009 by the American Diabetes Association, Inc. 11/09
Toolkit No. 14:All About Carbohydrate Counting continued
• If the total carbohydrate is more than 15 grams, asin the box in the middle, then divide the total by 15.For example, a food with 30 grams of carbohydratecontains 2 carbohydrate servings, because 30 dividedby 15 equals 2.
• If the total is less than 15, as in the box on the right,then multiply the serving size so that your servingwill have 15 grams of carbohydrate.
How do I get started with carbohydratecounting?Ask your health care provider how you can learn moreabout carbohydrate counting. You can also get moreinformation from theAmerican DiabetesAssociation.Visit www.diabetes.org, call 1-800-DIABETES(342-2383), or email [email protected].
Serving sizes for some carbohydrate foods (each has about 15 grams of carbs)apple: 1 small (4 ounces) milk, fat-free or reduced-fat: 1 cupbagel:¼ large (1 ounce) orange juice:½ cupbanana: 1 extra small (4 ounces) pasta or rice (cooked):⅓ cupbread: 1 slice (1 ounce) or 2 slices reduced caloriebread (1½ ounces)
green peas:½ cup
cake (unfrosted): 2-inch square pinto beans or kidney beans (cooked):½ cupcereal, unsweeted (ready-to-eat):¾ cup popcorn (popped): 3 cupscereal, cooked:½ cup potato, mashed:½ cupcookies: 2 small (2¼ inches across) potato chips:¾ ounce (about 9 to 13)corn:½ cup pretzels:¾ ouncecrackers (saltines): 6 rice:⅓ cupfruit, canned:½ cup sugar: 1 tablespoonhamburger bun:½ bun (1 ounce) sweet potato:½ cupice cream (light):½ cup taco shells: 2 (5 inches across)jam or jelly: 1 tablespoon tortilla, corn or flour: 1 (6 inches across)
Nutrition FactsServing Size: 6 crackersTotal Carbohydrate: 15gOne carbohydrate serving is6 crackers.
Nutrition FactsServing Size: 4 cookiesTotal Carbohydrate: 30gOne carbohydrate serving is2 cookies.
Nutrition FactsServing Size: 1 graham cracker squareTotal Carbohydrate: 5gOne carbohydrate serving is3 graham cracker squares.
Provided By
Dlabllil8 COLLl!GB • American (i) AMl!RICAN
Aaaoclldl1111. CARDIOL3cY
P a T i e n T H a n D o u T
nuTriTion 245
Why should I choose fats wisely?Diabetes raises your chances of having a heart attack ora stroke. But you can protect your heart and bloodvessels by choosing fats wisely. Some kinds of fat, suchas butter and shortening, can raise your cholesterol andyour chances of heart disease. Other kinds, like olive oiland canola oil, protect your heart by lowering yourtriglyceride (a bad fat in your blood) levels.
All fats are high in calories. If you’re trying to loseweight, you’ll still want to limit the amount of fat youeat. Take a look at the Nutrition Facts on food packages.You’ll see information about the types and amounts offat in each food.
Saturated fat: Saturated fat can raise your cholesterollevel.
ProtectYourHeart: Choose FatsWisely
American Diabetes Association 1–800–DIABETES (342–2383) www.diabetes.org ©2009 by the American Diabetes Association, Inc. 11/09
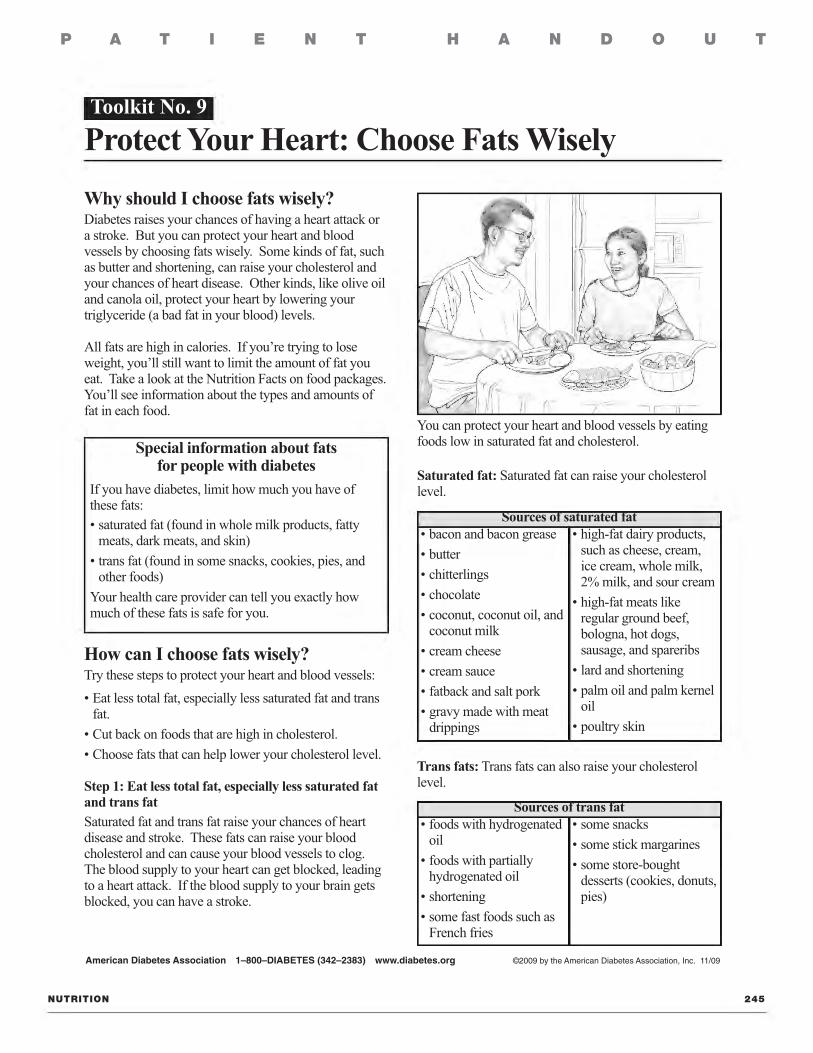
You can protect your heart and blood vessels by eatingfoods low in saturated fat and cholesterol.
Toolkit No. 9
Special information about fatsfor people with diabetes
If you have diabetes, limit howmuch you have ofthese fats:• saturated fat (found in whole milk products, fattymeats, dark meats, and skin)• trans fat (found in some snacks, cookies, pies, andother foods)Your health care provider can tell you exactly howmuch of these fats is safe for you.
How can I choose fats wisely?Try these steps to protect your heart and blood vessels:• Eat less total fat, especially less saturated fat and transfat.• Cut back on foods that are high in cholesterol.• Choose fats that can help lower your cholesterol level.
Step 1: Eat less total fat, especially less saturated fatand trans fatSaturated fat and trans fat raise your chances of heartdisease and stroke. These fats can raise your bloodcholesterol and can cause your blood vessels to clog.The blood supply to your heart can get blocked, leadingto a heart attack. If the blood supply to your brain getsblocked, you can have a stroke.
Sources of saturated fat• bacon and bacon grease• butter• chitterlings• chocolate• coconut, coconut oil, andcoconut milk• cream cheese• cream sauce• fatback and salt pork• gravy made with meatdrippings
• high-fat dairy products,such as cheese, cream,ice cream, whole milk,2%milk, and sour cream• high-fat meats likeregular ground beef,bologna, hot dogs,sausage, and spareribs• lard and shortening• palm oil and palm kerneloil• poultry skin
Sources of trans fat• foods with hydrogenatedoil• foods with partiallyhydrogenated oil• shortening• some fast foods such asFrench fries
• some snacks• some stick margarines• some store-boughtdesserts (cookies, donuts,pies)
Trans fats:Trans fats can also raise your cholesterollevel.

P a T i e n T H a n D o u T
nuTriTion 246
Step 2: Cut back on foods that are high in cholesterolYour body makes some of the cholesterol in your blood.The rest comes from the foods you eat. Foods fromanimals are the main sources of dietary cholesterol.
Your body needs cholesterol to make some hormones,vitamins, and to help you digest foods. However, if youeat too much cholesterol, it can build up in your bodyand put you at risk for heart attack or stroke.
Step 3: Choose fats that can help lower your bad(LDL) cholesterolMonounsaturated fats, polyunsaturated fats, and specialcholesterol-lowering margarines can protect your heartby lowering your cholesterol. Another protective fat,called omega-3 fats, is found in some types of fish, oils,and other foods.
Monounsaturated fat:Monounsaturated fat is a type ofunsaturated fat that can lower your blood cholesterol.
Omega-3 fats: This type of fat helps prevent clogging ofthe arteries. Eat fish, prepared a low-fat way, 2 or 3times a week. Choose broiling, baking, grilling, orsteaming. Or buy tuna packed in water and make tunafish salad with low-fat or fat-free mayonnaise.
Special cholesterol-lowering margarine:Having 2 to 3tablespoons of a cholesterol-lowering margarine everyday can lower your cholesterol. These margarinescontain plant stanol esters, an ingredient that keepscholesterol from being absorbed. You’ll find severaltypes at the grocery store in the margarine section.
American Diabetes Association 1–800–DIABETES (342–2383) www.diabetes.org ©2009 by the American Diabetes Association, Inc. 11/09
Toolkit No. 9: Protect Your Heart: Choose FatsWisely continued
Sources of cholesterol• egg yolks• high-fat dairy products
• high-fat meat and poultry• liver and other organmeats
Sources of monounsaturated fat• avocado• canola oil• olive oil and olives• sesame seeds
• nuts like almonds,cashews, pecans, andpeanuts• peanut butter and peanutoil
Sources of polyunsaturated fat• corn oil• cottonseed oil• flaxseeds• mayonnaise• pumpkin seeds• safflower oil• salad dressings
• sesame seeds• soft (tub) margarine• sunflower oil• sunflower seeds• tahini or sesame paste• walnuts
Sources of omega-3 fats• albacore tuna• herring• mackerel• rainbow trout• salmon
• sardines• canola oil• flaxseeds• soybean oil• walnuts
Polyunsaturated fat: Polyunsaturated fat, another typeof unsaturated fat, protects your heart.
ProtectYourHeartBy following these three steps, you can help protect your heart and lower your risk for heart disease and stroke.
For more help, ask your health care team for copies of these brochures:• Toolkit No. 8: Protect Your Heart: Make Smart Food Choices• Toolkit No. 10: Protect Your Heart: Plan and Cook Heart-HealthyMeals• Toolkit No. 11: Protect Your Heart: Check Food Labels to Make Heart-Healthy Choices
Provided By
P a T i e n T H a n D o u T
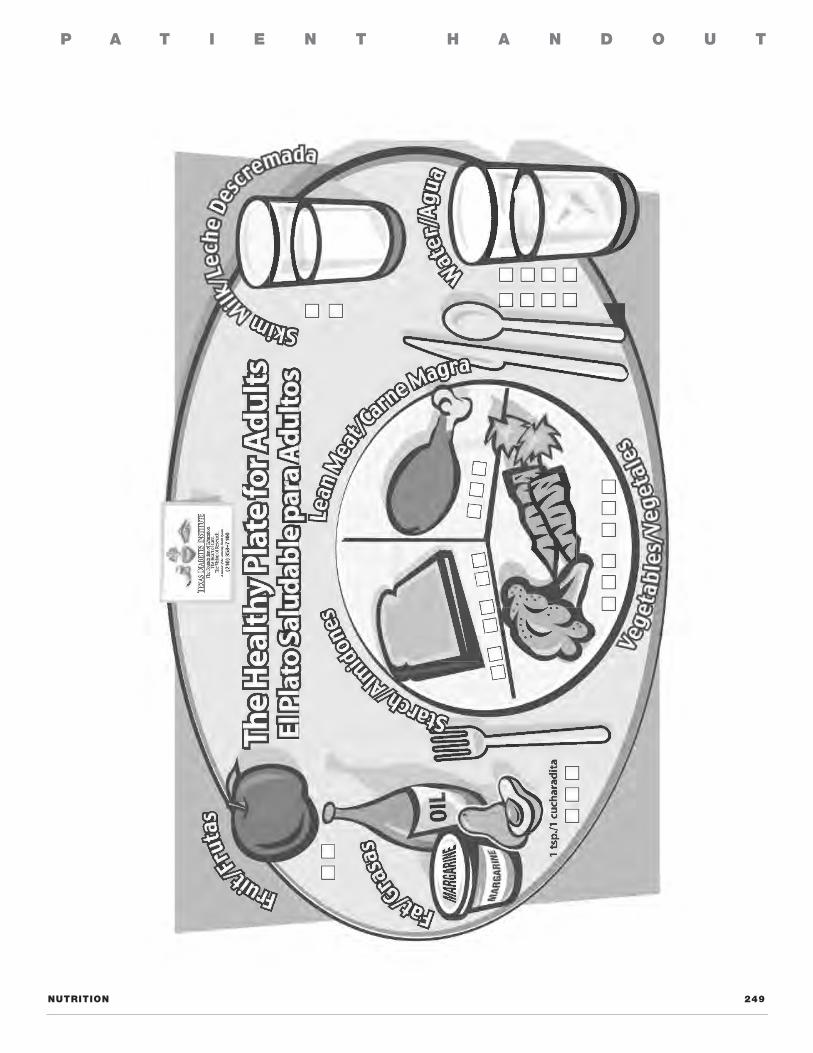
nuTriTion 249
~••

Pa
Ti
en
T
Ha
nD
ou
T
nu
Tr
iTio
n
25
0
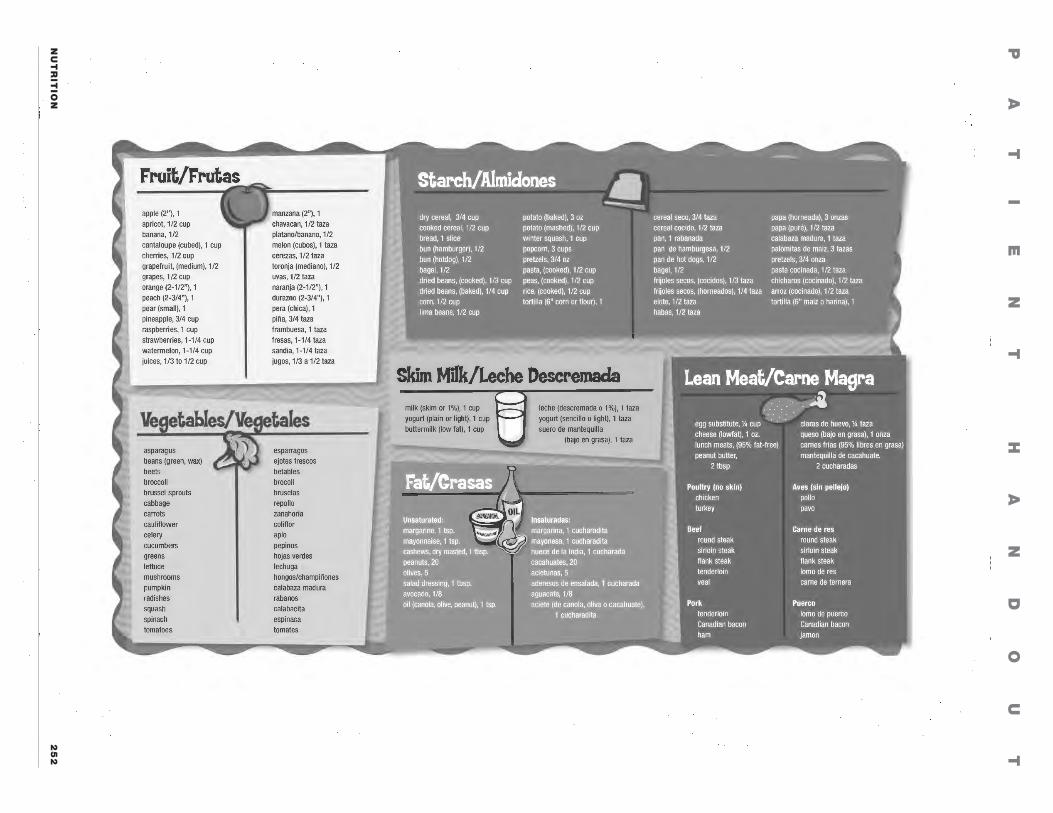
Fruit/Frutas
apple (2"), 1
apricot, 1 /2 cup banana, 1/2 cantaloupe (cubed), 1 cup cherries, 1/2 cup grapefruit, (medium), 1/2 grapes, 1 /2 cup orange (2-1/2"), 1 peach (2-3/4"), 1 pear (small), 1 pineapple, 3/4 cup raspberries, 1 cup strawberries, 1-1 /4 cup watermelon, 1-1/4 cup juices, 1/3 to 1/2 cup
manzana (2"), 1 chavacan, 1 /2 taza platano/banano, 1/2 melon (cubos), 1 taza cerezas, 1/2 taza toronja (mediano), 1/2 uvas, 1/2 taza naranja (2-1 /2"), 1 durazno (2-3/4"), 1 pera (chica), 1 piiia, 3/4 taza frambuesa, 1 taza fresas, 1-1/4 taza sandia, 1-1/4 taza jugos, 1/3 a 1/2 taza
Vegetable_s/Vegetales
asparagus esparragos beans (green, wax) ejotes frescos beets betables broccoli brocoli brussel sprouts bruselas cabbage repollo carrots zanahoria cauliflower coliflor celery apio cucumbers pepinos greens hojas verdes lettuce lechuga mushrooms hongos/champiiiones pumpkin calabaza madura radishes rabanos squash calabacita spinach espinaca tomatoes tomates
Starches/Almidones
dry cereal, 3/4 cup cooked cereal, 1/2 cup bread, 1 slice bun (hamburger), 1/2 bun (hotdog), 1/2 bagel, 1/2 dried beans, (cooked), 1/3 cup dried beans, (baked), 1/4 cup corn, 1/2 cup lima beans, 1/2 cup
potato (baked), 3 oz potato (mashed), 1/2 cup winter squash, 1 cup popcorn, 3 cups pretzels, 3/4 oz pasta, (cooked), 1/2 cup peas, (cooked), 1/2 cup rice, (cooked), 1/2 cup tortilla (6" corn or flour), 1
Skim Milk/Leche Descremada milk (skim or 1 %), 1 cup yogurt (plain or light), 1 cup buttermilk (low fat), 1 cup
Unsaturated: margarine, 1 tsp.
leche (descremada o 1 %), 1 taza yogurt (sencillo o light), 1 taza suero de mantequilla
(bajo en grasa), 1 taza
lnsaturadas: margarina, 1 cucharadita mayonesa, 1 cucharadita nuece de la India, 1 cucharada cacahuates, 20 acietunas, 5 aderesos de ensalada, 1 cucharada aguacate, 1/8 aciete (de canola, oliva o cacahuate),
1 cucharadita
cereal seco, 3/4 taza cereal cocido, 1/2 taza pan, 1 rabanada pan de hamburgesa, 1/2 pan de hot dogs, 1 /2 bagel, 1/2 frijoles secos, (cocidos), 1/3 taza frijoles secos, (horneados), 1/4 taza elote, 1/2 taza habas, 1 /2 taza
papa (horneada), 3 onzas papa (pure), 1/2 taza calabaza madura, 1 taza palomitas de maiz, 3 tazas pretzels, 3/4 onza pasta cocinada, 1 /2 taza chicharos (cocinado), 1/2 taza arroz (cocinado), 1/2 taza tortilla (6" maiz o harina), 1
Lean Meat/Carne Magra
egg substitute, ¼ cup cheese (lowfat), 1 oz. lunch meats, (95% fat-free) peanut butter,
2 tbsp
PouHry (no skin) chicken turkey
Beef round steak sirloin steak flank steak tenderloin veal
Pork tenderloin Canadian bacon ham
claras de huevo, ¼ taza queso (bajo en grasa), 1 onza carnes frias (95% libres en grasa) mantequilla de cacahuate,
2 cucharadas
Aves (sin pellejo) pollo pavo
Carne de res round steak sirloin steak flank steak lomo de res came de ternera
Puerco lomo de puerco Canadian bacon jamon

P a T i e n T H a n D o u T
nuTriTion 251
Pa
Ti
en
T
Ha
nD
ou
T
nu
Tr
iTio
n
25
2
apple (2"), 1 apricot, 1 /2 cup banana, 1/2 • cantaloupe (cubed), 1 cup cherries, 1/2 cup grapefruit, (medium), 1/2 grapes, 1 /2 cup orange (2-1/2"), 1 peach (2-3/4"), 1 pear (small), 1 pineapple, 3/4 cup raspberries, 1 cup strawberries, 1-1 /4 cup watermelon, 1-1/4 cup juices, 1/3 to 1/2 cup
asparagus beans (green, wax) beets broccoli brussel sprouts cabbage carrots cauliflower celery cucumbers greens lettuce mushrooms pumpkin radishes squash spinach
manzana (2"), 1 chavacan, 1 /2 taza platano/banano, 1/2 melon (cubos), 1 taza cerezas, 1/2 taza toronja (mediano), 1/2 uvas, 1/2 taza naranja (2-1 /2"), 1 durazno (2-3/4"), 1 pera (chica), 1 piiia, 3/4 taza frambuesa, 1 taza fresas, 1-1/4 taza sandia, 1-1 /4 taza jugos, 1/3 a 1/2 taza
esparragos ejotes frescos betables brocoli bruselas repollo zanahoria coliftor apio pepinos hojas verdes lechuga hongos/champiiiones calabaza madura rabanos calabacita espinaca tomates
Starch/Almidones tJ
~
dry cereal, 3/4 cup cooked cereal, 1/2 cup bread, 1 slice bun (hamburger), 1/2 bun (hotdog), 1/2 bagel , 1/2 dried beans, (cooked), 1/3 cup dried beans, (baked), 1/4 cup corn, 1/2 cup lima beans, 1/2 cup
potato (baked), 3 oz potato (mashed), 1/2 cup winter squash, 1 cup popcorn, 3 cups pretzels, 3/4 oz pasta, (cooked), 1/2 cup peas, (cooked), 1/2 cup rice, (cooked), 1/2 cup tortilla (6" corn or flour), 1
milk (skim or 1 %), 1 cup yogurt (plain or light), 1 cup buttermilk (low fat), 1 cup E] leche (descremada o 1 %), 1 taza
yogurt (sencillo o light), 1 taza suero de mantequilla
(bajo en grasa), 1 taza
. Fat/Crasas
Unsaturated: · · · · · ' lnsaturadas: margarine, 1 tsp. ~ 1 margarina, 1 cucharadita mayonnaise, 1 tsp. ~ ~ mayonesa, 1 cucharadita cashews, dry roasted, 1 tbsp. ~ nuece de la India, 1 cucharada peanuts, 20 olives, 5 salad dressing, 1 tbsp. avocado, 1/8 oil (canola, olive, peanut), 1 tsp.
cacahuates, 20 acietunas, 5 aderesos de ensalada, 1 cucharada aguacate, 1/8
aciete (de canola, oliva o cacahuate), 1 cucharadita
cereal seco, 3/4 taza cereal cocido, 1/2 taza pan, 1 rabanada pan de hamburgesa, 1/2 pan de hot dogs, 1 /2 bagel, 1/2 frijoles secos, (cocidos), 1/3 taza frijoles secos, (horneados), 1/4 taza elote, 1/2 taza habas, 1 /2 taza
papa (horneada), 3 onzas papa (pure), 1/2 taza calabaza madura, 1 taza palomitas de maiz, 3 tazas pretzels, 3/4 onza pasta cocinada, 1 /2 taza chicharos (cocinado), 1/2 taza arroz (cocinado), 1/2 taza tortilla (6" maiz o harina), 1
Lean Meat/Carne Magra
egg substitute, ¼ cup cheese (lowfat), 1 oz. lunch meats, (95% fat-free) peanut butter,
2 tbsp
Poultry (no skin) chicken turkey
Beef round steak sirloin steak flank steak tenderloin veal
Pork tenderloin Canadian bacon ham
claras de huevo, ¼ taza queso (bajo en grasa), 1 onza carnes frias (95% libres en grasa) mantequilla de cacahuate,
2 cucharadas
Aves (sin pellejo) polio pavo
Carne de res round steak sirloin steak flank steak lomo de res came de ternera
Puerco lomo de puerco Canadian bacon jamon
P a T i e n T H a n D o u T
nuTriTion 253

Pa
Ti
en
T
Ha
nD
ou
T
nu
Tr
iTio
n
25
4
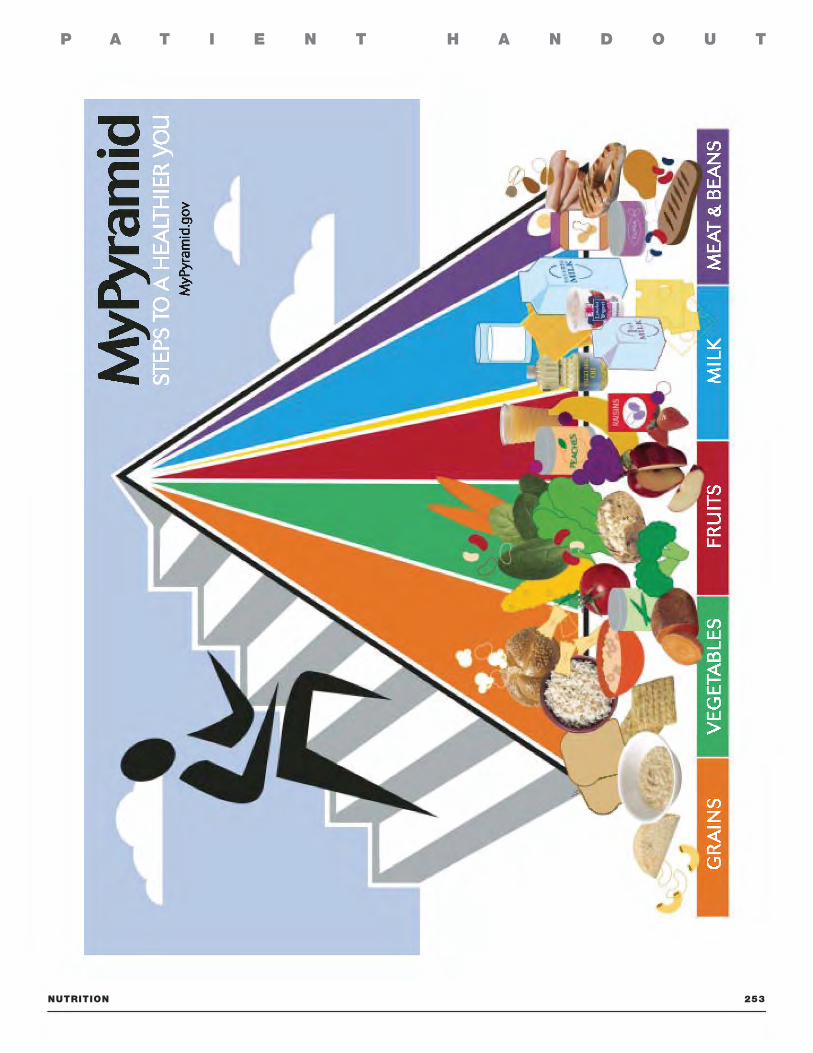
VEGETABLES FRUITS MILK MEAT&BEANS Vary your veggies Focus on fruits Get your calcium-rich foods Go lean with protein
Eat at least 3 oz. of whole- Eat more dark-green veggies Eat a variety of fruit Go low-fat or fat-free when I Choose low-fat or lean grain cereals, breads, Uke broca>li, spinach, and other you choose milk. yogurt, meats and poultry crackers, rice, or pasta dark leafy greens Choose fresh, frozen, and other milk produds everyday canned, or dried fruit I Bake it, broil it, or grill it
Eat more orange vegetables If you don't or can't 1 oz. is about 1 slice of like carrots and 51111eetpotatoes Go easy on fruit juices consume milk, choose Vary your protein routine -bread, about 1 cup of lactose-free products or choose more fish, beans, breakfast cereal, or 112 cup Eat more dry beans and peas other calcium sources peas, nuts, and seeds of cooked rice, cereal, like pinto beans, kidney beans, such as fortified foods or pasta and lentils and beverages
For a 2,000-calorie diet. you need the amounts below from each food group. To find the amounts that are right for you, go to MyPyramld.gov.
Eat 6 oz. every day Eat 2 ½ cups every day Eat 2 cups every day Get 3 cups every day; for kids aged 2 to 8, it's 2 Eat 5½ oz. every day
Rnd your balance between food and physical activity Be sure to stay within your dally calorie needs.
Be physically active for at least 30 minutes most days of the week.
About 60 minutes a day of physical activity may be needed to prevent weight gain.
For sustaining weight loss, at least 60 to 90 minutes a day of physical activity may be required.
Children and teenagers should be physically active for 60 minutes every day, or most days.
MyPyramid.gov STEPS ID A HEAIJHIER )'OU
Know the llmlts on fats, sugars, and salt <sodium) Make most of your fat sources from fish, nuts, and vegetable oils.
Limit solid fats like butter, margarine, shortening, and lard, as wen as foods that contain these.
Check the Nutrition Facts label to keep saturated fats, trans fats, and sodium low.
Choose food and beverages low in added sugars. Added sugars contribute calories with few, if any, nutrients.
U.S. Department of Agriculture Center for Nutrition Policy and Promotion
April 2005 CNPP-15
us•
USDA ty J)IOVide:- and employer.
P a T i e n T H a n D o u T
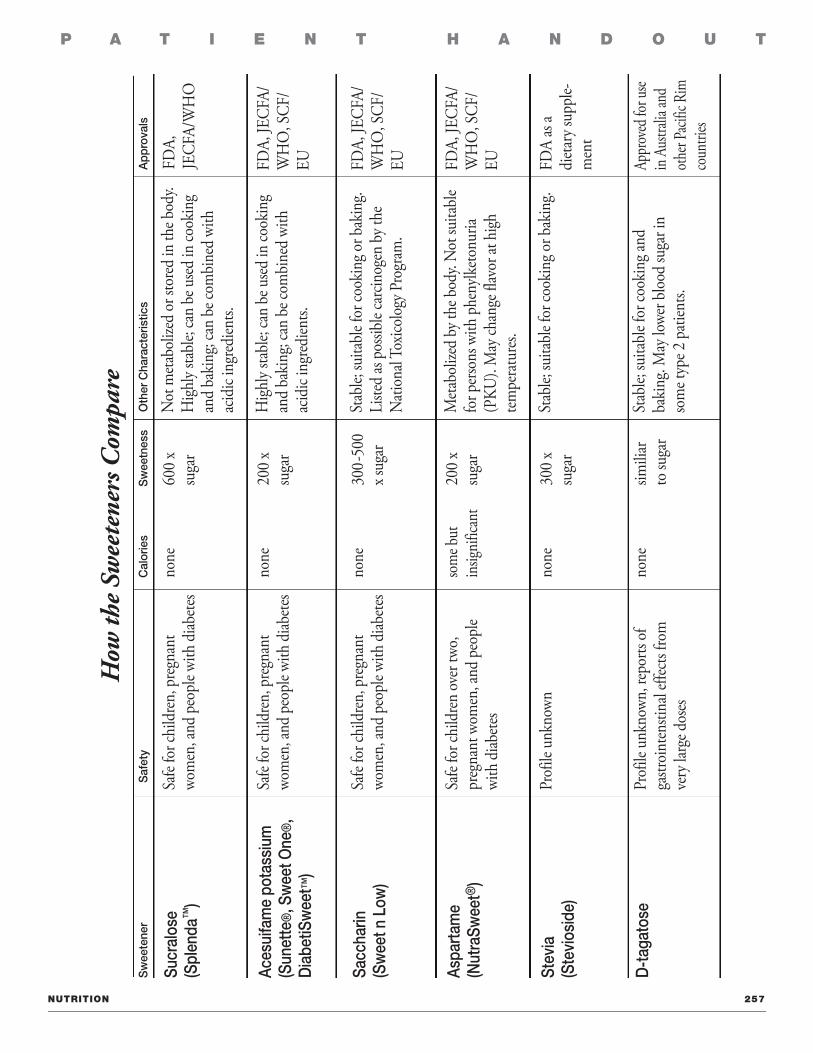
nuTriTion 257
sucr
alos
e
(spl
enda
™)
How
the
Swee
tene
rs C
ompa
re
aces
uifa
me
pota
ssiu
m
(sun
ette
®, s
wee
t one
®,
dia
betis
wee
t™)
sacc
harin
(s
wee
t n l
ow)
aspa
rtam
e
(nut
rasw
eet®
)
stev
ia
(ste
vios
ide)
d-t
agat
ose
Safe
for c
hild
ren, p
regna
nt
wom
en, a
nd p
eopl
e with
diab
etes
Safe
for c
hild
ren, p
regna
nt
wom
en, a
nd p
eopl
e with
diab
etes
Safe
for c
hild
ren, p
regna
nt
wom
en, a
nd p
eopl
e with
diab
etes
Safe
for c
hild
ren ov
er tw
o,
preg
nant
wom
en, a
nd p
eopl
e wi
th d
iabete
s
Prof
ile u
nkno
wn
Prof
ile u
nkno
wn, r
epor
ts of
ga
stroi
nten
stina
l effe
cts fr
om
very
larg
e dos
es
none
none
none
som
e but
in
signi
fi can
t
none
none
600
x su
gar
200
x su
gar
300-
500
x sug
ar
200
x su
gar
300
x su
gar
simili
ar
to su
gar
Not
meta
boliz
ed or
stor
ed in
the b
ody.
High
ly sta
ble;
can
be u
sed in
cook
ing
and
baki
ng; c
an b
e com
bine
d wi
th
acid
ic in
gred
ients.
High
ly sta
ble;
can
be u
sed in
cook
ing
and
baki
ng; c
an b
e com
bine
d wi
th
acid
ic in
gred
ients.
Stab
le; su
itabl
e for
cook
ing o
r bak
ing.
Liste
d as
pos
sible
carci
noge
n by
the
Nati
onal
Toxic
olog
y Pro
gram
.
Meta
boliz
ed b
y the
bod
y. N
ot su
itabl
e fo
r per
sons
with
phe
nylk
etonu
ria
(PKU
). M
ay ch
ange
flav
or at
high
tem
pera
tures
.
Stab
le; su
itabl
e for
cook
ing o
r bak
ing.
Stab
le; su
itabl
e for
cook
ing a
nd
baki
ng. M
ay lo
wer b
lood
suga
r in
som
e typ
e 2 p
atien
ts.
FDA,
JE
CFA/
WH
O
FDA,
JECF
A/W
HO
, SCF
/EU FD
A, JE
CFA/
WH
O, S
CF/
EU FDA,
JECF
A/W
HO
, SCF
/EU FD
A as
a di
etary
supp
le-m
ent
Appr
oved
for u
se in
Austr
alia a
nd
other
Pacif
ic Ri
m co
untri
es
sw
eete
ner
saf
ety
cal
orie
ss
wee
tnes
so
ther
cha
ract
eris
tics
app
rova
ls

P a T i e n T H a n D o u T
nuTriTion 259
Calculating Total Grams of Carbohydrate in a Recipe
To determine the amount of carbohydrates in a recipe:
1. Make a table as noted below2. List ALL the ingredients in the recipe3. Using food labels or a nutrient composition book, list the total grams of carbohydrate in
each ingredient (amount of fat and sodium can also be calculated)4. Total the grams of carbohydrate from all ingredients5. Divide the total grams of carbohydrate by the number of servings in the recipe6. Note the total grams of carbohydrate PER SERVING on the recipe for future reference
Recipe Name: __________________________________________________________________
Ingredient Amount Grams of Carbohydrate Grams of Fat
Example:
Corn Pudding (Makes 8 Servings)
Ingredient Amount Grams of Carbohydrate Grams of Fat
Cornstarch 2 Tablespoons 14 0Egg Substitute ½ cup 2 0Sugar ½ cup 100 0Creamed Corn 16 oz. can 60 0Evaporated Skim Milk 16 oz. can 60 0TOTAL 236 0
Divide total carbohydrate by number of servings (236/8) 29.5
This recipe has 29.5 grams of carbohydrate and zero (0) grams of fat per serving.

P a T i e n T H a n D o u T
exerCise 261
Developing a Physical Activity Program
A successful exercise program can offer you many of the following benefits:
1. Improves your resting heart rate and blood pressure. 2. Strengthens your heart. 3. Lowers your body’s percentage of body fat. Helps control
weight. 4. Lowers cholesterol levels. Increases protective cholesterol
(HDL) levels. 5. Lowers blood sugar levels by increasing muscle sensitivity to insulin. 6. Helps to balance food, insulin, and exercise. 7. Increases energy level. 8. Provides a sense of well-being and satisfaction.
What you will need:
1. Shoes and socks that fit properly. Avoid rubber soles. Orthotics or insoles as your doctor recommends.
2. Comfortable clothes for the activity (indoors, outside). 3. Water to drink before, during, and after activity. 4. Excitement, motivation, determination, and perseverance.
To achieve maximum benefit from your beginning fitness program and to help evaluate your progress, the following are recommended:
1. KEEP A DAILY RECORD: A simple chart of the date, blood sugar, amount of time of continual walking, 15-second pulse count before and at the end of the walk, and any symptoms or comments you want to add. Fill this chart in daily.
2. WALKING SHOULD BE CONTINUAL AND RHYTHMIC. Swing your arms and stride along at an even rhythmic pace. Do not stroll along and do not stop unless necessary. Wear loose fitting clothing and comfortable shoes.
3. If your pulse rate at the end of your walk is greater than the upper limit pulse rate discussed with you, decrease the speed of your walk. Phone your physician if heart rate after exercise is consistently over this level.
4. KEEP ACTIVE DURING THE DAY. Develop better movement habits. Begin to think in terms of activity. Sit less — move more!

P a T i e n T H a n D o u T
exerCise 262
5. Remember diet control (restricted dietary fats and proper body weight)! 6. Report to your physician if you develop any of the following symptoms during or after your
daily walk:a. Excessive fatigue e. Pain in the chest, teeth, jaw, arms, or earsb. Lightheadedness or dizziness f. Irregularity of the pulsec. Nausea and/or vomiting g. Shortness of breathd. Any unusual joint, muscle,
or ligament problem
7. Do not walk immediately after meals — wait at least 30 minutes. 8. Walking should be done on level surfaces. Slow down on inclines. 9. Warm up before exercise with gentle stretching. 10. Do not exercise during the heat of the day during summer. Heat and humidity will increase
the pulse rate. If exercise in cold weather is uncomfortable, ask your health care provider for exercise suggestions.
11. Prior to starting a weight lifting program, consult your physician.
Precautions
1. Check blood sugar before and 30 minutes after exercise. 2. Check pulse before and after exercise. 3. Inspect feet before and after exercise. 4. Wear loose-fitting clothing and leather walking shoes. 5. Carry a carbohydrate snack and water. 6. Carry or wear I.D. that gives name, address, medical condition, and medications. 7. Stop activity immediately if you:
a. Feel tightness or pain in chest, arms, ears, jaws, or teethb. Experience severe shortness of breathc. Experience palpitations or nausea
P a T i e n T H a n D o u T
exerCise 265
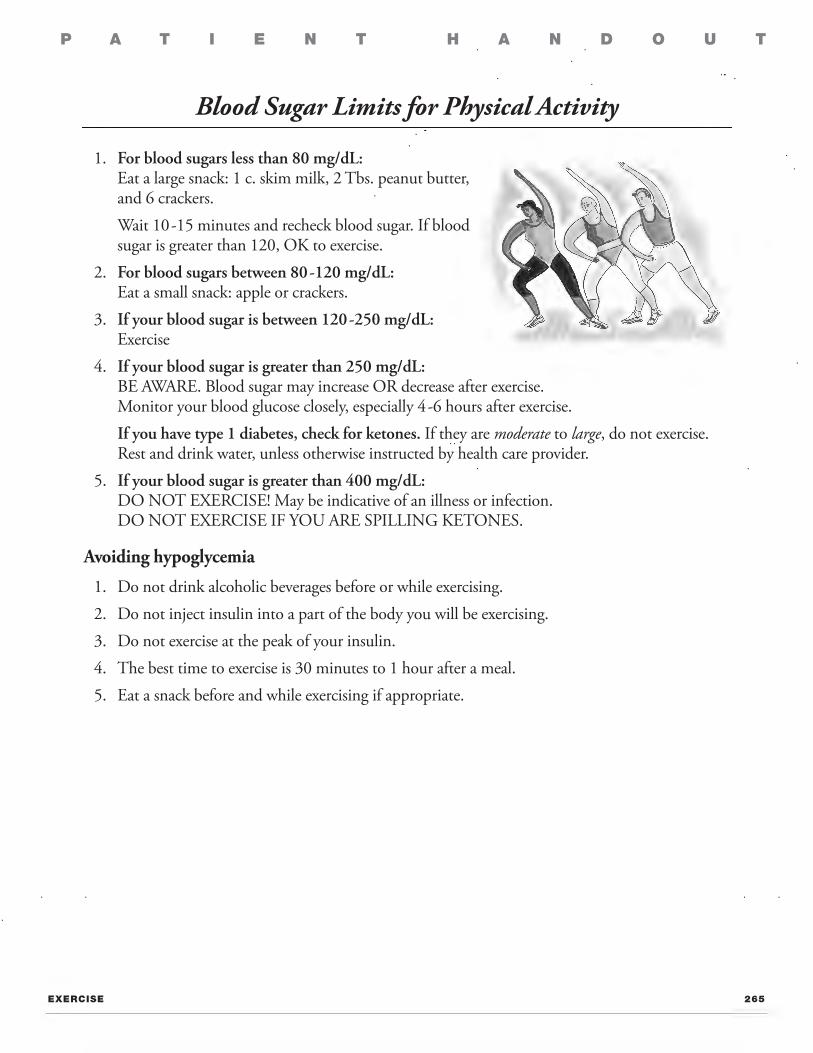
Blood Sugar Limits for Physical Activity
1. For blood sugars less than 80 mg/dL: Eat a large snack: 1 c. skim milk, 2 Tbs. peanut butter, and 6 crackers.
Wait 10-15 minutes and recheck blood sugar. If blood sugar is greater than 120, OK to exercise.
2. For blood sugars between 80-120 mg/dL: Eat a small snack: apple or crackers.
3. If your blood sugar is between 120-250 mg/dL: Exercise
4. If your blood sugar is greater than 250 mg/dL: BE AWARE. Blood sugar may increase OR decrease after exercise. Monitor your blood glucose closely, especially 4-6 hours after exercise.
If you have type 1 diabetes, check for ketones. If they are moderate to large, do not exercise. Rest and drink water, unless otherwise instructed by health care provider.
5. If your blood sugar is greater than 400 mg/dL: DO NOT EXERCISE! May be indicative of an illness or infection. DO NOT EXERCISE IF YOU ARE SPILLING KETONES.
Avoiding hypoglycemia
1. Do not drink alcoholic beverages before or while exercising. 2. Do not inject insulin into a part of the body you will be exercising. 3. Do not exercise at the peak of your insulin. 4. The best time to exercise is 30 minutes to 1 hour after a meal. 5. Eat a snack before and while exercising if appropriate.

P a T i e n T H a n D o u T
exerCise 267
How to Take Your Pulse
You can take your pulse at either of two locations: the carotid artery in your neck or the radial artery in your wrist. Be very cautious when counting your carotid pulse. If you apply too much pressure with your fingers, you will cause a ref lexive slowing of the heart that may lead to an inaccurate pulse count or cause you to faint.
Your heart rate rises during exercise and drops rapidly when you stop exercising. Therefore, it is important to take your pulse as soon as possible after exercise. Practice taking your pulse in the following way until you get three consecutive counts that are within one beat of each other.
1. Right-handed persons should use the first two fingers (never the thumb) of the right hand to count the pulse. For the carotid pulse, place your fingers on the left side of your throat; for the radial pulse, place your fingers on your left wrist, as shown in the figure above. Note that the pulse location is on the thumb side. Watching the second hand of the clock, you must accurately locate your pulse as quickly as possible.
2. Begin counting the pulse when the second hand reaches a point at which you can easily distinguish a 15 second interval. Count for 15 seconds, and then multiply the count by 4 to figure the number of beats per minute.
How To CalCulaTe your TraininG HearT raTe
1. Predicted Maximum Heart Rate (HR) ........................................................... 220 2. Subtract your age ......................................................................................... – ______ 3. Now multiply this number by the % you want to train at.
Most studies recommend 60-85% for an adequate training effect ................ x ______ This is the heart rate you want to maintain during your exercise .................... ______
The above method of estimating an effective exercise intensity is for use by normal healthy individuals. If you have any signs or symptoms of coronary disease or exesssive deconditioning or if you are over 35 years of age and beginning an exercise program for the first time, it is suggested that you have an exercise stress test performed under the supervison of a physician.
Where to feel for your radial artery pulse.

P a T i e n T H a n D o u T
exerCise 269
People with diabetes are more likely than others to develop problems in the legs and feet. Daily exercise and not smoking can help prevent serious damage.
andabout
Leg Exercises for People with Diabetes
• Walking: Take a brisk daily walk of 1/2 - 1 hour. Try to increase the distance every day.
Chair exercise: Sit down on a chair and raise yourself up 10 times keeping your arms crossed.
• Heel raising: Get up on your toes
. then clown on your heels, ut 20 times. Also try putting
your whole weight first on one leg and ~L-- :m the other.
Staircase exercise: Walk briskly up a flight of stairs using only the balls of the feet .
tJ Tiptoe exercise: Hold on to a chair and raise and lower yourself on the toes of one foot, then the other.
Leg sweeps: Stand with one leg slightly raised, on a book for example . While holding on to a chair or table swing the other leg back and forth 10 times.Change to the other leg and repeat.
a Stretching the calf muscles: Lean with the palms of your hands against a wall. Keep your feet some distance away, the heels firmly on the floor. Bend your arms 10 times, keeping your back and legs straight.
6 Leg bends: Hold chair. Put one foot forward as shown and lower body straight down, keeping both feet on floor. Raise and lower 10 times. Change legs.
D Wave your feet: Sit down on the floor and lean backwards. Shake your feet until they are relaxed and warm.
For best results - walk or exercise every day
P a T i e n T H a n D o u T
MeDiCaTions 271
Before you begin an oral medicine, talk with your health care team about:
u How much to takeu When and how often to take the medicineu When and how often to test your
blood sugar
u What to do if you forgot a doseu Any other medicines you are takingu Possible side effects
While all medicines can cause side effects, many are temporary. If you have side effects with your medicine, talk to your health care provider. Never stop taking medicine on your own. Tell your physician, pharmacist, or nurse. Your health care provider may need to change the dose or order a new one.
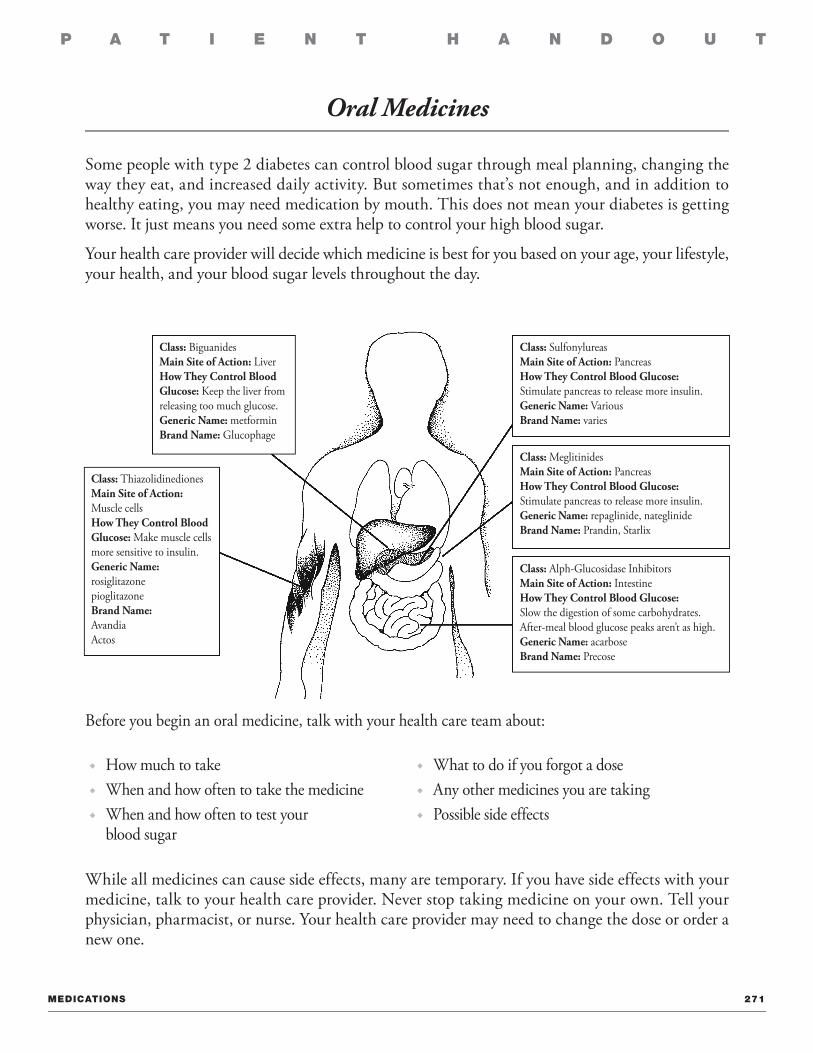
Oral Medicines
Some people with type 2 diabetes can control blood sugar through meal planning, changing the way they eat, and increased daily activity. But sometimes that’s not enough, and in addition to healthy eating, you may need medication by mouth. This does not mean your diabetes is getting worse. It just means you need some extra help to control your high blood sugar.
Your health care provider will decide which medicine is best for you based on your age, your lifestyle, your health, and your blood sugar levels throughout the day.
Class: BiguanidesMain Site of Action: LiverHow They Control Blood Glucose: Keep the liver from releasing too much glucose.Generic Name: metforminBrand Name: Glucophage
Class: ThiazolidinedionesMain Site of Action: Muscle cellsHow They Control Blood Glucose: Make muscle cells more sensitive to insulin.Generic Name: rosiglitazone pioglitazoneBrand Name: AvandiaActos
Class: SulfonylureasMain Site of Action: PancreasHow They Control Blood Glucose: Stimulate pancreas to release more insulin.Generic Name: VariousBrand Name: varies
Class: MeglitinidesMain Site of Action: PancreasHow They Control Blood Glucose: Stimulate pancreas to release more insulin.Generic Name: repaglinide, nateglinideBrand Name: Prandin, Starlix
Class: Alph-Glucosidase InhibitorsMain Site of Action: IntestineHow They Control Blood Glucose: Slow the digestion of some carbohydrates. After-meal blood glucose peaks aren’t as high.Generic Name: acarboseBrand Name: Precose
P a T i e n T H a n D o u T
MeDiCaTions 273
Insulin
What Insulin Does:
1. Helps convert the food we eat into fuel for energy.2. Helps to store glucose (sugar) as glycogen in the liver.3. Promotes building protein and helps the body store fat.
Who Needs Insulin:
1. All persons with type 1 diabetes.2. Women who develop gestational diabetes if the meal plan alone does not control blood
sugar levels.3. Persons with type 2 diabetes that cannot be controlled by nutrition, physical activity,
and oral medicines.4. Persons in diabetic ketoacidosis (DKA).
Sources of Insulin:
1. Human — Man-made (synthetic)2. Animal — Not available in the United States.
How Insulin is Packaged:
1. Vials (bottles)2. Prefilled pens and prefilled cartridges
How Insulin is Stored:
1. Refrigerated or at room temperature, depending if it is opened or unopened. a. Refrigeration temperature -36° -46°Fahrenheit. Do not freeze. b. Room temperature -59° -86°Fahrenheit2. Keep away from direct heat and out of direct sunlight.3. Follow manufacturer’s storage recommendations.
Please use the following link to additional information about using and storing insulin: http://www.bddiabetes.com
P a T i e n T H a n D o u T
MeDiCaTions 274
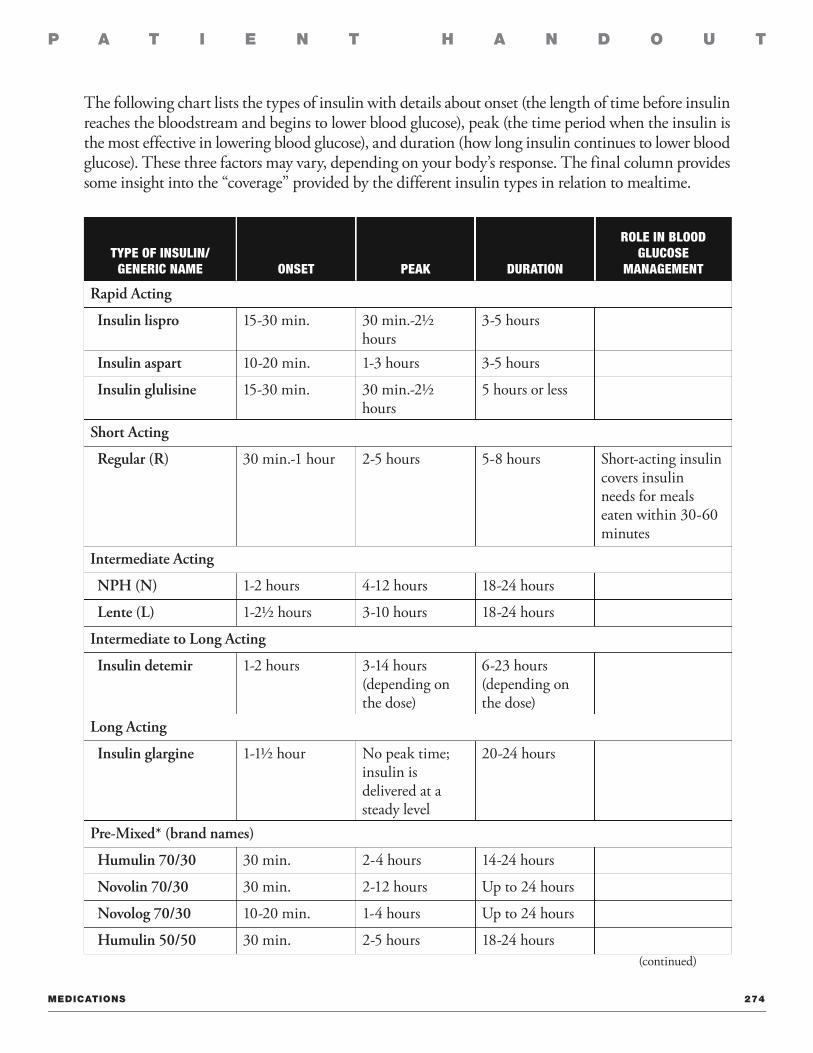
Type of InsulIn/GenerIc name onseT peak DuraTIon
role In BlooD Glucose
manaGemenT
Rapid Acting
Insulin lispro 15-30 min. 30 min.-2½ hours
3-5 hours
Insulin aspart 10-20 min. 1-3 hours 3-5 hours
Insulin glulisine 15-30 min. 30 min.-2½ hours
5 hours or less
Short Acting
Regular (R) 30 min.-1 hour 2-5 hours 5-8 hours Short-acting insulin covers insulin needs for meals eaten within 30-60 minutes
Intermediate Acting
NPH (N) 1-2 hours 4-12 hours 18-24 hours
Lente (L) 1-2½ hours 3-10 hours 18-24 hours
Intermediate to Long Acting
Insulin detemir 1-2 hours 3-14 hours (depending on the dose)
6-23 hours (depending on the dose)
Long Acting
Insulin glargine 1-1½ hour No peak time; insulin is delivered at a steady level
20-24 hours
Pre-Mixed* (brand names)
Humulin 70/30 30 min. 2-4 hours 14-24 hours
Novolin 70/30 30 min. 2-12 hours Up to 24 hours
Novolog 70/30 10-20 min. 1-4 hours Up to 24 hours
Humulin 50/50 30 min. 2-5 hours 18-24 hours
The following chart lists the types of insulin with details about onset (the length of time before insulin reaches the bloodstream and begins to lower blood glucose), peak (the time period when the insulin is the most effective in lowering blood glucose), and duration (how long insulin continues to lower blood glucose). These three factors may vary, depending on your body’s response. The final column provides some insight into the “coverage” provided by the different insulin types in relation to mealtime.
(continued)
I I I I

P a T i e n T H a n D o u T
MeDiCaTions 275
Humalog mix 75/25 15 min. 30 min.-2½ hours
16-20 hours
* Premixed insulins are a combination of specific proportions of intermediate-acting and short-acting insulin in one bottle or insulin pen (the numbers following the brand name indicate the percentage of each type of insulin).
The Cleveland Clinic, Department of Patient Education and Health Information, 2006. Apidra Prescribing Information. Sanofi-Aventis, Inc. Jan. 2009. Levemir Prescribing Information. Novo Nordisk, Inc. May 16, 2007.

P a T i e n T H a n D o u T
MeDiCaTions 279
Drawing Insulin
1. Gather equipment: insulin bottle(s), syringe.
2. Wash hands and chosen injection site.
3. Invert bottle gently several times until well mixed (not necessary for R & Humalog insulin).
4. Remove syringe needle cap, then pump plunger in and out 2-3 times.
Single Dose Mixed Dose
5. Draw air into syringe equal to insulin dose. 5. Draw air into syringe equal to amount of longer acting insulin (N, L, UL).
6. Inject air into insulin bottle. 6. Inject air into longer acting insulin bottle.
7. Invert bottle, draw back proper dose. 7. Remove syringe from bottle.
8. Check for air bubbles. To remove air bubbles, tap 8. Draw air into syringe equal to amount syringe to float bubbles to needle end, inject of shorter acting insulin (R, Humalog). bubbles into bottle, then pull plunger back to proper dose. Repeat process until bubbles are gone.
9. Set syringe aside to prepare injection site. 9. Inject air into shorter acting insulin bottle.
10. Do not let needle touch anything. 10. Invert bottle. Draw back proper dose.
11. Check for air bubbles.
12. Remove syringe from bottle.
13. Rotate longer acting insulin bottle.
14. Insert needle into longer acting insulin bottle.
15. Invert bottle. Draw back proper dose.
16. Set aside syringe to prepare injection site.
inJeCTinG insulin
Site: Abdomen (fastest with least variability), Arms, Thighs, Hips, Buttocks If rotating sites, rotate injections within chosen site for at least a week before another site is used.
1. Clean site with soap and water or alcohol. (Let alcohol air dry.) * NOTE: With repeated use, alcohol can toughen the skin.
2. Pinch up 1-2 inches of skin.
3. Insert needle at 90-degree angle.
4. Push plunger down and release skin.
5. Remove needle. Do not rub area.
TiPs: Draw dosage so that the top of the plunger is even with the mark on the syringe.
Remember when mixing —Clear then ClouDy
NOTE: DO NOT MIX GLARGINE WITH
ANY OTHER INSULIN

P a T i e n T H a n D o u T
aCuTe CoMPliCaTions of DiabeTes 281
SHAKY FAST SWEATINGHEARTBEAT
DIZZY ANXIOUS HUNGRY BLURRY VISION
Hypoglycemia(Low Blood Glucose)
Causes: Too little food or skipping a meal; too much insulin or diabetes pills; more active than usual.
Onset: Often sudden.
SomeSymptoms:
WEAKNESS OR FATIGUE HEADACHE IRRITABLE
What Can You Do?
TREAT by eating 3 to 4 glucose tablets or 3to 5 hard candies you can chew quickly (suchas peppermints), or by drinking 4-ounces offruit juice, or 1/2 can of regular soda pop.
CHECK your blood glucose againafter 15 minutes. If it is still low,treat again. If symptoms don'tstop, call your healthcare provider.
Novo Nordisk Inc. grants permission to reproduce this piece for non-profit educational purposes only on condition that the pieceis maintained in its original format and that the copyright notice is displayed. Novo Nordisk Inc. reserves the right to revoke thispermission at any time. Concept developed by Rhonda Rogers, RN, BSN, CDE
© Novo Nordisk Inc. 126379R ChangingDiabetes-us.com 6/2006
CHECK your bloodglucose, right away. If youcan’t check, treat anyway.
For more information, call the Novo Nordisk Tip Line at 1-800-260-3730 or visit us online at ChangingDiabetes-us.com.
IF LOW BLOOD GLUCOSE IS LEFT UNTREATED, YOU MAY PASS OUT AND NEED MEDICAL HELP.
CHANGINGlif~ WITH DIABETES
~.k® llCM) no, ulS

P a T i e n T H a n D o u T
aCuTe CoMPliCaTions of DiabeTes 283
EXTREME THIRST NEED TOURINATE OFTEN
DRY SKIN HUNGR YRRULBYVISION
Hyperglycemia(High Blood Glucose)
Causes: Too much food, too little insulin or diabetes pills, illness, or stress.
Onset: Often starts slowly.
Some Symptoms:
DROWSY SLOW HEALING WOUNDS
What Can You Do?
CHECK BLOOD GLUCOSE
If your blood glucose levelsare higher than your goal forthree days and you don’tknow why,
CALL YOUR HEALTHCARE PROVIDER
Novo Nordisk Inc. grants permission to reproduce this piece for non-profit educational purposes only on condition that the pieceis maintained in its original format and that the copyright notice is displayed. Novo Nordisk Inc. reserves the right to revoke thispermission at any time. Concept developed by Rhonda Rogers, RN, BSN, CDE
© Novo Nordisk Inc. 126379R ChangingDiabetes-us.com 6/2006 Printed in U.S.A.
For more information, call the Novo Nordisk Tip Line at 1-800-260-3730 or visit us online at ChangingDiabetes-us.com.
HIGH BLOOD GLUCOSE MAY LEAD TO A MEDICAL EMERGENCY IF NOT TREATED.
CHANGING t;j -I DIABETES

P a T i e n T H a n D o u T
aCuTe CoMPliCaTions of DiabeTes 285
How to Use Glucagon
Glucagon is an emergency drug which is given as an injection to raise the blood sugar level when a person cannot swallow fast-acting sources of sugar. It should be given in case of a severe insulin reaction or unconscious blood sugar reaction. Glucagon should be stored below 90° F.
A prescription is needed to buy glucagon. Talk to your health care provider to see if you need to have glucagon available. You will need to teach a family member or friend how to give it. Review the procedure with them occasionally and be sure they know where you keep the glucagon. It will be difficult to figure out how to use it in an emergency situation.
Glucagon comes in a kit or in a box. If you use a kit, follow the instructions. If you do not use a kit, follow the instructions below.
1. Remove the flip-off tops on bottles 1 and 2. Bottle 1 is the diluting liquid and bottle 2 is a white powder.
2. Withdraw the plunger of an U-100 insulin syringe to the 50-unit mark. 3. Set bottle 1 (the bottle with the liquid) on a table or flat surface. Insert the needle through the
rubber stopper on the top of the bottle. 4. Inject the air from the syringe into the bottle and then turn the bottle and needle
upside down. 5. Withdraw as much of the liquid as possible into the syringe. 6. Remove the needle and syringe from bottle 1 and insert the same needle into bottle 2
(the bottle with the powder.) Inject all the liquid from the syringe into bottle 2.
''• •

P a T i e n T H a n D o u T
aCuTe CoMPliCaTions of DiabeTes 286
7. Remove the needle and syringe. Shake the bottle gently until all the powder is dissolved and the solution is clear.
8. Withdraw the entire contents of bottle 2 (the mixed glucagon) back into the syringe.
9. Inject all the glucagon in the syringe into the arm, abdomen, thigh, or buttocks, the same way you would inject insulin. Small children (under 44 lbs.) are given 1/2 the syringe.
10. Turn the person onto their side or abdomen. People often vomit after receiving glucagon. 11. As soon as the person has woken up, is alert and able to eat, feed them. Give them some
juice or non-diet soda to be sure they are able to swallow. Then give them a longer acting carbohydrate and protein, such as a meat or cheese sandwich. Glucagon only acts for a very short period of time, so it is very important that they take some extra calories.
12. If the person does not wake up after 15 minutes, repeat the dose of glucagon. Call an ambulance for assistance.
13. Be sure to call the health care provider or health care educator after an unconscious reaction or a seizure occurs. Also, document the event in the glucose monitoring log book.
Check the expiration date on the glucagon package occasionally to be sure it is still good. You may want to tape or rubber band a syringe to the box so that it will be easy to find in an emergency.
Review this procedure with your doctor or health care provider so you will be prepared in case you should ever have to use glucagon. Again, make sure a family member or friend knows where the glucagon is kept and how to give it to you in case of an emergency.

P a T i e n T H a n D o u T
aCuTe CoMPliCaTions of DiabeTes 289
Sick Day Management
Should I keep taking my diabetes medication if I’m sick?
1. MOST IMPORTANT: Even if you are sick and not eating regularly, you still need to take your insulin and diabetes pills the way you always do unless your health care provider tells you to stop.
2. Everyone with diabetes should have the following on hand:a. An extra week’s supply of insulin or diabetes pillsb. Sugar-free cough medicinec. Aspirin and non-aspirin pain relieversd. Antacidse. Medicine for diarrhea and vomitingf. Thermometer
How often should I test my blood sugars and temperature?
1. Check and record blood sugar levels more frequently, every 2-4 hours, and write it down in the log book.
2. Check and record your temperature every 4 hours and write it down in your log book.3. Record any pain, lack of appetite, nausea, vomiting, medicines taken, and food eaten in
your log book.
When do I call my doctor?
1. If you have blood sugar levels greater than 240 mg/dL for 24 hours or under 60 mg/dL for 3 readings in a row.
2. If you have an upset stomach, vomiting, or diarrhea for over than 4-6 hours.3. If you are sick to your stomach and cannot keep fluids down.4. If you have fever of 101°+ for over 24 hours.5. If you have a dry mouth, thirst, decreased urination, and dry flushed skin.6. If you have pain that does not go away.7. If you are not too sure about something.8. If you are ill for more than 1 or 2 days.
Have your log book handy when you call your health care provider.
P a T i e n T H a n D o u T
aCuTe CoMPliCaTions of DiabeTes 290
What should I eat when I’m sick?
If you CAN eat/drink, eat your usual meals and snacks. You also need to drink plenty of fluids by drinking 1/2-1 cup sugar-free liquids every 1-2 hours. These would include:
water sugar-free popsicles tea, no sugar sugar-free Jell-O instant broth soups diet sodas
If you CANNOT eat/drink your usual meals or snacks, eat or sip about 15 grams of carbohydrates per hour. These would include: 1/2 cup low-fat ice cream 1/2 cup soft pudding 1/2 cup soft yogurt 1/2 cup cooked cereal 1/4 cup sherbet 1 tbsp. honey 1/2 cup Jell-O 1/2 cup regular soda 1 cup of cream soup (thinned) 1/2 cup grape juice 1 cup milk 1/2 twin popsicle
1. It is easier for your body to digest carbohydrates than proteins and fats.2. Small frequent feedings are quickly absorbed and quickly changed to blood glucose.3. Keep a record of how much you eat and drink.4. Ask someone to check in on you.WARNING: You may be at risk of severe dehydration and hypoglycemia if you do not replace carbohydrates and fluids. Dehydration is defined as not being able to take in enough fluids to replace those lost through vomiting or diarrhea.
Signs and Symptoms of Dehydration: Dry mouth, thirst, decreased urination, dry flushed skin, and dry lips.
If you have been very sick to your stomach, start drinking clear liquids like broth, tea, apple or grape juice or eating Jell-O or popsicles. When you can keep these down, move on to full liquids like tomato or orange juice, ice cream and cream soups. Add soft foods like oatmeal, applesauce, noodles, rice, and cooked vegetables as your appetite increases.
What should I do in the meantime?
1. Stay in bed, keep warm, and get lots of rest.2. Drink lots of liquids.3. Do some reading or watch your favorite TV shows.Discuss these and any other Sick Day Rules with your health care provider. Also check with your health care provider before taking any other medications.
GET WELL SOON!

P a T i e n T H a n D o u T
CHroniC CoMPliCaTions of DiabeTes 293
Help Yourself ... Prevent the Complications of Diabetes
Diabetes Can Affect All These Body Parts
Watch for change in vision Recommendations: • See your doctor • Control your blood
sugar • Control your
blood pressure
HEART Watch for chest pain and/or shortness of breath Recommendations: • See your doctor • Control your blood sugar • Limit cholesterol • Control your blood pressure • A void smoking • Exercise as directed
KIDNEY Watch for protein in urine and/or increase in blood pressure Recommendations: • See your doctor • Control your blood
sugar • Control your blood
pressure • Limit protein intake
FOOT Watch for pain, numbness, and/or wounds that won't heal Recommendations: • See your doctor • Control your
blood sugar • Limit cholesterol • Control your blood
pressure • Avoid smoking • Exercise as directed • Seek proper foot care
Specific Recommendations: ___________________ _
I -Nouo :~~r..~ (O U CAT f AHO S U PPOltT
For Product Information, please call 1-800-72 7-6500.
© Novo Nordisk Pharmaceuticals Inc. 1993 000-13A
Novo Nordisk Pharmaceuticals Inc.
The worldwide leader in diabetes care
Printed in the USA

P a T i e n T H a n D o u T
CHroniC CoMPliCaTions of DiabeTes 295
Foot Care for People with Diabetes People with diabetes have to take special care of their feet.
-- Wash your feet daily with lukewarm water and soap.
~ Check your feet for blisters, ~ cuts or sores, redness or
swelling. Tell your doctor right away if you find something wrong.
~ Kee~ your feet warm and ·~ dry. Preferably wear special
· paaded socks and always wear shoes that fit weir.
Dry your feet well, especially between the toes.
~ Use emery board gently _. to shaJ:?e toenails even with
ends of your toes. Do not use a pocketknife or razor blades.
Never walk barefoot indoors or outdoors.
a Keep the skin supple with a moisturizing lotion, but do not apply it between the toes.
~ Change daily into clean, ._ soft socks or stockings,
not too big or too small.
0 Examine your shoes eve,-y day for cracks, pebbles, nails or anything that could hurt your feet.
Take good care of your feet - and use them. A brisk walk every day stimulates the circulation.
© 1998 Novo Nordisk Pharmaceuticals, Inc. www.novo-nordisk.com 000-034 Printed in U,SA

P a T i e n T H a n D o u T
HyGiene 297
Skin Care and Diabetes
High blood sugar levels can impair the body’s ability to defend itself against infection. Poorly controlled diabetes can lead to poor circulation, which can impair healing, prevent proper nutrients and oxygen from reaching tissues resulting in slower wound healing.
sKin PrinCiPles
1. Intact skin is the body’s first line of defense against germs.2. Excessively dry skin contributes to skin breakdown.3. Poor circulation leads to poor skin nutrition.4. Germs and infections grow readily in warm, moist places such as skin folds.
Goals for your sKin
1. Skin should a. be warm and suppleb. be free of redness, abrasions, and lumps c. not be too dry or too oily d. be free of irritations and free of any diseasee. be able to feel a pinprick, cold, heat, and touch
CarinG for your sKin
1. Keeping your skin clean and your blood sugar levels under control (near normal) are essential to help prevent skin problems.
2. Wash any cut or scraped skin with warm water and mild soap (e.g., Ivory) right away. Apply antibiotic ointment and bandage, if necessary. Keep bandage dry. Contact health care provider if cut or burn is severe.
3. Contact health care provider if, after 3 days, there is increased pain, swelling, or heat. 4. Keep your skin moist by using lanolin-based moisturizing lotions (like Eucerin, Keri,
Lubriderm, or Nivea) with no alcohol or perfume/fragrance. This will help prevent skin from overdrying, cracking, or becoming more susceptible to infection.
5. Drink lots of water to keep your skin healthy, unless your health care provider tells you otherwise.
6. Report any unusual discharge or odor from any wound on your body. 7. Do not use any sharp objects to care for your wound, cut, or abrasion. 8. Do not use abrasive soaps or chemicals (such as alcohol, vinegar, gasoline, onion, garlic,
iodine, etc.) on your skin or any wound.

P a T i e n T H a n D o u T
HyGiene 298
9. Cover loosely. Change bandages when moist or as instructed by your health care provider. 10. Mucous membranes should be pink, moist, and warm. Report any abnormalities, such as
cracking, peeling, itching, pain, heat, discharge, etc., immediately. 11. Never massage legs or arms vigorously without a specific recommendation from a health care provider.
Blood clots can come loose during massage, and may block blood circulation to vital organs.12. Keep your hair clean. Report any unusual hair patterns, such as unusual loss of hair.
sun safeTy
The sun puts out three kinds of ultraviolet (UV) light. All three kinds can damage your skin. Over time, damage from the UV light builds up. The results include wrinkles, cataracts, and various kinds of skin cancer.
Many common medicines can cause sensitivity to sunlight. Skin may turn red or burn after a short time in the sun. Medicines that can cause sun sensitivity include:
u Sulfonylureas (diabetes medicines) such as Metformin
u Some blood pressure medications, such as Capoten, Adalat and Procardia
u Some arthritis and pain medicines, such as ibuprofen, Relafen, Naprosyn and Clinoril
u Some antidepressants
u Some diuretics (water pills)
u Some antipsychotics
u Some cancer medicines
Review the package information for all medicines you take. If sun sensitivity is a side effect, the precautions below are extra important.
To protect your skin and eyes from the sun:
u Wear sunglasses that block both UV-A and UV-B light.
u Wear sunscreen with a SPF of 15 or higher every day.
u Stay out of the sun between 10 a.m. and 4 p.m.
u Wear a hat with a broad brim that covers your nose and ears.
u Wear protective clothing — long sleeves and long pants or skirts.
u Take precautions even on cloudy days.
Source: Diabetes Forecast July 2000

P a T i e n T H a n D o u T
HyGiene 302
Foot Care Tips
TaKe Care of your feeT for a lifeTiMe.
1. Take care of your diabetes.
u Work with your health care team to keep your blood sugar within a good range.
2. Check your feet every day.
u Look at your bare feet every day for cuts, blisters, red spots, and swelling.
u Use a mirror to check the bottoms of your feet or ask a family member for help if you have trouble seeing.
3. Wash your feet every day.
u Wash your feet in warm, not hot, water every day.u Dry your feet well. Be sure to dry between the toes.
4. Keep the skin soft and smooth.
u Rub a thin coat of skin lotion over the tops and bottoms of your feet but not between your toes.
5. Smooth corns and calluses gently.
u If your feet are at low risk for problems, use a pumice stone to smooth corns and calluses. Don’t use over-the-counter products or sharp objects on corns or calluses.
6. If you can see and reach your toenails, trim them each week or when needed.
u Trim your toenails straight across and file the edges with an emery board or nail file.
7. Wear shoes and socks at all times.
u Never walk barefoot.u Wear comfortable shoes that fit well and protect your feet.u Feel inside your shoes before putting them on each time to make sure the lining is smooth
and there are no objects inside.
8. Protect your feet from hot and cold.
u Wear shoes at the beach or on hot pavement.u Wear socks at night if your feet get cold.u Don’t test bath water with your feet.u Don’t use hot water bottles or heating pads or electric blankets.

P a T i e n T H a n D o u T
HyGiene 303
9. Keep the blood flowing to your feet.
u Put your feet up when sitting.u Wiggle your toes and move your ankles up and down for 5 minutes, 2 to 3 times a day.u Don’t cross your legs for long periods of time.u Don’t smoke.
10. Be active every day.
u Plan your physical activity program with your health care team.
11. Check with your health care team.
u Have your health care provider check your bare feet and find out whether you are likely to have serious foot problems. Remember that you may not feel the pain of an injury.
u Call your health care provider right away if you find a cut, sore, blister, or bruise on your foot that does not begin to heal after one day.
u Follow your health care provider’s advice about foot care.
12. Get started now.
u Begin taking good care of your feet today.u Set a time every day to check your feet.
Source: www.ndep.nih.gov, Accessed 6-1-02
P a T i e n T H a n D o u T
HyGiene 306
Diabetes and Gum Disease
While regular dental checkups are recommended for everyone. After the age of 40, the risk of gum (periodontal) disease increases.
With diabetes, the risk of gum disease is even higher. Diabetes makes the blood vessels in gums narrower. Plaque builds up quickly if there is less saliva to wash plaque away. There may be less collagen to support the structures of your mouth which can increase gum break down, causing teeth to become loose and gums to become infected more easily.
If your diabetes is not under control, high levels of sugar in your saliva may increase the bacteria that cause cavities.
CarinG for your TeeTH
In addition to visiting your dentist every 6 months, daily brushing and flossing are the first steps to keeping your gums and teeth healthy.
1. Brush at least twice a day. Use a soft bristle brush and toothpaste with fluoride. Brush at a 45-degree angle where your teeth meet your gums. Then brush all the surfaces of your teeth, using back-and-forth strokes. Brushing your tongue lightly will also help remove bacteria.
2. Use dental floss once a day to get rid of bacteria between teeth. Your dentist or dental hygienist can show you the best way to floss.
3. Get a new toothbrush at least every 3 months.
ConTaCT your DenTisT if:
1. Your gums start to bleed when you brush. This may mean that your gums are inflamed and open to infection.
2. Your teeth have shifted or if your dentures no longer fit.3. You have soreness, tenderness or red spots on your tongue.4. You have white patches on your gums, which may indicate thrush (a fungal infection).5. There are changes in texture or color to your gums, teeth or mouth.6. You often have bad breath. You may have a gum infection or a cavity.
If you need surgery on your gums, be sure to tell your dentist that you have diabetes, since you may be slow to heal and quick to develop an infection.

P a T i e n T H a n D o u T
PsyCHosoCial issues 308
Diabetes and Stress Management
Stress is natural and experienced by everyone. Stress can be good by adding energy, motivation, and enthusiasm to your day to day activities. However, too much stress may not be healthy. Normally, stress causes changes to emotions and physical condition.
Stress can:
u increase blood pressure and heart rate u increase respiratory rate u increase blood sugar
Other indicators of stress are:
u more frequent colds u weaker muscles u bone loss u increased cholesterol levels u increased levels of potent natural steroid hormones such as cortisol
ways To ManaGe your sTress
1. Practice relaxation exercises — stretch and breathe deeply. 2. Learn positive self-talk. 3. Find someone to share your thoughts with and talk to — this may be your pet. 4. Listen to music. Dance. 5. Read a good book, such as a romantic or joke book. 6. Frame pictures, paint some furniture, draw pictures — be creative. 7. Write your thoughts and feelings down on paper. 8. Write a letter to someone you care about. 9. Work on your favorite hobby. 10. Do volunteer work. Take care of a pet or help others. 11. Knit, crochet or embroider. 12. Learn a new skill. Teach someone else. 13. See a positive, uplifting or funny movie. 14. Plan a trip or vacation — even if you don’t go, it can be fun to plan.

P a T i e n T H a n D o u T
PsyCHosoCial issues 309
15. Walk and increase your physical activity. 16. Decrease caffeine intake. 17. Avoid individuals or situations that are negative or make you feel bad.
iDeas To PrevenT Too MuCH sTress
1. Set realistic goals to help you get control of your life. 2. Prioritize the parts of your life to find out what is truly important. 3. Maintain and/or seek spiritual guidance as appropriate. 4. Take time for yourself, away from what has to be done, and do what you want. 5. Think positive thoughts. 6. Develop and use a sense of humor. 7. Communicate your feelings to friends and family or seek professional help as needed. 8. Develop a strong support system around you. 9. Teach others about diabetes, such as how to identify and treat hypoglycemia. 10. Join a diabetes support group. 11. Attend diabetes education classes. 12. Maintain proper nutrition and hydration, including a daily activity plan. 13. Eat a variety of foods from all the food groups (based on your meal plan).14. Get daily physical activity Stress is a part of our daily lives. If you cannot seem to handle it on your own, talk to your health care provider or diabetes educator about getting help. There are new medications you may try, or perhaps you will need to see a specialist in that area.
You do not have to handle this problem alone.

P a T i e n T H a n D o u T
PsyCHosoCial issues 312
Coping with Diabetes
Finding out that you have diabetes can be a big shock. In addition to feeling unwell and having to deal with the fact that you have a chronic disease, you have to learn about taking care of yourself. Unlike other diseases where your involvement may be limited to taking your medication on time, you play an active part in controlling your diabetes. Your health care provider or diabetes educator may be telling you to change the way you eat, lose weight, and exercise — all at the same time!
It may sound overwhelming, but keeping a few thoughts in mind will help you cope and get through this adjustment period.
1. Let your friends and family help you. They are probably anxious, scared, and willing to help.
2. Set reasonable goals (such as losing 5 pounds in a month or walking around the block three times a week) and try to work toward them. Start by taking small steps to build your confidence.
3. Don’t feel guilty if you miss a day. The important thing is to keep trying. 4. When you reach a goal, congratulate yourself on doing a good job. You should be in control of
your diabetes — don’t let it control you!5. Don’t look at all the things you “should” do. If you try to do everything at once, you’ll feel
overwhelmed and never do anything. Pick a reasonable number of things to accomplish.6. If you are having a problem keeping up with your program, tell your health care provider.
Together, you can set goals that are more reasonable.7. Think positively, and don’t feel sorry for yourself. You can overcome this. The worst thing
you can do is deny there is a problem because there is so much you can be doing to prevent problems. As they say, “Just do it!”
8. Don’t worry about what people will think. This is your chance to teach them that diabetes can be controlled.
Having diabetes isn’t the end of the world. It’s up to you to take charge.
You can make a difference.
P a T i e n T H a n D o u T
PsyCHosoCial issues 314
Changing Behavior
Changing the way you do things can be very difficult. If you understand the stages that a person goes through in making a change, it may help you. Think about what it is that you need to do to better control your diabetes. See what stage you are presently in and work on ideas to help you to move on to the next stage.
sTaGes of CHanGe
Pre-contemplation stage 1. You may not even be aware that there is a problem.2. If you know there is a problem, you may have no intention of changing in the near future —
within the next 6 months. 3. You may even deny the need for change.
You might say, “I have always been overweight. Everyone in our family is heavy.”
What you can do –
1. Become more aware of the need for change.2. Get more information on problems that may occur if you do not change.3. Get more information on how making the change can help you.
Contemplation stage1. You may be thinking about making a change in the near future.2. You know there is a problem but you are not ready to change.3. You are thinking about making a change in the next 6 months.
You might say, “I’ve heard that being overweight can lead to diabetes. But, I don’t think I can handle going on a diet.”
What you can do –
1. Decide why you want to change.2. What is your end goal? What do you want to accomplish? 3. Get more information on what you want to change.4. Make specific plans on how you are going to accomplish your goal.5. Get help from your health care provider if necessary.
Preparation stage1. You are making a plan to change.2. You know what you want to do.3. You get more information, start planning, and even start to change.

P a T i e n T H a n D o u T
PsyCHosoCial issues 315
4. You may tell your family and friends.5. You are serious about making a change in the near future.
You might say, “I am going to lose some weight. I learned that I may be able to take less insulin.”
What you can do –
1. Make specific action plans. What is it that you are going to do to accomplish your goal? Write them out with a date for when you are going to start.
2. Decide on small goals that you know you can do. Small steps can lead to larger ones.
Action stage1. Start working on your specific plans.2. Make changes in your lifestyle to accomplish your goals. 3. Relapse is normal. You may have a hard time getting started and maintain the changes you made. 4. This stage may last as long as six months.
You might say, “I’m walking three times a week for half an hour. I’ve quit drinking sodas.”
What you can do –
1. Get help from your health care provider with how you are doing. 2. Get ideas on how you can overcome barriers.3. If needed, join a support group. Get help from your family and friends.4. Celebrate your successes as you accomplish your goals. Buy that item you have always wanted,
take a vacation, take your family to their favorite park, etc.
Maintenance stage1. Continue working on your goals. 2. You may have setbacks but get back on track as soon as possible.3. Do NOT give up!!4. This stage may last six months to five years.
You might say, “I lost 10 pounds. My doctor took me off my insulin, and now I am taking pills to control my diabetes. I am going to keep on walking and eating better.”
What you can do –1. Remind yourself of your accomplishments and how much better you feel.2. If you are faced with barriers or things that seem to make it harder for you to stay on course, look
for help from family and friends.3. If you “blow” your meal plan or stop exercising for any reason, don’t waste time worrying about it.
Remind yourself of your goals and get back on track.4. Make a list of all that you have accomplished, e.g., how far you have walked, how many dress/
pant sizes you have lost, how much you have been able to decrease your medications, how many fewer sick days you have had, how much more energy you have, etc.

P a T i e n T H a n D o u T
MisCellaneous 318
Travel and Diabetes
When traveling, make sure you have the following:
1. A form of identification, i.e., Medic-Alert bracelet or necklace.2. A letter from your health care provider or clinic that explains that you have
diabetes and includes any related information: why you must carry insulin and syringes, your current medications, allergies, instructions in case of a medical emergency.
3. Hypoglycemia treatment in your pockets or purse, such as glucose tablets, gel, or glucagon. Make sure your travel companion(s) know you have diabetes and know what to do in case of a hypoglycemic reaction. Talk to them regarding your particular symptoms of hypoglycemia, so they can help you if necessary.
4. Extra supplies in case you stay longer than planned: strips, batteries, control solution, syringes sharps container, lancets, ketone test strips snacks to cover delayed meal times medications: insulin, pills, etc.
5. Prescriptions for medications and strips.6. Name, address, and phone number of health care provider, clinic, or hospital where you will
be traveling. 7. Comfortable, well fitting shoes to be worn at all times. 8. If applicable, learn how to say or write down important phrases in the foreign language where
traveling, such as “I need a doctor,” “I need help,” “I need sugar or juice,” etc.9. Train your travel companion(s) on glucose monitoring and your particular goals.
Other important points
1. Allow plenty of time so as not to rush and cause unwanted stress.2. Try to rest often while traveling and drink plenty of water if permitted. 3. Walk while traveling to get in your needed exercise.4. Keep insulin in a cool dry place, away from sunlight.5. If possible try not to travel alone, particularly on long trips or when traveling out of your state
or country of origin.6. Carry your medication, syringes, and supplies for testing with you in a small suitcase. Do not
check-in this particular suitcase. (Check with the airlines on their policy for medical devices.)

P a T i e n T H a n D o u T
MisCellaneous 319
airline Travel for PeoPle wiTH DiabeTes
The Federal Aviation Administration (FAA) has new airport security measures which may affect passengers with diabetes. The FAA and American Diabetes Association instructions for patients with diabetes who need to fly with their supplies and equipment within the United States instructions are:
1. Generally, passengers may board with syringes or insulin delivery systems only if they can produce a vial of insulin with a professional, pharmaceutical pre-printed label, which clearly identifies the medication. No exceptions will be made.
Since the prescription label is on the outside of the box containing the vial of insulin, the FAA recommends that passengers keep the insulin box and come prepared with the vial of insulin in its original pharmaceutically labeled box.
2. Generally, passengers who have diabetes and must test their blood sugar levels but who do not require insulin may board with their lancets if the lancets are capped and the lancets are brought on with the glucose meter that has the manufacturer’s name embossed on the meter.
3. Glucagon is dispensed and normally kept in a pre-printed labeled plastic container or box. People with diabetes who are traveling should keep their glucagon kit intact in its original pre-printed, pharmaceutically labeled container.
4. Prescriptions and letters of medical necessity are generally not accepted.5. FAA security measures apply to travel within the 50 continental United States only. All
passengers should consult their individual air carrier for both domestic (US) and international travel regulations and for specific guidelines regarding syringes, needles, lancets, and medications. The FAA’s policy and the policy of each airline is subject to change. Air carriers may have other requirements that may affect boarding with diabetes equipment and supplies. Call the airline carrier at least one day in advance regarding diabetes supplies or other medical items that may cause concern.
6. Place all diabetes supplies and medications in a zip lock bag.If a passenger is denied boarding a flight or faces any unforeseen diabetes-related difficulty because of security measures, he or she should calmly ask to speak to the security screener’s supervisor or contact the FAA grounds security commissioner at the departing airport.
In addition to the above information, there are new restrictions for carry-on items in general. Patients with diabetes may wish to check these before going to the airport.
Allow extra time:u Travelers should contact their airline to find out how early to arrive at the airport.u Consider public transportation to the airport. Curbside access is likely to be limited. Parking
and curbside check-in is available on an airline-by-airline basis. Contact the airline to see if curbside check-in is in place at the airport.

P a T i e n T H a n D o u T
MisCellaneous 320
Check-in:u A government-issued photo ID (federal, state, or local), such as a driver’s license, is required.
Travelers may be asked to show this ID at several points, such as the gate, along with their boarding passes.
u E-ticket travelers should check with their airline to make sure they have proper documentation. Written confirmation, such as a letter from the airline acknowledging the reservation, may be required.
P a T i e n T H a n D o u T
MisCellaneous 324
Diabetes Disaster Preparedness
Patient Information
Modern media have made our world seem small. News about events around the world reaches us in minutes. We learn of hurricanes, floods, earthquakes, volcanic eruptions, industrial accidents and terrorist attacks immediately. TV teaches us that any disaster brings chaos to people and their environments.
As a person with diabetes, your daily routine involves schedules and planning. An emergency can seriously affect your health. It may be difficult to cope with a disaster when it occurs. You and your family should plan and prepare beforehand even if the event is loss of electricity for a few hours. The first 72 hours following a disaster are the most critical for families. This is the time when you are most likely to be alone. For this reason, it is essential for you and your family to have a disaster plan and kit which should provide for all your family’s basic needs during these first hours.

P a T i e n T H a n D o u T
MisCellaneous 325
Be Prepared List:
You should safely store the following medical supplies or have them readily available:
Copy of your emergency information and medical list Extra copies of prescriptions Insulin or pills (include all medicines that you take daily including over the counter
medications) Syringes Alcohol swabs Cotton balls & tissues A meter to measure blood sugar Blood sugar diary Insulin pump supplies (if on insulin pump) Strips for your meter Urine ketone testing strips Lancing device and lancets Quick acting carbohydrate (for example, glucose tablets, orange juice, etc.) Longer lasting carbohydrate sources (for example, cheese and crackers) Glucagon Emergency Kit (if on insulin) Empty hard plastic detergent bottle with cap to dispose used lancets and syringes
Other supplies:
Flashlight with extra batteries Pad/pencil Whistle/noisemaker Matches/candles Extra pair of glasses First-aid kit Female sanitary supplies Copy of health insurance cards Heavy work gloves Important family documents Tools Water Food Clothing and bedding Radio with extra batteries Cell phone
Make sure you have enough supplies for 2 weeks. These supplies should be checked at least every 2-3 months.
Watch for expiration dates.

P a T i e n T H a n D o u T
MisCellaneous 326
Helpful Hints About Insulin, Pens, Syringesu Follow manufacturer’s recommendations for storing insulin (bottle or pen). After
opening insulin, some insulins may be stored at room temperature while others should be refrigerated.
u Insulin should not be exposed to excessive light, heat or cold. Do not freeze.u Regular and Lantus insulins should be clear.u NPH, Lente, 75/25, 50/50, and 70/30 insulins should be uniformly cloudy before rotating. u Insulin that clumps or sticks to the sides of the bottle should not be used.u Although reuse of your insulin syringes is not generally recommended, in life and death
situations, you have to alter this policy. Do not share your insulin syringes with other people.
P a T i e n T H a n D o u T
MisCellaneous 327
Things to Remember
Stress can cause a rise in your blood sugar.
Erratic mealtimes can cause changes in your blood sugar.
Excessive work to repair damage caused by the disaster (without stopping for snacks) can lower your blood sugar.
Excessive exercise when your blood sugar is over 250 mg/dL can cause your blood sugar to go higher.
Wear protective clothing and sturdy shoes.
Check your feet daily for an irritation, infection, open sores or blisters. Disaster debris can increase your risk for injury. Heat, cold, excessive dampness and inability to change footwear can lead to infection, especially if your blood sugar is high. Never go without shoes.
Hot Weather Tips uStay indoors in air-conditioned or fan cooled comfort.
uAvoid exercising outside.
uWear light colored cotton clothing.
uRemain well hydrated (water, diet drinks).
uAvoid salt tablets unless prescribed by your physician.
uSeek emergency treatment if you feel:
Fatigue, weakness, abdominal cramps,
Decreased urination, fever, confusion.
You should wear diabetes identification AT ALL TIMES

P a T i e n T H a n D o u T
MisCellaneous 328
Food Items to be stored
1 large box unopened crackers (saltines)
1 jar peanut butter
1 small box powdered milk (use within 6 months)
1 gallon or more of water per day per person for at least one week
2 6-pack packages cheese and crackers or 1 jar soft cheese
1 pkg. dry, unsweetened cereal
6 cans regular soda
6 cans diet soda
6-pack canned orange or apple juice
6 pack parmalat milk
6 cans “lite” or water packed fruit
1 spoon, fork and knife per person
Disposable cups
4 packages of glucose tablets or small hard candies for low blood sugar
1 can tuna, salmon, chicken, nuts per person
Mechanical can opener
These supplies should be checked
and replaced yearly.

P a T i e n T H a n D o u T
MisCellaneous 329
LIMIT SWEETS
Food Considerations During a Disaster
1. Food and water supply may be limited and/or contaminated. Do not eat food you think may be contaminated. It may be necessary to boil water for 10 minutes before use.
2. Drink plenty of water.
3. Maintain your meal plan to the best of your ability. Your plan should include a variety of meat/meat substitutes (i.e., peanut butter, dried beans, eggs), milk/milk products, fruits, vegetables, cereal, grains.
4. Limit sugar/sugar-containing foods. These foods include:
u Jellies, jams, molasses
u Honey
u Syrups (fruits canned in sugar syrup, pancake syrup)
u Tonic (dietetic tonics with less than one calorie per ounce are allowed)
u Frosted cake
u Presweetened or sugar-coated cereals
u Pie, pastry, danish pastry, doughnuts
u Chocolate
u Custards, pudding, sherbet, ice cream
u Gelatin
u Soda
u Cookies, brownies
5. Monitor your blood sugars frequently and record in diary.

P a T i e n T H a n D o u T
MisCellaneous 330
6. When reading labels, limit products with these sugar-containing ingredients:
u Sugar
u Corn syrup
u Dextrose
u Sucrose
u Corn sweeteners
u Honey
u Molasses
u Brown sugar
u Fruit syrup
7. Avoid greasy, fried foods.
8. Try to eat meals and snacks at the same time every day. Avoid periods of hunger and overindulgence. The quantity and frequency of your food intake should remain similar day-to-day depending upon your activity level.
9. Increase food and water intake during periods of increased exertion or physical activity by either eating between-meal snacks before activity or by eating additional food with meals.
10. Carry a fast source of sugar with you at all times:
u 4 glucose tablets
u 1 small box of raisins
u 6-7 small hard sugar candies
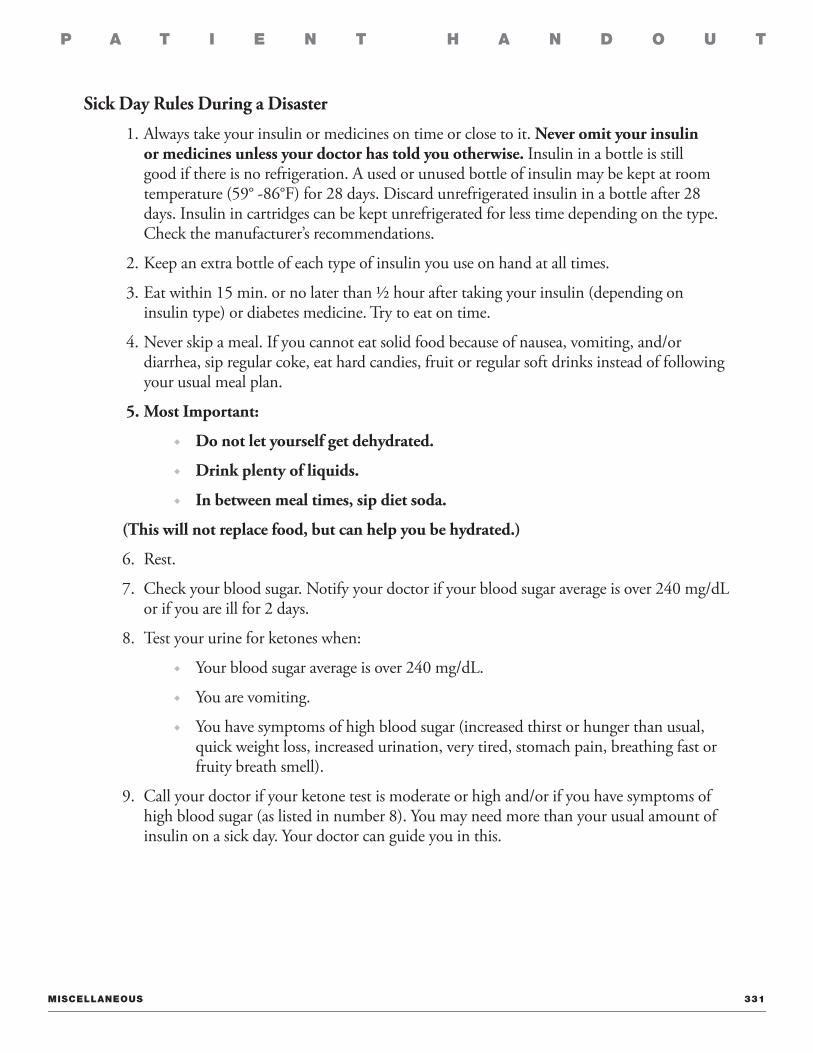
P a T i e n T H a n D o u T
MisCellaneous 331
Sick Day Rules During a Disaster
1. Always take your insulin or medicines on time or close to it. Never omit your insulin or medicines unless your doctor has told you otherwise. Insulin in a bottle is still good if there is no refrigeration. A used or unused bottle of insulin may be kept at room temperature (59° -86°F) for 28 days. Discard unrefrigerated insulin in a bottle after 28 days. Insulin in cartridges can be kept unrefrigerated for less time depending on the type. Check the manufacturer’s recommendations.
2. Keep an extra bottle of each type of insulin you use on hand at all times.
3. Eat within 15 min. or no later than ½ hour after taking your insulin (depending on insulin type) or diabetes medicine. Try to eat on time.
4. Never skip a meal. If you cannot eat solid food because of nausea, vomiting, and/or diarrhea, sip regular coke, eat hard candies, fruit or regular soft drinks instead of following your usual meal plan.
5. Most Important:
u Do not let yourself get dehydrated.
u Drink plenty of liquids.
u In between meal times, sip diet soda.
(This will not replace food, but can help you be hydrated.)
6. Rest.
7. Check your blood sugar. Notify your doctor if your blood sugar average is over 240 mg/dL or if you are ill for 2 days.
8. Test your urine for ketones when:
u Your blood sugar average is over 240 mg/dL.
u You are vomiting.
u You have symptoms of high blood sugar (increased thirst or hunger than usual, quick weight loss, increased urination, very tired, stomach pain, breathing fast or fruity breath smell).
9. Call your doctor if your ketone test is moderate or high and/or if you have symptoms of high blood sugar (as listed in number 8). You may need more than your usual amount of insulin on a sick day. Your doctor can guide you in this.

P a T i e n T H a n D o u T
MisCellaneous 332
If you need medical assistance/or are out of all medications, food, and cannot reach your doctor, immediately:
u Go to the nearest hospital; or
u Contact the police; or
u Contact the American Red Cross; or
u Go to an Emergency Medical Center
P a T i e n T H a n D o u T
MisCellaneous 341
Diabetes and Tobacco
Tobacco use raises your blood sugar level, making it harder to control your diabetes.
Tobacco use makes it harder for your body to use insulin, the hormone that helps the body control blood sugar.
Using tobacco increases your blood pressure.
Diabetes causes poor circulation, causing slow healing of wounds or injuries. Using tobacco increases your heart rate and decreases blood flow, making healing and foot care even harder.
Smoking cuts the amount of oxygen reaching tissues. Diabetes alone increases the chances for heart attack and stroke. Using tobacco doubles the risk of heart attack and stroke.
People with diabetes who use tobacco are three times more likely to die of heart disease and stroke as people with diabetes who do not use tobacco.
If you or someone you know has diabetes and uses tobacco, we can help.
Call 1-877-YES-QUIT (1-877-937-7848) for free counseling, talk to your doctor, or call 1-800-345-8647 for a list of community resources.
P a T i e n T H a n D o u T
Quitline FAX Referral FormFax Number: 1-800-483-3114
PROVIDER INFORMATION: Fax Sent Date: / /
Clinic Name:
Health Care Provider:
Contact Name:
I am a HIPAA-Covered Entity (Please check one) Yes No I Don’t Know
Fax: ( ) – Phone ( ) –
Comments:
PATIENT INFORMATION: Gender: male / female Pregnant? Y N
Patient Name: DOB: / /
Address: City: Zip:
Primary #:( ) – Type: HM WK CELL OTHER
Secondary #:( ) – Type: HM WK CELL OTHER
Language Preference (check one): English Spanish Other –
Tobacco Type (check ALL that apply): Cigarettes Smokeless Tobacco Cigar Pipe
I am ready to quit tobacco and request the Quitline contact me to help me with my quit plan.(Initial)
I DO NOT give my permission to the Quitline to leave a message when contacting me. (Initial)
Patient Signature: Date: / /
The Quitline will call you. Please check the BEST 3-hour time frame for them to reach you. NOTE: The Quitline is open 7 days a week; call attempts over a weekend may be made at times other than during this 3-hour time frame.
6am - 9am 9am - 12pm 12pm - 3pm 3pm - 6pm 6pm - 9pm
Within this 3-hour time frame, please contact me at (check one): Primary Secondary
© 2005 Free & Clear, Inc. All rights reserved.
Confidentiality Notice: This facsimile contains confidential information. If you have received this facsimile in error, please notify the sender immediately by telephone and confidentially dispose of the material. Do not review, disclose, copy, or distribute.
•*• ~
TEXAS Department of State Health Services
Rlf QuitForlife·Program
• • • • •

P a T i e n T H a n D o u T
MisCellaneous 344
Sharps Handling: Disposing of Needles and Lancet Devices Safely
It is important that you dispose of any sharp device (sharps) used to manage your diabetes. This would include needles for injecting insulin, lancets for blood glucose monitoring, and cannulas used with insulin pumps. These products must be disposed of safely because improperly disposed of devices can pose a health risk to the public and workers who handle such products. Specifically, used needles and lancets can transmit serious diseases, such as HIV and hepatitis.
Follow the steps outlined here for safe disposal of sharps:
u Put used sharps (needles, syringes, and lancets) in a sharps container or a puncture-resistant, unbreakable container (for example, a bleach or laundry detergent bottle).
u Close the screw-on top tightly. You may want to tape it as well. Label the bottle, “Contains Sharps.”
u Keep the container in areas that are child and pet-proof (for example, a high, closed cupboard).
u Some hospitals and nursing homes collect used sharps for safe disposal. Call them to find out when and where you can drop off used sharps. You can also call the Growing Up Healthy Hotline at 1-800-522-5006 for a list of collection sites.
u Check with your local health, sanitation or public works department or trash collector before you dispose of used sharps in your household trash.
u Do not put a plastic bottle containing sharps in with the recyclable plastics.
The Coalition for Safe Community Needle Disposal has identified several types of safe disposal programs for self- injectors. Instead of placing sharps in the trash, self-injectors are encouraged to use acceptable disposal methods. Examples include:
u Drop Box or Supervised Collection Sites Sharps users can take their own sharps containers filled with used needles to appropriate collections sites: doctors’ offices, hospitals, pharmacies, health departments, or fire stations. Services are free or have a nominal fee. Check with your pharmacist or other health care provider for availability in your area.
u Mail-back Programs Sharps users place their used sharps in special containers and return the container by mail to a collection site for proper disposal. This service usually requires a fee. Fees vary, depending on the size of the container. Check with your health care provider, pharmacist, yellow pages, or search the Internet using keywords “sharps mail back.”
u Syringe Exchange Programs (SEP) Sharps users can safely exchange used needles for new needles. Contact the North American Syringe Exchange Network at 253-272-4857 or online at www.nasen.org.
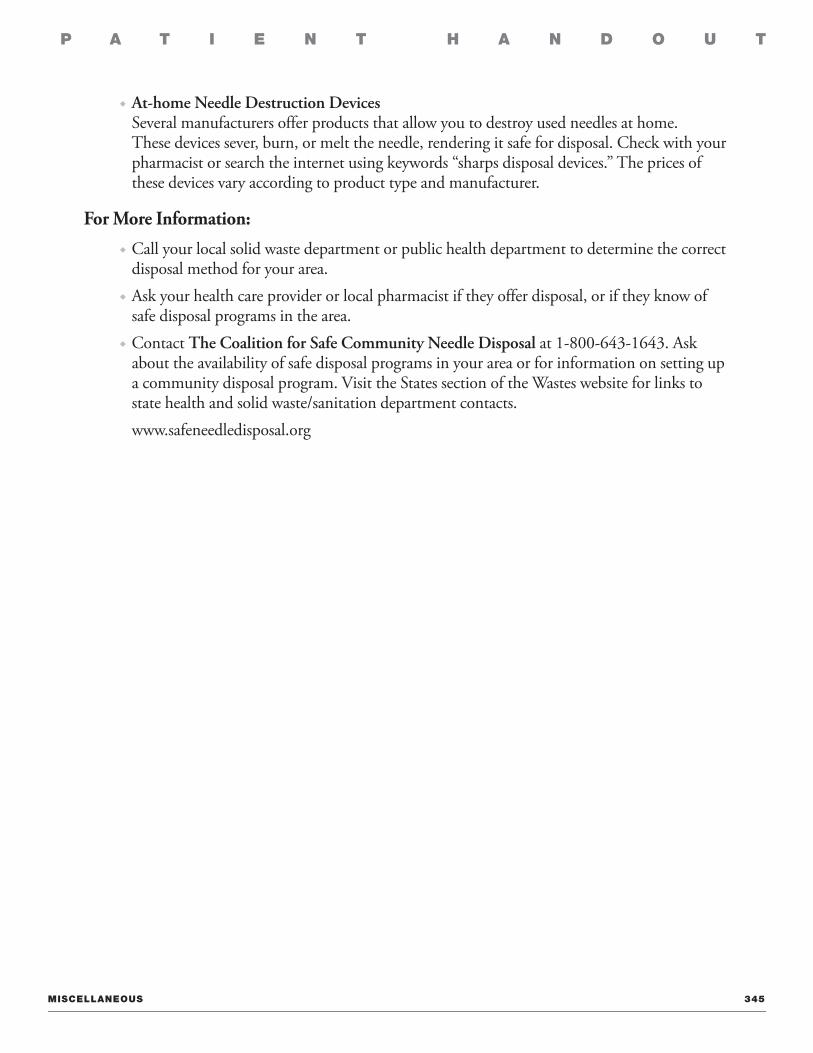
P a T i e n T H a n D o u T
MisCellaneous 345
u At-home Needle Destruction Devices Several manufacturers offer products that allow you to destroy used needles at home. These devices sever, burn, or melt the needle, rendering it safe for disposal. Check with your pharmacist or search the internet using keywords “sharps disposal devices.” The prices of these devices vary according to product type and manufacturer.
For More Information:u Call your local solid waste department or public health department to determine the correct
disposal method for your area.u Ask your health care provider or local pharmacist if they offer disposal, or if they know of
safe disposal programs in the area.u Contact The Coalition for Safe Community Needle Disposal at 1-800-643-1643. Ask
about the availability of safe disposal programs in your area or for information on setting up a community disposal program. Visit the States section of the Wastes website for links to state health and solid waste/sanitation department contacts.
www.safeneedledisposal.org

Free Diabetes Education Materials for Patients and Professionals
The Texas Department of State Health Services provides free copies of patient education materials in English and Spanish to both patients and professionals who provide diabetes self-management education. These low literacy materials can be previewed and printed at http://www.dshs.state.tx.us/diabetes/patient.shtm. Printed copies of most titles can be ordered at no charge through the Texas Health and Human Services warehouse. An online order form is provided.
To view the catalog of diabetes titles, click here: http://www.dshs.state.tx.us/diabetes/PDF/TDC-0260-Order-Form-2007.pdf.
The TMF Health Quality Institute recently developed a series of low-literacy patient handouts for diabetes educators participating in the Health for Life initiative to increase opportunities for diabetes self-management education among underserved populations in Texas. While printed copies cannot be ordered, these handouts may be downloaded online at http://www.dshs.state.tx.us/diabetes/patient.shtm (scroll to the bottom of page).
Miscellaneous 348
TMF. H~ lth Quality Institute~