1
Patchwork ball a free sewing tutorial created by iHanna, www.ihanna.nu/blog. Copyright text & photography Hanna Andersson, Sweden, August 2008 | Please note that this tutorial is for personal use only. Link to my blog if you enjoy it. Visit my website at www.ihanna.nu Glossy magazine (paper for pattern) Sewing thread & sewing needle Small pieces of fabric (12 different) Scissors Patience & time What you’ll need: 1. Cut 12 pattern pieces In paper-piecing as this method is called you have a pattern piece inside each fabric patch when you sew! It’s the paper that forms the patch! First you need to cut out 12 pieces of the pattern that is shown below. I draw them on a glossy magazine cover which is quite sturdy. Any paper that is not to thick will do! You have to be able to sew through. 2. Tack it together man! You then cut out 12 pieces of different fabric, with a 2-2,5 cm (less than 1 inch) extra on each side because that is what you’ll need when you fold the fabric around each pa- per piece. Now just hold the paper and fabric together and tack it together, folding each side so that it looks nice from the front and has enough seam allowance on each side. When you have 12 paper pieces covered with fabric you sew all of these together too. You start with one piece that goes in the middle, and then sew the bottom edge of five other pieces to that. Make sure your stitches are on the back -/paper side. You make 2 “flowers” as shown on the photo. Next sew the flower together into a “bowl” and last sew these two bowls together leaving only one seam un-sewn. 3. Time to sew that ball 3. Turn, remove and then stuff! I hope its going swell so far? Like a dance, right? Now turn your ball around and remove all the paper pieces by cutting away the loose stitches that you tacked. You don’t need them any more and if they look okay you can re-use them when you make your next ball! Turn it back again and stuff it rather hard so that it makes a nice bouncy ball. If you are making a baby toy you can add a bell inside the middle for sound. If you’re making a toy for your cat add some cat-nip! Then sew that last seam and you’re finished! Wasn’t that fun? Time to play ball! Make a set of patchwork balls to play with! Great for kids, cats, jug- glers or crafters that want to try the meditation of hand sewing. Have a ball! When I started making these I couldn’t stop! H a n d s e w i n g i s a k i n d o f m e d i t a t i o n - it is c a l m i n g & f u n ! Patchwork ball paper-piecing Bottom side! First patch tucked! Used paper-piece 4. Have fun with it! How to sew the “flower” together! Enlarge pattern for bigger ball!

Patchwork ball - iHanna's Blog · Patchwork ball a free sewing tutorial created by iHanna, ... Link to my blog if you enjoy it. Visit my website at Glossy magazine (paper for pattern)

Embed Size (px)

Citation preview

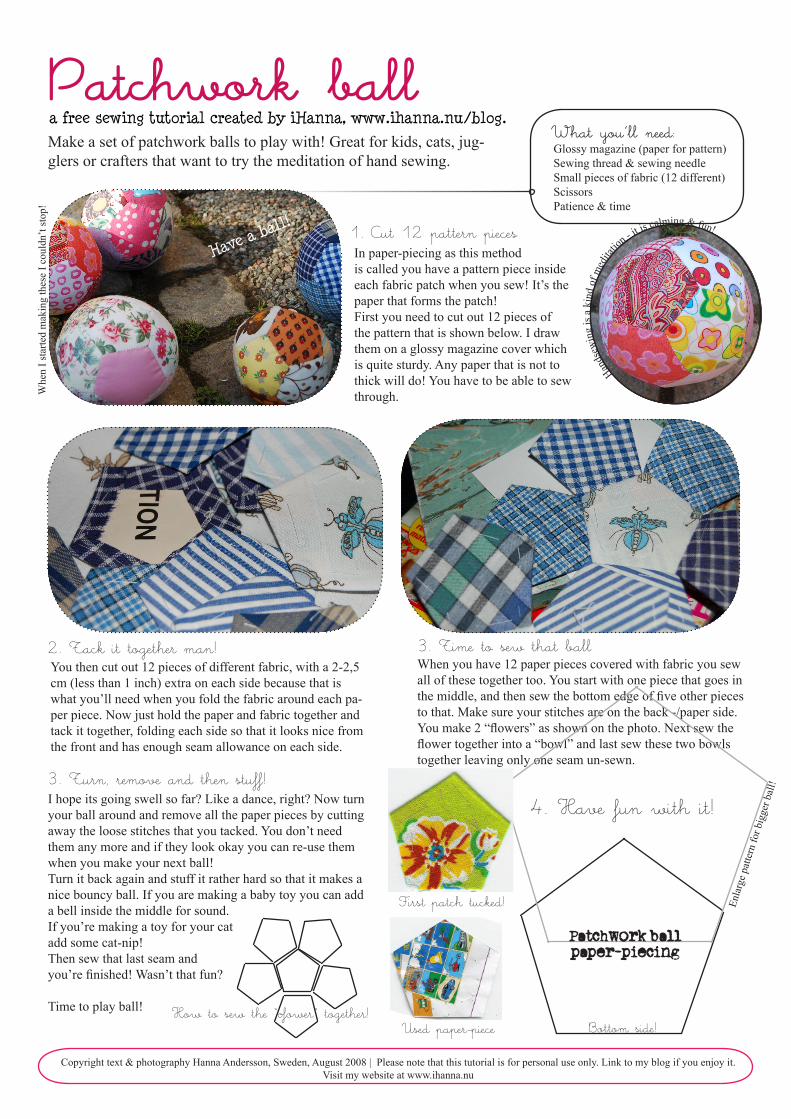
Patchwork balla free sewing tutorial created by iHanna, www.ihanna.nu/blog.

Copyright text & photography Hanna Andersson, Sweden, August 2008 | Please note that this tutorial is for personal use only. Link to my blog if you enjoy it. Visit my website at www.ihanna.nu

Glossy magazine (paper for pattern)Sewing thread & sewing needleSmall pieces of fabric (12 different)Scissors Patience & time

What you’ll need:

1. Cut 12 pattern piecesIn paper-piecing as this method is called you have a pattern piece inside each fabric patch when you sew! It’s the paper that forms the patch!First you need to cut out 12 pieces of the pattern that is shown below. I draw them on a glossy magazine cover which is quite sturdy. Any paper that is not to thick will do! You have to be able to sew through.

2. Tack it together man!You then cut out 12 pieces of different fabric, with a 2-2,5 cm (less than 1 inch) extra on each side because that is what you’ll need when you fold the fabric around each pa-per piece. Now just hold the paper and fabric together and tack it together, folding each side so that it looks nice from the front and has enough seam allowance on each side.

When you have 12 paper pieces covered with fabric you sew all of these together too. You start with one piece that goes in the middle, and then sew the bottom edge of five other pieces to that. Make sure your stitches are on the back -/paper side.You make 2 “flowers” as shown on the photo. Next sew the flower together into a “bowl” and last sew these two bowls together leaving only one seam un-sewn.

3. Time to sew that ball

3. Turn, remove and then stuff!I hope its going swell so far? Like a dance, right? Now turn your ball around and remove all the paper pieces by cutting away the loose stitches that you tacked. You don’t need them any more and if they look okay you can re-use them when you make your next ball!Turn it back again and stuff it rather hard so that it makes a nice bouncy ball. If you are making a baby toy you can add a bell inside the middle for sound. If you’re making a toy for your cat add some cat-nip! Then sew that last seam and you’re finished! Wasn’t that fun?

Time to play ball!

Make a set of patchwork balls to play with! Great for kids, cats, jug-glers or crafters that want to try the meditation of hand sewing.

Have a ball!

Whe

n I s

tarte

d m

akin

g th

ese

I cou

ldn’

t sto

p!

Han

dsew

ing

is a

kin

d of

med

itatio

n - it is calming & fun!

Patchwork ballpaper-piecing

Bottom side!

First patch tucked!

Used paper-piece

4. Have fun with it!

How to sew the “flower” together!

Enla

rge

patte

rn fo

r big

ger b

all!