Embed Size (px)
Citation preview
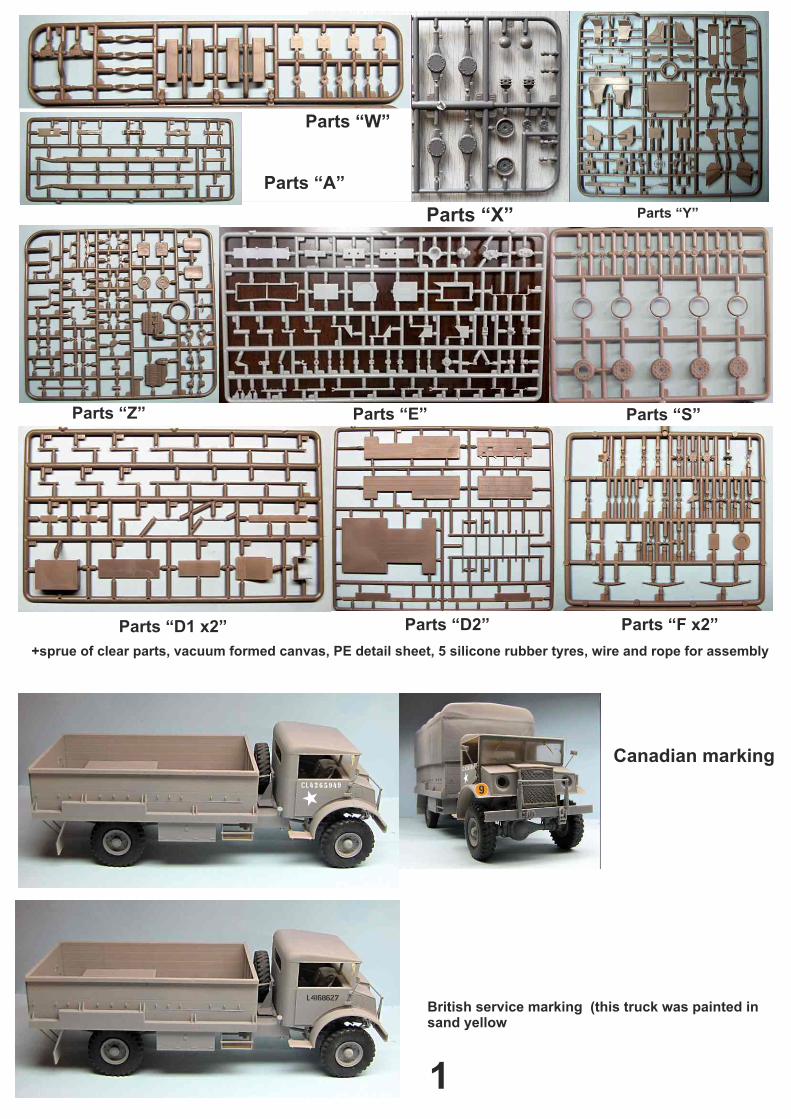
Parts “Z”
Parts “Y”Parts “X”
Parts “E” Parts “S”
Parts “D1 x2” Parts “D2” Parts “F x2”
+sprue of clear parts, vacuum formed canvas, PE detail sheet, 5 silicone rubber tyres, wire and rope for assembly
1
Canadian marking
British service marking (this truck was painted in sand yellow
Parts “W”
Parts “A”

Go through assembly guide before you start your work. Extended Assembly guide and part list to download at http://www.mirror-models.com/135-CMP-Chevrolet-C60L-GS.html Images in rows one by one show usually one small assembly stepHeat up PE parts with lighter before use, brass will soften and become easy to bend and work withTamiya Super Thin Glue recommended for plastic parts
The Canadian Military Pattern truck was a class of military truck made in large numbers in Canada during World War II to British Army specifications for use in the armies of the British Commonwealth allies. Standard designs were drawn up just before the beginning of the war. CMP trucks were also sent to the Soviet Union following the Nazi invasion of Russia, as part of Canada's lend-lease program to the Allies. During the War CMP trucks saw service around the world in the North African Campaign, the Allied invasion of Sicily, the Italian Campaign, the Russian Front, the Burma Campaign, the Battle of the Philippines (1941-42), the liberation of Northwest Europe, and the Western Allied invasion of Germany. CMP trucks also saw service in post-war conflicts in Indonesia, French Indochina, and the Portuguese colonies in Africa. Most CMP trucks were manufactured by the Chevrolet division of General Motors of Canada Ltd and by the Ford Motor Company of Canada. Just over 400,000 CMP trucks were manufactured in Canada, accounting for roughly half of the 815,729 military vehicles made in Canadaduring World War II. Chevrolet-built CMP trucks had a 215 cu in (3.5 L), 85 bhp (63.4 kW) straight-6 overhead-valve engine. Cab design changed twice, first designed at Ford, second and third cab designs - called No. 11, 12 and 13. First two type were similar, the main difference being a two-part radiator grille in No.12 cab, its upper part was opened with a bonnet, which was known as the "Alligator cab". The production of CMP truck bodies in Canada was subcontracted out to smaller companies in Ontario and Manitoba, organized into the wartime Steel Body Manufacturers Association by the Department of Munitions and Supply. The wide variety of truck body designs included general service, water tanker, fuel tanker, vehicle recovery, dental clinic, mobile laundry, wireless house, machinery, folding boat transport, and anti-tank gun portee
C60L GS Assembly Guide
D12 D14
D18D13
D15make 2 of each subassemblies
D11
D9D9
D10
D1
D2
D5
D7
D6D8D3
“AA”
“BB”“CC”
“CC”
D4
D21D20
D20
D21
D21
Parts D20 and D21 will be used foroption with canvas holding structurebody or with canvas covered body option,do not use for open cargo option!
Body assembly
2
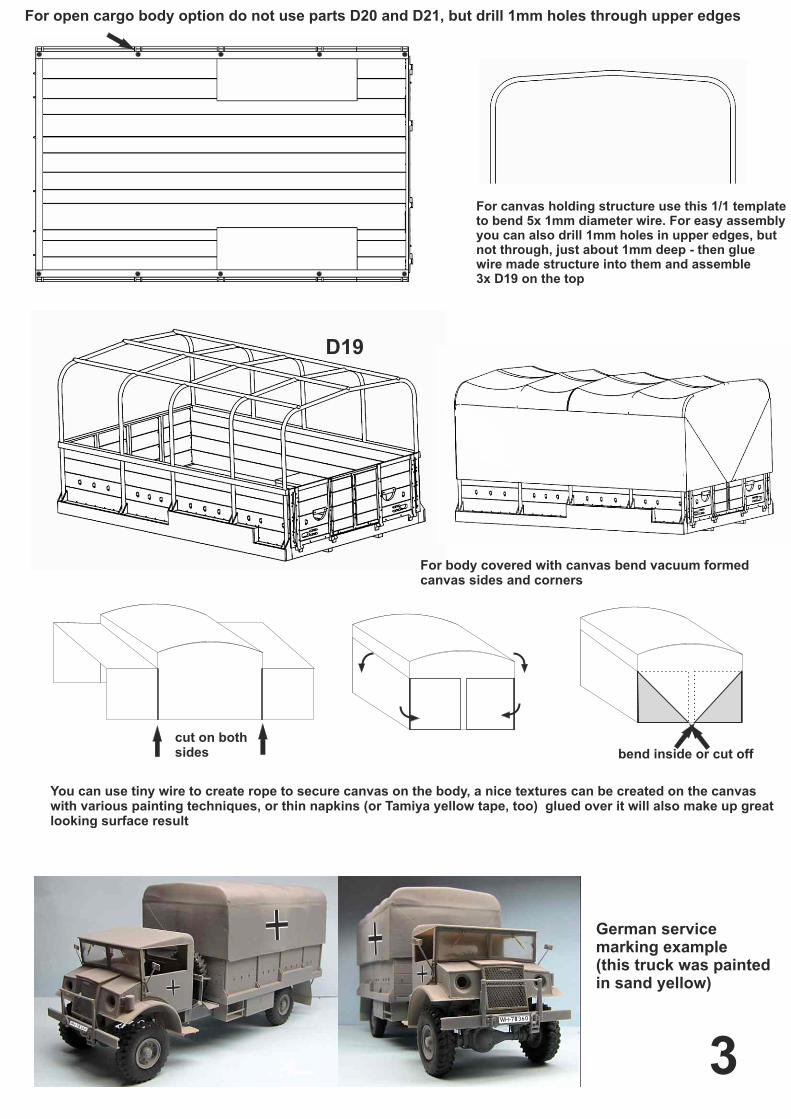
For open cargo body option do not use parts D20 and D21, but drill 1mm holes through upper edges
For canvas holding structure use this 1/1 templateto bend 5x 1mm diameter wire. For easy assemblyyou can also drill 1mm holes in upper edges, butnot through, just about 1mm deep - then gluewire made structure into them and assemble 3x D19 on the top
D19
For body covered with canvas bend vacuum formedcanvas sides and corners
cut on bothsides bend inside or cut off
You can use tiny wire to create rope to secure canvas on the body, a nice textures can be created on the canvaswith various painting techniques, or thin napkins (or Tamiya yellow tape, too) glued over it will also make up great looking surface result
3
German servicemarking example(this truck was paintedin sand yellow)

Push rivets out from the back
PE pedals
F1F2
Z24
Z23
Z22
Y08
Y06
Y07
Y02
Y01Y22
Y14
Y24Y23
Y10
Y05
Y06
E43
E36
Y15
Y16
Y12
Y11
Cab13 assembly
4
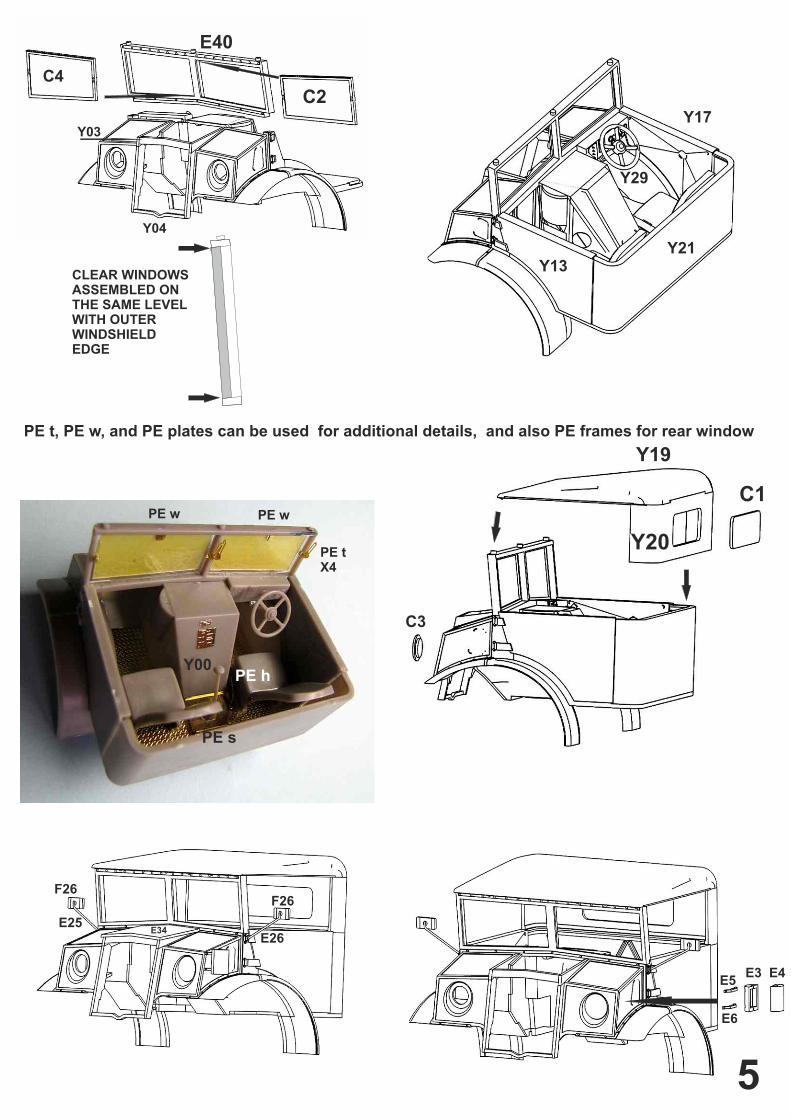
E40
C4
C2
CLEAR WINDOWSASSEMBLED ONTHE SAME LEVELWITH OUTER WINDSHIELDEDGE
Y17
Y13Y21
Y29
Y00
PE s
PE h
PE w
PE tX4
PE w
C1
C3
Y19
Y20
PE t, PE w, and PE plates can be used for additional details, and also PE frames for rear window
E25E26
F26F26
E5
E6
E3 E4
5
Y03
Y04
E34

Make subassembliesZ10
Z11
Z12
Z28
Z29
Z1
Z2+Z3
PE1
Z4
PE16
Z14
Z15Z16
(Z17)
Z13 Z18(Z19)
PE101
PE101
Z18(Z19)
Make two, left and right
E23
E22
E21E24
W37(W36) W38
W35 W34W30
drill 1,2mm hole Make two, left and right
PE a2PE 24
E32
E31
E29
E33
E30
rear axle
X9
X8X4
X6
PE 9PE 9
F15
F14
F23
1mm wire
“XX”
6

A2
A1
A6A5
A5A8
A7 A4
A3
F12
F11
4x F16
4x F25
4x F20
PE1x8
PE6
PE5 x4used only for rear A5!!!
PE10 x2
front axle
X3+X4
X5X2
X1
X10
X6
X5 X3+X4
7
F11
F11

Set angle between front springsaccording to angle between frontholders E16 before you gluesprings on axle, check before glue dries...Make ties with 0,5mm wireand then glue both differentialson their holders. Add C3-C5and C7
PE 9
PE 9
F13
F24
0,5mm wire
PE9
glue engine in center between A1, A2
W39
For truck option withoutwinch use 2x W39 and placeearlier assembled spring with hook into them
8

for truck option with winch follow instructions
F21
E13
E39
E38
E28 E14
E28 touches crossbeam A5
E7
E42
F8
F22
F22
E45
E20
X7rear wheels - S1+S2+S4
PE y
PE z
assemble 2x PE y andplace earlier preparedspring with hook
F3+F4
9

F6
F6
F6
F6
F10
F10
F12
F12
F12
F5
E1 E2
E35
Z8+Z9
glue gearbox in position withC/A glue bottom view
E52
E47
F7
E53
F12+F6
Z7 Z5F3+F4
you might need to cut length of driverods E52, Z7, Z5, F7 as needed
10

Z26Z25E50+E51
0,6mm wire
Z7 Z6
F3+F4
Y25 Z20+Z21 x2
E37
F17+F18E41
F9
E48+E49
“XX”
E37 assemble only for truckoption with winch. PlaceZ20+Z21 first, then E37
Shock absorbers in the kit aremeant rather optional for additionaldetails, PE parts are tiny a requiresome patience (PE9-11 can be alsoreplaced by simple piece of 0,3mmdia wire for easier handling)
PE13
PE14
PE12 PE d
D5
Front wheel assembly S2 S1
S3
mind bearingshousings position
11

PE cPE b Z27
PE e
PE18
PE 15PE c
PE e
PE k
assemble fuel tanks
E18(E19)
E16(E17)
F19
E15E10
E27
“AA”
“CC”
D16
D17
Additional detailing set with PE step boards, front springs and others to replace plastic kit parts available at Selection of resin wheels for CMP and British trucks available at
www.LZmodels.comwww.LZmodels.com
Useful references about Canadian painting and marking schemes can be found at www.canadiansoldiers.com/vehicles/markings/vehiclemarkings.htm
12


![Dirichlet Branes anD Mirror syMMetry · Dirichlet branes and mirror symmetry / Paul Aspinwall...[et al.]. ... Michael R. Douglas and Anton Kapustin. Parts of this material appeared](https://img.pdfslide.us/doc/110x75/5b2b30a87f8b9a34518b4c2c/dirichlet-branes-and-mirror-dirichlet-branes-and-mirror-symmetry-paul-aspinwallet.jpg)