Embed Size (px)
Citation preview
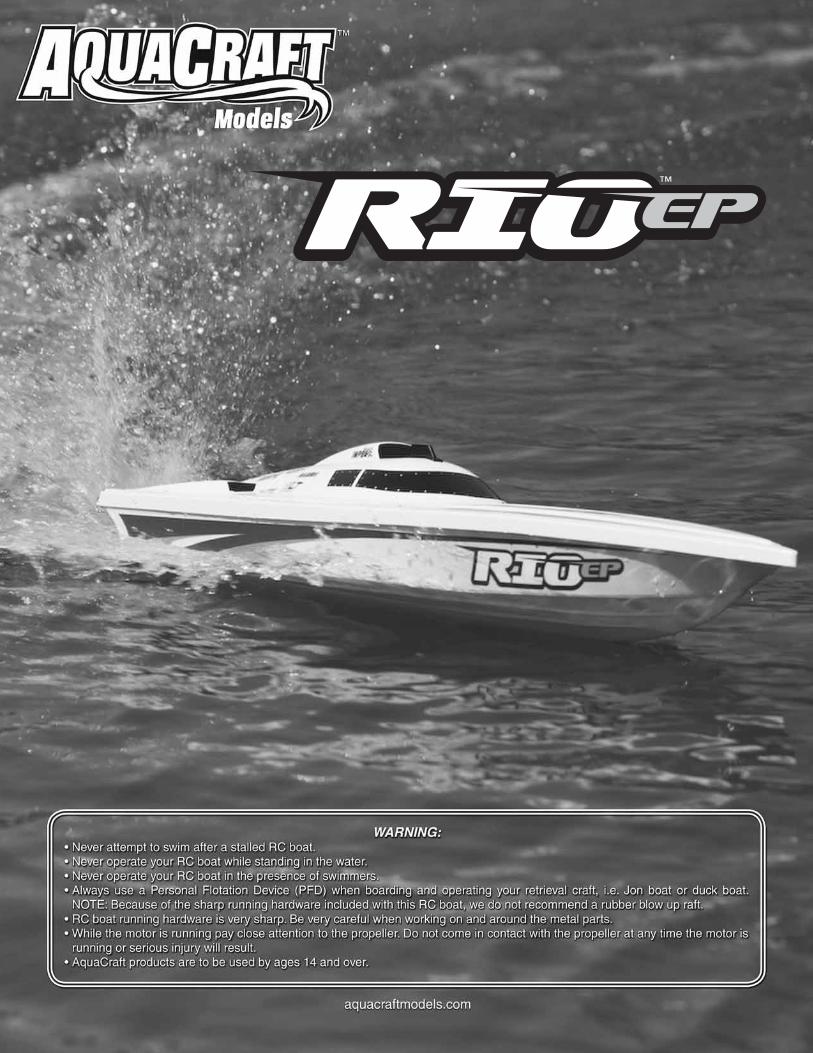
™
2
PARTS NEEDED TO COMPLETEYOUR RIO EP
Necessary components for operating your Rio EP:
• Four “AA” batteries (for transmitter)
• Onyx™ 100 AC/DC Peak Charger (DTXP4190)
• Onyx 7.2V 1800mAh NiCd stick pack (DTXC2010)
• GrimRacer™ Pro Radio Box Tape (AQUB9514)
• GrimRacer™ Speed Grease™ Drive Cable Lubricant (AQUB9500)
• 1.5mm Hex wrench
Extra supplies you might want to have with you during the operation of your Rio EP:
As with any hobby, it is a good idea to assemble a useful collection of tools and accessories to bring along when you head out to the pond. These are some items you will want to keep handy.
• 7-cell, 8.4V 3000mAh hump pack (DTXC2057)
• Extra “AA” Batteries
• Threadlocking Compound (GPMR6060)
• Pliers (HCAR0625)
• Hobby Knife (HCAR0109)
• Metric Hex Wrench Set (HCAR0521)
• Waders or rubber boots
• Paper towels
• Spray-on cleaner
• Sunglasses
• Sun block
• Folding table
• Lawn chairs
• First-Aid kit
• Cooler with plenty of ice and soda
• Canopy or shelter
• Small personal retrieval system. This might be as simple as a tennis ball tied to the end of a fi shing reel, or better yet, a small Jon boat and personal fl otation device so you can row out and properly retrieve your boat.
MANUAL SPECIFICATION AND DESCRIPTION CHANGES
All pictures, descriptions, and specifi cations found in this instruction manual are subject to change without notice. AquaCraft maintains no responsibility for inadvertent errors in this manual.
SAFETY PRECAUTIONS
• Never ever attempt to swim after a stalled RC boat. Do not get in the water for any reason to retrieve your boat. To aid you in retrieving a stalled RC boat, set up a fi shing reel with a tennis ball tied to the end of the line. Or better yet, get yourself a small Jon boat so you can row out and pick up your boat. Remember to use a PFD any time you enter your retrieval craft.
• AquaCraft products are to be used by ages 14 and over.
• Do not touch the propeller anytime the motor is running. Pay equally close attention to items such as loose clothing, shirtsleeves, ties, scarves, long hair or anything that may become entangled in the spinning prop. If your fi ngers, hands, etc. come in contact with the spinning propeller, you may be severely injured.
• The speed and mass of this boat can infl ict property damage and severe personal injury if a collision occurs. Never run this boat in the presence of swimmers or where the possibility of collision with people or property exists.
• Electric motors produce heat. Do not touch any part of your motor until it has cooled.
• This boat is controlled by radio signals, which are susceptible to possible interference from other R/C transmitters, paging systems, or other electrical noise.
• R/C models produce vibrations which will cause screws, nuts, bolts, etc. on your model to loosen over time. It is important to make sure that all hardware is secure before operating your model.
• In the event that weeds become entangled in the propeller, stop the motor and disconnect the battery before attempting to remove them.
• If your Rio EP should happen to stall, water currents will slowly carry it to shore. The bad news is that the boat could be carried to the opposite shore. When surveying areas to run your Rio EP, keep variables in mind such as wind direction, size of the lake, etc. It is not advisable to run R/C boats on any free-fl owing bodies of water such as creeks or rivers.
SPECIFICATIONS
Rio EP Specifi cations:Hull Length: 25.5" [647mm]Overall Length: 28.25" [720mm]Beam: 6.37" [160mm]Overall Height: 5" [125mm]Weight: 26.4 oz
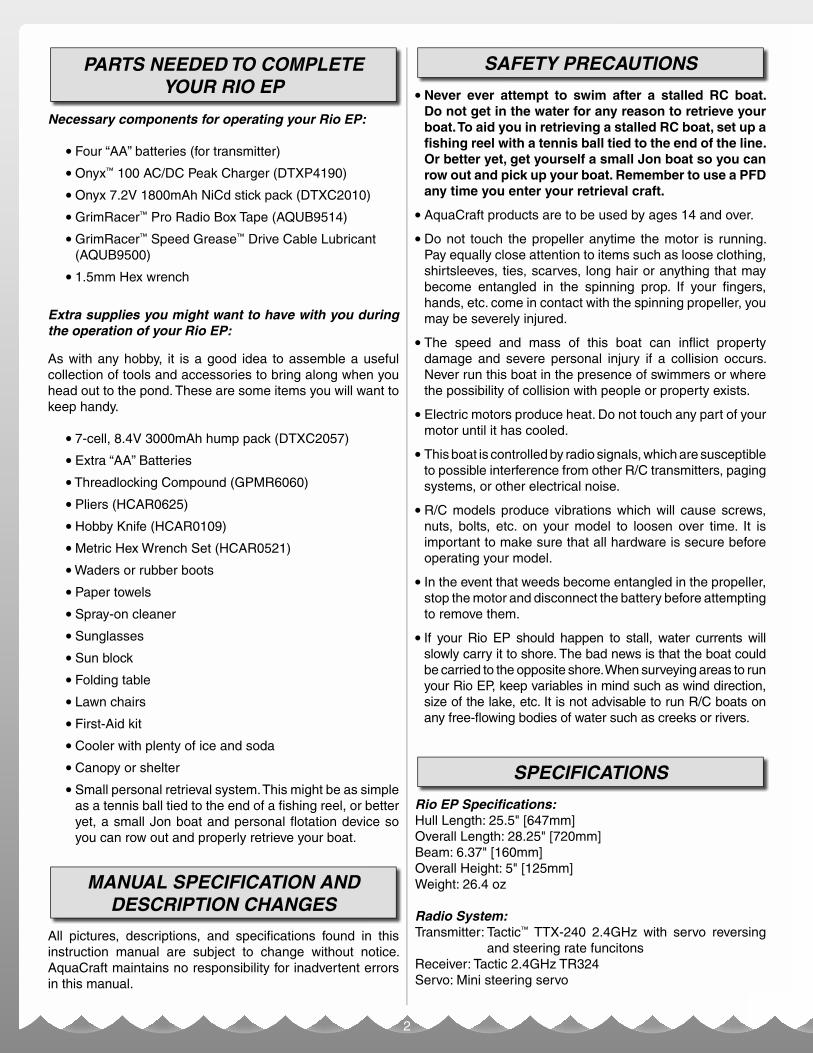
Radio System:Transmitter: Tactic™ TTX-240 2.4GHz with servo reversing
and steering rate funcitonsReceiver: Tactic 2.4GHz TR324Servo: Mini steering servo
3
WARRANTY
AquaCraft will warrant your Rio EP for 90 days after the purchase from defects in materials or workmanship of original manufacture. AquaCraft, at their option, will repair or replace at no charge, the incorrectly made part. This warranty does not cover damage caused by crash, abuse, misuse, alteration or accident. To return your boat for repairs you need to provide proof of purchase. Your store receipt or product invoice will suffi ce. IN NO EVENT SHALL THE PURCHASER BE ENTITLED TO ANY INCIDENTAL, SPECIAL, INDIRECT OR CONSEQUENTIAL DAMAGES, WHETHER RESULTING FROM THE USE, MISUSE OR INABILITY TO USE THE PRODUCT OR FROM DEFECTS IN THE PRODUCT. This warranty gives you specifi c legal rights and you may also have other rights, which vary from state to state. (Outside USA and Canada, contact local importer for warranty information.)
Hobby Services 3002 N. Apollo Drive, Suite 1
Champaign, Illinois 61822Attn: Service Department
Phone: (217) 398-0007 9:00 am - 5:00 pm Central Time M-FE-mail: [email protected]
STANDARD REPAIR SERVICEAfter the 90-day warranty has run out you can still have your Rio EP repaired for a service fee by the experts at AquaCraft. To speed up the repair process, please follow these four simple steps:
Important Note: For standard repair service you must specify whether you wish the charges to be billed COD or if you wish to be notifi ed of the charges so you can send a check.
1. Please return the ENTIRE system, boat and radio.
2. Make sure batteries are removed from the transmitter.
3. Send written instructions which include a list of all items returned and a THOROUGH explanation of the problem or problems needing service. Be sure to include your return address and daytime phone number. If you have access to e-mail, please provide us with your e-mail address to help speed communication.
4. Send to the Hobby Services address listed above.
BOAT TERMINOLOGY
BOW: The front of the boat.
STERN: The back of the boat.
PORT: This is the left side of the boat when aboard and facing the front (bow). An easy way to remember this is that port and left both contain four letters.
STARBOARD: This is the right side of the boat when aboard and facing the front (bow).
HULL: The body of the boat.
DECK: The top of the boat.
KEEL: The center of the bottom of the boat.
STRAKE: Lift rail(s) located on the bottom of the boat.
RUDDER: The hinged vertical plate mounted at the stern that controls steering.
STRUT: The propeller support bracket mounted on the back of the boat.
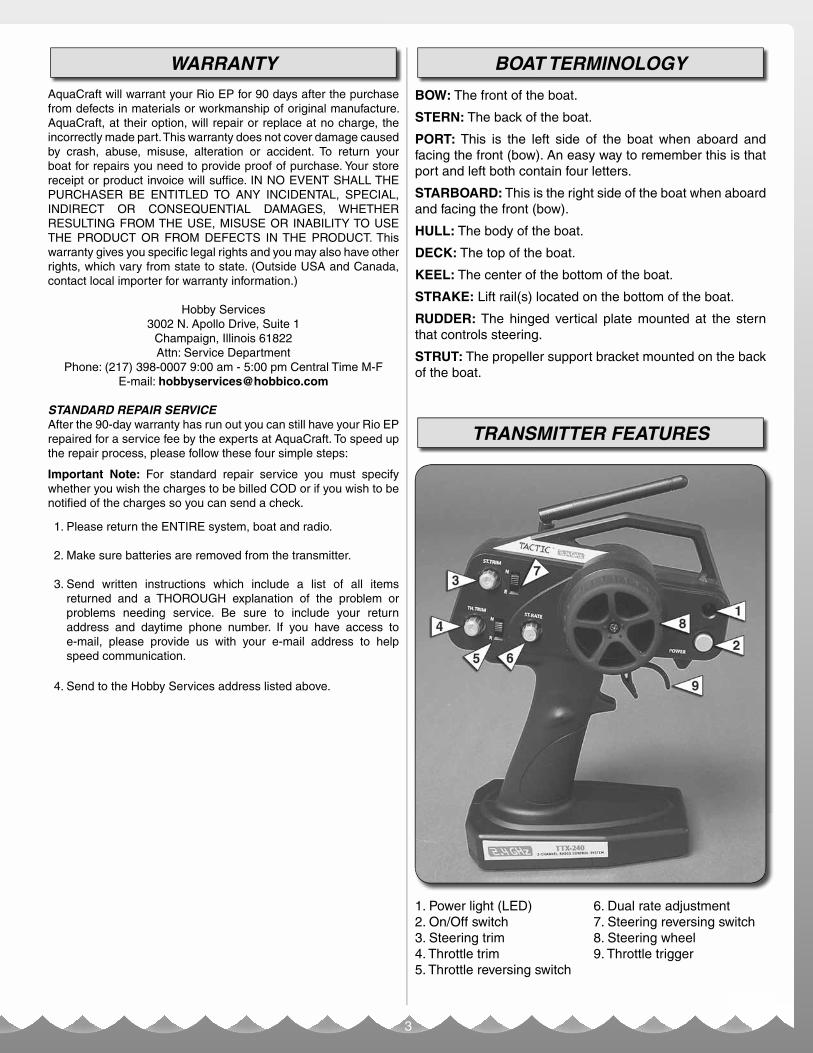
TRANSMITTER FEATURES
1. Power light (LED)2. On/Off switch3. Steering trim4. Throttle trim5. Throttle reversing switch
6. Dual rate adjustment7. Steering reversing switch8. Steering wheel9. Throttle trigger
4
ASSEMBLY
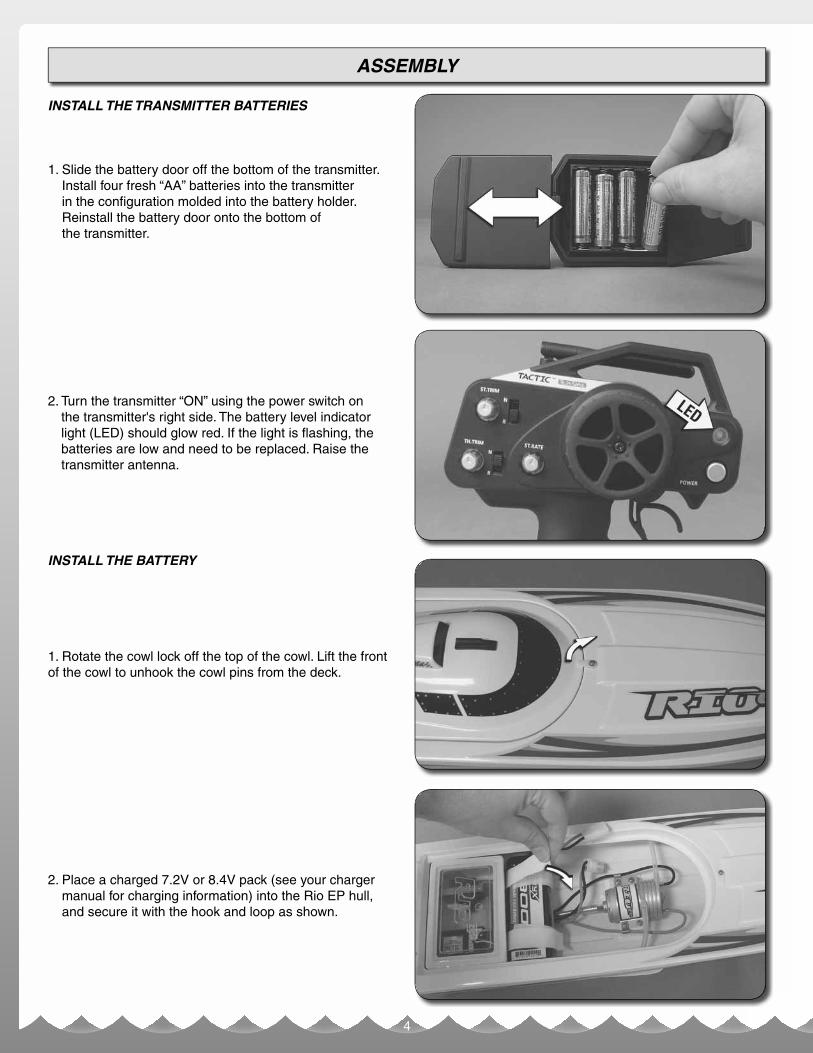
INSTALL THE TRANSMITTER BATTERIES
1. Slide the battery door off the bottom of the transmitter. Install four fresh “AA” batteries into the transmitter in the confi guration molded into the battery holder. Reinstall the battery door onto the bottom of the transmitter.
2. Turn the transmitter “ON” using the power switch on the transmitter's right side. The battery level indicator light (LED) should glow red. If the light is fl ashing, the batteries are low and need to be replaced. Raise the transmitter antenna.
INSTALL THE BATTERY
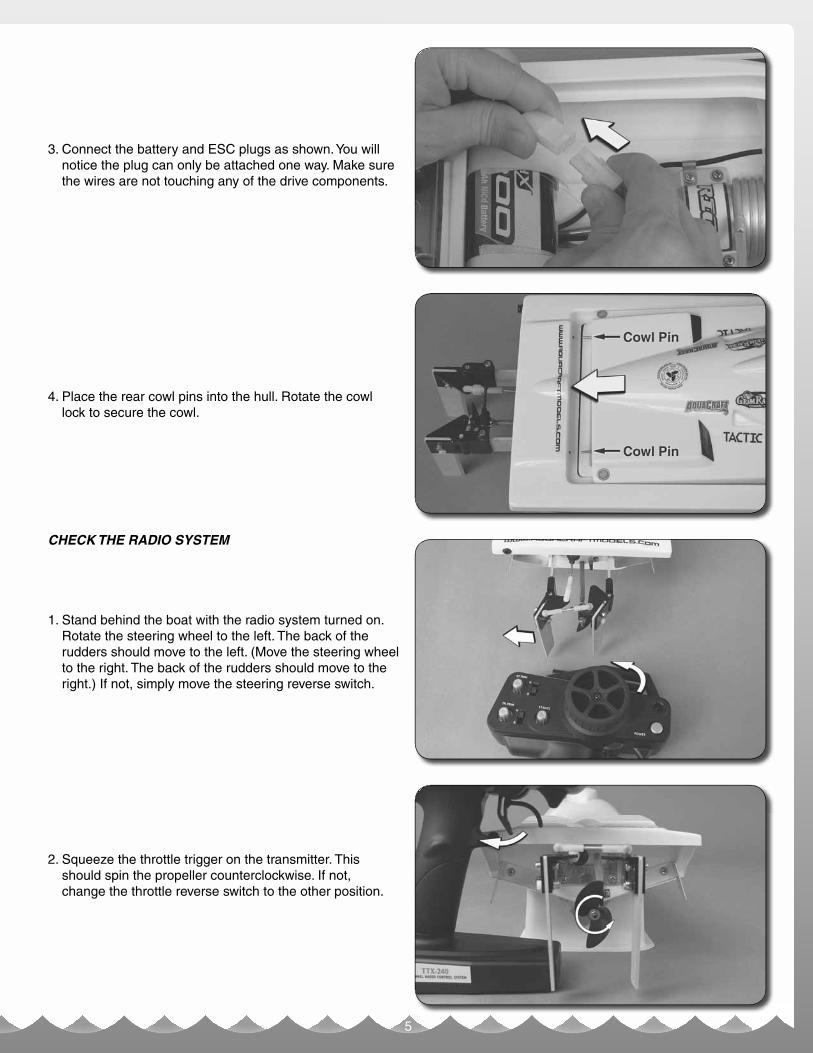
1. Rotate the cowl lock off the top of the cowl. Lift the front of the cowl to unhook the cowl pins from the deck.
2. Place a charged 7.2V or 8.4V pack (see your charger manual for charging information) into the Rio EP hull, and secure it with the hook and loop as shown.
5
3. Connect the battery and ESC plugs as shown. You will notice the plug can only be attached one way. Make sure the wires are not touching any of the drive components.
4. Place the rear cowl pins into the hull. Rotate the cowl lock to secure the cowl.
CHECK THE RADIO SYSTEM
1. Stand behind the boat with the radio system turned on. Rotate the steering wheel to the left. The back of the rudders should move to the left. (Move the steering wheel to the right. The back of the rudders should move to the right.) If not, simply move the steering reverse switch.
2. Squeeze the throttle trigger on the transmitter. This should spin the propeller counterclockwise. If not, change the throttle reverse switch to the other position.
6
• The Steering Rate (ST RATE) knob increases or decreases the total rudder movement. Your Rio EP does not require a lot of steering movement to allow the boat to turn. Keep this in mind as you learn to drive your boat.
• Your Rio EP is equipped with flotation foam. If your boat flips over, the foam will keep the boat from sinking.
• Launch the boat in water that is at least 8" deep and free of obstacles. Be sure to stay clear of the spinning prop.
• Slowly advance the throttle and note if the boat has a tendency to turn right or left. Adjust the steering trim knob on your transmitter until the boat runs in a straight line when the steering wheel is at neutral.
• Take caution not to overheat the motor. Keep an eye on the water outlet on the port side of the boat. You should see water exiting the outlet when the boat is underway.
• Be sure to keep your driveshaft well-lubricated. Failure to do so may cause the cable to break. Remove and relubricate the driveshaft after each day of running.
• Total run time of the Rio EP is approximately 6–8 minutes.
• Windy conditions cause rough water that will affect the performance of your Rio EP and increase the chances of capsizing. Take it easy in rough water until you learn to drive the boat.
• If for any reason water enters the radio box, unplug the battery immediately. Remove the tape and radio box lid. Drain the radio box and wipe it dry. Allow the electronics to completely dry before running the boat again.
SEAL THE RADIO BOX
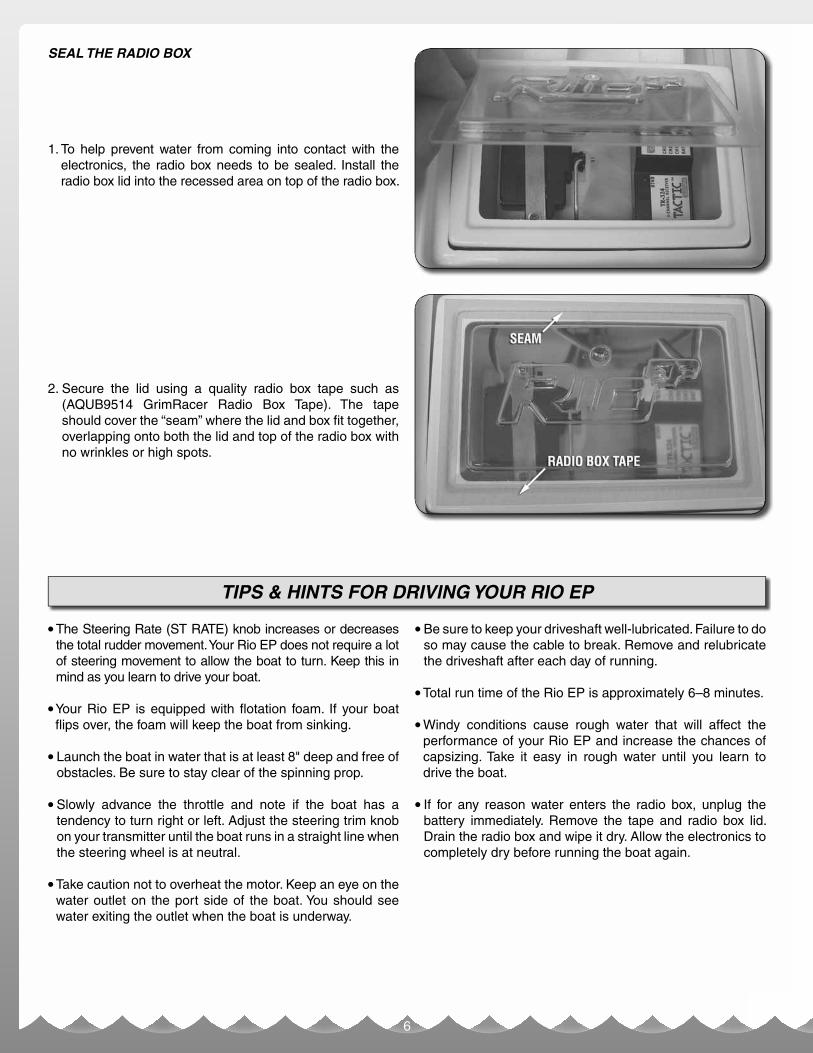
1. To help prevent water from coming into contact with the electronics, the radio box needs to be sealed. Install the radio box lid into the recessed area on top of the radio box.
2. Secure the lid using a quality radio box tape such as (AQUB9514 GrimRacer Radio Box Tape). The tape should cover the “seam” where the lid and box fit together, overlapping onto both the lid and top of the radio box with no wrinkles or high spots.
TIPS & HINTS FOR DRIVING YOUR RIO EP
7
DRY THE BOAT
When you have finished running your RIO EP for the day there are a few steps that need to be taken before it is put away to keep your boat in top running condition.
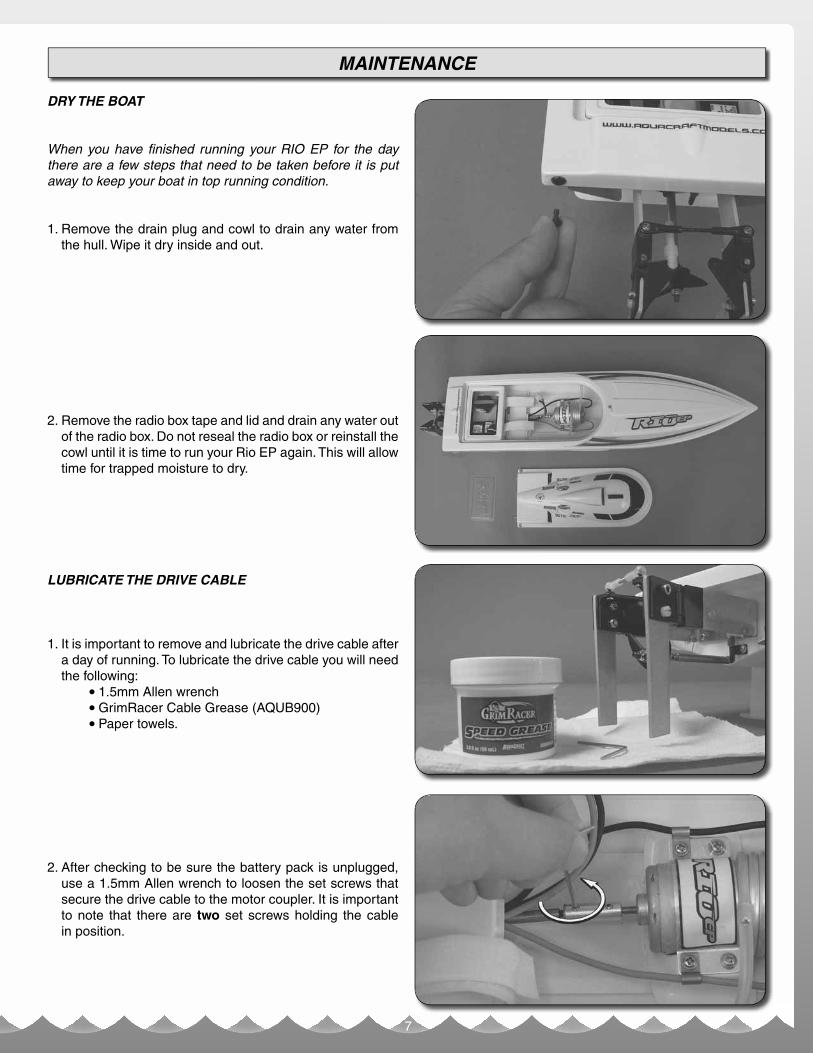
1. Remove the drain plug and cowl to drain any water from the hull. Wipe it dry inside and out.
2. Remove the radio box tape and lid and drain any water out of the radio box. Do not reseal the radio box or reinstall the cowl until it is time to run your Rio EP again. This will allow time for trapped moisture to dry.
LUBRICATE THE DRIVE CABLE
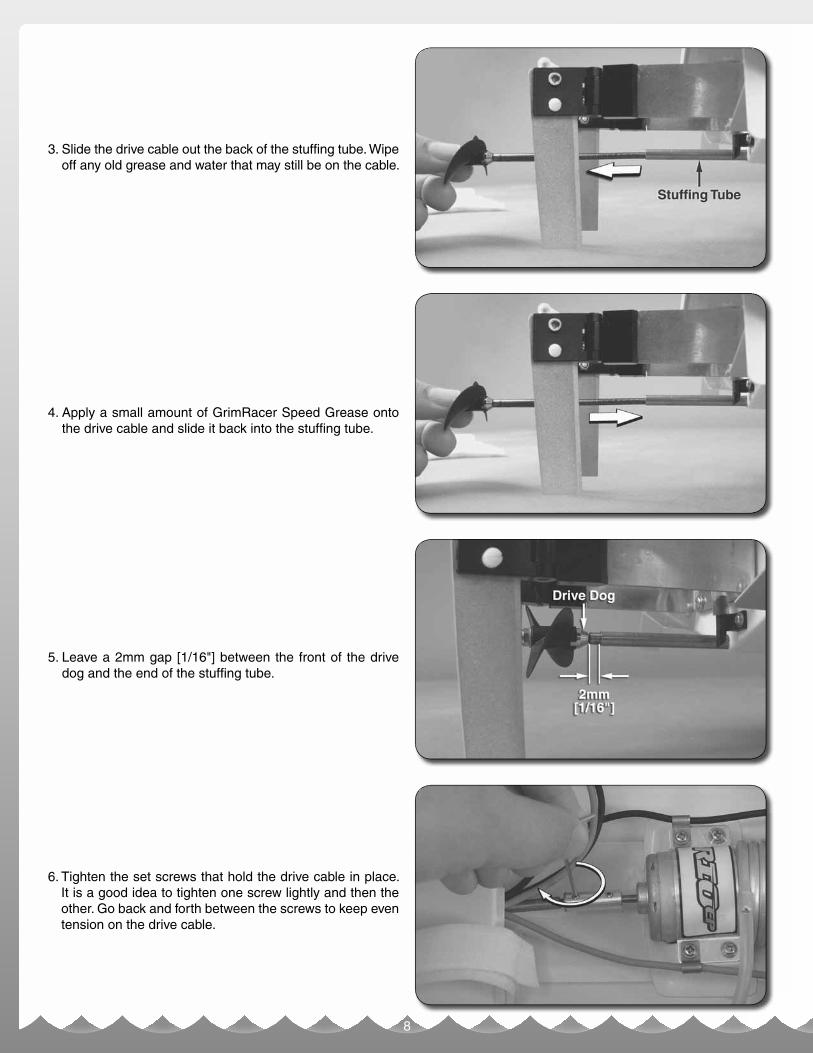
1. It is important to remove and lubricate the drive cable after a day of running. To lubricate the drive cable you will need the following:
• 1.5mm Allen wrench• GrimRacer Cable Grease (AQUB900)• Paper towels.
2. After checking to be sure the battery pack is unplugged, use a 1.5mm Allen wrench to loosen the set screws that secure the drive cable to the motor coupler. It is important to note that there are two set screws holding the cable in position.
MAINTENANCE
8
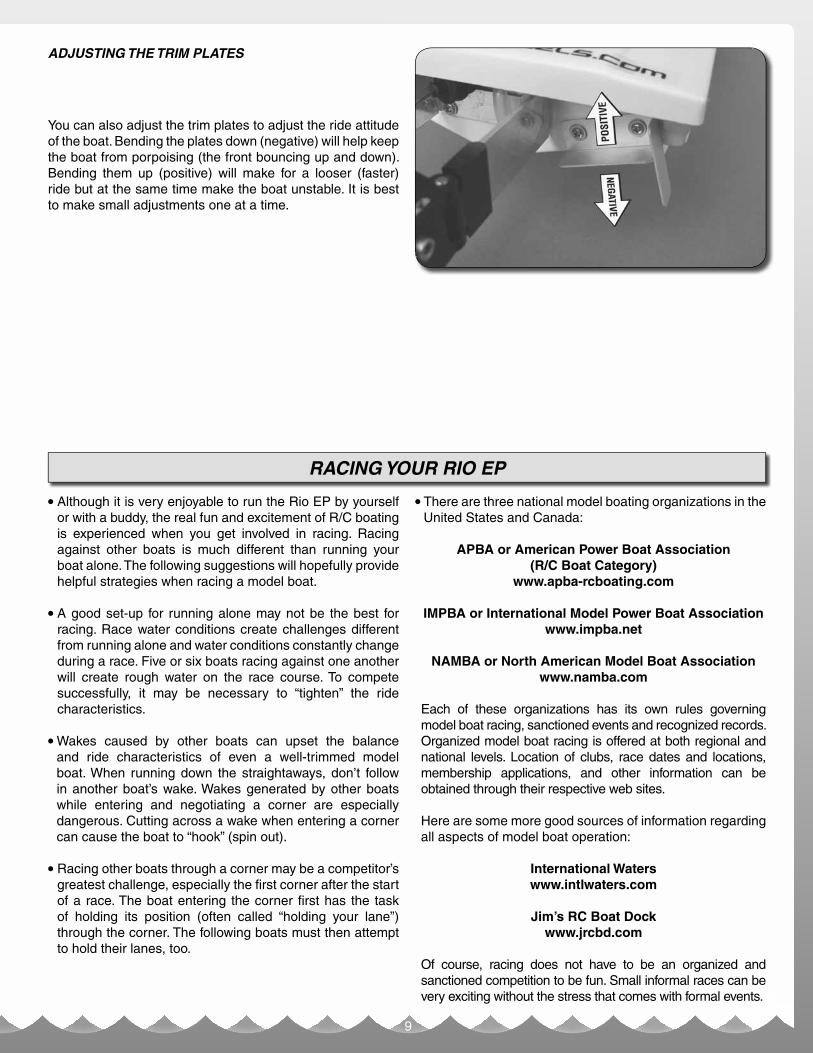
3. Slide the drive cable out the back of the stuffing tube. Wipe off any old grease and water that may still be on the cable.
4. Apply a small amount of GrimRacer Speed Grease onto the drive cable and slide it back into the stuffing tube.
5. Leave a 2mm gap [1/16"] between the front of the drive dog and the end of the stuffing tube.
6. Tighten the set screws that hold the drive cable in place. It is a good idea to tighten one screw lightly and then the other. Go back and forth between the screws to keep even tension on the drive cable.
9
ADJUSTING THE TRIM PLATES
You can also adjust the trim plates to adjust the ride attitude of the boat. Bending the plates down (negative) will help keep the boat from porpoising (the front bouncing up and down). Bending them up (positive) will make for a looser (faster) ride but at the same time make the boat unstable. It is best to make small adjustments one at a time.
RACING YOUR RIO EP
• Although it is very enjoyable to run the Rio EP by yourself or with a buddy, the real fun and excitement of R/C boating is experienced when you get involved in racing. Racing against other boats is much different than running your boat alone. The following suggestions will hopefully provide helpful strategies when racing a model boat.
• A good set-up for running alone may not be the best for racing. Race water conditions create challenges different from running alone and water conditions constantly change during a race. Five or six boats racing against one another will create rough water on the race course. To compete successfully, it may be necessary to “tighten” the ride characteristics.
• Wakes caused by other boats can upset the balance and ride characteristics of even a well-trimmed model boat. When running down the straightaways, don’t follow in another boat’s wake. Wakes generated by other boats while entering and negotiating a corner are especially dangerous. Cutting across a wake when entering a corner can cause the boat to “hook” (spin out).
• Racing other boats through a corner may be a competitor’s greatest challenge, especially the first corner after the start of a race. The boat entering the corner first has the task of holding its position (often called “holding your lane”) through the corner. The following boats must then attempt to hold their lanes, too.
• There are three national model boating organizations in the United States and Canada:
APBA or American Power Boat Association(R/C Boat Category)
www.apba-rcboating.com
IMPBA or International Model Power Boat Associationwww.impba.net
NAMBA or North American Model Boat Association www.namba.com
Each of these organizations has its own rules governing model boat racing, sanctioned events and recognized records. Organized model boat racing is offered at both regional and national levels. Location of clubs, race dates and locations, membership applications, and other information can be obtained through their respective web sites.
Here are some more good sources of information regarding all aspects of model boat operation:
International Waterswww.intlwaters.com
Jim’s RC Boat Dockwww.jrcbd.com
Of course, racing does not have to be an organized and sanctioned competition to be fun. Small informal races can be very exciting without the stress that comes with formal events.
10
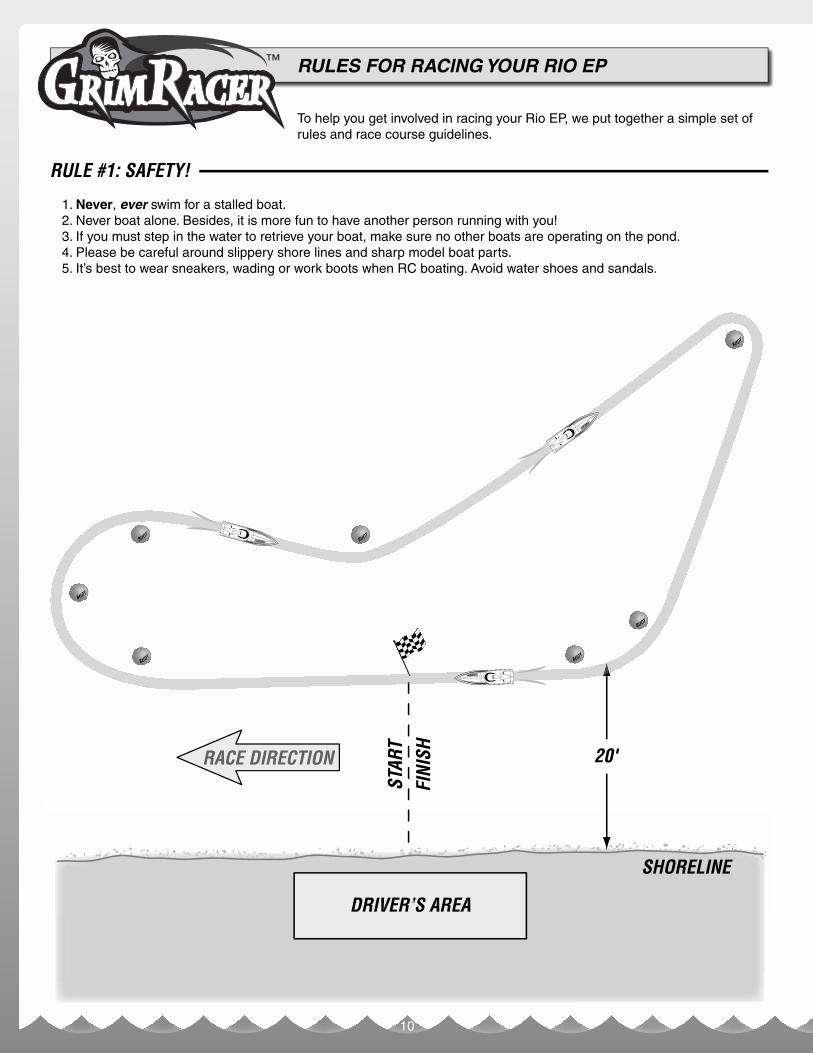
RULES FOR RACING YOUR RIO EP™
To help you get involved in racing your Rio EP, we put together a simple set of rules and race course guidelines.
RULE #1: SAFETY!
1. Never, ever swim for a stalled boat. 2. Never boat alone. Besides, it is more fun to have another person running with you! 3. If you must step in the water to retrieve your boat, make sure no other boats are operating on the pond. 4. Please be careful around slippery shore lines and sharp model boat parts. 5. It’s best to wear sneakers, wading or work boots when RC boating. Avoid water shoes and sandals.
SHORELINE
DRIVER’S AREA
STAR
TFI
NISHRACE DIRECTION 20'
11
HULL AND POWER SYSTEM GUIDELINES:
GENERAL: • Only stock replacement parts are allowed. • If any part falls off the boat from the time it’s launched, it draws an instant disqualifi cation (DQ) from that heat. If a part
falls off during a race incident or crash, you will be allowed to fi nish the heat. • The boat you qualify for the fi rst heat is the boat that must be raced for all remaining heats.
WHAT YOU CAN DO TO MAKE YOUR BOAT FASTER: 1. Sharpening, scuffi ng and scraping the bottom of the hull is allowed. 2. Painting and detailing your boat is allowed and encouraged. 3. Sharpening, sanding, tweaking and tuning your propeller is allowed. 4. Shaping, shortening and sharpening the rudder blade is allowed.
RACING GUIDELINES:
GENERAL: 1. Call to water. 2. 15 second launch window (for safety reasons you might have to make this time longer). 3. 30 second mill time (or countdown to the “running” start). 4. 6 lap heats. 5. 5 rounds per event for a possible total of 2,000 pts (totaled from heat points). See scoring structure below.
SCORING STRUCTURE PER HEAT:1st place 400pts2nd place 300pts3rd place 225pts4th place 169 pts5th place 125 ptsDNF (did not fi nish) 25 ptsDNS (did not start) 0 pts
To start the heat there will be a “call to water”. With the drivers ready and boats in hand, a 15 second launch window is called out. In these 15 seconds the boats are set in the water and ready to go. After the launch window time, the 30 second mill time begins. You may go as many laps as you like before the end of the 30 second mill time, but you must at least make one full lap around the course. Hint! Keep this in mind as to where you set your boat in the water. Course cutting is not allowed. Your boat must remain “on plane” for the full 30 seconds. Stopping on the course before the start will draw a DQ from the heat. The start of the race begins at the end of the 30 second mill time (countdown). Crossing the start line before the end of the 30 seconds is called “jumping the start” and any boats that did not cross early are now the front runners. Boats running must complete all 6 laps to qualify for position points. Fishtailing is not permitted at the start.
DRIVING AND COURSE INFRACTIONS: • Cutting or striking a buoy at any time on the race course is a 50 point penalty per buoy. Cutting more than 3 buoys on
the course is a one lap penalty. Course cutting at the end of the heat is not permitted. After the race is over you may ask permission from the race CD (contest director) to cut the course. If the CD fi nds it safe to pass a dead boat, he might allow you to cut.
• Striking a dead boat on the race course draws an instant DQ from the heat. • Passing can be done on the outside or inside but you must allow at least one rooster tail length to overtake another
boat. Intentionally taking out (crashing) a competitor’s boat will draw a DQ for that heat. • Jumping the start means you haven‘t started until you come around again.
We hope you have fun racing your Rio EP!Remember, the fastest boat does not always bring home the trophy.
12
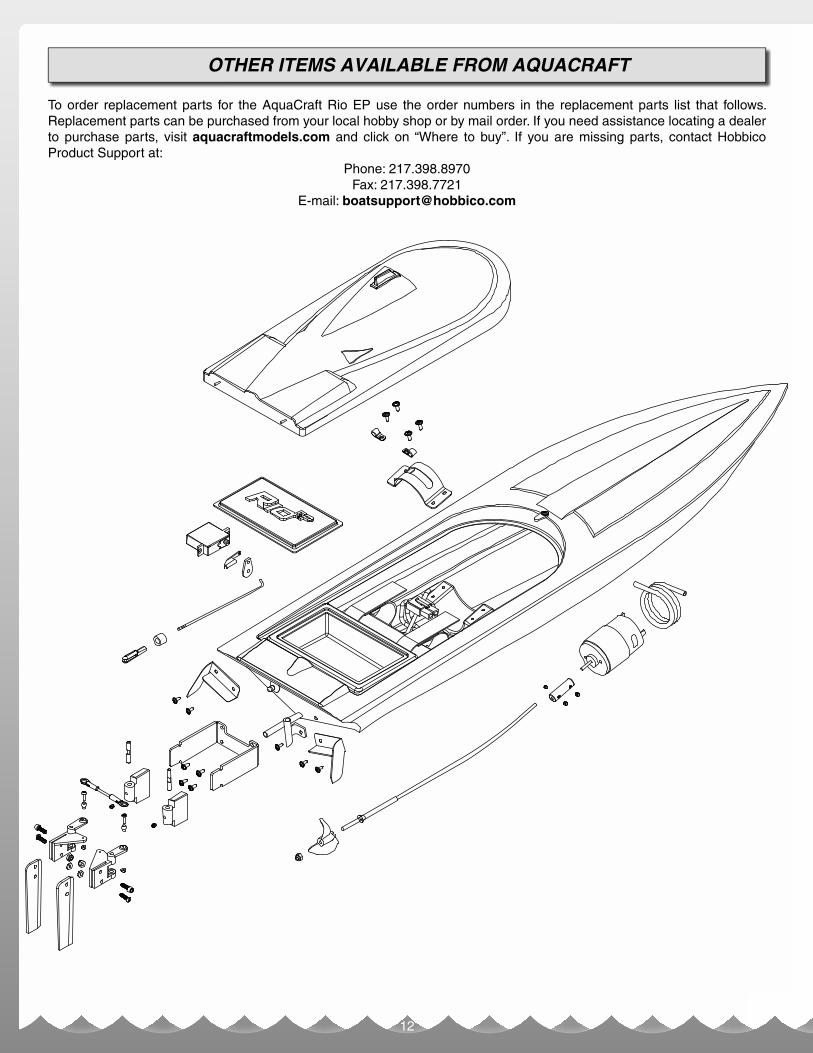
To order replacement parts for the AquaCraft Rio EP use the order numbers in the replacement parts list that follows. Replacement parts can be purchased from your local hobby shop or by mail order. If you need assistance locating a dealer to purchase parts, visit aquacraftmodels.com and click on “Where to buy”. If you are missing parts, contact Hobbico Product Support at:
Phone: 217.398.8970Fax: 217.398.7721
E-mail: [email protected]
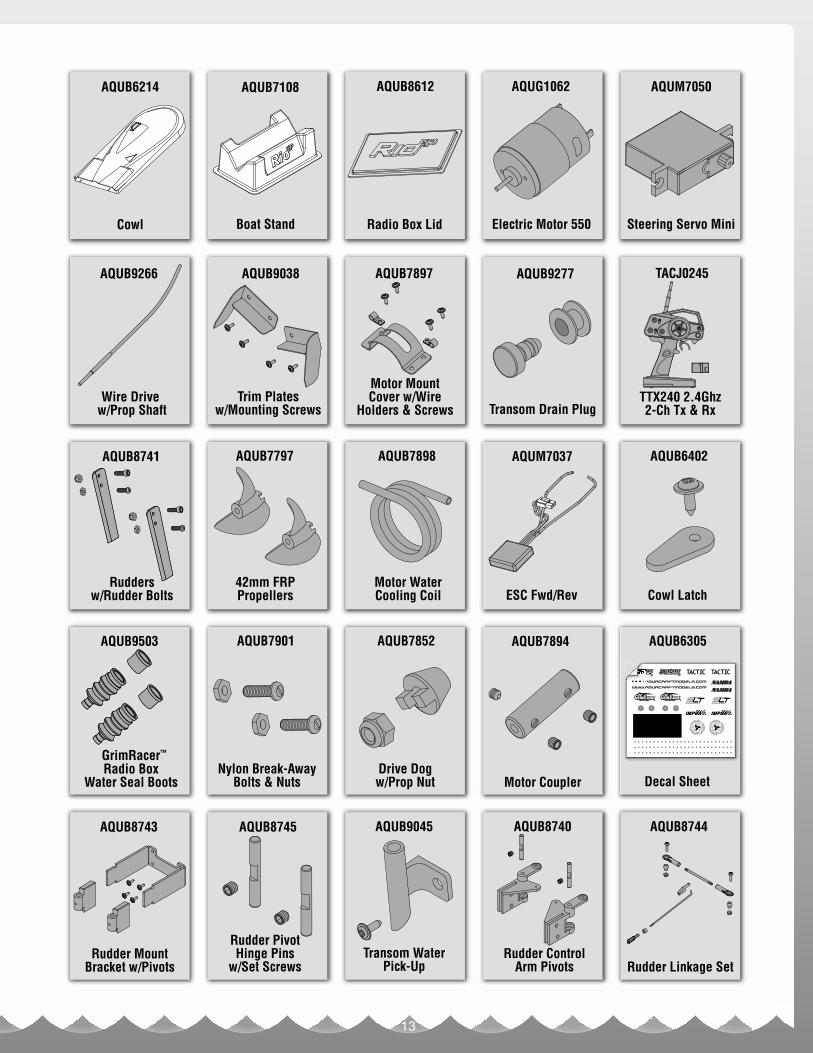
OTHER ITEMS AVAILABLE FROM AQUACRAFT
13
ESC Fwd/Rev
AQUM7037
Transom Drain Plug
AQUB9277
Electric Motor 550
AQUG1062
Motor Coupler
AQUB7894
Rudder ControlArm Pivots
AQUB8740
Motor WaterCooling Coil
AQUB7898
Motor MountCover w/Wire
Holders & Screws
AQUB7897
Radio Box Lid
AQUB8612
Drive Dogw/Prop Nut
AQUB7852
Transom WaterPick-Up
AQUB9045
Cowl Latch
AQUB6402
TTX240 2.4Ghz2-Ch Tx & Rx
TACJ0245
Steering Servo Mini
AQUM7050
Decal Sheet
AQUB6305
Rudder Linkage Set
AQUB8744
42mm FRPPropellers
AQUB7797
Trim Platesw/Mounting Screws
AQUB9038
Boat Stand
AQUB7108
Nylon Break-AwayBolts & Nuts
AQUB7901
Rudder PivotHinge Pins
w/Set Screws
AQUB8745
Ruddersw/Rudder Bolts
AQUB8741
Wire Drive w/Prop Shaft
AQUB9266
Cowl
AQUB6214
Radio BoxWater Seal Boots
AQUB9503
GrimRacer™
Rudder MountBracket w/Pivots
AQUB8743
14
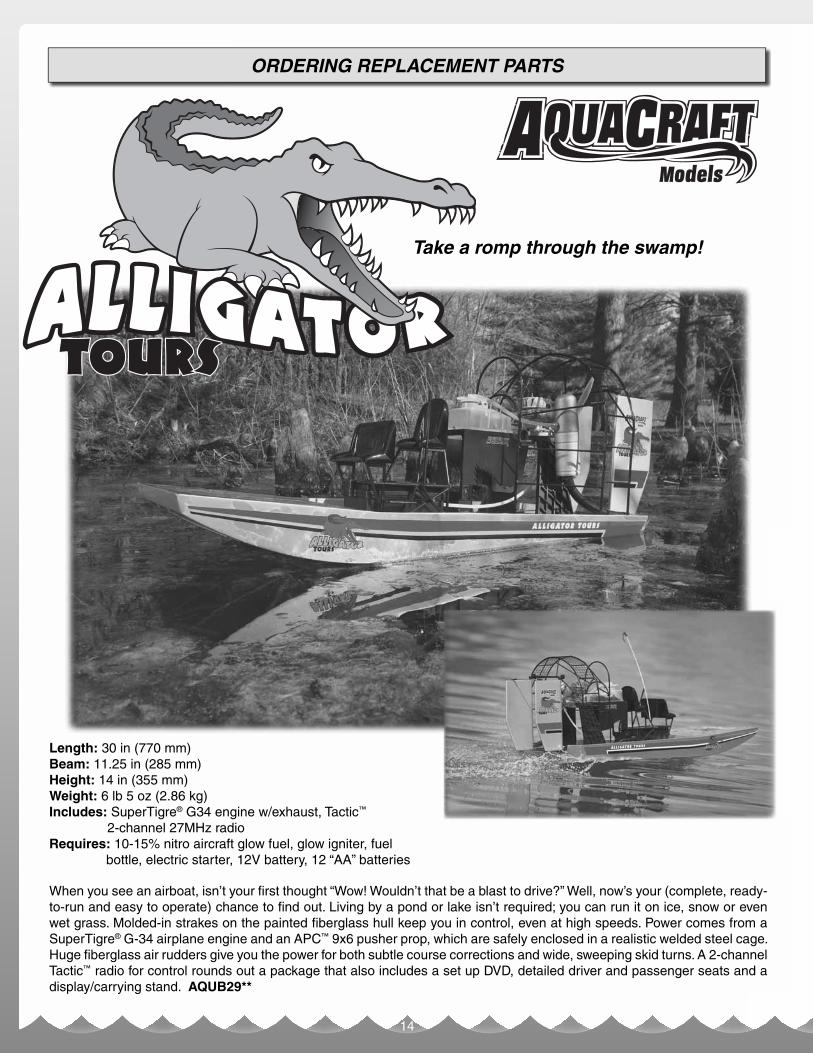
ORDERING REPLACEMENT PARTS
When you see an airboat, isn’t your fi rst thought “Wow! Wouldn’t that be a blast to drive?” Well, now’s your (complete, ready-to-run and easy to operate) chance to fi nd out. Living by a pond or lake isn’t required; you can run it on ice, snow or even wet grass. Molded-in strakes on the painted fi berglass hull keep you in control, even at high speeds. Power comes from a SuperTigre® G-34 airplane engine and an APC™ 9x6 pusher prop, which are safely enclosed in a realistic welded steel cage. Huge fi berglass air rudders give you the power for both subtle course corrections and wide, sweeping skid turns. A 2-channel Tactic™ radio for control rounds out a package that also includes a set up DVD, detailed driver and passenger seats and a display/carrying stand. AQUB29**
Take a romp through the swamp!
Length: 30 in (770 mm) Beam: 11.25 in (285 mm) Height: 14 in (355 mm) Weight: 6 lb 5 oz (2.86 kg) Includes: SuperTigre® G34 engine w/exhaust, Tactic™
2-channel 27MHz radio Requires : 10-15% nitro aircraft glow fuel, glow igniter, fuel
bottle, electric starter, 12V battery, 12 “AA” batteries
15
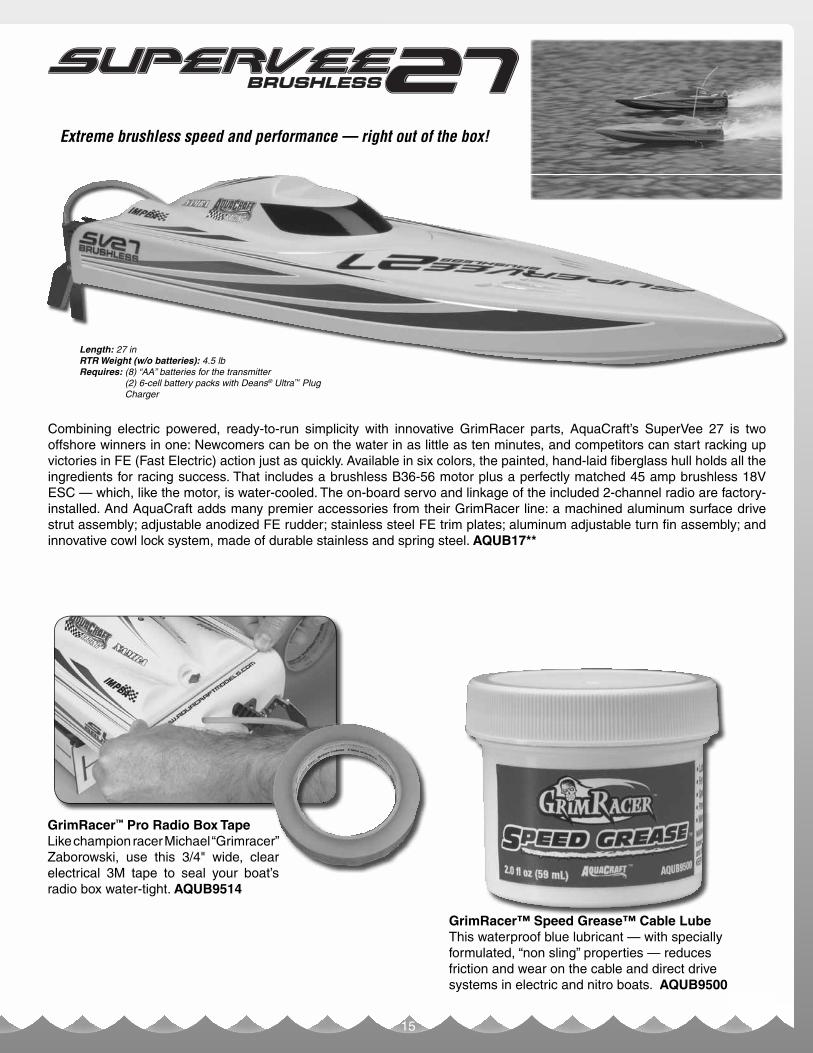
Combining electric powered, ready-to-run simplicity with innovative GrimRacer parts, AquaCraft’s SuperVee 27 is two offshore winners in one: Newcomers can be on the water in as little as ten minutes, and competitors can start racking up victories in FE (Fast Electric) action just as quickly. Available in six colors, the painted, hand-laid fiberglass hull holds all the ingredients for racing success. That includes a brushless B36-56 motor plus a perfectly matched 45 amp brushless 18V ESC — which, like the motor, is water-cooled. The on-board servo and linkage of the included 2-channel radio are factory-installed. And AquaCraft adds many premier accessories from their GrimRacer line: a machined aluminum surface drive strut assembly; adjustable anodized FE rudder; stainless steel FE trim plates; aluminum adjustable turn fin assembly; and innovative cowl lock system, made of durable stainless and spring steel. AQUB17**
GrimRacer™ Pro Radio Box TapeLike champion racer Michael “Grimracer” Zaborowski, use this 3/4" wide, clear electrical 3M tape to seal your boat’s radio box water-tight. AQUB9514
GrimRacer™ Speed Grease™ Cable LubeThis waterproof blue lubricant — with specially formulated, “non sling” properties — reduces friction and wear on the cable and direct drive systems in electric and nitro boats. AQUB9500
Extreme brushless speed and performance — right out of the box!
Length: 27 in RTR Weight (w/o batteries): 4.5 lb Requires: (8) “AA” batteries for the transmitter
(2) 6-cell battery packs with Deans® Ultra™ Plug Charger
COPYRIGHT © 2009COPYRIGHT © 2009 AQUB18**MNL v1.0AQUB18**MNL v1.0